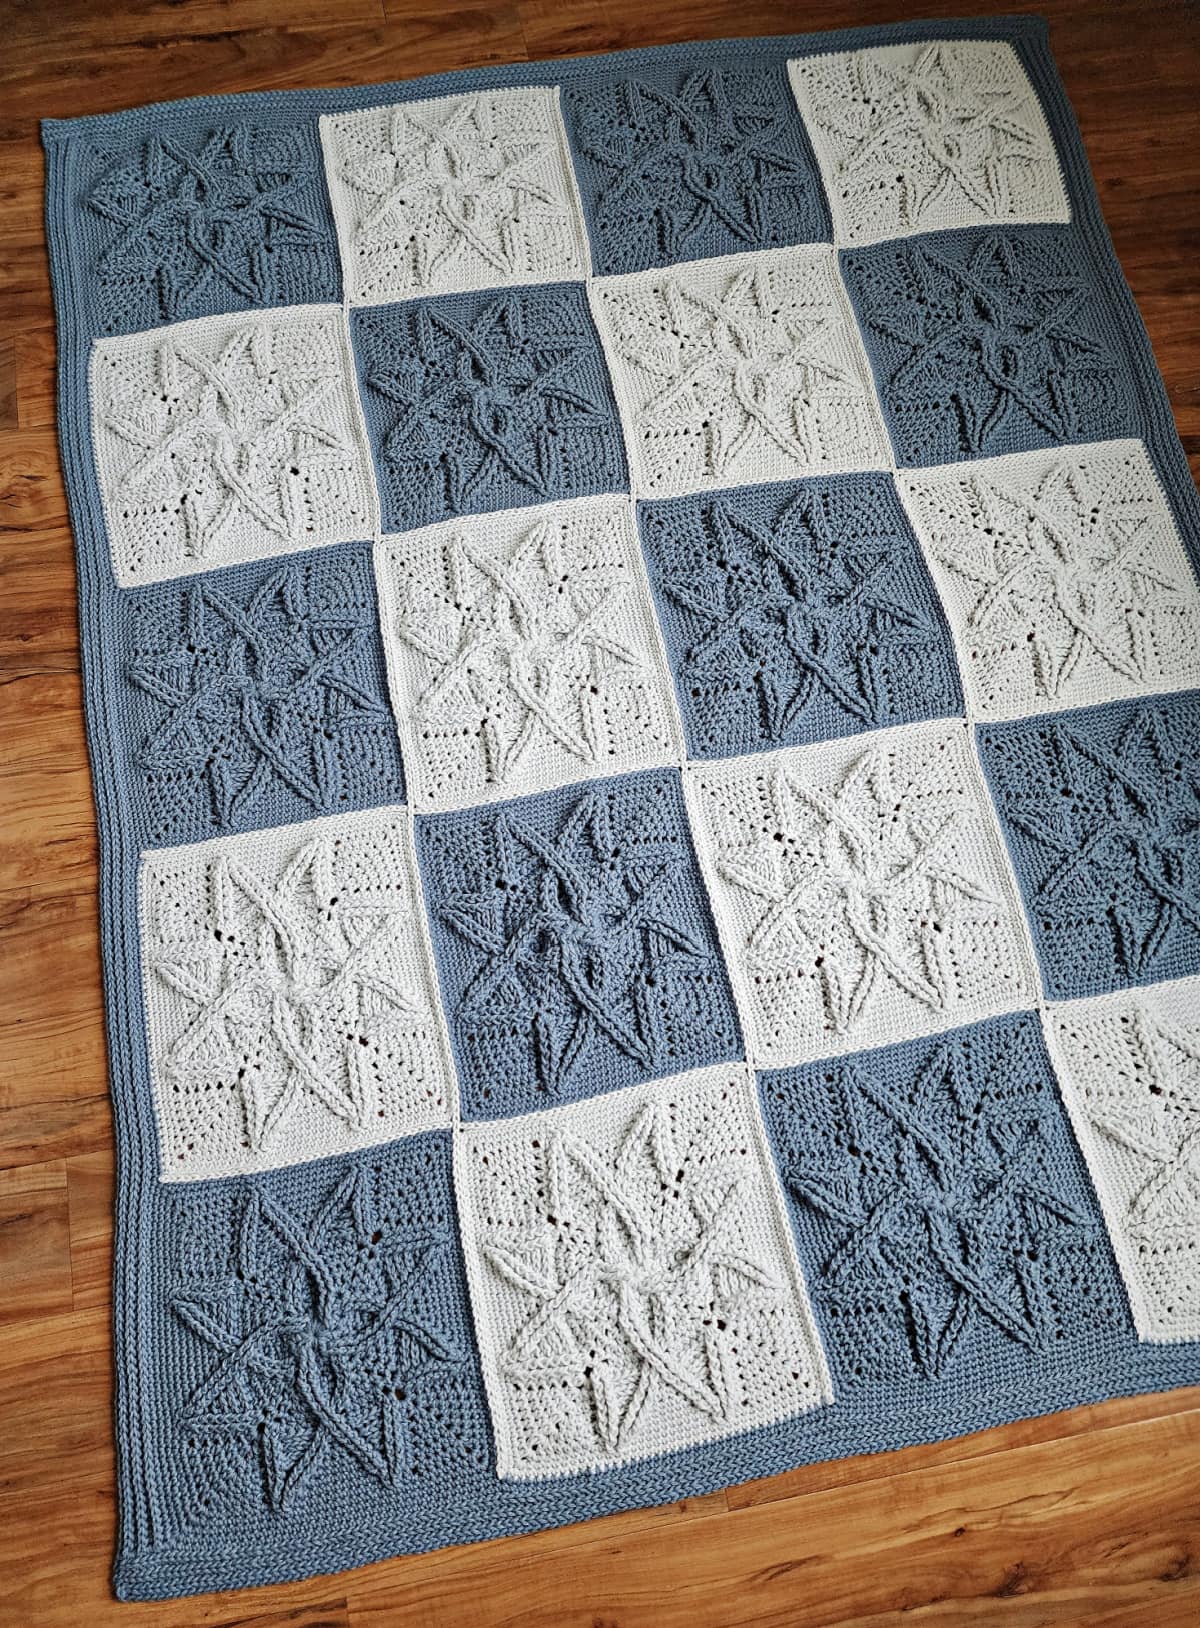
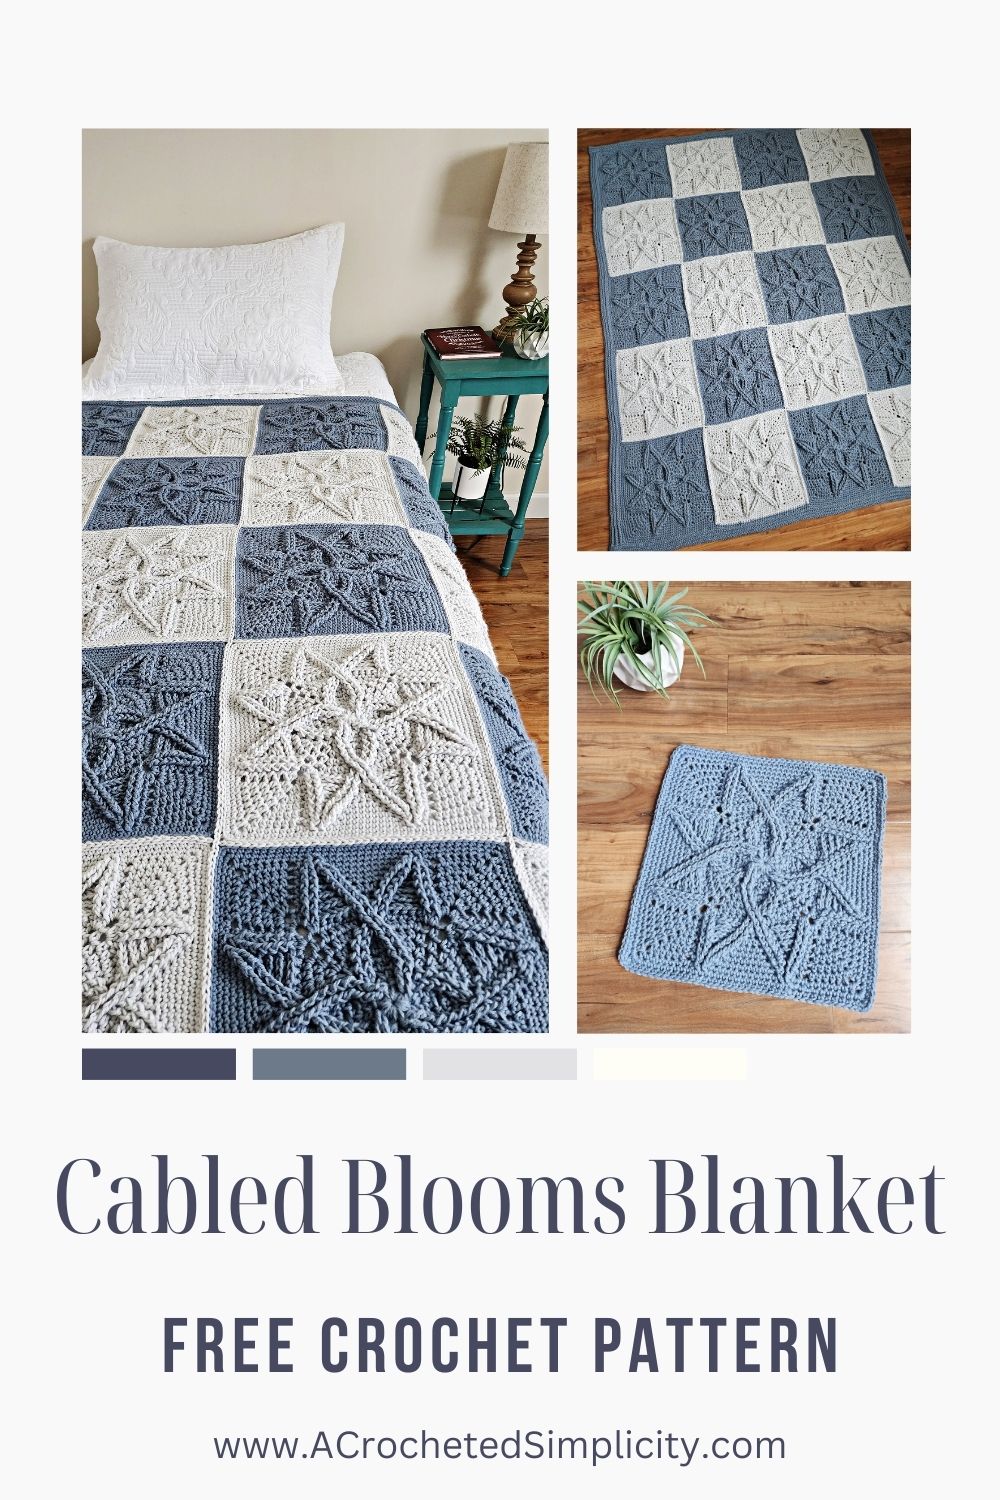
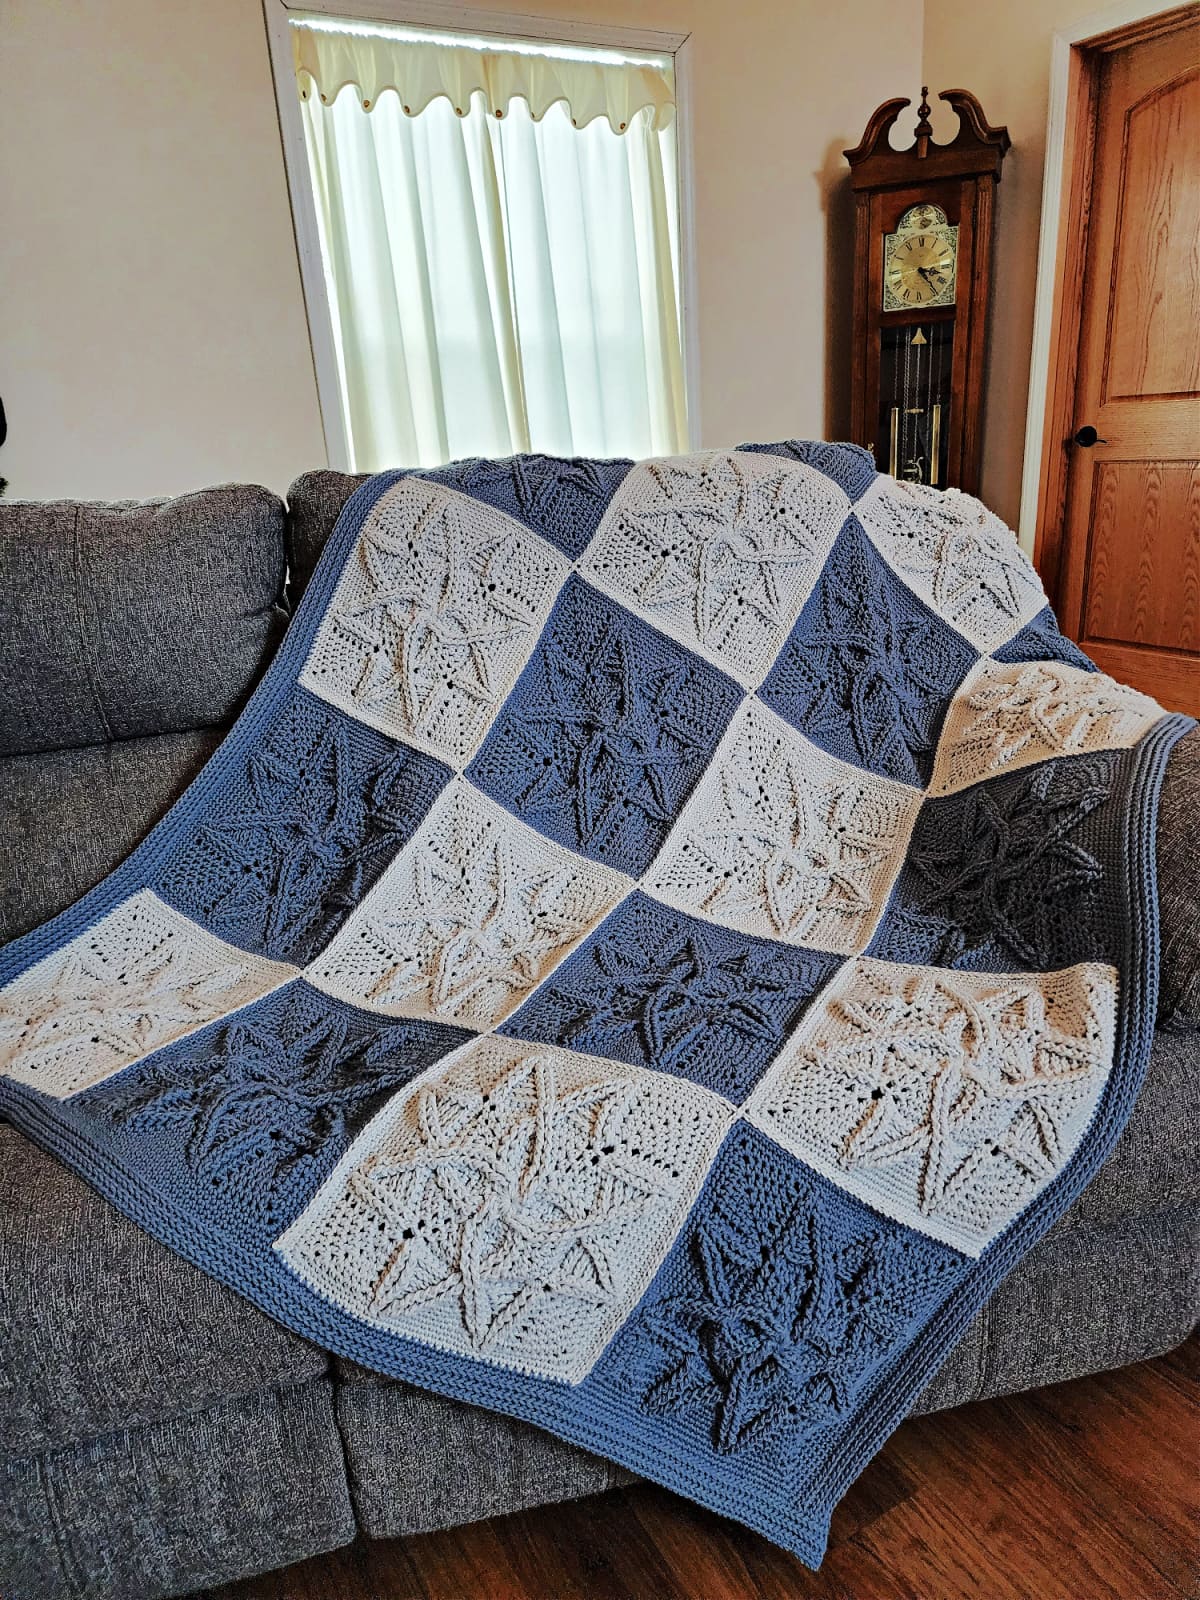
Cabled Blooms Cabled Crochet Blanket
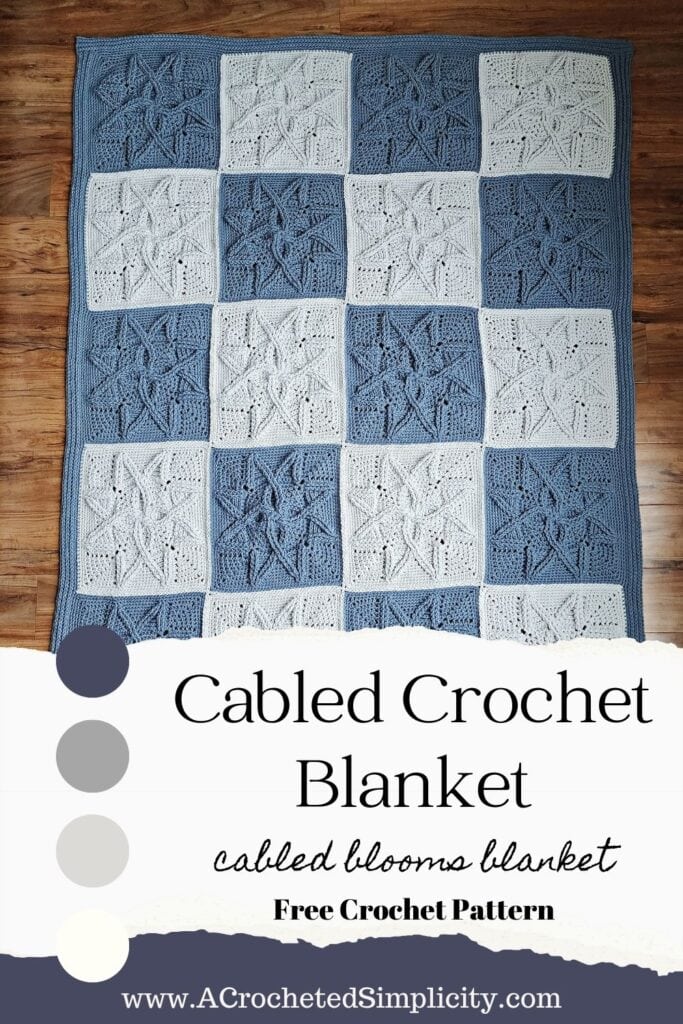
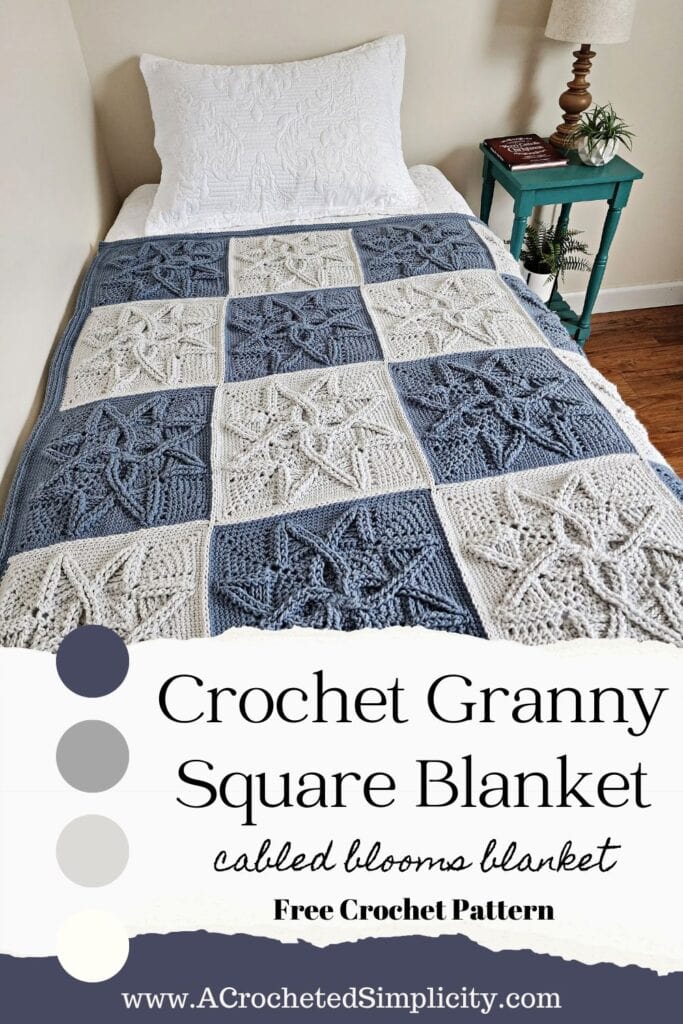
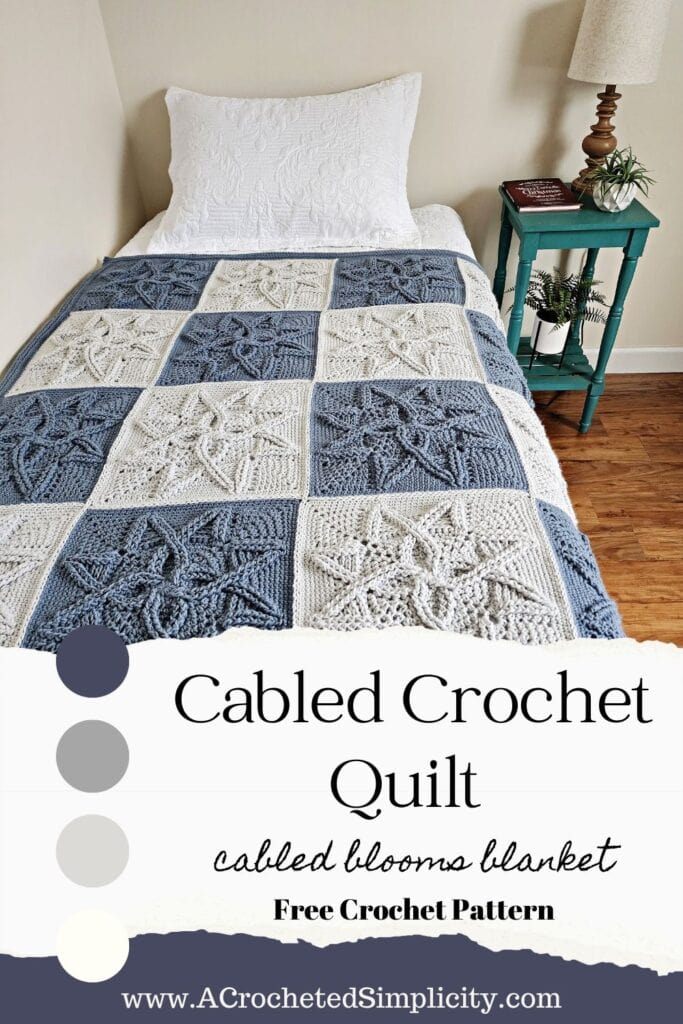

Learn to crochet a cabled crochet blanket made with crochet squares in contrasting colors and finished with a log cabin style crochet ribbed border.
The Cabled Blooms Crochet Blanket is beautiful in one color, but when made with two… it becomes a stunning crochet quilt to add to your home decor!
You’ll find the crochet cable blanket pattern is free below, or an ad-free print friendly PDF (including all photo tutorials + BONUS crochet cables stitch chart) on Ravelry, or on Etsy (aff).
My love for crochet cables came just a few weeks after I taught myself to crochet and it has grown over the years. My favorites are cables that move horizontally as well as vertically, but even the most basic crochet cables add interest to crochet designs.
The Cabled Blooms Blanket combines cables that only move vertically and cables that more horizontally and vertically. This crochet cable blanket is a lot of fun to crochet and includes a video tutorial!
How to Crochet a Blanket with Squares
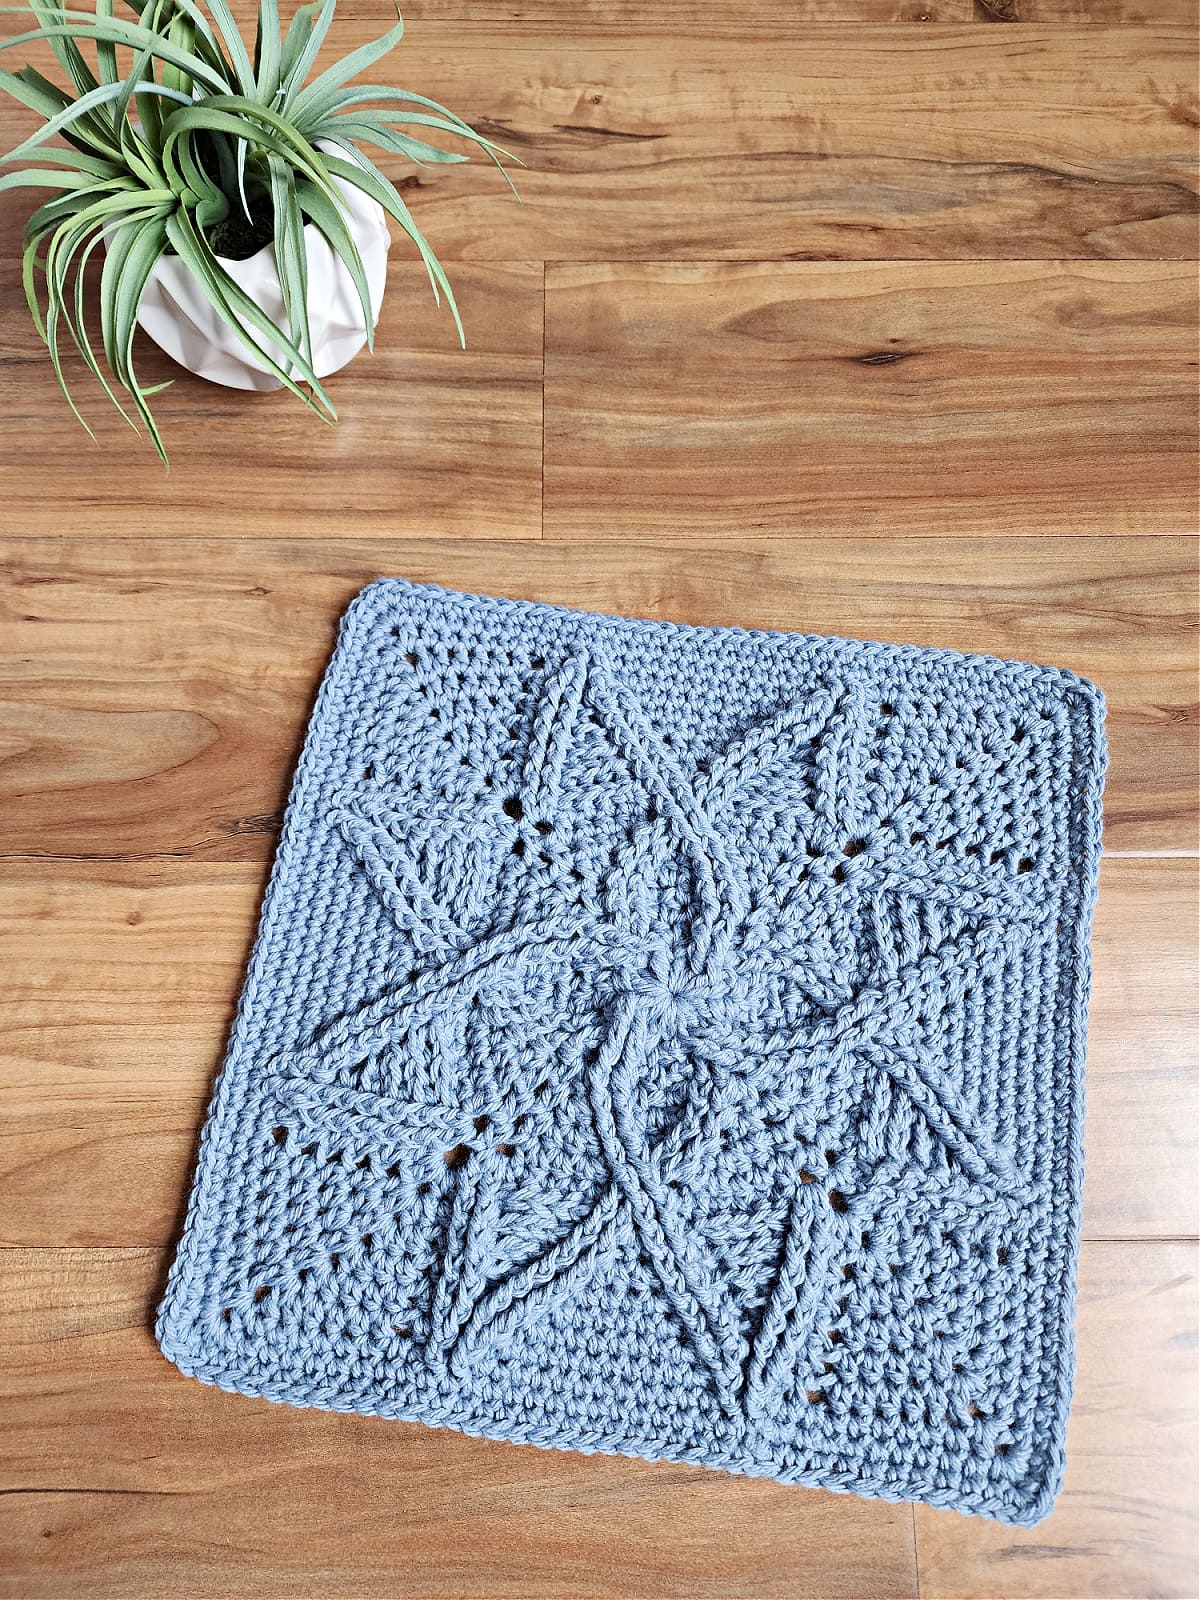
The Cabled Blooms Blanket is constructed out of 12 inch crochet motif squares.
To make a crochet throw blanket, you’ll crochet twenty crochet quilt squares. I chose to use two colors and made ten squares in each color, but you can also make your cable crochet afghan in one solid color.
After you crochet a square, it’s best to block it before seaming it to others.
Once you’ve crocheted and blocked all blanket squares, you will join crochet squares by crocheting them together. My favorite stitch for joining crochet granny squares is the flat slip stitch seam. As the name suggest, it creates a very flat seam.
Lastly, you’ll add a log cabin style crochet border around the perimeter of your crochet quilt blanket.
Crochet Cables
Crochet cables are one of many ways to add texture and design to your crochet projects. Cable designs range from very basic crochet cables that only move upward, to more intricate cable designs that move inward and outward as they move upward.
Many new crocheters (and even seasoned ones) are intimidated by crochet cables at first, but after working a few rows, they soon discover that they’re easier than they thought!
Traditional crochet cables are made using a combination of post stitches. Front post double crochet and front post treble crochet are the most common post stitches used for cables, but for wider cables, taller post stitches are used.
To create the twists in a cable design, first, you’ll skip a few stitches and work post stitches around the next few. Then, working in front or behind the first set of post stitches, you’ll work post stitches around the skipped stitches. That’s it!
Be patient as you work crochet cables. Sometimes it takes a couple rows before you’re able to clearly see cable movement.
Related: If you like working from stitch charts, the ad-free PDF includes a BONUS crochet cables chart.
Yarn
For this cable crochet blanket, I chose Lion Brand Yarns Pound of Love. Pound of Love is a 100% premium acrylic, worsted weight yarn that is currently available in 32 gorgeous colors.
Although Pound of Love is classified as a Craft Yarn Council 4 / worsted weight yarn, I’ve found that it is on the lighter side of most worsted weight yarns. This makes it the perfect choice for a cable blanket since cables add a lot of thickness to crochet fabric.
Pound of Love is the perfect yarn for so many different crochet projects and the yardage in one ball is incredible at 1,020 yards, making it affordable too!
I personally love how snuggly soft it becomes after a quick wash and dry, leaving you with a very cozy crochet blanket.
Adjusting the Size of Your Blanket
The crochet cables blanket pictured is throw size. If you are looking for a smaller or larger blanket, this pattern is very easy to adjust.
You can easily increase the size of your afghan by adding more afghan squares. Likewise, you can easily make a smaller afghan by using fewer crochet squares.
For help determining what size to make your crochet blanket pattern, check out my Standard Blanket Size Chart.
How to Crochet a Cable Crochet Blanket – Video Tutorial
The Cabled Blooms Blanket is more of an intermediate level crochet pattern so I’ve created a YouTube crochet video tutorial to help you along the way.
I added fifteen chapters in the video description to make it easier for you to stop and pick back up right where you need to without having to re-watch a lot of footage that you’ve already watched.
If you love to crochet blankets, I have a few other crochet blanket videos on my YouTube channel.
If you love crochet video tutorials, make sure to subscribe to our channel because there are more great tutorials coming your way!
Cabled Blooms Blanket – Free Crochet Cable Blanket Pattern
The cable knit-look throw blanket is free below, but if you love to work offline, or need to order your yarn, I’ve got a couple other great options for you.
Purchase the ad-free, printable PDF on Ravelry, or Etsy (aff).
Purchase the crochet blanket kit! Lion Brand also has a full kit of the Cabled Blooms Crochet Blanket, available on their website. The blanket crochet kit includes your choice of colors and a digital copy of the crochet pattern.
This post contains affiliate links.
Materials
- Yarn: Worsted Weight / 4 yarn, Lion Brand Yarns Pound of Love, was used for the cable throw blanket shown in the photos (454 g / 16oz / 1,020 yards / 932 meters / 100% premium acrylic) per ball.
- Cadet: 1,800 yards / 2 balls / #550-112U
- Elephant Grey: 1,800 yards / 2 balls / #550-151N
- Crochet Hook: J/ 10 / 6.00mm (My favorite crochet hooks are the Clover Amour Hooks, I’ve never had an ache in my hand since switching)
- Scissors
- Yarn Needle
- Locking Stitch Markers
Skill Level
- Intermediate
Gauge
- Measurements are noted throughout the pattern.
Size
- Cable Crochet Blanket Square: 12″ x 12″ (unblocked)
- Throw: 51″ W x 63″ L (including ribbed border)
- You can easily increase the size of your afghan by adding more afghan squares.
- Check out my Blanket Size Chart, for standard blanket sizes.
Abbreviations (U.S. Terms)
- ch(s): chain(s)
- sl st(s): slip stitch(es)
- st(s): stitch(es)
- sp(s): space(s)
- sc: single crochet
- dc: double crochet
- fpdc: front post double crochet
- bpdc: back post double crochet
- fptr: front post treble crochet
- fpdc2tog: front post double crochet decrease
- Join yarn with a standing single crochet
- yo: yarn over
- sp: space
- BLO: back loop only
- Rep: repeat
- Rnd: round
- SM: stitch marker
- RS: right side
- WS: wrong side
Special Stitches
- Front Post Double Crochet (fpdc): Yo, insert hook from front to back to front around the post of the designated stitch, yo, pull up a loop, yo, pull thru 2 loops, yo, pull thru remaining 2 loops.
- Back Post Double Crochet (bpdc): Yo, insert hook from back to front to back around the post of the designated stitch, yo, pull up a loop, yo, pull thru 2 loops, yo, pull thru remaining 2 loops.
- Front Post Treble Crochet (fptr): Yo 2 twice, insert hook from front to back to front around the post of the designated stitch, yo, pull up a loop, (yo, pull thru 2 loops) 3 times.
- Front Post Double Crochet Decrease (fpdc2tog): (yo, insert your hook from front to back to front around the post of the next stitch, yo, pull up a loop, yo, pull thru 2 loops on your hook) twice, yo, pull thru remaining loops on your hook.
- Join yarn with a standing single crochet: When instructed to “Join with a standing sc”, begin with a slip knot on your hook. Insert your hook into the stitch or space indicated, yo, pull up a loop, yo and draw thru both loops on hook.
Pattern Notes
- I tend to crochet on the tighter side. You may need to go down a hook size (or two) to meet gauge if you crochet on the looser side.
- Beginning chain(s) are not included in stitch count, unless noted otherwise.
- Each ch-1 space worked within a round is counted as a stitch.
- The first stitch of each round is worked into the same stitch as the beginning chain, unless stated otherwise.
- Lion Brand Yarns Pound of Love, worsted weight yarn, was used for the sample shown in the photos. 100% Premium Acrylic, (solids: 1,020 yards / 454 g / 16 oz / 932 m)
- Yarns similar in fiber and weight can be substituted.
- Yardage & Colors
- Cadet: #550-112U (2 Balls / 1,800 yards)
- Elephant Grey: #550-151N (2 Balls / 1,800 yards)
- Standard Blanket Sizes can be found in my Blanket Size Chart.
- How to crochet a throw blanket: This cabled crochet blanket is constructed out of 12″ cabled motif squares. After crocheting all motif blanket squares, they are seamed with a flat slip stitch seam. A ribbed log cabin border is then added to the perimeter.
- The ad-free PDF includes a BONUS crochet stitch chart for the crochet square pattern.
Don’t Forget! There’s a crochet video tutorial, if you need a visual aid!
Cabled Crochet Blanket Pattern
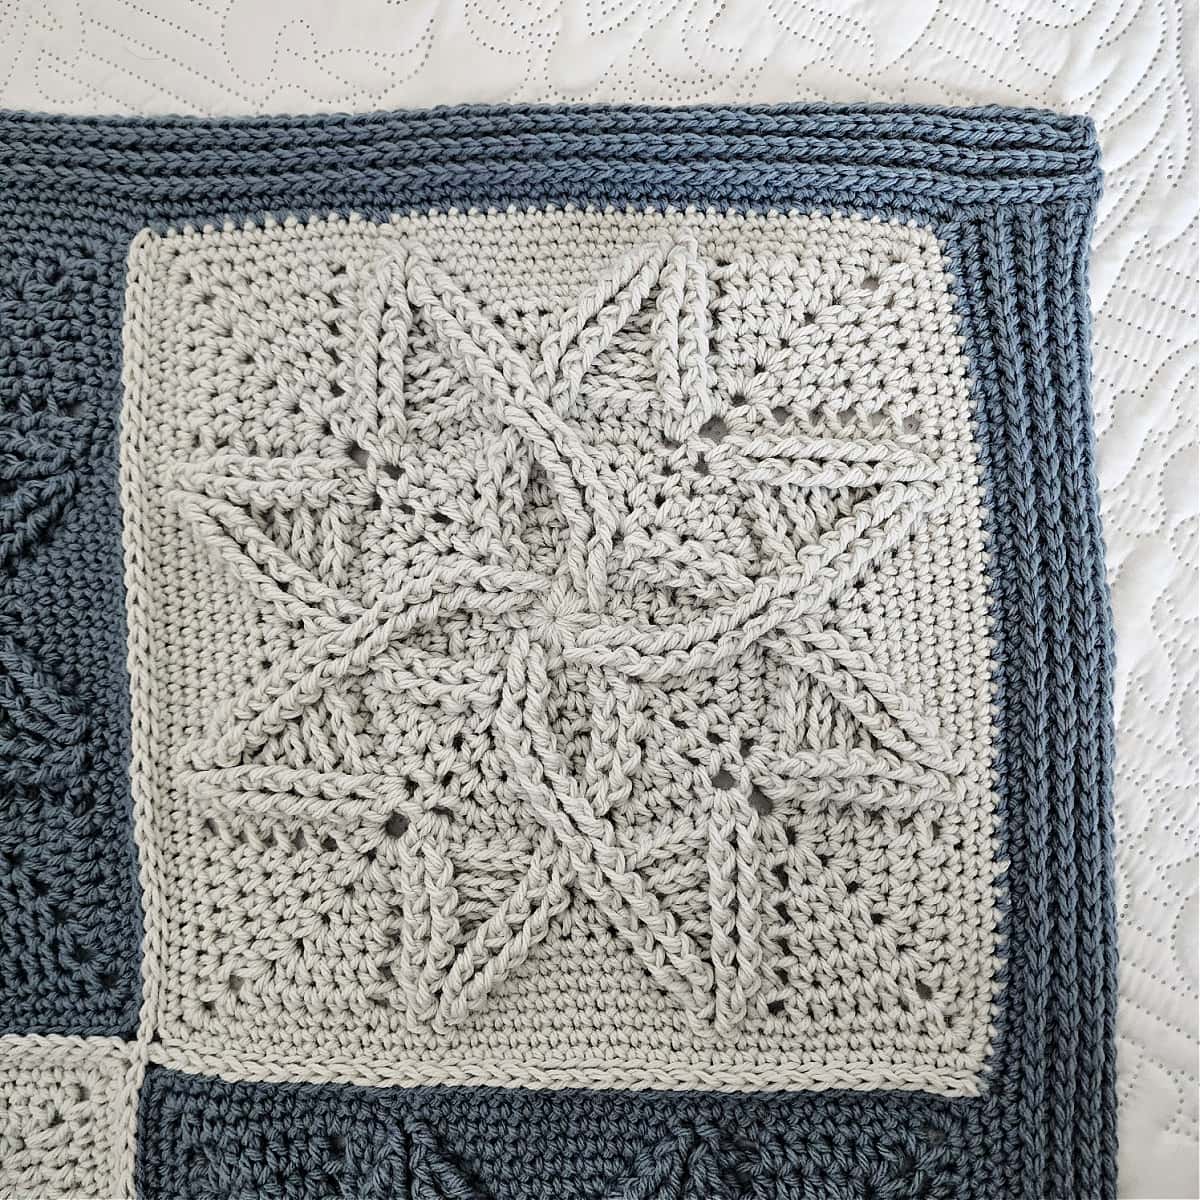
12 inch Crochet Square Pattern
Make 20 squares total, 10 of each color.
Rnd 1 (RS): With yarn & a 6.00mm crochet hook, ch 3, work 20 dc into the 3rd ch from your hook. Join with a sl st to the 1st dc. (20 sts) *Approximately 1.75” diameter.
Rnd 2: Ch 1, [ skip each of the next 2 sts, fptr around each of the next 2 sts, working in front of fptr just made, fptr around each of the 2 skipped sts, (hdc, ch 1, hdc) in the next st ] rep from [ to ] around. Join. (28 sts) *Approximately 2.75” diameter.
Rnd 3: Ch 1, [ fpdc around each of the next 4 post sts, hdc in the next st, ch 1, hdc in the next ch-1 sp, ch 1, hdc in the next st ] rep from [ to ] around. Join. (36 sts) *Approximately 3.25” measured across cables.
Rnd 4: Ch 1, [ fpdc around each of the next 2 post sts, work (hdc, ch 1, hdc) between the 2nd & 3rd post sts from Rnd 3, fpdc around each of the next 2 post sts, skip next hdc, hdc in next ch-1 sp, ch 1, skip next hdc, hdc in next ch-1 sp, skip next hdc ] rep from [ to ] around. Join. (40 sts) *Approximately 3.75” square.
Rnd 5: Ch 1, [ fpdc around each of the next 2 post sts, 2 hdc in next st, ch 1, hdc in next ch-1 sp, ch 1, 2 hdc in next st, fpdc around each of the next 2 post sts, hdc in next st, hdc in next ch-1 sp, hdc in next st ] rep from [ to ] around. Join. (56 sts) *Approximately 4.25” square.
Rnd 6: Sl st over to the 1st hdc (work the first 2 sts of the rnd into this same st), ch 1, [ 2 hdc in the next st, hdc in next st, ch 1, hdc in next ch-1 sp, ch 1, skip next st, hdc in next ch-1 sp, ch 1, hdc in next st, 2 hdc in next st, fpdc around each of the next 2 post sts, skip next st, sc in next st, skip next st, fpdc around each of the next 2 post sts ] rep from [ to ] around. Join. (64 sts) *Approximately 5” square (maybe a smidge more).
Rnd 7: Ch 1, [ 2 hdc in next st, hdc in each of the next 2 sts, hdc in the next ch-1 sp, (ch 1, skip next st, hdc in next ch-1 sp) twice, hdc in each of the next 2 sts, 2 hdc in next st, skip each of the next 2 post sts, skip the next sc, fptr around each of the next 2 post sts, working in front of fptr just made, fptr around each of the 2 skipped post sts (skipping over sc between the post sts) ] rep from [ to ] around. Join. (68 sts) *Approximately 6” square.
Rnd 8: Ch 1, [ hdc in each of the next 5 sts, 2 hdc in the next ch-1 sp, ch 2, 2 hdc in the next ch-1 sp, hdc in each of the next 5 sts, fpdc around each of the next 4 post sts ] rep from [ to ] around. Join. (80 sts) *Approximately 7” at this point.
Rnd 9: Ch 1, [ skip the next st, bpdc around each of the next 4 hdc, fpdc around each of the next 2 hdc, (2 hdc, ch 1, 2 hdc) in the next ch-2 sp, fpdc around each of the next 2 hdc, bpdc around each of the next 4 hdc, skip next st, fpdc around each of the next 2 post sts, work 2 hdc between the 2nd & 3rd post sts from Rnd 8, fpdc around each of the next 2 post sts ] rep from [ to ] around. Join. (92 sts)
Rnd 10: Ch 1, [ skip next st, bpdc around each of the next 3 post sts, fpdc around each of the next 2 post sts, hdc in next st, ch 1, skip next st, (2 hdc, ch 1, 2 hdc) in the next ch-1 sp, ch 1, skip next st, hdc in next st, fpdc around each of the next 2 post sts, bpdc around each of the next 3 post sts, skip next st, fpdc around each of the next 2 post sts, 2 hdc in each of the next 2 sts, fpdc around each of the next 2 post sts ] rep from [ to ] around. Join. (108 sts)
Rnd 11: Ch 1, [ skip next st, bpdc around each of the next 2 post sts, fpdc around each of the next 2 post sts, hdc in next st, ch 1, skip next ch-1, hdc in next 2 sts, (hdc, ch 1, hdc) in next ch-1 sp, hdc in next 2 sts, ch 1, skip next ch-1, hdc in next st, fpdc around each of the next 2 post sts, bpdc around each of the next 2 post sts, skip next st, fpdc around each of the next 2 post sts, 2 sc in next st, sc in next 2 sts, 2 sc in next st, fpdc around each of the next 2 post sts ] rep from [ to ] around. Join. (116 sts) *Approximately 9” at this point.
Rnd 12: Ch 1, [ skip next st, bpdc around the next post st, fpdc around each of the next 2 post sts, hdc in next st, ch 1, skip next ch-1, hdc in next 3 sts, (hdc, ch 1, hdc) in next ch-1 sp, hdc in next 3 sts, ch 1, skip next ch-1, hdc in next st, fpdc around each of the next 2 post sts, bpdc around the next post st, skip next st, fpdc around each of the next 2 post sts, 2 sc in next st, sc in each of the next 4 sts, 2 sc in next st, fpdc around each of the next 2 post sts] rep from [ to ] around. Join. (124 sts)
Rnd 13: Sl st over to 1st hdc (work the first st of the rnd into this same st), ch 1, [ hdc in next st, ch 1, skip next ch-1, hdc in next 4 sts, (hdc, ch 1, hdc) in next ch-1 sp, hdc in next 4 sts, ch 1, skip next ch-1, hdc in next st, fpdc around each of the next 2 post sts, skip the next st, fptr around each of the next 2 post sts, 2 sc in next st, sc in each of the next 6 sts, 2 sc in next st, fptr around each of the next 2 post sts, skip the next st, fpdc around each of the next 2 post sts ] rep from [ to ] around. Join. (132 sts) *Approximately 10” at this point.
Rnd 14: Ch 1, [hdc in next st, ch 1, skip next ch-1, hdc in each of the next 5 sts, (dc, ch 1, dc) in next ch-1 sp, hdc in each of the next 5 sts, ch 1, skip next ch-1, hdc in next st, (fpdc2tog) twice, 2 sc in next st, sc in each of the next 8 sts, 2 sc in next st, (fpdc2tog) twice ] rep from [ to ] around. Join. (132 sts)
Rnd 15: Ch 1, [ sc in each of the next 8 sts & ch across to corner ch-1 sp, (hdc, ch 1, hdc) in next ch-1 sp, sc in each of the next 8 sts & ch’s, fpdc around each of the next 2 post sts, sc in each of the next 12 sts, fpdc around each of the next 2 post sts ] 4 times. Join. (140 sts)
Rnd 16: Ch 1, [ sc in each st across to ch-1 sp at corner, 3 sc in next ch-1 sp ] 4 times, then sc in each remaining st. Join. (148 sts) Place a stitch marker in the middle of each set of 3 corner stitches.
Rnd 17: Ch 1, [ sc in each st across to middle corner st, 3 sc in middle corner st ] 4 times, then sc in each remaining st. Join. (156 sts) Move the stitch markers up and place a stitch marker in the middle of each set of 3 corner stitches to help with seaming.
Fasten off. Crochet square should measure approximately 12″ x 12″.
Complete all 20 afghan crochet squares, block them, then continue below to Seaming. If you remove the corner stitch markers for blocking, place them back in each corner stitch before you join your squares.
Blocking Crochet Squares
I prefer to block my squares first, then weave in the ends. This way my woven in ends don’t affect the natural stretch of the crochet square during blocking.
If you’ve never blocked your crochet projects before, check out my Super Easy Blocking Tutorial.
Seaming
After you’ve crocheted and blocked all 20 squares, lay them out in rows of 4, alternating colors (see photo below).
Row 1 Layout: Blue, Grey, Blue, Grey
Row 2 Layout: Grey, Blue, Grey, Blue
Row 3 Layout: Rep Row 1
Row 4 Layout: Rep Row 2
Row 5 Layout: Rep Row 1
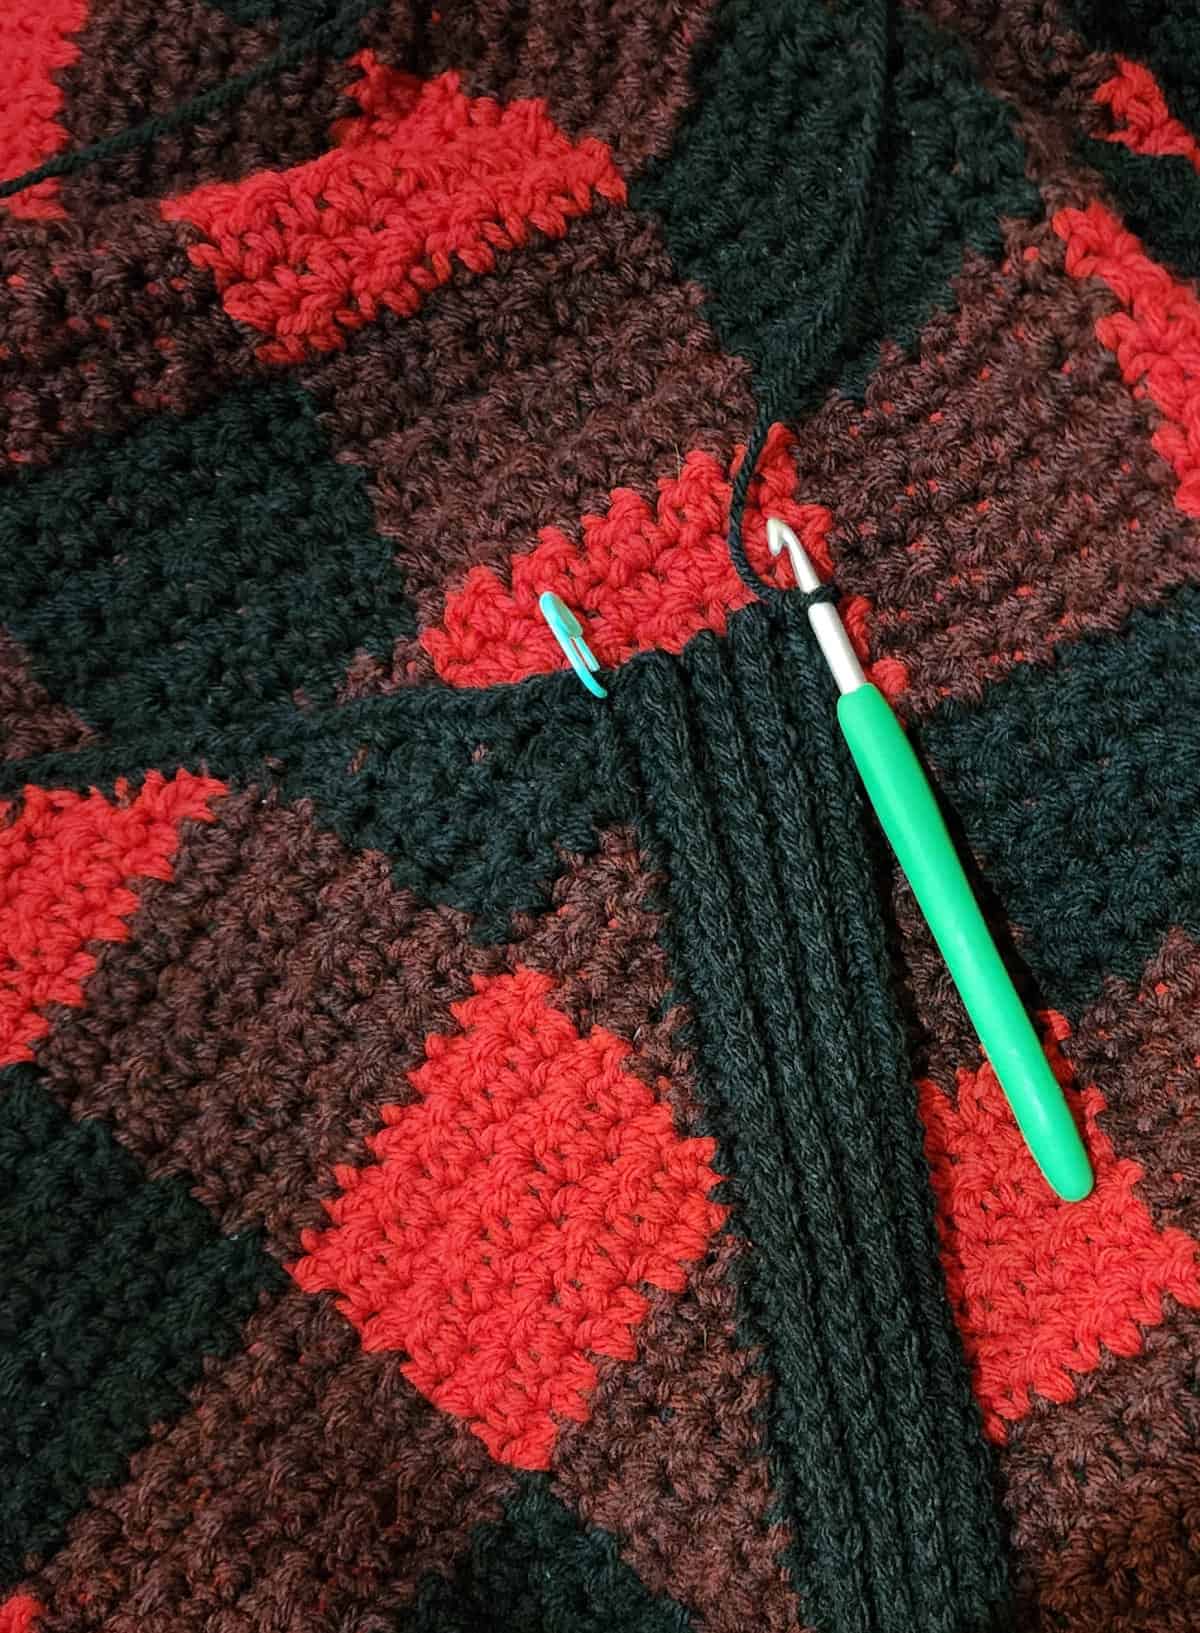
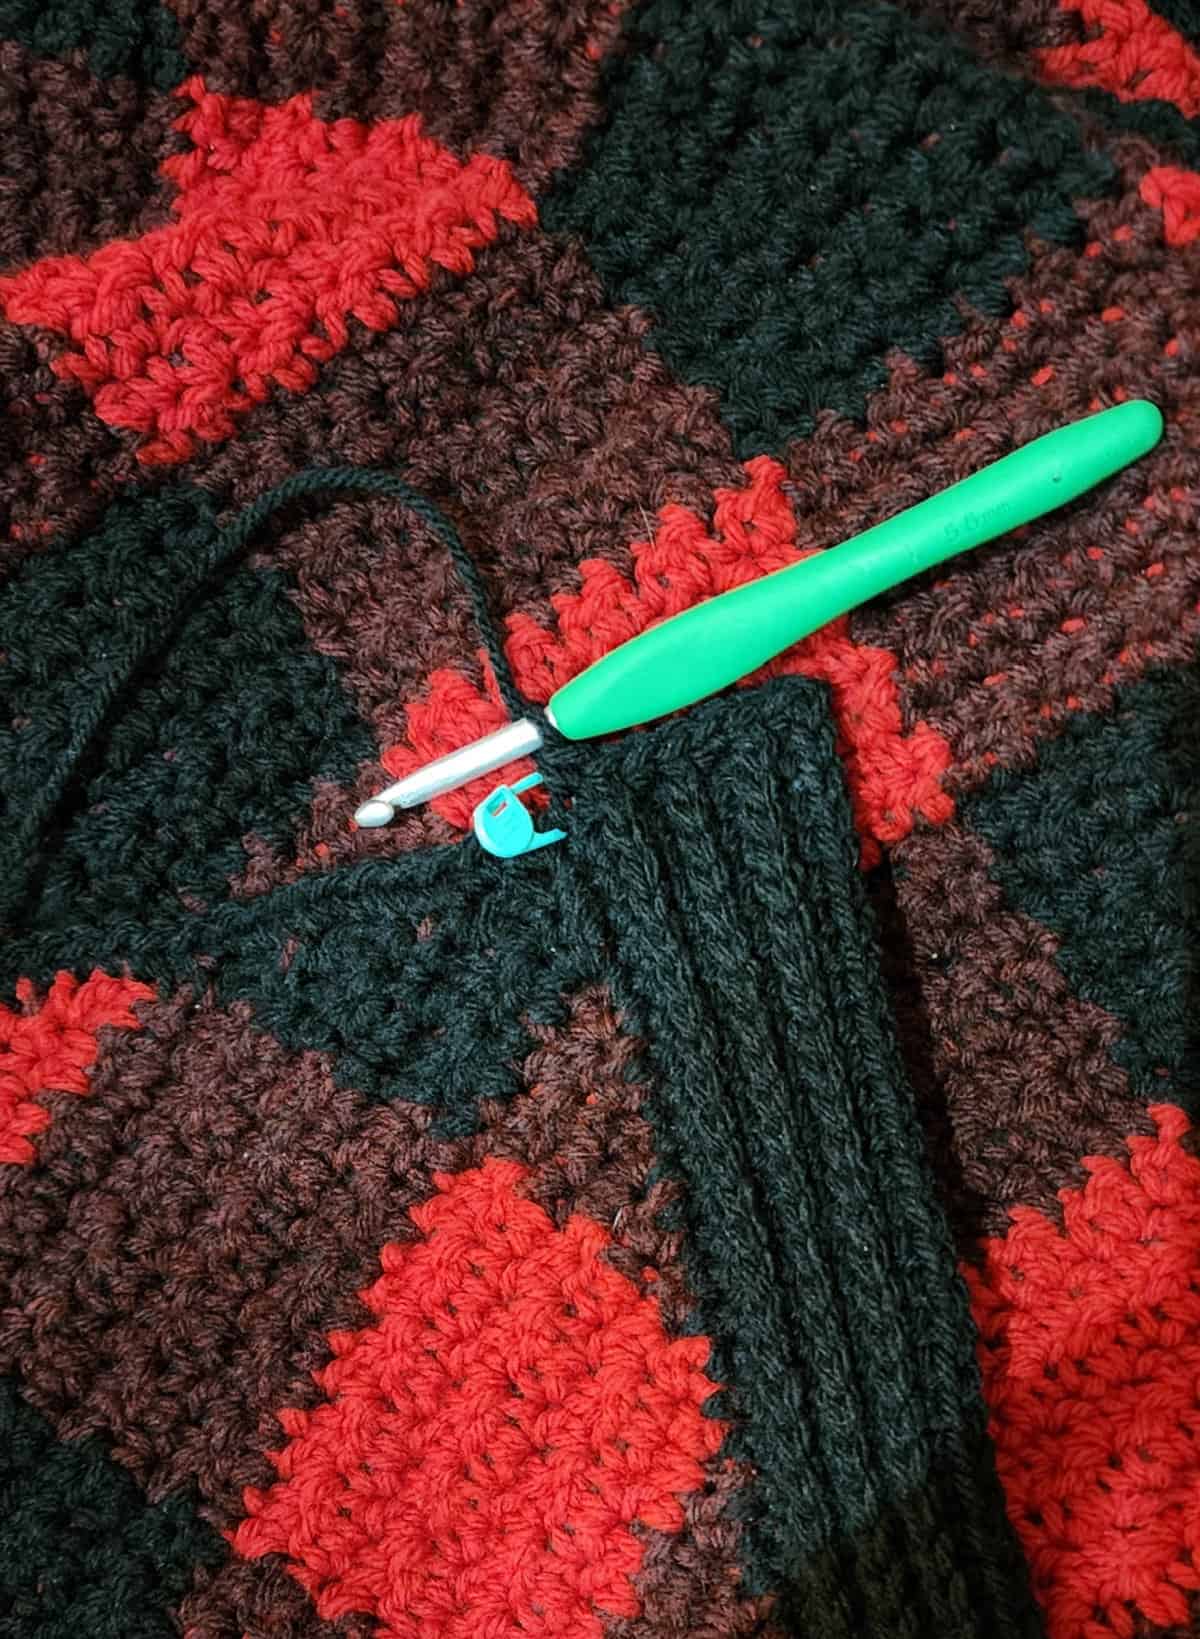
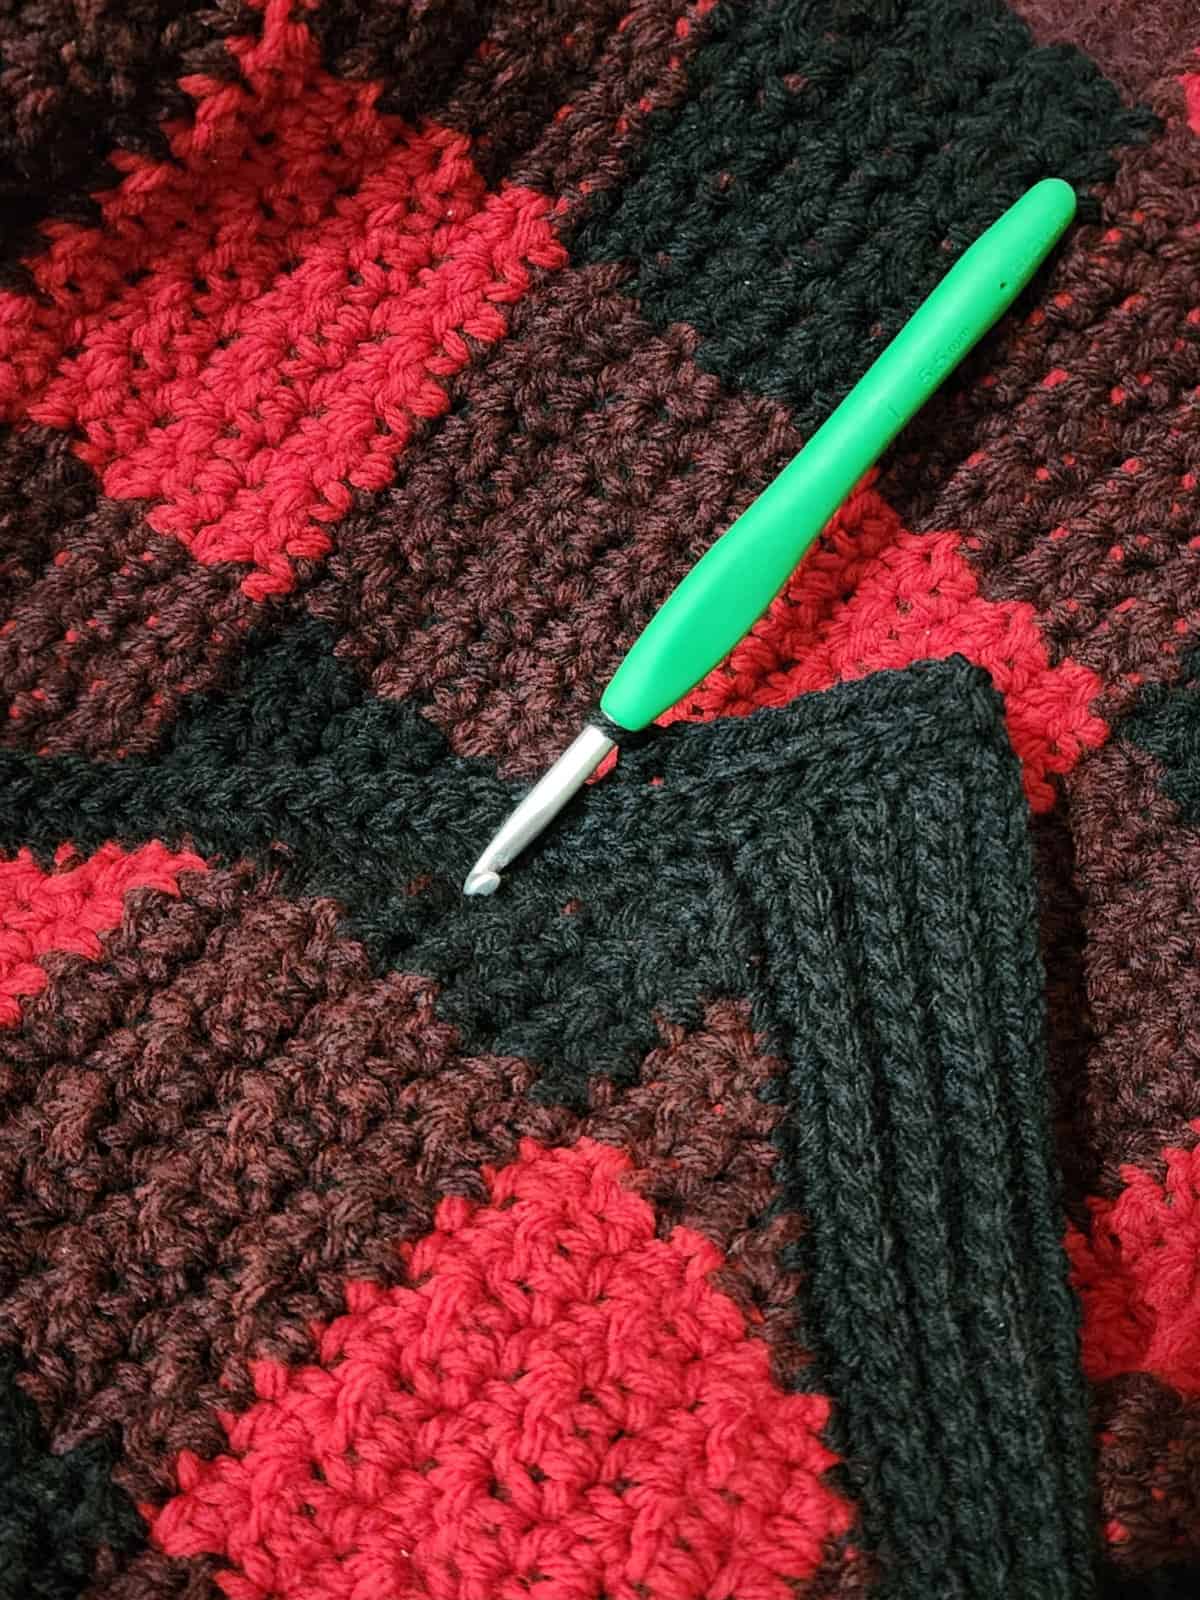
With Grey yarn & a 6.00mm crochet hook, seam all cabled crochet squares together using the Flat Slip Stitch Seam.
I prefer to work all horizontal seams first, then work all vertical seams, but it doesn’t matter which you choose to work first.
Note: This seam is worked into the BLO (or inside loops), as shown in the step-by-step photo tutorial.
After you complete the seams and weave in all ends. Place a stitch marker into each of the 4 corner stitches of the seamed blanket.
Before we can crochet a border on a blanket, we need to prepare the perimeter for the ribbed crochet border.
Continue on to Prepare the Perimeter for a Border.
Prepare the Perimeter for a Border
Rnd 1 (RS): With Blue yarn and a 6.00mm crochet hook (or whatever size is needed to keep from having a wavy edge), join yarn with a standing sc in any marked corner stitch, then [ work along the side of the blanket and work 1 sc into each st until you reach the next marked corner st, (sc, ch 1, sc) into the next corner st ] work from [ to ] 3 times, then work along the last side of the blanket and work 1 sc into each st until you reach the corner where you joined your yarn, work a (sc, ch 1) in the corner st where you joined your yarn. Join with a sl st to the first st. Stitch count isn’t crucial.
Move all 4 SM up to the middle ch-1 of each corner as you complete each round. Do not fasten off. Continue on to the Log Cabin Crochet Ribbed Border.
Log Cabin Crochet Ribbed Border
The photos in the tutorial photos are of my C2C Buffalo Plaid Blanket, but the technique is the same for this crochet blanket border.
Continue on from the previous section and work into the stitches along the next side.
Gauge Note: If your border is becoming wavy, switch to a smaller hook. If your border is cinching inward, go up a hook size or two. The most important thing is that your border lays flat.
Wide Crochet Border: If you’d like a wide crochet border pattern, simply repeat Rows 2 – 3. Make sure to end with a Row 3 repeat.
Side 1
Row 1 (RS): Ch 1, sc in each st across to the next corner marked with a SM, work the last sc of the row into the marked corner st. Turn.
Row 2 (WS): Ch 1, BLO sl st in each st across. Turn.
Row 3: Ch 1, BLO sc in each st across. Turn.
Rows 4 – 7: Rep Rows 2 – 3.
Do not fasten off. Continue on to Sides 2 & 3.
Sides 2 & 3
Continuing on from the previous side, rotate your blanket to work along the next side.
Row 1 (RS): Ch 1, work 1 sc into each row of the ribbing from the previous side, sc in the corner st, sc in each st across to the next corner st, work the last sc of the row into the next marked corner stitch. Turn.
Row 2 (WS): Ch 1, BLO sl st across, then work 1 sl st into the BLO of the turning chain. Turn.
Row 3: Ch 1, BLO sc in each st across. Turn.
Row 4: Ch 1, BLO sl st across. Turn.
Rows 5 – 7: Rep Rows 3 – 4, ending with a Row 3.
Do not fasten off. Repeat once for Side #3, then continue on to Side 4.
Side 4
Continuing on from Side 3, rotate your blanket to work along the last side.
Row 1 (RS): Ch 1, work 1 sc into each row from the ribbing of the previous section, sc in the corner st, sc in each st across to the next corner st, sc in the corner st, then work 1 sc into each row from the ribbing section of Side 1. Turn.
Row 2 (WS): Ch 1, BLO sl st across, then work 1 sl st into the BLO of the turning chain. Turn.
Row 3: Ch 1, BLO sc in each st across. Turn.
Row 4: Ch 1, BLO sl st across. Turn.
Rows 5 – 7: Rep Rows 3 – 4, ending with Row 3.
Fasten off. Weave in ends.
Questions Crocheters Frequently Ask About Crochet Blankets
Can a Beginner Crochet a Blanket?
After learning a few simple stitches, a simple crochet blanket makes a perfect project for a beginner crocheter. Although blankets are larger projects and may seem a bit intimidating, they are really just large rectangles…or really big dishcloths. 😉
What Type Yarn is Best for Crochet Blankets?
Worsted weight acrylics yarns are my go-to for crochet blankets. Acrylic yarns are affordable and available in a wide range of colors. They’re easy to care for and once washed and dried, they’re super soft.
How Much Yarn to Crochet a Blanket?
The answer to this question is “it depends”. It depends on the size of the blanket, the weight of the yarn you’re using, and the crochet stitch pattern used.
To make the Cabled Blooms Blanket the size shown in the photos, you’ll need four balls of Lion Brand Pound of Love, or approximately 3,500 yards of a comparable worsted weight yarn.
How to Wash Crocheted Blankets?
Laundering instructions are specific to the yarn you’re using for your motif blanket. Make sure to check the label of the yarn for instructions.
It’s also a great idea to include a yarn label or a note when gifting a crocheted baby blanket so the recipients know how to wash a crochet baby blanket.
What is a Motif in Crochet?
In crochet, a motif is often referred to as several different names interchangeably. You may see a crochet motif called a granny square, crochet blanket square, crochet quilt motif, and more. In a nutshell, a motif is a design feature that is most commonly a square that you make several of and join to create a larger project.
I MADE IT! NOW WHAT?
Pin this post!: Save this cabled crochet blanket pattern to your Pinterest boards so that you can come back and make it again.
Leave a comment below: We love to hear your feedback.
Share Your Finished Projects on Facebook or Instagram: I love to see your finished projects! Share with us on social media and tag me @acrochetedsimplicity or use the hashtag #ACrochetedSimplicity so I can find your posts.
JOIN US IN THE FACEBOOK COMMUNITY GROUP!
Come share your finished projects with us in the A Crocheted Simplicity Crochet Community Group on Facebook. Join us for fun community events such as crochet alongs, join in on crochet conversations, ask questions, get advice, and share your love for crochet!

More Crochet Blanket Patterns I Think You’ll Love
More Crochet Blanket Patterns Free
Are you looking for more free crochet blanket patterns? We have several more free crochet patterns for a crochet throw blanket pattern, hexagon crochet blanket, crochet baby blanket patterns, and more.
If you’re looking for how to crochet a granny square, you’ll also find several crochet squares for blanket.
is there not a starting chain for the first step? it’s didn’t say to chain 23 then DC in the 3rd from hook for 20 total stitches but I assume that’s what u do?
Hi Jessica,
The cabled square is worked in the round. So Rnd 1 begins with a ch 3, then work all 20 sts into the 3rd ch from your hook. If you’d rather begin with a magic circle (ring), you can. Just make sure to work 20 sts in Rnd 1.
Happy Crocheting,
Jennifer
so I realized that RIGHT after I posted that comment and then felt like biggest idiot ever 😆😆😆
I am a knitter. Is it possible to convert the Cable Blooms Blanket with knitting instructions?
I do not need to be included on your website email advertisement or comments. Just a straight answer for the blanket pattern. I wont bother you after your reply.
Thanks,
Penny
Hi Penny,
The instructions for my Cabled Blooms Blanket are available in crochet only. I am not a knitter.
Happy Knitting,
Jennifer
In round 2 do you slip stitch to the first fptr made or the first one in the round,?
Hi Arrika,
You will always join to the 1st stitch of the round. For Rnd 2, the first stitch is a fptr, so you will sl st join to that first fptr.
Does that make sense?
Jennifer
is there a tutorial on this blanket I think I understand how to do it but I also like to see it worked I am so obsessed with this blanket got to start it right now. Thank you so much for sharing
Hi Brenda,
I do not currently have a video tutorial, but I will be working on one soon! I just have a few doctor appointments to get through first.
Happy Crocheting,
Jennifer
I am on square 7…love this. For some reason I have issues with row 6 and 7 consistently….its all me and ridiculous. I did use YouTube to assist me for about 2 squares however now I am going by the written printed pattern and a row counter. Directions are great…..and now I’m going to try other cable patterns after this. Thank You!!
Hi Angie,
I’m glad you’re loving this blanket and are going to venture out to more cable designs now. 🙂 I’d love to see a photo once you’re all done. 🙂
Happy Crocheting,
Jennifer
Absolutely amazing! I can’t wait to make this gorgeous afghan
Thank you!
Oh my goodness! This afghan is beautiful and I’m so glad you added a link in today’s email. Thank you❣️