Diamonds & Twists Cabled Beanie – Free Crochet Hat Pattern
Crochet cables have held a special place in my heart since I first learned how to crochet post stitches. I continue to be in awe at how a stitch as simple as the post stitch can transform a plain crocheted fabric into one full of texture and interest. I love to incorporate crochet cables in a variety of different project types, such as hats, bags, slippers and more. Cables can be used to create a large range of designs from traditional to modern. You can find the free crochet cabled beanie pattern in this post below, or an ad-free print friendly version on Love Crafts here, Ravelry here, or on Etsy here. *The ad-free PDF includes a bonus crochet stitch chart.
>CLICK HERE TO SIGN-UP TO RECEIVE OUR NEWSLETTER!<
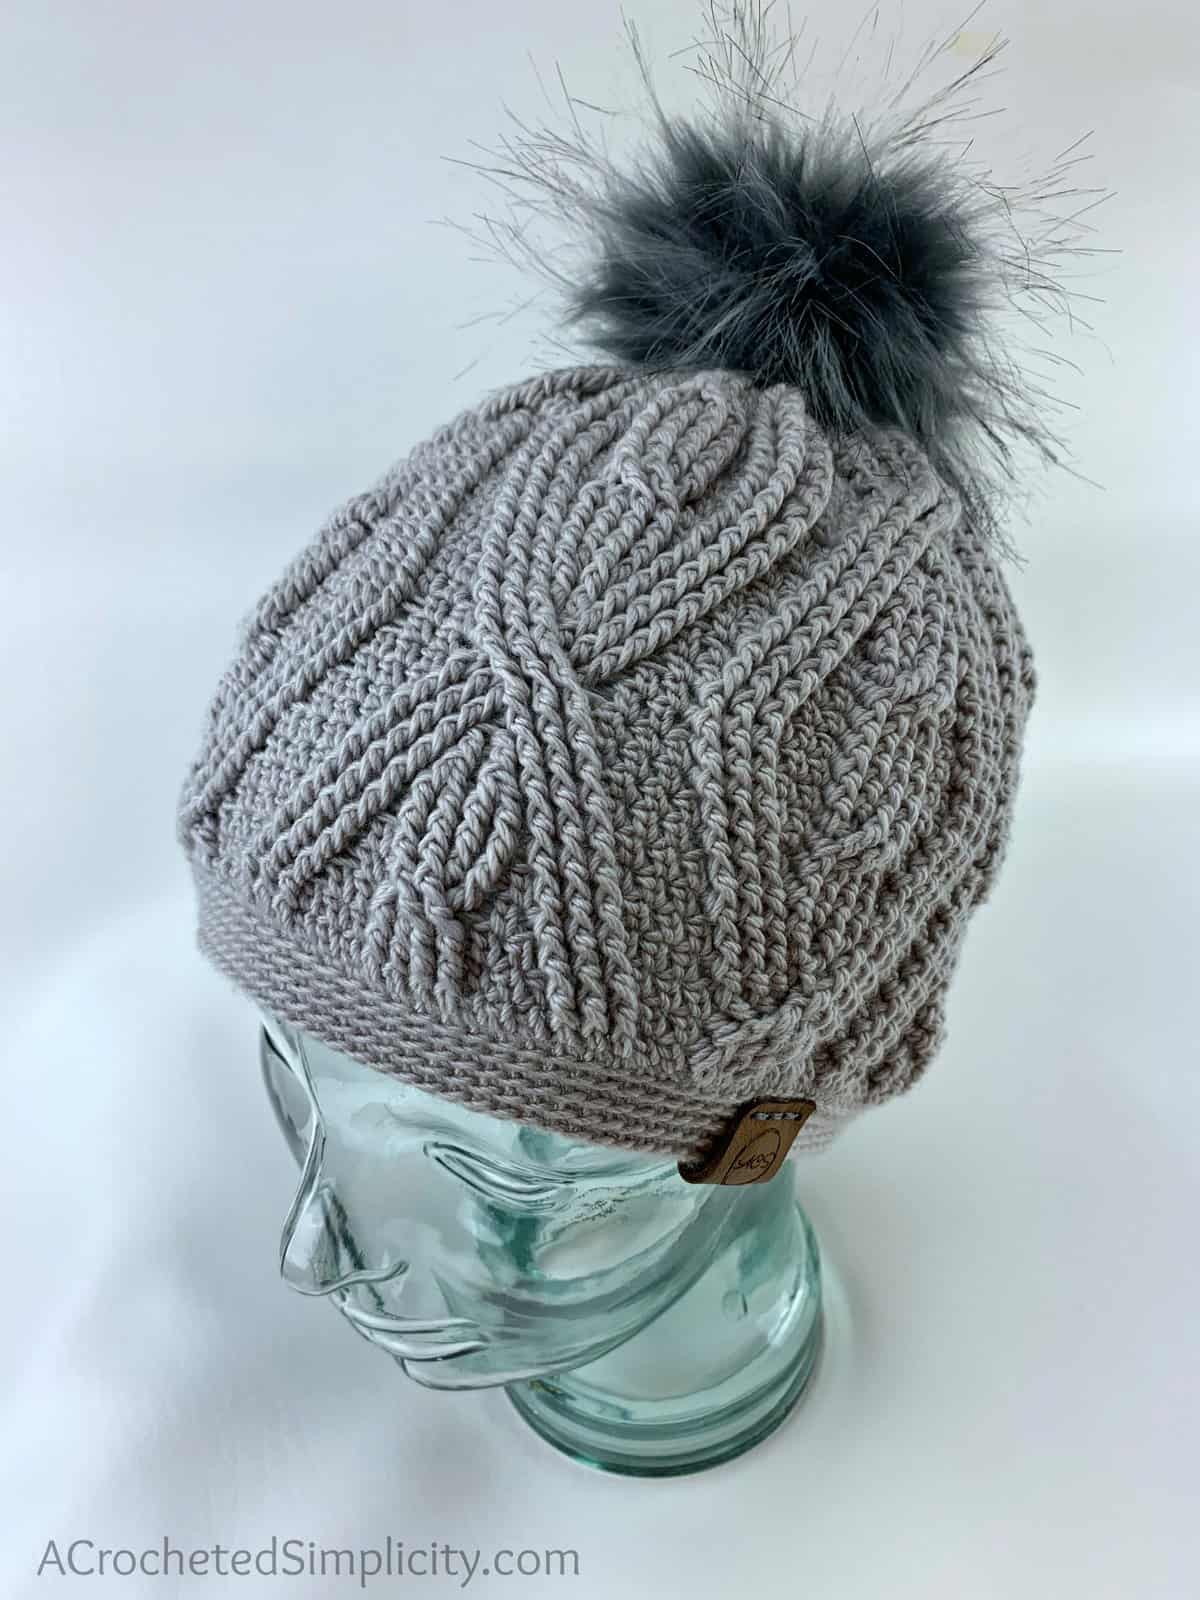
Although I really like simple, vertical crochet cable patterns, I LOVE cable patterns that create movement… cables that move inward and outward horizontally. I designed the diamonds & twists cable stitch pattern for this crochet beanie, but I can’t wait to get a cabled crochet afghan on my hook soon… it’ll be the perfect project to get me through the remaining winter months here in Michigan’s Upper Peninsula.

Aren’t personalized leather tags such a great finishing touch to add to our crochet items? I ordered these ones and a couple different wooden ones from an awesome online maker. You can find links to where I purchased and a tutorial on how to attach all of them HERE.

Furls is shaking things up a bit this year by hosting a a weekly blog hop with some of their favorite designers! Follow along on the Furls blog HERE so you don’t miss out on the 52 crochet & knit designs coming in 2020. Each designer will create a new crochet or knit design using Whims Merino yarn and their favorite Furls crochet hook. In the Furls post you’ll find an updated list that includes a link to each new design as it’s released.
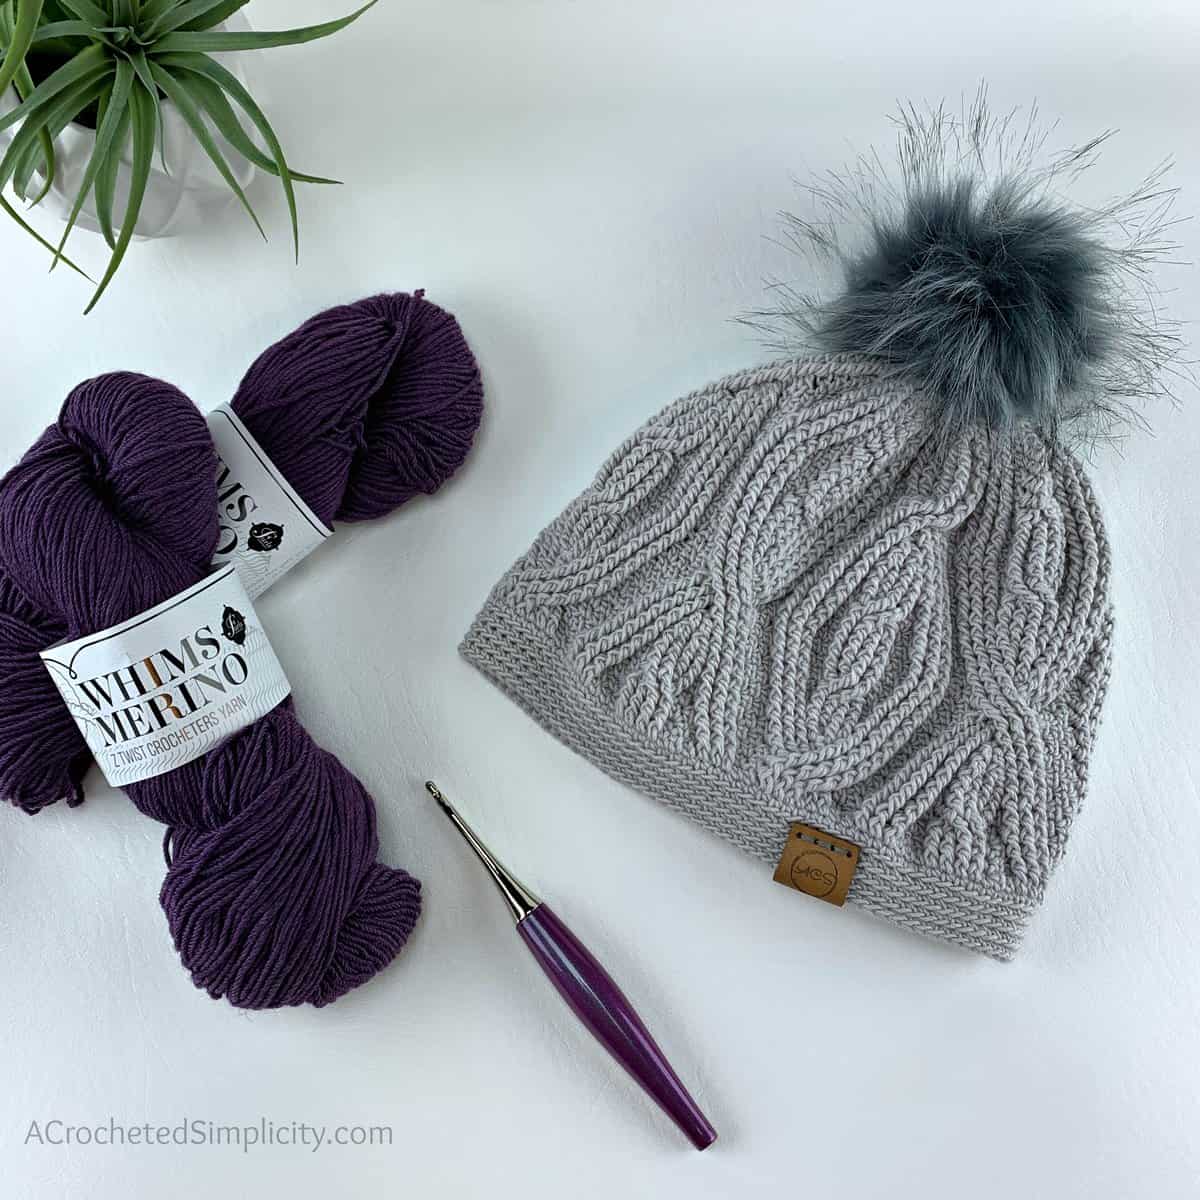
For Week 4 of the Furls Blog Hop, I designed the Diamonds & Twists Cabled Beanie using Whims Merino DK yarn.
The Yarn
DK weight yarn is a great yarn weight to use for more detailed crochet cables, especially when making a cabled beanie. This is why I chose Whims Merino DK Yarn by Furls for the Diamonds & Twists Cabled Beanie. Not only is Whims Merino DK Yarn perfect because of the weight, it’s also perfect because of the way it’s made. This yarn is a z-twist yarn made just for crocheters. You can read more about the z-twist yarn and watch a short video on the Furls website HERE.
Whims Merino DK yarn is a 50% superwash merino, 50% nylon yarn that is available in several great colors. It’s a super soft and silky yarn that has a lot of bounce and sheen to it and because of the nylon content, it also has a lot of stretch. For this crochet cabled beanie pattern I used less than 2 hanks (now available as skeins). If you’re looking for a great worsted weight yarn, check out their worsted weight version.

Diamonds & Twists Cabled BEANIE – FREE CROCHET HAT PATTERN
The free pattern is below, but if you love to work offline, I’ve got a couple other great options for you.
Purchase the ad-free, printable PDF, including all photo tutorials, on Love Crafts here, Ravelry here, or on Etsy here. *The ad-free PDF includes a bonus crochet stitch chart.
Save this pattern to your Ravelry favorites here.
Pin it for later here.
This post contains affiliate links.
Materials
- Yarn: DK Weight / 3 / 350 yards / Whims Merino DK in Light Grey was used for the sample in the photos.
- Crochet Hooks: Furls Odyssey Purple Crochet Hooks H/8/5.00mm; G/6/4.00mm
- Scissors
- Yarn Needle
- Scrap piece of yarn or stitch marker
- Faux Fur Pom (optional – I LOVE these poms!)
 Fiskars All Purpose Scissor...Shop on Amazon
  Outus 9 Pcs Large Eye Blunt...Shop on Amazon
 ") JINSEY 12pcs Faux Fur Fluff...Shop on Amazon
JINSEY 12pcs Faux Fur Fluff...Shop on Amazon
Experience Level: Intermediate
Abbreviations (US Terms)
- ch(s): chain(s)
- st(s): stitch(es)
- sl st(s): slip stitch(es)
- sc: single crochet
- ext sc: extended single crochet (click HERE for tutorial)
- fpdc: front post double crochet (click HERE for tutorial)
- fptr: front post treble crochet (click HERE for tutorial)
- extsc2tog: extended single crochet decrease
- fpdc2tog: front post double crochet decrease by 1 (click HERE for tutorial)
- fpdc3tog: front post double crochet decrease by 2
- yo: yarn over
- rep: repeat
- rnd: round
- BLO: back loop only
- RS: right side
- standing sc: standing single crochet (click HERE for tutorial)
- See Special Stitches below for all cable stitch pattern definitions
Size
- One Size Fits Most Teens/Adults: fits 20-1/2″ – 23-1/2″ circumference
Gauge
- In ext sc: 20.5 sts = 4″; 7 rows = 1.5″
Notes
- I tend to crochet on the tighter side. You may need to go down a hook size (or two) to meet gauge if you crochet on the looser side.
- Yarn Notes: Furls Whims Merino in Light Grey was used for the sample shown in the photos. (196 yards / 180 m / 50% superwash merino / 50% nylon).
- Another comparable DK weight yarn may be used as long as gauge is met. Note that the yarn I used is half nylon so there is a lot of stretch to it. Some fibers, such as cotton and cotton blends, may not be suitable for this design.
- This beanie is constructed from the bottom up. You’ll work the body of the hat up to the crown and then add a hat band.
Special Stitches
- Extended Single Crochet (ext sc): Insert hook into stitch indicated, yo, pull up a loop, yo, pull thru 1 loop on hook, yo, pull thru remaining two loops on hook. (click HERE for tutorial)
- Extended Single Crochet Decrease (extsc2tog): Insert hook into stitch indicated, yo, pull up a loop, yo, pull thru 1 loop on hook, insert hook into next st, yo, pull up a loop, yo, pull thru 1 loop on hook, yo, pull thru remaining loops on hook.
- Front Post Double Crochet (fpdc): Yo, insert hook from front to back to front around the post of the designated stitch, yo, pull up a loop, yo, pull thru 2 loops, yo, pull thru remaining 2 loops. (click HERE for tutorial)
- Front Post Treble Crochet (fptr): Yo 2 twice, insert hook from front to back to front around the post of the designated stitch, yo, pull up a loop, (yo, pull thru 2 loops) 3 times. (click HERE for tutorial)
- Front Post Double Crochet Decrease by 1 stitch (fpdc2tog): (yo, insert your hook from front to back to front around the post of the next stitch indicated, yo, pull up a loop, yo, pull thru 2 loops on hook) twice, yo, pull thru all remaining loops on your hook. (click HERE for tutorial)
- Front Post Double Crochet Decrease by 2 stitches (fpdc3tog): (yo, insert your hook from front to back to front around the post of the next stitch indicated, yo, pull up a loop, yo, pull thru 2 loops on hook) 3 times, yo, pull thru all remaining loops on your hook.
- Forward Cable 4 (FWD Cable 4): Skip each of the next 2 post sts, fptr around each of the next 2 post sts, working in front of the 2 fptr just worked, fptr around each of the 2 skipped post sts.
- Backward Cable 4 (BWD Cable 4): Skip each of the next 2 post sts, fptr around each of the next 2 post sts, working behind the 2 fptr just worked, fptr around each of the 2 skipped post sts.
- Forward Cable 6 (FWD Cable 6): Skip each of the next 3 post sts, fptr around each of the next 3 post sts, working in front of the 3 fptr just worked, fptr around each of the 3 skipped post sts. (click HERE for tutorial)
- Backward Cable 6 (BWD Cable 6): Skip each of the next 3 post sts, fptr around each of the next 3 post sts, working behind the 3 fptr just worked, fptr around each of the 3 skipped post sts.
Diamonds & Twists Cabled Beanie
Body of Hat Instructions
This hat is worked in a spiral (continuous rounds). I strongly suggest using a scrap piece of yarn to keep track of the beginning of each round.
The ad-free PDF includes a bonus crochet stitch chart.
Set-up: With a 5.00mm crochet hook, ch 104, being careful not to twist the ch, join with a sl st to the 1st ch. (104 chs)
Rnd 1 (RS): Switch to a 4.00mm crochet hook, ch 1, working into the back humps of the foundation chain, ext sc in each ch around. Do not join. (104 sts) Begin working in a spiral (continuous rounds). Place a scrap piece of yarn after the last stitch of the round and move it up as you complete each round.
Rnd 2: * fpdc around each of the next 3 sts, ext sc in each of the next 3 sts, fpdc around each of the next 4 sts, ext sc in each of the next 3 sts, fpdc around each of the next 3 sts, ext sc in each of the next 2 sts, fpdc around each of the next 6 sts, ext sc in each of the next 2 sts, rep from * around.
Rnd 3: * ext sc in the top of the next post st, fpdc around the same post st as the ext sc just worked, fpdc around each of the next 2 post sts, skip the next st, ext sc in each of the next 2 sts, fpdc around each of the next 4 post sts, ext sc in each of the next 2 sts, skip the next st, fpdc around each of the next 3 post sts, ext sc in the top of the same post st as the last fpdc worked around, ext sc in each of the next 2 sts, BWD Cable 6, ext sc in each of the next 2 sts, rep from * around.
Rnd 4: * ext sc in the next st, fpdc around each of the next 3 post sts, ext sc in each of the next 2 sts, fpdc around each of the next 4 post sts, ext sc in each of the next 2 sts, fpdc around each of the next 3 sts, ext sc in each of the next 3 sts, fpdc around each of the next 6 post sts, ext sc in each of the next 2 sts, rep from * around.
Rnd 5: * ext sc the next st, ext sc in the top of the next post st, fpdc around the same post st as the ext sc just worked, fpdc around each of the next 2 post sts, skip the next st, ext sc in the next st, FWD Cable 4, ext sc in the next st, skip the next st, fpdc around each of the next 3 post sts, ext sc in the top of the same post st as the last fpdc worked around, ext sc in each of the next 2 sts, skip the next st, fpdc around each of the next 3 post sts, ext sc in the top of the same post st as the last fpdc worked around, ext sc in the top of the next post st, fpdc around the same post st as the ext sc just worked, fpdc around each of the next 2 post sts, skip the next st, ext sc in the next st, rep from * around.
Rnd 6: * ext sc in each of the next 2 sts, fpdc around each of the next 3 post sts, ext sc in the next st, fpdc around each of the next 4 post sts, ext sc in the next st, fpdc around each of the next 3 post sts, ext sc in each of the next 3 sts, fpdc around each of the next 3 post sts, ext sc in each of the next 2 sts, fpdc around each of the next 3 post sts, ext sc in the next st, rep from * around.
Rnd 7: * ext sc in each of the next 2 sts, ext sc in the top of the next post st, fpdc around the same post st as the ext sc just worked, fpdc around each of the next 2 post sts, skip the next st, fpdc around each of the next 4 post sts, skip the next st, fpdc around each of the next 3 post sts, ext sc in the top of the same post st as the last fpdc worked around, ext sc in each of the next 2 sts, skip the next st, fpdc around each of the next 3 post sts, 2 fpdc around each of the next 2 ext sc, fpdc around each of the next 3 post sts, skip the next st, rep from * around.
Rnd 8: * ext sc in each of the next 3 sts, fpdc around each of the next 10 sts, rep from * around.
Rnd 9: Ext sc in the next st, MOVE the SM and place it after the ext sc just worked, * ext sc in each of the next 2 sts, ext sc in the top of the next post st, fpdc around the same post st as the ext sc just worked, fpdc around each of the next 2 post sts, (fpdc2tog) twice, fpdc around each of the next 3 post sts, ext sc in the top of the same post st as the last fpdc worked around, ext sc in each of the next 2 sts, skip the next st, fpdc around each of the next 3 post sts, ext sc in the top of the same post st as the last fpdc worked around, fpdc around each of the next 4 post sts, ext sc in the top of the next post st, fpdc around the same post st as the ext sc just worked, fpdc around each of the next 2 post sts, skip the next st, rep from * around. (105 sts)
Rnd 10: * ext sc in each of the next 3 sts, fpdc around each of the next 8 post sts, ext sc in each of the next 3 sts, fpdc around each of the next 3 post sts, ext sc in the next st, fpdc around each of the next 4 post sts, ext sc in the next st, fpdc around each of the next 3 post sts, rep from * around. (104 sts)
Rnd 11: Ext sc in the next st, MOVE the SM and place it after the ext sc just worked, * ext sc in each of the next 2 sts, ext sc in the top of the next post st, fpdc around the same post st as the ext sc just worked, fpdc around each of the next 2 post sts, skip each of the next 2 sts, fpdc around each of the next 3 post sts, ext sc in the top of the same post st as the last fpdc worked around, ext sc in each of the next 2 sts, skip the next st, fpdc around each of the next 3 post sts, ext sc in the top of the same post st as the last fpdc worked around, ext sc in the next st, BWD Cable 4, ext sc in the next st, ext sc in the top of the next post st, fpdc around the same post st as the ext sc just worked, fpdc around each of the next 2 post sts, skip the next st, rep from * around. (105 sts)
Rnd 12: * ext sc in each of the next 3 sts, fpdc around each of the next 6 post sts, ext sc in each of the next 3 sts, fpdc around each of the next 3 post sts, ext sc in each of the next 2 sts, fpdc around each of the next 4 post sts, ext sc in each of the next 2 sts, fpdc around each of the next 3 post sts, rep from * around. (104 sts)
Rnd 13: Ext sc in the next st, MOVE the SM and place it after the ext sc just worked, * ext sc in each of the next 2 sts, FWD Cable 6, ext sc in each of the next 2 sts, skip the next st, fpdc around each of the next 3 sts, ext sc in the top of the same post st as the last fpdc worked around, ext sc in each of the next 2 sts, fpdc around each of the next 4 post sts, ext sc in each of the next 2 sts, ext sc in the top of the next post st, fpdc around the same post st as the ext sc just worked, fpdc around each of the next 2 post sts, skip the next st, rep from * around. (105 sts)
Rnd 14: * ext sc in each of the next 2 sts, fpdc around each of the next 6 post sts, ext sc in each of the next 2 sts, fpdc around each of the next 3 post sts, ext sc in each of the next 3 sts, fpdc around each of the next 4 post sts, ext sc in each of the next 3 sts, fpdc around each of the next 3 post sts, rep from * around. (104 sts)
Rnd 15: * ext sc in the next st, skip the next st, fpdc around each of the next 3 sts, ext sc in the top of the same post st as the last fpdc worked around, ext sc in the top of the next post st, fpdc around the same post st as the ext sc just worked, fpdc around each of the next 2 post sts, skip the next st, ext sc in the next st, ext sc in the top of the next post st, fpdc around the same post st as the ext sc just worked, fpdc around each of the next 2 post sts, skip the next st, ext sc in each of the next 2 sts, fpdc around each of the next 4 post sts, ext sc in each of the next 2 sts, skip the next st, fpdc around each of the next 3 post sts, ext sc in the top of the same post st as the last fpdc worked around, rep from * around.
Rnd 16: * ext sc in the next st, fpdc around each of the next 3 post sts, ext sc in each of the next 2 sts, (fpdc around each of the next 3 post sts, ext sc in each of the next 2 sts) twice, fpdc around each of the next 4 post sts, ext sc in each of the next 2 sts, fpdc around each of the next 3 post sts, ext sc in the next st, rep from * around.
Rnd 17: * skip the next st, fpdc around each of the next 3 post sts, 2 fpdc around each of the next 2 ext sc, fpdc around each of the next 3 post sts, skip the next st, ext sc in the next st, ext sc in the top of the next post st, fpdc around the same post st as the ext sc just worked, fpdc around each of the next 2 post sts, skip the next st, ext sc in the next st, BWD Cable 4, ext sc in the next st, skip the next st, fpdc around each of the next 3 post sts, ext sc in the top of the same post st as the last fpdc worked around, ext sc in the next st, rep from * around.
Before you begin round 18, BLO sl st in each of the next 24 sts. Make sure to move the stitch marker and place it after the 24th sl st. This is done to move the beginning of the round over without having to fasten off and re-join yarn. These sl sts are not counted as stitches nor will you work into them later.
Rnd 18: * ext sc in each of the next 2 sts, fpdc around each of the next 10 post sts, ext sc in each of the next 2 sts, fpdc around each of the next 3 post sts, ext sc in the next st, fpdc around each of the next 4 post sts, ext sc in the next st, fpdc around each of the next 3 post sts, rep from * around.
Rnd 19: * ext sc in the next st, skip the next st, fpdc around each of the next 3 post sts, ext sc in the top of the same post st as the last fpdc worked around, fpdc around each of the next 4 post sts, ext sc in the top of the next post st, fpdc around the same post st as the ext sc just worked, fpdc around each of the next 2 post sts, skip the next st, ext sc in the next st, ext sc in the top of the next post st, fpdc around the same post st as the ext sc just worked, fpdc around each of the next 2 post sts, skip the next st, fpdc around each of the next 4 post sts, skip the next st, fpdc around each of the next 3 post sts, ext sc in the top of the same post st as the last fpdc worked around, rep from * around.
Rnd 20: * ext sc in the next st, fpdc around each of the next 3 post sts, ext sc in the next st, fpdc around each of the next 4 post sts, ext sc in the next st, fpdc around each of the next 3 post sts, ext sc in each of the next 2 sts, fpdc around each of the next 10 post sts, ext sc in the next st, rep from * around.
Rnd 21: * skip the next st, fpdc around each of the next 3 post sts, ext sc in the top of the same post st as the last fpdc worked around, ext sc in the next st, FWD Cable 4, ext sc in the next st, ext sc in the top of the next post st, fpdc around the same post st as the ext sc just worked, fpdc around each of the next 2 post sts, skip the next st, ext sc in the next st, ext sc in the top of the next post st, fpdc around the same post st as the ext sc just worked, fpdc around each of the next 2 post sts, (fpdc2tog) twice, fpdc around each of the next 3 post sts, ext sc in the top of the same post st as the last fpdc worked around, ext sc in the next st, rep from * around.
Before you begin round 22, BLO sl st in each of the next 24 sts. Make sure to move the stitch marker and place it after the 24th sl st. This is done to move the beginning of the round over without having to fasten off and re-join yarn. These sl sts are not counted as stitches nor will you work into them later.
Rnd 22: * ext sc in each of the next 2 sts, fpdc around each of the next 3 post sts, ext sc in each of the next 2 sts, fpdc around each of the next 4 post sts, ext sc in each of the next 2 sts, fpdc around each of the next 3 post sts, ext sc in each of the next 2 sts, fpdc around each of the next 8 post sts, rep from * around.
Rnd 23: * ext sc in the next st, skip the next st, fpdc around each of the next 3 post sts, ext sc in the top of the same post st as the last fpdc worked around, ext sc in each of the next 2 sts, fpdc around each of the next 4 post sts, ext sc in each of the next 2 sts, ext sc in the top of the next post st, fpdc around the same post st as the ext sc just worked, fpdc around each of the next 2 post sts, skip the next st, ext sc in the next st, ext sc in the top of the next post st, fpdc around the same post st as the ext sc just worked, fpdc around each of the next 2 post sts, skip each of the next 2 post sts, fpdc around each of the next 3 post sts, ext sc in the top of the same post st as the last fpdc worked around, rep from * around.
Rnd 24: * ext sc in the next st, fpdc around each of the next 3 post sts, ext sc in each of the next 3 sts, fpdc around each of the next 4 post sts, ext sc in each of the next 3 sts, fpdc around each of the next 3 post sts, ext sc in each of the next 2 sts, fpdc around each of the next 6 post sts, ext sc in the next st, rep from * around.
Before you begin round 25, BLO sl st in the next st. Make sure to move the stitch marker and place it after the sl st. This is done to move the beginning of the round over without having to fasten off and re-join yarn. This sl st is not counted as a stitch nor will you work into it later.
Rnds 25 – 28: Rep Rnds 3 – 6.
Do not fasten off. Continue on to Crown Shaping. Approximate dimensions at this point (laid flat): 10″ W x 6″ H.
Crown Shaping
Rnd 1: * extsc2tog, fpdc around each of the next 3 post sts, ext sc in the next st, (fpdc2tog) twice, ext sc in the next st, fpdc around each of the next 3 post sts, extsc2tog, ext sc in the next st, fpdc around each of the next 3 post sts, ext sc in each of the next 2 sts, fpdc around each of the next 3 post sts, ext sc in the next st, rep from * around. (88 sts)
Rnd 2: * ext sc in the next st, fpdc around the next post st, fpdc2tog, ext sc in the next st, fpdc around each of the next 2 post sts, ext sc in the next st, fpdc2tog, fpdc around the next post st, ext sc in each of the next 2 sts, fpdc around the next post st, fpdc2tog, ext sc in each of the next 2 sts, fpdc2tog, fpdc around the next post st, ext sc in the next st, rep from * around. (72 sts)
Before you begin round 3, BLO sl st in the next st. Make sure to move the stitch marker and place it after the sl st. This is done to move the beginning of the round over without having to fasten off and re-join yarn. This sl st is not counted as a stitch nor will you work into it later.
Rnd 3: * fpdc around each of the next 2 post sts, ext sc in the next st, fpdc2tog, ext sc in the next st, fpdc around each of the next 2 post sts, ext sc2tog, (fpdc around each of the next 2 post sts, ext sc2tog) twice, rep from * around. (56sts)
Rnd 4: * fpdc2tog, ext sc in the next st, fpdc around the next post st, ext sc in the next st, (fpdc2tog, ext sc in the next st) 3 times, rep from * around. (40 sts)
Rnd 5: * fpdc around the next post st, fpdc2tog around the next 2 ext sc (skip over the fpdc between them), fpdc around the next post st, ext sc in the next st, fpdc2tog around the next 2 post sts (skip over the ext sc between them), ext sc in the next st, rep from * around. (24 sts)
Rnd 6: * fpdc3tog, ext sc in the next st, fpdc around the next post st, ext sc in the next st, rep from * around. (16 sts)
Rnd 7: * fpdc2tog around the next 2 post sts (skip the ext sc between them), ext sc in the next st, rep from * around. (12 sts)
Fasten off leaving an 8″ tail. With a yarn needle and tail of yarn, close the gap in the crown. Continue on to Hat Band.
Hat Band
Rnd 1 (RS): Using a 4.00 mm crochet hook, join yarn with a standing sc (click HERE for tutorial) in the bottom of the foundation ch, close to where the join is, sc in each st around. Do not join. Work in continuous rounds and use a scrap piece of yarn to keep your place. (104 sts)
Rnds 2 – 5: BLO sc in each st around. (104 sts)
Fasten off. Weave in ends. Your Diamonds & Twists Cabled Beanie is complete!

NOW THAT YOU’VE FINISHED CROCHETING YOUR DIAMONDS BEANIE OR SLOUCH HAT, ADD YOUR OWN FINISHING TOUCHES USING ONE OF THESE FUN OPTIONS!
- Chain Loop Pom (click here for tutorial)
- Faux Fur Pom (click here)
- Personalized Tags (click here for tutorial)
MORE FREE CROCHET PATTERNS FROM A CROCHETED SIMPLICITY
If you enjoy this crochet beanie pattern, you may enjoy these other projects as well. And if you just want to browse, you can find all of our free crochet patterns HERE.


Are you intimidated by crocheted cables? Would you love to learn? Take an Annies Video Class with me and let me ease your fears of crocheted cables! Click on the photo below to watch a free preview. You can also see the other 4 classes I have available! (affiliate link)
Please share your finished ACS projects with us in the A Crocheted Simplicity Crochet Community Group on Facebook! Use hashtag #ACrochetedSimplicity when sharing on social media so I can find your posts!