My Favorite Crochet Summer Top
Make a crochet summer top to add to your seasonal staples!
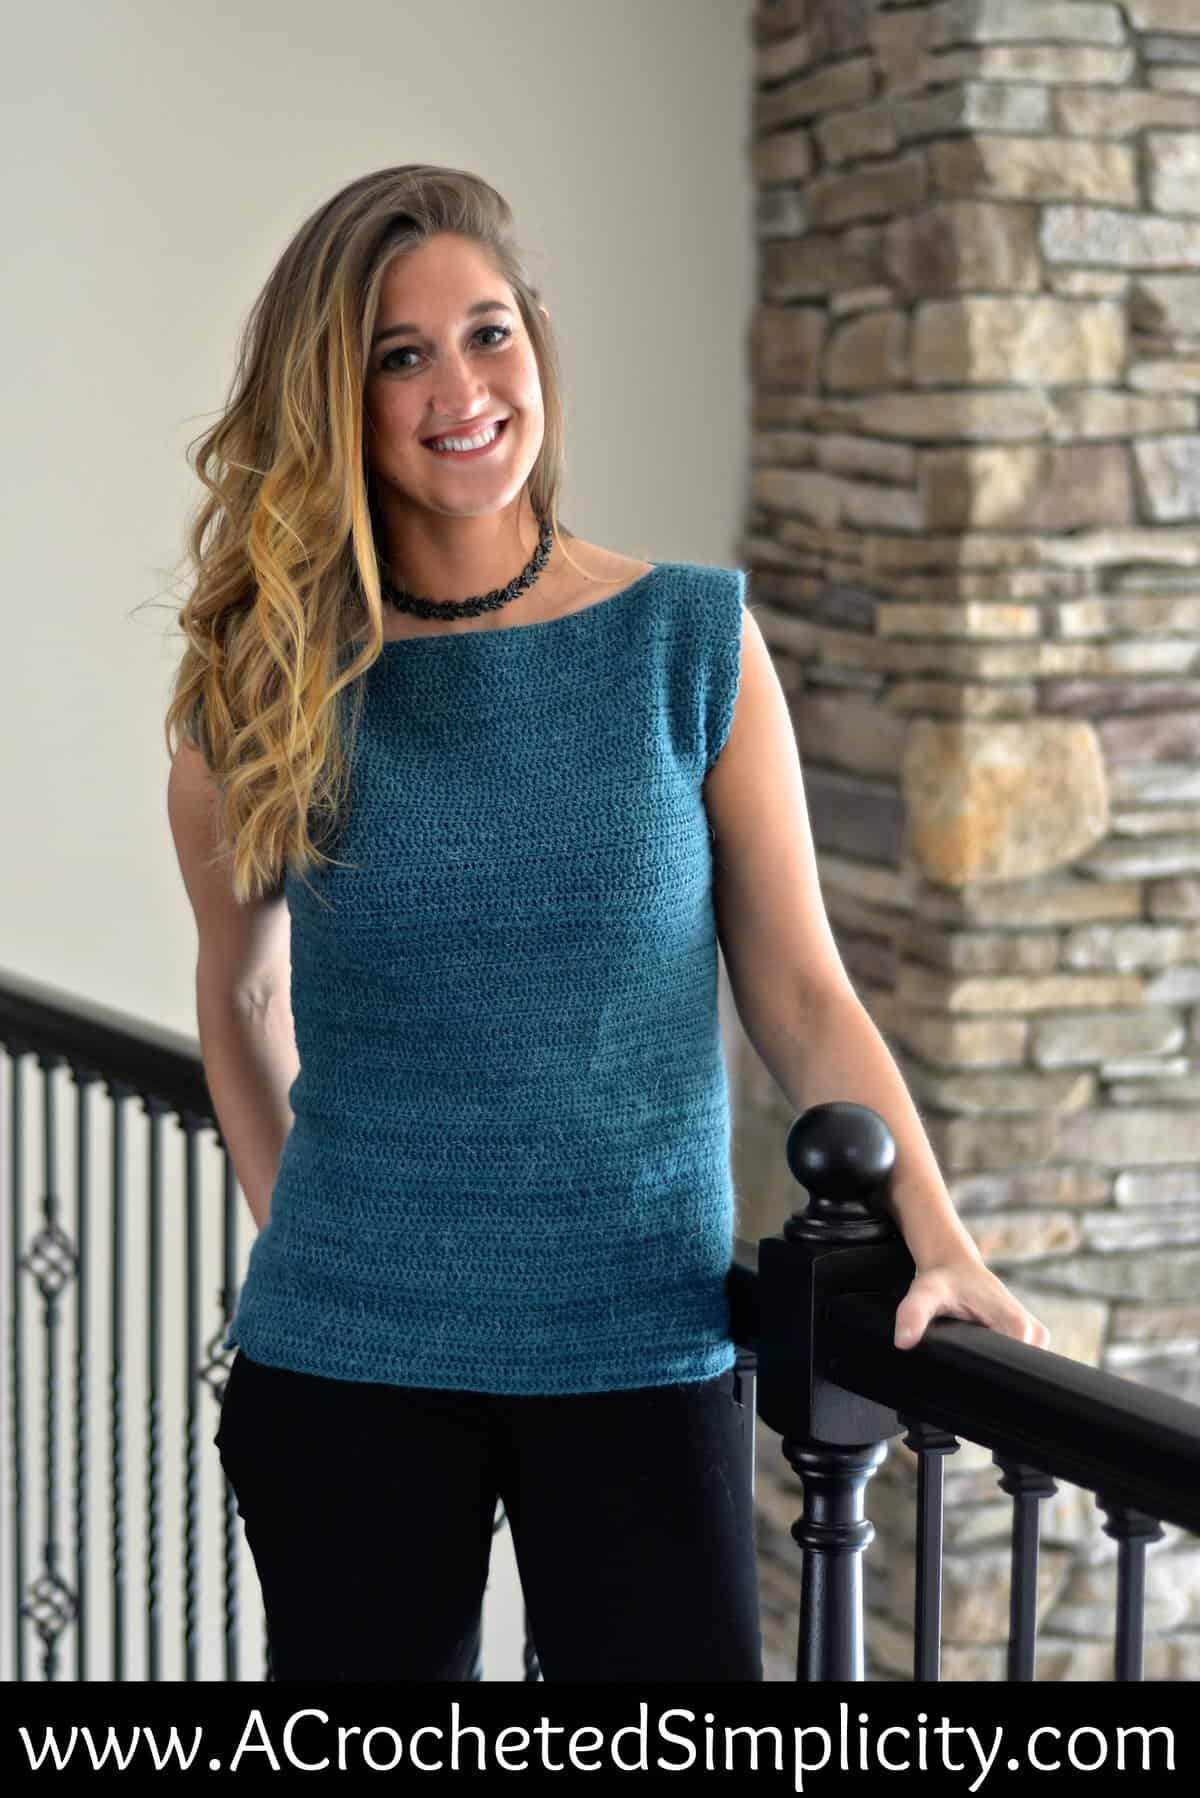
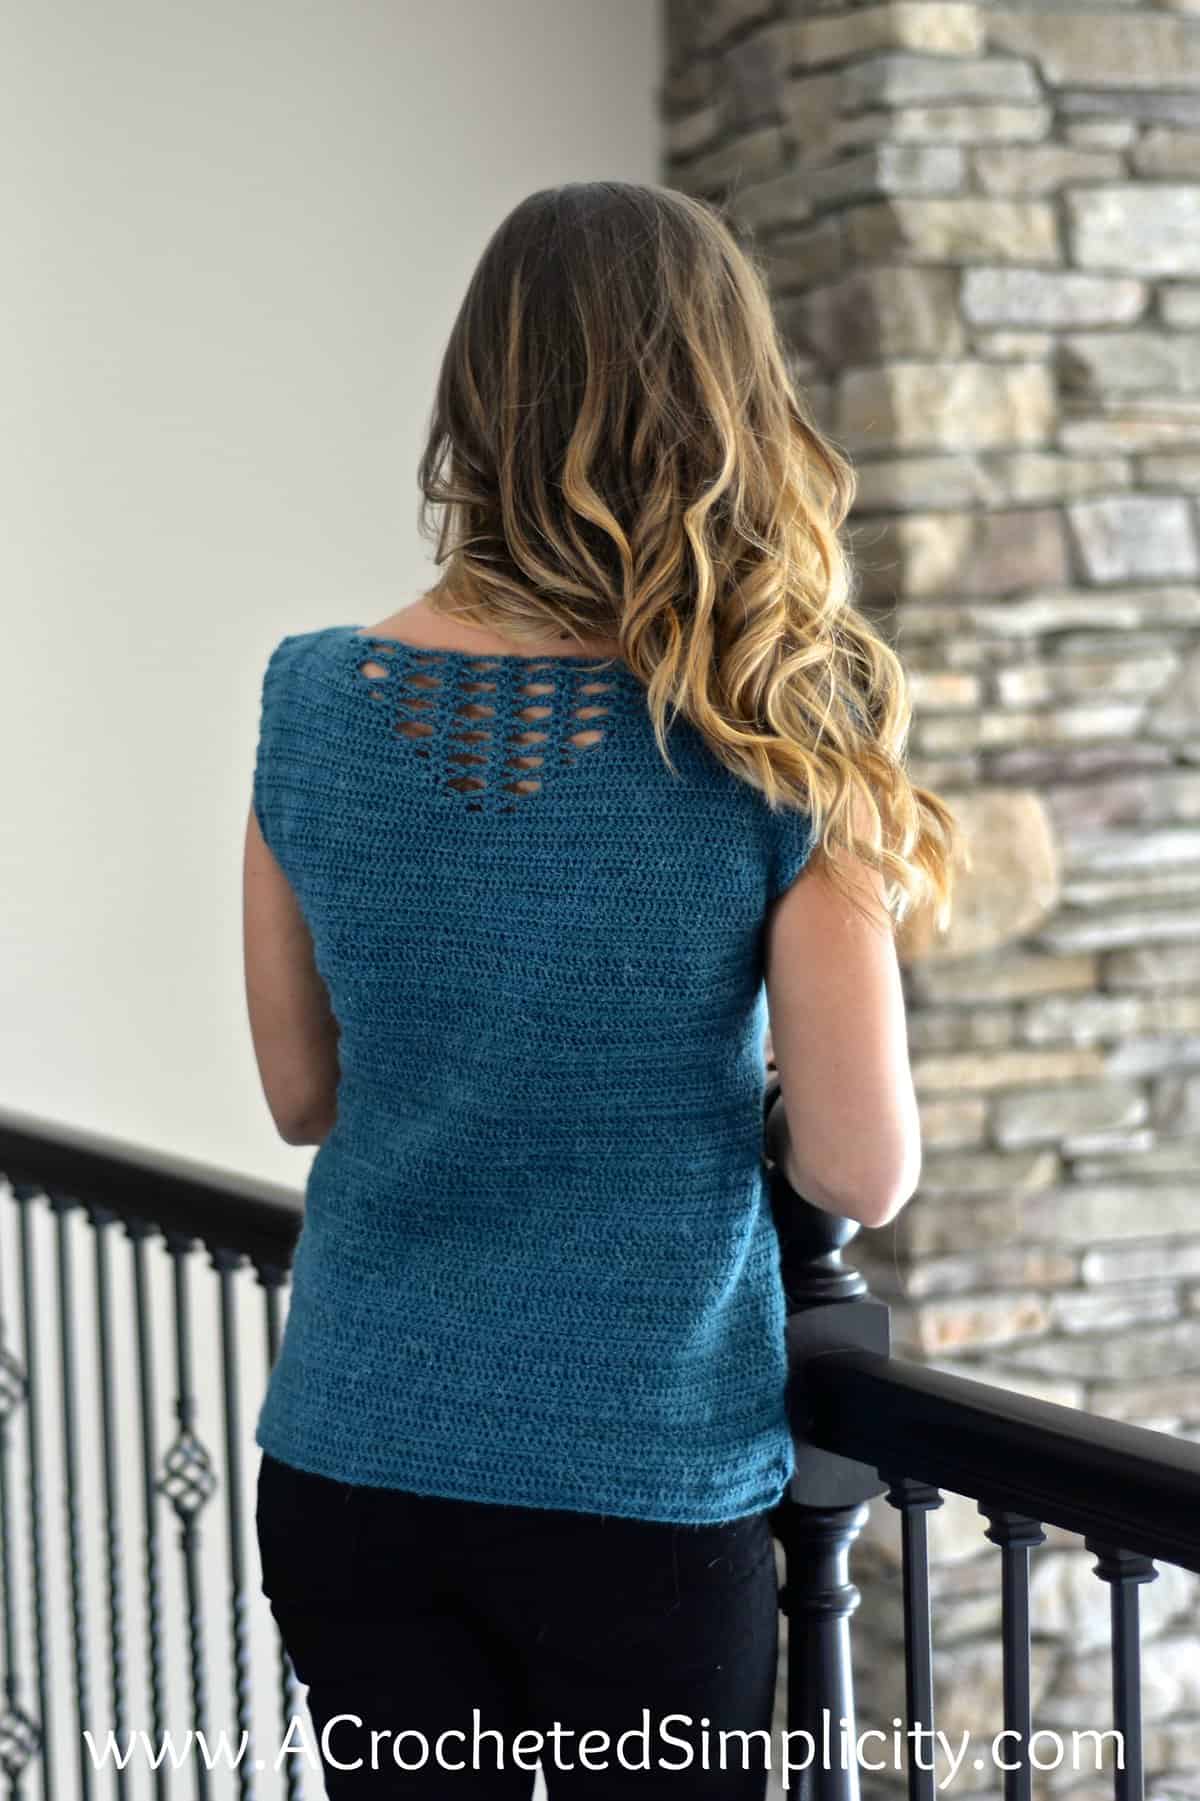
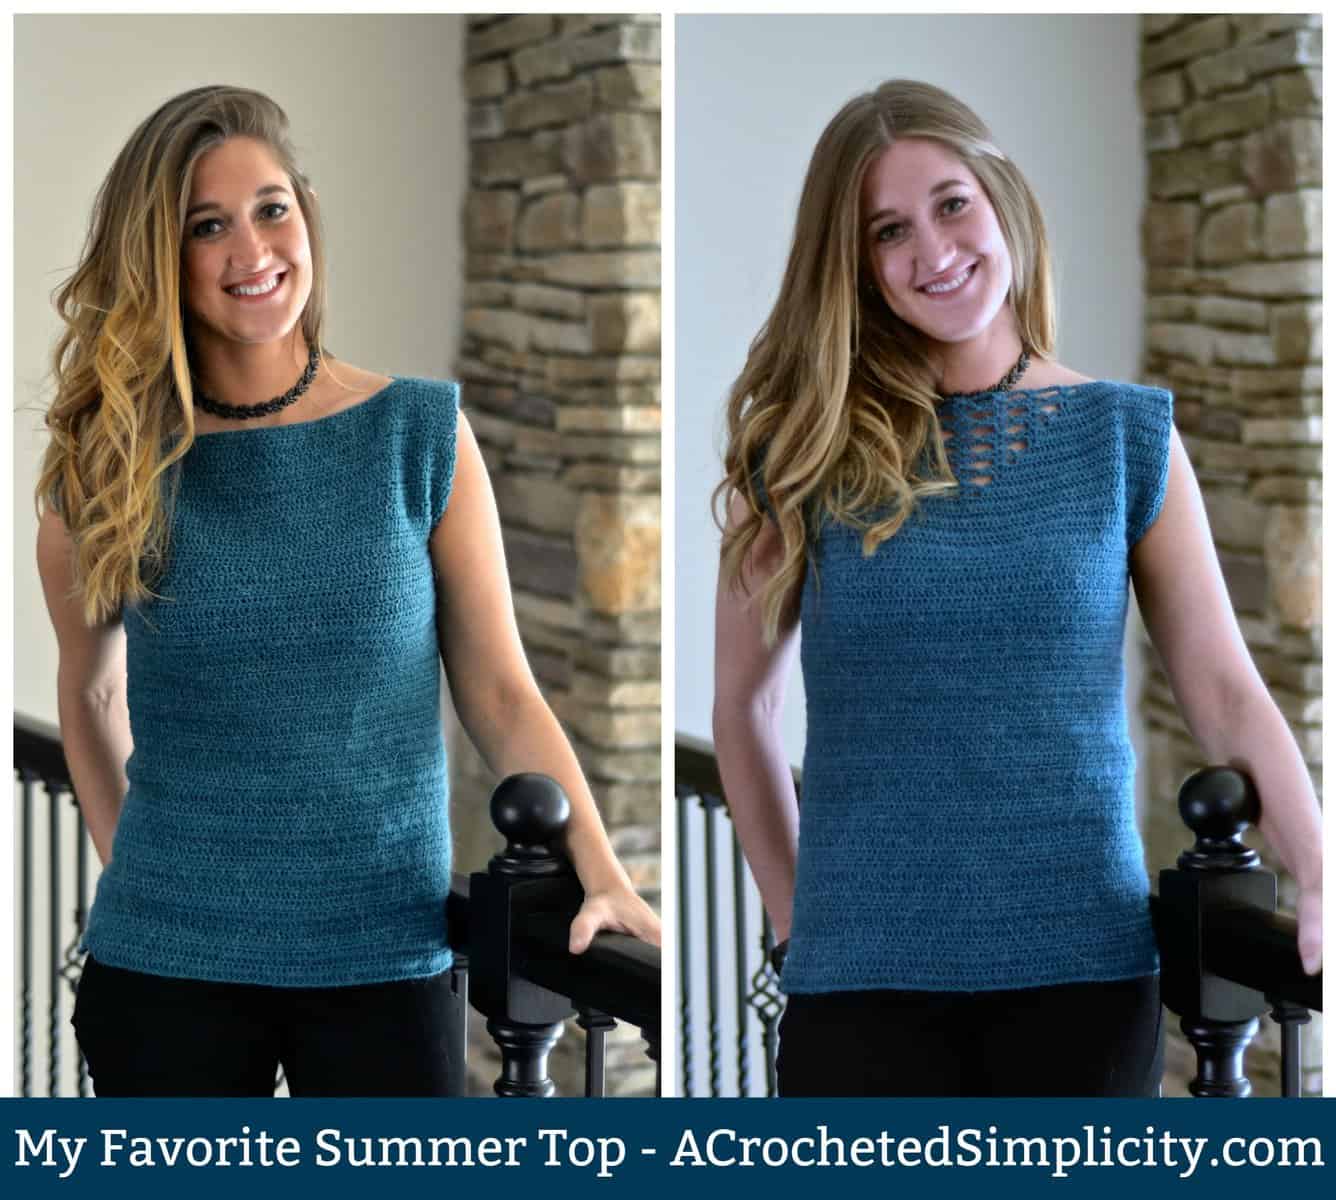
Aside from the openwork back and subtle waist shaping, you’ll love that this crochet summer top pattern is seamless!
“Say what?!?! NO SEAMS?!?!” Yes, you read that correctly… no seams! Are you already reaching for your yarn and hook? I hope so!
You’ll find the free crochet summer top pattern in the post below, or you can find an ad-free printable PDF (that includes all photo tutorials, + a Bonus Stitch Chart & garment schematic), on Ravelry, or Etsy (aff).
Summer is quickly approaching, at least I hope it is, and it’s time for lightweight airy tops.
One of my favorite summer tops is one I purchased a few years ago from a large department store. Two of the things I love most about this top are it’s openwork back and subtle waist shaping. I incorporated these two elements into the design for this summer crochet top.
Whether paired with denim shorts for a casual vibe or layered over a sundress, its relaxed silhouette and breathable fabric make it the perfect companion for sunny adventures or lazy afternoons in the park.
Yarn
Premier Chamonix Yarn is the yarn I chose for my crochet top. Chamonix is a #2 sport weight yarn and is an acrylic, angora, and mohair blend. This yarn was great to work with and I absolutely love the finished look that the angora and mohair lend to the garment.
As I update this post, I realize that this specific yarn has been discontinued since I designed this top. Check out Yarn Sub for several great recommended substitutions.
Choosing Which Size to Crochet
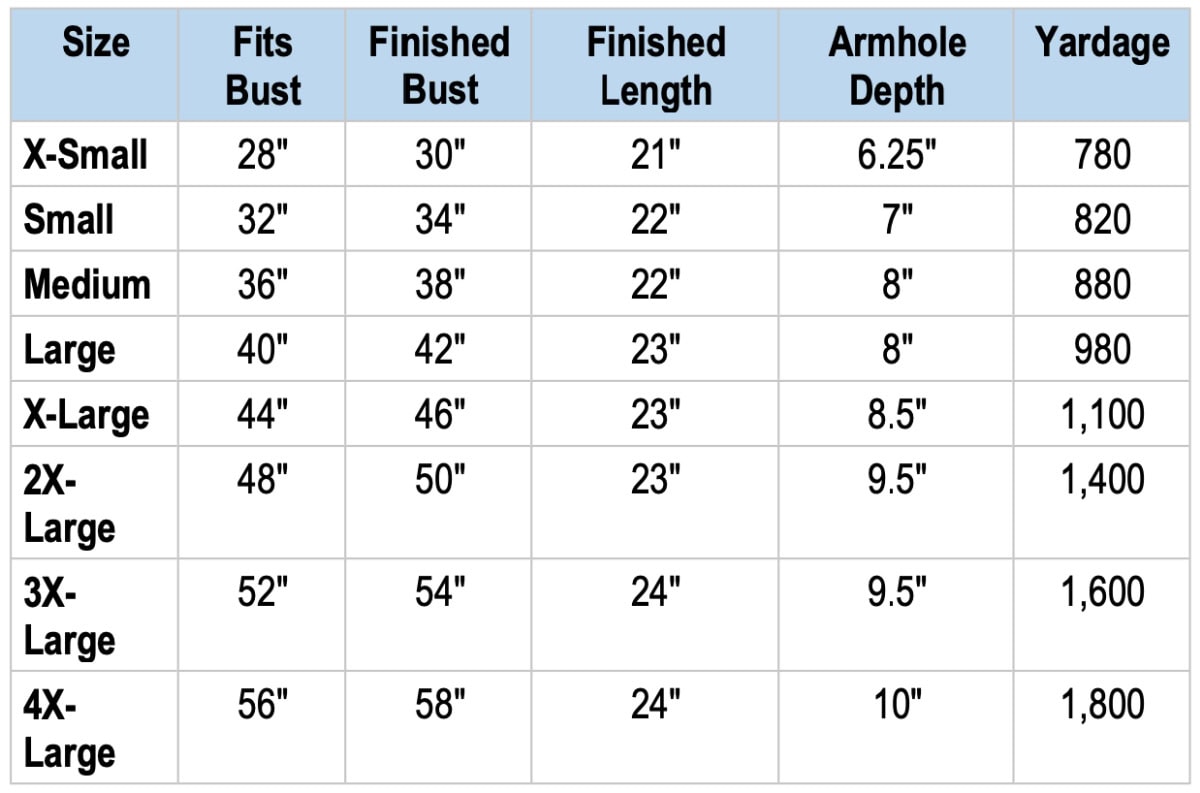
To choose your size, look over the size chart below.
- ‘Fits Bust’ measurement is the measurement of the intended wearer, not the garment’s finished measurement.
- Finished Bust, Length, and Armhole Depth are measurements of the finished garment.
- This crochet summer top has no positive or negative ease. For best fit, choose your size based on your actual bust size.
- If you prefer a more loosely fitted top, I would suggest making a top one size larger than chest size.
- Top length is measured from the top of the shoulder to the bottom edge of the top.
- Adjusting Top Length: See the notes at the end of the Top With Waist Shaping or Top Without Waist Shaping sections for adjusting length.
- Note: Adjusting the size of your crochet blouse will affect the amount of yarn you’ll need. You may need more or less than what is specified in the yardage chart below.
Size & Yardage Chart
The notes above refer to this size chart.
How to Crochet a Summer Top
I designed this crochet top to be 100% seamless! You don’t even have to seam the shoulders. But in order to do so, it’s constructed a little differently than you may be used to. The following will walk you through how
You’ll begin by crocheting the upper back panel with the openwork lace crochet stitch pattern. The bottom of this panel becomes the bottom of the armhole opening and the top of the panel becomes the top of the shoulders.
After completing the upper back panel, you’ll continue working along the top edge of the back panel to begin the shoulders and create the neck opening for the front upper panel.
The front upper panel is then worked down to the bottom of the armhole opening. At this point, you’ll begin working in rounds and will join the front and back panels.
You’ll continue working in joined and turned rounds to complete the body of the top. While crocheting the body of top, you’ll find there are two options included for a top with waist shaping, or a top without waist shaping.
Lastly, when you near the bottom of the top, you will create a split hem.
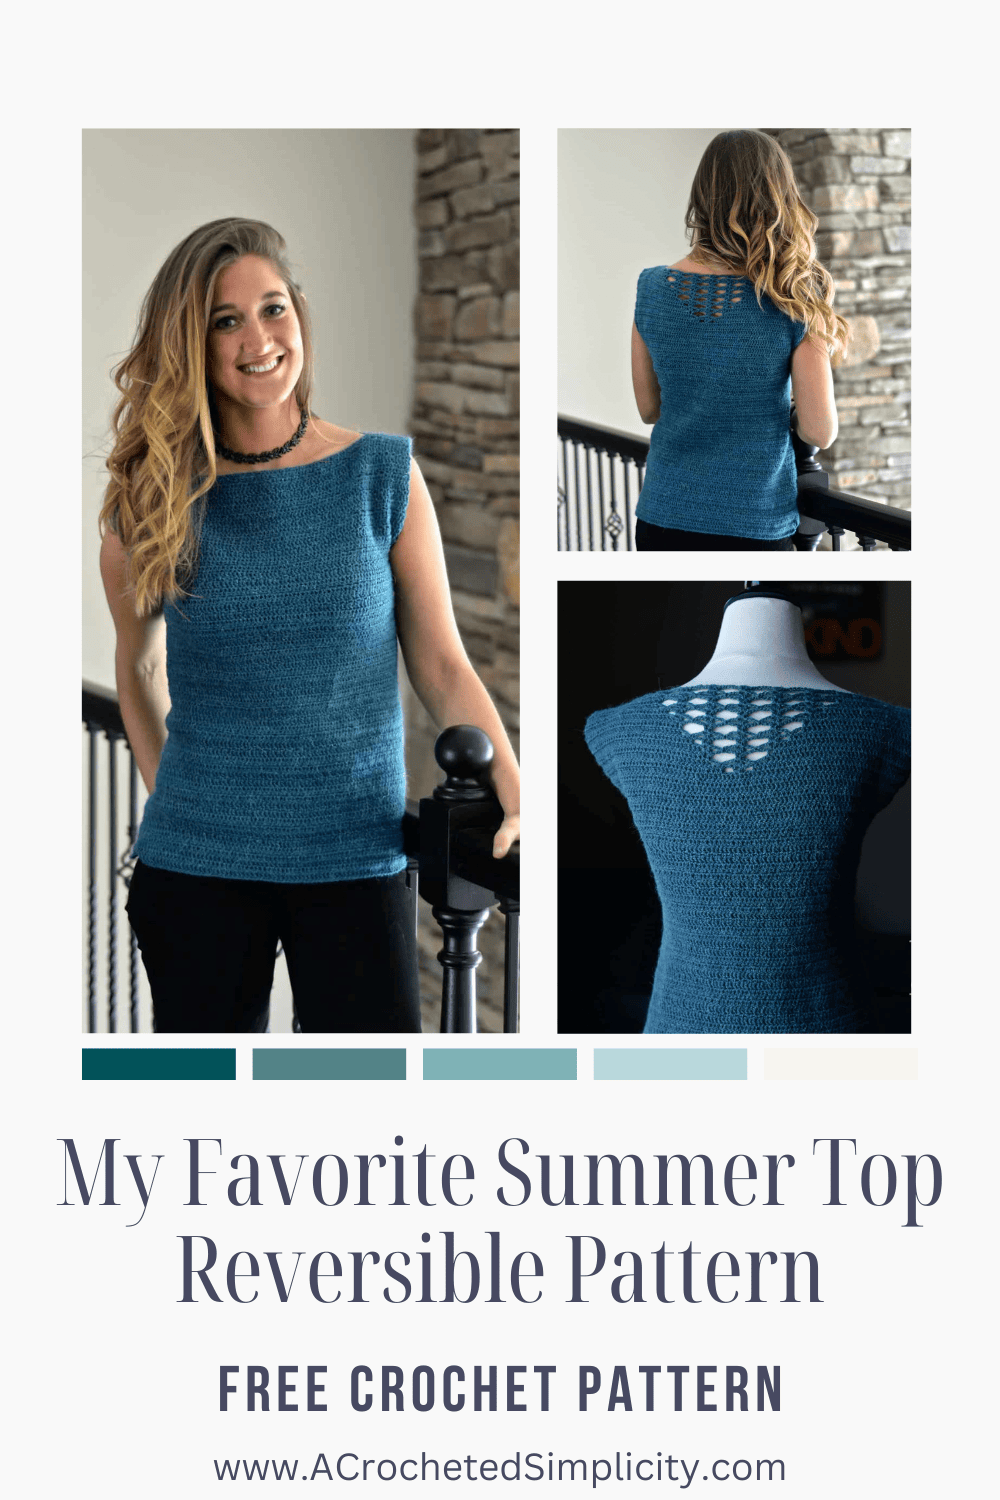
My Favorite Summer Top – Free Pattern
The crochet pattern for summer top is below, but if you love to work offline, or need to order your yarn, I’ve got a couple other great options for you.
Purchase the ad-free, printable PDF, including all photo tutorials, + a BONUS stitch chart & garment schematic, on Ravelry, or Etsy (aff).
This post contains affiliate links.
Materials
- Yarn: Sport Weight / 2 yarn Premier Chamonix Yarn in Tide Pool was used for the sample shown in the photos. See yardage in the size chart above.
- Crochet Hooks: E/3.5mm, D/3.25mm, C/2.75mm (My favorite hooks are Clover Amour Hooks, I’ve never had an ache in my hand since switching.)
- Locking Stitch Markers
- Scissors
- Tapestry Needle
Abbreviations (US Terms)
- ch(s): chain(s)
- st(s): stitch(es)
- sl st(s): slip stitch(es)
- sc: single crochet
- dc: double crochet
- dc2tog: double crochet decrease
- Alt-dc: alternate double crochet
- Join yarn with a standing single crochet
- Join yarn with a standing double crochet
- sp(s): space(s)
- yo: yarn over
- Rep: repeat
- Rnd: round
Experience Level
- Easy
Gauge
- Back Panel, in dc with a 3.25mm hook: 26 sts = 5″; 7 rows = 2.25″
- Front Panel & Body (see gauge swatch instructions below)
Sizes
- Women’s XS through 4XL
- See size chart above.
Special Stitches
- Double Crochet Decrease (dc2tog): (Yo, insert hook in next st, yo, pull up a loop, yo, pull thru 2 loops on hook) twice, yo, pull thru remaining 3 loops on hook.
- Alternate Double Crochet (Alt-dc): After turning your work, do not ch, instead, insert your hook into the first st, yo, pull up a loop, yo, pull thru both loops, insert your hook between the legs of the st just made, (yo, pull up a loop) twice, yo, pull thru remaining loops.
- Join yarn with a standing sc: When instructed to “Join with a standing sc”, begin with a slip knot on your hook. Insert your hook into the stitch or space indicated, yo, pull up a loop, yo and draw thru both loops on hook.
- Join yarn with a standing double crochet: When instructed to “Join with a standing dc”, begin with a slip knot on your hook. YO, insert your hook into the stitch or space indicated, yo, pull up a loop, yo, pull through 2 loops on your hook, yo, pull through remaining 2 loops on your hook.
Pattern Notes
- Beginning chain(s) are not included in stitch count, unless noted otherwise.
- This lightweight crochet top was designed to have the openwork in the back, but it is a reversible top and you could wear it with the openwork in the front, if you choose. There are modeled photos of both options at the bottom of this post.
- Premier Yarns Chamonix in Tide Pool was used for the sample in the photos. Fine/Sport (2) Weight Yarn / 80% Acrylic/10% Mohair / 10% Polyamide (380 yards / 348 m / 3 oz / 85 g)
- Yardage: Refer to the Size Chart above.
- Changes for Sizes are written as follows: XS (S, M, L, XL, 2XL, 3XL, 4XL) unless noted otherwise.
- Stitch Counts are written at the end of the rows as follows: (XS, S, M, L, XL, 2XL, 3XL, 4XL) unless noted otherwise.
- Construction Notes: You’ll first crochet the upper back panel which has the openwork lace crochet stitch pattern. After completing the upper back panel, you’ll continue working along the top edge of the back panel to begin the shoulders and neck opening of the front upper panel. The front upper panel is then worked down to the bottom of the armhole opening. At this point, you’ll work a round to join the front and back panels, then continue working in joined and turned rounds to complete the body of the top. Once you near the bottom of the top, you will create a split hem.
Gauge Swatch for Front Panel & Body
Gauge: 26 sts = 5″; 15 rows = 4″
Row 1: With yarn & a 3.50mm crochet hook, ch 29, switch to a 3.25mm crochet hook, dc in 3rd ch from your hook, dc in each remaining ch across. Turn. (27 sts)
Row 2: Alt-dc, dc in each st across. Turn. (27 sts)
Row 3: Ch 1, sc in the first st, *ch 1, skip the next st, sc in the next st, rep from * across. Turn. (27 sts)
Row 4: Alt-dc, dc in each st and ch-1 sp across. Turn. (27 sts)
Row 5: Alt-dc, dc in each st across. Turn. (27 sts)
Rows 6 – 15: Rep Rows 3 – 5, ending with a Row 3 repeat. (27 sts)
Finished Size: 5.2″ W x 4″ H.
Upper Back Panel
Note: Row 1 is the bottom of the back panel. As you work the panel, you’re working from the bottom of the armhole opening up towards the shoulders.
Row 1: With yarn & a 3.50mm crochet hook, ch 81 (91, 101, 111, 121, 133, 143, 153), switch to a 3.25mm crochet hook, working into the back humps of the foundation ch, dc in the 3rd ch from your hook and in each ch across. Turn. (79, 89, 99, 109, 119, 131, 141, 151 sts)
Place a stitch marker into the bottom of each of the first and last stitches of Row 1.
Rows 2 – 6 (8, 9, 9, 9, 11, 12, 13): Alt-dc in the first st, dc in each remaining st across. Turn. (79, 89, 99, 109, 119, 131, 141, 151 sts)
Do not fasten off. Continue on to the Openwork Section.
Openwork Section
Row 1: Alt-dc in the first st, dc in each of the next 35 (40, 45, 50, 55, 61, 67, 71) sts, ch 2, skip each of the next 3 sts, (dc, ch 1, dc) in the next st, ch 2, skip each of the next 3 sts, dc in each remaining st across. Turn. (79, 89, 99, 109, 119, 131, 141, 151 sts)
Row 2: Alt-dc in the first st, dc in each of the next 32 (37, 42, 47, 52, 58, 64, 68) sts, ch 3, skip each of the next 2 sts, sl st in the next st, ch 3, (dc, ch 1, dc) in the next ch-1 sp, ch 3, skip the next dc & ch-2 sp, sl st in the next st, ch 3, skip each of the next 2 sts, dc in the next st, dc in each remaining st across. Turn.
Row 3: Alt-dc in the first st, dc in each of the next 31 (36, 41, 46, 51, 57, 63, 67) sts, ch 1, dc in the next st, ch 6, (dc, ch 1, dc) in the next ch-1 sp, ch 6, skip the next dc and 2 ch-3 sps, dc in the next dc, ch 1, dc in the next st, dc in each remaining st across. Turn.
Row 4: Alt-dc in the first st, dc in each of the next 30 (35, 40, 45, 50, 56, 62, 66) sts, skip the next st, * (dc, ch 1, dc) in the next ch-1 sp, ch 3, sl st in the next ch-6 sp, ch 3, rep from *, then (dc, ch 1, dc) in the next ch-1 sp, skip the next dc, dc in the next st, dc in each remaining st across. Turn.
Row 5: Alt-dc in the first st, dc in each of the next 28 (33, 38, 43, 48, 54, 60, 64) sts, ch 2, skip each of the next 3 sts, * (dc, ch 1, dc) in the next ch-1 sp, ch 6, rep from *, then (dc, ch 1, dc) in the next ch-1 sp, ch 2, skip each of the next 3 sts, dc in the next st, dc in each remaining st across. Turn.
Row 6: Alt-dc in the first st, dc in each of the next 25 (30, 35, 40, 45, 51, 57, 61) sts, ch 3, skip each of the next 2 sts, sl st in the next st, * ch 3, (dc, ch 1, dc) in the next ch-1 sp, ch 3, sl st in the next ch-6 sp, rep from *, then ch 3, (dc, ch 1, dc) in the next ch-1 sp, ch 3, skip the next dc & ch-2 sp, sl st in the next st, ch 3, skip each of the next 2 sts, dc in the next st, dc in each remaining st across. Turn.
Row 7: Alt-dc in the first st, dc in each of the next 24 (29, 34, 39, 44, 50, 56, 60) sts, ch 1, dc in the next st, * ch 6, (dc, ch 1, dc) in the next ch-1 sp, rep from * twice, then ch 6, skip the next dc and 2 ch-3 sps, dc in the next dc, ch 1, dc in the next st, dc in each remaining st across. Turn.
Row 8: Alt-dc in the first st, dc in each of the next 23 (28, 33, 38, 43, 49, 55, 59) sts, skip the next st, * (dc, ch 1, dc) in the next ch-1 sp, ch 3, sl st in the next ch-6 sp, ch 3, rep from * 3 times, then (dc, ch 1, dc) in the next ch-1 sp, skip the next dc, dc in the next st, dc in each remaining st across. Turn.
Row 9: Alt-dc in the first st, dc in each of the next 21 (26, 31, 36, 41, 47, 53, 57) sts, ch 2, skip each of the next 3 sts, * (dc, ch 1, dc) in the next ch-1 sp, ch 6, rep from * 3 times, then (dc, ch 1, dc) in the next ch-1 sp, ch 2, skip each of the next 3 sts, dc in the next st, dc in each remaining st across. Turn.
Row 10: Alt-dc in the first st, dc in each of the next 18 (23, 28, 33, 38, 44, 50, 54) sts, ch 3, skip each of the next 2 sts, sl st in the next st, * ch 3, (dc, ch 1, dc) in the next ch-1 sp, ch 3, sl st in the next ch-6 sp, rep from * 3 times, then ch 3, (dc, ch 1, dc) in the next ch-1 sp, ch 3, skip the next dc & ch-2 sp, sl st in the next st, ch 3, skip each of the next 2 sts, dc in the next st, dc in each remaining st across. Turn.
Row 11: Alt-dc in the first st, dc in each of the next 17 (22, 27, 32, 37, 43, 49, 53) sts, ch 1, dc in the next st, * ch 6, (dc, ch 1, dc) in the next ch-1 sp, rep from * 4 times, then ch 6, skip the next dc and 2 ch-3 sps, dc in the next dc, ch 1, dc in the next st, dc in each remaining st across. Turn.
Row 12: Alt-dc in the first st, dc in each of the next 16 (21, 26, 31, 36, 42, 48, 52) sts, skip the next st, * (dc, ch 1, dc) in the next ch-1 sp, ch 3, sl st in the next ch-6 sp, ch 3, rep from * 5 times, then (dc, ch 1, dc) in the next ch-1 sp, skip the next dc, dc in the next st, dc in each remaining st across. Turn.
Row 13: Alt-dc in the first st, dc in each of the next 14 (19, 24, 29, 34, 40, 46, 50) sts, ch 2, skip each of the next 3 sts, * (dc, ch 1, dc) in the next ch-1 sp, ch 6, rep from * 5 times, then (dc, ch 1, dc) in the next ch-1 sp, ch 2, skip each of the next 3 sts, dc in the next st, dc in each remaining st across. Turn.
Sizes XS & S: Continue on to Upper Front Panel. All other sizes continue on to the next row.
Row 14: Alt-dc in the first st, dc in each of the next — (–, 21, 26, 31, 37, 43, 47) sts, ch 3, skip each of the next 2 sts, sl st in the next st, * ch 3, (dc, ch 1, dc) in the next ch-1 sp, ch 3, sl st in the next ch-6 sp, rep from * 5 times, then ch 3, (dc, ch 1, dc) in the next ch-1 sp, ch 3, skip the next dc & ch-2 sp, sl st in the next st, ch 3, skip each of the next 2 sts, dc in the next st, dc in each remaining st across. Turn.
Row 15: Alt-dc in the first st, dc in each of the next — (–, 20, 25, 30, 36, 42, 46) sts, ch 1, dc in the next st, * ch 6, (dc, ch 1, dc) in the next ch-1 sp, rep from * 6 times, then ch 6, skip the next dc and 2 ch-3 sps, dc in the next dc, ch 1, dc in the next st, dc in each remaining st across. Turn.
Sizes M & L: Continue on to Upper Front Panel. All other sizes continue on to the next row.
Row 16: Alt-dc in the first st, dc in each of the next — (–, –, –, 29, 35, 41, 45) sts, skip the next st, * (dc, ch 1, dc) in the next ch-1 sp, ch 3, sl st in the next ch-6 sp, ch 3, rep from * 7 times, then (dc, ch 1, dc) in the next ch-1 sp, skip the next dc, dc in the next st, dc in each remaining st across. Turn.
Row 17: Alt-dc in the first st, dc in each of the next — (–, –, –, 27, 33, 39, 43) sts, ch 2, skip each of the next 3 sts, * (dc, ch 1, dc) in the next ch-1 sp, ch 6, rep from * 7 times, then (dc, ch 1, dc) in the next ch-1 sp, ch 2, skip each of the next 3 sts, dc in the next st, dc in each remaining st across. Turn.
Sizes XL, 2XL, 3XL & 4XL: Continue on to Upper Front Panel.
Upper Front Panel
Row 1: Continuing on from the Openwork Section, alt-dc in the first st, dc in each of the next 12 (12, 15, 20, 20, 25, 31, 31) sts, ch 53 (63, 67, 67, 77, 79, 77, 87), skip across to last 13 (13, 16, 21, 21, 26, 32, 32) sts, dc in each of the last 13 (13, 16, 21, 21, 26, 32, 32) sts. Turn. (79, 89, 99, 109, 119, 131, 141, 151 sts)
Row 2: Alt-dc in the first st, dc in each remaining st and ch across. Turn. (79, 89, 99, 109, 119, 131, 141, 151 sts)
Row 3: Ch 1, sc in the first st, *ch 1, skip the next st, sc in the next st, rep from * across. Turn. (79, 89, 99, 109, 119, 131, 141, 151 sts)
Row 4: Alt-dc in the first st, dc in each remaining st and ch-1 sp across. Turn. (79, 89, 99, 109, 119, 131, 141, 151 sts)
Row 5: Alt-dc in the first st, dc in each remaining st across. Turn. (79, 89, 99, 109, 119, 131, 141, 151 sts)
Rows 6 – (22, 25, 28, 28, 31, 34, 34, 37): Rep Rows 3 – 5, ending with a Row 4 repeat. (79, 89, 99, 109, 119, 131, 141, 151 sts)
Do not fasten off. Continue on to the Body of Top.
Body of Top
Bring Row 1 of the Upper Back Panel to meet the last row of the Upper Front Panel. Use the stitch markers in the Upper Back Panel to hold the front and back panels together at each corner.
Rnd 1: Alt-dc in the first st, dc in each st across the front panel, dc in each st across the back panel to the last 2 sts, dc2tog. Join w/ a sl st to the alt-dc. Turn. (157, 177, 197, 217, 237, 261, 281, 301 sts) Leave the gap at the underarm where the stitch markers were. This adds to the armhole depth. Remove stitch markers.
Rnd 2: Ch 1, sc in the first st, *ch 1, skip the next st, sc in the next st, rep from * around. Join with a sl st to the first sc. Turn. (157, 177, 197, 217, 237, 261, 281, 301 sts)
Rnd 3: Alt-dc in teh first st, dc in each remaining st and ch-1 sp around. Join. Turn. (157, 177, 197, 217, 237, 261, 281, 301 sts)
Rnd 4: Alt-dc in the first st, dc in each remaining st around. Join. Turn. (157, 177, 197, 217, 237, 261, 281, 301 sts)
Do not fasten off. Continue on to the instructions for Top With Waist Shaping or Top Without Waist Shaping, depending on the style you prefer to make.
Top With Waist Shaping
Repeat Rnds 2 – 4, from Body of Top, until your crochet summer top measures 8” (9”, 11”, 11”, 14”, 14”, 16″, 16″) from shoulder.
Waist Shaping: Switch to crochet hook 2.75mm (or smaller hook, if desired) and repeat Rnds 2 – 4 until top measures 14” [15”, 16”, 16”, 17”, 17”, 18″, 18″] from top of shoulder.
Hip Shaping: Switch back to crochet hook 3.25mm (or larger hook) and repeat Rnds 2 – 4, ending with a Rnd 3 repeat, until top measures 20” (21”, 21”, 22”, 22”, 22”, 23″, 23″).
Custom Length: If you prefer a longer top, continue to repeat Rnds 2 – 4 until top measures desired length less 1″ (ending with a Rnd 3 repeat).
Do not fasten off. Continue on to the Split Hem Front.
Top Without Waist Shaping
Repeat Rnds 2 – 4, from Body of Top, until top measures 20” (21”, 21”, 22”, 22”, 22”, 23″, 23″) from shoulder, ending with a Rnd 3 repeat.
Custom Length: If you prefer a longer top, continue to repeat Rnds 2 – 4 until top measures desired length less 1″ (ending with a Rnd 3 repeat).
Do not fasten off. Continue on to the Split Hem First Panel.
Split Hem First Panel
Row 1: Alt-dc in the first st, dc in each of the next 78 (88, 98, 108, 118, 130, 140, 150) sts. Turn. (79, 89, 99, 109, 119, 131, 141, 151 sts)
Rows 2 – 3: Alt-dc in the first st, dc in each remaining st across. Turn. (79, 89, 99, 109, 119, 131, 141, 151 sts)
Fasten off. Weave in ends. Continue on to the Split Hem Second Panel.
Split Hem Second Panel
Row 1: With yarn & a 3.25mm crochet hook, join yarn with a standing dc in the 80th (90th, 100th, 110th, 120th, 132nd, 142nd, 152nd) st of the last round of top before split hem, dc in each of the next 78 (88, 98, 108, 118, 130, 140, 150) sts. Turn. (79, 89, 99, 109, 119, 131, 141, 151 sts)
Rows 2 – 3: Alt-dc in the first st, dc in each remaining st across. Turn. (79, 89, 99, 109, 119, 131, 141, 151 sts)
Rnd 3: Ch 1, work 1 sc into the top of each dc and 2 sc into the side of each dc around entire hem. Join. (181, 201, 221, 241, 261, 285, 305, 325 sts)
Fasten off. Weave in ends. Continue on to Finishing Options.
Finishing Options
Professionally finish your crochet summer top by blocking it with one of three simple blocking methods.
Do you prefer a tighter fit around the armholes? If you’d like a tighter fit around the armholes, join yarn with a sc at the bottom of the underarm and sc around the opening. Stitch count is not crucial.
Small Cap Sleeve Option: Add a small cap sleeve by working 2 – 3 rounds of sc around each armhole.
Which is your favorite way to wear it? Openwork in the front or the back?
I Made It! Now What?
Pin this post!: Save this summer crochet top pattern to your Pinterest boards so that you can come back and make it again.
Leave a comment below: We love to hear your feedback.
Share Your Finished Projects on Facebook or Instagram: I love to see your finished projects! Share with us on social media and tag me @acrochetedsimplicity or use the hashtag #ACrochetedSimplicity so I can find your posts.
Join us in the Facebook Community Group
Come share your finished projects with us in the A Crocheted Simplicity Crochet Community Group on Facebook. Join us for fun community events such as crochet alongs, join in on crochet conversations, ask questions, get advice, and share your love for crochet!

More Summer Crochet Top Patterns I Think You’ll Love
More Crochet for Summer
Are you looking for more summer crochet projects? We have several more patterns for summer crochet, including crochet summer tops, crochet summer hat, crochet summer cardigan, crochet beach bags, and a crochet beach cover up.
I actually Love both! My yarn should arrive saturday! I can’t wait to try this one!
In the front!
I love this pattern so much! I did want to double check the medium instructions for row 3 in the Openwork Section Alt-dc, dc in each of the next 31 (36, 43, 46, 51, 57, 63, 67) sts, is what it states but I think it should be 41 sts not 43? I’m going to continue on assuming that the correct number is 41. Correct me if I’m wrong…
Eek! Thank you for bringing this to my attention, Katie! I’m off to edit it right now. Yes, you’re correct, Row 3 should be 41 sts for the medium and each row after is 2 sts less as well. Thanks Again!
Thanks so much!!! Glad I could help! I love this pattern so much it is gorgeous! I am making it in a khaki green
I think the open work should be on both the front and the back.
It is beautiful, nice job.
Such a cute top, Jennifer! Love the subtle waist shaping too!
Thanks, Stephanie!
Hi friend, just popping buy to use your affiliate link to buy some solar lights on Amazon. 🙂 This shirt is adorable and so is your daughter!
Thanks, Jess!!
I absolutely love this pattern. I wish it was print-friendly, but I’ll try to save it. Looks so elegant, functional, and how proud I would be to say “I made this”!
Hi Sandra – I had to remove the print friendly option because the plugin stopped working with my website’s theme. If the two cooperate again in the future, I’ll add it back. Jennifer
I think the openwork should be in the front.
If you have long hair. the beautiful work would be covered up.
I love this blouse. I like the open work in the back mainly because my hair is short. Thanks for sharing the pattern.
I stopped in a new LYS to browse around and found some yummy yarn I had to have. I asked whether they had a swatch or anything made with it so I could see how it worked up. The shop owner had made your My Favorite Summer Top with the yarn I wanted, and it was so lovely! I bought the yarn and am getting this pattern too. I might just reverse the top now and again to wear the openwork in the front and back at different times. We’re coming into fall here, but I bought a self-striping light wool blend in fall colors and thought this would be really nice under a light wrap or jacket.
That’s wonderful, Monique! Please share your finished top with us, we’d love to see!!!
Jennifer
I would really like to try this pattern using Premier DK colors. Do I need to adjust hook size for the DK weight yarn?
I love this top. I just finished making it and the pattern is so well written. I will definitely look at your other patterns. The Alt DC is my new favorite way to start a row/round. Thank you for the work you do.
want to make this lovely top this year for my summer wardrobe
On to do list for next summer🥰
I love this top! I really like the openwork in the back. I have the yarn and I can’t wait to make this lovely top! Thank You!
I can’t wait to crochet this top. I have some 2 weight yarn ant this pattern is just what I want. I was hooked when I read no seams! Thank you!!
This pattern is the one that introduced me to your beautiful work! Thank you for sharing your lovely vision and patterns 🙂
I can’t wait till I can make this one!
I’m not a fan of the open work- could the pattern be modified to match the “closed” work side?
Hi Adrienne,
Yes, it can easily be modified and worked all in the stitch pattern of the rest of the top. Instead of working the openwork stitch pattern, work the stitch pattern the same as the upper front panel.