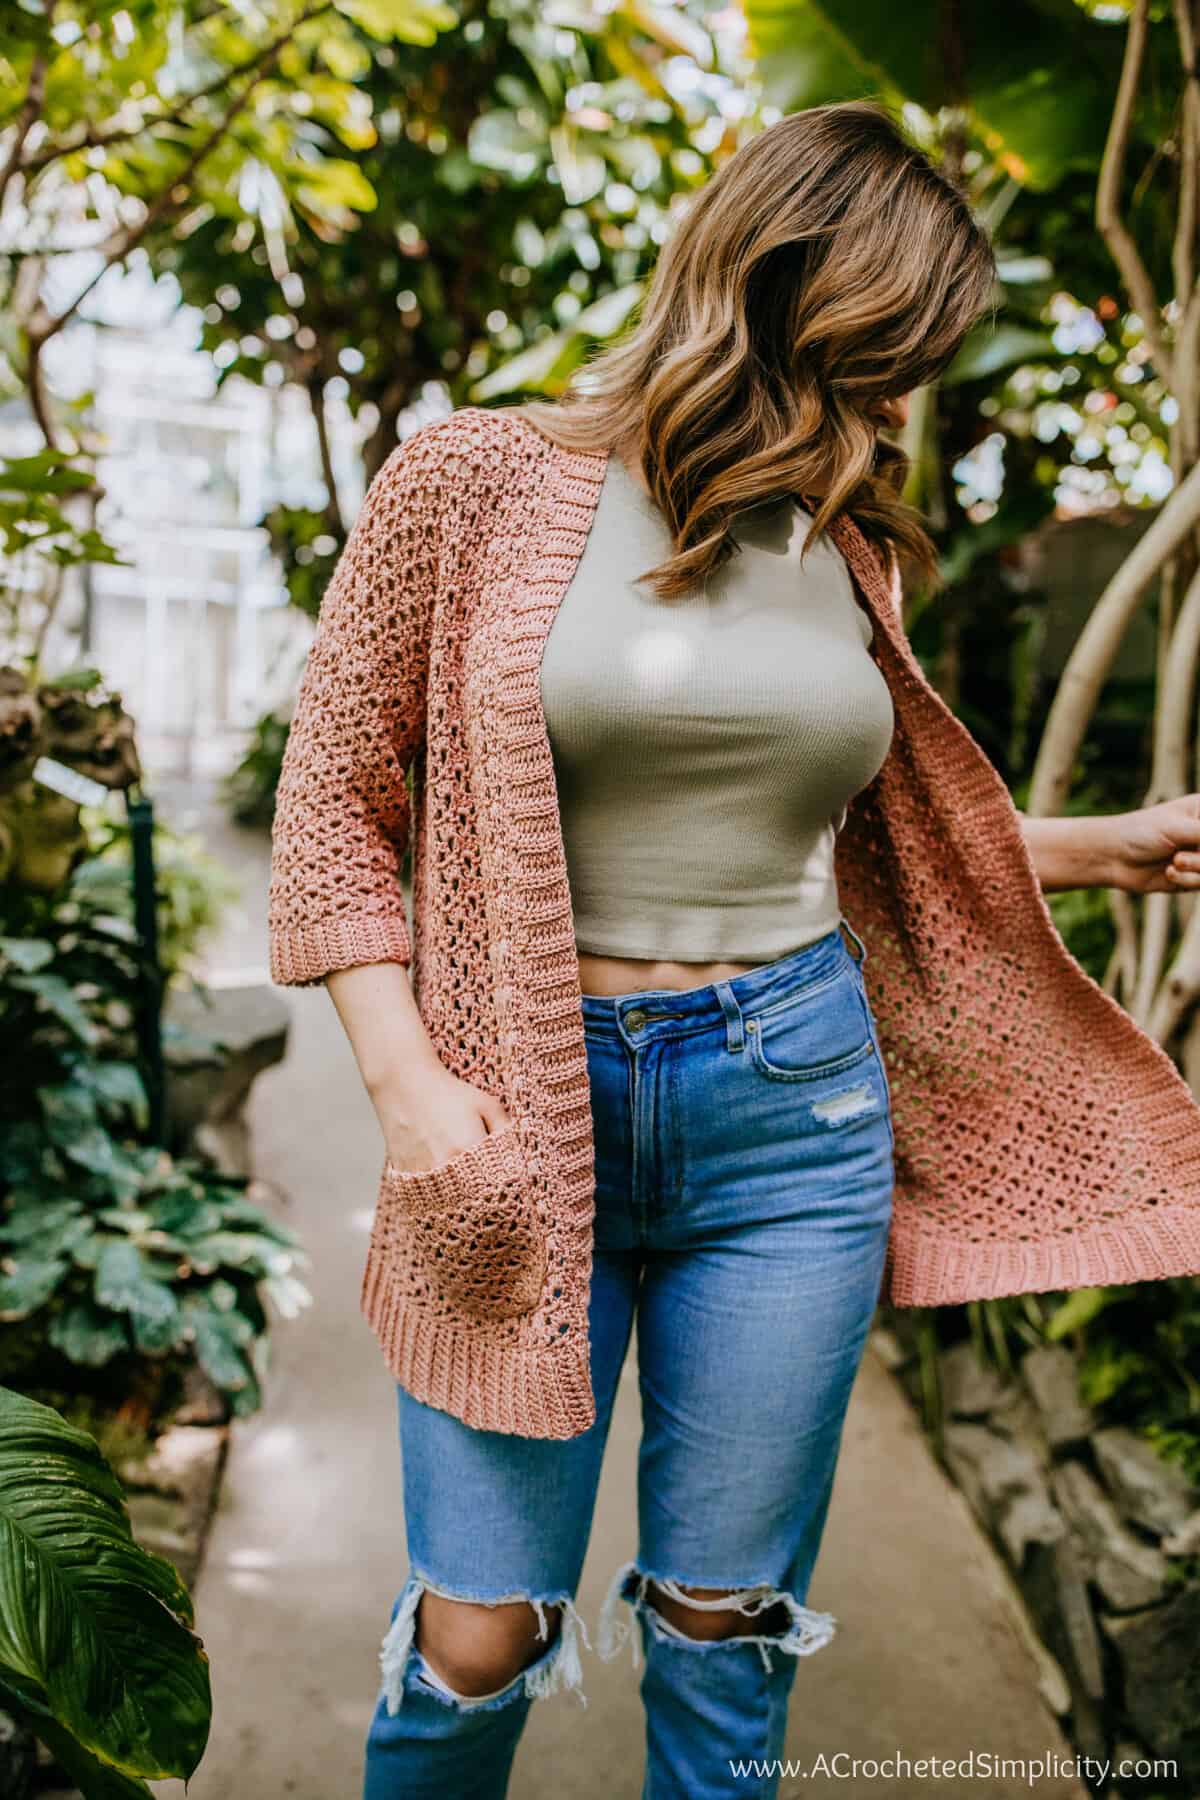
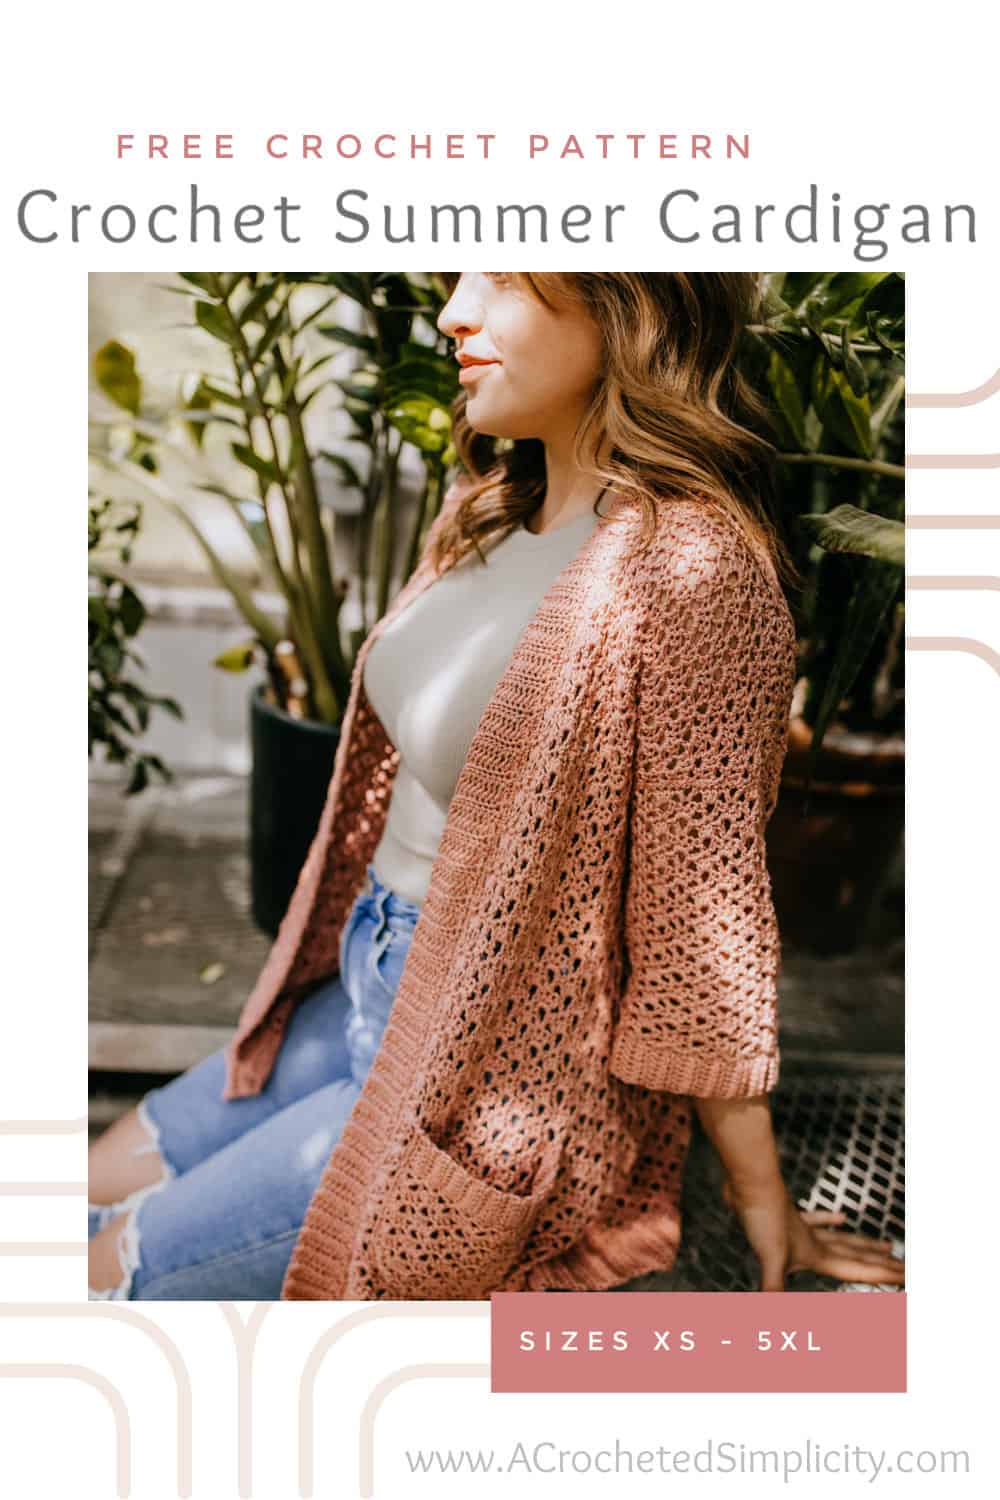
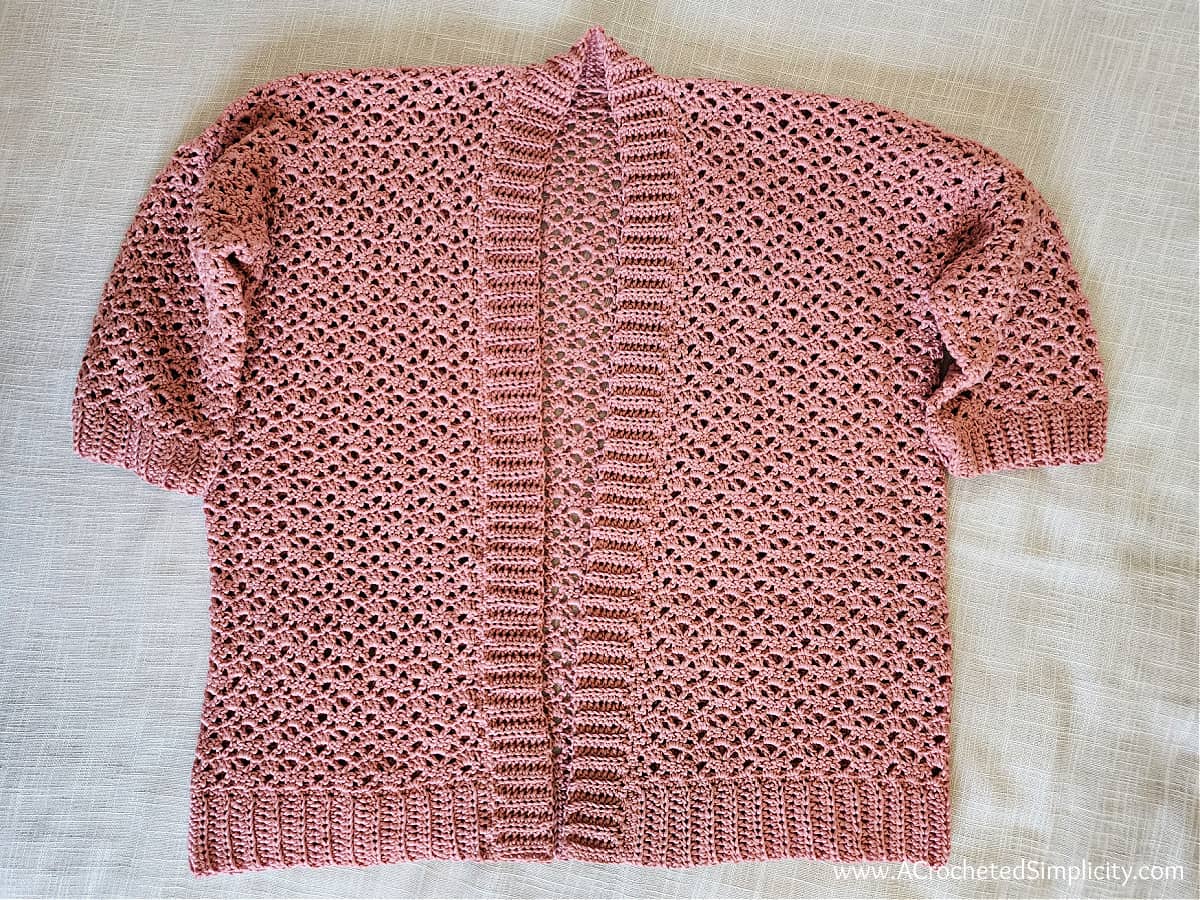
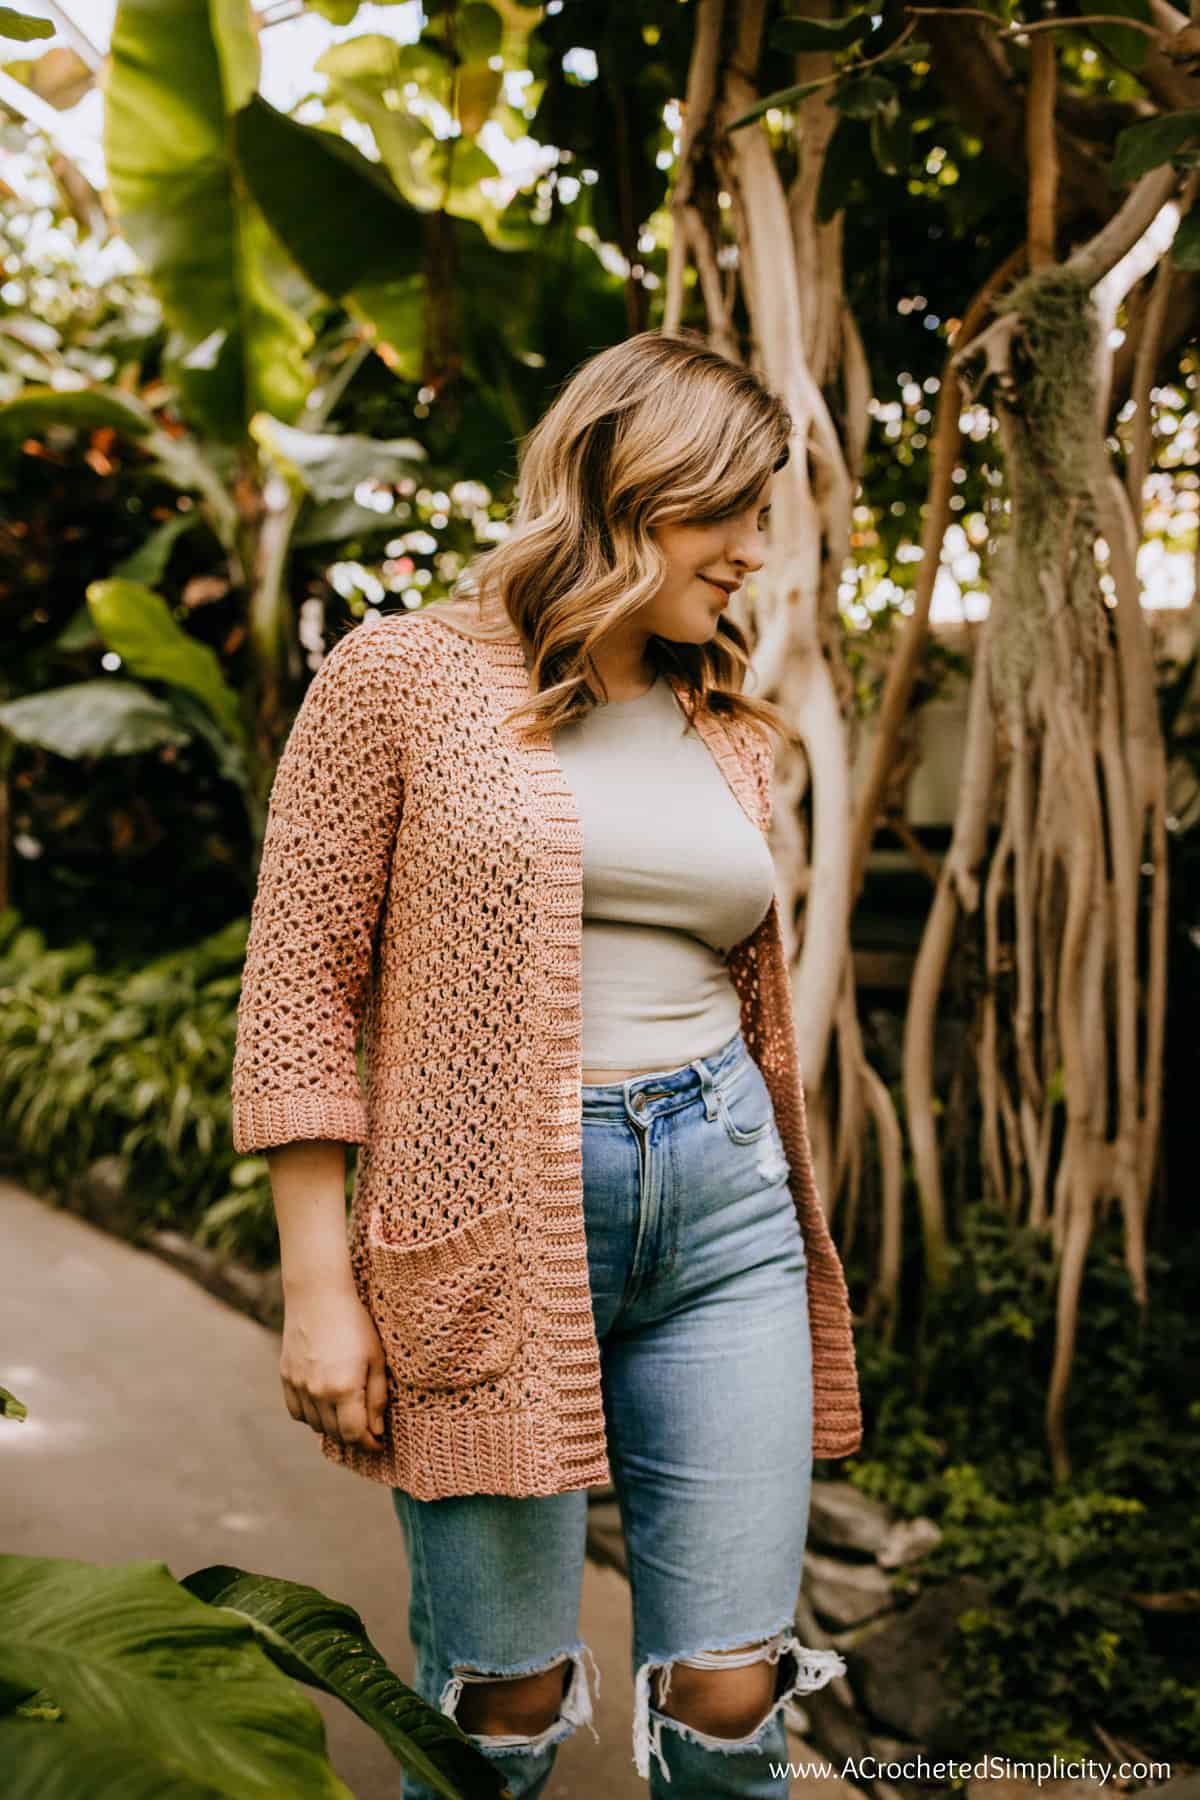
Crochet Summer Cardigan

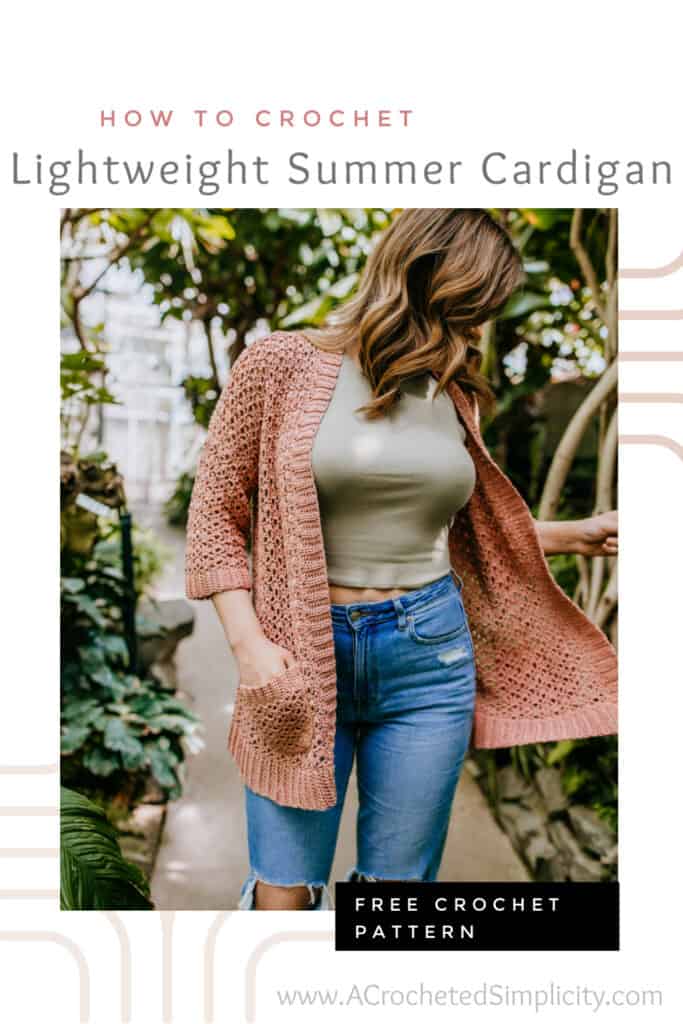


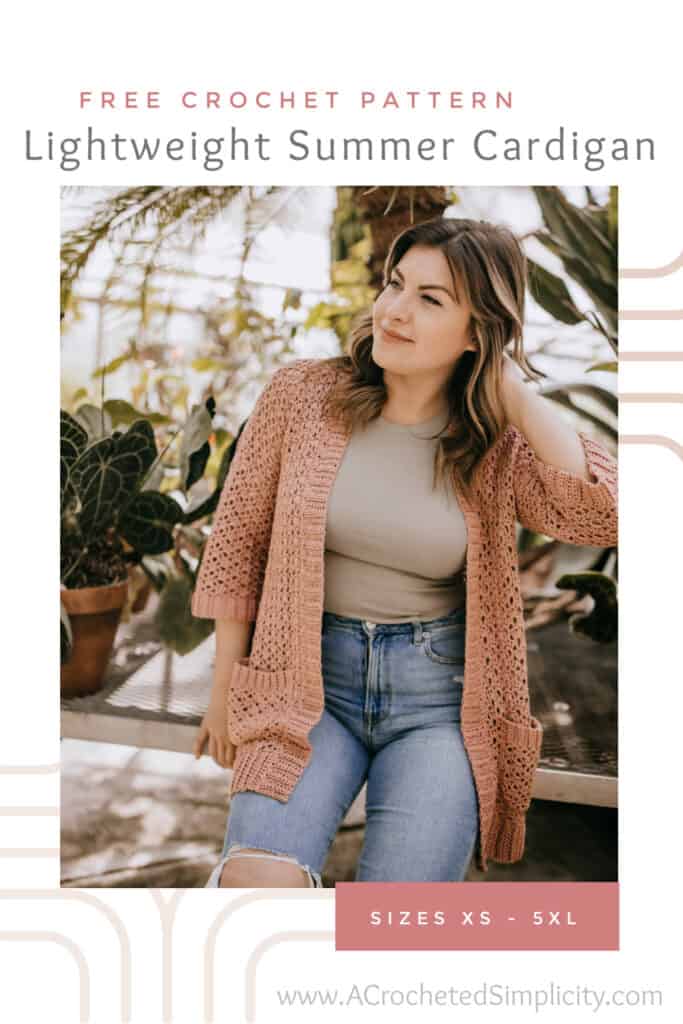


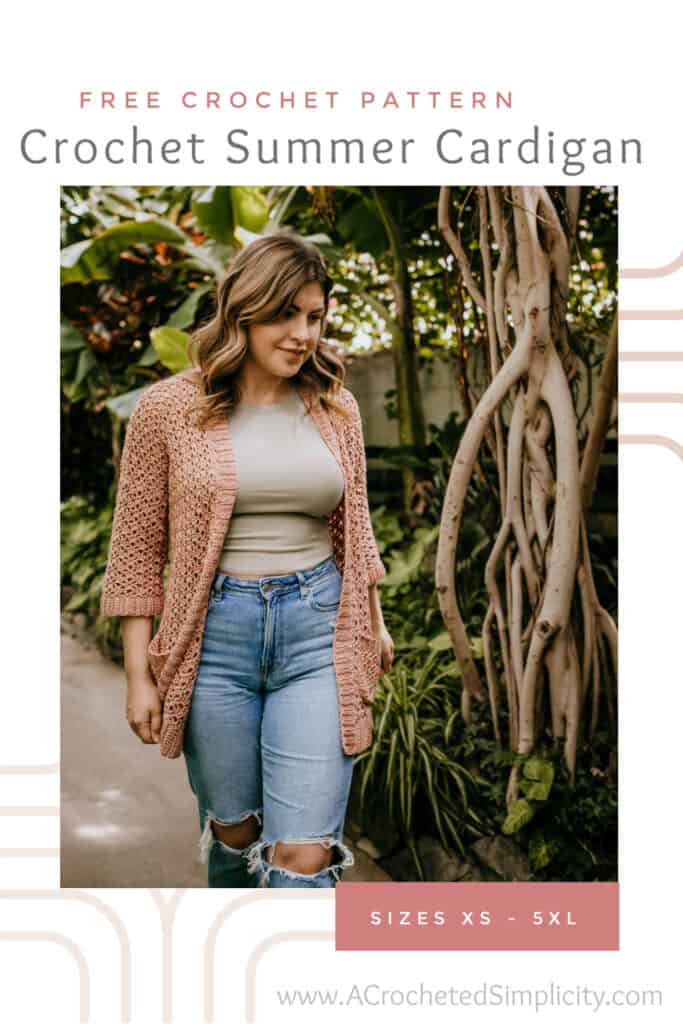
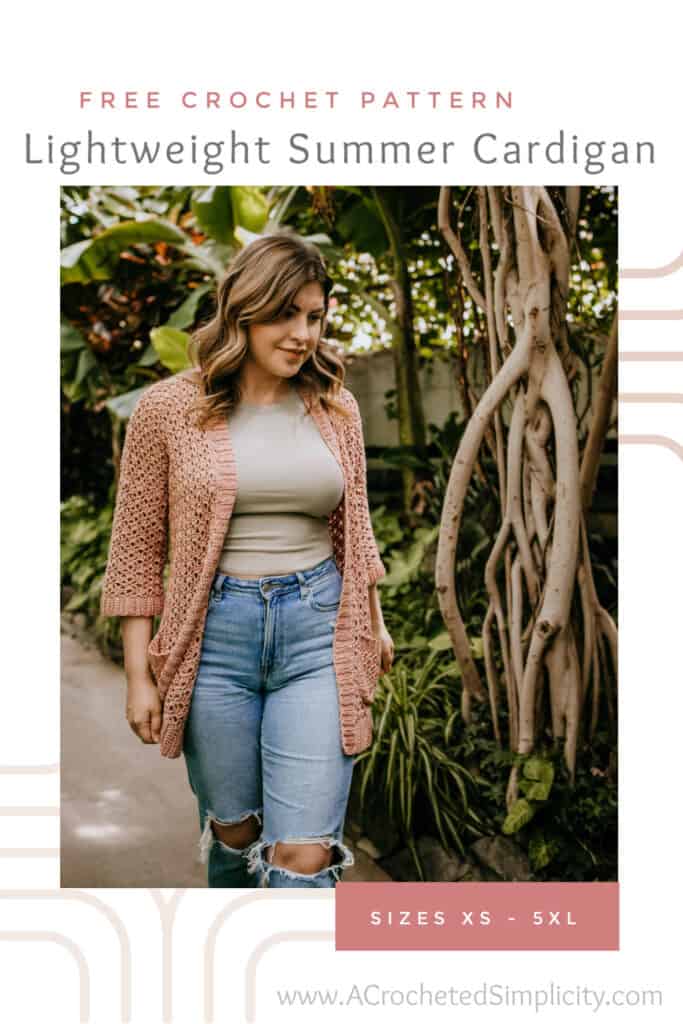
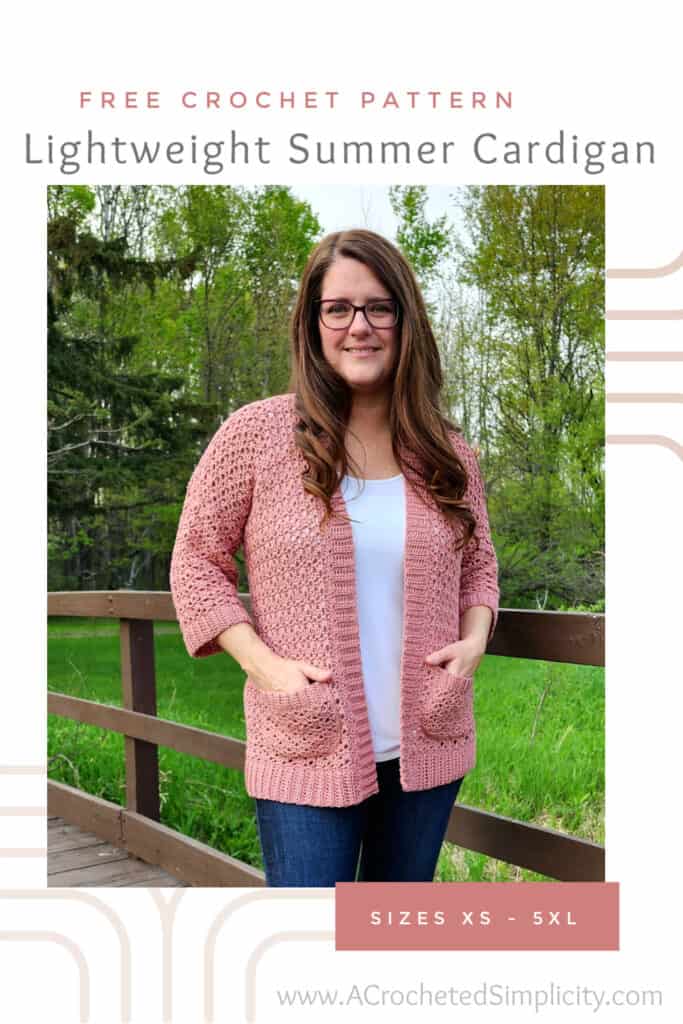

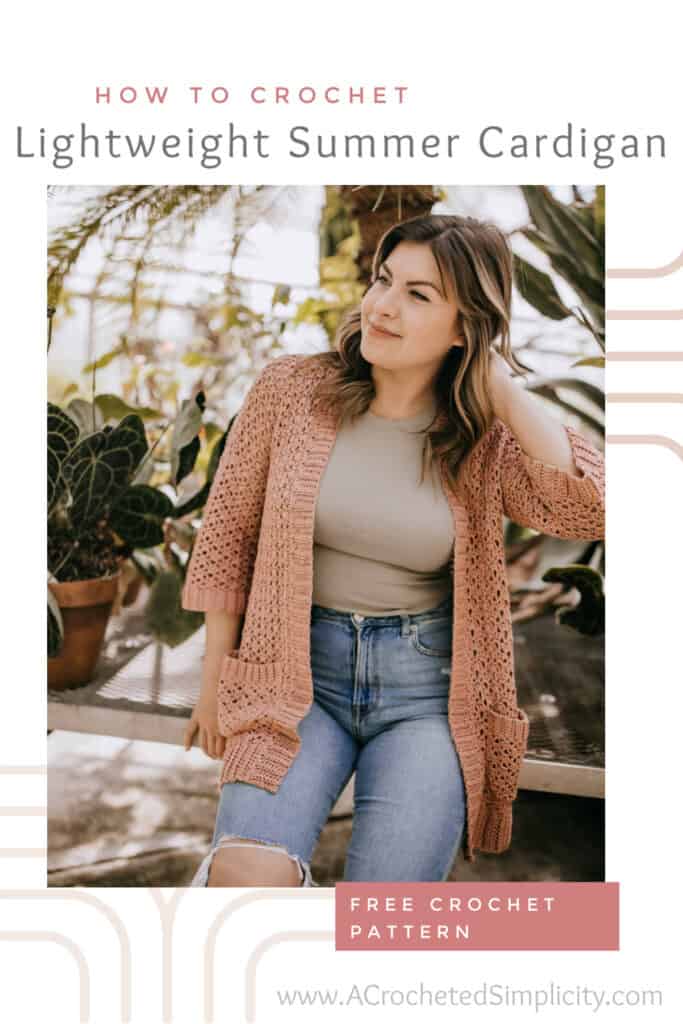

A lightweight, fashionable crochet summer cardigan is a must have summer essential!
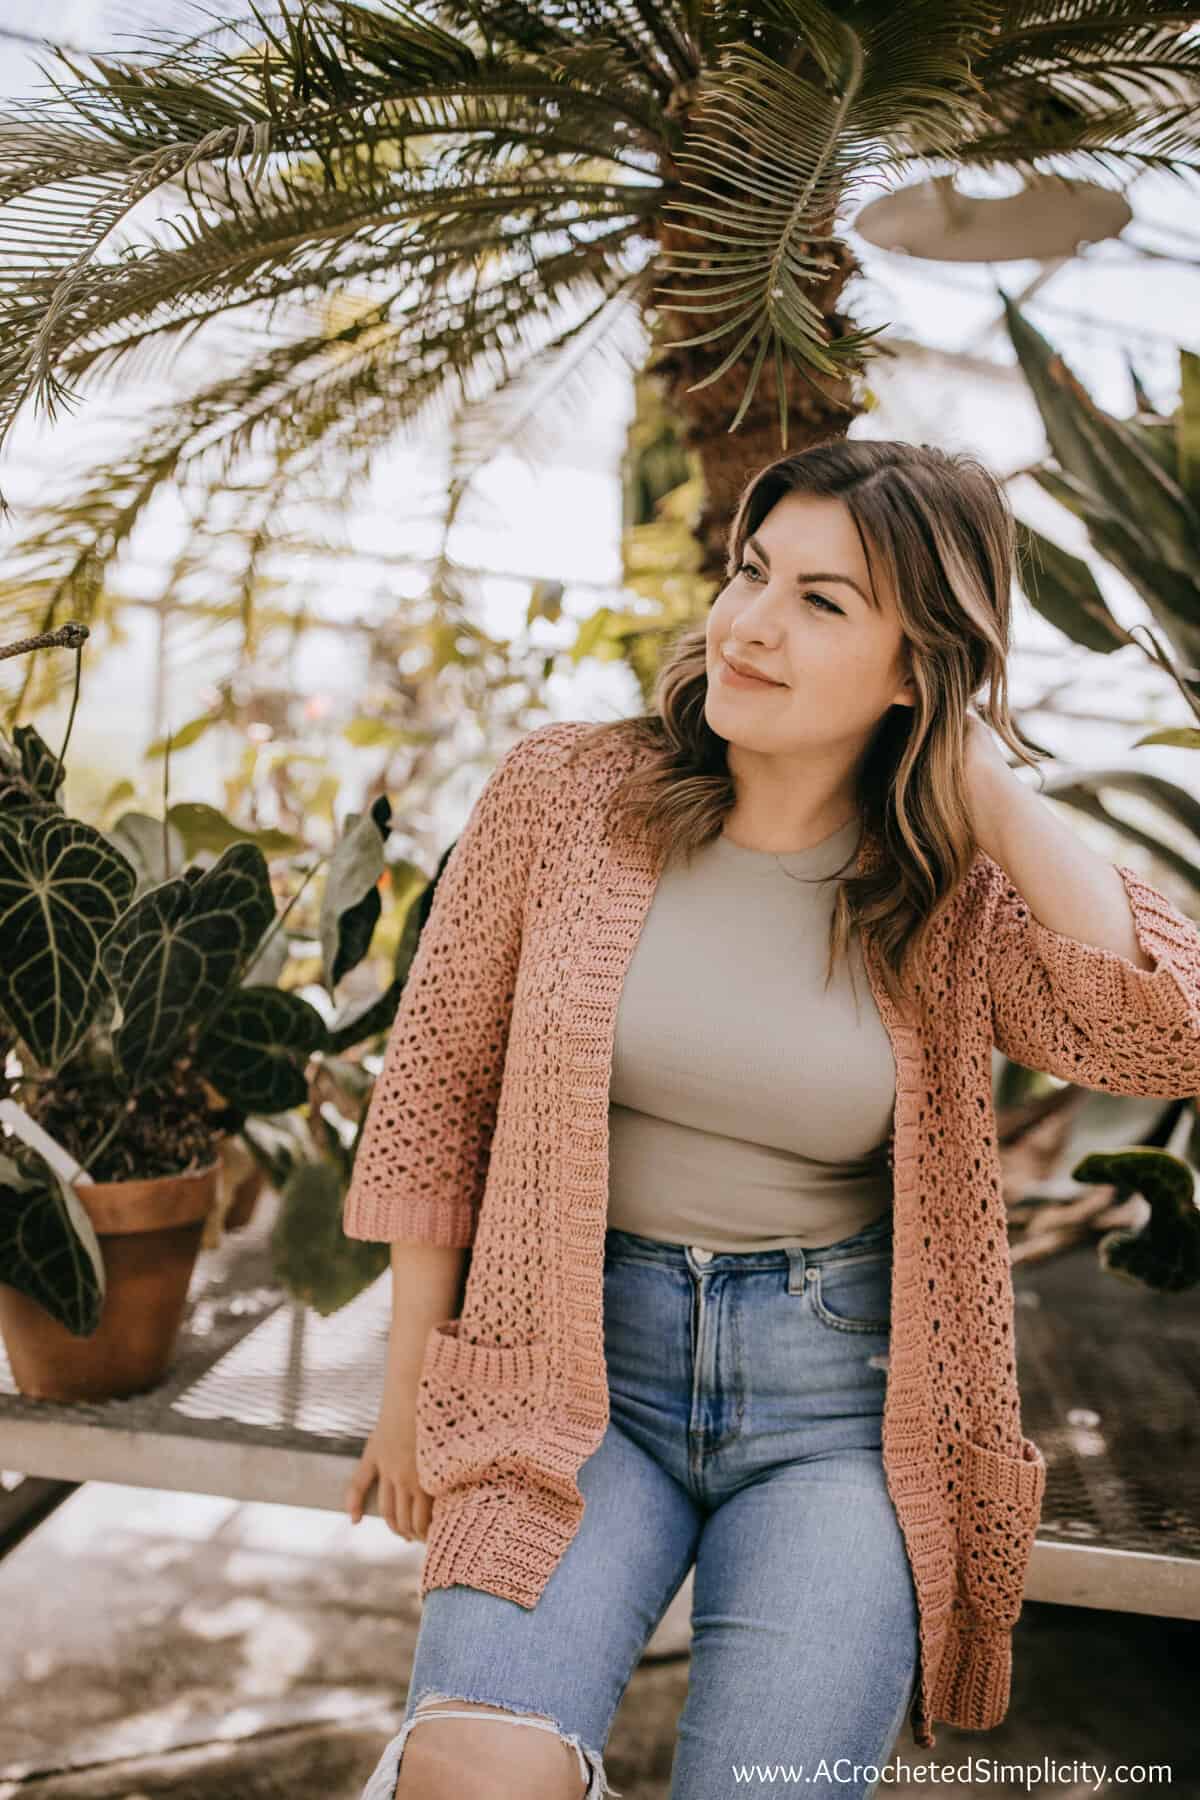
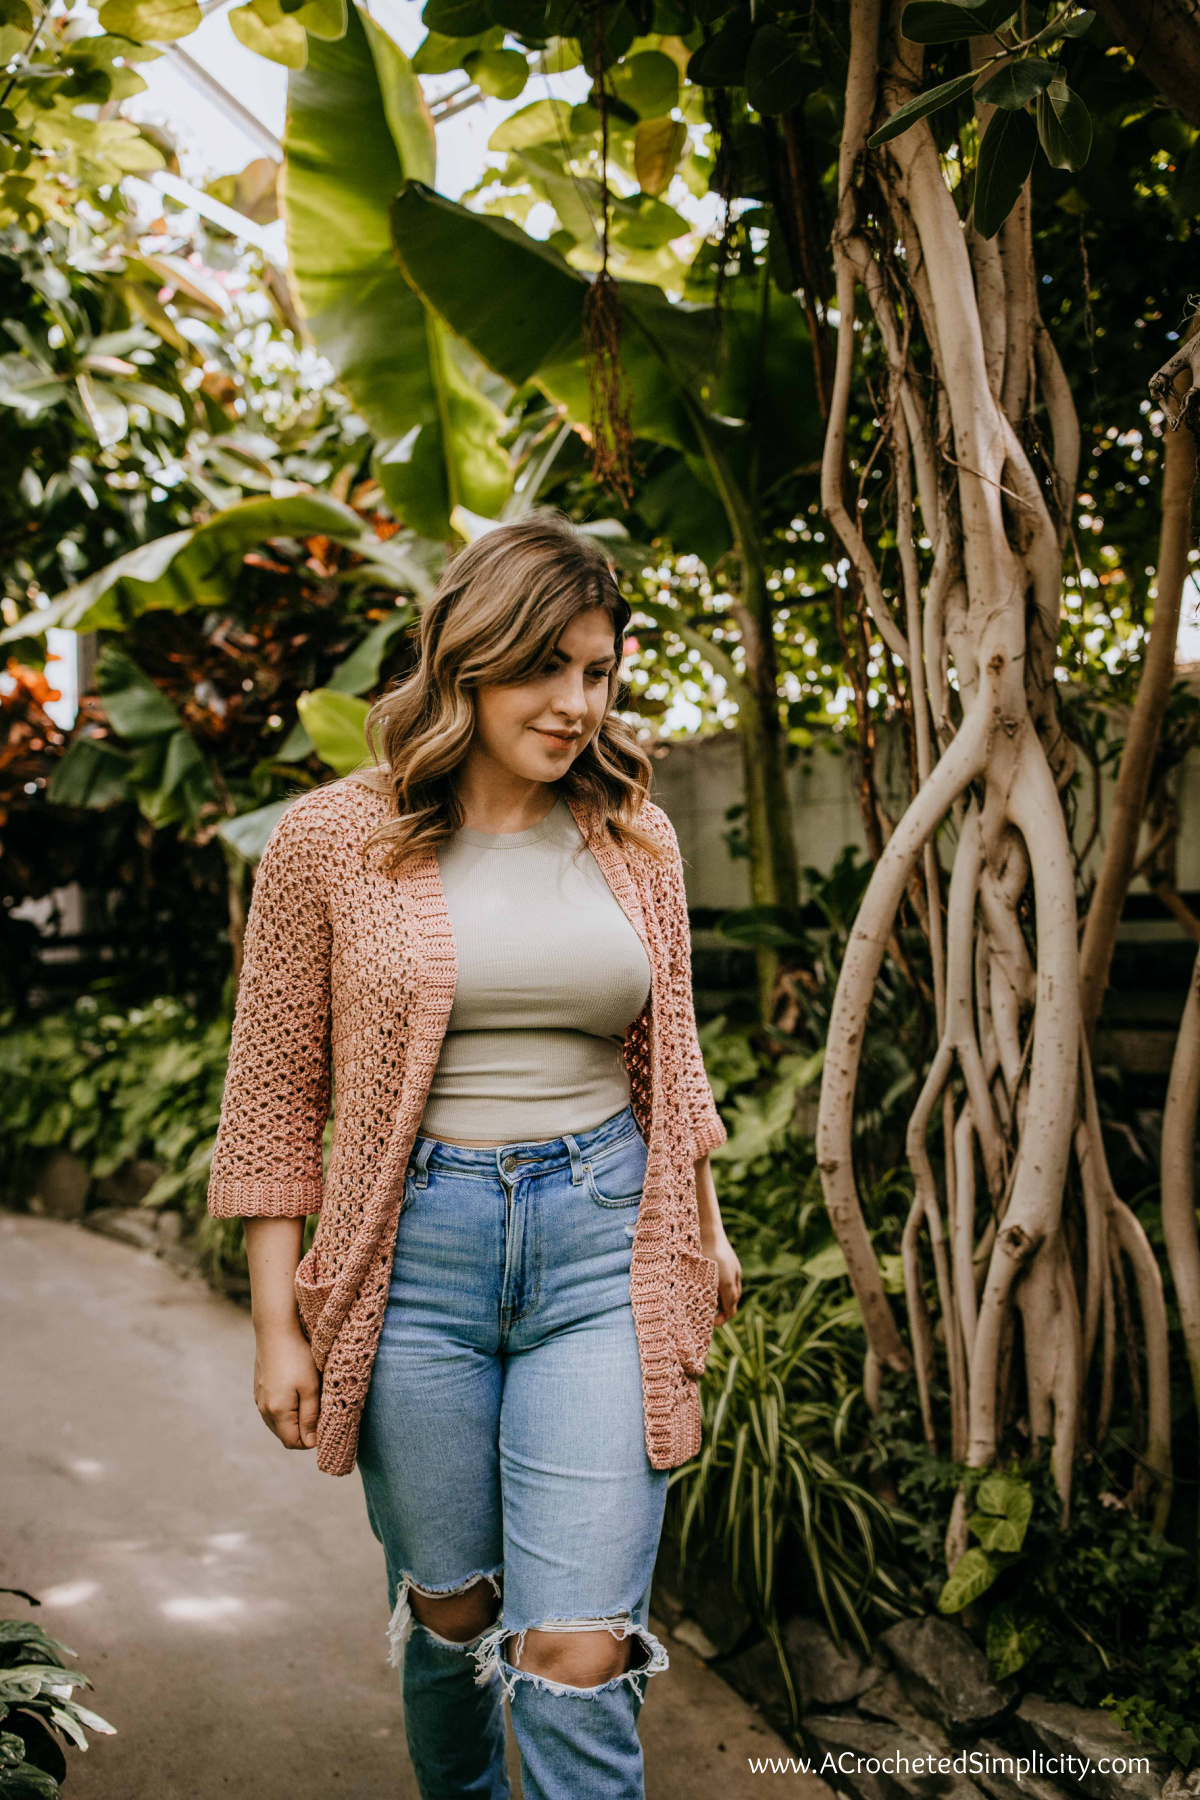
An easy crochet lace pattern, slightly oversized fit, and a soft cotton blend yarn make this crochet summer cardigan a wardrobe staple that’s perfect for the warmer months, and also one that you’ll be reaching for all year round!
You can find the free crochet cardigan pattern, for the Summer Splendor Cardigan, in this post below, or an ad-free print friendly version (including all photo tutorials) on Ravelry, or on Etsy (aff).
Your Perfect Summer Crochet Project
Do you wonder what to crochet during summer? Make yourself a crochet cardigan for summer!
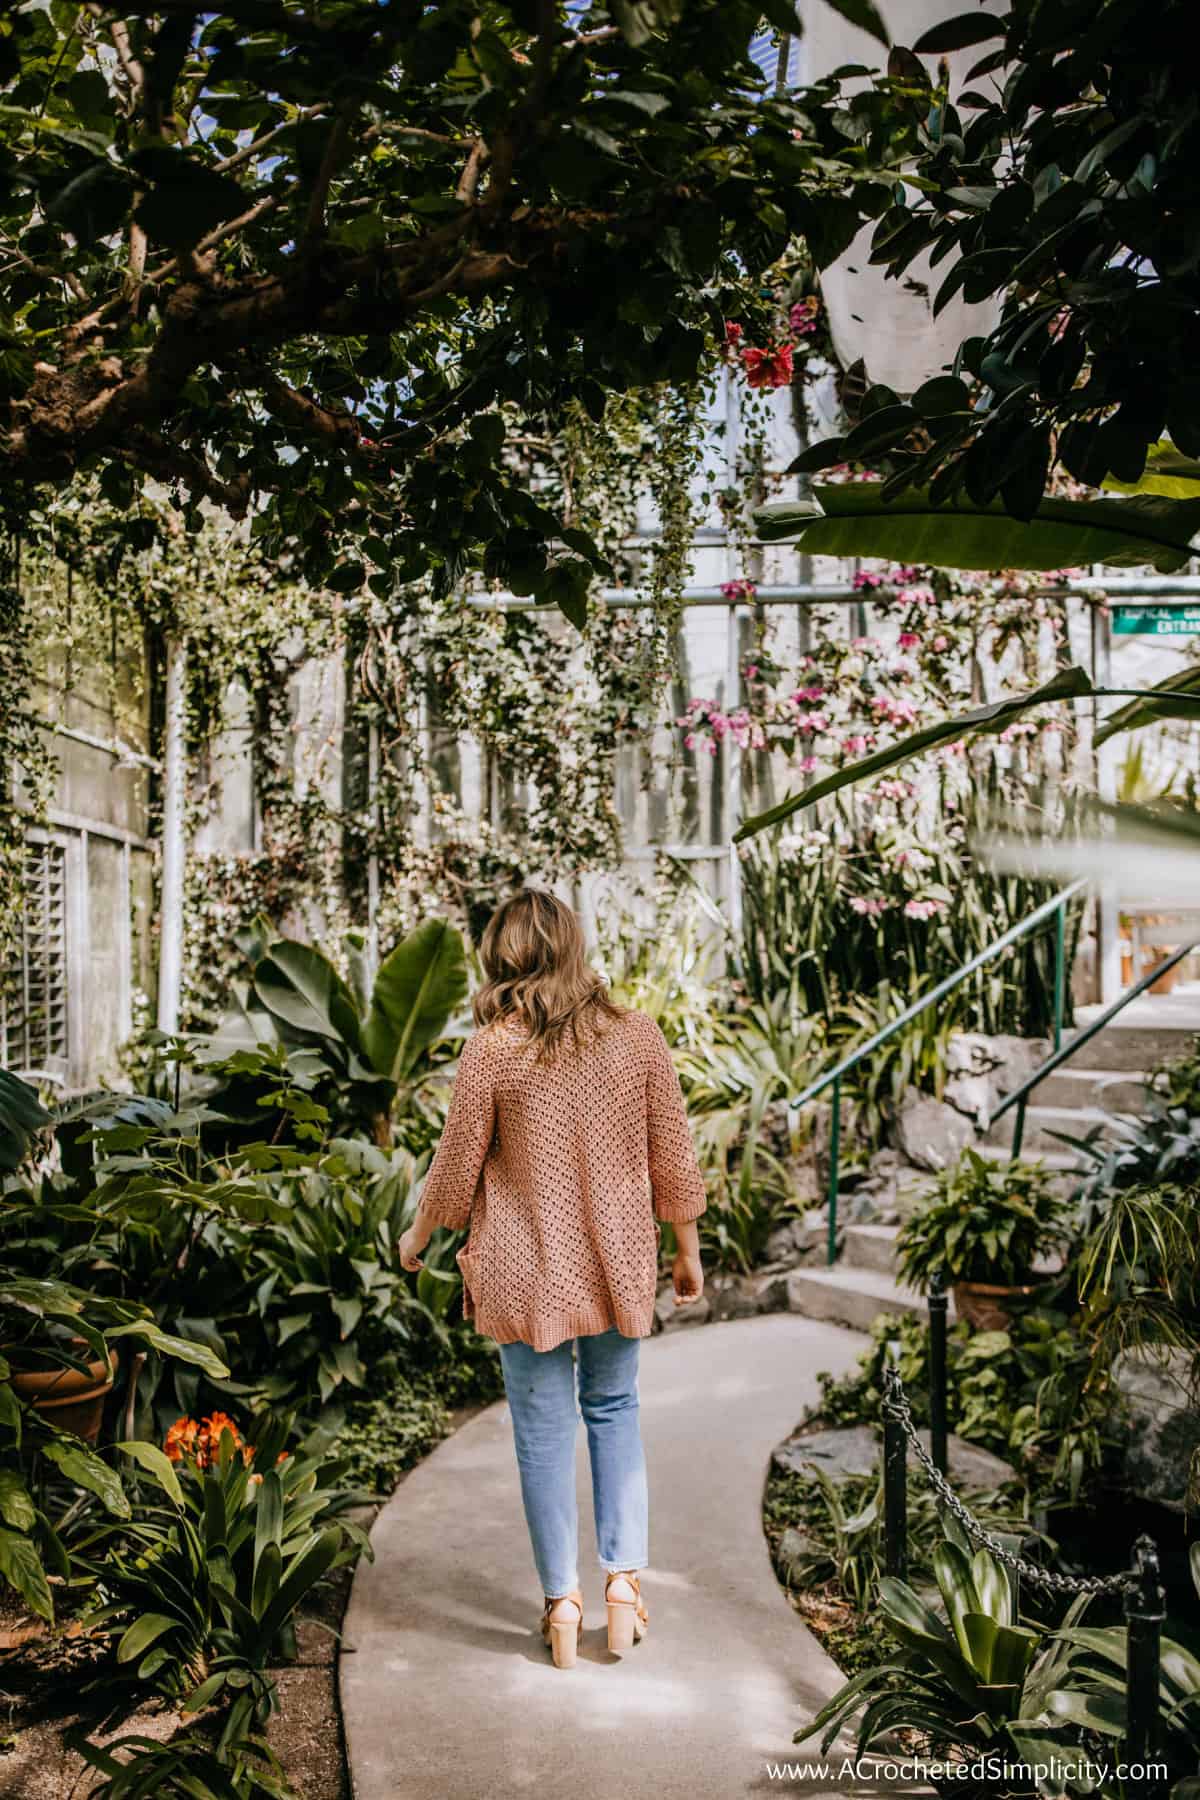
Pair it with a light tee and a skirt, shorts, or jeans for a casual summer vibe. Or, wear it over a sundress on a chilly summer night.
This summer crochet cardigan is the perfect layering piece. You’ll want to keep it with you all summer long.
Cardigans are like bags. I keep trying to convince my husband that one can never have too many!
Lightweight crochet summer tops and swim cover ups are also a lot of fun to crochet during summer.
Garment Construction
If you’re in search of the perfect crochet cardigan for summer, this one is an easy summer crochet project to make and I’ve included several tutorial photos to help along the way!
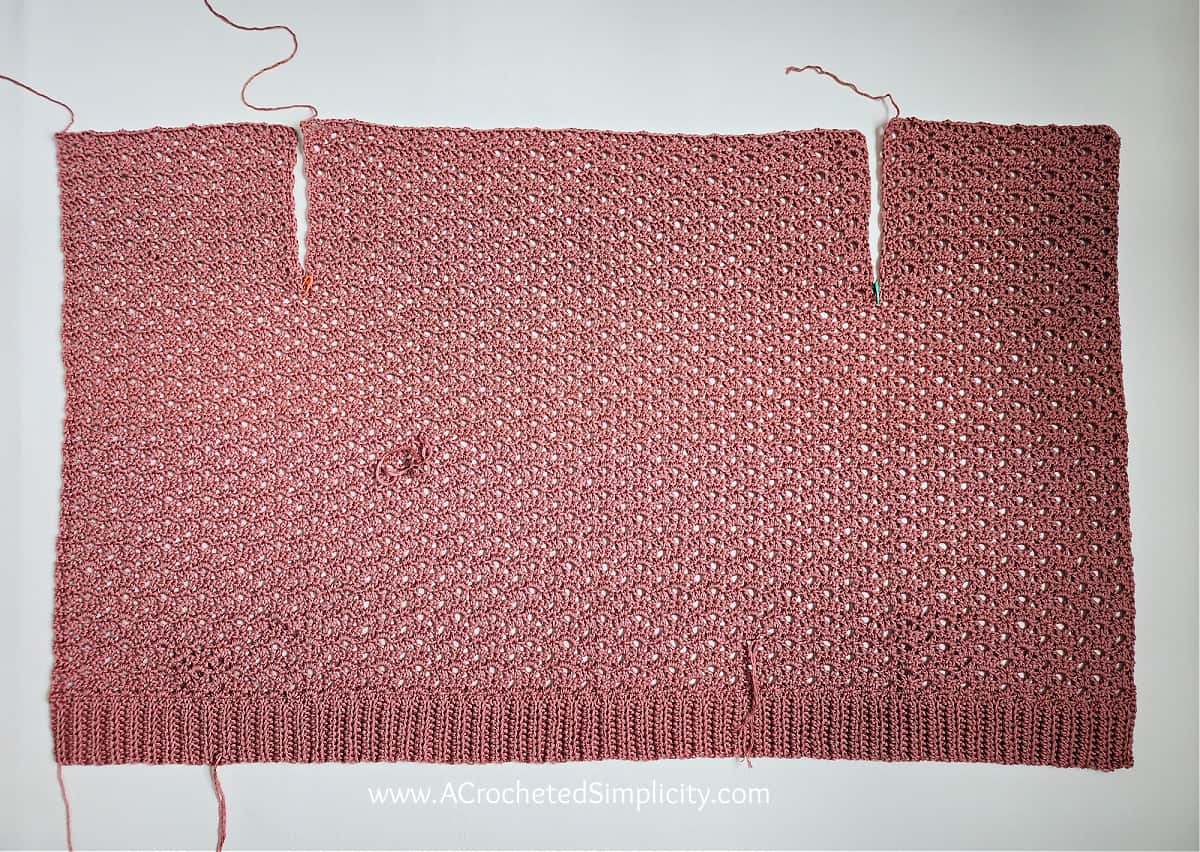
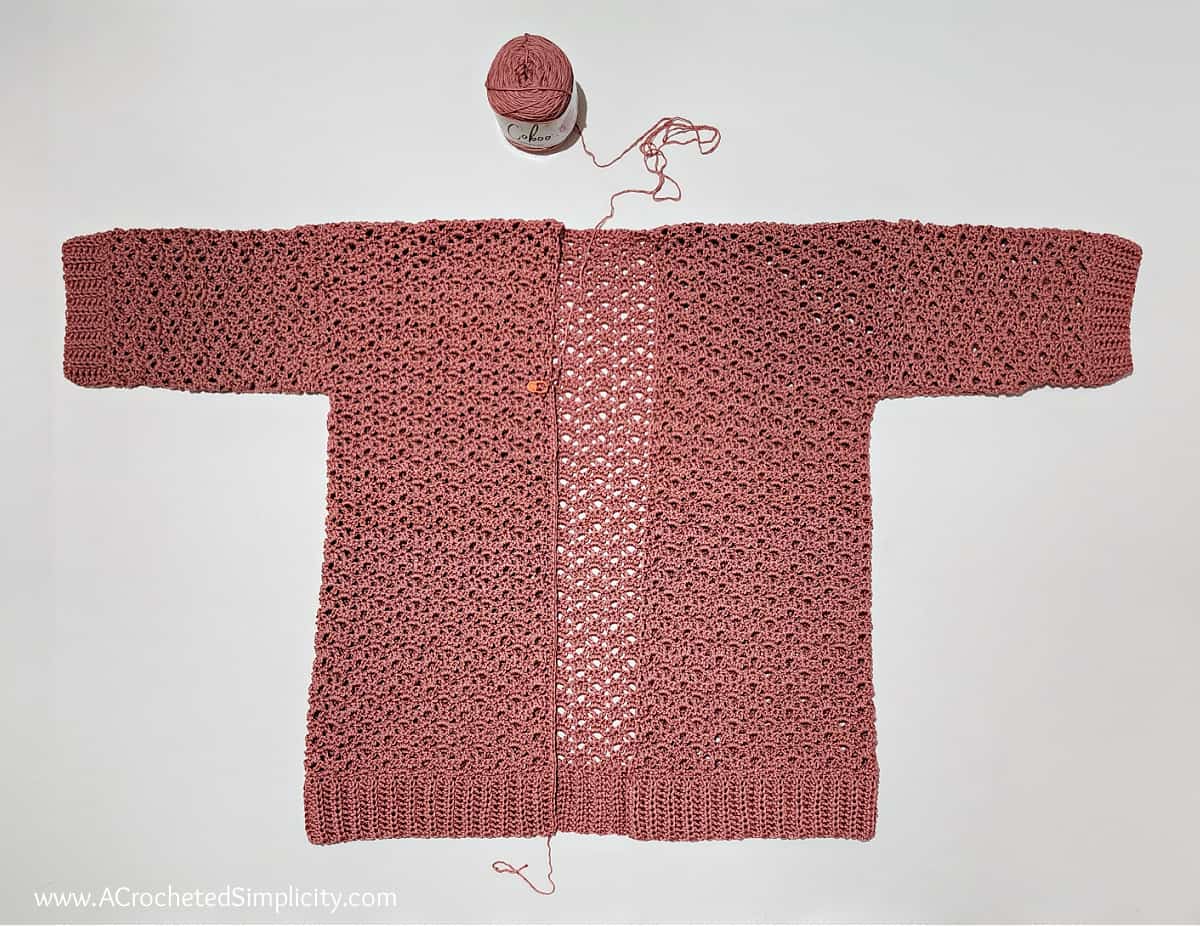
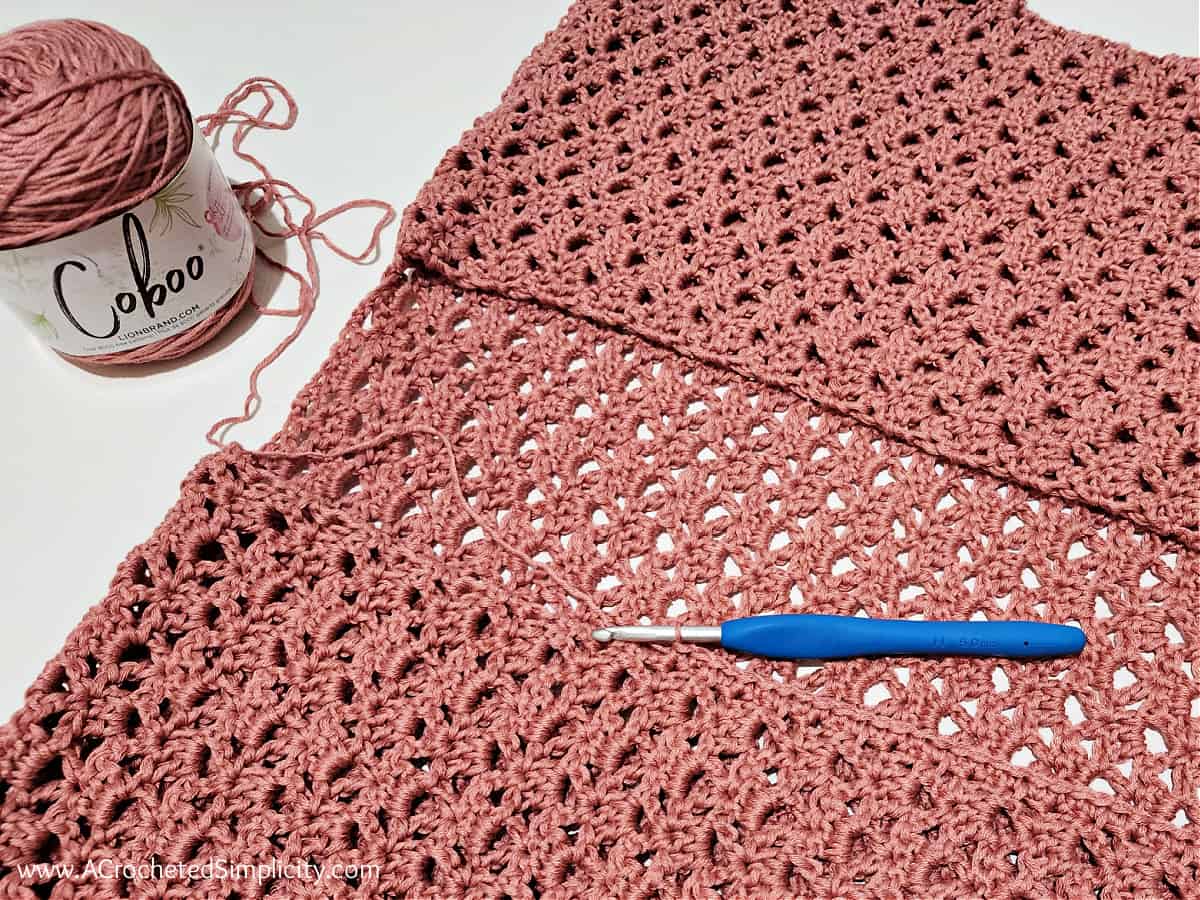
This summer cardigan is crocheted from the bottom up. You’ll begin by making the bottom crochet ribbing. Then you’ll work the main portion of the cardigan onto its’ long edge and crochet until you reach the armhole.
Once you reach the bottom of the armhole openings, you will split the cardigan for the front and back panels. After working each of the panels, you will seam the shoulders.
3/4 length sleeves are then crocheted, seamed and sewn onto the armhole openings.
Next, you’ll add a ribbed edge to the front of the crochet cardigan. Lastly, you’ll make pockets and attach them (if desired).
This crochet cardigan pattern is size inclusive and includes instructions for women’s sizes XS through 5XL. It is a loose fitting crochet cardigan and has 6-8″+ of positive ease built in. I’ve also included size adjustment options.
It’s slightly oversized fit, simple construction, basic crochet stitches, and minimal sewing make it an easy crochet cardigan pattern for those who have never crocheted a garment before.
Choosing Which Size to Crochet
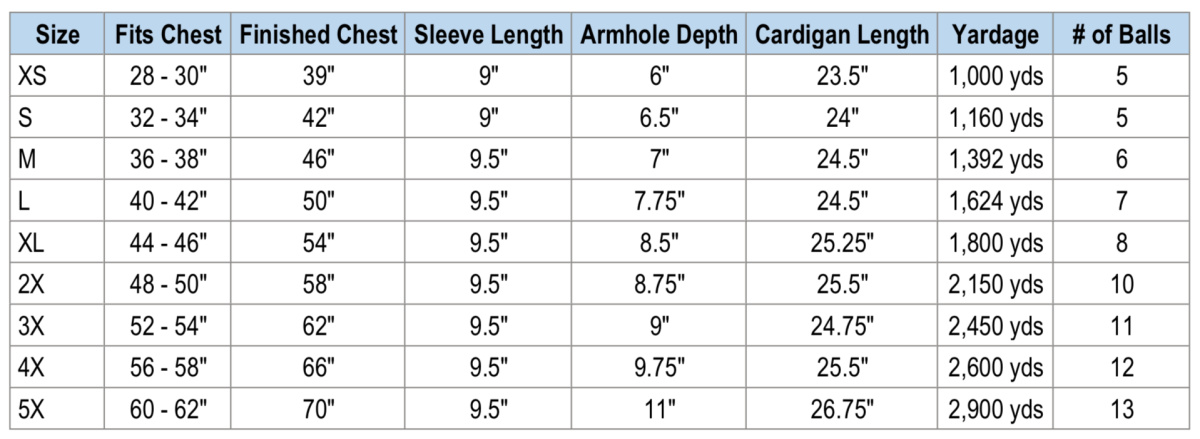
To choose your size, look over the size chart below.
- ‘Fits Chest’ measurement is the measurement of the intended wearer, not the garment’s finished measurement.
- Finished Chest, Sleeve Length, and Cardigan Length are measurements of the finished garment.
- This cardigan has 6-8″+ of positive ease built in for a classic fit.
- If you prefer more of an oversized summer cardigan, I would suggest making one size larger than chest size.
- If you prefer a more fitted look, I would suggest sizing down (as long as your chest size is within the range of the smaller size).
- Cardigan length is measured from the nape of the neck down. It does not include the front ribbed edge.
- Sleeve length is measured from the underarm of the cardigan to edge of the cuff.
- Adjusting Cardigan Length: See the notes in the Body of Cardigan section for adjusting length.
- Adjusting Sleeve Length: If you need to adjust sleeve length, either lengthening or shortening, please do so by working more or fewer regular rows where noted in the pattern instructions.
- Note: Adjusting the size of your crochet cardigan will affect the amount of yarn you’ll need. You may need more or less than what is specified in the yardage chart below.
Size & Yardage Chart
Yarn
Made using Lion Brand Coboo, a soft cotton blend yarn, the Summer Splendor Crochet Cardigan is a wardrobe staple that’s perfect for the warmer months, and also one that you’ll be reaching for all year round.
I chose this yarn because it’s a cotton blend DK weight yarn which makes it a great choice for a summer crochet cardigan pattern. It’s a lightweight yarn with a beautiful drape that is perfect for this lace crochet cardigan.
Yarn Substitutions
Another DK weight yarn can be substituted as long as you meet gauge and you’re happy with the drape of the cardigan. Lion Brand Cottino is a perfect substitute!
I personally recommend a DK weight yarn that is a cotton blend for a lightweight summer cardigan. I feel they are less dense than 100% cotton yarns and much cooler to wear in summer months. Also, the more dense the yarn, the heavier your summer cardigan will be.
Crochet Summer Cardigan – Free Crochet Cardigan Pattern
The free cardigan crochet pattern is below, but if you love to work offline, I’ve got a couple other great options for you.
Purchase the ad-free, printable PDF, including all photo tutorials, on Ravelry, or on Etsy (aff).
Purchase the crochet summer cardigan kit! (aff): Lion Brand has a full kit of the Summer Splendor Crochet Cardigan, available on their website. The kit includes your choice of colors and a digital copy of the pattern.
This post contains affiliate links.
Materials
- Yarn: DK Weight / 3 / Yarn, (Lion Brand Coboo in Mauve was used for the samples in the photos) (100 g / 3.5oz / 232 yards / 212 m / 51% cotton / 49% rayon from bamboo).
- Yardage: See Size Charts Above
- Crochet Hooks: I/9/5.50mm; H/8/5.00mm; G/6/4.00mm; or size needed to obtain gauge (My favorite crochet hooks are the Clover Amour Crochet Hooks, I’ve never had an ache in my hand since switching).
- Locking Stitch Markers
- Scissors
- Yarn Needle
Abbreviations (US Terms)
- ch(s): chain(s)
- sl st(s): slip stitch(es)
- st(s): stitch(es)
- yo: yarn over
- sp: space
- sc: single crochet
- hdc: half double crochet
- dc: double crochet
- Hdc2tog: half double crochet 2 together
- Alt-dc: alternate double crochet
- Join with a standing single crochet
- Join with a standing double crochet
- SM: stitch marker
- Rep: repeat
- RS: Right Side
- WS: Wrong Side
- BLO: back loop only
- SM: stitch marker
Experience Level
- Easy to Intermediate
Gauge
- With 5.00mm hook in openwork stitch pattern: 18 sts = 4.25″ (measured at bottom of foundation chain); 15 rows = 7″
- See swatch instructions below.
Sizes
- Women’s XS through 5XL
- See size chart above.
Special Stitches
- Alternate Double Crochet (alt-dc): After turning your work, do not ch, instead, insert your hook into the first st, yo, pull up a loop, yo, pull thru both loops, insert your hook between the legs of the st just made, yo, pull up a loop, yo, pull through one loop, yo, pull thru remaining loops.
- Join with a standing single crochet: begin with a slip knot on your hook, insert your hook into the stitch or space indicated, yo, pull up a loop, yo and draw thru both loops on hook.
- Join with a standing double crochet: begin with a slip knot on your hook. YO, insert your hook into the stitch or space indicated, yo, pull up a loop, yo, pull through 2 loops on your hook, yo, pull through remaining 2 loops on your hook.
Notes
- Turning chains are not included in stitch count unless noted otherwise.
- Lion Brand Coboo (100 g / 3.5oz / 232 yards / 212 m / 51% cotton / 49% rayon from bamboo).
- Colorway & Yardage
- Mauve #835-145L (see yardage in chart above)
- Changes for Sizes are written as follows: XS (S, M, L, XL, 2XL, 3XL, 4XL, 5XL)
- Stitch Counts are written at the end of the rows as follows: (XS, S, M, L, XL, 2XL, 3XL, 4XL, 5XL).
- Crochet Cardigan Construction: First, you’ll crochet the bottom ribbing in rows. Then you’ll work the body of the cardigan onto the bottom ribbing from the bottom up. Once you reach the underarms you will split the cardigan for the front and back panels. After working each of the panels, you will seam the shoulders. Two sleeves are then crocheted, seamed and sewn onto the armhole openings. Next, you’ll add a ribbed edge to the front of the cardigan. Lastly, you’ll make pockets and attach them (if desired).
- Model wears a women’s medium and is wearing a medium sample.
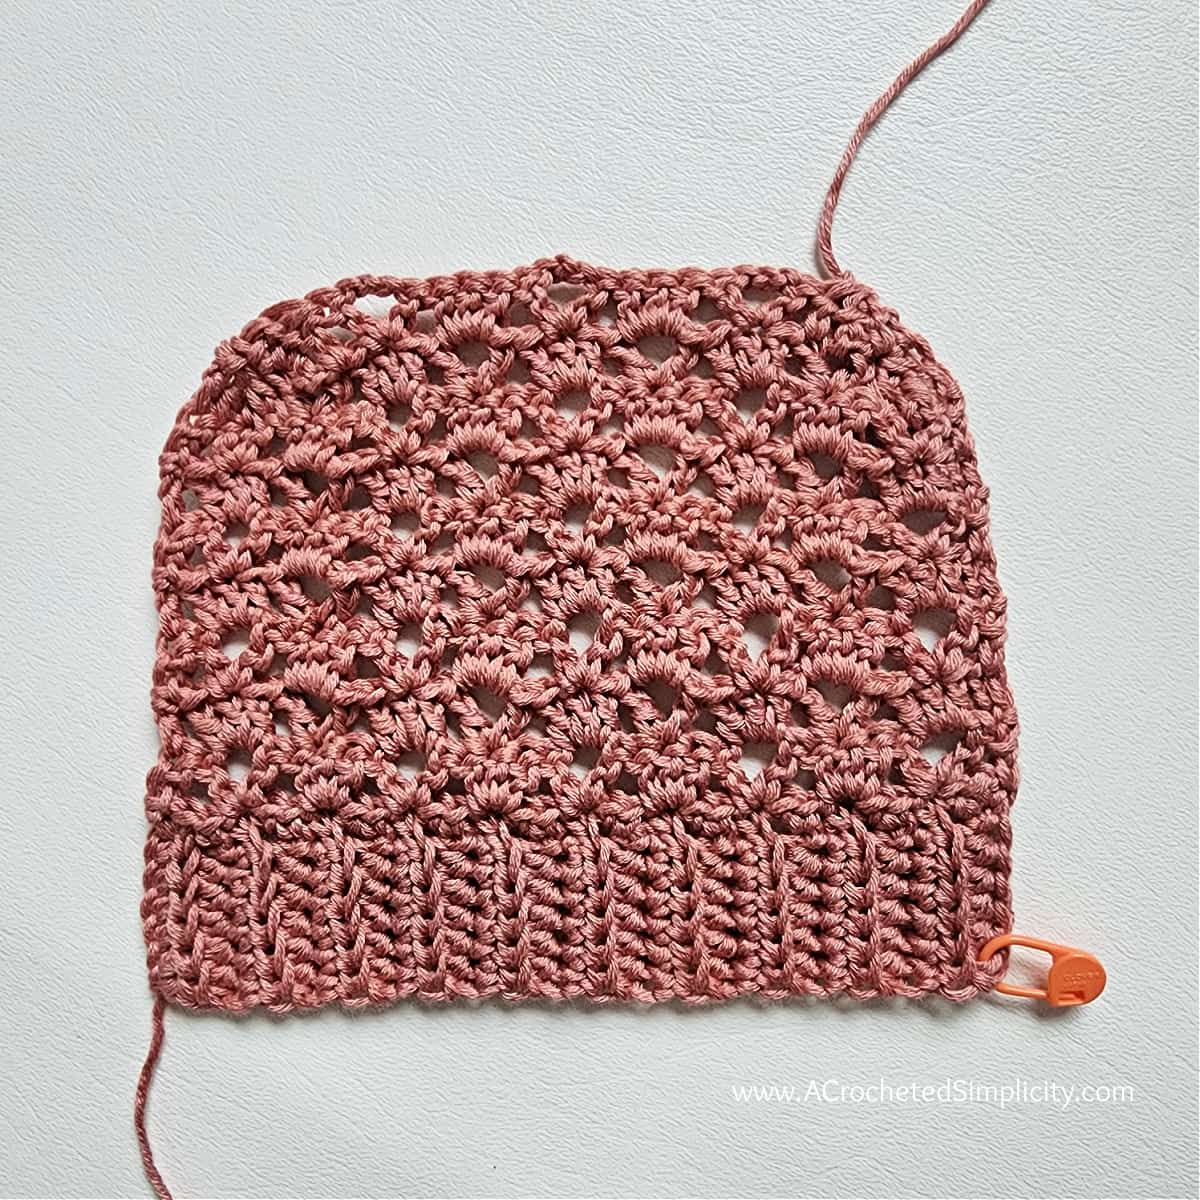
Swatch Instructions
Crochet a small swatch to check gauge so your crochet lace cardigan comes out the correct size.
Gauge: With 5.00mm hook in openwork stitch pattern: 18 sts = 4.25″ (measured at bottom of foundation chain); 15 rows = 7″
Set-Up: With a 5.50mm crochet hook, ch 33.
Row 1: Switch to a 5.00mm crochet hook, working into the back hump of the ch, dc in the 3rd ch from your hook, skip each of the next 2 chs, (dc, ch 3, dc) in the next ch, skip each of the next 2 chs, [ 3 dc in the next ch, skip each of the next 2 chs, (dc, ch 3, dc) in the next ch, skip each of the next 2 chs ] work from [ to ] across to the last ch, dc in the last ch. Turn. (24 dc + 5 ch-3’s)
Row 2: Alt-dc in the first st, 3 dc in the next ch-3 sp, [ (dc, ch 3, dc) in the middle dc of the next 3 dc group, 3 dc in the next ch-3 sp ] work from [ to ] across to the last ch, dc in the last st. Turn. (25 dc + 4 ch-3’s)
Row 3: Alt-dc in the first st, (dc, ch 3, dc) in the middle dc of the next 3 dc group, [ 3 dc in the next ch-3 sp, (dc, ch 3, dc) in the middle dc of the next 3 dc group ] work from [ to ] across to the last ch, dc in the last st. Turn. (24 dc + 5 ch-3’s)
Rows 4 – 9: Rep Rows 2 – 3.
Fasten off. Completed swatch should be 7.25″ W x 4.25″ H.
Crochet Summer Cardigan Written Pattern
Changes for Sizes: XS (S, M, L, XL, 2XL, 3XL, 4XL, 5XL)
Bottom Ribbing
Gauge: 10 sts = 2.25″; 10 rows = 3.55″ H
Row 1: With yarn & a 5.00mm crochet hook, ch 11, working in the back humps of the chain, hdc in the 2nd ch from your hook and in each ch across. Turn. (10 sts)
Rows 2 – 92 (104, 116, 128, 140, 152, 164, 176, 188): Ch 1, BLO hdc in each st across. Turn.
Place a SM in the first stitch of the last row of Bottom Ribbing to mark where you will later begin the Front Cardigan Edging.
Do not fasten off. Continue on to Prepare Ribbing for Body of Cardigan. Bottom Ribbing should measure approximately (32.75″, 37″, 41.25″, 45.5″, 49.75″, 54″, 58.25″, 62.5″, 66.75″).
Prepare Ribbing for Body of Cardigan
Row 1 (RS): After turning at the end of the last row of the ribbing, rotate to work along the long edge of the ribbing, work 2 sc into each of the first 2 sts, [sc in the next st, 2 sc in the next st] rep from [ to ] across. Turn. (139, 157, 175, 193, 211, 229, 247, 265, 283 sts)
Do not fasten off. Continue on to Body of Cardigan.
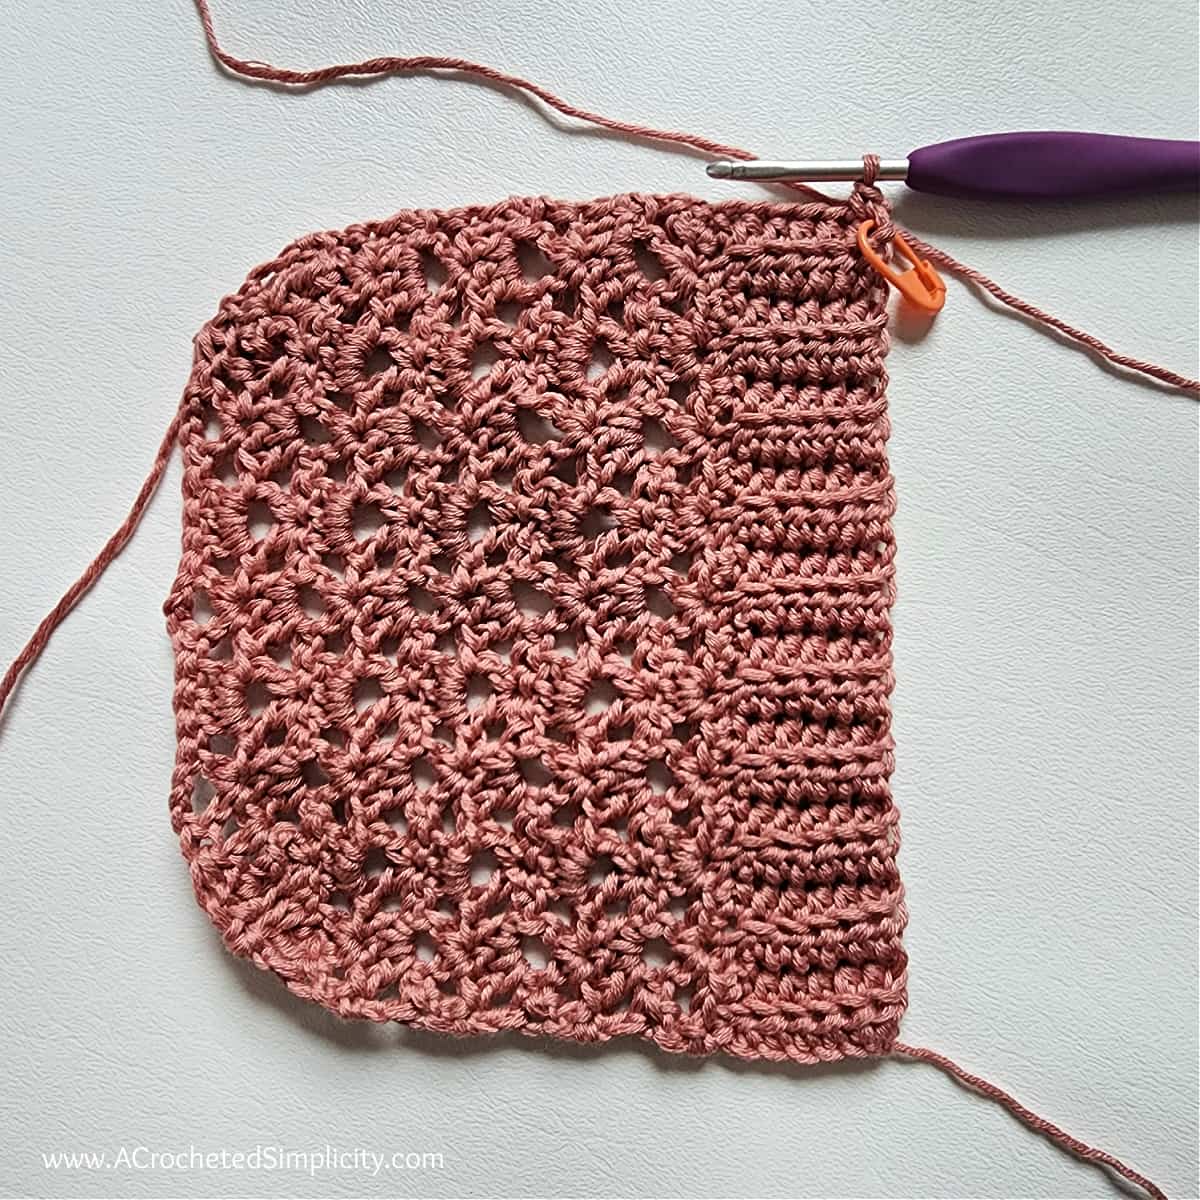
Body of Cardigan
Row 1 (WS): Alt-dc in the first st, skip each of the next 2 sts, (dc, ch 3, dc) in the next st, skip each of the next 2 sts, [ 3 dc in the next st, skip each of the next 2 sts, (dc, ch 3, dc) in the next st, skip each of the next 2 sts ] rep from [ to ] across to the last st, dc in the last st. Turn. (114 dc +23 ch-3’s) (129 dc +26 ch-3’s) (144 dc +29 ch-3’s) (159 dc +32 ch-3’s) (174 dc +35 ch-3’s) (189 dc +38 ch-3’s) (204 dc +41 ch-3’s) (219 dc +44 ch-3’s) (234 dc +47 ch-3’s)
Row 2 (RS): Alt-dc in the first st, 3 dc in the next ch-3 sp, [ (dc, ch 3, dc) in the middle dc of the next 3 dc group, 3 dc in the next ch-3 sp ] rep from [ to ] across to the last st, dc in the last st. Turn. (115 dc +22 ch-3’s) (130 dc +25 ch-3’s) (145 dc +28 ch-3’s) (160 dc +31 ch-3’s) (175 dc +34 ch-3’s) (190 dc +37 ch-3’s) (205 dc +40 ch-3’s) (220 dc +43 ch-3’s) (235 dc +46 ch-3’s)
Row 3: Alt-dc in the first st, (dc, ch 3, dc) in the middle dc of the next 3 dc group, [ 3 dc in the next ch-3 sp, (dc, ch 3, dc) in the middle dc of the next 3 dc group ] rep from [ to ] across to the last st, dc in the last st. Turn. (114 dc +23 ch-3’s) (129 dc +26 ch-3’s) (144 dc +29 ch-3’s) (159 dc +32 ch-3’s) (174 dc +35 ch-3’s) (189 dc +38 ch-3’s) (204 dc +41 ch-3’s) (219 dc +44 ch-3’s) (234 dc +47 ch-3’s)
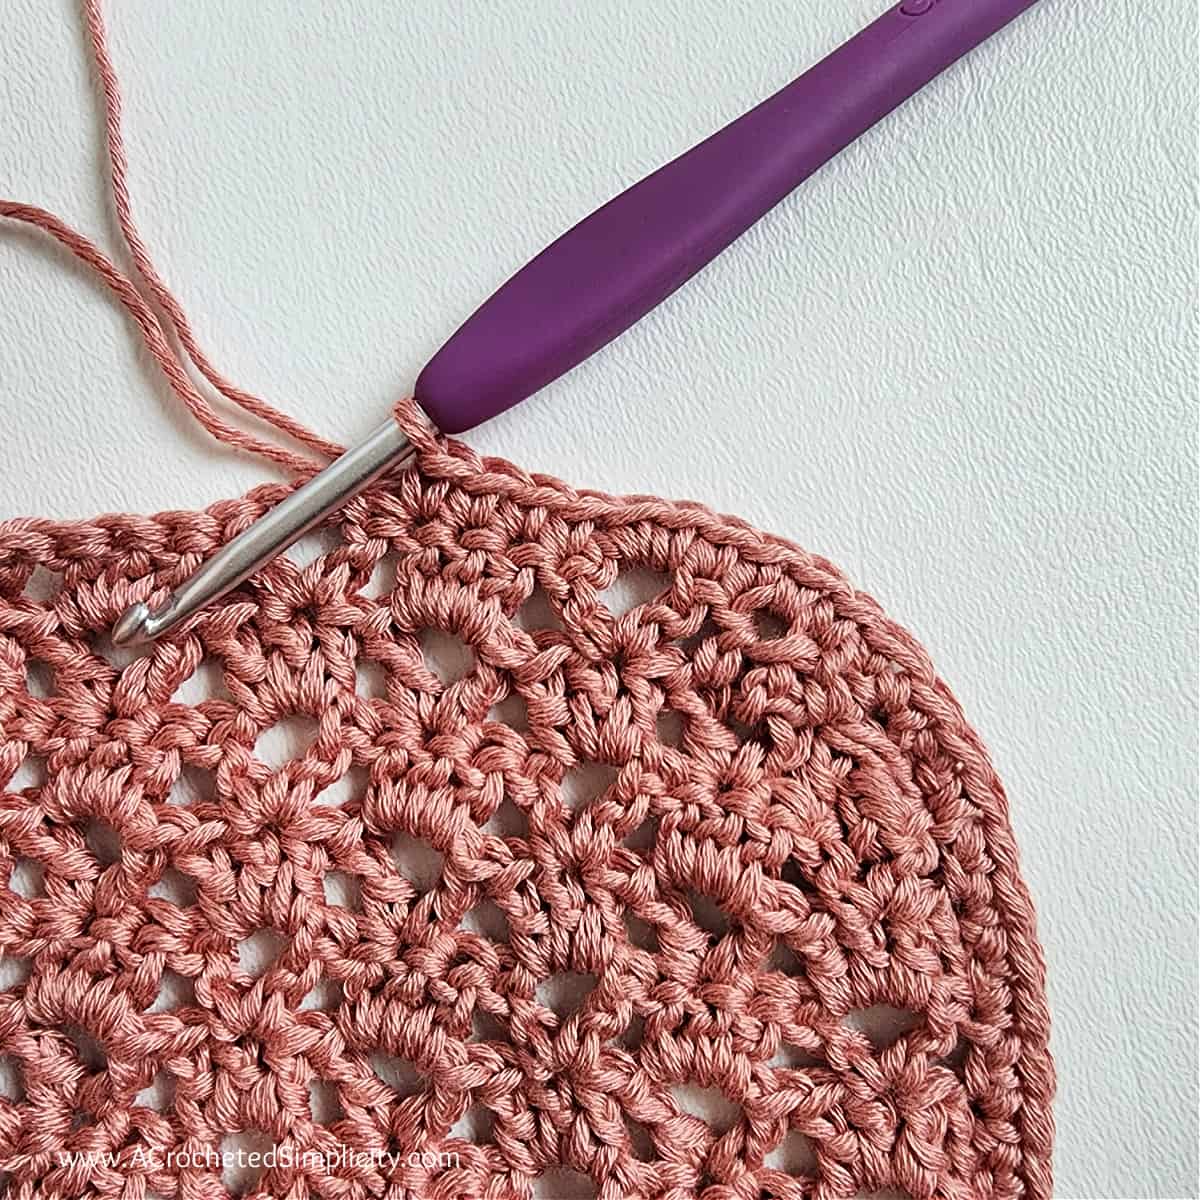
Rows 4 – 33 (33, 33, 31, 31, 31, 29, 29, 29): Rep Rows 2 – 3.
Do not fasten off. Continue on to Front Right Panel for the size you’re making. Cardigan height (including bottom ribbing) should measure approximately (17.5″, 17.5″, 17.5″, 16.75″, 16.75″, 16.75″, 15.75″, 15.75″, 15.75″) at this point.
Adjusting Length: If you prefer a longer or shorter cardigan, here is where you’ll want to adjust. The length stated above is the cardigan’s length from the bottom of the armhole to the bottom hem. If at all possible, check length, at this point, on the intended wearer.
- Longer: If you’d like a longer cardigan, repeat Rows 2 – 3 in multiples of 2 (make sure to end with a Row 3 repeat).
- Shorter: If you’d like a shorter cardigan, work fewer rows in multiples of 2 (make sure to end with a Row 3 repeat).
Front Right Panel for Sizes XS (S, M, 2XL, 3XL)
Changes for Sizes: XS (S, M, 2XL, 3XL)
Row 1 (RS): Alt-dc in the first st, 3 dc in the next ch-3 sp, [ (dc, ch 3, dc) in the middle dc of the next 3 dc group, 3 dc in the next ch-3 sp ] work from [ to ] 4 (5, 6, 8, 9) times, dc in the dc after the ch-3 you just worked into. Turn. (25 dc + 4 ch-3’s) (30 dc + 5 ch-3’s) (35 dc + 6 ch-3’s) (45 dc + 8 ch-3’s) (50 dc + 9 ch-3’s)
Place a SM in the same dc you worked the last dc into. This marks the beginning of the Back Panel.
Row 2: Alt-dc in the first st, (dc, ch 3, dc) in the middle dc of the next 3 dc group, [ 3 dc in the next ch-3 sp, (dc, ch 3, dc) in the middle dc of the next 3 dc group ] rep from [ to ] across to the last st, dc in the last st. Turn. (24 dc + 5 ch-3’s) (29 dc + 6 ch-3’s) (34 dc + 7 ch-3’s) (44 dc + 9 ch-3’s) (49 dc + 10 ch-3’s)
Row 3: Alt-dc in the first st, 3 dc in the next ch-3 sp, [ (dc, ch 3, dc) in the middle dc of the next 3 dc group, 3 dc in the next ch-3sp] rep from [ to ] across to the last st, dc in the last st. Turn. (25 dc + 4 ch-3’s) (30 dc + 5 ch-3’s) (35 dc + 6 ch-3’s) (45 dc + 8 ch-3’s) (50 dc + 9 ch-3’s)
Rows 4 – 13 (14, 15, 19, 20): Rep Rows 2 – 3, ending with a Row 2 Rep for the S and 3XL sizes and ending with a Row 3 rep for the XS, M, and 2XL sizes.
Fasten off. Weave in ends. Continue on to Back Panel for the size you’re making. Front Right Panel height should measure approximately (6″, 6.5″, 7″, 8.75″, 9″) at this point.
Back Panel Sizes XS (S, M, 2XL, 3XL)
Row 1 (RS): With yarn & a 5.00mm crochet hook, join yarn with a standing dc in the st marked with a SM marking where to begin the Back Panel, (dc, ch 3, dc) in the middle dc of the next 3 dc group, [ 3 dc in the next ch-3 sp, (dc, ch 3, dc) in the middle dc of the next 3 dc group ] work from [ to ] 13 (14, 15, 20, 21) times, skip the next dc, dc in the 1st dc of the next (dc, ch 3, dc). Turn. (69 dc + 14 ch-3’s) (74 dc + 15 ch-3’s) (79 dc + 16 ch-3’s) (104 dc + 21 ch-3’s) (109 dc + 22 ch-3’s)
Place a SM in the same dc you worked the last dc in. This marks the beginning of the Front Left Panel.
Row 2: Alt-dc in the first st, 3 dc in the next ch-3 sp, [ (dc, ch 3, dc) in the middle dc of the next 3 dc group, 3 dc in the next ch-3 sp ] rep from [ to ] across to the last st, dc in the last st. Turn. (70 dc + 13 ch-3’s) (75 dc + 14 ch-3’s) (80 dc + 15 ch-3’s) (105 dc + 20 ch-3’s) (110 dc + 21 ch-3’s)
Row 3: Alt-dc in the first st, (dc, ch 3, dc) in the middle dc of the next 3 dc group, [ 3 dc in the next ch-3 sp, (dc, ch 3, dc) in the middle dc of the next 3 dc group ] rep from [ to ] across to the last st, dc in the last st. Turn. (69 dc + 14 ch-3’s) (74 dc + 15 ch-3’s) (79 dc + 16 ch-3’s) (104 dc + 21 ch-3’s) (109 dc + 22 ch-3’s)
Rows 4 – 13 (14, 15, 19, 20): Rep Rows 2 – 3.
Fasten off. Weave in ends. Continue on to Front Left Panel for the size you’re making. Back Panel height should measure approximately (6″, 6.5″, 7″, 8.75″, 9″) at this point.
Front Left Panel Sizes XS (S, M, 2XL, 3XL)
Row 1 (RS): With yarn & a 5.00mm crochet hook, join yarn with a standing dc in the st marked with a SM marking where to begin the Front Left Panel, 3 dc in the next ch-3 sp, [ (dc, ch 3, dc) in the middle dc of the next 3 dc group, 3 dc in the next ch-3 sp ] work from [ to ] 4 (5, 6, 8, 9) times, dc in the dc after the ch-3 you just worked into. Turn. (25 dc + 4 ch-3’s) (30 dc + 5 ch-3’s) (35 dc + 6 ch-3’s) (45 dc + 8 ch-3’s) (50 dc + 9 ch-3’s)
Row 2: Alt-dc in the first st, (dc, ch 3, dc) in the middle dc of the next 3 dc group, [ 3 dc in the next ch-3 sp, (dc, ch 3, dc) in the middle dc of the next 3 dc group ] rep from [ to ] across to the last st, dc in the last st. Turn. (24 dc + 5 ch-3’s) (29 dc + 6 ch-3’s) (34 dc + 7 ch-3’s) (44 dc + 9 ch-3’s) (49 dc + 10 ch-3’s)
Row 3: Alt-dc in the first st, 3 dc in the next ch-3 sp, [ (dc, ch 3, dc) in the middle dc of the next 3 dc group, 3 dc in the next ch-3s p ] rep from [ to ] across to the last st, dc in the last st. Turn. (25 dc + 4 ch-3’s) (30 dc + 5 ch-3’s) (35 dc + 6 ch-3’s) (45 dc + 8 ch-3’s) (50 dc + 9 ch-3’s)
Rows 4 – 13 (14, 15, 19, 20): Rep Rows 2 – 3.
Fasten off. Weave in ends. Continue on to Seam Shoulders. Front Left Panel should measure approximately (6″, 6.5″, 7″, 8.75″, 9″) at this point.
Front Right Panel Sizes (L, XL, 4XL, 5XL)
Changes for Sizes: L (XL, 4XL, 5XL)
Row 1 (RS): Alt-dc in the first st, [ 3 dc in the next ch-3 sp, (dc, ch 3, dc) in the middle dc of the next 3 dc group ] work from [ to ] 7 (8, 10, 11) times, dc in the next dc of the 3 dc group you just worked into. Turn. (37 dc + 7 ch-3’s) (42 dc + 8 ch-3’s) (52 dc + 10 ch-3’s) (57 dc + 11 ch-3’s)
Place a SM in the next dc. This marks the beginning of the Back Panel.
Row 2: Alt-dc in the first st, [ 3 dc in the next ch-3 sp, (dc, ch 3, dc) in the middle dc of the next 3 dc group ] rep from [ to ] across to the last st, dc in the last st. Turn. (37 dc + 7 ch-3’s) (42 dc + 8 ch-3’s) (52 dc + 10 ch-3’s) (57 dc + 11 ch-3’s)
Rows 3 – 16 (18, 21, 24): Rep Row 2.
Fasten off. Weave in ends. Continue on to Back Panel. Front Right Panel height should measure approximately (7.75″, 8.5″, 9.75″, 11″) at this point.
Back Panel Sizes (L, XL, 4XL, 5XL)
Row 1 (RS): With yarn & a 5.00mm crochet hook, join yarn with a standing dc in the st marked with a SM marking where to begin the Back Panel, 3 dc in the next ch-3 sp, [ (dc, ch 3, dc) in the middle dc of the next 3 dc group, 3 dc in the next ch-3 sp ] work from [ to ] 17, 18, 23, 24) times, dc in the next dc. Turn. (90 dc + 17 ch-3’s) (95 dc + 18 ch-3’s) (120 dc + 23 ch-3’s) (125 dc + 24 ch-3’s)
Place a SM in the next dc. This marks the beginning of the Front Left Panel.
Row 2: Alt-dc in the first st, (dc, ch 3, dc) in the middle dc of the next 3 dc group, [ 3 dc in the next ch-3 sp, (dc, ch 3, dc) in the middle dc of the next 3 dc group ] rep from [ to ] across to the last st, dc in the last st. Turn. (89 dc + 18 ch-3’s) (94 dc + 19 ch-3’s) (119 dc + 24 ch-3’s) (124 dc + 25 ch-3’s)
Row 3: Alt-dc in the first st, 3 dc in the next ch-3 sp, [ (dc, ch 3, dc) in the middle dc of the next 3 dc group, 3 dc in the next ch-3 sp ] rep from [ to ] across to the last st, dc in the last st. Turn. (90 dc + 17 ch-3’s) (95 dc + 18 ch-3’s) (120 dc + 23 ch-3’s) (125 dc + 24 ch-3’s)
Rows 4 – 16 (18, 21, 24): Rep Rows 2 – 3, ending with a Row 2 Rep for L, XL, & 5XL sizes and ending with a Row 3 rep for the 4XL size.
Fasten off. Weave in ends. Continue on to Front Left Panel for the size you’re making. Back Panel height should measure approximately (7.75″, 8.5″, 9.75″, 11″) at this point.
Front Left Panel Sizes (L, XL, 4XL, 5XL)
Row 1 (RS): With yarn & a 5.00mm crochet hook, join yarn with a standing dc in the st marked with a SM marking where to begin the Front Left Panel, [ (dc, ch 3, dc) in the middle dc of the next 3 dc group, 3 dc in the next ch-3 sp ] work from [ to ] 7 (8, 10, 11) times, dc in the last st. Turn. (37 dc + 7 ch-3’s) (42 dc + 8 ch-3’s) (52 dc + 10 ch-3’s) (57 dc + 11 ch-3’s)
Row 2: Alt-dc in the first st, [ (dc, ch 3, dc) in the middle dc of the next 3 dc group, 3 dc in the next ch-3 sp ] rep from [ to ] across to the last st, dc in the last st. Turn. (37 dc + 7 ch-3’s) (42 dc + 8 ch-3’s) (52 dc + 10 ch-3’s) (57 dc + 11 ch-3’s)
Rows 3 – 16 (18, 21, 24): Rep Row 2.
Fasten off. Weave in ends. Continue on to Seam Shoulders. Front Left Panel height should measure approximately (7.75″, 8.5″, 9.75″, 11″) at this point.
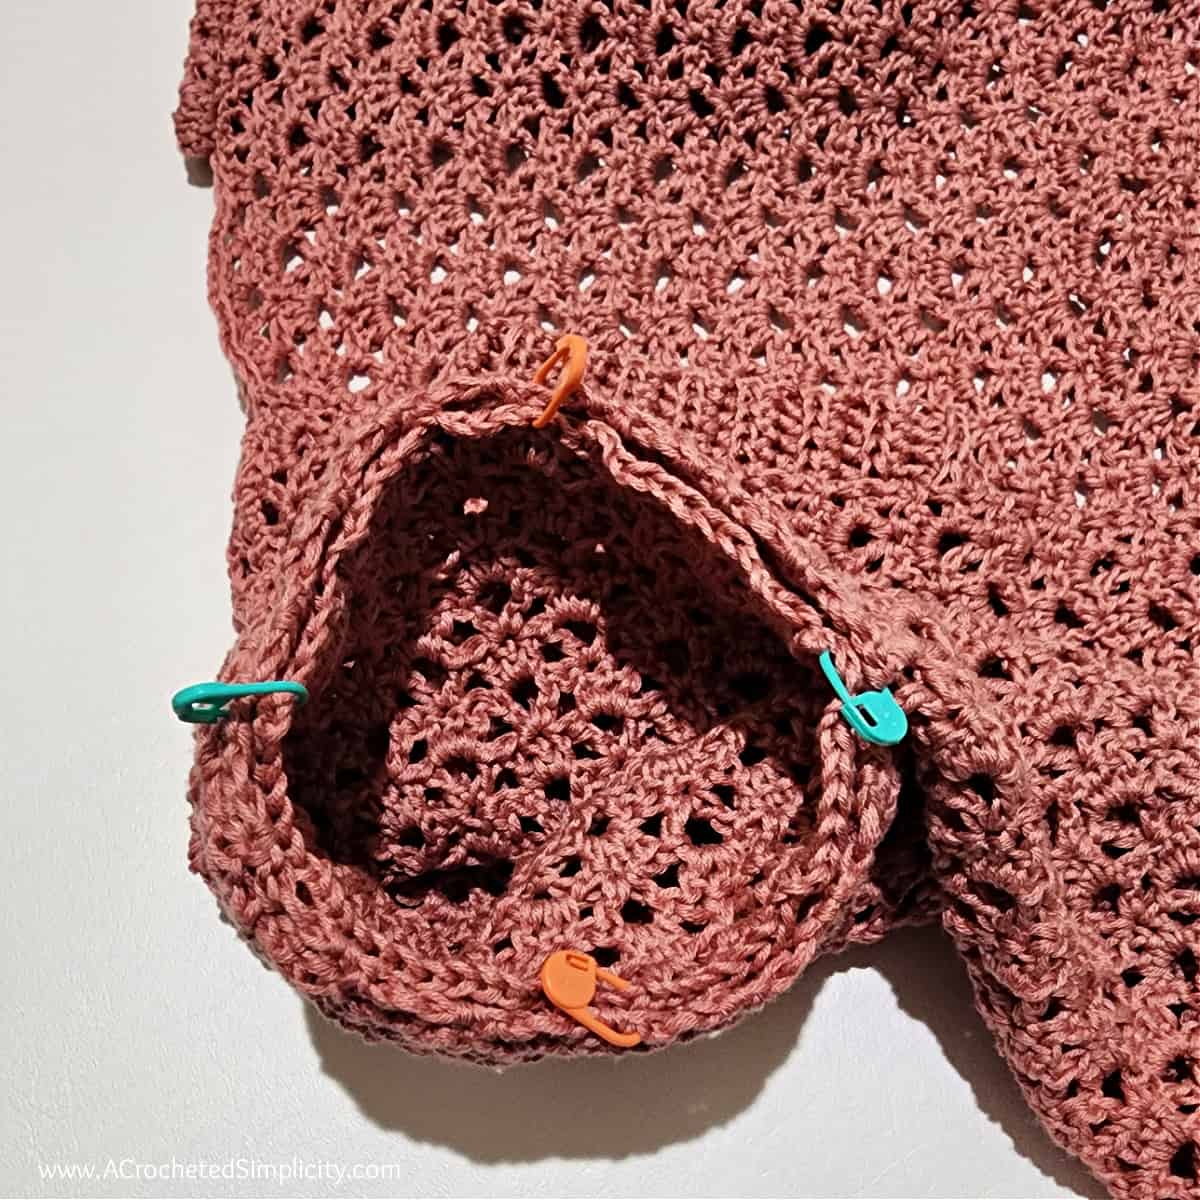
Seam Shoulders
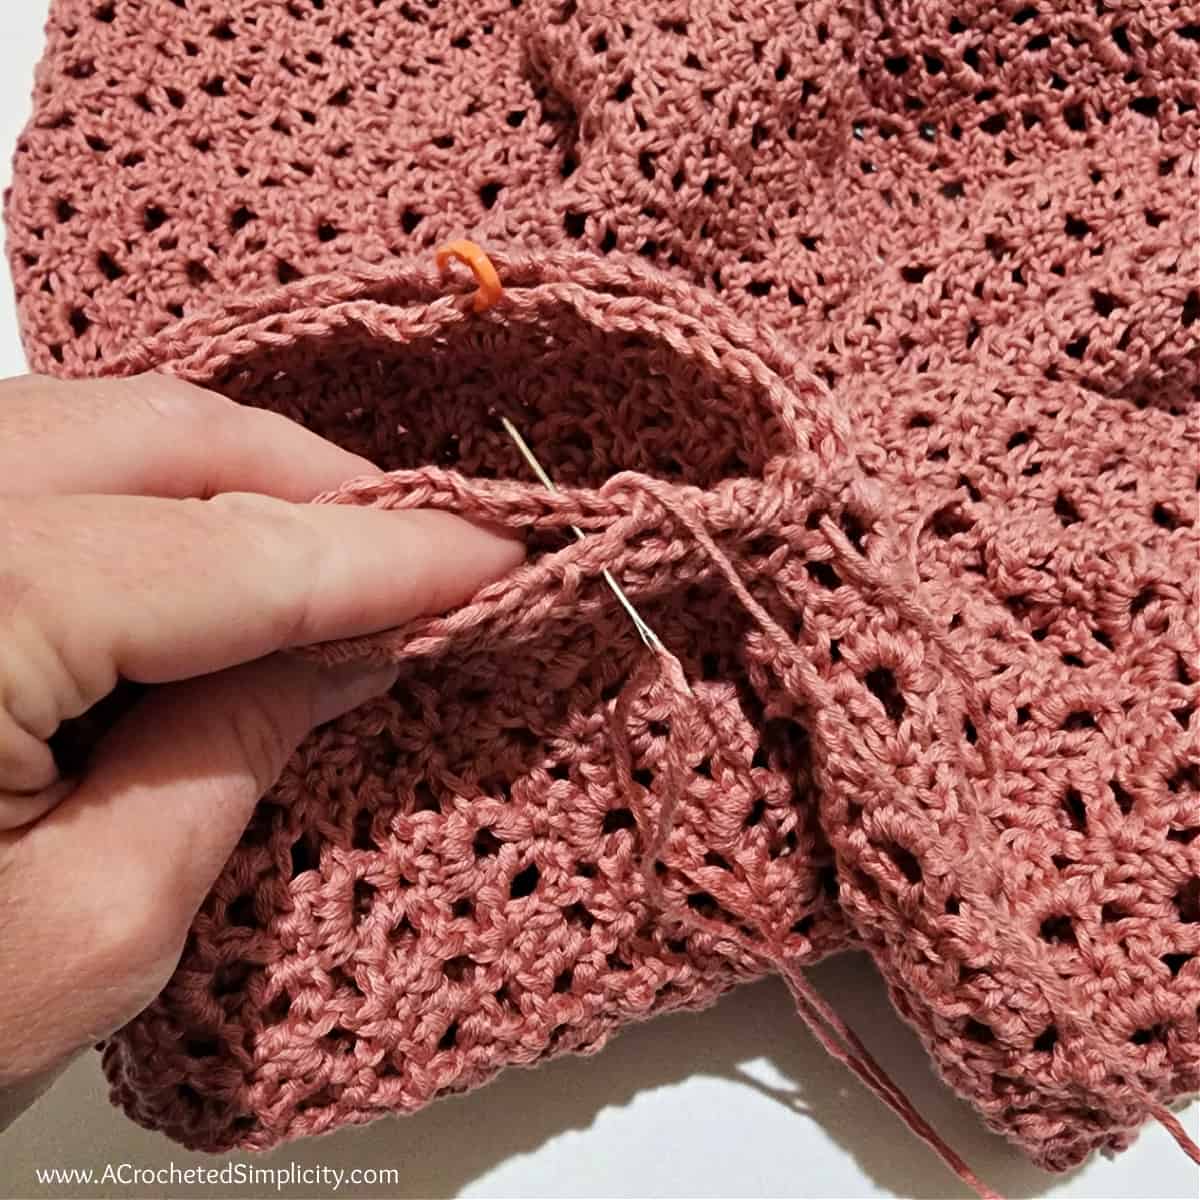
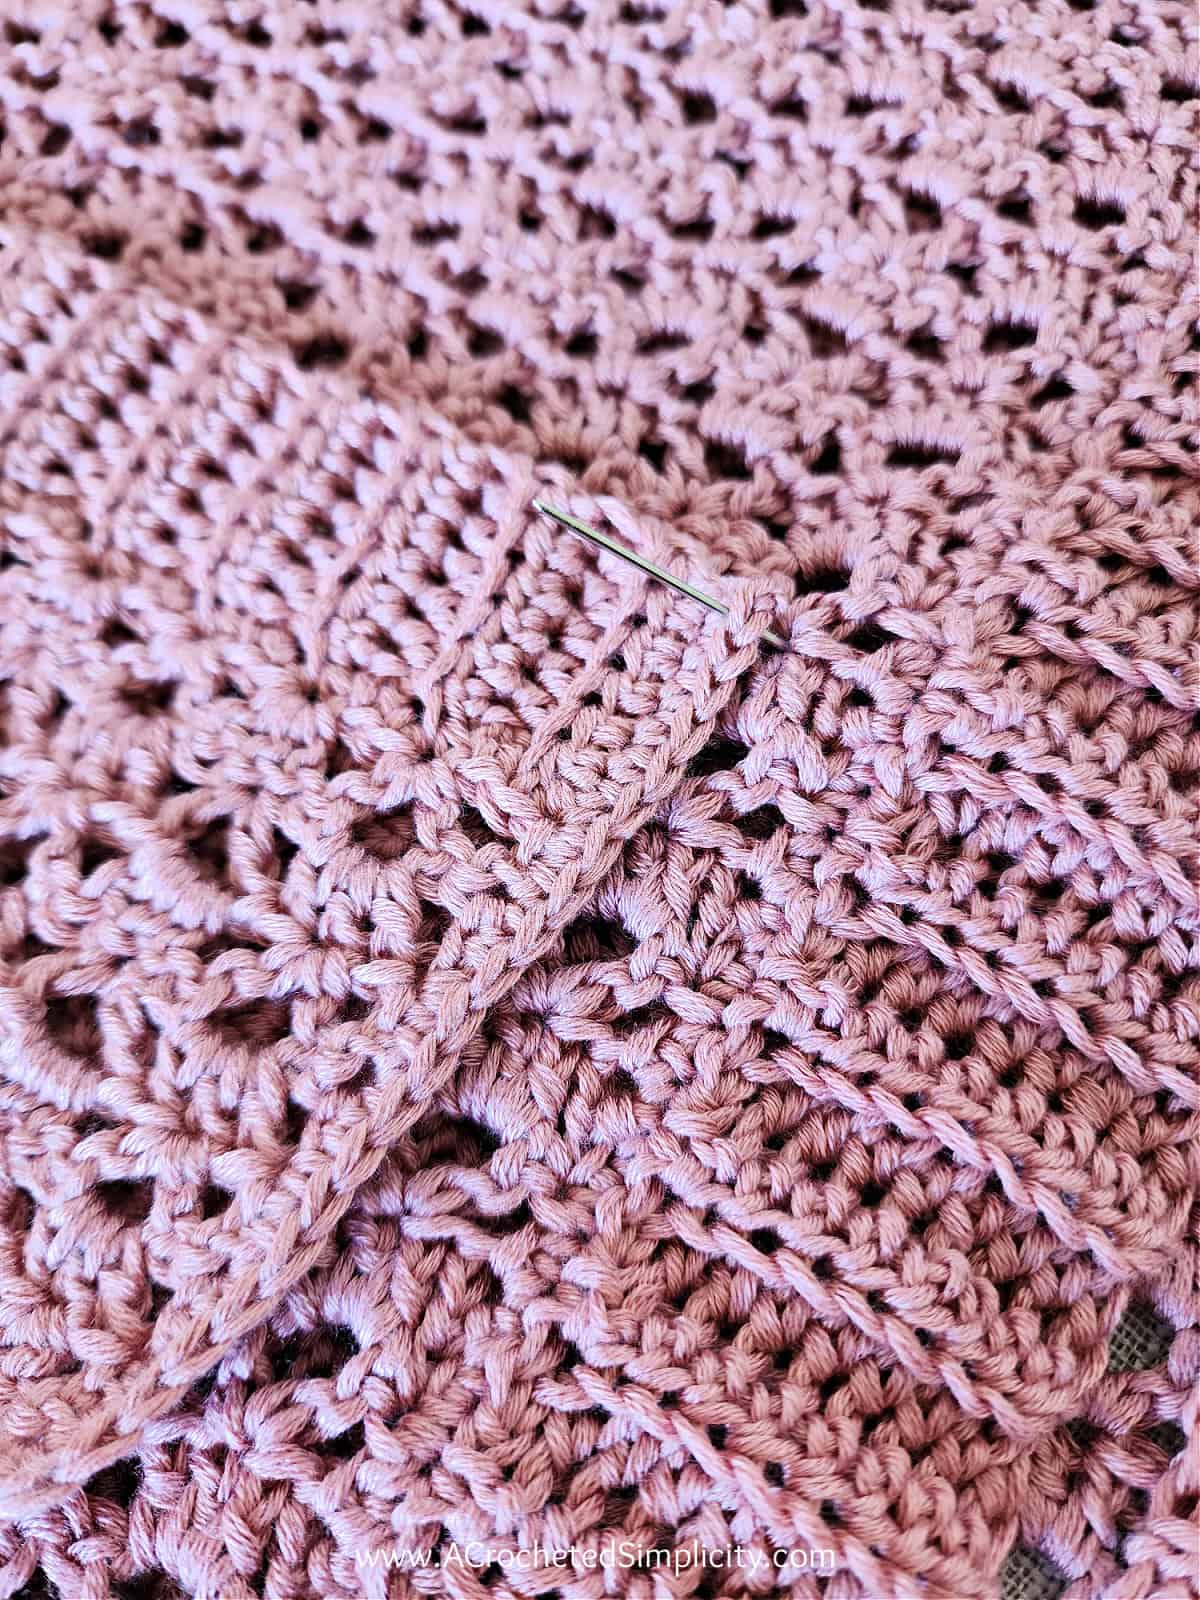
Step 1: With the RS facing out, fold the two front panels in towards the center of the cardigan (as shown below), creating a fold where it splits for the sleeves. Line up the corners of the upper front panels with the corners of the back panel. Match up the stitches on the front panel with corresponding stitches along the back panel. To make it easier, I recommend using locking stitch markers to hold the panels in place during seaming.
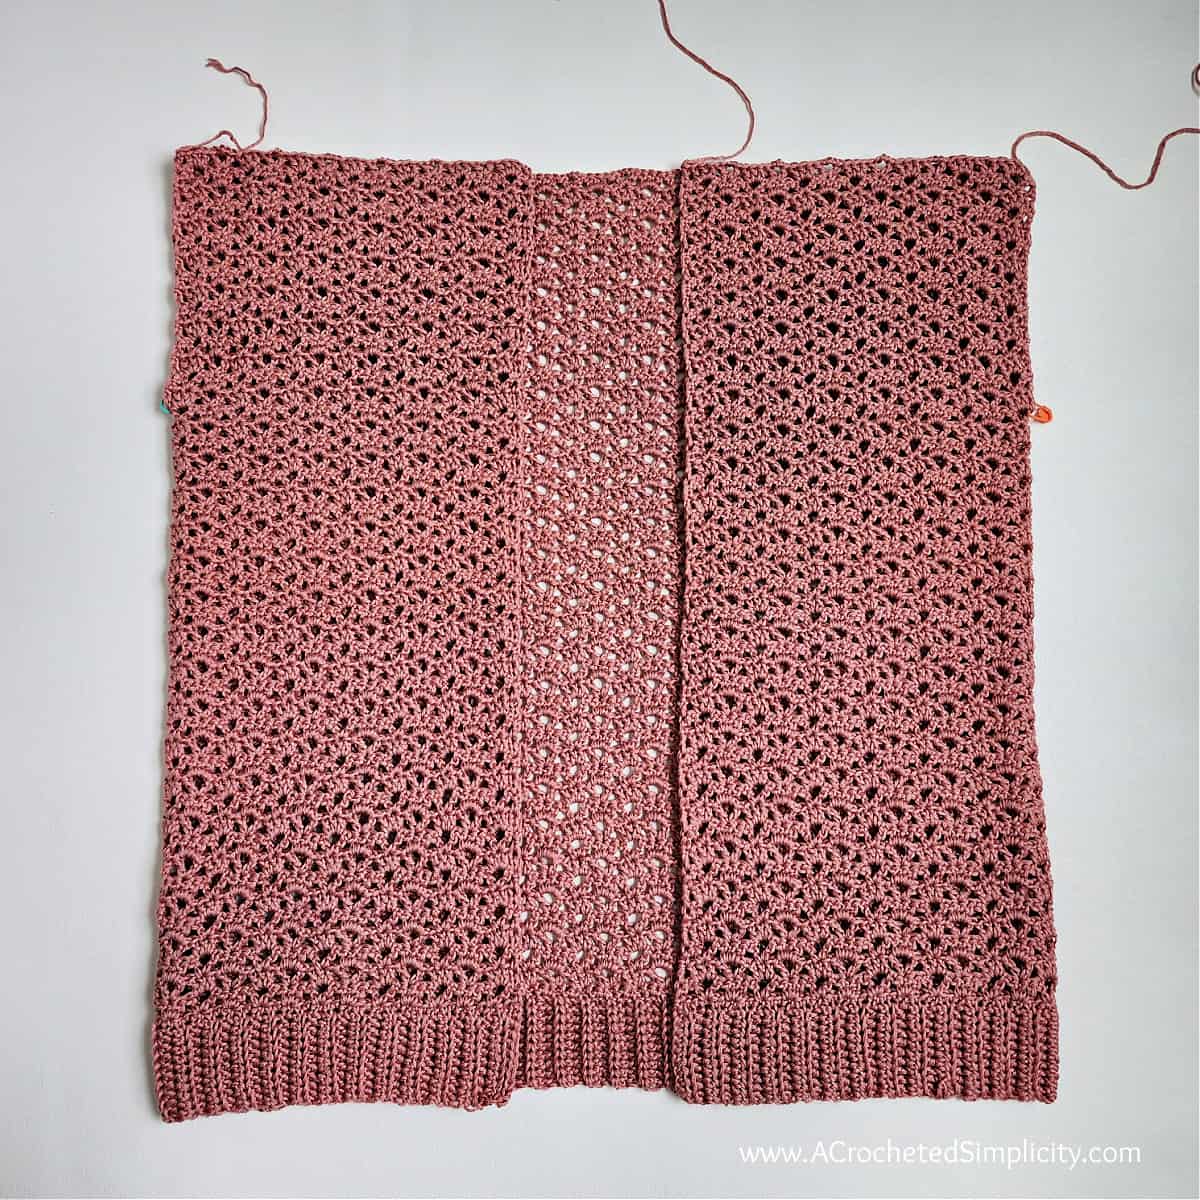
Step 2: With the right side facing out, use a yarn needle and a length of yarn that is 3 – 4 times the length of the seam you’ll be creating, and whipstitch a front panel to the back panel. Repeat for the second front panel.
Weave in ends. Continue on to the Sleeves.
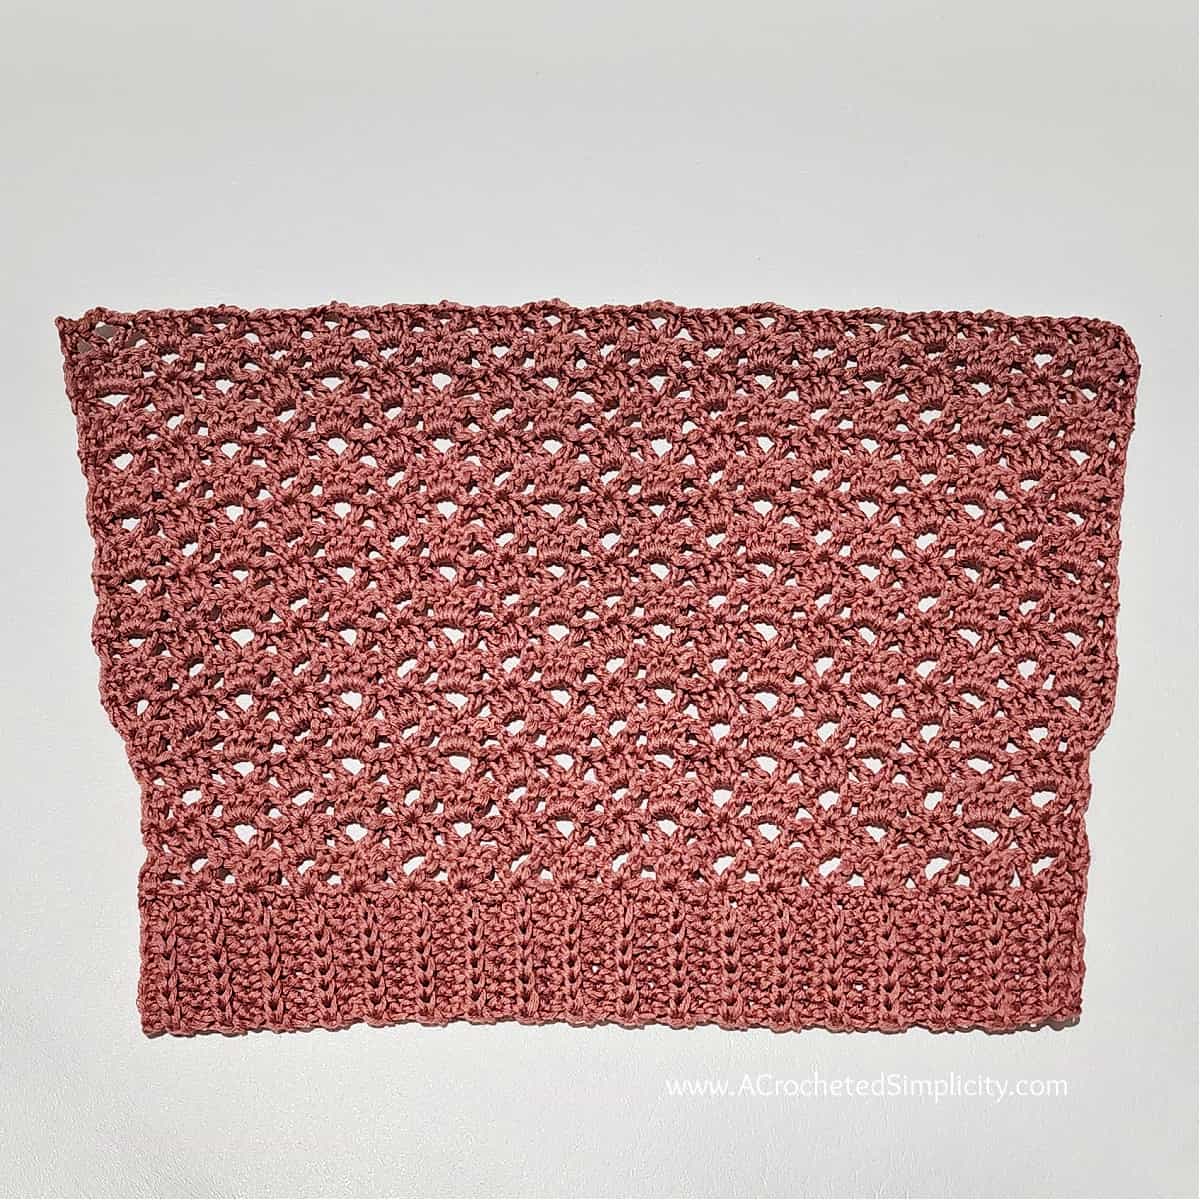
Sleeves – Make 2
Sleeve Ribbing
Gauge: 7 sts = 1.75″; 8 rows = 3″
Row 1: With yarn & a 5.00mm crochet hook, ch 8, working in the back humps of the chain, hdc in the 2nd ch from your hook and in each ch across. Turn. (7 sts)
Rows 2 – 32 (34, 36, 40, 44, 46, 48, 52, 56): Ch 1, BLO hdc in each st across. Turn.
Do not fasten off. Continue on to Prepare Ribbing for Sleeve. Sleeve Ribbing should measure approximately (11.5″, 12.25″, 13″, 14.5″, 15.75″, 16.5″, 17.25″, 18.5″, 20″).
Prepare Ribbing for Sleeve
Row 1 (RS): After turning at the end of the last row of the sleeve ribbing, rotate to work along the long edge of the ribbing, work 2 sc into each of the first 2 sts, [sc in the next st, 2 sc in the next st] rep from [ to ] across. Turn. (49, 52, 55, 61, 67, 70, 73, 79, 85 sts)
Do not fasten off. Continue on to the Sleeve for the size you’re making.
Sleeve Sizes XS (M, L, XL, 3XL, 4XL, 5XL)
Row 1 (WS): Alt-dc in the first st, skip each of the next 2 sts, (dc, ch 3, dc) in the next st, skip each of the next 2 sts, [ 3 dc in the next st, skip each of the next 2 sts, (dc, ch 3, dc) in the next st, skip each of the next 2 sts ] rep from [ to ] across to the last st, dc in the last st. Turn. (39 dc + 8 ch-3’s) (44 dc + 9 ch-3’s) (49 dc + 10 ch-3’s) (54 dc + 11 ch-3’s) (59 dc + 12 ch-3’s) (64 dc + 13 ch-3’s) (69 dc + 14 ch-3’s)
Row 2 (RS): Alt-dc in the first st, 3 dc in the next ch-3 sp, [ (dc, ch 3, dc) in the middle dc of the next 3 dc group, 3 dc in the next ch-3 sp ] rep from [ to ] across to the last st, dc in the last st. Turn. (40 dc + 7 ch-3’s) (45 dc + 8 ch-3’s) (50 dc + 9 ch-3’s) (55 dc + 10 ch-3’s) (60 dc + 11 ch-3’s) (65 dc + 12 ch-3’s) (70 dc + 13 ch-3’s)
Row 3: Alt-dc in the first st, (dc, ch 3, dc) in the middle dc of the next 3 dc group, [ 3 dc in the next ch-3 sp, (dc, ch 3, dc) in the middle dc of the next 3 dc group ] rep from [ to ] across to the last st, dc in the last st. Turn. (39 dc + 8 ch-3’s) (44 dc + 9 ch-3’s) (49 dc + 10 ch-3’s) (54 dc + 11 ch-3’s) (59 dc + 12 ch-3’s) (64 dc + 13 ch-3’s) (69 dc + 14 ch-3’s)
Row 4: Rep Row 2.
Row 5: (Alt-dc, dc) in the first st, (dc, ch 3, dc) in the middle dc of the next 3 dc group, [ 3 dc in the next ch-3 sp, (dc, ch 3, dc) in the middle dc of the next 3 dc group ] rep from [ to ] across to the last st, 2 dc in the last st. Turn. (41 dc + 8 ch-3’s) (46 dc + 9 ch-3’s) (51 dc + 10 ch-3’s) (56 dc + 11 ch-3’s) (61 dc + 12 ch-3’s) (66 dc + 13 ch-3’s) (71 dc + 14 ch-3’s)
Row 6: (Alt-dc, dc, ch 3, dc) in the first st, 3 dc in the next ch-3 sp, [ (dc, ch 3, dc) in the middle dc of the next 3 dc group, 3 dc in the next ch-3 sp ] rep from [ to ] across to the last 2 sts, skip the next st, (dc, ch 3, 2 dc) in the last st. Turn. (44 dc + 9 ch-3’s) (49 dc + 10 ch-3’s) (54 dc + 11 ch-3’s) (59 dc + 12 ch-3’s) (64 dc + 13 ch-3’s) (69 dc + 14 ch-3’s) (74 dc + 15 ch-3’s)
Row 7: Alt-dc in the first st, 3 dc in the next ch-3 sp, [ (dc, ch 3, dc) in the middle dc of the next 3 dc group, 3 dc in the next ch-3 sp ] rep from [ to ] across to the last st, dc in the last st. Turn. (45 dc + 8 ch-3’s) (50 dc + 9 ch-3’s) (55 dc + 10 ch-3’s) (60 dc + 11 ch-3’s) (65 dc + 12 ch-3’s) (70 dc + 13 ch-3’s) (75 dc + 14 ch-3’s)
Row 8: Alt-dc in the first st, (dc, ch 3, dc) in the middle dc of the next 3 dc group, [ 3 dc in the next ch-3 sp, (dc, ch 3, dc) in the middle dc of the next 3 dc group ] rep from [ to ] across to the last st, dc in the last st. Turn. (44 dc + 9 ch-3’s) (49 dc + 10 ch-3’s) (54 dc + 11 ch-3’s) (59 dc + 12 ch-3’s) (64 dc + 13 ch-3’s) (69 dc + 14 ch-3’s) (74 dc + 15 ch-3’s)
Rep Rows 7 – 8 until sleeve (including ribbing) measures 9″ (9.5″, 9.5″, 9.5″, 9.5″, 9.5″, 9.5″), or desired length.
Fasten off. Weave in ends. Make a second sleeve, then continue on to Seaming Sleeves.
Sleeve Sizes (S, 2XL)
Row 1 (WS): Alt-dc in the first st, skip each of the next 2 sts, [ (dc, ch 3, dc) in the next st, skip each of the next 2 sts, 3 dc in the next st, skip each of the next 2 sts ] rep from [ to ] across to the last st, dc in the last st. Turn. (42 dc + 8 ch-3’s) (57 dc + 11 ch-3’s)
Row 2 (RS): Alt-dc in the first st, [ (dc, ch 3, dc) in the middle dc of the next 3 dc group, 3 dc in the next ch-3 sp ] rep from [ to ] across to the last st, dc in the last st. Turn. (42 dc + 8 ch-3’s) (57 dc + 11 ch-3’s)
Rows 3 – 4: Rep Row 2.
Row 5: (Alt-dc, dc) in the first st, [ (dc, ch 3, dc) in the middle dc of the next 3 dc group, 3 dc in the next ch-3 sp ] rep from [ to ] across to the last st, 2 dc in the last st. Turn. (44 dc + 8 ch-3’s) (59 dc + 11 ch-3’s)
Row 6: (Alt-dc, 3 dc) in the first st, [ (dc, ch 3, dc) in the middle dc of the next 3 dc group, 3 dc in the next ch-3 sp ] rep from [ to ] across to the last 2 sts, skip the next st, (dc, ch 3, 2 dc) in the last st. Turn. (47 dc + 9 ch-3’s) (62 dc + 12 ch-3’s)
Row 7: Alt-dc in the first st, [ 3 dc in the next ch-3 sp, (dc, ch 3, dc) in the middle dc of the next 3 dc group ] rep from [ to ] across to the last st, dc in the last st. Turn. (47 dc + 9 ch-3’s) (62 dc + 12 ch-3’s)
Rep Row 7 until sleeve (including ribbing) measures (9″, 9.5″), or desired length.
Fasten off. Weave in ends. Make a second sleeve, then continue on to Seaming Sleeves.
Seaming Sleeves
Step 1: With the RS of a sleeve facing out, fold it in half lengthwise (as shown in the photo below). Line up the stitches from the first and last rows of the sleeve ribbing and the stitches from the rest of the long edge of the sleeve. To make it easier, I recommend using locking stitch markers to hold the edges of the sleeve in place during seaming.
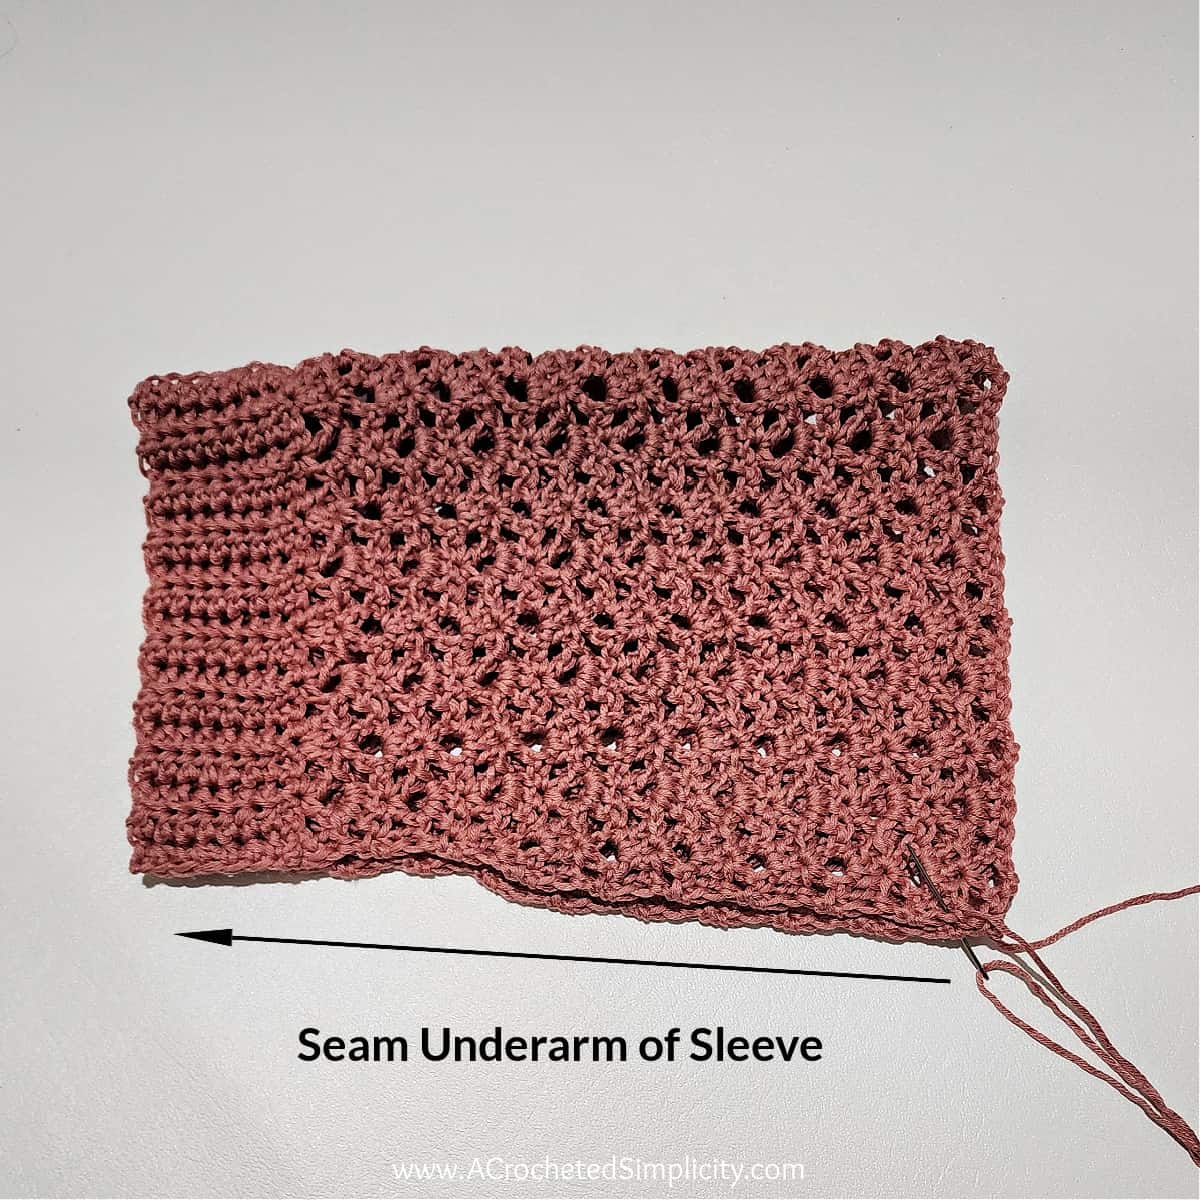
Step 2: With the right side facing out, use a yarn needle and a length of yarn that is 3 – 4 times the length of the seam you’ll be creating, and whipstitch the underarm seam of the sleeve. Repeat for the second sleeve.
Weave in ends. Continue on to Attaching Sleeves.
Attaching Sleeves
Step 1: Turn the sleeve inside out so that the WS is facing out. With the RS of the cardigan facing out, insert the sleeve into the armhole. When you do this, the WS of the cardigan will be facing the WS of the sleeve. Line up the sleeve seam with the bottom of the armhole opening. To make it easier, I recommend using at least 4 locking stitch markers to hold the sleeve in place while seaming.
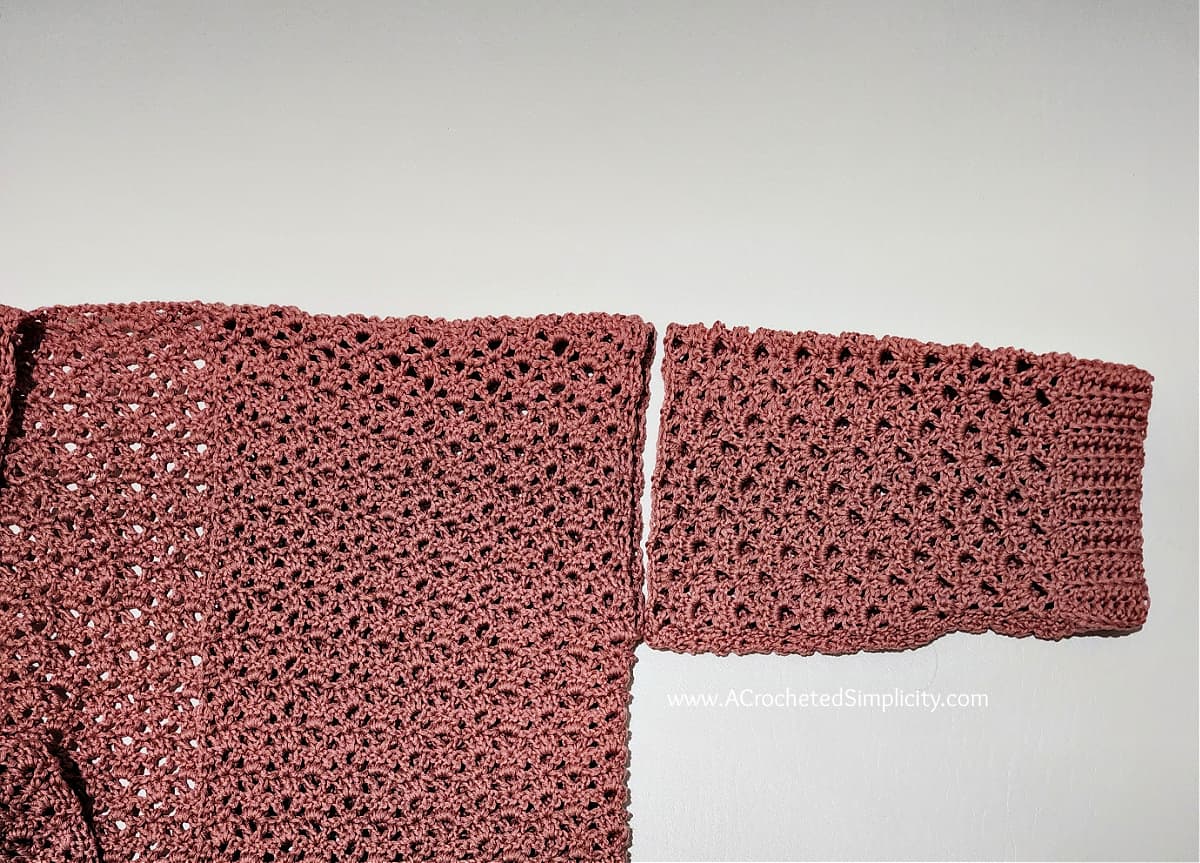
Step 2: Use a yarn needle and a length of yarn that is 3 – 4 times the length of the seam you’ll be creating, and whipstitch the sleeve to the armhole. Repeat for the second sleeve.
Weave in ends. Continue on to Front Cardigan Edging.

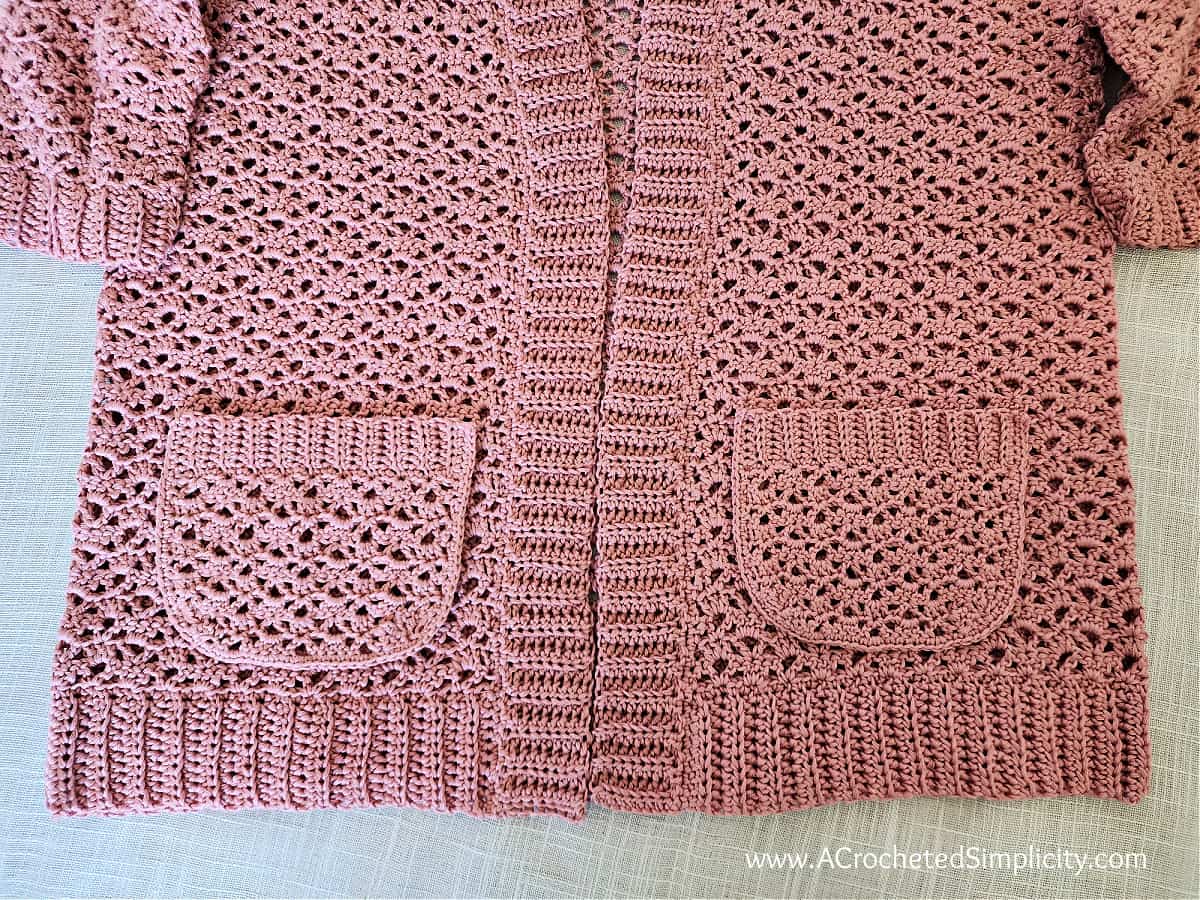
Front Cardigan Edging
Row 1 (RS): With a 5.00mm crochet hook, join yarn with a standing sc in the st marked with a SM, sc in each of the next 9 sts along the bottom ribbing, then working up the right side of the front opening of the cardigan, sc into the next sc, work 2 sc into each dc or alt-dc all the way up to the back neck opening, work 1 sc into each dc and 2 sc into each ch-3 sp across the back neck opening, then rotate to work down the left side of the front opening of the cardigan, work 2 sc into each dc or alt-dc, then 1 sc into the sc before the bottom ribbing, lastly, finish by working 1 sc into each of the 10 ribbing sts. Stitch count isn’t crucial.
Do not fasten off. Continue on to Front Cardigan Ribbing.
Front Cardigan Ribbing
Gauge Note & Tip: Exact gauge is not crucial. Simply adjust your hook size so that your ribbing lays flat. As you’re working the Front Cardigan Ribbing, if your ribbing becomes wavy, this means that your row height is too tall. Try going down a hook size or two.
Ribbing is approximately 2″ wide.
Row 1 (WS): Ch 11, working in the back humps of the ch, hdc in the 2nd ch from your hook, hdc in each of the next 8 chs, hdc2tog in the next ch & same st as ch 11. Do not turn. (10 sts)
Row 2 (RS): ( sl st into the next st along the edge of the cardigan ) 2 times (these 2 sl sts do not count as sts), TURN, BLO hdc in each st across the previous row. Turn. (10 sts)
Row 3: Ch 1, BLO hdc in the first st, BLO hdc in each of the next 8 sts, hdc2tog in the BLO of the next st and both loops of the next st along the edge of the cardigan. Do not turn. (10 sts)
Row 4: ( sl st into the next st along the edge of the cardigan ) 2 times (these 2 sl sts do not count as sts), TURN, BLO hdc in each st across the previous row. Turn. (10 sts)
Rep Rows 3 – 4, ending with a Row 4 Rep, all the way around the front opening of the cardigan.
Working the Final Rows of Front Cardigan Ribbing:
- If you work all the way around the front opening of the cardigan and end perfectly with a Row 4, then fasten off, weave in ends and continue on to Pockets, if you’re making pockets.
- If you work all the way around the front opening of the cardigan, ending with a Row 4 Rep and still have 1 stitch remaining from the Front Cardigan Edging, then work one final Row 3 Rep. Fasten off, weave in ends, and continue on to Pockets, if you’re making pockets.
- If you work all the way around the front opening of the cardigan, ending with a Row 4 Rep and still have 2 stitches remaining from the Front Cardigan Edging, work a Row 3 Rep. Then work a modified Row 4 Rep, only sl st into 1 st along the edge of the cardigan (not 2 as you have been doing), then turn and complete the Row 4 Rep. Fasten off. Weave in ends and continue on to Pockets, if you’re making pockets.
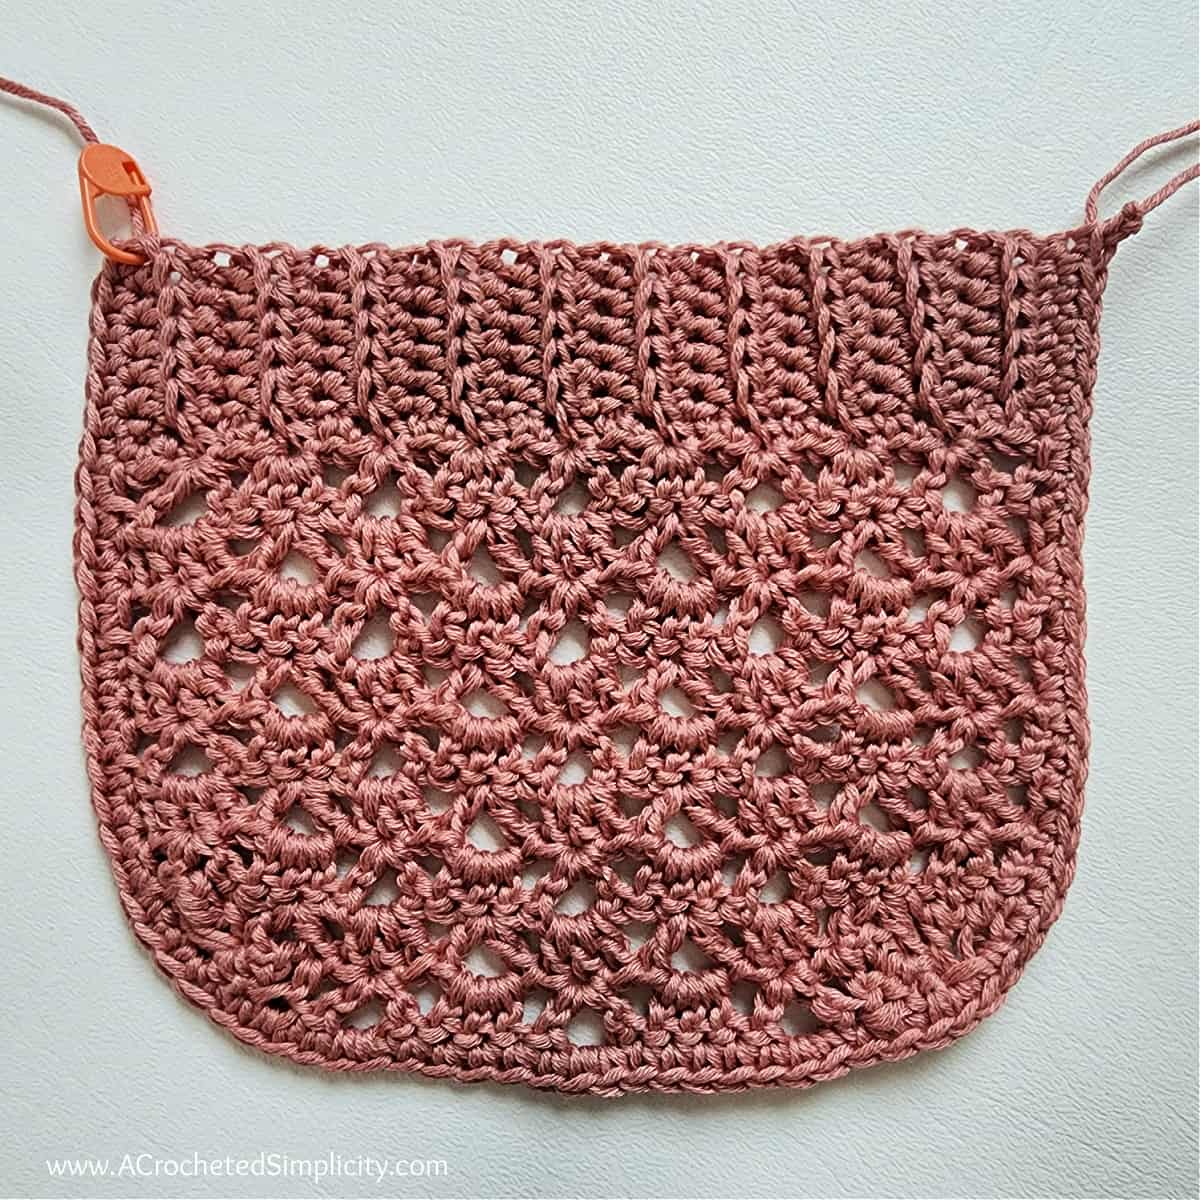
Pocket Ribbing (Make 2 Pockets)
Row 1: With yarn & a 4.00mm crochet hook, ch 7, working in the back humps of the chain, hdc in the 2nd ch from your hook and in each ch across. Turn. (6 sts) Ribbing width is approximately 1.25″
Rows 2 – 20: Ch 1, BLO hdc in each st across. Turn.
Place a SM in the first stitch of the last row of Pocket Ribbing to mark where you will later begin the Pocket Edging.
Do not fasten off. Continue on to Prepare Ribbing for Pocket. Pocket Ribbing should measure approximately 6.25″.
Prepare Ribbing for Pocket
Row 1 (RS): After turning at the end of the last row of the pocket ribbing, rotate to work along the long edge of the ribbing, work 2 sc into each of the first 2 sts, [ sc in the next st, 2 sc in the next st ] rep from [ to ] across. Turn. (31 sts)
Do not fasten off. Continue on to Pocket.
Row 1 (WS): Alt-dc in the first st, skip each of the next 2 sts, (dc, ch 3, dc) in the next st, skip each of the next 2 sts, [ 3 dc in the next st, skip each of the next 2 sts, (dc, ch 3, dc) in the next st, skip each of the next 2 sts ] rep from [ to ] across to the last st, dc in the last st. Turn. (24 dc + 5 ch-3’s)
Row 2 (RS): Alt-dc in the first st, 3 dc in the next ch-3 sp, [ (dc, ch 3, dc) in the middle dc of the next 3 dc group, 3 dc in the next ch-3 sp ] rep from [ to ] across to the last st, dc in the last st. Turn. (25 dc + 4 ch-3’s)
Row 3: Alt-dc in the first st, (dc, ch 3, dc) in the middle dc of the next 3 dc group, [ 3 dc in the next ch-3 sp, (dc, ch 3, dc) in the middle dc of the next 3 dc group ] rep from [ to ] across to the last st, dc in the last st. Turn. (24 dc + 5 ch-3’s)
Rows 4 – 7: Rep Rows 2 – 3.
Row 8: Alt-dc3tog worked into the first 3 dc of the row (skipping over ch-3), [ (dc, ch 3, dc) in the middle dc of the next 3 dc group, 3 dc in the next ch-3 sp ] rep from [ to ] 3 times, (dc, ch 3, dc) in the middle dc of the next 3 dc group, dc3tog over the last 3 dc (skipping over ch-3). Turn. (19 dc + 4 ch-3’s)
Row 9: Alt-dc3tog worked into the first 3 dc of the row (skipping over ch-3), [ (dc, ch 3, dc) in the middle dc of the next 3 dc group, 3 dc in the next ch-3 sp ] rep from [ to ] 2 times, (dc, ch 3, dc) in the middle dc of the next 3 dc group, dc3tog over the last 3 dc (skipping over ch-3). Turn. (14 dc + 3 ch-3’s)
Fasten off. Continue on to Pocket Edging.
Pocket Edging
Row 1 (RS): After fastening off the pocket, turn the pocket so that the RS is facing you, with a 4.00mm crochet hook, join yarn with a standing sc in the st marked with a SM, sc in each of the next 5 sts along the pocket ribbing, then working along the side of the pocket, sc into the next sc, work 2 sc into each dc or alt-dc (14 sts), work 3 sc into each dc3tog or alt- dc3tog (6 sts), then working across the bottom edge of the pocket, work 1 sc into each dc and 2 sc into each ch-3 sp (18 sts), then rotate and work 3 sc into each dc3tog or alt-dc3tog (6 sts), then continue to work along the side of the pocket and work 2 sc into each dc or alt-dc (14 sts), then 1 sc into the sc before the ribbing, lastly, finish by working 1 sc into each of the 6 ribbing sts. (72 sts) Stitch count isn’t crucial.
Finished Size of Pocket: 6.5″ W x 5.25″ H.
Fasten off, leaving a 36″ tail of yarn for attaching the pocket to the cardigan. Make the second pocket, then Continue on to Attaching the Pockets.
Attaching the Pockets
Step 1: Position pockets as shown in the photo below. I lined up the top edge of my pocket with Row 12 of the openwork stitch pattern in the body of cardigan. The bottom of the pocket was approximately 1″ above the bottom ribbing. The edge of my pockets that was closest to the front ribbing was approximately .75″ from the front ribbing.
Step 2: I highly suggest using 4 locking stitch markers (as shown in the photo below) to hold the pocket in place while you sew it onto the cardigan.
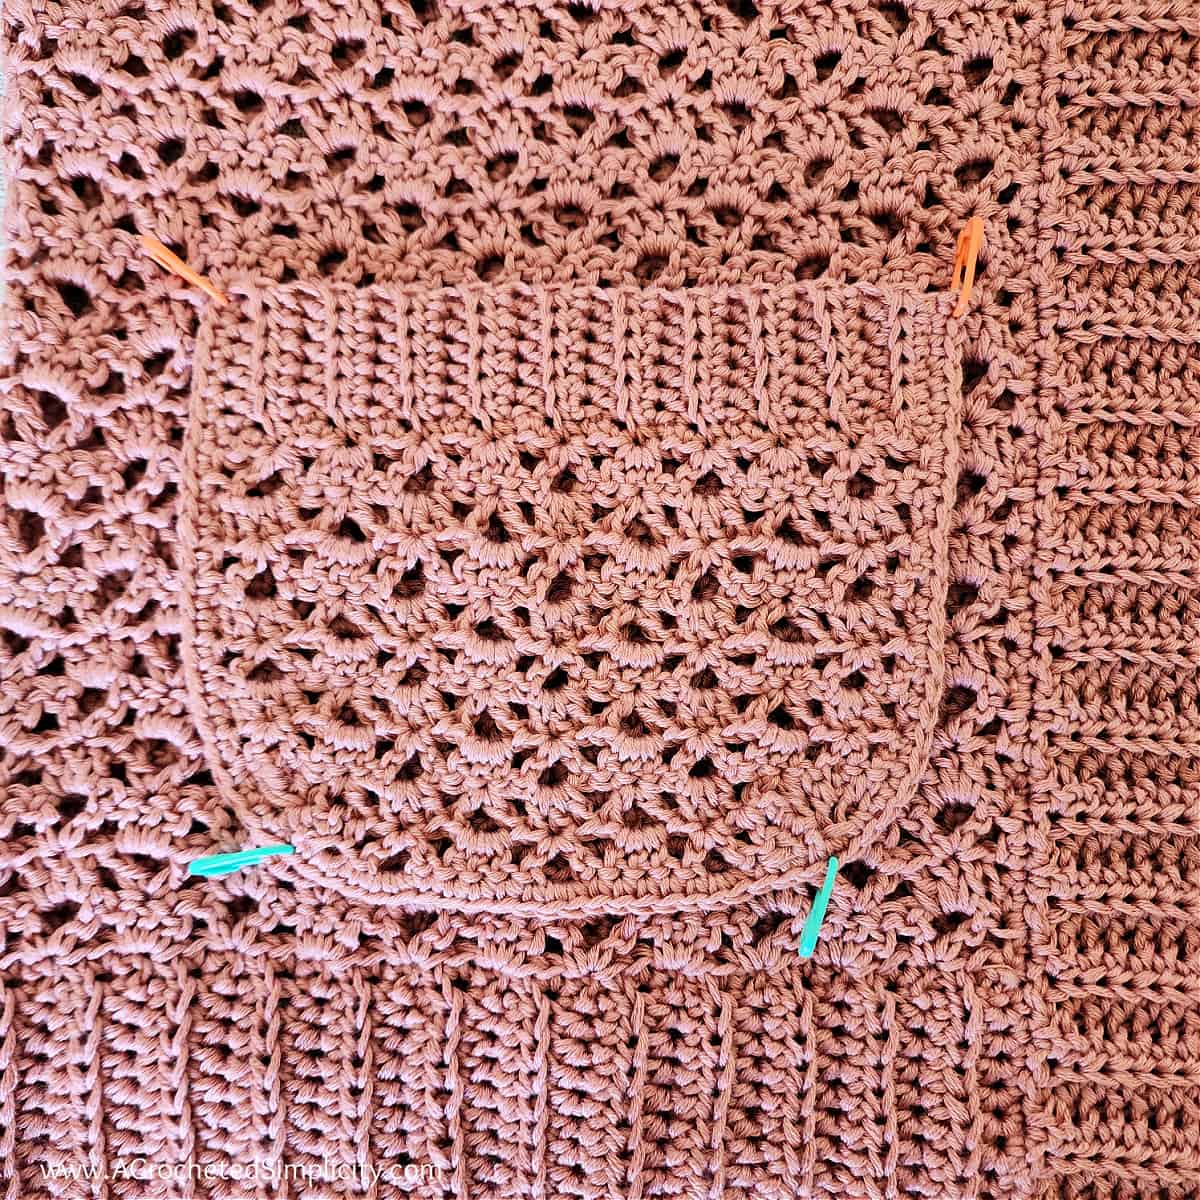
Step 3: Use a yarn needle and the tail of yarn you left when fastening off the pocket edging and sew the pocket onto the cardigan. Fasten off. Weave in ends. Repeat for the second pocket.
That’s it! Block your cardigan (if you prefer) and wear it!!!
If you have never blocked a crochet project before, check out my post on 3 blocking methods!
Frequently Asked Questions
What to crochet during summer?
- There are so many different types of crochet projects you can crochet during summer. From crochet sunhats, summer crochet tops, and swim cover ups, to lightweight blankets, crochet beach totes, and home decor.
What is the best yarn to use for a summer crochet cardigan?
- For a summer crochet cardigan, I recommend a cotton blend yarn. I prefer a cotton bamboo blend because it creates a lightweight crochet cardigan that will help keep you cool. A DK weight or lighter works best.
- I would avoid using wool or a wool blend yarn for a summer crochet cardigan.
How many days does it take to crochet a cardigan?
- The answer to this question really depends on your individual skill level and how quickly you crochet.
- This crochet summer cardigan could easily be completed in a week, if you were to crochet a few hours a day. The lace crochet stitch pattern helps make it work up more quickly than some other crochet cardigan patterns.
I MADE IT! NOW WHAT?
Pin this post!: Save this crochet cardigan sweater pattern to your Pinterest boards so that you can come back and make it again.
Leave a comment below: We love to hear your feedback.
Share Your Finished Projects on Facebook or Instagram: I love to see your finished projects! Share with us on social media and tag me @acrochetedsimplicity or use the hashtag #ACrochetedSimplicity so I can find your posts.
Join us in the Facebook Community Group!
Come share your finished projects with us in the A Crocheted Simplicity Crochet Community Group on Facebook. Join us for fun community events such as crochet alongs, join in on crochet conversations, ask questions, get advice, and share your love for crochet!

More Crochet Cardigan Patterns I Think You’ll Love
- Mila Cardigan
- Celsea Button Up Cardigan
- Aurora Women’s Crochet Cardigan
- Fireside Crochet Cardigan
- Men’s Shawl Collar Cardigan
More Crochet Sweater Patterns
Are you looking for more crochet cardigan sweater patterns? We have several more patterns for crochet clothes, including matching sweaters for mothers and daughters and even for fathers and sons.
your CROCHET SUMMER CARDIGAN above is an ideal wear for 3 out of 4 seasons of the year but made in heaver weight yarn it would suit for the winter as well
i was taken back to 40th birthday 32 years ago when i was studying art & design in my local art school
during the time i was there we given projects one was to design a garment using the local tropical, to worn in the tropics
the pictures showing the cardigan being modelled in the same tropical garden setting the project i was set 32 years ago
in fact the project was later set for that years intake as compotation entries
one of 3 judges designed Princess Diana’s (Princess of Wales) wedding gown
i was awarded second place and another student has first place
there was an awards ceremony in the same location were we meet the 3 judges which was on TV that evening and a time the art school was in the news
That sounds like it was a lot of fun!!! Thank you for sharing your story. 🙂
I think this would be a great sweater to make even not in the summer! I get warm at work at times, so a lightweight sweater would be perfect. Very pretty design!! ❤️
This cardigan is super cute. I’m always cold, so this would be great for a hot summers day when I end up in a shop or restaurant that has the AC set too cool.
I love this cardigan and would love to win a year of free PDF’s because your patterns are so gorgeous. All the best in 2024.
I’ve got ~1200m of a discontinued deramores dk in cream that I’ve been wondering what to make with…. This looks just perfect! 🤩
Beautiful sweater for spring!
Made this one!
This would be perfect for work! 😍
I would love to make this! i have never made a cardigan before. i love the detailed stitch pattern and it has pockets!
Thank you for sharing all your creative patterns with us. Happy New Year!
I love this pattern and can’t wait to make it for myself! I love your patterns.
I plan on making this sweater for me! I never make projects for me so this will be perfect. Thank you
I love your patterns and can’t wait to make this cardigan. I’m always looking for them, as I love them. Happy New Year and all the best this year!
Hi, this Cardigan looks so beautiful 💖! I have never made a Cardigan before, I’m thinking of trying my hand at making this one. Is there a diagram that shows how it looks as you are crocheting the different sections or is that not really necessary!
Hi Sandra,
There is a bonus garment schematic in the Ad-Free PDF. And there are several photos in the written pattern that’s free on the blog (they’re also in the PDF). If you ever get stuck on something, or just want to make sure you’re on the right track, you’re always welcome to e-mail me with questions. 🙂
Happy Crocheting,
Jennifer
Hi! I’m currently making this cardigan (bought the kit off of lion brand!!), and I have a question. I’m at the front ribbing, row 1. Once I do 8 half double crochets and then hdc2tog, I’m not sure how I’m supposed to have 10 stitches (and I seem to have an unworked chain space on my original chain). Am I missing a step?
Hi Crystal,
You’ll first hdc in the 2nd ch from your hook, then work 8 hdc, then the hdc2tog for a total of 10 sts.
Happy Crocheting,
Jennifer