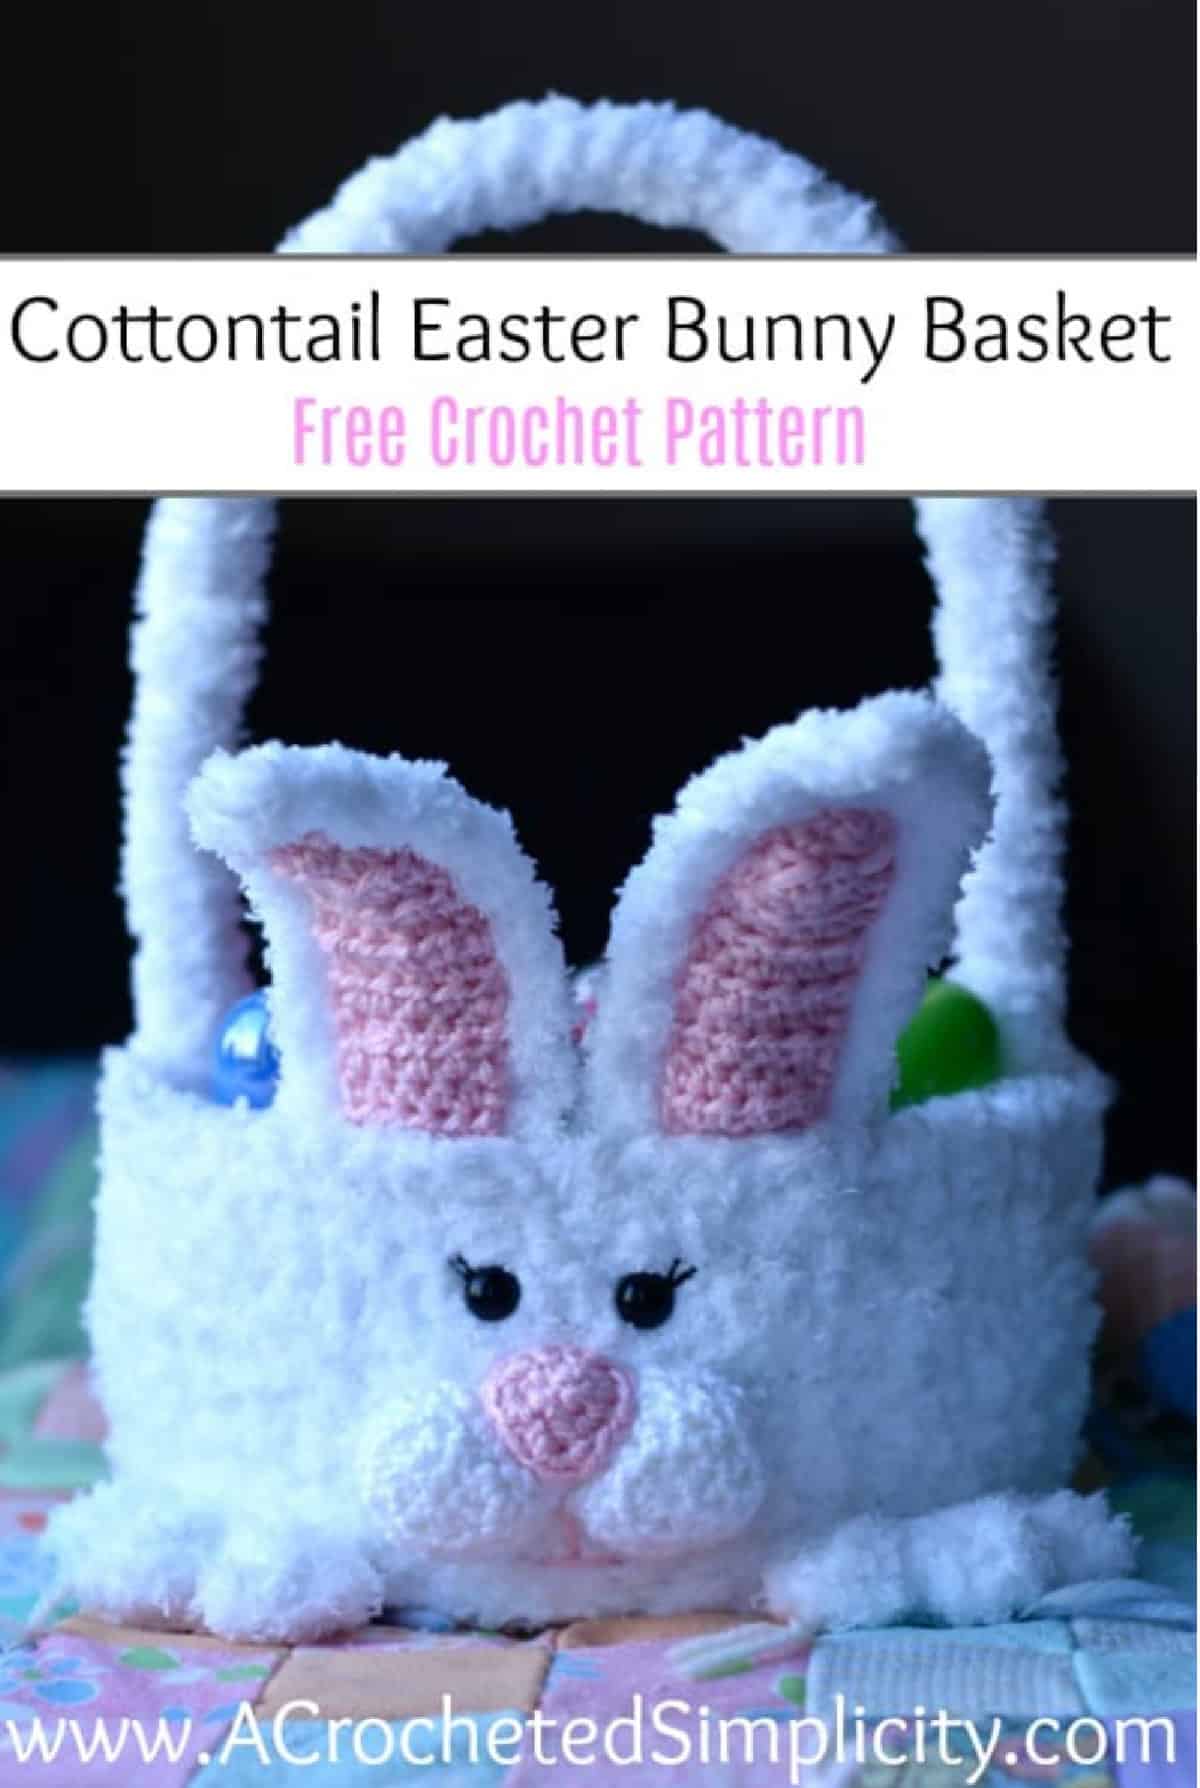
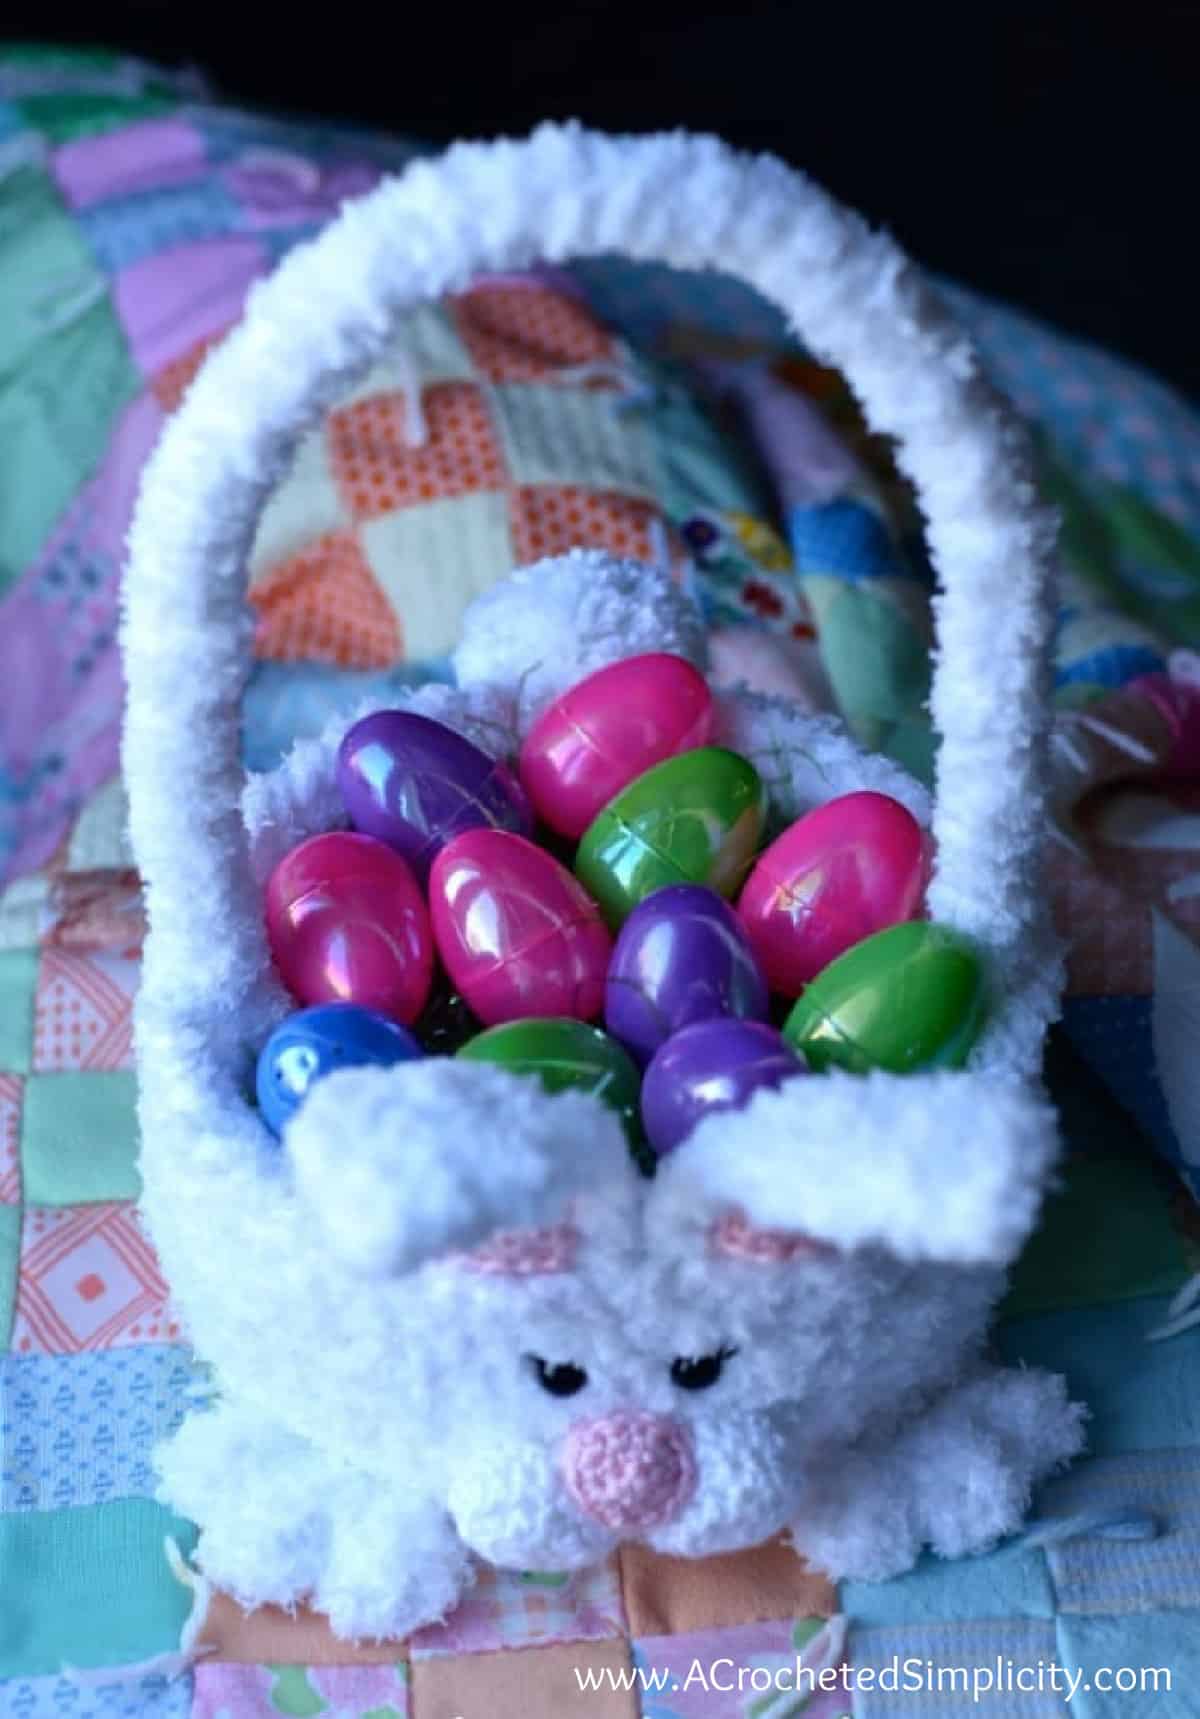
Crochet Easter Basket – Cottontail Bunny Easter Basket

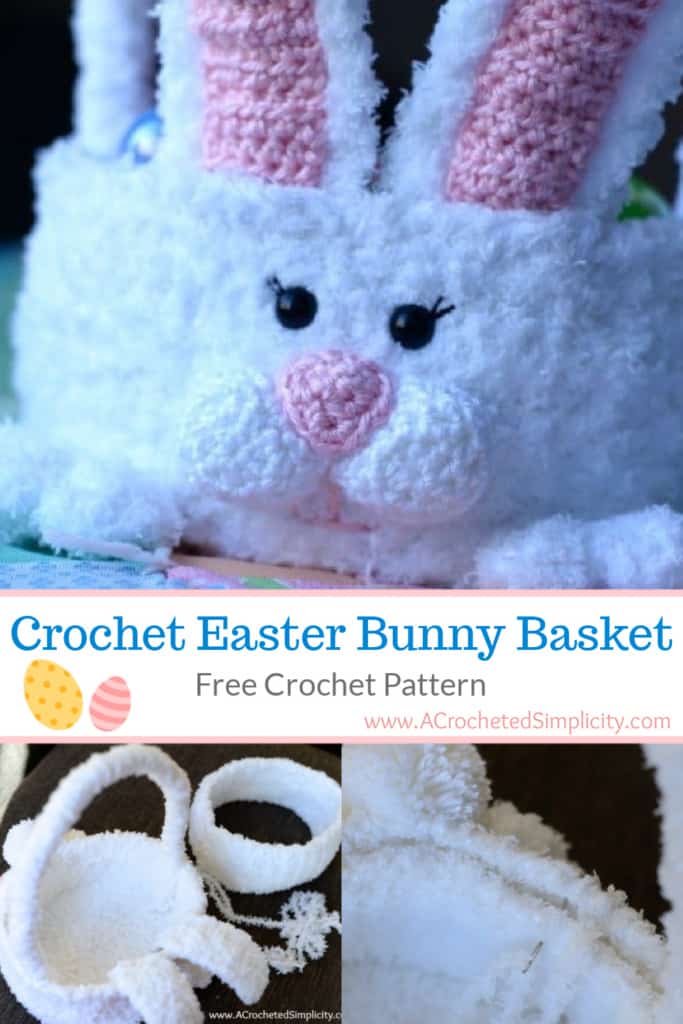
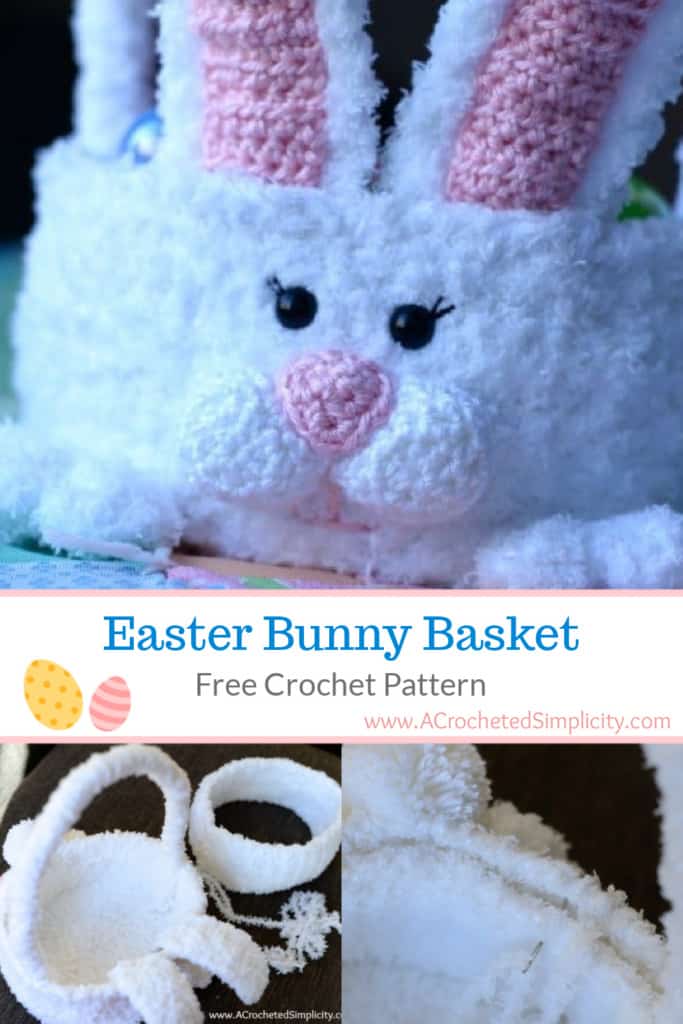
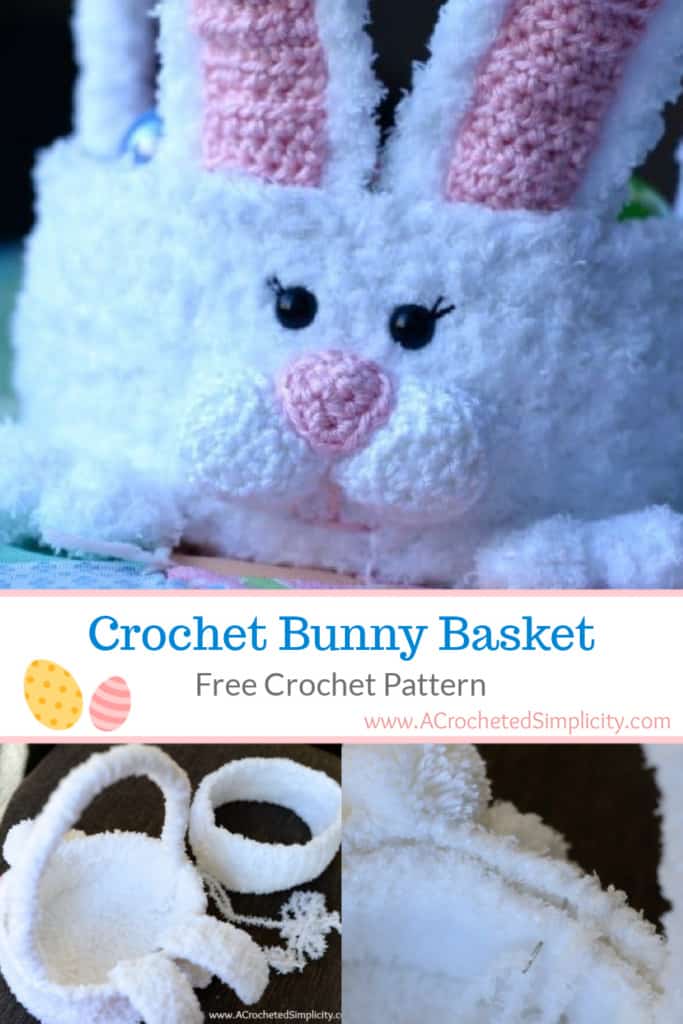
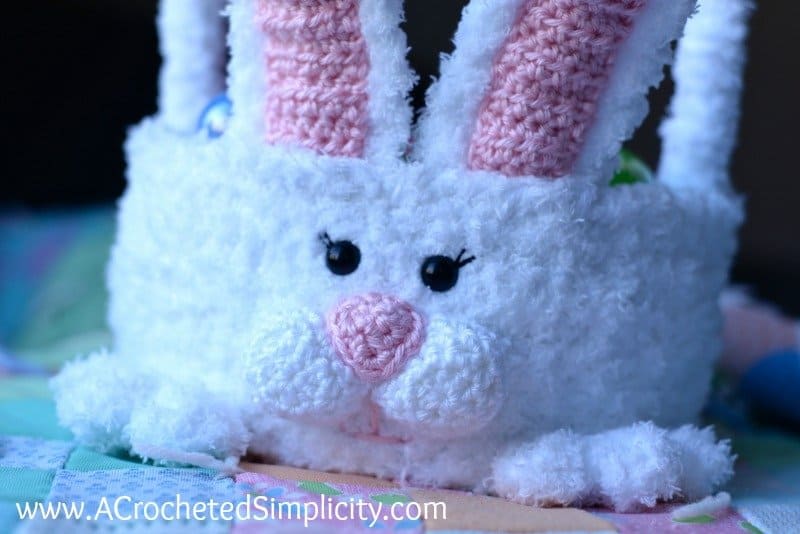
Add a little hop to your little one’s step on Easter morning with a cute crochet Easter basket. This bunny basket is sweet and fluffy and has the cutest little bunny feet.
Fill with Easter grass and your little one will have the cutest crochet egg basket at the Easter egg hunt! Or, leave the handle off and you’ll have a cute bunny basket to add to your Easter decor.
You can find the crochet Easter Bunny basket pattern free in this post below, or an ad-free print friendly version on Ravelry, or on Etsy (aff).
This cute crochet Easter basket was made for my oldest granddaughter, Elayna. After the two youngest were born I made them each crochet bunny baskets too. I used different accent colors so the kids could easily tell which one is theirs.
My grandkids LOVE their crochet Easter baskets and each year they send me a picture of themselves next to them. It warms this grandma’s heart.
I hope this little bunny crochet Easter basket becomes a favorite of your kids and grandkids too!
Related: If you’re looking for a basic crochet basket pattern that you can customize, our Easy Easter Basket Crochet Pattern that is perfect for that! It makes a great adult Easter basket.
How to Crochet an Easter Basket
This free crochet bunny rabbit pattern for a basket is worked from the bottom up.
First, you’ll crochet the base of the basket and then the sides. Next, you’ll crochet the bunny feet and assemble them. Then, you’ll crochet the nose and cheeks. Then crochet the long bunny ears. After you crochet all of the pieces, you’ll attach them to the basket.
After adding the facial features to the fluffy bunny basket, it’s time to add the handle (if you’re adding one).
Lastly, you can crochet a liner and add plastic canvas to reinforce the sides of your basket. This is optional.
Yarn
Bunnies are made to be soft and fluffy and Bernat Pipsqueak is the perfect yarn for this one. I used Bernat Pipsqueak yarn and Caron Simply Soft in white for the crochet Easter bunny and Caron Simply Soft in light pink for bunny’s features.
Our Pipsqueak Bunny Bag is perfect for collecting eggs in an Easter egg hunt!
Yarn Tip!
I’ve heard many crocheters say that it’s difficult to crochet with Bernat Pipsqueak yarn because the fibers make it hard to see the stitches clearly.
Whenever I’m working with this yarn I like to work a strand or two of Pipsqueak yarn with one strand of Caron Simply Soft, together as one.
Doing so really helps to be able to see, and especially feel, the stitches. It also makes working with the yarn much easier, and in the case of our Easter basket, it adds the needed stability to such a soft yarn.
Crochet Easter Bunny Basket – Free Crochet Basket Pattern
The free crochet Easter basket pattern is below, but if you love to work offline, I’ve got a couple other great options for you.
Purchase the ad-free, printable PDF, including all photo tutorials, on Ravelry, or on Etsy (aff).
This post contains affiliate links.
Materials
- Yarn: Bernat Pipsqueak in Whitey White (245 yards) & Caron Simply Soft in White (300 yards) & Soft Pink (50 yards)
- Crochet Hooks: K/10.5 / 6.5mm; J/10/6.00mm; I/9/5.50mm; H/8/5.00mm (My favorite crochet hooks are the Clover Amour Hooks, I’ve never had an ache in my hand since switching)
- Scissors
- Yarn Needle
- 12mm Solid Black Eyes (2)
- Black Thread (4 yards)
- 24″ – 28″ (3/4″) Cotton Piping/Cording (purchased by the yard at craft stores)
- Plastic Canvas: (2) 10-1/2″ x 13-1/2″ sheets (optional)
- Aluminum Craft Wire or Chenille Stems/Pipe Cleaners (optional)
Abbreviations (U.S. Terms)
- ch(s): chain(s)
- sl st: slip stitch
- sc: single crochet
- hdc: half double crochet
- BPhdc: back post half double crochet
- rev sc: reverse single crochet / crab stitch
- cluster st: 2 double crochet cluster stitch
- sc2tog: single crochet decrease
- hdc2tog: half double crochet decrease
- st(s): stitch(es)
- yo: yarn over
- RS: right side
- Rep: repeat
- Rnd: round
Gauge
- See measurements listed throughout pattern.
Finished Size
- One Size: 4-3/8″ H x 8.75″ Diameter (not including handle)
Notes
- Beginning chain(s) are not included in stitch count, unless noted otherwise.
- First stitch of each row is worked into the same stitch as beginning chain, unless noted otherwise.
- I tend to crochet on the tighter side. You may find yourself needing to go down a hook size (or two) to properly meet gauge. However, gauge isn’t crucial because this isn’t a garment.
- Yarn Notes: Bernat Pipsqueak in whitey white and Caron Simply Soft in white, were used for the basket shown in the photos. Other yarns used were Caron Simply Soft in soft pink.
- Caron Simply Soft, worsted (4) weight yarn (6 oz / 170 g /315 yards / 288 m / 100% acrylic).
- Bernat Pipsqueak, bulky (5) weight yarn (8.8 oz / 250 g / 254 yards / 232 m / 100% polyester).
- Yardage
- Bernat Pipsqueak: 245 yards
- Caron Simply Soft White: 300 yards
- Caron Simply Soft Soft Pink: 50 yards
Special Stitches
- Back Post Half Double Crochet (BPhdc): Yo, insert hook from back to front to back around the post of the designated stitch, yo, pull up a loop, yo, pull through all loops on hook.
- Reverse Single Crochet (rev sc): This stitch is worked from left to right. With the right side of the work facing you, working left to right, insert hook in next stitch to the right, yo, pull up a loop, yo, pull through both loops on hook.
- 2 DC Cluster Stitch (cluster st): Yo, insert hook into designated st, yo, pull up a loop, yo, pull through 2 loops, yo, insert hook into same st, yo, pull up a loop, yo, pull through 2 loops, yo, pull through all remaining loops.
Crochet Easter Basket Pattern
Crochet Basket Base
Yarn Note: 2 strands of Caron Simply Soft in White & 1 strand of Bernat Pipsqueak, held together and worked as one.
Rnd 1: Using a 6.5mm crochet hook, begin with a magic ring, sl st into magic ring, ch 1, work 8 hdc in magic ring. Pull yarn to tighten ring and join with sl st to 1st hdc. (8 sts)
Rnd 2: Ch 1, 2 hdc in each st around. Join. (16 sts) *Diameter at this point: 2.625″.
Rnd 3: Ch 1, *2 hdc in the next st, hdc in the next st, rep from * around. Join. (24 sts) *Diameter at this point: 3.75″.
Rnd 4: Ch 1, *2 hdc in the next st, hdc in each of the next 2 sts, rep from * around. Join. (32 sts) *Diameter at this point: 4.75″.
Rnd 5: Ch 1, *2 hdc in the next st, hdc in each of the next 3 sts, rep from * around. Join. (40 sts) *Diameter at this point: 5.625″.
Rnd 6: Ch 1, *2 hdc in the next st, hdc in each of the next 4 sts, rep from * around. Join. (48 sts) *Diameter at this point: 6.75″.
Rnd 7: Ch 1, *2 hdc in the next st, hdc in each of the next 5 sts, rep from * around. Join. (56 sts) *Diameter at this point: 7.75″.
Rnd 8: Ch 1, *2 hdc in the next st, hdc in each of the next 6 sts, rep from * around. Join. (64 sts) *Diameter at this point: 8.75″.
Do not fasten off. Continue on to the Sides of Basket.
Sides of Basket
Rnd 1: Ch1, BPhdc around each st around. Join. (64 sts)
Rnds 2 – 7: Ch 1, hdc in each st around. Join.
Rnd 8: Ch 1, rev sc in each st around. Join.
Fasten off. Weave in ends. Approximate height of basket: 4.375″. Continue on to Back Feet.
Back Bunny Feet (Make 4)
Yarn Note: 1 strand of Caron Simply Soft in White & 1 strand of Bernat Pipsqueak, held together and worked as one.
Row 1: Using a 6.00mm crochet hook, begin with a magic ring, sl st into magic ring, ch 1, work 4 hdc into magic ring. Do not join. Pull yarn to tighten ring. Turn. (4 sts)
Row 2: Ch 1, hdc in each st across. Turn.
Row 3: Ch 1, 2 hdc in first st, hdc in each of the next 2 sts, 2 hdc in last st. Turn. (6 sts)
Rows 4 – 6: Ch 1, hdc in each st across. Turn.
Row 7: Ch 2, cluster st in first st, ch 2, *sl st in each of the next 2 sts, ch 2, cluster st in the same st as ch-2, ch 2, rep from *, then sl st in the last st. (3 bunny toes made)
Fasten off. Leave a tail of the Pipsqueak yarn on 2 of them to whipstitch 2 back feet together later. Approximate size: 3.75″ H x 3.25″ W. Continue on to Toes & Pads.
Bunny Toes (Make 6)
Yarn Notes: 1 strand of Caron Simply Soft in soft pink.
Rnd 1: Using a 5mm crochet hook, ch 2, work 8 sc in 2nd ch from hook. Join w/ a sl st to 1st st. (8 sts)
Fasten off leaving a tail of yarn to sew onto foot. Using a yarn needle, sew 1 toe onto each toe of 2 of the feet. Continue on to Pads.
Pads on Bunny Feet (Make 2)
Yarn Notes: 1 strand of Caron Simply Soft in soft pink.
Rnd 1: Using a 5mm crochet hook, ch 2, work 8 sc in 2nd ch from hook. Join w/ a sl st to 1st st. (8 sts)
Rnd 2: Ch1,*hdc in each of the next 3 sts, 3 hdc in next st, rep from *. Join. (12sts)
Fasten off leaving a tail of yarn to sew onto foot. Using a yarn needle, sew 1 pad onto 2 of the feet. Continue on to Back Bunny Foot Assembly.
Back Bunny Foot Assembly
Using a yarn needle and tail of Pipsqueak yarn, whipstitch together 1 plain foot and 1 foot with the toes and pads. Lightly stuff before completing seam.
Weave in ends. Continue on to Front Feet.
Front Bunny Feet (Make 4)
Yarn Note: 1 strand of Caron Simply Soft in White & 1 strand of Bernat Pipsqueak, held together and worked as one.
Row 1: Using a 6.00mm crochet hook, ch 7, hdc in the 2nd ch from your hook and in each ch across. Turn. (6 sts)
Row 2: Ch 2, cluster st in first st, ch 2, *sl st in each of the next 2 sts, ch 2, cluster st in the same st as ch-2, ch 2, rep from *, then sl st in the last st. (3 bunny toes made)
Fasten off. Leave a tail of the Pipsqueak yarn on 2 of them to whipstitch 2 front feet together later. Approximate size: 1.75″ H x 3.25″ W. Continue on to Front Bunny Foot Assembly.
Front Bunny Foot Assembly
Using a yarn needle and tail of Pipsqueak yarn, whipstitch 2 front feet together.
Weave in ends. Continue on to Bunny Nose.
Bunny Nose
Yarn Notes: 1 strand of Caron Simply Soft in soft pink.
Row 1: Using a 5mm crochet hook, ch 4, working in the back hump of the foundation ch, sc in the 2nd ch from your hook, sc in each remaining ch. Turn. (3 sts)
Row 2: Ch 1, sc2tog, sc in next st. Turn. (2 sts)
Row 3: Ch 1, sc2tog. (1 st)
Rnd 4: Ch 1, sc evenly around nose, working an extra sc in each of the 3 corners.
Fasten off leaving a tail to sew onto basket. Continue on to Cheeks.
Cheeks (Make 2)
Yarn Notes: 1 strand of Caron Simply Soft in white.
Rnd 1: Using a 5mm crochet hook, ch 2, work 8 hdc in 2nd ch from your hook. Join w/ a sl st to the 1st st. (8 sts)
Rnd 2: Ch 1, *2 hdc in the next st, hdc in the next st, rep from * around. Join. (12 sts)
Rnd 3: Ch 1, *2 hdc in the next st, hdc in the next st, rep from * around. Join. (18 sts)
Rnd 4: Ch 1, hdc in each st around. Join.
Fasten off leaving a tail to sew onto basket. Continue on to Outer Ear.
Outer Ear (Make 2)
Yarn Notes: 1 strand of Bernat Pipsqueak in white.
Row 1: Using a 5.5mm crochet hook, ch 5, hdc in the 2nd ch from your hook and in each ch across. Turn. (4 sts)
Row 2: Ch 1, 2 hdc in the first st, hdc in each of the next 2 sts, 2 hdc in the last st. Turn. (6 sts)
Row 3: Ch 1, hdc in each st across. Turn.
Rep Row 3 until ear measures 5″.
Decrease Rows
Row 1: Ch 1, hdc2tog, hdc in each of the next 2 sts, hdc2tog. Turn. (4 sts)
Row 2: Ch 1, hdc2tog twice. Turn. (2 sts)
Row 3: Ch 1, hdc2tog. (1 st)
Fasten off. Weave in ends. Continue on to Inner Ear. Approximately 2-1/2″ W x 7″ L.
Inner Ear (Make 2)
Yarn Notes: 1 strand of Caron Simply Soft in soft pink.
Row 1: Using a 5.00mm crochet hook, ch 4, hdc in the 2nd ch from your hook and in each ch across. Turn. (3 sts)
Row 2: Ch 1, 2 hdc in the first st, hdc in the next st, 2 hdc in the last st. Turn. (5 sts)
Row 3: Ch 1, hdc in each st across. Turn.
Rep Row 3 until ear measures 4″.
Decrease Rows
Row 1: Ch 1, hdc2tog, hdc in the next st, hdc2tog. Turn. (3 sts)
Row 2: Ch 1, hdc2tog in the first & last sts, skipping the middle st. Turn. (1 st)
Fasten off. Weave in ends. Continue on to Crochet Bunny Ears Assembly. Approximately 1-1/2″ W x 4-1/2″ L.
Crochet Bunny Ears Assembly
Note: I added 1 pipe cleaner between the inner and outer layers of each ear.
Step 1: Fold one pipe cleaner in half. Fold the ends up again so that they are shorter than the inner ear.
Step 2: Lay the folded pipe cleaner on top of the outer ear. Lay the inner ear on top of the pipe cleaner on the outer ear, leaving an equal amount of space around the edge.
Step 3: Using a yarn needle and piece of yarn, sew the inner ear to the outer ear. Be careful that you don’t sew all the way thru the ear so that your stitches aren’t seen.
Repeat for the second ear. Continue on to Attaching Parts to the Bunny Basket.
Attaching Parts to the Bunny Basket
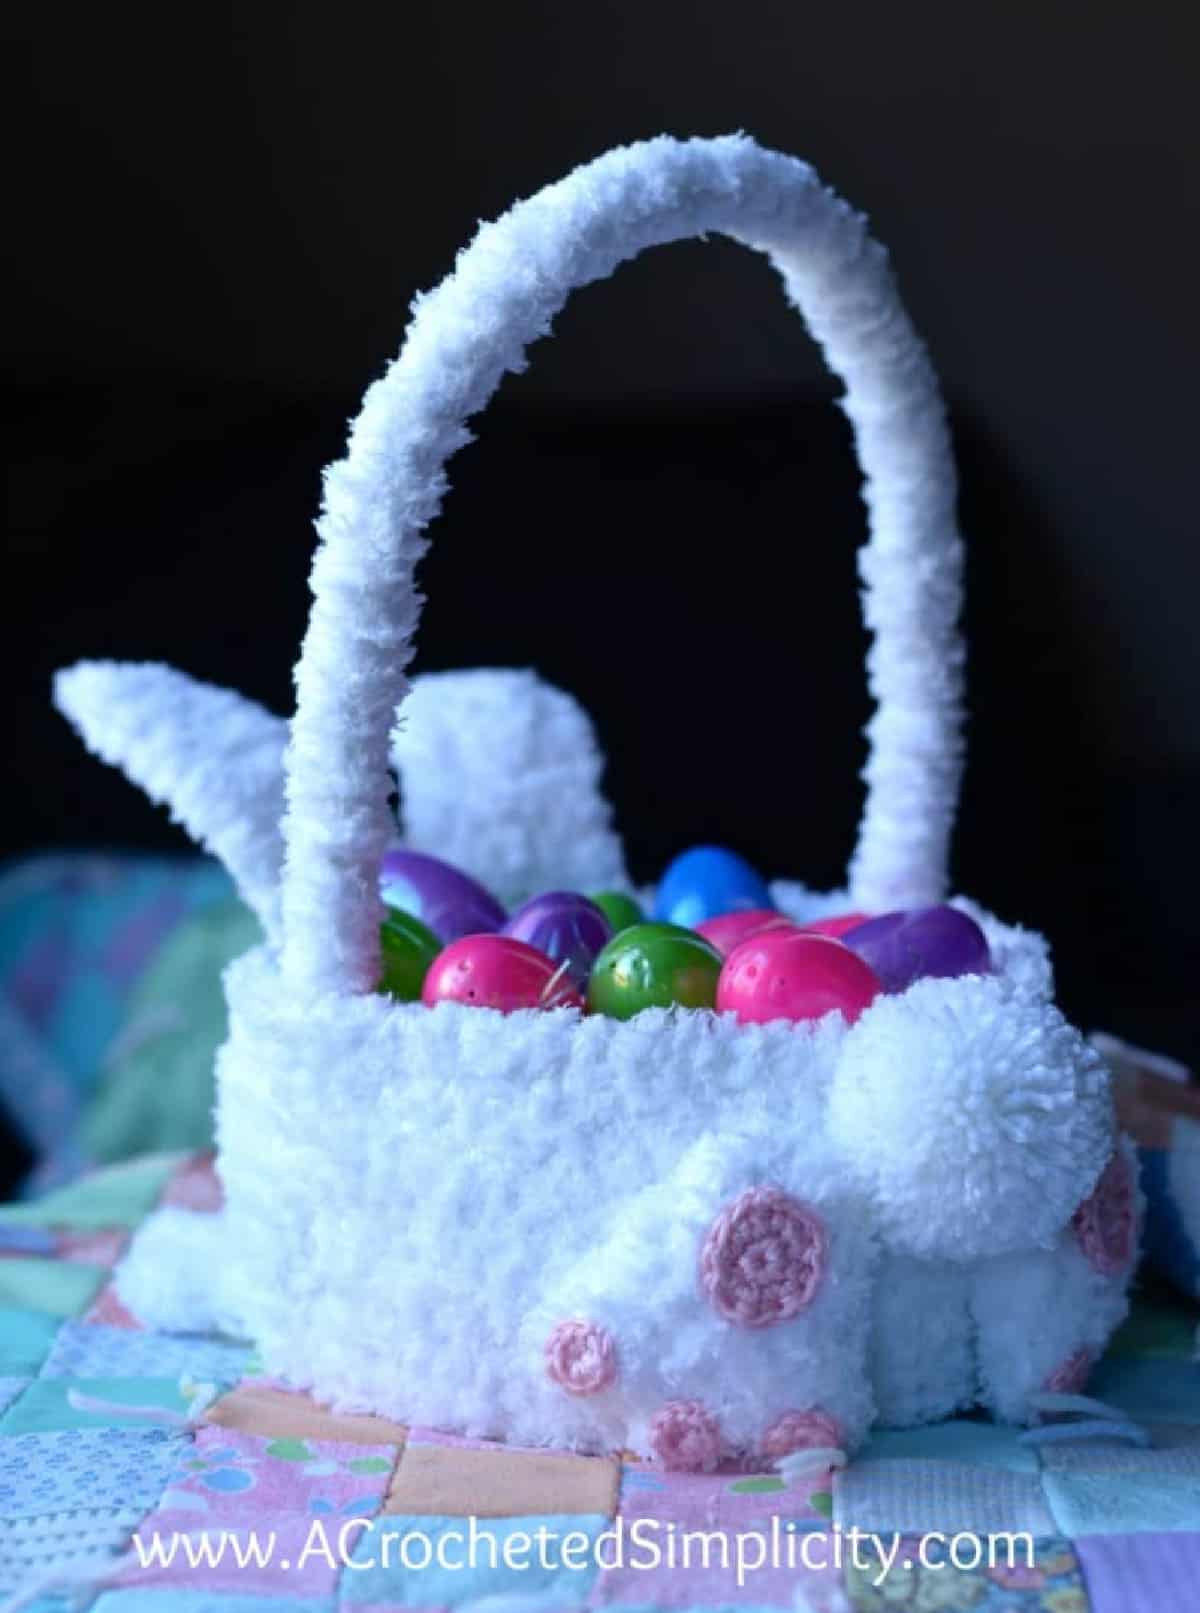
Tail: Make 2-1/2″ diameter yarn pom. I used a Clover Pom Maker to make mine. Make sure to leave a tail of yarn long enough to sew the pom onto the basket. Secure the pom near the upper edge of the basket, as shown in the photo below.
Back Feet: Using an 18″ strand of Pipsqueak yarn and a yarn needle, attach both back feet near the tail. Position the feet with the toes down and heels up. Place the heels closer to the tail and slightly angle the toes out to the right and left. See photo below.
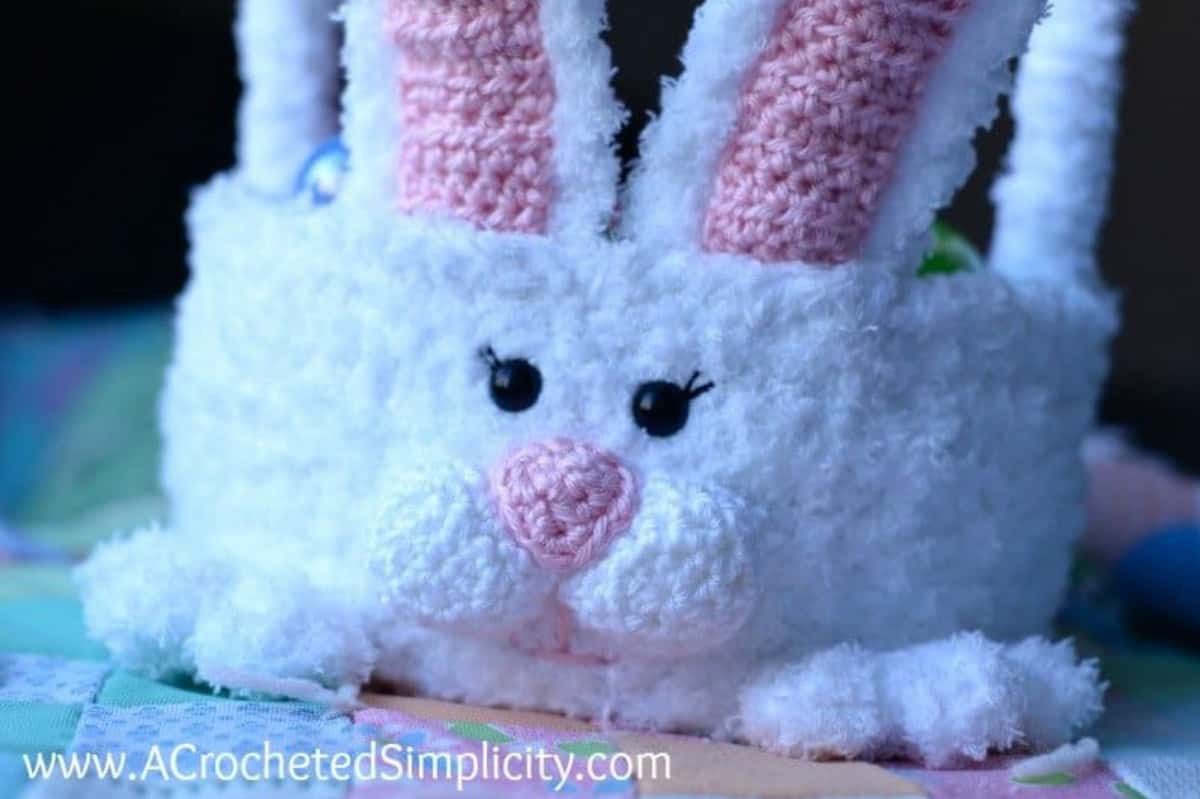
Cheeks: Fold the basket in half at the tail to make it easy to find the front center where you’ll attach the cheeks. Mark the front center with a scrap of yarn for a visual. Position the cheeks near the middle of the side, on the front of the basket (approximately 2″ down from the top edge of the basket). Use a yarn needle and 12″ piece of Caron Simply Soft yarn in white and attach 1 cheek to the basket to the right of the center you marked with the scrap piece of yarn. Sew the cheek on by sewing through the stitches of the last round of the cheek and the side of the basket. Repeat for the left cheek except place this one to the left of the center you marked with the scrap piece of yarn. After attaching both cheeks to the basket, tack stitch the cheeks together on the sides where they touch. See photo below.
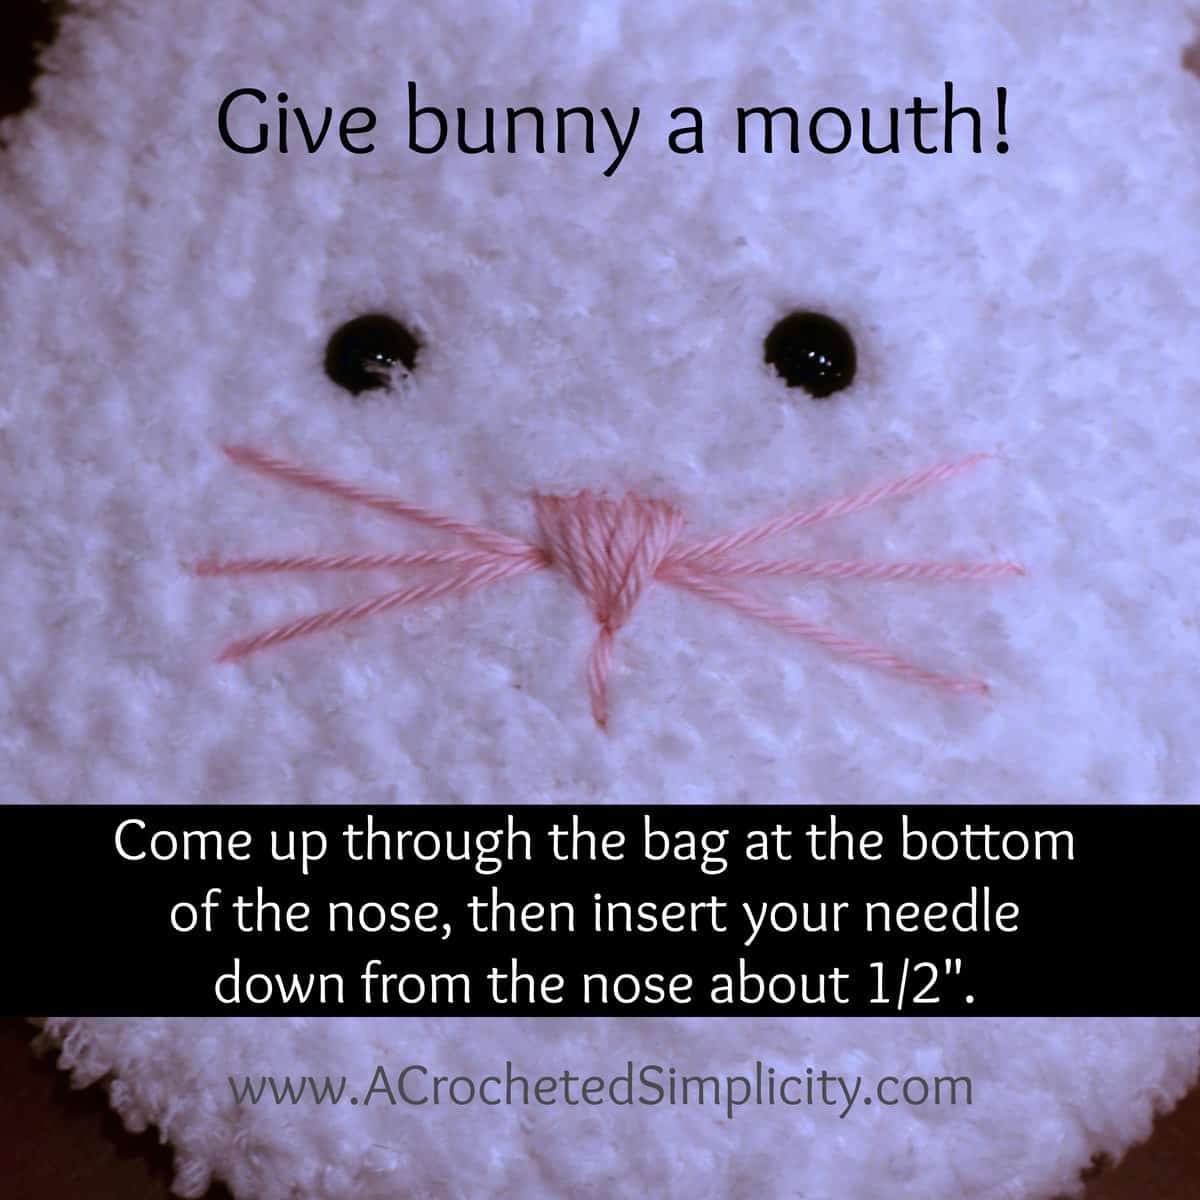
Nose: Center the nose between the cheeks, but on top of them. Place the tip of the nose pointing down in the center, place the opposite edge near the side of the basket. Use a 10″ piece of Caron Simply Soft yarn in soft pink and sew the nose onto the cheeks and side of basket. Lightly stuff if needed to keep nose from sinking between the two cheeks. See photo below.
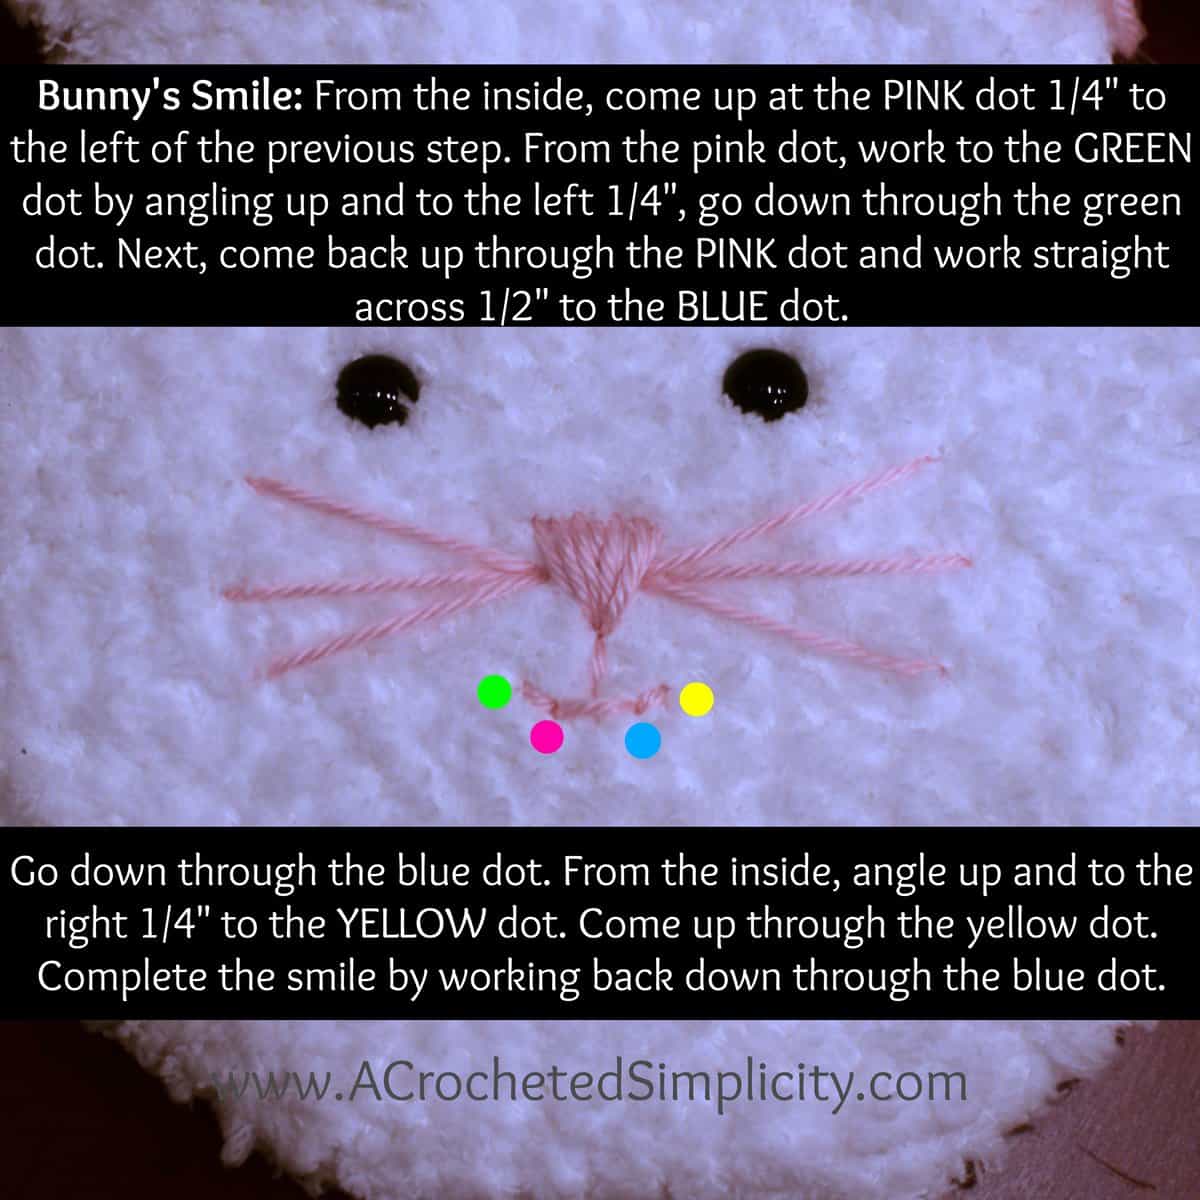
Mouth: See tutorial below.
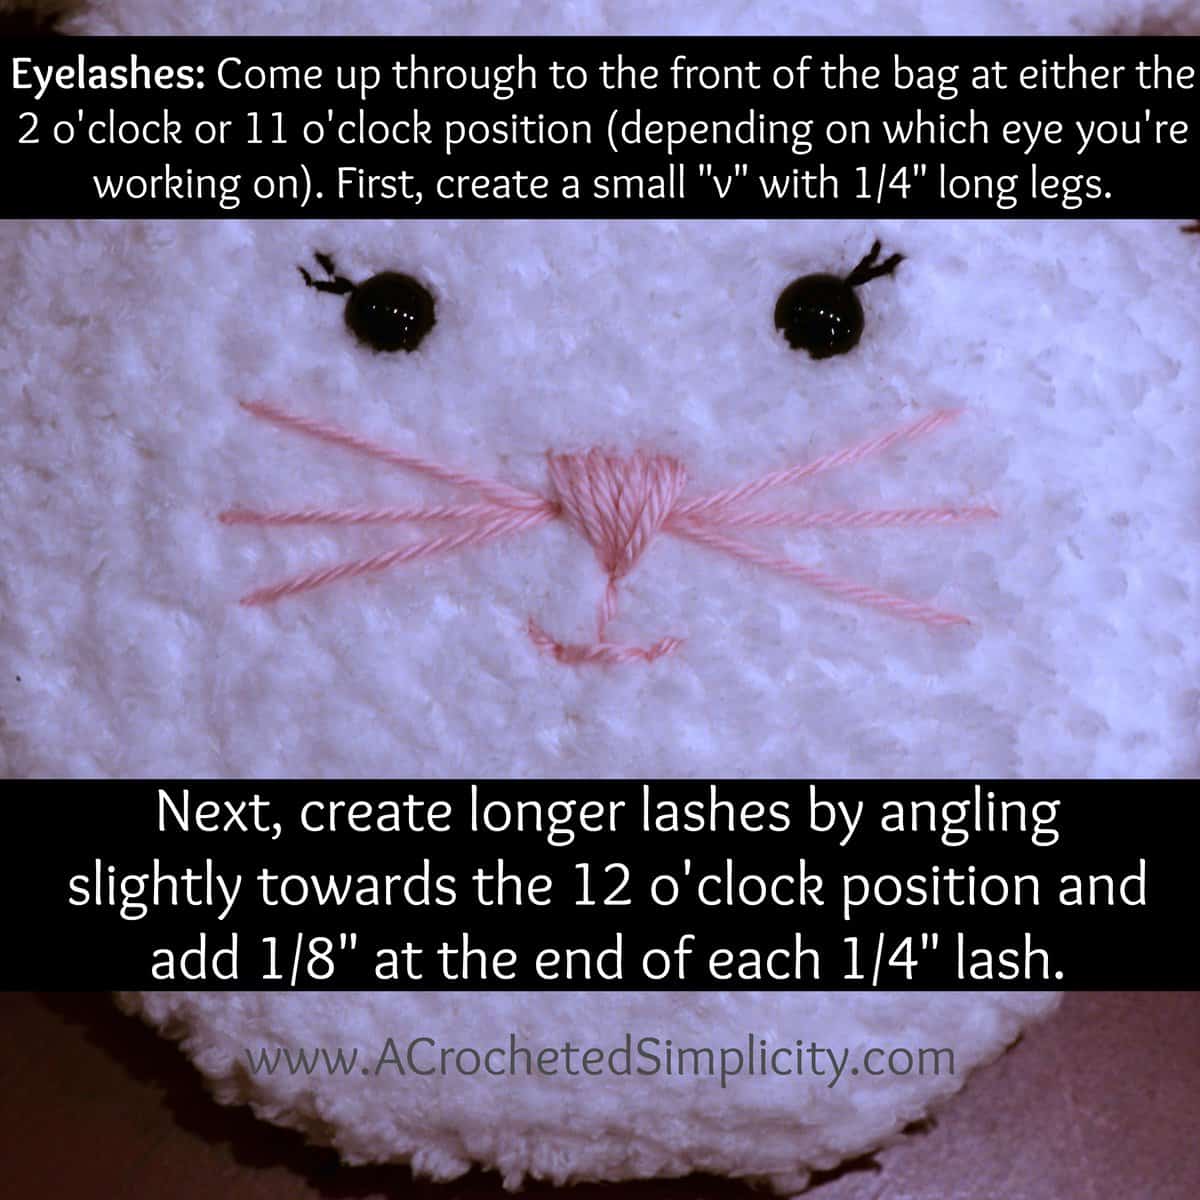
Eyes & Eyelashes: Position black safety eyes on face as shown in the photos and attach securely. See tutorial below for eyelashes. Center the eyes approximately 1-3/8″ down from the top edge of the basket and approximately 1-3/8″ apart (center to center).
Ears: Position the ears on the front of the basket as shown in the photos. Place row 1 of the ears on the inside of the basket, approximately 1.5″ down from the top edge. Using a 12″ strand of Pipsqueak yarn and a yarn needle, sew ears onto the basket. Note: Adding a liner will also help firm up the ears and keep them from moving.
Front Feet: Using a 12″ strand of Pipsqueak yarn and a yarn needle, attach both front feet as shown in the photos. Position them approximately 1/4″ (to the right and left) from the outside edge of each cheek. Sew them onto the basket near the bottom edge.
Continue on to Handle & Liner. If desired, see tutorial below for reinforcing the sides of the basket.
Handle
Follow the instructions below to make the handle. Continue on to make the Easter Basket Liner.
Easter Basket Liner
Note: The liner is optional, but I love how it adds stability to the basket (even without the plastic canvas between the sides) and it covers up the yarn strands from attaching the pieces to the basket. It just adds a nice finishing touch!
Yarn Notes: 1 strand of Bernat Pipsqueak in white.
Row 1: Using a 6mm crochet hook, ch 10, hdc in the 2nd ch from your hook and in each ch across. Turn. (9 sts)
Row 2: Ch 1, hdc in each st across. Turn.
Repeat Row 2 until liner measures the circumference of the inside of the basket.
Fasten off leaving a tail of yarn that is twice the circumference of the basket. Using a yarn needle and tail of yarn, seam the first row to the last row to create a tube.
- See tutorial below for attaching the handle to the liner.
- See tutorial below for adding the plastic canvas, if desired.
- If you’re not adding plastic canvas, see tutorial for sewing in the liner & handle assembly.
Bunny Face Tutorial
Note: Photos below are not of this basket, but techniques for the mouth and eyelashes are the same.
Mouth: Use a yarn needle and (1) 8″ strand of Caron Simply Soft in soft pink and follow the instructions in the photos below.
Eyelashes: Hold together as one, (8) 12″ strands of black thread. Or you can also use black embroidery floss.
Reinforcing the Sides of the Basket (Optional)
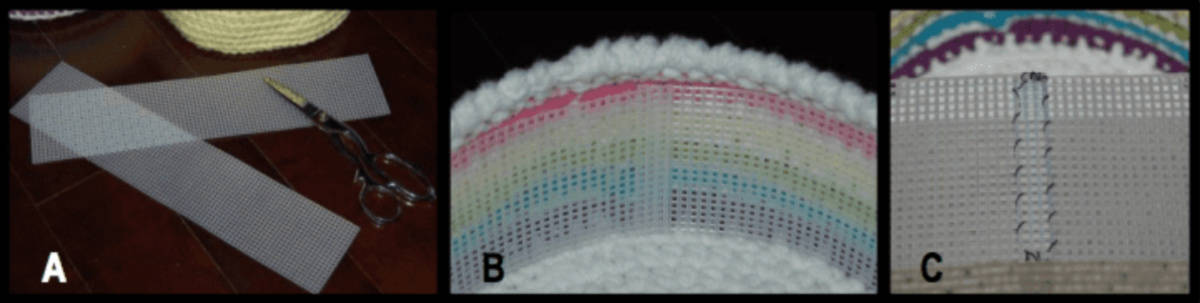
Step 1: See Photo A. Cut (2) 3.75″ X 13.5″ rectangles of plastic canvas.
Step 2: See Photo B. Position the rectangles on the inside of the basket as shown. I overlapped mine by 3 small squares. Mark your cut, if needed. Remove rectangles and trim ends to fit, if needed.
Step 3: See Photo C. Using a needle and thread or yarn, sew the ends of the rectangles together.
Make sure to overlap the same distance as you used when measuring in step 2.
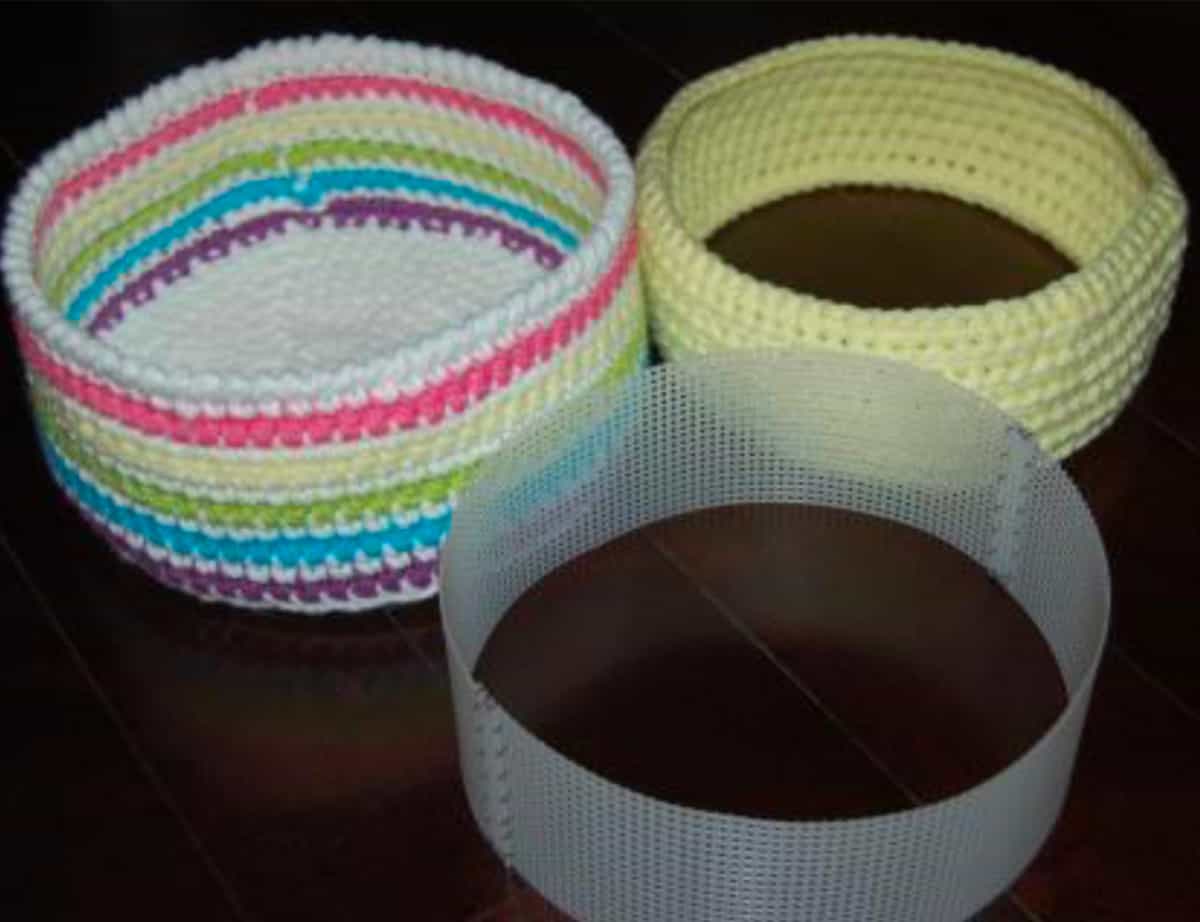
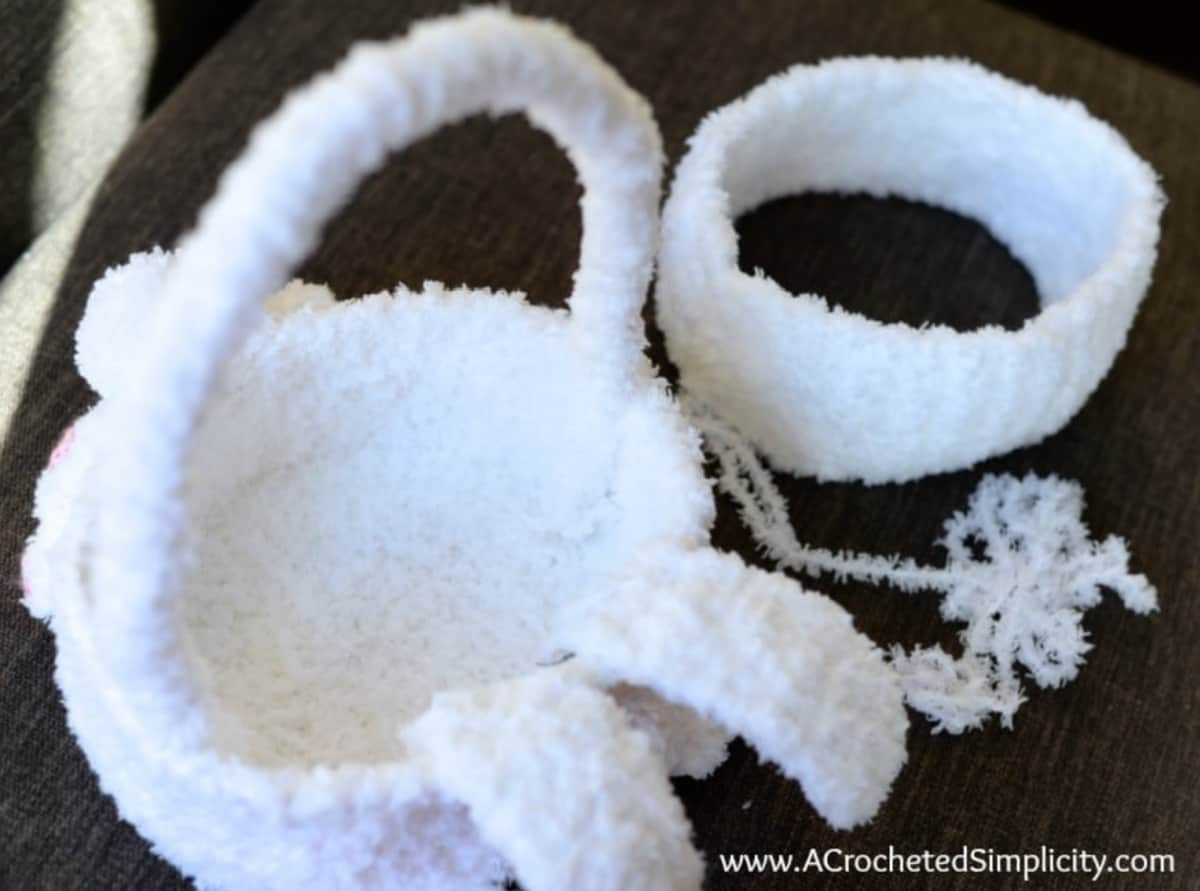
The photo above shows a completed basket, liner and insert for reinforcement. Note: It does not show the basket in this pattern, but the assembly is the same.
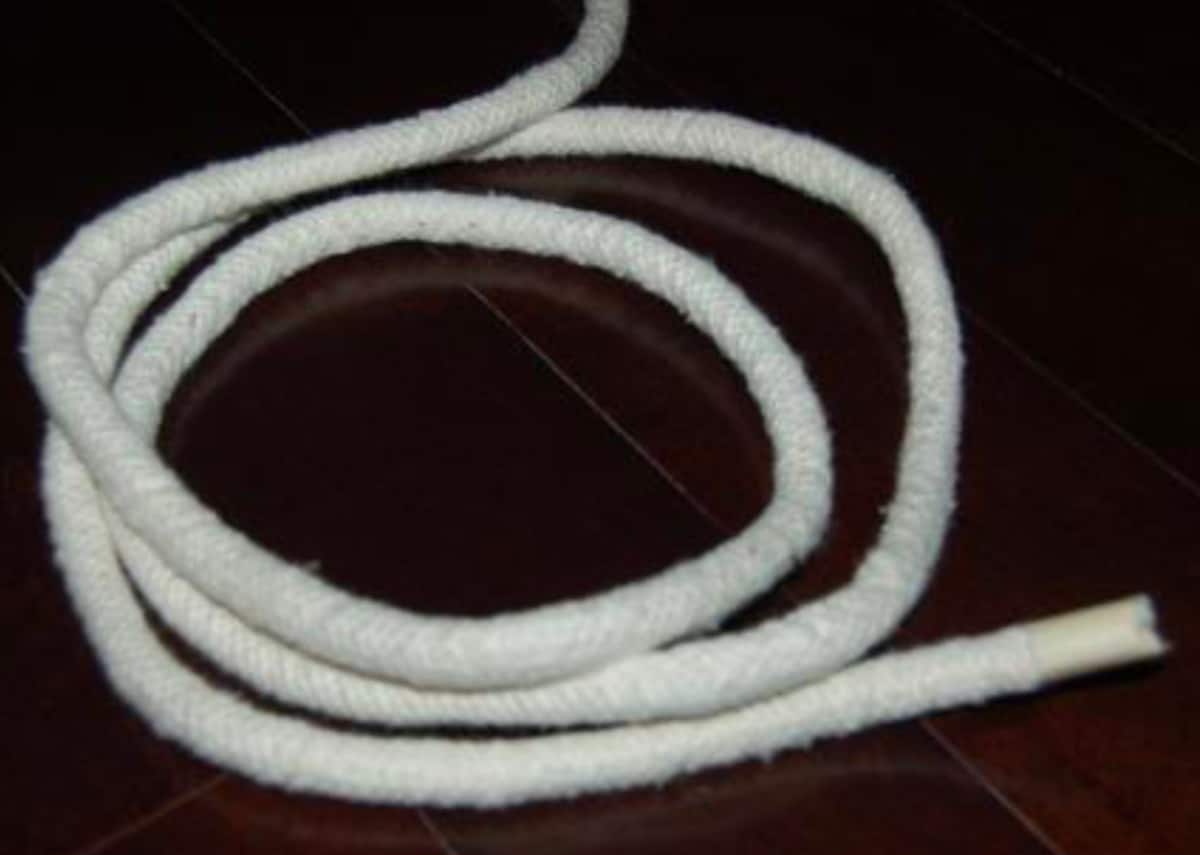
The photo above shows the cotton piping/cording that I used for the handle. For my basket, I cut mine at 28″.
Constructing the Handle & Assembly
Note: Photos below are not of the Easter bunny basket, but construction techniques used are the exact same. For the crochet bunny basket handle, I only used ONE STRAND of Bernat Pipsqueak when covering the handle.
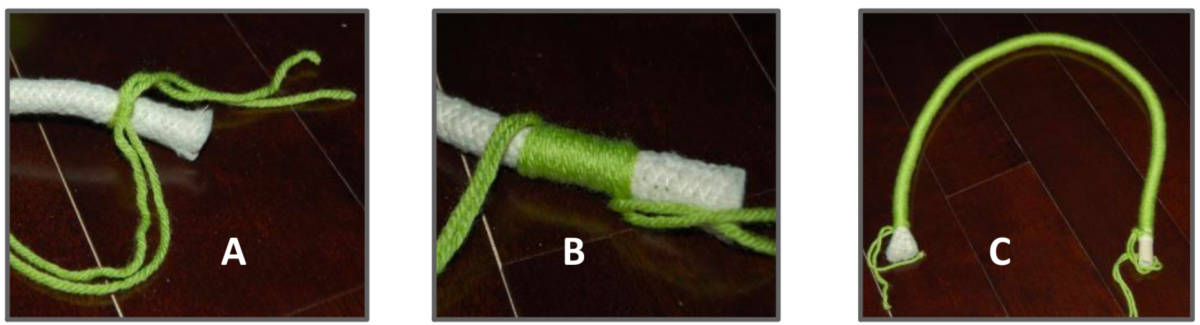
Step 1: See Photo A. After you’ve cut your cotton piping/cording to 28″, attach yarn near one end of it by tying the yarn in a knot around the cotton piping/cording.
Note: If you’d like to make your handle stiffer and easy to shape, add a length of aluminum craft wire to the handle. Lay the wire alongside the cotton piping/cording and complete Step 2.
Step 2: See Photo B. Wrap yarn around your cotton piping/cording until you are 1-1/2″ from the end. Make sure to wrap your yarn close together so you do not have gaps showing the piping/cording. Knot yarn to fasten so that it won’t slip off.
Step 3: See Photo C. Shows the your completely wrapped handle.

Step 4: See Photo D. Lay your liner flat and lay one end of the handle at each fold in the liner.
Step 5: See Photo E. Using a yarn needle and 2 strands of yarn, in the same color as your liner, attach the handle to the liner by sewing around it and thru the liner. Continue to sew the height of the liner.
Step 6: See Photo F. Place your plastic canvas piece inside your basket.
Step 7: See Photo G. Place your liner & handle assembly inside your basket.

Sew in Liner
Sew your liner into your basket using a length of Pipsqueak yarn and yarn needle.

Sew evenly around the top edge of your basket. Sew around the inside bottom edge of the basket. Fasten Off. Weave in ends.
Add a little crochet holiday fun to your home with our Easter Bunny Towel & Washcloth Set. It’s super cute & fun!
I MADE IT! NOW WHAT?
Pin this post!: Save this crochet Easter basket pattern to your Pinterest boards so that you can come back and make it again.
Leave a comment below: We love to hear your feedback.
Share Your Finished Projects on Facebook or Instagram: I love to see your finished projects! Share with us on social media and tag me @acrochetedsimplicity or use the hashtag #ACrochetedSimplicity so I can find your posts.
Join us in the Facebook Community Group!
Come share your finished projects with us in the A Crocheted Simplicity Crochet Community Group on Facebook. Join us for fun community events such as crochet alongs, join in on crochet conversations, ask questions, get advice, and share your love for crochet!

More Free Bunny Crochet Patterns I Think You’ll Love
More Crochet Easter Patterns
Did you enjoy this free crochet bunny rabbit pattern? We have several more patterns for the holidays that I think you’ll enjoy.
Jennifer, this is such a cute basket and very creative. I made this basket last year and it was such a hit! This pattern is easy to follow with very clear and cob=ncise instructions. Even as a beginning crocheter I was able to read this pattern and follow it without needing more clarification or help. I made the basket in grey and everyone that saw it was amazed it was a crochet project. This basket prompted one friend to ask if I could make a corgi dog basket for her. That was a big unknown but the skills learned from your pattern i did mange to pull off making the corgi basket too. You creativity is out of this world and I thank you for sharing so many of your beautiful patterns with us
Teri,
Thank you for sharing your finished photos with me. Your baskets turned out so cute!
Happy Crocheting,
Jennifer