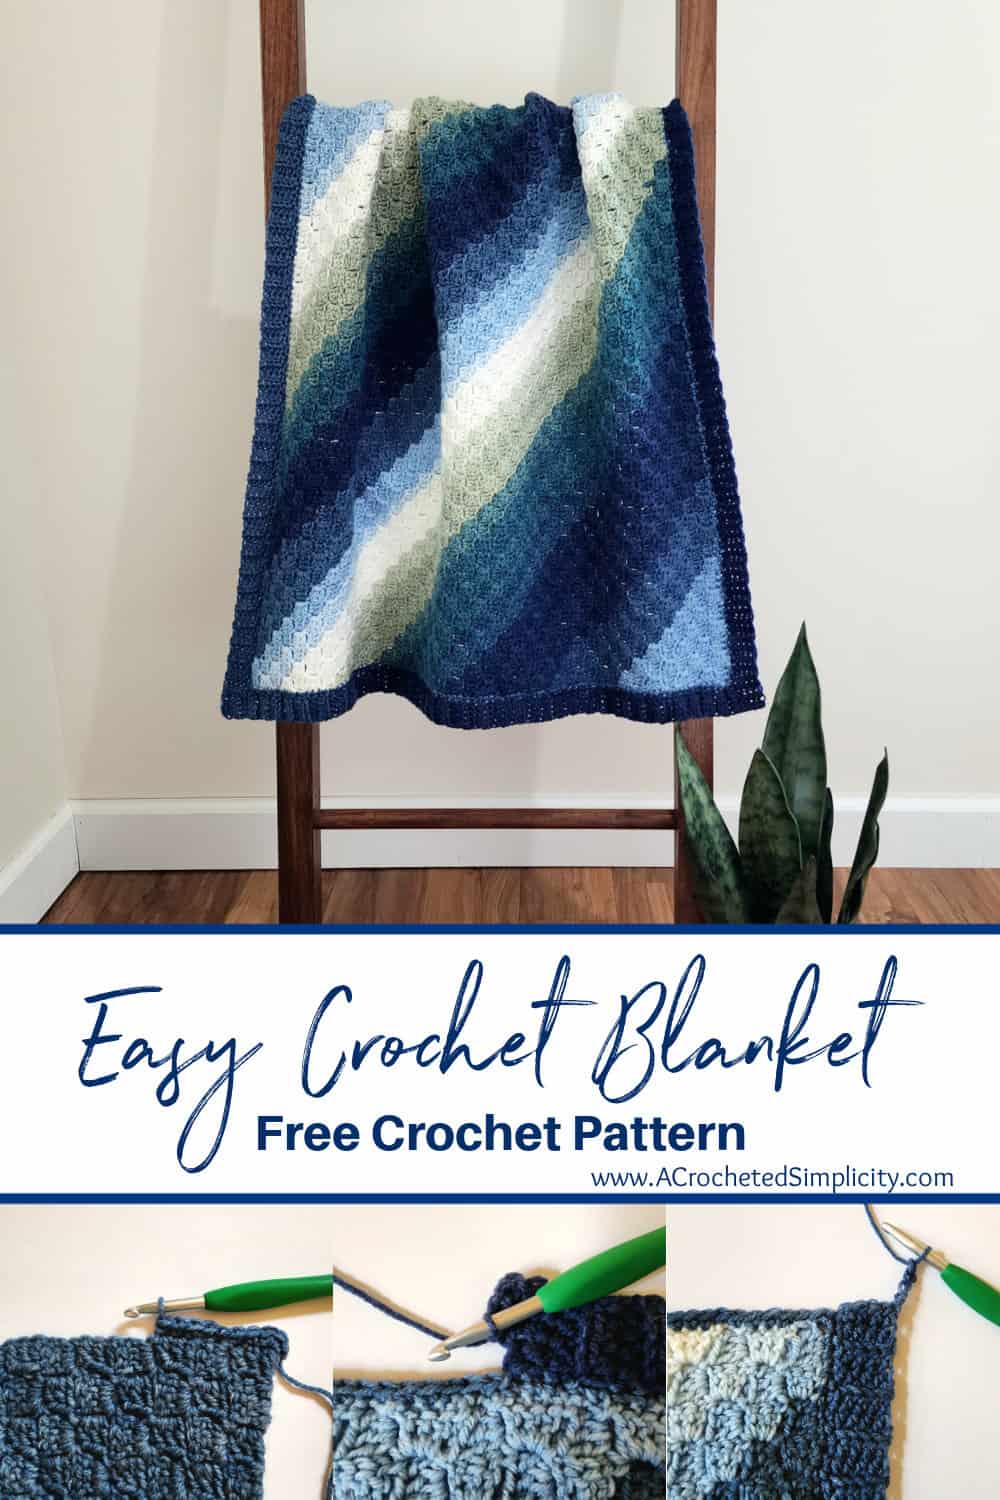
Crochet C2C Blanket – Caspian Crochet Blanket
Learn how to make a crochet C2C blanket for beginners. It’s quick, easy, and fun to make!
This C2C crochet tutorial includes a step-by-step photo tutorial which makes this blanket perfect for crocheters who are just learning how to corner to corner crochet.
You’ll find the free corner to corner crochet pattern below, or an ad-free print friendly PDF (including all photo tutorials) on Love Crafts, Ravelry, or on Etsy (aff).
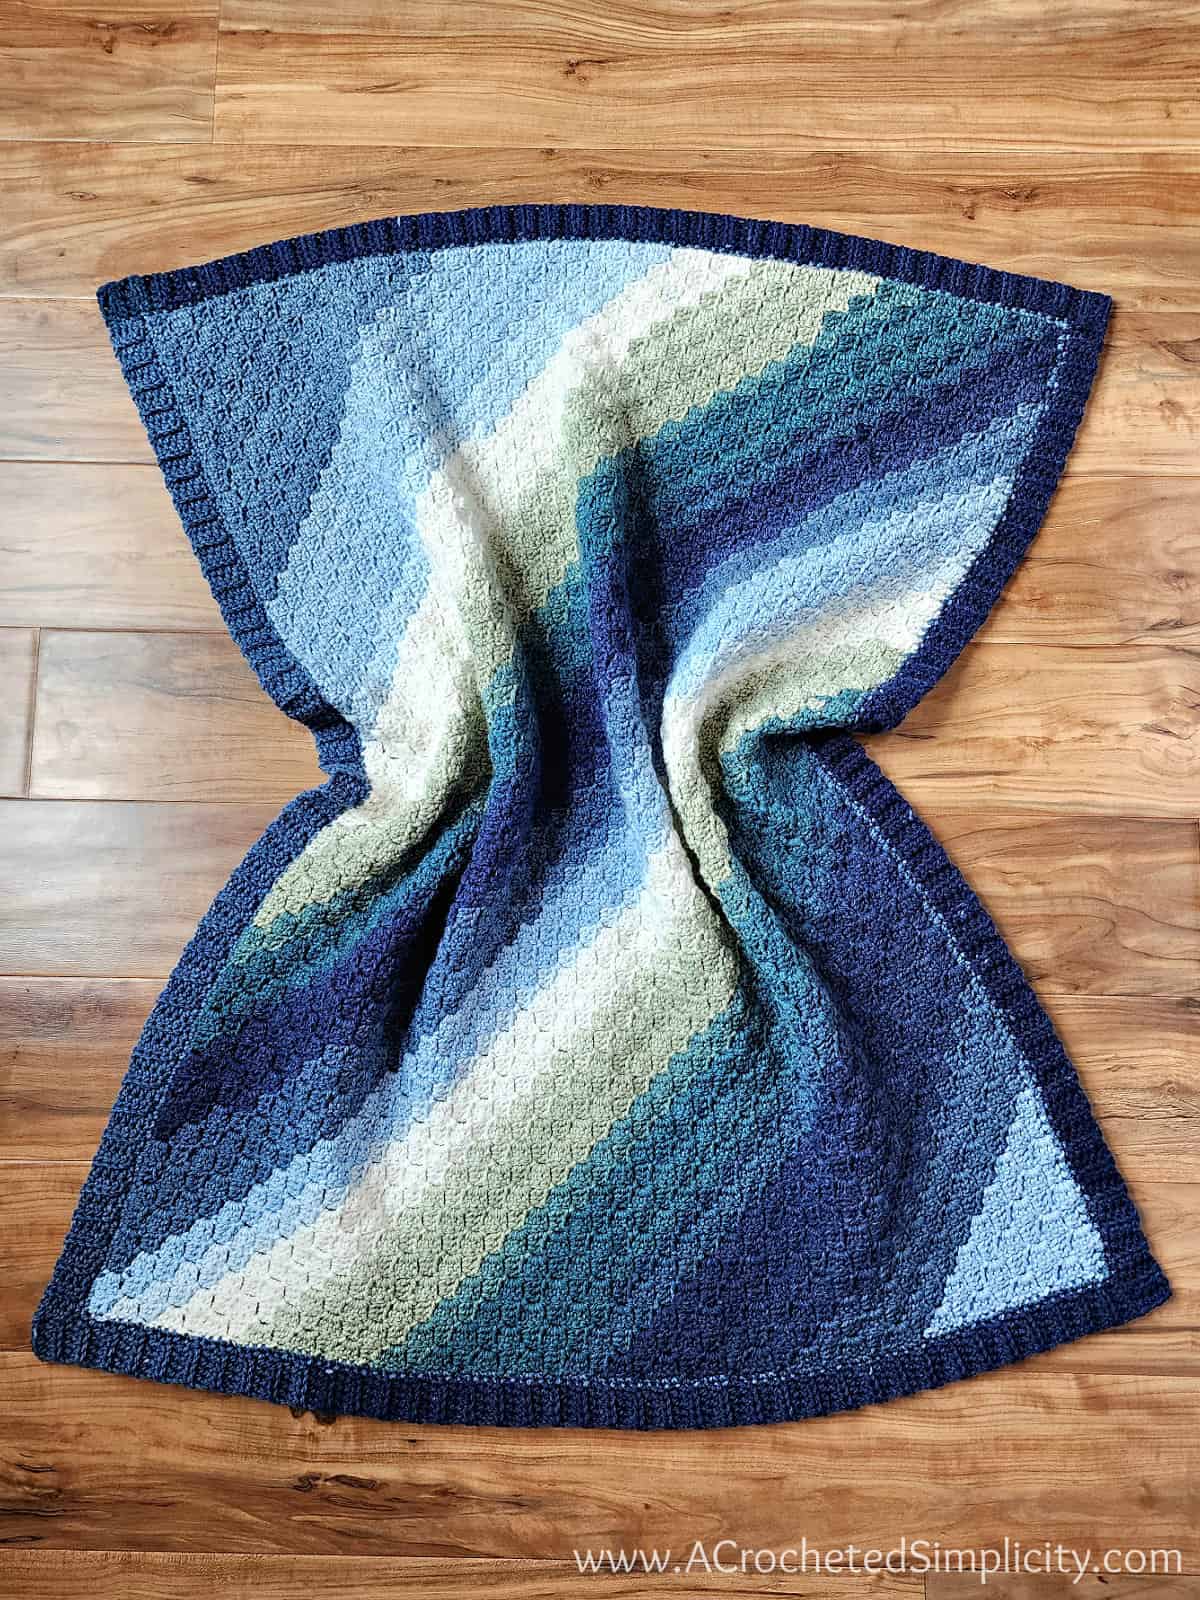
I have an upcoming baby shower and needed to make a baby boy crochet blanket. When I saw the Mandala Baby Yarn in Echo Caves, I knew it would be perfect for such a blanket!
A self-striping yarn with long color changes is perfect for a C2C crochet baby boy blanket. I love a crochet blanket with diagonal stripes, but weaving in dozens of ends from color changes is not my favorite pastime. 😉
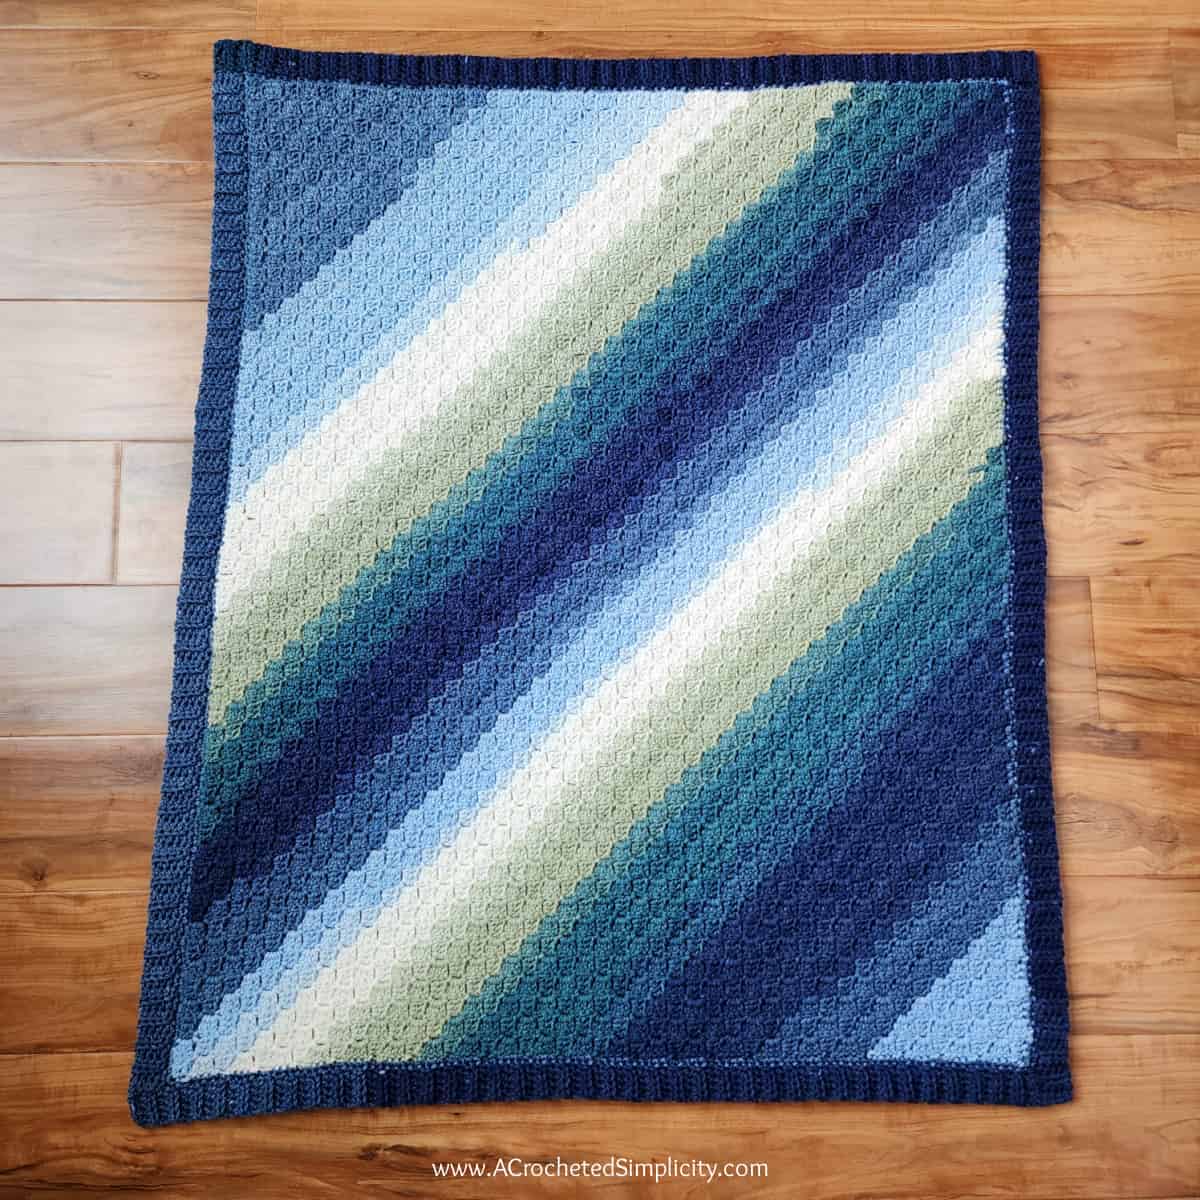
The Caspian Crochet Blanket is a colorful, yet simple crochet blanket. You’ll learn how to use the diagonal box stitch to make a C2C crochet pattern rectangle. Then you’ll learn how to add a ribbed C2C blanket border.
C2C Stitch – Corner to Corner Crochet Stitch
Recently I received an e-mail from a crocheter telling me that she looked through all of my free C2C crochet blanket patterns and she didn’t see one with the corner to corner crochet stitch (C2C crochet stitch). I explained to her that C2C crochet is a technique and not a stitch and then realized she was referring to the diagonal box stitch.
I’ve released several corner to corner blanket patterns on the blog using different corner to corner crochet stitches. However, I haven’t shared a pattern for a basic C2C blanket using the most popular stitch pattern, the crochet diagonal box stitch.
This is how the Caspian C2C Crochet Blanket came to be! This beginner C2C crochet blanket will teach you how to C2C crochet. It’s a very basic diagonal box stitch crochet afghan pattern with a ribbed crochet blanket border.
Learn ALL about Corner to Corner Crochet in this crochet article. The article includes several free C2C crochet patterns that use C2C stitch variations.
How to C2C Crochet for Beginners
This step-by-step, corner to corner crochet tutorial is perfect for beginners who want to learn the C2C technique using the crochet diagonal box stitch.
When making this easy crochet blanket, with the crochet corner to corner tutorial below, you will learn:
- How to crochet diagonally (or on the bias).
- How to crochet the diagonal box stitch.
- How to make a C2C crochet rectangle.
- How to start C2C crochet.
- How to Increase in C2C.
- How to crochet a C2C rectangle.
- How to decrease C2C crochet.
- Edging for C2C crochet blanket.
- How to make a corner to corner crochet border.
The Yarn
I chose Lion Brand Mandala Baby in Echo Caves for the easy C2C crochet baby blanket that you see in the photos. This self-striping yarn is perfect for a diagonal box stitch blanket. The long color changes will create diagonal stripes without leaving you with a lot of ends to weave in.
Mandala Baby is a 100% acrylic, DK weight yarn that is currently available in ten beautiful colorways. Echo Caves is my favorite!
Colorwork
I let the colors of Mandala flow the way they came in the cake. When beginning the next cake, I pulled apart the new cake and cut the yarn so that I could begin with the same color as I left off with the old cake. Refer to the yarn label for the order of the colors.
Use ANY Weight Yarn
If you prefer to make a worsted weight crochet blanket instead, no problem! With this corner to corner crochet pattern you can use ANY weight yarn you’d like.
I suggest using a crochet hook that is at least one size larger than the size listed on the ball band of the yarn you choose. Adjust your crochet hook size until you get the drape you’d like for your crochet throw. Gauge is not crucial.
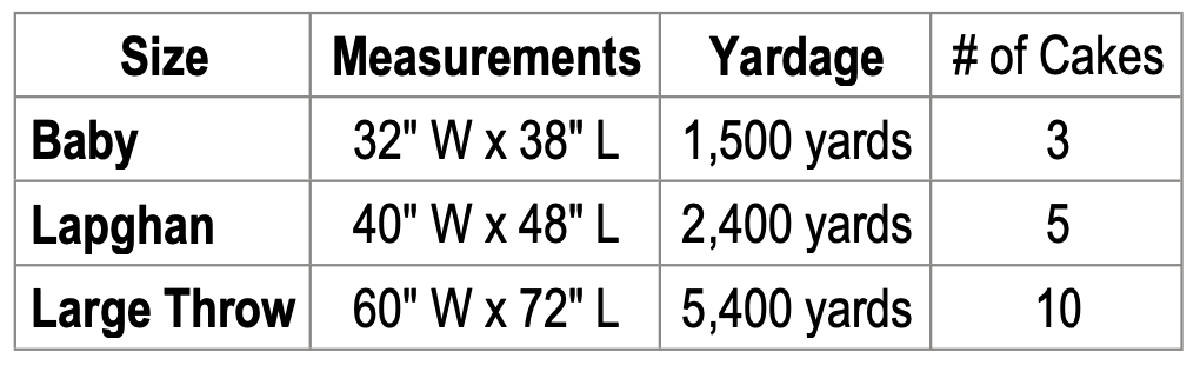
Size & Yardage Chart
The chart below is the Caspian C2C crochet blanket size chart. I’ve included 3 different sizes for this written crochet blanket pattern, but you can easily adjust the written pattern instructions and use my standard blanket size chart to customize the size of your C2C blanket.
Easy C2C Crochet Blanket Pattern – FREE CROCHET PATTERN
The diagonal crochet blanket pattern free is below, but if you love to work offline, I’ve got a couple other great options for you.
Purchase the ad-free, printable C2C Crochet Pattern PDF, including all step-by-step photo tutorials, on Love Crafts, Ravelry, or on Etsy (aff).
Purchase this Corner to Corner Crochet Blanket kit! (aff): Lion Brand has a full kit of the Caspian Crochet Blanket, available on their website. The crochet kit includes your choice of colors and a digital copy of the crochet pattern.
This post contains affiliate links.
MATERIALS
- Yarn: DK Weight / 3 / Yarn, (Lion Brand Mandala Baby in Echo Caves was used for the sample in the photos) (590 yards / 540 m / 150 g / 5.3 oz / 100% acrylic).
- Yardage: See Size Chart Above
- Crochet Hook: I/9/5.50mm; or size needed to obtain gauge (My favorite crochet hooks are the Clover Amour Crochet Hooks, I’ve never had an ache in my hand since switching).
- Locking Stitch Markers
- Scissors
- Yarn Needle
Materials are available from our affiliates below:
 Mandala Baby Yarn, Echo Caves, 1770 Foot (Pack of 1)") Lion Brand Yarn (1 Skein) M...Shop on Amazon
Lion Brand Yarn (1 Skein) M...Shop on Amazon  Amour Crochet Hook: 5.50mmShop on Amazon
  Fiskars 154110-1001 Non-sti...Shop on Amazon
  Lion Brand Yarn 400-5-5002 ...Shop on Amazon
  Clover 3672 Amour Crochet H...Shop on Amazon
ABBREVIATIONS (US TERMS)
- ch(s): chain(s)
- sl st(s): slip stitch(es)
- st(s): stitch(es)
- yo: yarn over
- sp(s): space(s)
- sc: single crochet
- hdc: half double crochet
- hdc2tog: half double crochet 2 together
- dc: double crochet
- Join with a standing single crochet
- SM: stitch marker
- Rep: repeat
- Rnd: round
- RS: Right Side
- BLO: back loop only
EXPERIENCE LEVEL
- Beginner C2C Crochet Pattern
Gauge
- 1 block = .75″ square
- See Ribbed Border for ribbing gauge note.
Sizes
- 3 Sizes (see size chart above)
- Easily adjust to make ANY size blanket
SPECIAL STITCHES
- Join with a standing single crochet: begin with a slip knot on your hook, insert your hook into the stitch or space indicated, yo, pull up a loop, yo and draw thru both loops on hook.
PATTERN NOTES
- Turning chains are not included in stitch count unless noted otherwise.
- Lion Brand Mandala Baby, 100% Acrylic (590 yards / 540 m / 150 g / 5.3 oz).
- Colorway & Yardage
- Echo Caves #526-205AW (see yardage in chart above)
- Use ANY weight yarn you’d like. I suggest using a crochet hook that is at least one size larger than the size listed on the ball band of the yarn you choose. Adjust hook size until you get the drape you’d like for your afghan. Gauge is not crucial.
- Changes for sizes written as follows: Baby (Lapghan, Large Throw)
- Construction: The Caspian Crochet Blanket is crocheted corner to corner using the crochet diagonal box stitch. You will then prepare the edge of the blanket by adding a simple single crochet round. A ribbed border is then added.
- Colorwork: I let the colors of Mandala flow the way they came in the cake. When beginning the next cake, I pulled apart the new cake so that I could begin with the same color as I left off with the old cake. Refer to the yarn label for the order of the colors.
- The sample shown in the photos is baby blanket size. Notes are included to easily make ANY size blanket.
Easy C2C Crochet Blanket Pattern Instructions
Beginning Rows
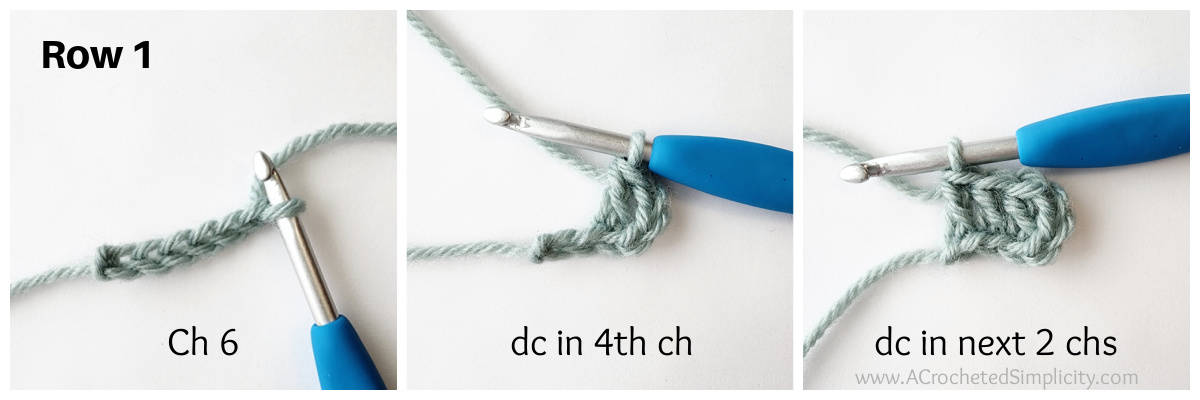
Beginning Row 1 (RS): With yarn and a 5.50mm crochet hook, ch 6, working into the back humps of the foundation ch, dc in the 4th ch from your hook, dc in each of the next 2 chs. Turn. (1 block)
Pro Tip! When beginning the next block, work the ch-3 tightly. It will help lessen the gaps in your blanket created by the diagonal box stitch.
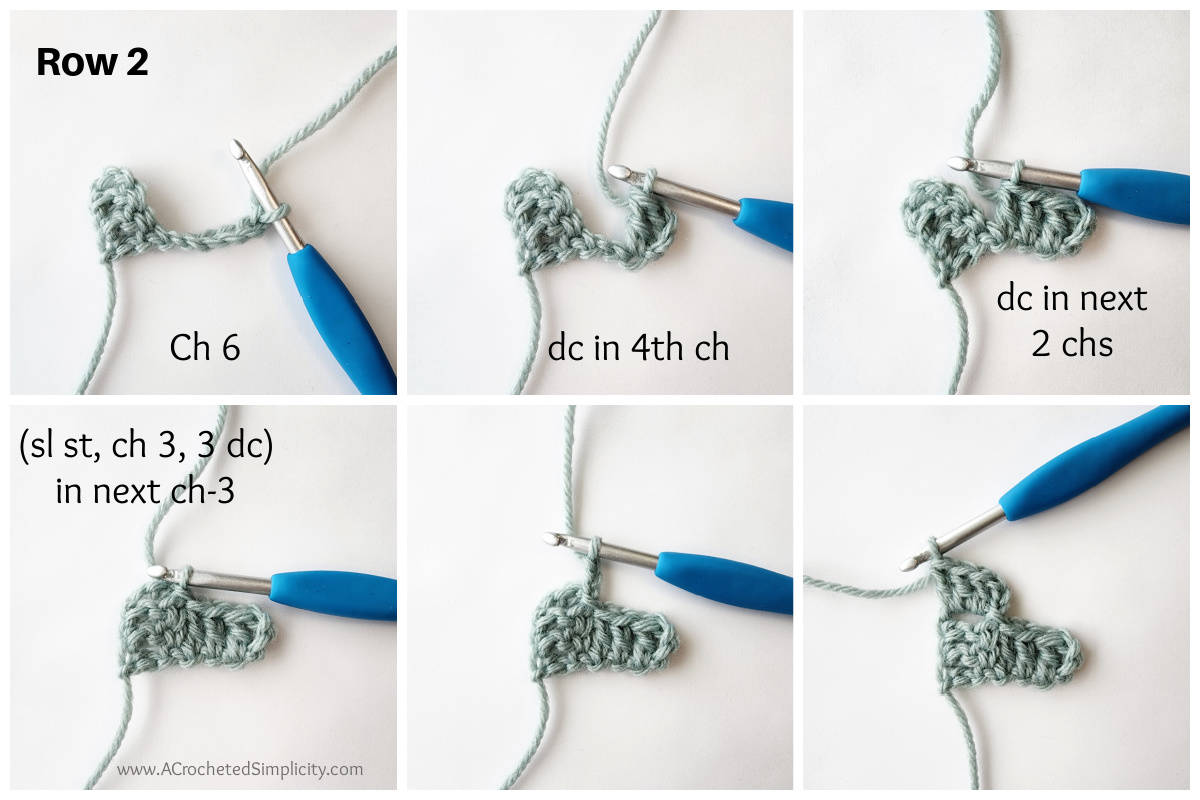
Beginning Row 2: Ch 6, dc in the 4th ch from your hook, dc in each of the next 2 chs, (sl st, ch 3, 3 dc) into the next ch-3 sp. Turn. (2 blocks)
Do not fasten off. Continue on to the Increase Rows.
Increase Rows
Note: In the Increase Rows section, each row you work will increase by 1 block. This section increases both our width and length. At the end of this section, you will have a large triangle. The length of one of the perpendicular edges is the width of your blanket.
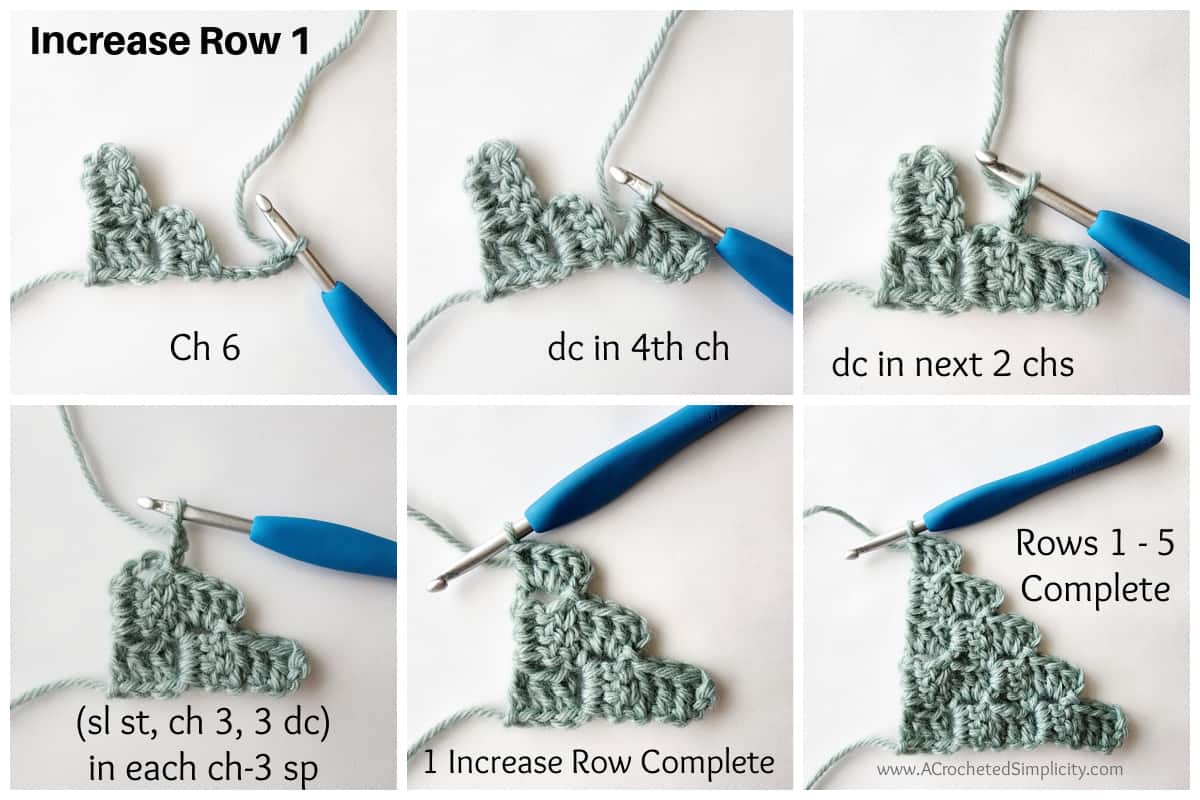
Increase Row 1: Ch 6, dc in the 4th ch from your hook, dc in each of the next 2 chs, (sl st, ch 3, 3 dc) into each ch-3 sp across. Turn. Row increases by 1 block.
Rep Increase Row 1 until your blanket measures approximately 30″ (38″, 58″)W, or desired width. Do not fasten off.
Continue on to the Rectangle Rows.
Rectangle Rows
Note: In the corner to corner crochet rectangle section, one end of the row increases while the other end of the row decreases. This section increases the length of our blanket only. The number of blocks per row stays the same for the entire section. At the end of this section, you will have a rectangle that is missing a large triangle in the upper corner.
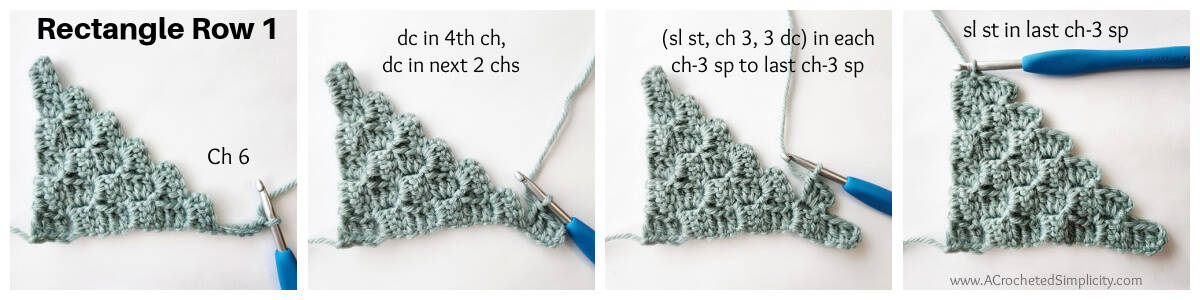
Rectangle Row 1: Ch 6, dc in the 4th ch from your hook, dc in each of the next 2 chs, (sl st, ch 3, 3 dc) into each ch-3 sp across to the last ch-3 sp, sl st in the last ch-3 sp. Turn.
Rectangle Row 2: Sl st in each dc across to the next ch-3 sp, (sl st, ch 3, 3 dc) into each remaining ch-3 sp across. Turn.
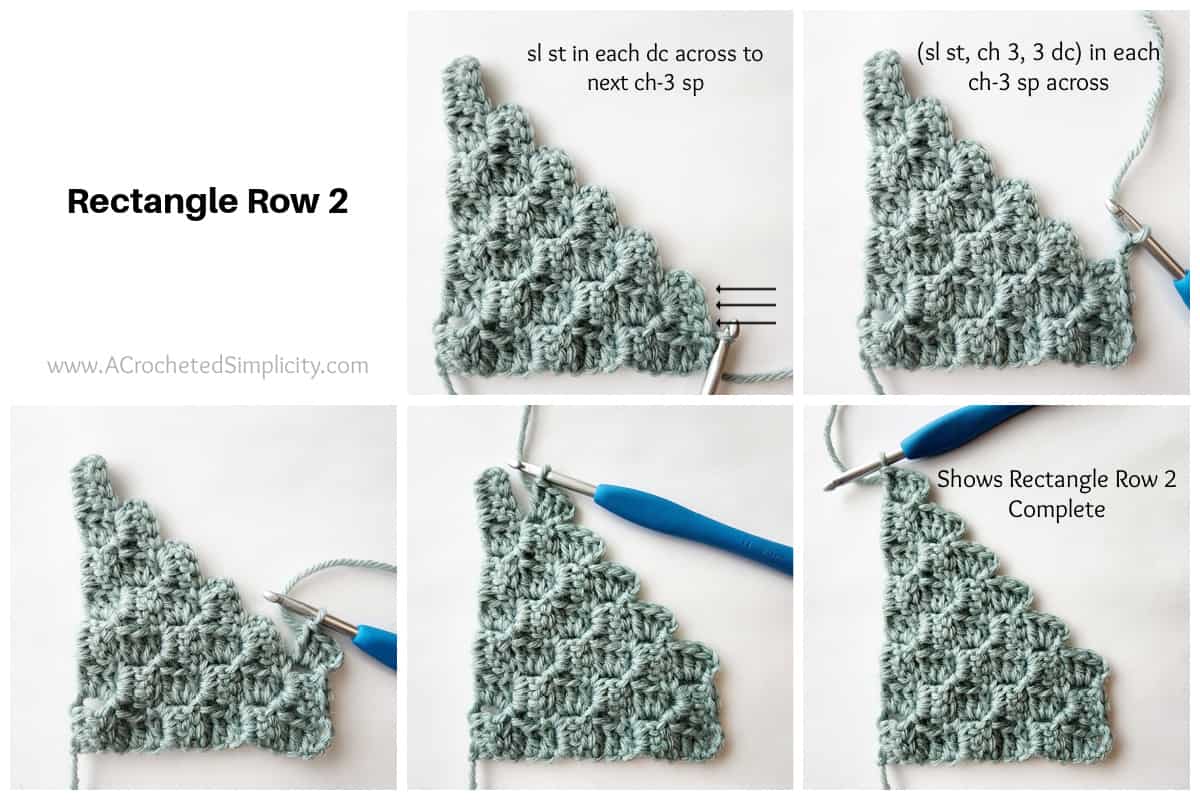
Rep Rectangle Rows 1 – 2, ending with a Rectangle Row 2, until your blanket measures approximately 36″ (46″, 70″) L, or desired length.
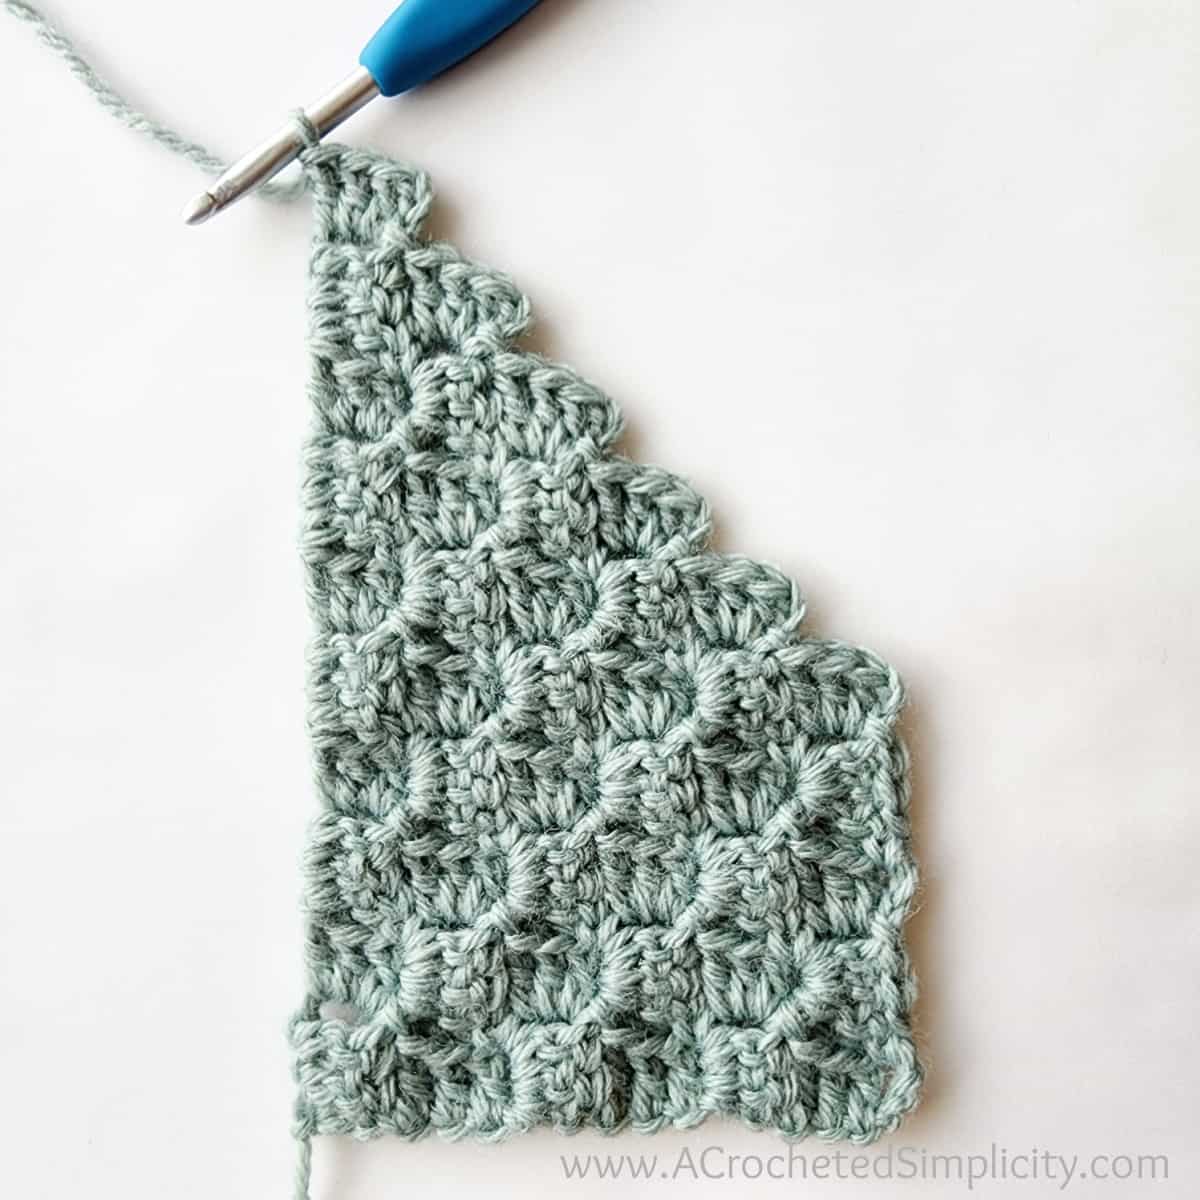
The photo above shows Rectangle Rows 1 – 4 complete.
Do not fasten off. Continue on to the Decrease Rows.
Decrease Rows
Note: In the C2C crochet decrease section, each row you work will decrease by 1 block until you are left with only 2 blocks in a row. Then you will work the Final Row to complete the rectangular C2C blanket.
Decrease Row 1: Sl st in each dc across to the next ch-3 sp, (sl st, ch 3, 3 dc) into each ch-3 sp across to the last ch-3 sp, sl st in the last ch-3 sp. Turn.
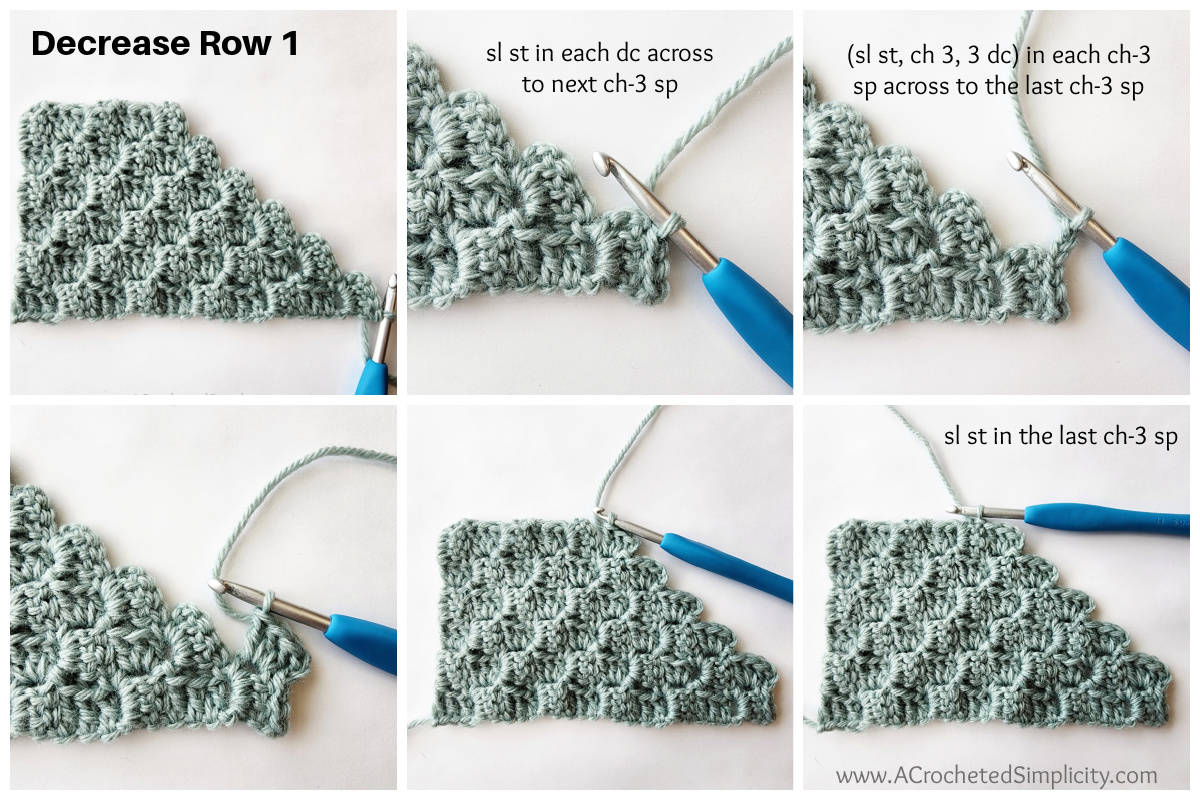
The photos below show the progression of the corner to corner crochet decrease for the diagonal box stitch.
Rep Decrease Row 1 until you have 2 blocks remaining.

Do not fasten off. Continue on to the Final Row.
Final Row
Final Row: Sl st in each dc across to the next ch-3 sp, (sl st, ch 3, 3 dc) into the ch-3 sp, sl st into the last ch-3 sp. (1 block)
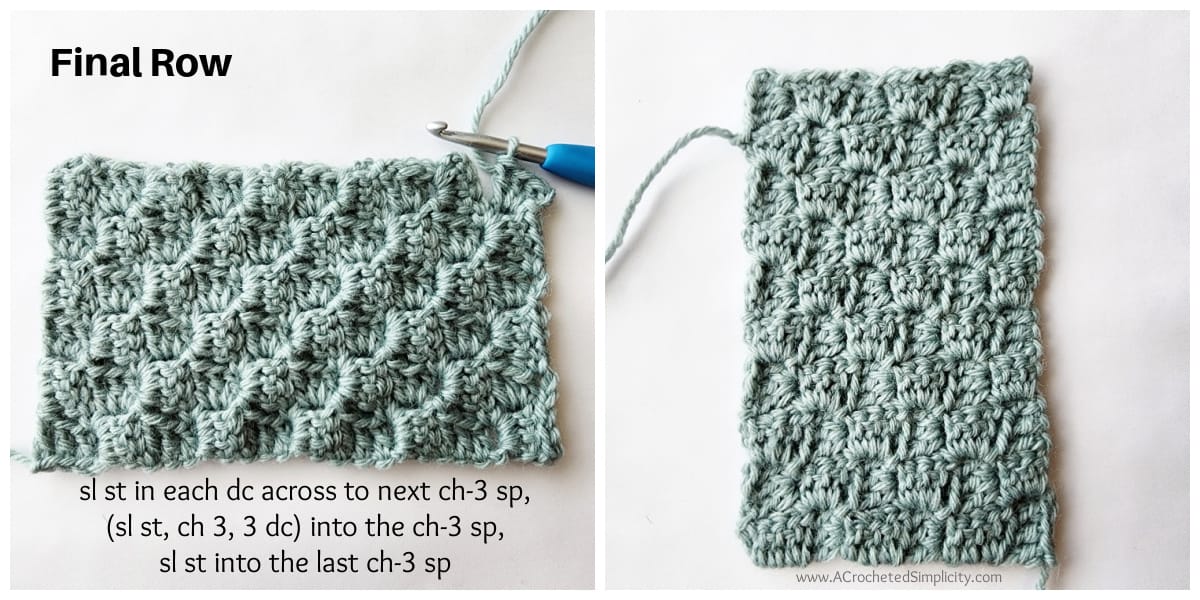
Fasten off. Continue on to Prepare Edge for C2C Crochet Border.
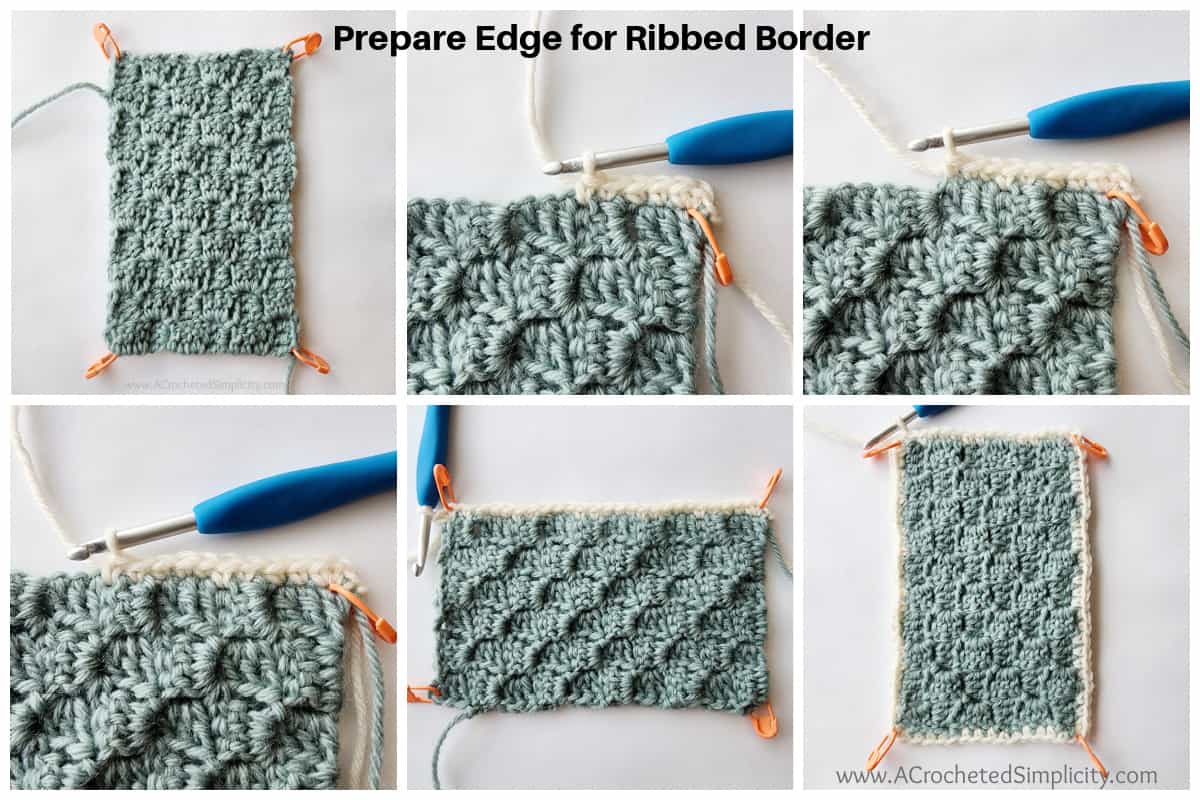
Prepare Edge for C2C Crochet Border
Place a locking stitch marker into each corner stitch.
Choose either side to be your right side. It doesn’t matter which side you choose.
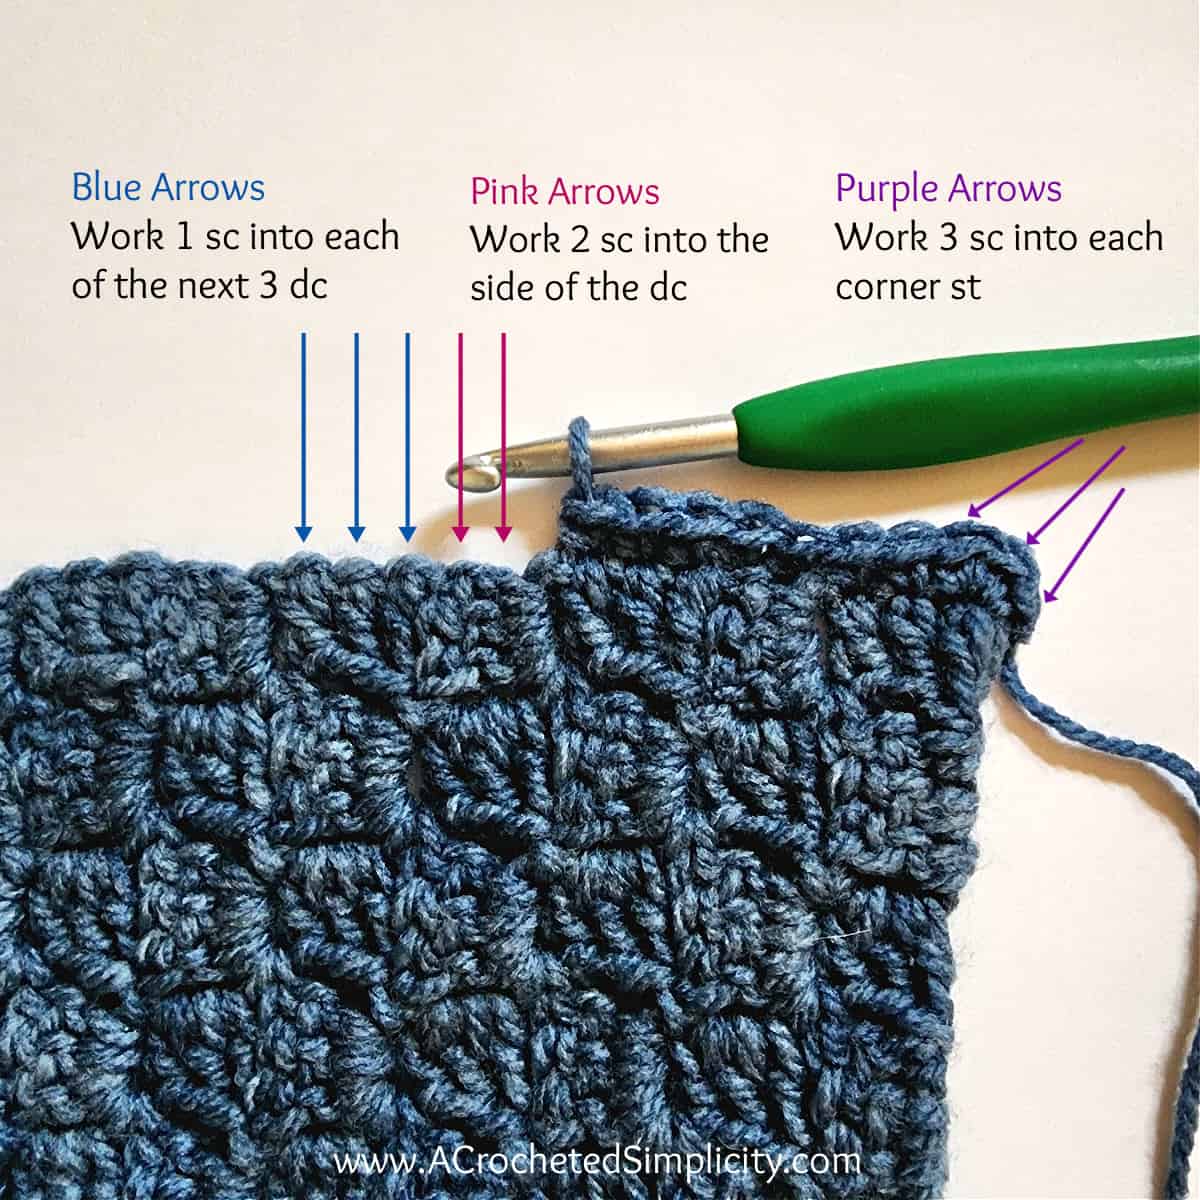
Rnd 1 (RS): With a 5.50mm crochet hook, join yarn with a standing sc in any corner, work 2 more sc in the same corner, (working along the next edge, work 2 sc into each horizontal dc and work 1 sc into the bottom or top of each vertical dc, then work 3 sc into the next corner st) work from ( to ) 3 times, then working along the last edge, work 2 sc into each horizontal dc and work 1 sc into the bottom or top of each vertical dc. Join with a sl st to the 1st st. Stitch count is not crucial.
Move stitch markers up to the middle sc in each corner.
Do not fasten off. Continue on to the Ribbed Border Edge #1.
If you prefer a more simple corner to corner crochet border, scroll down to C2C Crochet Blanket Border, Option #2.
Ribbed Border – Edge #1
Gauge Note & Tip: Exact gauge is not crucial. Simply adjust your hook size so that your ribbed edge lays flat. As you’re working the C2C crochet border pattern, if your ribbed edge becomes wavy, this means that your row height is too tall. Try going down a hook size or two.
Ribbing is approximately 1″ wide.
Set-up: Sl st over to the next corner st.
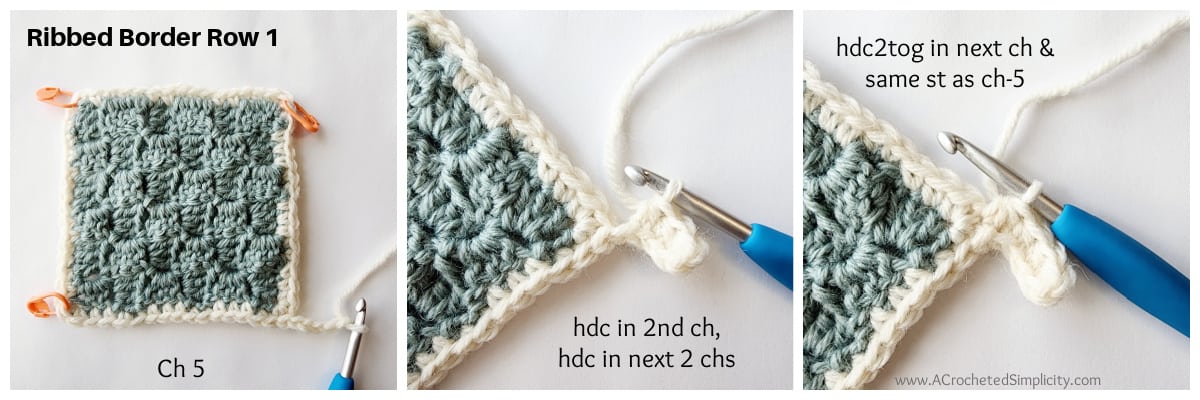
Row 1 (RS): Ch 5, working into the back hump of the ch, hdc in the 2nd ch from your hook, hdc in each of the next 2 chs, hdc2tog in the next ch & same st as ch 5. Do not turn. (4 sts)
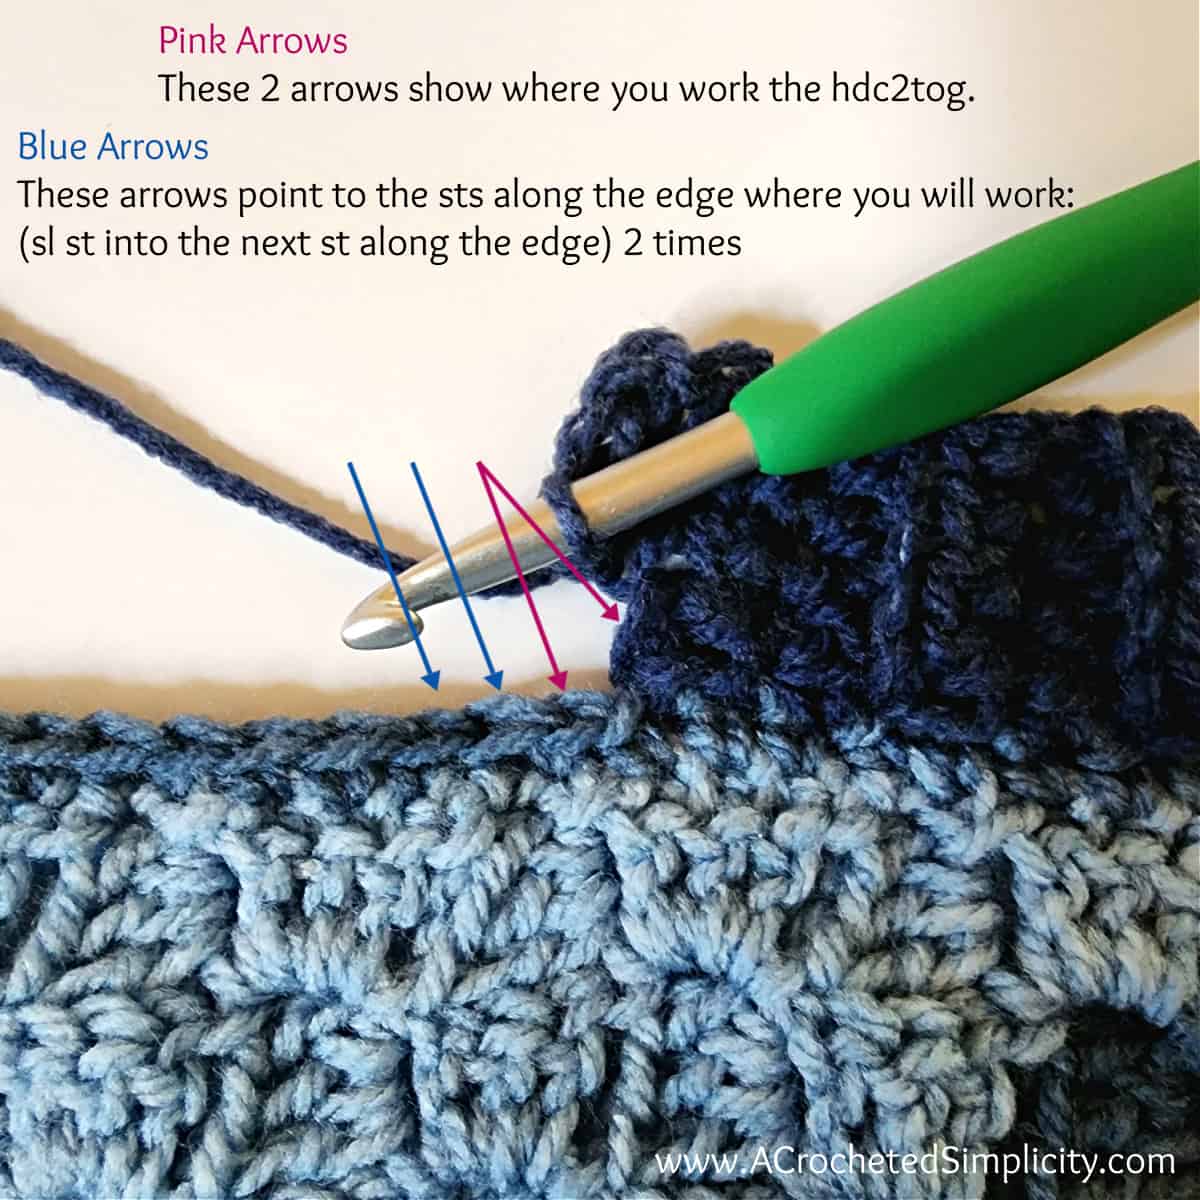
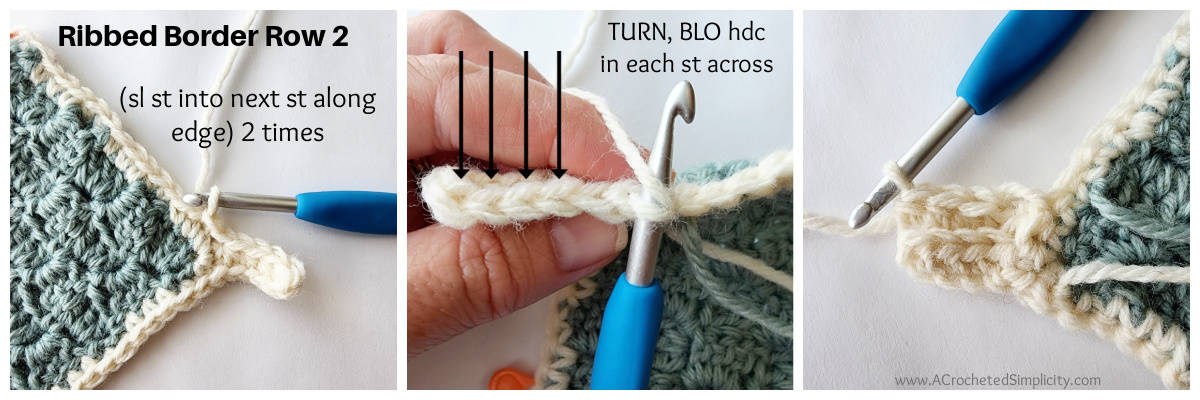
Row 2: ( sl st into the next st along the edge of the blanket ) 2 times (these 2 sl sts do not count as sts), TURN, BLO hdc in each st across the previous row. Turn. (4 sts)
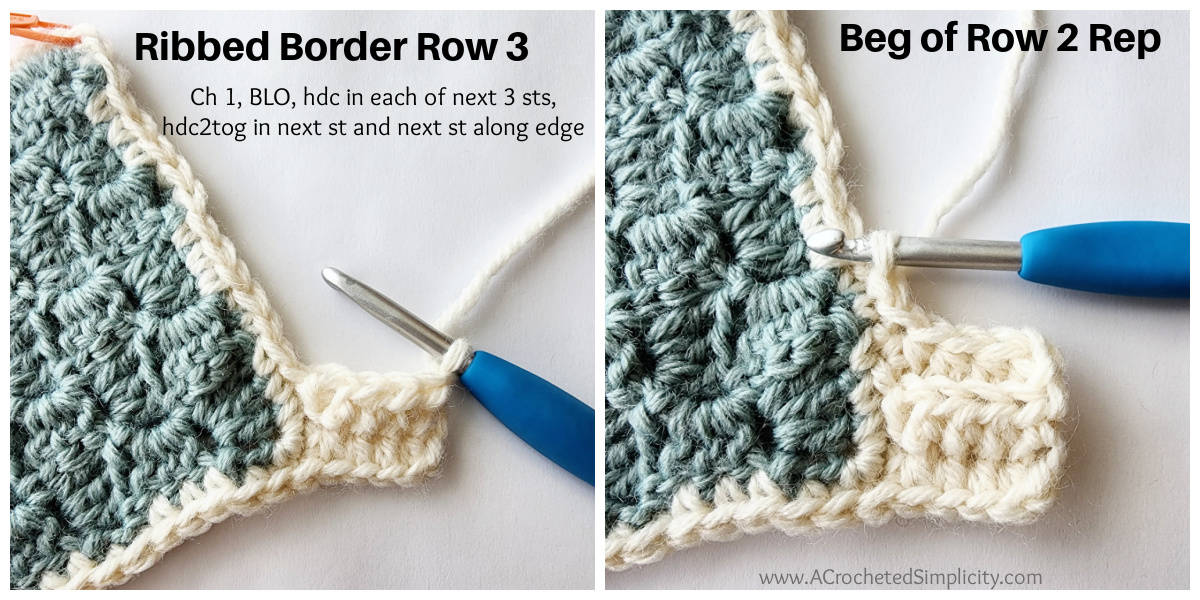
Row 3: Ch 1, BLO hdc in the first st, BLO hdc in each of the next 2 sts, hdc2tog in the BLO of the next st and both loops of the next st along the edge of the blanket. Do not turn. (4 sts)
Rep Rows 2 – 3 across the edge of the blanket until you reach the next corner marked with a SM.

If you end with 1, 2, or 3 stitches before the corner SM, read the following for completing the ribbing for that edge.
Working the Final Rows of Ribbing along any Edge:
- 1 Stitch Remaining: If you repeat Rows 2 – 3 all the way across an edge of the blanket and have 1 stitch remaining after the last Row 3 repeat, work a Modified Row 2 (see instructions below). Continue to work ribbing along the next edge of the blanket. If this is your final edge, fasten off, weave in ends and block, if desired.
- 2 Stitches Remaining: If you repeat Rows 2 – 3 all the way across an edge of the blanket and have 2 stitches remaining after the last Row 3 repeat, simply repeat Row 2 one more time. Continue to work ribbing along the next edge of the blanket. If this is your final edge, fasten off, weave in ends and block, if desired.
- 3 Stitches Remaining: If you repeat Rows 2 – 3 all the way across an edge of the blanket and have 3 stitches remaining after the last Row 3 repeat, work the following: ○ Modified Row 2 (see instructions below)
- Row 3 repeat
- Modified Row 2
- Continue to work ribbing along the next edge of the blanket. If this is your final edge, fasten off, weave in ends and block, if desired.
Modified Row 2: sl st into the next st along the edge of the blanket (1 time) (this sl st does not count as a st), TURN, BLO hdc in each st across the previous row. Turn. (4 sts)
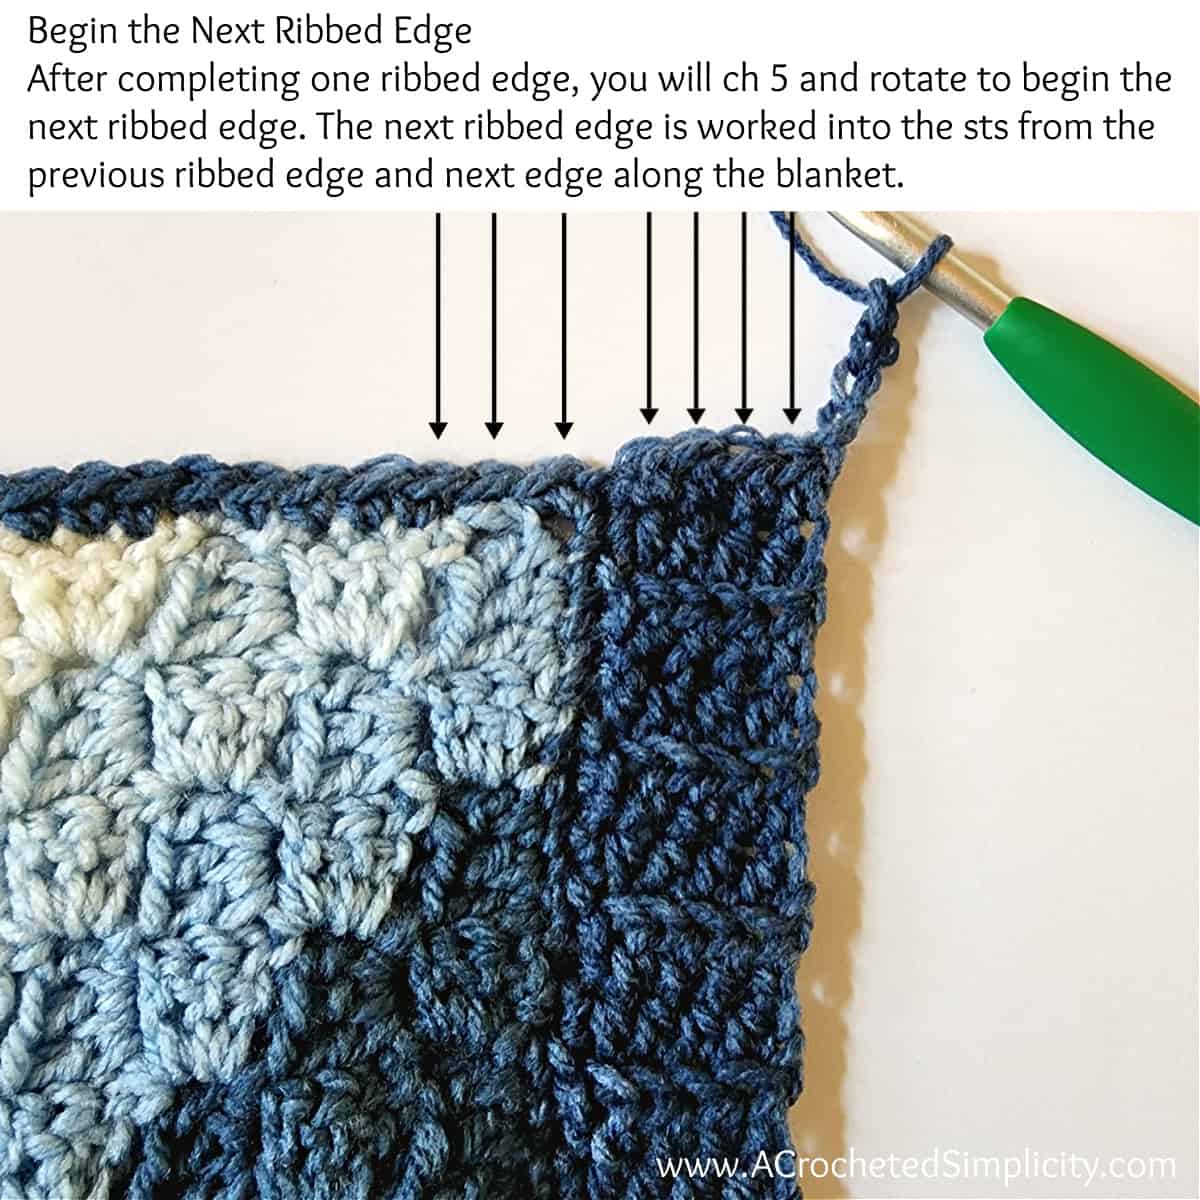
Ribbed Border – Edges #2, #3, & #4
Repeat Ribbed Border Instructions Rows 1 – 3, then repeat Rows 2 – 3 across the edge of the blanket until you reach the next corner marked with a SM.
If you end with 1, 2, or 3 stitches before the corner SM, read the notes above for completing the ribbing for that edge.
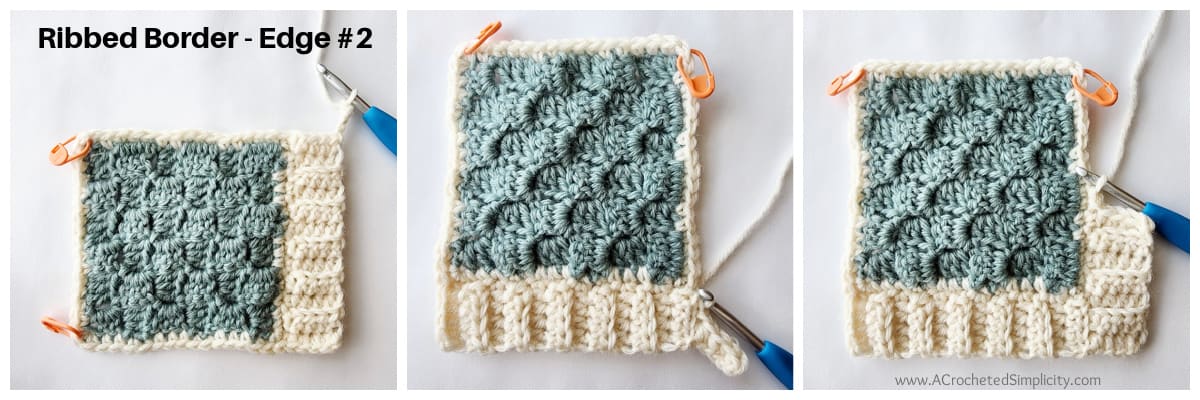
The photos above show Edge #2 being worked.
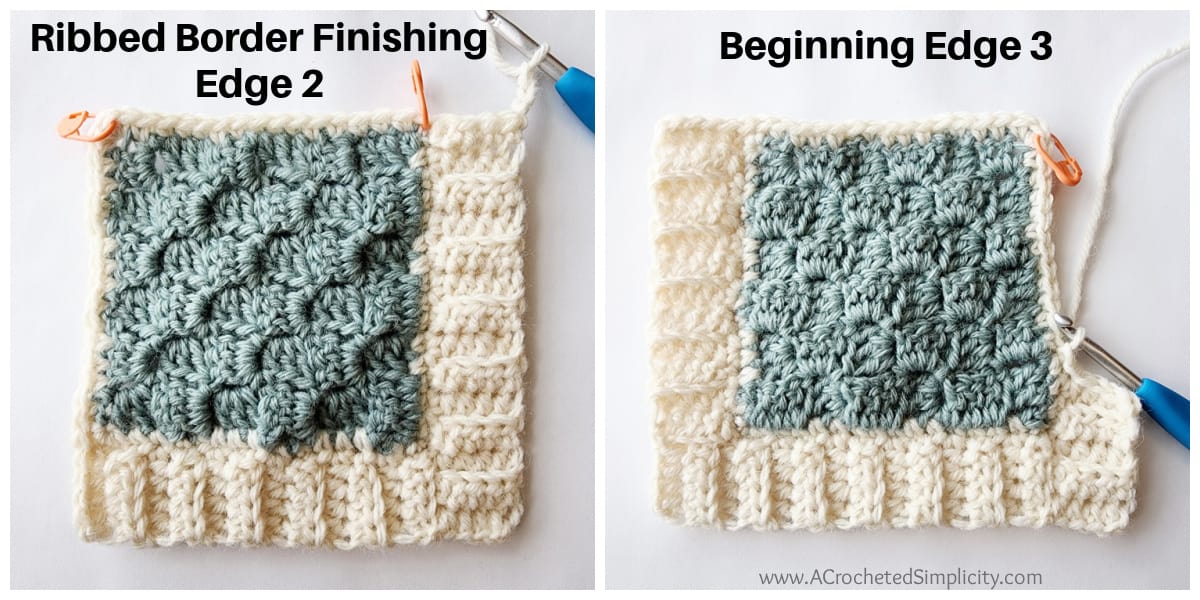
The photos above show Edge #2 completed and the beginning of Edge #3.
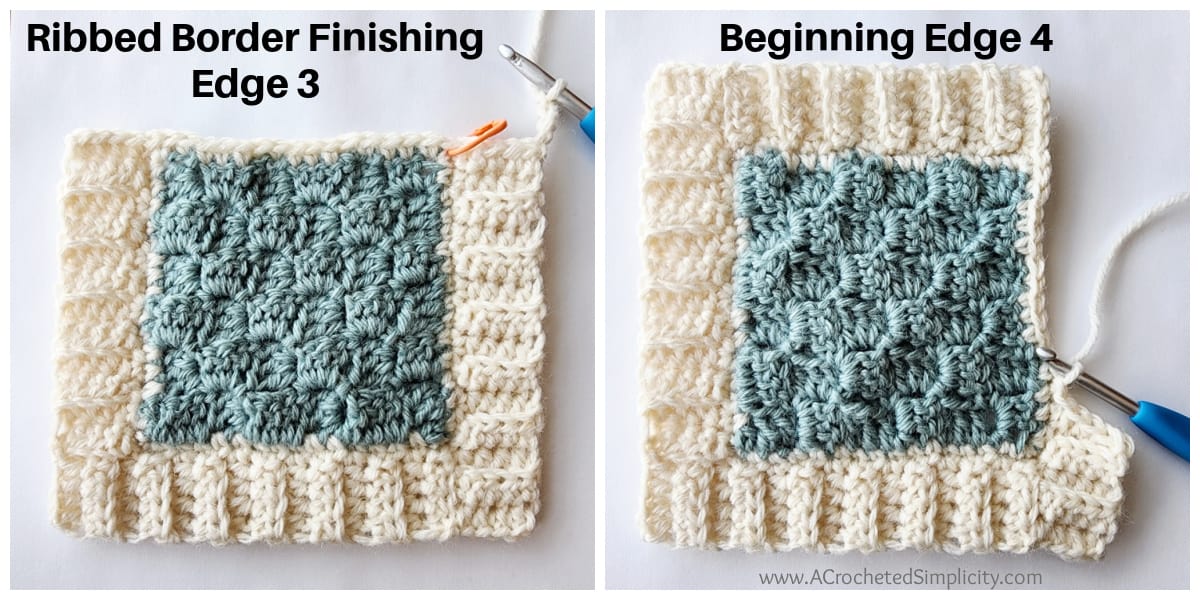
These two photos above show Edge #3 completed and the beginning of Edge #4.
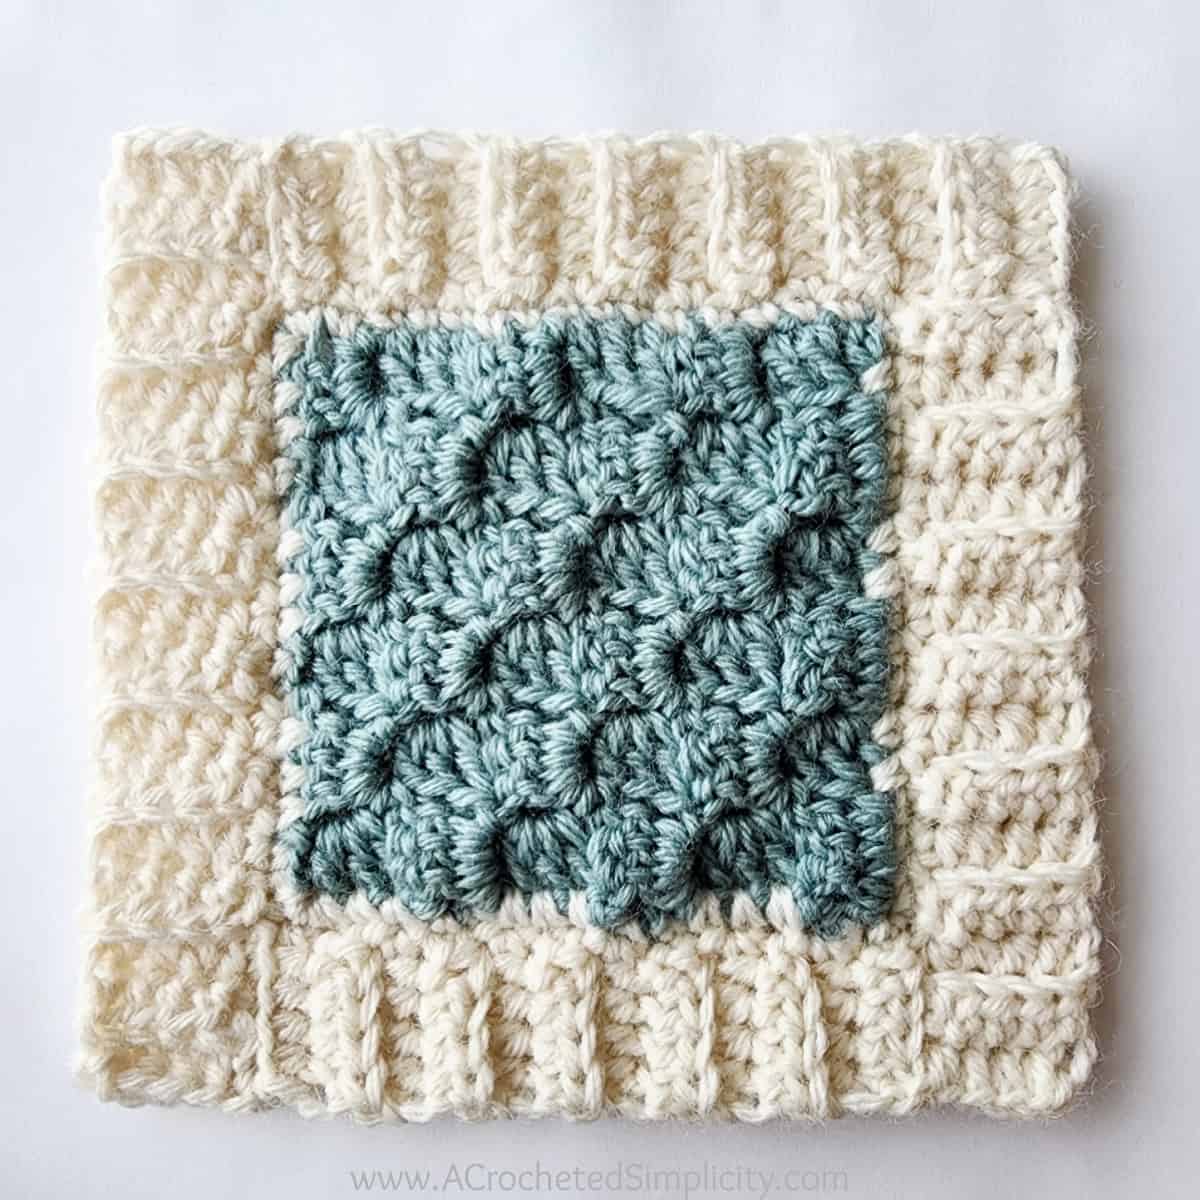
The photo above shows a small swatch with a completed C2C crochet border pattern.
WEAVE IN ANY REMAINING ENDS AND THAT’S IT! BLOCK YOUR CORNER TO CORNER CROCHET BLANKET TO ADD A PROFESSIONAL FINISH!!!
Related: If you have never blocked a crochet project before, check out my post on 3 blocking methods!
C2C Crochet Blanket Border, Option #2
If you’d like a simpler crochet border for your crochet C2C blanket, follow these basic instructions:
Step 1: Work the section above titled “Prepare Edge for C2C Crochet Border”. This adds a simple single crochet edge to your diagonal box stitch blanket.
Step 2: You can add a simple single crochet border, or use any taller stitch to create a wider border. Using single crochet, half double crochet, or double crochet, simply repeat rounds of crochet stitches. Work as many rounds as you’d like, using the following instructions:
- Work 1 crochet stitch in each stitch along each edge.
- Work 3 crochet stitches in each corner stitch. This will keep your corners from curling.
QUESTIONS CROCHETERS FREQUENTLY ASK ABOUT CORNER-TO-CORNER CROCHET (C2C)
In addition to questions I’ve answered in this article above, below are some commonly asked questions about corner-to-corner crochet.
What is C2C Crochet?
The technique of working corner to corner crochet is very simple. Choose any crochet stitch, begin your project in one corner and crochet on the bias (on a diagonal… think *triangle*), increasing each row, until your project is the desired width and length. Then, decrease each row until you’ve reached the corner opposite the one you started.
What does C2C mean?
C2C is the standard abbreviation for corner to corner crochet.
What is a C2C stitch in crochet?
You’ll often hear others refer to a C2C stitch in crochet. Crocheters call the diagonal box stitch the C2C stitch. This is incorrect! There is no specific C2C stitch. C2C is a crochet technique, not a stitch.
How do you avoid gaps in C2C crochet? How do I make my C2C tighter?
This question is typically asked when crocheting a C2C project with the diagonal box stitch. Each block consists of 3 double crochet and a chain 3. The chain 3 can make your project appear a little holey.
There are two ways to help avoid gaps in your diagonal box stitch projects.
- Work your ch-3 tightly, or
- Instead of a chain 3, work a chain 2. If you choose to use a ch-2 instead, then you’ll begin an increase row with a ch-5 instead of a ch-6. This is also referred to as the C2C 5 2 method.
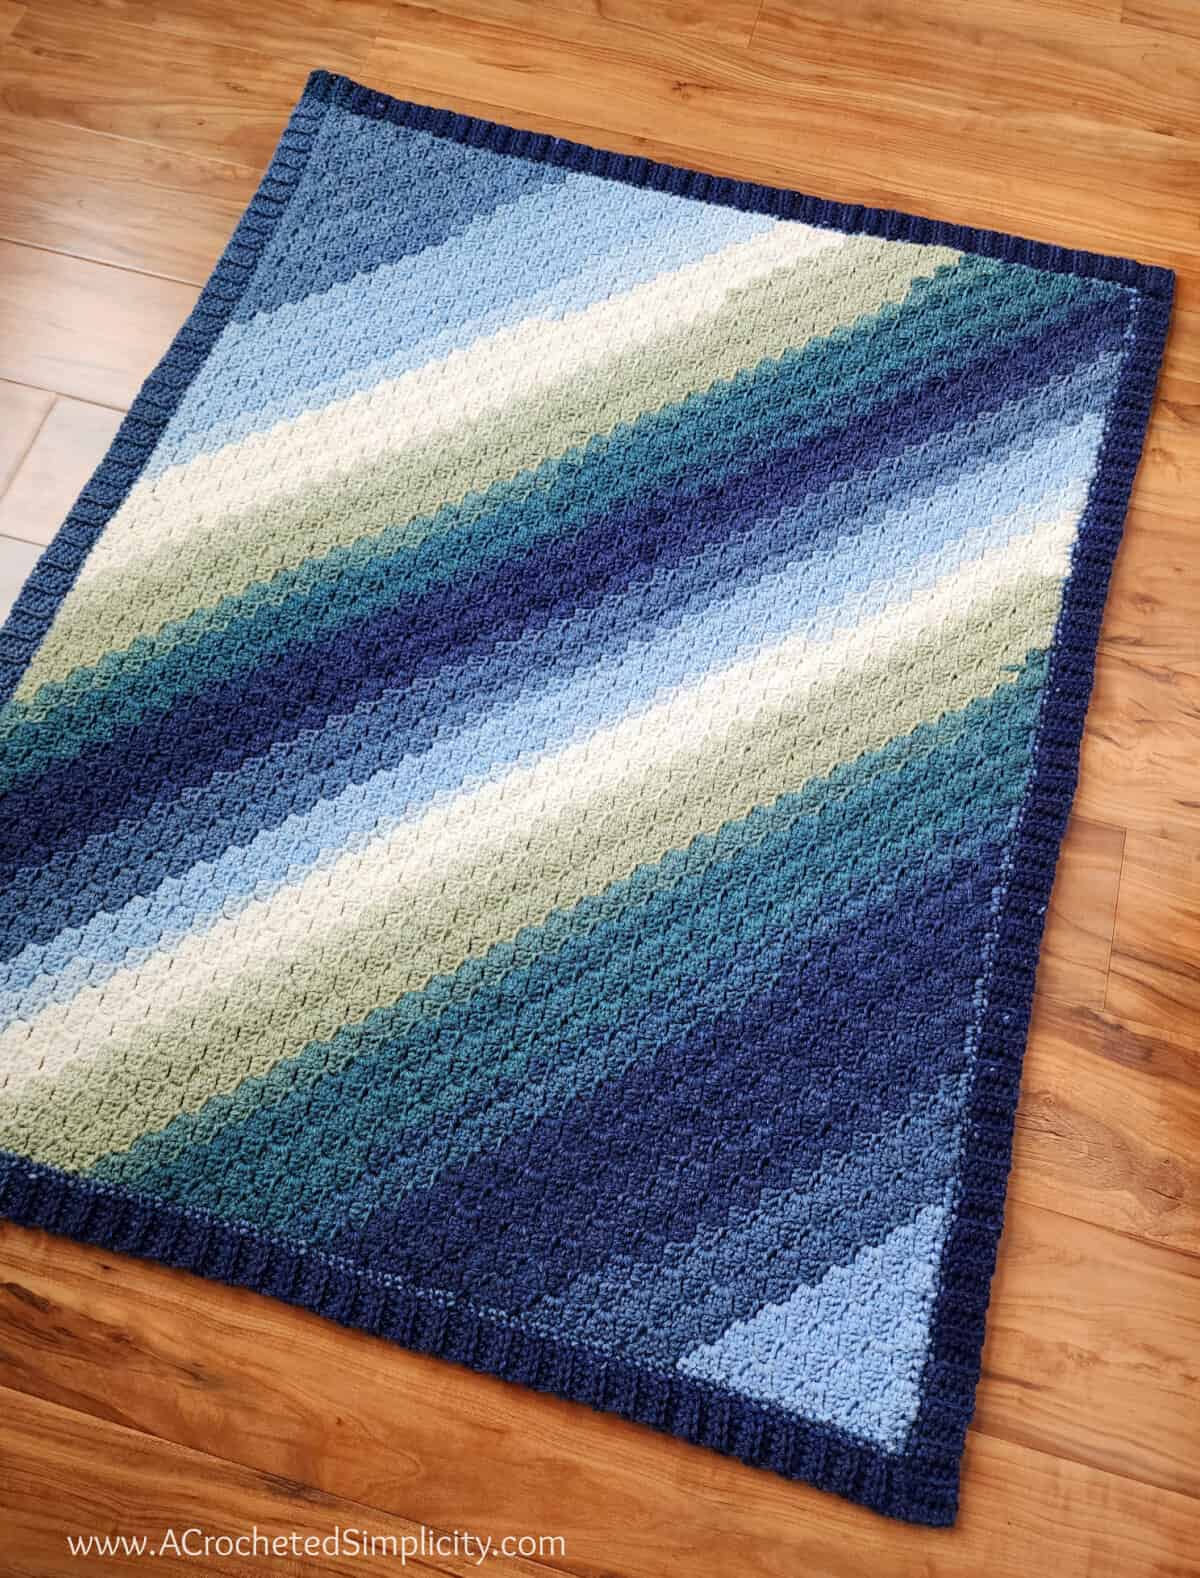
What size is a C2C crochet baby blanket?
The size of this C2C baby blanket free pattern in the photos is 32″ W x 38″ L, however, you can easily make yours larger or smaller. Check out my Standard Blanket Size Chart, it’s also a great C2C blanket size chart.
You can easily adapt this C2C crochet pattern to make a twin size crochet blanket or even larger.
I MADE IT! NOW WHAT?
Pin this post! Save this crochet C2C blanket pattern to your Pinterest boards so that you can come back and make it again.
Leave a comment below: We love to hear your feedback.
Share Your Finished Projects on Facebook or Instagram: I love to see your finished projects! Share with us on social media and tag me @acrochetedsimplicity or use the hashtag #ACrochetedSimplicity so I can find your posts.
JOIN US IN THE FACEBOOK COMMUNITY GROUP!
Come share your finished projects with us in the A Crocheted Simplicity Crochet Community Group on Facebook. Join us for fun community events such as crochet alongs, join in on crochet conversations, ask questions, get advice, and share your love for crochet!

MORE FREE CORNER TO CORNER CROCHET PATTERNS I THINK YOU’LL LOVE – DIFFERENT C2C STITCHES
MORE FUN & FREE CORNER TO CORNER CROCHET
Are you looking for more corner to corner crochet written instructions? We have several more free C2C crochet patterns.
You’ll find plenty of free corner to corner crochet blanket patterns using different corner to corner crochet stitches such as the griddle stitch (aka lemon peel stitch), extended moss stitch, mini-bean stitch, and many more!
I love the colors in this C2C blanket!
I haven’t tried C.2 C yet. Maybe that’s my next project…
I’ve always wanted to learn to do a c2c blanket. This is a beautiful one, Thank you! I would loveo to win the year of pdf’s.
Love your designs!
Gloria
I love to crochet corner to corner. This blanket is beautiful. Thank you for the tips, I will definitely use them.
Do you always work in the bumps on your chain 6? Or just the first time?
Hi Emily,
I always work into the back humps. I prefer to work into the back humps as I feel it gives a nicer finished look.
Happy Crocheting,
Jennifer