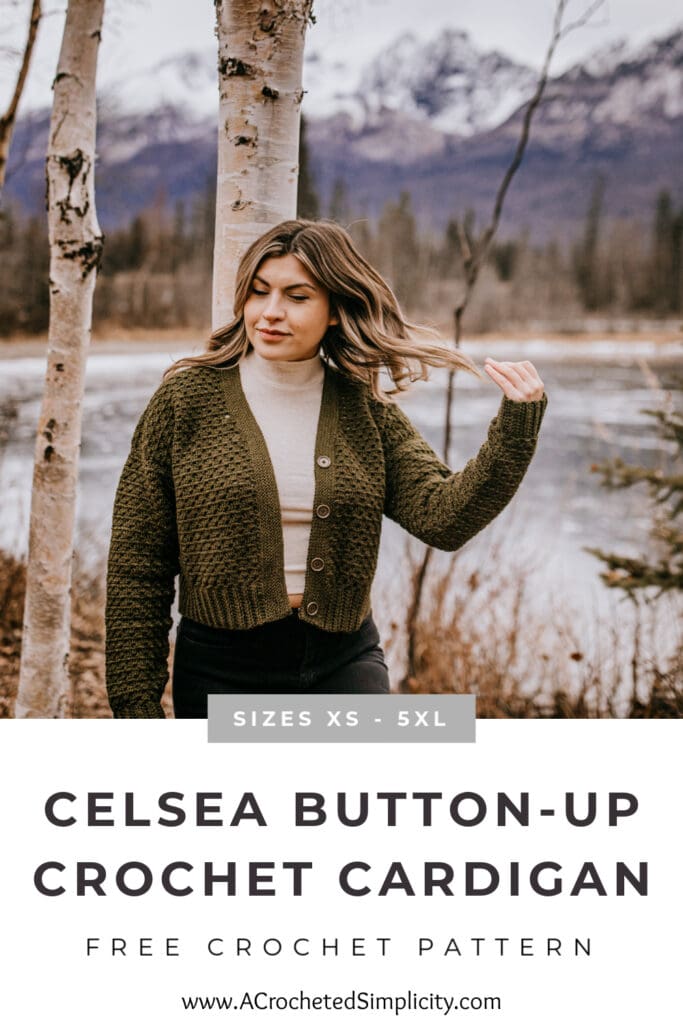
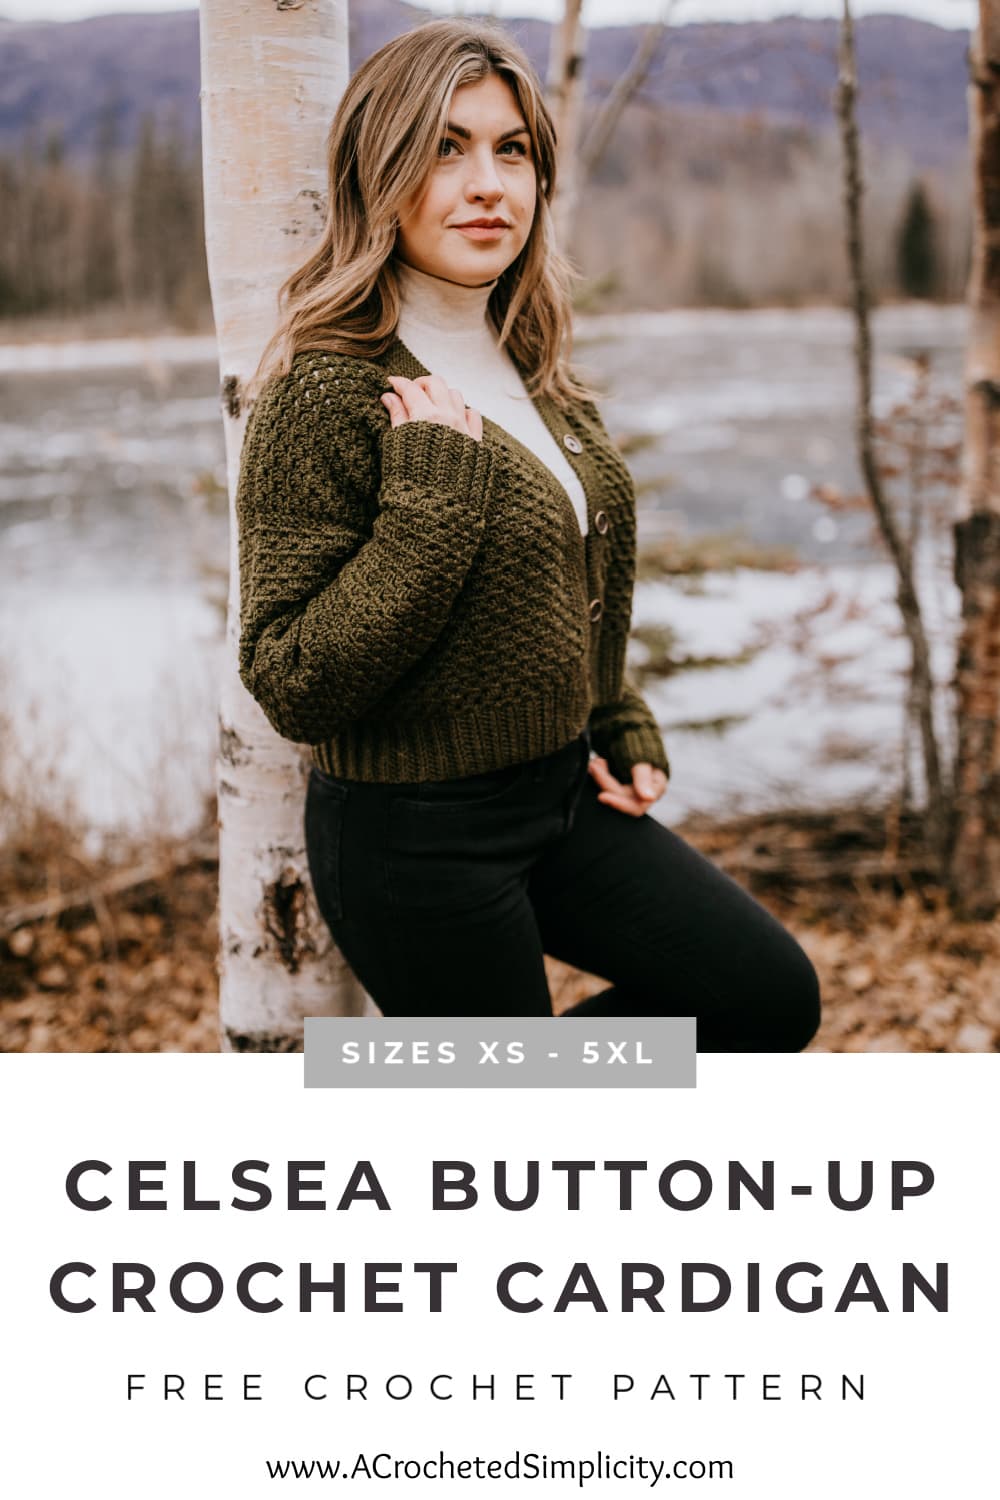
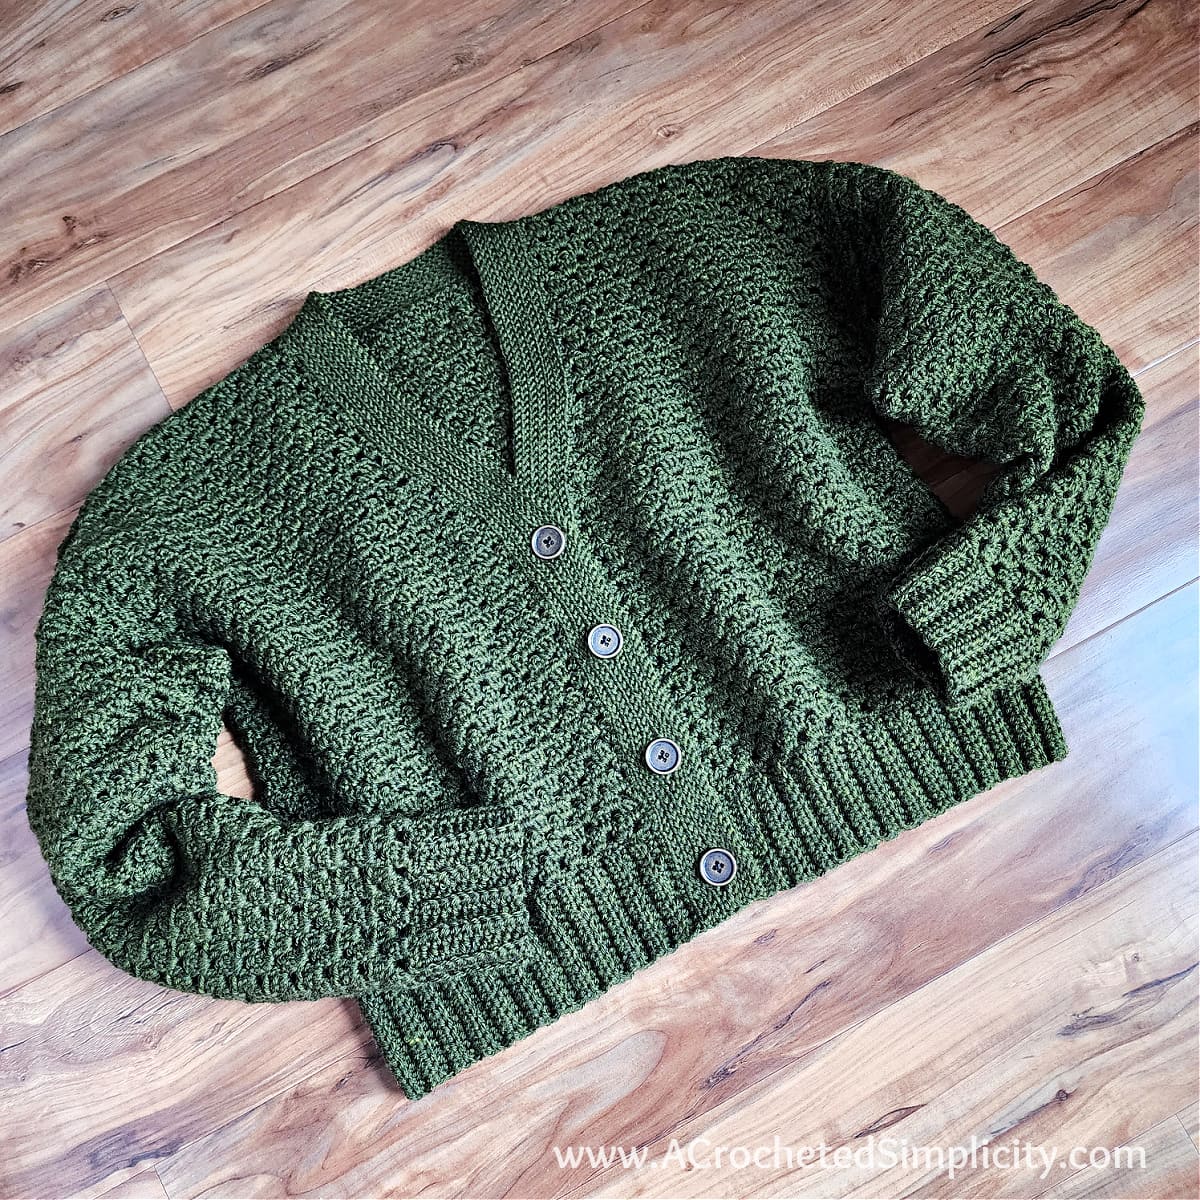
Celsea Button Up Crochet Cardigan
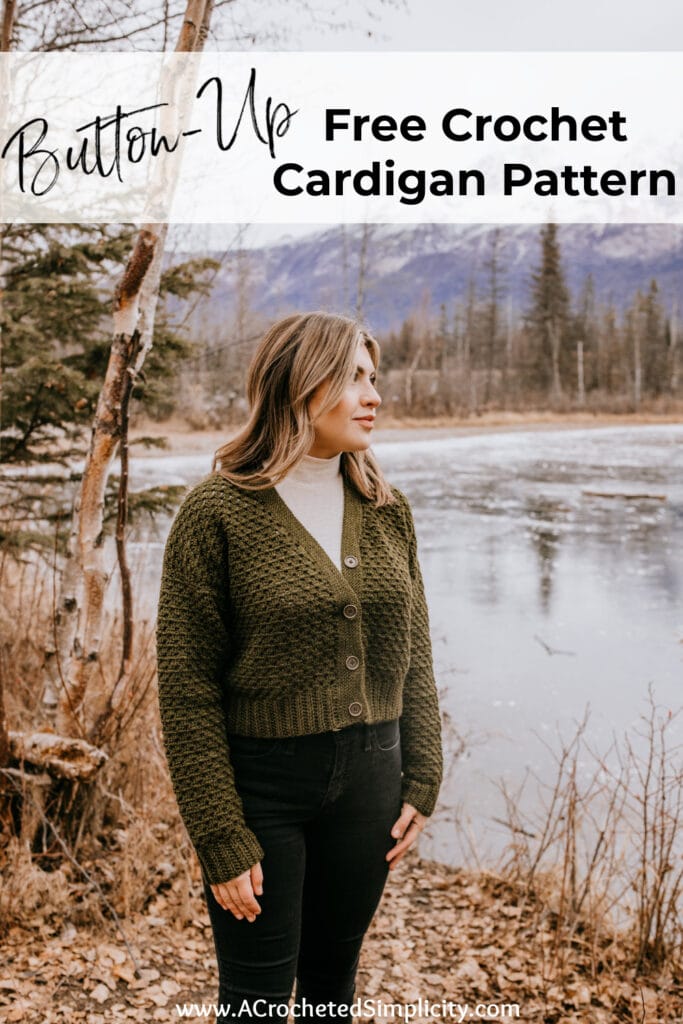
The Celsea Button Up Crochet Cardigan is a simple granny stitch cardigan that’s nearly seamless and the length is easily adjustable to fit your style!
When you combine the classic crochet granny stitch with an oversized button up cardigan and you’ll have a modern crochet granny stitch cardigan that your friends will want to “borrow”.
You’ll find the crochet cardigan pattern free below, or an ad-free print friendly PDF (including all photo tutorials + BONUS garment schematic) on Ravelry, or on Etsy (aff).
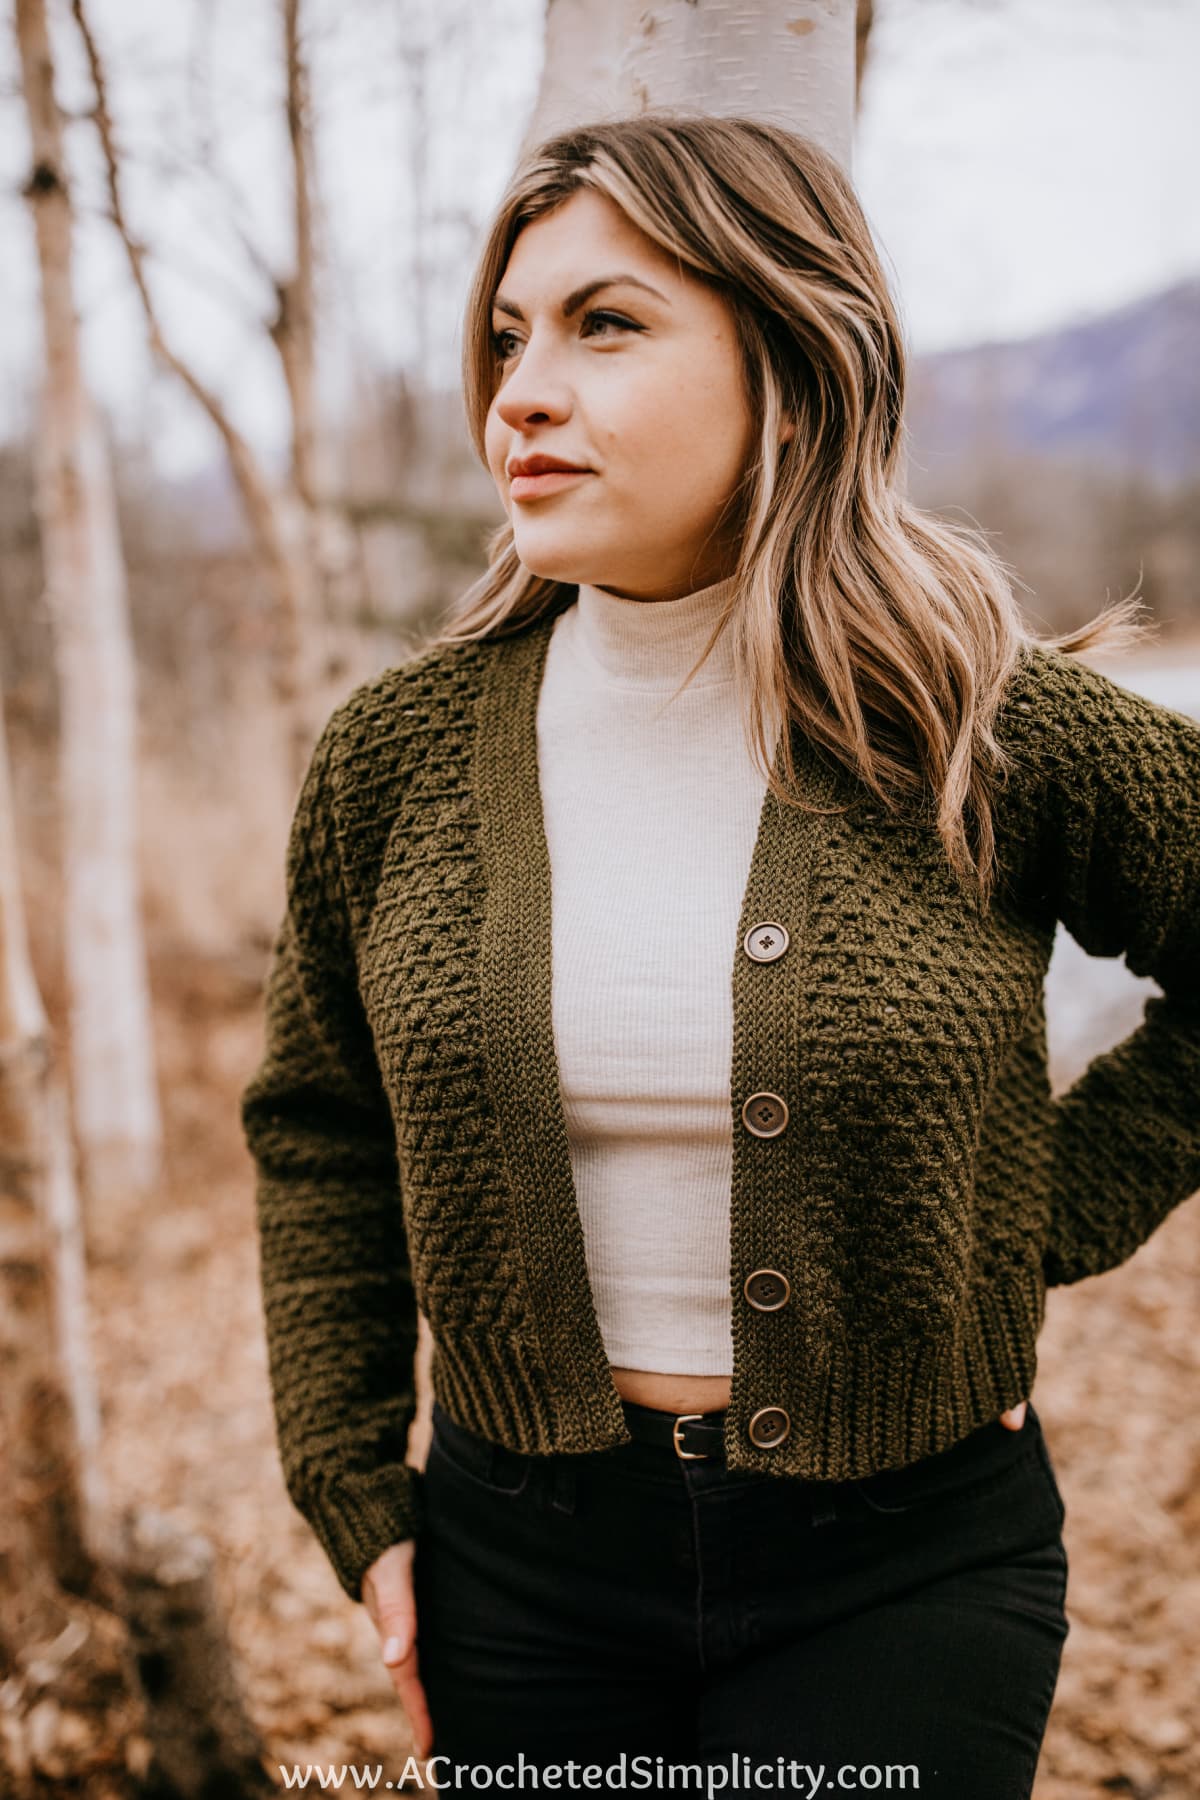
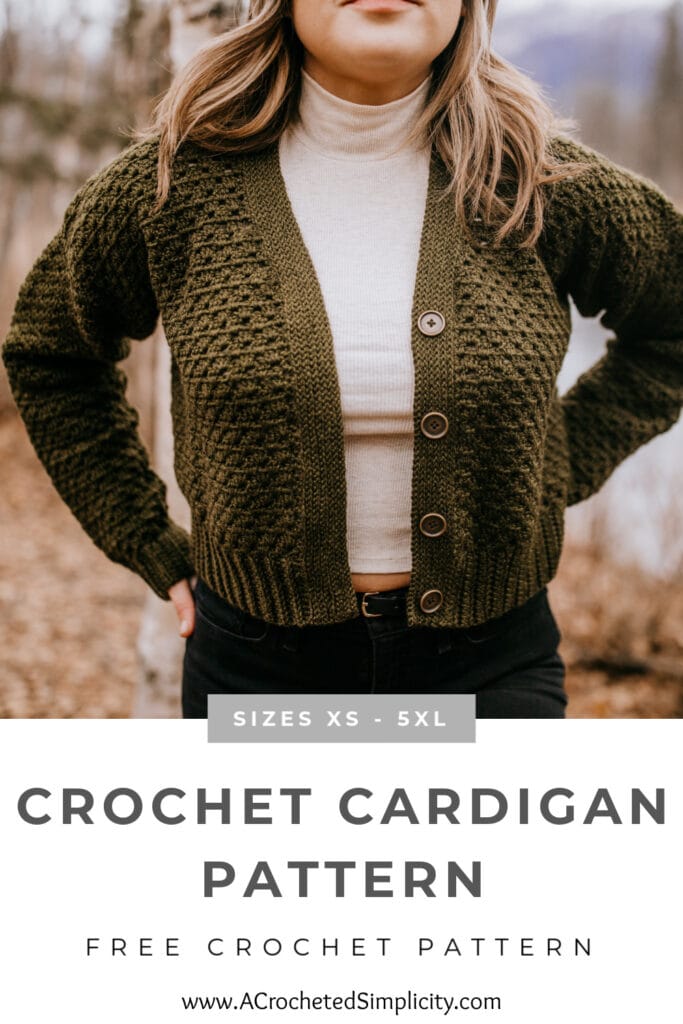
The Celsea Button Up Cardigan has an oversized fit, with a slightly shaped front neck opening, tapered sleeves, knit-look ribbing along the bottom hem and cuffs, and a knit-look buttonhole front edging. It’s size inclusive from XS – 5XL, however, the length can be easily adjusted.
This simple granny stitch button up crochet cardigan is ideal for advance beginners.
Make sure to order an extra ball of yarn or two, if you prefer a longer cardigan.
Trendy Crochet Granny Cardigan
You may have noticed that every where you turn this year you see a granny stitch crochet pattern. This is because it’s been used for many trendy crochet ideas this year.
Because the granny crochet stitch is a slightly open and airy crochet stitch pattern, it makes a great year round cardigan!
Easily adjust the length of your button up crochet cardigan. Whether it’s cropped, waist length, or a long cardigan that fits your personal style, it’s super easy to adjust the length of this free crochet cardigan pattern.
Crochet Granny Stitch OR Granny Stripe
For the Celsea Button Up Crochet Cardigan, I worked the granny stitch in rows. You may also see this referred to as the flat granny stitch, straight granny stitch, and even the granny stripe stitch.
The crochet stitches used for both the granny stitch and granny stripe are the same. Both use a cluster of three double crochet stitches nestled between the three double crochet clusters from the previous row.
You may sometimes come across a slight variation where a ch-1 is worked between each three double crochet cluster. This creates larger gaps between the clusters and the stitch pattern is more open and airy. I did not add a ch-1 between three dc clusters in this cardigan pattern.
Related: If you love the crochet granny stitch pattern, I have several other crochet patterns that use this crochet stitch. Projects ranging from crochet bags and blankets to home decor and a granny stitch top.
How to Crochet a Cardigan
If you’re searching for crochet patterns for cardigan sweaters, easy crochet cardigan patterns, cropped crochet cardigans, or plus size crochet sweaters, this button up cardigan checks all the boxes.
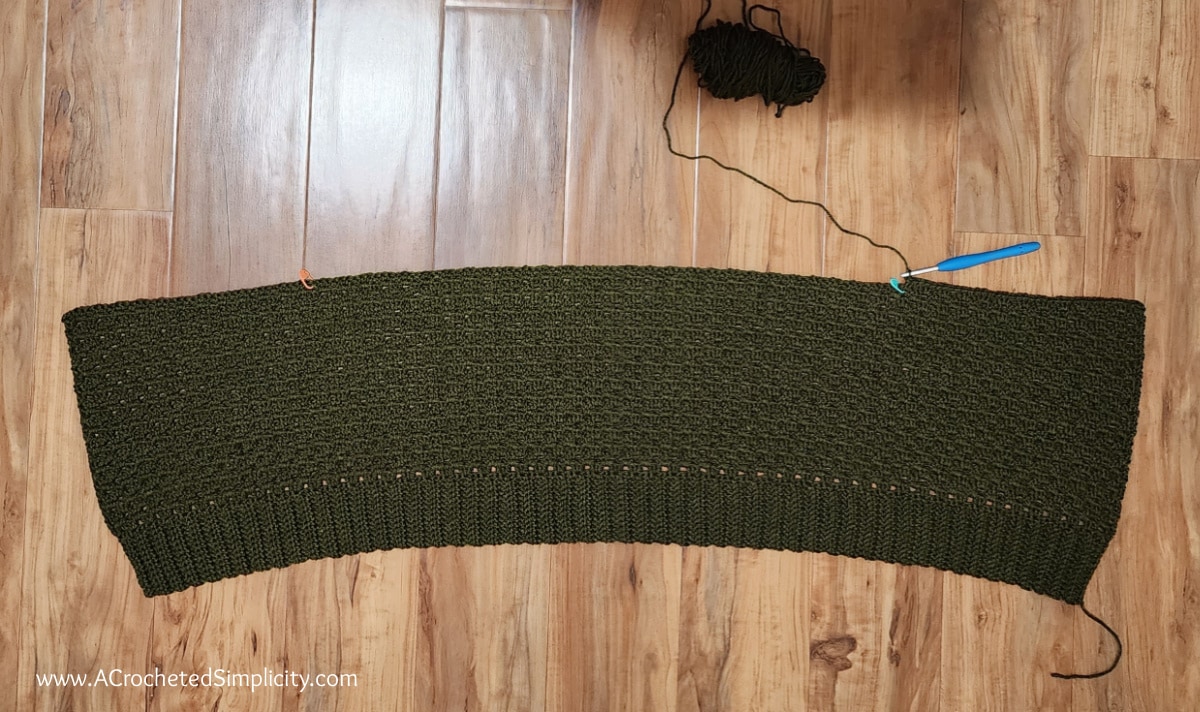
This crochet cardigan is worked from the bottom up.
You’ll begin by working the bottom ribbing, then rotate to work the body of cardigan into the side of the rows of ribbing.
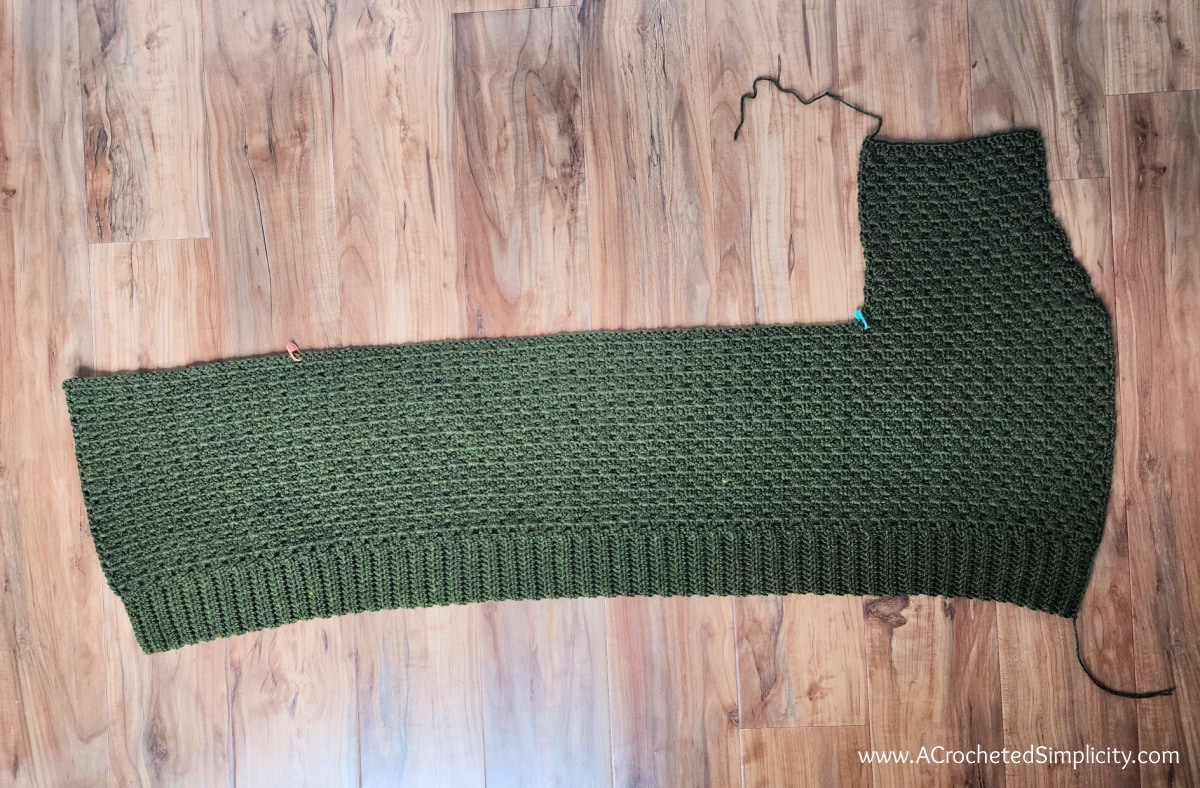
For the body of cardigan, you’ll work the crochet granny stitch in rows until you reach the bottom of the armhole. This is where you’ll adjust the length of your cardigan, if you prefer a long cardigan or cropped cardi.
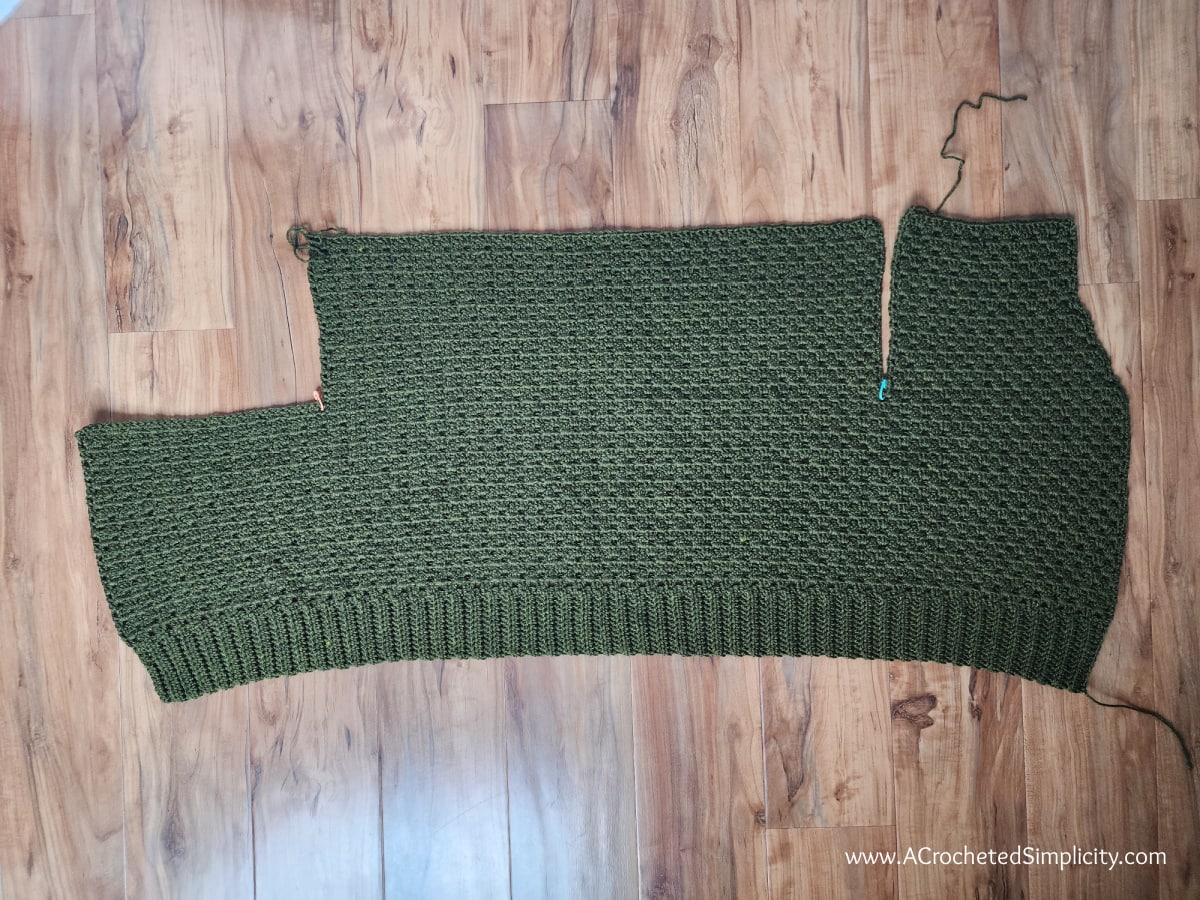
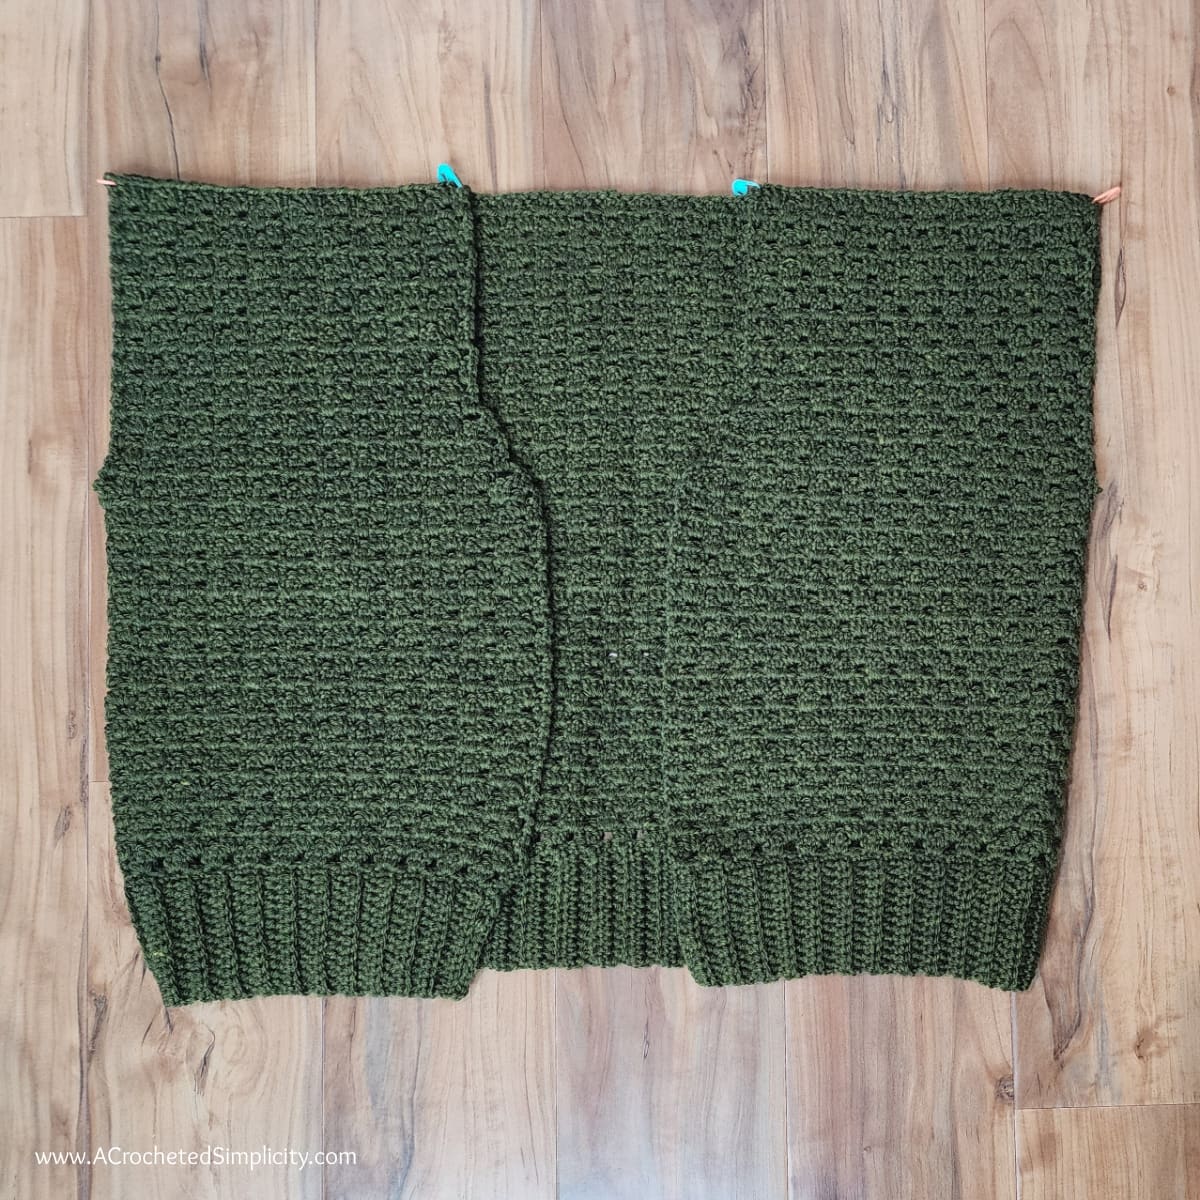
You’ll then split this panel for the two front panels and back panel. The front panels have simple granny stitch decreases to shape the neckline into a slight v-neck shape. The back panel is worked in rows without decreases.
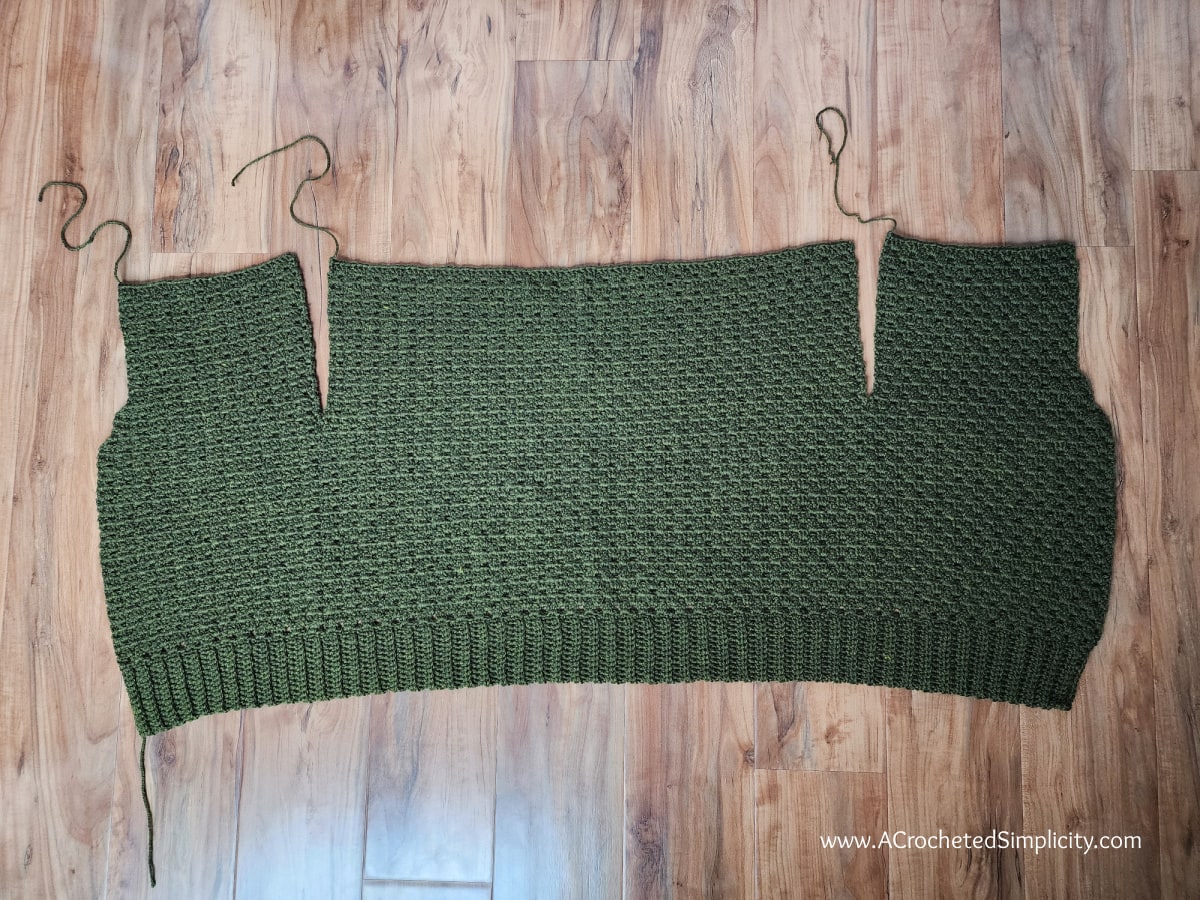
After the body of cardigan is complete, you will then seam the shoulders with a whipstitch.
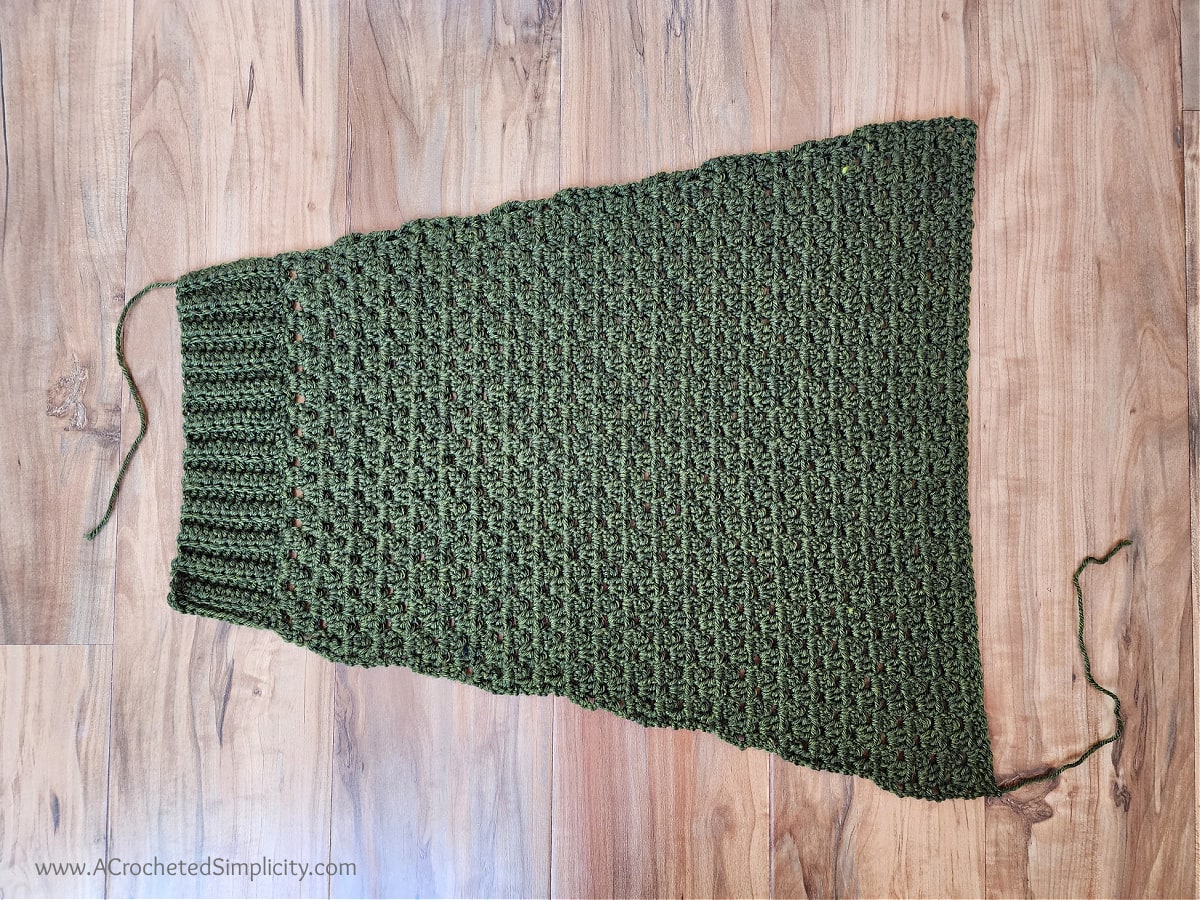
Next, crochet the sleeves. First, you’ll crochet ribbing for the sleeve cuff, then rotate to work into the side of the rows of ribbing to begin the body of sleeve. The sleeve is worked in rows from the cuff to the top of the sleeve.
The sleeve is also worked in the granny stitch, but you will increase the granny stitch pattern to shape the sleeve.
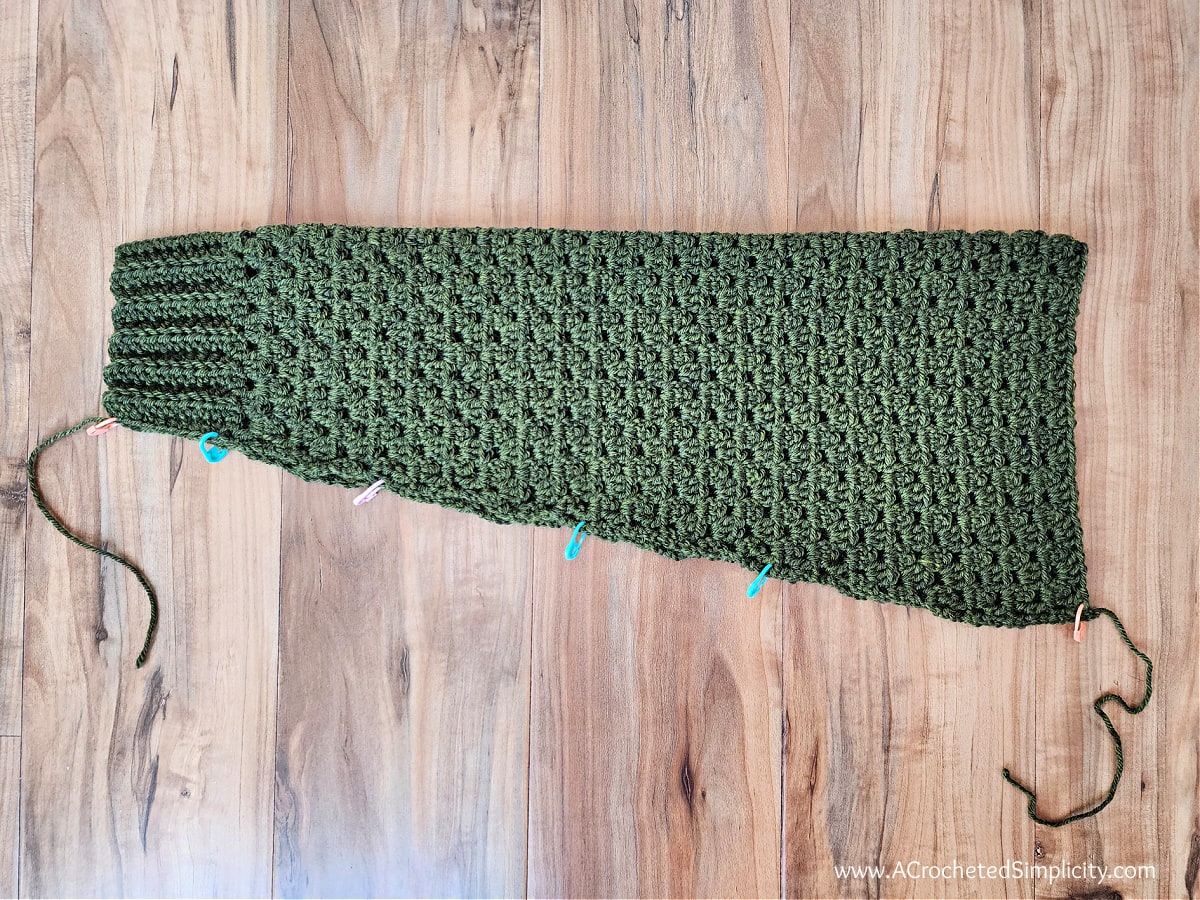
After completing the sleeves, you will seam the sleeves then attach them to the armhole openings in the cardigan with a whipstitch.
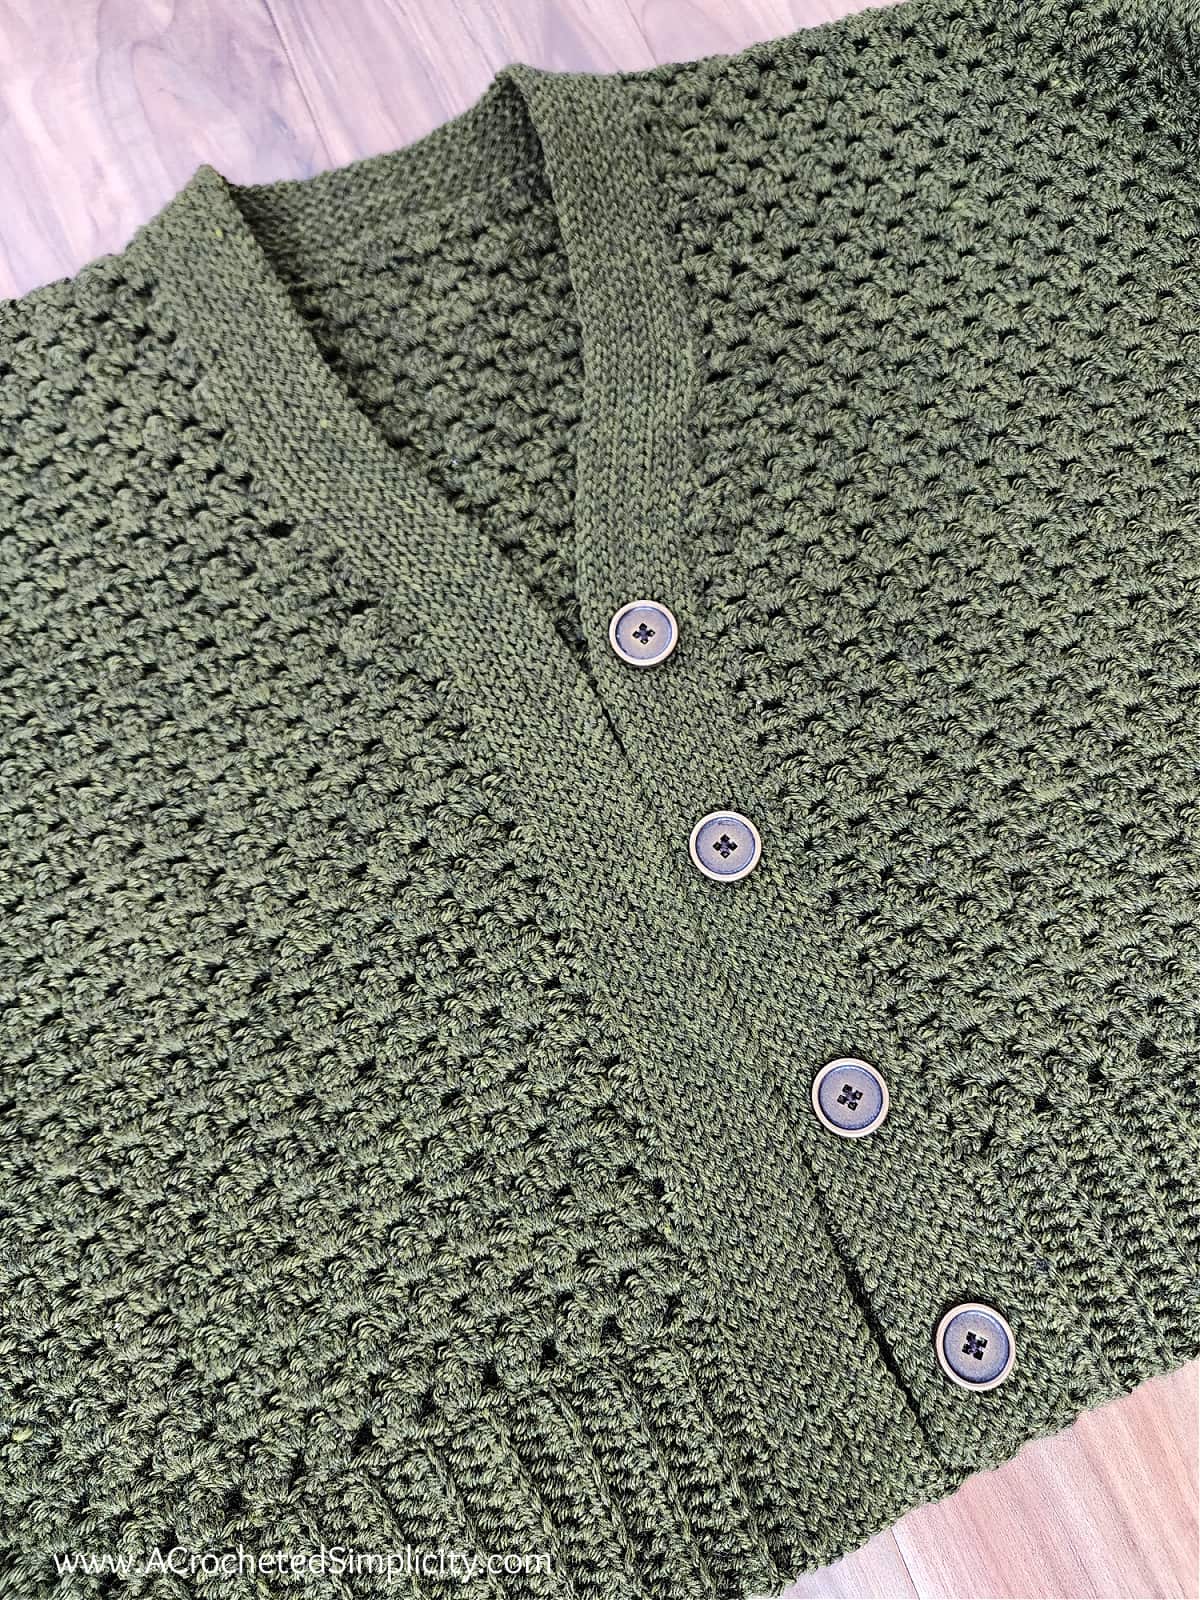
Lastly, you’ll finish crocheting your cardigan by adding a simple button and buttonhole edging around the front opening.
Finish it off by attaching buttons.
And there you have it! That’s how you crochet a button up cardigan!
Choosing Which Size to Crochet
To choose your size, look over the size chart below.
- ‘Fits Bust’ measurement is the measurement of the intended wearer, not the cardigan’s finished measurement.
- Finished Bust, Panel Width, and Top Length are measurements of the finished crochet sweater.
- This crochet cardigan has 6-8″ of positive ease built in for an oversized fit.
- If you prefer a more classic fitting cardigan, I would suggest making a size smaller than your actual bust size, (as long as your actual bust size is within the range of the smaller size’s finished bust).
- Cardigan sweater length is measured from the nape of the neck down (does not include the front buttonhole edging).
- Sleeve length is measured from the underarm of the crochet cardigan to edge of the cuff.
- Adjusting Top Length: See the notes in the Body of Cardigan section for adjusting length. If you add length to your cardigan, you will need more yarn than what is shown in the chart below
- Lengthening Sleeves: If you need to lengthen your sleeves, simply repeat Rows 7 – 8, in order, depending on where you left off for the size you’re making.
Size & Yardage Chart
The notes above refer to this size chart.
Yarn
This crochet cardigan for ladies is a simple cardigan sweater that was designed using Lion Brand Wool Ease Recycled Yarn. I chose the colorway Olive because it pairs nicely with neutrals and fall outfits.
Lion Brand Wool Ease is my favorite worsted weight yarn so I knew I would love the recycled version just as much!
It’s a worsted weight, recycled acrylic and wool blend with fantastic sheen! It is currently available in 7 colors, but I’m hoping they’ll add more.
Yarn Substitutions
You can substitute other worsted weight yarns as long as you’re able to meet gauge and you’re happy with the drape of the crochet fabric.
I personally recommend a worsted weight yarn that is a wool blend for a winter crochet sweater. However, if you’re making this sweater to wear during the summer months, it I would choose a cotton or cotton blend.
Celsea Button Up Crochet Cardigan – Free Crochet Cardigan Pattern
The modern crochet sweater pattern is below, but if you love to work offline, I’ve got a couple other great options for you.
Purchase the ad-free, printable PDF, including all photo tutorials + BONUS crochet garment schematic, on Ravelry, or on Etsy (aff).
Purchase this crochet granny sweater kit! (aff): Lion Brand has a full kit of the Celsea Button Up Crochet Cardigan, available on their website. The crochet cardigan kit includes your choice of colors and a digital copy of the crochet pattern.
This post contains affiliate links.
Materials
- Yarn: Worsted Weight / 4 / Yarn, Lion Brand Wool Ease Recycled Yarn in Olive was used for the sample in the photos, (85 g / 3 oz / 196 yards / 179 m / 80% recycled acrylic / 20% recycled wool).
- Yardage: See Size Chart Above
- Crochet Hook: H/8/5.00mm; or size needed to obtain gauge (My favorite crochet hooks are the Clover Amour Crochet Hooks, I’ve never had an ache in my hand since switching).
- Locking Stitch Markers
- Scissors
- Yarn Needle
- Buttons – (4) 7/8″
Abbreviations (US Terms)
- ch(s): chain(s)
- sl st(s): slip stitch(es)
- st(s): stitch(es)
- yo: yarn over
- sp(s): space(s)
- sc: single crochet
- hdc: half double crochet
- dc: double crochet
- Alt-ch3: alternate chain 3
- Join with a standing single crochet
- Join with a standing double crochet
- SM: stitch marker
- Rep: repeat
- Rnd: round
- RS: Right Side
- WS: Wrong Side
- BLO: back loop only
- FLO: front loop only
Experience Level
- Easy
Gauge
- See individual sections for gauge.
Sizes
- Women’s XS through 5XL
- See size chart above.
Special Stitches
- Alternate Chain-3: (Alt-ch3): Complete last st of previous row, take loop off hook, insert hook into sp between last dc and last 3 dc of previous row, put loop on hook and pull thru sp, turn, ch 3.
- Join with a standing single crochet: begin with a slip knot on your hook, insert your hook into the stitch or space indicated, yo, pull up a loop, yo and draw thru both loops on hook.
- Join with a standing double crochet: begin with a slip knot on your hook. YO, insert your hook into the stitch or space indicated, yo, pull up a loop, yo, pull through 2 loops on your hook, yo, pull through remaining 2 loops on your hook.
Pattern Notes
- Turning chains are not included in stitch count unless noted otherwise.
- Lion Brand Wool Ease Recycled (85 g / 3 oz / 196 yards / 179 m / 80% recycled acrylic / 20% recycled wool).
- Colorway & Yardage
- Olive #632-172T (see yardage in chart above)
- Changes for Sizes are written as follows: XS (S, M, L, XL, 2XL, 3XL, 4XL, 5XL)
- Stitch Counts at the end of each row are written as follows: (XS, S, M, L, XL, 2XL, 3XL, 4XL, 5XL).
- Crochet Cardigan Sweater Construction: This free crochet cardigan pattern is worked from the bottom up. You’ll begin by working the bottom ribbing, then rotate to work the body of cardigan into the side of the rows of crochet ribbing. For the body of cardigan, you’ll work the crochet granny stitch in rows until you reach the bottom of the armhole. You’ll then split this panel for the two front panels and back panel. The front panels have simple granny stitch decreases to slightly shape the neckline. The back panel is worked in rows without decreases. After the body of cardigan is complete, you will then seam the shoulders. Next, work the sleeves. First, you’ll make the sleeve cuff ribbing, then rotate to work into the side of the rows of ribbing to begin the body of sleeve. The sleeve is worked in rows from the cuff to the top of the sleeve. The sleeve is also worked in the granny stitch, but you will crochet granny stitch increases to shape the sleeve. After completing the sleeves, you will seam the sleeves then attach them to the armhole openings in the cardigan. Lastly, you’ll complete your cardigan by adding a knit-look button and buttonhole edging around the front opening. Finish it off by attaching buttons.
- Model wears a women’s medium and is wearing a medium sample.
Celsea Button Up Crochet Cardigan Written Pattern
CHANGES FOR SIZES AS FOLLOWS: XS (S, M, L, XL, 2XL, 3XL, 4XL, 5XL)
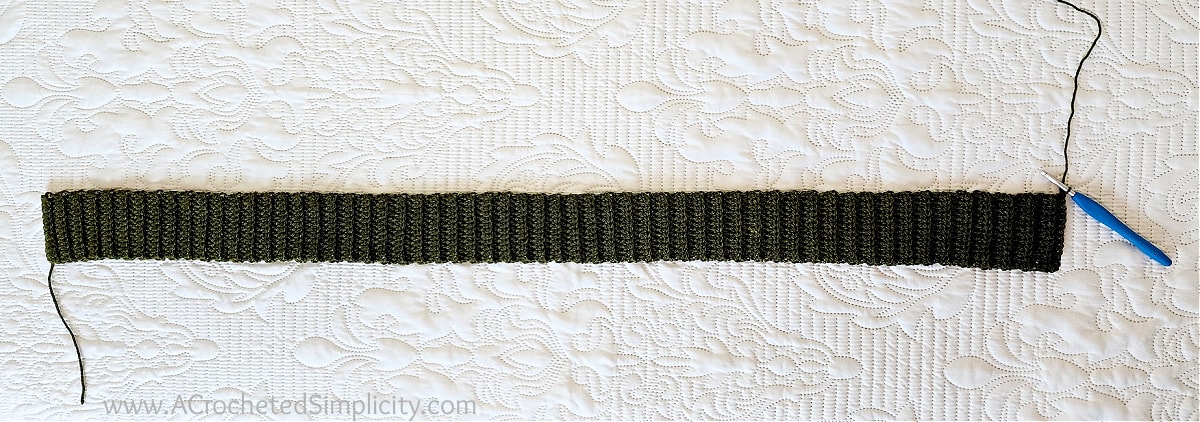
Bottom Ribbing
Gauge: With a 5.00mm crochet hook, in BLO hdc: 12 sts = 2.75″; 9 rows = 3.5″
Row 1: With yarn & a 5.00mm crochet hook, ch 13, working into the back humps of the ch, hdc in the 2nd ch from your hook and in each ch across. Turn. (12 sts)
Rows 2 – 86 (96, 106, 116, 126, 136, 146, 156, 166) : Ch 1, BLO hdc in each st across. Turn. (12 sts)
Do not fasten off. Continue on to Body of Cardigan.
Body of Cardigan
Gauge: With a 5.00mm crochet hook, in granny stitch: 15 sts = 4″; 11 rows = 4″.
- Gauge height is not as crucial as gauge width for the Body of Cardigan.
Row 1 (RS): After turning at the end of the last row of the ribbing, rotate to work along the long edge of the ribbing, work 2 sc into each of the first 2 sts, then [sc in the next st, 2 sc in the next st] rep from [ to ] across. Turn. (130, 145, 160, 175, 190, 205, 220, 235, 250 sts)
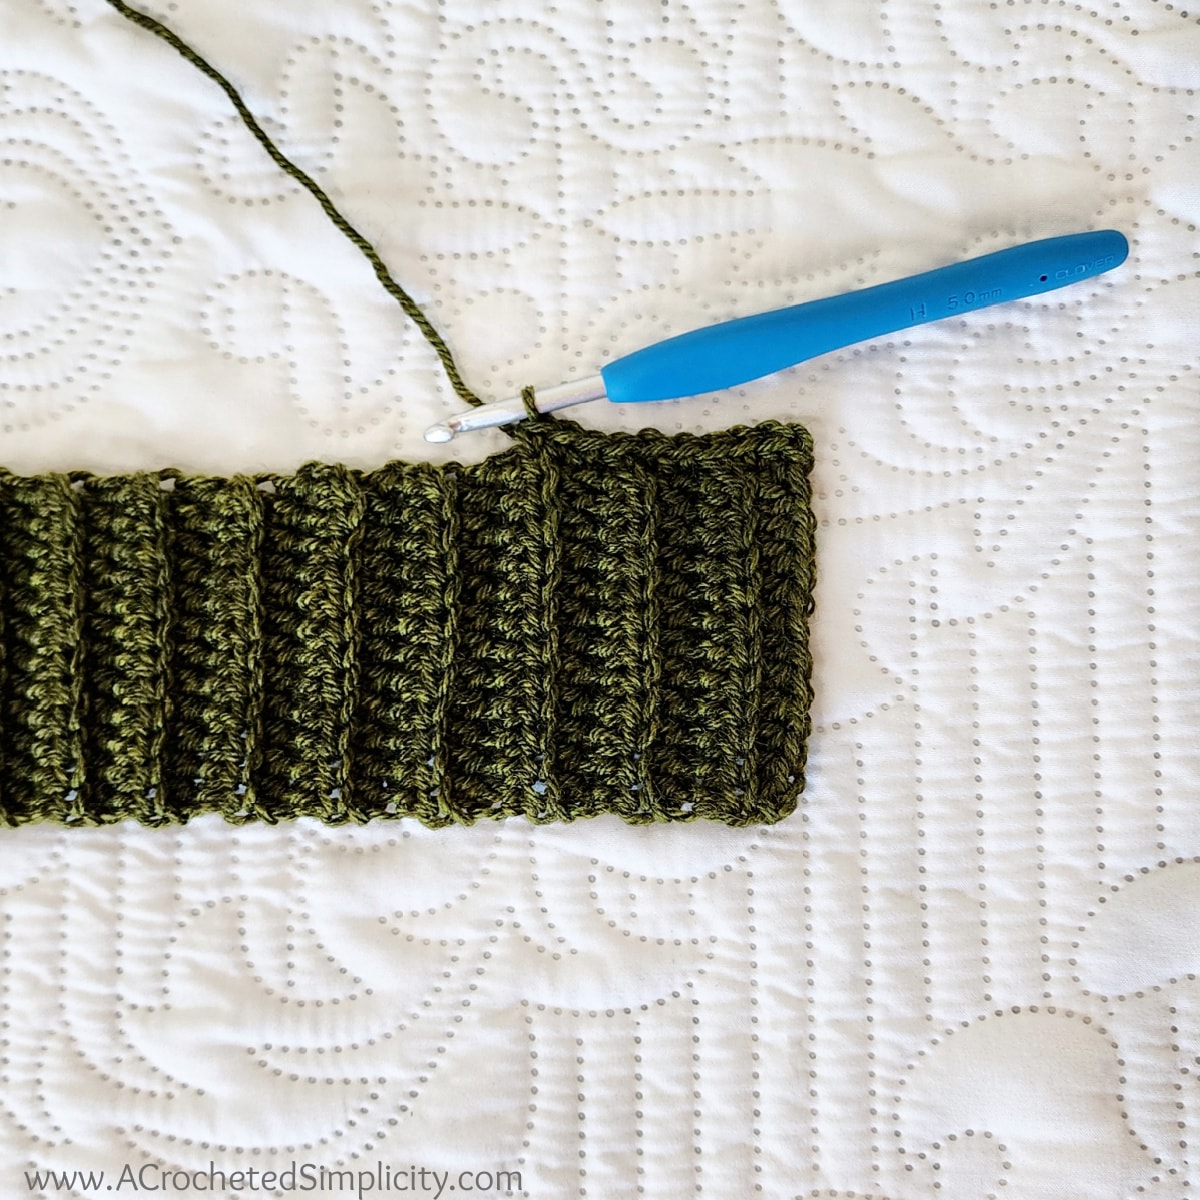
Row 2: Ch 3 (counts as a st), dc in the first st, skip each of the next 2 sts, [ 3 dc in the next st, skip each of the next 2 sts ] rep from [ to ] across to the last st, 2 dc in the last st. Turn. (130, 145, 160, 175, 190, 205, 220, 235, 250 sts)
Row 3: Ch 3 (counts as a st), 3 dc in each sp across to the last 2 sts, dc in the top of ch 3. (131, 146, 161, 176, 191, 206, 221, 236, 251 sts)
Your Body of Cardigan width should be: 34.5″ (38.5″, 42.5″, 46.5″, 50.5″, 54.5″, 58.5″, 62.5″, 66.5″).
- The Bottom Ribbing should be slightly narrower than the Body of Cardigan. This is intentional.
Row 4: Alt-ch3, dc in the same sp, 3 dc in each sp across to the last sp, 2 dc in the last sp. Turn. (130, 145, 160, 175, 190, 205, 220, 235, 250 sts)
Row 5: Ch 3 (counts as a st), 3 dc in each sp across to the last 2 sts, dc in the top of ch 3. (131, 146, 161, 176, 191, 206, 221, 236, 251 sts)
Rep Rows 4 – 5, ending with a Row 5, until your cardigan measures approximately 10″ (10″, 11″, 11.5″, 11.5″, 12″, 12″, 13″, 13″) (including bottom ribbing).
Do not fasten off. Continue on to the Front Left Panel.
Adjusting Length: If you prefer a longer or shorter cardigan, here is where you’ll want to make the adjustment. The length stated in the chart above is measured from the top of the shoulder to the bottom edge of the cardigan (including the bottom ribbing).
- Longer: If you’d like a longer cardigan, repeat Rows 4 – 5 in multiples of 2 (make sure to end with a Row 5 repeat).
- Shorter: If you’d like a shorter, cropped cardigan, work fewer rows in multiples of 2 (make sure to end with a Row 5 repeat).
Front Left Panel
Row 1 (WS): Alt-ch3, dc in the same sp, [ 3 dc in the next sp ] 9 (10, 11, 12, 14, 15, 16, 17, 19) times, then 2 dc in the next sp. Turn. (31, 34, 37, 40, 46, 49, 52, 55, 61 sts)
Your Front Left Panel width should be: 8″ (9″, 10″, 11″, 12″, 13″, 14″, 15″, 16″).
Place Stitch Markers: Before you turn to complete Row 2, place 1 locking stitch marker to mark where to begin the Back Panel and place 1 more locking stitch marker to mark where to end the Back Panel / begin the Front Right Panel.
- Begin Back Panel: To mark the beginning of the Back Panel, place a SM in the same space that you worked the last 2 dc of Row 1 of the Front Left Panel into.
- End Back Panel / Begin Front Right Panel: After placing the SM to mark the beginning of the back panel, skip 22 (25, 28, 31, 32, 35, 38, 41, 42) spaces, place a SM in the next space to mark the end of the Back Panel / beginning of the Front Right Panel.
Row 2: Ch 3 (counts as a st), 3 dc in each sp across to the last sp, skip the last sp, dc in the top of ch 3. (29, 32, 35, 38, 44, 47, 50, 53, 59 sts) Stitch count decreases by 2 stitches. This is a decrease row to shape the neckline.
Row 3: Alt-ch3, dc in the same sp, 3 dc in each sp across to the last sp, 2 dc in the last sp. Turn. (28, 31, 34, 37, 43, 46, 49, 52, 58 sts)
Row 4: Ch 3 (counts as a st), 3 dc in each sp across to the last 2 sts, dc in the top of ch 3. (29, 32, 35, 38, 44, 47, 50, 53, 59 sts)
Row 5: Alt-ch3, dc in the same sp, 3 dc in each sp across to the last sp, 2 dc in the last sp. Turn. (28, 31, 34, 37, 43, 46, 49, 52, 58 sts)
Do not fasten off. Continue below for the size cardigan you’re making.
Size XS
Rows 6 – 9: Rep Rows 2 – 5. (25 sts) at the end of Row 9. Scroll down and continue with All Sizes.
Sizes S & M
Rows 6 – 13: Rep Rows 2 – 5. (25, 28 sts) at the end of Row 13. Scroll down and continue with All Sizes.
Sizes L & XL
Rows 6 – 13: Rep Rows 2 – 5. (31, 37 sts) at the end of Row 13. Scroll down and continue with All Sizes.
Sizes 2X & 3X
Rows 6 – 13: Rep Rows 2 – 5. (40, 43 sts) at the end of Row 13. Scroll down and continue with All Sizes.
Sizes 4X & 5X
Rows 6 – 13: Rep Rows 2 – 5. (46, 52 sts) at the end of Row 13. Scroll down and continue with All Sizes.
All Sizes
Rep Rows 4 – 5, until Front Left Panel measures approximately 7.5″ (8″, 8″, 8.5″, 8.5″, 9″, 9″, 10″, 10″) H. * Make a note of how many total rows you worked for your Front Left Panel and be sure to work the same number of total rows for the Back Panel and Front Right Panel.
Fasten off. Weave in ends. Continue on to the Back Panel. The Shoulder width of your panel should be 7″ (7″, 7.5″, 8.5″, 10″, 11″, 11.75″, 12.5″, 14″).
Back Panel
Row 1 (WS): With yarn & a 5.00mm crochet hook, join yarn with a standing dc in the sp you marked with a SM to begin the Back Panel, work 1 more dc in the same sp, [ 3 dc in the next sp ] 22 (25, 28, 31, 32, 35, 38, 41, 42) times, then 2 dc in the next sp. Turn. (70, 79, 88, 97, 100, 109, 118, 127, 130 sts)
Your Back Panel width should be: 18″ (20″, 22″, 24″, 26″, 28″, 30″, 32″, 34″).
Row 2: Ch 3 (counts as a st), 3 dc in each sp across to the last 2 sts, dc in the last st. (71, 80, 89, 98, 101, 110, 119, 128, 131 sts)
Row 3: Alt-ch3, dc in the same sp, 3 dc in each sp across to the last sp, 2 dc in the last sp. Turn. (70, 79, 88, 97, 100, 109, 118, 127, 130 sts)
Rep Rows 2 – 3, until you’ve worked the same number of rows as your Front Left Panel.
Fasten off. Weave in ends. Continue on to the Front Right Panel. The Back Panel should be 18″ (20″, 22″, 24″, 26″, 28″, 30″, 32″, 34″) W.
Front Right Panel
Row 1 (WS): With yarn & a 5.00mm crochet hook, join yarn with a standing dc in the sp you marked with a SM to begin the Front Right Panel, work 1 more dc in the same sp, [ 3 dc in the next sp ] 9 (10, 11, 12, 14, 15, 16, 17, 19) times, then 2 dc in the next sp. Turn. (31, 34, 37, 40, 46, 49, 52, 55, 61 sts)
Your Front Right Panel width should be: 8″ (9″, 10″, 11″, 12″, 13″, 14″, 15″, 16″).
Row 2: Ch 3 (counts as a st), skip the first sp, 3 dc in each sp across to the last 2 sts, dc in the last st. (29, 32, 35, 38, 44, 47, 50, 53, 59 sts) Stitch count decreases by 2 stitches. This is a decrease row to shape the neckline.
Row 3: Alt-ch3, dc in the same sp, 3 dc in each sp across to the last sp, 2 dc in the last sp. Turn. (28, 31, 34, 37, 43, 46, 49, 52, 58 sts)
Row 4: Ch 3 (counts as a st), 3 dc in each sp across to the last 2 sts, dc in the top of ch 3. (29, 32, 35, 38, 44, 47, 50, 53, 59 sts)
Row 5: Alt-ch3, dc in the same sp, 3 dc in each sp across to the last sp, 2 dc in the last sp. Turn. (28, 31, 34, 37, 43, 46, 49, 52, 58 sts)
Row 6: Ch 3 (counts as a st), skip the first sp, 3 dc in each sp across to the last 2 sts, dc in the top of ch 3. (26, 29, 32, 35, 41, 44, 47, 50, 56 sts) Stitch count decreases by 2 stitches. This is a decrease row to shape the neckline.
Do not fasten off. Continue below for the size you’re making.
Size XS
Rows 7 – 9: Rep Rows 3 – 5. (25 sts) at the end of Row 9. Scroll down and continue with All Sizes.
Sizes S & M
Rows 7 – 13: Rep Rows 3 – 6, ending with a Row 5. (25, 28 sts) at the end of Row 13. Scroll down and continue with All Sizes.
Sizes L & XL
Rows 7 – 13: Rep Rows 3 – 6, ending with a Row 5. (31, 37 sts) at the end of Row 13. Scroll down and continue with All Sizes.
Sizes 2X & 3X
Rows 7 – 13: Rep Rows 3 – 6, ending with a Row 5. (40, 43 sts) at the end of Row 13. Scroll down and continue with All Sizes.
Sizes 4X & 5X
Rows 7 – 13: Rep Rows 3 – 6, ending with a Row 5. (46, 52 sts) at the end of Row 13. Scroll down and continue with All Sizes.
Rep Rows 4 – 5, until you’ve worked the same number of rows as your Front Left Panel.
Fasten off. Weave in ends. Continue on to Seam Shoulders. The Shoulder width of your panel should be 7″ (7″, 7.5″, 8.5″, 10″, 11″, 11.75″, 12.5″, 14″) W.
Seam Shoulders
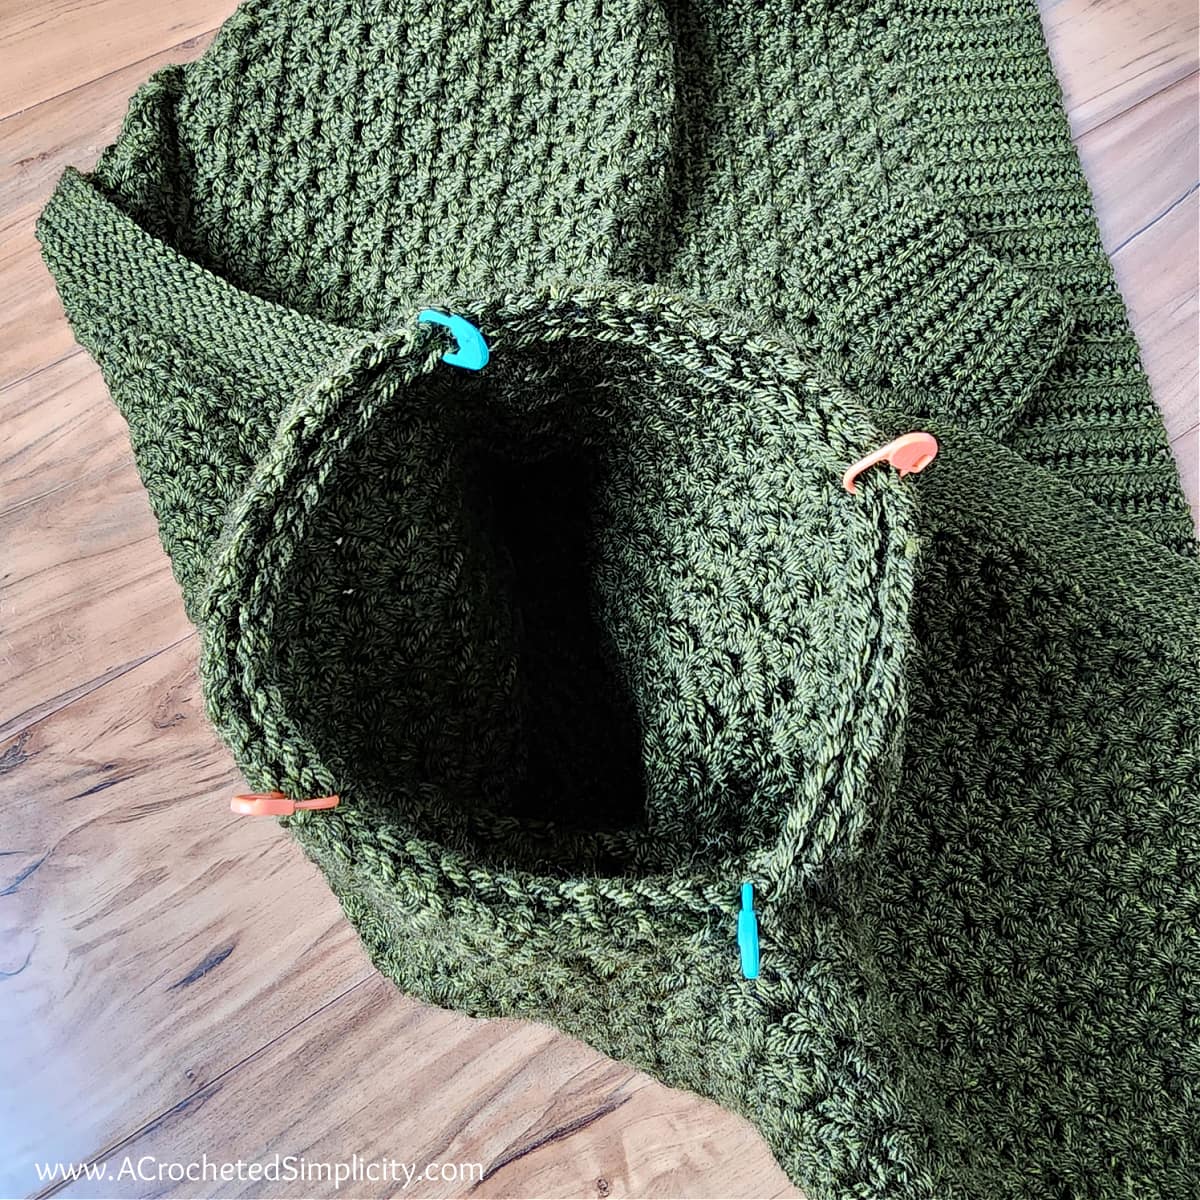
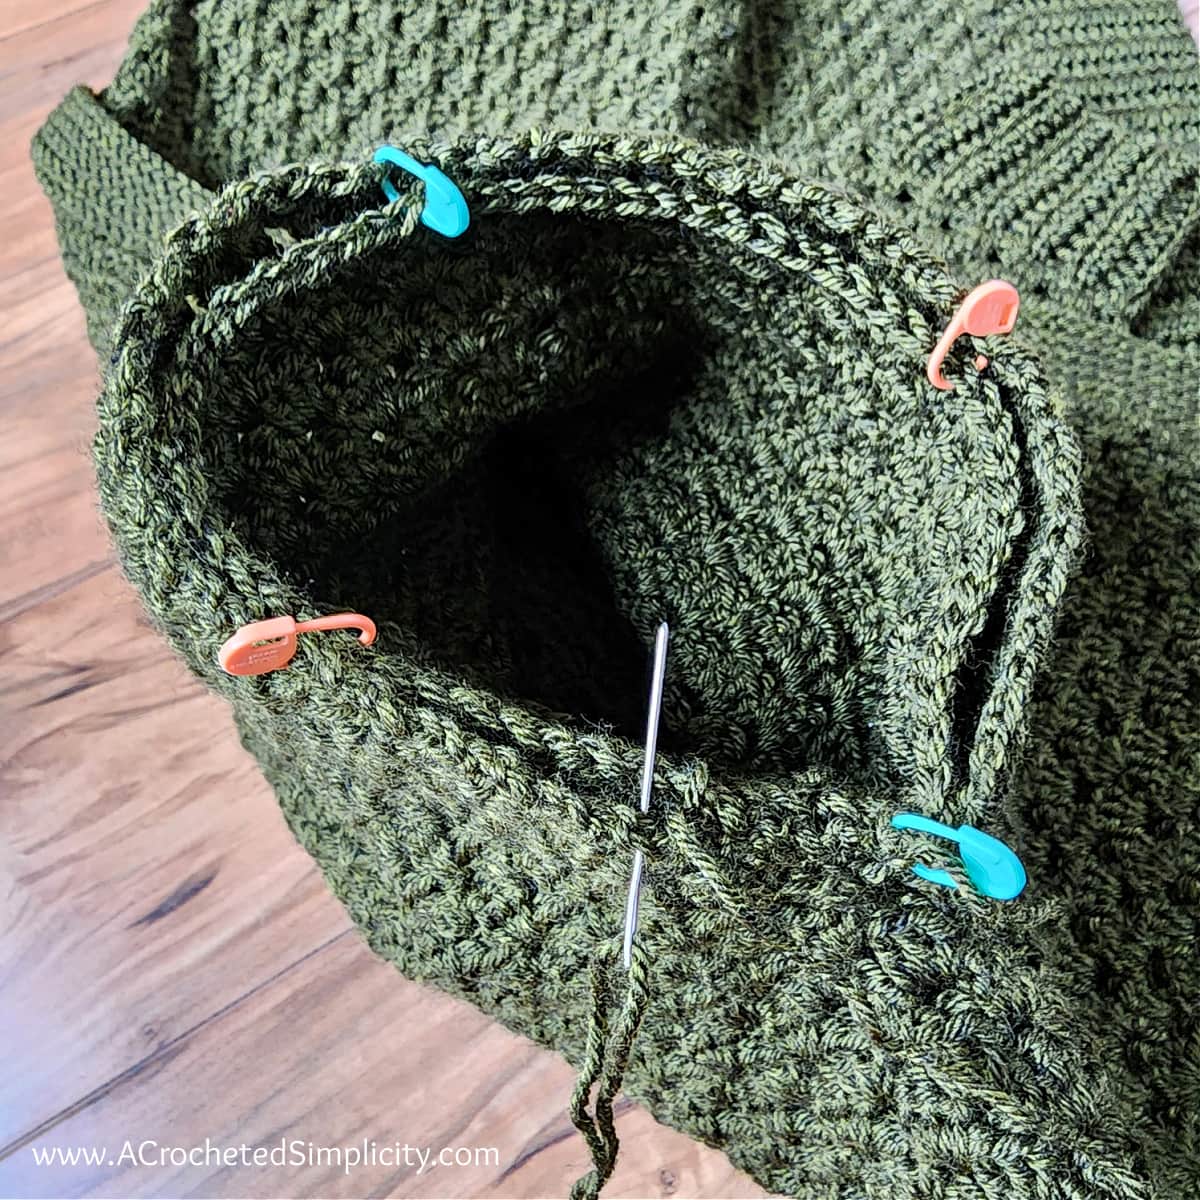
Step 1: With the RS facing out, fold the two front panels in towards the center of the cardigan (as shown below), creating a fold where it splits for the sleeves. Line up the corners of the upper front panels with the corners of the back panel. Match up the stitches on the front panel with corresponding stitches along the back panel. To make it easier, I recommend using locking stitch markers to hold the panels in place during seaming.
Step 2: With the right side facing out, use a yarn needle and a length of yarn that is 3 – 4 times the length of the seam you’ll be creating, and whipstitch a front panel to the back panel. Repeat for the second front panel.
Weave in ends. Continue on to Front Cardigan Edging.
Front Cardigan Edging
Row 1 (RS): With a 5.00mm crochet hook, join yarn with a standing sc in the bottom front corner of the garment’s right side, sc in each of the next 9 sts along the bottom ribbing, then working up the right side of the front opening of the cardigan, sc into the next sc, work 2 sc into each dc or alt-ch3 all the way up to the back neck opening, work 1 sc into each dc across the back panel , then rotate to work down the left side of the front opening of the cardigan, work 2 sc into each dc or alt-ch3, then 1 sc into the sc before the bottom ribbing, lastly, finish by working 1 sc into each of the 10 ribbing sts. Stitch count isn’t crucial.
Do not fasten off. Continue on to Cardigan Buttonhole Edging.
Cardigan Buttonhole Edging
Gauge Note & Tip: Exact gauge is not crucial. Simply adjust your hook size so that your ribbing lays flat. As you’re working the Cardigan Buttonhole Edging, if your ribbing becomes wavy, this means that your row height is too tall. Try going down a hook size or two.
Edging is approximately 1.5″ wide.
Row 1 (WS): Ch 1, FLO sl st in each st up and around the cardigan’s front opening. Turn. Stitch count isn’t crucial.
Rows 2 – 5: Ch 1, FLO sl st in each st up and around the cardigan’s front opening. Turn. Stitch count does not change.
Place Stitch Markers to Mark Buttonholes: Before continuing to Row 6, lay your cardigan out flat in front of you. Layout your buttons on top of Rows 1 – 5, equally spacing them. You can use as many or as few as you’d like. I decided to use four 7/8″ buttons. Place a SM in each st from Row 5 nearest the center of each button. This marks the center of each buttonhole. You should have marked as many stitches as you have buttons. See photo below.
Note: If you use larger or smaller buttons than I used, you may have to adjust the size of your buttonholes in Row 6. I used a ch-3/skip 3 sts, for my buttonholes. If you need to ch-4 for your buttons, make sure to skip 4 sts.
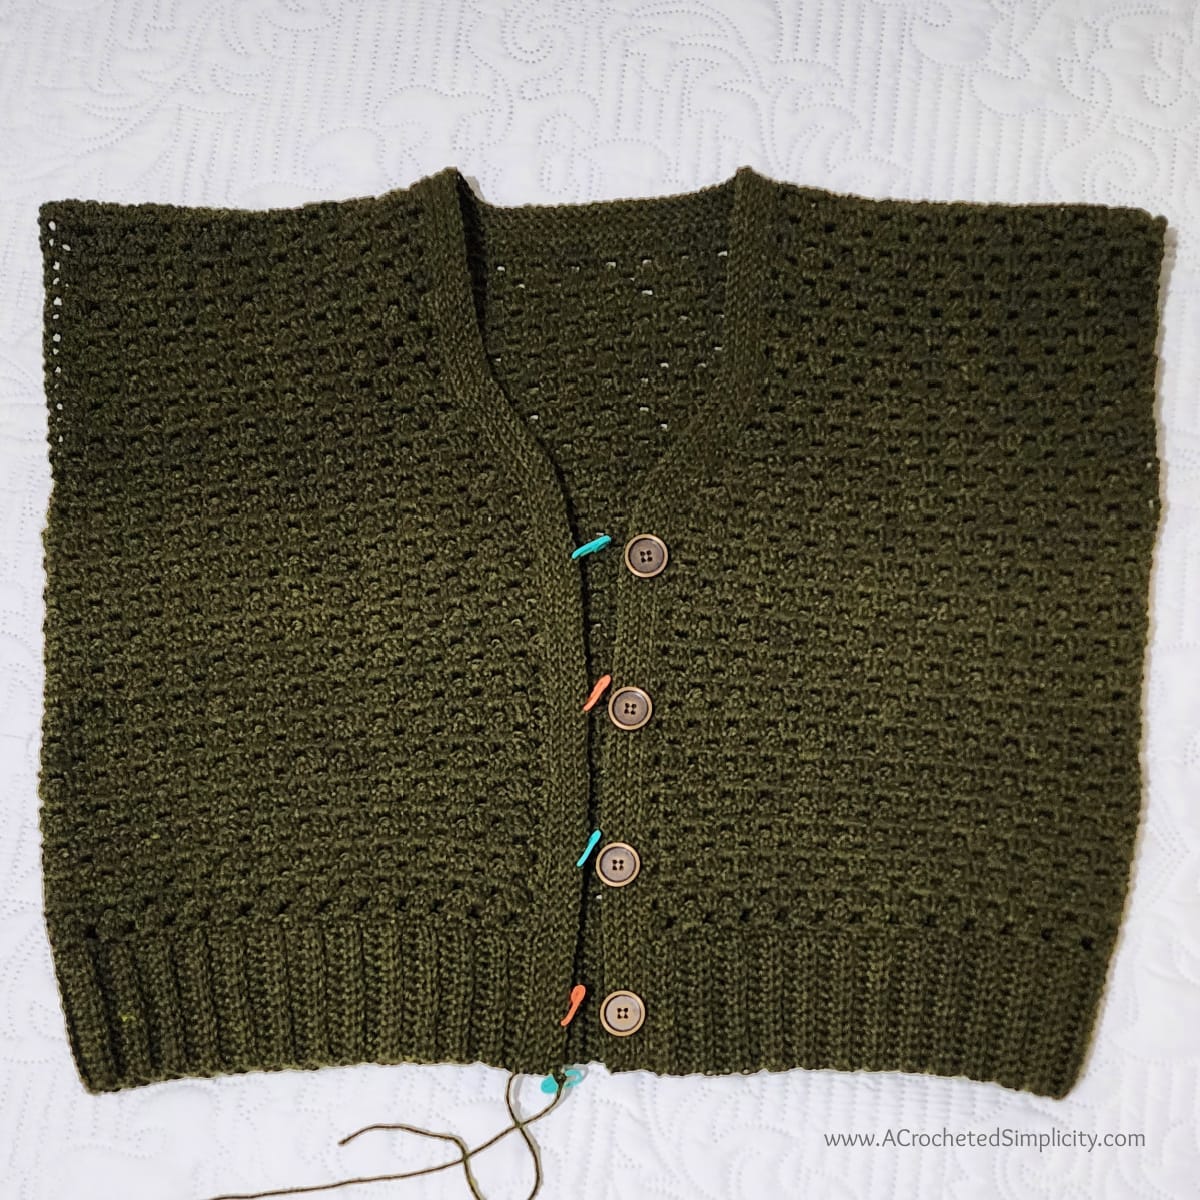
Row 6 (RS): Ch 1, (FLO sl st in each st across to the st before the next SM, ch 3, skip each of the next 3 sts) work from ( to ) 4 times (or as many times as buttons you are adding), FLO sl st in each remaining st up and around the cardigan’s front opening. Turn. You should have created a buttonhole for each of the buttons you’ll be attaching to your cardigan.
Row 7: Ch 1, FLO sl st in each st and ch up and around the cardigan’s front opening. Turn.
Rows 8 – 11: Ch 1, FLO sl st in each st up and around the cardigan’s front opening. Turn.
Fasten off. Weave in ends. Continue onto Sleeve Cuff.
Sleeve Cuff – All Sizes – Make 2
Gauge: With a 5.00mm crochet hook, in BLO hdc: 10 sts = 2.5“; 9 rows = 3.25″
Row 1: With yarn & a 5.00mm crochet hook, ch 11, working into the back humps of the ch, hdc in the 2nd ch from your hook and in each ch across. Turn. (10 sts)
Rows 2 – 22 (22, 24, 26, 26, 28, 28, 30, 30): Ch 1, BLO hdc in each st across. Turn. (10 sts)
Do not fasten off. Continue on to Body of Sleeve for the size you’re making.
Body of Sleeve
Gauge: With a 5.00mm crochet hook, in granny stitch: 15 sts = 4″; 11 rows = 4.25″.
- Gauge width is most important. If gauge height is too short, you can easily add more rows until your sleeve reaches the correct length. See note below.
Row 1 (RS): After turning at the end of the last row of the ribbing, rotate to work along the long edge of the ribbing, work 2 sc into each of the first 2 sts, then [sc in the next st, 2 sc in the next st] rep from [ to ] across. Turn. (34, 34, 37, 40, 40, 43, 43, 46, 46 sts)
Row 2: Ch 3 (counts as a st), dc in the first st, skip each of the next 2 sts, [ 3 dc in the next st, skip each of the next 2 sts ] rep from [ to ] across to the last st, 2 dc in the last st. Turn. (34, 34, 37, 40, 40, 43, 43, 46, 46 sts)
Row 3: Ch 3 (counts as a st), 3 dc in each sp across to the last 2 sts, dc in the top of ch 3. (35, 35, 38, 41, 41, 44, 44, 47, 47 sts)
At this point, your Body of Sleeve width should be approximately: 9″ (9″, 9.5″, 11″, 11″, 11″, 11.5″, 12.5″, 12.5″).
- The Cuff Ribbing should be slightly narrower than the Body of Sleeve. This is intentional.
Row 4: Alt-ch3, dc in the same sp, 3 dc in each sp across to the last sp, (2 dc, ch 1, dc) in the last sp. (35, 35, 38, 41, 41, 44, 44, 47, 47 sts) *Stitch count does not increase from the previous row. Ch-1 doesn’t count as a stitch.
Row 5: Alt-ch3, dc in the same sp, 3 dc in each sp across to the last st, 2 dc in the top of ch 3. Turn. (37, 37, 40, 43, 43, 46, 46, 49, 49 sts) *Stitch count increases by 2 stitches.
Row 6: Ch 3 (counts as a st), 3 dc in each sp across to the last 2 sts, dc in the top of the ch 3. (38, 38, 41, 44, 44, 47, 47, 50, 50 sts) *Stitch count increases by 1 stitch.
Row 7: Alt-ch3, dc in the same sp, 3 dc in each sp across to the last sp, 2 dc in the last sp. Turn. (37, 37, 40, 43, 43, 46, 46, 49, 49 sts) *Stitch count decreases by 1 stitch.
Row 8: Ch 3 (counts as a st), 3 dc in each sp across to the last 2 sts, dc in the top of the ch 3. (38, 38, 41, 44, 44, 47, 47, 50, 50 sts) *Stitch count increases by 1 stitch.
Do not fasten off. Continue on to the instructions for the size you’re making.
Lengthening Sleeves: If you need to lengthen your sleeves, first complete your sleeves for the size you’re making. Then, simply repeat Rows 7 – 8, in the order you left off, depending on the size you’re making.
Size XS
Rows 9 – 33: Rep Rows 4 – 8 (5 times). (53 sts) at the end of Row 33.
Rows 34 – 39: Rep Rows 4 – 6 (2 times). (59 sts) at the end of Row 39.
Row 40: Rep Row 7. (58 sts)
Row 41: Rep Row 8. (59 sts)
Row 42: Rep Row 7. (58 sts) Last row should be 15″ W.
Fasten off. Weave in ends. Total sleeve length should be 18.5″ L. Make second sleeve. Continue on to Sleeve Seam.
Size S
Rows 9 – 38: Rep Rows 4 – 8, (6 times). (56 sts) at the end of Row 38.
Rows 39 – 44: Rep Rows 4 – 6, (2 times). (62 sts) at the end of Row 44. Last row should be 16″ W.
Fasten off. Weave in ends. Total sleeve length should be 19.5″ L. Make second sleeve. Continue on to Sleeve Seam.
Size M
Rows 9 – 43: Rep Rows 4 – 8, (7 times). (62 sts) at the end of Row 43.
Row 44: Rep Row 7. (61 sts) Last row should be 16″ W.
Fasten off. Weave in ends. Total sleeve length should be 19.5″ L. Make second sleeve. Continue on to Sleeve Seam.
Sizes L & XL
Rows 9 – 43: Rep Rows 4 – 8, (7 times). (65, 65 sts) at the end of Row 43.
Row 44: Rep Row 7. (64, 64 sts) Last row should be (17″, 17″) W.
Fasten off. Weave in ends. Total sleeve length should be (19.5″, 19.5″) L. Make second sleeve. Continue on to Sleeve Seam.
Sizes 2X & 3X
Rows 9 – 43: Rep Rows 4 – 8, (7 times). (68, 68 sts) at the end of Row 43.
Row 44: Rep Row 7. (67, 67 sts)
Row 45: Rep Row 8. (68, 68 sts)
Row 46: Rep Row 7. (67, 67 sts) Last row should be (18″, 18″) W.
Fasten off. Weave in ends. Total sleeve length should be (20″, 20″) L. Make second sleeve. Continue on to Sleeve Seam.
Sizes 4X & 5X
Rows 9 – 33: Rep Rows 4 – 8 (5 times). (65, 65 sts) at the end of Row 33.
Rows 34 – 45: Rep Rows 4 – 6 (4 times). (77, 77 sts) at the end of Row 45.
Row 46: Rep Row 7. (76, 76 sts) Last row should be (20″, 20″) W.
Fasten off. Weave in ends. Total sleeve length should be (20″, 20″) L. Make second sleeve. Continue on to Sleeve Seam.
Sleeve Seam
Step 1: With the RS of a sleeve facing out, fold it in half lengthwise (as shown in the photo below). Line up the stitches from the first and last rows of the sleeve ribbing and the stitches from the rest of the long edge of the sleeve.
Tip! To help keep you on track while seaming, I recommend using locking stitch markers to hold the edges of the sleeve in place. Make sure to line up the edges of the same rows when placing your stitch markers.
Step 2: With the right side facing out, use a yarn needle and a length of yarn that is 3 – 4 times the length of the seam you’ll be creating, and whipstitch the underarm seam of the sleeve. Repeat for the second sleeve.
Weave in ends. Continue on to Attaching Sleeves.

Attaching Sleeves
Step 1: Turn the sleeve inside out so that the WS is facing out. With the RS of the cardigan facing out, insert the sleeve into the armhole. When you do this, the WS of the cardigan will be facing the WS of the sleeve. Line up the sleeve seam with the bottom of the armhole opening. To make it easier, I recommend using at least 4 locking stitch markers to hold the sleeve in place while seaming.
Step 2: Use a yarn needle and a length of yarn that is 3 – 4 times the length of the seam you’ll be creating, and whipstitch the sleeve to the armhole. Make sure not to pull the whipstitch too tight or your seam sleeve will be narrower than the armhole opening.
Repeat for the second sleeve.
Weave in ends. Continue on to Attach Buttons.
Attach Buttons
Lay your cardigan flat with the buttonhole edge overlapping the button edge. Use a SM to mark the center of each buttonhole on the button edge.
Use a needle and thread and sew buttons on to the button edge of the cardigan.
Related: If you have never blocked a crochet project before, check out my post on 3 blocking methods!
QUESTIONS CROCHETERS FREQUENTLY ASK ABOUT CROCHET CARDIGAN PATTERNS
If you have any questions that I haven’t answered below, always feel free to reach out to me, (e-mail me: ACrochetedSimplicity at Gmail dot Com), and I’ll do my best to help!
Can a beginner crocheter make a cardigan?
Absolutely! After a crocheter becomes comfortable with reading crochet patterns, basic crochet stitches, and meeting gauge, crocheting a simple cardigan should be on their bucket list. My Aurora Cardigan with pockets is a beginner-friendly crochet cardigan pattern.
If you’ve never crocheted a sweater before, I suggest choosing a slightly oversized cardigan as it will be most forgiving, if your gauge is off a bit.
How many skeins do I need for a crochet cardigan?
For this button up crochet cardigan, you’ll need any where from 1,400 – 3,400 yards, depending on which size you’re making. Also, keep in mind that you will need more or less yarn, if you are making your top longer or shorter than the dimensions in the size chart above.
What is the best crochet stitch for a cardigan?
The answer to this question is “it depends”. It depends on which season you’re crocheting a sweater for.
If you’re crocheting a cardigan for summer, you’ll want to use a lacy stitch pattern.
But, if you’re crocheting a sweater for winter, you’ll want to choose a crochet stitch that is more dense and won’t create holes.
My favorite is the extended single crochet stitch. I love it because it’s taller than a regular single crochet stitch, like the half double crochet. But it’s not as thick as the half double crochet stitch so it creates a crochet fabric with a great drape.
How do you button up a cardigan?
Most will button all but the bottom button of their cardigan. However, you can use your body shape as a guide for buttoning your cardigan.
Buttoning only one button in the middle, helps to highlight your waist and create a more feminine shape.
Buttoning the top button only will draw attention to your lower body.
Also, depending on the fit of the cardigan, buttoning all buttons could be slimming.
HOW TO GRANNY STITCH CROCHET
The crochet granny stitch is simply a two row repeat of a cluster of three double crochet stitches nestled between the three double crochet clusters from the previous row.
Refer to Row 2 of the Body of Cardigan above to learn how to crochet the granny stitch in rows.
I MADE IT! NOW WHAT?
Pin this post!: Save this summer top crochet pattern to your Pinterest boards so that you can come back and make it again.
Leave a comment below: We love to hear your feedback.
Share Your Finished Projects on Facebook or Instagram: I love to see your finished projects! Share with us on social media and tag me @acrochetedsimplicity or use the hashtag #ACrochetedSimplicity so I can find your posts.
JOIN US IN THE FACEBOOK COMMUNITY GROUP!
Come share your finished projects with us in the A Crocheted Simplicity Crochet Community Group on Facebook. Join us for fun community events such as crochet alongs, join in on crochet conversations, ask questions, get advice, and share your love for crochet!

MORE CROCHET PATTERNS FOR CARDIGAN SWEATERS I THINK YOU’LL LOVE
MORE CROCHET SWEATER PATTERNS
Are you looking for more crochet sweater patterns? We have several more patterns for crochet clothes, including matching sweaters for mothers and daughters and even for fathers and sons.
Lovely cardigan! Thank you for sharing the pattern.
Thank you!
You design the best sweaters!
Thanks, Debbie. <3
Oh, Jennifer, I absolutely LOVE this pattern. It is the exact style I have been searching for, but never found just the right pattern. I can’t wait to be able to start this sweater. And the Grannie stitch is one of my favorites….it just goes so fast and you are done in no time.
Can’t thank you enough for this beautiful pattern!!!
Hi Linda,
I’m so happy to hear how excited you are about my new button up cardigan! Please send me a picture when you’ve finished. I’d love to see it!
Happy Crocheting,
Jennifer
I am trying to make this cardigan in a size medium. I’ve done the bottom band. if I have 106 rows, and I’m working along the edge, working 2 single crochets into the first 2 stitches, then a single crochet in the next stitch, followed by two single crochets in the next stitch, followed by a single crochet in the next stitch, followed by two single crochets in the next stitch etc, I don’t see how my stitch count will be 145. could you please explain? I have read the directions over and over to see what I’m missing.
Hi Sharon,
If you are making a size Medium, your stitch count for Row 1 of the Body of Cardigan will be 160 sts, not 145.
Up in the Pattern Notes, take a peak and see how the Changes for Instructions are listed for the different sizes. Then right below it, the Changes for Stitch Counts at the end of the rows.
Please let me know if this doesn’t answer your question.
Happy Crocheting,
Jennifer
This is super cute! I love that you have plus sizes as well!
this looks amazing! I would do bigger length though, probably until knee length! I like to cover up waist and hips.
design looks attractive 😍
I cannot wait to try my hand at this one!
I am new to crochet but you have made this sweater look easy with all the pictures. This is one sweater I will start looking for yarn for.
I’m glad to hear that, Sherry!
I love this pattern. it has a nice stitch and in my favorite color – green.
This actually looks like something I can make. I have ordered my yarn and anxious to get started!! Thank you for the simplified instructions.
This cardigan is beautiful and elegant and would be perfect to add to my office attire! Such beautiful work!
This is so simple and yet so elegant. A very versatile piece. Thank you
So cute! I would need to really up my crochet skills for this, but it would be worth it!
Love this Cropped Cardi! It’s definitely on my list to make 😁 So excited about the new years giveaway too!
This is SOOOOO adorable!
This is very kind of you to offer such a generous giveaway.
HAPPY NEW YEAR!!!!
I really love this cardigan and plan to make one soon. I am excited with this contest. Good luck everyone!
This cardigan is on my must make list! It is so cute and I like the texture to it.
This is next on my hook. I have the perfect yarn and the perfect recipient.
Love this cardigan! Will have to try this next!
I’m not sure which post to comment on to enter your giveaway, but I love this cardigan design
it’s amazing, & the green, I’m so envious, 🥰
This looks beautiful, I can’t wait to try it. Thankyou for making this pattern size inclusive 🙂
Absolutely love this style and can’t wait to try it!
thank you for all the size help info, that’s super useful, I just love the look of this cardi and think I may try making one without the buttons and button holes as well, happy new year to you and thank you for all your awesome patterns.
This is beautiful. I am hoping to make my first sweater or cardigan this winter.
This cardigan is really lovely! I don’t know why I haven’t seen it before! It’s definitely on my “wish list” now of garments I want to make 🙂
I cannot wait to make this beautiful cardigan. It will be the 1st thing I make for me in the new year.
Me encantó el patrón y pronto me pondré manos a la obra
Saludos
My daughter has a way of “borrowing” my sweaters and they don’t get brought back! I do believe this will be the next sweater I make and give to her and then make one for myself❤️ Thank you for sharing this pattern!
Hi
I would love to make this sweater.
Regards
I love this cardigan! I’ll be making it soon!
love the texture of this cardi, this will be my next project
Beautiful sweater and I have some yarn that will be perfect for it.
Oh this is lovely. Thank you for a chance to win
This looks so pretty. I’m looking for a pattern to make with Christmas themed yarn, and this pattern is perfect!
Would like to lengthen it a bit.
I love this sweater! It is short and cute.
is #284 my number or Sharon’s?
This is a beautiful pattern that I absolutely will give a try in January 2024. I first have to finish my sweater (almost there). It seems to be beginner-friendly. I am going to make this cardigan a little bit longeras I like to cover up my waist and hips. Nice and warm when I am waiting for public transportation.
Hi Thank you for the pattern. It looks like fun to make and it will be my first project after the new year.
Please enter me in your sweepstakes also.
Thank you,
Pat
I choose this pattern for giveaway. looking forward to starting
This ia a beautiful cardigan!
I love the look of this cardigan.
This will be so cute on my granddaughter. I like the yarn color a lot.
I can’t wait to make this super cute little cards.
Looking forward to trying my first sweater. I think this cute one is it.
This one is next on my list!
I love this cardigan! It’s definitely on my to-make list for 2024.
Hello,
I really like your cardigan pattern. I would be very happy to crochet it but I am a beginner at crochet.
Thank you for sharing this wonderful pattern with us.
Happy new year 2024
I can’t wait to make this cute sweater!!
I am so glad that I noticed this cardi pattern! I LOVE the button-up, cropped style of this sweater, and I would love to try my hand at making it in the new year. Beautiful design! Thank you for sharing this with your crochet community!
Lovely design! Thanks for sharing such a great pattern – and including photos in the instructions.
As a librarian, I really need to make this pattern.
Such a cute pattern!!
I love the subtlety of the granny stitch, which in your design gives texture but doesn’t loo like a throw-back to the 70s.
I got a cropped cardigan for Christmas that I really like, but it would be even better to be able to make my own in every color! Adding this to my list of projects for next year!
Gorgeous pattern – adding to my 2024 to do list!
I have never crocheted a sweater. I like the stitch on this one because it’s so interesting. I’m needing a sweater. I’ll get the pattern on ravelry or Etsy. Thank you!
Love the look of this cardigan. A friend asked me to make a cardigan for her daughter but garments are intimidating to me for some reason.
This cardi pattern is great. And love that the length is so easy to customize!
I love everything about this sweater!
I love this cardigan! I hope to finally make one in 2024!
This pattern is just to cute. Can’t wait to get the yarn I need to make this cardigan. Thanks for all the patterns you have shared. you are so talented.
I love your patterns! Your instructions are so easy to follow! I am going to attempt this sweater in 2024! Thats My New Year’s resolution.
I hope to make this cardigan for the New Year.
This is super cute! I love that you included plus sizes!
What a cute cardigan! I think I’ve found the perfect gift to make for my daughter!
Such beautiful work! Thank you for sharing 🙂
This is beautiful, I would prefer the longer cardigan for myself
My granddaughter name is Chelsea when I first saw this pattern I made a note that it would be my first crochet project for the New Year. Thank you for all there beautiful pattern you design for us.
I have spent the better part of two days searching for a cardigan to make for my adult daughter. I’m so happy to have not given up, because this pattern is perfect. It has everything that she likes in a cardigan. You have so many beautiful projects. Your talent is awesome! Thank you for sharing it with us.
Hi Maryann,
I’m so happy to hear that you found just what you were looking for! Thank you. <3
Happy Crocheting,
Jennifer
Hi
I have made the bottom band of the cardigan for the size medium. My gauge matches the stated gauge however the band for the medium seems to be VERY long /large. I double counted the number of rows several times. Maybe I should use single crochets instead of HDC?
Hi Amanda,
What does the length of your band measure? For a size medium, after 106 rows, it should measure approximately 41.25″ L.
I hope someone can help me! I’m making the XS for my granddaughter. I’m working on the bottom band and the directions say do 86 rows…I’m at 70 rows and it measures 27.5”…it seems really long….my gauge matched….is this correct? Or can you tell me what the bottom band should measure?
Thank you for,your help!
Hi Joyce,
You’re right on track! The waistband should measure approximately 33.5″ after 86 rows.
I hope this helps.
Jennifer
Thank you so much, Jennifer…I was afraid it was going to be wide ….
hi iam trying to do size Large i dont understand whrn you divide front and back how man stithes for back 95? and each front 40?
thanks
Maria B
Hi Maria,
You’ll begin with the Front Left Panel (40 sts) for a size large. Row 1 of the Back Panel for the size L states 97 sts. Then Row 1 of the Front Right Panel is 40 sts.
I hope this helps,
Jennifer
For the sleeve cuff into body of sleeve… using an H hook doesn’t line up with the gauge you have here. I tried a 4.5mm hook and then a G hook to get closer to your gauge. With the G hook, my gauge is 10 sts = 2.5” but the 9 rows equals 3.75”, with 8 rows = 3.25”. I don’t crochet loose by any means but it seems I’m going to have to use extremely taut tension to match the pattern gauge.
Not a criticism AT ALL… but actually just a cry for help LOL
Thank you in advance for any tips!
Hi Ryan,
It sounds like you may be a lifter! Have you ever heard the terms yanker, lifter, and rider?
Yanker:
Yankers pull the yarn tightly when pulling through a stitch, creating a smaller, tighter loop. Their hook angle is often close to 90 degrees to the work, resulting in shorter, denser rows.
Rider:
Riders keep the loops on their hook at about the same size as the hook itself, pulling the yarn through at a 45-degree angle. This results in a more balanced row height and stitch gauge.
Lifter:
Lifters pull up a larger loop, lifting it away from the work and creating a taller stitch. Their hook is often held almost parallel to the work.
Try keeping your hook really close to the top edge of your work and try not to lift as you work the stitches. This should help shorten your gauge.
Let me know if you have any questions,
Jennifer
Hello, I am making this cardigan and I am stuck on shaping the neckline. I’ve frogged the left panel three times now! After following the instructions; the neckline is not going in any at all. I get to about row 7 or 8 and it’s just going straight up. I’m not sure what I’m doing wrong but something is not working out. lol. Could you help me please?
Hi Dawn,
Are you able to e-mail me a photo so I can take a peek at what’s going on? [email protected]
Happy Crocheting,
Jennifer