Men’s Crochet Cardigan
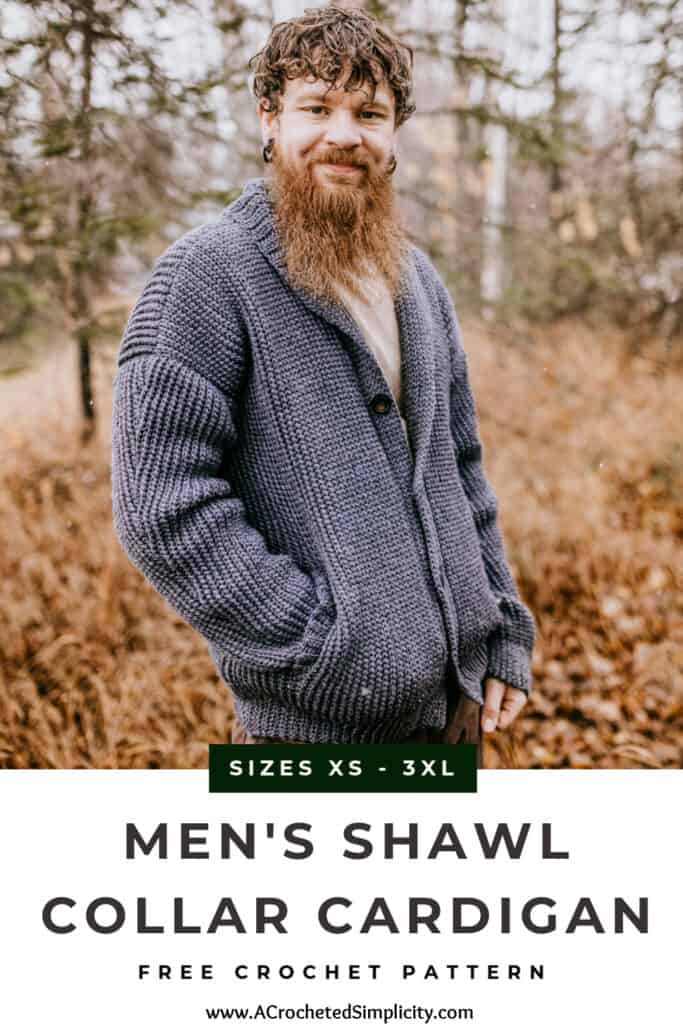


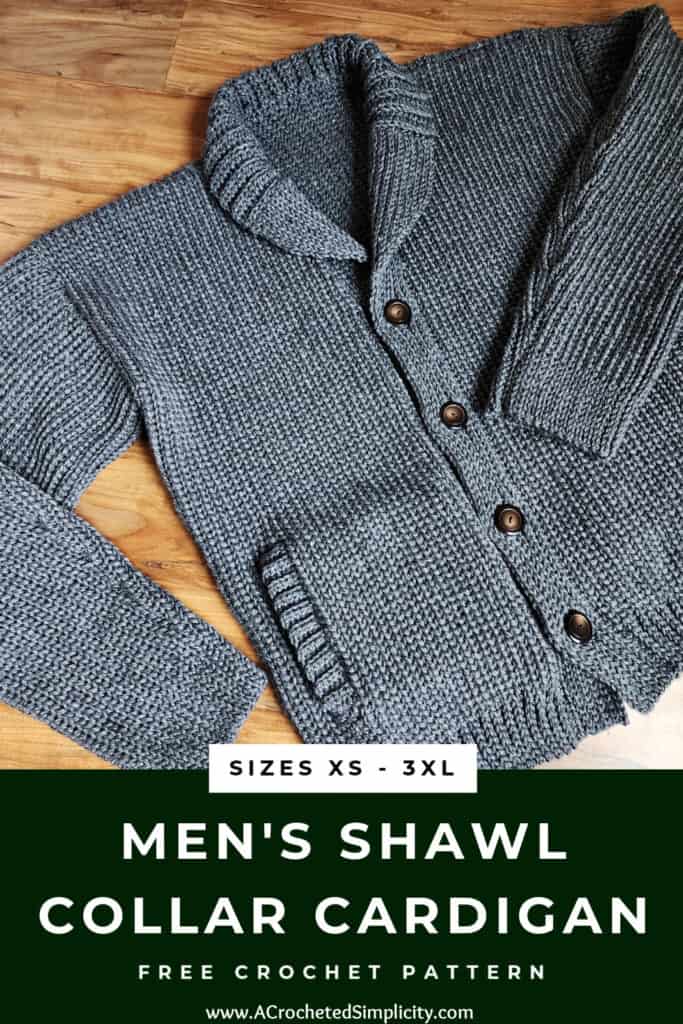
Learn to crochet this mens crochet cardigan, it will become an heirloom piece of clothing you will enjoy your whole life.
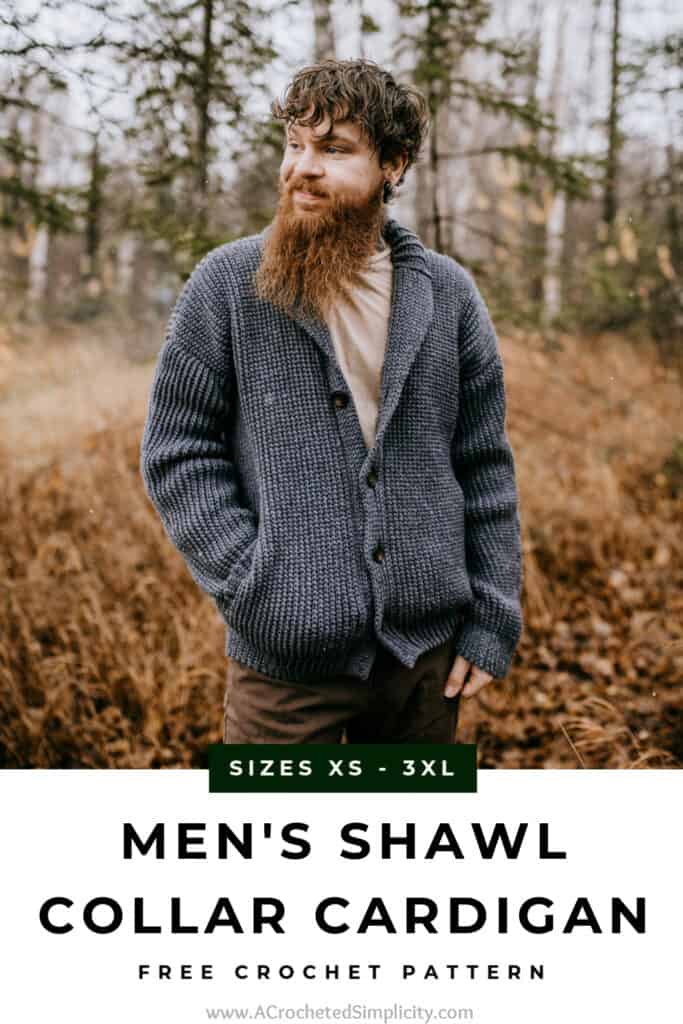
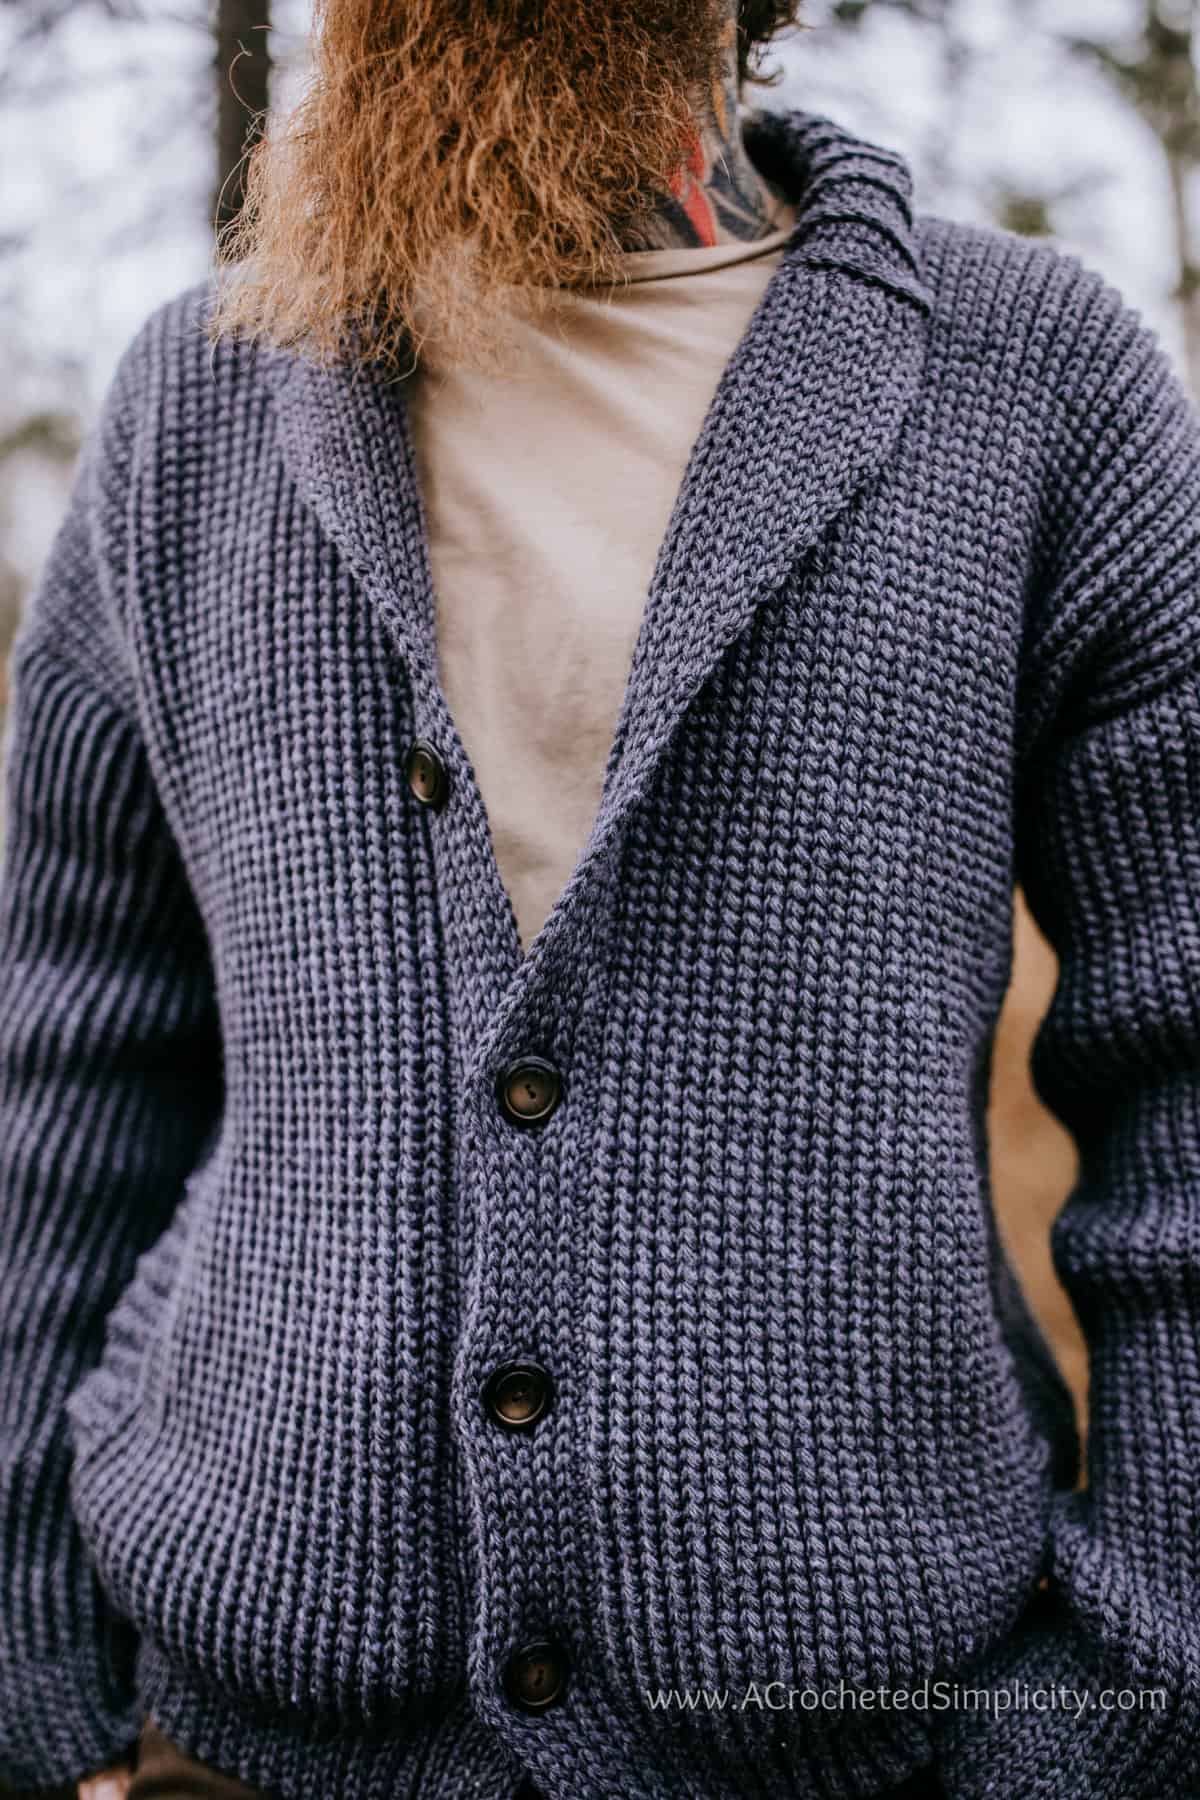
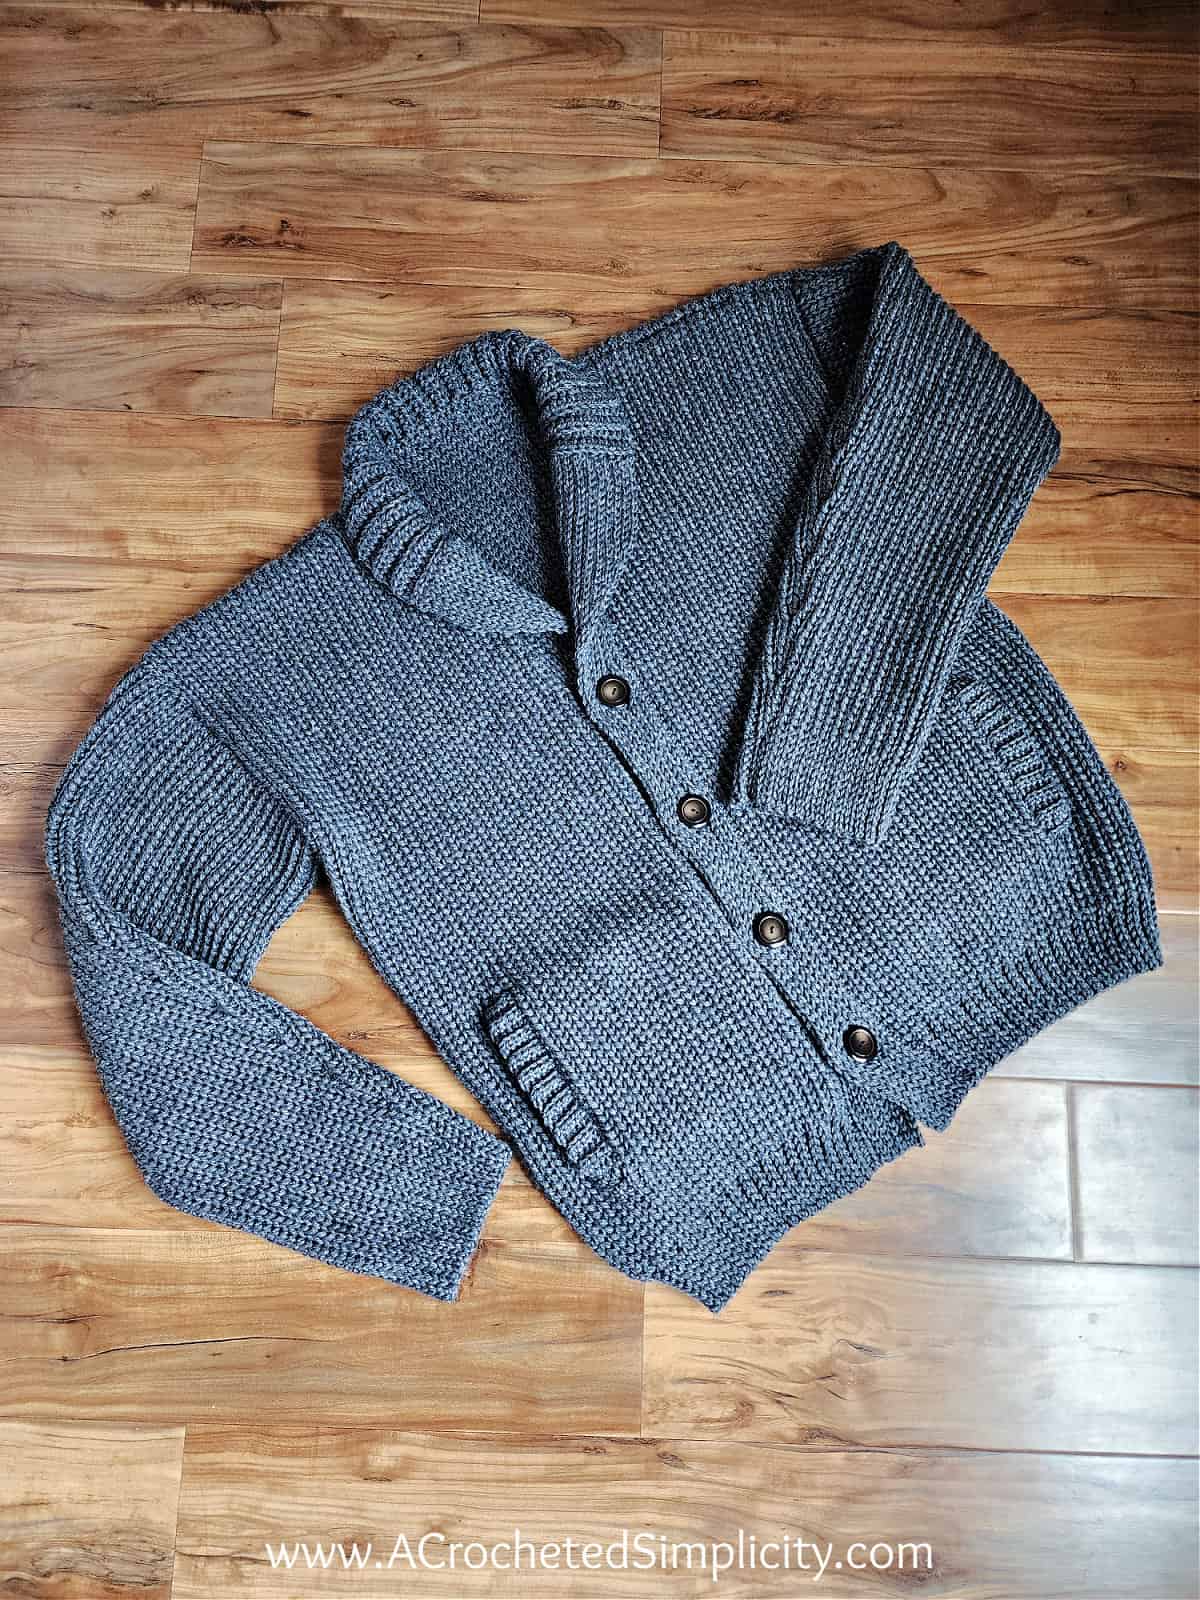
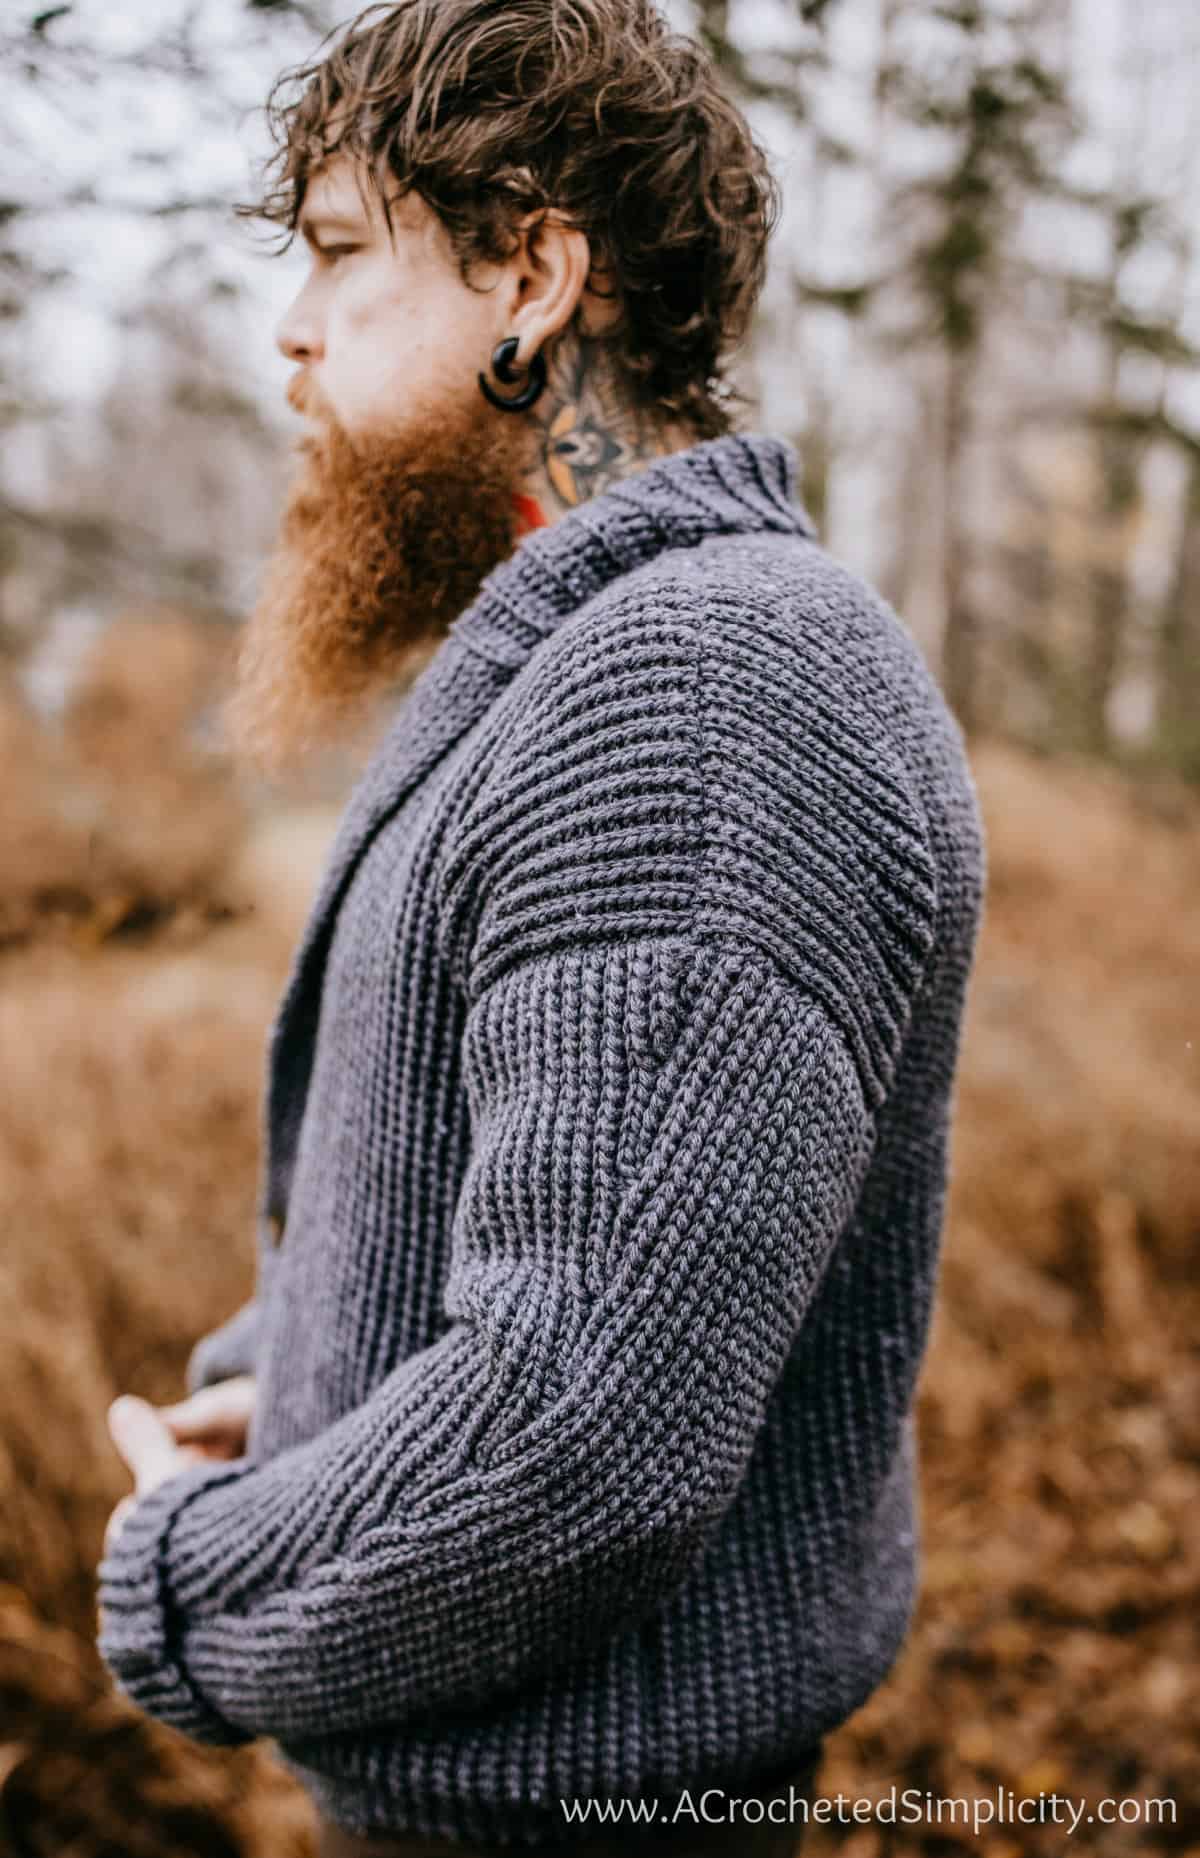
It’s not only the coziest crochet mens cardigan you’ll ever wear, it’s also the most versatile. Style it for either casual or dressy attire. It’s also makes the perfect crochet garment for layering in cool weather as the shawl collar helps keep their neck warm and toasty.
You’ll find the men’s shawl collar cardigan crochet pattern free below, or an ad-free printer friendly PDF (including all photo tutorials & BONUS garment schematics) on Ravelry, or on Etsy (aff).
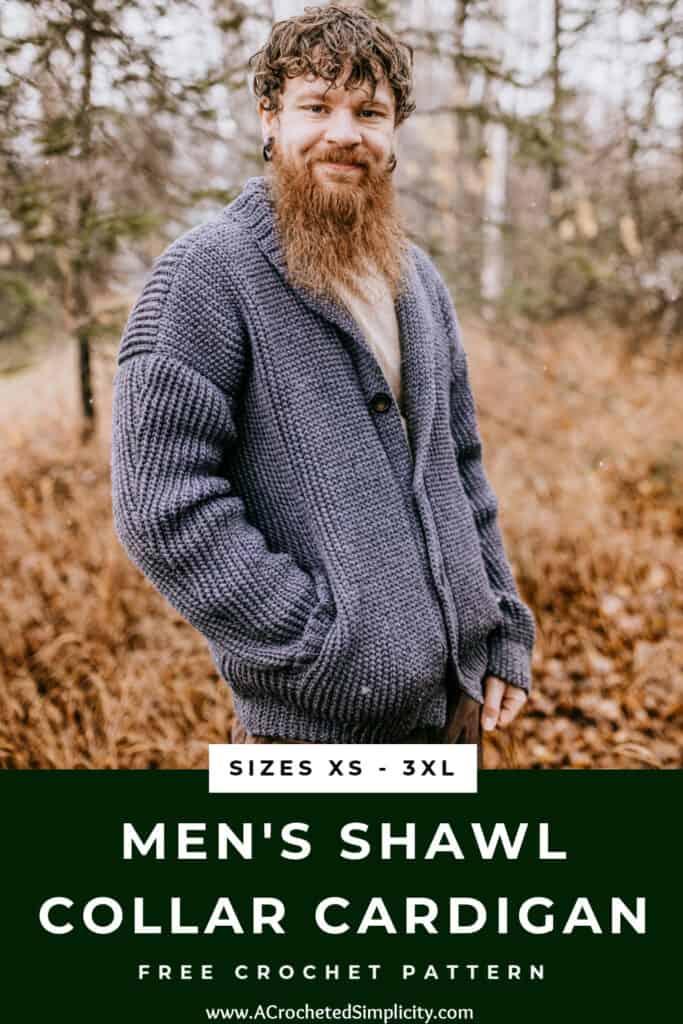
How Do You Style a Shawl Collar Cardigan
When I said above, “It’s not only the coziest men’s crochet cardigan you’ll ever wear, it’s also the most versatile.”, I meant it!
This mens crochet cardigan has both a formal and relaxed vibe that ranges from business wear to something you’ll wear lounging around at home.
For casual coziness at home, wear it unbuttoned over a t-shirt and a pair of jeans. And as a bonus, the shawl collar adds a touch of formality to the crochet men’s cardigan, making you look more put together when you have to make a late night milk run.
Button it up and wear it to most workplaces as smart or business casual. If you don’t want a tailored look, the men’s shawl cardigan can also be worn over a shirt and tie, in place of a sport coat.
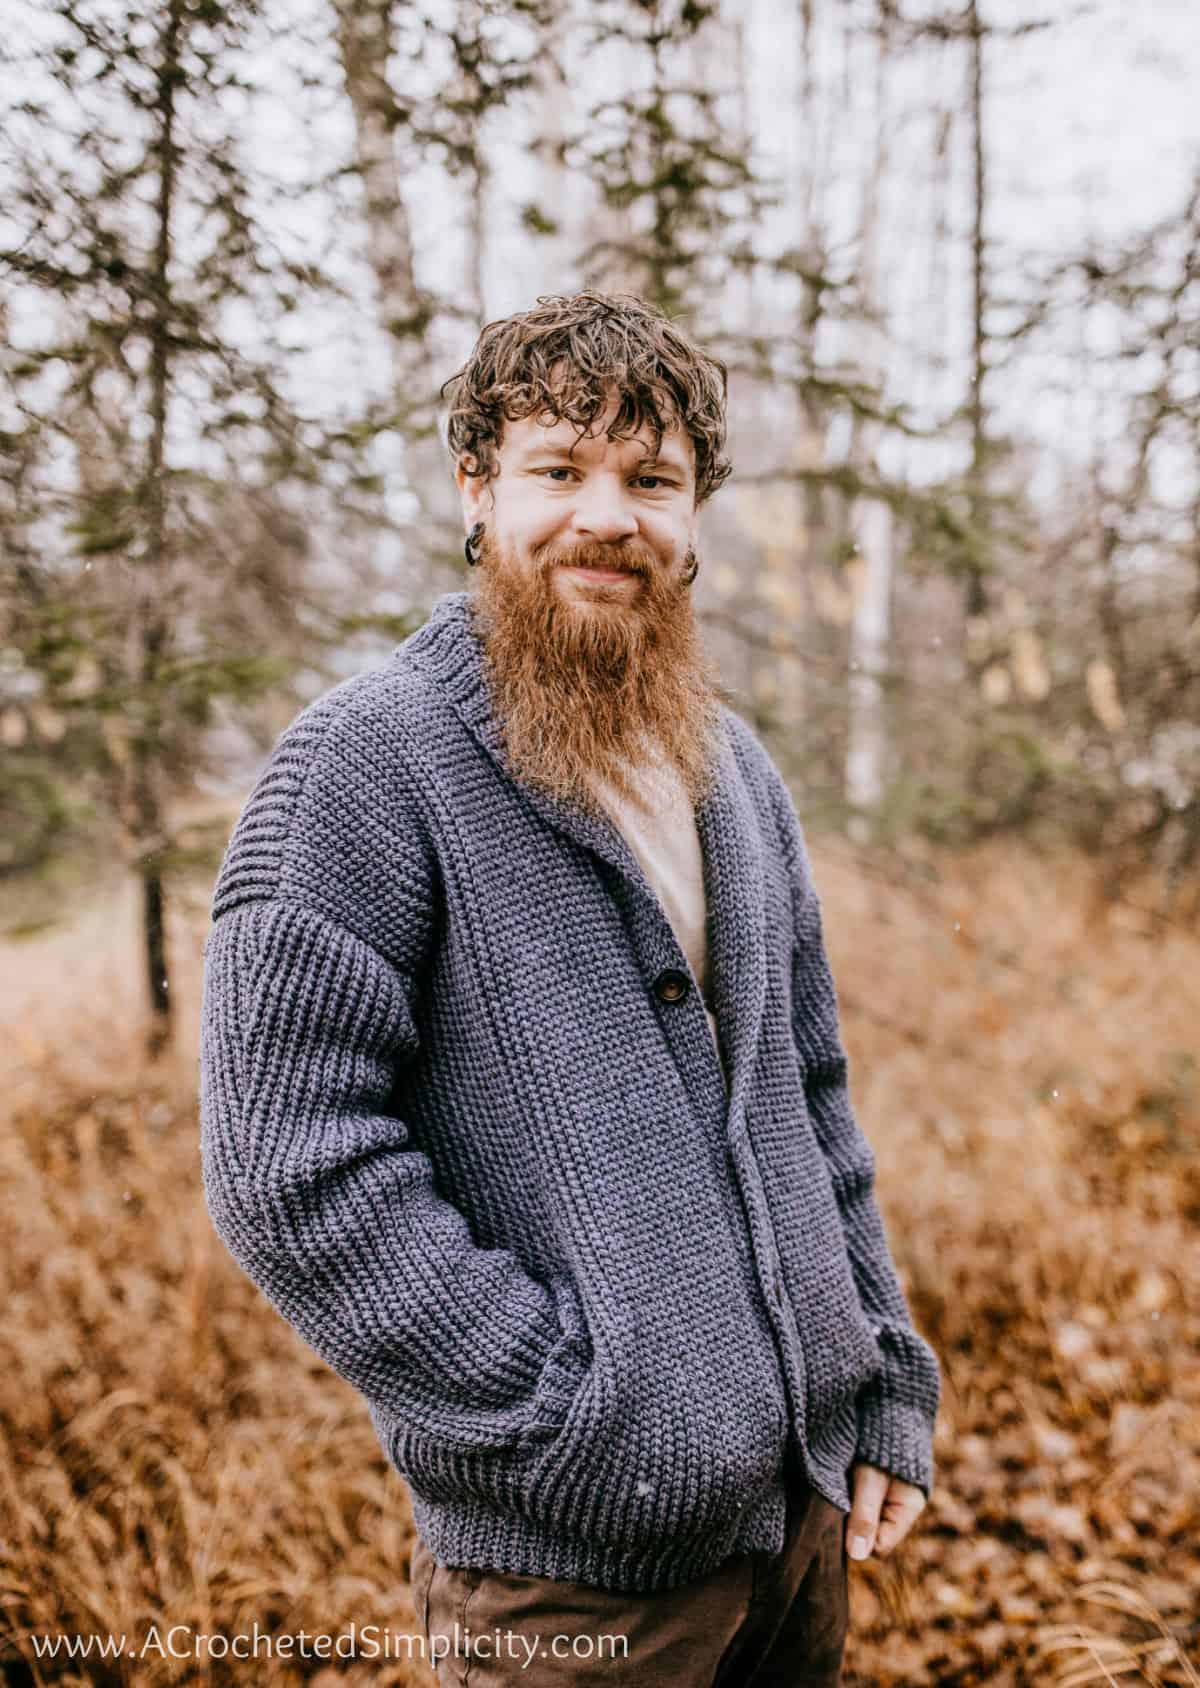
You can also wear it as an overcoat alternative, or wear it under an overcoat as a warm layering garment.
No matter how you choose to wear it, the Men’s Shawl Collar Crochet Cardigan will keep you looking dapper while keeping you cozy and warm.
Related: If you love the classic style of a shawl collar, you’ll love the Brentwood Men’s Pullover!
Yarn
This men’s crochet sweater was designed with a worsted weight yarn to make sure it would be warm enough to be worn as an overcoat on sunny winter days. I chose not to use a bulky yarn for fear it would then be too thick to be worn as a layering piece under a winter coat.
I chose Lion Brand Yarn’s Basic Stitch Antimicrobial Yarn for my cardigan crochet sweater. If you’re someone who has a wool allergy, or you don’t care for acrylic yarns, this yarn is a great alternative to both of those!
Basic Stitch Antimicrobial is a worsted weight / 4, recycled polyester / amicor blend yarn and it’s currently available in 12 colors! I’d love to make another cardigan in the color Hazelwood.
Yarn Substitutes
There are many worsted weight yarns that would make great substitutions. Lion Brand Wool Ease Recycled, Lion Brand Heartland, Lion Brand Pound of Love, Lion Brand Vanna’s Choice… just to name a few.
I’d also love to see a men’s crochet cardigan with buttons in Lion Brand Jeans Yarn.
Self-Striping Yarn: If you choose a self-striping yarn, your stripes will be be vertical because of how this men’s cardigan is constructed.
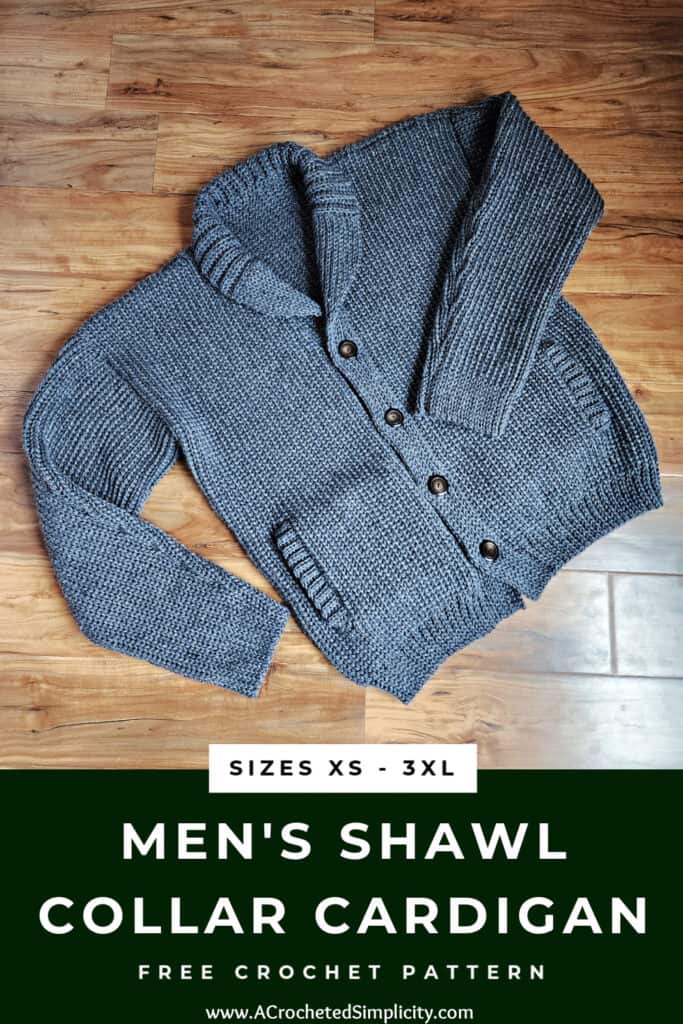
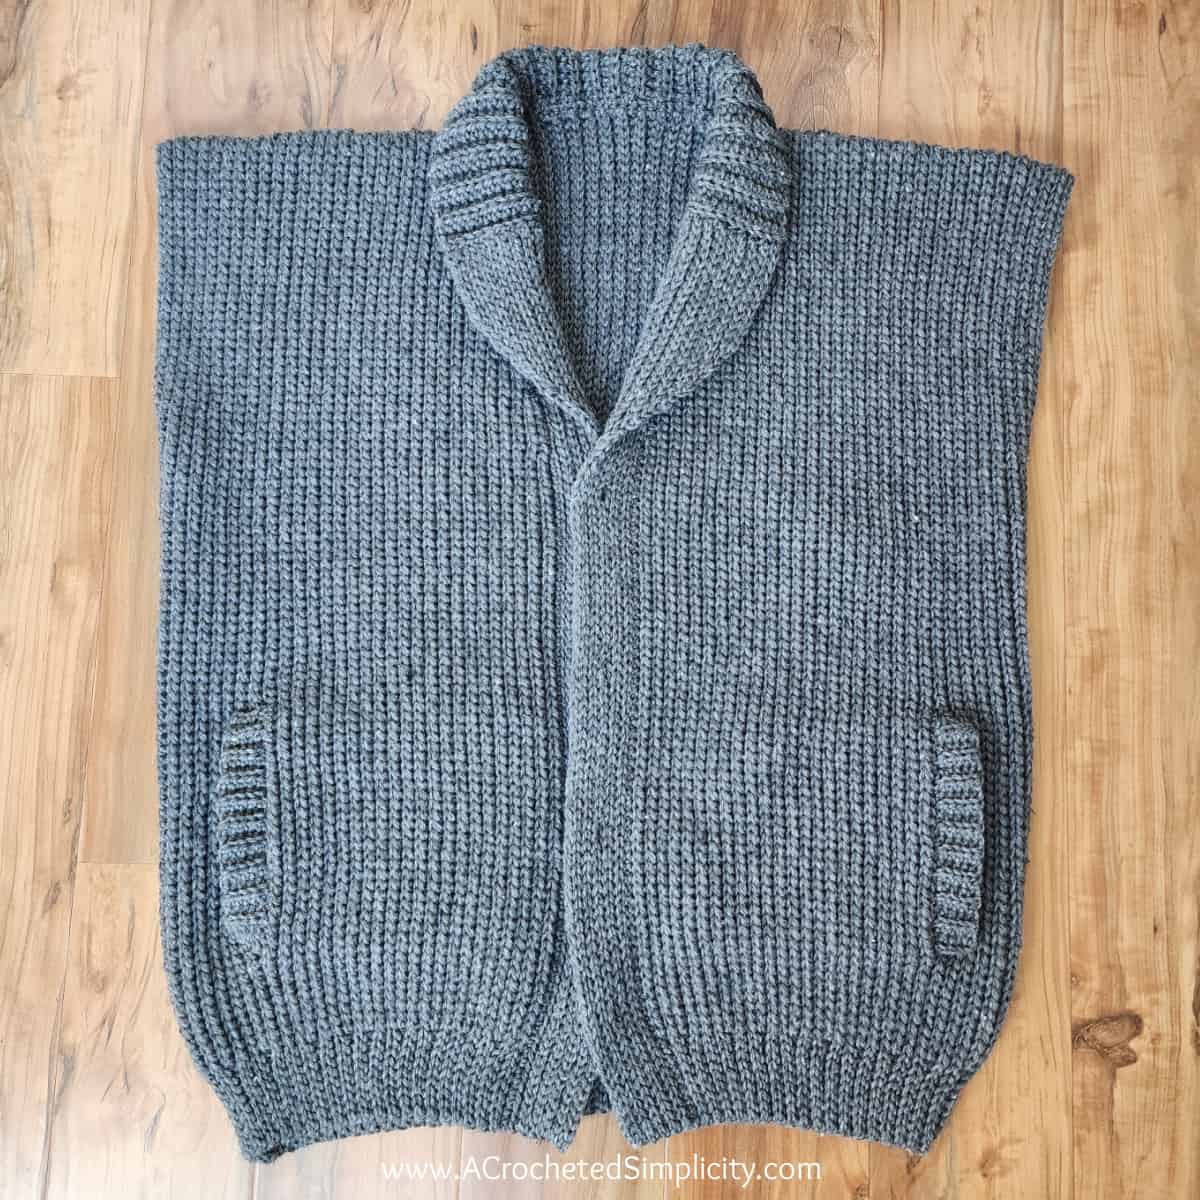
Shawl Collar Cardigan Pattern Construction
This shawl collar cardigan for men is worked in panels using knit-look crochet stitches, then sewn together with a simple crochet whipstitch seam. I know what many of you are thinking, “Seaming is one of my least favorite things to do next to weaving in ends. Why did she have to design this cardigan in panels?!”
Seaming isn’t my favorite pastime either, but did you know that seams add structure and support to garments. They keep them from stretching out of shape, which mean they will last longer than garments without seams.
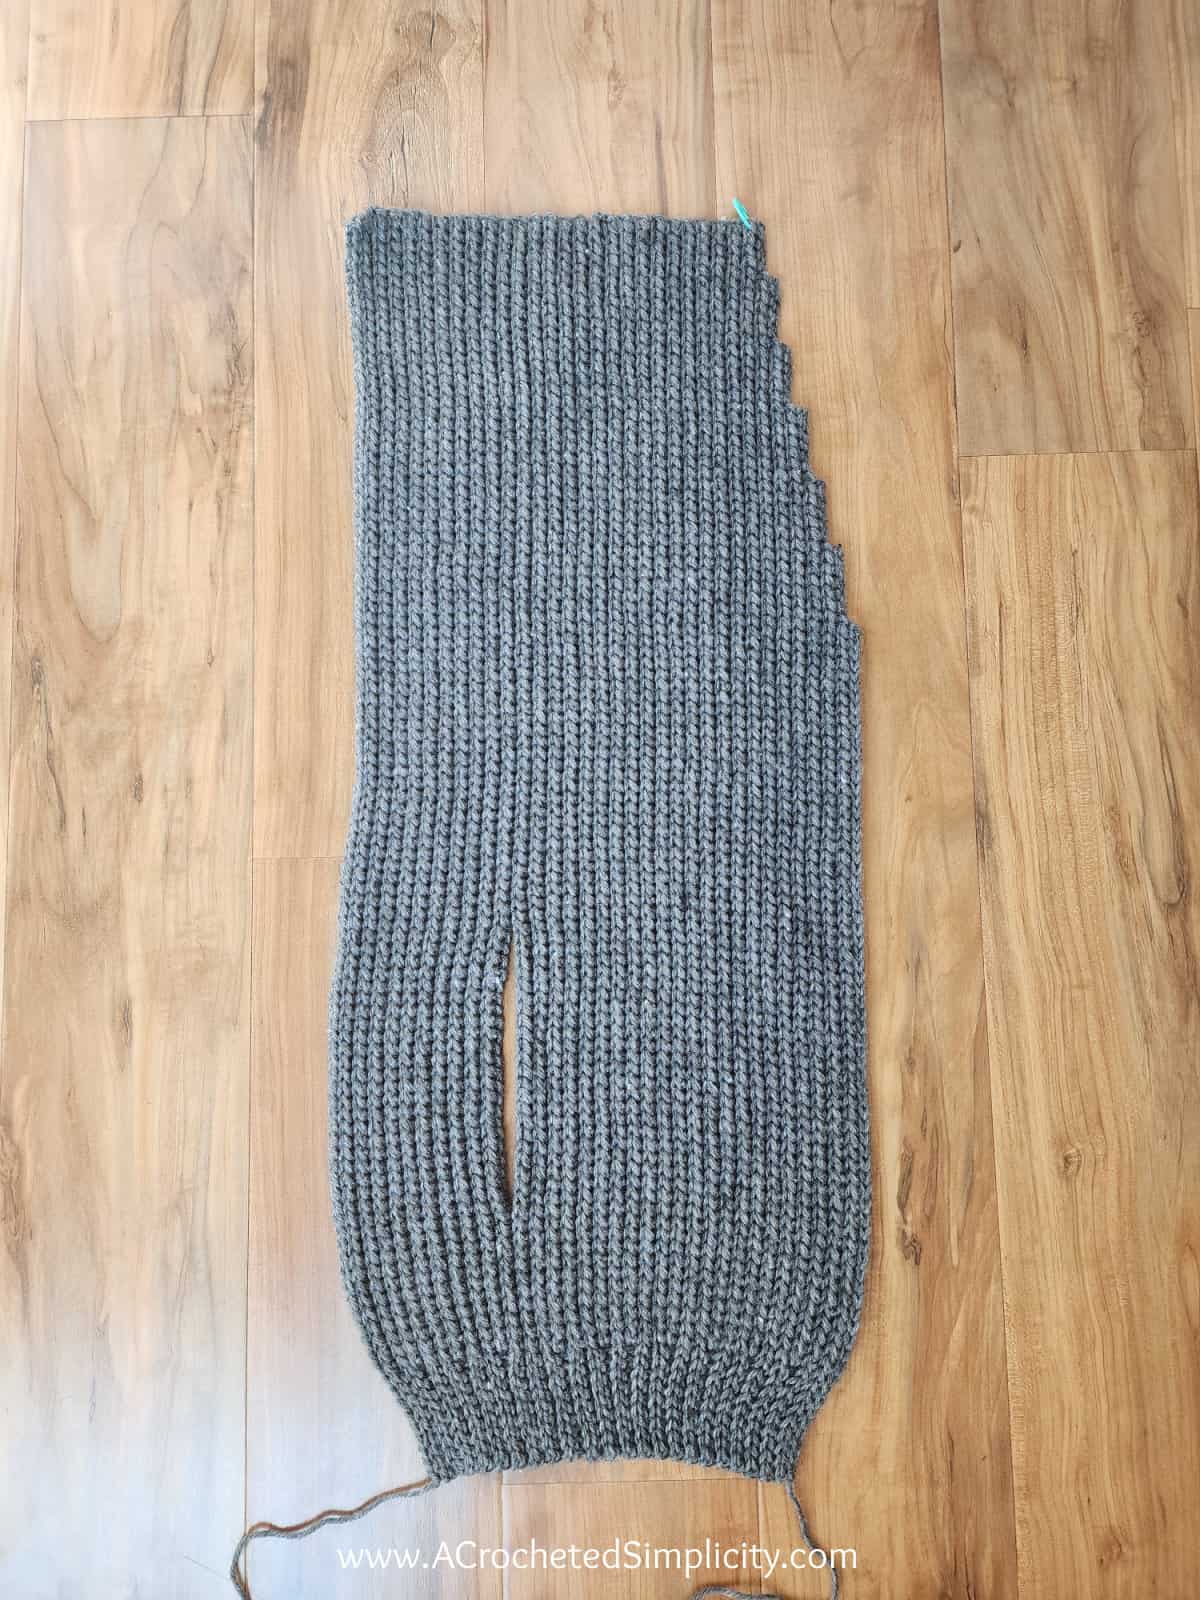
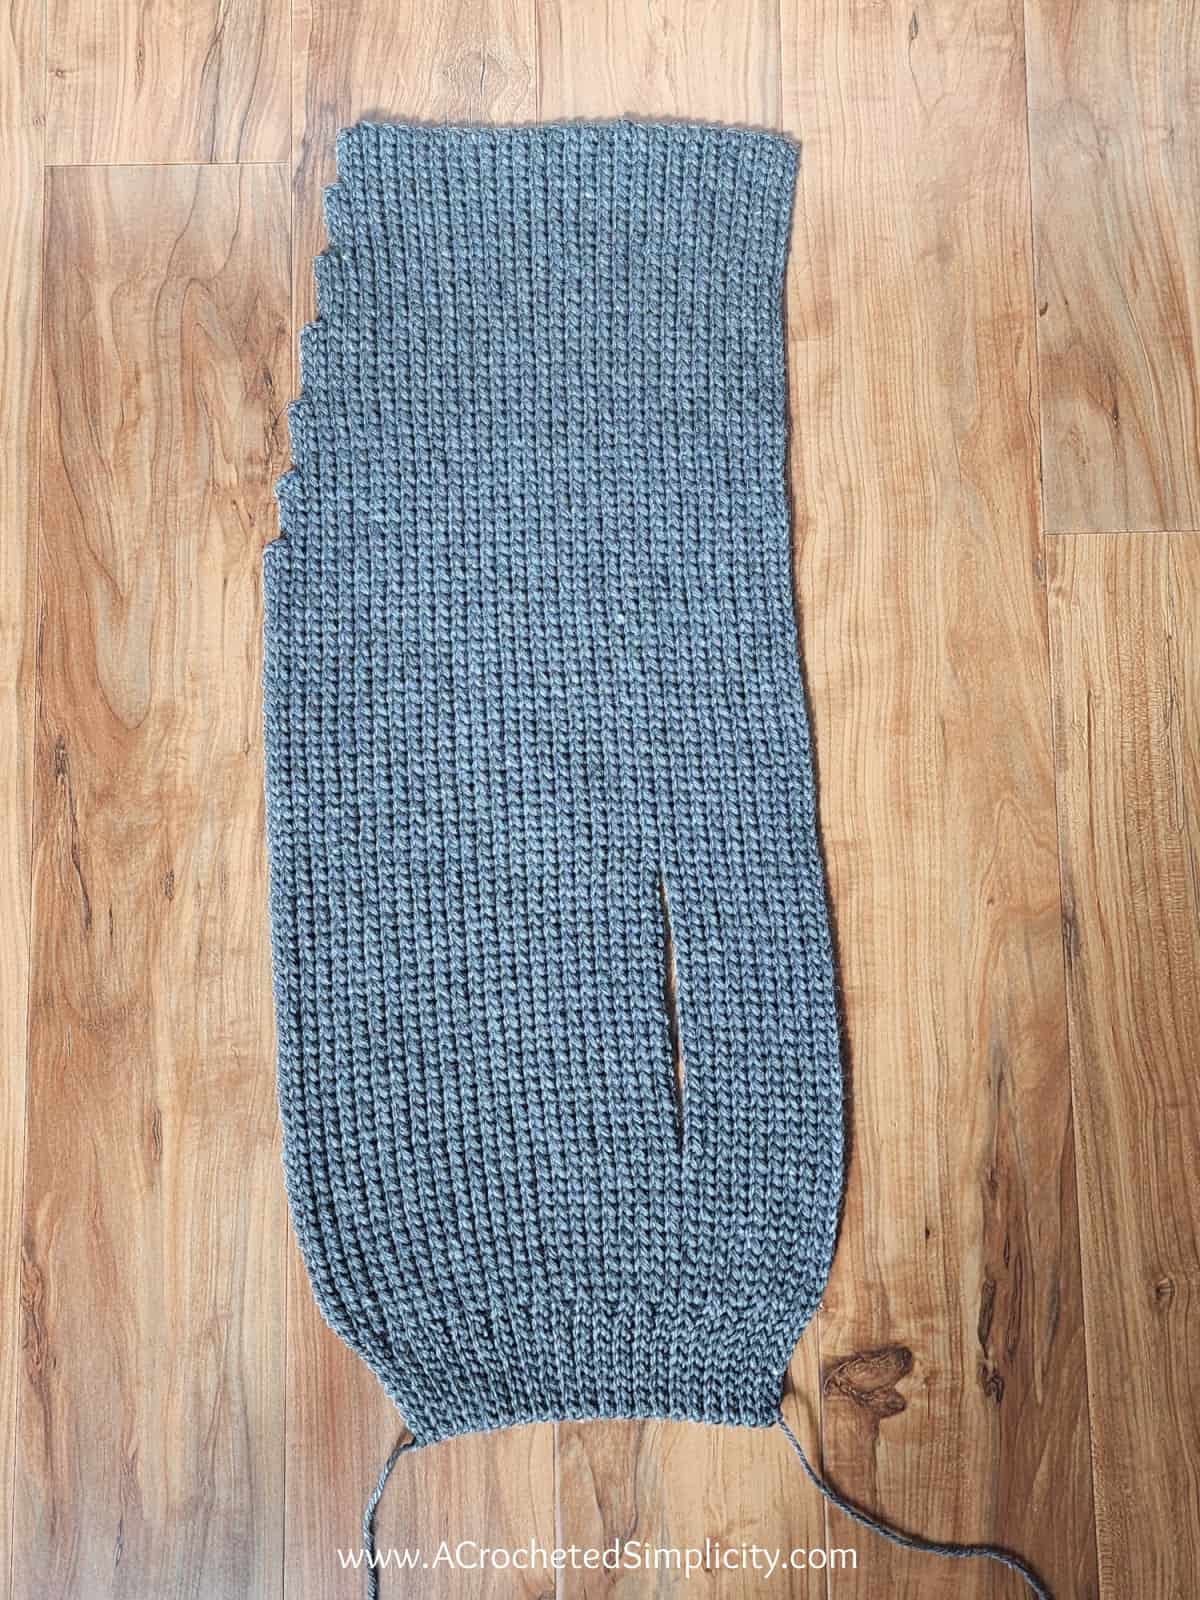
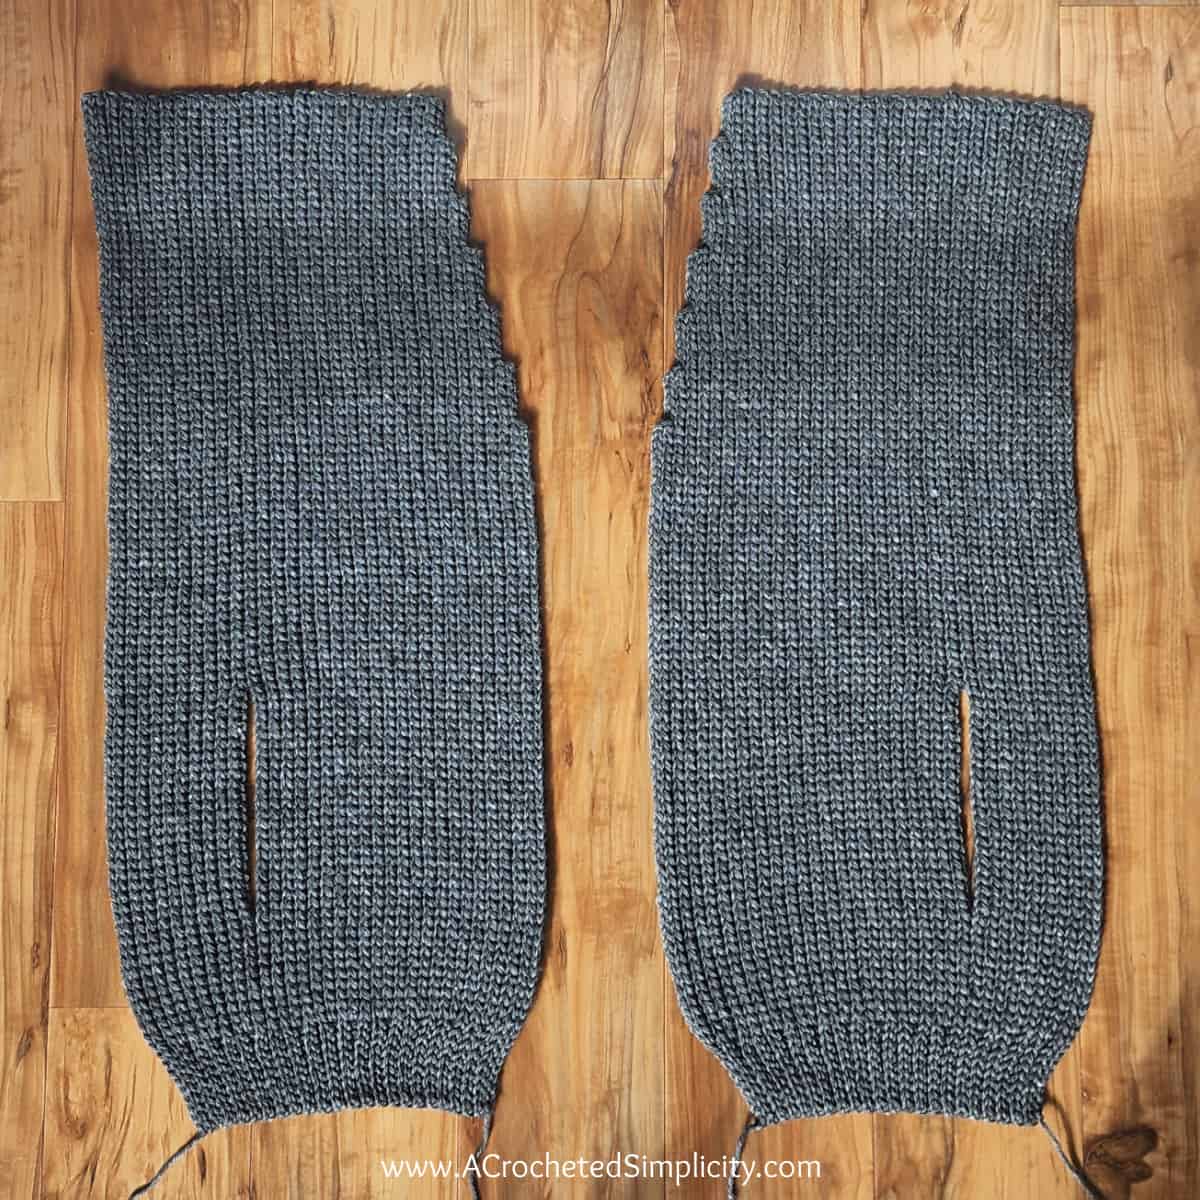
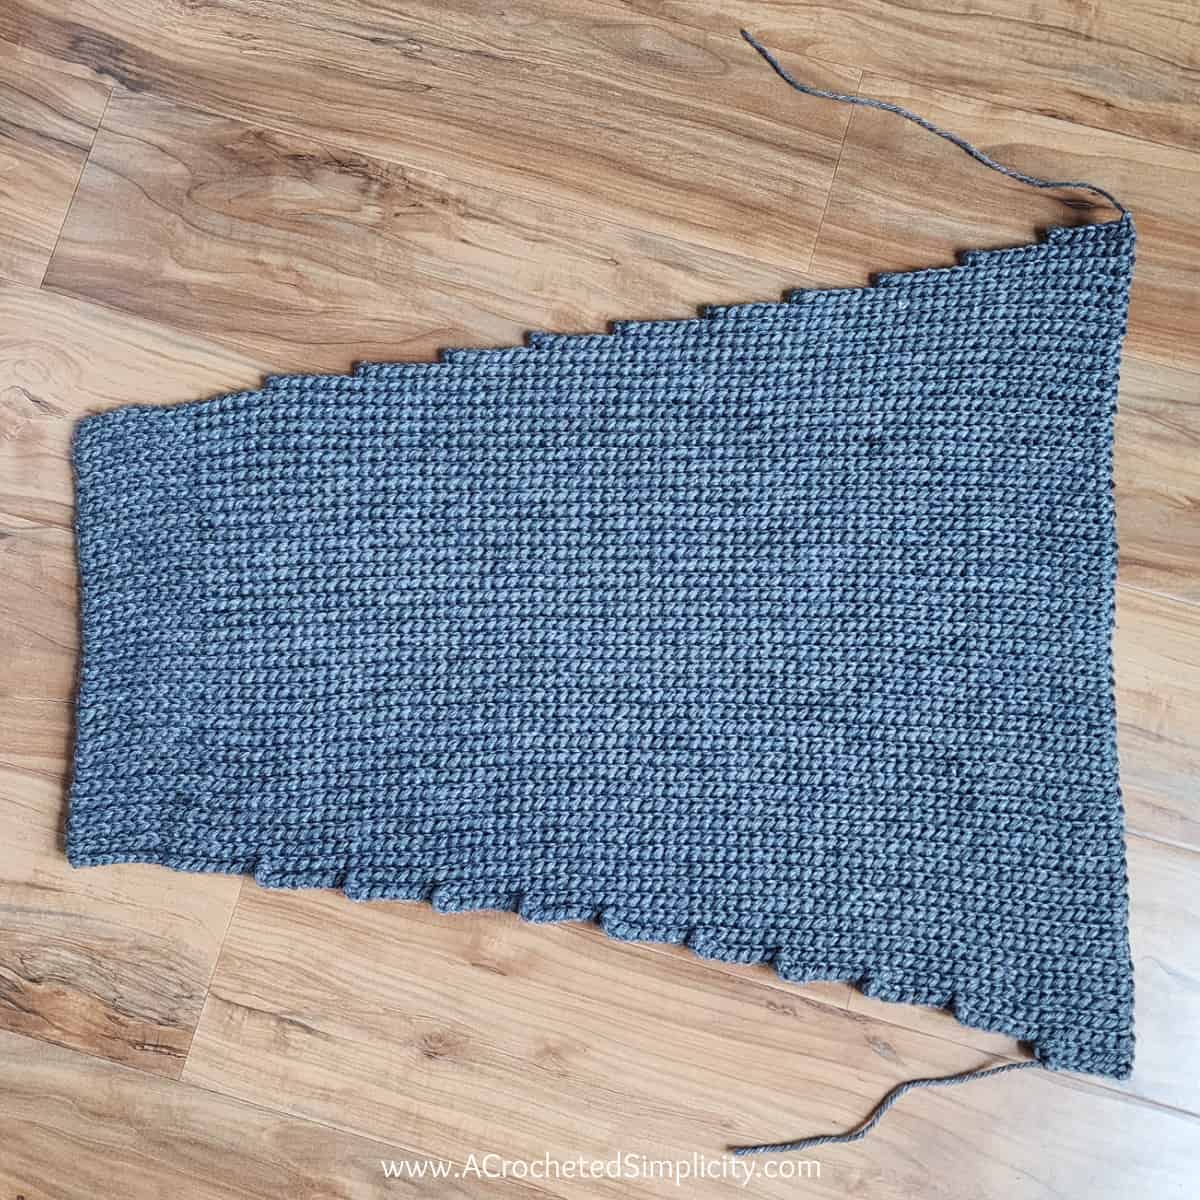
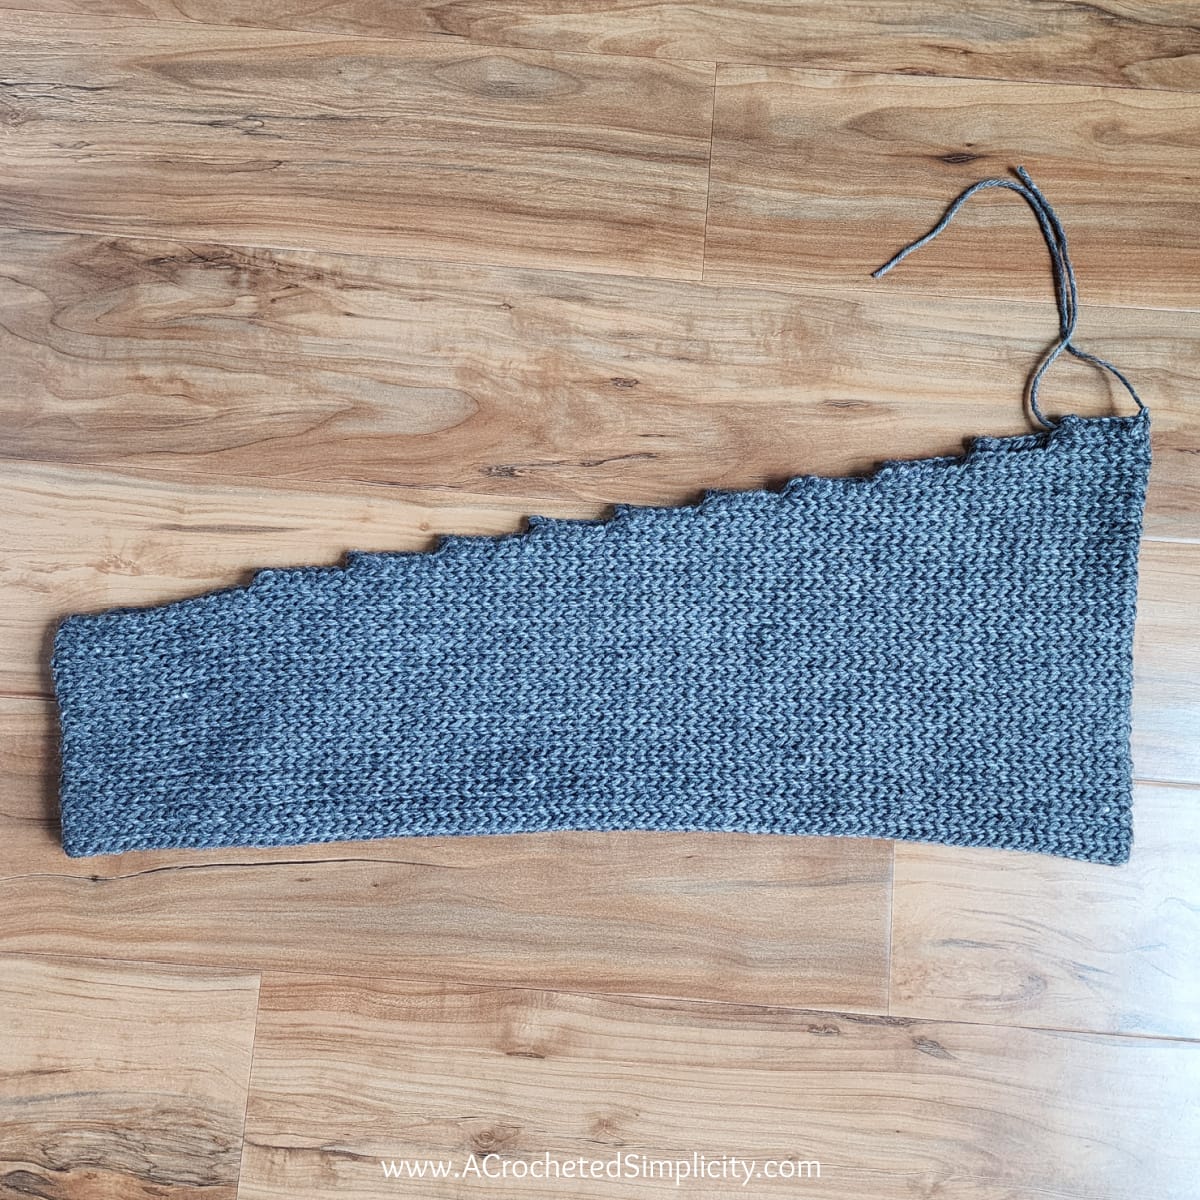
The front and back panels are worked sideways from the bottom edge of the cardigan to the shoulders. The front panels include a little simple shaping to gradually shape the neckline. If you’re adding side seam pockets to your mens crochet cardigan, you’ll create pocket openings as you crochet the front panels.
After crocheting the front and back panels, you’ll join then with a simple whipstitch seam.
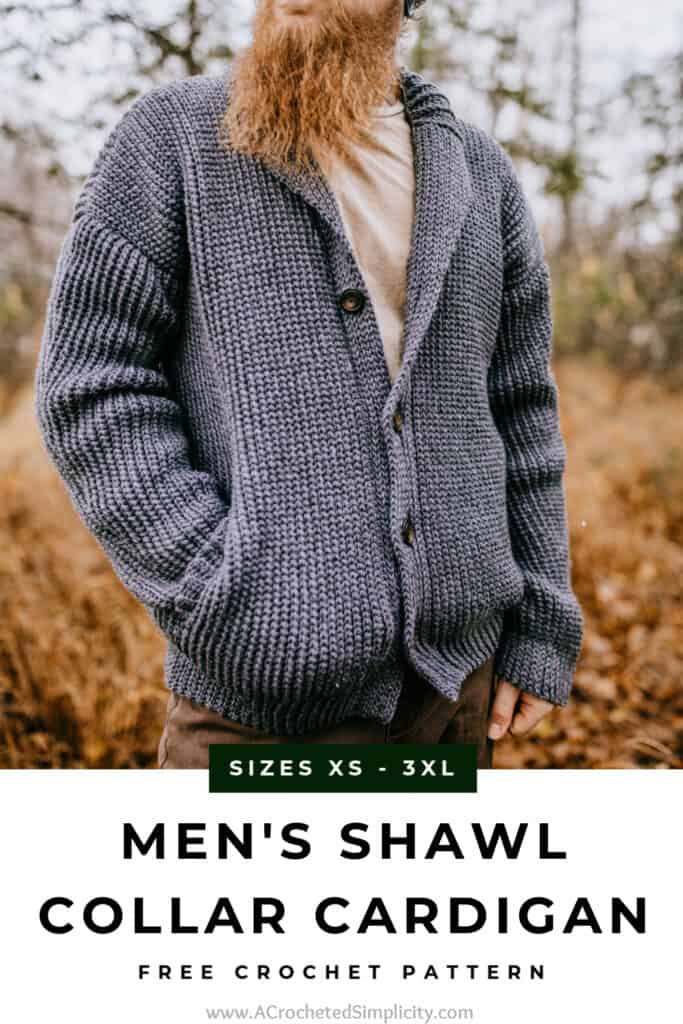
Next, you’ll crochet the shawl collar and buttonhole edge up and around the front opening of the cardigan.
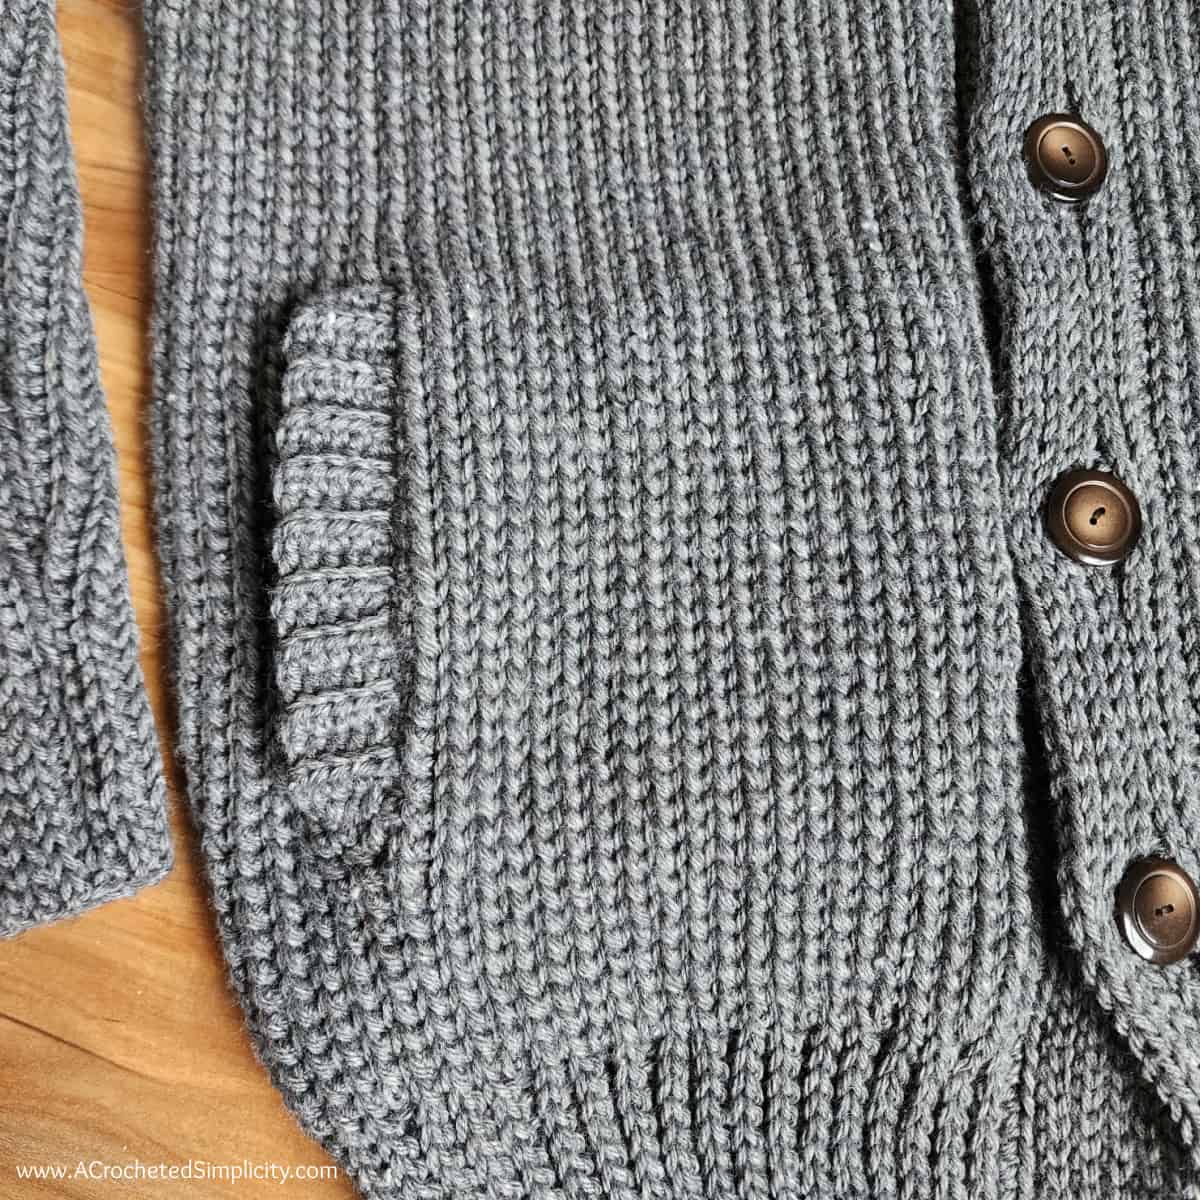
After completing the shawl color, you’ll make two pockets and ribbing and attach them to the pocket openings.
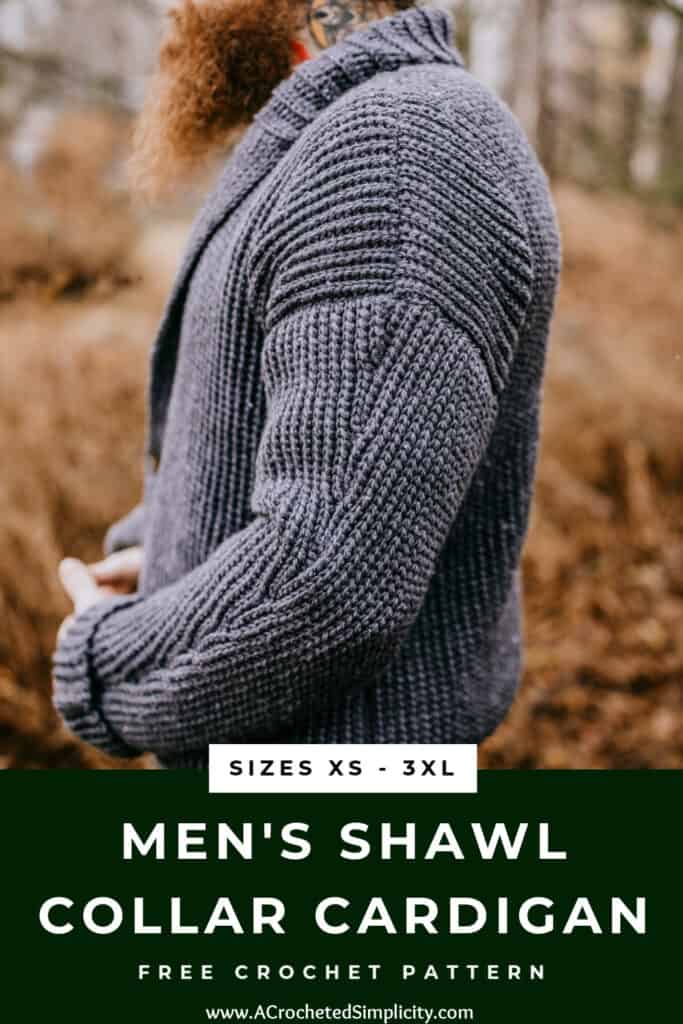
Then, you’ll crochet the sleeves. The tapered sleeves are worked flat from armhole to cuff and joined with a slip stitch seam. This crochet seam creates a nice visual effect along the length of the sleeve. After completing the sleeves, you’ll whipstitch them to the armhole openings.
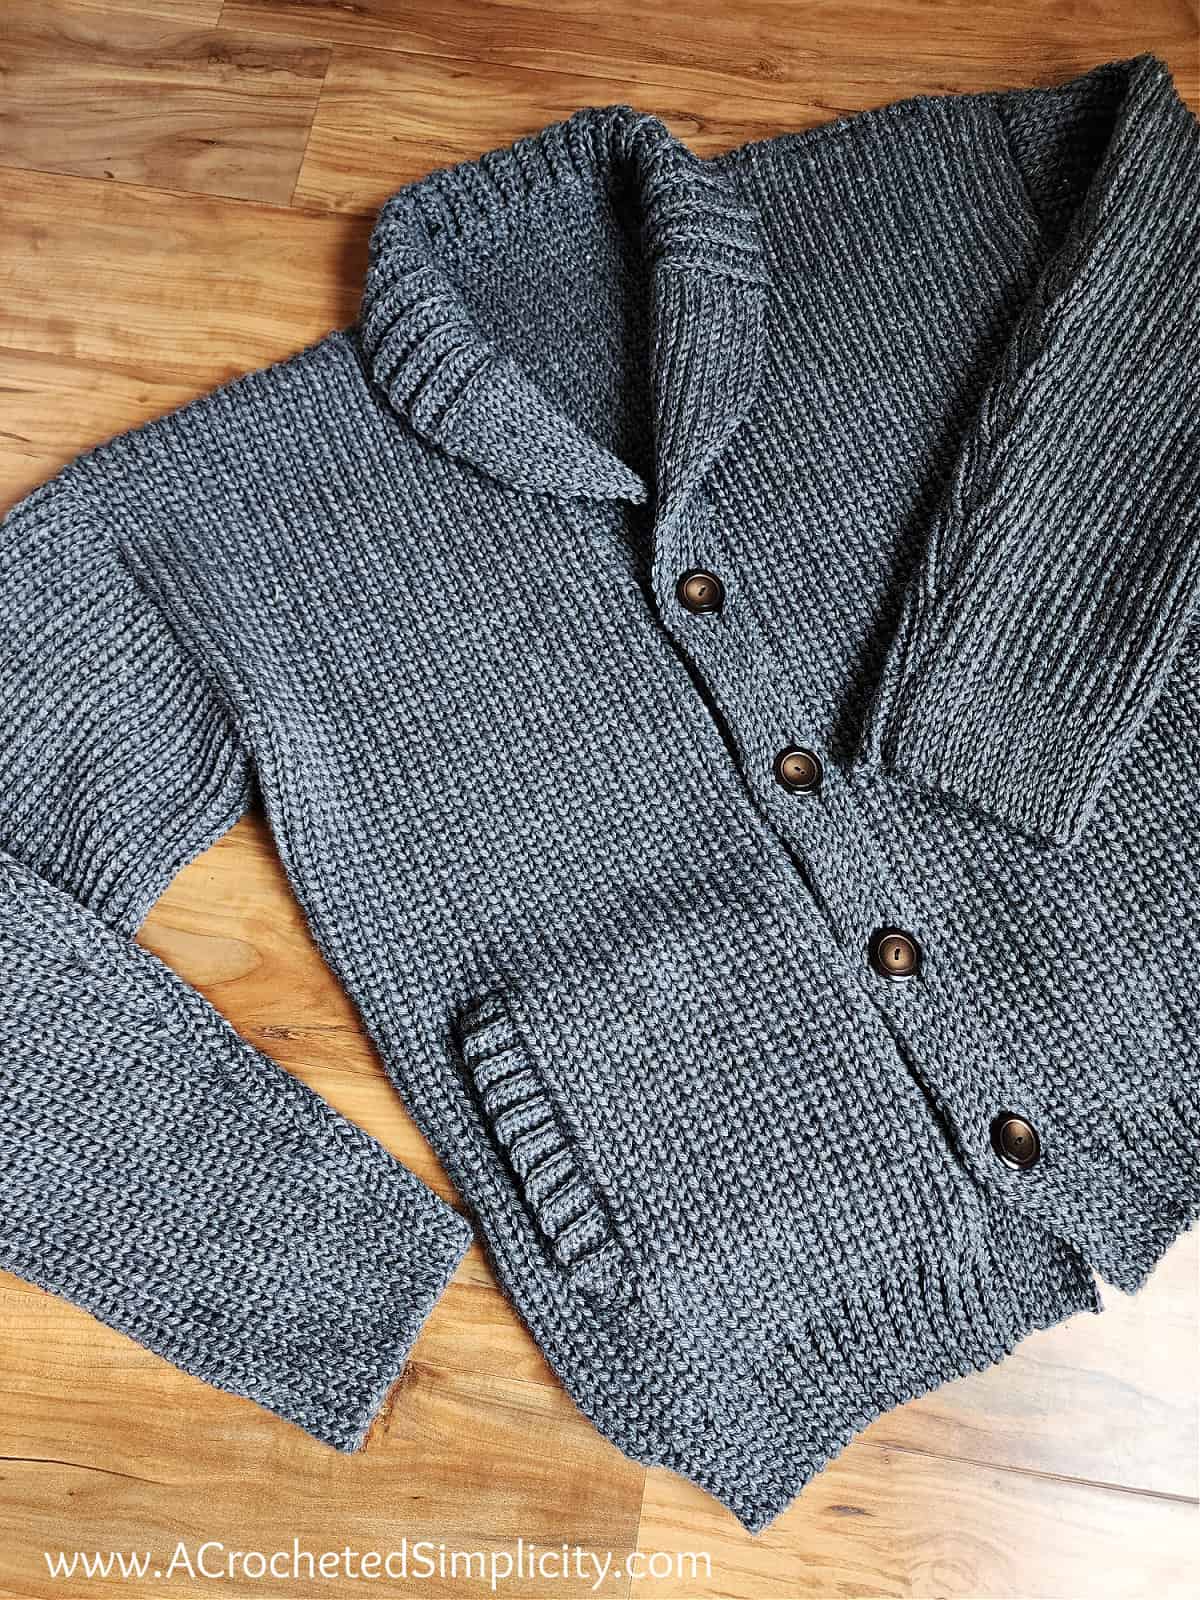
Lastly, sew on the buttons and your shawl collar crochet cardigan is complete!
Would you prefer a zippered cardigan instead of a button up cardigan? Adding a zipper to your crochet is super easy!
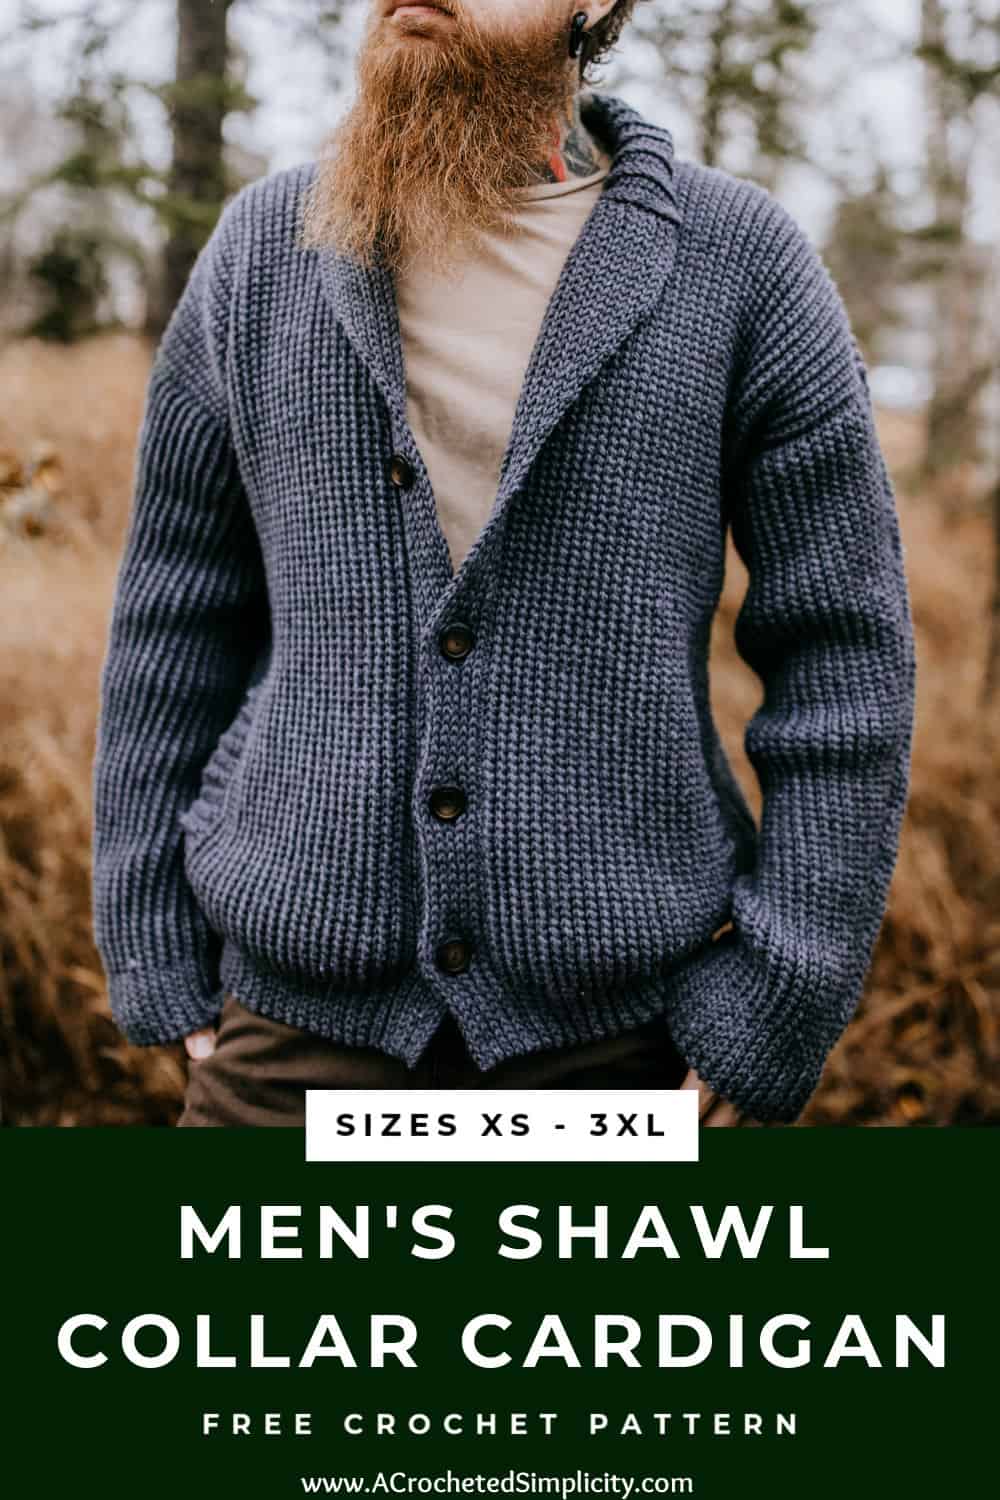
How To Get The
Men’s Shawl Collar Cardigan Pattern
Option 1: Scroll down for the free crochet men’s cardigan pattern right here in this blog post.
Option 2: Purchase the ad-free printable PDF from one of my shops:
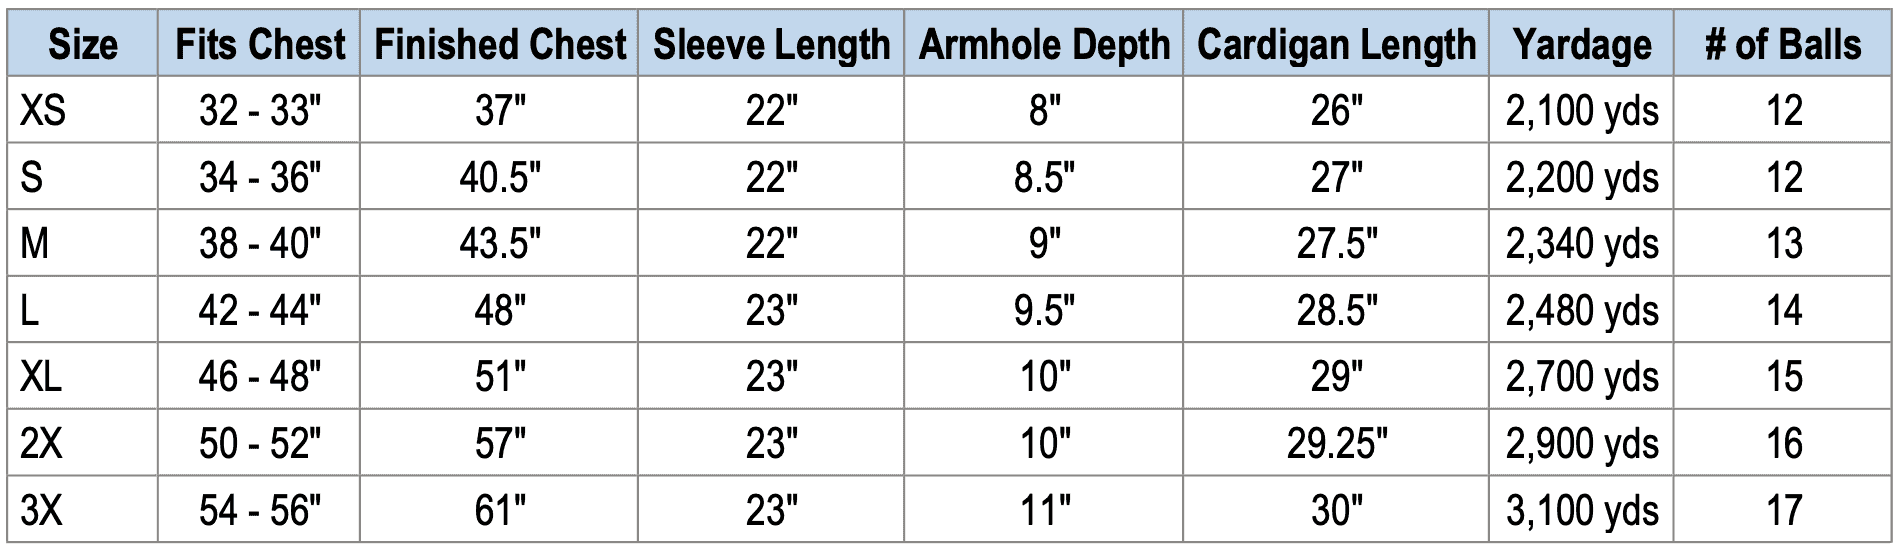
Choosing Which Size To Crochet
To choose your size, look over the size chart below.
- ‘Fits Chest’ measurement is the measurement of the intended wearer, not the garment’s finished measurement.
- Finished Chest, Sleeve Length, and Cardigan Length are measurements of the finished garment.
- This cardigan has 4-6″+ of positive ease built in for a classic fit.
- If you prefer more of an oversized cardigan, I would suggest making one size larger than chest size.
- If you prefer a more fitted look, I would suggest sizing down (as long as your chest size is within the range of the smaller size).
- Cardigan length is measured from the nape of the neck down. It does not include the collar.
- Sleeve length is measured from the underarm of the cardigan to edge of the cuff.
- Adjusting Cardigan Length
- Shorten Cardigan: To shorten the length of your cardigan, work a shorter foundation chain for Row 1 of all three panels: Front Right, Front Left, and Back.
- Lengthen Cardigan: To increase the length of your cardigan, work a longer foundation chain for Row 1 of all three panels: Front Right, Front Left, and Back.
- Note: Adjusting the size of your shawl sweater will affect the amount of yarn you will need. You will need more or less than what is specified in the yardage chart below.
Men’s Cardigan Size & Yardage Chart
The notes above refer to this size chart.
Men’s Shawl Collar Cardigan Crochet Pattern
The free mens crochet cardigan pattern is below, but if you love to work offline, I’ve got a couple other great options for you.
Purchase the ad-free, printable PDF, including all photo tutorials (and BONUS garment schematics), on Ravelry, or on Etsy (aff).
Purchase the Men’s Shawl Collar Cardigan crochet kit! (aff): Lion Brand has a full kit for this men’s crochet cardigan available on their website. The crochet kit includes your choice of colors and a digital copy of the crochet pattern.
This post contains affiliate links.
Materials
- Yarn: Worsted Weight / 4 / Yarn, (Lion Brand Basic Stitch Antimicrobial in Charcoal was used for the sample in the photos) (100 g / 3.5oz / 186 yards / 170 m / 65% recycled polyester / 35% amicor acrylic).
- Yardage: See size & yardage chart above.
- Crochet Hooks: J/10/6.00mm; I/9/5.50mm; G/6/4.00mm; or size needed to obtain gauge (My favorite crochet hooks are the Clover Amour Crochet Hooks, I’ve never had an ache in my hand since switching).
- Locking Stitch Markers
- Scissors
- Yarn Needle
- (4) Buttons 1-18″ (size isn’t crucial)
Abbreviations (US Terms)
- ch(s): chain(s)
- sl st(s): slip stitch(es)
- st(s): stitch(es)
- sc: single crochet
- hdc: half double crochet
- hdc2tog: half double crochet 2 together
- hdslst: half double slip stitch
- yo: yarn over
- sp: space
- SM: stitch marker
- Rep: repeat
- Rnd: round
- RS: right side
- WS: wrong side
- BLO: back loop only
- FLO: front loop only
- Join yarn with a standing single crochet
- Join yarn with a standing half double crochet
Experience Level
- Easy / Intermediate
Gauge
- See Gauge Swatch instruction below.
- With a 6.00mm crochet hook, in pattern stitch (gauge swatch): 11 sts = 4″; 12 rows = 3.5″
Sizes
- Men’s XS through 3XL
- See size chart above.
Special Stitches
- Half Double Slip Stitch (hdslst): Yo, insert your hook into the stitch indicated, yo, pull up a loop and pull that loop through all loops on your hook. This stitch is also referred to as a yarn over slip stitch.
- Join with a standing single crochet: Begin with a slip knot on your hook, insert your hook into the stitch or space indicated, yo, pull up a loop, yo and draw thru both loops on your hook.
- Join with a standing half double crochet: Begin with a slip knot on your hook, yo, insert your hook into the stitch or space indicated, yo, pull up a loop, yo and draw thru all 3 loops on your hook.
- Half Double Crochet 2 Together (hdc2tog): (yo, insert hook into next stitch, yo, pull up a loop) twice, yo, pull thru all remaining loops on your hook.
Pattern Notes
- Turning chains are not included in stitch count unless noted otherwise.
- Lion Brand Yarn Basic Stitch Antimicrobial (100 g / 3.5oz / 186 yards / 170 m / 65% recycled polyester / 35% amicor acrylic).
- Colorway & Yardage
- Charcoal #204-152AE (see yardage in the size chart above)
- Changes for Sizes: XS (S, M, L, XL, 2XL, 3XL)
- Construction: This men’s crochet cardigan is worked in rows that will be vertical with the bottom hem worked at the same time as the body of the cardigan. You will work two front panels with slight neck opening shaping and slits for pockets (if, desired), and a back panel. Although there is shaping for the neckline, this cardigan has a dropped shoulder. After working each of the panels, you will seam the shoulders and each side. Next, you’ll crochet a shawl collar and add a ribbed front edging with buttonholes (if adding buttons) to the front of the cardigan. Then you’ll make the pockets and ribbing and attach them to the cardigan. Two sleeves are then crocheted, seamed, and sewn into the armhole openings. Finish your cardigan by sewing buttons on.
- 2 Pocket Options: Instructions are included for a cardigan with & without pockets.
- Zipper Option: If you’d prefer to add a zipper to your cardigan instead of buttons, purchase a separating zipper. To find the length of the zipper you’ll need, measure approximately 1/2″ up from the button edge of the cardigan, up to where it splits for the shawl collar to lay down. I have a super simple zipper tutorial on my blog.
- Adjusting Cardigan Length: See notes below.
- Progression photos can be found throughout the pattern.
- Model wears a men’s large and is wearing a large sample.
Adjusting Cardigan Length
Do you have a guy who has a longer or shorter than average torso?
- I strongly suggest making a gauge swatch first, before adjusting the length of your cardigan.
- Shorten Cardigan: To shorten the length of your cardigan, work a shorter foundation chain for Row 1 of all three panels: Front Right, Front Left, and Back.
- Lengthen Cardigan: To increase the length of your cardigan, work a longer foundation chain for Row 1 of all three panels: Front Right, Front Left, and Back.
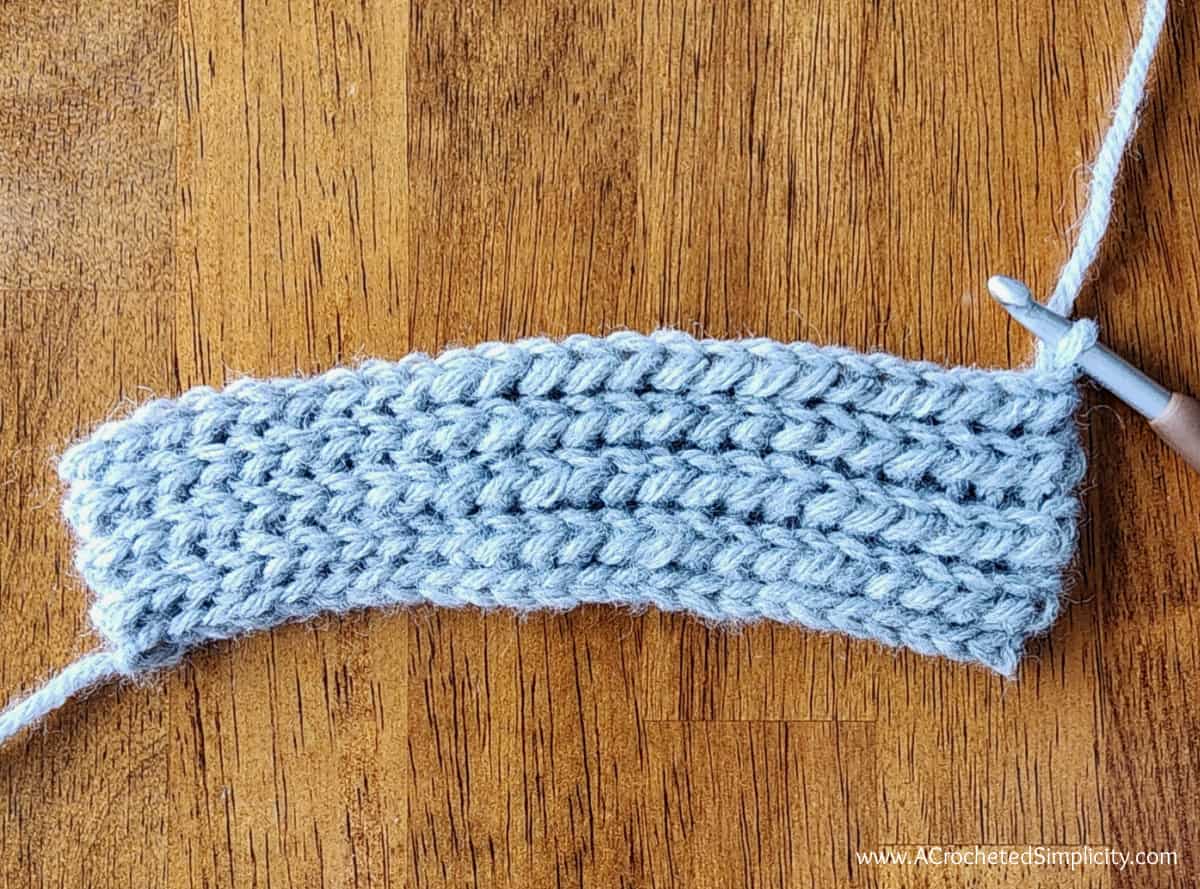
Gauge Swatch Instructions
Gauge: 24 sts = 6.5″; 18 rows = 3.25″
Note: ALL stitches, beginning with Row 2, are worked into the back loops only, unless otherwise specified.
Row 1 (RS): With yarn & a 6.00mm crochet hook, ch 25, switch to a 5.5mm crochet hook, sl st into the 2nd ch from your hook and into each ch across. Turn. (24 sts)
Row 2: Ch 1, BLO, sl st in each of the first 9 sts, hdslst in each remaining st across. Turn. (24 sts)
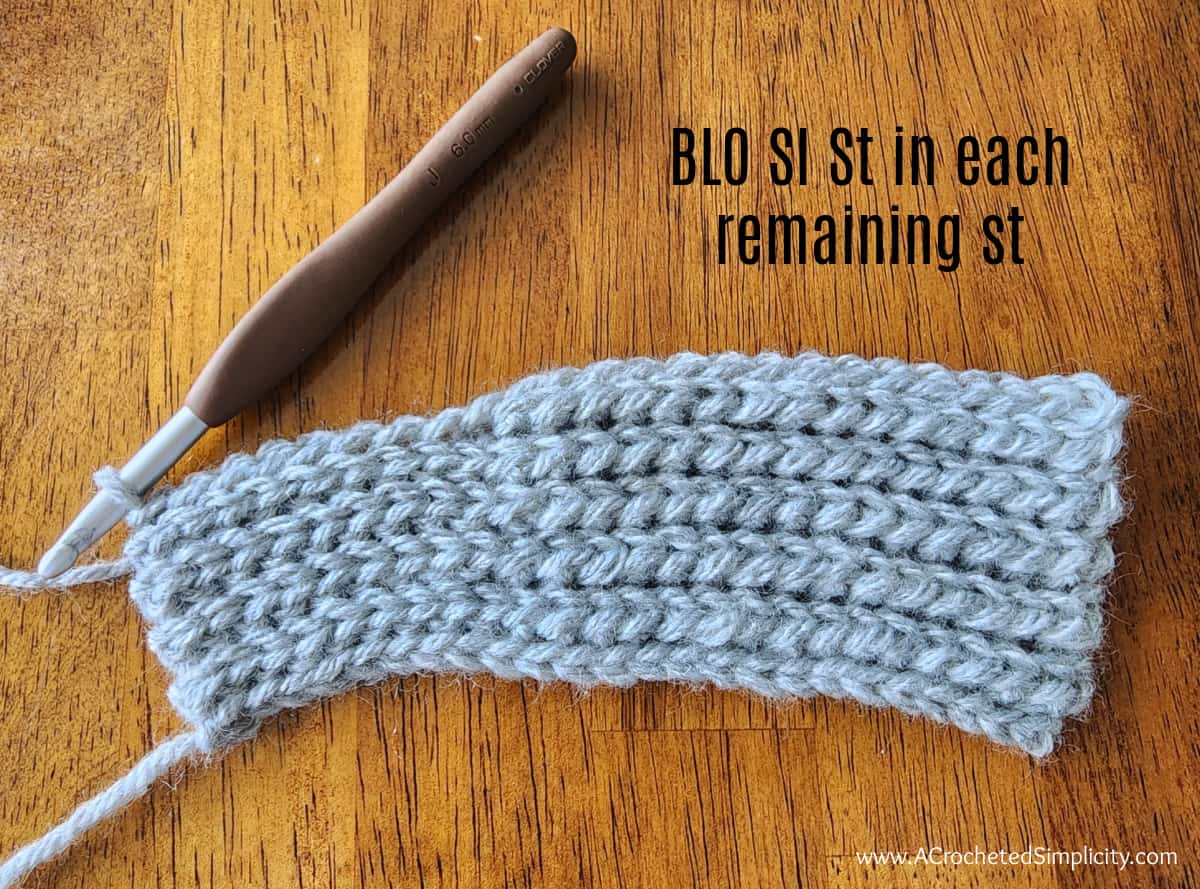
Row 3: Ch 1, BLO, sl st in each st across. Turn. (24 sts)
Row 4: Ch 1, BLO, sl st in each of the first 9 sts, hdslst in each remaining st across. Turn. (24 sts)
Rows 5 – 6: Rep rows 3 – 4.
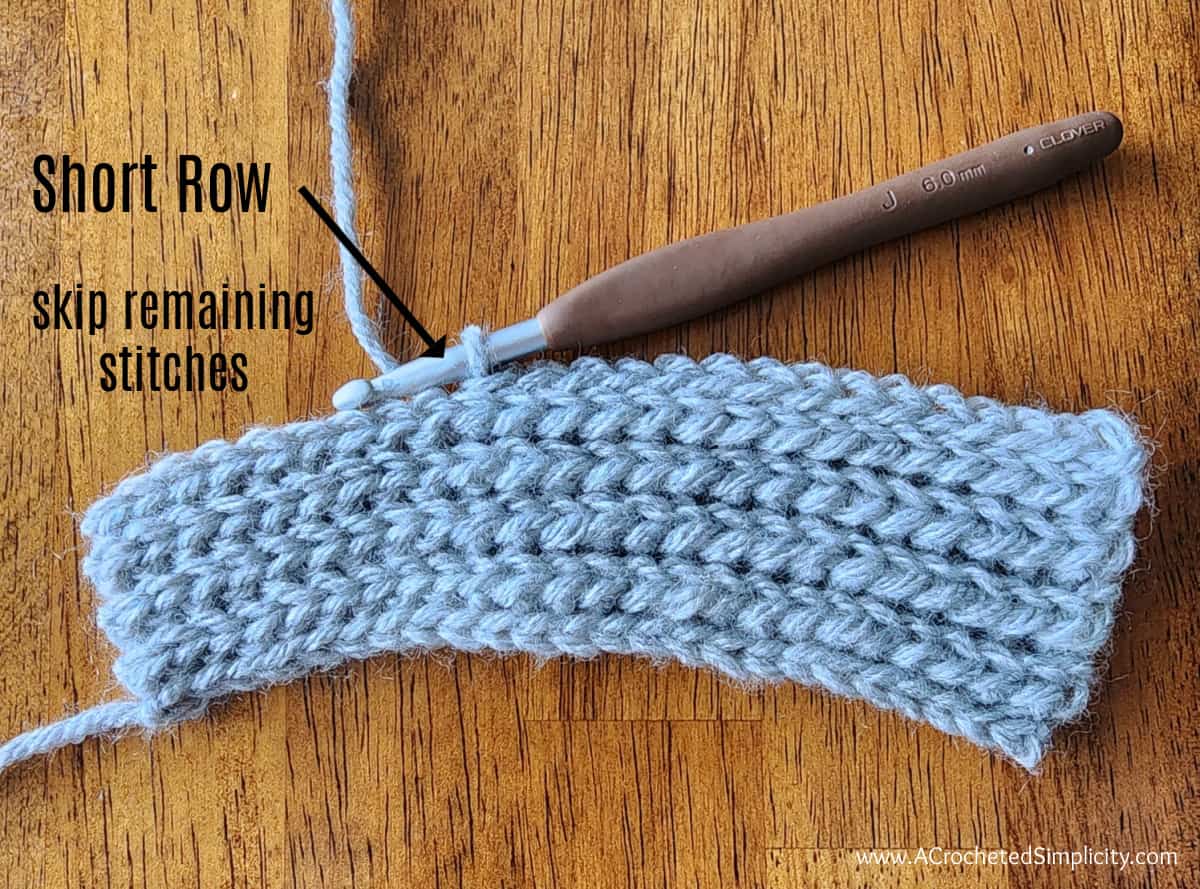
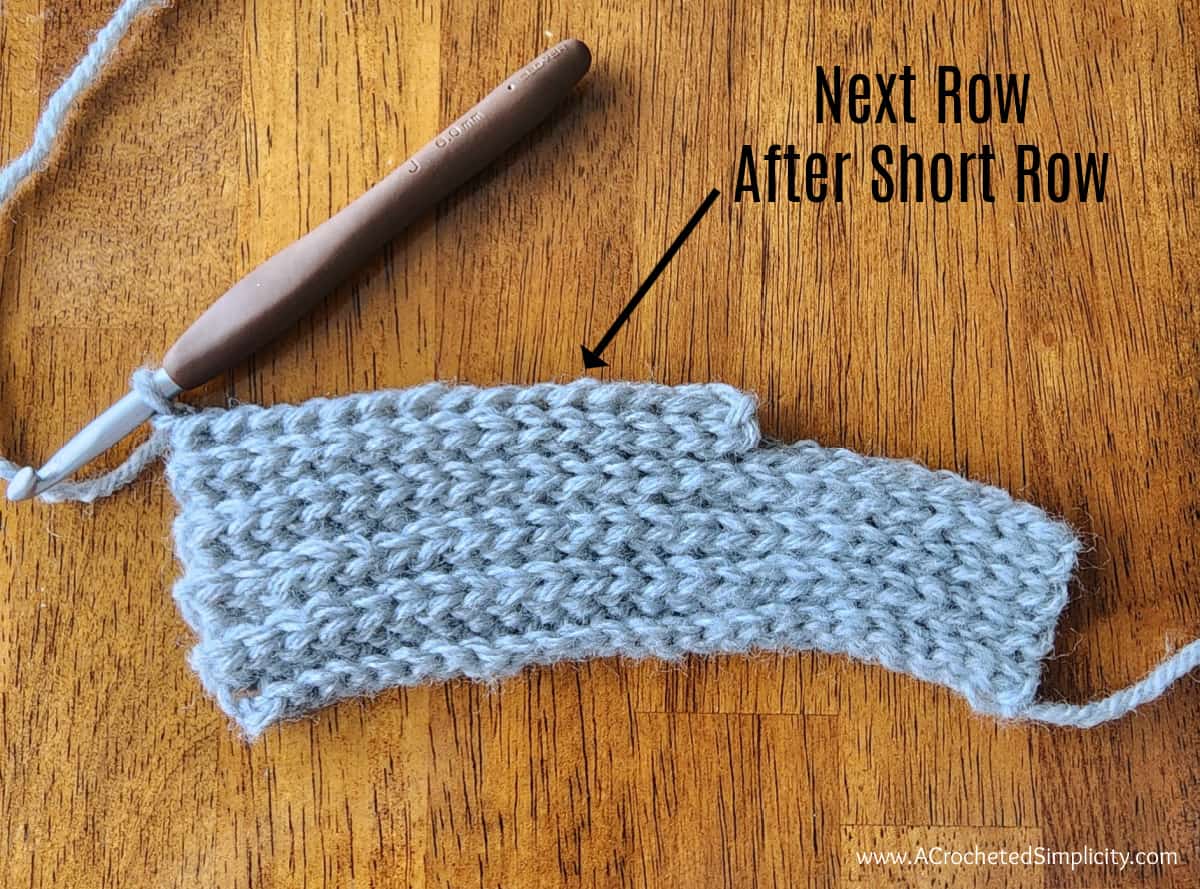
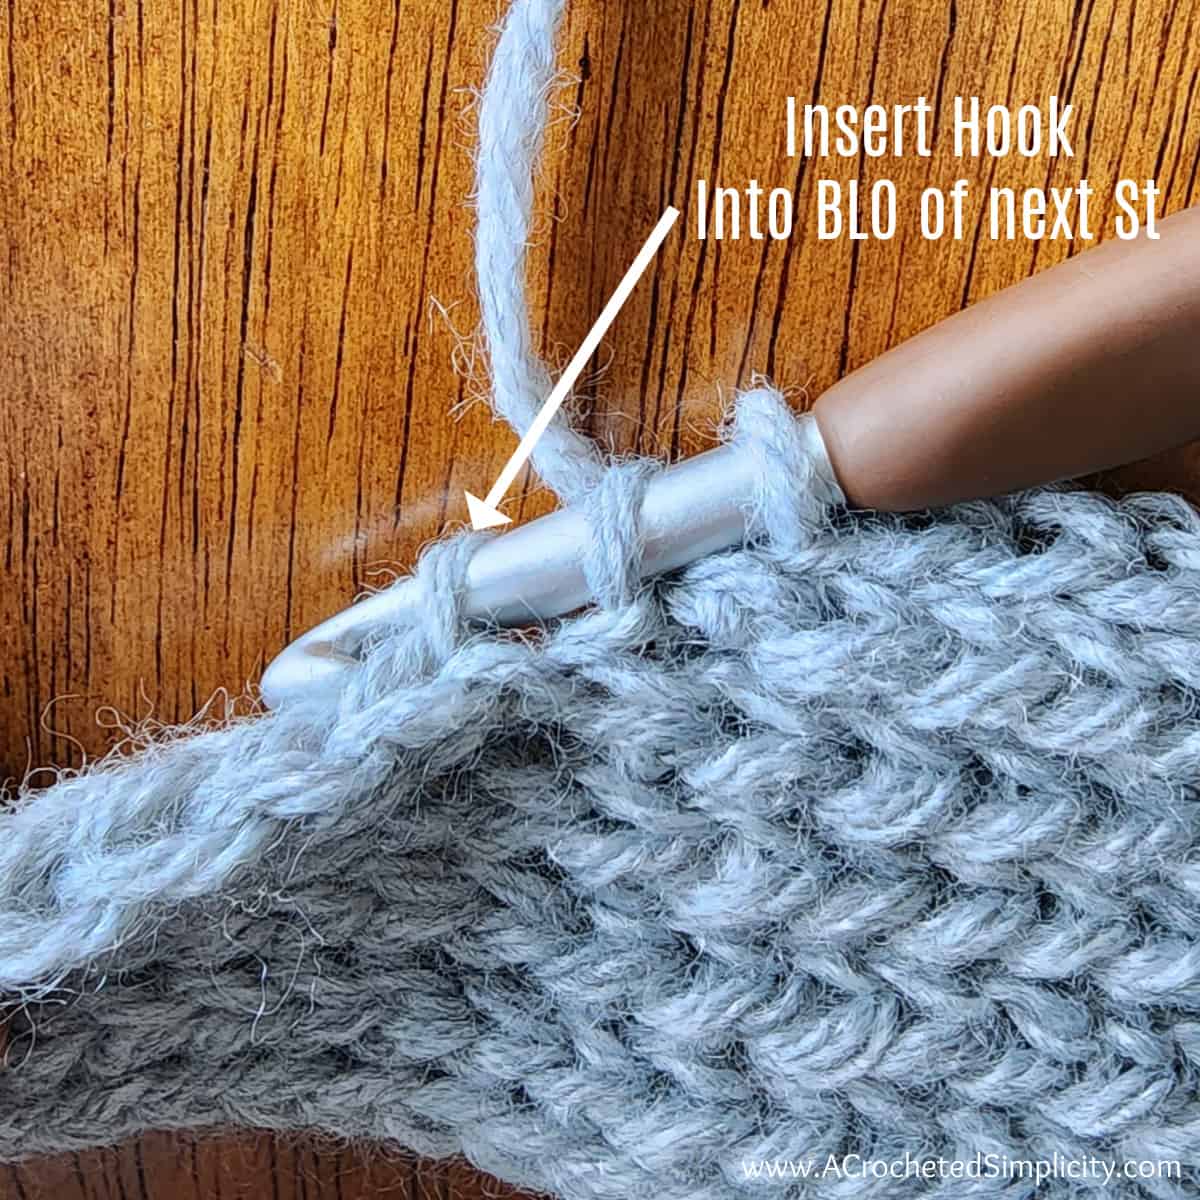
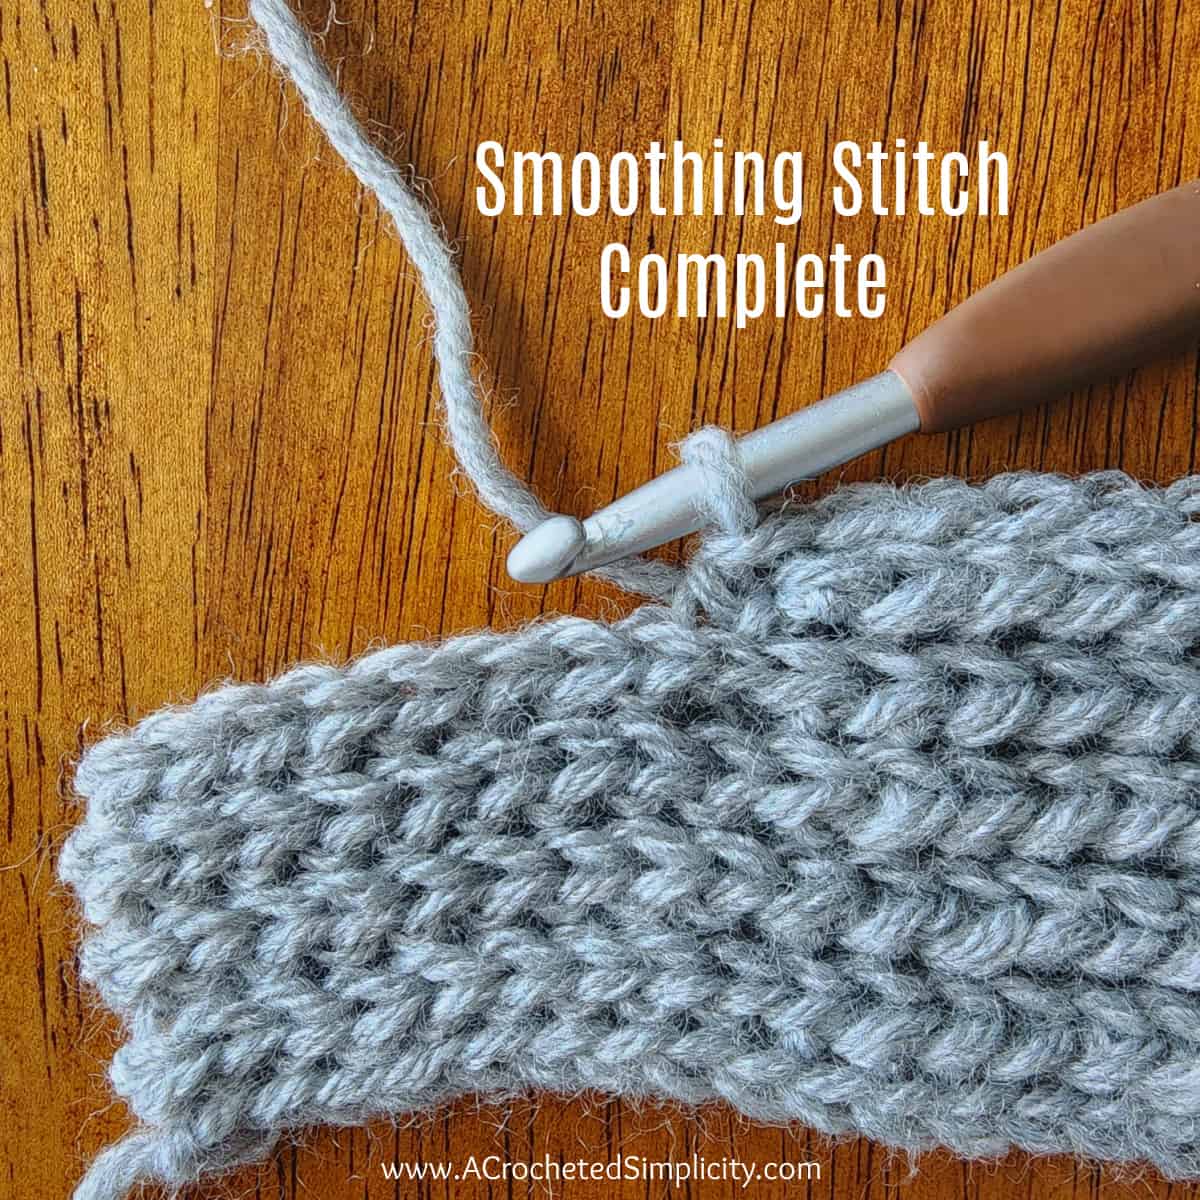
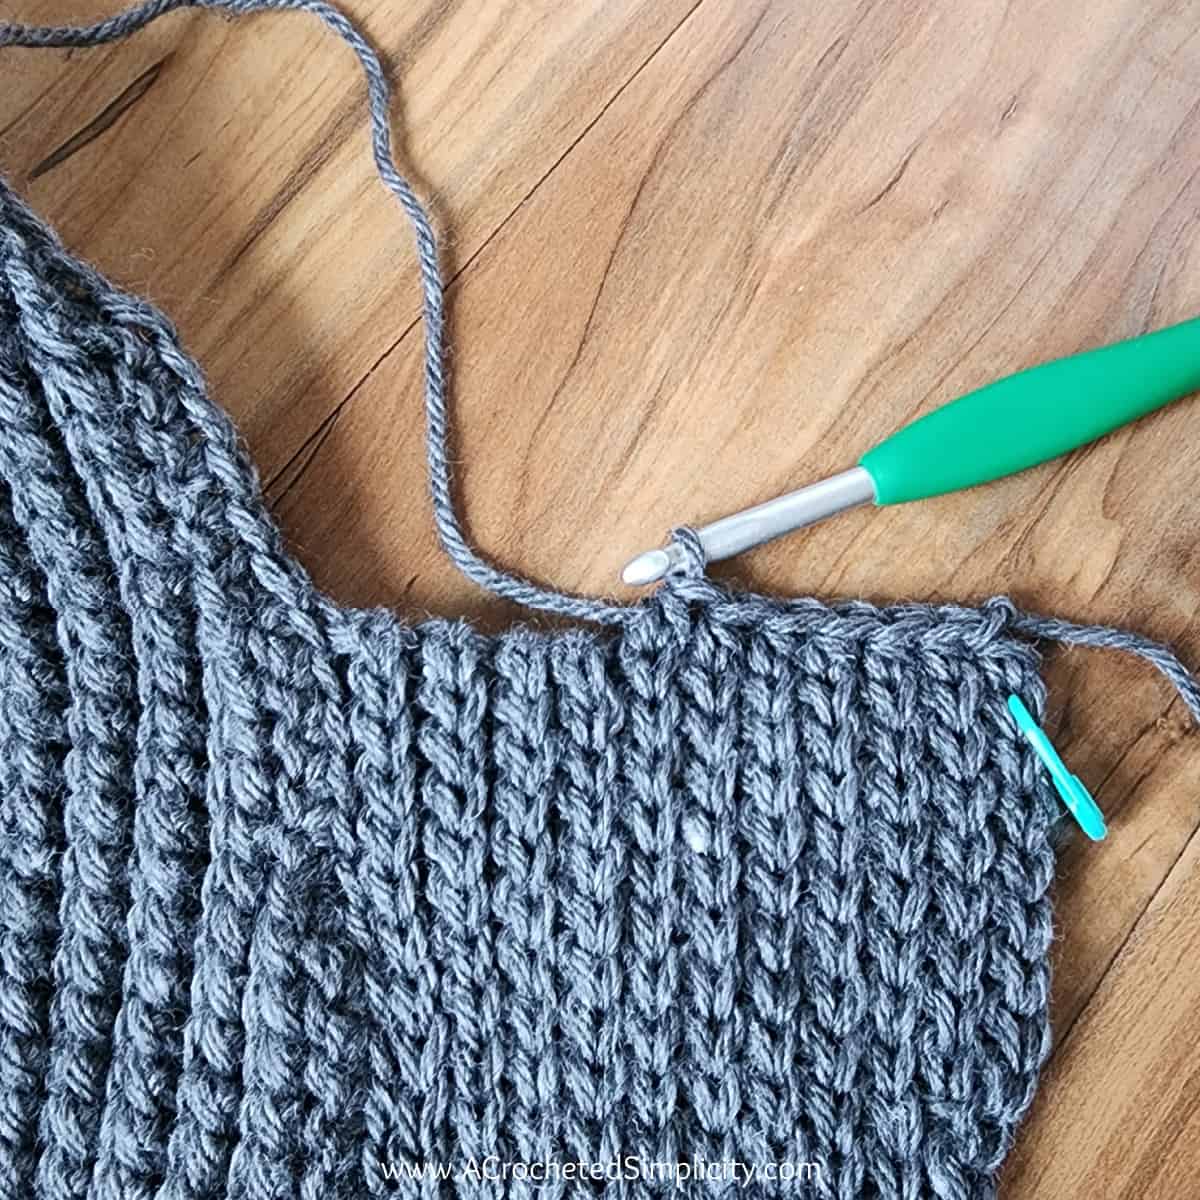
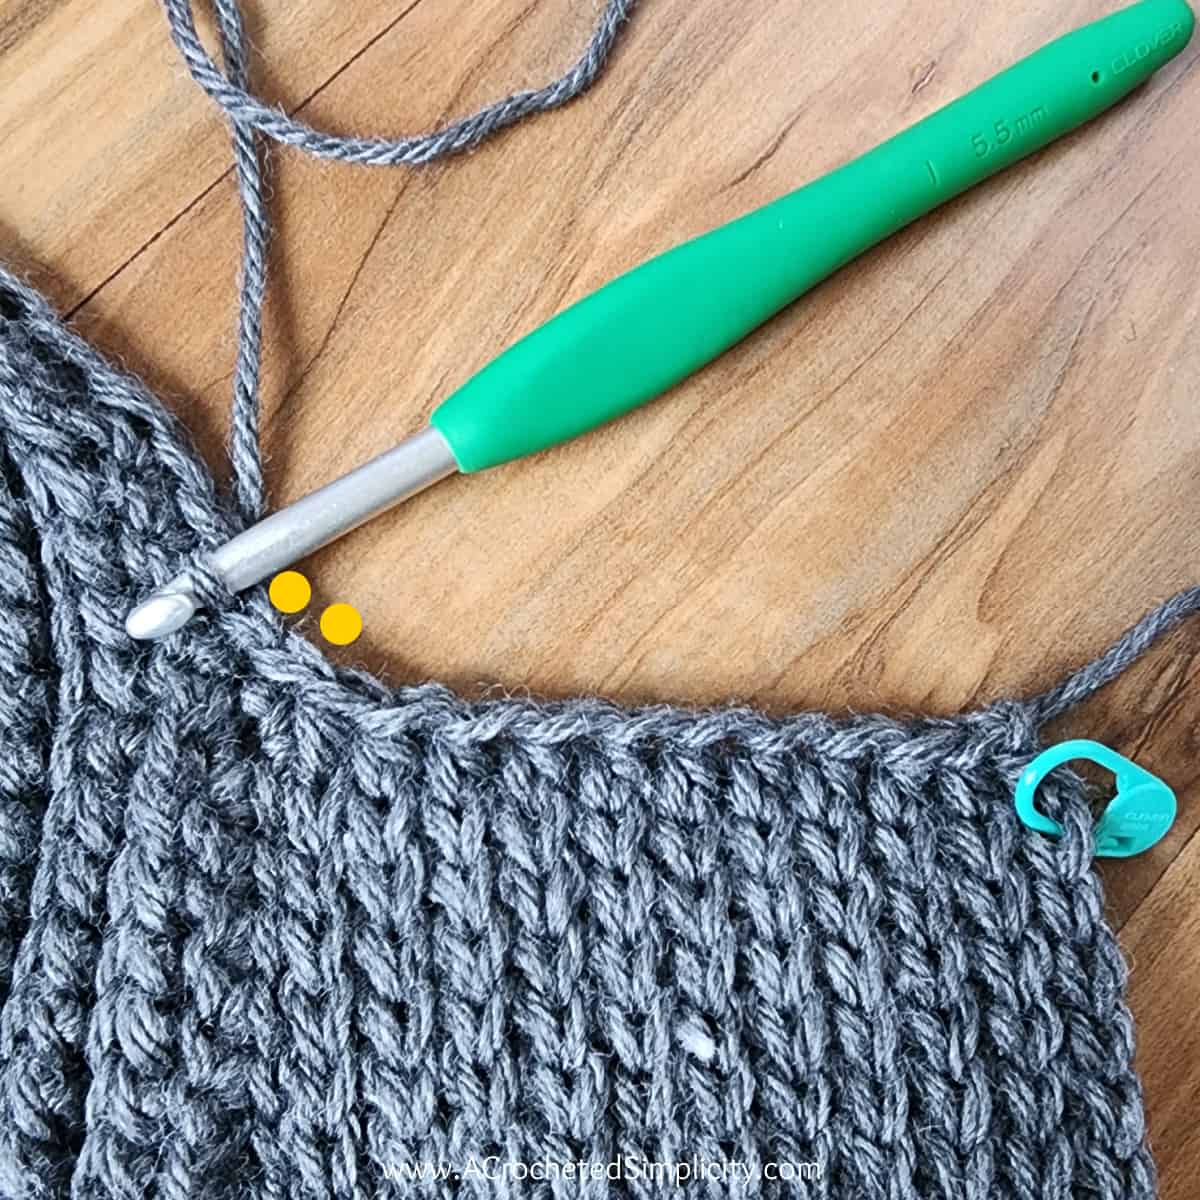
Note: Row 7 is a short row. Short rows are added throughout the front and back panels as a way to slightly taper the bottom hem of the cardigan. There are photos below the gauge swatch instructions that show you how to work a “smoothing stitch” to seamlessly transition between short rows and regular rows.
Row 7: Ch 1, BLO sl st in each st across to the last 9 sts, skip the last 9 sts. Turn. (15 sts)
Row 8: Ch 1, BLO hdslst in each st across. Turn. (15 sts)
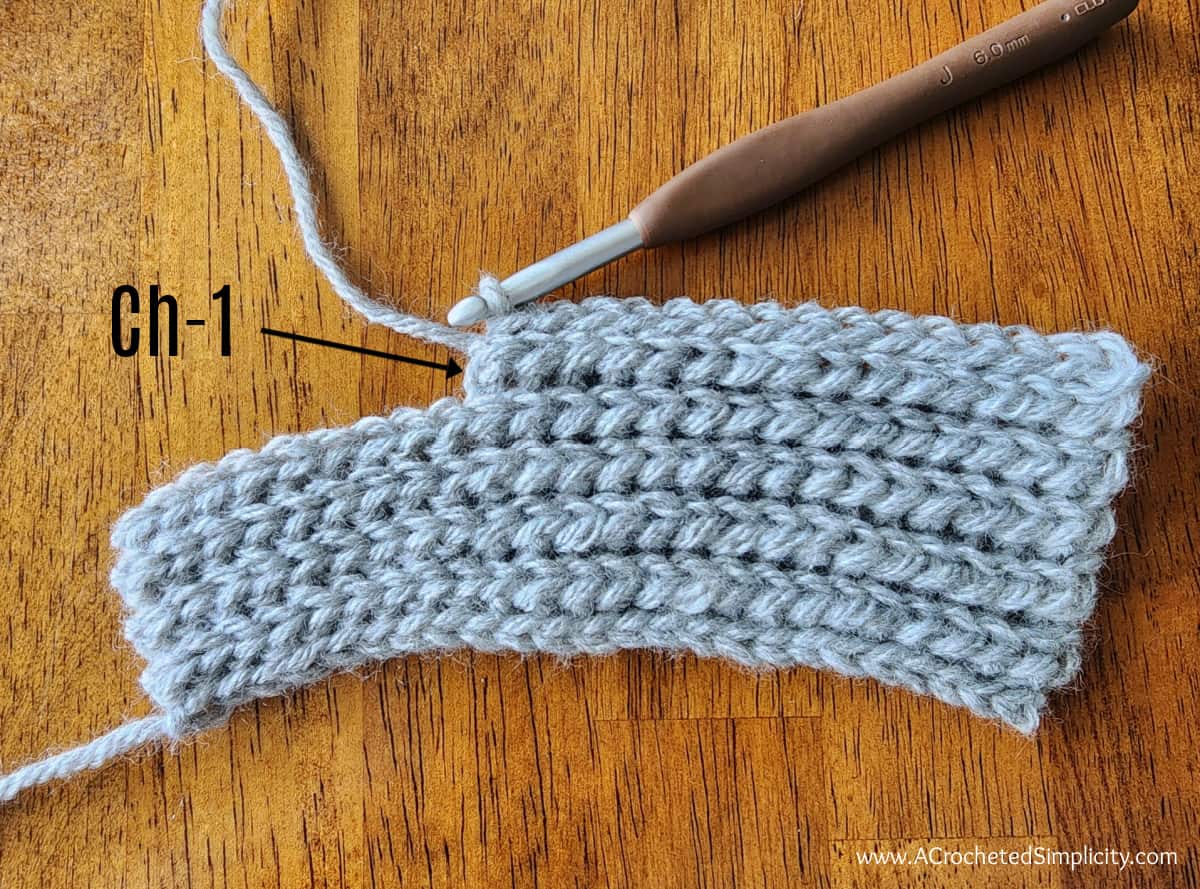
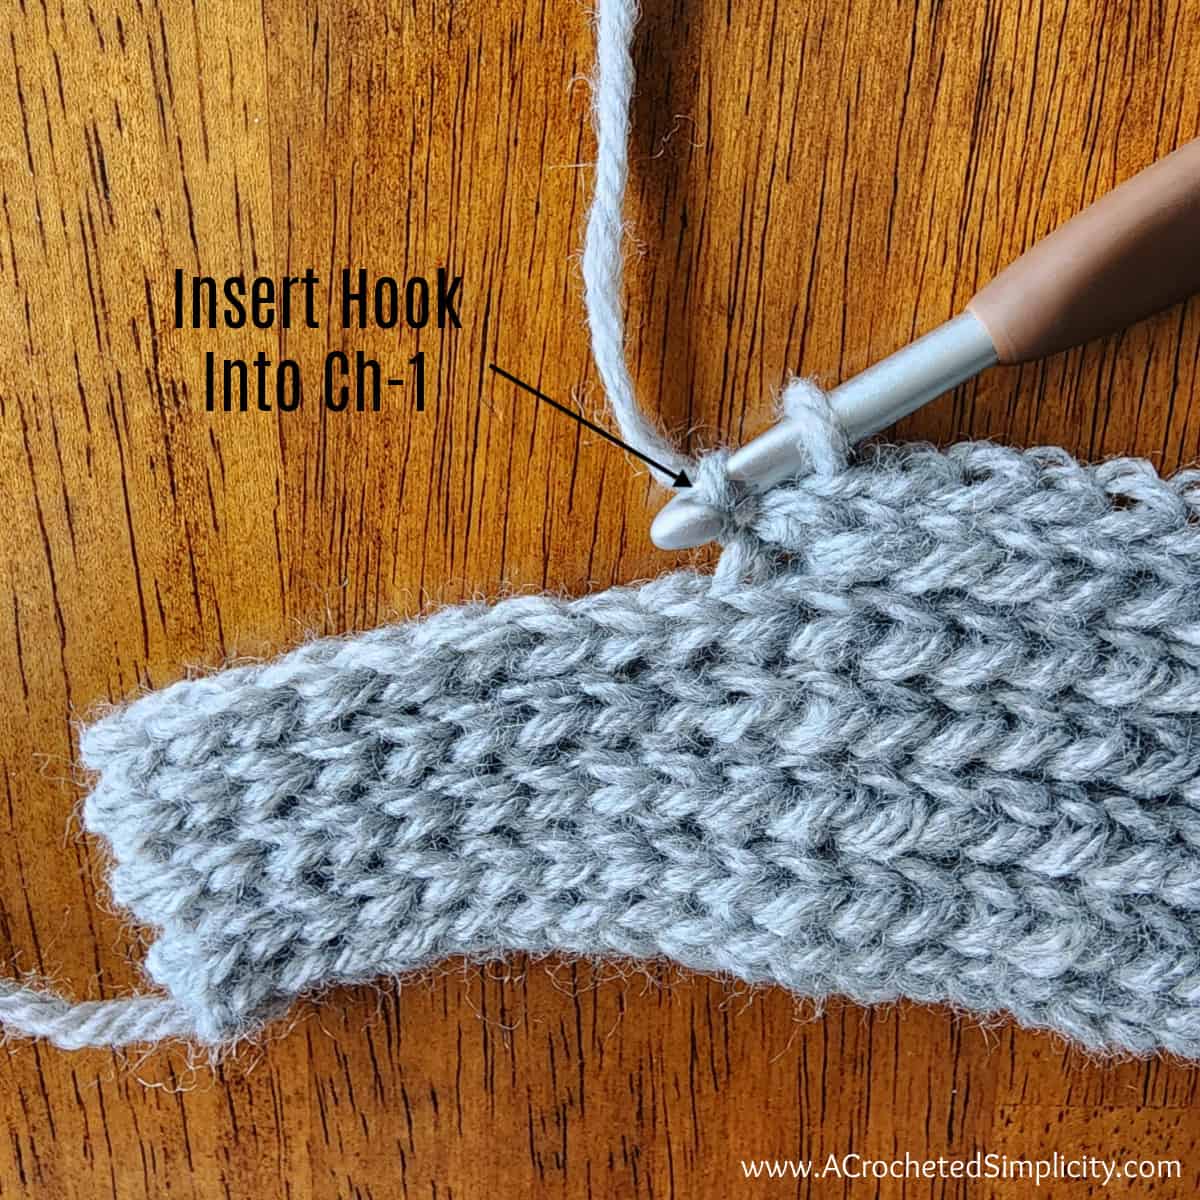
Row 9: Ch 1, BLO, sl st in each st across the previous row and in each skipped st from 2 rows prior. Turn. (24sts)
Row 10: Ch 1, BLO, sl st in each of the first 9 sts, hdslst in each remaining st across. Turn. (24 sts)
Rows 11 – 18: Rep Rows 3 – 10.
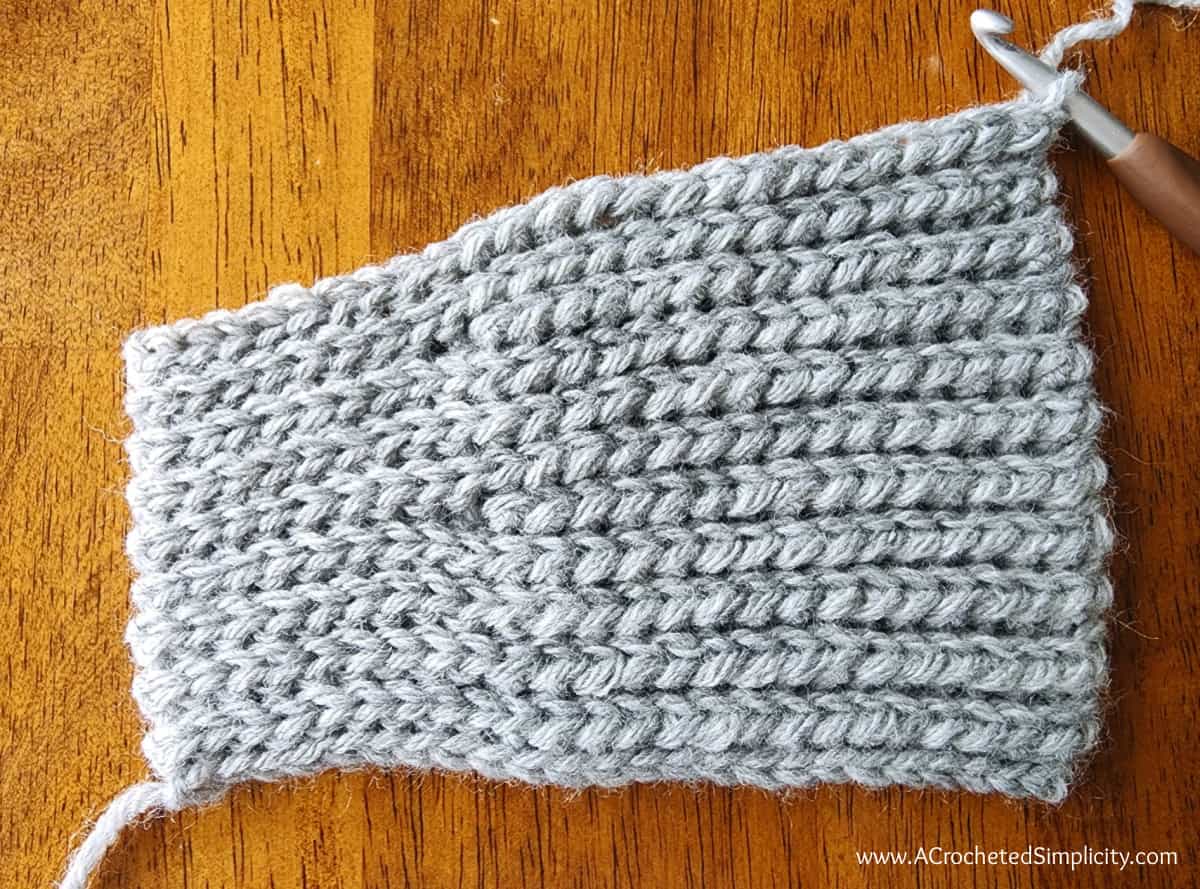
Fasten off. Swatch should measure: 6.5″ W x 3.25″ H (measuring row height along the right hand side edge of the swatch, not the edge with the short rows).
How to Seamlessly Transition Between Short Rows & Regular Rows
The following photos show how I seamlessly transition between short rows and regular rows.
Crochet Mens Shawl Collared Cardigan Written Pattern
Begin your cardigan with the Front Right Panel Beginning Rows for the size you’re making.
X-Small: Front Right Panel Beginning Rows
Note: ALL stitches, beginning with Row 2, are worked into the back loops only, unless otherwise specified.
Set-Up: With yarn and a 6.00mm crochet hook, ch 67.
Row 1 (RS): Switch to a 5.50mm crochet hook, working in the back humps of the foundation ch, sl st in the 2nd ch from your hook and in each ch across. Turn. (66 sts) Length of Row 1 = 18″.
Row 2: Ch 1, BLO, sl st in each of the first 9 sts, hdslst in each remaining st across. Turn. (66 sts)
Row 3: Switch to a 6.00mm crochet hook, ch 8, switch back to a 5.50mm crochet hook, sl st in the 2nd ch from your hook, sl st in each of the next 6 chs, BLO sl st in each remaining st across. Turn. (73 sts)
Row 4: Ch 1, BLO, sl st in each of the first 9 sts, hdslst in each remaining st across. Turn. (73 sts)
Row 5: Switch to a 6.00mm crochet hook, ch 8, switch back to a 5.50mm crochet hook, sl st in the 2nd ch from your hook, sl st in each of the next 6 chs, BLO sl st in each remaining st across to the last 9 sts, skip the last 9 sts. Turn. (71 sts)
Row 6: Ch 1, BLO, hdslst in each st across. Turn. (71 sts)
Row 7: Switch to a 6.00mm crochet hook, ch 8, switch back to a 5.50mm crochet hook, sl st in the 2nd ch from your hook, sl st in each of the next 6 chs, BLO sl st in each st across the previous row, and in each skipped st from 2 rows prior. Turn. (87 sts)
Row 8: Ch 1, BLO, sl st in each of the first 9 sts, hdslst in each remaining st across. Turn. (87 sts)
Row 9: Switch to a 6.00mm crochet hook, ch 10, switch back to a 5.50mm crochet hook, sl st in the 2nd ch from your hook, sl st in each of the next 8 chs, BLO sl st in each remaining st across. Turn. (96 sts)
Row 10: Ch 1, BLO, sl st in each of the first 9 sts, hdslst in each remaining st across. Turn. (96 sts)
Do not fasten off. Continue on to Right Shoulder. Front Right Beginning Rows should measure 26″ W x 1.75″ H.
Small: Front Right Panel Beginning Rows
Note: ALL stitches, beginning with Row 2, are worked into the back loops only, unless otherwise specified.
Set-Up: With yarn and a 6.00mm crochet hook, ch 69.
Row 1 (RS): Switch to a 5.50mm crochet hook, working in the back humps of the foundation ch, sl st in the 2nd ch from your hook and in each ch across. Turn. (68 sts) Length of Row 1 = 18.5″.
Row 2: Ch 1, BLO, sl st in each of the first 9 sts, hdslst in each remaining st across. Turn. (68 sts)
Row 3: Switch to a 6.00mm crochet hook, ch 6, switch back to a 5.50mm crochet hook, sl st in the 2nd ch from your hook, sl st in each of the next 4 chs, BLO sl st in each remaining st across. Turn. (73 sts)
Row 4: Ch 1, BLO, sl st in each of the first 9 sts, hdslst in each remaining st across. Turn. (73 sts)
Row 5: Switch to a 6.00mm crochet hook, ch 6, switch back to a 5.50mm crochet hook, sl st in the 2nd ch from your hook, sl st in each of the next 4 chs, BLO sl st in each remaining st across to the last 9 sts, skip the last 9 sts. Turn. (69 sts)
Row 6: Ch 1, BLO, hdslst in each st across. Turn. (69 sts)
Row 7: Switch to a 6.00mm crochet hook, ch 6, switch back to a 5.50mm crochet hook, sl st in the 2nd ch from your hook, sl st in each of the next 4 chs, BLO sl st in each st across the previous row, and in each skipped st from 2 rows prior. Turn. (83 sts)
Row 8: Ch 1, BLO, sl st in each of the first 9 sts, hdslst in each remaining st across. Turn. (83 sts)
Row 9: Switch to a 6.00mm crochet hook, ch 6, switch back to a 5.50mm crochet hook, sl st in the 2nd ch from your hook, sl st in each of the next 4 chs, BLO sl st in each remaining st across. Turn. (88 sts)
Row 10: Ch 1, BLO, sl st in each of the first 9 sts, hdslst in each remaining st across. Turn. (88 sts)
Row 11: Switch to a 6.00mm crochet hook, ch 6, switch back to a 5.50mm crochet hook, sl st in the 2nd ch from your hook, sl st in each of the next 4 chs, BLO sl st in each remaining st across to the last 9 sts, skip the last 9 sts. Turn. (84 sts)
Row 12: Ch 1, BLO, hdslst in each st across. Turn. (84 sts)
Row 13: Switch to a 6.00mm crochet hook, ch 8, switch back to a 5.50mm crochet hook, sl st in the 2nd ch from your hook, sl st in each of the next 6 chs, BLO sl st in each st across the previous row, and in each skipped st from 2 rows prior. Turn. (100 sts)
Row 14: Ch 1, BLO, sl st in each of the first 9 sts, hdslst in each remaining st across. Turn. (100 sts)
Do not fasten off. Continue on to Right Shoulder. Front Right Beginning Rows should measure 27″ W x 2.5″ H.
Medium: Front Right Panel Beginning Rows
Note: ALL stitches, beginning with Row 2, are worked into the back loops only, unless otherwise specified.
Set-Up: With yarn and a 6.00mm crochet hook, ch 69.
Row 1 (RS): Switch to a 5.50mm crochet hook, working in the back humps of the foundation ch, sl st in the 2nd ch from your hook and in each ch across. Turn. (68 sts) Length of Row 1 = 18.5″.
Row 2: Ch 1, BLO, sl st in each of the first 9 sts, hdslst in each remaining st across. Turn. (68 sts)
Row 3: Switch to a 6.00mm crochet hook, ch 7, switch back to a 5.50mm crochet hook, sl st in the 2nd ch from your hook, sl st in each of the next 5 chs, BLO sl st in each remaining st across. Turn. (74 sts)
Row 4: Ch 1, BLO, sl st in each of the first 9 sts, hdslst in each remaining st across. Turn. (74 sts)
Row 5: Switch to a 6.00mm crochet hook, ch 7, switch back to a 5.50mm crochet hook, sl st in the 2nd ch from your hook, sl st in each of the next 5 chs, BLO sl st in each remaining st across to the last 9 sts, skip the last 9 sts. Turn. (71 sts)
Row 6: Ch 1, BLO, hdslst in each st across. Turn. (71 sts)
Row 7: Switch to a 6.00mm crochet hook, ch 7, switch back to a 5.50mm crochet hook, sl st in the 2nd ch from your hook, sl st in each of the next 5 chs, BLO sl st in each st across the previous row, and in each skipped st from 2 rows prior. Turn. (86 sts)
Row 8: Ch 1, BLO, sl st in each of the first 9 sts, hdslst in each remaining st across. Turn. (86 sts)
Row 9: Switch to a 6.00mm crochet hook, ch 7, switch back to a 5.50mm crochet hook, sl st in the 2nd ch from your hook, sl st in each of the next 5 chs, BLO sl st in each remaining st across. Turn. (92 sts)
Row 10: Ch 1, BLO, sl st in each of the first 9 sts, hdslst in each remaining st across. Turn. (92 sts)
Row 11: Switch to a 6.00mm crochet hook, ch 7, switch back to a 5.50mm crochet hook, sl st in the 2nd ch from your hook, sl st in each of the next 5 chs, BLO sl st in each remaining st across to the last 9 sts, skip the last 9 sts. Turn. (89 sts)
Row 12: Ch 1, BLO, hdslst in each st across. Turn. (89 sts)
Row 13: Switch to a 6.00mm crochet hook, ch 5, switch back to a 5.50mm crochet hook, sl st in the 2nd ch from your hook, sl st in each of the next 3 chs, BLO sl st in each st across the previous row, and in each skipped st from 2 rows prior. Turn. (102 sts)
Row 14: Ch 1, BLO, sl st in each of the first 9 sts, hdslst in each remaining st across. Turn. (102 sts)
Do not fasten off. Continue on to Right Shoulder. Front Right Beginning Rows should measure 27.5″ W x 2.5″ H.
Large: Front Right Panel Beginning Rows
Note: ALL stitches, beginning with Row 2, are worked into the back loops only, unless otherwise specified.
Set-Up: With yarn and a 6.00mm crochet hook, ch 71.
Row 1 (RS): Switch to a 5.50mm crochet hook, working in the back humps of the foundation ch, sl st in the 2nd ch from your hook and in each ch across. Turn. (70 sts) Length of Row 1 = 19″.
Row 2: Ch 1, BLO, sl st in each of the first 9 sts, hdslst in each remaining st across. Turn. (70 sts)
Row 3: Switch to a 6.00mm crochet hook, ch 7, switch back to a 5.50mm crochet hook, sl st in the 2nd ch from your hook, sl st in each of the next 5 chs, BLO sl st in each remaining st across. Turn. (76 sts)
Row 4: Ch 1, BLO, sl st in each of the first 9 sts, hdslst in each remaining st across. Turn. (76 sts)
Row 5: Switch to a 6.00mm crochet hook, ch 7, switch back to a 5.50mm crochet hook, sl st in the 2nd ch from your hook, sl st in each of the next 5 chs, BLO sl st in each remaining st across to the last 9 sts, skip the last 9 sts. Turn. (73 sts)
Row 6: Ch 1, BLO, hdslst in each st across. Turn. (73 sts)
Row 7: Switch to a 6.00mm crochet hook, ch 7, switch back to a 5.50mm crochet hook, sl st in the 2nd ch from your hook, sl st in each of the next 5 chs, BLO sl st in each st across the previous row, and in each skipped st from 2 rows prior. Turn. (88 sts)
Row 8: Ch 1, BLO, sl st in each of the first 9 sts, hdslst in each remaining st across. Turn. (88 sts)
Row 9: Switch to a 6.00mm crochet hook, ch 7, switch back to a 5.50mm crochet hook, sl st in the 2nd ch from your hook, sl st in each of the next 5 chs, BLO sl st in each remaining st across. Turn. (94 sts)
Row 10: Ch 1, BLO, sl st in each of the first 9 sts, hdslst in each remaining st across. Turn. (94 sts)
Row 11: Switch to a 6.00mm crochet hook, ch 7, switch back to a 5.50mm crochet hook, sl st in the 2nd ch from your hook, sl st in each of the next 5 chs, BLO sl st in each remaining st across to the last 9 sts, skip the last 9 sts. Turn. (91 sts)
Row 12: Ch 1, BLO, hdslst in each st across. Turn. (91 sts)
Row 13: Switch to a 6.00mm crochet hook, ch 6, switch back to a 5.50mm crochet hook, sl st in the 2nd ch from your hook, sl st in each of the next 4 chs, BLO sl st in each st across the previous row, and in each skipped st from 2 rows prior. Turn. (105 sts)
Row 14: Ch 1, BLO, sl st in each of the first 9 sts, hdslst in each remaining st across. Turn. (105 sts)
Do not fasten off. Continue on to Right Shoulder. Front Right Beginning Rows should measure 28.5″ W x 2.5″ H.
X-Large: Front Right Panel Beginning Rows
Note: ALL stitches, beginning with Row 2, are worked into the back loops only, unless otherwise specified.
Set-Up: With yarn and a 6.00mm crochet hook, ch 71.
Row 1 (RS): Switch to a 5.50mm crochet hook, working in the back humps of the foundation ch, sl st in the 2nd ch from your hook and in each ch across. Turn. (70 sts) Length of Row 1 = 19″.
Row 2: Ch 1, BLO, sl st in each of the first 9 sts, hdslst in each remaining st across. Turn. (70 sts)
Row 3: Switch to a 6.00mm crochet hook, ch 6, switch back to a 5.50mm crochet hook, sl st in the 2nd ch from your hook, sl st in each of the next 4 chs, BLO sl st in each remaining st across. Turn. (75 sts)
Row 4: Ch 1, BLO, sl st in each of the first 9 sts, hdslst in each remaining st across. Turn. (75 sts)
Row 5: Switch to a 6.00mm crochet hook, ch 6, switch back to a 5.50mm crochet hook, sl st in the 2nd ch from your hook, sl st in each of the next 4 chs, BLO sl st in each remaining st across to the last 9 sts, skip the last 9 sts. Turn. (71 sts)
Row 6: Ch 1, BLO, hdslst in each st across. Turn. (71 sts)
Row 7: Switch to a 6.00mm crochet hook, ch 6, switch back to a 5.50mm crochet hook, sl st in the 2nd ch from your hook, sl st in each of the next 4 chs, BLO sl st in each st across the previous row, and in each skipped st from 2 rows prior. Turn. (85 sts)
Row 8: Ch 1, BLO, sl st in each of the first 9 sts, hdslst in each remaining st across. Turn. (85 sts)
Row 9: Switch to a 6.00mm crochet hook, ch 6, switch back to a 5.50mm crochet hook, sl st in the 2nd ch from your hook, sl st in each of the next 4 chs, BLO sl st in each remaining st across. Turn. (90 sts)
Row 10: Ch 1, BLO, sl st in each of the first 9 sts, hdslst in each remaining st across. Turn. (90 sts)
Row 11: Switch to a 6.00mm crochet hook, ch 6, switch back to a 5.50mm crochet hook, sl st in the 2nd ch from your hook, sl st in each of the next 4 chs, BLO sl st in each remaining st across to the last 9 sts, skip the last 9 sts. Turn. (86 sts)
Row 12: Ch 1, BLO, hdslst in each st across. Turn. (86 sts)
Row 13: Switch to a 6.00mm crochet hook, ch 6, switch back to a 5.50mm crochet hook, sl st in the 2nd ch from your hook, sl st in each of the next 4 chs, BLO sl st in each st across the previous row, and in each skipped st from 2 rows prior. Turn. (100 sts)
Row 14: Ch 1, BLO, sl st in each of the first 9 sts, hdslst in each remaining st across. Turn. (100 sts)
Row 15: Switch to a 6.00mm crochet hook, ch 8, switch back to a 5.50mm crochet hook, sl st in the 2nd ch from your hook, sl st in each of the next 6 chs, BLO sl st in each remaining st across. Turn. (107 sts)
Row 16: Ch 1, BLO, sl st in each of the first 9 sts, hdslst in each remaining st across. Turn. (107 sts)
Do not fasten off. Continue on to Right Shoulder. Front Right Beginning Rows should measure 29″ W x 2.8″ H.
2X-Large: Front Right Panel Beginning Rows
Note: ALL stitches, beginning with Row 2, are worked into the back loops only, unless otherwise specified.
Set-Up: With yarn and a 6.00mm crochet hook, ch 71.
Row 1 (RS): Switch to a 5.50mm crochet hook, working in the back humps of the foundation ch, sl st in the 2nd ch from your hook and in each ch across. Turn. (70 sts) Length of Row 1 = 19″.
Row 2: Ch 1, BLO, sl st in each of the first 9 sts, hdslst in each remaining st across. Turn. (70 sts)
Row 3: Switch to a 6.00mm crochet hook, ch 6, switch back to a 5.50mm crochet hook, sl st in the 2nd ch from your hook, sl st in each of the next 4 chs, BLO sl st in each remaining st across. Turn. (75 sts)
Row 4: Ch 1, BLO, sl st in each of the first 9 sts, hdslst in each remaining st across. Turn. (75 sts)
Row 5: Switch to a 6.00mm crochet hook, ch 6, switch back to a 5.50mm crochet hook, sl st in the 2nd ch from your hook, sl st in each of the next 4 chs, BLO sl st in each remaining st across to the last 9 sts, skip the last 9 sts. Turn. (71 sts)
Row 6: Ch 1, BLO, hdslst in each st across. Turn. (71 sts)
Row 7: Switch to a 6.00mm crochet hook, ch 6, switch back to a 5.50mm crochet hook, sl st in the 2nd ch from your hook, sl st in each of the next 4 chs, BLO sl st in each st across the previous row, and in each skipped st from 2 rows prior. Turn. (85 sts)
Row 8: Ch 1, BLO, sl st in each of the first 9 sts, hdslst in each remaining st across. Turn. (85 sts)
Row 9: Switch to a 6.00mm crochet hook, ch 6, switch back to a 5.50mm crochet hook, sl st in the 2nd ch from your hook, sl st in each of the next 4 chs, BLO sl st in each remaining st across. Turn. (90 sts)
Row 10: Ch 1, BLO, sl st in each of the first 9 sts, hdslst in each remaining st across. Turn. (90 sts)
Row 11: Switch to a 6.00mm crochet hook, ch 6, switch back to a 5.50mm crochet hook, sl st in the 2nd ch from your hook, sl st in each of the next 4 chs, BLO sl st in each remaining st across to the last 9 sts, skip the last 9 sts. Turn. (86 sts)
Row 12: Ch 1, BLO, hdslst in each st across. Turn. (86 sts)
Row 13: Switch to a 6.00mm crochet hook, ch 6, switch back to a 5.50mm crochet hook, sl st in the 2nd ch from your hook, sl st in each of the next 4 chs, BLO sl st in each st across the previous row, and in each skipped st from 2 rows prior. Turn. (100 sts)
Row 14: Ch 1, BLO, sl st in each of the first 9 sts, hdslst in each remaining st across. Turn. (100 sts)
Row 15: Switch to a 6.00mm crochet hook, ch 9, switch back to a 5.50mm crochet hook, sl st in the 2nd ch from your hook, sl st in each of the next 7 chs, BLO sl st in each remaining st across. Turn. (108 sts)
Row 16: Ch 1, BLO, sl st in each of the first 9 sts, hdslst in each remaining st across. Turn. (108 sts)
Do not fasten off. Continue on to Right Shoulder. Front Right Beginning Rows should measure 29.25″ W x 2.8″ H.
3X-Large: Front Right Panel Beginning Rows
Note: ALL stitches, beginning with Row 2, are worked into the back loops only, unless otherwise specified.
Set-Up: With yarn and a 6.00mm crochet hook, ch 71.
Row 1 (RS): Switch to a 5.50mm crochet hook, working in the back humps of the foundation ch, sl st in the 2nd ch from your hook and in each ch across. Turn. (70 sts) Length of Row 1 = 19″.
Row 2: Ch 1, BLO, sl st in each of the first 9 sts, hdslst in each remaining st across. Turn. (70 sts)
Row 3: Switch to a 6.00mm crochet hook, ch 5, switch back to a 5.50mm crochet hook, sl st in the 2nd ch from your hook, sl st in each of the next 3 chs, BLO sl st in each remaining st across. Turn. (74 sts)
Row 4: Ch 1, BLO, sl st in each of the first 9 sts, hdslst in each remaining st across. Turn. (74 sts)
Row 5: Switch to a 6.00mm crochet hook, ch 5, switch back to a 5.50mm crochet hook, sl st in the 2nd ch from your hook, sl st in each of the next 3 chs, BLO sl st in each remaining st across to the last 9 sts, skip the last 9 sts. Turn. (69 sts)
Row 6: Ch 1, BLO, hdslst in each st across. Turn. (69 sts)
Row 7: Switch to a 6.00mm crochet hook, ch 5, switch back to a 5.50mm crochet hook, sl st in the 2nd ch from your hook, sl st in each of the next 3 chs, BLO sl st in each st across the previous row, and in each skipped st from 2 rows prior. Turn. (82 sts)
Row 8: Ch 1, BLO, sl st in each of the first 9 sts, hdslst in each remaining st across. Turn. (82 sts)
Row 9: Switch to a 6.00mm crochet hook, ch 5, switch back to a 5.50mm crochet hook, sl st in the 2nd ch from your hook, sl st in each of the next 3 chs, BLO sl st in each remaining st across. Turn. (86 sts)
Row 10: Ch 1, BLO, sl st in each of the first 9 sts, hdslst in each remaining st across. Turn. (86 sts)
Row 11: Switch to a 6.00mm crochet hook, ch 5, switch back to a 5.50mm crochet hook, sl st in the 2nd ch from your hook, sl st in each of the next 3 chs, BLO sl st in each remaining st across to the last 9 sts, skip the last 9 sts. Turn. (81 sts)
Row 12: Ch 1, BLO, hdslst in each st across. Turn. (81 sts)
Row 13: Switch to a 6.00mm crochet hook, ch 5, switch back to a 5.50mm crochet hook, sl st in the 2nd ch from your hook, sl st in each of the next 3 chs, BLO sl st in each st across the previous row, and in each skipped st from 2 rows prior. Turn. (94 sts)
Row 14: Ch 1, BLO, sl st in each of the first 9 sts, hdslst in each remaining st across. Turn. (94 sts)
Row 15: Switch to a 6.00mm crochet hook, ch 5, switch back to a 5.50mm crochet hook, sl st in the 2nd ch from your hook, sl st in each of the next 3 chs, BLO sl st in each remaining st across. Turn. (98 sts)
Row 16: Ch 1, BLO, sl st in each of the first 9 sts, hdslst in each remaining st across. Turn. (98 sts)
Row 17: Switch to a 6.00mm crochet hook, ch 5, switch back to a 5.50mm crochet hook, sl st in the 2nd ch from your hook, sl st in each of the next 3 chs, BLO sl st in each remaining st across to the last 9 sts, skip the last 9 sts. Turn. (93 sts)
Row 18: Ch 1, BLO, hdslst in each st across. Turn. (93 sts)
Row 19: Switch to a 6.00mm crochet hook, ch 9, switch back to a 5.50mm crochet hook, sl st in the 2nd ch from your hook, sl st in each of the next 7 chs, BLO sl st in each st across the previous row, and in each skipped st from 2 rows prior. Turn. (110 sts)
Row 20: Ch 1, BLO, sl st in each of the first 9 sts, hdslst in each remaining st across. Turn. (110 sts)
Do not fasten off. Continue on to Right Shoulder. Front Right Beginning Rows should measure 30″ W x 3.6″ H.
Right Shoulder – All Sizes
Note: ALL stitches, beginning with Row 1, are worked into the back loops only, unless otherwise specified.
Row 1: Ch 1, BLO, sl st in each st across. Turn. (96, 100, 102, 105, 107, 108, 110 sts)
Row 2: Ch 1, BLO, sl st in each of the first 9 sts, hdslst in each remaining st. Turn. (96, 100, 102, 105, 107, 108, 110 sts)
Row 3: Ch 1, BLO, sl st in each st across to the last 9 sts, skip the last 9 sts. Turn. (87, 91, 93, 96, 98, 99, 101 sts)
Row 4: Ch 1, BLO, hdslst in each st across. Turn. (87, 91, 93, 96, 98, 99, 101 sts)
Row 5: Ch 1, BLO sl st in each st across the previous row and in each skipped st from 2 rows prior. Turn. (96, 100, 102, 105, 107, 108, 110 sts)
Row 6: Ch 1, BLO, sl st in each of the first 9 sts, hdslst in each remaining st. Turn. (96, 100, 102, 105, 107, 108, 110 sts)
Row 7: Ch 1, BLO, sl st in each st across. Turn. (96, 100, 102, 105, 107, 108, 110 sts)
X-Small: Rows 8 – 18: Rep Rows 2 – 7, ending with a Row 6.
Small: Rows 8 – 20: Rep Rows 2 – 7, ending with a Row 2.
Medium: Rows 8 – 24: Rep Rows 2 – 7, ending with a Row 6.
Large: Rows 8 – 30: Rep Rows 2 – 7, ending with a Row 6.
X-Large: Rows 8 – 32: Rep Rows 2 – 7, ending with a Row 2.
2X-Large: Rows 8 – 42: Rep Rows 2 – 7, ending with a Row 6.
3X-Large: Rows 8 – 44: Rep Rows 2 – 7, ending with a Row 2.
Do not fasten off. Continue on to Creating Pocket, if you’re adding pockets to your cardigan. If you are NOT adding pockets, then continue on to and complete the Front Right Panel Final Rows, then Rep Rows 5 & 6 one more time.
Front Right Panel Current Row Count & Measurements
Row Count: At this point, your front right panel should have 28 (34, 38, 44, 48, 58, 64) rows.
Row Height: At this point, the height of your rows should be: 5″ (6″, 6.75″, 7.75″, 8.5″, 10.4″, 11.5″).
Panel Length: Length at this point should be: 26″ (27″, 27.5″, 28.5″, 29″, 29.25″, 30″).
Creating Pocket – All Sizes
Note: ALL stitches, beginning with Row 1, are worked into the back loops only, unless otherwise specified.
Row 1: Ch 1, BLO, sl st in each of the next 55 (59, 61, 62, 64, 63, 65) sts, loosely ch 22 (22, 22, 24, 24, 26, 26) and skip each of the next 22 (22, 22, 24, 24, 26, 26) sts, BLO sl st in each of the remaining 19 sts. Turn. (96, 100, 102, 105, 107, 108, 110 sts)
Row 2: Ch 1, BLO, sl st in each of the first 9 sts, hdslst in each remaining st and ch across. Turn. (96, 100, 102, 105, 107, 108, 110 sts)
Do not fasten off. Continue on to Front Right Panel Final Rows. Pocket Opening should be 6″ (6″, 6″, 6.5″, 6.5″, 7″, 7″) W.
Front Right Panel Final Rows – All Sizes
Note: If you are NOT adding pockets to your cardigan, repeat Rows 5 & 6 one more time.
Row 1: Ch 1, BLO, sl st in each st across to the last 9 sts, skip the last 9 sts. Turn. (87, 91, 93, 96, 98, 99, 101 sts)
Row 2: Ch 1, BLO, hdslst in each st across. Turn. (87, 91, 93, 96, 98, 99, 101 sts)
Row 3: Ch 1, BLO sl st in each st across the previous row and in each skipped st from 2 rows prior. Turn. (96, 100, 102, 105, 107, 108, 110 sts)
Row 4: Ch 1, BLO, sl st in each of the first 9 sts, hdslst in each remaining st. Turn. (96, 100, 102, 105, 107, 108, 110 sts)
Row 5: Ch 1, BLO, sl st in each st across. Turn. (96, 100, 102, 105, 107, 108, 110 sts)
Row 6: Ch 1, BLO, sl st in each of the first 9 sts, hdslst in each remaining st. Turn. (96, 100, 102, 105, 107, 108, 110 sts)
X-Small: Rows 7 – 18: Rep Rows 1 – 6, ending with a Row 6.
Row 19: Rep Row 5.
Fasten off. Weave in ends. Continue on to the Back Panel.
Small: Rows 7 – 18: Rep Rows 1 – 6, ending with a Row 6.
Row 19: Rep Row 5.
Fasten off. Weave in ends. Continue on to the Back Panel.
Medium: Rows 7 – 18: Rep Rows 1 – 6, ending with a Row 6.
Row 19: Rep Row 5.
Fasten off. Weave in ends. Continue on to the Back Panel.
Large: Rows 7 – 18: Rep Rows 1 – 6, ending with a Row 6.
Row 19: Rep Row 5.
Fasten off. Weave in ends. Continue on to the Back Panel.
X-Large: Rows 7 – 18: Rep Rows 1 – 6, ending with a Row 6.
Row 19: Rep Row 5.
Fasten off. Weave in ends. Continue on to the Back Panel.
2X-Large: Rows 7 – 17: Rep Rows 1 – 6, ending with a Row 5.
Fasten off. Weave in ends. Continue on to the Back Panel.
3X-Large: Rows 7 – 17: Rep Rows 1 – 6, ending with a Row 5.
Fasten off. Weave in ends. Continue on to the Back Panel.
Front Right Panel Final Row Count & Measurements
Row Count: At this point, your front right panel should have 49 (55, 59, 65, 69, 77, 83) rows.
Row Height: At this point, the height of your rows should be: 8.25″ (9.25″, 10″, 11″, 11.75″, 13.25″, 14.25″).
Panel Length: Length at this point should be: 26″ (27″, 27.5″, 28.5″, 29″, 29.25″, 30″).
Back Panel – All Sizes
Note: ALL stitches, beginning with Row 2, are worked into the back loops only, unless otherwise specified.
Set-Up: With yarn and a 6.00mm crochet hook, ch 97 (101, 103, 106, 108, 109, 111).
Row 1 (RS): Switch to a 5.50mm crochet hook, working in the back humps of the foundation ch, sl st in the 2nd ch from your hook and in each ch across. Turn. (96, 100, 102, 105, 107, 108, 110 sts)
Row 2: Ch 1, BLO, sl st in each of the first 9 sts, hdslst in each remaining st across. Turn. (96, 100, 102, 105, 107, 108, 110 sts)
Row 3: Ch 1, BLO, sl st in each st across to the last 9 sts, skip the last 9 sts. Turn. (87, 91, 93, 96, 98, 99, 101 sts)
Row 4: Ch 1, BLO, hdslst in each st across. Turn. (87, 91, 93, 96, 98, 99, 101 sts)
Row 5: Ch 1, BLO sl st in each st across the previous row and in each skipped st from 2 rows prior. Turn. (96, 100, 102, 105, 107, 108, 110 sts)
Row 6: Ch 1, BLO, sl st in each of the first 9 sts, hdslst in each remaining st. Turn. (96, 100, 102, 105, 107, 108, 110 sts)
Row 7: Ch 1, BLO, sl st in each st across. Turn. (96, 100, 102, 105, 107, 108, 110 sts)
X-Small: Rows 8 – 103: Rep Rows 2 – 7, ending with a Row 7.
Fasten off. Weave in ends. Continue on to the Front Left Panel.
Small: Rows 8 – 113: Rep Rows 2 – 7, ending with a Row 5.
Fasten off. Weave in ends. Continue on to the Front Left Panel.
Medium: Rows 8 – 121: Rep Rows 2 – 7, ending with a Row 7.
Fasten off. Weave in ends. Continue on to the Front Left Panel.
Large: Rows 8 – 133: Rep Rows 2 – 7, ending with a Row 7.
Fasten off. Weave in ends. Continue on to the Front Left Panel.
X-Large: Rows 8 – 143: Rep Rows 2 – 7, ending with a Row 5.
Fasten off. Weave in ends. Continue on to the Front Left Panel.
2X-Large: Rows 8 – 161: Rep Rows 2 – 7, ending with a Row 5.
Fasten off. Weave in ends. Continue on to the Front Left Panel.
3X-Large: Rows 8 – 170: Rep Rows 2 – 7, ending with a Row 2.
Row 171: Rep Row 7.
Fasten off. Weave in ends. Continue on to the Front Left Panel.
Note: If your row height measurement is off, simple add or remove rows to get it to the correct size. Just make sure to end with a complete row of BLO sl st across. Row count is not crucial for this section.
Back Panel Final Row Count & Measurements
Row Count: At this point, your back panel should have 103 (113, 121, 133, 143, 161, 171) rows.
Row Height: At this point, the height of your rows should be: 18.5″ (20″, 22″, 24″, 25.5″, 28.5″, 30.5 “).
Panel Length: Length at this point should be: 26″ (27″, 27.5″, 28.5″, 29″, 29.25″, 30″).
Front Left Panel – All Sizes
Note: ALL stitches, beginning with Row 2, are worked into the back loops only, unless otherwise specified.
Set-Up: With yarn and a 6.00mm crochet hook, ch 97 (101, 103, 106, 108, 109, 111).
Row 1 (RS): Switch to a 5.50mm crochet hook, working in the back humps of the foundation ch, sl st in the 2nd ch from your hook and in each ch across. Turn. (96, 100, 102, 105, 107, 108, 110 sts)
Row 2: Ch 1, BLO, sl st in each of the first 9 sts, hdslst in each remaining st across. Turn. (96, 100, 102, 105, 107, 108, 110 sts)
Row 3: Ch 1, BLO, sl st in each st across to the last 9 sts, skip the last 9 sts. Turn. (87, 91, 93, 96, 98, 99, 101 sts)
Row 4: Ch 1, BLO, hdslst in each st across. Turn. (87, 91, 93, 96, 98, 99, 101 sts)
Row 5: Ch 1, BLO sl st in each st across the previous row and in each skipped st from 2 rows prior. Turn. (96, 100, 102, 105, 107, 108, 110 sts)
Row 6: Ch 1, BLO, sl st in each of the first 9 sts, hdslst in each remaining st across. Turn. (96, 100, 102, 105, 107, 108, 110 sts)
Row 7: Ch 1, BLO, sl st in each st across. Turn. (96, 100, 102, 105, 107, 108, 110 sts)
X-Small: Rows 8 – 20: Rep Rows 2 – 7, ending with a Row 2.
Small: Rows 8 – 20: Rep Rows 2 – 7, ending with a Row 2.
Medium: Rows 8 – 20: Rep Rows 2 – 7, ending with a Row 2.
Large: Rows 8 – 20: Rep Rows 2 – 7, ending with a Row 2.
X-Large: Rows 8 – 20: Rep Rows 2 – 7, ending with a Row 2.
2X-Large: Rows 8 – 18: Rep Rows 2 – 7, ending with a Row 6.
3X-Large: Rows 8 – 18: Rep Rows 2 – 7, ending with a Row 6.
Do not fasten off. Continue on to Creating Pocket, if you’re adding pockets to your cardigan. If you are NOT adding pockets, then continue on to and complete the Front Left Panel Middle Rows, then Rep Rows 4 & 5 one more time.
Front Left Panel Current Row Count & Measurements
Row Count: At this point, your front right panel should have 20 (20, 20, 20, 20, 18, 18) rows.
Row Height: At this point, the height of your rows should be: 3.5″ (3.5″, 3.5″, 3.5″, 3.5″, 3.25″, 3.25″).
Panel Length: Length at this point should be: 26″ (27″, 27.5″, 28.5″, 29″, 29.25″, 30″).
Creating Pocket – All Sizes
Note: ALL stitches, beginning with Row 1, are worked into the back loops only, unless otherwise specified.
Row 1: Ch 1, BLO, sl st in each of the next 55 (59, 61, 62, 64, 63, 6ths 5) sts, loosely ch 22 (22, 22, 24, 24, 26, 26) and skip each of the next 22 (22, 22, 24, 24, 26, 26) sts, BLO sl st in each of the remaining 19 sts. Turn. (96, 100, 102, 105, 107, 108, 110 sts)
Row 2: Ch 1, BLO, sl st in each of the first 9 sts, hdslst in each remaining st and ch across. Turn. (96, 100, 102, 105, 107, 108, 110 sts)
Do not fasten off. Continue on to Front Left Panel Middle Rows. Pocket Opening should be 6″ (6″, 6″, 6.5″, 6.5″, 7″, 7″) W.
Front Left Panel Middle Rows – All Sizes
Note: If you are NOT adding pockets to your cardigan, repeat Rows 4 & 5 one more time.
Row 1: Ch 1, BLO, sl st in each st across to the last 9 sts, skip the last 9 sts. Turn. (87, 91, 93, 96, 98, 99, 101 sts)
Row 2: Ch 1, BLO, hdslst in each st across. Turn. (87, 91, 93, 96, 98, 99, 101 sts)
Row 3: Ch 1, BLO sl st in each st across the previous row and in each skipped st from 2 rows prior. Turn. (96, 100, 102, 105, 107, 108, 110 sts)
Row 4: Ch 1, BLO, sl st in each of the first 9 sts, hdslst in each remaining st. Turn. (96, 100, 102, 105, 107, 108, 110 sts)
Row 5: Ch 1, BLO, sl st in each st across. Turn. (96, 100, 102, 105, 107, 108, 110 sts)
Row 6: Ch 1, BLO, sl st in each of the first 9 sts, hdslst in each remaining st. Turn. (96, 100, 102, 105, 107, 108, 110 sts)
X-Small: Rows 7 – 18: Rep Rows 1 – 6, ending with a Row 6.
Row 19: Rep Row 5.
Do not fasten off. Weave in ends. Continue on to Front Left Panel Final Rows.
Small: Rows 7 – 21: Rep Rows 1 – 6, ending with a Row 3.
Do not fasten off. Weave in ends. Continue on to Front Left Panel Final Rows.
Medium: Rows 7 – 24: Rep Rows 1 – 6, ending with a Row 6.
Row 25: Rep Row 5.
Do not fasten off. Weave in ends. Continue on to Front Left Panel Final Rows.
Large: Rows 7 – 30: Rep Rows 1 – 6, ending with a Row 6.
Row 31: Rep Row 5.
Do not fasten off. Weave in ends. Continue on to Front Left Panel Final Rows.
X-Large: Rows 7 – 33: Rep Rows 1 – 6, ending with a Row 3.
Do not fasten off. Weave in ends. Continue on to Front Left Panel Final Rows.
2X-Large: Rows 7 – 42: Rep Rows 1 – 6, ending with a Row 6.
Row 43: Rep Row 5.
Do not fasten off. Weave in ends. Continue on to Front Left Panel Final Rows.
3X-Large: Rows 7 – 45: Rep Rows 1 – 6, ending with a Row 3.
Do not fasten off. Weave in ends. Continue on to Front Left Panel Final Rows.
Front Left Panel Current Row Count & Measurements
Row Count: At this point, your front right panel should have 41 (43, 47, 53, 55, 63, 65) rows.
Row Height: At this point, the height of your rows should be: 7.35″ (7.75″, 8.5″, 9.5″, 9.85″, 11.25″, 11.65″).
Panel Length: Length at this point should be: 26″ (27″, 27.5″, 28.5″, 29″, 29.25″, 30″).
Front Left Panel Final Rows – All Sizes
Note: ALL stitches, beginning with Row 1, are worked into the back loops only, unless otherwise specified.
Row 1: Ch 1, BLO, sl st in each of the first 9 sts, hdslst in each st across to the last 9 (7, 4, 5, 7, 8, 8) sts, skip each of the last 9 (7, 4, 5, 7, 8, 8) sts. Turn. (87, 93, 98, 100, 100, 100, 102 sts)
Row 2: Ch 1, BLO, sl st in each st across. Turn. (87, 93, 98, 100, 100, 100, 102 sts)
Row 3: Ch 1, BLO, sl st in each of the first 9 sts, hdslst in each st across to the last 7 (5, 6, 6, 5, 5, 4) sts, skip each of the last 7 (5, 6, 6, 5, 5, 4) sts. Turn. (80, 88, 92, 94, 95, 95, 98 sts)
Row 4: Ch 1, BLO, sl st in each st across. Turn. (80, 88, 92, 94, 95, 95, 98 sts)
Row 5: Ch 1, BLO, sl st in each of the first 9 sts, hdslst in each st across to the last 7 (5, 6, 6, 5, 5, 4) sts, skip each of the last 7 (5, 6, 6, 5, 5, 4) sts. Turn. (73, 83, 86, 88, 90, 90, 94 sts)
Row 6: Ch 1, BLO, sl st in each st across to the last 9 sts, skip each of the last 9 sts. Turn. (64, 74, 77, 79, 81, 81, 85 sts)
Row 7: Ch 1, BLO, hdslst in each st across to the last 7 (5, 6, 6, 5, 5, 4) sts, skip each of the last 7 (5, 6, 6, 5, 5, 4) sts. Turn. (57, 69, 71, 73, 76, 76, 81 sts)
Row 8: Ch 1, BLO sl st in each st across the previous row and in each skipped st from 2 rows prior. Turn. (66, 78, 80, 82, 85, 85, 90 sts)
X-Small: Fasten off. Weave in ends. Continue on to Seaming Panels.
Row 9: Ch 1, BLO, sl st in each of the first 9 sts, hdslst in each st across to the last X (5, 6, 6, 5, 5, 4) sts, skip each of the last X (5, 6, 6, 5, 5, 4) sts. Turn. (XX, 73, 74, 76, 80, 80, 86 sts)
Row 10: Ch 1, BLO, sl st in each st across to the last 9 sts, skip each of the last 9 sts. Turn. (XX, 64, 65, 67, 71, 71, 77 sts)
Row 11: Ch 1, BLO, hdslst in each st across to the last X (5, 6, 6, 5, 5, 4) sts, skip each of the last X (5, 6, 6, 5, 5, 4) sts. Turn. (XX, 59, 59, 61, 66, 66, 73 sts)
Row 12: Ch 1, BLO, sl st in each st across the previous row and in each skipped st from 2 rows prior. Turn. (XX, 68, 68, 70, 75, 75, 82 sts)
Small: Fasten off. Weave in ends. Continue on to Seaming Panels.
Medium: Fasten off. Weave in ends. Continue on to Seaming Panels.
Large: Fasten off. Weave in ends. Continue on to Seaming Panels.
Row 13: Ch 1, BLO, sl st in each of the first 9 sts, hdslst in each st across to the last X (X, X, X, 5, 5, 4) sts, skip each of the last X (X, X, X, 5, 5, 4) sts. Turn. (XX, XX, XX, XX, 70, 70, 78 sts)
Row 14: Ch 1, BLO, sl st in each st across. Turn. (XX, XX, XX, XX, 70, 70, 78 sts)
X-Large: Fasten off. Weave in ends. Continue on to Seaming Panels.
2X-Large: Fasten off. Weave in ends. Continue on to Seaming Panels.
Row 15: Ch 1, BLO, sl st in each of the first 9 sts, hdslst in each st across to the last X (X, X, X, X, X, 4) sts, skip each of the last X (X, X, X, X, X, 4) sts. Turn. (XX, XX, XX, XX, XX, XX, 74 sts)
Row 16: Ch 1, BLO, sl st in each st across. Turn. (XX, XX, XX, XX, 70, 70, 74 sts)
Row 17: Ch 1, BLO, sl st in each of the first 9 sts, hdslst in each st across to the last X (X, X, X, X, X, 4) sts, skip each of the last X (X, X, X, X, X, 4) sts. Turn. (XX, XX, XX, XX, XX, XX, 70 sts)
Row 18: Ch 1, BLO, sl st in each st across. Turn. (XX, XX, XX, XX, 70, 70, 70 sts)
3X-Large: Fasten off. Weave in ends. Continue on to Seaming Panels.
Front Left Panel Final Row Count & Measurements
Row Count: At this point, your front right panel should have 49 (55, 59, 65, 69, 77, 83 ) rows.
Row Height: At this point, the height of your rows should be: 8.25″ (9.25″, 10″, 11″, 11.75″, 13.25″, 14.25″).
Panel Length: Length at this point should be: 26″ (27″, 27.5″, 28.5″, 29″, 29.25″, 30″).
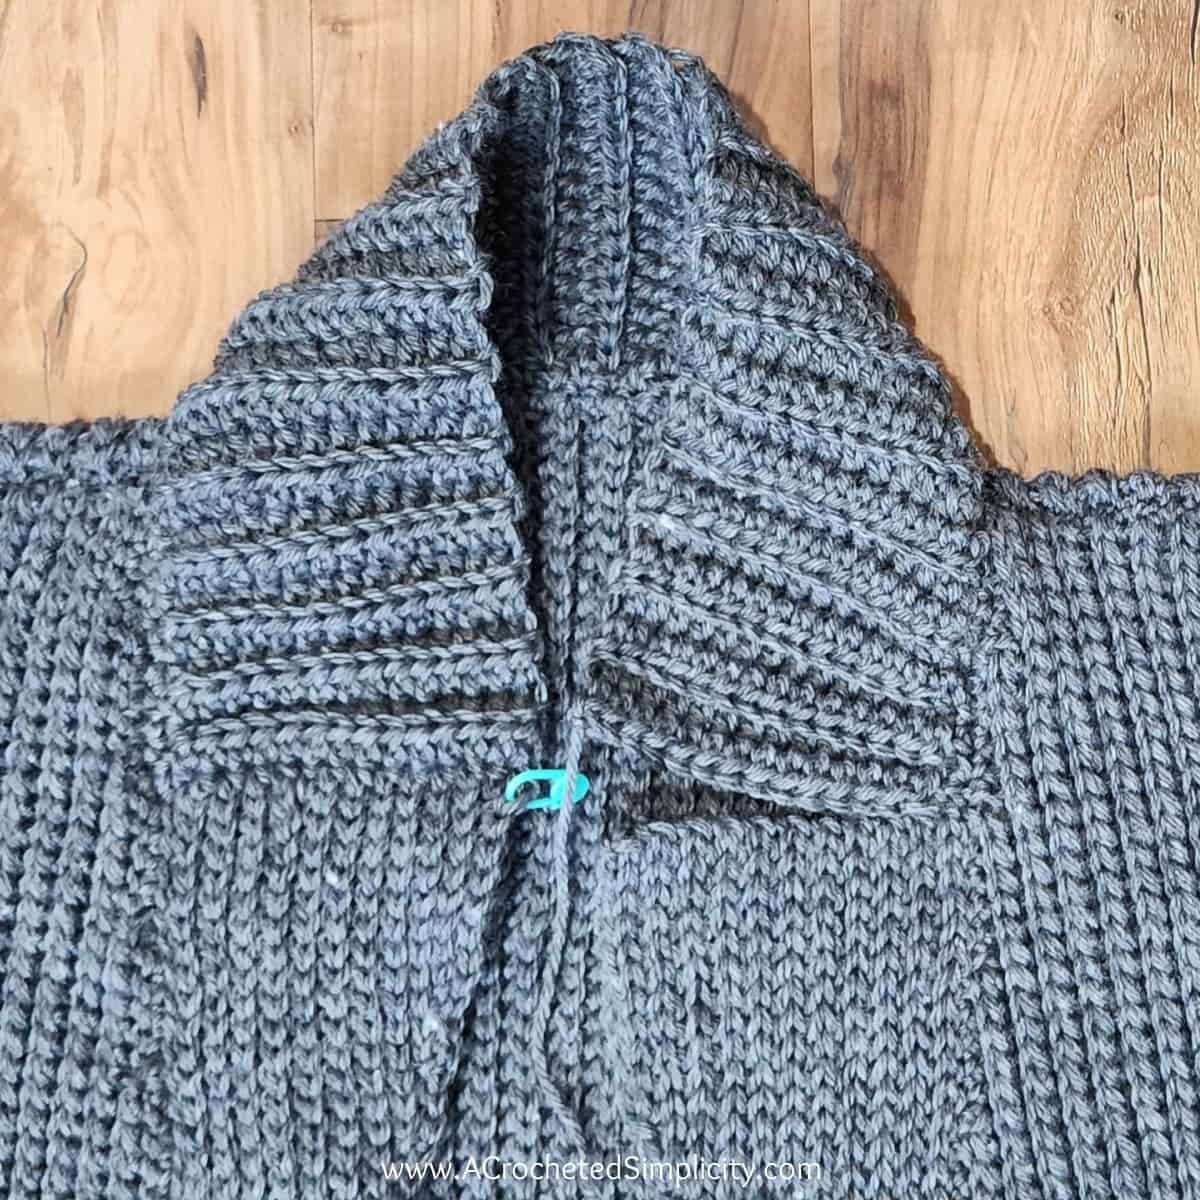
Seaming Panels
- Seam Shoulders: With the wrong side of all panels facing out, line up the upper corners of the Back Panel with the upper corners from the Front Right & Left Panels.
- Line up the rows of the Right & Left Shoulders sections with the rows along the back panel. Use locking stitch markers to hold the panels together while you seam the shoulders.
- With a yarn needle and a piece of yarn 4 times the length of the seam to be sewn, whipstitch each row of the shoulder to a corresponding row on the back panel.
- Repeat for the second shoulder.
- Weave in ends. Continue on to Side Seams.
- Side Seams: With the wrong side of the panels still facing out, line up the sides of the Front Right & Left Panels with the sides of the Back Panel.
- From the shoulder seam, count 31 (32, 34, 36, 38, 38, 42 ) sts down along the edges of the front and back panels and place a locking stitch marker through both layers to mark where to begin the side seam.
- With a yarn needle and a piece of yarn 4 times the length of the seam to be sewn, whipstitch the sides of the panels together beginning where you placed a stitch marker and working towards the hem of the cardigan.
- Repeat for the second side seam.
- Weave in ends. Turn cardigan right side out and continue on to Prepare Front Edging.
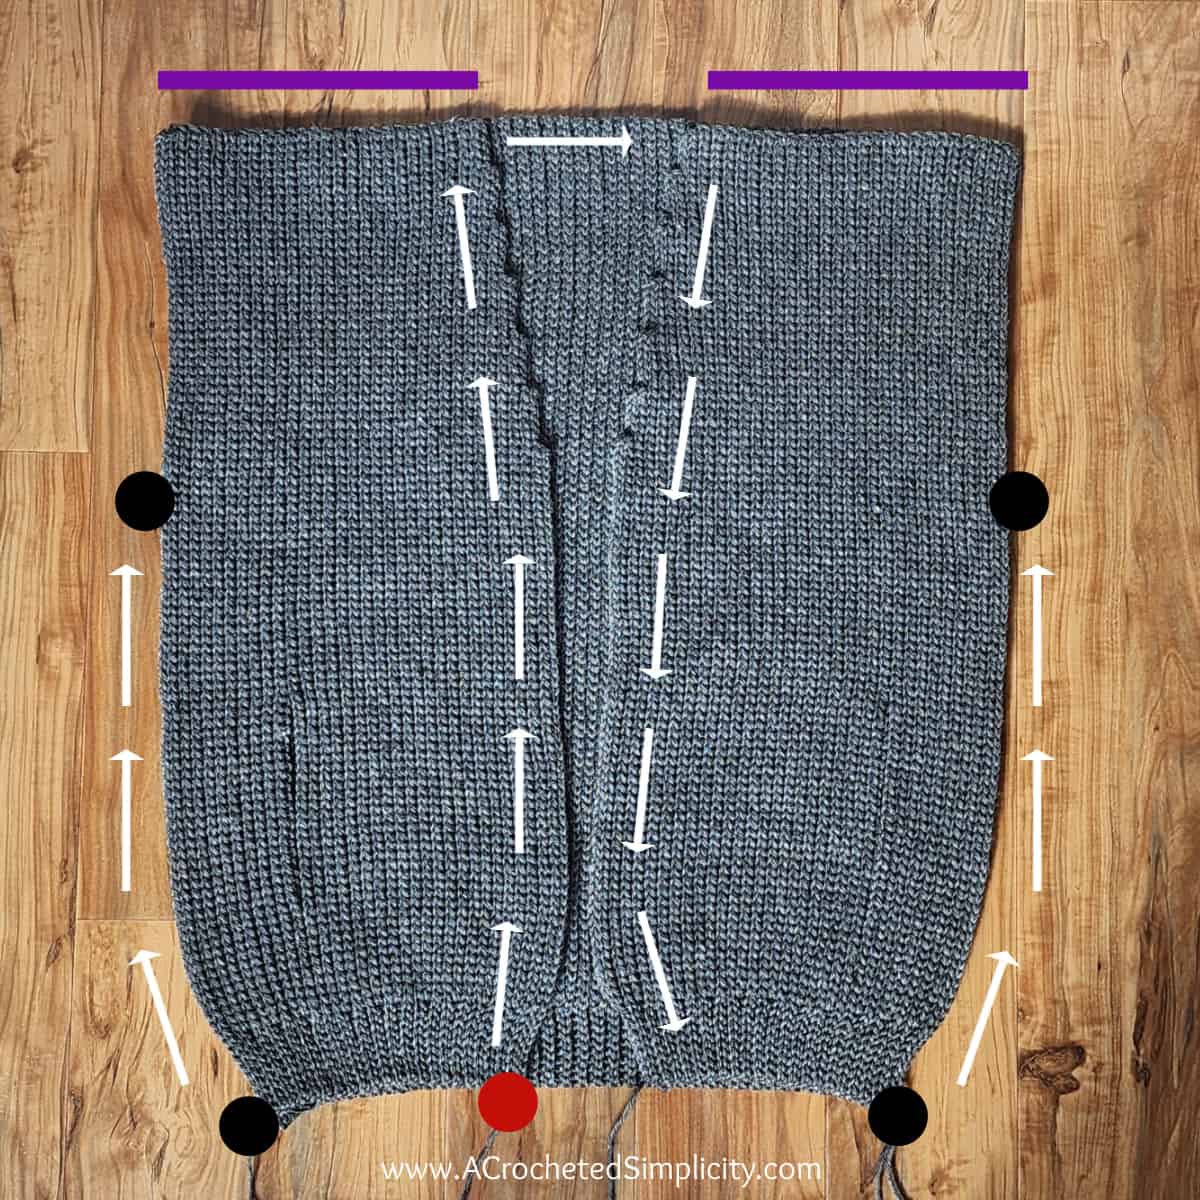
- Purple Lines: Show shoulder seams.
- Black Dots on left & right sides: Show where you will work the side seams.
- Red Dot: Marks where you will join yarn to work “Prepare Front Edging”.
- White Arrows in the center: Show the direction you will work the section “Prepare Front Edging”.
Prepare Front Edging
Row 1 (RS): With the RS facing you, and a 5.50mm crochet hook, join yarn with a standing sc in the bottom left corner of the front opening (this is the front right panel), sc in each st up the front right panel edge, across the neck opening along the back panel, and down the front left panel edge. Turn. Stitch count is not crucial.
Do not fasten off. Continue on to Place Stitch Markers.
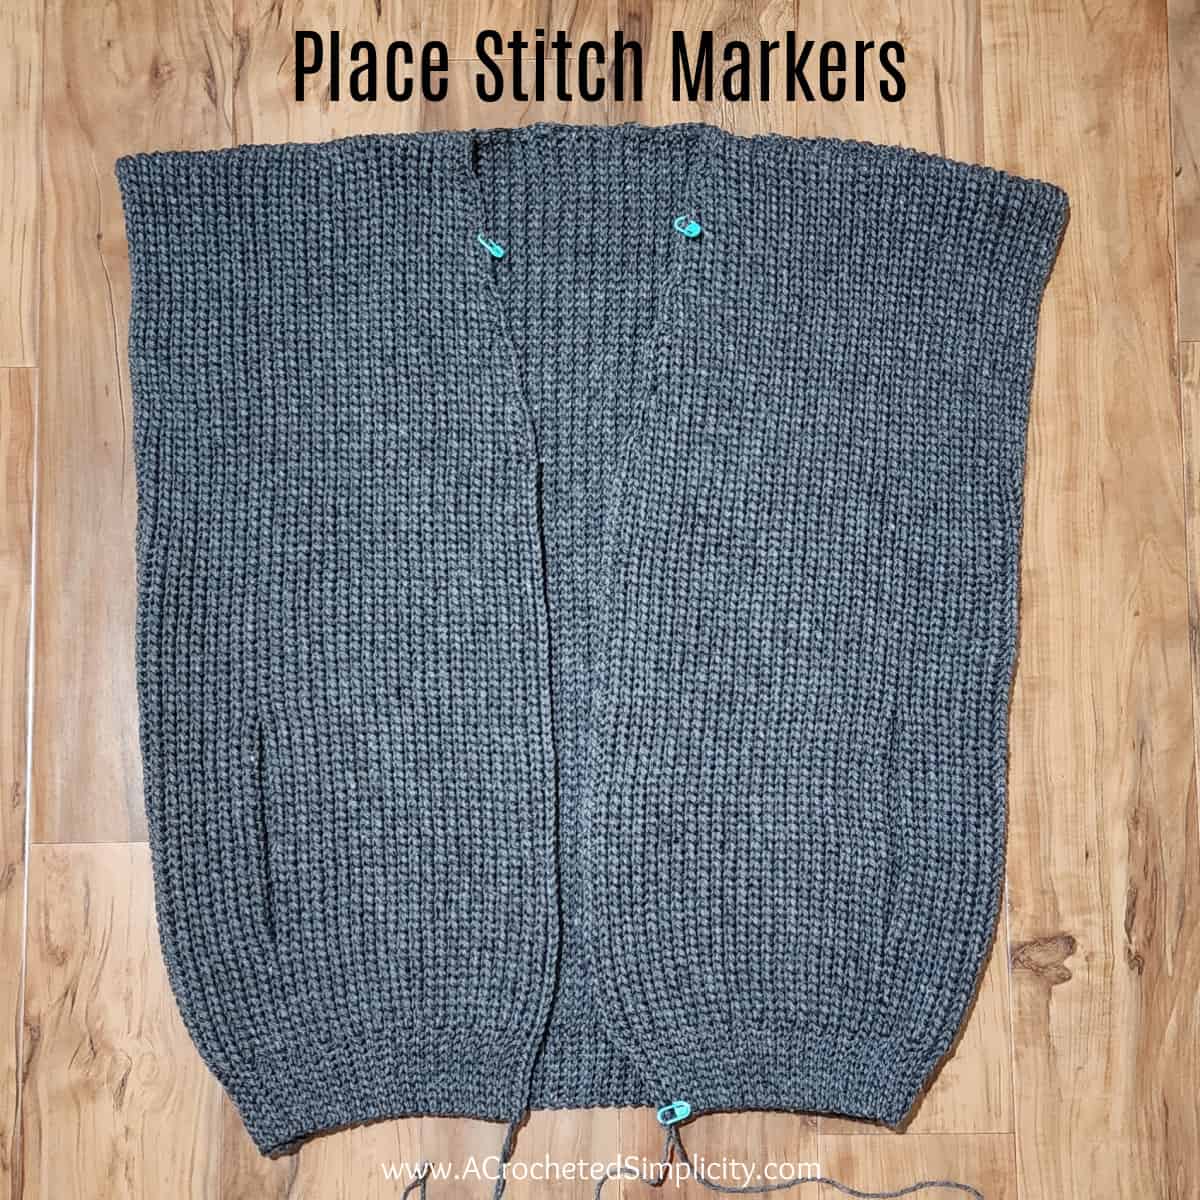
Place Stitch Markers
Before continuing on, measure down 3″ (3″, 3″, 3″, 3.5″, 3.5″, 3.5″ ) from the neck opening on the front right panel and place a locking stitch marker. Count how many stitches this is, then count down the same number of stitches along the front left panel and place a locking stitch marker. These stitch markers are to mark the transition in the collar between the horizontal and vertical rows.
Continue on to Front Left Buttonhole Edge.
Front Left Buttonhole Edge
Row 1 (WS): Ch 1, BLO sl st in each st across to the st marked with a SM (but do not sl st in the stitch marked with the SM). Turn. Stitch count isn’t crucial.
Rows 2 – 4: Ch 1, BLO sl st in each st across. Turn. Stitch count does not change.
Place Stitch Markers to Mark Buttonholes: Before continuing to Row 5, lay your cardigan out flat in front of you. Layout your buttons on top of Rows 1 – 4, equally spacing them. You can use as many or as few as you’d like. I decided to use four 1-1/8″ buttons. Place a SM in each st from Row 4 nearest the center of each button. This marks the center of each buttonhole. You should have marked as many stitches as you have buttons.
Note: If you use larger or smaller buttons than I used, you may have to adjust the size of your buttonholes in Row 5. I used a ch-3/skip 3 sts, for my buttonholes. If you need to ch-4 for your buttons, make sure to skip 4 sts.
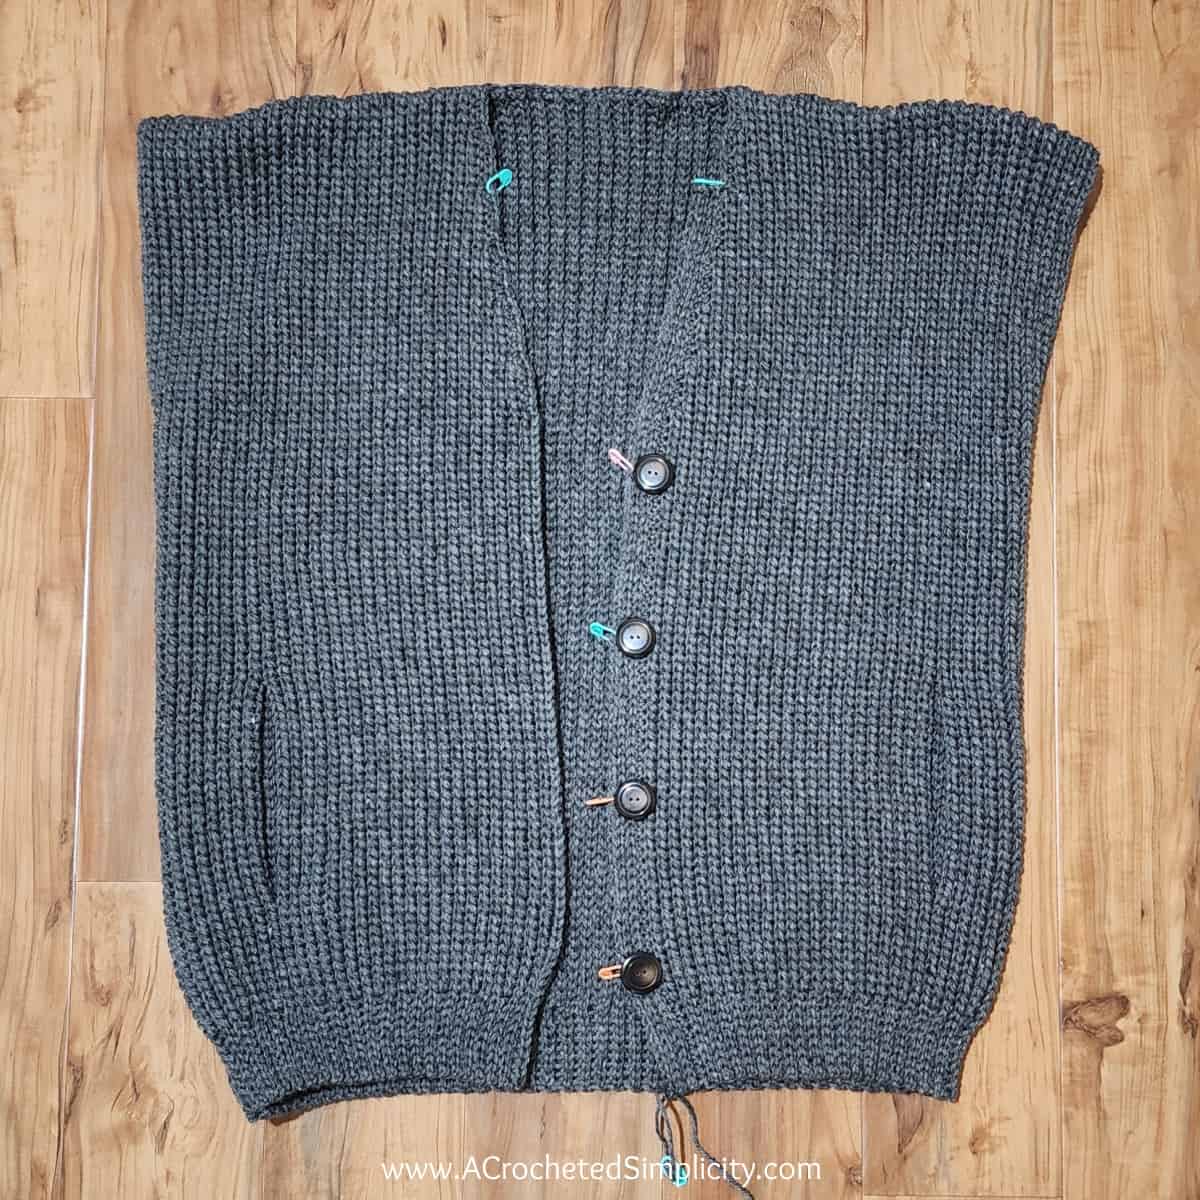
Row 5: Ch 1, (BLO sl st in each st across to the st before the next SM, ch 3, skip each of the next 3 sts) rep from ( to ) 4 times (or as many times as buttons you are adding), BLO sl st in each remaining st across. Turn. You should have created a buttonhole for each of the buttons you’ll be attaching to your cardigan.
Row 6: Ch 1, BLO sl st in each st and ch across. Turn.
Rows 7 – 9: Ch 1, BLO sl st in each st across. Turn.
Do not fasten off. Continue on to Left Collar Wing.
Left Collar Wing
Place Stitch Marker: With the right side facing you, place a locking stitch marker in the 3rd st to the right of the top buttonhole you created. Count how many stitches up from the bottom of the hem where you placed this SM and write this number down. You will need to mark the same stitch on the Front Right Button Edge later.
Row 1 (RS): Ch 1, BLO sl st in each st across to the SM (not in the stitch marked with marker). Turn.
Row 2: Ch 1, BLO sl st in each st across. Turn.
Row 3: Ch 1, BLO sl st in each st across to the last 3 sts, skip each of the last 3 sts. Turn.
Row 4: Ch 1, BLO sl st in each st across. Turn.
Sizes X-Small, Small, Medium, Large
Rows 5 – 12: Rep Rows 3 – 4.
Row 13: Ch 1, BLO sl st in each st across the previous row, and in each skipped st down to Row 9 of the Front Left Buttonhole Edge, then finish by BLO sl st in each st across to the bottom hem.
Fasten off. Weave in ends. Continue on to Front Right Button Edge.
Sizes X-Large, 2X-Large, 3X-Large Rows
5 – 14: Rep Rows 3 – 4.
Row 15: Ch 1, BLO sl st in each st across the previous row, and in each skipped st down to Row 9 of the Front Left Buttonhole Edge, then finish by BLO sl st in each st across to the bottom hem.
Fasten off. Weave in ends. Continue on to Front Right Button Edge.

Front Right Button Edge
Row 1 (RS): With a 5.50mm crochet hook & yarn, join yarn in the bottom corner of the Front Right Panel, BLO sl st in each st across to the st marked with a SM (but do not sl st in the stitch marked with the SM). Turn. Stitch count isn’t crucial.
Rows 2 – 9: Ch 1, BLO sl st in each st across. Turn. Stitch count does not change.
Do not fasten off. Continue on to Right Collar Wing.
Right Collar Wing
Place Stitch Marker: Count up from the bottom of the hem the same number of stitches as the SM you placed on the Front Left Buttonhole Edge to mark the Left Collar Wing. Place a locking SM to mark the Right Collar Wing.
Row 1 (WS): Ch 1, BLO sl st in each st across to the SM (not in the stitch marked with marker). Turn.
Row 2: Ch 1, BLO sl st in each st across. Turn.
Row 3: Ch 1, BLO sl st in each st across to the last 3 sts, skip each of the last 3 sts. Turn.
Row 4: Ch 1, BLO sl st in each st across. Turn.
Sizes X-Small, Small, Medium, Large Rows
5 – 12: Rep Rows 3 – 4.
Row 13: Ch 1, BLO sl st in each st across the previous row, and in each skipped st down to Row 9 of the Front Right Button Edge, then finish by BLO sl st in each st across to the bottom hem.
Place Stitch Marker: Place a SM in the 1st stitch of Row 13 to mark where you will begin the Horizontal Collar Ribbing.
Fasten off. Weave in ends. Continue on to Horizontal Collar Ribbing.
Sizes X-Large, 2X-Large, 3X-Large
Rows 5 – 14: Rep Rows 3 – 4.
Row 15: Ch 1, BLO sl st in each st across the previous row, and in each skipped st down to Row 9 of the Front Right Button Edge, then finish by BLO sl st in each st across to the bottom hem.
Place Stitch Marker: Place a SM in the 1st stitch of Row 15 to mark where you will begin the Horizontal Collar Ribbing.
Fasten off. Weave in ends. Continue on to Horizontal Collar Ribbing.
Horizontal Collar Ribbing
You’ll begin this section by working into the ends of the rows along the top of the Right Collar Wing (join yarn where you just placed a SM). You’ll continue working back and forth in rows and joining every other one to the edge of the sweater up and around the remaining neck opening between the two collar wings.
Row 1 (RS): With a 5.50mm crochet hook, join yarn with a standing hdc in the st you marked to begin the Horizontal Collar Ribbing, work 12 (12, 12, 12, 14, 14, 14) more hdc across the edge of the Right Collar Wing, then hdc2tog in the last st and the next st along the neck opening. Do not turn. (14, 14, 14, 14, 16, 16, 16 sts)
Row 2: Sl st into the next st along the edge of the cardigan (this sl st does not count as a st), TURN, BLO hdc in each st across the previous row. Turn. (14, 14, 14, 14, 16, 16, 16 sts)
Row 3: Ch 1, BLO hdc in the first st, BLO hdc in each of the next 12 (12, 12, 12, 14, 14, 14) sts, hdc2tog in the BLO of the next st and both loops of the next st along the edge of the cardigan. Do not turn. (14, 14, 14, 14, 16, 16, 16sts)
Row 4: ( sl st into the next st along the edge of the cardigan ) 2 times (these 2 sl sts do not count as sts), TURN, BLO hdc in each st across the previous row. Turn. (14, 14, 14, 14, 16, 16, 16sts)
Row 5: Ch 1, BLO hdc in the first st, BLO hdc in each of the next 12 (12, 12, 12, 14, 14, 14) sts, hdc2tog in the BLO of the next st and both loops of the next st along the edge of the cardigan. Do not turn. (14, 14, 14, 14, 16, 16, 16sts)

Rep Rows 2 – 5, ending with either a Row 3 or Row 5 Rep, all the way around the neck opening to the top of the Left Collar Wing.
Fasten off, leaving a tail of yarn 4 times the width of the ribbing. With a yarn needle and tail of yarn, whipstitch the FLO of the last row of the ribbing to the stitches across the top edge of the left collar wing. Weave in ends. Continue on to Side Seam Pockets.
Side Seam Pocket (Make 2) (Optional)
Rnd 1: With a 5.50mm crochet hook & yarn, make a chain that is the same size as the perimeter of the pocket opening, join with a sl st to the 1st ch to form a circle. Stitch count isn’t crucial.
Rnd 2: Ch 1, working in the back humps of the ch, sc in each ch around. Join.
Rnd 3: Ch 1, sc in each st around. Join.
Rep Rnd 3 until your pocket measures 6″, or desired depth.
Fasten off, leaving a tail of yarn 4 times the width of the pocket. Using a yarn needle and tail of yarn, lay the pocket flat and whipstitch the edge together to create the bottom of the pocket. Weave in ends. Make the second pocket, then continue on to Attaching the Pockets.
Attaching the Pockets
Step One: Insert a pocket into the pocket opening. Line up the opening in the pocket with the pocket opening on the cardigan. Use a few locking stitch markers to hold it in place while attaching it to the cardigan.
Step Two: With a yarn needle and piece of yarn that is 3 – 4 times the perimeter of the pocket, whipstitch the open edge of the pocket to the pocket opening in the cardigan.
Weave in ends. Repeat for the second pocket. Continue on to Pocket Ribbing. If you choose not to add pocket ribbing, continue on to the Sleeves for the size cardigan you’re making.
Pocket Ribbing – Make 2
The pocket ribbing is for aesthetic purposes only and is optional.
Row 1: With a 4.00mm crochet hook and yarn, ch 6, working in the back hump of the foundation ch, hdc in the 2nd ch from your hook and in each ch across. Turn. (5 sts)
Row 2: Ch 1, BLO hdc in each st across. Turn. ( 5 sts)
Rep Row 2 until your pocket ribbing measures just a tad shorter than the length of the pocket opening. So when stretched a little, it should measure the length of the pocket opening.
Fasten off, leaving a tail of yarn 3 – 4 times the length of the pocket ribbing. Line up the long edge of the pocket ribbing with the pocket opening. Use a yarn needle and tail of yarn and whipstitch the pocket ribbing to the side of the pocket opening closest to the front opening of the cardigan. Also secure the short edges of the pocket ribbing.
Continue on to the Sleeves for the size cardigan you’re making.
X-Small Sleeves (Make 2)
Note: ALL stitches, beginning with Row 2, are worked into the back loops only, unless otherwise specified.
Row 1 (RS): Using a 6.00mm crochet hook, ch 9, switch to a 5.5mm crochet hook, sl st in the 2nd ch from your hook and in each ch across. Turn. (8 sts)
Row 2: Ch 1, BLO hdslst in each st across. Turn. (8 sts)
Row 3: Ch 1, BLO sl st in each st across. Turn. (8 sts)
Row 4: Switch to a 6.00mm crochet hook, ch 9, switch to a 5.50mm crochet hook, hdslst in the 2nd ch from your hook, hdslst in each of the next 7 chs, BLO hdslst in each remaining st. Turn. (16 sts)
Row 5: Ch 1, BLO sl st in each st across. Turn. (16 sts)
Rows 6 – 19: Rep Rows 4 – 5. (72 sts) at the end of Row 19.
Row 20: Switch to a 6.00mm crochet hook, ch 10, switch to a 5.50mm crochet hook, sl st in the 2nd ch from your hook, sl st in each of the next 9 chs, BLO sl st in the next st, BLO hdslst in each remaining st. Turn. (81 sts) Sleeve length should be 22″ at this point.
Row 21: Ch 1, BLO sl st in each st across. Turn. ( 81 sts)
Row 22: Ch 1, BLO, sl st in each of the first 10 sts, BLO hdslst in each remaining st across. Turn. (81 sts)
Rows 23 – 74: Rep Rows 21 – 22.
Row 75: Ch 1, BLO sl st in each of the next 72 sts, skip the remaining sts. Turn. (72 sts)
Row 76: Ch 1, BLO hdslst in each st across. Turn. (72 sts)
Row 77: Ch 1, BLO sl st in each st across to the last 8 sts, skip the last 8 sts. Turn. (64 sts)
Row 78: Ch 1, BLO hdslst in each st across. Turn. (64 sts)
Rows 79 – 92: Rep Rows 77 – 78. (8 sts) at the end of Row 92.
Fasten off. Weave in ends. With RS together, yarn & a 5.5mm crochet hook, sl st the long, angled edges together. Weave in ends. Make the second sleeve. Continue on to Attaching the Sleeves.
Small Sleeves (Make 2)
Note: ALL stitches, beginning with Row 2, are worked into the back loops only, unless otherwise specified.
Row 1 (RS): Using a 6.00mm crochet hook, ch 8, switch to a 5.5mm crochet hook, sl st in the 2nd ch from your hook and in each ch across. Turn. (7 sts)
Row 2: Ch 1, BLO, hdslst in each st across. Turn. (7 sts)
Row 3: Ch 1, BLO sl st in each st across. Turn. (7 sts)
Row 4: Switch to a 6.00mm crochet hook, ch 8, switch to a 5.50mm crochet hook, hdslst in the 2nd ch from your hook, hdslst in each of the next 6 chs, BLO hdslst in each remaining st. Turn. (14 sts)
Row 5: Ch 1, BLO sl st in each st across. Turn. (14 sts)
Rows 6 – 21: Rep Rows 4 – 5. (70 sts) at the end of Row 21.
Row 22: Switch to a 6.00mm crochet hook, ch 12, switch to a 5.50mm crochet hook, sl st in the 2nd ch from your hook, sl st in each of the next 9 chs, hdslst in each of the next ch, BLO hdslst in each remaining st. Turn. (81 sts) Sleeve length should be 22″ at this point.
Row 23: Ch 1, BLO sl st in each st across. Turn. (81 sts)
Row 24: Ch 1, BLO, sl st in each of the first 10 sts, BLO hdslst in each remaining st across. Turn. (81 sts)
Rows 25 – 76: Rep Rows 23 – 24.
Row 77: Ch 1, BLO sl st in each of the next 70 sts, skip the remaining sts. Turn. (70 sts)
Row 78: Ch 1, BLO hdslst in each st across. Turn. (70 sts)
Row 79: Ch 1, BLO sl st in each st across to the last 7 sts, skip the last 7 sts. Turn. (63 sts)
Row 80: Ch 1, BLO hdslst in each st across. Turn. (63 sts)
Rows 81 – 96: Rep Rows 79 – 80 . (7 sts) at the end of Row 96.
Fasten off. Weave in ends. With RS together, yarn & a 5.5mm crochet hook, sl st the long, angled edges together. Weave in ends. Make the second sleeve. Continue on to Attaching the Sleeves.
Medium Sleeves (Make 2)
Note: ALL stitches, beginning with Row 2, are worked into the back loops only, unless otherwise specified.
Row 1 (RS): Using a 6.00mm crochet hook, ch 8, switch to a 5.5mm crochet hook, sl st in the 2nd ch from your hook and in each ch across. Turn. (7 sts)
Row 2: Ch 1, BLO, hdslst in each st across. Turn. (7 sts)
Row 3: Ch 1, BLO sl st in each st across. Turn. (7 sts)
Row 4: Switch to a 6.00mm crochet hook, ch 8, switch to a 5.50mm crochet hook, hdslst in the 2nd ch from your hook, hdslst in each of the next 6 chs, BLO hdslst in each remaining st. Turn. (14 sts)
Row 5: Ch 1, BLO sl st in each st across. Turn. (14 sts)
Rows 6 – 21: Rep Rows 4 – 5. (70 sts) at the end of Row 21.
Row 22: Switch to a 6.00mm crochet hook, ch 12, switch to a 5.50mm crochet hook, sl st in the 2nd ch from your hook, sl st in each of the next 9 chs, hdslst in each of the next ch, BLO hdslst in each remaining st. Turn. (81 sts) Sleeve length should be 22″ at this point.
Row 23: Ch 1, BLO sl st in each st across. Turn. (81 sts)
Row 24: Ch 1, BLO, sl st in each of the first 10 sts, BLO hdslst in each remaining st across. Turn. (81 sts)
Rows 25 – 82: Rep Rows 23 – 24.
Row 83: Ch 1, BLO sl st in each of the next 70 sts, skip the remaining sts. Turn. (70 sts)
Row 84: Ch 1, BLO hdslst in each st across. Turn. (70 sts)
Row 85: Ch 1, BLO sl st in each st across to the last 7 sts, skip the last 7 sts. Turn. (63 sts)
Row 86: Ch 1, BLO hdslst in each st across. Turn. (63 sts)
Rows 87 – 102: Rep Rows 85 – 86 . (7 sts) at the end of Row 102.
Fasten off. Weave in ends. With RS together, yarn & a 5.5mm crochet hook, sl st the long, angled edges together. Weave in ends. Make the second sleeve. Continue on to Attaching the Sleeves.
Large Sleeves (Make 2)
Note: ALL stitches, beginning with Row 2, are worked into the back loops only, unless otherwise specified.
Row 1 (RS): Using a 6.00mm crochet hook, ch 8, switch to a 5.5mm crochet hook, sl st in the 2nd ch from your hook and in each ch across. Turn. (7 sts)
Row 2: Ch 1, BLO, hdslst in each st across. Turn. (7 sts)
Row 3: Ch 1, BLO sl st in each st across. Turn. (7 sts)
Row 4: Switch to a 6.00mm crochet hook, ch 8, switch to a 5.50mm crochet hook, hdslst in the 2nd ch from your hook, hdslst in each of the next 6 chs, BLO hdslst in each remaining st. Turn. (14 sts)
Row 5: Ch 1, BLO sl st in each st across. Turn. (14 sts)
Rows 6 – 21: Rep Rows 4 – 5. (70 sts) at the end of Row 21.
Row 22: Switch to a 6.00mm crochet hook, ch 16, switch to a 5.50mm crochet hook, sl st in the 2nd ch from your hook, sl st in each of the next 9 chs, hdslst in each of the next 5 chs, BLO hdslst in each remaining st. Turn. (85 sts) Sleeve length should be 23″ at this point.
Row 23: Ch 1, BLO sl st in each st across. Turn. (85 sts)
Row 24: Ch 1, BLO, sl st in each of the first 10 sts, BLO hdslst in each remaining st across. Turn. (85 sts)
Rows 25 – 84: Rep Rows 23 – 24.
Row 85: Ch 1, BLO sl st in each of the next 70 sts, skip the remaining sts. Turn. (70 sts)
Row 86: Ch 1, BLO hdslst in each st across. Turn. (70 sts)
Row 87: Ch 1, BLO sl st in each st across to the last 7 sts, skip the last 7 sts. Turn. (63 sts)
Row 88: Ch 1, BLO hdslst in each st across. Turn. (63 sts)
Rows 89 – 104: Rep Rows 87 – 88 . (7 sts) at the end of Row 104.
Fasten off. Weave in ends. With RS together, yarn & a 5.5mm crochet hook, sl st the long, angled edges together. Weave in ends. Make the second sleeve. Continue on to Attaching the Sleeves.
X-Large Sleeves (Make 2)
Note: ALL stitches, beginning with Row 2, are worked into the back loops only, unless otherwise specified.
Row 1 (RS): Using a 6.00mm crochet hook, ch 8, switch to a 5.5mm crochet hook, sl st in the 2nd ch from your hook and in each ch across. Turn. (7 sts)
Row 2: Ch 1, BLO, hdslst in each st across. Turn. (7 sts)
Row 3: Ch 1, BLO sl st in each st across. Turn. (7 sts)
Row 4: Switch to a 6.00mm crochet hook, ch 8, switch to a 5.50mm crochet hook, hdslst in the 2nd ch from your hook, hdslst in each of the next 6 chs, BLO hdslst in each remaining st. Turn. (14 sts)
Row 5: Ch 1, BLO sl st in each st across. Turn. (14 sts)
Rows 6 – 23: Rep Rows 4 – 5. (77 sts) at the end of Row 23.
Row 24: Switch to a 6.00mm crochet hook, ch 9, switch to a 5.50mm crochet hook, sl st in the 2nd ch from your hook, sl st in each of the next 7 chs, BLO sl st in each of the next 2 sts, BLO hdslst in each remaining st. Turn. (85 sts) Sleeve length should be 23″ at this point.
Row 25: Ch 1, BLO sl st in each st across. Turn. (85 sts)
Row 26: Ch 1, BLO, sl st in each of the first 10 sts, BLO hdslst in each remaining st across. Turn. (85 sts)
Rows 27 – 90: Rep Rows 25 – 26.
Row 91: Ch 1, BLO sl st in each of the next 77 sts, skip the remaining sts. Turn. (77 sts)
Row 92: Ch 1, BLO hdslst in each st across. Turn. (77 sts)
Row 93: Ch 1, BLO sl st in each st across to the last 7 sts, skip the last 7 sts. Turn. (70 sts)
Row 94: Ch 1, BLO hdslst in each st across. Turn. (70 sts)
Rows 95 – 112: Rep Rows 93 – 94. (7 sts) at the end of Row 112.
Fasten off. Weave in ends. With RS together, yarn & a 5.5mm crochet hook, sl st the long, angled edges together. Weave in ends. Make the second sleeve. Continue on to Attaching the Sleeves.
2X-Large Sleeves (Make 2)
Note: ALL stitches, beginning with Row 2, are worked into the back loops only, unless otherwise specified.
Row 1 (RS): Using a 6.00mm crochet hook, ch 7, switch to a 5.5mm crochet hook, sl st in the 2nd ch from your hook and ineach ch across. Turn. (6 sts)
Row 2: Ch 1, BLO, hdslst in each st across. Turn. (6 sts)
Row 3: Ch 1, BLO sl st in each st across. Turn. (6 sts)
Row 4: Switch to a 6.00mm crochet hook, ch 7, switch to a 5.50mm crochet hook, hdslst in the 2nd ch from your hook, hdslst in each of the next 5 chs, BLO hdslst in each remaining st. Turn. (12 sts)
Row 5: Ch 1, BLO sl st in each st across. Turn. (12 sts)
Rows 6 – 27: Rep Rows 4 – 5. (78 sts) at the end of Row 27.
Row 28: Switch to a 6.00mm crochet hook, ch 8, switch to a 5.50mm crochet hook, sl st in the 2nd ch from your hook, sl st in each of the next 6 chs, BLO sl st in each of the next 3 sts, BLO hdslst in each remaining st. Turn. (85 sts) Sleeve length should be 23″ at this point.
Row 29: Ch 1, BLO sl st in each st across. Turn. (85 sts)
Row 30: Ch 1, BLO, sl st in each of the first 10 sts, BLO hdslst in each remaining st across. Turn. (85 sts)
Rows 31 – 88: Rep Rows 29 – 30.
Row 89: Ch 1, BLO sl st in each of the next 78 sts, skip the remaining sts. Turn. (78 sts)
Row 90: Ch 1, BLO hdslst in each st across. Turn. (78 sts)
Row 91: Ch 1, BLO sl st in each st across to the last 6 sts, skip the last 6 sts. Turn. (72 sts)
Row 92: Ch 1, BLO hdslst in each st across. Turn. (72 sts)
Rows 93 – 114: Rep Rows 91 – 92. (6 sts) at the end of Row 114.
Fasten off. Weave in ends. With RS together, yarn & a 5.5mm crochet hook, sl st the long, angled edges together. Weave in ends. Make the second sleeve. Continue on to Attaching the Sleeves.
3X-Large Sleeves (Make 2)
Note: ALL stitches, beginning with Row 2, are worked into the back loops only, unless otherwise specified.
Row 1 (RS): Using a 6.00mm crochet hook, ch 6, switch to a 5.5mm crochet hook, sl st in the 2nd ch from your hook and in each ch across. Turn. (5 sts)
Row 2: Ch 1, BLO, hdslst in each st across. Turn. (5 sts)
Row 3: Ch 1, BLO sl st in each st across. Turn. (5 sts)
Row 4: Switch to a 6.00mm crochet hook, ch 6, switch to a 5.50mm crochet hook, hdslst in the 2nd ch from your hook, hdslst in each of the next 4 chs, BLO hdslst in each remaining st. Turn. (10 sts)
Row 5: Ch 1, BLO sl st in each st across. Turn. (10 sts)
Rows 6 – 29: Rep Rows 4 – 5. (70 sts) at the end of Row 29.
Row 30: Switch to a 6.00mm crochet hook, ch 16, switch to a 5.50mm crochet hook, sl st in the 2nd ch from your hook, sl st in each of the next 9 chs, hdslst in each of the next 5 chs, BLO hdslst in each remaining st. Turn. (85 sts) Sleeve length should be 23″ at this point.
Row 31: Ch 1, BLO sl st in each st across. Turn. (85 sts)
Row 32: Ch 1, BLO, sl st in each of the first 10 sts, BLO hdslst in each remaining st across. Turn. (85 sts)
Rows 33 – 96: Rep Rows 31 – 32.
Row 97: Ch 1, BLO sl st in each of the next 70 sts, skip the remaining sts. Turn. (70 sts)
Row 98: Ch 1, BLO hdslst in each st across. Turn. (70 sts)
Row 99: Ch 1, BLO sl st in each st across to the last 5 sts, skip the last 5 sts. Turn. (65 sts)
Row 100: Ch 1, BLO hdslst in each st across. Turn. (65 sts)
Rows 101 – 124: Rep Rows 99 – 100 . (5 sts) at the end of Row 124.
Fasten off. Weave in ends. With RS together, yarn & a 5.5mm crochet hook, sl st the long, angled edges together. Weave in ends. Make the second sleeve. Continue on to Attaching the Sleeves.
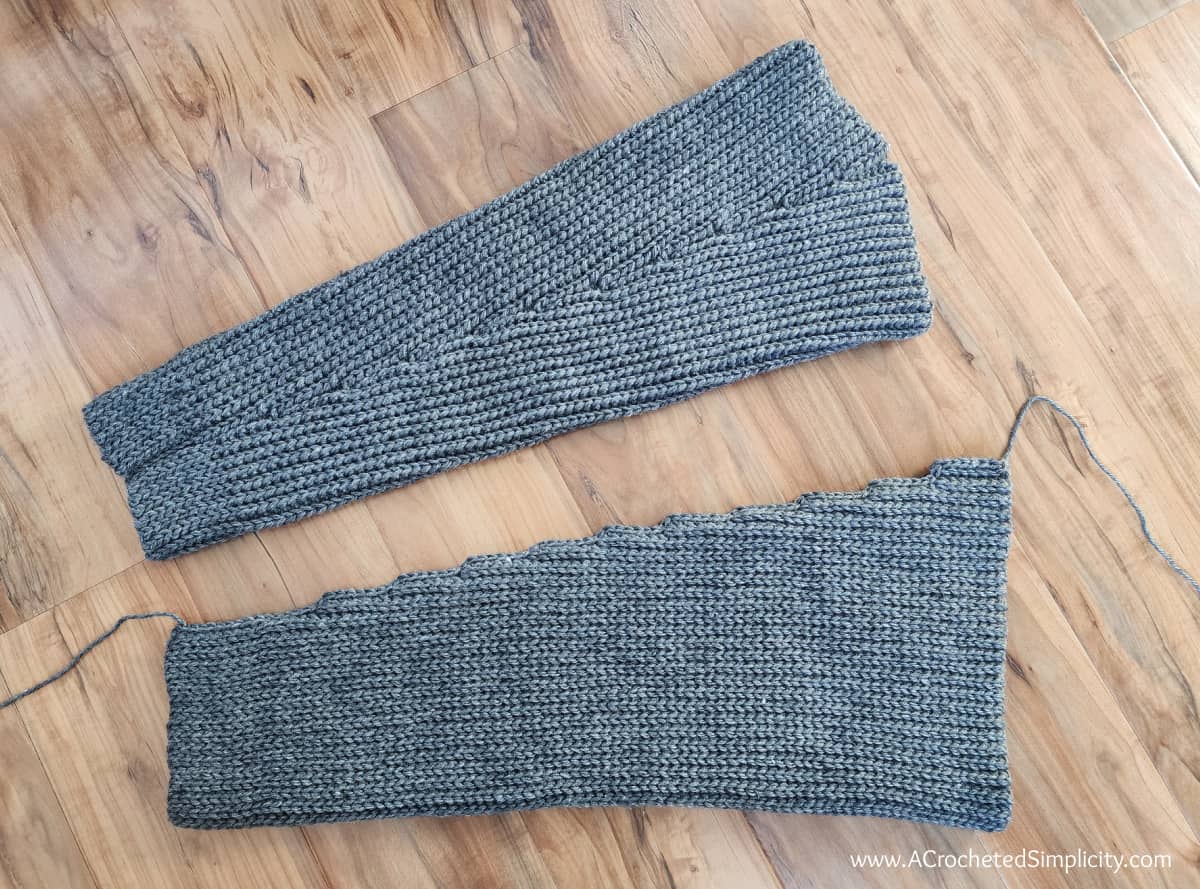
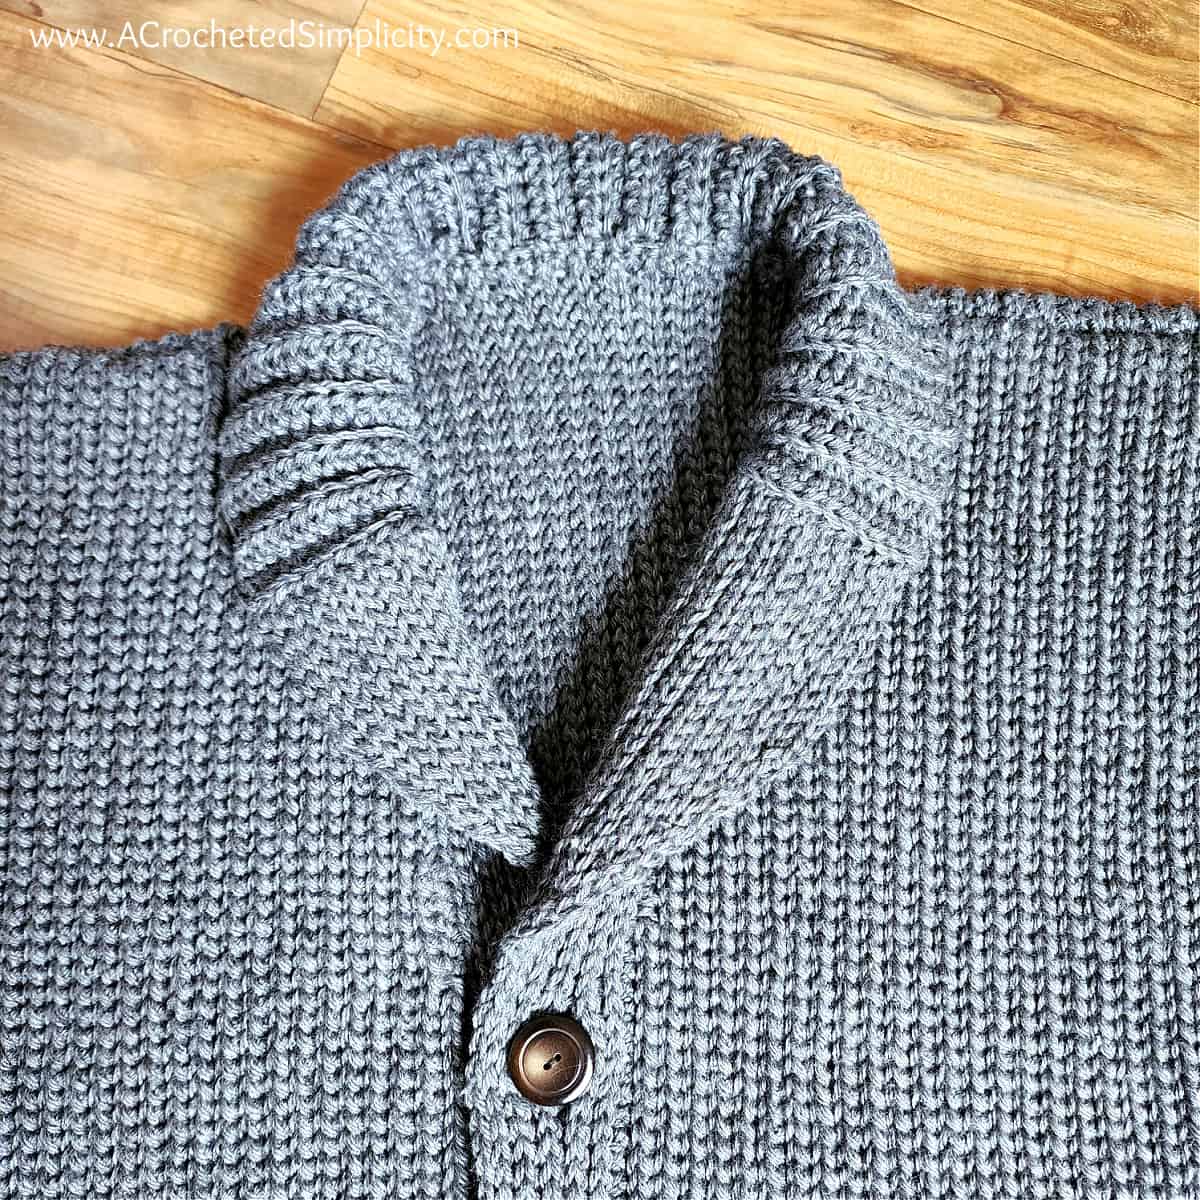
Decorative Sleeve
To have a decorative sleeve, as shown in the photo above, make sure to line up the seam of your sleeves with the shoulder seams on your cardigan.
Attaching the Sleeves
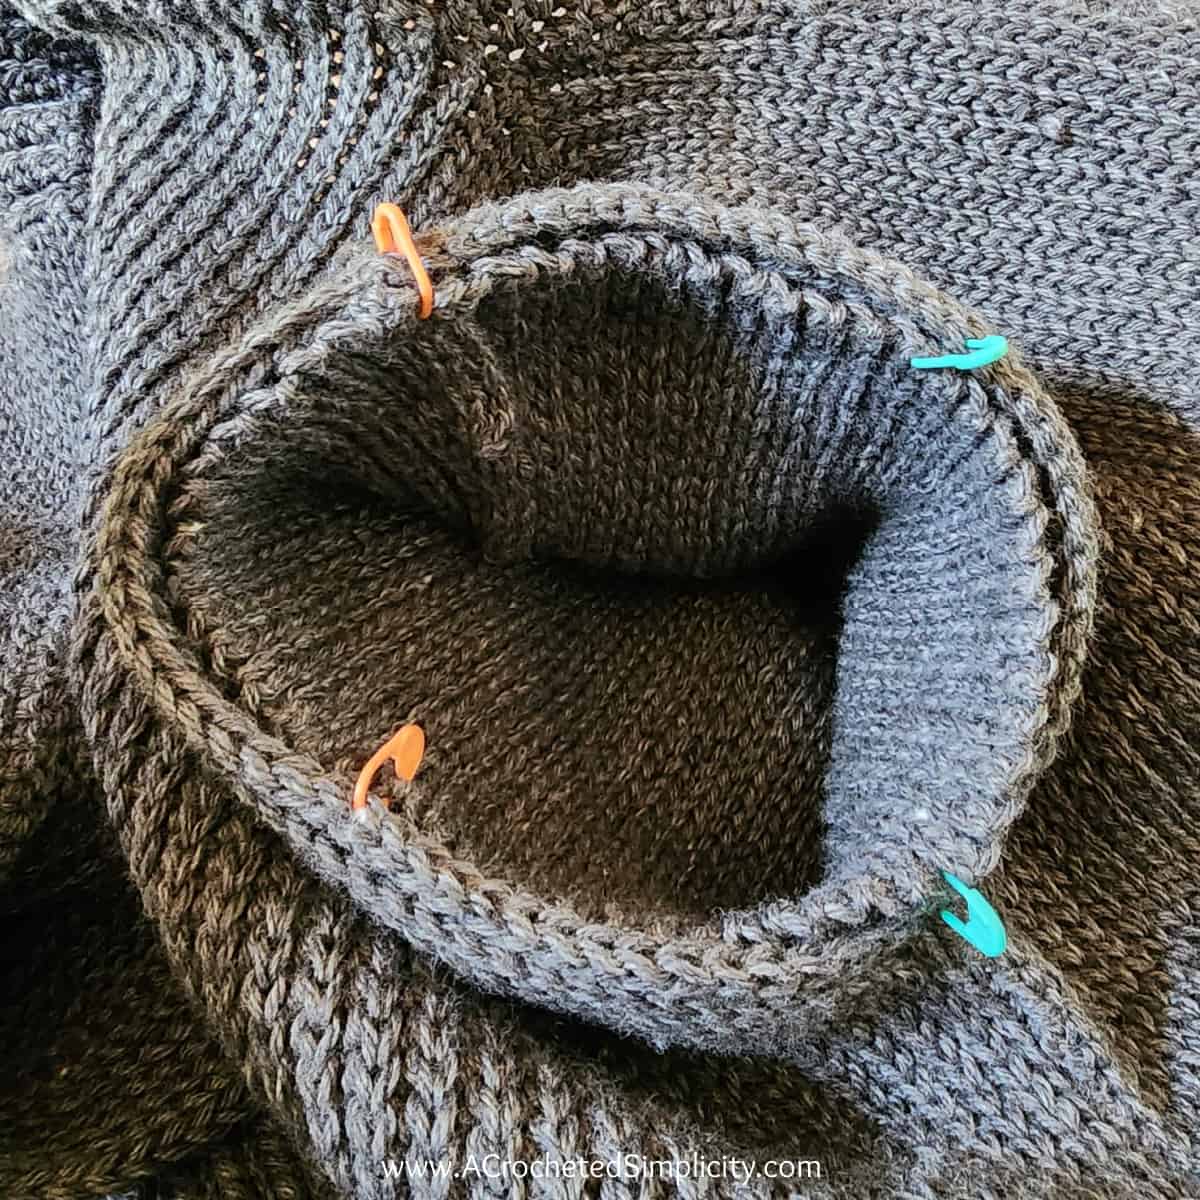
Step 1: Line up the seam of the sleeve with the shoulder seam. On the inside of the cardigan, place several stitch markers through the edge of both the sleeve and armhole opening to secure the 2 pieces together during seaming. Use as many or as few stitch markers as you are comfortable with.
Step 2: Working on the inside of the cardigan, use a yarn needle and length of yarn 3 – 4 times the perimeter of the sleeve opening and whipstitch the sleeve to the sleeve opening.
Fasten off. Weave in ends. Continue on to Attach Buttons.
Attach Buttons
Lay your cardigan flat with the buttonhole edge overlapping the button edge. Use a SM to mark each buttonhole on the button edge.
Use a needle and thread and sew buttons on to the button edge of the cardigan.
THAT’S IT! BLOCK YOUR BUTTON UP CARDIGAN (IF YOU PREFER) AND WEAR IT!!!
Related: If you have never blocked a crochet project before, check out my post on 3 blocking methods!
Questions Crocheters Frequently Ask About Shawl Collar Cardigan Patterns
If you have any questions that I haven’t answered below, always feel free to reach out to me, (e-mail me: ACrochetedSimplicity at Gmail dot Com), and I’ll do my best to help!
What is a shawl collar cardigan?
A crochet shawl collar cardigan has a rolled collar and lapel in one piece that curves from the back of the neck down to the front closure of a single-breasted or double-breasted garment.
Can I wear a cardigan with a collared shirt?
Absolutely! It’s okay to wear a double collar, as long as the collar on the shirt isn’t a shawl collar as well. Some examples of collared shirts that look great under a shawl collar are a turtleneck / rollneck, regular dress shirt collar, and even a crew neck.
My favorite casual layered look is a collared flannel over a t-shirt and under a shawl neck cardigan.
When should a man wear a cardigan?
When a blazer would be too formal, an unbuttoned cardigan is a better choice because it creates a more casual look. But when a more formal or professional look is needed, a buttoned up cardigan is perfect!
I MADE IT! NOW WHAT?
Pin this post!: Save this men’s crochet cardigan pattern to your Pinterest boards so that you can come back and make it again.
Leave a comment below: We love to hear your feedback.
Share Your Finished Projects on Facebook or Instagram: I love to see your finished projects! Share with us on social media and tag me @acrochetedsimplicity or use the hashtag #ACrochetedSimplicity so I can find your posts.
JOIN US IN THE FACEBOOK COMMUNITY GROUP!
Come share your finished projects with us in the A Crocheted Simplicity Crochet Community Group on Facebook. Join us for fun community events such as crochet alongs, join in on crochet conversations, ask questions, get advice, and share your love for crochet!

More Free Men’s Crochet Patterns I Think You’ll Love
More Free Knit-Look Crochet Patterns
Do you love the look of knitting, but you can’t knit a stitch to save your soul? Browse all of our free knit look crochet patterns. You’ll find a variety of knit-look crochet project ideas.
What a beautiful sweater with so many pictures to help.
Thank you>
Thank you, Catherine!
I love this pattern! it’s hard to find an uncomplicated pattern for men, that has great lines and simple details. The pattern is easy to follow and well written.
I love the look of this cardigan. Going to be the first garment that I make in 2024!
I love this Men’s Shawl Collar Cardigan pattern. I have not started it yet as I have a baby blanket to finish-up ASAP, along with another WIP, but it is next in line. The details really make the difference!
Love your patterns and can’t wait to do this one for my guy!
This looks amazing. I have not done anything this advanced but may have to give it a try,
A wonderful project for the man in your life!! I’m excited to begin this project for my husband. Thanks for sharing such a handsome pattern!
This is a must make for me! Love the look of this cardigan!
Can’t wait to try this one
adding this one to my project list!
I love the look of this cardigan. It is actually something the men in my life would wear.
Love this design! On my list of future projects to do for my son, Thank you for your great designs!
Happy New Year!
I love the look of this cardigan, I can’t wait to start working on it. Thank you so so much for the pattern, it’s so detailed and seems easy to follow. <3 Much love, God bless!
Thanks, Ana!
Happy Crocheting,
Jennifer
I’m on Row 22 of the large sleeve. it says at the beginning of this row to chain 16 but Row 21 finished by BLO slst and this would put the chains on the wrong side of the sleeve. if im thinking correctly, I should BLO Hdslst to the other side and then chain 16 and proceed from there as that is the side all the other chain extensions are on and the small side where the wrist would go. where as if I follow the pattern I would would putt the extending 15 chains on the shoulder? clarification would be appreciated. thank you!!
Hi Terri,
I think it’s possible that you’ve miscounted your rows. If you scroll down to the photo of the completed sleeve, do you see where the beginning tail of yarn is? And then each of the little jagged corners up and to the left of it? The little corners are all the beginning of the EVEN numbered rows. So Row 4 is the first corner up and to the left of the tail, then Row 6, then Row 8 and so on. So then that will also make Row 22 be worked along the same side as the rest of them. Row 22 is what is creating the cuff of the sleeve so it begins with sl sts, then switches to hdslsts.
If you need a sketch for a visual, feel free to send me an e-mail as I can’t attach photos to comments.
Jennifer
Have I missed something? I’ve looked for the yardage needed and haven’t found it. I need to make a man’s medium.
thank you
Hi Bunny,
There’s a Size & Yardage Chart in the post. You can use the table of contents to jump to that part of the post. 🙂
Happy Crocheting,
Jennifer
Hi, I was reding through the blog for this pattern and have found that there are a number of stitch counts missing and showing as x, this is from the front left shoulder final rows, row 9.
I would consider buying the pattern but am worried that the same would be the case there and it does not have an explanation for this
please let me know if this is an issue that can be resolved.
Hi Sue,
There are no stitch counts missing in the blog post instructions. The X’s are place holders. If you look after Row 8, it says “X-Small: fasten off”. Then for Row 9, there is an X in the place of where the XS stitch count previously was because the XS is finished. Then if you continue on, you’ll notice as each size is fastened off, there is also an X as a place holder in the stitch counts for those sizes.
I hope this clarifies things for you. Please let me know if you have any further questions.
Jennifer
hi, this might be a silly question- I’m still quite new to crochet- but you say at the start of the pattern that ‘all stitches are back loop only unless specified’ but then in some of the rows you says BLO for some of the stitches and not all, should I assume that actually not all the stitches should be BLO, only the ones that are specified?
Hi Molly,
Beginning in Row 2, all stitches are worked in BLO unless otherwise specified. The otherwise specified stitches are when you’ll increase a row by chaining and then you work into the chs (and not BLO), but that is specified in the pattern. If you take a peek at the gauge swatch, an easy example is to look at Row 2: Row 2: Ch 1, BLO, sl st in each of the first 9 sts, hdslst in each remaining st across. Turn. (24 sts)
Do you see how I’ve written “Ch 1, BLO, sl st….”? The BLO is within commas. When you see BLO at the beginning of a row and it’s within commas all by itself, this means the entire row is worked BLO.
Does this make sense?
Jennifer
I’m on the horizontal ribbing for size large. I’m not understanding how it’s supposed to come out to 14 sts. Working 12 sts along the edge of the right wing then one hdc2tog and that makes it into 14 sts? What am I missing?
Hi Hol,
Don’t forget the first stitch. The join yarn with a hdc counts as your first stitch. Then you’ll work 12 more stitches and end with the hdc2tog for a total of 14 sts.
I hope this helps,
Jennifer
Is the 12-14 st on the edging of the cardigan? Including the joining stitch I can only get 11 sts on the collar wing
I am working on the front right panel and work in the right side of the chain (back humps) for the first row. When I do this my panel is always with the wrong side facing. Am I doing something wrong, ir just keep going?
Hi Deanna,
For the very first foundation chain in Row 1, I did work into the back humps of the chain. But for the rows where you add a chain to increase the length of the row, I would work under the top two loops, which leaves the back hump showing. This should keep your chain from twisting. Let me know if you have any questions about this.
Happy Crocheting,
Jennifer
Hello! I’m making the 3X, finishing the Front Right Panel on row 20 and I keep ending with 110 stitches instead of 111. Based on the math, I believe it would be 110? I added the 93 from row 17-18, the additional 8 from the chains into which we slip stitched, and the final 9 which we had skipped prior but slip stitched into for row 19. 93+8+9 equals 110 so I think I calculated correctly. At least right now I’m just moving forward with that and believing it will all be fine 😂
If it is 111, can you help me know where the other stitch goes?
Thank you! I’m trying to make this for my dad for Christmas!
Hi Katie,
EEK! You are correct, thank you for letting me know so I can update the pattern.
Jennifer