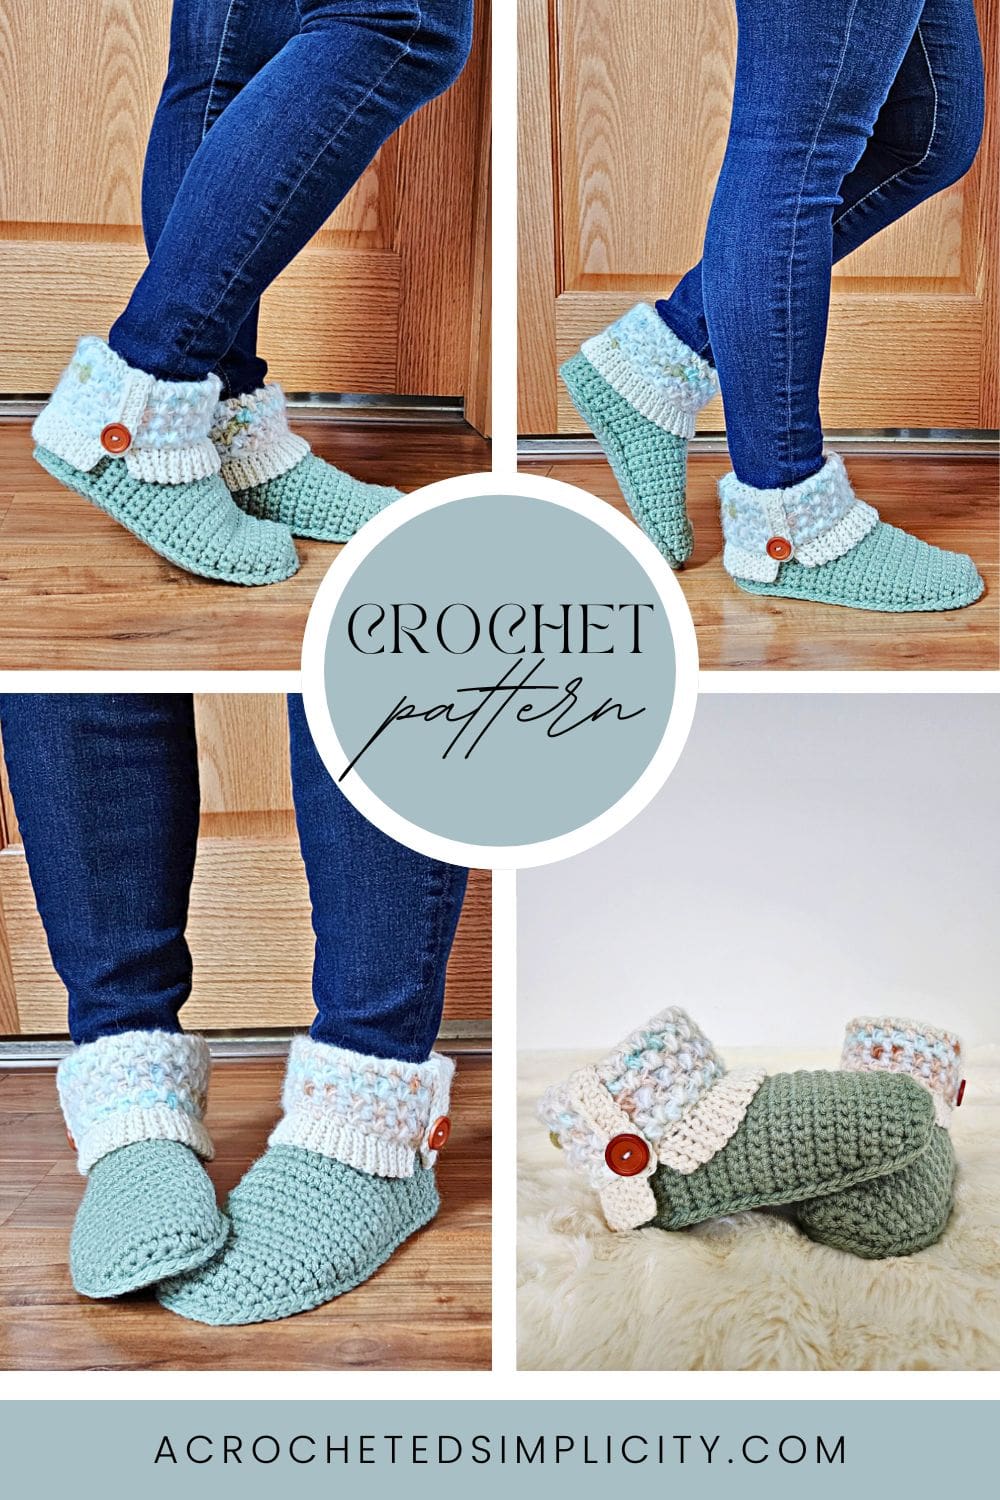
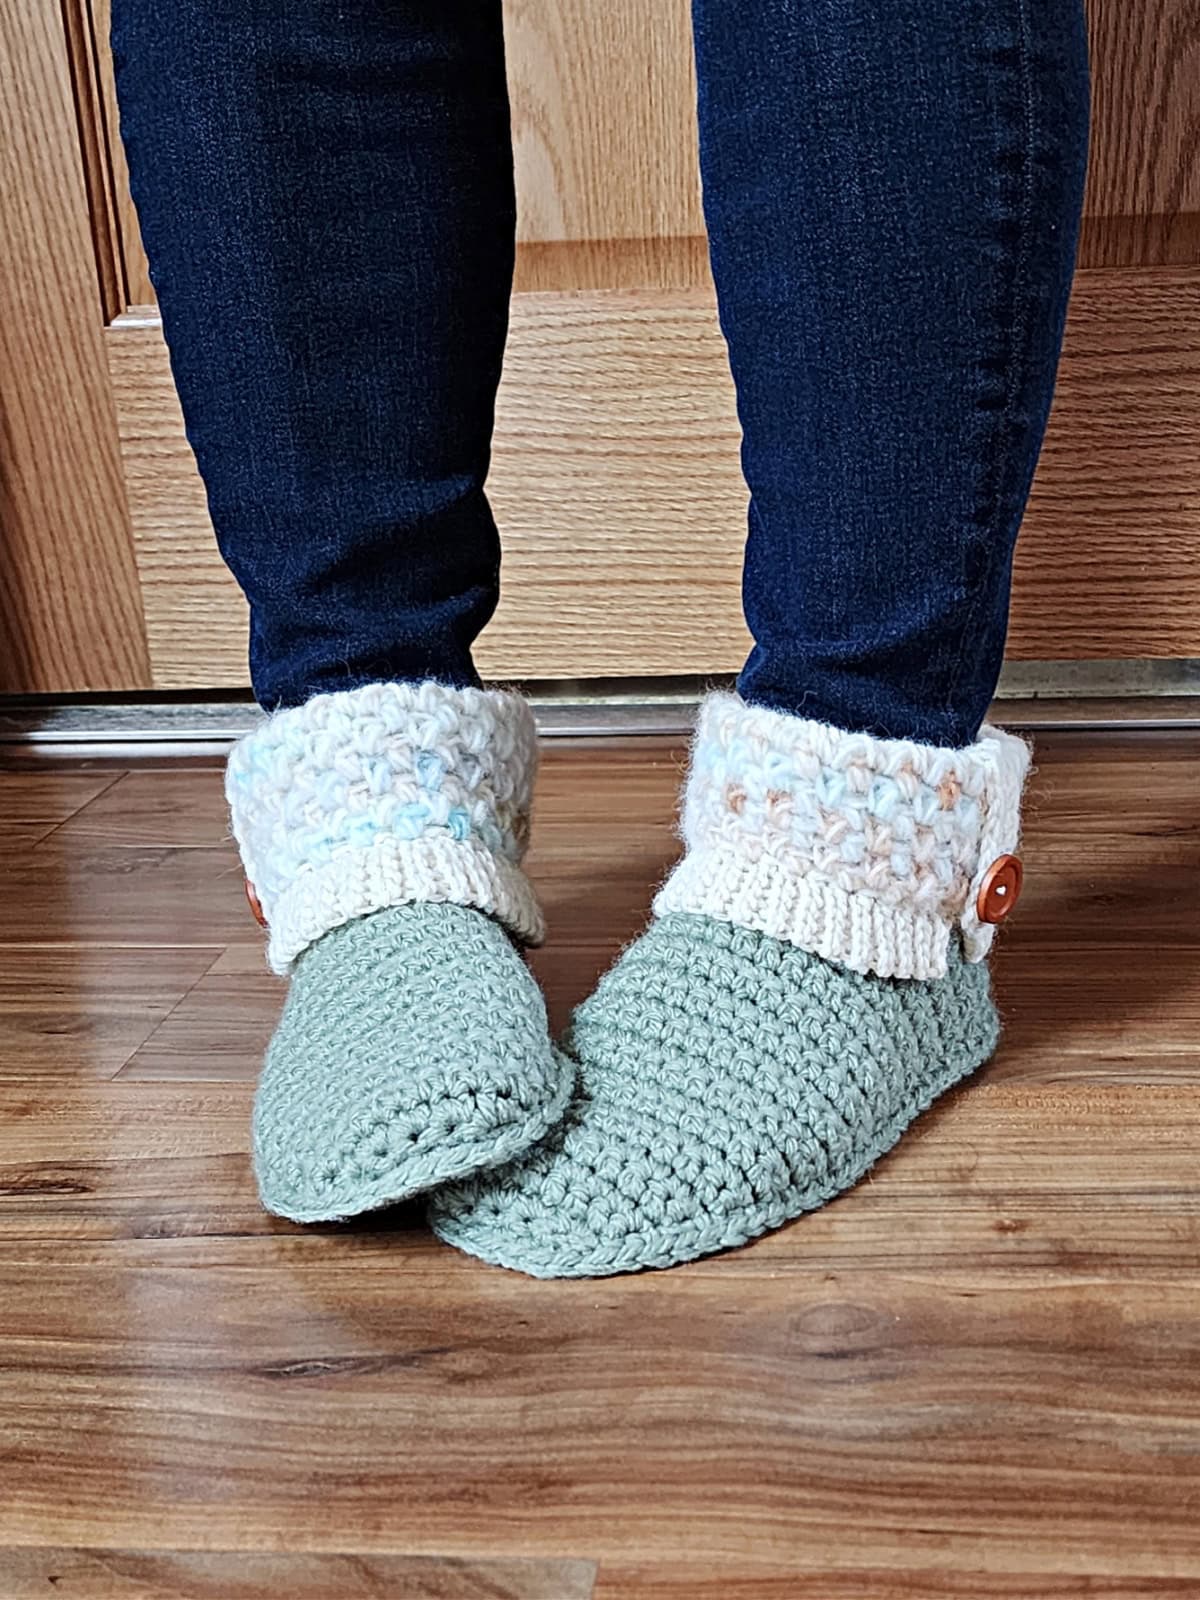
Hibernation Crochet Slipper Boots
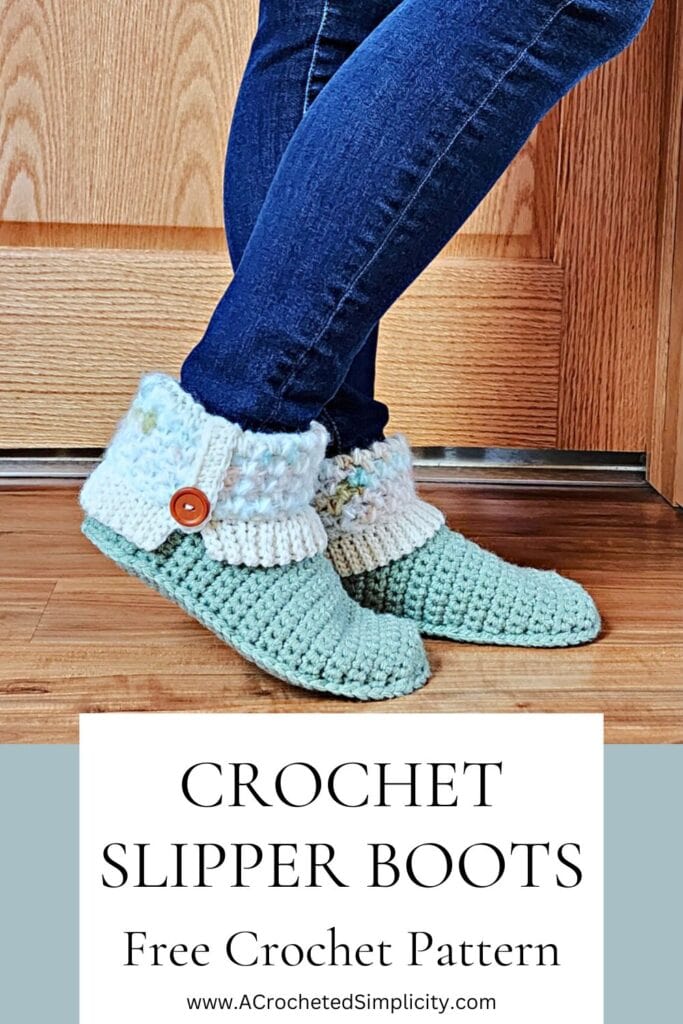
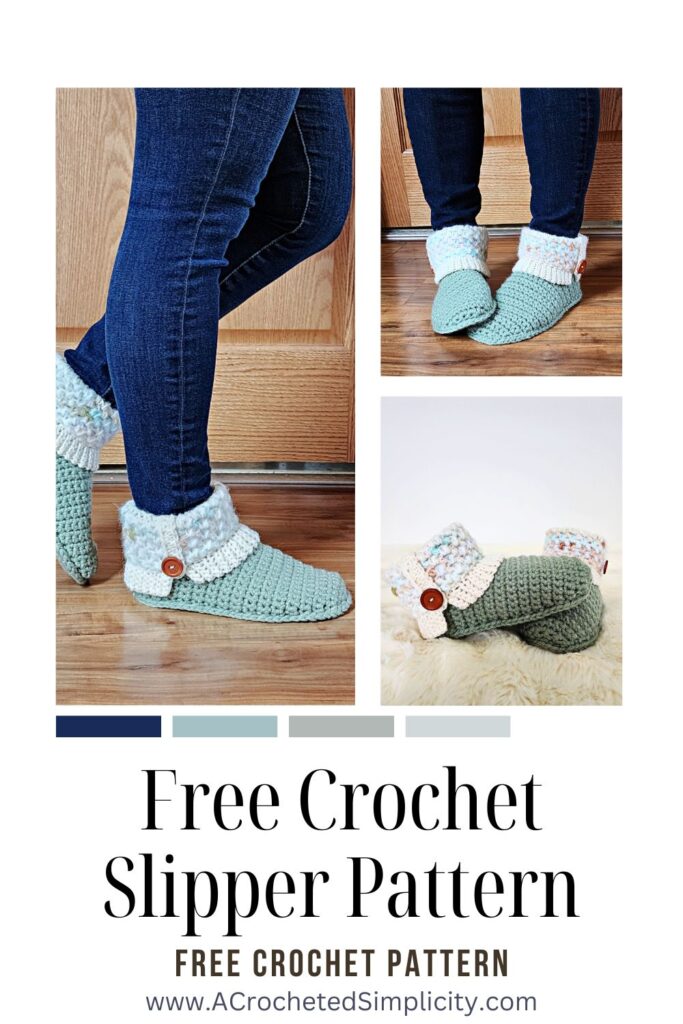
Cozy up in style with a pair of crochet slipper boots!
Perfect for chilly evenings or a thoughtful crochet gift, these slipper boots effortlessly combine comfort and fashion.
You’ll find the free crochet slipper boot pattern + video tutorial, in the post below, or you can find an ad-free printable PDF (that includes all photo tutorials + link to the video tutorial), on Ravelry, or Etsy (aff).
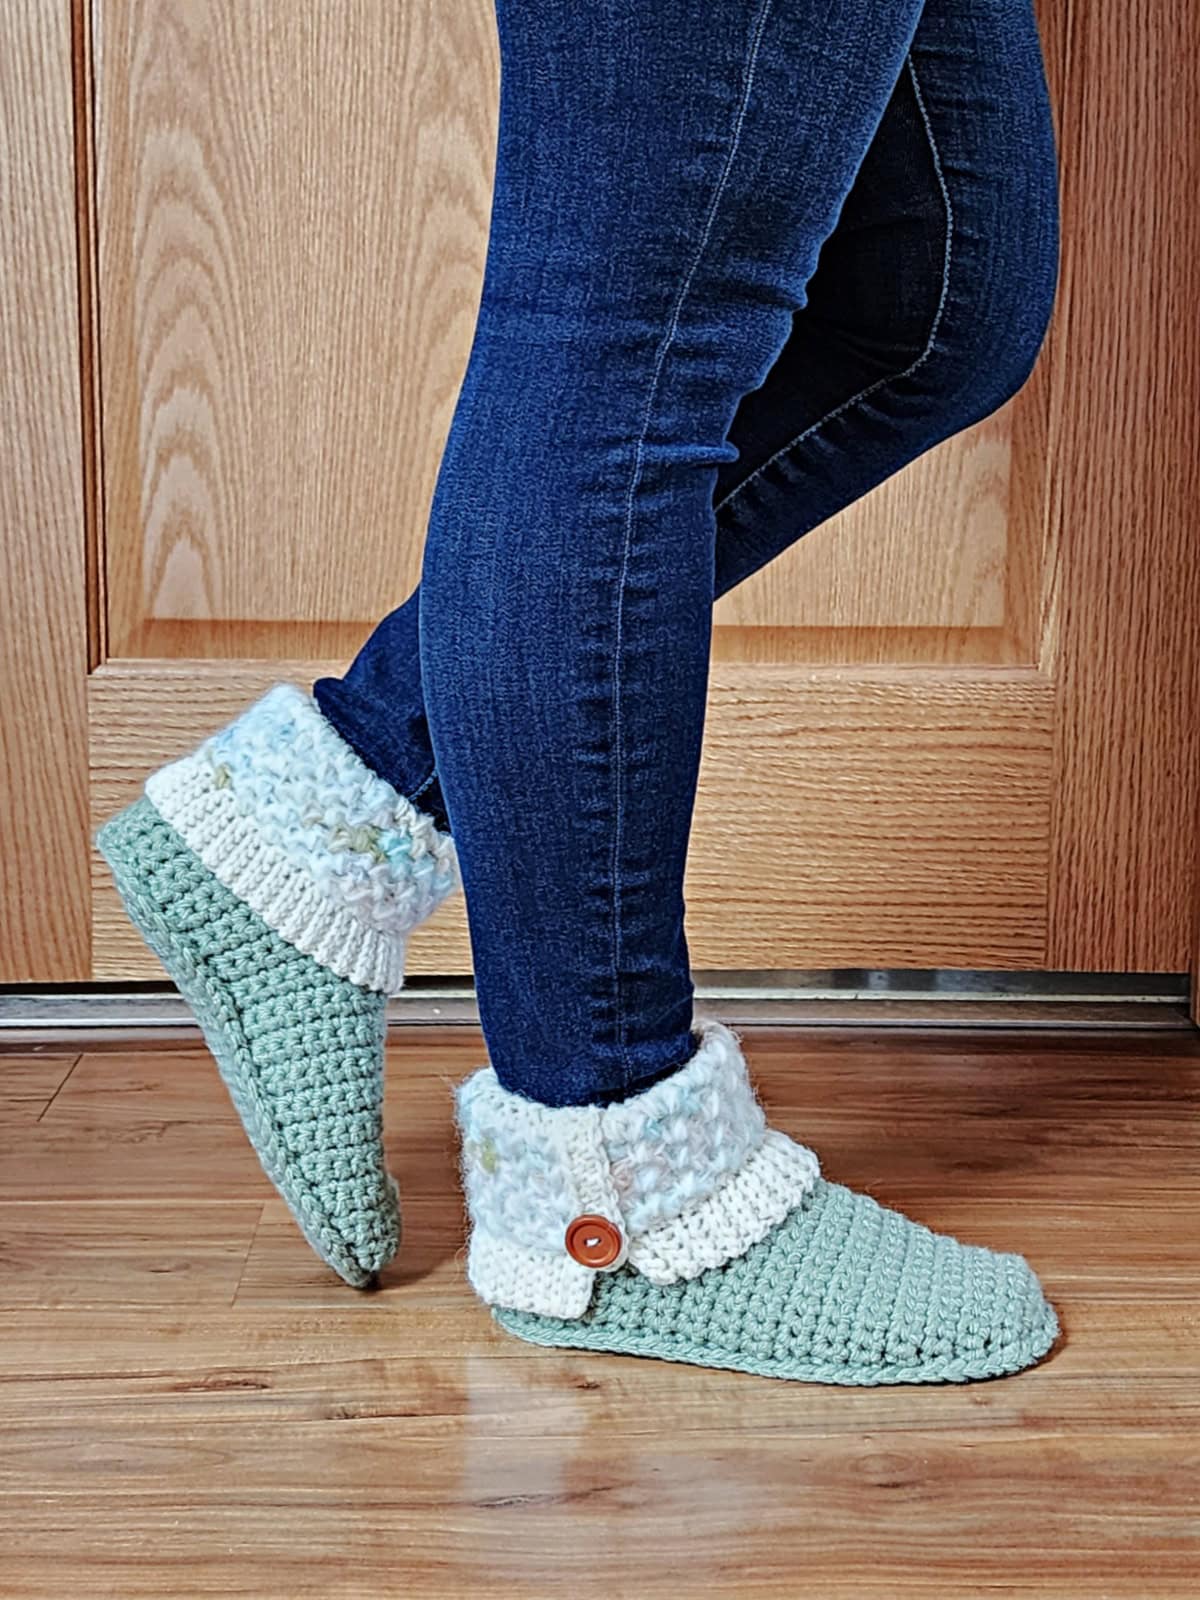
Keep your feet toasty warm this winter with a pair of Hibernation Crochet Slipper Boots. Lion Brand Hue & Me yarn adds extra warmth to these chunky crochet slippers, while Wool Ease and Scarfie Lite add lightweight, textured cuffs.
Made with soft, high-quality yarn and designed for a snug fit, they’re ideal for lounging around the house.
Play around with a variety of yarn colors and buttons to combine your own personal style with these ladies slipper boots!
How to Crochet Slipper Boots
These crochet slippers are made in three pieces and joined together.
First, you’ll crochet the soles and uppers of the slipper boot in rows.
Next, you’ll join the soles to the uppers by working single crochet around the perimeter of the sole.
Then you’ll crochet the ankle onto the slipper.
Lastly, you’ll crochet the textured cuff and faux buttonhole strap and sew them onto the slipper boot. Finish them off with fun buttons for a little extra pizazz!
Watch the Video Tutorial on YouTube
Skills & Techniques You’ll Use
This crochet pattern for slipper boots combines the beginner-friendly single crochet stitch for the solid portion of the slipper soles and uppers and the mini-bean stitch for the slipper cuffs.
Crochet skills you’ll practice:
- Single Crochet
- Single Crochet Spike Stitch
- Mini-Bean Stitch
- Join yarn with a standing single crochet
- Seaming pieces with a whipstitch
If you want to make hard sole slipper boots, sew a flip-flop sole to the bottom of them.
How to Wash Crochet Slippers
My youngest bought herself a pair of UGG slipper boots and loves them, but they aren’t as easy to care for as crocheted slippers are. I love the convenience of being able to toss my slippers in the washer!
Many crocheters will ask ‘Can you wash crochet in a washing machine?’
Depending on the yarn you used to crochet the slippers, yes, in most cases, you can simply toss your handmade slippers in the washing machine. Make sure to check the yarn label for care instructions first.
If the yarn you used is machine washable, I recommend washing them on a gentle cycle in cold or warm water. Then, lay them flat to dry.
Tip: If you have them handy, I like to wash my crochet slippers in mesh laundry bags.
How to Make Crochet Slippers Non-Slip
Handmade slippers are great, but they can be super slippery on hard surfaces!
When my kids were little and we had hardwood floors and stairs, I was always worried about them slipping and falling. So, when I started crocheting slippers for them, I wanted a fun, quick, and easy way to make the soles non-slip.
That’s when I remembered making non-slip socks with my friends for a high school sock hop. We used Tulip Puff Paint for our socks so I figured why not try it on the kids slippers… it worked great!
My kids loved being able to choose their own colors and help paint shapes on the soles of their slippers. They made little stars, hearts, and squiggly lines and their favorite was the glow-in-the-dark puff paint.
Although there are many great options to keep crochet slippers from slipping, such as Plasti Dip or sewing non-slip fabric onto the soles, I’ve found that the easiest, most fun, and most cost effective is Tulip Puff Paint!
Yarn
For these women’s slipper boots, I wanted to make sure my toes would be toasty warm, and at the same time not have too much bulk around my ankles. Because of this, I chose to use Lion Brand Hue & Me bulky yarn to add extra warmth to these chunky crochet slipper boots and then Lion Brand Yarn Wool Ease and Scarfie Lite to add lightweight, textured cuffs.
Hue & Me yarn is a chunky weight / 5 yarn that is an acrylic wool blend that is perfect for making warm slipper boots.
Lion Brand Wool Ease and Scarfie Lite are both worsted weight / 4 yarns that are perfect for adding a little style and texture to your slippers.
Related: If you love the Hibernation Slipper Boots, make sure to check out the Fireside Crochet Slipper Boots. They’re just as cozy!
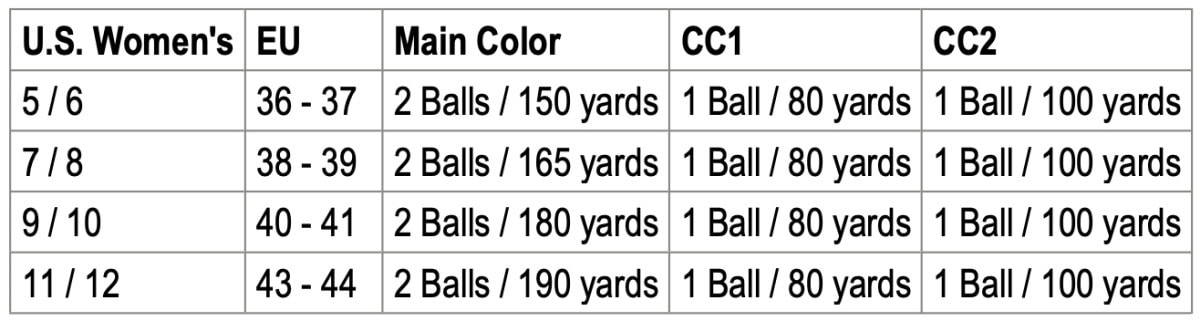
Size Chart & Yardage
- Main Color: Lion Brand Hue & Me (Bulky Weight #5) in Artichoke #617- 171X
- CC1: Lion Brand Wool Ease (Worsted Weight #4) in Fisherman #620-099
- CC2: Lion Brand Scarfie Lite (Worsted Weight #4) in Palm #827-600AP
Crochet Slipper Boots – Free Pattern
The free slipper crochet pattern is below, but if you love to work offline, I’ve got a couple other great options for you.
Purchase the ad-free, printable PDF, including all photo tutorials + video tutorial link, on Ravelry, or on Etsy (aff).
Purchase the slipper boot crochet kit! (aff): Lion Brand has a full kit of the Hibernation Crochet Slipper Boots, available on their website. The crochet slipper kit includes your choice of colors and a digital copy of the crochet pattern.
This post contains affiliate links.
Materials
- Yarns: A combination of bulky/chunky weight and worsted weight yarns are used for these slipper boots.
- Chunky Weight / 5 / Yarn, Lion Brand Yarns Hue & Me in Artichoke was used for the bootie portion of the slippers in the photos 80% Acrylic / 20% Wool (137 yards / 125 m / 125 g / 4.4 oz)
- Worsted Weight / 4 / Yarn, Lion Brand Wool Ease in Fisherman, worsted weight / 4 yarn, 80% Acrylic / 20% Wool (197 yds / 180 m / 85 g / 3 oz)
- Worsted Weight / 4 / Yarn, Lion Brand Yarns Scarfie Lite in Palm, 43% Acrylic/ 41% Polyester / 9% Nylon/ 7% Wool (349 yards / 320 m / 100 g / 3.5 oz)
- Yardage: See Size Chart Above
- Crochet Hooks: I/9/5.50mm; H/8/5.00mm; or size needed to obtain gauge (My favorite crochet hooks are the Clover Amour Crochet Hooks, I’ve never had an ache in my hand since switching).
- Locking Stitch Markers
- Scissors
- Yarn Needle
- 1″ Buttons (2) (optional)
Abbreviations (U.S. Terms)
- ch(s): chain(s)
- sl st(s): slip stitch(es)
- st(s): stitch(es)
- yo: yarn over
- sp(s): space(s)
- sc: single crochet
- hdc: half double crochet
- dc: double crochet
- sc2tog: single crochet decrease
- MBS: mini-bean stitch
- spike sc: Single Crochet Spike Stitch
- BLO: back loop only
- FLO: front loop only
- Rep: repeat
- Rnd: round
- SM: stitch marker
- MC: main color
- CC1: contrasting color 1
- CC2: contrasting color 2
Experience Level
- Easy
Gauge
- See individual sections for gauge.
Sizes
- Women’s Sizes (U.S.): 5/6, 7/8, 9/10, 11/12
- See size chart above with EU sizes.
Special Stitches
- Mini-Bean Stitch (MBS): Insert your hook into the specified stitch, yo, pull up a loop, yo, insert your hook into the same st, yo, pull up a loop, yo, pull through all loops on your hook.
- Single Crochet Spike Stitch (spike sc): Begin the spike stitch by inserting your hook into the stitch 1 row down from the current row, yo, pull up a long loop (make sure to pull the loop up to the top edge of your work), yo, pull through all loops on your hook.
- Join yarn with a standing single crochet: Begin with a slip knot on your hook, insert your hook into the stitch or space indicated, yo, pull up a loop, yo and draw thru both loops on hook.
Pattern Notes
- Turning chains are not counted as stitches, unless noted otherwise.
- The first stitch of each row is worked into the same stitch as the beginning chain, unless noted otherwise.
- Each ch-1 space worked within a row is counted as a stitch.
- Yarn Notes: Lion Brand Yarns Hue & Me, Wool Ease, & Scarfie Lite were used for the sample. Other comparable yarns may be used as long as gauge is met.
- Lion Brand Yarns Hue & Me, in Artichoke, bulky weight / 5 yarn, 80% Acrylic / 20% Wool (137 yards / 125 m / 125 g / 4.4 oz).
- Lion Brand Wool Ease, in Fisherman, worsted weight / 4 yarn, 80% Acrylic / 20% Wool (197 yds / 180 m / 85 g / 3 oz).
- Lion Brand Yarns Scarfie Lite, in Palm, 43% Acrylic/ 41% Polyester / 9% Nylon/ 7% Wool (349 yards / 320 m / 100 g / 3.5 oz).
- Yardage & Colors – See Chart Above
- MC: Artichoke #617- 171X (2 balls) 150 (165, 180, 190) yards
- CC1: Fisherman #620-099 (1 ball) 80 yards
- CC2: Palm #827-600AP (1 ball) 100 yards
- Slipper Boot Construction: This crochet slipper boot pattern is made in three pieces and joined together. First, you’ll crochet the soles and uppers in rows. Next, you’ll join the soles to the uppers by working single crochet stitches around the perimeter. Then you’ll crochet the ankle onto the slipper. Lastly, you’ll crochet the textured cuff and faux buttonhole strap and sew them onto the slipper. Finish them off with buttons!
- Watch the Video Tutorial!
Crochet Slipper Boot Pattern – Construction Notes
Scroll down to the individual size for the slippers you’re making and crochet the Soles, Uppers, and Ankles. Then continue scrolling down to the Cuff section for all sizes.
All tutorial photos of the soles, uppers, ankles, and cuffs, for all sizes, can be seen below, just after the Slipper Cuff instructions.
Video Tutorial: Don’t forget that there’s a Video Tutorial available, if you should need it!
Important Note About Sizing
The size of the slipper sole is intended to be approximately 1/2″ shorter and narrower than the finished slipper size stated by the heading for each size. This is because when joining the sole to the upper with single crochet stitches, you’re adding more stitches to the perimeter and also because the process of seaming stretches the yarn a bit. If you have wide feet, see the note at the end of the sole instructions for the size slipper you’re crocheting.
Slipper Boots Size 5/6
Finished Size: Length: 9″ & Width: 3-1/2″
Gauge: 3 sc = 1″; 2.75 rows = 1″
Slipper Sole Size 5/6 – Make 2
Row 1: With MC (bulky) yarn & a 5.50mm crochet hook, ch 3 (ch-2 counts as 1st dc), work 8 dc into the 3rd ch from your hook. Do not join. Turn. (9 sts)
Row 2: Ch 2 (counts as a st), dc in the next st (not the same st as ch 2), (2 dc in next st, dc in next 2 sts) twice, 2 dc in last st (last st is the top of ch 2 from beginning of Row 1). Turn. (12 sts)
Row 3: Ch 1, 2 sc in the first st, (sc in next st, 2 sc in next st) 5 times, 2 sc in last st (last st is the top of ch 2 from beginning of Row 2). Turn. (19 sts)
Row 4: Ch 1, rotate to work across the flat edge of the sole, work 1 sc in the side of each sc row and 2 sc in the side of each dc row. Turn. (10 sts)
Rows 5 – 10: Ch 1, sc in each st across. Turn. (10 sts)
Row 11: Ch 1, sc2tog, sc in each of the next 6 sts, sc2tog. Turn. (8 sts)
Rows 12 – 22: Ch 1, sc in each st across. Turn. (8 sts)
Row 23: Ch 1, sc2tog, sc in each of the next 4 sts, sc2tog. Turn. (6 sts)
Row 24: Ch 1, sc2tog, sc in each of the next 2 sts, sc2tog. (4 sts)
Note: If you have wide feet, you may get a better fit by working 1 sc in each stitch around your sole before continuing.
Fasten Off. Weave in ends.
Upper Size 5/6 – Make 2
Row 1: With MC (bulky) yarn & a 5.50mm crochet hook, ch 6, working into the back hump of the ch, sc in the 2nd ch from your hook and in each ch across. Turn. (5 sts)
Row 2: Ch 1, work 2 sc in each st across. Turn. (10 sts)
Row 3: Ch 1, 2 sc in the first st, sc in each of the next 8 sts, 2 sc in last st. Turn. (12 sts)
Row 4: Ch 1, sc in each st across. Turn. (12 sts)
Row 5: Ch 1, 2 sc in the first st, sc in each of the next 10 sts, 2 sc in last st. Turn. (14 sts)
Row 6: Ch 1, sc in each st across. Turn. (14 sts)
Row 7: Ch 1, 2 sc in the first st, sc in each of the next 12 sts, 2 sc in last st. Turn. (16 sts)
Row 8: Ch 1, sc in each st across. Turn. (16 sts)
Row 9: Ch 1, 2 sc in the first st, sc in each of the next 14 sts, 2 sc in last st. Turn. (18 sts)
Row 10: Ch 1, sc in each st across. Turn. (18 sts)
Row 11: Ch 1, 2 sc in the first st, sc in each of the next 16 sts, 2 sc in last st. Turn. (20 sts)
Rows 12 – 20: Ch 1, sc in each st across. Turn. (20 sts)
Do not fasten off. Continue on to the Upper – Right Side.
Upper Size 5/6 – Right Side
Row 1: Ch 1, sc in the first st, sc in each of the next 5 sts. Before turning, skip each of the next 8 sts and place a SM in the 9th stitch to mark where to join yarn later for the Upper – Left Side. Turn. (6 sts)
Rows 2 – 11: Ch 1, sc in each st across. Turn. (6 sts)
Fasten Off. Continue on to the Upper – Left Side.
Upper Size 5/6 – Left Side
Row 1: With MC (bulky) yarn & a 5.50mm crochet hook, join yarn with a standing sc in the st marked with a SM, sc in each of the next 5 sts. Turn. (6 sts)
Rows 2 – 12: Ch 1, sc in each st across. Turn. (6 sts)
Fasten off, leaving a tail of yarn. With a yarn needle and the tail of yarn you left, line up the last rows of the Upper Left & Right Sides and whipstitch them together. Weave in ends. Continue on to Join Sole & Upper.
Join Sole & Upper
Step 1: Lay the upper on top of the sole. Line up the center toe of the upper with the sole and use a locking stitch marker to hold the pieces together. Line up the center of each heel and use a locking stitch marker to hold them together.
Step 2: Place a few other locking stitch markers around the perimeter to hold the pieces in place while you seam them.
Step 3: With MC (bulky) yarn & a 5.50mm crochet hook, join yarn with a standing sc in the back center of the heel (make sure to work through both layers of the sole & upper), sc evenly around the perimeter of the sole. Join yarn with a sl st to the 1st st. Stitch count is not crucial. Work as many sc around as needed to join the sole & upper.
Weave in ends. Continue on to the Ankle.
Ankle Size 5/6
Rnd 1: With MC (bulky) yarn & a 5.50mm crochet hook, join yarn with a standing sc in the st nearest the center back of the heel, sc in each st and side of each row around. Join with a sl st to the 1st st. (31 sts)
Rnds 2 – 8: Ch 1, sc in each st around. Join. (31 sts)
Fasten Off. Weave in ends. Continue on to the Slipper Cuff below.
Slipper Boots Size 7/8
Finished Size: Length: 9-3/4″ & Width: 4″
Gauge: 3 sc = 1″; 2.75 rows = 1″
Slipper Sole Size 7/8 – Make 2
Row 1: With MC (bulky) yarn & a 5.50mm crochet hook, ch 3 (ch-2 counts as 1st dc), work 8 dc into the 3rd ch from your hook. Do not join. Turn. (9 sts)
Row 2: Ch 2 (counts as a st), dc in the next st (not the same st as ch 2), (2 dc in next st, dc in next 2 sts) twice, 2 dc in last st (last st is the top of ch 2 from beginning of Row 1). Turn. (12 sts)
Row 3: Ch 1, 2 hdc in the first st, (hdc in next st, 2 hdc in next st) 5 times, 2 hdc in last st (last st is the top of ch 2 from beginning of Row 2). Turn. (19 sts)
Row 4: Ch 1, rotate to work across the flat edge of the sole, work 1 sc in the side of each hdc row and 2 sc in the side of each dc row. Turn. (10 sts)
Rows 5 – 10: Ch 1, sc in each st across. Turn. (10 sts)
Row 11: Ch 1, sc2tog, sc in each of the next 6 sts, sc2tog. Turn. (8 sts)
Rows 12 – 24: Ch 1, sc in each st across. Turn. (8 sts)
Row 25: Ch 1, sc2tog, sc in each of the next 4 sts, sc2tog. Turn. (6 sts)
Row 26: Ch 1, sc2tog, sc in each of the next 2 sts, sc2tog. (4 sts)
Note: If you have wide feet, you may get a better fit by working 1 sc in each stitch around your sole before continuing.
Fasten Off. Weave in ends.
Upper Size 7/8 – Make 2
Row 1: With MC (bulky) yarn & a 5.50mm crochet hook, ch 6, working into the back hump of the ch, sc in the 2nd ch from your hook and in each ch across. Turn. (5 sts)
Row 2: Ch 1, work 2 sc in each st across. Turn. (10 sts)
Row 3: Ch 1, 2 sc in the first st, sc in each of the next 8 sts, 2 sc in last st. Turn. (12 sts)
Row 4: Ch 1, sc in each st across. Turn. (12 sts)
Row 5: Ch 1, 2 sc in the first st, sc in each of the next 10 sts, 2 sc in last st. Turn. (14 sts)
Row 6: Ch 1, sc in each st across. Turn. (14 sts)
Row 7: Ch 1, 2 sc in the first st, sc in each of the next 12 sts, 2 sc in last st. Turn. (16 sts)
Row 8: Ch 1, sc in each st across. Turn. (16 sts)
Row 9: Ch 1, 2 sc in the first st, sc in each of the next 14 sts, 2 sc in last st. Turn. (18 sts)
Row 10: Ch 1, sc in each st across. Turn. (18 sts)
Row 11: Ch 1, 2 sc in the first st, sc in each of the next 16 sts, 2 sc in last st. Turn. (20 sts)
Rows 12 – 15: Ch 1, sc in each st across. Turn. (20 sts)
Row 16: Ch 1, 2 sc in the first st, sc in each of the next 18 sts, 2 sc in last st. Turn. (22 sts)
Rows 17 – 22: Ch 1, sc in each st across. Turn. (22 sts)
Do not fasten off. Continue on to the Upper – Right Side.
Upper Size 7/8 – Right Side
Row 1: Ch 1, sc in the first st, sc in each of the next 5 sts. Before turning, skip each of the next 10 sts and place a SM in the 11th stitch to mark where to join yarn later for the Upper – Left Side. Turn. (6 sts)
Rows 2 – 11: Ch 1, sc in each st across. Turn. (6 sts)
Fasten Off. Continue on to the Upper – Left Side.
Upper Size 7/8 – Left Side
Row 1: With MC (bulky) yarn & a 5.50mm crochet hook, join yarn with a standing sc in the st marked with a SM, sc in each of the next 5 sts. Turn. (6 sts)
Rows 2 – 12: Ch 1, sc in each st across. Turn. (6 sts)
Fasten off, leaving a tail of yarn. With a yarn needle and the tail of yarn you left, line up the last rows of the Upper Left & Right Sides and whipstitch them together. Weave in ends. Continue on to Join Sole & Upper.
Join Sole & Upper
Step 1: Lay the upper on top of the sole. Line up the center toe of the upper with the sole and use a locking stitch marker to hold the pieces together. Line up the center of each heel and use a locking stitch marker to hold them together.
Step 2: Place a few other locking stitch markers around the perimeter to hold the pieces in place while you seam them.
Step 3: With MC (bulky) yarn & a 5.50mm crochet hook, join yarn with a standing sc in the back center of the heel (make sure to work through both layers of the sole & upper), sc evenly around the perimeter of the sole. Join yarn with a sl st to the 1st st. Stitch count is not crucial. Work as many sc around as needed to join the sole & upper.
Weave in ends. Continue on to the Ankle.
Ankle Size 7/8
Rnd 1: With MC (bulky) yarn & a 5.50 mm crochet hook, join yarn with a standing sc in the st nearest the center back of the heel, sc in each st and side of each row around. Join with a sl st to the 1st st. (33 sts)
Rnds 2 – 8: Ch 1, sc in each st around. Join. (33 sts)
Fasten Off. Weave in ends. Continue on to the Slipper Cuff below.
Slipper Boot Size 9/10
Finished Size: Length: 10-3/4″ & Width: 4″
Gauge: 3 sc = 1″; 2.75 rows = 1″
Slipper Sole Size 9/10 – Make 2
Row 1: With MC (bulky) yarn & a 5.50 mm crochet hook, ch 3 (ch-2 counts as 1st dc), work 8 dc into the 3rd ch from your hook. Do not join. Turn. (9 sts)
Row 2: Ch 2 (counts as a st), dc in the next st (not the same st as ch 2), (2 dc in next st, dc in next 2 sts) twice, 2 dc in last st (last st is the top of ch 2 from beginning of Row 1). Turn. (12 sts)
Row 3: Ch 1, 2 hdc in the first st, (hdc in next st, 2 hdc in next st) 5 times, 2 hdc in last st (last st is the top of ch 2 from beginning of Row 2). Turn. (19 sts)
Row 4: Ch 1, rotate to work across the flat edge of the sole, work 1 sc in the side of each hdc row and 2 sc in the side of each dc row. Turn. (10 sts)
Rows 5 – 11: Ch 1, sc in each st across. Turn. (10 sts)
Row 12: Ch 1, sc2tog, sc in each of the next 6 sts, sc2tog. Turn. (8 sts)
Rows 13 – 26: Ch 1, sc in each st across. Turn. (8 sts)
Row 27: Ch 1, sc2tog, sc in each of the next 4 sts, sc2tog. Turn. (6 sts)
Row 28: Ch 1, sc2tog, sc in each of the next 2 sts, sc2tog. (4 sts)
Note: If you have wide feet, you may get a better fit by working 1 sc in each stitch around your sole before continuing.
Fasten Off. Weave in ends.
Upper Size 9/10 – Make 2
Row 1: With MC (bulky) yarn & a 5.50 mm crochet hook, ch 6, working into the back hump of the ch, sc in the 2nd ch from your hook and in each ch across. Turn. (5 sts)
Row 2: Ch 1, work 2 sc in each st across. Turn. (10 sts)
Row 3: Ch 1, 2 sc in the first st, sc in each of the next 8 sts, 2 sc in last st. Turn. (12 sts)
Row 4: Ch 1, sc in each st across. Turn. (12 sts)
Row 5: Ch 1, 2 sc in the first st, sc in each of the next 10 sts, 2 sc in last st. Turn. (14 sts)
Row 6: Ch 1, sc in each st across. Turn. (14 sts)
Row 7: Ch 1, 2 sc in the first st, sc in each of the next 12 sts, 2 sc in last st. Turn. (16 sts)
Row 8: Ch 1, sc in each st across. Turn. (16 sts)
Row 9: Ch 1, 2 sc in the first st, sc in each of the next 14 sts, 2 sc in last st. Turn. (18 sts)
Row 10: Ch 1, sc in each st across. Turn. (18 sts)
Row 11: Ch 1, 2 sc in the first st, sc in each of the next 16 sts, 2 sc in last st. Turn. (20 sts)
Rows 12 – 15: Ch 1, sc in each st across. Turn. (20 sts)
Row 16: Ch 1, 2 sc in the first st, sc in each of the next 18 sts, 2 sc in last st. Turn. (22 sts)
Rows 17 – 22: Ch 1, sc in each st across. Turn. (22 sts)
Do not fasten off. Continue on to the Upper – Right Side.
Upper Size 9/10 – Right Side
Row 1: Ch 1, sc in the first st, sc in each of the next 5 sts. Before turning, skip each of the next 10 sts and place a SM in the 11th stitch to mark where to join yarn later for the Upper – Left Side. Turn. (6 sts)
Rows 2 – 12: Ch 1, sc in each st across. Turn. (6 sts)
Fasten Off. Continue on to the Upper – Left Side.
Upper Size 9/10 – Left Side
Row 1: With MC (bulky) yarn & a 5.50 mm crochet hook, join yarn with a standing sc in the st marked with a SM, sc in each of the next 5 sts. Turn. (6 sts)
Rows 2 – 13: Ch 1, sc in each st across. Turn. (6 sts)
Fasten off, leaving a tail of yarn. With a yarn needle and the tail of yarn you left, line up the last rows of the Upper Left & Right Sides and whipstitch them together. Weave in ends. Continue on to Join Sole & Upper.
Join Sole & Upper
Step 1: Lay the upper on top of the sole. Line up the center toe of the upper with the sole and use a locking stitch marker to hold the pieces together. Line up the center of each heel and use a locking stitch marker to hold them together.
Step 2: Place a few other locking stitch markers around the perimeter to hold the pieces in place while you seam them.
Step 3: With MC (bulky) yarn & a 5.50 mm crochet hook, join yarn with a standing sc in the back center of the heel (make sure to work through both layers of the sole & upper), sc evenly around the perimeter of the sole. Join yarn with a sl st to the 1st st. Stitch count is not crucial. Work as many sc around as needed to join the sole & upper.
Weave in ends. Continue on to the Ankle.
Ankle Size 9/10
Rnd 1: With MC (bulky) yarn & a 5.50 mm crochet hook, join yarn with a standing sc in the st nearest the center back of the heel, sc in each st and side of each row around. Join with a sl st to the 1st st. (35 sts)
Rnds 2 – 8: Ch 1, sc in each st around. Join. (35 sts)
Fasten Off. Weave in ends. Continue on to the Slipper Cuff below.
Slipper Boot Size 11/12
Finished Size: Length: 11-1/4″ & Width: 4-1/2″
Gauge: 3 sc = 1″; 2.75 rows = 1″
Slipper Sole Size 11/12 – Make 2
Row 1: With MC (bulky) yarn & a 5.50mm crochet hook, ch 3 (ch-2 counts as 1st dc), work 8 dc into the 3rd ch from your hook. Do not join. Turn. (9 sts)
Row 2: Ch 2 (counts as a st), dc in the next st (not the same st as ch 2), (2 dc in next st, dc in next 2 sts) twice, 2 dc in last st (last st is the top of ch 2 from beginning of Row 1). Turn. (12 sts)
Row 3: Ch 2 (does not count as a st), 2 dc in the first st, (dc in next st, 2 dc in next st) 5 times, 2 dc in last st (last st is the top of ch 2 from beginning of Row 2). Turn. (19 sts)
Row 4: Ch 1, rotate to work across the flat edge of the sole, work 2 sc in the side of each dc row. Turn. (12 sts)
Rows 5 – 12: Ch 1, sc in each st across. Turn. (12 sts)
Row 13: Ch 1, sc2tog, sc in each of the next 8 sts, sc2tog. Turn. (10 sts)
Rows 14 – 28: Ch 1, sc in each st across. Turn. (10 sts)
Row 29: Ch 1, sc2tog, sc in each of the next 6 sts, sc2tog. Turn. (8 sts)
Row 30: Ch 1, sc2tog, sc in each of the next 4 sts, sc2tog. (6 sts)
Note: If you have wide feet, you may get a better fit by working 1 sc in each stitch around your sole before continuing.
Fasten Off. Weave in ends.
Upper Size 11/12 – Make 2
Row 1: With MC (bulky) yarn & a 5.50mm crochet hook, ch 6, working into the back hump of the ch, sc in the 2nd ch from your hook and in each ch across. Turn. (5 sts)
Row 2: Ch 1, work 2 sc in each st across. Turn. (10 sts)
Row 3: Ch 1, 2 sc in the first st, sc in each of the next 8 sts, 2 sc in last st. Turn. (12 sts)
Row 4: Ch 1, sc in each st across. Turn. (12 sts)
Row 5: Ch 1, 2 sc in the first st, sc in each of the next 10 sts, 2 sc in last st. Turn. (14 sts)
Row 6: Ch 1, sc in each st across. Turn. (14 sts)
Row 7: Ch 1, 2 sc in the first st, sc in each of the next 12 sts, 2 sc in last st. Turn. (16 sts)
Row 8: Ch 1, sc in each st across. Turn. (16 sts)
Row 9: Ch 1, 2 sc in the first st, sc in each of the next 14 sts, 2 sc in last st. Turn. (18 sts)
Row 10: Ch 1, sc in each st across. Turn. (18 sts)
Row 11: Ch 1, 2 sc in the first st, sc in each of the next 16 sts, 2 sc in last st. Turn. (20 sts)
Rows 12 – 15: Ch 1, sc in each st across. Turn. (20 sts)
Row 16: Ch 1, 2 sc in the first st, sc in each of the next 18 sts, 2 sc in last st. Turn. (22 sts)
Row 17: Ch 1, 2 sc in the first st, sc in each of the next 20 sts, 2 sc in last st. Turn. (24 sts)
Rows 18 – 24: Ch 1, sc in each st across. Turn. (24 sts)
Do not fasten off. Continue on to the Upper – Right Side.
Upper Size 11/12 – Right Side
Row 1: Ch 1, sc in the first st, sc in each of the next 6 sts. Before turning, skip each of the next 10 sts and place a SM in the 11th stitch to mark where to join yarn later for the Upper – Left Side. Turn. (7 sts)
Rows 2 – 12: Ch 1, sc in each st across. Turn. (7 sts)
Fasten Off. Continue on to the Upper – Left Side.
Upper Size 11/12 – Left Side
Row 1: With MC (bulky) yarn & a 5.50mm crochet hook, join yarn with a standing sc in the st marked with a SM, sc in each of the next 6 sts. Turn. (7 sts)
Rows 2 – 13: Ch 1, sc in each st across. Turn. (67sts)
Fasten off, leaving a tail of yarn. With a yarn needle and the tail of yarn you left, line up the last rows of the Upper Left & Right Sides and whipstitch them together. Weave in ends. Continue on to Join Sole & Upper.
Join Sole & Upper
Step 1: Lay the upper on top of the sole. Line up the center toe of the upper with the sole and use a locking stitch marker to hold the pieces together. Line up the center of each heel and use a locking stitch marker to hold them together.
Step 2: Place a few other locking stitch markers around the perimeter to hold the pieces in place while you seam them.
Step 3: With MC (bulky) yarn & a 5.50mm crochet hook, join yarn with a standing sc in the back center of the heel (make sure to work through both layers of the sole & upper), sc evenly around the perimeter of the sole. Join yarn with a sl st to the 1st st. Stitch count is not crucial. Work as many sc around as needed to join the sole & upper.
Weave in ends. Continue on to the Ankle.
Ankle Size 11/12
Rnd 1: With MC (bulky) yarn & a 5.50mm crochet hook, join yarn with a standing sc in the st nearest the center back of the heel, sc in each st and side of each row around. Join with a sl st to the 1st st. (35 sts)
Rnds 2 – 8: Ch 1, sc in each st around. Join. (35 sts)
Fasten Off. Weave in ends. Continue on to the Slipper Cuff below.
Slipper Cuff – All Sizes
You’ll begin the slipper cuff by first crocheting the stretchy ribbed band. Then, you’ll crochet the textured portion around the long edge of the band.
Stretchy Ribbed Band
Gauge: In CC1 yarn & a 5.00mm crochet hook, in BLO sl st: 4 sts = 1″ W; 13 rows = 2″
Row 1 (RS): With CC1 yarn & a 5.00mm crochet hook, ch 5, working in the back humps of the chain, sl st into the 2nd ch from your hook and into each ch across. Turn. (4 sts) Place a SM in the bottom of the last st of the first row.
Rows 2 – 69: Ch 1, BLO sl st in each st across. Turn. (4 sts)
Do not fasten off. Stretchy Ribbed Band, unstretched, should measure approximately 1″ W x 10-1/2″ L. Continue on to Prepare Edge for Textured Cuff.
Prepare Edge for Textured Cuff
Rnd 1 (RS): Bring the last row around to meet the first row and join with a sc in the stitch you marked with a SM to form a circle, sc in the same st, then, working around the edge of the stretchy cuff, (sc in the next st, skip the next st) rep from ( to ) 30 times, sc in each of the last 8 sts. Join with a sl st to the 1st st. (40 sts) Place a SM in st #19.
Fasten off. Weave in ends. Continue on to Textured Cuff.
Textured Cuff
Gauge: In CC2 yarn & a 5.00mm crochet hook, in Rows 2 – 8 stitch pattern below: 9 sts = 3″ W; 7.5 rows = 2″
Rnd 1 (RS): With CC2 yarn & a 5.00mm crochet hook, join yarn with a sl st in the st marked with a SM, ch 1, MBS in the first st, ch 1, skip the next st, (MBS in the next st, ch 1, skip the next st) rep from ( to ) 19 times. Join. Turn. (40 sts)
Rnds 2 – 8: Ch 1, MBS in the first ch-1 sp, ch 1, skip the next st, (MBS in the next ch-1 sp , ch 1, skip the next st) rep from ( to ) 19 times. Join. Turn. (40 sts) Switch to CC1 yarn. Fasten off CC2 yarn.
Rnd 9 (RS): With CC1, ch 1, (sc in the next ch-1, spike sc in the next MBS from the previous round) rep from ( to ) around. Join. (40 sts)
Fasten off, leaving a tail of yarn 3 – 4 times the circumference of the cuff. When laid flat, the Textured Cuff measures approximately 5-1/2″ W x 3-1/2″ H, including the stretchy ribbed band. Continue on to the Faux Buttonhole Strap.
Faux Buttonhole Strap
Row 1 (RS): With CC1 yarn & a 5.00mm crochet hook, ch 11, working into the 2nd humps of the ch, work 3 sc in the 2nd ch from your hook, sc in each of the next 8 chs, 3 sc in the last ch, rotate to work in the bottom of the foundation ch, sc in each of the next 8 chs. Join. (22 sts)
Fasten off, leaving a tail of yarn approximately 3 times the perimeter of the strap. Faux Buttonhole Strap is approximately 1/2″ W x 3″L. Continue on to Attaching the Cuff to the Ankle.
Tutorial Photos & Crochet Slipper Progression
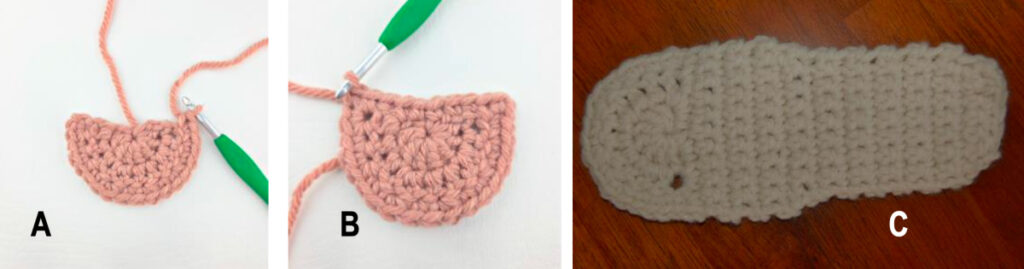
Photo B: Shows Row 4 stitches worked across the flat edge of the half circle that rows 1 – 3 create.
Photo C: Shows a completed sole.
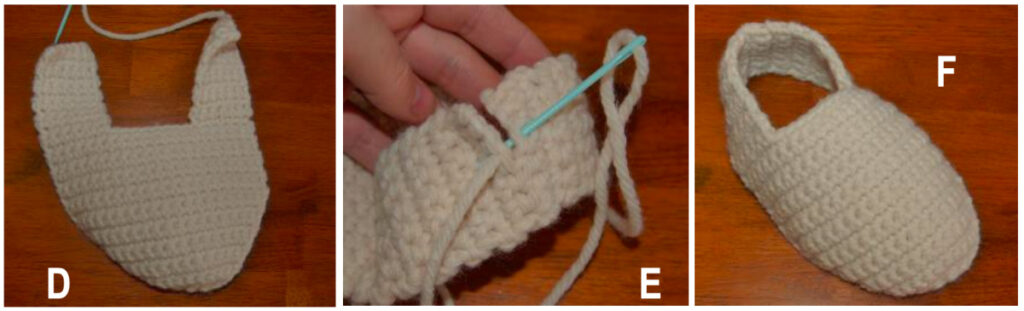
Photo E: Shows the whipstitching of the back of the heel of the upper.
Photo F: Shows the upper after you’ve whipstitched the heel together.
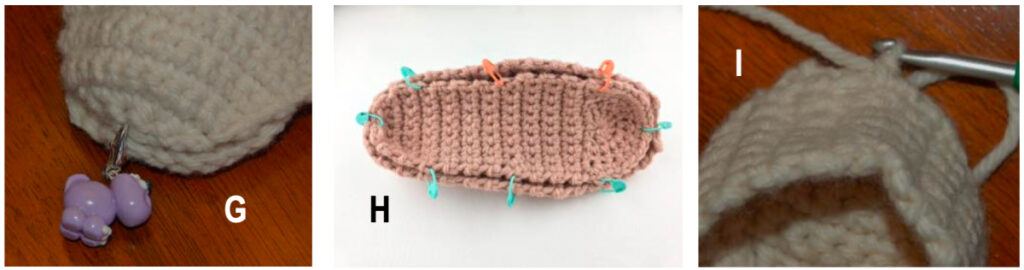
Photo H: Shows several locking stitch markers holding the sole and upper together to prepare for seaming.
Photo I: Shows join with a standing sc (working through both layers of the Upper and the Sole) in the back center of the heel.
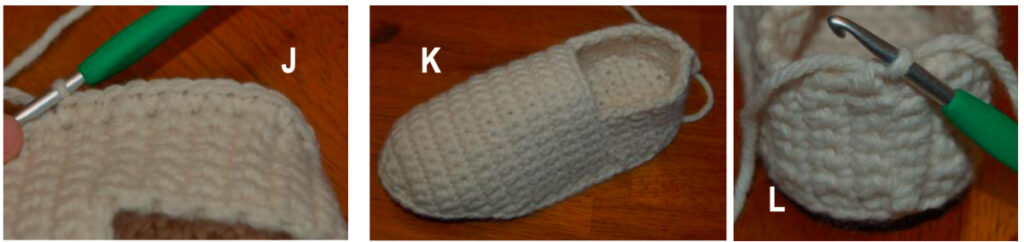
Photo K: Shows the sole attached to the upper.
Photo L: Show yarn joined with a standing single crochet at the center back of the heel to begin the Ankle.
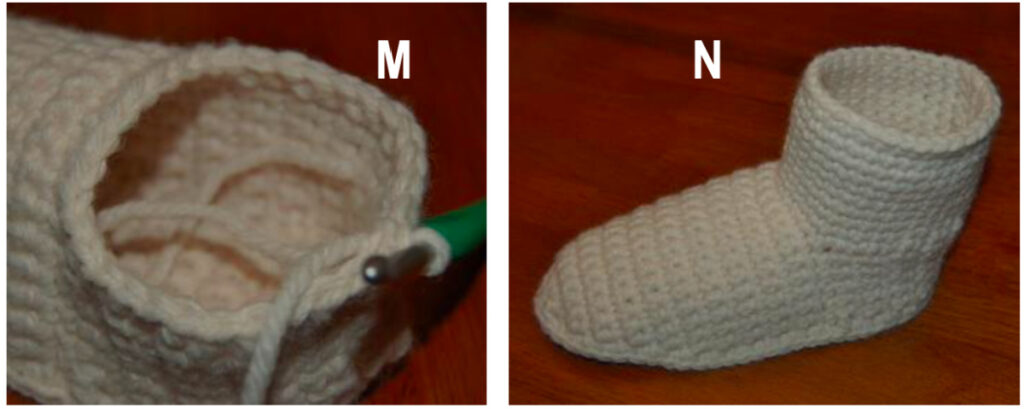
Photo N: Shows the ankle complete. Note that the ankle on the boot shown is taller than the ankle on the Hibernation Slippers. This photo is only used to show the construction.
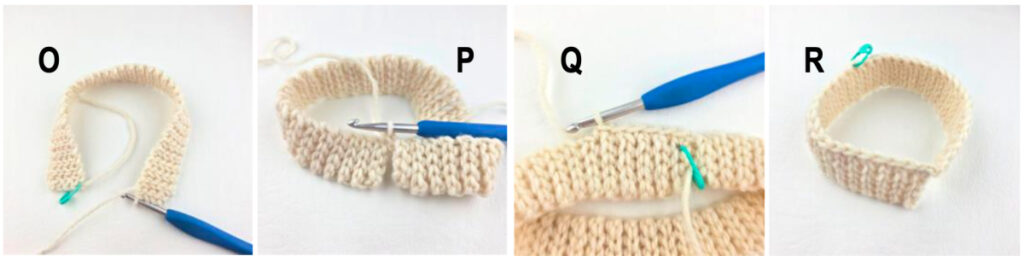
Photo P: Shows the stretchy ribbed band complete and joined with a single crochet in the stitch that was marked.
Photo Q: Shows sc being worked around the edge of the stretchy ribbed band.
Photo R: Shows the stretchy ribbed band complete and a SM placed in the 19th stitch to mark where to join CC2 yarn.
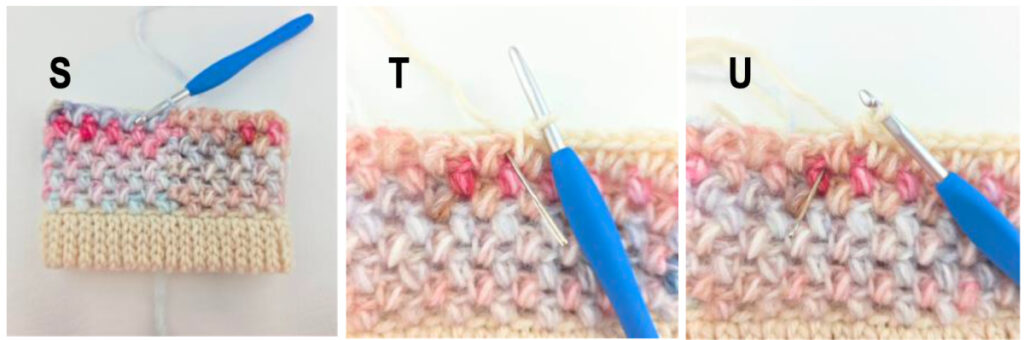
Photo T: The yarn needle is showing to work the sc in the ch-1 space from the previous row.
Photo U: The yarn needle is showing to work the spike sc in the mini-bean stitch that’s one row down.
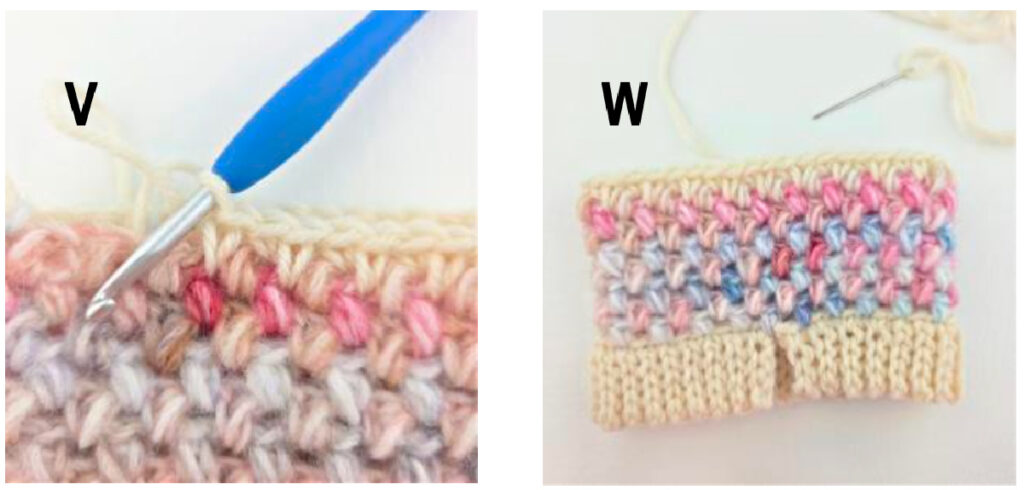
Photo W: Shows a textured cuff ready to attach to the ankle opening of the slipper boot.
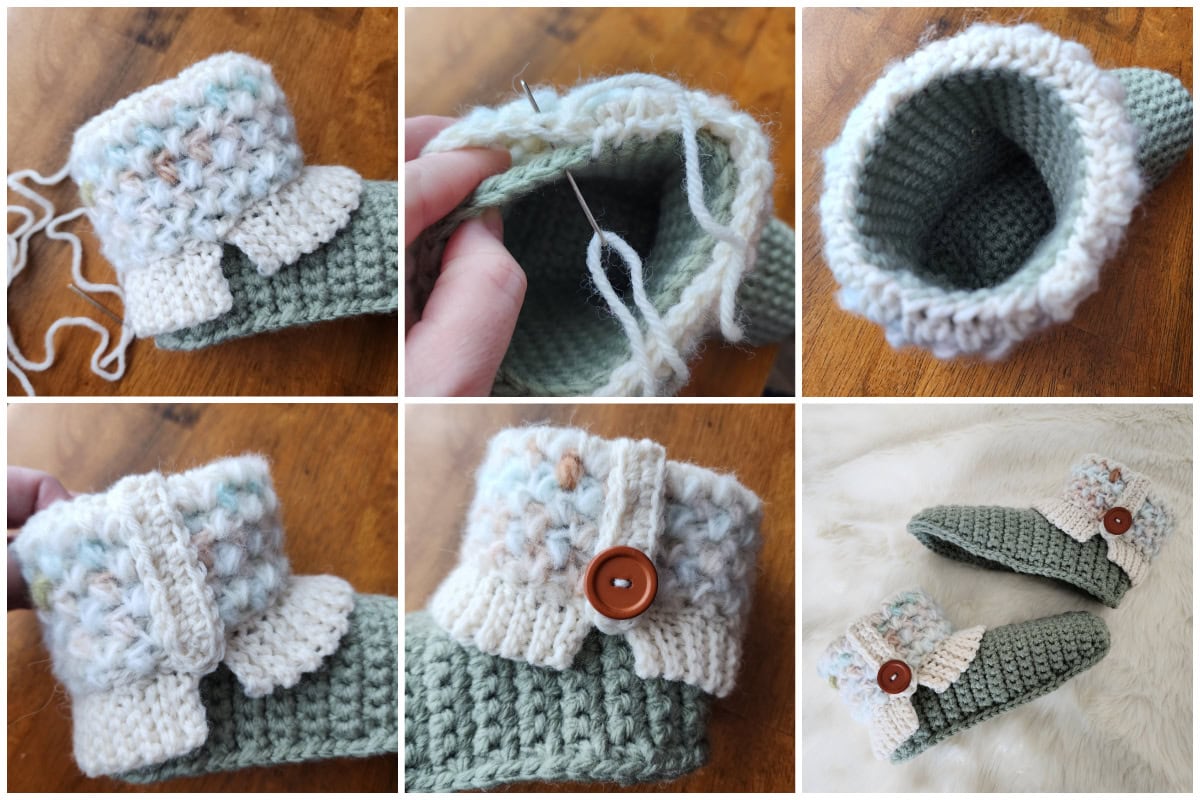
Attaching the Cuff to the Ankle of the Slipper Boot
Step 1: Slip the finished cuff over the ankle of the slipper boot. Position it so that the slit in the ribbed band is on the side of the slipper boot. You’ll have 1 slipper with the slit on the left and one slipper with the slit on the right.
Step 2: With tail of yarn and a yarn needle, whipstitch the top edge of the cuff to the top edge of the ankle. Stitch counts vary between the two openings, just position the stitches evenly around. The cuff has more stitches than the ankle so you will work twice into a few stitches of the cuff to make up for this.
Step 3: Position the Faux Buttonhole Strap on the side of the cuff, just above the slit in the ribbed band. With tail of yarn and yarn needle, attach the faux buttonhole strap to the cuff. Weave in ends.
Step 4: Position a button on the faux buttonhole strap, as shown below. Use yarn and yarn needle to attach the button to the faux buttonhole strap. Weave in ends.
One slipper boot is complete. Repeat all steps to complete the second slipper boot.
I MADE IT! NOW WHAT?
Pin this post!: Save this crochet slipper boots pattern to your Pinterest boards so that you can come back and make it again.
Leave a comment below: We love to hear your feedback.
Share Your Finished Projects on Facebook or Instagram: I love to see your finished projects! Share with us on social media and tag me @acrochetedsimplicity or use the hashtag #ACrochetedSimplicity so I can find your posts.
Join us in the Facebook Community Group!
Come share your finished projects with us in the A Crocheted Simplicity Crochet Community Group on Facebook. Join us for fun community events such as crochet alongs, join in on crochet conversations, ask questions, get advice, and share your love for crochet!

Free Crochet Accessory Patterns I Think You’ll Love
More Cozy Crochet Patterns
Are you looking for more cozy crochet patterns for fall and winter? We have several more patterns for crochet sweaters, mittens, beanies, and blankets.
We also have a few premium crochet slipper patterns as well.
I like it.
Hi Natasha,
If you scroll down the page, you’ll find a section title “Progression Photos of Sole, Upper, and Ankle”. It is just before the Slipper Cuff section.
In these progression photos, if you look at Photo A, you’ll see a half circle on the left side of the photo. This half circle is how the sole is started (this is the toe area). You’ll crochet the half circle, then move on and crochet across the flat edge of that half circle to complete the sole (to the heel).
Does this make sense?
Jennifer
Love, love this patten. Am going to do what you said and add a flip flop sole to the bottom of them. I have done crochet flip flop but not with slipper boot. This will be funny to do. With let you know how it comes out. Ana
Hi Ana,
I’d love to see a photo when you’ve made them! 🙂
Happy Crocheting,
Jennifer
I love the look of this slipper!
I have a question. The directions for the sole and upper say to make 2. Is that for the second slipper, or are they joined together to be double thick?
Hi Karen,
Make one per slipper. Although if you prefer a thicker sole, you can double them up. You’ll just need more yarn than what is stated in the pattern.
Happy Crocheting,
Jennifer
Love this slipper! Made one pair for my 94 year old mom and in the process of making another! Replacing those “slipper socks” which were a pain because you always had to adjust them when they caught on her toenails! Kudos, Jennifer
Hello-just started with sole of size 7/8
However it doesn’t look long enough
I wear a size 8 shoe and my foot measures 9”” long but the sole of 7/8 size measures 6.5”” long
Did I do something wrong or is that right?
Thank you Karen
I moved up to a size 6 hook and finished one sole which looks better-measures 9 1/4” long
Hi Karen,
I’m glad you’re on the right track now! 🙂
Happy Crocheting,
Jennifer
Thank you so much. This is exactly what I need.
We live in our RV. I sit in front of my computer most of the time. I sit indian style all the time. I need something I can walk around in, in here – we have carpet – and not have to remove them everytime I sit down. This is perfect. Will use my merino wool yarn to make these.
I should note, I have merino socks but the bottoms wear out.
Thanks again,
Laura
love the boot slippers