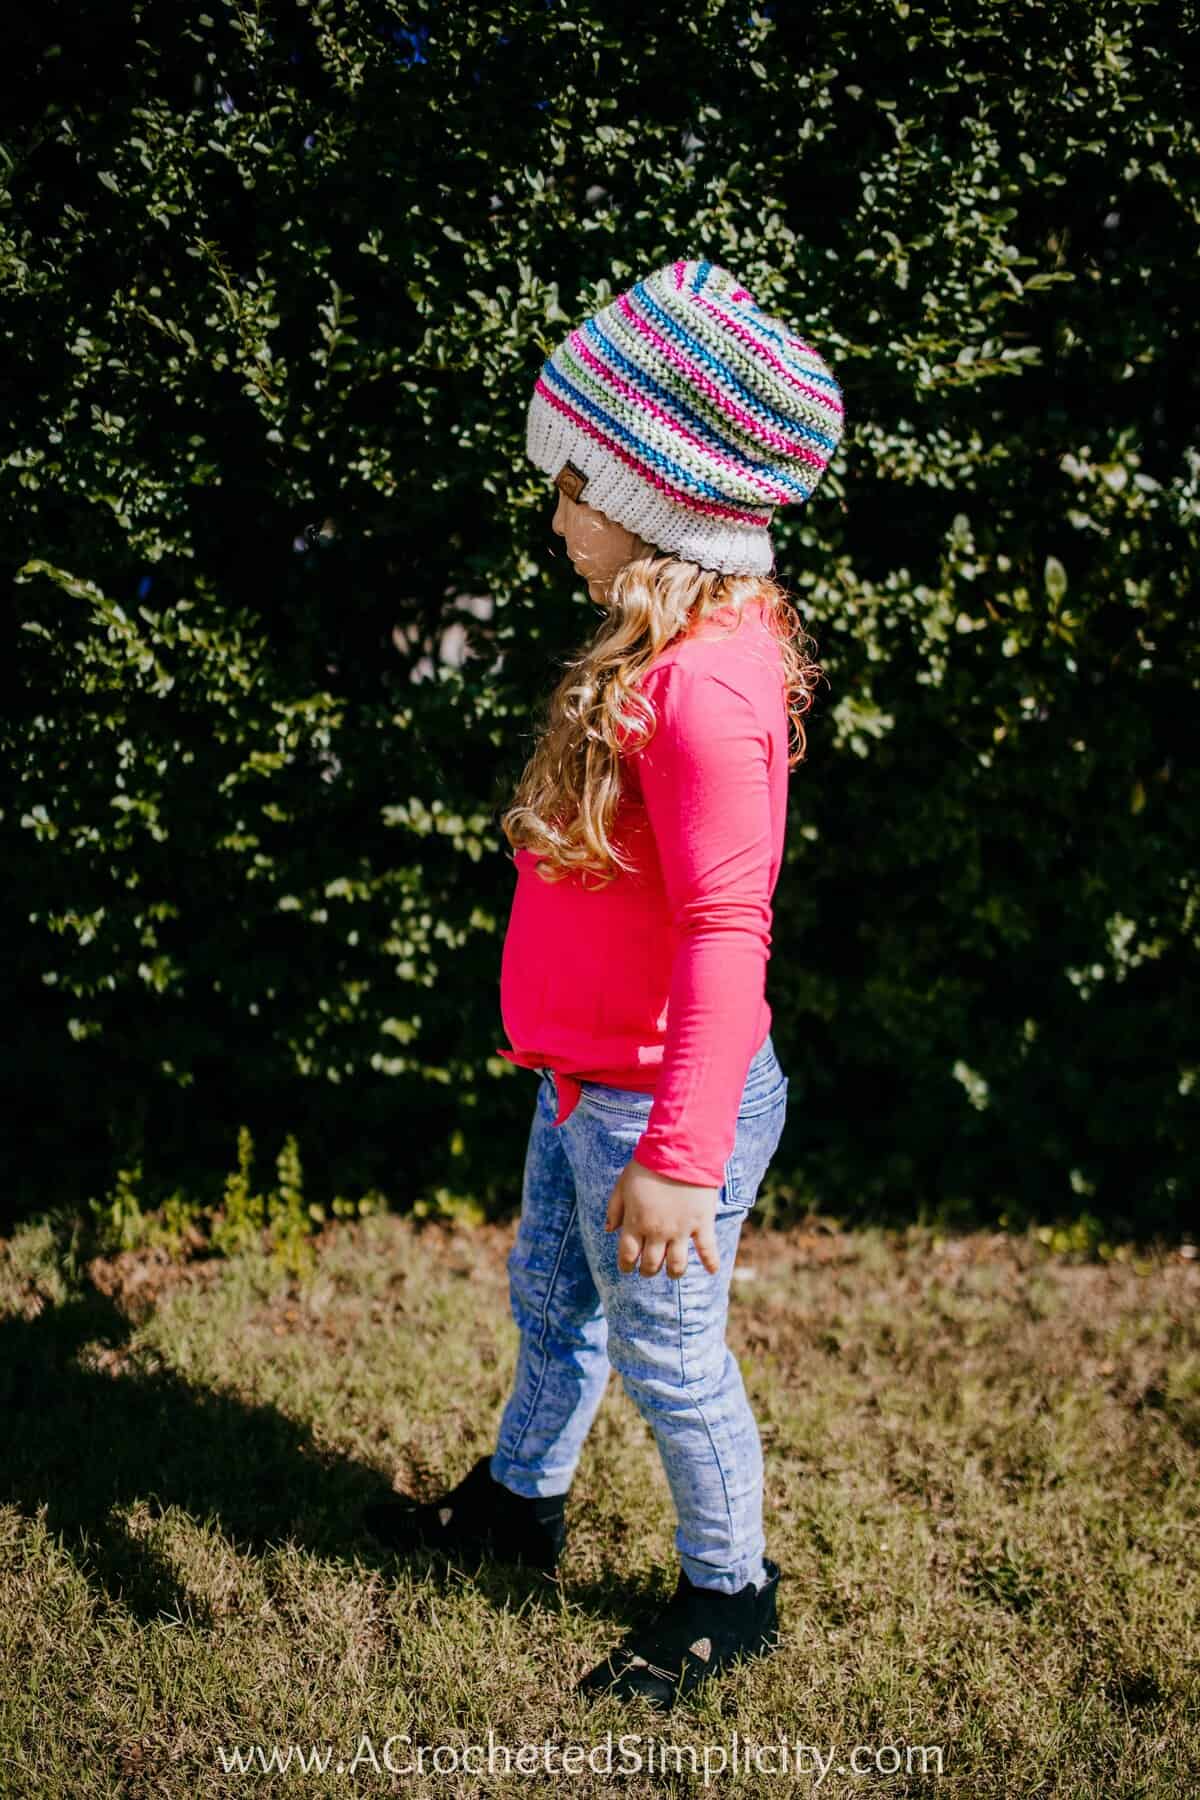
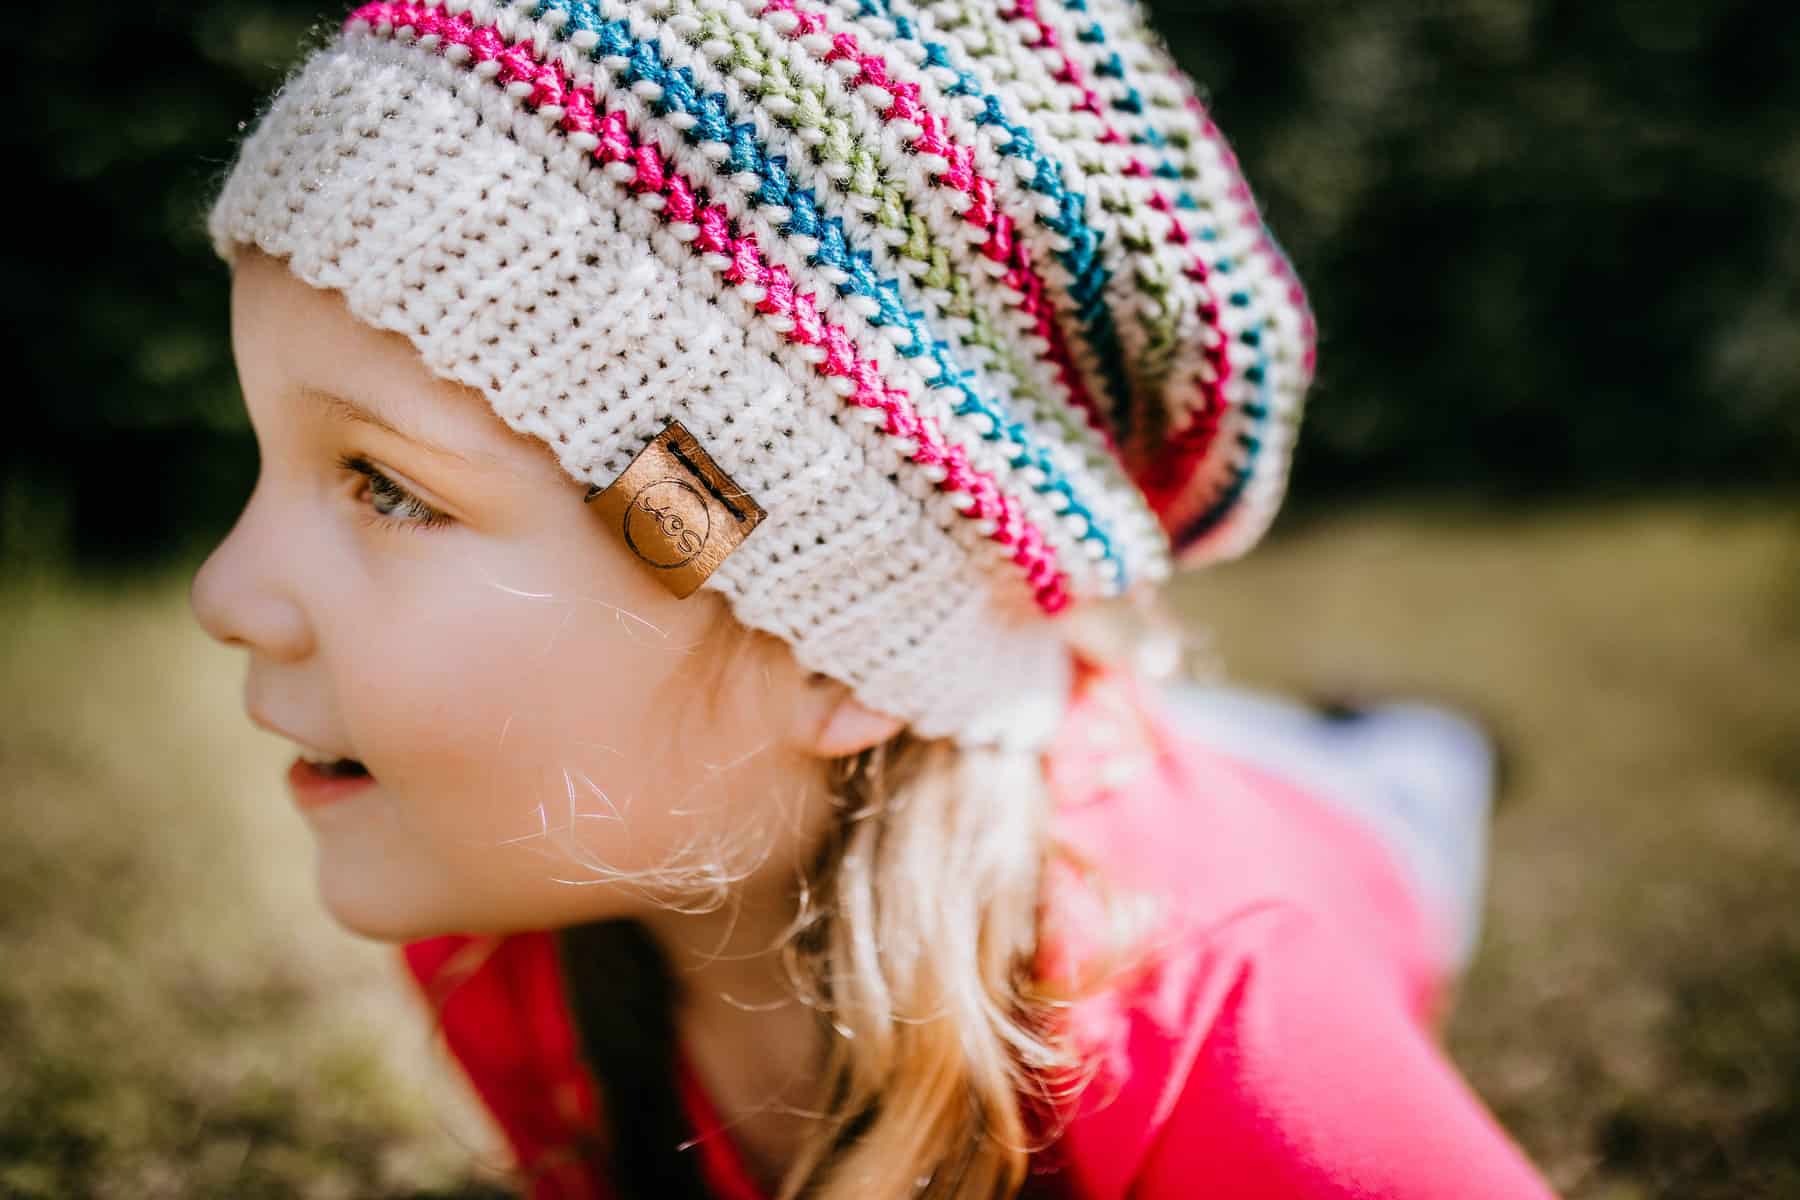
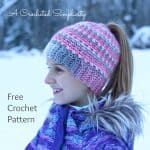
Aurora Slouch – Free Crochet Hat Pattern
For the Aurora Slouch, I’ve combined several simple crochet stitches that add both a nice texture and drape.The free crochet slouch pattern can be found in this blog post below, or you can purchase an ad-free, easily printable PDF on Love Crafts here, Ravelry here or Etsy here.
>> CLICK HERE TO SIGN-UP TO RECEIVE OUR NEWSLETTER <<
Aren’t personalized leather tags such a great finishing touch to add to our crochet items? I ordered these ones and a couple different wooden ones from an awesome online maker. You can find links to where I purchased and a tutorial on how to attach all of them HERE.
THE YARN
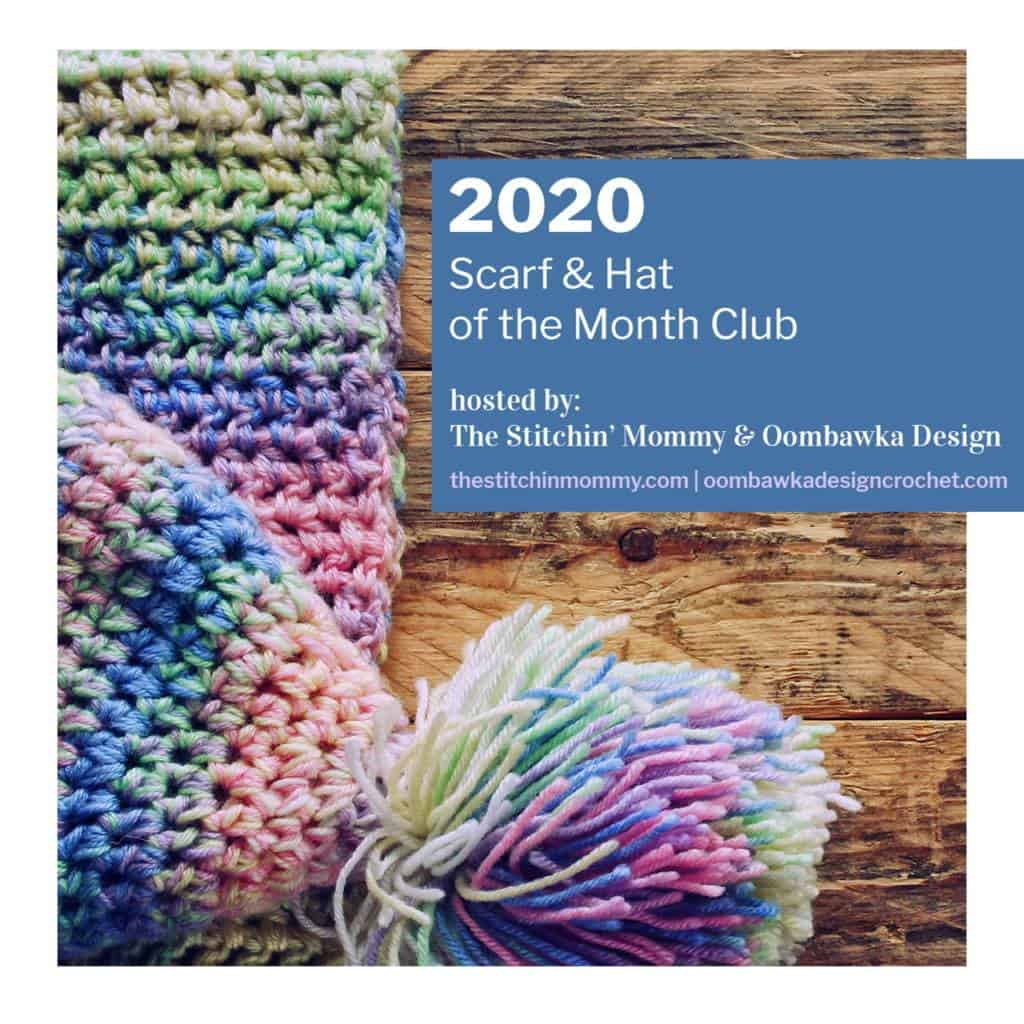
2020 SCARF & HAT OF THE MONTH CLUB
The Aurora Slouch free crochet pattern is my contribution to the 2020 Scarf and Hat of the Month Club CAL with Rhondda from Oombawka Design and Amy from The Stitchin’ Mommy. This is a fun, year long crochet along where you will find a total of 36 new free crochet scarf and hat patterns from Rhondda, Amy, and 6 guest designers! Today only, make sure that you grab your free pdf of my Aurora Slouch (scroll down to the BIG PINK BUTTON below) and free pdfs of Rhondda’s XXXXXXX, and Amy’s XXXXXXXX crochet patterns!
If you would like to know more about this CAL, including the schedule please visit the links above (or click the picture below).
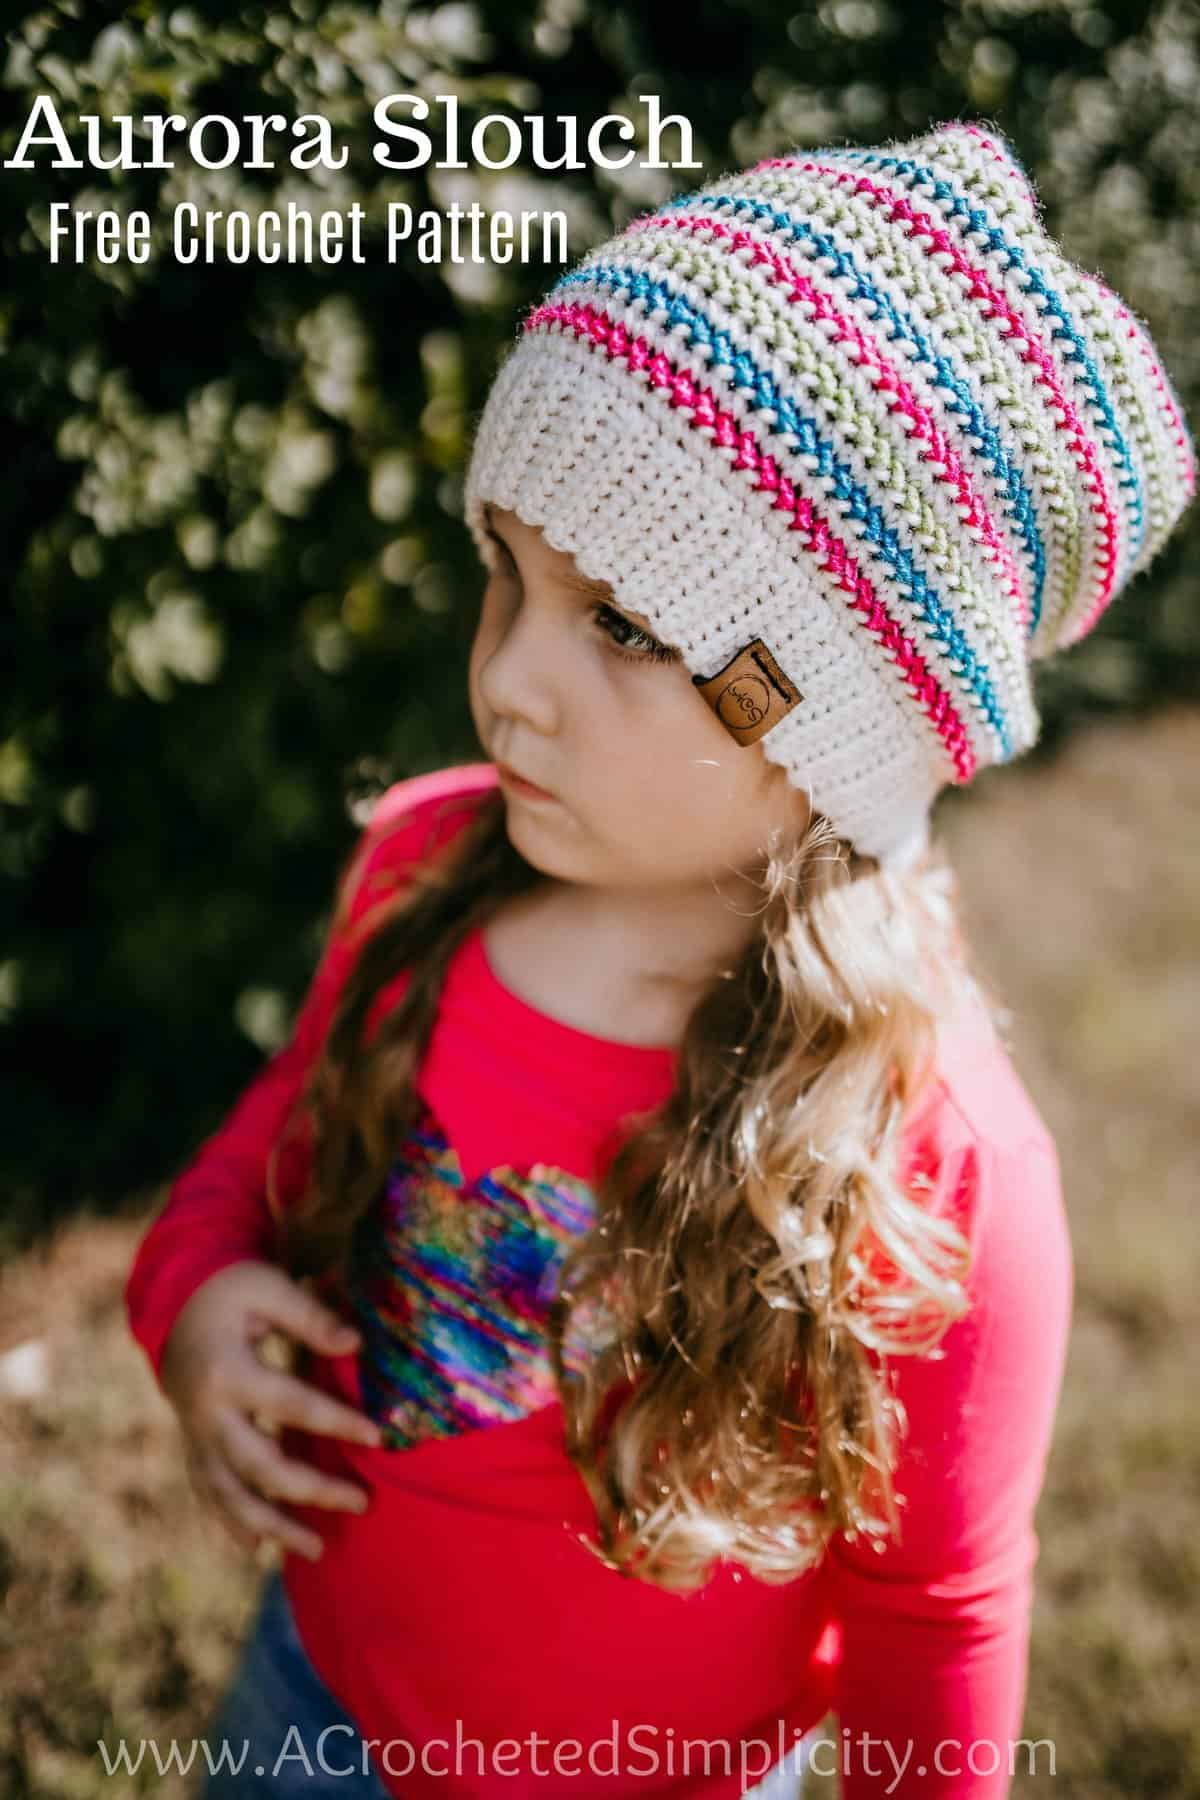
AURORA SLOUCH – FREE CROCHET HAT PATTERN
The free pattern is below, but if you love to work offline, or need to order your yarn, I’ve got a couple other great options for you.
Purchase the ad-free, printable PDF, including all photo tutorials, on Love Crafts here, Ravelry here, or Etsy here.
Save this pattern to your Ravelry favorites here.
Pin it for later here.
This post contains affiliate links.
MATERIALS
- Yarn: Worsted Weight Yarn / 4 / Any Color (I chose Lion Brands Wool Ease and Mandala Ombre)
- Yardage:
- MC (Wool Ease): 180 yards (200 yards, 240 yards)
- CC (Mandala): 80 yards (100 yards, 120 yards)
- Yardage:
- Crochet Hooks: G/6/4.00mm, H/8/5.00mm (My favorite crochet hooks are the Clover Amour Hooks, I’ve never had an ache in my hand since switching)
- Scissors
- Yarn Needle
- Scrap piece of yarn or stitch marker
- Faux Fur Pom (optional – I LOVE these poms!)
Many of these materials are available for purchase through our affiliates below:
 Lion Brand Yarn Wool-Ease Yarn, Fisherman") (1 Skein) Lion Brand Yarn W...Shop on Amazon
(1 Skein) Lion Brand Yarn W...Shop on Amazon ") JINSEY 12pcs Faux Fur Fluff...Shop on Amazon
JINSEY 12pcs Faux Fur Fluff...Shop on Amazon  Clover 1047/H Deep Blue Amo...Shop on Amazon
  Fiskars 154110-1001 Non-sti...Shop on Amazon
  Lion Brand Yarn 400-5-5002 ...Shop on Amazon
Gauge
- In hat band stitch pattern: 4.5 sts = 2″; 9 rows = 2″
- Body of Hat: 7.5 sts = 2″; 7 rounds = 2″
Fits Head Size
- Kids: 18″ – 20″ circ.
- Teen / Adult Small: 20-1/2″ – 22-1/2″ circ.
- Adult Medium / Large: 23″ – 24-1/2″ circ.
Abbreviations (US Terms)
- ch(s): chain(s)
- sl st(s): slip stitch(es)
- st(s): stitch(es)
- sc: single crochet
- Hhdc: herringbone half double crochet (click here for tutorial)
- Hhdc2tog: Hhdc decrease
- RS: Right Side
- BLO: back loop only
- Rep: repeat
- Rnd: round
- yo: yarn over
- MC: main color (cream)
- CC: contrasting color (mandala ombre)
- circ: circumference
Notes
- Turning chains are not included in stitch count unless noted otherwise.
- Yarn Notes: Lion Brand Yarns Wool Ease in Fisherman & Lion Brand Mandala Ombre were used for the samples. Another comparable light worsted weight yarn may be used as long as gauge is met.
- Lion Brand Yarns Wool Ease in Fisherman: 80% Acrylic / 20% Wool (197 yds / 180 m / 85 g / 3 oz)
- Lion Brand Mandala Ombre in Happy, 100% Acrylic (344 yards / 315 m / 150 g / 5.3 oz).
- Changes for sizes are written as follows: Kids (Teen/Adult Small, Adult Medium/Large)
- This hat is worked from the bottom up.
Special Stitches
- Double Stitch: Begin by inserting your hook into the same stitch as the previously worked stitch ended in, yo, pull up a loop, insert your hook into the next stitch, yo, pull up a loop, yo, pull through all 3 loops on your hook. *See the photo tutorial at the end of this pattern. Make sure to look at how to work the last double stitch of the round.
- Herringbone Half Double Crochet (Hhdc): Yo, insert hook into stitch indicated, yo, pull up a loop and pull it thru 1 loop on hook, yo, pull thru remaining loops. Click HERE for tutorial.
- Herringbone Half Double Crochet Decrease (Hhdc2tog): Yo, insert hook into stitch indicated, yo, pull up a loop and pull it thru 1 loop on hook, yo, insert hook into next stitch, yo, pull up a loop and pull it thru 1 loop on hook, yo, pull thru all remaining loops on hook.
- Triple Stitch: Begin by inserting your hook into the same stitch as the previously worked stitch ended in, yo, pull up a loop, (insert your hook into the next stitch, yo, pull up a loop) twice, yo, pull through all 4 loops on your hook.
Stretchy Hat Band
Stretchy Band
Gauge: In stitch pattern as the pattern is written, using a 4mm hook: 4.5 sts = 2″; 9 rows = 2″
Row 1 (RS): Using a 4mm crochet hook, ch 8 (9, 9), working into the back hump of the foundation ch, sc in the 2nd ch from your hook and in each ch across. Turn. ( 7, 8, 8 sts)
Row 2: Ch 1, BLO, sl st in each st across. Turn.
Row 3: Ch 1, BLO, sc in each st across. Turn.
Rows 4 – 67 (77, 85): Rep Rows 2 – 3.
Approximate length at this point (un-stretched): 14.35″ (16.5″, 18.25″)
Row 68 (78, 86) – Seam Row: With RS facing out, bring the first row up to meet the last row (the first row should be in front if you kept the RS facing out). Position your working yarn so that it’s on the inside of the hat band (if needed, click HERE and scroll down to the seam photos in the tutorial). Ch 1, slip stitch the rows together using the following method: insert your hook (from front to back) into the FLO of the 1st stitch of Row 1, insert your hook (from back to front) into the BLO of the 1st stitch of the last row, yo, pull thru all loops on your hook. Continue in this way across the hat band to complete the seam. ( 7, 8, 8 sts)
Do not fasten off. Continue on to Body of Hat.
Body of Hat
The entire Body of Hat is worked in continuous rounds. I strongly suggest using a scrap piece of yarn to keep track of the beginning and ending of each round.
Rnd 1 (RS): With MC & a 5mm crochet hook and working into the sides of the rows of the hat band, ch 1, sc in the side of each row around the hat band. Do not join. Begin using a SM or scrap piece of yarn to keep track of the beginning and ending of each round as you work. (68, 74, 78 sts)
Rnd 3: Hhdc in each st around. Do not join. *Switch to MC.
Repeat Rounds 2 – 3, ending with a round 3, until hat measures approximately: 7.5″ (8″, 8.5″)
Do not fasten off. Continue on to Crown Shaping.
Crown Shaping
Fasten off leaving an 8″ tail of yarn. Using a yarn needle, weave the tail of yarn in and out of the stitches from the last round, pull tail to cinch the crown of the hat closed, knot to secure and weave in ends.
Rnd 1 (MC): (work 5 double sts, then 1 triple st) 10 times, then double st in each remaining st around. Do not join. (58, 64, 68 sts) *Switch to CC.
Rnd 2 (CC): (Hhdc in each of the next 4 sts, then Hhdc2tog over the next 2 sts) 10 times, then Hhdc in each remaining st around. Do not join. (48, 54, 58 sts) *Switch to MC.
Rnd 3 (MC): (work 3 double sts, then 1 triple st) 10 times, then double st in each remaining st around. Do not join. (38, 44, 48 sts) *Switch to CC.
Rnd 4 (CC): (Hhdc in each of the next 2 sts, then Hhdc2tog over the next 2 sts) 10 times, then Hhdc in each remaining st around. Do not join. (28, 34, 38 sts) *Switch to MC.
Rnd 5 (MC): (work 1 double st, then 1 triple st) 10 times, then double st in each remaining st around. Do not join. (18, 24, 28 sts) *Switch to CC.
Rnd 6 (CC): Hhdc in each st around. Do not join. (18, 24, 28 sts) *Switch to MC.
Rnd 7 (MC): Triple st around. Join with a sl st to the 1st st. (9, 12, 14 sts)
Fasten off leaving an 8″ tail of yarn. Using a yarn needle, weave the tail of yarn in and out of the stitches from the last round, pull tail to cinch the crown of the hat closed, knot to secure and weave in ends.
Now that you’ve finished crocheting your Argyle Beanie or Slouch hat, add your own finishing touches using one of these fun options!
- Chain Loop Pom (click here for tutorial)
- Faux Fur Pom (click here)
- Personalized Tags (click here for tutorial)
Double Stitch Photo Tutorial
Note: The very first double stitch of a round is worked differently than the double stitch definition/written instructions below. The instructions below only pertain to the remaining stitches of the round. Follow the photo tutorial to begin the round.
Double Stitch: Begin by inserting your hook into the same stitch as the previously worked stitch ended in, yo, pull up a loop, insert your hook into the next stitch, yo, pull up a loop, yo, pull through all 3 loops on your hook.

Photo Above Left: Photo is of a small swatch of 24 sc. I did not join my round.
Photo Above Center: I used a scrap of yarn as a stitch marker and placed it after the last sc of my swatch.
Photo Above Right: Begin the first double stitch of the round: insert your hook into the first st, yo, pull up a loop,
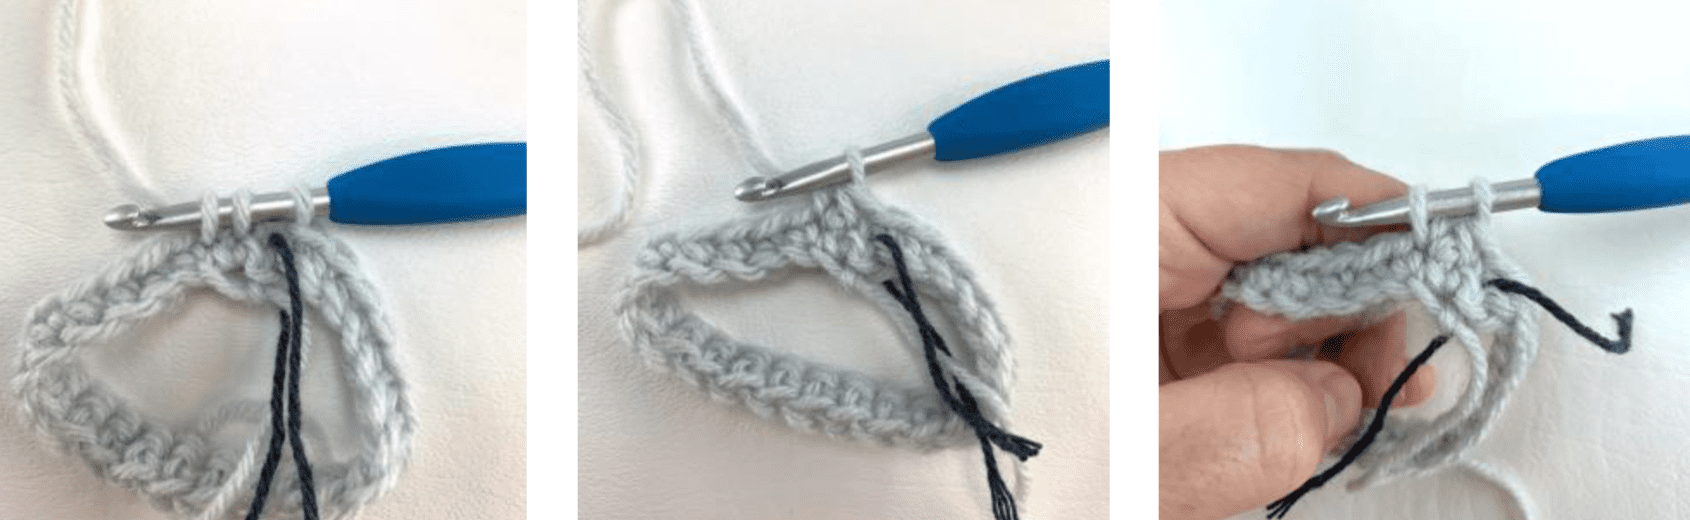
Photo Above Left: Insert your hook into the next st, yo, pull up a loop.
Photo Above Center: Yo, pull through all 3 loops on your hook. Photo shows the first double stitch of the round complete.
Photo Above Right: Begin the next double stitch (and each remaining double stitch) by inserting your hook into the same stitch as the previously worked stitch ended in, yo, pull up a loop.
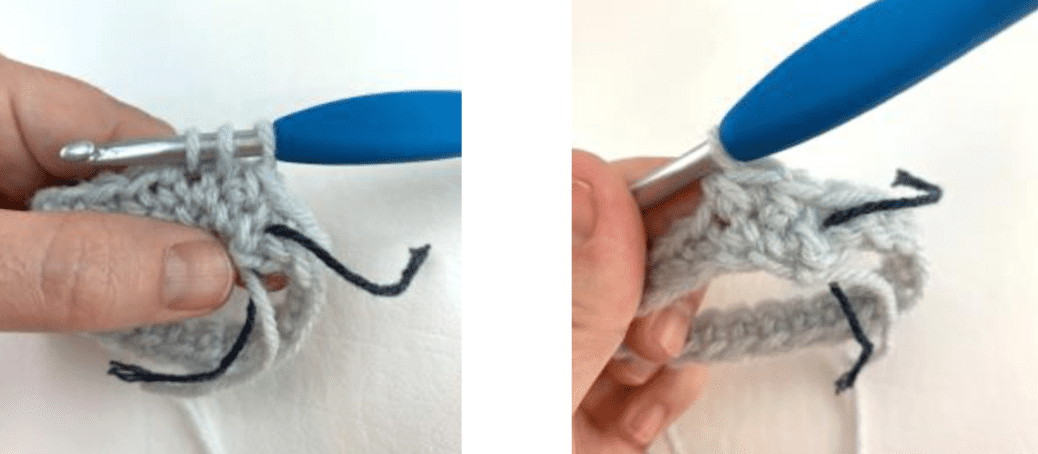
Photo G: Insert your hook into the next st, yo, pull up a loop.
Photo H: Yo, pull through all 3 loops on your hook. Photo shows the second double stitch of the round complete. Continue below to see how to work the last double stitch of a round.
How to work the very last double stitch in a round.

Photo Above Left: The very last double stitch of the round is worked in the last stitch (see the pink arrow) and the same stitch as where you began the first stitch of the round (see the yellow arrow).
Photo Above Right: Insert your hook into the last st, yo, pull up a loop.

Photo Above Left: Insert your hook into the same stitch that you began the very first double stitch of the round in. See yellow arrow. Do not work into the first double stitch, you’ll essentially work under it.
Photo Above Right: Shows the very last double stitch of the round complete.
Note: A triple stitch is ended the same way a double stitch is ended. The last stitch you insert your hook into is the same stitch as where you began your first stitch.
MORE FREE CROCHET PATTERNS FROM A CROCHETED SIMPLICITY
If you enjoy this crochet beanie & slouch pattern, you may enjoy these other projects as well. And if you just want to browse, you can find all of our free crochet patterns HERE.


Are you intimidated by knit-look crochet? Would you love to learn my tips & tricks? Take an Annies Video Class with me and let me ease your fears and help you increase your skills! Click on the photo below to watch a free preview. You can also see the other 4 video classes I have available!

Please share your finished ACS projects with us in the A Crocheted Simplicity Crochet Community Group on Facebook! Use hashtag #ACrochetedSimplicity when sharing on social media so I can find your posts!