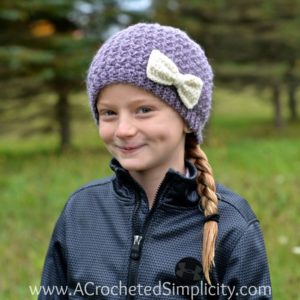
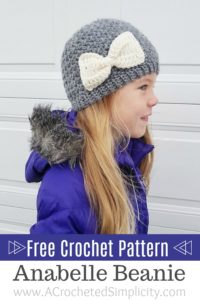
Anabelle Beanie – Free Crochet Pattern
Do you often find yourself using the same stitch pattern for several projects in a row? Either a new to you stitch pattern or an old favorite that you haven’t worked in quite a while? Shortly after I began designing, I started designing collections of patterns. For instance, my Chasing Chevrons patterns were my first collection using a specific stitch pattern.
> CLICK HERE to SIGN-UP to Receive our Newsletter! <
Just recently it was my turn to design a new square for a crochet along and I designed the Textured Twist 12″ Afghan Square (click HERE to see it). During the design process, several other coordinating pieces began running through my head, the Anabelle Beanie is one of them.
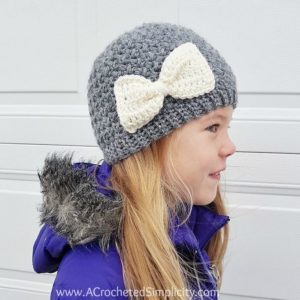
I chose to use Lion Brand Yarns Touch of Alpaca for this hat. I love using the lighter worsted weight / 4 yarns and this one is no exception! Touch of Alpaca offers all the qualities you’ll find in a natural fiber yarn combined with durability and washability. This yarn is available in 16 neutral and jewel tone shades! Click HERE for the Yarn Giveaway! Enter to win before 11:59 pm CST, October 18, 2018.
>Don’t lose it! Add it to your Ravelry Favorites or Queue.<
>Don’t forget to Pin-It too!<
*Purchase an AD-FREE PDF of this pattern (including all sizes, charts, and photo tutorials) on Craftsy or Ravelry*
Materials
- Yarn: Worsted Weight / 4 / Lion Brand Touch of Alpaca 90% acrylic / 10% alpaca (3.5 oz / 100 g / 207 yards / 190 m) You’ll only need 1 ball (less than 207 yards).
- Crochet Hooks: G/6/4.00mm; H/8/5.00mm
- Scissors
- Yarn Needle
- Faux Fur Pom
Many of these materials are available for purchase through our affiliates below:
 Clover 1045/G Purple Amour ...Shop on Amazon
  Clover 1047/H Deep Blue Amo...Shop on Amazon
  Fiskars All Purpose Scissor...Shop on Amazon
  Touch of Alpaca Yarn, Taupe") Lion Brand Yarn (1 Skein) T...Shop on Amazon
Lion Brand Yarn (1 Skein) T...Shop on Amazon ") SUSULU DIY 12pcs Faux Racco...Shop on Amazon
SUSULU DIY 12pcs Faux Racco...Shop on Amazon
Skill Level
- Easy
Abbreviations
- ch(s): chain(s)
- sl st(s): slip stitch(es)
- st(s): stitch(es)
- sc: single crochet
- dc: double crochet
- MBS: mini bean stitch
- MBS2tog: mini bean stitch decrease
- Alt-dc: click HERE for tutorial
- RS: right side
- BLO: back loop only
- Rep: repeat
- Rnd: round
- yo: yarn over
Gauge
- Band in slip stitch: 3 sts = .75″; 13 rows = 2″
- Body of Hat: 8 sts = 2″
Fits Head Size
- Toddler: 18″ – 19″ circ. (B: 160 yards)
- Child: 19″ – 20.5″ circ. (B: 170 yards)
- Teen / Adult Small: 20″ – 22″ circ. (B: 195 yards)
- Adult Medium / Large: 23″ – 24″ circ. (B: 200 yards)
Notes
- Band Width: See the tip below for working a wider band.
- Beanie or Slouch: Instructions are included for both a beanie and slouch length hat.
- Turning chains are not included in stitch count unless noted otherwise.
- This hat is worked from the bottom up.
- I tend to crochet on the tighter side. You may find yourself needing to go down a hook size (or two) to properly meet gauge.
- You can use another WW yarn as long as it’s similar in thickness and you match gauge. I’ve found this yarn is a lighter worsted weight / 4 yarn.
- Changes for sizes written as follows: Toddler (Child, Teen/Adult Small, Adult Medium/Large)
- Personalized Tags for your crochet: read this blog post to find out where I purchase mine & how to add them!
Special Stitches
- Mini-Bean Stitch (MBS): Insert your hook into the specified stitch, yo, pull up a loop, yo, insert your hook into the same st, yo, pull up a loop, yo, pull through all loops on your hook.
- Mini-Bean Stitch Decrease (MBS2tog): Insert your hook into the next stitch, yo, pull up a loop, yo, skip the next ch-1, insert your hook into the next st, yo, pull up a loop, yo, pull through all loops on your hook. *Each MBS2tog decreases stitch count by 2 stitches.
Anabelle Beanie Crochet Beanie Pattern – All Sizes
TIP: Check out this video tutorial (click HERE) that includes lots of helpful tips on working slip stitch crochet.
Changes for Sizes Written as follows: Toddler (Child, Teen/Adult Small, Adult Med/Lg)
Important Note: DO NOT (even if you’re really, really tempted to) stretch the hat band while you’re working it as this could greatly affect the positive ease of your finished band.
Stretchy Hat Band
Click HERE for a super easy way to count your rows!
Tip! The band design on this hat is narrow. If you prefer a wider band, simply add more chains to the foundation chain. I made my daughter a child size slouch version of this hat and made the band 8 stitches wide instead.
Row 1 (RS): Using a 5.00 mm crochet hook, ch 4 (4, 5, 5), working into the back hump of the chain, sl st in 2nd ch from hook and each ch across. Turn. (3, 3, 4, 4 sts)
Row 2: Ch 1, BLO sl st in each st across. Turn. (3, 3, 4, 4 sts)
Rows 3 – 73 (77, 83, 91): Rep Row 2. Your un-stretched band should measure approximately: 11″ ( 12″, 13″, 14″) (sl st ribbing stretches a lot)
Row 74 (78, 84, 92) – Seam Row: With RS facing out, bring the first row up to meet the last row (the first row should be in front if you kept the RS facing out). Position your working yarn so that it’s on the inside of the band (See photo & video tutorial here for seam). Ch 1, slip stitch the rows together using the following method: insert your hook (from front to back) into the FLO of the 1st stitch of Row 1, insert your hook (from back to front) into the BLO of the 1st stitch of the last row, yo, pull thru all loops on your hook. Continue in this way across the band to complete the seam. (3, 3, 4, 4 sts)
Do not fasten off. Continue on to Body of Hat.
Body of Hat
Rnd 1 (RS): Continuing on from the band, with a 5.00 mm crochet hook, ch 1, sc in the side of each row around, add one more sc in the side of the last row. Join w/ a sl st to the 1st stitch. (75, 79, 85, 93 sts)
Rnd 2 (RS): Ch 1, MBS in the next st, (ch 1, skip the next st, MBS in the next st) rep from ( to ) around. Join. Turn. (75, 79, 85, 93 sts) *Note: you should be working a MBS in a MBS from the previous round, not in the ch-1 sps.
Crown Shaping – Toddler
Rnd 2: Ch 1, [ (MBS in the next st, ch 1, skip the next st) twice, MBS2tog over the next 2 MBS skipping over a ch-1, ch 1, skip the next st ] rep from [ to ] around to the last st, then work MBS in the next st. Join. Turn. (43 sts)
Rnds 3 – 4: Ch 1, MBS in the next st, (ch 1, skip the next st, MBS in the next st) rep from ( to ) around. Join. Turn. (43 sts)
Rnd 5: Ch 1, [ (MBS in the next st, ch 1, skip the next st) twice, MBS2tog over the next 2 MBS skipping over a ch-1, ch 1, skip the next st ] rep from [ to ] around to the last 3 sts, then MBS in the next st, ch 1, skip the next st, MBS in the next st. Join. Turn. (33 sts)
Rnd 6: Ch 1, [ (MBS in the next st, ch 1, skip the next st) twice, MBS2tog over the next 2 MBS skipping over a ch-1, ch 1, skip the next st ] rep from [ to ] around to the last st, then MBS in the next st. Join. Turn. (25 sts)
Rnd 7: Ch 1, ( MBS in the next st, ch 1, skip the next st, MBS2tog over the next 2 MBS skipping over a ch-1, ch 1, skip the next st) rep from [ to ] around to the last st, then work MBS in the next st. Join. (17 sts)
Fasten off leaving an 8″ tail. Using a yarn needle, weave tail of yarn in and out of every stitch from the last round, pull gently to cinch closed. Secure with a knot on the inside of the hat. Weave in ends. Continue on to Bow, if desired.
Crown Shaping – Child
Rnd 1 (RS): Ch 1, [* (MBS in the next st, ch 1, skip the next st) twice, MBS2tog over the next 2 MBS skipping over a ch-1 *, ch 1, skip the next st ] rep from [ to ] around to the last 7 sts, then work from * to *. Join. Turn. (59 sts)
Rnd 2: Ch 1, [ (MBS in the next st, ch 1, skip the next st) twice, MBS2tog over the next 2 MBS skipping over a ch-1, ch 1, skip the next st ] rep from [ to ] around to the last 3 sts, then work MBS in the next st, ch 1, skip the next st, MBS in the next st. Join. Turn. (45 sts)
Rnds 3 – 4: Ch 1, MBS in the next st, (ch 1, skip the next st, MBS in the next st) rep from ( to ) around. Join. Turn. (45 sts)
Rnd 5: Ch 1, [ (MBS in the next st, ch 1, skip the next st) twice, MBS2tog over the next 2 MBS skipping over a ch-1, ch 1, skip the next st ] rep from [ to ] around to the last 5 sts, then work (MBS in the next st, ch 1, skip the next st) twice, MBS in the next st. Join. Turn. (35 sts)
Rnd 6: Ch 1, [ (MBS in the next st, ch 1, skip the next st) twice, MBS2tog over the next 2 MBS skipping over a ch-1, ch 1, skip the next st ] rep from [ to ] around to the last 3 sts, then work MBS in the next st, ch 1, skip the next st, MBS in the next st. Join. Turn. (27 sts)
Rnd 7: Ch 1, ( MBS in the next st, ch 1, skip the next st, MBS2tog over the next 2 MBS skipping over a ch-1, ch 1, skip the next st) work from ( to ) around to the last 3 sts, then work MBS in the next st, ch 1, skip the next st, MBS in the next st. Join. (19 sts)
Fasten off leaving an 8″ tail. Using a yarn needle, weave tail of yarn in and out of every stitch from the last round, pull gently to cinch closed. Secure with a knot on the inside of the hat. Weave in ends. Continue on to Bow, if desired.
Crown Shaping – Teen / Adult Small
Rnd 1 (RS): Ch 1, [ (MBS in the next st, ch 1, skip the next st) twice, MBS2tog over the next 2 MBS skipping over a ch-1, ch 1, skip the next st ] rep from [ to ] around to the last 5 sts, then work (MBS in the next st, ch 1, skip the next st) twice, MBS in the next st. Join. Turn. (65 sts)
Rnd 2: Ch 1, [ (MBS in the next st, ch 1, skip the next st) twice, MBS2tog over the next 2 MBS skipping over a ch-1, ch 1, skip the next st ] rep from [ to ] around to the last st, then work MBS in the next st. Join. Turn. (49 sts)
Rnds 3 – 4: Ch 1, MBS in the next st, (ch 1, skip the next st, MBS in the next st) rep from ( to ) around. Join. Turn. (49 sts)
Rnd 5: Ch 1, [ (MBS in the next st, ch 1, skip the next st) twice, MBS2tog over the next 2 MBS skipping over a ch-1, ch 1, skip the next st ] rep from [ to ] around to the last st, then MBS in the next st. Join. Turn. (37 sts)
Rnd 6: Ch 1, [ (MBS in the next st, ch 1, skip the next st) twice, MBS2tog over the next 2 MBS skipping over a ch-1, ch 1, skip the next st ] rep from [ to ] around to the last 5 sts, then work (MBS in the next st, ch 1, skip the next st) twice, MBS in the next st. Join. Turn. (29 sts)
Rnd 7: Ch 1, ( MBS in the next st, ch 1, skip the next st, MBS2tog over the next 2 MBS skipping over a ch-1, ch 1, skip the next st) rep from [ to ] around to the last 5 sts, then work (MBS in the next st, ch 1, skip the next st) twice, MBS in the next st. Join. (21 sts)
Fasten off leaving an 8″ tail. Using a yarn needle, weave tail of yarn in and out of every stitch from the last round, pull gently to cinch closed. Secure with a knot on the inside of the hat. Weave in ends. Continue on to Bow, if desired.
Crown Shaping – Adult Medium / Large
Rnd 1 (RS): Ch 1, [ (MBS in the next st, ch 1, skip the next st) twice, MBS2tog over the next 2 MBS skipping over a ch-1, ch 1, skip the next st ] rep from [ to ] around to the last 5 sts, then work (MBS in the next st, ch 1, skip the next st) twice, MBS in the next st. Join. Turn. (71 sts)
Rnd 2: Ch 1, [* (MBS in the next st, ch 1, skip the next st) twice, MBS2tog over the next 2 MBS skipping over a ch-1 *, ch 1, skip the next st ] rep from [ to ] around to the last 7 sts, then work from * to *. Join. Turn. (55 sts)
Rnds 3 – 4: Ch 1, MBS in the next st, (ch 1, skip the next st, MBS in the next st) rep from ( to ) around. Join. Turn. (55 sts)
Rnd 5: Ch 1, [* (MBS in the next st, ch 1, skip the next st) twice, MBS2tog over the next 2 MBS skipping over a ch-1 *, ch 1, skip the next st ] rep from [ to ] around to the last 7 sts, then work from * to *. Join. Turn. (43 sts)
Rnd 6: Ch 1, [ (MBS in the next st, ch 1, skip the next st) twice, MBS2tog over the next 2 MBS skipping over a ch-1, ch 1, skip the next st ] rep from [ to ] around to the last 3 sts, then work MBS in the next st, ch 1, skip the next st, MBS in the next st. Join. Turn. (33 sts)
Rnd 7: Ch 1, ( MBS in the next st, ch 1, skip the next st, MBS2tog over the next 2 MBS skipping over a ch-1, ch 1, skip the next st) rep from [ to ] around to the last 3 sts, then work MBS in the next st, ch 1, skip the next st, MBS in the next st. Join. (23 sts)
Fasten off leaving an 8″ tail. Using a yarn needle, weave tail of yarn in and out of every stitch from the last round, pull gently to cinch closed. Secure with a knot on the inside of the hat. Weave in ends. Continue on to Bow, if desired.
Bow
Row 1: Using a 4.00 mm crochet hook & a contrasting color yarn, ch 17, working in the back hump of the foundation ch, dc in the 3rd ch from your hook, dc in each ch across. Turn. (15 sts)
Rows 2 – 4: Alt-dc in the first st (click HERE for tutorial), dc in each remaining st across. Turn. (15 sts)
Rnd 5: Next you’ll be working around the perimeter of the rectangle, sc evenly around working 3 sts in each corner. Fasten off. Weave in ends. Continue on to Shaping & Attaching the Bow.
Shaping & Attaching the Bow
Pinch bow in the center along the long edge, wrap yarn around the center of the bow until it’s as thick as you’d like, knot to secure. Use a yarn needle and yarn tail to sew the bow onto the hat. Tack stitch each of the 4 corners of the bow to the hat.
Weave in ends.
FIND ALL OF MY FREE CROCHET PATTERNS HERE
Are you intimidated by knit-look crochet? Would you love to learn my tips & tricks? Take an Annies Video Class with me and let me ease your fears and help you increase your skills! Click on the photo below to watch a free preview. You can also see the other 4 video classes I have available!

Please share your finished ACS projects with me in the A Crocheted Simplicity Crochet Community Group on Facebook!
HAPPY CROCHETING!

Love it! I can’t wait to whip up a few 🙂
Thanks, Lori!