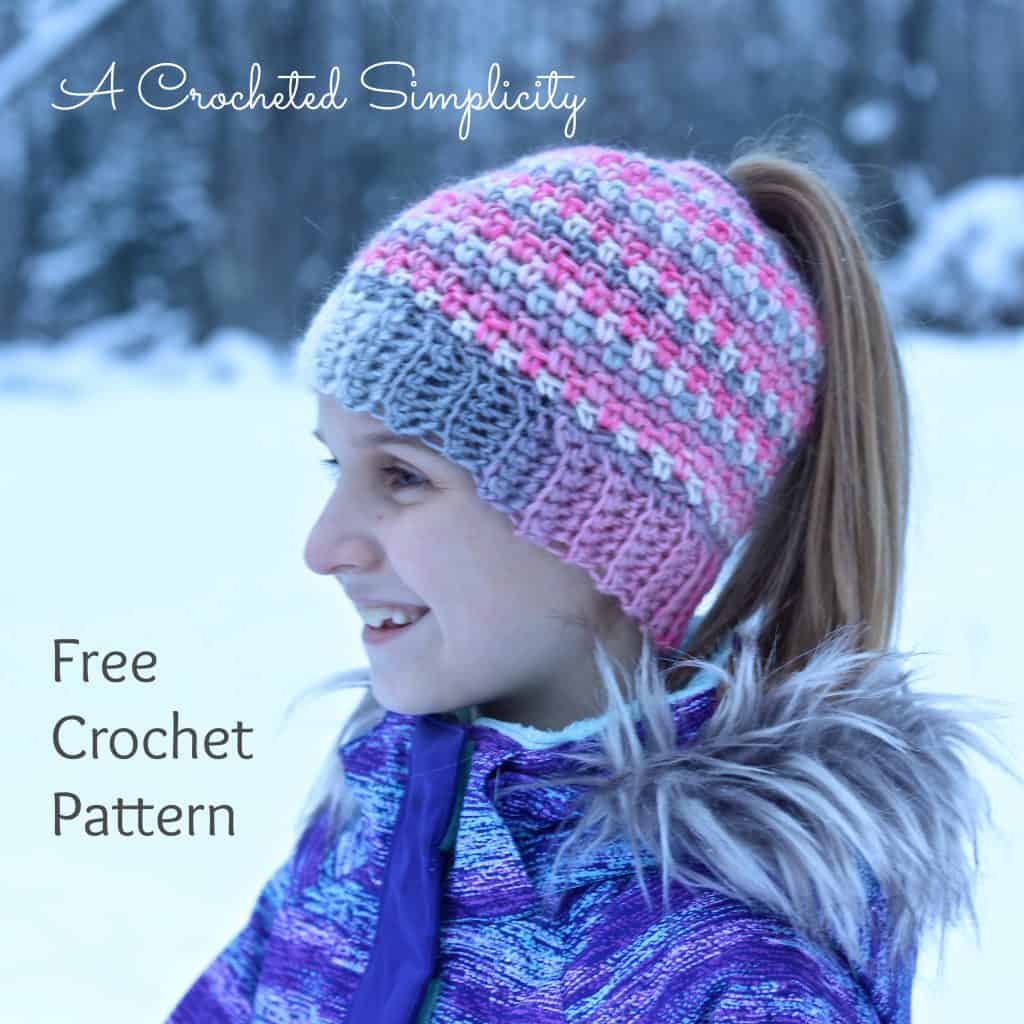
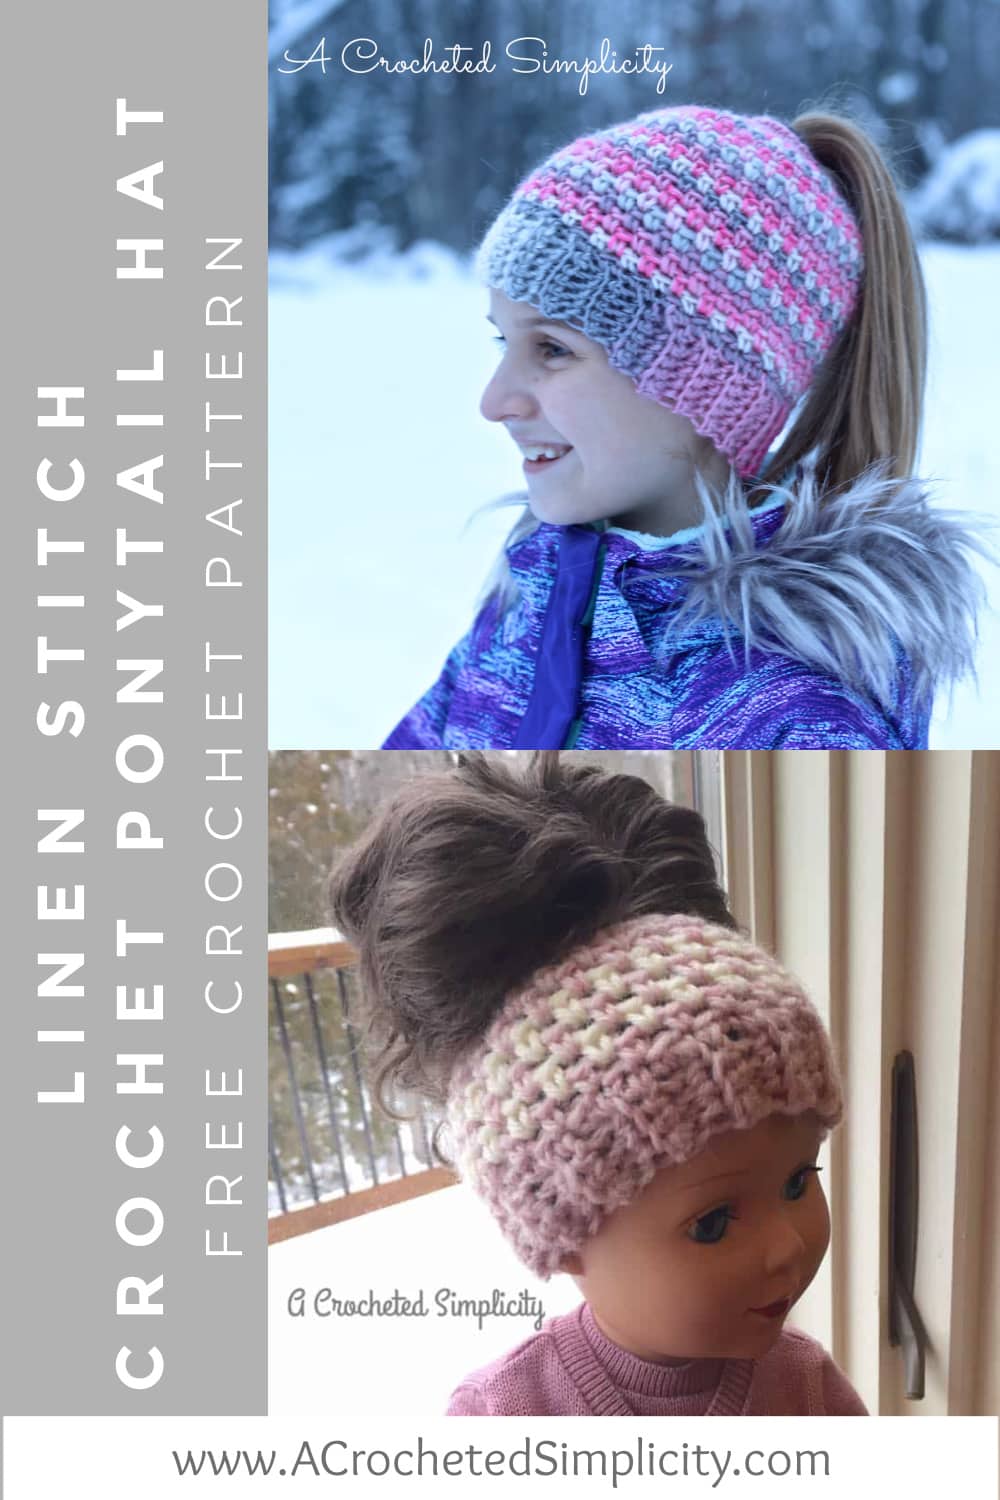
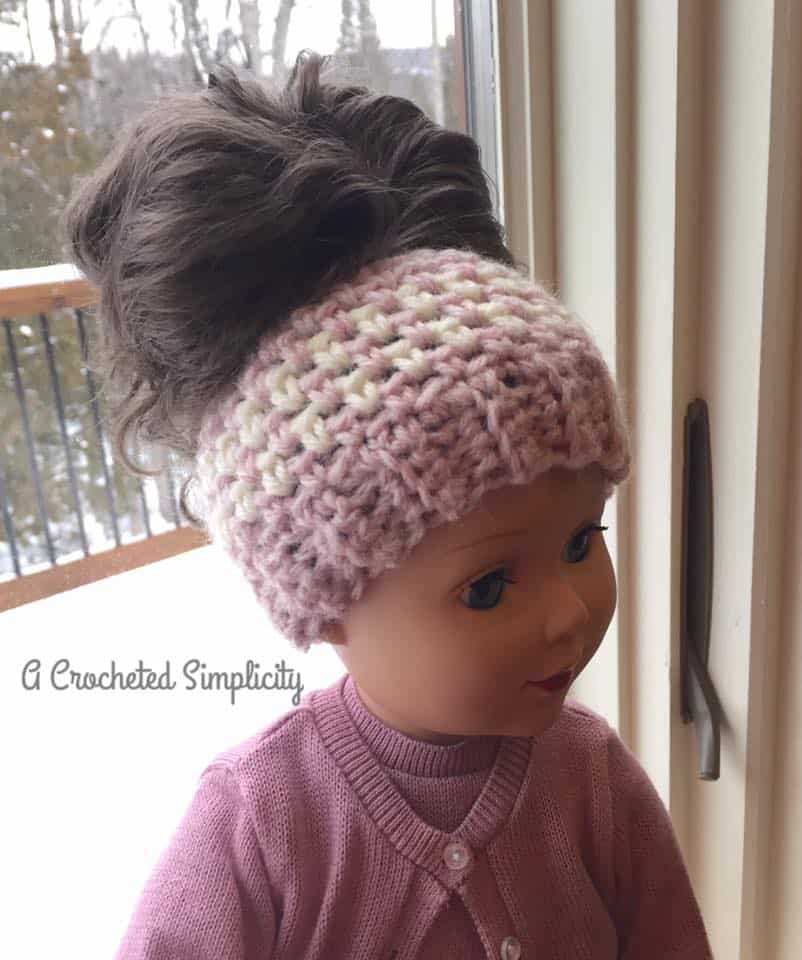
Linen Stitch Crochet Ponytail Hat with Video Tutorial
Learn to make a Crochet Ponytail Hat using the popular linen stitch crochet pattern (aka the moss stitch).
The messy bun hat is a very popular crochet hat style this winter season. So soon after designing my Big Bold Cabled Ponytail / Messy Bun hat, I decided I wanted to design a simpler crochet bun hat using the popular linen stitch, also known as moss stitch crochet. My daughters are in love with this messy bun hat trend!
If you’re feeling adventurous, you can use this crochet ponytail hat pattern as a base pattern and substitute many other stitch patterns that have a multiple of 2 or 4. You will just have to modify the crown shaping rows when you get to them, but that’s pretty simple too.
Crochet Messy Bun Hat – Free Crochet Pattern
The linen stitch crochet messy bun hat pattern is free below. There is also a crochet video tutorial.
This post contains affiliate links.
Materials
- Yarn: Worsted Weight / 4 / (200 – 300 yards)
- Crochet Hooks: I/9/5.50mm; J/10/6.00mm
- Yarn Needle
- Elastic Hair Band (optional): standard 2″ diameter
Stitch Abbreviations (US Terms)
- ch: chain
- sc: single crochet
- sl st: slip stitch
- sc2tog: single crochet decrease
- sp(s): space(s)
- rep: repeat
- rnd: round
- BLO: back loop only
Sizes
- 18″ Doll
- Toddler: fits 18″-19″ circ. x 7″ H
- Child: fits 19″-20″ circ. x 7.5″ H
- Teen/Adult Small: fits 20″-22″ circ. x 8.25″ H
- Adult Medium/Large: fits 23″-24″ circ. x 9″ H
Gauge
- Any (see instructions)
Pattern Notes
- Turning chains are not counted as stitches, unless specified otherwise.
- The first stitch of each row is worked into the same stitch as the turning chain, unless noted otherwise.
- Chain 1’s in the linen stitch pattern are included as a stitch.
- Yarn: Then yarn I used for the sample shown has been discontinued.
- Other worsted weight yarns can be substituted.
- Changes for sizes written as follows: doll (toddler, child, teen/adult small, adult medium/large)
- Changes for stitch counts are written as follows: (doll, toddler, child, teen/adult small, adult medium/large)
- VIDEO TUTORIAL: There is a video tutorial available for this messy bun crochet hat pattern.
Crochet Messy Bun Hat Pattern
Hat Band Instructions
Set-up: With yarn and a 5.50mm crochet hook, ch 5 (7, 7, 9, 9).
Row 1: Working in the back hump of the foundation chain, sc in 2nd ch from your hook, sc in each ch across. Turn. (4, 6, 6, 8, 8 sts)
Row 2: Ch 1, BLO sc in each st across. Turn. (4, 6, 6, 8, 8 sts)
Repeat Row 2 until the band (unstretched) measures: Doll (9″); Toddler (15”); Child (16”), Teen/Adult Small (17”), Adult Medium/Large (19”).
Band Seam: Bring Row 1 to meet the last row, ch 1, (sl st BLO of last row to BLO of 1st row) repeat across. (4, 6, 6, 8, 8 sts) Turn band inside out.
Do not fasten off. Continue on to the Body of Hat.
Body of Hat
TIP for Row 1: Count how many rows you worked for the band. Subtract that number from the number of sts you need to work in Rnd 1. This number is the number of increases you need to work around your band.
Example: I’m making the adult med/lg and my band has 68 rows & at the end of Rnd 1 I need to have 76 sts. So for my math I have 76 sts – 68 rows = 8 increases for Rnd 1. For Rnd 1 I need to work 8 increases of 2 sc in side of next row to increase to 76 sts.
Rnd 1: With a 6.00mm crochet hook, and working into the sides of the rows of the hat band, ch 1, sc (48, 60, 64, 72, 76 sts) evenly around band. Join with a sl st to 1st sc. (48, 60, 64, 72, 76 sts)
Rnd 2: Ch 1, sc in same st as ch 1, ch 1, skip next st, (sc in next st, ch 1, skip next st) repeat around. Join. (48, 60, 64, 72, 76 sts)
Rnd 3: Ch 2 (counts as 1st st and 1st ch-1), skip 1st sc, sc in next ch-1 sp, (ch 1, skip next sc, sc in next ch-1 sp) repeat around. Join. (48, 60, 64, 72, 76 sts)
Rnd 4: Ch 1, sc in first ch-1 sp, ch 1, skip next sc, (sc in next ch-1 sp, ch 1, skip next sc) repeat around. Join. (48, 60, 64, 72, 76 sts)
Do not fasten off. Continue below to the instructions for the size hat you’re making.
18″ Doll: Rep Rnds 3 – 4 (ending with a rep of rnd 3) until hat measures 2-1/4” then continue to Crown Shaping Doll.
Toddler: Rep Rnds 3 – 4 (ending with a rep of rnd 3) until hat measures 5-1/4” then continue to Crown Shaping Toddler.
Child: Rep Rnds 3 – 4 (ending with a rep of rnd 3) until hat measures 5-3/4” then continue to Crown Shaping Child.
Teen / Adult Small: Rep Rnds 3 – 4 (ending with a rep of rnd 3) until hat measures 6-1/2″ then continue to Crown Shaping Teen/Adult Small.
Adult Medium / Large: Rep Rnds 3 – 4 (ending with a rep of rnd 3) until hat measures 7” then continue to Crown Shaping Adult Medium/Large.
Crown Shaping 18″ Doll
Rnd 1: Ch 1, (sc2tog in next 2 ch-1 sps (skipping over a sc), ch 1, skip next sc, sc in next ch-1 sp, ch 1, skip next sc) rep around. Join with a sl st to 1st sc2tog. (32 sts)
Rnd 2: Ch 2 (counts as 1st st), skip 1st st, (sc2tog in next 2 ch-1 sps (skipping over a sc), ch 1, skip next sc, sc in next ch-1 sp, ch 1, skip next sc) rep around to last ch-1 sp, sc in last ch-1 sp. Join with a sl st to 1st ch of rnd. (22 sts)
Rnd 3: Ch 1, (sc2tog in next 2 ch-1 sps (skipping over a sc), ch 1, skip next sc, sc in next ch-1 sp, ch 1, skip next sc) rep around to last 3 sts, sc2tog in next 2 ch-1 sps. Join with a sl st to 1st sc. (14 sts)
Fasten off. Weave in ends.
Crown Shaping Toddler
Rnd 1: Ch 1, (sc2tog in next 2 ch-1 sps (skipping over an sc), ch 1, skip next sc, sc in next ch-1 sp, ch 1, skip next sc) rep around. Join with a sl st to 1st sc2tog. (40 sts)
Rnd 2: Ch 2 (counts as 1st st), skip 1st st, (sc2tog in next 2 ch-1 sps (skipping over a sc), ch 1, skip next sc, sc in next ch-1 sp, ch 1, skip next sc) rep around to last 3 sts, sc2tog in next 2 ch-1 sps. Join with a sl st to 1st ch of rnd. (28 sts)
Rnd 3: Ch 1, (sc2tog in next 2 ch-1 sps (skipping over an sc), ch 1, skip next sc, sc in next ch-1 sp, ch 1, skip next sc) rep around to last 4 sts, (sc in next ch-1 sp, ch 1, skip next sc) 2 times. Join with a sl st to 1st sc. (20 sts)
Do not fasten off. Continue to Finishing.
Crown Shaping Child
Rnd 1: Ch 1, (*sc2tog in next 2 ch-1 sps (skipping over an sc), ch 1, skip next sc*, sc in next ch-1 sp, ch 1, skip next sc) repeat around to last 4 sts, then rep from * to *. Join with a sl st to 1st sc2tog. (42 sts)
Rnd 2: Ch 2 (counts as 1st st), skip 1st st, (*sc2tog in next 2 ch-1 sps (skipping over a sc), ch 1, skip next sc, sc in next ch-1 sp*, ch 1, skip next sc) rep around to last 5 sts, then rep from * to *. Join with a sl st to 1st ch of rnd. (28 sts)
Rnd 3: Ch 1, (*sc2tog in next 2 ch-1 sps (skipping over an sc), ch 1, skip next sc*, sc in next ch-1 sp, ch 1, skip next sc) rep around to last 4 sts, then rep from * to *. Join with a sl st to 1st sc. (18 sts)
Do not fasten off. Continue to Finishing.
Crown Shaping Teen / Adult Small
Rnd 1: Ch 1, (sc2tog in next 2 ch-1 sps (skipping over an sc), ch 1, skip next sc, sc in next ch-1 sp, ch 1, skip next sc) rep around. Join with a sl st to 1st sc2tog. (48 sts)
Rnd 2: Ch 2 (counts as 1st st and 1st ch-1), skip 1st st, (*sc2tog in next 2 ch-1 sps (skipping over a sc), ch 1, skip next sc, sc in next ch-1 sp*, ch 1, skip next sc) rep around to last 5 sts, then rep from * to *. Join with a sl st to 1st ch of rnd. (32 sts)
Rnd 3: Ch 1, (sc2tog in next 2 ch-1 sps (skipping over an sc), ch 1, skip next sc, sc in next ch-1 sp, ch 1, skip next sc) rep around to last 2 sts, sc in next ch-1 sp, ch 1, skip next sc. Join with a sl st to 1st sc. (22 sts)
Do not fasten off. Continue to Finishing.
Crown Shaping Adult Medium / Large
Rnd 1: Ch 1, (*sc2tog in next 2 ch-1 sps (skipping over an sc), ch 1, skip next sc*, sc in next ch-1 sp, ch 1, skip next sc) repeat around to last 4 sts, then rep from * to *. Join with a sl st to 1st sc2tog. (50 sts)
Rnd 2: Ch 2 (counts as 1st st and 1st ch-1), skip 1st st, (sc2tog in next 2 ch-1 sps (skipping over a sc), ch 1, skip next sc, sc in next ch-1 sp, ch 1, skip next sc) rep around to last st, sc in last ch-1 sp. Join with a sl st to 1st ch of rnd. (34 sts)
Rnd 3: Ch 1, (*sc2tog in next 2 ch-1 sps (skipping over an sc), ch 1, skip next sc*, sc in next ch-1 sp, ch 1, skip next sc) rep around to last 4 sts, then rep from * to *. Join with a sl st to 1st sc. (22 sts)
Do not fasten off. Continue to Finishing.
Finishing with Elastic Hair Band
Rnd 1: Ch 1, sc in each st and ch-1 sp around. Join with a sl st to 1st sc. (18, 18, 22, 22 sts)
Rnd 2: Hold elastic hair band near opening in crown, ch 1, work stitches around elastic hair band and into each st around, (sc in next 2 sts, 2 sc in next st). Join with a sl st to 1st sc. (24, 24, 29, 29 sts)
Fasten off. Weave in ends. Your crochet ponytail hat is complete!
Finishing without Elastic Hair Band
Rnd 1: Ch 1, sc in each st and ch-1 sp around. Join with a sl st to 1st sc. (18, 18, 22, 22 sts)
Fasten off. Weave in ends. Your crochet messy bun hat is complete!
I MADE IT! NOW WHAT?
Pin this post! Save this crochet bun hat pattern free to your Pinterest boards so that you can come back and make it again.
Leave a comment below: We love to hear your feedback.
Share Your Finished Projects on Facebook or Instagram: I love to see your finished projects! Share with us on social media and tag me @acrochetedsimplicity or use the hashtag #ACrochetedSimplicity so I can find your posts.
JOIN US IN THE FACEBOOK COMMUNITY GROUP!
I hope you’ve enjoyed this crochet bun hat pattern! Make sure to check out our other crochet beanie hat patterns.
Come share your finished projects with us in the A Crocheted Simplicity Crochet Community Group on Facebook. Join us for fun community events such as crochet alongs, join in on crochet conversations, ask questions, get advice, and share your love for crochet!

My daughter just asked for this for Christmas.
🙂
Thanks! I added it to the round up of free patterns as well and can’t wait to work this one up!
Thank you, Kasie!
I love this pattern, but, the only question I have is, what does BLO stand for? I will be making a few of these.
Thank you so much.
Jean.
Back Loop Only (I’ve updated the stitch abbreviations)
I just wanted to thank you for making this pattern and offering it for free.
I am going to try and make a couple for two little girls.
thanks again.
You’re welcome!
What is the name of the color of yarn that you used for this?
FEMME(ish)
going to make not a hard pattern thank you
going to try pattern ,thank you and keep them coming .
You’re welcome!
I love this pattern and was wondering what is the name of the yarn (color) pictured in the photo?
Thank you!!
FEMME(ish)
What does BLO stand for?
Back Loop Only (I’ve updated the stitch abbreviations to include it)
Love this pattern
you say i hook or j hook but you dont specify which one to use all i see is J what is the i one for ?
Under the “Band” it specifies to use the I hook. 😉
When doing the stitches into the band do the chains between the single chains count in the 76 stitches?
I’m confused by what you’re referring to as the chains between single chains.
Can’t wait to try this pattern, thanks! Do I need 4 skeins of yarn, or just an amount that totals 200-300 yards?
Just an amount that is 200 – 300 yards. 😉
I think I am a little confused. Instructions say 17″ for hat in brim and fits 23″ – 24″. I followed them to the letter. The person I made it for says it fits a child.
Hi Kim~ What kind of yarn did you use? I used an 100% acrylic yarn which has much more stretch than wool/wool blends. And when you say your band measured 17″, was that unstretched?
I’m confused by your math. I ended up with 60 rows for the band. You say to subtract but it looks as though you added. What would my st # be?
Hi Dara~ You subtract your Row number from the total number of sts specified for Rnd 1 of your hat. This will tell you how many increases you need to add around your band to get to the correct number of sts for the size you’re working. So, you’re adding sts, but subtracting numbers to figure out how many to add.
I just wanted to say thank you for this awesome pattern!! Because of you, i am able to give 3 special little girls a Christmas present!! ???
I’m so happy to hear that, Tracy. <3
I am loving this pattern! Thank you so much for posting it! I am currently working on the body of the hat for an adult medium/large and was wondering abut the part that said “until hat measures 7-3/4″ then continue to . . . .” Does the 7-3/4″ include the band of the hat or is the 7-3/4″ just the body of the hat. Again, thanks for this pattern!
Hi Robyn~ Yes, the measurement is including the band as well. 🙂
Thank you for this free pattern. I’m going to add it to my “must make list” to my must make list.
You’re welcome!
I’m having trouble with the start of the crown. Do you have a video showing it?
Hi Becky~ Did you see that I added a video tutorial? 🙂
Am confused about how to increase. I need 8 increases for row one. Do I evenly space them ?
Hi Jeanne~ Yes, if you’re comfortable “eyeballing it”, you can just evenly space those extra stitches around the band. 🙂
How do you do the sc2tog?
Hi Diana~ Did you see that I added a video tutorial? 🙂
I too had the same problem with the size. I made the child size for a 6 year old…and it’s too small. So i made it again in the teen/ adult small size and it’s still a bit snug.
I also made the adult medium/large for a 9 year old and it fits good. It also fits me. I used 100%acrylic.
But this is a great pattern
Hi Kisha~ Did you measure your band before you stretched it? I have a hard time resisting stretching my work as I’m crocheting..lol.. but for this to fit you really need to resist the urge until after it reaches the length stated. 🙂
I made one last night and another one today, love it
Glad to hear it! 😀
Thank you so much for the pattern! For the crown shaping, should all of the stitches go into the sc-space, not the actual stitches? I’m a little confused by the instructions and just want to make sure I’m doing it correctly. Thank you!!
Hi Tasha~ Yes, you’re correct!
Hi –
My adult daughter asked me to make this for her. I am trying a small sample using the doll measurements before I invest in yarn.
I am confused by how to work stitches in round 1. Instructions say to work in “sides” of the rows. I don’t get it. Have watched the tutorial but it is too fast to see where the stitches are being placed. Help!!
Hi Margie~ The sts are simply worked into the side of the sc from each row of the band. You can insert your hook into the center of the stitch or around it. Try both and see which you prefer. 🙂
Just finished it for my daughter (7 yo). The mathematics tho ?. But I like the final result. Thanks for the free pattern.
You’re welcome. lol You don’t have to work out the math if you can eyeball working evenly around the band. 😉
sO I AM STARING TO MAKE THE BODY OF T HE HAT, I AM CONFUSED BY HOW MANY INCREASES I NEED FOR THE TE=EN/CHILD HAT,I HAVE 40 ROWS AROUND THAT EQUAL 17 IN?
HOW MANY INCREASES DO I NEED?
Hi Mary – If you have 40 Rows for the band and you are making the child size hat, you will need to work 64 sts for Rnd 1. Since you have 40 rows in your band, you will need to work 24 increases. So for Rnd 1, you could work the following: 2 sc in each of the next 8 sts, *sc in next, 2 sc in next, rep from * around. (64 sts)
If you’re making a teen size, you will need to work 72 sts for Rnd 1. Since you have 40 rows in your band, you will need to work 32 increases. So for Rnd 1, you could work the following: sc in each of the next 8 sts, 2 sc in each of the next 32 sts. (72 sts)