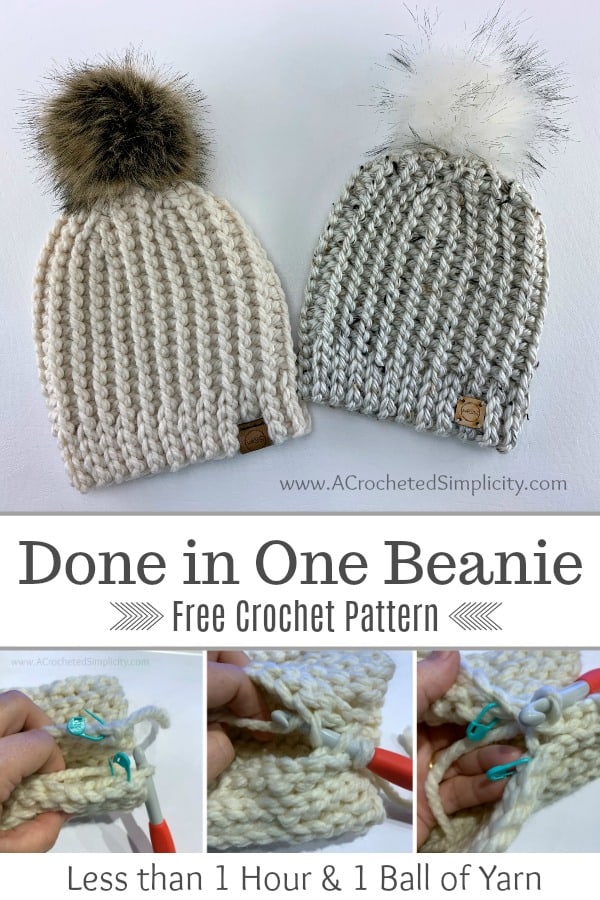
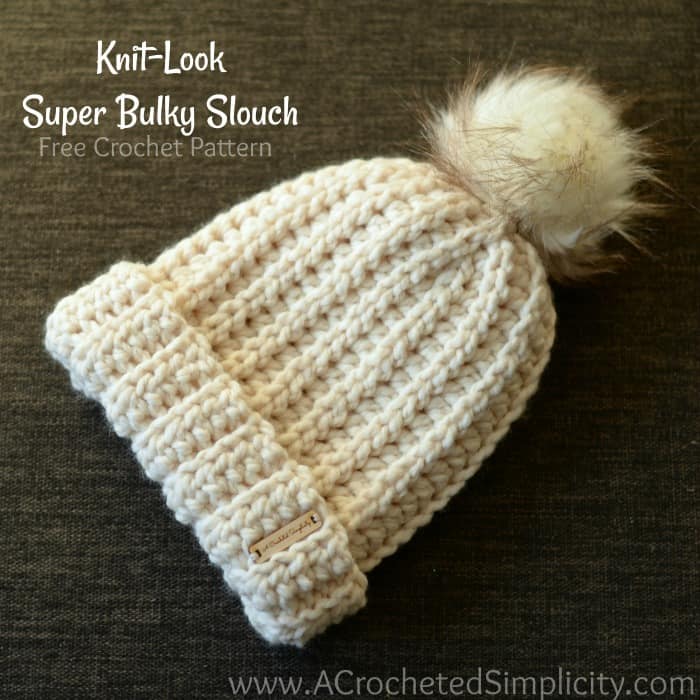
Done in One Beanie – Free Crochet Hat Pattern
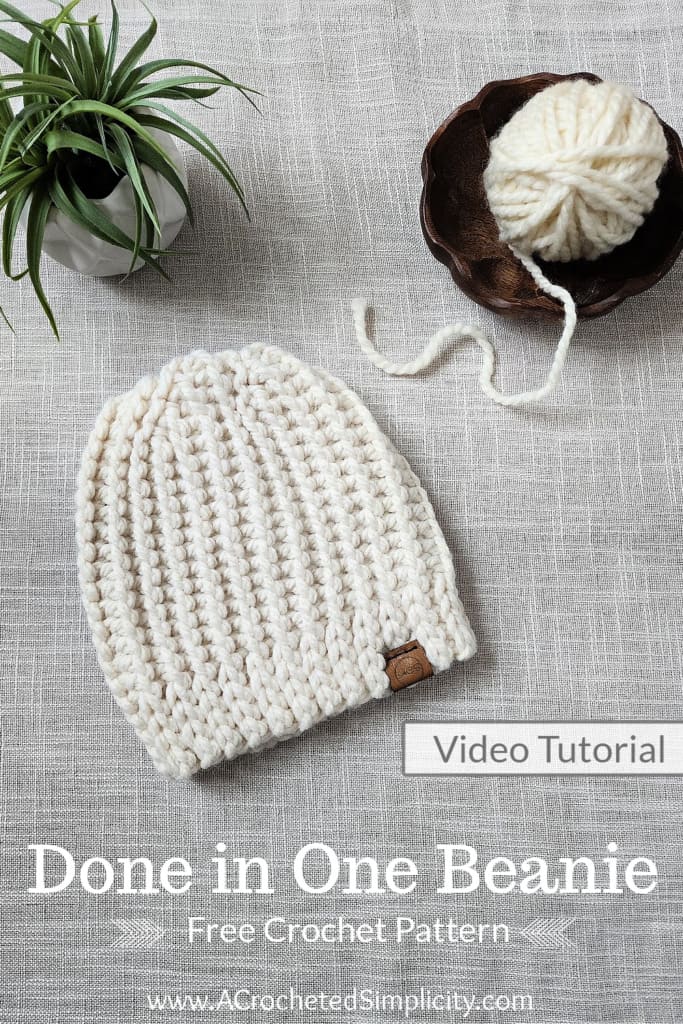
Now that the holiday season has come to a close, it’s time for ELK Studio’s annual Make It For Me Event. During the month of January, Kathy spotlights free crochet patterns on her blog from many of your favorite designers. Each of these designs is a great project to make for yourself after spending countless days crocheting holiday gifts for others. The Done in One Beanie pattern is a super quick one hour beanie that’s fun to make and uses less than 1 ball of yarn.
You can find the free crochet beanie pattern in this post below, or an ad-free print friendly version on Love Crafts, Ravelry, or on Etsy.
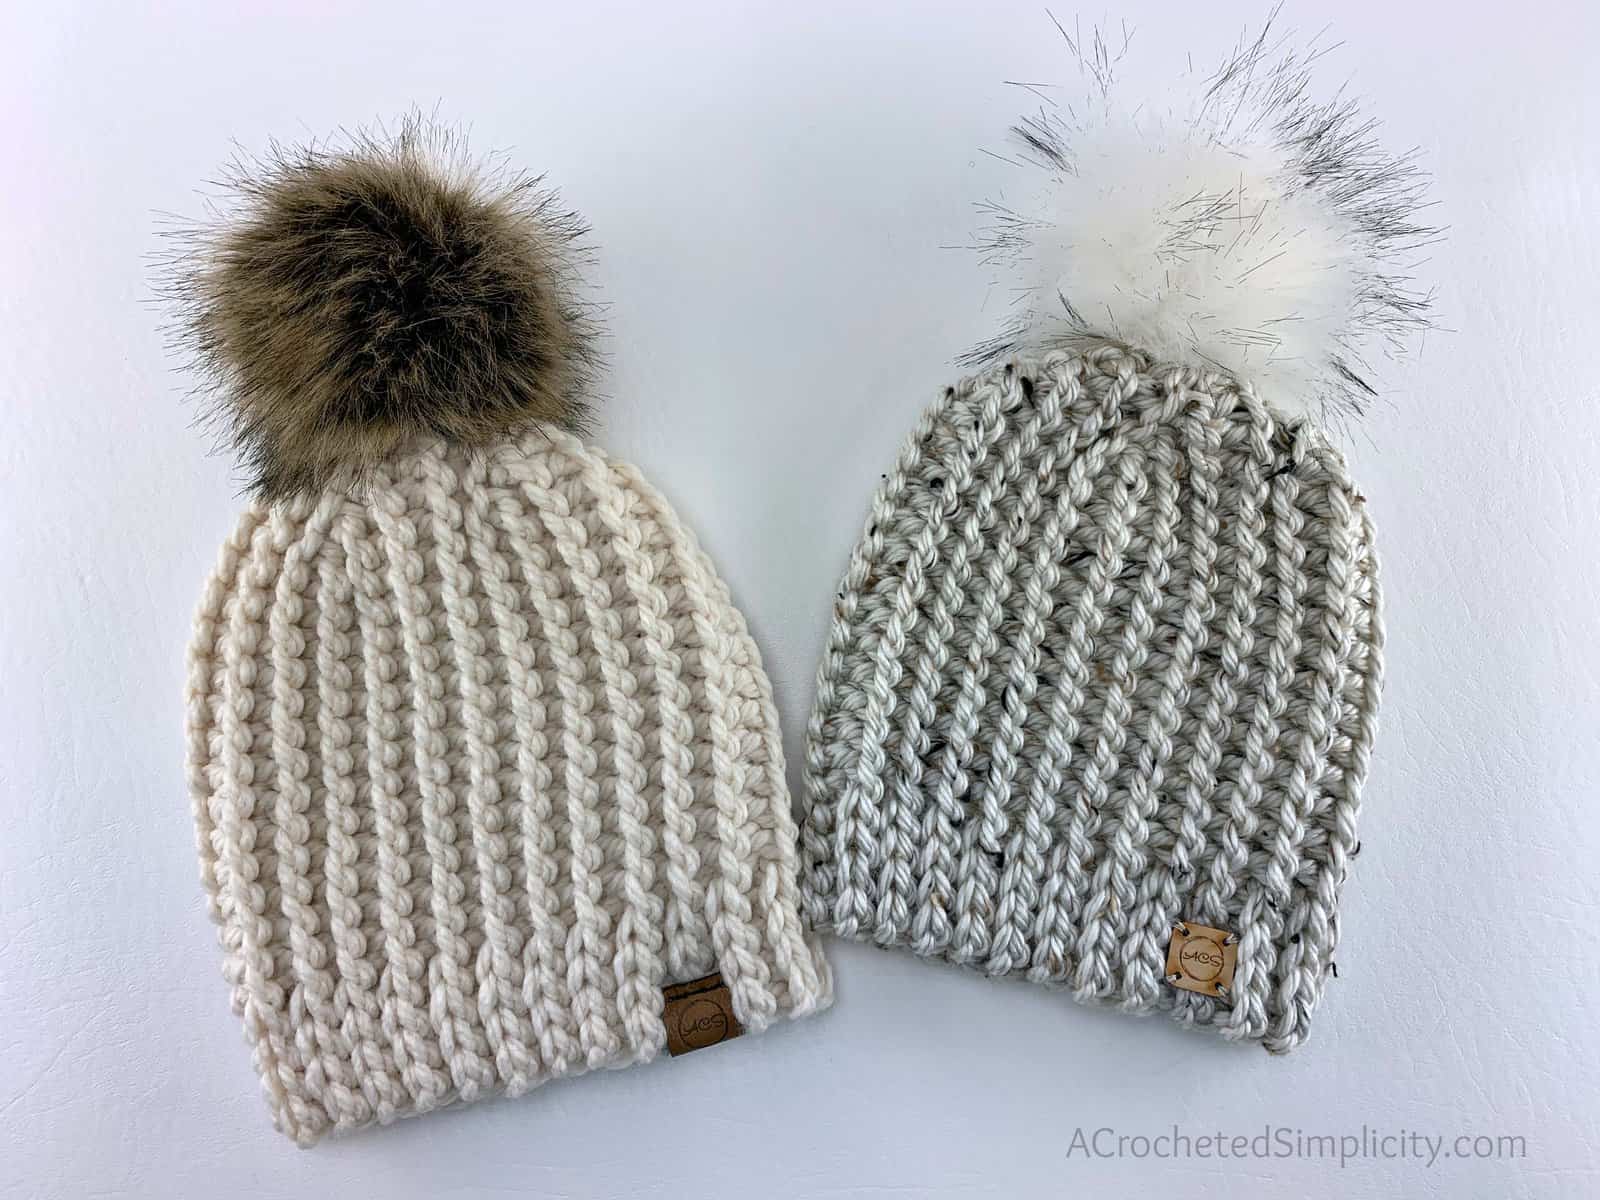
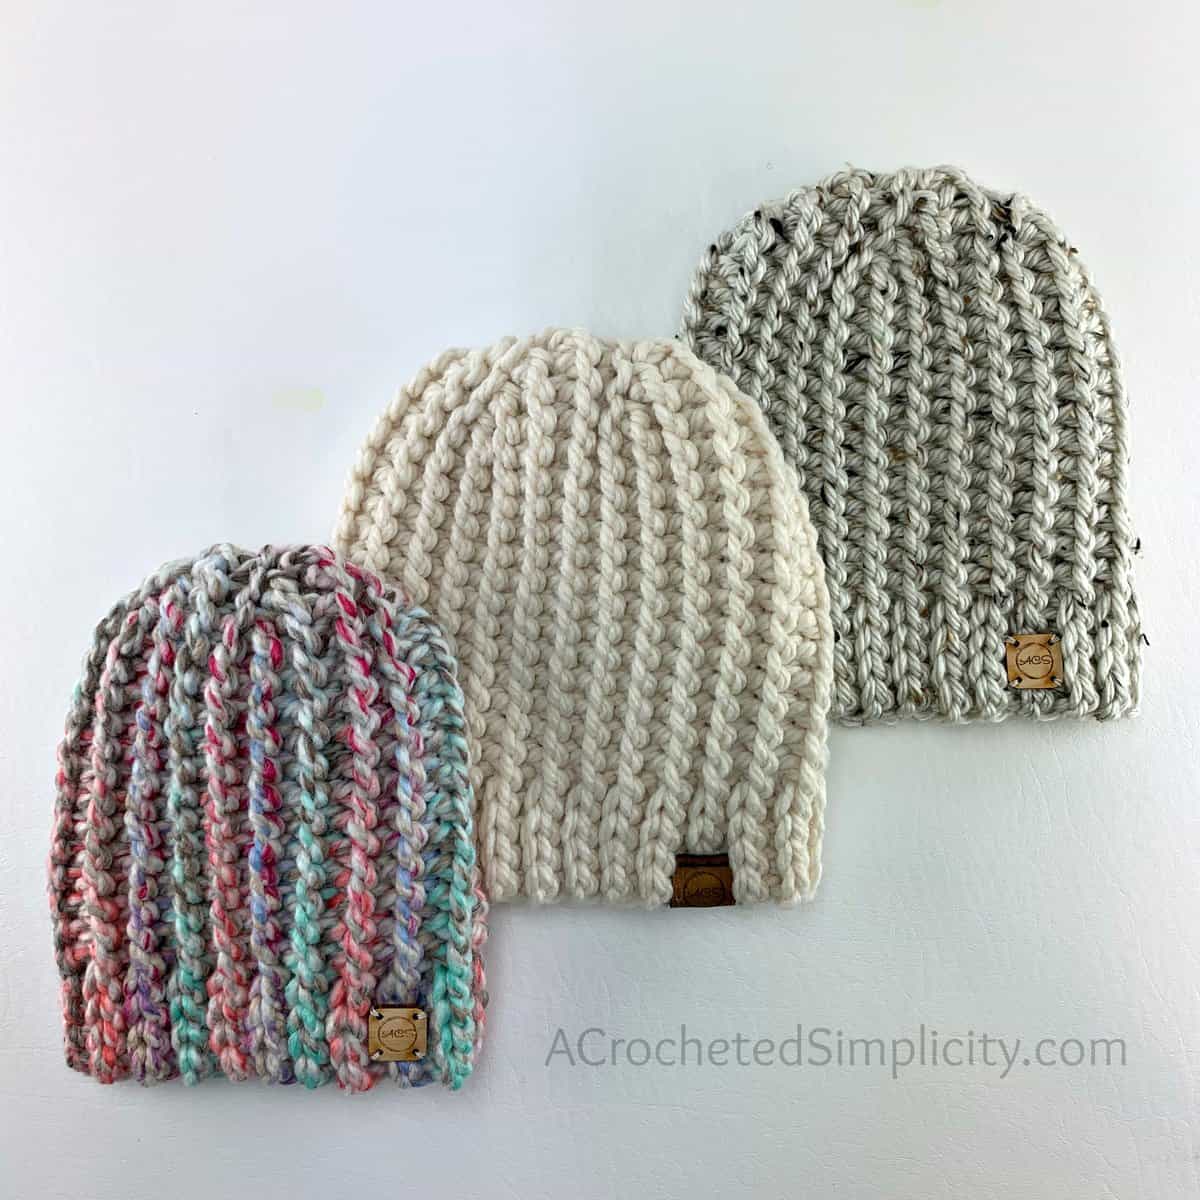
For this year’s Make it For Me design, I decided to design the Done in One Beanie for myself. I’ve made several crochet beanies this winter, but have given all of them to others as gifts. So when the really cold temps arrived here in Michigan’s Upper Peninsula, I realized the perfect project for myself for this event was a new, super thick, super-quick, super bulky winter hat. And because I love knit-look crochet and short rows, it made my heart happy that I could incorporate both of them into this new crochet beanie design.
For me, this knit-look crochet beanie checked all the boxes I was hoping to check:
- One hour beanie
- Use less than 1 ball of yarn
- Super thick and warm
- It’s crocheted, but resembles knit.
- Perfectly fitted crown – Oh how I LOVE short rows!
Aren’t personalized leather and wooden tags such a great finishing touch to add to our crochet items? I ordered these and a couple different wooden ones from an awesome online maker. You can find links to where I purchased and a tutorial on how to attach all of them HERE.
The Done in One Beanie is the perfect crochet beanie for craft fairs, teacher gifts, holiday gifts and last minute gift giving because it’s a one hour beanie pattern (or less). Several of my awesome pattern testers made more than one during testing because they were so fun to work up…. and a little addicting.
YARN
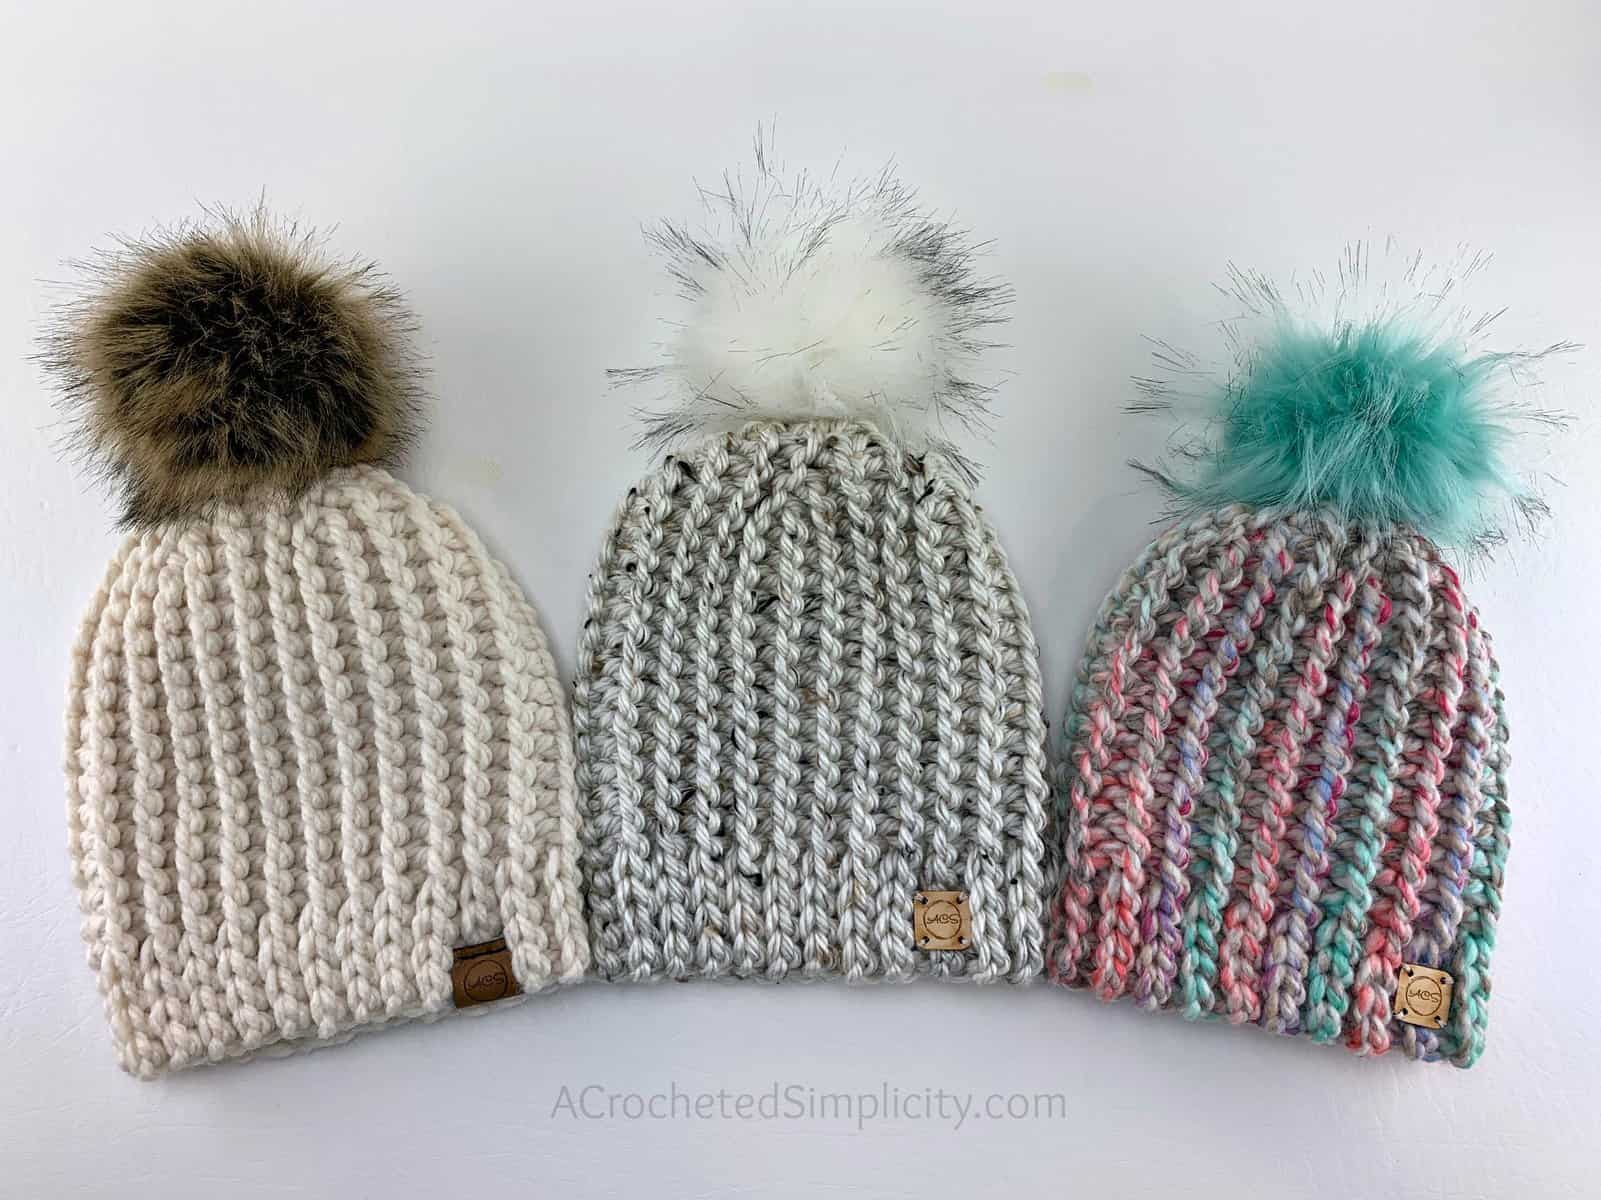
For this super bulky one hour beanie, I chose Lion Brand Yarn’s Wool Ease Thick & Quick and Hometown USA. Both yarns are a super bulky / 6 weight and very similar to each other. Wool Ease Thick & Quick is available in 79 colors… Yes, 79!! With so many to choose from, you shouldn’t have a problem finding a few favorites. You’ll find them all HERE. Hometown USA is available in 52 colors, you can view them HERE.
The Done in One Beanie works up using less than 1 ball of either super bulky yarn, but note the difference in yardages between the solids, tweeds and stripes. If you chose a colorway other than a solid, you may need a tad more than 1 ball. So make sure to check the yardage of the colorway you’ve chosen.
HOW TO CROCHET THE DONE IN ONE BEANIE – VIDEO TUTORIAL
The Done in One Beanie is a knit look crochet beanie that is crocheted using the crochet garter stitch and short rows. Crochet along with me as I make the baby size hat!
If you love crochet video tutorials, make sure to subscribe to our channel because we have more crochet tutorials coming your way!
Done in One Beanie – FREE CROCHET HAT PATTERN
The free knit look crochet pattern is below, but if you love to work offline, I’ve got a couple other great options for you.
Purchase the ad-free, printable PDF, including all photo tutorials, on Love Crafts, Ravelry, or on Etsy (aff).
Save this pattern to your Ravelry favorites.
This post contains affiliate links.
MATERIALS
- Yarn: Super Bulky Weight Yarn / 6; Lion Brand Yarns Wool Ease Thick & Quick and Hometown USA were used for the samples shown.
- See Notes below for yardage needed per size.
- Crochet Hook: M/N/9.00mm (my favorite hooks are Clover Amour Hooks, I’ve never had an ache in my hand since switching)
- Locking Stitch Markers
- Scissors
- Tapestry Needle
- Faux Fur Pom (optional)
- Fun Fur Pom – Click HERE for a free tutorial
Many of the materials are available for purchase through our affiliates:
 Lion Brand Yarn Thick & Qui...Shop on Amazon
  Clover 1056/MN Amour Croche...Shop on Amazon
  Clover Lock Ring Markers, 2...Shop on Amazon
  Fiskars 154110-1001 Non-sti...Shop on Amazon
ABBREVIATIONS (US TERMS)
- ch(s): chain(s)
- st(s): stitch(es)
- sl st(s): slip stitch(es)
- FLO: front loop only
- BLO: back loop only
- RS: right side
- SM: stitch marker
- Rep: repeat
- circ: circumference
GAUGE
- See gauge swatch instructions below.
Fits Head Size
- Baby: 16″ – 17.5″ circ.
- Toddler: 17.5″ – 19″ circ.
- Child: 19″ – 21″ circ.
- Teen / Adult Small: 21″ – 22.5″ circ.
- Adult Medium / Large: 22.5″ – 23.5″ circ.
- Adult X-Large: 23.5″ – 24.5″ circ.
NOTES
- Turning chains are not included in stitch count.
- The first stitch of each row is worked into the same stitch as the turning chain, unless stated otherwise.
- Yarn 1: Lion Brand Wool Ease Thick & Quick in Fisherman was used for the cream hat. (170 g / 6oz / 106 yards / 97 m / 80% acrylic / 20% wool).
- Yarn 2: Lion Brand Hometown USA in Aspen Tweed was used for the tweed hat. (113 g / 4 oz / 64 yards / 59 m / 94% acrylic / 6% rayon).
- Yardage
- Baby (50 yards), Toddler (60 yards), Child (65 yards)
- Teen/Adult Small (70 yards), Adult Medium/Large (80 yards), Adult X-Large (85 yards)
- This hat is worked sideways using my favorite short row method and then seamed in a special way that creates an invisible seam.
- If you prefer a longer or shorter hat, simply increase or decrease your foundation chain.
- Custom Sizing Instructions: See instructions below gauge swatch instructions.
- Video Tutorial: https://www.youtube.com/watch?v=DLC0kWPsGoQ
Gauge Swatch Instructions
Gauge: 10 sts = 4″; 10 rows = 3.25″
Row 1 (RS): With a 9.00mm crochet hook (or size needed to obtain gauge), ch 11, working into the back hump of the foundation ch, sl st in the 2nd ch from your hook, sl st in each ch across. Turn. (10 sts)
Row 2: Ch 1, BLO sl st in each st across. Turn.
Row 3: Ch 1, FLO sl st in each st across. Turn.
Rows 4 – 10: Rep Rows 2 – 3, ending w/ a Row 2 rep.
Finished Size: 4″ W x 3.25″ H
Custom Sizing Instructions
- If you prefer a longer or shorter hat, simply increase or decrease your foundation chain.
- If you need to adjust the circumference of your hat to make it larger, simply begin another short row section and work additional rows, ending with an odd numbered row, then seam your hat.
- If you need to adjust the circumference of your hat to make it smaller, simply work fewer rows, making sure to end with an odd numbered row before seaming.
Kids’ Beanie Instructions
Scroll down for adult sizes.
Refer to progression photos below
Changes for sizes written as follows: Baby (Toddler, Child)
Finished Size (seamed & laid flat): 6.5″ W x 7″ L (7.25″ W x 7.25″ L, 7.75″ W x 7.75″ L) Note that finished length is less than the length of Row 1 due to the nature of the short rows.
Row 1 (RS): With a 9.00mm crochet hook (or size needed to obtain gauge), ch 20 (21, 22), working into the back hump of the foundation ch, sl st in the 2nd ch from your hook, sl st in each ch across. Turn. (19, 20, 21 sts) *Length of Row 1: 7.6″ (8″, 8.4″).
Tip: Before turning, place a SM in the FLO of the first stitch of Row 1 & every odd numbered row throughout. If you haven’t worked short rows before, this will help you complete Row 10 & the end of each short row section after Row 10.
Row 2: Ch 1, BLO sl st in each st across to the last st, skip the last st. Turn. (18, 19, 20 sts)
Row 3: Ch 1, FLO sl st in each of the next 15 (16, 16) sts, BLO sl st in each of the last 3 (3, 4) sts. Turn. (18, 19, 20 sts)
Row 4: Ch 1, BLO sl st in each st across to the last st, skip the last st. Turn. (17, 18, 19 sts)
Row 5: Ch 1, FLO sl st in each of the next 14 (15, 15) sts, BLO sl st in each of the last 3 (3, 4) sts. Turn. (17, 18, 19 sts)
Row 6: Ch 1, BLO sl st in each st across to the last st, skip the last st. Turn. (16, 17, 18 sts)
Row 7: Ch 1, FLO sl st in each of the next 13 (14, 14) sts, BLO sl st in each of the last 3 (3, 4) sts. Turn. (16, 17, 18 sts)
Row 8: Ch 1, BLO sl st in each st across to the last st, skip the last st. Turn. (15, 16, 17 sts)
Row 9: Ch 1, FLO sl st in each of the next 12 (13, 13) sts, BLO sl st in each of the last 3 (3, 4) sts. Turn. (15, 16, 17 sts)
Row 10: Ch 1, BLO sl st in each st across previous row, BLO sl st in each unworked st to Row 1. Turn. (19, 20, 21 sts) Remove SM after completing this row. Row height at this point should be 3.25″.
Row 11: Ch 1, FLO sl st in each of the next 16 (17, 17) sts, BLO sl st in each of the last 3 (3, 4) sts. Turn. (19, 20, 21 sts)
Rows 12 – 19: Rep Rows 2 – 9.
Row 20: Ch 1, BLO sl st in each st across previous row, BLO sl st in each unworked st to Row 11. Turn. (19, 20, 21 sts)
Row 21: Ch 1, FLO sl st in each of the next 16 (17, 17) sts, BLO sl st in each of the last 3 (3, 4) sts. Turn. (19, 20, 21 sts)
Rows 22 – 29: Rep Rows 2 – 9.
Row 30: Ch 1, BLO sl st in each st across previous row, BLO sl st in each unworked st to Row 21. Turn. (19, 20, 21 sts)
Do not fasten off. Continue on to the last section for the size hat you’re making.
Baby
Row 31: Ch 1, FLO sl st in each of the next 16 sts, BLO sl st in each of the last 3 sts. Turn. (19 sts)
Rows 32 – 39: Rep Rows 2 – 9.
Do not fasten off. Continue on to the seam row below.
Toddler
Row 31: Ch 1, FLO sl st in each of the next 17 sts, BLO sl st in each of the last 3 sts. Turn. (20 sts)
Rows 32 – 39: Rep Rows 2 – 9.
Row 40: Ch 1, BLO sl st in each st across previous row, BLO sl st in each unworked st to Row 31. Turn. (20 sts)
Row 41: Ch 1, FLO sl st in each of the next 17 sts, BLO sl st in each of the last 3 sts. Turn. (20 sts)
Rows 42 – 43: Rep Rows 2 – 3.
Do not fasten off. Continue on to the seam row below.
Child
Row 31: Ch 1, FLO sl st in each of the next 17 sts, BLO sl st in each of the last 4 sts. Turn. (21 sts)
Rows 32 – 39: Rep Rows 2 – 9.
Row 40: Ch 1, BLO sl st in each st across previous row, BLO sl st in each unworked st to Row 31. Turn. (21 sts)
Row 41: Ch 1, FLO sl st in each of the next 17 sts, BLO sl st in each of the last 4 sts. Turn. (21 sts)
Rows 42 – 45: Rep Rows 2 – 5.
Do not fasten off. Continue on to the seam row below.
Kids’ Seam
Row 40 (44, 46): See photo tutorial below.
Ch 1, with the Wrong Side of the hat facing out, bring Row 1 up to meet the last row worked, position it so that the working yarn is on the inside of the hat then work the following:
- First 3 (3, 4) stitches: Insert your hook (from front to back) into the BLO of the next st of the last row, insert your hook (from back to front) into the BLO of the next st of the first row, yo, pull through all loops on your hook. Work a total of 3 (3, 4) stitches in this manner, then continue on.
- Remaining 16 (17, 17) stitches: Insert your hook (from front to back) into the BLO of the next st of the last row, insert your hook (from back to front) into the FLO of the next st of the first row, yo, pull through all loops on your hook. Work a total of 16 (17, 17) stitches. When you get to the unworked stitches of the short rows, continue seaming in the same manner.
Fasten off leaving an 8″ tail of yarn. Continue on to finishing.
Finishing
Turn hat right side out. Using a yarn needle and the 8” yarn tail, weave in and out of ends of crown opening. Pull yarn tight to close gap. Weave in ends. Add a pom, if desired.
Adult Beanie Instructions
Refer to progression photos below
Changes for sizes written as follows: Teen/Adult Small (Adult Medium/Large, Adult X-Large)
Finished Size (seamed & laid flat): 8″ W x 8″ L (8.5″ W x 8.75″ L, 9″ W x 9.5″ L) Note that finished length is less than the length of Row 1 due to the nature of the short rows.
Row 1 (RS): With a 9.00mm crochet hook (or size needed to obtain gauge), ch 23 (25, 27) working into the back hump of the foundation ch, sl st in the 2nd ch from your hook, sl st in each ch across. Turn. (22, 24, 26 sts) *Length of Row 1: 8.8″ (9.6″, 10.4″).
Tip: Before turning, place a SM in the FLO of the first stitch of Row 1 & every odd numbered row throughout. If you haven’t worked short rows before, this will help you complete Row 10 & the end of each short row section after Row 10.
Row 2: Ch 1, BLO sl st in each st across to the last st, skip the last st. Turn. (21, 23, 25 sts)
Row 3: Ch 1, FLO sl st in each of the next 17 (19, 21) sts, BLO sl st in each of the last 4 sts. Turn. (21, 23, 25 sts)
Row 4: Ch 1, BLO sl st in each st across to the last st, skip the last st. Turn. (20, 22, 24 sts)
Row 5: Ch 1, FLO sl st in each of the next 16 (18, 20) sts, BLO sl st in each of the last 4 sts. Turn. (20, 22, 24 sts)
Row 6: Ch 1, BLO sl st in each st across to the last st, skip the last st. Turn. (19, 21, 23 sts)
Row 7: Ch 1, FLO sl st in each of the next 15 (17, 19) sts, BLO sl st in each of the last 4 sts. Turn. (19, 21, 23 sts)
Row 8: Ch 1, BLO sl st in each st across to the last st, skip the last st. Turn. (18, 20, 22 sts)
Row 9: Ch 1, FLO sl st in each of the next 14 (16, 18) sts, BLO sl st in each of the last 4 sts. Turn. (18, 20, 22 sts)
Row 10: Ch 1, BLO sl st in each st across previous row, BLO sl st in each unworked st to Row 1. Turn. (22, 24, 26 sts) Remove SM after completing this row. Row height at this point should be 3.25″.
Row 11: Ch 1, FLO sl st in each of the next 18 (20, 22) sts, BLO sl st in each of the last 4 sts. Turn. (22, 24, 26 sts)
Rows 12 – 19: Rep Rows 2 – 9.
Row 20: Ch 1, BLO sl st in each st across previous row, BLO sl st in each unworked st to Row 11. Turn. (22, 24, 26 sts)
Row 21: Ch 1, FLO sl st in each of the next 18 (20, 22) sts, BLO sl st in each of the last 4 sts. Turn. (22, 24, 26 sts)
Rows 22 – 29: Rep Rows 2 – 9.
Row 30: Ch 1, BLO sl st in each st across previous row, BLO sl st in each unworked st to Row 21. Turn. (22, 24, 26 sts)
Row 31: Ch 1, FLO sl st in each of the next 18 (20, 22) sts, BLO sl st in each of the last 4 sts. Turn. (22, 24, 26 sts)
Rows 32 – 39: Rep Rows 2 – 9.
Row 40: Ch 1, BLO sl st in each st across previous row, BLO sl st in each unworked st to Row 31. Turn. (22, 24, 26 sts)
Do not fasten off. Continue on to the last section for the size hat you’re making.
Teen / Adult Small
Row 41: Ch 1, FLO sl st in each of the next 18 sts, BLO sl st in each of the last 4 sts. Turn. (22 sts)
Rows 42 – 47: Rep Rows 2 – 7.
Do not fasten off. Continue on to the seam row below.
Adult Medium / Large
Row 41: Ch 1, FLO sl st in each of the next 20 sts, BLO sl st in each of the last 4 sts. Turn. (24 sts)
Rows 42 – 49: Rep Rows 2 – 9.
Do not fasten off. Continue on to the seam row below.
Adult X-Large
Row 41: Ch 1, FLO sl st in each of the next 20 sts, BLO sl st in each of the last 4 sts. Turn. (24 sts)
Rows 42 – 49: Rep Rows 2 – 9.
Row 50: Ch 1, BLO sl st in each st across previous row, BLO sl st in each unworked st to Row 41. Turn. (26 sts)
Row 51: Ch 1, FLO sl st in each of the next 22 sts, BLO sl st in each of the last 4 sts. Turn. (26 sts)
Do not fasten off. Continue on to the seam row below.
Adult Seam
Row 48 (50, 52): See photo tutorial below.
Ch 1, with the Wrong Side of the hat facing out, bring Row 1 up to meet the last row worked, position it so that the working yarn is on the inside of the hat then work the following:
- First 4 stitches: Insert your hook (from front to back) into the BLO of the next st of the last row, insert your hook (from back to front) into the BLO of the next st of the first row, yo, pull through all loops on your hook. Work a total of 4 stitches in this manner, then continue on.
- Remaining 18 (20, 22) stitches: Insert your hook (from front to back) into the BLO of the next st of the last row, insert your hook (from back to front) into the FLO of the next st of the first row, yo, pull through all loops on your hook. Work a total of 18 (20, 22) stitches. When you get to the unworked stitches of the short rows, continue seaming in the same manner.
Fasten off leaving an 8″ tail of yarn. Continue on to finishing.
Finishing
Turn hat right side out. Using a yarn needle and the 8” yarn tail, weave in and out of ends of crown opening. Pull yarn tight to close gap. Weave in ends. Add a pom, if desired.
Progression Photos
Don’t forget there’s a VIDEO TUTORIAL!
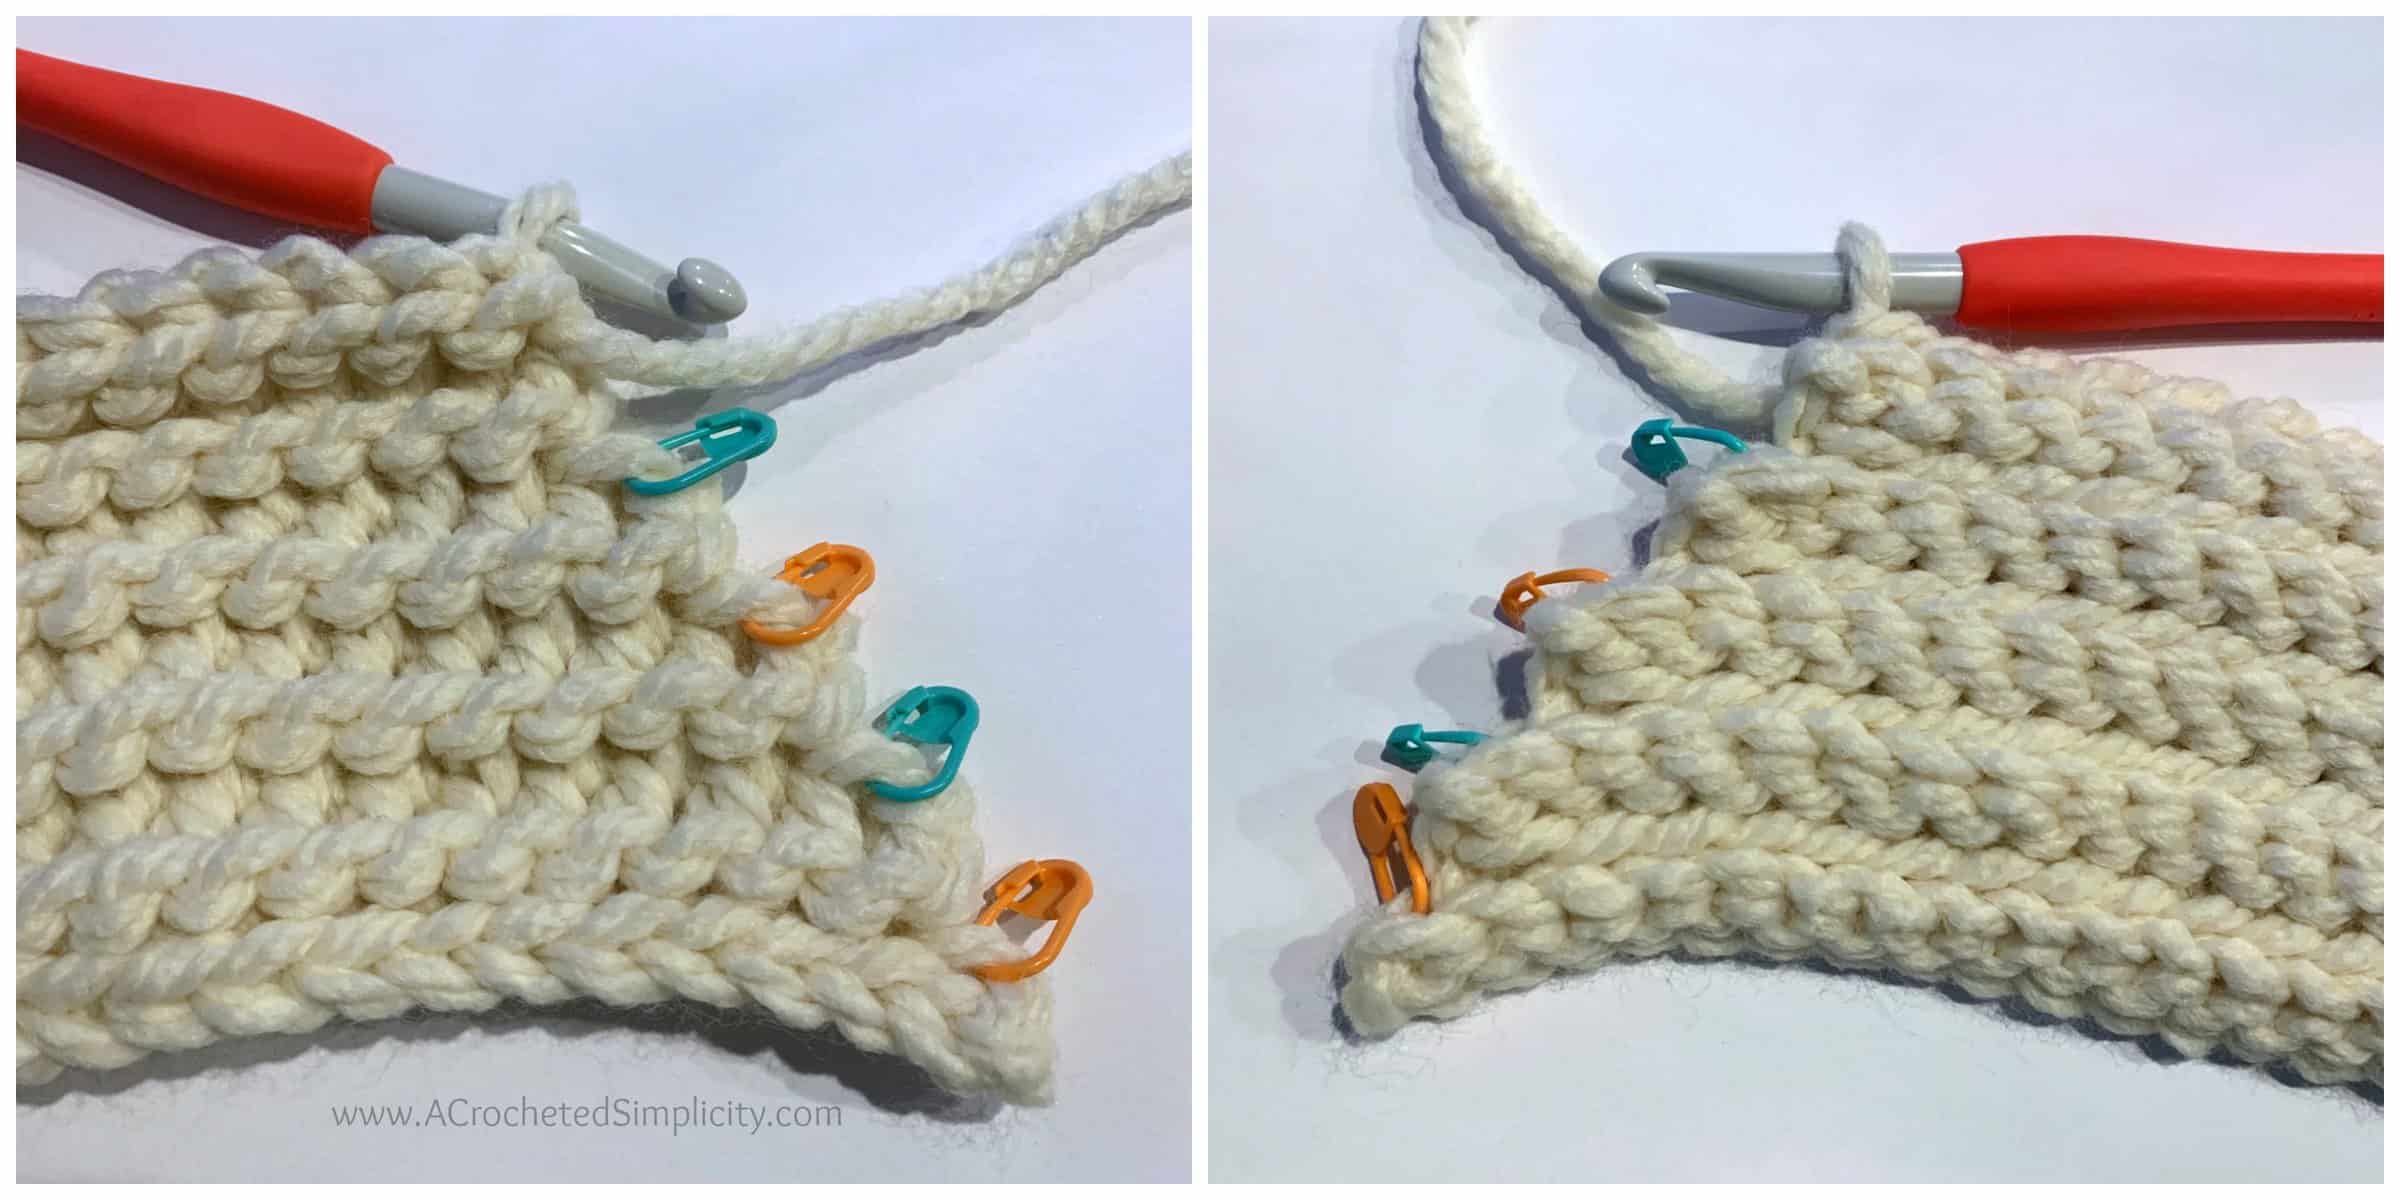
Photo Above Left: Shows the right side of the hat before finishing row 10. Note the SM that mark every odd row.
Photo Above Right: Shows the wrong side of the hat, row 10, just before working into each of the skipped stitches along the short rows.
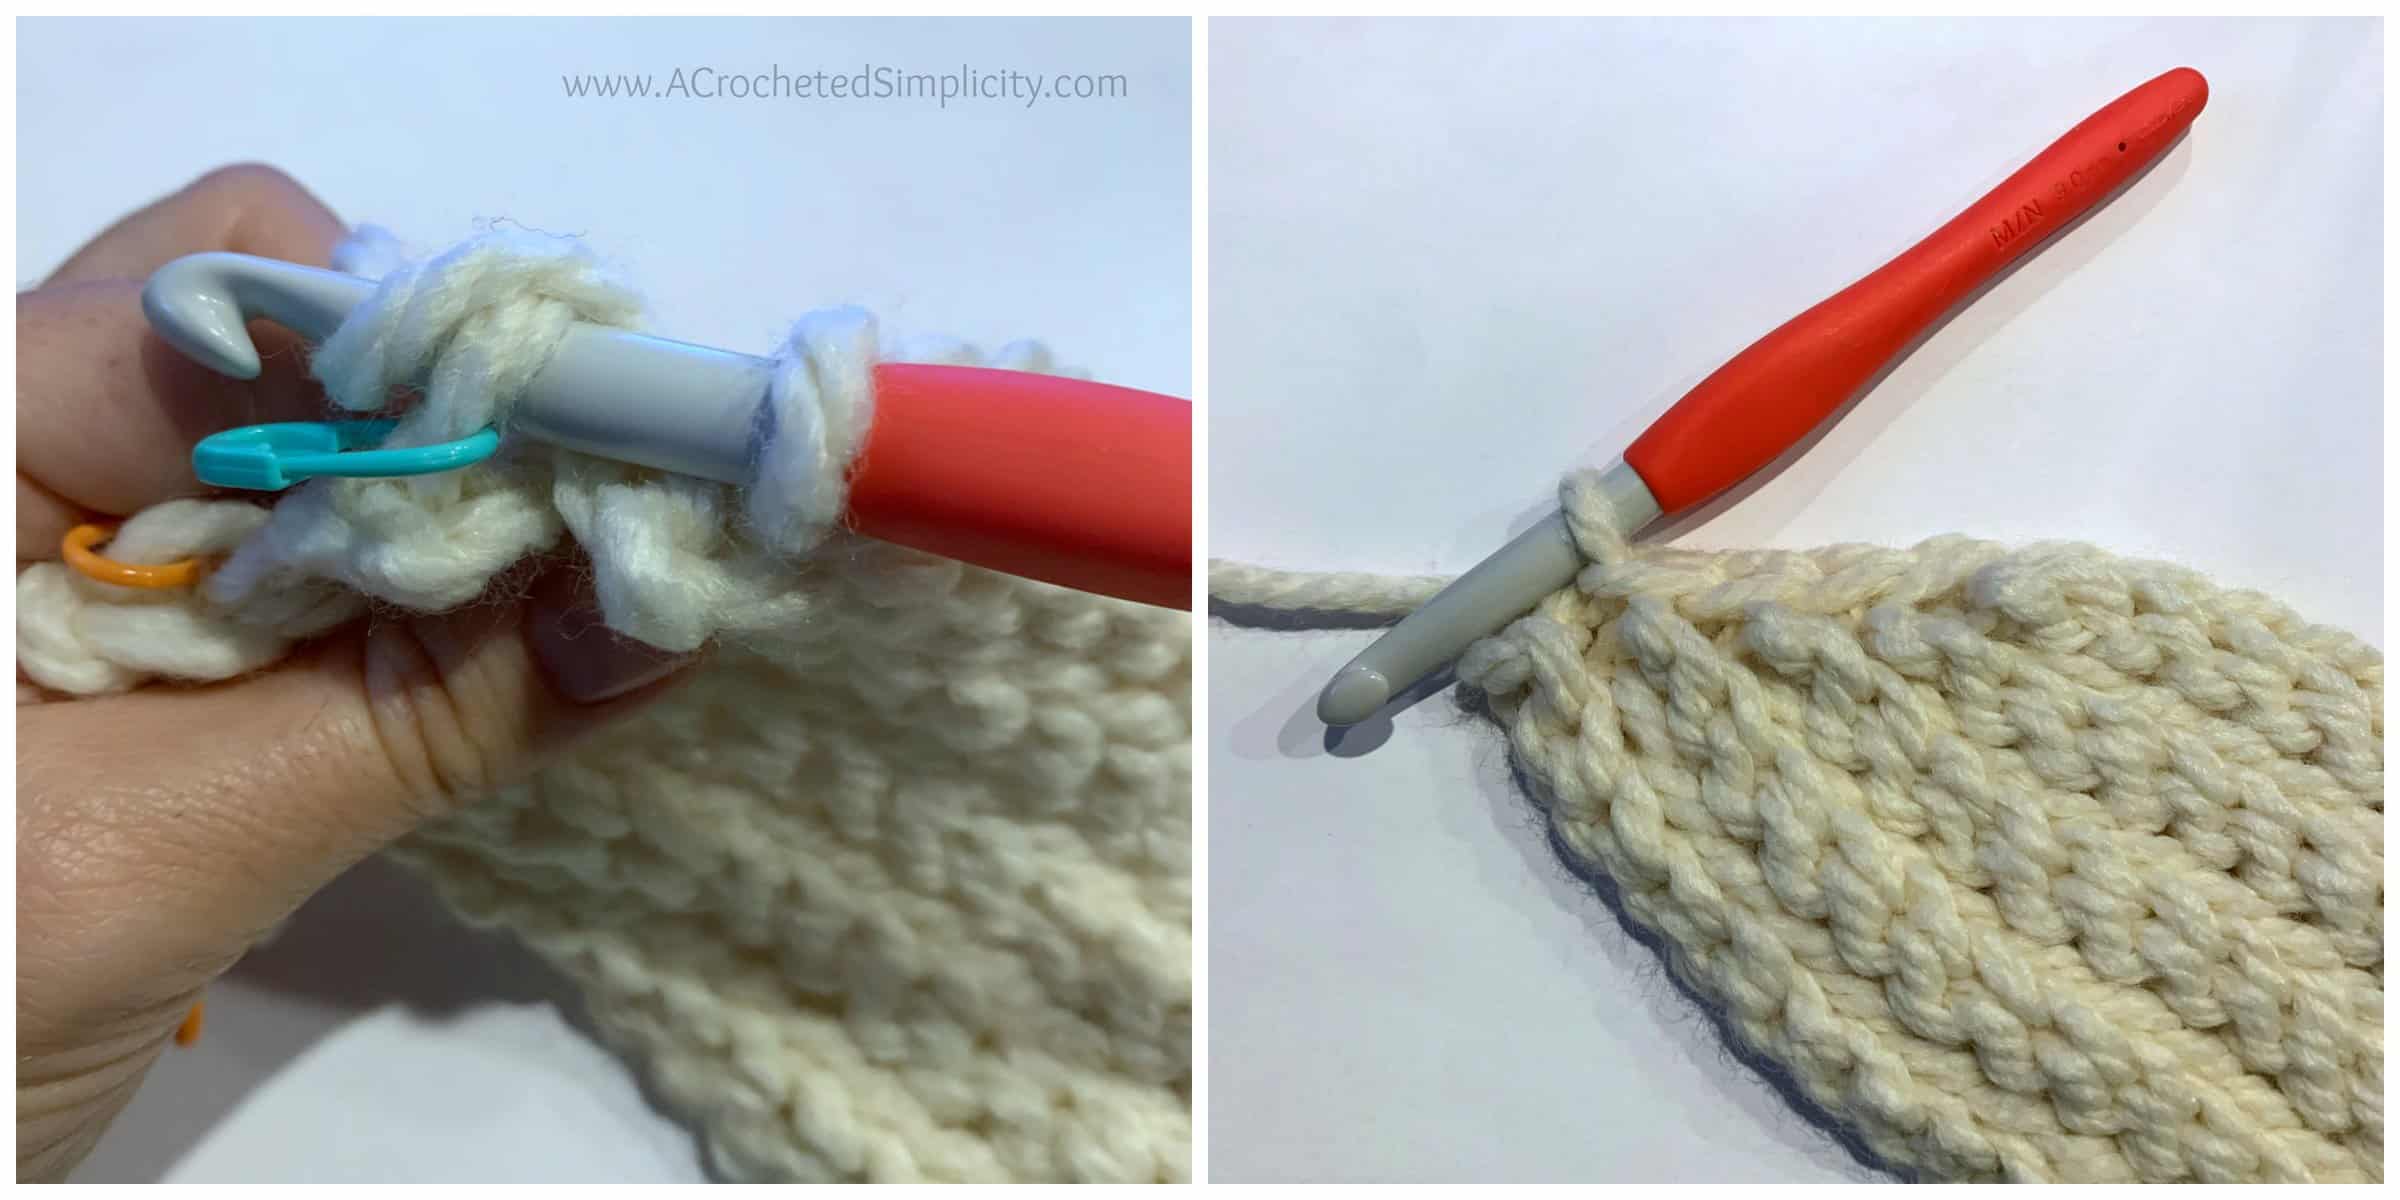
Photo Above Left: Shows row 10, working into the skipped stitches along the short rows.
Photo Above Right: Shows row 10 complete. First short row section, rows 1 – 10, complete.
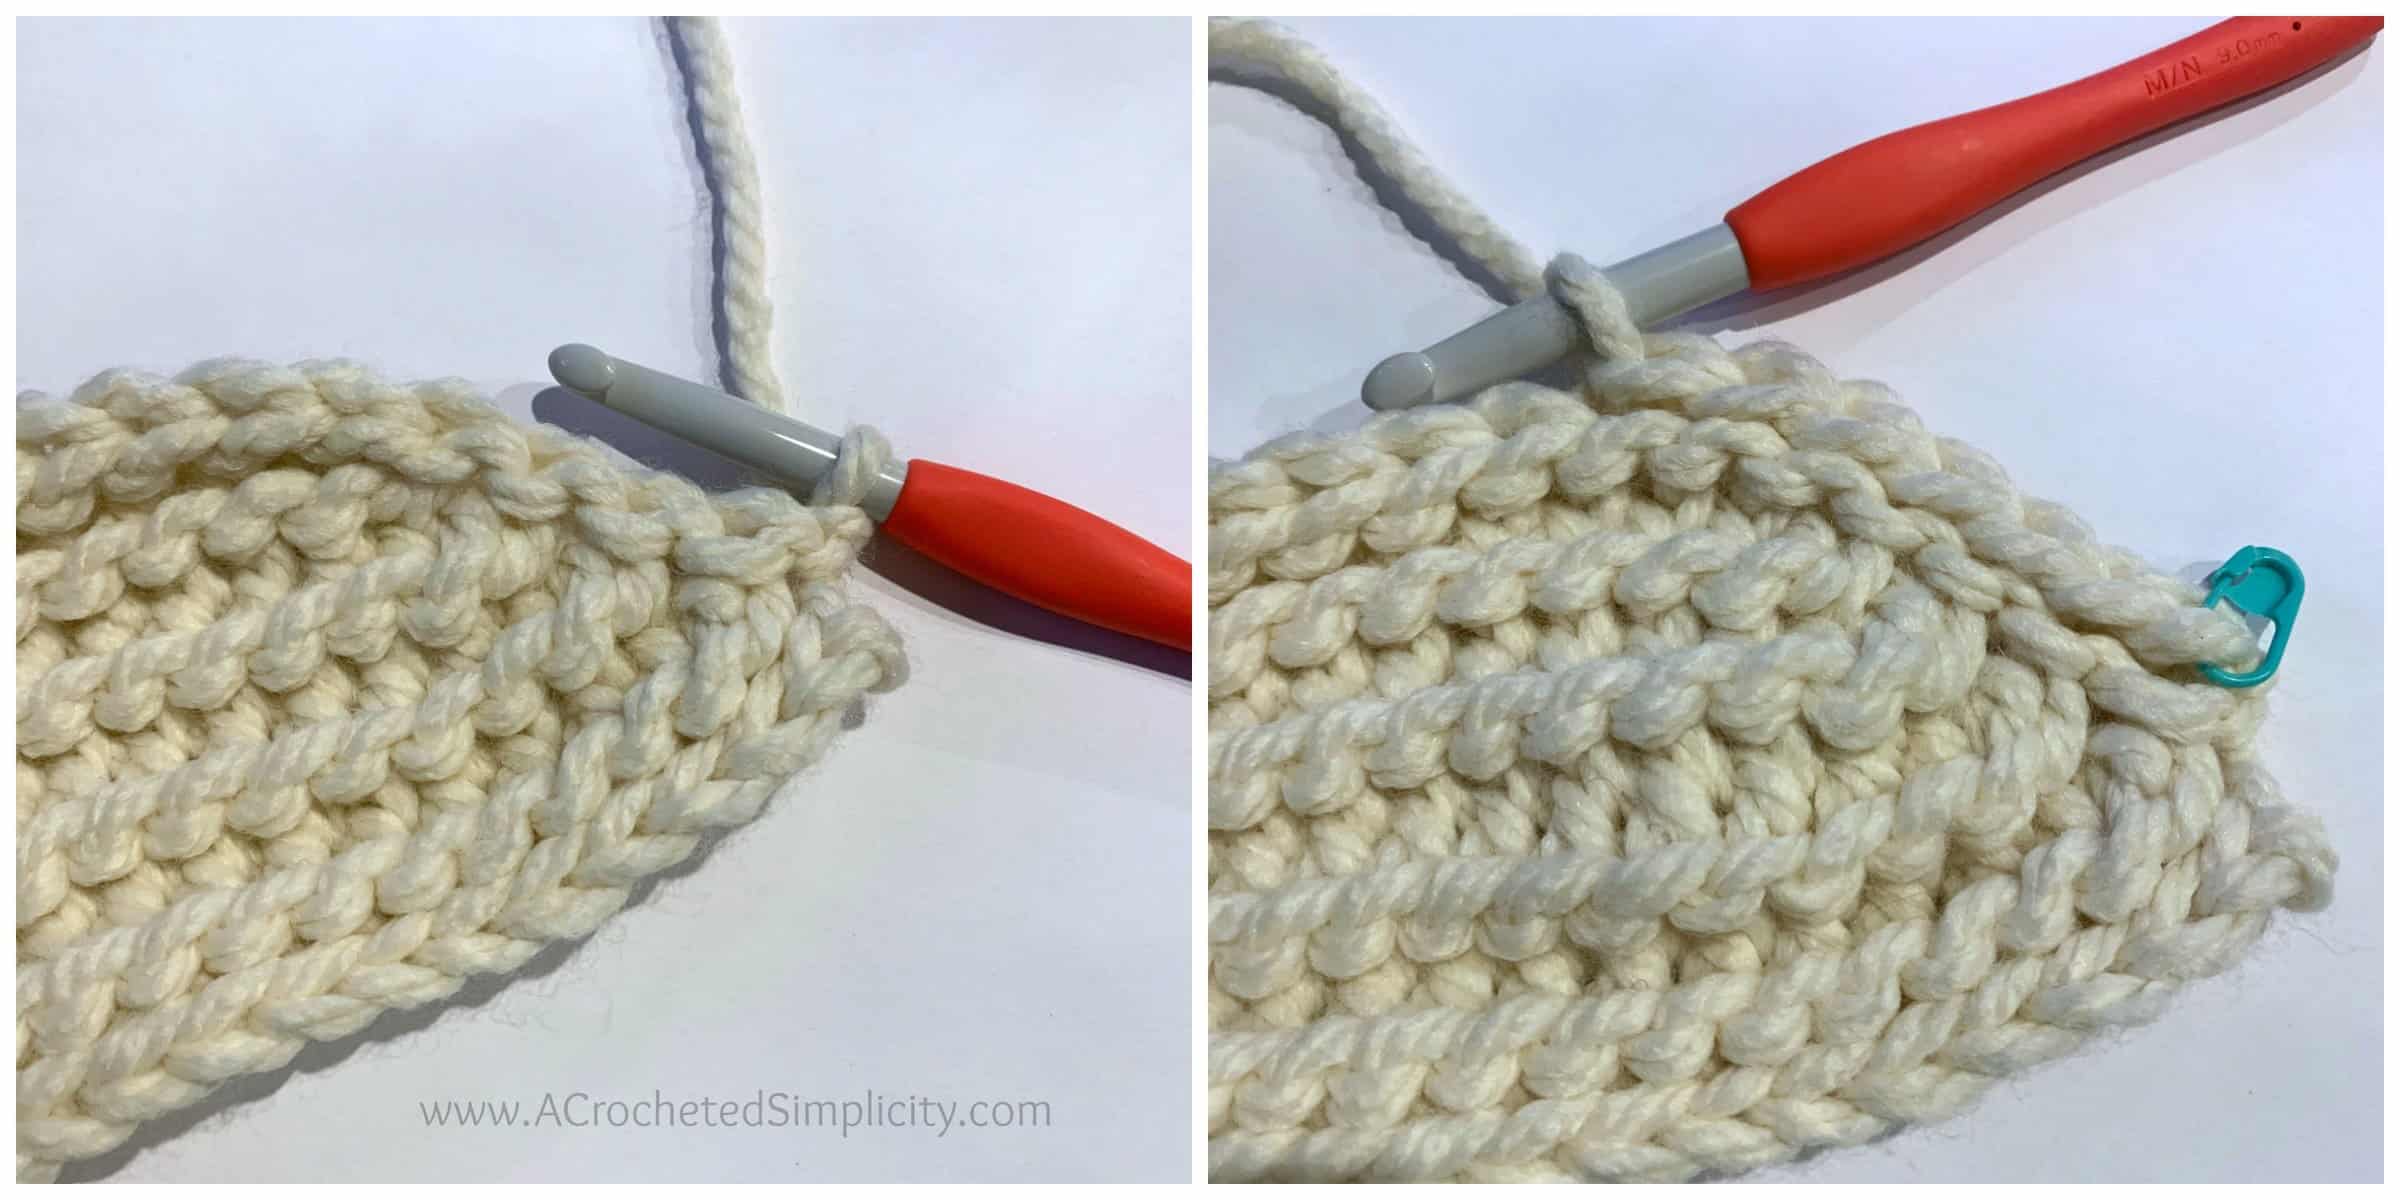
Photo Above Left: Shows the right side of the hat, ready to begin row 11.
Photo Above Right: Shows the beginning of row 11 being worked.
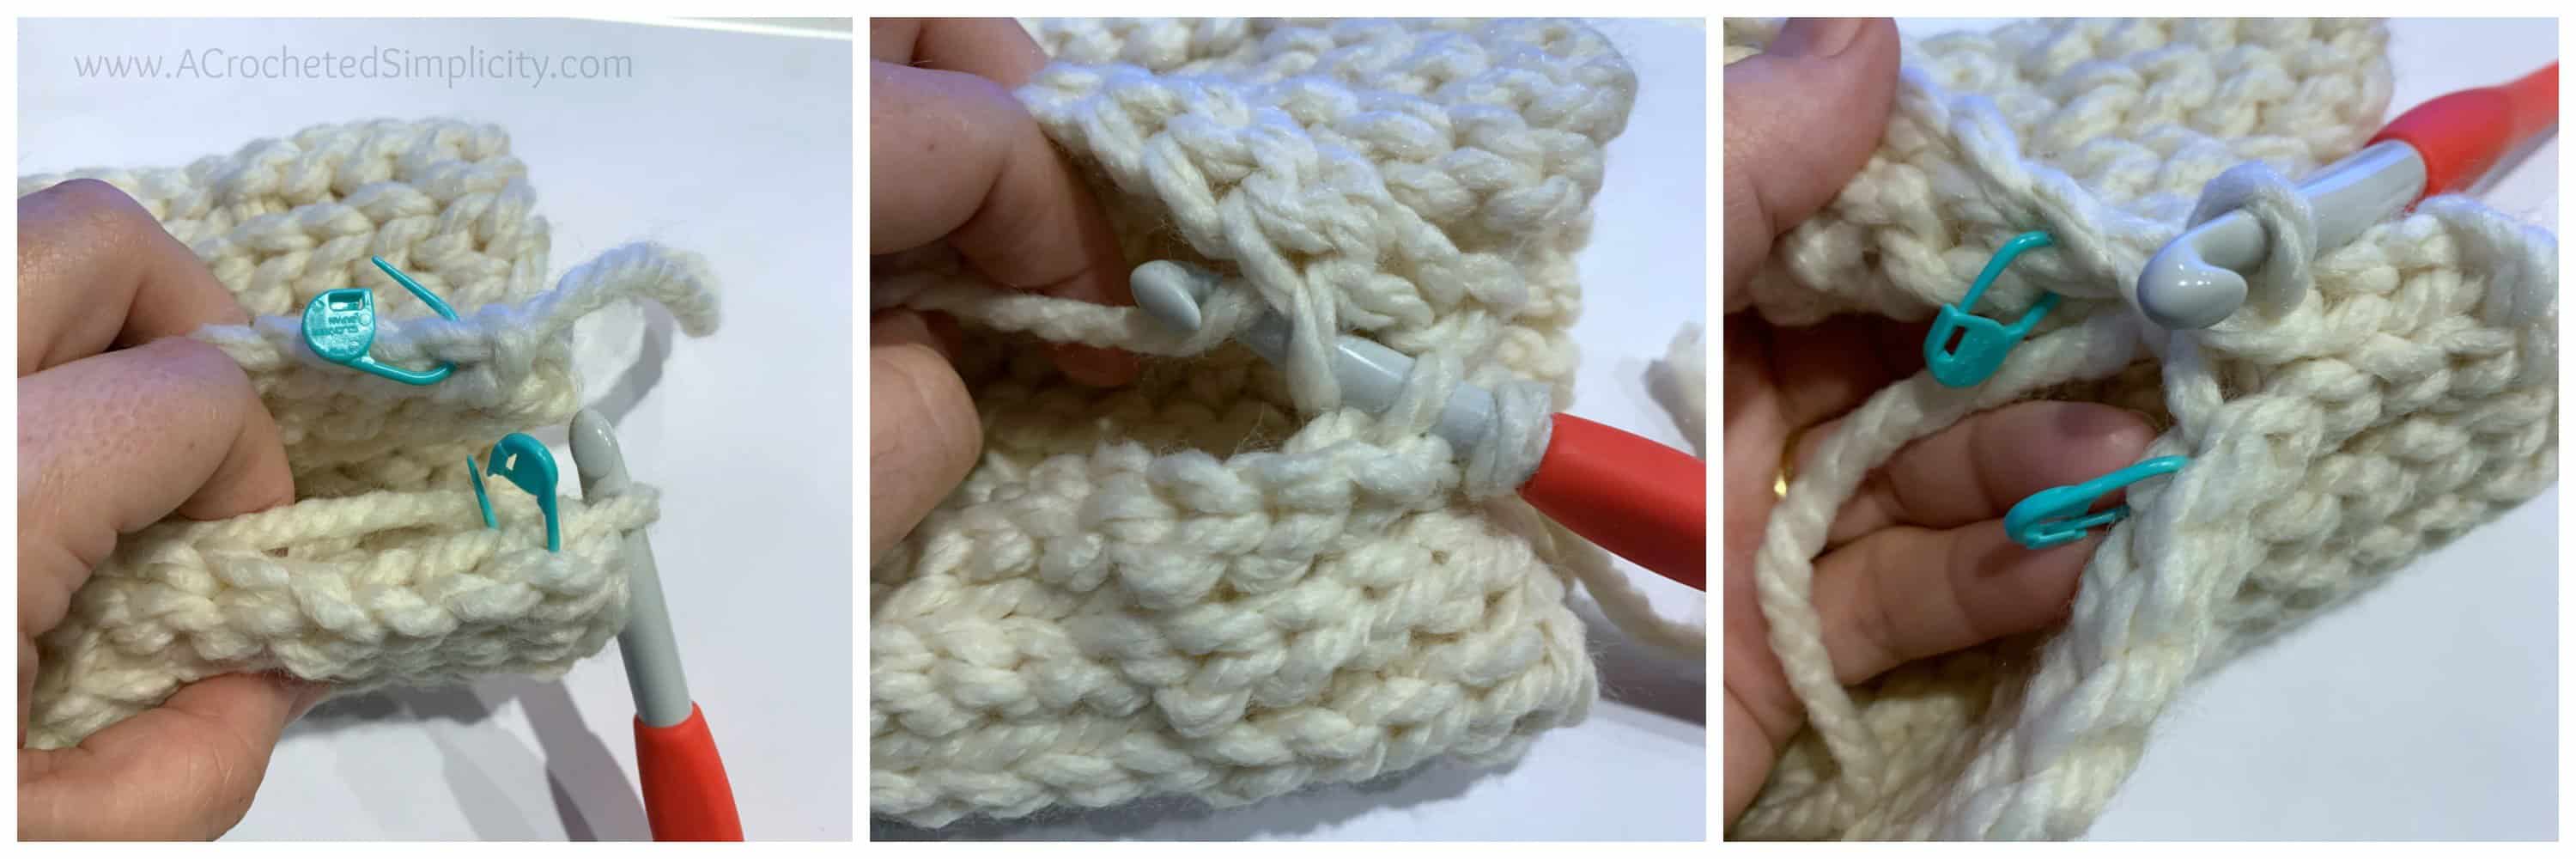
Photo Above Left: The SMs mark the BLO of the last row (front) and first row (back).
Photo Above Center: Shows the beginning of the seam being worked. Sl st into the BLO of the first and last rows with the working yarn held on the inside of the hat. Refer to written instructions for more specific details.
Photo Above Right: The SMs mark the BLO of the last row (front) and FLO of the first row (back). The remainder of the seam is worked into these stitches.
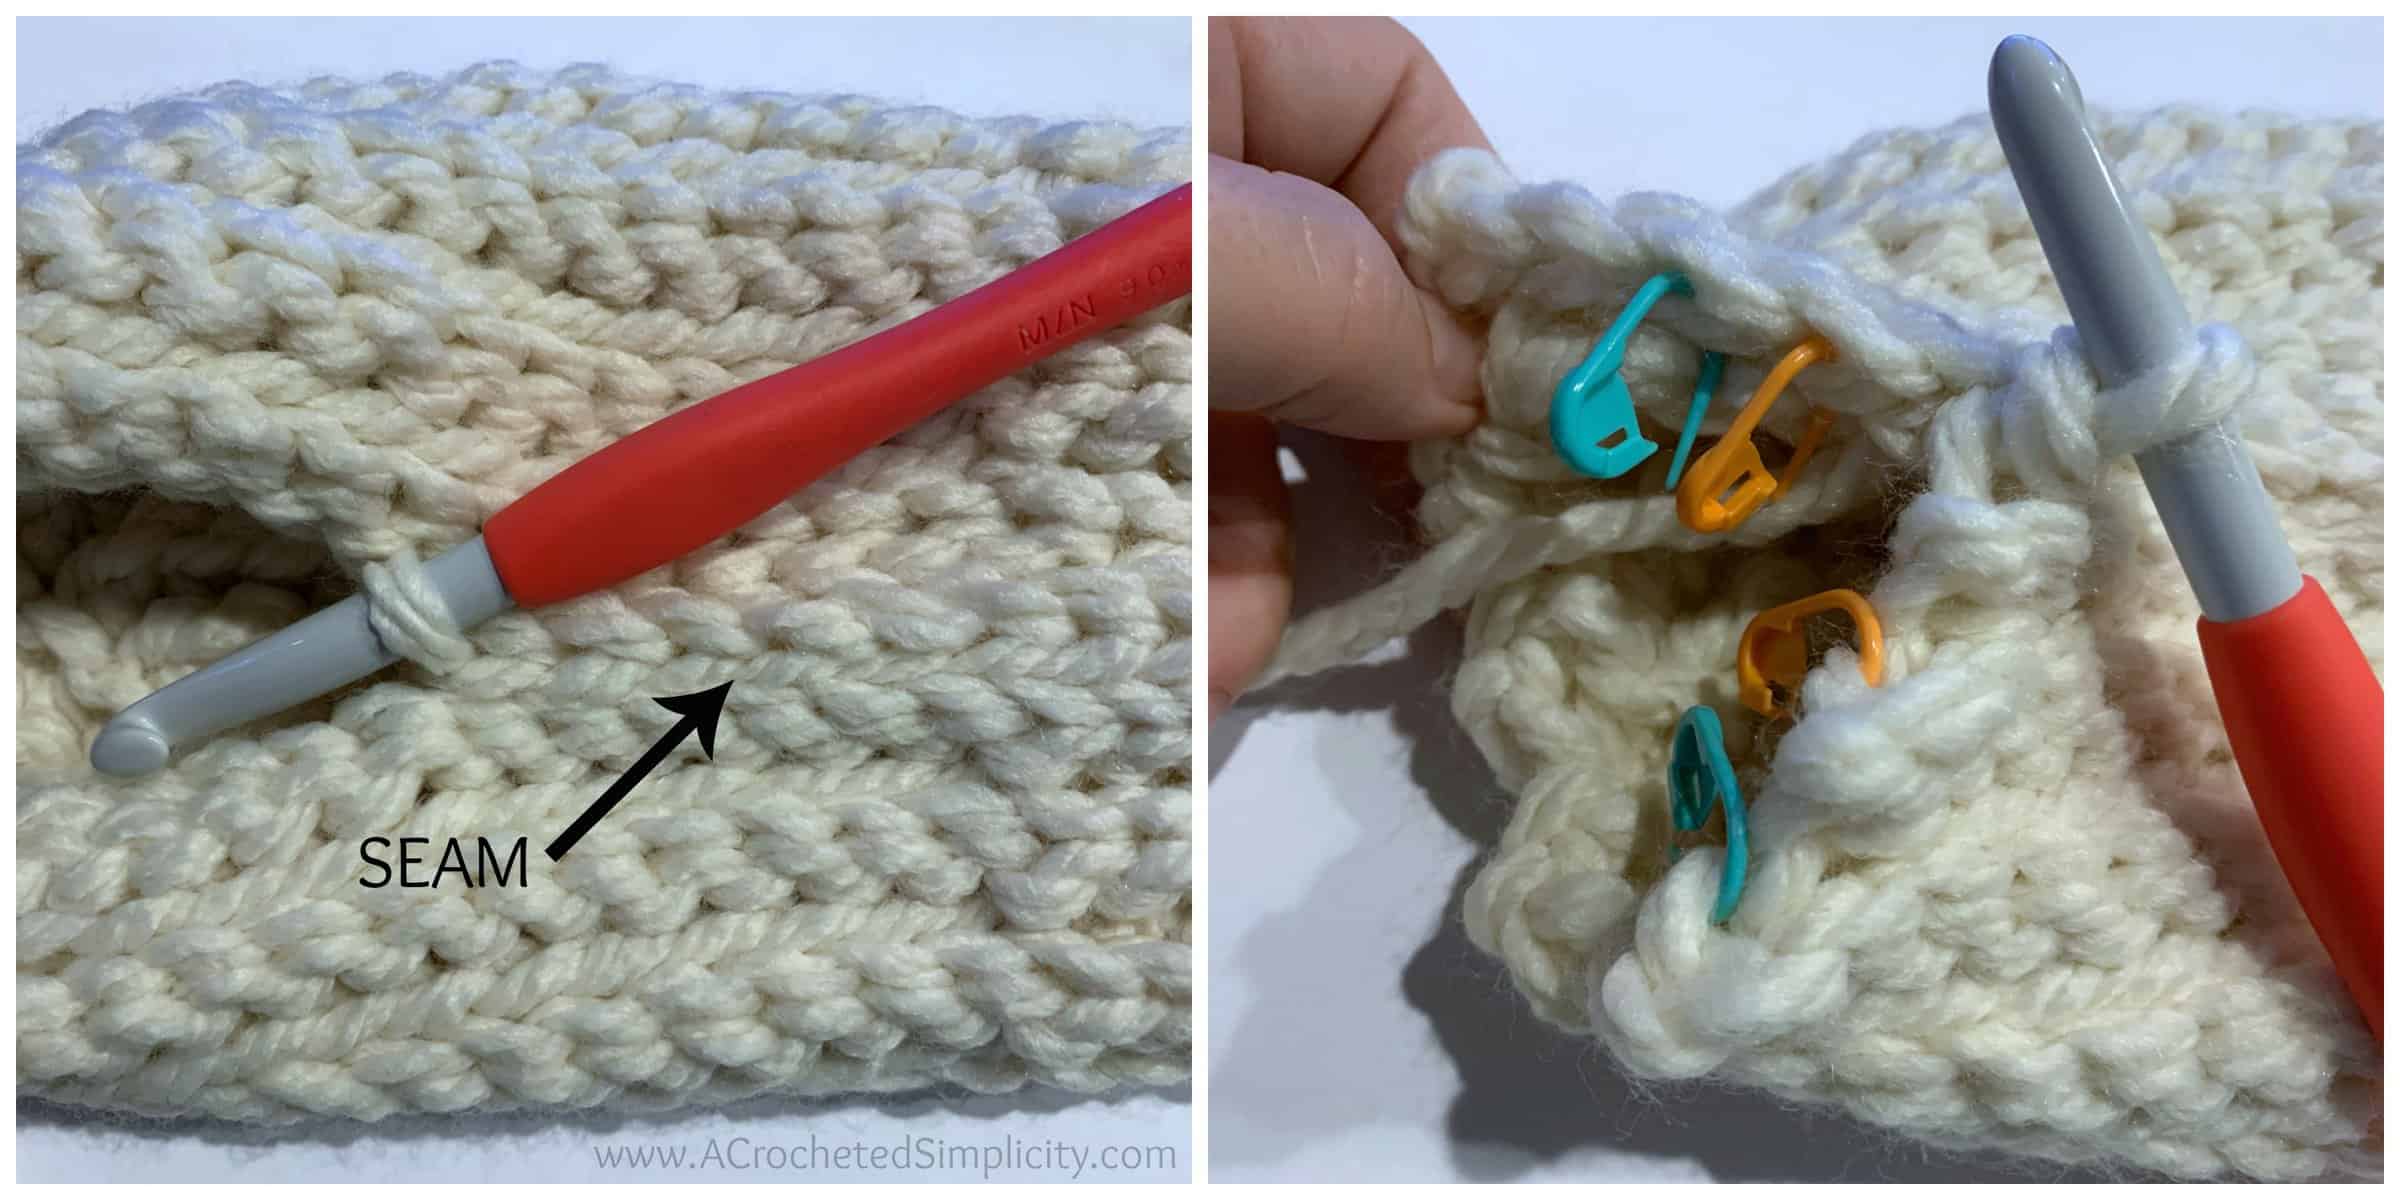
Photo Above Left: Shows what the seam (on the inside of the hat) will look like after working a few stitches.
Photo Above Right: Shows continuing to work the seam into the skipped stitches of the last crochet short row section.
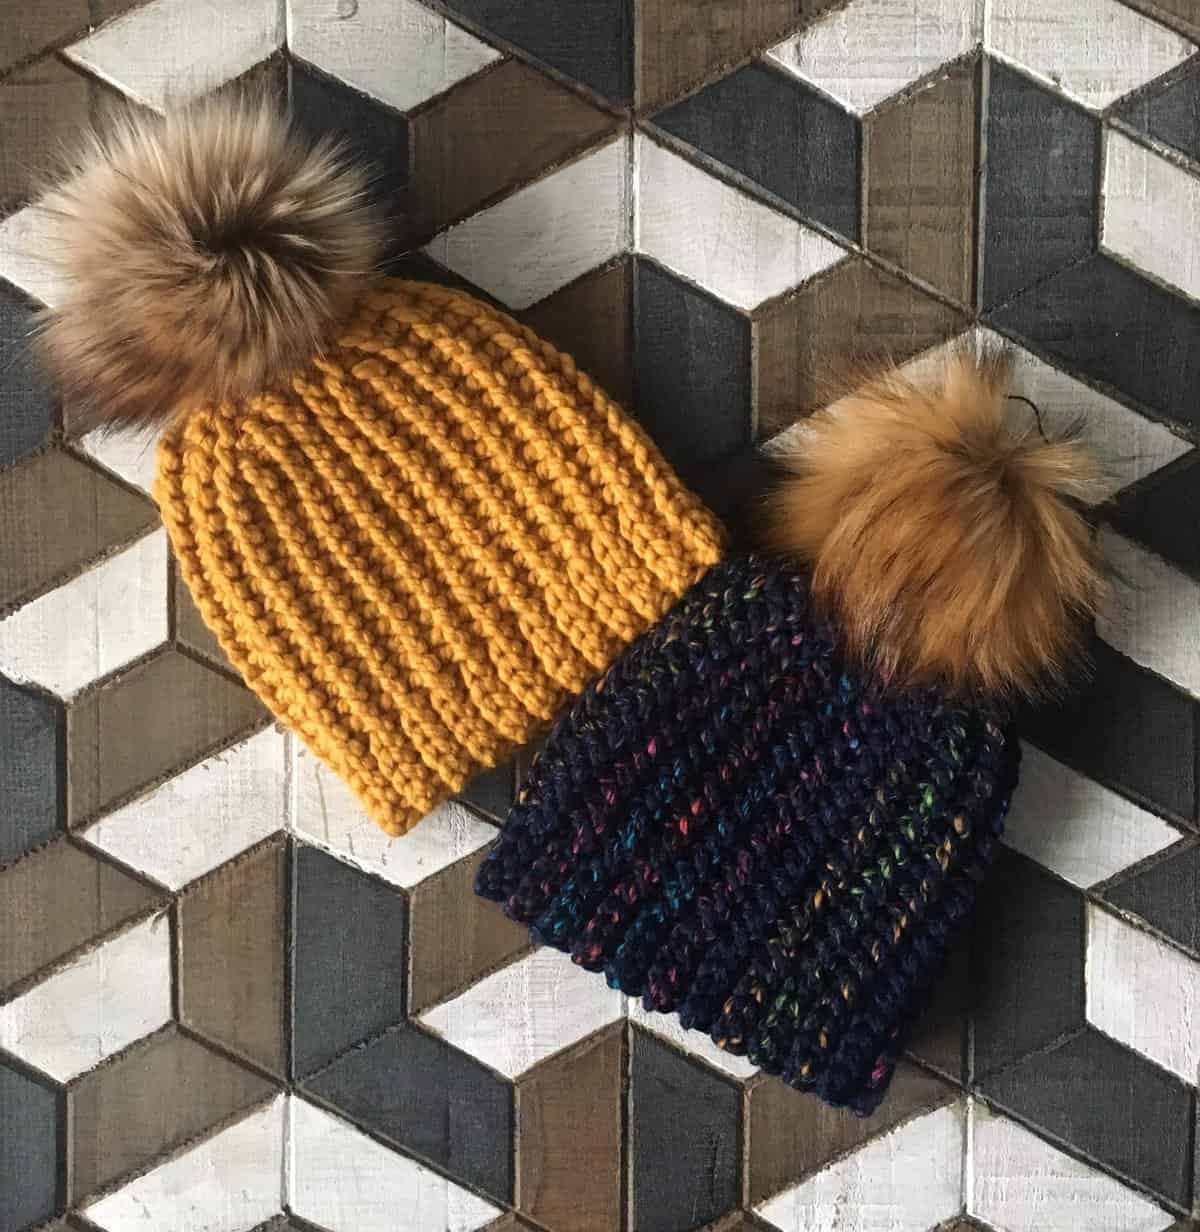
NOW THAT YOU’VE FINISHED CROCHETING YOUR DONE IN ONE BEANIE, ADD YOUR OWN FINISHING TOUCHES USING ONE OF THESE FUN OPTIONS!
- Chain Loop Pom (click here for tutorial)
- Faux Fur Pom (click here)
- Personalized Tags (click here for tutorial)
MAKE A MATCHING SET!
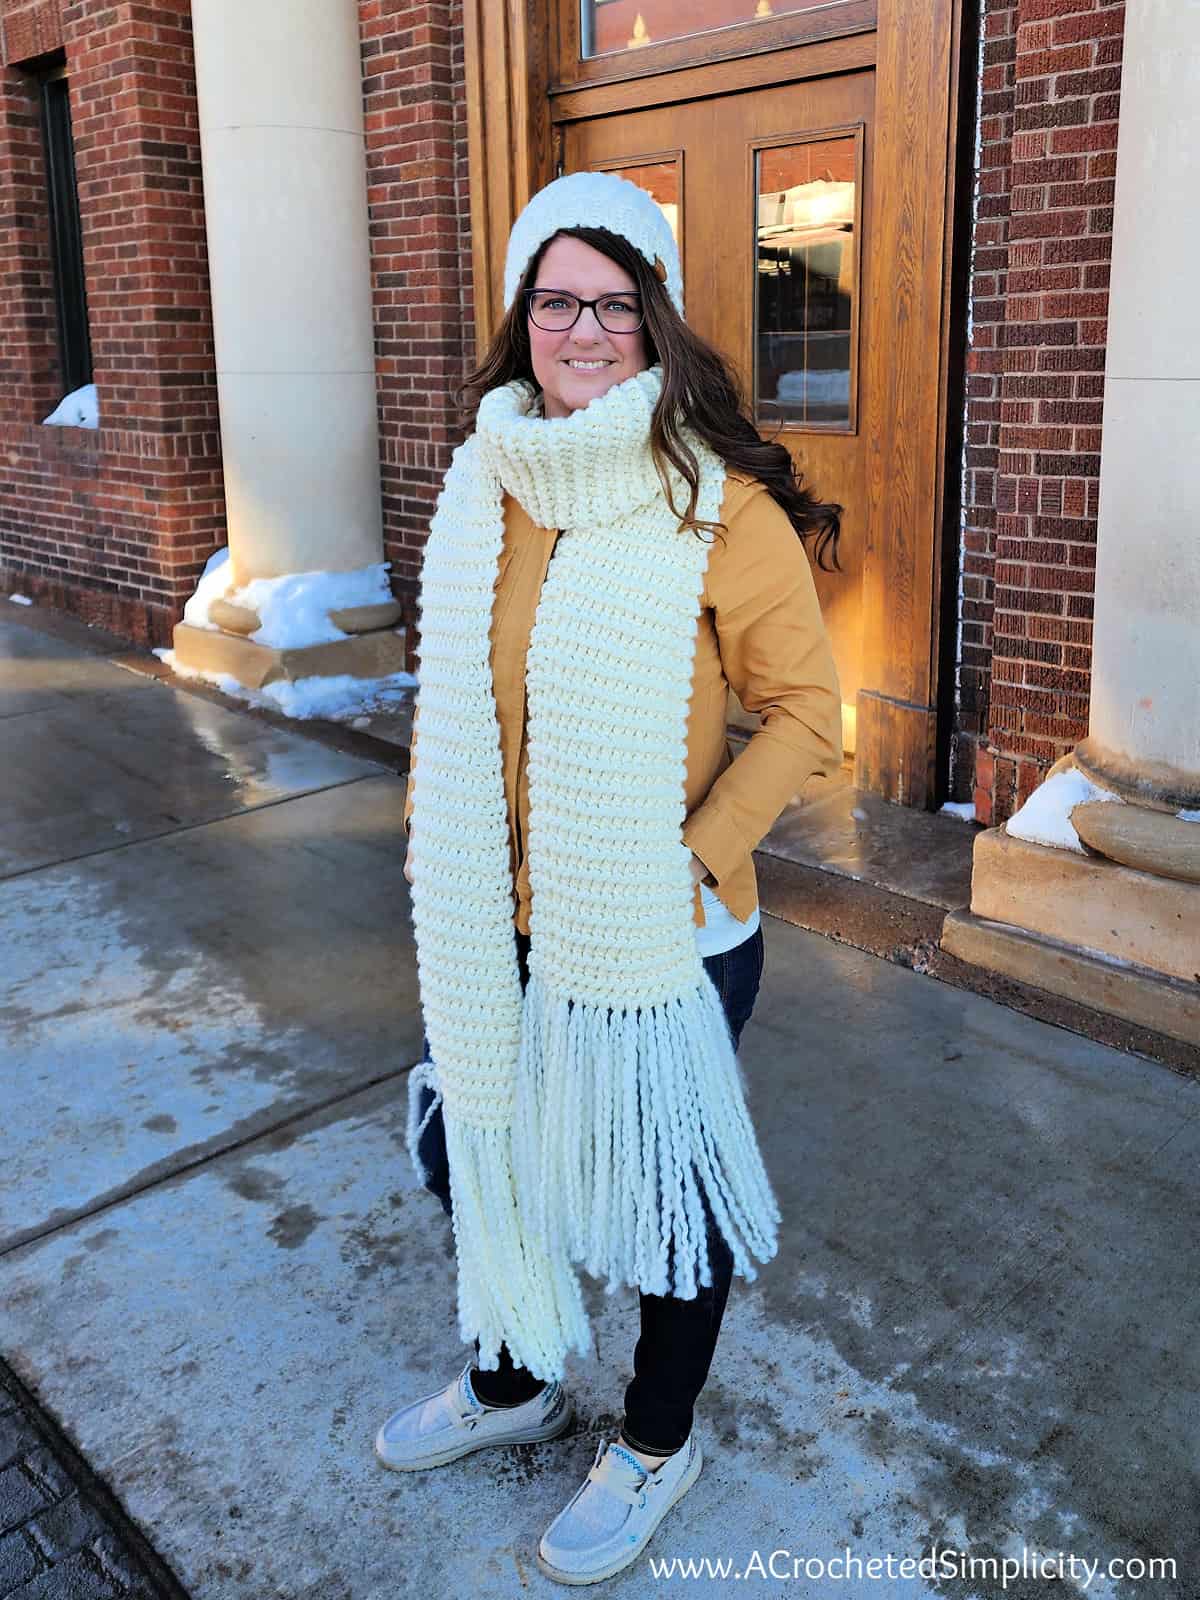
Make the Knit Look Crochet Garter Stitch Scarf and the Done in One Beanie for a quick crochet gift and matching set.
MORE FREE CROCHET PATTERNS FROM A CROCHETED SIMPLICITY
If you enjoy this crochet beanie pattern, you may enjoy these other projects as well. And if you just want to browse, you can find all of our free crochet patterns HERE.


Are you intimidated by knit-look crochet? Would you love to learn my tips & tricks? Take an Annies Video Class with me and let me ease your fears and help you increase your skills! Click on the photo below to watch a free preview. You can also see the other 4 video classes I have available!


Please share your finished ACS projects with us in the A Crocheted Simplicity Crochet Community Group on Facebook! Use hashtag #ACrochetedSimplicity when sharing on social media so I can find your posts!
It gets very cold here too in Wyoming…down to -45 sometimes not even counting wind chill so warm hats are very needed so I make them for my Caps for Kids group to distrubute. This is a very interresting pattern and I can’t wait to start one. I’m especially interested in that seaming method because my sewing skills in seams is not good to say the least. Thank you
This hat has been on my “must try” list for a long time. I finally made my first one. The pattern is perfect. No issues at all. I went up to a 10mm to meet gauge and followed the pattern to a tee. I promise there are no problems with this pattern. I am an experienced pattern tester and new tech editor. I think slip stitches can be difficult for beginners so it’s important not to pull your stitches tight, but other than that, I can’t see why anyone would have difficulty with this pattern. Don’t be afraid to try it. Thank you for the wonderful, free pattern.
love making this hat for my nephew & niece!
This is first time I ever even heard of a short row! I didn’t mind it at all. I love learning new things.
I will need to make some of theses hats. The pattern looks fun, easy, quick and good looking
This stitch is absolutely awesome. It really looks like garter stitch and I can’t wait to make the hat.