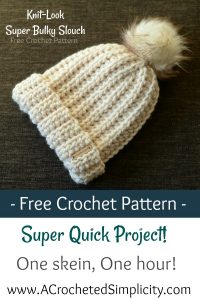
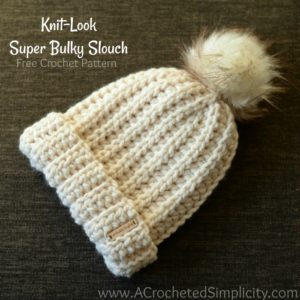
Free Crochet Pattern – Knit-Look Super Bulky Slouch
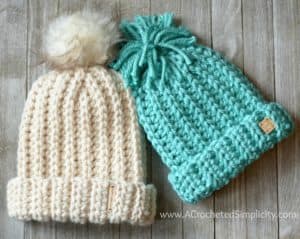
Do you find yourself watching television and noticing everything that’s knit or crochet? Lately, many have been taking note of the different hats being worn by the Olympians. Some are simple, some complex, but most are likely machine knit. So when you don’t want to spend $100, or wait for one to arrive from an online store, what do you do? You set out to make your own handmade knit-look creation.
Tammy posted in my Facebook Community Group asking if anyone knew of a crochet version of the slouch worn by Olympian Chloe Kim. Since I needed a break from a large project I had been working on, I grabbed a large hook, some super bulky yarn, and set out to create a knit-look crochet version for her (and all of you).
>CLICK HERE TO SIGN-UP TO RECEIVE OUR NEWSLETTER!<
~DON’T LOSE IT, ADD IT TO YOUR RAVELRY FAVORITES OR QUEUE.~
~DON’T FORGET TO PIN IT TOO!~
*PURCHASE AN AD-FREE PDF OF THIS PATTERN (INCLUDING BOTH ADULT & KIDS’ SIZES AND FLOPPY YARN POM TUTORIAL) ON CRAFTSY OR RAVELRY*
This post contains affiliate links.
MATERIALS
- Yarn: Yarn used for the sample shown above is Lion Brand Yarn Wool Ease Thick & Quick; 6 / Super Bulky Weight Yarn; 1 ball (106 yards)
- Crochet Hook: M/N/9.00mm (my favorite hooks are Clover Amour Hooks, I’ve never had an ache in my hand since switching)
- Locking Stitch Markers
- Scissors
- Tapestry Needle
- Faux Fur Pom (optional)
- Fun Fur Pom – Click HERE for a free tutorial
- USA Patches (fabric or faux leather) – I found some on Etsy HERE
Many of the materials are available for purchase through our affiliates:
 Lion Brand Yarn 640-099 Woo...Shop on Amazon
  DIY 12pcs Faux Raccoon Fur ...Shop on Amazon
  Clover 1056/MN Amour Croche...Shop on Amazon
  Clover Lock Ring Markers, 2...Shop on Amazon
  Fiskars 154110-1001 Non-sti...Shop on Amazon
STITCH ABBREVIATIONS
- ch(s): chain(s)
- st(s): stitch(es)
- sl st(s): slip stitch(es)
- hdc: half double crochet
- FLO: front loop only
- BLO: back loop only
- RS: right side
- SM: stitch marker
- Rep: repeat
GAUGE
- See gauge swatch instructions below.
SIZE
- Fits Head Size, Teen/Adult: 21″ – 23-1/3″ head circumference
- For Kids’ Sizes Click HERE
NOTES
- Turning chains are not counted as a stitch or included in stitch count.
- The first stitch of each row is worked into the same stitch as the turning chain, unless stated otherwise.
- Yardage: 104 yards (just shy of one ball of Lion Brand Wool Ease Thick & Quick)
- This hat is worked sideways using my favorite short row method and then it is seamed.
- If you prefer a longer or shorter hat, simply increase or decrease your foundation chain.
- If you need to adjust the circumference of your hat to make it larger, simply begin another short row section and work additional rows, ending w/ an odd numbered row, then seam.
- If you need to adjust the circumference of your hat to make it smaller, simply work fewer rows, making sure to end with an odd numbered row before the seam.
- Video Tutorial – Click Here
Gauge Swatch Instructions
Gauge: 8.75 sts = 4″; 8 rows = 4.25″
Row 1 (RS): Using a 9.00mm crochet hook (or size needed to obtain gauge), ch 10. working into the back hump of the foundation chain, hdc into the 2nd ch from your hook, hdc in each ch across. Turn. (9 sts)
Row 2: Ch 1, BLO sl st in each st across. Turn.
Row 3: Ch 1, BLO hdc in each st across. Turn.
Rows 4 – 8: Rep Rows 2 – 3, ending w/ a Row 2 rep.
Finished Size: 4.11″ W x 4.25″ H
Video Tutorial – Click HERE
Knit-Look Hat Instructions (Adult)
Finished Size (laid flat): 8-1/2″ W x 12-1/2″ L (band not folded up); 8-1/2″ W x 10″ L (band folded up) *Note: Finished length is shorter than Row 1 due to the nature of the short rows.
Row 1 (RS): Using a 9.00mm crochet hook (or size needed to obtain gauge), ch 29, working into the back hump of the foundation ch, hdc in the 2nd ch from your hook, hdc in each ch across. Turn. (28 sts) Length of Row 1: 13″
Tip: Place a SM in the FLO of the first hdc of Row 1 & every odd numbered row throughout. If you haven’t worked short rows before, this will help you complete Row 8 & the end of each short row section after Row 8.
Row 2: Ch 1, BLO sl st in each of the next 27 sts (leave the last st unworked). Turn. (27 sts)
Row 3: Ch 1, BLO hdc in each st across. Turn. (27 sts)
Row 4: Ch 1, BLO sl st in each of the next 26 sts (leave the last st unworked). Turn. (26 sts)
Row 5: Ch 1, BLO hdc in each st across. Turn. (26 sts)
Row 6: Ch 1, BLO sl st in each of the next 25 sts (leave the last st unworked). Turn. (25 sts)
Row 7: Ch 1, BLO hdc in each st across. Turn. (25 sts)
Row 8: Ch 1, BLO sl st in each st across previous row, BLO sl st in each unworked st to Row 1. Turn. (28 sts) Remove SM after completing this row.
Row 9: Ch 1, BLO hdc in each st across. Turn. (28 sts)
Rows 10 – 15: Rep Rows 2 – 7.
Row 16: Ch 1, BLO sl st in each st across previous row, BLO sl st in each unworked st to Row 9. Turn. (28 sts)
Row 17: Ch 1, BLO hdc in each st across. Turn. (28 sts)
Rows 18 – 23: Rep Rows 2 – 7.
Row 24: Ch 1, BLO sl st in each st across previous row, BLO sl st in each unworked st to Row 17. Turn. (28 sts)
Row 25: Ch 1, BLO hdc in each st across. Turn. (28 sts)
Rows 26 – 31: Rep Rows 2 – 7.
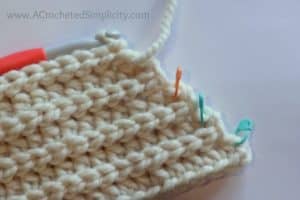
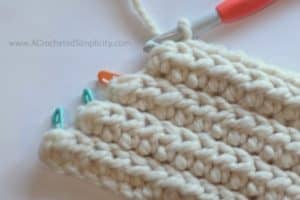
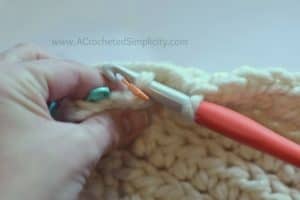
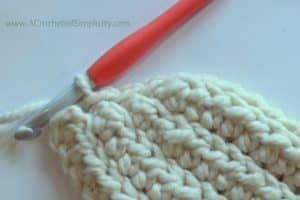
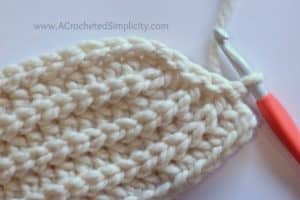
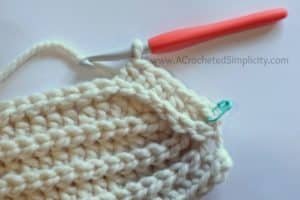
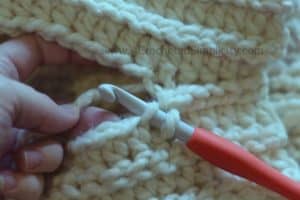
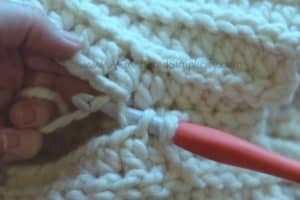
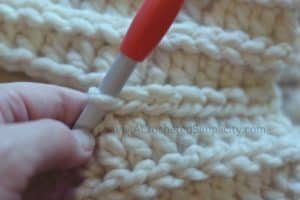
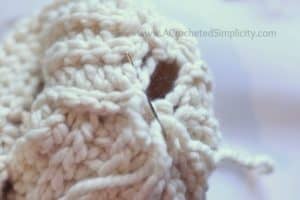
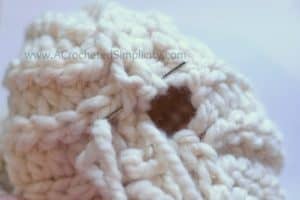
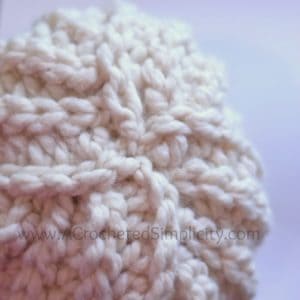
Seam – Row 32: See photos below. With the Right Side of the hat facing you bring the first row up to meet the last row. Position your working yarn so that it’s on the inside of the hat. Slip stitch the rows together using the following method: insert your hook (from front to back) into the FLO of the 1st stitch of Row 1 (first pic below), insert your hook (from back to front) into the BLO of the 1st stitch of the last row (second pic below), yo, pull thru all loops on your hook (third pic below). Continue in this way across the hat to complete the seam. When you get to the unworked stitches of the short rows, continue seaming in the BLO just as you would do to finish up a section of short rows (fourth pic below). You can also see a video tutorial of this seam being working HERE.
Fasten off leaving an 8″ tail of yarn. Continue on to finishing.

Finishing
Using a yarn needle and the 8” yarn tail, weave in and out of ends of crown opening. Pull yarn tight to close gap. Weave in ends. Add a pom, if desired. Fold the edge of the hat up 2-1/2″ and wear!
CLICK HERE FOR THE BIG FLOPPY YARN POM TUTORIAL
Add a custom label to your finished projects for a professional touch (click here for my tutorial)! I love the custom labels that I purchased from this Etsy shop HERE (affiliate link)
Click HERE for Kids’ Sizes
FIND ALL OF MY FREE CROCHET PATTERNS HERE
Are you intimidated by crocheted cables? Would you love to learn? Take an Annies Video Class with me and let me ease your fears of crocheted cables! Click on the photo below to watch a free preview. You can also see the other 2 classes I have available! (affiliate link)
I’d LOVE to see your finished hats! Stop on by the A Crocheted Simplicity Crochet Community on Facebook to share! ?
I love the look of this hat! BUT, I can not get my wrong side to look like yours. I’m obviously doing something wrong. Do you have a video tutorial showing how to make the stitches used in this hat? Thanks!
Hi Connie ~ I finally fought my internet and won and the video tutorial is now available!
Do you have. the istructions in left hand. Tank you..
Hi Barbara- I do not, however, isn’t it the same as right handed except yours will be a mirror image to mine? Jennifer
Thank you so much for this pattern. I am not an expert crocheter but I managed to create a really beautiful hat I am so pleased with.
Hi Jane,
Thank you! I’m so glad you enjoyed the pattern.
Jennifer
What non-wool yarn brand would you suggest for this? Thanks!
Hi Sherry,
One of the yarn I used for mine is Lion Brand’s Hometown. It is an acrylic yarn.
Jennifer
Since hometown has less yardage, do we still need one skein to make one without the Pom Pom? Thanks!
I love ❤️ love this pattern!! Thank you so very much for sharing , it’s just what I needed today!
I’m glad you love it, Karen. Thank you for taking the time to leave a comment.
Jennifer
This is a beautiful pattern. Would it be easy to add a second color for a two tone hat?
Hi Julie,
It would be easy to create a 2-tone hat. It depends on how striped you’d like it, but I’d recommend only changing colors every other row to keep from having too many ends to weave in.
Jennifer
My wool hats are coming out great. But in the past acrylic hats are stretching too much. Does your child’s hometown hat stretch too much with wearing?
Hi Marylou,
I didn’t realize you commented twice or I would’ve added this all in one response. 🙂
Yes, acrylic hats can stretch much more than wool hats. All fibers react so differently.
You do not have to use the Hometown yarn for your hat, if you prefer a wool or wool blend. I used Wool Ease Thick & Quick for my adult size of this same pattern. I actually prefer the wool blends.
That said, because of the stretchy stitch pattern used in this hat, the finished hat will be a little smaller than the intended wearer’s head, but it will stretch to fit.
Will the Hometown stretch like others, yes, BUT the design of this hat is intended to help keep it from happening as much as most other crochet hats.
If you have additional questions, feel free to e-mail me: [email protected]
Happy Crocheting!
Jennifer
Thank you for your reply. I made 5 woolease hats and they came out great. I’m hoping thee hometown works for the children’s hats. My little nephew has a 22 inch head so I’m a little concerned about adding another row.
Hopefully it’ll work.
If he has a 22 inch head, I’d make an adult size for him. My kiddos all had adult size noggins at an early age. They got them from their momma. lol
OK. Thanks. I’ll follow your directions for adult size using the Hometown yarn and 10mm hook.
It’s so comforting you read these and respond! I never write questions.
You’re welcome. Let me know if you need any additional help.
This is so cute! I can think of so many people who I could make this for.