• Skip to primary navigation
  • Skip to main content
  • Skip to primary sidebar

A Crocheted Simplicity

Modern Crochet - Beyond the Basics

  • Home
  • Blog
  • Free Crochet Patterns
    • Crochet for Adults
    • Crochet for Kids
    • Crochet for Baby
    • Crochet for Dolls
    • Crochet Bags
    • Crochet for Home
    • Holiday Crochet
    • Crochet for Pets
    • Miscellaneous Crochet
  • Tutorials & More
    • Crochet Stitch Tutorials
    • All-Natural Homemade Lotion
    • DIY Crafts
    • Crochet Tips & Yarn Tutorials
    • Yarn Reviews
  • Crochet Patterns
    • Adult Garments
    • Kids’ Garments
    • Headgear: Beanies, Slouches, Headwarmers, Caps & More
    • Neck Gear – Cowls, Scarves, Wraps & More
    • Feet & Leg Gear – Slippers, Baby Sandals, Legwarmers & More
    • Afghans – Blankets
    • Bags, Purses & Totes
    • Christmas Stockings
    • 18″ Doll Clothes
    • Miscellaneous
    • Coffee Cozy Patterns
    • Basket Patterns
    • Linky Ladies Link Party
    • Crochet Pattern Round-Ups
  • Mini-Mystery Crochet Alongs
    • Mini-Mystery Crochet Along – Information Guide
  • Crochet Kits
  • Video Classes
  • Privacy Policy
    • About Me
  • Contact Me
  • Nav Social Menu

    • Facebook
    • Instagram
    • Pinterest
    • YouTube

How to Make a Pom Pom

February 15, 2018 By Jennifer Pionk Leave a Comment

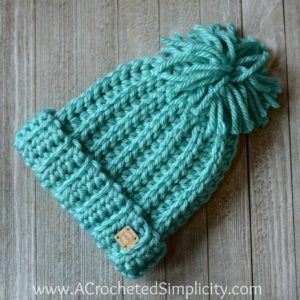
Are you looking for how to make a pom pom to adorn the top of a crochet or knit hat? If so, then look no further! In this tutorial, I’ll share with you how I made the big, floppy pom pom for my daughter’s newest crochet hat, the Knit-Look Super Bulky Slouch (shown below). You can use this tutorial to make a yarn pom pom with any weight yarn and in various sizes.


~CLICK HERE TO SIGN-UP TO RECEIVE OUR NEWSLETTER!~


How to Make a Pom Pom - a tutorial by A Crocheted Simplicity

~PIN IT TO SAVE IT FOR LATER!~


This post contains affiliate links.

MATERIALS

  • Yarn: Yarn used for the tutorial is Lion Brand Yarn Hometown USA in Miami Seafoam; 6 / Super Bulky Weight Yarn / less than 6 yards
  • You can easily substitute other bulky or super bulky yarns.
  • Substitute yarns: You can choose to use a lighter weight yarn. You will simple have to wrap the yarn many more times so your pom looks floppy (or full) and not deflated.
  • Scissors
  • Cell phone or piece of cardboard (approximately 3″ W x 5-1/2″ H)


How to Make a Pom Pom


Floppy Yarn Pom Tutorial by A Crocheted Simplicity

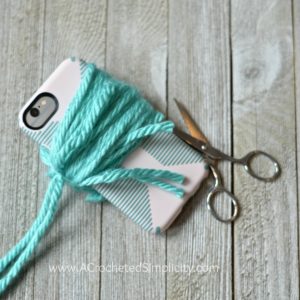
Step 1:  Cut an 18″ long piece of yarn and lay it across your cell phone (or piece of cardboard), as shown above. This is the yarn you’ll use to form your pom and secure it later.


Floppy Yarn Pom Tutorial by A Crocheted Simplicity

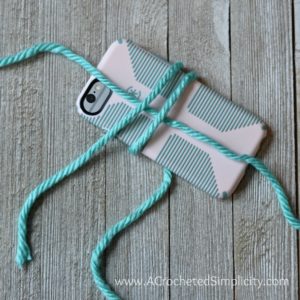
Step 2: Leave a 3-4″ long tail and begin wrapping your yarn around the long edge of your cell phone, as shown above. Wrap the yarn around 40 times. Make sure to wrap it around the 18″ piece of yarn you placed in the previous step. Do not wrap too tightly or it will be hard to remove the pom later.


Floppy Yarn Pom Tutorial by A Crocheted Simplicity

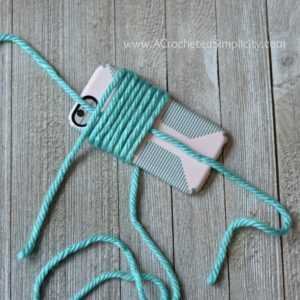
Step 3: Continue to wrap the yarn around your cell phone until you’ve wrapped it 40 times. I like to wrap mine as neatly as possible to keep the loops the same size. 


Floppy Yarn Pom Tutorial by A Crocheted Simplicity

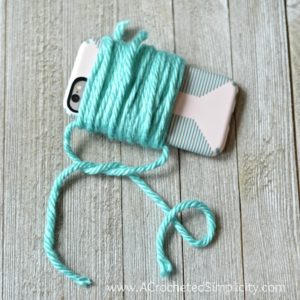
Step 4: After you’ve completed wrapping your yarn, flop the tail up on top of the rest. Slide the 18″ piece of yarn down until it’s along the long edge of your cell phone. Tie it to secure.

Tip: I like to tie mine loosely until I remove the yarn from my cell phone, then I loosen the knot and tie it tightly.


Floppy Yarn Pom Tutorial by A Crocheted Simplicity

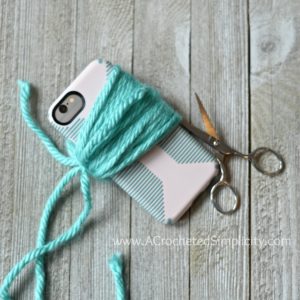
Step 5: Use your scissors and cut the loops of yarn along the long edge opposite of where you gathered the yarn.


Floppy Yarn Pom Tutorial by A Crocheted Simplicity

Continue cutting the loops of yarn across the long edge until you have cut all of them.


Learn How to Make a Pom Pom - Yarn Pom Tutorial by A Crocheted Simplicity

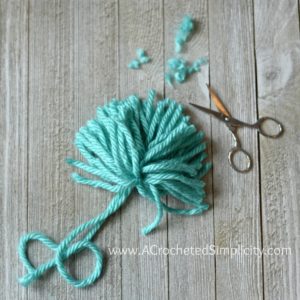
Step 6: Secure your yarn pom by re-knotting the knot you made in step 4. Make it as tight as you can without breaking the yarn. Next, use your scissors to trim the uneven ends of your pom. 


Floppy Yarn Pom Tutorial by A Crocheted Simplicity

Step 7:  To help me shape my pom, I like to gather it in one hand like a tassel. I then take my scissors and trim the long ends in an arch shape. 


Voila! You’ve Learned How to Make a Pom Pom!


Now you’re ready to secure it to the top of your newest hat using the tails of yarn from the beginning 18″ piece.


Click on the photo below to be taken to the Knit-Look Super Bulky Slouch (Kids’) crochet pattern!

Free Crochet Pattern - Knit-Look Super Bulky Slouch (Kids' Sizes) by A Crocheted Simplicity

FIND ALL OF MY FREE CROCHET PATTERNS HERE


Are you intimidated by knit-look crochet? Would you love to learn my tips & tricks? Take an Annies Video Class with me and let me ease your fears and help you increase your skills! Click on the photo below to watch a free preview. You can also see the other 4 video classes I have available!

Learn Knit-Look Crochet with instructor Jennifer Pionk


Please share your finished ACS projects with us in the A Crocheted Simplicity Crochet Community Group on Facebook! Use hashtag #ACrochetedSimplicity when sharing on social media so I can find your posts!


Free patterns, tutorials and more!

Signup now to get FREE crochet patterns, tutorials, giveaways & crochet along info sent straight to your inbox!

I agree to have my personal information transfered to Mad Mimi ( more information )

I will never give away, trade or sell your email address. You can unsubscribe at any time. See Privacy Policy for more info.

© Copyright 2019 Jennifer Pionk aka A Crocheted Simplicity. All Rights Reserved. All designs, posts, videos and images are property of Jennifer Pionk and are my own original work. No parts may be reproduced, altered, or distributed in any form, or by any means, without express written permission from Jennifer Pionk. If you want to share this information with someone, share the link to this post. If you want to share on your own blog / website, then you may use the first photo in this post and link back to this post. You may not give away printed copies of this post. Thank you.

This post may contain affiliate links/ads. If you purchase something from a link in this post, I may be compensated.

Previous Post: « Free Crochet Pattern – Knit-Look Super Bulky Slouch (Kids’)
Next Post: Personalize Your Crochet – How to Add Labels & Tags to your Crochet Items »

Reader Interactions

Leave a Reply Cancel reply

Your email address will not be published. Required fields are marked *

Primary Sidebar

Hi there, I'm Jennifer! Welcome to my little corner of the internet where I share FREE crochet patterns, tutorials, tips, and more! More About A Crocheted Simplicity

Follow me on Social Media!

  • Facebook
  • Instagram
  • Pinterest
  • YouTube

Looking for something specific?

Subscribe to my YouTube Channel for all video tutorials

YouTube subscribe button by Skipser

Free patterns, tutorials and more!

Signup now to get FREE crochet patterns, tutorials, giveaways & crochet along info sent straight to your inbox!

I agree to have my personal information transfered to Mad Mimi ( more information )

I will never give away, trade or sell your email address. You can unsubscribe at any time. See Privacy Policy for more info.

Modern Crochet Blogs

Crocheted with in Michigan

Copyright © 2021 · Genesis Framework · WordPress · Log in

We use cookies to ensure that we give you the best experience on our website. If you continue to use this site we will assume that you are happy with it.OkRead more