How to Make Faux Fur Poms using Fur Yarn!
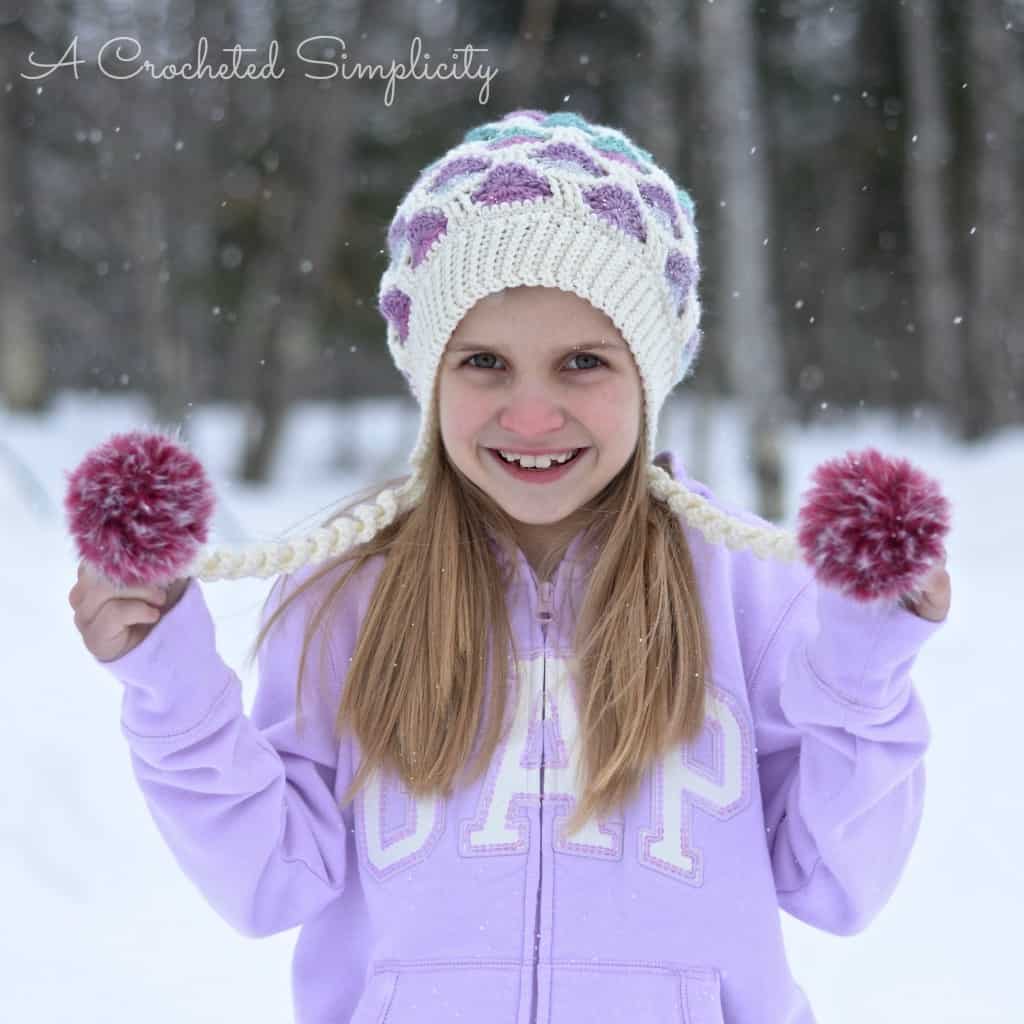
*The crochet pattern for my Polka Dot Slouch shown above can be found here: Polka Dot Slouch
~Click HERE to sign-up to receive our weekly newsletter!~
*This post contains affiliate links.
Fur is very much on trend right now and what easier way to add a modern touch to your hats than with handmade fur poms! Yes, of course you can purchase pre-made fur poms from companie, but when you’re a DIY’er, I know you’d rather make them yourself. 😉 ( or when you live in the boonies, like I do, and there are zero stores close by that sell the pre-made fur poms…you make them yourself).
If you’d rather NOT make them yourself, I found a couple of great resources for very reasonably priced, great quality, poms! I’ve ordered both of these myself. If you decide to order these fur poms, I’ll share a great tip with you! Of course they come a little flattened from being packaged and shipped. There’s a simple way to fluff them back up….. use a hairdryer! Seriously only takes seconds to go from a “bed head” pom to a “perfect pom”.
") SUSULU DIY 12pcs Faux Racco...Shop on Amazon
SUSULU DIY 12pcs Faux Racco...Shop on Amazon ") Kelly's Luxury SOft Faux Fo...Shop on Amazon
Kelly's Luxury SOft Faux Fo...Shop on Amazon
If you’d still like to make your own, there are several different brands of fun fur and many great colors to choose from. Below are just a few from our sponsors:
 Black") Lion Brand Yarn Lion Brand ...Shop on Amazon
Lion Brand Yarn Lion Brand ...Shop on Amazon  100 Gram Baby Pink Eyelash ...Shop on Amazon
  Lime Green Extra Long Eyela...Shop on Amazon
  Louisa Harding Luzia Faux F...Shop on Amazon
Materials
- Yarn: Most any brand of Fun Fur should work well for this project. *approximately 20 yards will make 1 large pom and 2 small poms (as shown in the photo above)
- Hook: J/10.0/6.00mm (My favorite is the Clover Amour 6 mm hook )
- Stitch Marker (or scrap of yarn)
- Scissors
- Yarn Needle
- Scrap yarn pieces for stuffing your poms (or cotton batting)
Finished Sizes
- Small: approx. 3″
- Large: approx. 4″
Notes
- Pom is worked in continuous rounds (without joining). I suggest using a stitch marker to keep track of your stitches and rounds.
Instructions
Small Pom
Round 1: Begin w/ a Magic Ring, sl st into magic ring, ch 1, work 8 sc into magic ring. – 8 sts
Round 2: *Working in Back Loops Only*, work 2 sc in each st around. – 16 sts
Rounds 3 thru 5: *Working in Back Loops Only*, work 1 sc in each st around. – 16 sts
Round 6: *Working in Back Loops Only*, sc2tog around. – 8 sts
Fasten off. Make sure to pull loose end of magic ring tight to cinch the opening, secure the end with a knot and pull loose ends to the inside of the pom. Stuff your pom w/ scrap pieces of yarn until you’re happy with the firmness of it. Using a yarn needle and piece of yarn, sew closed the opening from Round 6. See Finishing, below.
Large Pom
Round 1: Begin w/ a Magic Ring, sl st into magic ring, ch 1, work 8 sc into magic ring. – 8 sts
Round 2: *Working in Back Loops Only*, work 2 sc in each st around. – 16 sts
Round 3: *Working in Back Loops Only*, ( 2 sc in next st, sc in next st ) repeat from ( to ) around. – 24 sts
Rounds 4 thru 7: *Working in Back Loops Only*, work 1 sc in each st around. – 24 sts
Round 8: *Working in Back Loops Only*, ( sc2tog, sc in next st) repeat from ( to ) around. – 16 sts
Round 9: *Working in Back Loops Only*, sc2tog around. – 8 sts
Fasten off. Make sure to pull loose end of magic ring tight to cinch the opening, secure the end with a knot and pull loose ends to the inside of the pom. Stuff your pom w/ scrap pieces of yarn until you’re happy with the firmness of it. Using a yarn needle and piece of yarn, sew closed the opening from Round 9. See Finishing, below.
Finishing
Using a yarn needle, insert the needle under the little loops of fur that are caught in the stitches from making your fur pom. Gently lift up to free them and “fluff” your pom. This takes a couple minutes to do, but will make your pom much fluffier. 🙂
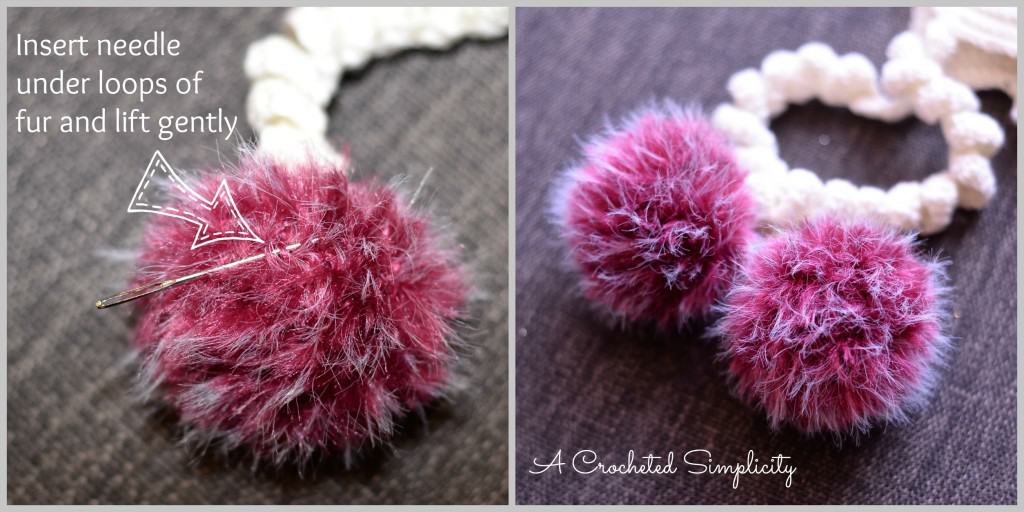
**Louisa Harding Luzia in Raspberry is the fur yarn used in the poms above.
Voila! Now you have your own handmade fur poms to add to your hats! 😀
Are you intimidated by crocheted cables? Would you love to learn? Take an Annies Video Class with me and let me ease your fears of crocheted cables! Click on the photo below to watch a free preview. You can also see the other 2 classes I have available! (affiliate link)
I’d LOVE to see your finished fur poms! Stop on by the A Crocheted Simplicity Crochet Community on Facebook to share! 😀