Chantilly Crochet Summer Top


Make yourself a crochet summer top that’s perfect for those sun-soaked days and balmy nights.
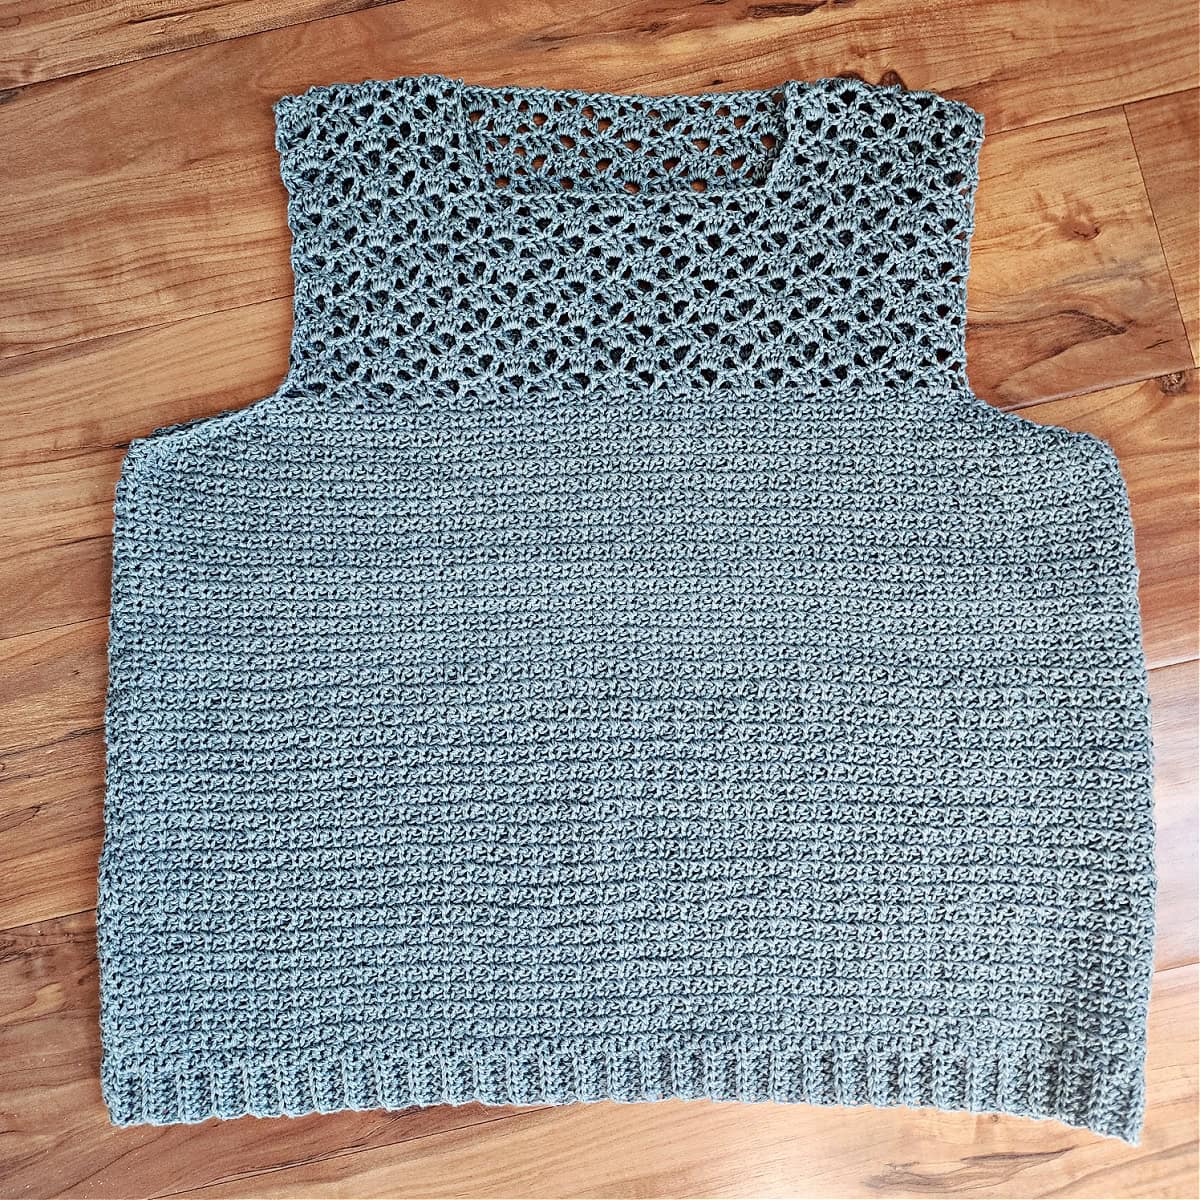
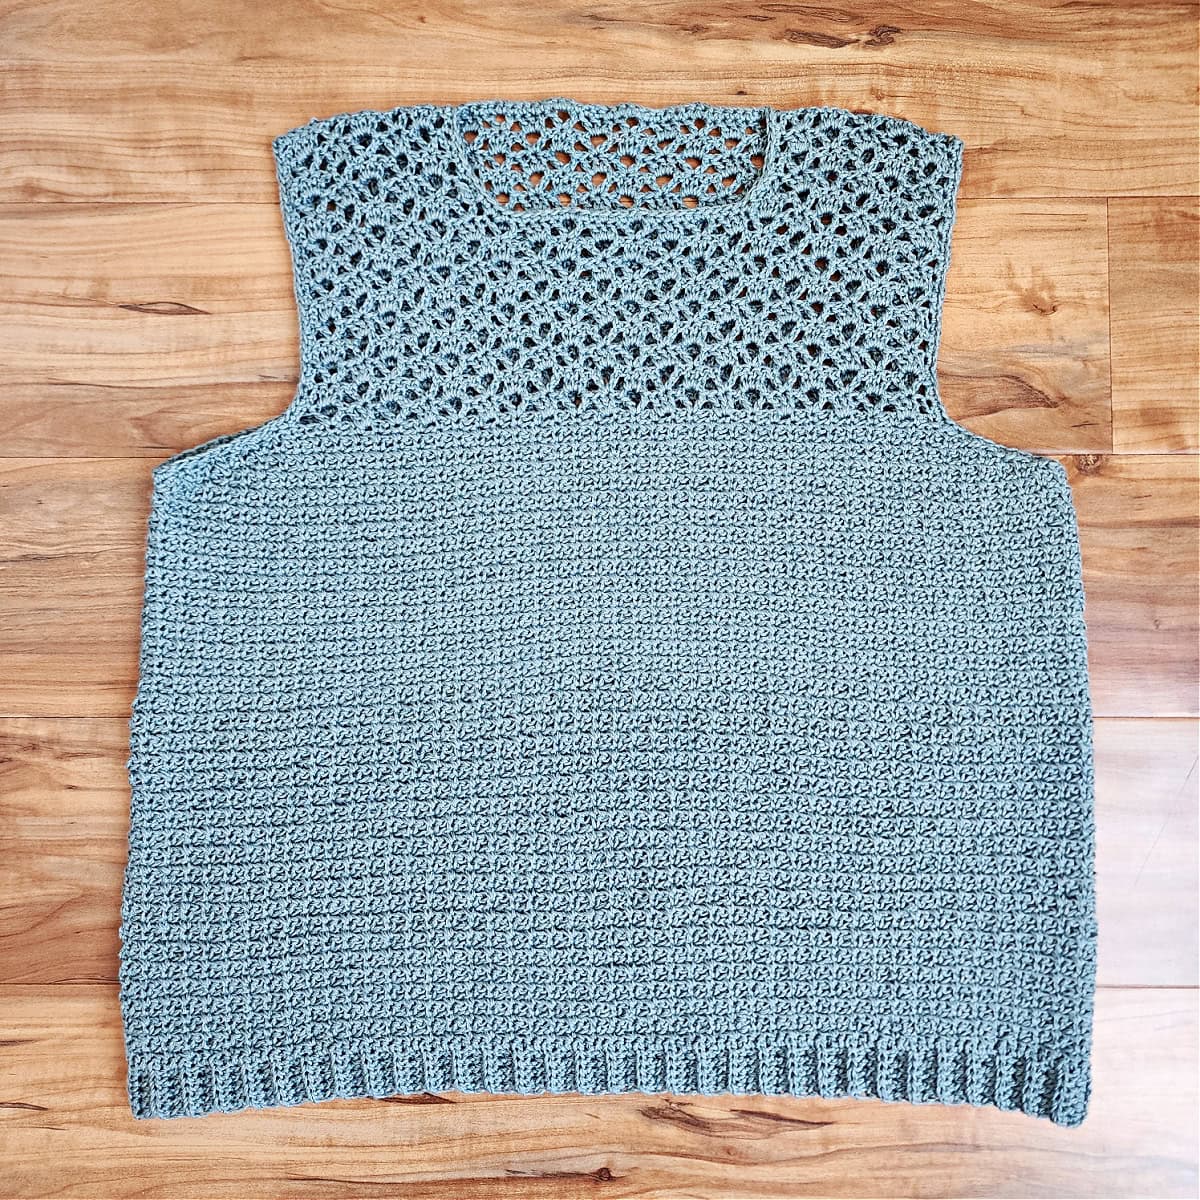
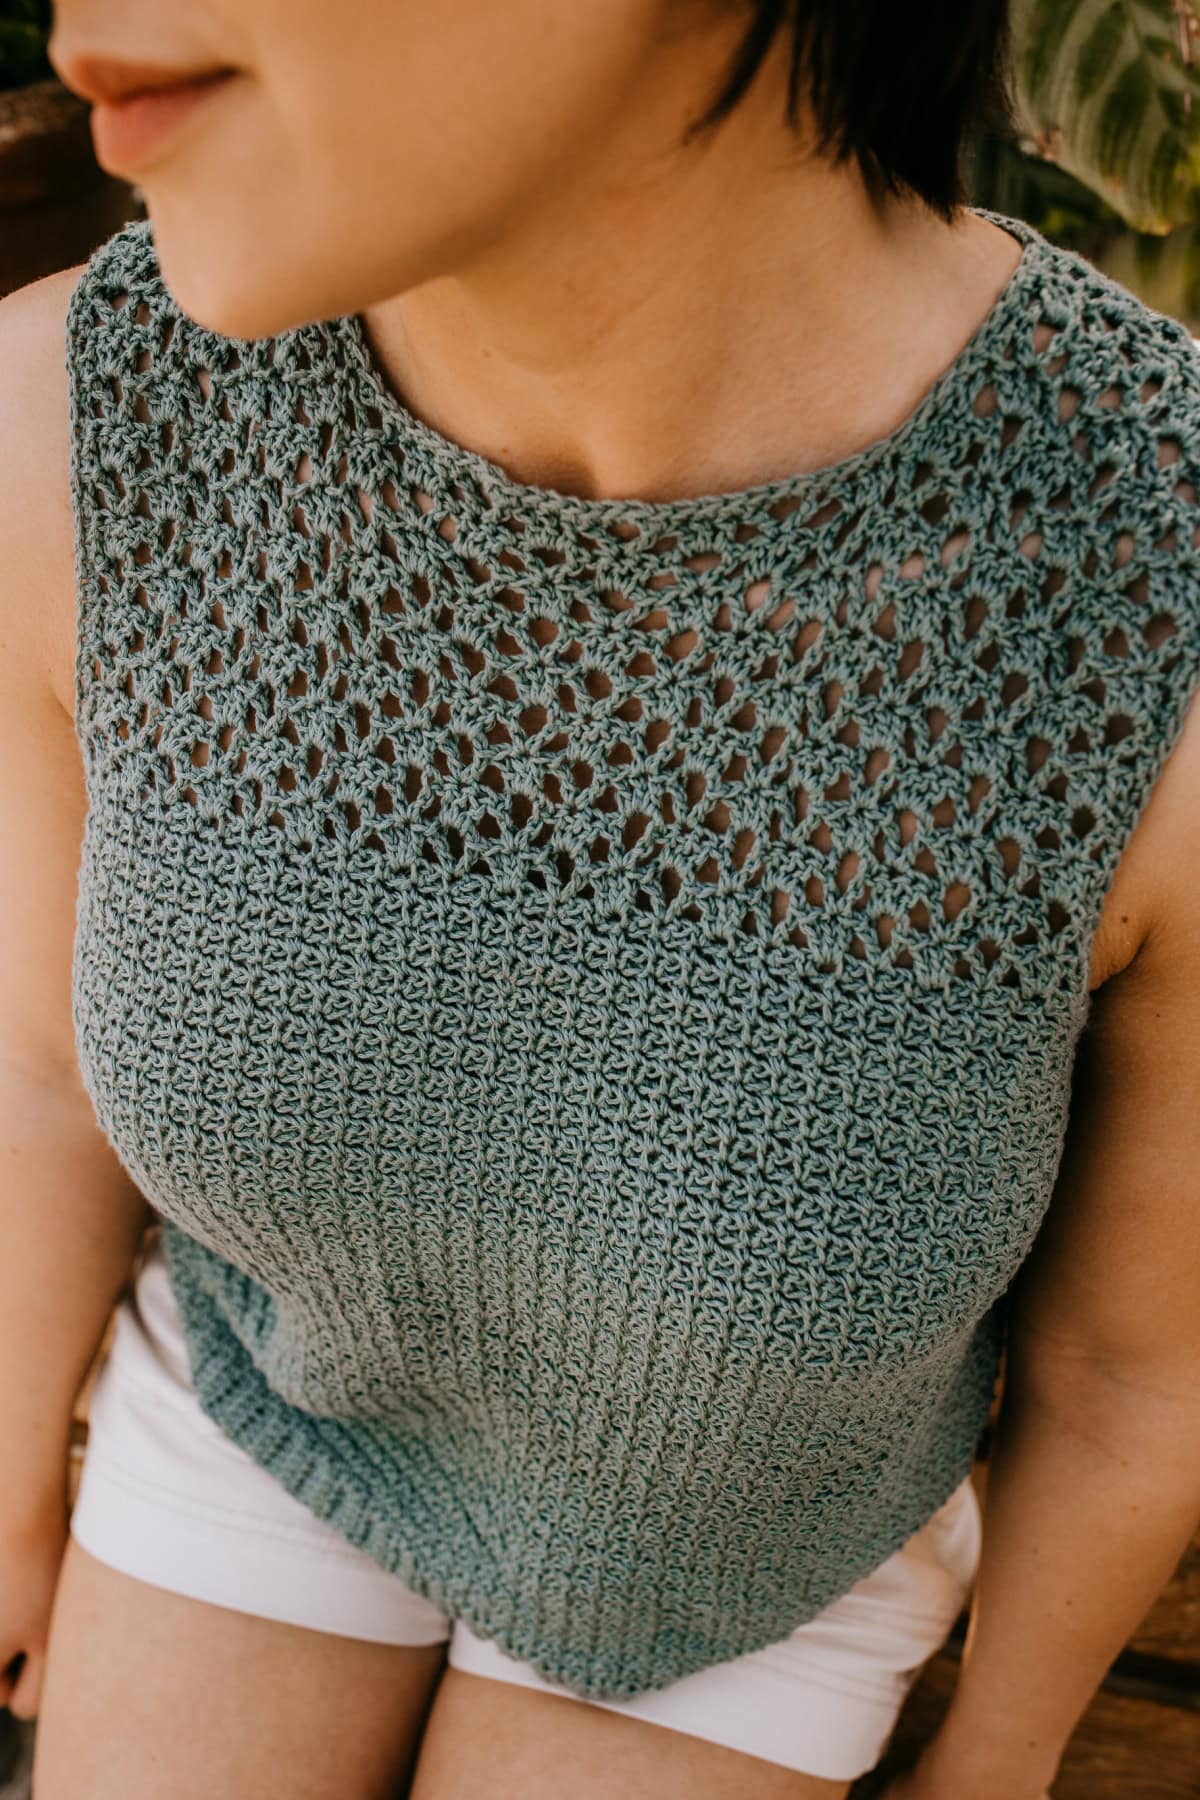
The Chantilly Summer Top is the epitome of summer chic. Crafted with lacy crochet stitches and a cotton, bamboo, linen blend yarn, its breathable fabric ensures coolness even on the hottest of days.
You’ll find the free crochet summer top pattern in the post below, or you can find an ad-free printable PDF (that includes all photo tutorials, + a Bonus garment schematic), on Ravelry, or Etsy (aff).
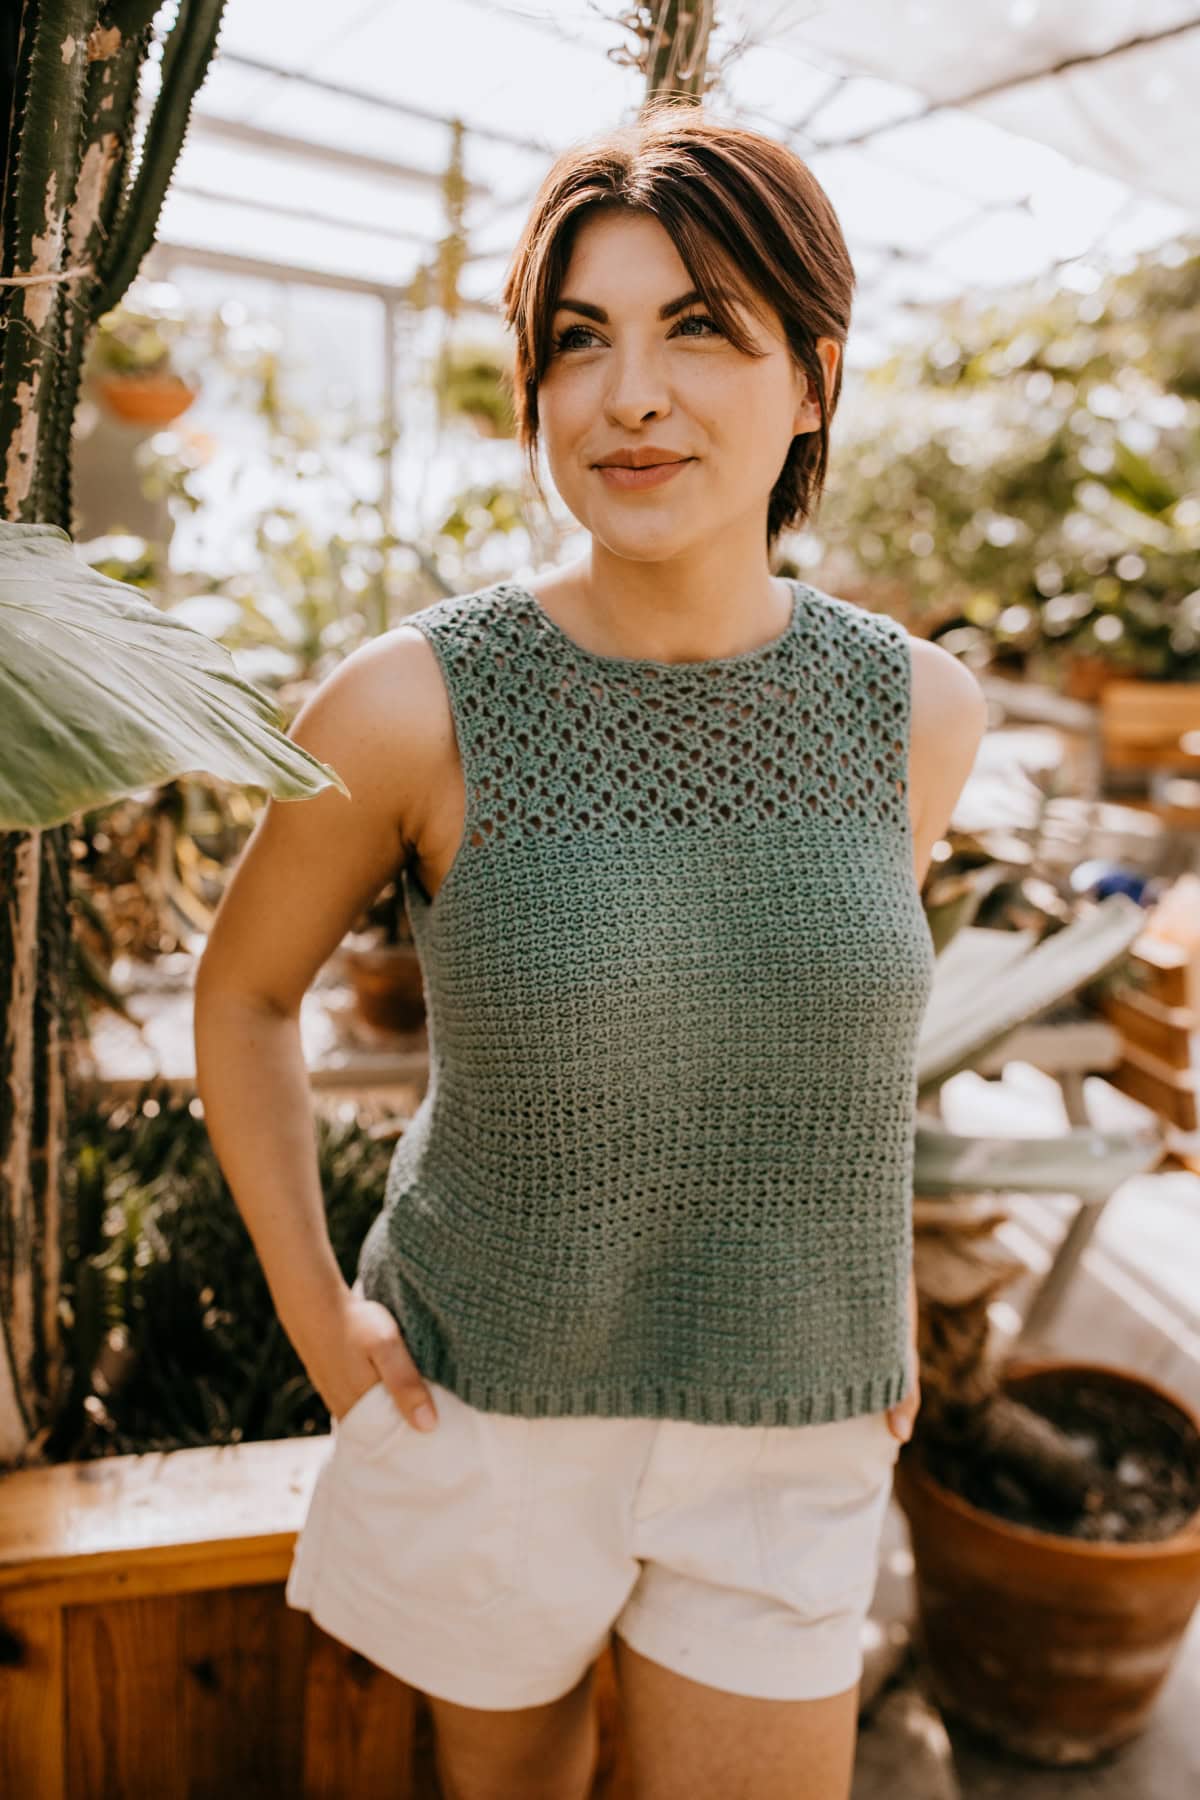
The Chantilly Crochet Summer Top embodies effortless elegance. Pair it with your favorite shorts for a casual daytime look, or dress it up with a flowing skirt for evening soirées. Versatile and oh-so-stylish, this sleeveless crochet top is a must-have for your summer wardrobe, promising both comfort and sophistication all season long.
Although it was originally designed to be a crochet top for summer, this crochet ladies top will also be great for layering under a crochet cardigan in the winter.
The Perfect Summer Essential
Summer essentials are must-have items that keep you cool, comfortable, and stylish during the hot months. The Chantilly Summer Top is crocheted with a cotton, bamboo, linen blend yarn making it quintessential for beating the heat on hot summer days. Stay cool and enjoy everything summer has to offer!
Related: If you love the lace crochet stitch pattern on this crochet top, make sure to check out the Summer Splendor Cardigan.
How to Crochet a Summer Top
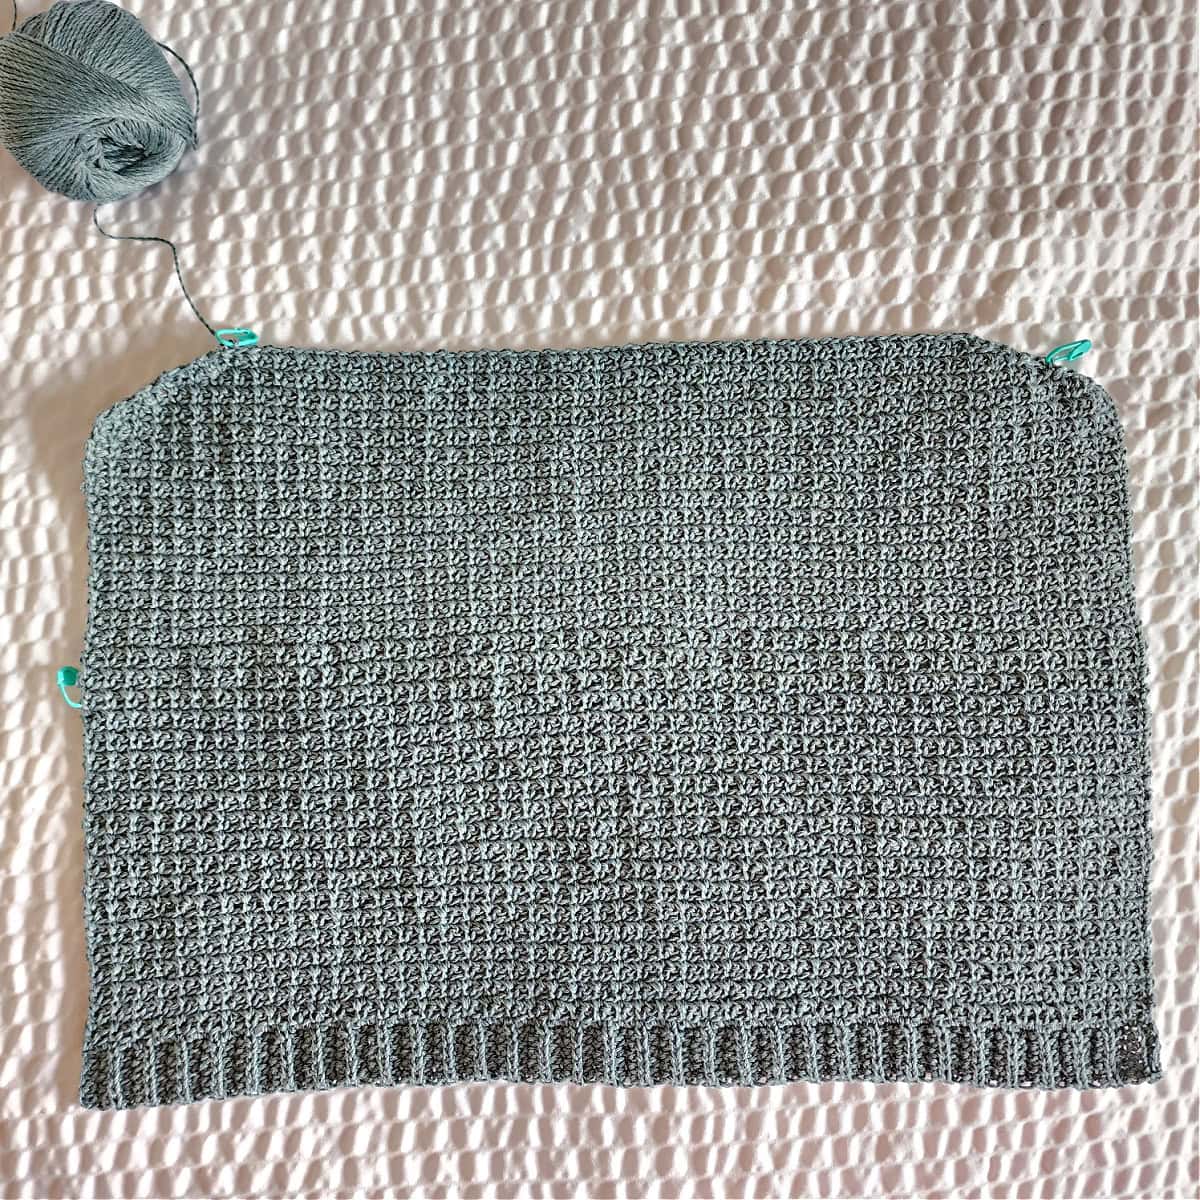
This crochet top pattern is constructed with two similar panels from the bottom hem to the shoulders.
First, you’ll crochet the bottom ribbing back and forth is rows. Then you’ll turn the ribbing sideways and begin working the body of top along the long edge of the ribbing.
Once your panel has reached a specific measurement, you will work panel shaping. Don’t let the panel shaping scare you! It’s nothing more than skipping a stitch or two and working a single crochet decrease (sc2tog).
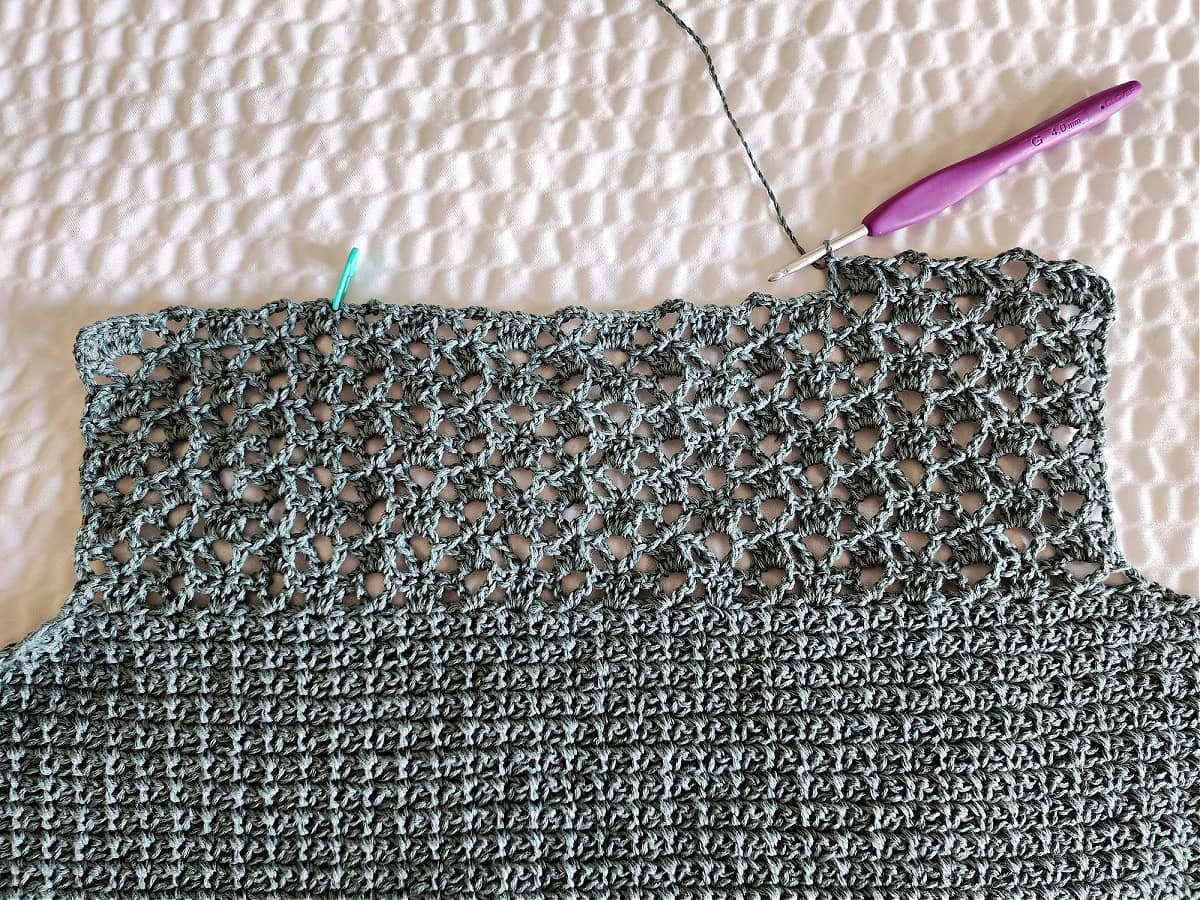
After the panel shaping is complete, you’ll add a simple lace stitch pattern section to the top of the panel. When crocheting the front panel, you’ll add simple neck shaping and shoulders.
After completing both a front and back panel, you will seam the shoulders and the sides with a simple whipstitch. Lastly, you’ll add a simple single crochet edging around each armhole opening and the neck opening.
Best Yarn for Crochet Summer Tops
For crochet summer tops, the best yarn choices are typically lightweight and breathable. Though you can use any of the following yarn types individually, I prefer yarn blends that include a combination of them.
The following yarn types provide a comfortable and airy feel, ensuring your crochet top is perfect for warm summer days:
- Cotton yarn is a top favorite due to its natural breathability, moisture-wicking properties, and comfort against the skin.
- Linen yarn is another excellent option, known for its durability and coolness, making it perfect for hot weather. Linen yarns also add a wonderful drape to your summer clothes.
- Bamboo yarn, with its silky texture and breathable nature, is also ideal for summer garments.
Skills & Techniques You’ll Use
This crochet pattern for summer top combines the beginner-friendly single crochet mesh stitch for the solid portion of the top and an easy lace crochet stitch for the upper portion.
Crochet skills you’ll practice:
- Half Double Crochet Ribbing
- Single Crochet Mesh Stitch
- Alternate Double Crochet (Alt-dc)
- Making a Gauge Swatch
- Simple Shaping
- Seaming Panels with a Whipstitch
- Blocking Your Garment (if desired)
Choosing Which Size to Crochet
Model wears a women’s size medium and is modeling a size medium crochet summer top.
To choose your size, look over the size chart below.
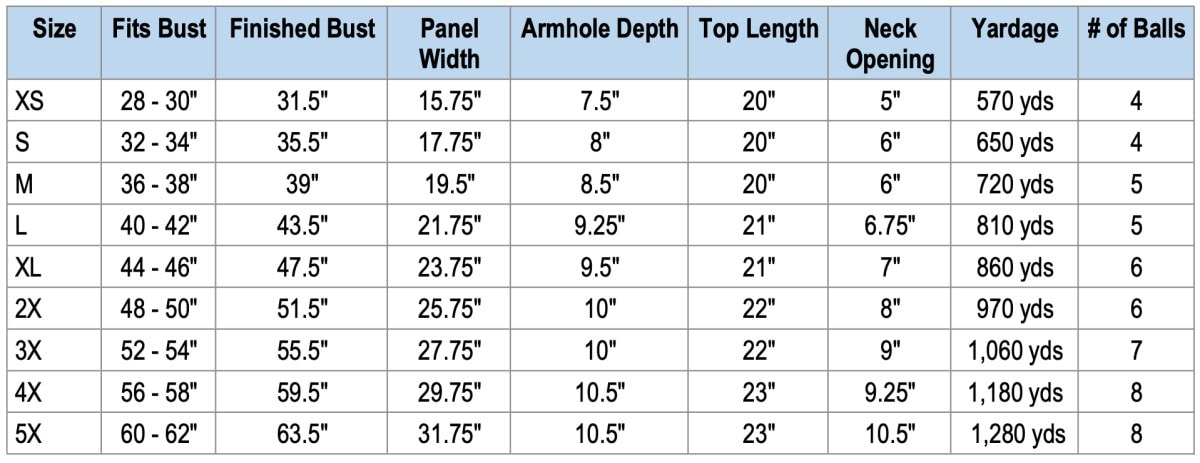
- ‘Fits Chest’ measurement is the measurement of the intended wearer, not the garment’s finished measurement.
- Finished Bust, Panel Width, and Top Length are measurements of the finished garment.
- This crochet lace top has 2-4″+ of positive ease built in for a classic fit.
- If you prefer a more loosely fitted summer top, I would suggest making one size larger than bust size.
- If you prefer a more fitted look, I would suggest sizing down (as long as your bust size fits range of the smaller size).
- Top length is measured from the top of the shoulder to the bottom edge of the top (including the bottom ribbing).
- Adjusting Top Length: See the notes at the end of the Body of Top section for adjusting length.
Size & Yardage Chart
The notes above refer to this size chart.
Yarn
As stated above, I prefer a blend of any of the three types of yarns listed above. For the Chantilly crochet ladies top, I chose Lion Brand Yarns Cotton Bamboo Linen. When made with this yarn, you’ll feel like you’re wrapped in a little piece of heaven when wearing your summer crochet top.
Lion Brand Collection Cotton Bamboo Linen is a craft yarn council #2, sport weight yarn comprised of cotton, bamboo, and linen (as you may have guessed by the name). The combination of these three natural fibers give this yarn a unique softness, beautiful drape, and durability.
I chose this yarn because it’s a sport weight and the fibers are perfect for lacy crochet patterns, but another great feature is that it’s machine washable!
Yarn Substitutions
Other sport weight yarns can be substituted as long as you meet gauge and you love the drape of the fabric.
I personally recommend a sport weight yarn that is a blend of any of the three yarns listed above. I feel they are less dense than 100% cotton yarns alone. The more dense the yarn, the heavier your crochet summer top will be if it gets wet and the longer it will take to dry.
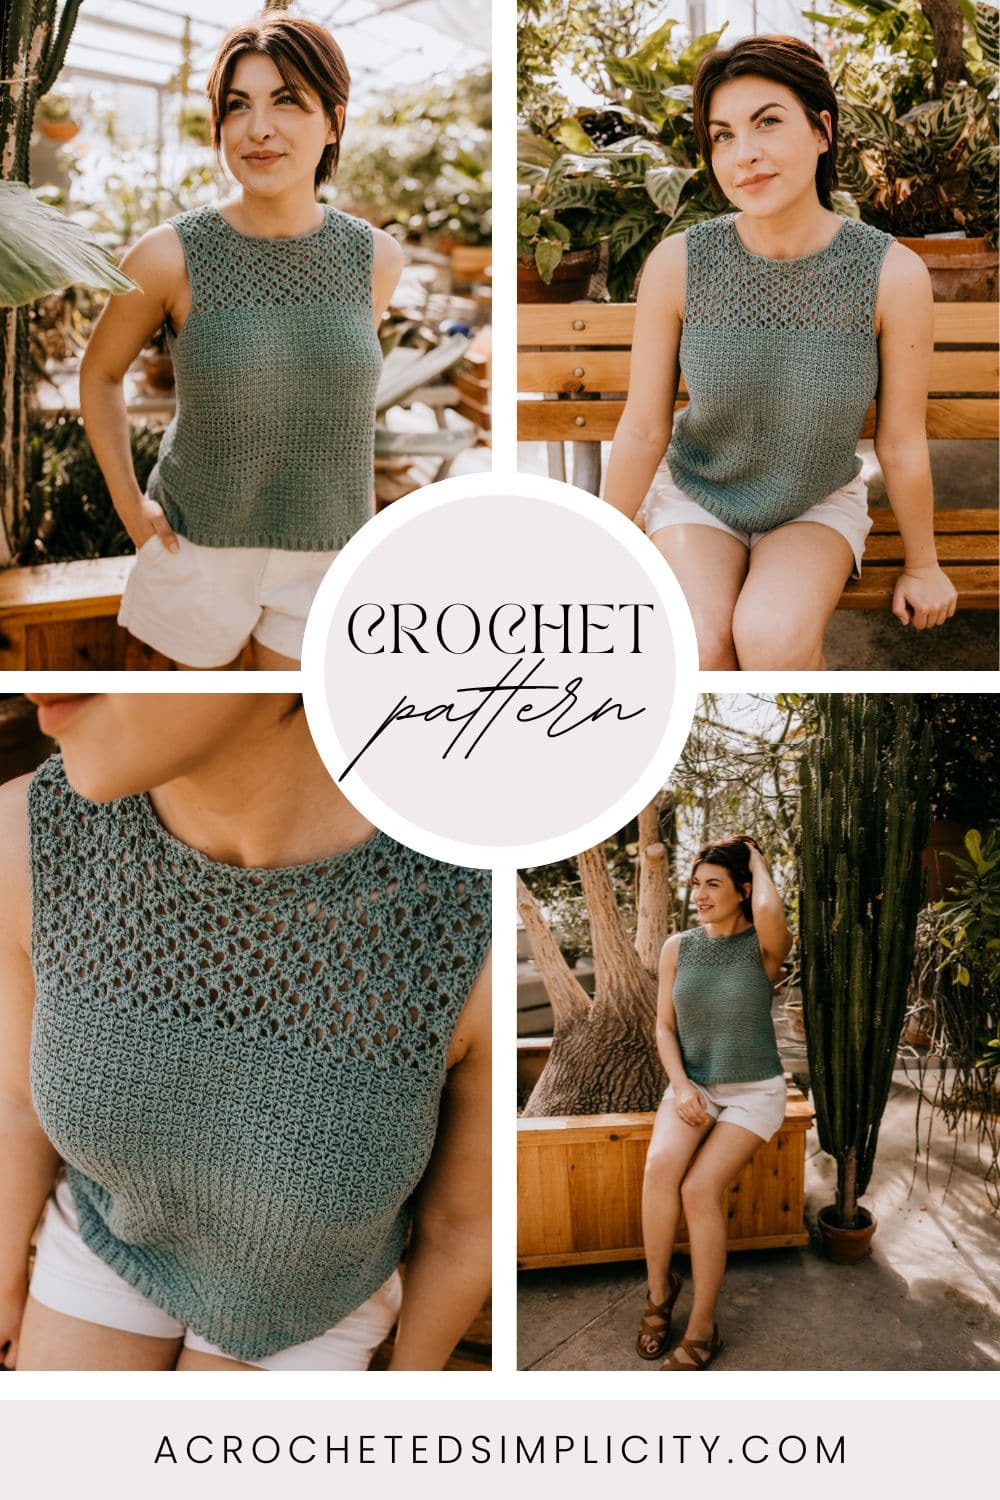
Chantilly Crochet Summer Top – Free Pattern
The crochet summer top pattern is free below, but if you love to work offline, I’ve got a couple other great options for you.
Purchase the ad-free, printable PDF, including all photo tutorials + BONUS crochet garment schematic, on Ravelry, or on Etsy (aff).
Purchase this crochet summer top kit! (aff): Lion Brand has a full kit of the Chantilly Summer Top, available on their website. The crochet summer top kit includes your choice of colors and a digital copy of the crochet pattern.
This post contains affiliate links.
Materials
- Yarn: Sport Weight / 2 / Yarn, Lion Brand Yarns Cotton Bamboo Linen in Sage was used for the sample in the photos (40% Cotton / 35% Bamboo / 25% Linen (164 yds / 150 m / 50 g / 1.75 oz).
- Yardage: See Size Chart Above
- Crochet Hook: G/6/4.00mm; or size needed to obtain gauge (My favorite crochet hooks are the Clover Amour Crochet Hooks, I’ve never had an ache in my hand since switching).
- Locking Stitch Markers
- Scissors
- Yarn Needle
Abbreviations (US Terms)
- ch(s): chain(s)
- sl st(s): slip stitch(es)
- st(s): stitch(es)
- yo: yarn over
- sp(s): space(s)
- sc: single crochet
- hdc: half double crochet
- dc: double crochet
- sc2tog: single crochet decrease
- Alt-dc: alternate double crochet
- Alt-dc2tog: alternate double crochet decrease
- Join with a standing single crochet
- Join with a standing double crochet
- SM: stitch marker
- Rep: repeat
- RS: Right Side
- WS: Wrong Side
- BLO: back loop only
Experience Level
- Easy / Intermediate
Gauge
- Ribbing in BLO hdc: 5 sts = 1″; 10 rows = 3″ H
- In single crochet mesh (sc, ch-1, skip 1): 15 sts = 3″; 17 rows = 3″
- In lace stitch pattern: 15 sts = 3″ (measured at bottom of Row 1); 14 rows = 7″
- See Swatch Instructions below.
Sizes
- Women’s XS through 5XL
- See size chart above.
Special Stitches
- Alternate Double Crochet (alt-dc): After turning your work, do not ch, instead, insert your hook into the first st, yo, pull up a loop, yo, pull thru both loops, insert your hook between the legs of the st just made, yo, pull up a loop, yo, pull through one loop, yo, pull thru remaining loops.
- Alternate Double Crochet Decrease (Alt-dc2tog): After turning your work, do not ch, instead, insert your hook into the first st, yo, pull up a loop, yo, pull thru both loops, insert your hook between the legs of the st just made, yo, pull up a loop, yo, pull thru one loop, yo, insert your hook into the next st indicated, yo, pull up a loop, yo, pull through 2 loops, yo, pull through remaining 3 loops.
- Join yarn with a standing single crochet: Begin with a slip knot on your hook, insert your hook into the stitch or space indicated, yo, pull up a loop, yo and draw thru both loops on hook.
- Join with a standing double crochet: Begin with a slip knot on your hook, yo, insert your hook into the stitch or space indicated, yo, pull up a loop, yo, pull through 2 loops on your hook, yo, pull through remaining 2 loops on your hook.
Pattern Notes
- Turning chains are not counted as stitches, unless noted otherwise.
- The first stitch of each row is worked into the same stitch as the beginning chain, unless noted otherwise.
- Yarn Notes: Lion Brand Yarns Cotton Bamboo Linen was used for the samples. Another comparable sport weight yarn may be used as long as gauge is met.
- Lion Brand Cotton Bamboo Linen (50 g / 1.75oz / 164 yards / 150 m / 40% cotton / 35% bamboo / 25% linen).
- Colorway & Yardage
- Sage: #465-177F (see yardage in chart above)
- Changes for Sizes are written as follows: XS (S, M, L, XL, 2XL, 3XL, 4XL, 5XL) unless noted otherwise.
- Stitch Counts are written at the end of the rows as follows: (XS, S, M, L, XL, 2XL, 3XL, 4XL, 5XL) unless noted otherwise.
- A BONUS crochet garment schematic is included in the Ad-Free PDF.
- Gauge Swatch instructions are included below.
- Model wears a women’s medium and is wearing a medium sample.
- Crochet Summer Top Construction Notes: This crochet shirt pattern is constructed with two panels. First, you’ll crochet the bottom ribbing in rows. Then you’ll work the body of top onto the bottom ribbing from the bottom up. Once you’ve reached a specific measurement, you will work panel shaping. Then you will work the lace section on the top of the panel. For the front panel you will add neck shaping. After working each of the panels, you will seam the shoulders, then seam the sides. Lastly, you’ll add a simple single crochet edging around each armhole opening and the neck opening.
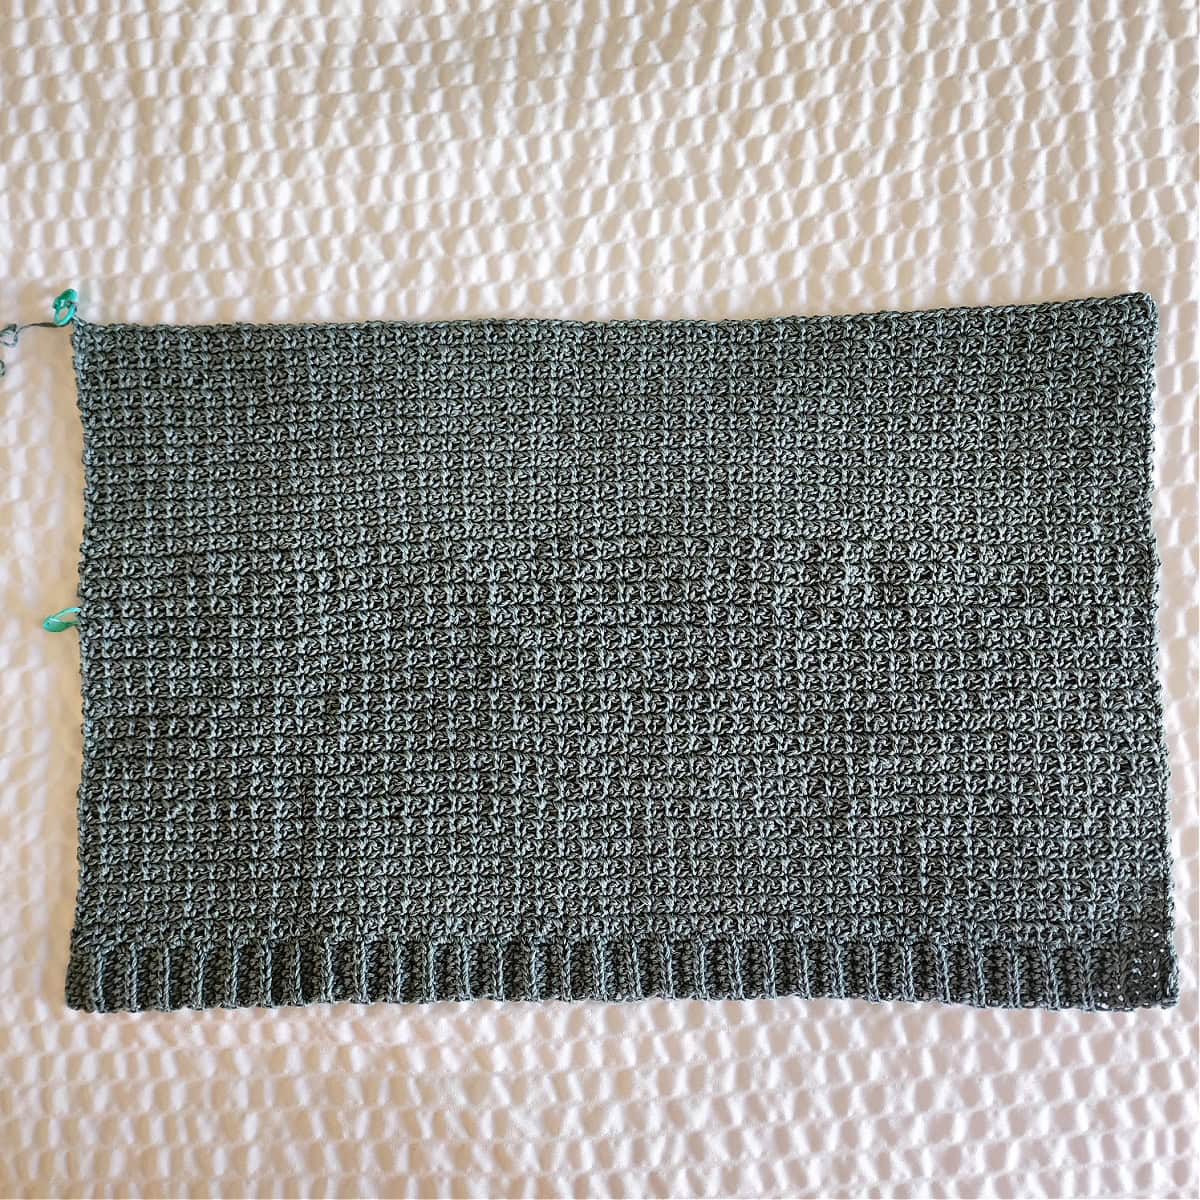
Gauge Swatch Instructions
I strongly recommend making a gauge swatch before you begin to make summer crochet tops. Adjust your crochet hook size as needed to meet gauge so that your crochet top comes out the right size.
Set-Up: With a 4.00 mm crochet hook, ch 30.
Row 1: Working in the back hump of the foundation ch, sc in the 2nd ch from your hook and in each ch across. Turn. (29 sts)
Rows 2 – 10: Ch 1, sc in the first st, (ch 1, skip the next st, sc in the next st) rep from ( to ) across. Turn. (29 sts)
Row 11: Alt-dc in the first st, skip each of the next 2 sts, [ 3 dc in the next st, skip each of the next 2 sts, (dc, ch 3, dc) in the next st, skip each of the next 2 sts ] work from [ to ] 4 times, skip the next st, dc in the last st. Turn. (22 dc + 4 ch-3’s)
Rows 12 – 14: Alt-dc in the first st, [ 3 dc in the next ch-3 sp, (dc, ch 3, dc) in the middle dc of the next 3 dc group ] work from [ to ] 4 times, dc in the last st. Turn. (22 dc + 4 ch-3’s)
Swatch should measure 5.75″ W x 3.75″ H. If you scroll down to near the end of the post, there’s a close-up of the lace stitch pattern.
Summer Top Construction
You’ll make a front panel and a back panel for your crochet summer top. Make each panel using the following instructions:
Front Panel: Bottom Ribbing, Prepare Ribbing for Body of Top, Body of Top, Panel Shaping, Openwork Lace Section – Front Panel, Right Shoulder, Left Shoulder.
Back Panel: Bottom Ribbing, Prepare Ribbing for Body of Top, Body of Top, Panel Shaping, Openwork Lace Section – Back Panel.
Bottom Ribbing
Gauge: 5 sts = 1″; 10 rows = 3″ H
Row 1: With yarn & a 4 .00mm crochet hook, ch 6, working in the back humps of the chain, hdc in the 2nd ch from your hook and in each ch across. Turn. (5 sts)
Rows 2 – 53 (60, 65, 73, 80, 86, 93, 100, 106): Ch 1, BLO hdc in each st across. Turn.
Do not fasten off. Continue on to Prepare Ribbing for Body of Top for the size you’re making. Bottom Ribbing should measure approximately (16″, 18″, 19.5″, 22″, 24″, 26″, 28″, 30″, 32″).
Prepare Ribbing for Body of Top
Sizes XS, M, L, 3X
Row 1: After turning at the end of the last row of the ribbing, rotate to work along the long edge of the ribbing, work 1 sc into the first st, (sc in the next st, 2 sc in the next st) rep from ( to ) 26 (32, 36, 46) times . Turn. (79, 97, 109, 139 sts)
Do not fasten off. Continue on to Body of Top.
Sizes S, XL, 4X
Row 1: After turning at the end of the last row of the ribbing, rotate to work along the long edge of the ribbing, work 2 sc into the first st, (sc in the next st, 2 sc in the next st) rep from ( to ) 29 (39, 49) times . Turn. (89, 119, 149 sts)
Do not fasten off. Continue on to Body of Top.
Sizes 2X, 5X
Row 1: After turning at the end of the last row of the ribbing, rotate to work along the long edge of the ribbing, work (sc in the next st, 2 sc in the next st) rep from ( to ) 43 (53) times . Turn. (129, 159 sts)
Do not fasten off. Continue on to Body of Top.
Body of Top
Note: Aside from the beginning ch 1, all other ch-1’s are included in the stitch count.
Row 1: Ch 1, sc in the first st, (ch 1, skip the next st, sc in the next st) rep from ( to ) across. Turn. (79, 89, 97, 109, 119, 129, 139, 149, 159 sts)
All Sizes: Repeat Row 1 until your panel measures 12.5″ (12″, 11.5″, 12″, 11.5″, 12″, 12″, 12.5″, 12.5″) including the bottom ribbing. Note: The required panel measurement may be longer for smaller sizes. This is intentional and is not a typo. This measurement is only a portion of the overall finished panel size.
Make note of how many rows you worked before the panel shaping and be sure to work the same number of rows for the Back Panel, before the panel shaping.
Do not fasten off. Continue on to Panel Shaping.
Adjusting Length: If you prefer a longer or shorter summer top, here is where you’ll want to make the adjustment. The length stated in the chart above is measured from the top of the shoulder to the bottom edge of the crochet top (including the bottom ribbing).
- Longer: If you’d like a longer top, repeat Row 1 until you’ve added the desired length.
- Shorter: If you’d like a crochet crop top, work fewer repeats of Row 1.
Panel Shaping
Row 1: Ch 1, work an sc2tog over the first 2 sc (skipping over the ch-1 sp), ch 1, skip the next ch-1 sp, (sc in the next st, ch 1, skip the next ch-1 sp) rep from ( to ) across to the last 3 sts, sc2tog over the next 2 sc, (skipping over the ch-1 sp). Turn. (75, 85, 93, 105, 115, 125, 135, 145, 155 sts)
Rows 2 – 8 (8, 8, 10, 11, 11, 11, 12, 13): Repeat Row 1. (47, 57, 65, 69, 75, 85, 95, 101, 107 sts) at the end of Row 8 (8, 8, 10, 11, 11, 11, 12, 13).
At this point, your panel should measure approximately (14″, 13.5″, 13″, 13.75″, 13.5″, 14″, 14″, 14.5″, 14.75″) including the bottom ribbing. Note: The listed panel measurement may be longer for smaller sizes. This is intentional and is not a typo. This measurement is only a portion of the overall finished panel size.
Do not fasten off. Continue on to the Openwork Lace Section for the panel you’re making (Front or Back) and the size crochet top you’re making.
X-Small – Openwork Lace Section – Front Panel
Row 1: Alt-dc in the first st, skip each of the next 2 sts, [ 3 dc in the next st, skip each of the next 2 sts, (dc, ch 3, dc) in the next st, skip each of the next 2 sts ] work from [ to ] 7 times, skip the next st, dc in the last st. Turn. (37 dc + 7 ch-3’s)
Rows 2 – 8: Alt-dc in the first st, [ 3 dc in the next ch-3 sp, (dc, ch 3, dc) in the middle dc of the next 3 dc group ] work from [ to ] 7 times, dc in the last st. Turn. (37 dc + 7 ch-3’s)
Do not fasten off. Continue on to the Right Shoulder.
X-Small – Right Shoulder
Row 1: Alt-dc in the first st, [ 3 dc in the next ch-3 sp, (dc, ch 3, dc) in the middle dc of the next 3 dc group ] work from [ to ] 2 times, skip the next dc, dc in the next dc. Skip the next 13 dc. Place a locking SM in the next dc to mark the beginning of the Left Shoulder for later. Turn to work Row 2 of the Right Shoulder. (12 dc + 2 ch-3’s)
Row 2: Alt-dc2tog over the first 2 dc, (dc, ch 3, dc) in the middle dc of the next 3 dc group, 3 dc in the next ch-3 sp, (dc, ch 3, dc) in the middle dc of the next 3 dc group, dc in the last st. Turn. (9 dc + 2 ch-3’s)
Row 3: Alt-dc in the first st, 3 dc in the next ch-3 sp, (dc, ch 3, dc) in the middle dc of the next 3 dc group, 3 dc in the next ch-3 sp, dc in the last st. Turn. (10 dc + 1 ch-3)
Row 4: Alt-dc in the first st, (dc, ch 3, dc) in the middle dc of the next 3 dc group, 3 dc in the next ch-3 sp, (dc, ch 3, dc) in the middle dc of the next 3 dc group, dc in the last st. Turn. (9 dc + 2 ch-3’s)
Shoulder should be approximately 2.25″ W x 2″H. Overall length of your top should be approximately 20″.
Fasten off leaving a tail of yarn 3 times the width of the shoulder for shoulder seaming later. Continue on to the Left Shoulder.
X-Small – Left Shoulder
Row 1: With yarn & a 4.00mm crochet hook, join yarn with a standing dc in the st marked with a SM, [ 3 dc in the next ch-3 sp, (dc, ch 3, dc) in the middle dc of the next 3 dc group ] work from [ to ] 2 times, dc in the last st. Turn. (12 dc + 2 ch-3’s)
Row 2: Alt-dc in the first st, 3 dc in the next ch-3 sp, (dc, ch 3, dc) in the middle dc of the next 3 dc group, 3 dc in the next ch-3 sp, skip the next dc, dc2tog in the next st & last st. Turn. (10 dc + 1 ch-3)
Row 3: Alt-dc in the first st, (dc, ch 3, dc) in the middle dc of the next 3 dc group, 3 dc in the next ch-3 sp, (dc, ch 3, dc) in the middle dc of the next 3 dc group, dc in the last st. Turn. (9 dc + 2 ch-3’s)
Row 4: Alt-dc in the first st, 3 dc in the next ch-3 sp, (dc, ch 3, dc) in the middle dc of the next 3 dc group, 3 dc in the next ch-3 sp, dc in the last st. Turn. (10 dc + 1 ch-3)
Shoulder should be approximately 2.25″ W x 2″H. Overall length of your top should be approximately 20″.
Fasten off leaving a tail of yarn 3 times the width of the shoulder for shoulder seaming later. Set your front panel aside and make the back panel. Make the Back Panel through the panel shaping section, then complete it by working the Openwork Lace Section – Back Panel.
X-Small – Openwork Lace Section – Back Panel
Note: All sc and ch-1s are counted as stitches. In Row 1 of this section, it says to work “into the next st”, and “st” refers to either sc or ch-1 sps.
Row 1: Alt-dc in the first st, skip each of the next 2 sts, [ 3 dc in the next st, skip each of the next 2 sts, (dc, ch 3, dc) in the next st, skip each of the next 2 sts ] work from [ to ] 7 times, skip the next st, dc in the last st. Turn. (37 dc + 7 ch-3’s)
Rows 2 – 12: Alt-dc in the first st, [ 3 dc in the next ch-3 sp, (dc, ch 3, dc) in the middle dc of the next 3 dc group ] work from [ to ] 7 times, dc in the last st. Turn. (37 dc + 7 ch-3’s)
Fasten off. Weave in ends. Scroll down and continue on to Seaming. Overall length of your top should be approximately 20″.
Small – Openwork Lace Section – Front Panel
Row 1: Alt-dc in the first st, skip the next st, [ 3 dc in the next st, skip each of the next 2 sts, (dc, ch 3, dc) in the next st, skip each of the next 2 sts ] work from [ to ] 9 times, dc in the last st. Turn. (47 dc + 9 ch-3’s)
Rows 2 – 9: Alt-dc in the first st, [ 3 dc in the next ch-3 sp, (dc, ch 3, dc) in the middle dc of the next 3 dc group ] work from [ to ] 9 times, dc in the last st. Turn. (47 dc + 9 ch-3’s)
Do not fasten off. Continue on to the Right Shoulder.
Small – Right Shoulder
Row 1: Alt-dc in the first st, [ 3 dc in the next ch-3 sp, (dc, ch 3, dc) in the middle dc of the next 3 dc group ] work from [ to ] 2 times, 3 dc in the next ch-3 sp, skip the next dc, dc in the next dc. Skip the next 18 dc. Place a locking SM in the next dc to mark the beginning of the Left Shoulder for later. Turn to work Row 2 of the Right Shoulder. (15 dc + 2 ch-3’s)
Row 2: Alt-dc2tog in the first & 3rd dc, [ 3 dc in the next ch-3 sp, (dc, ch 3, dc) in the middle dc of the next 3 dc group ] work from [ to ] 2 times, dc in the last st. Turn. (12 dc + 2 ch-3’s)
Rows 3 – 4: Alt-dc in the first st, [ 3 dc in the next ch-3 sp, (dc, ch 3, dc) in the middle dc of the next 3 dc group ] work from [ to ] 2 times, dc in the last st. Turn. (12 dc + 2 ch-3’s)
Shoulder should be approximately 2.75″ W x 2″H. Overall length of your top should be approximately 20″.
Fasten off leaving a tail of yarn 3 times the width of the shoulder for shoulder seaming later. Continue on to the Left Shoulder.
Small – Left Shoulder
Row 1: With yarn & a 4.00mm crochet hook, join yarn with a standing dc in the st marked with a SM, (dc, ch 3, dc) in the middle dc of the next 3 dc group, [ 3 dc in the next ch-3 sp, (dc, ch 3, dc) in the middle dc of the next 3 dc group ] work from [ to ] 2 times, dc in the last st. Turn. (14 dc + 3 ch-3’s)
Row 2: Alt-dc in the first st, [ 3 dc in the next ch-3 sp, (dc, ch 3, dc) in the middle dc of the next 3 dc group ] work from [ to ] 2 times, work a dc2tog over the last 2 sts. Turn. (12 dc + 2 ch-3’s)
Rows 3 – 4: Alt-dc in the first st, [ 3 dc in the next ch-3 sp, (dc, ch 3, dc) in the middle dc of the next 3 dc group ] work from [ to ] 2 times, dc in the last st. Turn. (12 dc + 2 ch-3’s)
Shoulder should be approximately 2.75″ W x 2″H. Overall length of your top should be approximately 20″.
Fasten off leaving a tail of yarn 3 times the width of the shoulder for shoulder seaming later. Set your front panel aside and make the back panel. Make the Back Panel through the panel shaping section, then complete it by working the Openwork Lace Section – Back Panel.
Small – Openwork Lace Section – Back Panel
Note: All sc and ch-1s are counted as stitches. In Row 1 of this section, it says to work “into the next st”, and “st” refers to either sc or ch-1 sps.
Row 1: Alt-dc in the first st, skip the next st, [ 3 dc in the next st, skip each of the next 2 sts, (dc, ch 3, dc) in the next st, skip each of the next 2 sts ] work from [ to ] 9 times, dc in the last st. Turn. (47 dc + 9 ch-3’s)
Rows 2 – 13: Alt-dc in the first st, [ 3 dc in the next ch-3 sp, (dc, ch 3, dc) in the middle dc of the next 3 dc group ] work from [ to ] 9 times, dc in the last st. Turn. (47 dc + 9 ch-3’s)
Fasten off. Weave in ends. Scroll down to continue on to Seaming. Overall length of your top should be approximately 20″.
Medium – Openwork Lace Section – Front Panel
Row 1: Alt-dc in the first st, skip each of the next 2 sts, [ 3 dc in the next st, skip each of the next 2 sts, (dc, ch 3, dc) in the next st, skip each of the next 2 sts ] work from [ to ] 10 times, skip the next st, dc in the last st. Turn. (52 dc + 10 ch-3’s)
Rows 2 – 9: Alt-dc in the first st, [ 3 dc in the next ch-3 sp, (dc, ch 3, dc) in the middle dc of the next 3 dc group ] work from [ to ] 10 times, dc in the last st. Turn. (52 dc + 10 ch-3’s)
Do not fasten off. Continue on to the Right Shoulder.
Medium – Right Shoulder
Row 1: Alt-dc in the first st, [ 3 dc in the next ch-3 sp, (dc, ch 3, dc) in the middle dc of the next 3 dc group ] work from [ to ] 3 times, skip the next dc, dc in the next dc. Skip the next 18 dc. Place a locking SM in the next dc to mark the beginning of the Left Shoulder for later. Turn to work Row 2 of the Right Shoulder. (17 dc + 3 ch-3’s)
Row 2: Alt-dc2tog in the first 2 dc, skip the next dc, [ (dc, ch 3, dc) in the middle dc of the next 3 dc group, 3 dc in the next ch-3 sp ] work from [ to ] 2 times, (dc, ch 3, dc) in the middle dc of the next 3 dc group, dc in the last st. Turn. (14 dc + 3 ch-3’s)
Row 3: Alt-dc in the first st, [ 3 dc in the next ch-3 sp, (dc, ch 3, dc) in the middle dc of the next 3 dc group ] work from [ to ] 2 times, 3 dc in the next ch-3 sp, dc in the last st. Turn. (15 dc + 2 ch-3’s)
Row 4: Alt in the first dc, [ (dc, ch 3, dc) in the middle dc of the next 3 dc group, 3 dc in the next ch-3 sp ] work from [ to ] 2 times, (dc, ch 3, dc) in the middle dc of the next 3 dc group, dc in the last st. Turn. (14 dc + 3 ch-3’s)
Row 5: Rep Rows 3.
Shoulder should be approximately 3.5″ W x 2.5″H. Overall length of your top should be approximately 20″.
Fasten off leaving a tail of yarn 3 times the width of the shoulder for shoulder seaming later. Continue on to the Left Shoulder.
Medium – Left Shoulder
Row 1: With yarn & a 4.00mm crochet hook, join yarn with a standing dc in the st marked with a SM, [ 3 dc in the next ch-3 sp, (dc, ch 3, dc) in the middle dc of the next 3 dc group ] work from [ to ] 3 times, dc in the last st. Turn. (17 dc + 3 ch-3’s)
Row 2: Alt-dc in the first st, [ 3 dc in the next ch-3 sp, (dc, ch 3, dc) in the middle dc of the next 3 dc group ] work from [ to ] 2 times, 3 dc in the next ch-3 sp, dc2tog in the middle dc of the next 3 dc group and the last st. Turn. (15 dc + 2 ch-3’s)
Row 3: Alt-dc in the first st, [ (dc, ch 3, dc) in the middle dc of the next 3 dc group, 3 dc in the next ch-3 sp ] work from [ to ] 2 times, (dc, ch 3, dc) in the middle dc of the next 3 dc group, dc in the last st. Turn. (14 dc + 3 ch-3’s)
Row 4: Alt-dc in the first st, [ 3 dc in the next ch-3 sp, (dc, ch 3, dc) in the middle dc of the next 3 dc group ] work from [ to ] 2 times, 3 dc in the next ch-3 sp, dc in the last st. Turn. (15 dc + 2 ch-3’s)
Row 5: Rep Row 3.
Shoulder should be approximately 3.5″ W x 2.5″H. Overall length of your top should be approximately 20″.
Fasten off leaving a tail of yarn 3 times the width of the shoulder for shoulder seaming later. Set your front panel aside and make the back panel. Make the Back Panel through the panel shaping section, then complete it by working the Openwork Lace Section – Back Panel.
Medium – Openwork Lace Section – Back Panel
Note: All sc and ch-1s are counted as stitches. In Row 1 of this section, it says to work “into the next st”, and “st” refers to either sc or ch-1 sps.
Row 1: Alt-dc in the first st, skip each of the next 2 sts, [ 3 dc in the next st, skip each of the next 2 sts, (dc, ch 3, dc) in the next st, skip each of the next 2 sts ] work from [ to ] 10 times, skip the next st, dc in the last st. Turn. (52 dc + 10 ch-3’s)
Rows 2 – 14: Alt-dc in the first st, [ 3 dc in the next ch-3 sp, (dc, ch 3, dc) in the middle dc of the next 3 dc group ] work from [ to ] 10 times, dc in the last st. Turn. (52 dc + 10 ch-3’s)
Fasten off. Weave in ends. Scroll down to continue on to Seaming. Overall length of your top should be approximately 20″.
Large – Openwork Lace Section – Front Panel
Row 1: Alt-dc in the first st, skip the next st, [ 3 dc in the next st, skip each of the next 2 sts, (dc, ch 3, dc) in the next st, skip each of the next 2 sts ] work from [ to ] 11 times, dc in the last st. Turn. (57 dc + 11 ch-3’s)
Rows 2 – 9: Alt-dc in the first st, [ 3 dc in the next ch-3 sp, (dc, ch 3, dc) in the middle dc of the next 3 dc group ] work from [ to ] 11 times, dc in the last st. Turn. (57 dc + 11 ch-3’s)
Do not fasten off. Continue on to the Right Shoulder.
Large – Right Shoulder
Row 1: Alt-dc in the first st, [ 3 dc in the next ch-3 sp, (dc, ch 3, dc) in the middle dc of the next 3 dc group ] work from [ to ] 3 times, skip the next dc, dc in the next dc. Skip the next 23 dc. Place a locking SM in the next dc to mark the beginning of the Left Shoulder for later. Turn to work Row 2 of the Right Shoulder. (17 dc + 3 ch-3’s)
Row 2: Alt-dc2tog over the first 2 dc, skip the next dc, [ (dc, ch 3, dc) in the middle dc of the next 3 dc group, 3 dc in the next ch-3 sp ] work from [ to ] 2 times, (dc, ch 3, dc) in the middle dc of the next 3 dc group, dc in the last st. Turn. (14 dc + 3 ch-3’s)
Row 3: Alt-dc in the first st, [ 3 dc in the next ch-3 sp, (dc, ch 3, dc) in the middle dc of the next 3 dc group ] work from [ to ] 2 times, 3 dc in the next ch-3 sp, dc in the last st. Turn. (15 dc + 2 ch-3’s)
Row 4: Alt-dc in the first st, [ (dc, ch 3, dc) in the middle dc of the next 3 dc group, 3 dc in the next ch-3 sp ] work from [ to ] 2 times, (dc, ch 3, dc) in the middle dc of the next 3 dc group, dc in the last st. Turn. (14 dc + 3 ch-3’s)
Rows 5 – 6: Rep Rows 3 – 4.
Shoulder should be approximately 3.5″ W x 3″H. Overall length of your top should be approximately 21″.
Fasten off leaving a tail of yarn 3 times the width of the shoulder for shoulder seaming later. Continue on to the Left Shoulder.
Large – Left Shoulder
Row 1: With yarn & a 4.00mm crochet hook, join yarn with a standing dc in the st marked with a SM, [ 3 dc in the next ch-3 sp, (dc, ch 3, dc) in the middle dc of the next 3 dc group ] work from [ to ] 3 times, dc in the last st. Turn. (17 dc + 3 ch-3’s)
Row 2: Alt-dc in the first st, [ 3 dc in the next ch-3 sp, (dc, ch 3, dc) in the middle dc of the next 3 dc group ] work from [ to ] 2 times, 3 dc in the next ch-3 sp, skip the next dc, dc2tog over the next st & the last st. Turn. (15 dc + 2 ch-3’s)
Row 3: Alt-dc in the first st, [ (dc, ch 3, dc) in the middle dc of the next 3 dc group, 3 dc in the next ch-3 sp ] work from [ to ] 2 times, (dc, ch 3, dc) in the middle dc of the next 3 dc group, dc in the last st. Turn. (14 dc + 3 ch-3’s)
Row 4: Alt-dc in the first st, [ 3 dc in the next ch-3 sp, (dc, ch 3, dc) in the middle dc of the next 3 dc group ] work from [ to ] 2 times, 3 dc in the next ch-3 sp, dc in the last st. Turn. (15 dc + 2 ch-3’s)
Rows 5 – 6: Rep Rows 3 – 4.
Shoulder should be approximately 3.5″ W x 3″H. Overall length of your top should be approximately 21″.
Fasten off leaving a tail of yarn 3 times the width of the shoulder for shoulder seaming later. Set your front panel aside and make the back panel. Make the Back Panel through the panel shaping section, then complete it by working the Openwork Lace Section – Back Panel.
Large – Openwork Lace Section – Back Panel
Note: All sc and ch-1s are counted as stitches. In Row 1 of this section, it says to work “into the next st”, and “st” refers to either sc or ch-1 sps.
Row 1: Alt-dc in the first st, skip the next st, [ 3 dc in the next st, skip each of the next 2 sts, (dc, ch 3, dc) in the next st, skip each of the next 2 sts ] work from [ to ] 11 times, dc in the last st. Turn. (57 dc + 11 ch-3’s)
Rows 2 – 15: Alt-dc in the first st, [ 3 dc in the next ch-3 sp, (dc, ch 3, dc) in the middle dc of the next 3 dc group ] work from [ to ] 11 times, dc in the last st. Turn. (57 dc + 11 ch-3’s)
Fasten off. Weave in ends. Scroll down to continue on to Seaming. Overall length of your top should be approximately 21″.
X-Large – Openwork Lace Section – Front Panel
Row 1: Alt-dc in the first st, skip the next st, [ 3 dc in the next st, skip each of the next 2 sts, (dc, ch 3, dc) in the next st, skip each of the next 2 sts ] work from [ to ] 12 times, dc in the last st. Turn. (62 dc + 12 ch-3’s)
Rows 2 – 9: Alt-dc in the first st, [ 3 dc in the next ch-3 sp, (dc, ch 3, dc) in the middle dc of the next 3 dc group ] work from [ to ] 12 times, dc in the last st. Turn. (62 dc + 12 ch-3’s)
Do not fasten off. Continue on to the Right Shoulder.
X-Large – Right Shoulder
Row 1: Alt-dc in the first st, [ 3 dc in the next ch-3 sp, (dc, ch 3, dc) in the middle dc of the next 3 dc group ] work from [ to ] 3 times, 3 dc in the next ch-3 sp, skip the next dc, dc in the next dc. Skip the next 23 dc. Place a locking SM in the next dc to mark the beginning of the Left Shoulder for later. Turn to work Row 2 of the Right Shoulder. (20 dc + 3 ch-3’s)
Row 2: Alt-dc2tog in the first & 3rd dc, [ 3 dc in the next ch-3 sp, (dc, ch 3, dc) in the middle dc of the next 3 dc group ] work from [ to ] 3 times, dc in the last st. Turn. (17 dc + 3 ch-3’s)
Rows 3 – 6: Alt-dc in the first st, [ 3 dc in the next ch-3 sp, (dc, ch 3, dc) in the middle dc of the next 3 dc group ] work from [ to ] 3 times, dc in the last st. Turn. (17 dc + 3 ch-3’s)
Shoulder should be approximately 3.5″ W x 3″H. Overall length of your top should be approximately 21″.
Fasten off leaving a tail of yarn 3 times the width of the shoulder for shoulder seaming later. Continue on to the Left Shoulder.
X-Large – Left Shoulder
Row 1: With yarn & a 4.00mm crochet hook, join yarn with a standing dc in the st marked with a SM, (dc, ch 3, dc) in the middle dc of the next 3 dc group, [ 3 dc in the next ch-3 sp, (dc, ch 3, dc) in the middle dc of the next 3 dc group ] work from [ to ] 3 times, dc in the last st. Turn. (19 dc + 3 ch-3’s)
Row 2: Alt-dc in the first st, [ 3 dc in the next ch-3 sp, (dc, ch 3, dc) in the middle dc of the next 3 dc group ] work from [ to ] 3 times, work a dc2tog over the last 2 sts. Turn. (17 dc + 3 ch-3’s)
Rows 3 – 6: Alt-dc in the first st, [ 3 dc in the next ch-3 sp, (dc, ch 3, dc) in the middle dc of the next 3 dc group ] work from [ to ] 3 times, dc in the last st. Turn. (17 dc + 3 ch-3’s)
Shoulder should be approximately 3.5″ W x 3″H. Overall length of your top should be approximately 21″.
Fasten off leaving a tail of yarn 3 times the width of the shoulder for shoulder seaming later. Set your front panel aside and make the back panel. Make the Back Panel through the panel shaping section, then complete it by working the Openwork Lace Section – Back Panel.
X-Large – Openwork Lace Section – Back Panel
Note: All sc and ch-1s are counted as stitches. In Row 1 of this section, it says to work “into the next st”, and “st” refers to either sc or ch-1 sps.
Row 1: Alt-dc in the first st, skip the next st, [ 3 dc in the next st, skip each of the next 2 sts, (dc, ch 3, dc) in the next st, skip each of the next 2 sts ] work from [ to ] 12 times, dc in the last st. Turn. (62 dc + 12 ch-3’s)
Rows 2 – 15: Alt-dc in the first st, [ 3 dc in the next ch-3 sp, (dc, ch 3, dc) in the middle dc of the next 3 dc group ] work from [ to ] 12 times, dc in the last st. Turn. (62 dc + 12 ch-3’s)
Fasten off. Weave in ends. Scroll down to continue on to Seaming. Overall length of your top should be approximately 21″.
2X-Large – Openwork Lace Section – Front Panel
Row 1: Alt-dc in the first st, skip the next st, [ 3 dc in the next st, skip each of the next 2 sts, (dc, ch 3, dc) in the next st, skip each of the next 2 sts ] work from [ to ] 13 times, 3 dc in the next st, skip each of the next 3 sts, dc in the last st. Turn. (70 dc + 13 ch-3’s)
Row 2: Alt-dc in the first st, [ (dc, ch 3, dc) in the middle dc of the next 3 dc group, 3 dc in the next ch-3 sp ] work from [ to ] 13 times, (dc, ch 3, dc) in the middle dc of the next 3 dc group, dc in the last st. Turn. (69 dc + 14 ch-3’s)
Row 3: Alt-dc in the first st, [ 3 dc in the next ch-3 sp, (dc, ch 3, dc) in the middle dc of the next 3 dc group ] work from [ to ] 13 times, 3 dc in the next ch-3 sp, dc in the last st. Turn. (70 dc + 13 ch-3’s)
Rows 4 – 9: Rep Rows 2 – 3.
Do not fasten off. Continue on to the Right Shoulder.
2X-Large – Right Shoulder
Row 1: Alt-dc in the first st, [ (dc, ch 3, dc) in the middle dc of the next 3 dc group, 3 dc in the next ch-3 sp ] work from [ to ] 4 times, skip the next dc, dc in the next dc. Skip the next 26 dc. Place a locking SM in the next dc to mark the beginning of the Left Shoulder for later. Turn to work Row 2 of the Right Shoulder. (22 dc + 4 ch-3’s)
Row 2: Alt-dc2tog in the first & 3rd dc, [ 3 dc in the next ch-3 sp, (dc, ch 3, dc) in the middle dc of the next 3 dc group ] work from [ to ] 3 times, 3 dc in the next ch-3 sp, dc in the last st. Turn. (20 dc + 3 ch-3’s)
Row 3: Alt-dc in the first st, [ (dc, ch 3, dc) in the middle dc of the next 3 dc group, 3 dc in the next ch-3 sp ] work from [ to ] 3 times, (dc, ch 3, dc) in the middle dc of the next 3 dc group, dc in the last st. Turn. (19 dc + 4 ch-3’s)
Row 4: Alt-dc in the first st, [ 3 dc in the next ch-3 sp, (dc, ch 3, dc) in the middle dc of the next 3 dc group ] work from [ to ] 3 times, 3 dc in the next ch-3 sp, dc in the last st. Turn. (20 dc + 3 ch-3’s)
Rows 5 – 7: Rep Rows 3 – 4, ending with a Row 3.
Shoulder should be approximately 4.5″ W x 3.5″H. Overall length of your top should be approximately 22″.
Fasten off leaving a tail of yarn 3 times the width of the shoulder for shoulder seaming later. Continue on to the Left Shoulder.
2X-Large – Left Shoulder
Row 1: With yarn & a 4.00 mm crochet hook, join yarn with a standing dc in the st marked with a SM, [ 3 dc in the next ch-3 sp, (dc, ch 3, dc) in the middle dc of the next 3 dc group ] work from [ to ] 4 times, dc in the last st. Turn. (22 dc + 4 ch-3’s)
Row 2: Alt-dc in the first st, [ 3 dc in the next ch-3 sp, (dc, ch 3, dc) in the middle dc of the next 3 dc group ] work from [ to ] 3 times, 3 dc in the next ch-3 sp, skip the next dc, dc2tog over the next st & the last st. Turn. (20 dc + 3 ch-3’s)
Row 3: Alt-dc in the first st, [ (dc, ch 3, dc) in the middle dc of the next 3 dc group, 3 dc in the next ch-3 sp ] work from [ to ] 3 times, (dc, ch 3, dc) in the middle dc of the next 3 dc group, dc in the last st. Turn. (19 dc + 4 ch-3’s)
Row 4: Alt-dc in the first st, [ 3 dc in the next ch-3 sp, (dc, ch 3, dc) in the middle dc of the next 3 dc group ] work from [ to ] 3 times, 3 dc in the next ch-3 sp, dc in the last st. Turn. (20 dc + 3 ch-3’s)
Rows 5 – 7: Rep Rows 3 – 4, ending with a Row 3.
Shoulder should be approximately 4.5″ W x 3.5″H. Overall length of your top should be approximately 22″.
Fasten off leaving a tail of yarn 3 times the width of the shoulder for shoulder seaming later. Set your front panel aside and make the back panel. Make the Back Panel through the panel shaping section, then complete it by working the Openwork Lace Section – Back Panel.
2X-Large – Openwork Lace Section – Back Panel
Note: All sc and ch-1s are counted as stitches. In Row 1 of this section, it says to work “into the next st”, and “st” refers to either sc or ch-1 sps.
Row 1: Alt-dc in the first st, skip the next st, [ 3 dc in the next st, skip each of the next 2 sts, (dc, ch 3, dc) in the next st, skip each of the next 2 sts ] work from [ to ] 13 times, 3 dc in the next st, skip each of the next 3 sts, dc in the last st. Turn. (70 dc + 13 ch-3’s)
Row 2: Alt-dc in the first st, [ (dc, ch 3, dc) in the middle dc of the next 3 dc group, 3 dc in the next ch-3 sp ] work from [ to ] 13 times, (dc, ch 3, dc) in the middle dc of the next 3 dc group, dc in the last st. Turn. (69 dc + 14 ch-3’s)
Row 3: Alt-dc in the first st, [ 3 dc in the next ch-3 sp, (dc, ch 3, dc) in the middle dc of the next 3 dc group ] work from [ to ] 13 times, 3 dc in the next ch-3 sp, dc in the last st. Turn. (70 dc + 13 ch-3’s)
Rows 4 – 16: Rep Rows 2 – 3, ending with a Row 2.
Fasten off. Weave in ends. Scroll down to continue on to Seaming. Overall length of your top should be approximately 22″.
3X-Large – Openwork Lace Section – Front Panel
Row 1: Alt-dc in the first st, skip each of the next 2 sts, [ 3 dc in the next st, skip each of the next 2 sts, (dc, ch 3, dc) in the next st, skip each of the next 2 sts ] work from [ to ] 15 times, skip the next st, dc in the last st. Turn. (77 dc + 15 ch-3’s)
Rows 2 – 9: Alt-dc in the first st, [ 3 dc in the next ch-3 sp, (dc, ch 3, dc) in the middle dc of the next 3 dc group ] work from [ to ] 15 times, dc in the last st. Turn. (77 dc + 15 ch-3’s)
Do not fasten off. Continue on to the Right Shoulder.
3X-Large – Right Shoulder
Row 1: Alt-dc in the first st, [ 3 dc in the next ch-3 sp, (dc, ch 3, dc) in the middle dc of the next 3 dc group ] work from [ to ] 4 times, 3 dc in the next ch-3 sp, skip the next dc, dc in the next dc. Skip the next 28 dc. Place a locking SM in the next dc to mark the beginning of the Left Shoulder for later. Turn to work Row 2 of the Right Shoulder. (25 dc + 4 ch-3’s)
Row 2: Alt-dc2tog in the first & 3rd dc, [ 3 dc in the next ch-3 sp, (dc, ch 3, dc) in the middle dc of the next 3 dc group ] work from [ to ] 4 times, dc in the last st. Turn. (22 dc + 4 ch-3’s)
Rows 3 – 7: Alt-dc in the first st, [ 3 dc in the next ch-3 sp, (dc, ch 3, dc) in the middle dc of the next 3 dc group ] work from [ to ] 4 times, dc in the last st. Turn. (22 dc + 4 ch-3’s)
Shoulder should be approximately 5″ W x 3.5″H. Overall length of your top should be approximately 22″.
Fasten off leaving a tail of yarn 3 times the width of the shoulder for shoulder seaming later. Continue on to the Left Shoulder.
3X-Large – Left Shoulder
Row 1: With yarn & a 4.00mm crochet hook, join yarn with a standing dc in the st marked with a SM, (dc, ch 3, dc) in the middle dc of the next 3 dc group, [ 3 dc in the next ch-3 sp, (dc, ch 3, dc) in the middle dc of the next 3 dc group ] work from [ to ] 4 times, dc in the last st. Turn. (25 dc + 5 ch-3’s)
Row 2: Alt-dc in the first st, [ 3 dc in the next ch-3 sp, (dc, ch 3, dc) in the middle dc of the next 3 dc group ] work from [ to ] 4 times, work a dc2tog over the last 2 sts. Turn. (22 dc + 4 ch-3’s)
Rows 3 – 7: Alt-dc in the first st, [ 3 dc in the next ch-3 sp, (dc, ch 3, dc) in the middle dc of the next 3 dc group ] work from [ to ] 4 times, dc in the last st. Turn. (22 dc + 4 ch-3’s)
Shoulder should be approximately 5″ W x 3.5″H. Overall length of your top should be approximately 22″.
Fasten off leaving a tail of yarn 3 times the width of the shoulder for shoulder seaming later. Set your front panel aside and make the back panel. Make the Back Panel through the panel shaping section, then complete it by working the Openwork Lace Section – Back Panel.
3X-Large – Openwork Lace Section – Back Panel
Note: All sc and ch-1s are counted as stitches. In Row 1 of this section, it says to work “into the next st”, and “st” refers to either sc or ch-1 sps.
Row 1: Alt-dc in the first st, skip each of the next 2 sts, [ 3 dc in the next st, skip each of the next 2 sts, (dc, ch 3, dc) in the next st, skip each of the next 2 sts ] work from [ to ] 15 times, skip the next st, dc in the last st. Turn. (77 dc + 15 ch-3’s)
Rows 2 – 16: Alt-dc in the first st, [ 3 dc in the next ch-3 sp, (dc, ch 3, dc) in the middle dc of the next 3 dc group ] work from [ to ] 15 times, dc in the last st. Turn. (77 dc + 15 ch-3’s)
Fasten off. Weave in ends. Scroll down to continue on to Seaming. Overall length of your top should be approximately 22″.
4X-Large – Openwork Lace Section – Front Panel
Row 1: Alt-dc in the first st, skip each of the next 2 sts, [ 3 dc in the next st, skip each of the next 2 sts, (dc, ch 3, dc) in the next st, skip each of the next 2 sts ] work from [ to ] 16 times, skip the next st, dc in the last st. Turn. (82 dc + 16 ch-3’s)
Rows 2 – 10: Alt-dc in the first st, [ 3 dc in the next ch-3 sp, (dc, ch 3, dc) in the middle dc of the next 3 dc group ] work from [ to ] 16 times, dc in the last st. Turn. (82 dc + 16 ch-3’s)
Do not fasten off. Continue on to the Right Shoulder.
4X-Large – Right Shoulder
Row 1: Alt-dc in the first st, [ 3 dc in the next ch-3 sp, (dc, ch 3, dc) in the middle dc of the next 3 dc group ] work from [ to ] 5 times, skip the next dc, dc in the next dc. Skip the next 28 dc. Place a locking SM in the next dc to mark the beginning of the Left Shoulder for later. Turn to work Row 2 of the Right Shoulder. (27 dc + 5 ch-3’s)
Row 2: Alt-dc2tog in the first 2 dc, skip the next dc, [ (dc, ch 3, dc) in the middle dc of the next 3 dc group, 3 dc in the next ch-3 sp ] work from [ to ] 4 times, (dc, ch 3, dc) in the middle dc of the next 3 dc group, dc in the last st. Turn. (24 dc + 5 ch-3’s)
Row 3: Alt-dc in the first st, [ 3 dc in the next ch-3 sp, (dc, ch 3, dc) in the middle dc of the next 3 dc group ] work from [ to ] 4 times, 3 dc in the next ch-3 sp, dc in the last st. Turn. (25 dc + 4 ch-3’s)
Row 4: Alt-dc in the first st, [ (dc, ch 3, dc) in the middle dc of the next 3 dc group, 3 dc in the next ch-3 sp ] work from [ to ] 4 times, (dc, ch 3, dc) in the middle dc of the next 3 dc group, dc in the last st. Turn. (24 dc + 5 ch-3’s)
Rows 5 – 7: Rep Rows 2 – 3, ending with a Row 3.
Shoulder should be approximately 5.5″ W x 3.5″H. Overall length of your top should be approximately 23″.
Fasten off leaving a tail of yarn 3 times the width of the shoulder for shoulder seaming later. Continue on to the Left Shoulder.
4X-Large – Left Shoulder
Row 1: With yarn & a 4.00mm crochet hook, join yarn with a standing dc in the st marked with a SM, [ 3 dc in the next ch-3 sp, (dc, ch 3, dc) in the middle dc of the next 3 dc group ] work from [ to ] 5 times, dc in the last st. Turn. (27 dc + 5 ch-3’s)
Row 2: Alt-dc in the first st, [ 3 dc in the next ch-3 sp, (dc, ch 3, dc) in the middle dc of the next 3 dc group ] work from [ to ] 4 times, 3 dc in the next ch-3 sp, skip the next st, dc2tog over the next st & the last st. Turn. (25 dc + 4 ch-3’s)
Row 3: Alt-dc in the first st, [ (dc, ch 3, dc) in the middle dc of the next 3 dc group, 3 dc in the next ch-3 sp ] work from [ to ] 4 times, (dc, ch 3, dc) in the middle dc of the next 3 dc group, dc in the last st. Turn. (24 dc + 5 ch-3’s)
Row 4: Alt-dc in the first st, [ 3 dc in the next ch-3 sp, (dc, ch 3, dc) in the middle dc of the next 3 dc group ] work from [ to ] 4 times, 3 dc in the next ch-3 sp, dc in the last st. Turn. (25 dc + 4 ch-3’s)
Rows 5 – 7: Rep Rows 2 – 3, ending with a Row 3.
Shoulder should be approximately 5.5″ W x 3.5″H. Overall length of your top should be approximately 23″.
Fasten off leaving a tail of yarn 3 times the width of the shoulder for shoulder seaming later. Set your front panel aside and make the back panel. Make the Back Panel through the panel shaping section, then complete it by working the Openwork Lace Section – Back Panel.
4X-Large – Openwork Lace Section – Back Panel
Note: All sc and ch-1s are counted as stitches. In Row 1 of this section, it says to work “into the next st”, and “st” refers to either sc or ch-1 sps.
Row 1: Alt-dc in the first st, skip each of the next 2 sts, [ 3 dc in the next st, skip each of the next 2 sts, (dc, ch 3, dc) in the next st, skip each of the next 2 sts ] work from [ to ] 16 times, skip the next st, dc in the last st. Turn. (82 dc + 16 ch-3’s)
Rows 2 – 17: Alt-dc in the first st, [ 3 dc in the next ch-3 sp, (dc, ch 3, dc) in the middle dc of the next 3 dc group ] work from [ to ] 16 times, dc in the last st. Turn. (82 dc + 16 ch-3’s)
Fasten off. Weave in ends. Scroll down to continue on to Seaming. Overall length of your top should be approximately 23″.
5X-Large – Openwork Lace Section – Front Panel
Row 1: Alt-dc in the first st, skip each of the next 2 sts, [ 3 dc in the next st, skip each of the next 2 sts, (dc, ch 3, dc) in the next st, skip each of the next 2 sts ] work from [ to ] 17 times, skip the next st, dc in the last st. Turn. (87 dc + 17 ch-3’s)
Rows 2 – 10: Alt-dc in the first st, [ 3 dc in the next ch-3 sp, (dc, ch 3, dc) in the middle dc of the next 3 dc group ] work from [ to ] 17 times, dc in the last st. Turn. (87 dc + 17 ch-3’s)
Do not fasten off. Continue on to the Right Shoulder.
5X-Large – Right Shoulder
Row 1: Alt-dc in the first st, [ 3 dc in the next ch-3 sp, (dc, ch 3, dc) in the middle dc of the next 3 dc group ] work from [ to ] 5 times, skip the next dc, dc in the next dc. Skip the next 33 dc. Place a locking SM in the next dc to mark the beginning of the Left Shoulder for later. Turn to work Row 2 of the Right Shoulder. (27 dc + 5 ch-3’s)
Row 2: Alt-dc2tog in the first 2 dc, skip the next dc, [ (dc, ch 3, dc) in the middle dc of the next 3 dc group, 3 dc in the next ch-3 sp ] work from [ to ] 4 times, (dc, ch 3, dc) in the middle dc of the next 3 dc group, dc in the last st. Turn. (24 dc + 5 ch-3’s)
Row 3: Alt-dc in the first st, [ 3 dc in the next ch-3 sp, (dc, ch 3, dc) in the middle dc of the next 3 dc group ] work from [ to ] 4 times, 3 dc in the next ch-3 sp, dc in the last st. Turn. (25 dc + 4 ch-3’s)
Row 4: Alt-dc in the first st, [ (dc, ch 3, dc) in the middle dc of the next 3 dc group, 3 dc in the next ch-3 sp ] work from [ to ] 4 times, (dc, ch 3, dc) in the middle dc of the next 3 dc group, dc in the last st. Turn. (24 dc + 5 ch-3’s)
Rows 5 – 7: Rep Rows 2 – 3, ending with a Row 3.
Shoulder should be approximately 5.5″ W x 3.5″H. Overall length of your top should be approximately 23″.
Fasten off leaving a tail of yarn 3 times the width of the shoulder for shoulder seaming later. Continue on to the Left Shoulder.
5X-Large – Left Shoulder
Row 1: With yarn & a 4.00mm crochet hook, join yarn with a standing dc in the st marked with a SM, [ 3 dc in the next ch-3 sp, (dc, ch 3, dc) in the middle dc of the next 3 dc group ] work from [ to ] 5 times, dc in the last st. Turn. (27 dc + 5 ch-3’s)
Row 2: Alt-dc in the first st, [ 3 dc in the next ch-3 sp, (dc, ch 3, dc) in the middle dc of the next 3 dc group ] work from [ to ] 4 times, 3 dc in the next ch-3 sp, skip the next st, dc2tog over the next st & the last st. Turn. (25 dc + 4 ch-3’s)
Row 3: Alt-dc in the first st, [ (dc, ch 3, dc) in the middle dc of the next 3 dc group, 3 dc in the next ch-3 sp ] work from [ to ] 4 times, (dc, ch 3, dc) in the middle dc of the next 3 dc group, dc in the last st. Turn. (24 dc + 5 ch-3’s)
Row 4: Alt-dc in the first st, [ 3 dc in the next ch-3 sp, (dc, ch 3, dc) in the middle dc of the next 3 dc group ] work from [ to ] 4 times, 3 dc in the next ch-3 sp, dc in the last st. Turn. (25 dc + 4 ch-3’s)
Rows 5 – 7: Rep Rows 2 – 3, ending with a Row 3.
Shoulder should be approximately 5.5″ W x 3.5″H. Overall length of your top should be approximately 23″.
Fasten off leaving a tail of yarn 3 times the width of the shoulder for shoulder seaming later. Set your front panel aside and make the back panel. Make the Back Panel through the panel shaping section, then complete it by working the Openwork Lace Section – Back Panel.
5X-Large – Openwork Lace Section – Back Panel
Note: All sc and ch-1s are counted as stitches. In Row 1 of this section, it says to work “into the next st”, and “st” refers to either sc or ch-1 sps.
Row 1: Alt-dc in the first st, skip each of the next 2 sts, [ 3 dc in the next st, skip each of the next 2 sts, (dc, ch 3, dc) in the next st, skip each of the next 2 sts ] work from [ to ] 17 times, skip the next st, dc in the last st. Turn. (87 dc + 17 ch-3’s)
Rows 2 – 17: Alt-dc in the first st, [ 3 dc in the next ch-3 sp, (dc, ch 3, dc) in the middle dc of the next 3 dc group ] work from [ to ] 17 times, dc in the last st. Turn. (87 dc + 17 ch-3’s)
Fasten off. Weave in ends. Scroll down to continue on to Seaming. Overall length of your top should be approximately 23″.
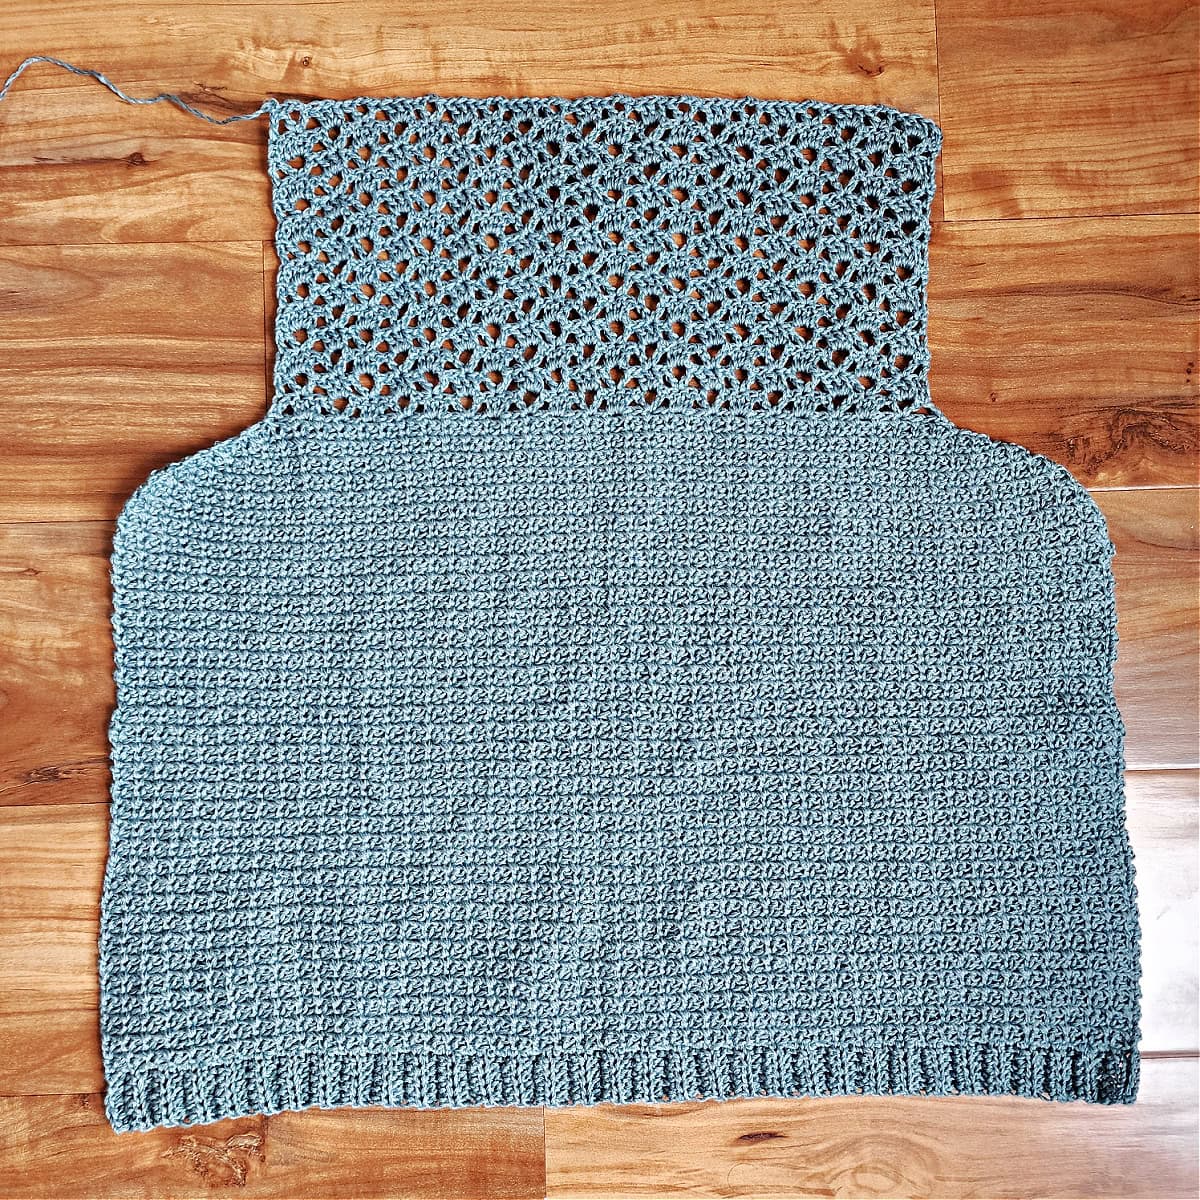
Seaming
Step 1: Lay the front panel on top of the back panel. To make it easier to seam, I recommend using locking stitch markers to hold the panels in place during seaming. I used stitch markers to secure the shoulders to the top of the back panel and down along each of the panel side seams.
Step 2: With a yarn needle and tail of yarn left, whipstitch each shoulder from the front panel to the back panel.
Step 3: With a yarn needle and tail of yarn 3 times the length of the side seam, whipstitch the sides together from the bottom hem up to where the shaping begins (this is the bottom of the armhole opening).
Weave in ends. Continue on to Edging the Neck & Armhole Openings.
Edging the Neck & Armhole Openings
Edging the Neck Opening: With the RS facing out, using yarn and a 4.00mm crochet hook, join yarn with a standing sc in a stitch along the back of the neck opening (exact placement isn’t crucial), sc evenly around the neck opening. The stitch count is not crucial. Simply work as many sc as needed around the neck opening so that the edge lays flat.
Edging the Armhole Openings: With the RS facing out, using yarn and a 4.00mm crochet hook, join yarn with a standing sc in a stitch along the bottom of the armhole opening (exact placement isn’t crucial), sc evenly around the armhole opening. The stitch count is not crucial. Simply work as many sc as needed around the armhole opening so that the edge lays flat.
Repeat for the second armhole opening. Weave in ends.
Give your crochet summer top a professional finish by blocking it!
Related: Pair the Chantilly Crochet Summer Top with the Stop & Rewind Crochet Sun Hat and Summer Essentials Crochet Beach Bag for a fun day out on the beach.
I MADE IT! NOW WHAT?
Pin this post!: Save this crochet summer top pattern to your Pinterest boards so that you can come back and make it again.
Leave a comment below: We love to hear your feedback.
Share Your Finished Projects on Facebook or Instagram: I love to see your finished projects! Share with us on social media and tag me @acrochetedsimplicity or use the hashtag #ACrochetedSimplicity so I can find your posts.
Join us in the Facebook Community Group!
Come share your finished projects with us in the A Crocheted Simplicity Crochet Community Group on Facebook. Join us for fun community events such as crochet alongs, join in on crochet conversations, ask questions, get advice, and share your love for crochet!

More Free Crochet Summer Top Patterns I Think You’ll Love
- Honeycomb Mesh Crochet Top
- Lakelyn Crochet Tank Top
- Granny Stitch Top
- Summer Splendor Crochet Cardigan
- Summer Lovin’ Crochet Beach Cover-Up
- Wandering Free Crochet Summer Top
More Summer Crochet Top Patterns
Are you looking for more crochet summer top patterns free? We have several more patterns for women’s crochet tops, including tops, cardigans, and beach cover-ups.
We also have a few premium summer crochet top patterns as well.
I just finished swatching the Chantilly Top and have a question. Are your swatch measurements blocked?
Hi MB,
My swatch measurements are unblocked.
Happy Crocheting,
Jennifer
Is there a video for this pattern? Ty
Hi,
There currently is not a video tutorial. If you have questions at any point, don’t hesitate to send me a quick e-mail. 🙂
Happy Crocheting,
Jennifer
My swatch came out curved/larger at the top than the bottom. Is that correct, and if not, is there a way to correct for that when I begin the tank top? Thanks!
Hi,
I apologize for the late response. For some reason I stopped receiving e-mail notifications of blog post questions and just now realized this. If you are still struggling with this, please send me an e-mail so I can help get you on track: [email protected]
Jennifer