Brentwood Crochet Shawl Collar Pullover for Kids
Learn to make a crochet shawl collar pullover for kids with basic crochet stitches and minimal seaming.
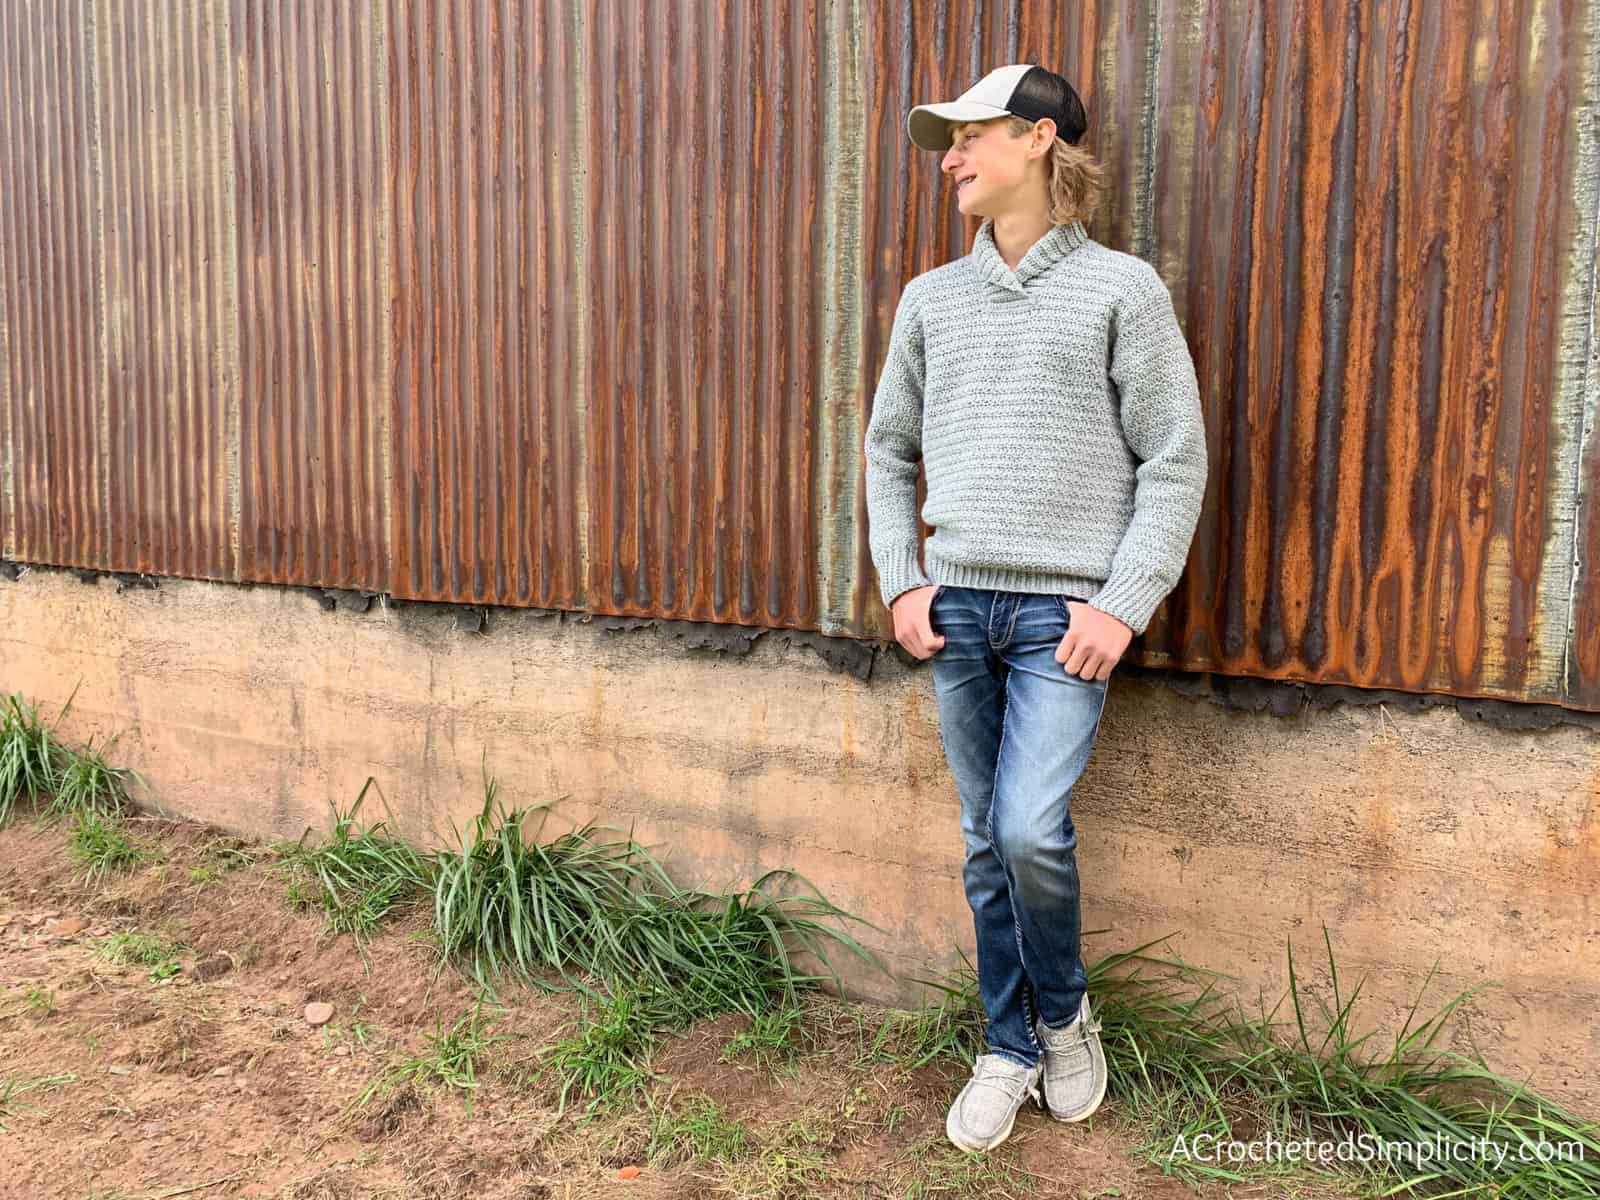
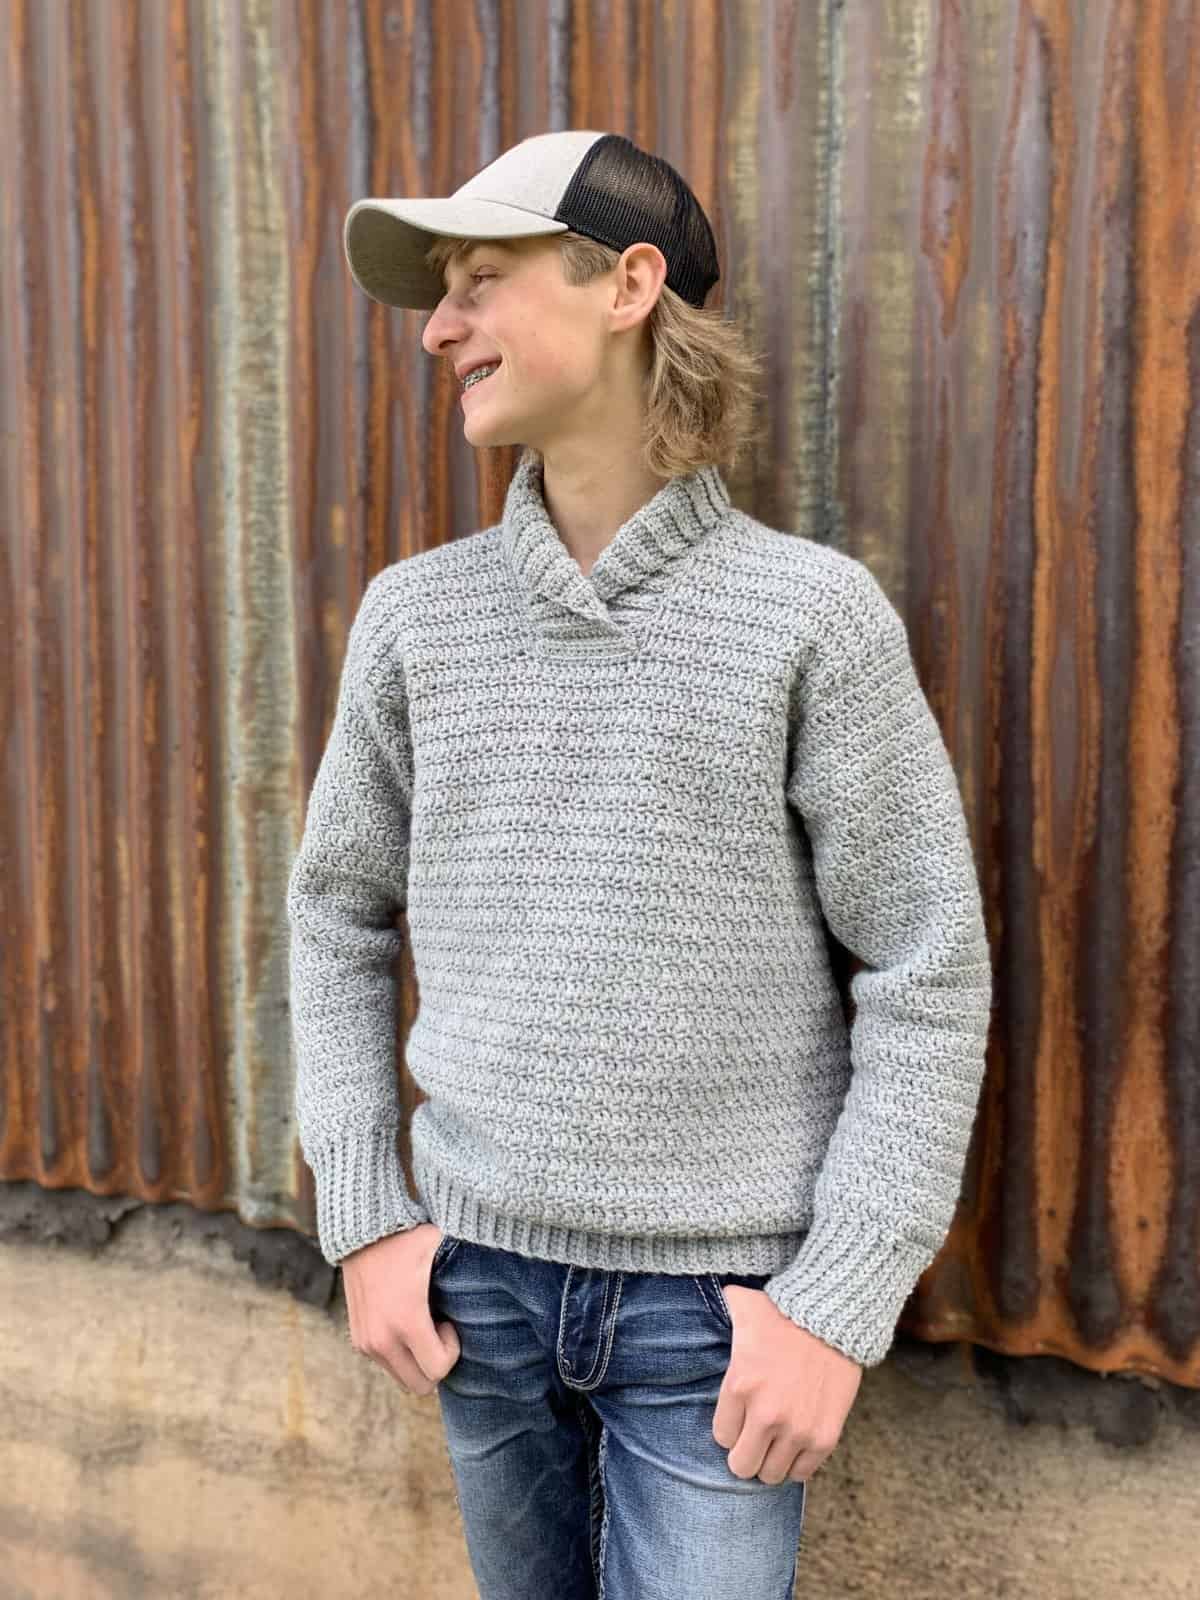
The Brentwood Kids Shawl Collared Pullover is a classic crochet pullover that can be worn for years to come. Pair it with dress slacks for a dressier look, or pair it with jeans for a more casual vibe.
You can find the free crochet sweater pattern for kids in this post below, or an ad-free print friendly version on Ravelry, or on Etsy. The ad-free version also includes a detailed garment schematic and all photo tutorials.
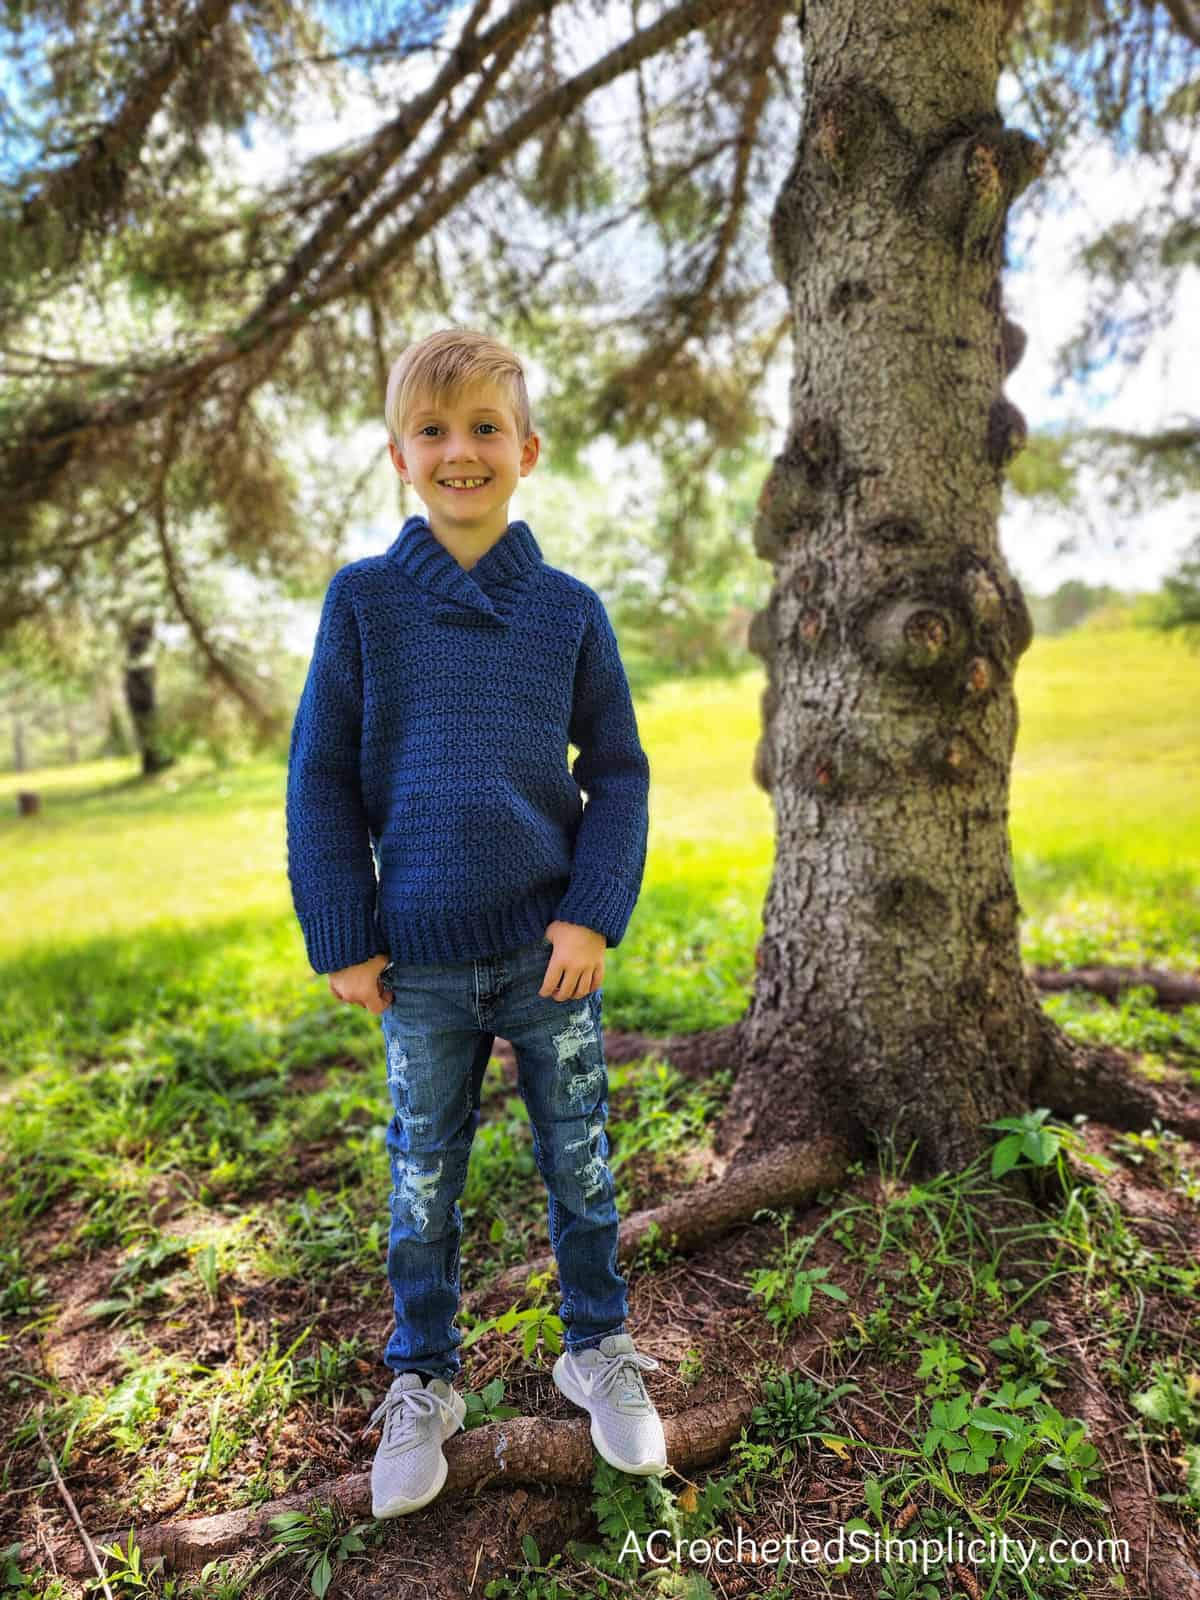
This classic crochet shawl collared pullover is worked from the bottom up with minimal seaming (shoulders only). The collar is then added. The sleeves are worked directly from the armhole openings and worked and shaped down to the cuff.
This pattern also comes in men’s sizes.
The Yarn
For this crochet kids pullover, I chose Lion Brand Yarns Wool Ease, which is a worsted weight yarn. Wool Ease is an acrylic / wool blend yarn that is available in 31 gorgeous colors. Although Wool Ease is classified as a Craft Yarn Council 4 / worsted weight yarn, I’ve found that it is on the lighter side of most worsted weight yarns. Keep this in mind if you plan to substitute your favorite worsted weight yarn.

Brentwood Crochet Shawl Collar Pullover for Kids– Free Crochet Pullover Pattern
The free crochet shawl collar pullover pattern is below, but if you love to work offline, I’ve got a great option for you.
Purchase the ad-free, printable PDF, including all photo tutorials & charts, on Ravelry, and on Etsy. * The ad-free version also includes a detailed garment schematic and all photo tutorials.
Save this pattern to your Ravelry favorites.
This post contains affiliate links.
Materials
- Yarn: Worsted Weight / 4 / Yarn, (Lion Brand Yarns Wool Ease in Riverside & Grey Heather were used for the samples in the photos) (3 oz / 85 g / 197 yards / 180 m / 80% acrylic / 20% wool) per ball.
- Yardage needed per size is shown in the size chart below.
- Wool Ease is also available on Amazon.
- Crochet Hooks: H/8/5.00mm, I/9/5.50mm (My favorite crochet hooks are the Clover Amour Hooks, I’ve never had an ache in my hand since switching)
- Scissors
- Yarn Needle
- Locking Stitch Markers or scrap pieces of yarn
Gauge
- Waistband: 9 sts = 2.25″; 10 rows = 2.60″
- Sweater: In pattern stitch as written (5.50mm hook), 15 sts = 4”; 14 rows = 5″
Sizes
- Kid’s Sizes 2 (4, 6, 8, 10, 12, 14/16) (see size chart below)
Skill Level
- Intermediate
Abbreviations (US Terms)
- ch(s): chain(s)
- sl st(s): slip stitch(es)
- st(s): stitch(es)
- sp(s): space(s)
- sc: single crochet
- hdc: half double crochet
- dc: double crochet
- sc2tog: single crochet decrease
- RS: right side
- WS: wrong side
- yo: yarn over
- Rep: repeat
- Rnd(s): round(s)
- SM: stitch marker
- beg: beginning
- yo: yarn over
- BLO: back loop only /
- FLO: front loop only
- Alt-dc: alternate double crochet
- Alt-dc2tog: alternate double crochet decrease
- Join with a standing single crochet
Pattern Notes
- I tend to crochet on the tighter side. You may need to go down a hook size (or two) to meet gauge if you crochet on the looser side.
- Turning chains are not included in stitch count.
- First stitch of a row/round is worked in the same stitch as turning chain, unless otherwise specified.
- Yarn: Yarn used for the sample shown here is Lion Brand Yarns Wool Ease in Riverside (3 oz / 85 g / 197 yards / 180 m / 80% acrylic / 20% wool) per ball.
- Yarns similar in fiber content and weight can be substituted as long as gauge is met.
- Chains (for chain spaces) are included in stitch count.
- This pullover is worked from the bottom up then split for front and back panels. After the panels are worked, the shoulders are seamed, then sleeves and collar are added.
- Changes for sizes are written as follows: 2 (4, 6, 8, 10, 12, 14/16)
- Yardage: Please refer to the size chart below.
- Tip: After I get each section started, I prefer to work with my sweater inside out to minimize it rubbing on me as I work.
Special Stitches
- Double Crochet Decrease (dc2tog): (Yo, insert hook in next st, yo, pull up a loop, yo, pull thru 2 loops on hook) twice, yo, pull thru remaining 3 loops on hook.
- Alternate Double Crochet (Alt-dc): After turning your work, do not ch, instead, insert your hook into the first st, yo, pull up a loop, yo, pull thru both loops, insert your hook between the legs of the st just made, yo, pull up a loop, yo, pull thru one loop, yo, pull thru remaining loops.
- Alternate Double Crochet Decrease (Alt-dc2tog): After turning your work, do not ch, instead, insert your hook into the first st, yo, pull up a loop, yo, pull thru both loops, insert your hook between the legs of the st just made, yo, pull up a loop, yo, pull thru one loop, yo, insert your hook into the next st indicated, yo, pull up a loop, yo, pull through 2 loops, yo, pull through remaining 3 loops.
- Join with a standing sc: When instructed to “Join with a standing sc”, begin with a slip knot on your hook. Insert your hook into the stitch or space indicated, yo, pull up a loop, yo and draw thru both loops on hook.
- Half Double Crochet Decrease (hdc2tog): (yo, insert hook into next stitch, yo, pull up a loop) twice, yo, pull thru all remaining loops on your hook.
Size Chart
| Size | Fits Chest | Finished Chest | Finished Length
(w/o collar) |
Yardage |
| 2 | 21″ | 25″ | 15″ | 700 yards |
| 4 | 23″ | 27″ | 16″ | 850 yards |
| 6 | 25″ | 29″ | 17″ | 1,000 yards |
| 8 | 26″ | 30″ | 19″ | 1,100 yards |
| 10 | 28″ | 32″ | 21″ | 1,300 yards |
| 12 | 30″ | 34″ | 22″ | 1,400 yards |
| 14/16 | 32″ | 35″ | 23″ | 1,600 yards |
Lengthening the Torso
Do you have a guy who has a longer than average torso? No worries, simply use this guide to make your custom length sweater!
Step 1: Work the waist band as written.
Step 2: Work the Body of Sweater as written. This is where you will add more length to the torso. Continue repeating Rnds 2 – 3, ending w/ a Rnd 3, until you’ve added the additional length you desire. Continue on to Front Upper Center Panel.
Lengthening Sleeves
The sleeves are worked in joined rows (rounds) from armhole to cuff. To lengthen the sleeves, simply repeat rounds 3 – 4, making sure to end with a RS round, until your sleeves are the desired length and then add the 2″ or 2.5″ cuff.
Brentwood Crochet Shawl Collar Pullover for Kids
Waistband
Hook: H/8/5.00mm
Row 1 (RS): Ch 8 (8, 9, 9, 9, 10, 10), hdc in 2nd ch from hook, hdc in each ch across. Turn. (7, 7, 8, 8, 8, 9, 9 sts)
Row 2: Ch 1, BLO sl st across. Turn. (7, 7, 8, 8, 8, 9, 9 sts)
Row 3: Ch 1, BLO hdc across. Turn. (7, 7, 8, 8, 8, 9, 9 sts)
Rows (4- 67) (4 – 75) (4 – 81) (4 – 85) (4 – 93) (4 – 101) (4 – 105): Repeat Rows 2 – 3.
Row 68 (76) (82) (86) (94) (102) (106) – Seam Row: With RS facing out, bring the first row up to meet the last row (the first row should be in front if you kept the RS facing out). Position your working yarn so that it’s on the inside of the band (seam tutorial). Ch 1, slip stitch the rows together using the following method: insert your hook (from front to back) into the FLO of the 1st stitch of Row 1, insert your hook (from back to front) into the BLO of the 1st stitch of the last row, yo, pull thru all loops on your hook. Continue in this way across the band to complete the seam. (7, 7, 8, 8, 8, 9, 9 sts)
Do not fasten off. Continue on to the Body of Sweater.
Body of Sweater
See notes above for instructions on lengthening the torso of the sweater.
Sizes 2 (4)
Rnd 1 (RS): With a 5.50mm crochet hook, work into the sides of the rows of the waistband, ch 1, sc in each of the next 16 (24) rows, (sc in the next row, 2 sc in the next row) 26 times. Join with a sl st to the 1st st. Turn. (94, 102 sts)
Sizes 6 (8, 10, 12)
Rnd 1 (RS): With a 5.50mm crochet hook, work into the sides of the rows of the waistband, ch 1, sc in each of the next 4 (8, 16, 24) rows, (sc in each of the next 2 rows, 2 sc in the next row) 26 times. Join with a sl st to the 1st st. Turn. (108, 112, 120, 128 sts)
Size 14/16
Rnd 1 (RS): With a 5.50mm crochet hook, work into the sides of the rows of the waistband, ch 1, sc in each of the next 2 rows, (sc in each of the next 3 rows, 2 sc in the next row) 26 times. Join with a sl st to the 1st st. Turn. (132 sts)
All Sizes
Rnd 2: Ch 1, sc in the first st, ch 1, skip the next st, (sc in the next st, ch 1, skip the next st) rep around. Join. Turn.
Rnd 3 (RS): Alt-dc in the first ch-1 sp, dc in each sc and ch-1 sp around. Join. Turn.
All Sizes: Rep Rnds 2 – 3, until work measures 10.25″ (10.75″, 11.5″, 13″, 14.5″, 15″, 16″), ending w/ a Rnd 3 rep.
Do not fasten off. Continue on to Armhole Shaping for the size you’re making.
Armhole Shaping
Notes: Work the armhole shaping noted below, for the size pullover you’re making, then continue on to Row 1 of the Front Upper Center Panel.
Size 2 Armhole Shaping: BLO sl st in next 3 sts, then continue to Row 1 and work next 41 sts only. Skip 6 sts after Row 1 is complete, place a SM in the 7th st to mark the beginning of the back panel.
Size 4 Armhole Shaping: BLO sl st in next 3 sts, then continue to Row 1 and work next 45 sts only. Skip 6 sts after Row 1 is complete, place a SM in the 7th st to mark the beginning of the back panel.
Size 6 Armhole Shaping: BLO sl st in next 3 sts, then continue to Row 1 and work next 47 sts only. Skip 7 sts after Row 1 is complete, place a SM in the 8th st to mark the beginning of the back panel.
Size 8 Armhole Shaping: BLO sl st in next 3 sts, then continue to Row 1 and work next 49 sts only. Skip 7 sts after Row 1 is complete, place a SM in the 8th st to mark the beginning of the back panel.
Size 10 Armhole Shaping: BLO sl st in next 3 sts, then continue to Row 1 and work next 53 sts only. Skip 7 sts after Row 1 is complete, place a SM in the 8th st to mark the beginning of the back panel.
Size 12 Armhole Shaping: BLO sl st in next 3 sts, then continue to Row 1 and work next 57 sts only. Skip 7 sts after Row 1 is complete, place a SM in the 8th st to mark the beginning of the back panel.
Size 14/16 Armhole Shaping: BLO sl st in next 3 sts, then continue to Row 1 and work next 59 sts only. Skip 7 sts after Row 1 is complete, place a SM in the 8th st to mark the beginning of the back panel.
Front Upper Center Panel
Sizes 2 (4, 6, 8, 10, 12)
Row 1 (WS): Ch 1, sc in the first st, ch 1, skip the next st, (sc in the next st, ch 1, skip the next st 19 (21, 22, 23, 25, 27) times, sc in the next st. (41, 45, 47, 49, 53, 57 sts). *Before you turn to complete Row 2, skip 6 (6, 7, 7, 7, 7) sts after Row 1 is complete, place a SM in the 7th (7th, 8th, 8th, 8th, 8th) st to mark beginning of Back Panel. Turn to work Row 2.
Row 2 (RS): Alt-dc in the first st, dc in each of the next 40 (44, 46, 48, 52, 56) sc and ch-1 sps. Turn.
Do not fasten off. Continue on to the Upper Right Panel for the size you’re making.
Size 14/16
Row 1 (WS): Ch 1, sc in the first st, ch 1, skip the next st, (sc in the next st, ch 1, skip the next st) 28 times, sc in the next st. (59 sts) *Before you turn to complete Row 2, skip 7 sts after Row 1 is complete, place a SM in the 8th st to mark beginning of Back Panel. Turn to work Row 2.
Row 2 (RS): Alt-dc in the first st, dc in each of the next 58 sc and ch-1 sps. Turn.
Row 3: Ch 1, sc in the first st, ch 1, skip the next st, (sc in the next st, ch 1, skip the next st) 28 times, sc in the next st. Turn.
Row 4: Rep Row 2.
Do not fasten off. Continue on to the Upper Right Panel for the size you’re making.
Upper Right Panel
Sizes 2 (4, 8, 10, 14/16)
Row 1 (WS): Ch 1, sc in the first st, ch 1, skip the next st, (sc in the next st, ch 1, skip the next st) 6 (7, 8, 9, 10) times, sc in the next st. (15, 17, 19, 21, 23 sts)
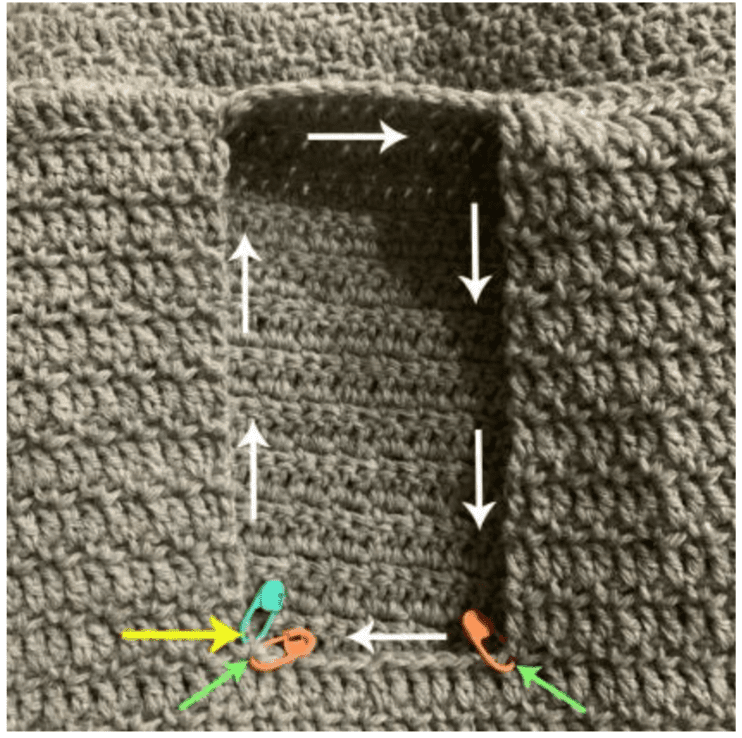
*Before you turn to work Row 2, place a SM in the following (see photo below):
- Place a SM (orange on left) in the same st as the last sc worked in Row 1 to mark the last st of the Set-up round of the Collar.
- Place a SM (green on left) in the side of the last sc worked in Row 1 to mark the beg of the Set-up round of the Collar.
- Skip 11 (11, 11, 11, 13) sts after working Row 1, place a SM (orange on right) in the 12th (12th, 12th, 12th, 14th) st to mark the beg of the Upper Left Panel.
Turn to work Row 2.
Row 2 (RS): Alt-dc in the first st, dc in each of the next 14 (16, 18, 20, 22) sc and ch-1 sps. Turn.
Row 3: Ch 1, sc in the first st, ch 1, skip the next st, (sc in the next st, ch 1, skip the next st) 6 (7, 8, 9, 10) times, sc in the next st. Turn.
Rows 4 – 12 (14, 16, 16, 20): Rep Rows 2 – 3, ending with a row 2 rep.
Fasten off. Weave in ends. Continue on to the Upper Left Panel.
Sizes 6 (12)
Row 1 (WS): Ch 1, sc in the first st, ch 1, skip the next st, (sc in the next st, ch 1, skip the next st) 7 (9) times, sc in each of the next 2 sts. (18, 22 sts)
*Before you turn to work Row 2, place a SM in the following (see photo above):
- Place a SM (orange on left) in the same st as the last sc worked in Row 1 to mark the last st of the Set-up round of the Collar.
- Place a SM (green on left) in the side of the last sc worked in Row 1 to mark the beg of the Set-up round of the Collar.
- Skip 11 (13) sts after working Row 1, place a SM (orange on right) in the 12th (14th) st to mark the beg of the Upper Left Panel.
Turn to work Row 2.
Row 2 (RS): Alt-dc in the first st, dc in each of the next 17 (21) sc and ch-1 sps. Turn.
Row 3: Ch 1, sc in the first st, ch 1, skip the next st, (sc in the next st, ch 1, skip the next st) 7 (9) times, sc in each of the next 2 sts. Turn.
Rows 4 – 14 (20): Rep Rows 2 – 3, ending with a row 2 rep.
Fasten off. Weave in ends. Continue on to the Upper Left Panel.
Upper Left Panel
Sizes 2 (4, 8, 10, 14/16)
Row 1 (WS): Join yarn with a standing sc in the st with marker that marks the beginning of the upper left panel, ch 1, skip the next st, (sc in the next st, ch 1, skip the next st) 6 (7, 8, 9, 10) times, sc in the next st. Turn. (15, 17, 19, 21, 23 sts) You should have a gap of 11 (11, 11, 11, 13) sts between the upper right & left panels.
Row 2 (RS): Alt-dc in the first st, dc in each of the next 14 (16, 18, 20, 22) sc and ch-1 sps. Turn.
Row 3: Ch 1, sc in the first st, ch 1, skip the next st, (sc in the next st, ch 1, skip the next st) 6 (7, 8, 9, 10) times, sc in the next st. Turn.
Rows 4 – 12 (14, 16, 16, 20): Rep Rows 2 – 3, ending with a row 2 rep.
Fasten off. Weave in ends. Continue on to Back Panel.
Sizes 6 (12)
Row 1 (WS): Join yarn with a standing sc in the st with marker that marks the beginning of the upper left panel, ch 1, skip the next st, (sc in the next st, ch 1, skip the next st) 7 (9) times, sc in each of the next 2 sts. Turn. (18, 22 sts) You should have a gap of 11 (13) sts between the upper right & left panels.
Row 2 (RS): Alt-dc in the first st, dc in each of the next 17 (21) sc and ch-1 sps. Turn.
Row 3: Ch 1, sc in the first st, ch 1, skip the next st, (sc in the next st, ch 1, skip the next st) 7 (9) times, sc in each of the next 2 sts. Turn.
Rows 4 – 14 (20): Rep Rows 2 – 3, ending with a row 2 rep.
Fasten off. Weave in ends. Continue on to the Back Panel.
Back Panel
Row 1 (WS): Join yarn with a standing sc in the st with st marker for back panel, ch 1, skip the next st, (sc in the next st, ch 1, skip the next st) 19 (21, 22, 23, 25, 27, 28) times, sc in the next st. Turn. (41, 45, 47, 49, 53, 57, 59 sts)
Row 2 (RS): Alt-dc in the first st, dc in each of the next 40 (44, 46, 48, 52, 56, 58) sc and ch-1 sps. Turn.
Row 3: Ch 1, sc in the first st, ch 1, skip the next st, (sc in the next st, ch 1, skip the next st) 19 (21, 22, 23, 25, 27, 28) times, sc in the next st. Turn.
Rows 4 – 14 (16, 16, 18, 18, 22, 24): Rep Rows 2 – 3, ending with a row 2 rep.
Fasten off. Weave in ends. Continue to Shoulder Seams.
Shoulder Seams
Turn sweater inside out. Line up the outer corners of the back panel with the outer corners of the front panels. Using a tapestry needle and yarn, whipstitch each stitch of the front panel to the back panel. Weave in ends. Turn sweater right side out. Continue on to the Collar Set-Up.
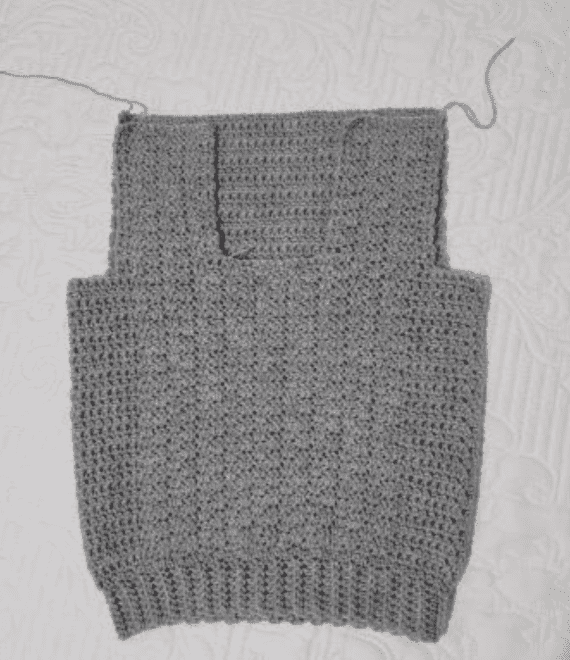
Photo Above: This photo shows the right side of the sweater just before shoulders are seamed.
Collar Set-Up
Gauge: With a 5.00mm hook, in BLO hdc: 12.5 sts = 3″; 9 rows = 3″
Note: When working a hdc2tog in the last st of a row and into the next st along the edge of the neck opening, work thru BOTH loops along the edge of the neck opening.
Set up Round: With RS facing you & using a H/8/5.00mm hook, join yarn with a sc in the side of the sc marked for beginning the collar (see GREEN SM in the photo below, left), work 1 sc into the side of each sc row & 2 sc into the side of each dc row up the side of the neck opening until you reach the back of the neck opening (18, 21, 21, 24, 24, 30, 30) sts, work 2 sc in the first st along the back of the neck opening, work 1 sc into each of the remaining ( 10, 10, 10, 10, 10, 12, 12) sts along the back of the neck opening, rotate to work down the opposite side, work 1 sc into the side of each sc row & 2 sc into the side of each dc row down the side of the neck opening (18, 21, 21, 24, 24, 30, 30) sts, work 1 sc into each of the 11 (11, 11, 11, 11, 13, 13) sts across the bottom of the neck opening. Join. (59, 65, 65, 71, 71, 87, 87 sts)
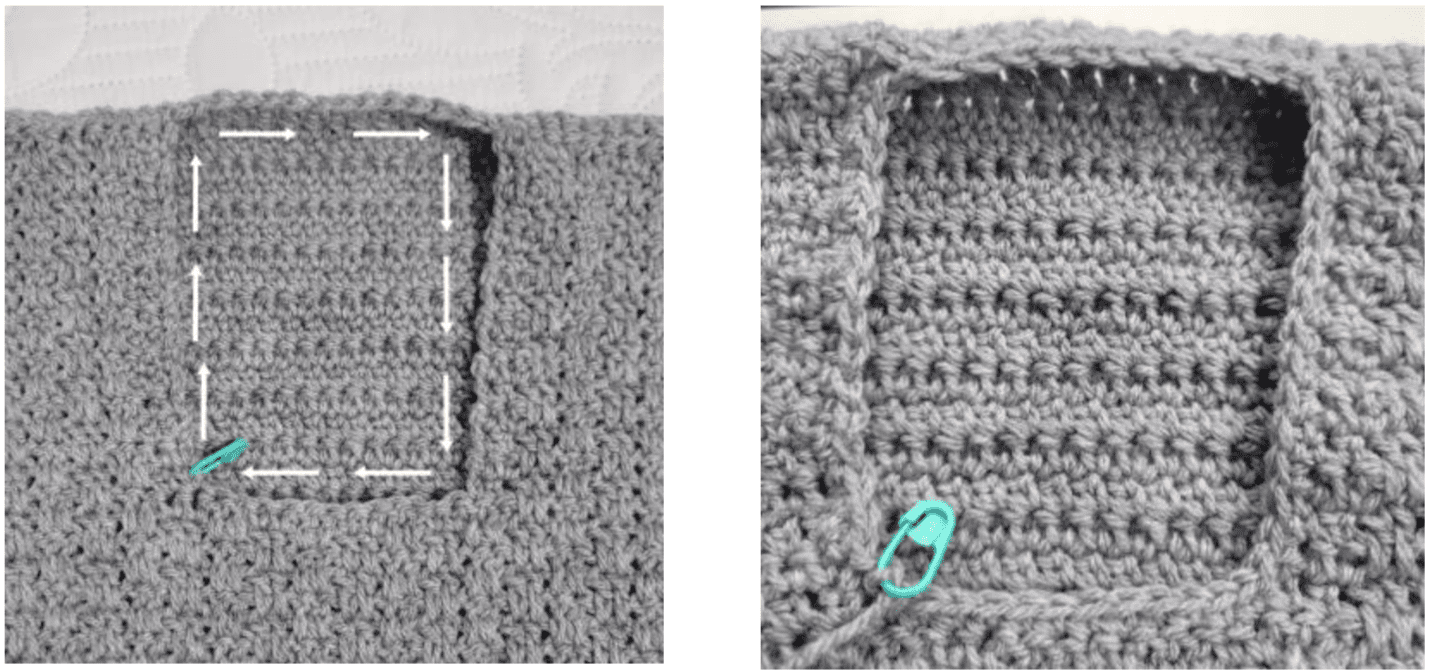
Photo Above Left: Photo shows the green stitch marker that you placed at the end of Row 1 of the Upper Right Panel to mark the beginning of the Set up round of the Collar. The white arrows show the direction that you will work the stitches around the neck opening.
Photo Above Right: Shows the Collar Set-Up round complete.
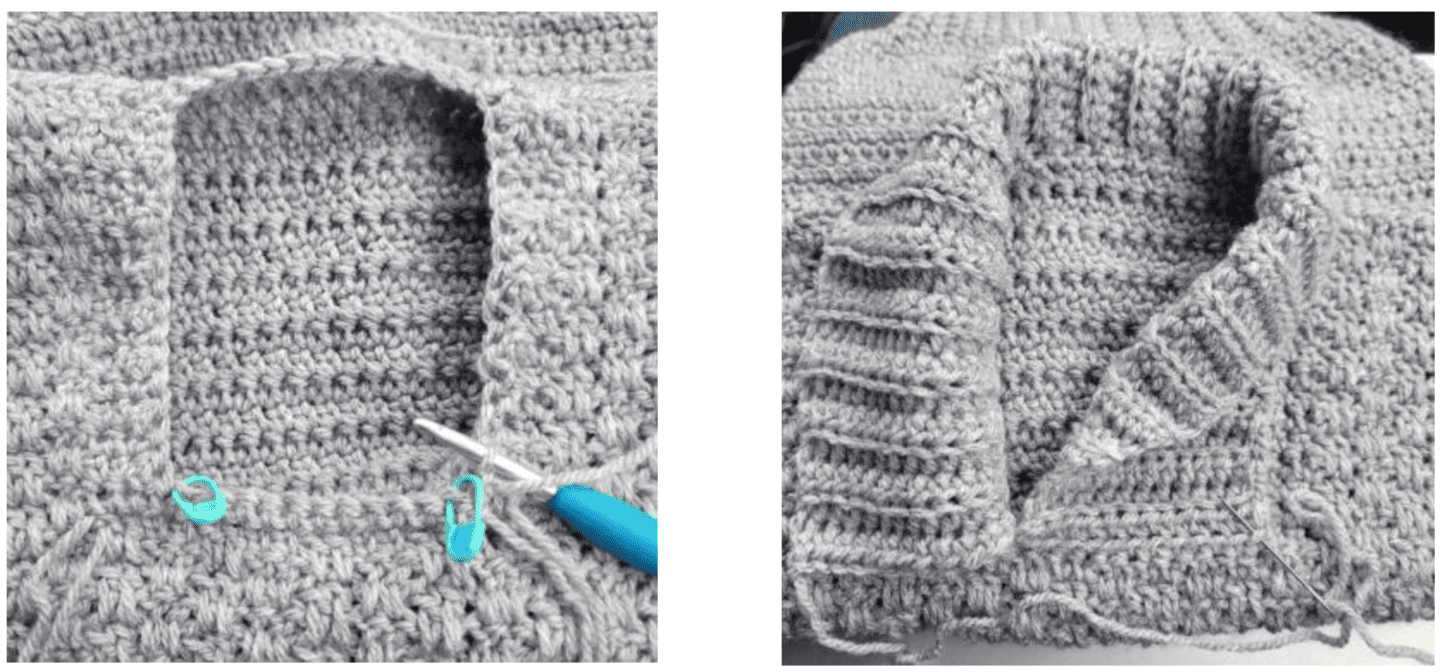
Photo Above Left: After you’ve completed the Collar Set-Up, turn your sweater inside out to begin working the Collar. The position of the blue crochet hook shows where you ended the Collar Set-Up. Row 1 of the Collar Construction is worked in the FLO of stitches marked by the green stitch markers, along the bottom of the neck opening. The Collar is worked back in forth in rows around the neck opening.
Photo Above Right: This photo shows the sweater turned right side out and the Collar completed and waiting to be finished. Finish the Collar by whipstitching the last row of the Collar to the remaining loops from Row 1 (marked with the silver yarn needle).
Collar
Beginning at the bottom of the neck opening, you will work the Collar back and forth in rows, working up and around the sides and back of the neck opening. You will end up back at the bottom of the neck opening, fasten off, then whipstitch the last row of the collar to the bottom of the neck opening.
ALL SIZES
Row 1: Turn sweater inside out, ch 1, turn, FLO 2 hdc in the first st, FLO hdc in each of the next (9, 9, 9, 9, 9, 11, 11) sts along the bottom of the neck opening, hdc2tog in FLO of next st and BOTH loops of next st along edge of neck opening. (12, 12, 12, 12, 12, 14, 14 sts)
Row 2: Sl st in the next st along edge of neck opening, turn, BLO hdc in each st across. (12, 12, 12, 12, 12, 14, 14 sts)
Row 3: Ch 1, turn, BLO hdc in each of the next (11, 11, 11, 11, 11, 13, 13) sts, hdc2tog in the BLO of the next st and BOTH loops of the next st along edge of neck opening. (12, 12, 12, 12, 12, 14, 14 sts)
Row 4: Sl st in the next st along edge of neck opening, turn, BLO hdc in next (11, 11, 11, 11, 11, 13, 13) sts, BLO 2 hdc in last st. (13, 13, 13, 13, 13, 15, 15 sts)
Row 5: Ch 1, turn, BLO hdc in each of the next (12, 12, 12, 12, 12, 14, 14) sts, hdc2tog in BLO of the next st and BOTH loops of the next st along edge of neck opening. (13, 13, 13, 13, 13, 15, 15 sts)
Row 6: Sl st in the next st along edge of neck opening, turn, BLO hdc in next (12, 12, 12, 12, 12, 14, 14) sts, BLO 2 hdc in last st. (14, 14, 14, 14, 14, 16, 16 sts)
Size 2: Skip to section labeled ALL SIZES
Row 7: Ch 1, turn, BLO hdc in each of the next (13, 13, 13, 13, 15, 15) sts, hdc2tog in BLO of the next st and BOTH loops of the next st along edge of neck opening. (14, 14, 14, 14, 16, 16 sts)
Row 8: Sl st in the next st along edge of neck opening, turn, BLO hdc in next (13, 13, 13, 13, 15, 15) sts, BLO 2 hdc in last st. (15, 15, 15, 15, 17, 17 sts)
Sizes 4, 6, 12, & 14/16: Skip to section labeled ALL SIZES
Row 9: Ch 1, turn, BLO hdc in each of the next (14, 14) sts, hdc2tog in BLO of the next st and BOTH loops of the next st along edge of neck opening. (15, 15 sts)
Row 10: Sl st in the next st along edge of neck opening, turn, BLO hdc in next (14, 14) sts, BLO 2 hdc in last st. (16, 16 sts)
Sizes 8 & 10: Continue to section labeled ALL SIZES
ALL SIZES
Row 1: Ch 1, turn, BLO hdc in each of the next (13, 14, 14, 15, 15, 16, 16) sts, hdc2tog in BLO of the next st and BOTH loops of the next st along edge of neck opening. (14, 15, 15, 16, 16, 17, 17 sts)
Row 2: Sl st in the next st along edge of neck opening, turn, BLO hdc in each st across. (14, 15, 15, 16, 16, 17, 17 sts)
Size 2: Rows 3 – 36: Rep Rows 1 – 2.
Sizes 4 & 6: Rows 3 – 38: Rep Rows 1 – 2.
Size 8: Rows 3 – 40: Rep Rows 1 – 2.
Size 10: Rows 3 – 40: Rep Rows 1 – 2.
Sizes 12 & 14/16: Rows 3 – 58: Rep Rows 1 – 2.
Do not fasten off. Continue on to Decrease Rows.
Decrease Rows
Row 1: Ch 1, turn, BLO hdc2tog, hdc in each of the next (11, 12, 12, 13, 13, 14, 14) sts, hdc2tog in BLO of the next st and BOTH loops of the next st along edge of neck opening. (13, 14, 14, 15, 15, 16, 16 sts)
Row 2: Sl st in the next st along edge of neck opening, turn, BLO hdc in each st across. (13, 14, 14, 15, 15, 16, 16 sts)
Row 3: Ch 1, turn, BLO hdc2tog, hdc in each of the next (10, 11, 11, 12, 12, 13, 13) sts, hdc2tog in BLO of the next st and BOTH loops of the next st along edge of neck opening. (12, 13, 13, 14, 14, 15, 15 sts)
Row 4: Sl st in the next st along edge of neck opening, turn, BLO hdc in each st across. (12, 13, 13, 14, 14, 15, 15 sts)
Size 2: Skip to section labeled Final Rows
Row 5: Ch 1, turn, BLO hdc2tog, hdc in each of the next (10, 10, 11, 11, 12, 12) sts, hdc2tog in BLO of the next st and BOTH loops of the next st along edge of neck opening. (12, 12, 13, 13, 14, 14 sts)
Row 6: Sl st in the next st along edge of neck opening, turn, BLO hdc in each st across. (12, 12, 13, 13, 14, 14 sts)
Sizes 4, 6, 12, & 14/16: Skip to section labeled Final Rows
Row 7: Ch 1, turn, BLO hdc2tog, hdc in each of the next (10, 10) sts, hdc2tog in BLO of the next st and BOTH loops of the next st along edge of neck opening. (12, 12 sts)
Row 8: Sl st in the next st along edge of neck opening, turn, BLO hdc in each st across. (12, 12 sts)
Sizes 8 & 10: Continue to section labeled Final Rows
Final Rows
Row 1: Ch 1, turn, BLO hdc in each of the next (11, 11, 11, 11, 11, 13, 13) sts, hdc2tog in the BLO of the next st and BOTH loops of the next st along edge of neck opening. (12, 12, 12, 12, 12, 14, 14 sts)
Row 2: Sl st in the next st along edge of neck opening, turn, BLO hdc in each st across. (12, 12, 12, 12, 12, 14, 14 sts)
Fasten off leaving an 8” tail. Continue on to Finishing Collar.
Finishing Collar
Turn sweater RS out. Line up the last row of the collar with the remaining loops of Row 1 of the collar. Whipstitch the last row of the Collar to the remaining loops of Row 1. Weave in ends.
Continue on to the Sleeves.
Sleeves
Sizes 2 (4)
Rnd 1 (RS): With a 5.00 mm crochet hook, join yarn at the bottom center of the armhole opening, ch 1, work 1 sc into the side of each sc, 2 sc into the side of each dc. Join with a sl st to the 1st st. Do not turn. (48, 54, sts)
Sizes 6 (8, 10, 12, 14/16)
Rnd 1 (RS): With a 5.00 mm crochet hook, join yarn at the bottom center of the armhole opening, ch 1, sc2tog, then work 1 sc into the side of each sc, 2 sc into the side of each dc and 1 sc in each sc. Join with a sl st to the 1st st. Do not turn. (54, 60, 60, 72, 78 sts)
All Sizes
Rnd 2 (RS): Switch to a 5.50 mm crochet hook, ch 1, sc in the first st, sc in each of the next 7 ( 13, 13, 19, 19, 11, 17) sts, (sc2tog, sc in each of the next 2 (2, 2, 2, 2, 4, 4) sts) rep from ( to ) around. Join. Do not turn. (38, 44, 44, 50, 50, 62, 68 sts)
Rnd 3 (RS): Alt-dc in the first st, dc in each sc around. Join. Turn.
Rnd 4 (WS): Ch 1, sc in the first st, ch 1, skip the next st, (sc in the next st, ch 1, skip the next st) rep from ( to ) around. Join. Turn.
Rnd 5: Alt-dc2tog over the first 2 sts, dc in each st around to the last 2 sts, dc2tog. Join. Turn. (36, 42, 42, 48, 48, 60, 66 sts)
Rnd 6: Ch 1, sc in the first st, ch 1, skip the next st, (sc in the next st, ch 1, skip the next st) rep from ( to ) around. Join. Turn.
Rnds 7 – 14: Repeat Rnds 5 – 6. (28, 34, 34, 40, 40, 52, 58 sts) Stitch count at the end of Rnd 14.
Rnds 15 – 18: Repeat Rnds 3 – 4.
Sizes 2 (4, 6, 8, 10)
Rnds 19 – 22: Repeat Rnds 5 – 6. (24, 30, 30, 36, 36 sts) Stitch count at the end of Rnd 22.
Repeat Rnds 3 – 4, ending with a Rnd 3 repeat, until sleeve measures (9-1/2″, 10-1/2″, 11-1/2″, 12-1/2″, 13-1/2″), or desired length, measured along the underarm. Do not turn at the end of the last round. Do not fasten off. Continue on to the Cuff.
Size 12
Rnds 19 – 30: Repeat Rnds 5 – 6. (40 sts) Stitch count at the end of Rnd 30.
Repeat Rnds 3 – 4, ending with a Rnd 3 repeat, until sleeve measures (15-1/2″), or desired length, measured along the underarm. Do not turn at the end of the last round. Do not fasten off. Continue on to the Cuff.
Size 14/16
Rnds 19 – 36: Repeat Rnds 5 – 6. (40 sts) Stitch count at the end of Rnd 36.
Repeat Rnds 3 – 4, ending with a Rnd 3 repeat, until sleeve measures (16-1/2″), or desired length, measured along the underarm. Do not turn at the end of the last round. Do not fasten off. Continue on to the Cuff.
Cuff – Sizes 2 (4, 6)
Gauge: : 8 sts = 2″; 12 rows = 2.5″
Row 1 (RS): With a 5.50 mm crochet hook, ch 9, sc in 2nd ch from hook, sc in next 6 chs, sc2tog in next ch and same st as ch 9. (8 sts)
Row 2: Sl st in next st along edge of sleeve, turn, BLO sl st across. (8 sts)
Row 3: Ch 1, turn, BLO, sc in next 7 sts, sc2tog in next st and next st along edge of sleeve. (8 sts)
Rows 4 – 23 (29, 29): Repeat Rows 2 & 3. (8 sts)
Row 24 (30, 30): Sl st in next st along edge of sleeve, turn, line up last row with Row 1, holding working yarn on the inside of the cuff sl st FLO of 1st row to BLO of last row across. (8 sts)
Fasten off. Weave in ends. Repeat Sleeve and Cuff for opposite sleeve.
Cuff – Sizes 8 (10, 12, 14/16)
Gauge: 10 sts = 2.5″; 12 rows = 2.5″
Row 1 (RS): With a 5.50 mm crochet hook, ch 11, sc in 2nd ch from hook, sc in next 8 chs, sc2tog in next ch and same st as ch 11. (10 sts)
Row 2: Sl st in next st along edge of sleeve, turn, BLO sl st across. (10 sts)
Row 3: Ch 1, turn, BLO, sc in next 9 sts, sc2tog in next st and next st along edge of sleeve. (10 sts)
Rows 4 – 35 (35, 39, 39): Repeat Rows 2 & 3. (10 sts)
Row 36 (36, 40, 40): Sl st in next st along edge of sleeve, turn, line up last row with Row 1, holding working yarn on the inside of the cuff sl st FLO of 1st row to BLO of last row across. (10 sts)
Fasten off. Weave in ends. Repeat Sleeve and Cuff for opposite sleeve.
Blocking Your Crochet Wearables
- Blocking isn’t mandatory, but it does add a nice finished look to crochet wearables!
- Check out my Blocking Tutorial & Learn 3 Different Ways to Block!

MORE FREE CROCHET PATTERNS FROM A CROCHETED SIMPLICITY
If you enjoyed this crochet cardigan pattern, you may enjoy these other projects as well. And if you just want to browse, you can find all of our free crochet patterns HERE.


JOIN US IN THE FACEBOOK COMMUNITY GROUP!
I hope you’ve enjoyed this kids shawl collar crochet pullover sweater.
Come share your finished projects with us in the A Crocheted Simplicity Crochet Community Group on Facebook. Join us for fun community events such as crochet alongs, join in on crochet conversations, ask questions, get advice, and share your love for crochet!

Okay. I’m a little confused. I just started the body and it says to turn the work for each round. Is there a reason that we turn the work?
Hi Charli,
Yes, there are a few reasons. One of them being to keep the stitch pattern lined up as you work different sections of the sweater.
Jennifer
This sweater is so adorable. I have a grandson due to arrive in 2024. I wonder if his big sister would like to have matching sweaters when he is old enough….lol
After having only girls, I now have lots of young men to crochet for, and this pattern will be nice for the ones living on the east coast of the USA!
I love this pattern! I can’t wait to make one for each of my grandsons. I also want to be included in the 2024 giveaway.
Thank you, Linda
This is my next project for my boy! He’s going to love it!
I really love this pattern and it is certainly on my todo list for my grandson Albert who is 7
I love seeing patterns for men and boys!!
My grandsons will look so handsome in this sweater. Thanks for a lovely pattern that is masculine.
This sweater is adorable and I am definitely going to make one for my 2 youngest boys!!!! They will love it!!!!
This sweater is very nice. I have twin grandsons that would look good in one of these! (I am commenting for the 2024 giveaway)
I love this patter!My grandson will look great in this!
I made the Brentwood Men’s Pullover for my son a few years ago. I loved making it even though I had to really work on the front overlap – I’m a lefty and there were no lefty tips. Tomorrow (Jan 1, 2024) I’m going to make one for my grandson. I know it will be a pleasure. I’m coordinating the yarn & color with a different sweater I just finished for his father. They will be a father & son color match.
I have 3 great grand sons. This will look good on each of them. I thinking school color.
I really like this pattern. It’s so hard to find nice patterns for boys. This one is excellent!
love this pattern made it for my grandson
I mainly do children’s garments, and I really like the looks of the Brentwood Pullover. It would look great for boys or girls, and I think it would be fairly easy.
I’m looking forward to making these. I have 5 Grandsons and they sure need some Clothes. Thank you!!!! would love to win the year full of PSFs
This is a project I can see my 14-year old wear! Lovely design!
With two young grandchildren, this is the perfect sweater for them!