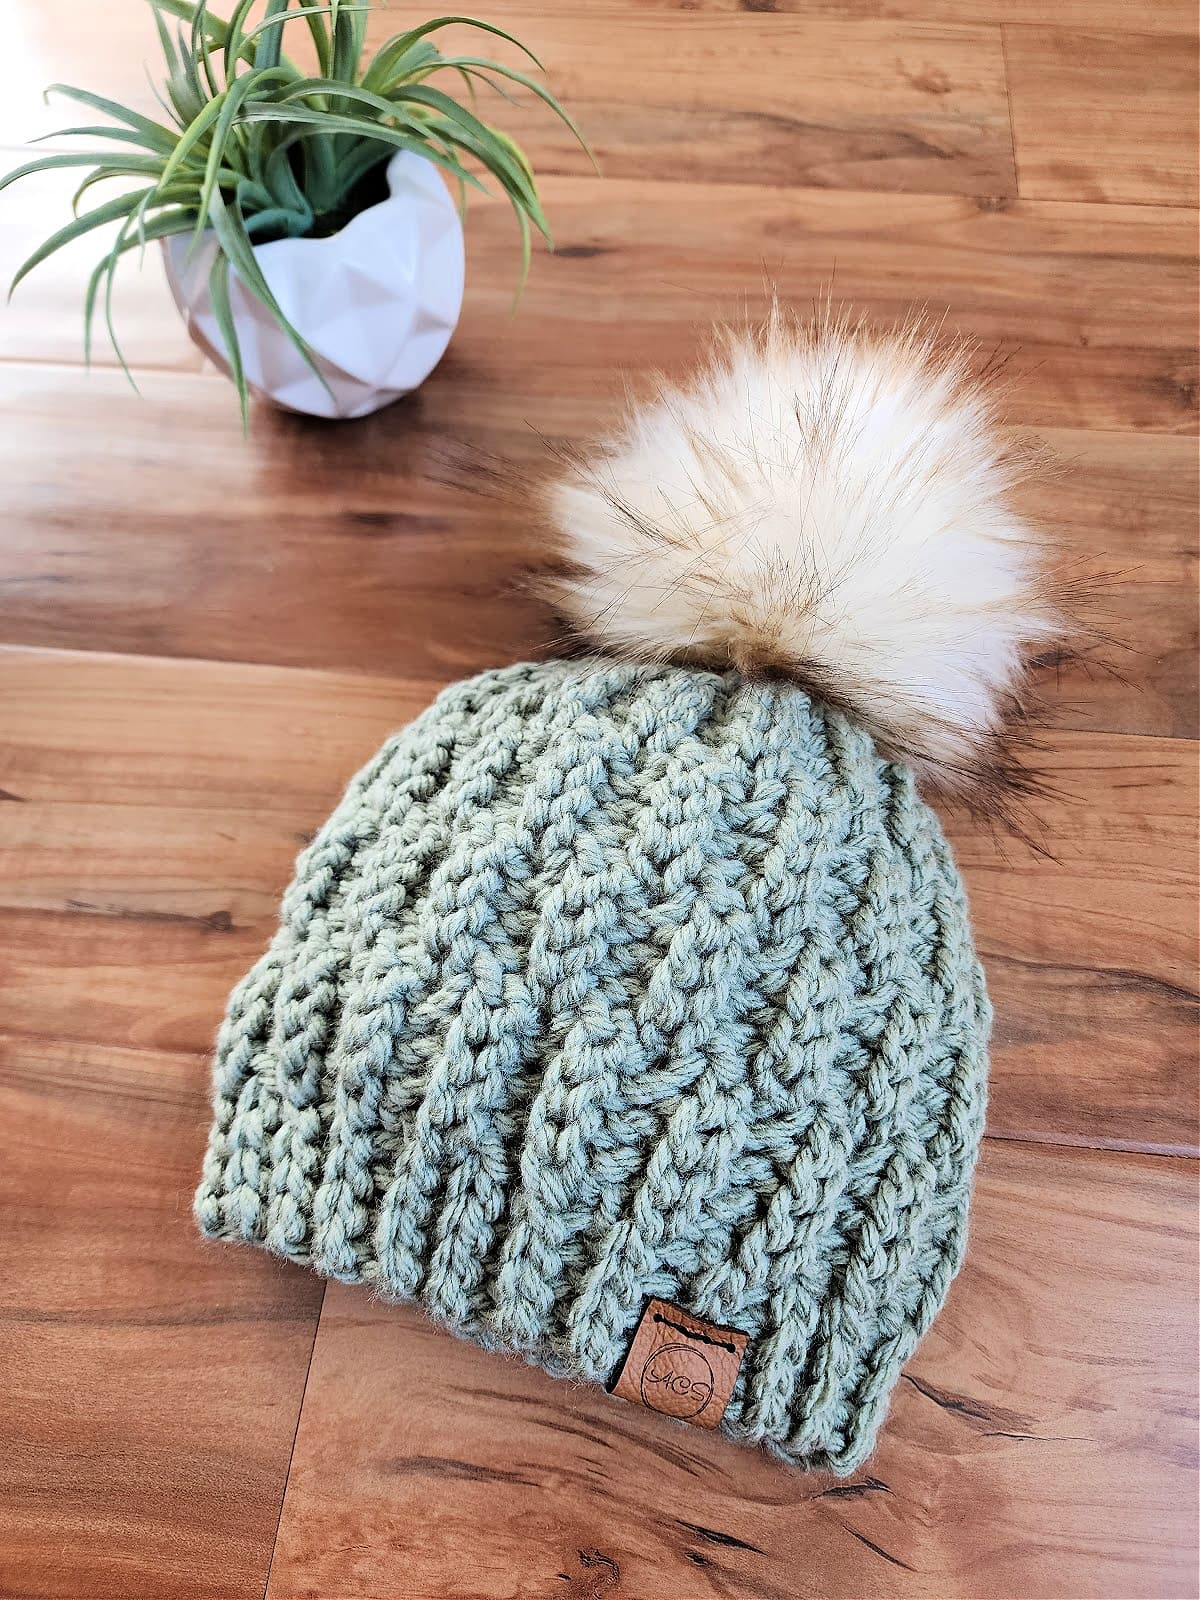
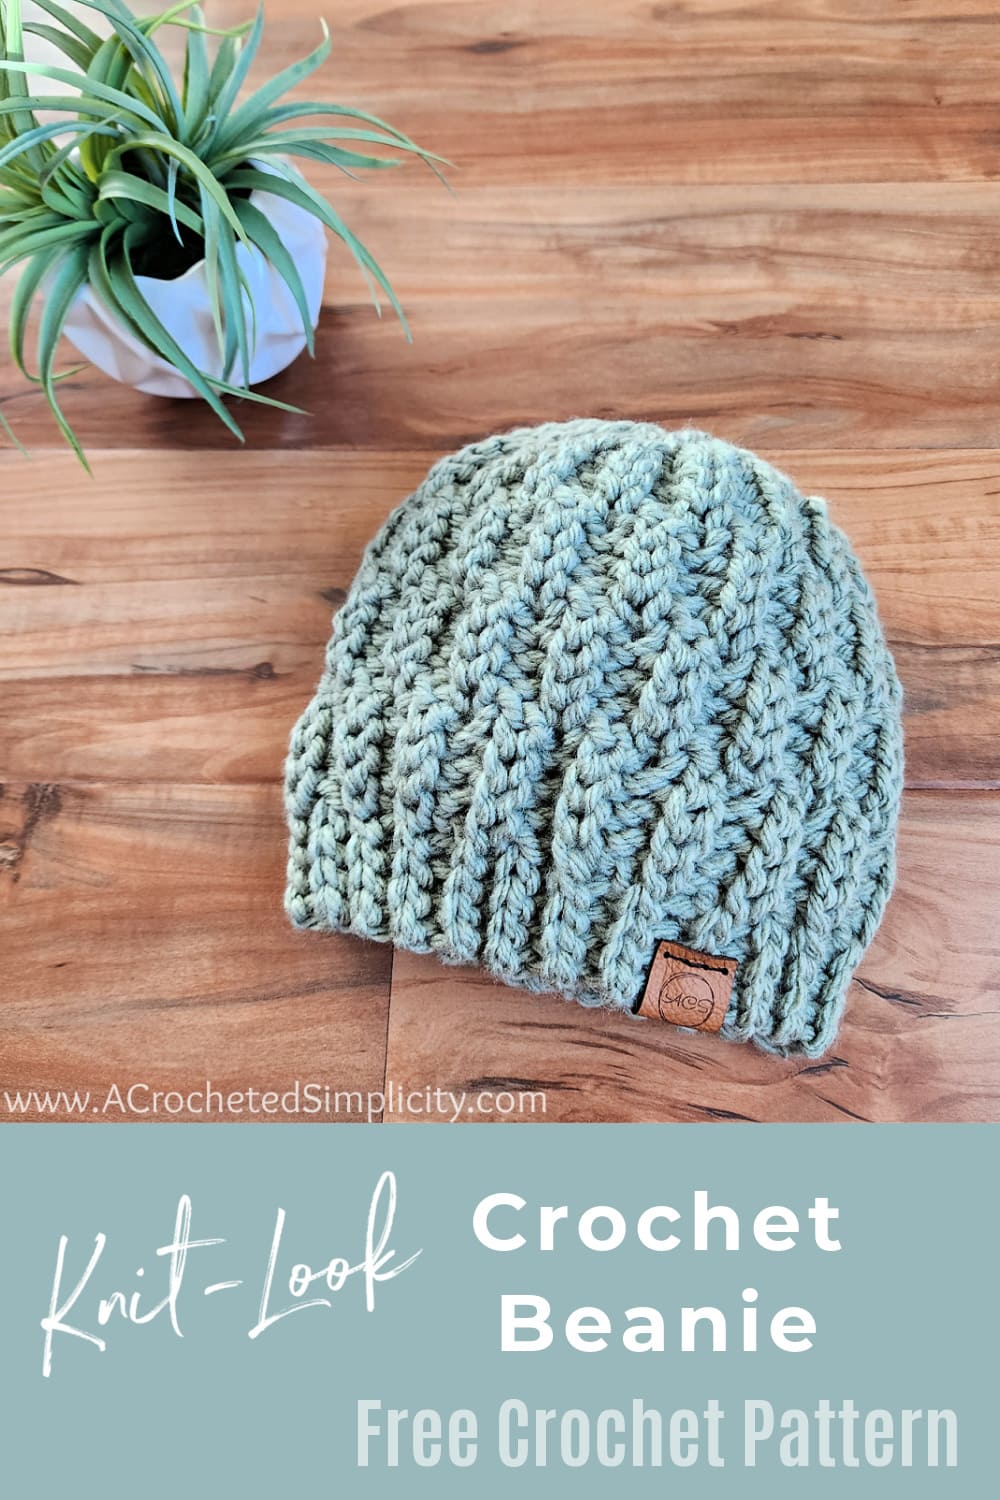
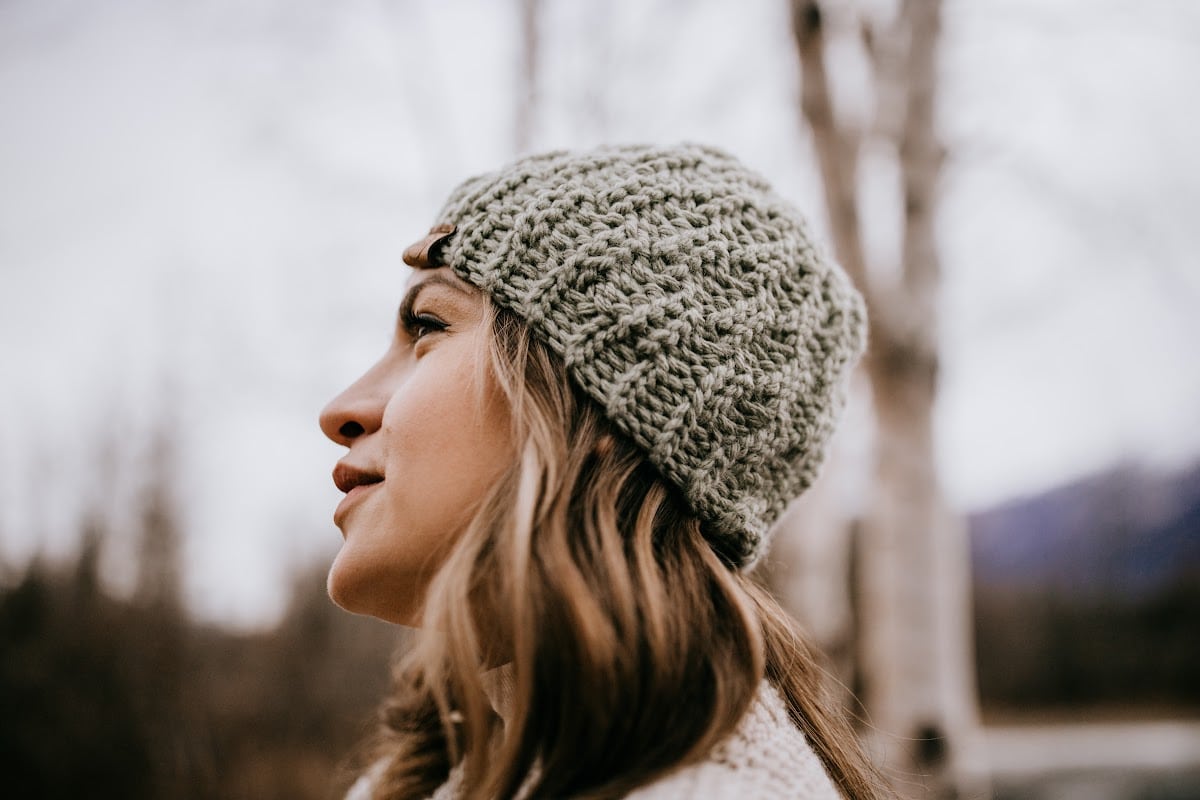
Chunky Crochet Beanie Pattern – Frosty Air

Learn how to crochet the Frosty Air Knit Look Beanie with this chunky crochet beanie pattern.
Made with just one skein of bulky-weight yarn, this knit look beanie works up in under and hour, making it a perfect last minute quick gift.
You’ll find the beanie crochet pattern free below, or you can find an ad-free print friendly version on Ravelry, or on Etsy (aff).
For Customized Leather, Cork, and Wood Labels, I highly recommend All This Wood on Etsy! I used a 1″ x 2″ leather label for this crocheted hat.
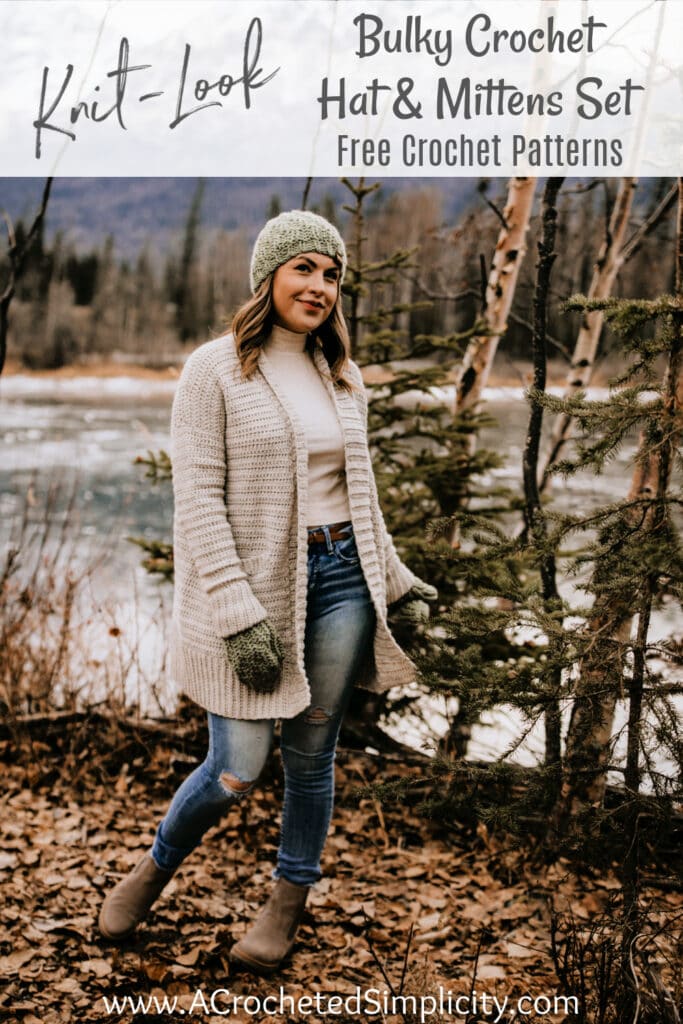
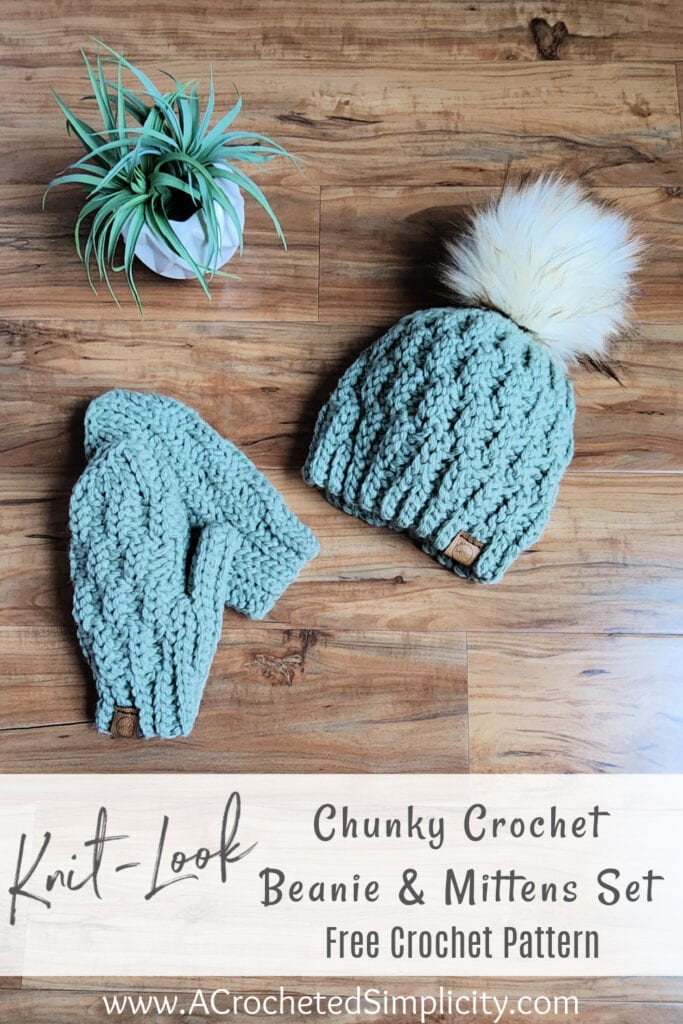
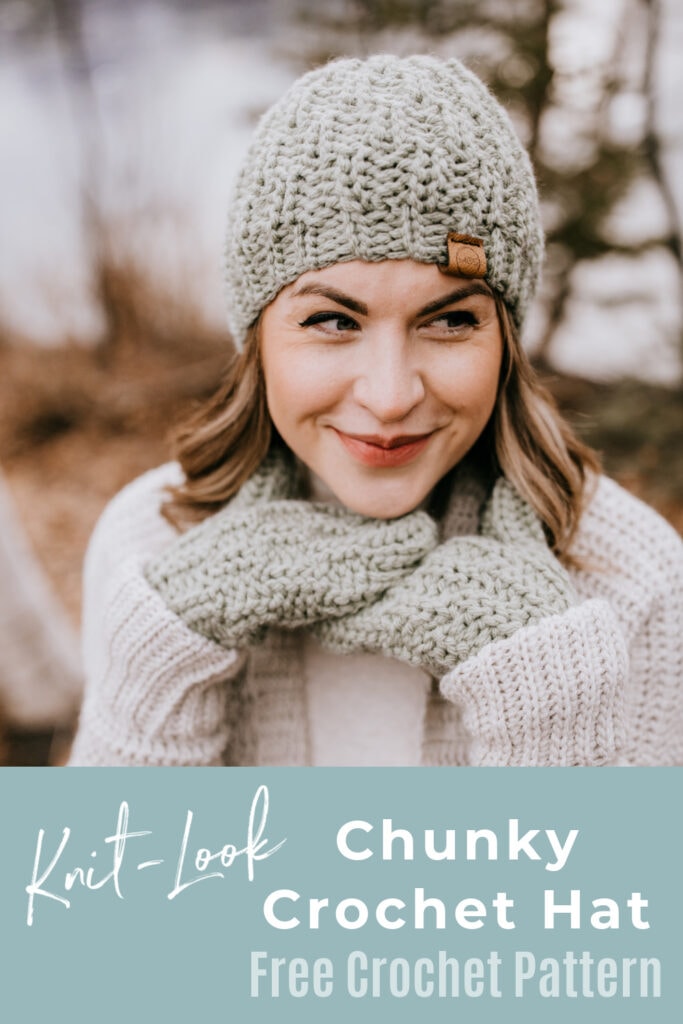
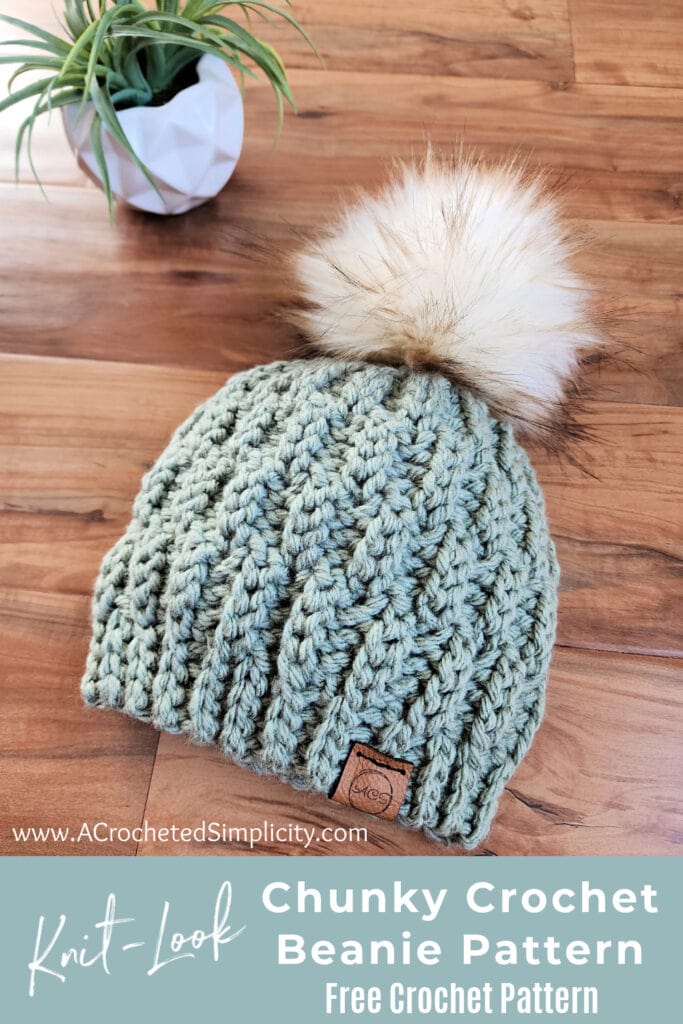
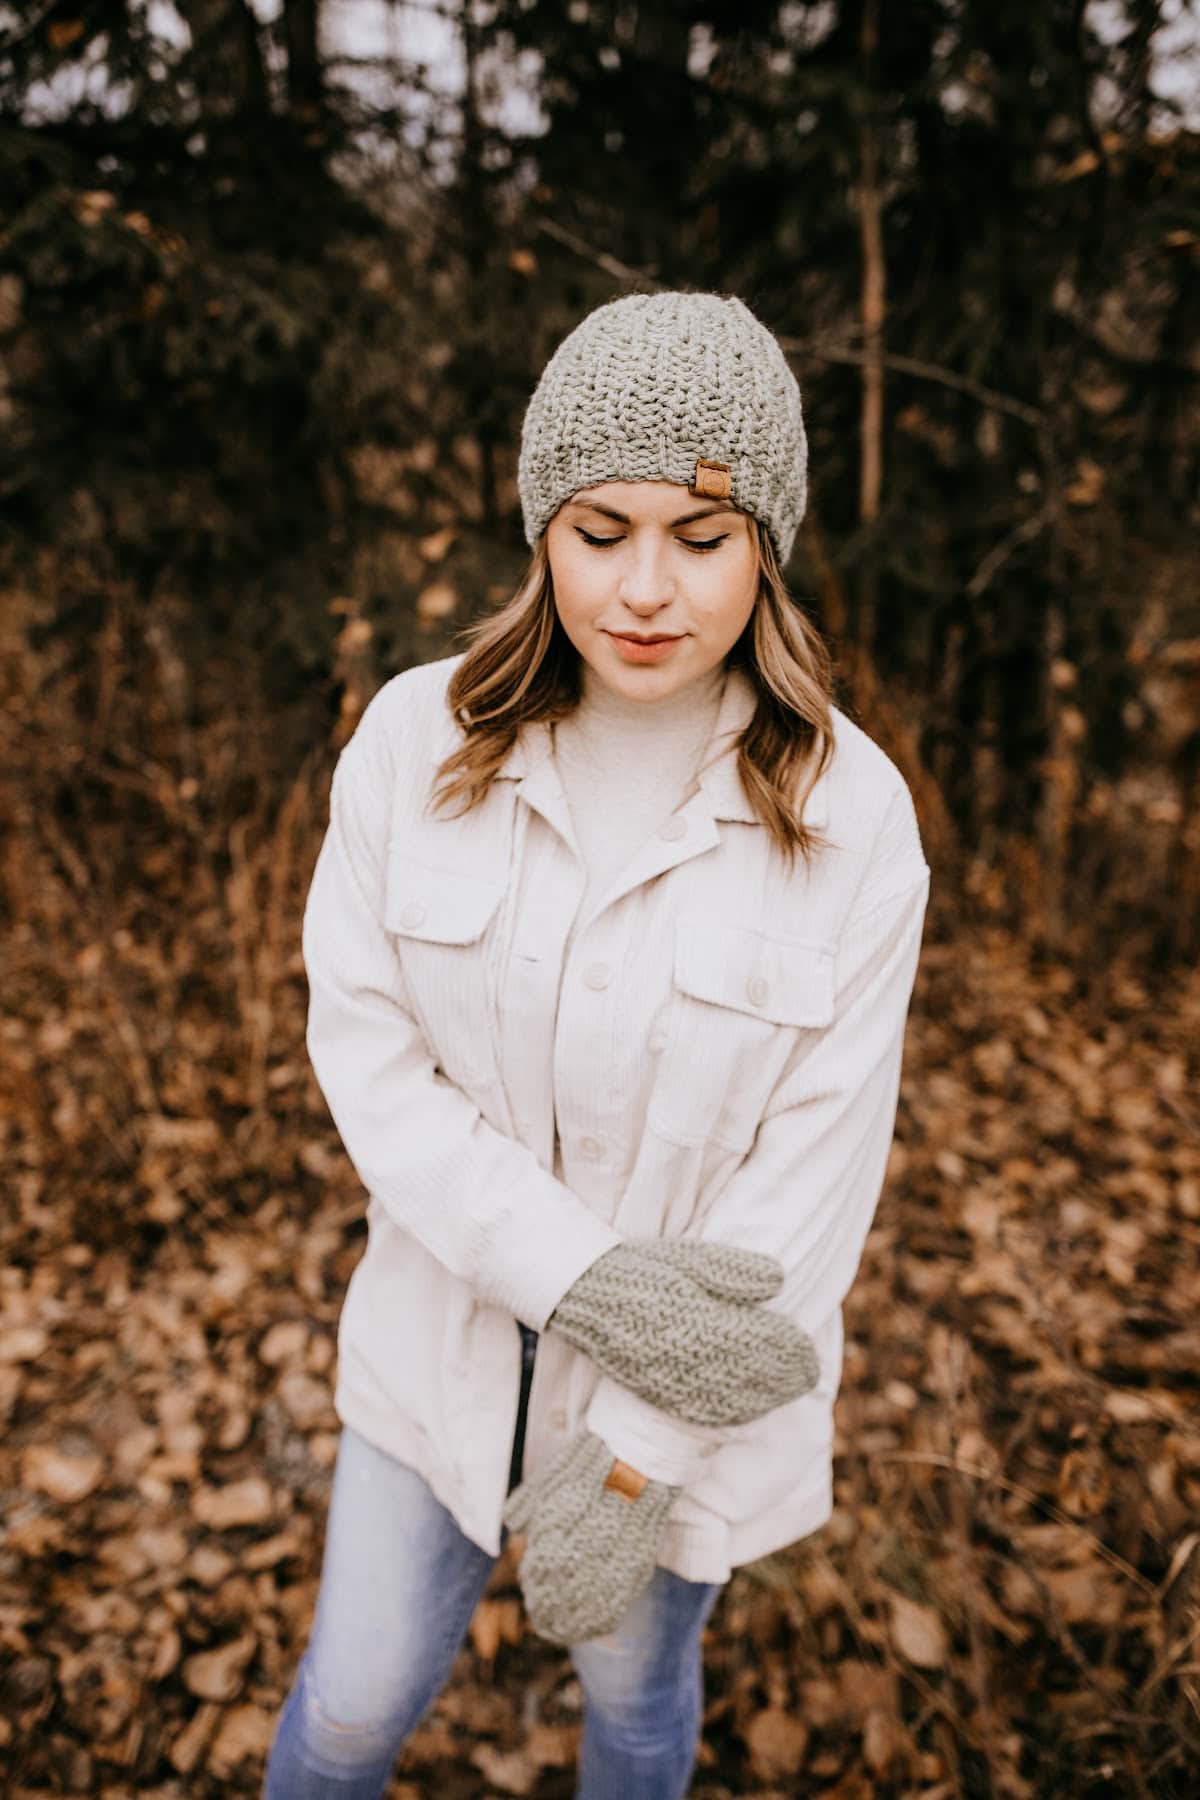
The Frosty Air beanie crochet pattern is a great unisex style beanie. Take off the faux fur pom, add a leather tag, and it’s perfect for mens crochet beanies.
Projects that use one ball of yarn are among my favorite, for several reasons. I like that they help to use up random balls of leftover yarn from larger projects. They also make great last minute, quick crochet gifts, and they are the perfect size crochet projects to take with you on long car rides.
The Frosty Air crochet beanie is a great one skein chunky yarn crochet pattern. It’s compact and easy to travel with, uses only one ball of bulky yarn, and makes a great gift for a family member, friend, or co-worker!
Knit-Look Crochet
I LOVE knit-look crochet and all of the different stitches and techniques we can crochet to create it. I especially love to combine different slip stitches and crochet short rows to make stretchy, knit look crochet beanies with nicely fitted, non-bulky crowns.
I’ve used several combinations of crochet stitches and short rows to create many different knit-look crochet hats. In addition to slip stitches and short rows, they all have one more thing in common, the stitches are mainly worked into one loop only, either the back loop only (BLO), or front loop only (FLO).
For the Frosty Air Beanie, I also used crochet short rows and slip stitches worked into the back and front loops, but then I added a little twist. I took knit-look crochet stitches one step further and used inverse slip stitches!
Don’t fret! Inverse stitches sound much more complicated than they are. Inverse stitches are worked the same as regular stitches, except you insert your crochet hook into a stitch from back to front, instead of front to back.
First, I’ll show you how to crochet inverse slip stitches. Then, I’ll teach you how to work something I like to call a “smoothing stitch”!
Inverse Crochet Slip Stitches
There are two crochet inverse slip stitches, the Inverse Front Loop Only Slip Stitch (iF sl st) and the Inverse Back Loop Only Slip Stitch (iB sl st). The only difference between these two stitches is that one is worked in the front loop only and the other is worked in the back loop only, but they each produce a distinctly different looking stitch.
I have a video tutorial for the iB sl st that will help you master these stitches. You work the iF sl st the same way, except it’s worked into the front loop only.
Let’s learn each of these two knit-look stitches before we begin crocheting a hat.
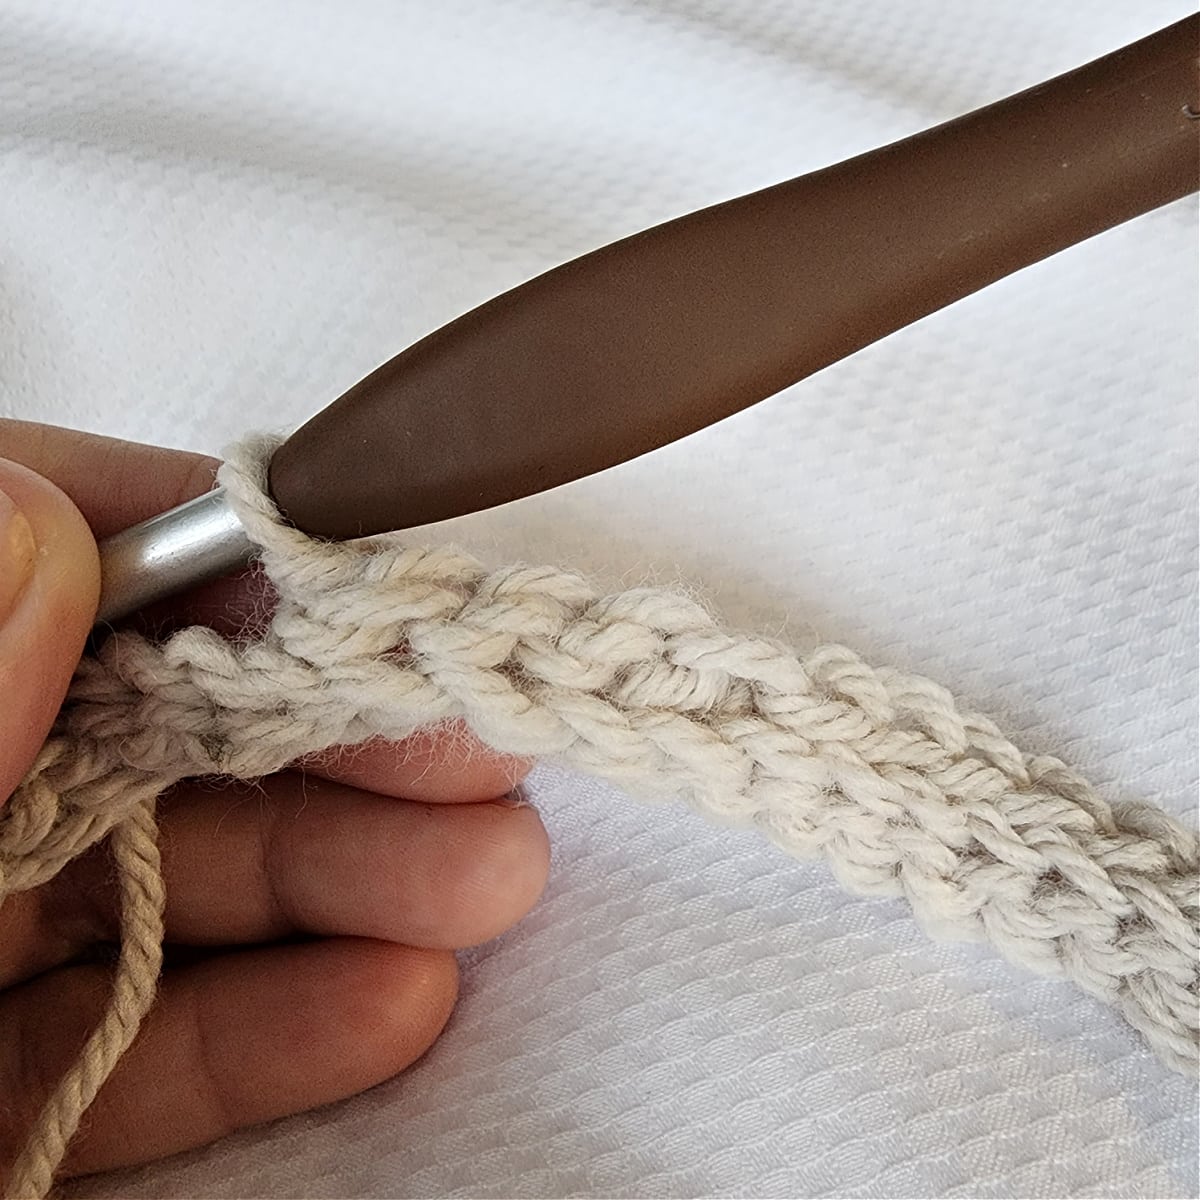
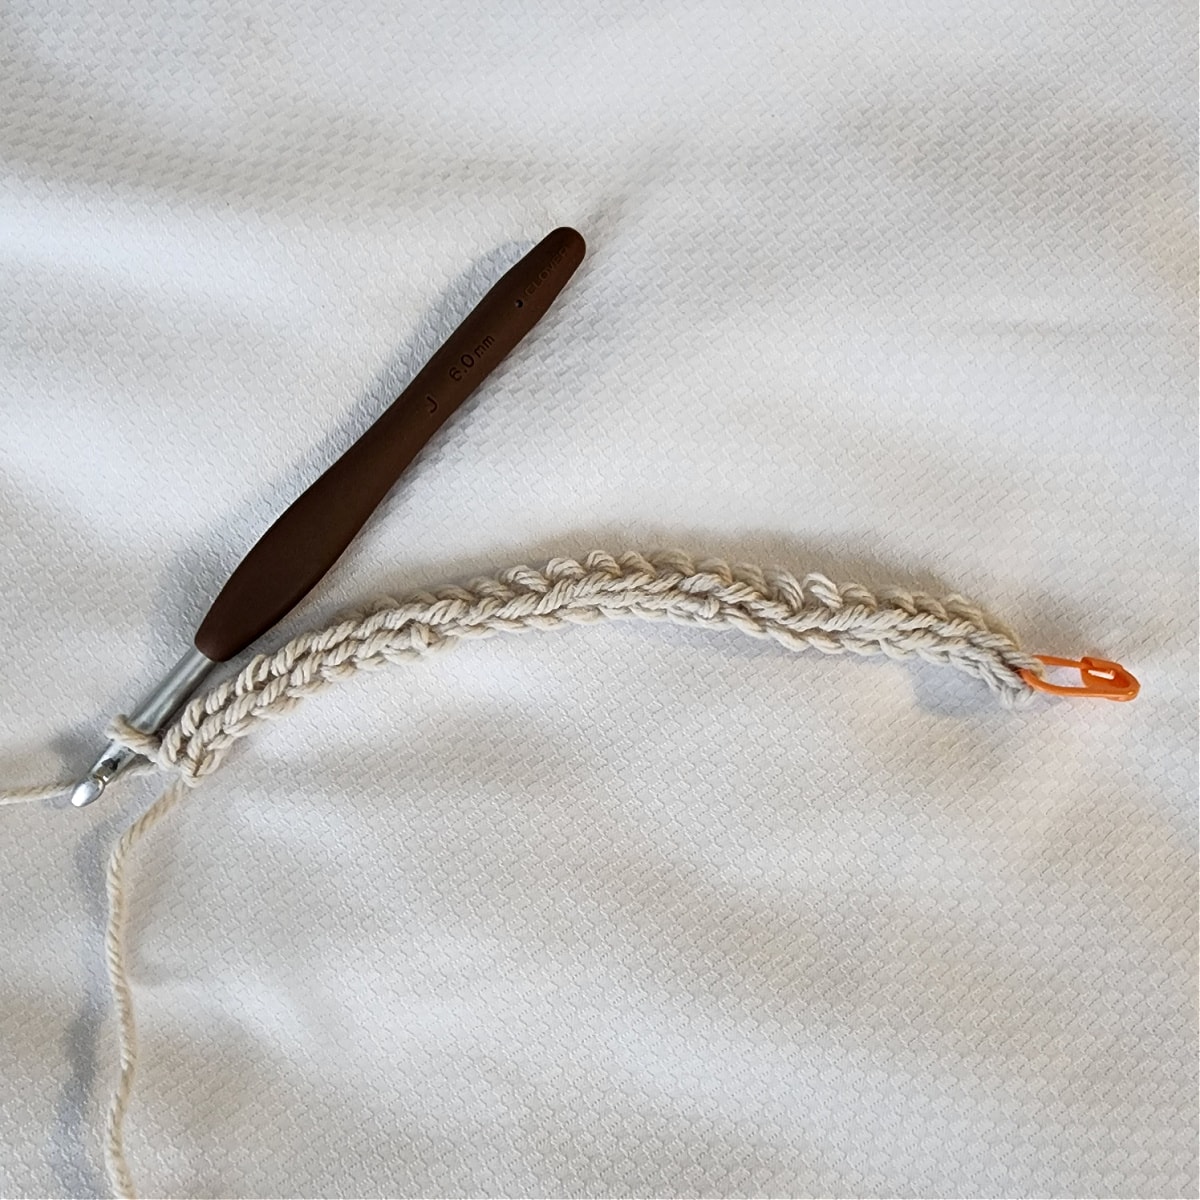
How to Crochet an Inverse Front Loop Only Slip Stitch (iF sl st)
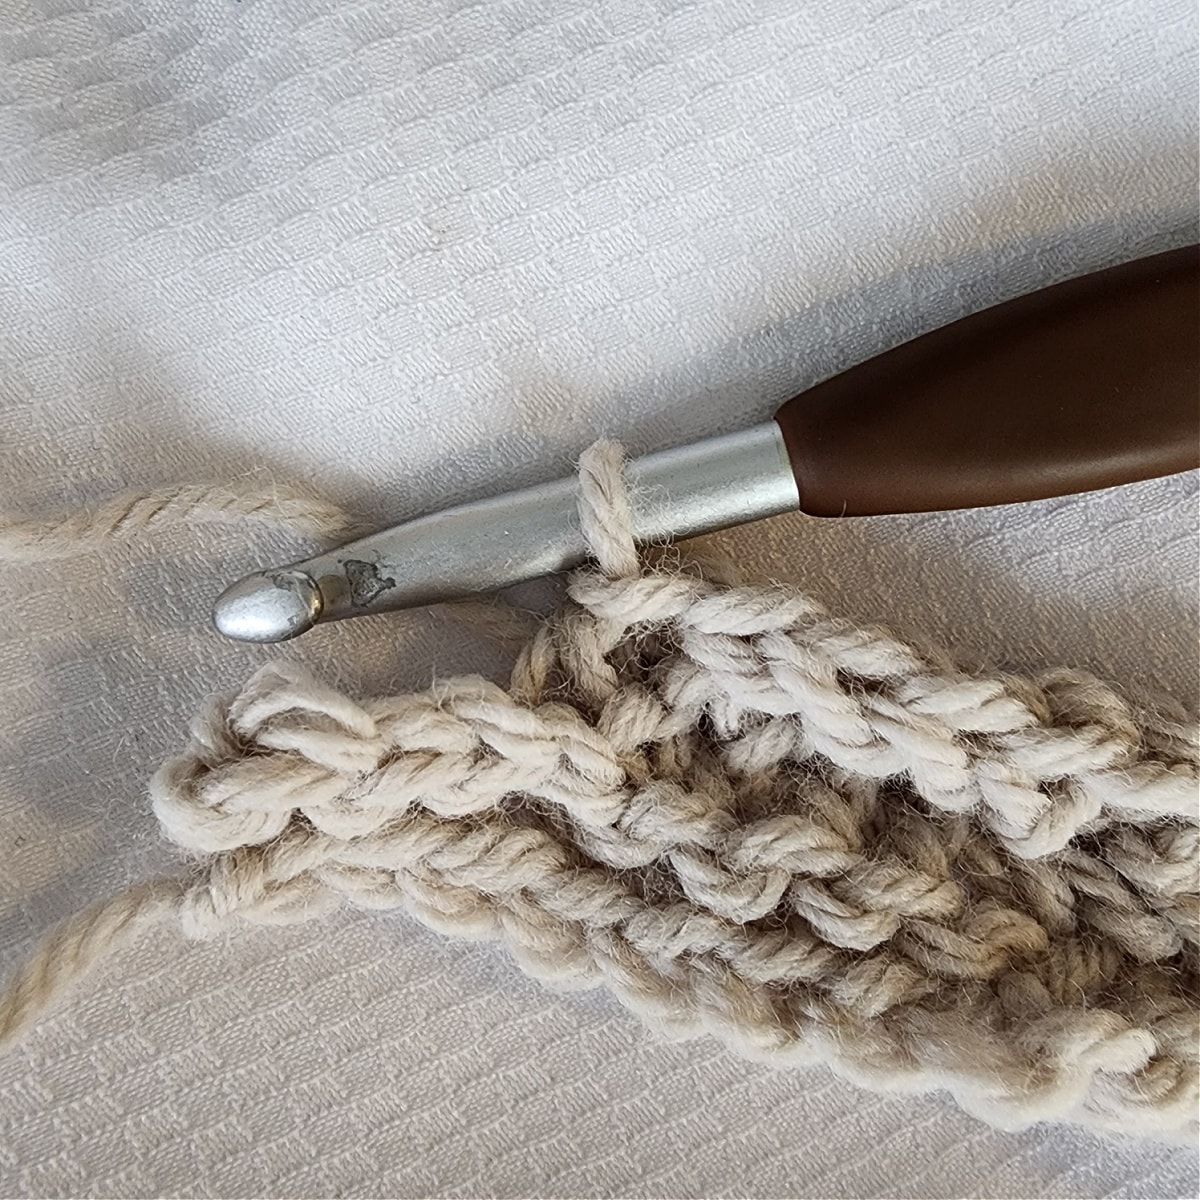
Inverse Front Loop Only Slip Stitch (iF sl st): With the working yarn in front of your work, insert your hook into the front loop of the next stitch from back to front, yo, pull up a loop and pull that loop through the loop on your hook.
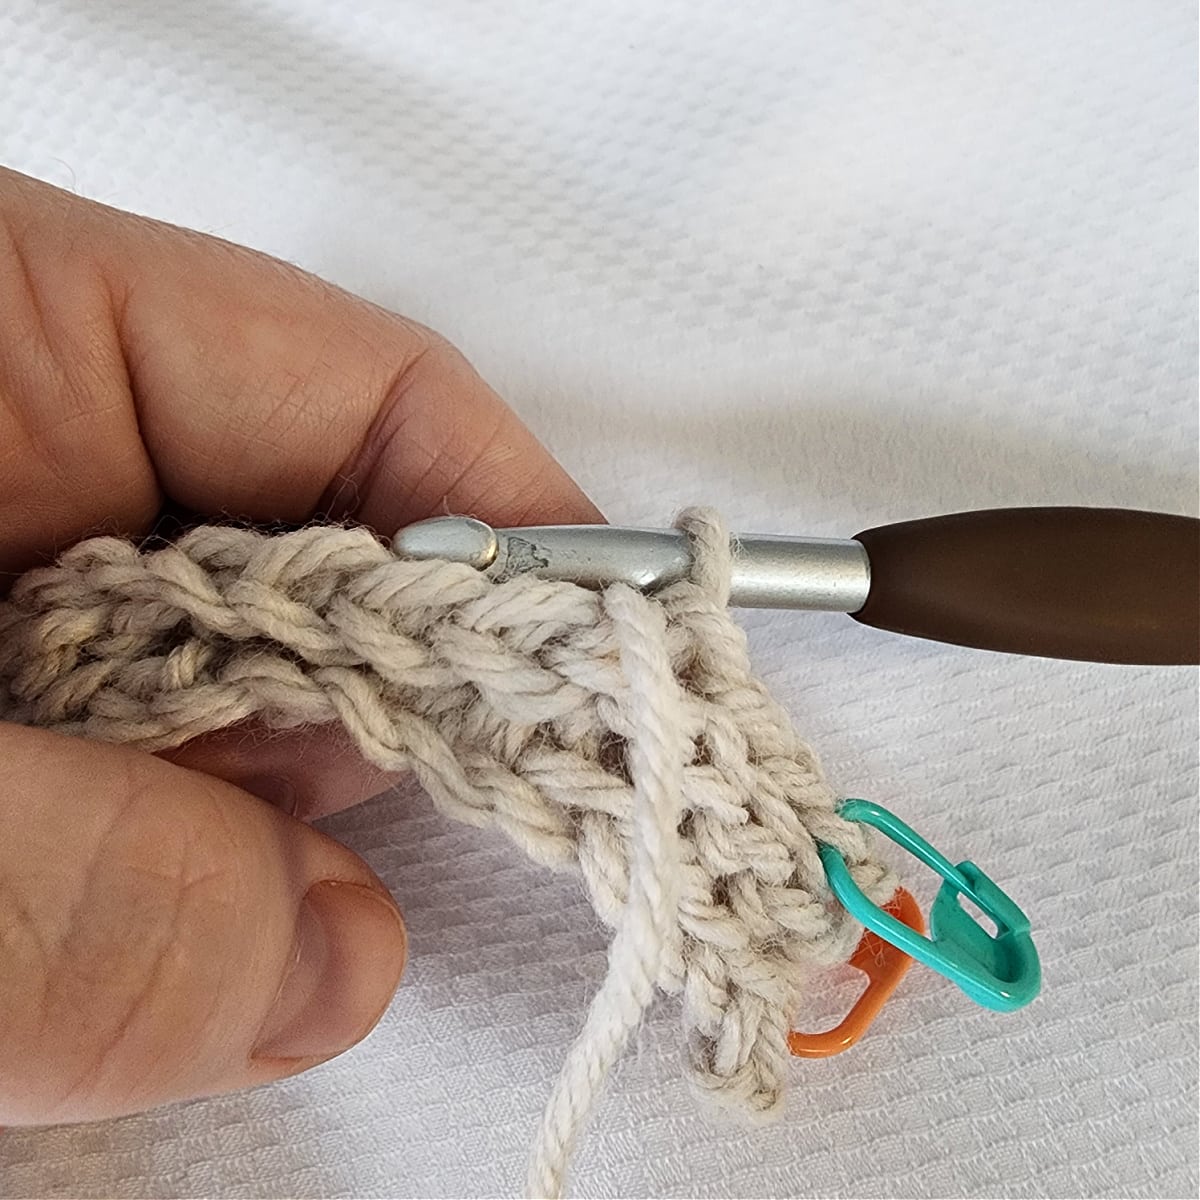
Place the working yarn in front of your work.
Insert your hook into the front loop of the next stitch, from back to front. Yarn over.
Pull up a loop and pull that loop through the loop on your hook.
The photo above shows 4 iF sl sts complete.
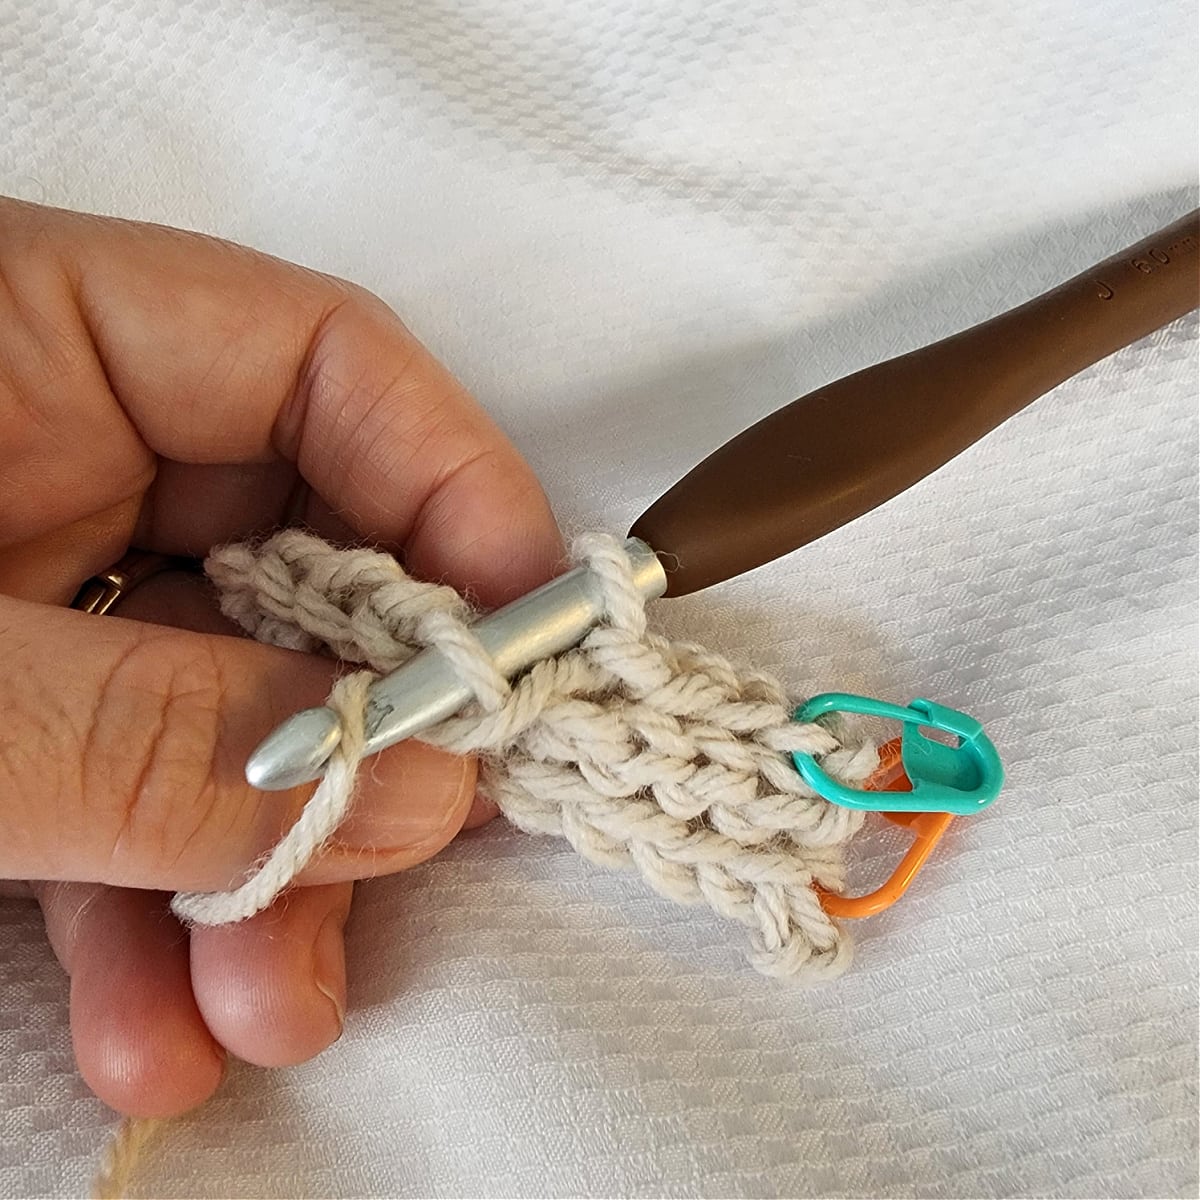
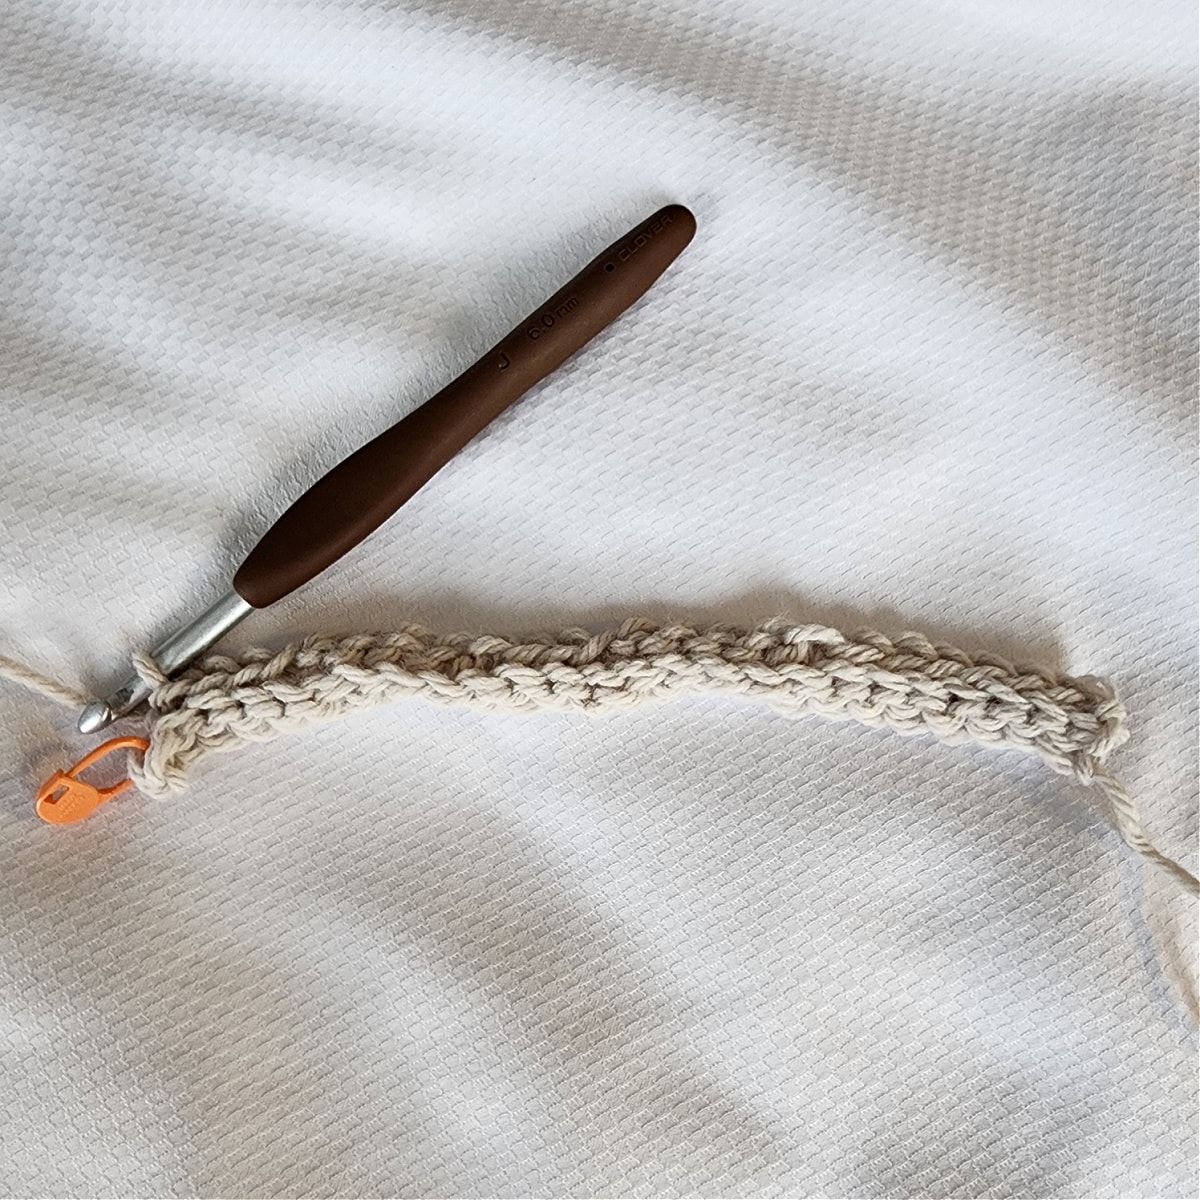
How to Crochet an Inverse Back Loop Only Slip Stitch (iB sl st)
Inverse Back Loop Only Slip Stitch (iB sl st): With the working yarn in front of your work, insert your hook into the back loop of the next stitch from back to front, yo, pull up a loop and pull that loop through the loop on your hook.
There are step-by-step photos below, and I also have a video tutorial for this stitch.
Place the working yarn in front of your work.

Pull up a loop and pull that loop through the loop on your hook.
Related: Learn to crochet Reversible Knit-Look Ribbing and the Knit-Look Garter Stitch.
How to Work a Smoothing Stitch
How do you seamlessly transition from a short row to a regular row? With this one simple trick, we will learn how to work a “smoothing stitch”.
A smoothing stitch seamlessly transitions from short rows to regular rows without leaving unsightly bumps between the rows.
This isn’t an “extra” stitch worked in a row. The smoothing stitch counts as the first back loop only slip stitch (BLO sl st) that you will work whenever transitioning from a short row to a regular row.
In the photo above, the yarn needle is showing the Ch-1 worked at the beginning of the previous row.
To work a smoothing stitch, begin by inserting your crochet hook into the loop of the ch-1 that was worked at the beginning of the previous row.
Next, insert your hook into the BLO of the next skipped stitch from 2 rows prior and yarn over.
Then, pull up a loop, pull that loop through all 3 loops on your hook to complete what I call a “smoothing stitch”.
How to Crochet a Beanie
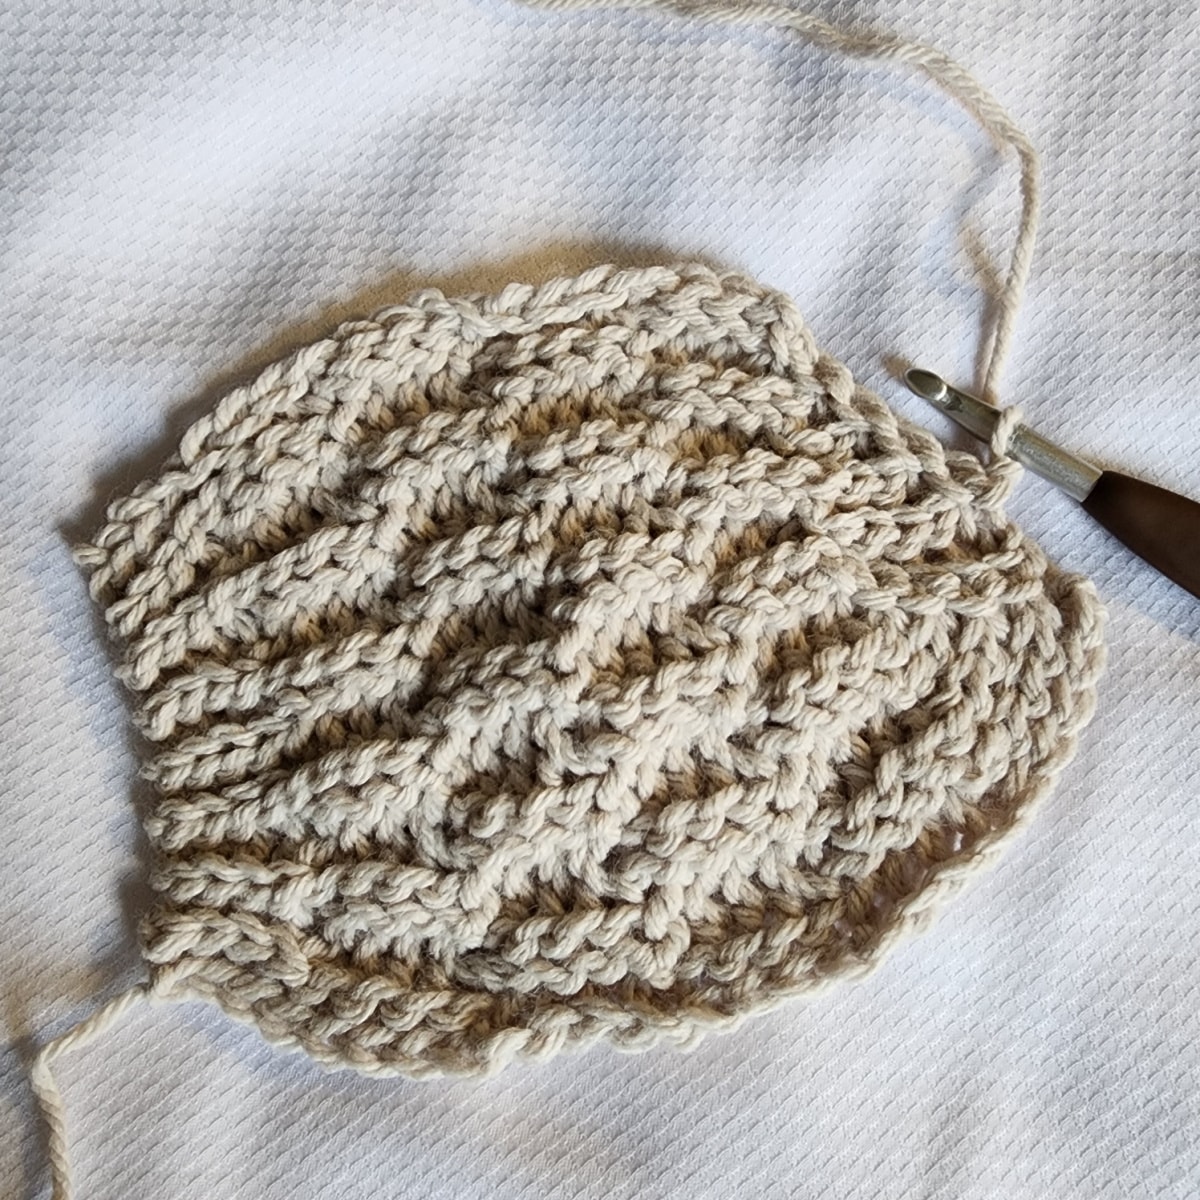
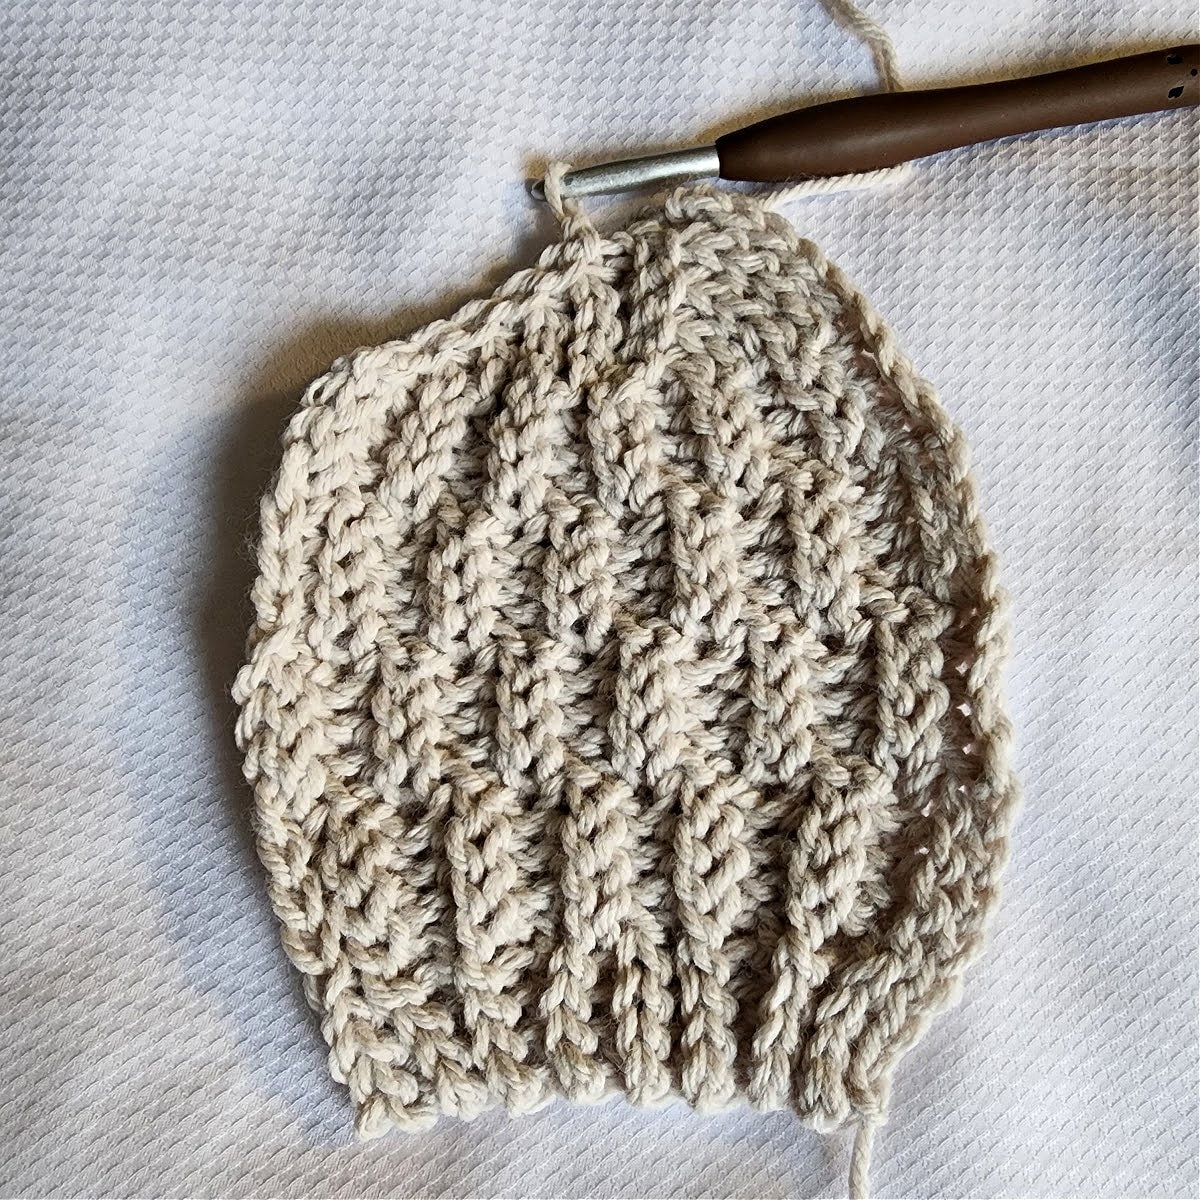
This knit look beanie isn’t constructed like a basic crochet hat that’s worked top down or bottom up. The Frosty Air Chunky Beanie is crocheted flat, side to side, then seamed.
When you crochet a beanie with short rows, you’ll crochet the hat back and forth in rows, usually from the crown to the band of the hat. As you crochet, each row will get shorter and shorter until you’ve created a small wedge. You’ll then work a full length row, working smoothing stitches into previously unworked stitches, to smooth the short rows and complete a pie shaped section.
You’ll continue to crochet short row sections until your work is tall enough and then whipstitch a nearly seamless seam. Lastly, you’ll weave yarn in and out of the rows of the crown, pull yarn tight to cinch the gap closed, and weave in ends.
Chunky Crochet Yarn
For this chunky yarn crochet hat pattern, I chose to use Lion Brand Yarns Hue & Me. Hue & Me is a bulky yarn, acrylic and wool blend, that is available in 30 gorgeous colorways! In this carefully curated palette, each color pairs well with the others, so you’ll never have to wonder “will this match?”.
Each ball of Hue & Me yarn comes with 137 yards making it great for a one ball of yarn chunky hat pattern!
If you’ve been looking for one skein crochet projects with bulky yarn, this chunky beanie checks the box!
Did you know? Chunky yarn and bulky yarn are one in the same and the terms are used interchangeably.
Yarn Substitutes
If you don’t have access to Lion Brand Hue & Me, but would love to make this chunky crochet beanie, no worries! I’ve got a couple great options for you to check out.
When I haven’t used a yarn before and need to find a yarn substitution, the first thing I do is to check YarnSub.com to look for a comparable yarn.
If you’re unable to find a suitable bulky yarn, the next best thing is to hold 2 strands of lighter worsted yarn together (by lighter worsted I mean a 4 weight yarn, not DK 3 weight yarn). For example, I’ve held together 2 strands of Lion Brand Wool Ease or Pound of Love when I’ve needed a chunky yarn.
I highly recommend that when holding 2 strands together, it’s best to do a crochet swatch to make sure that the 2 yarns you’re holding together will work for this crochet hat pattern.
Frosty Air Crochet Beanie – Chunky Crochet Hat Free Pattern
The knit look beanie pattern is free below, but if you love to work offline, I’ve got a couple other great options for you.
Purchase the ad-free, printable PDF, including all photo tutorials, on Ravelry, or on Etsy (aff).
Purchase the chunky crochet beanie and mittens kit! (aff): Lion Brand has a full kit of the Frosty Air Crochet Beanie & Mittens Set, available on their website. The crochet beanie and mittens kit includes your choice of colors and a digital copy of the crochet patterns for both the Frosty Air Beanie & Mittens.
This post contains affiliate links.
Materials
- Yarn: Bulky Weight / 5 / Yarn, Lion Brand Yarns Hue & Me was used for the sample in the photos, (125 g / 4.4 oz / 137 yards / 125 m / 80% acrylic / 20% wool).
- Artichoke: 1 ball (137 yards)
- Crochet Hook: L/8.00mm; or size needed to obtain gauge (My favorite crochet hooks are the Clover Amour Crochet Hooks, I’ve never had an ache in my hands since switching).
- Locking Stitch Markers
- Scissors
- Yarn Needle
- Faux Fur Pom on Amazon (optional)
- Faux Fur Pom on Etsy (optional)
Abbreviations (US Terms)
- ch(s): chain(s)
- sl st(s): slip stitch(es)
- st(s): stitch(es)
- yo: yarn over
- FLO sl st: front loop only slip stitch
- BLO sl st: front loop only slip stitch
- iF sl st: inverse front loop only slip stitch
- iB sl st: inverse back loop only slip stitch
- SM: stitch marker
- Rep: repeat
- RS: Right Side
- WS: Wrong Side
- BHO: back hump only
- BLO: back loop only
- FLO: front loop only
Experience Level
- Easy / Intermediate
Gauge
- In BLO sl st: 8 sts = 3″ W; 12 rows = 3.75″ H
Sizes
- Adult Small / Medium: Fits Head Sizes 21″ – 22.5″
- Adult Large: Fits Head Sizes 23″ – 24.5″
Special Stitches
- Front Loop Only Slip Stitch (FLO sl st): With the working yarn behind your work, insert your hook from front to back into the front loop only of the next stitch, yo, pull up a loop and pull that loop through the loop on your hook.
- Back Loop Only Slip Stitch (BLO sl st): With the working yarn behind your work, insert your hook from front to back into the back loop only of the next stitch, yo, pull up a loop and pull that loop through the loop on your hook.
- Inverse Front Loop Only Slip Stitch (iF sl st): With the working yarn in front of your work, insert your hook into the front loop of the next stitch from back to front, yo, pull up a loop and pull that loop through the loop on your hook. See photo tutorial above.
- Inverse Back Loop Only Slip Stitch (iB sl st): With the working yarn in front of your work, insert your hook into the back loop of the next stitch from back to front, yo, pull up a loop and pull that loop through the loop on your hook. See photo tutorial above.
Pattern Notes
- Turning chains are not counted as stitches, unless specified otherwise.
- The first stitch of each row is worked into the same stitch as the turning chain, unless noted otherwise.
- Yarn Notes: Lion Brand Yarns Hue & Me was used for the samples. Another comparable bulky weight / 5 yarn may be used as long as gauge is met.
- Lion Brand Yarns Hue & Me, bulky weight / 5 yarn, 80% Acrylic / 20% Wool (137 yds / 125 m / 125 g / 4.4 oz)
- Yardage
- Artichoke: #617-171X – 1 Ball (137 yards)
- Changes for Sizes as Follows: Adult Small/Medium ( Adult Large)
- Changes for Stitch Counts as Follows: (Adult Small/Medium, Adult Large)
- Beanie Crochet Construction: This knit-look crochet beanie is worked flat in crochet short rows. After completing all short row sections, it is seamed. Lastly, the gap in the crown is closed using a yarn needle and piece of yarn.
Chunky Crochet Beanie Pattern
Changes for sizes written as follows: Adult Small / Medium (Adult Large)
Finished Size (seamed & laid flat): 9″ W x 8.75″ L (9.5″ W x 9.5″ L) Note that finished length is less than the length of Row 1 due to the nature of the short rows.
Note: In Row 1, you’ll be working some stitches into the back hump (BHO) of the foundation chains and other stitches into the front loop (FLO) of the foundation chains. The front loop is the loop closest to you when the back hump of the chain is facing up.
Row 1 (RS): With yarn & an 8.00mm crochet hook (or size needed to obtain gauge), ch 26 (28), working into the back hump of the foundation ch, sl st in the 2nd ch from your hook, BHO sl st in each of the next 4 (6) chs, (FLO sl st in each of the next 4 chs, BHO sl st in each of the next 4 chs) work from ( to ) 2 times, BHO sl st in each of the last 4 chs. Turn. (25, 27 sts)
Length of Row 1: 9.5″ (10.25″).
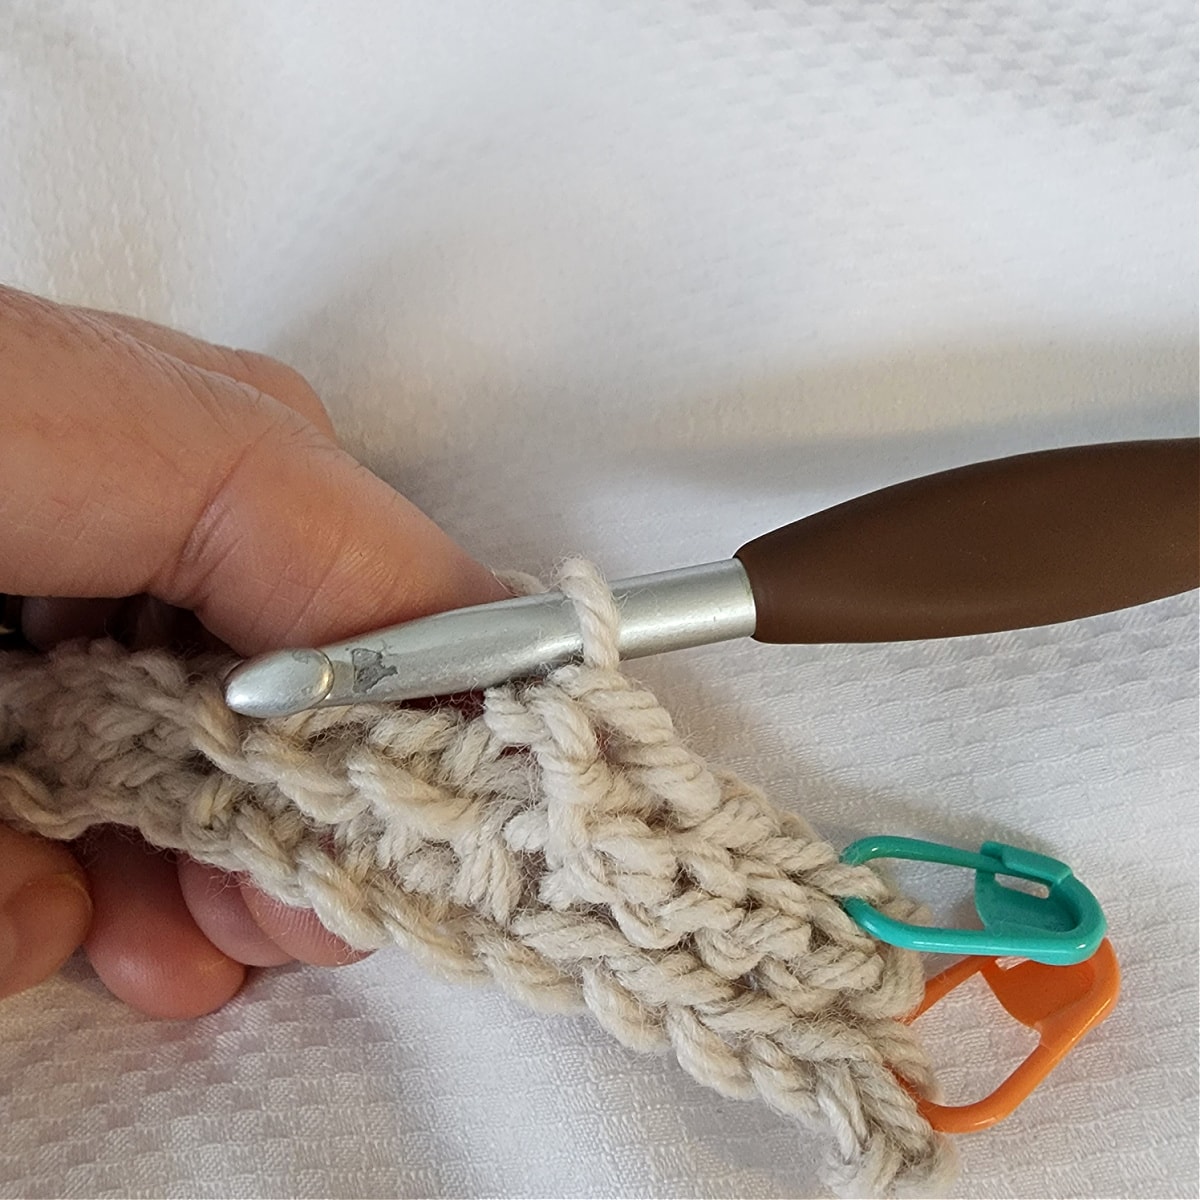
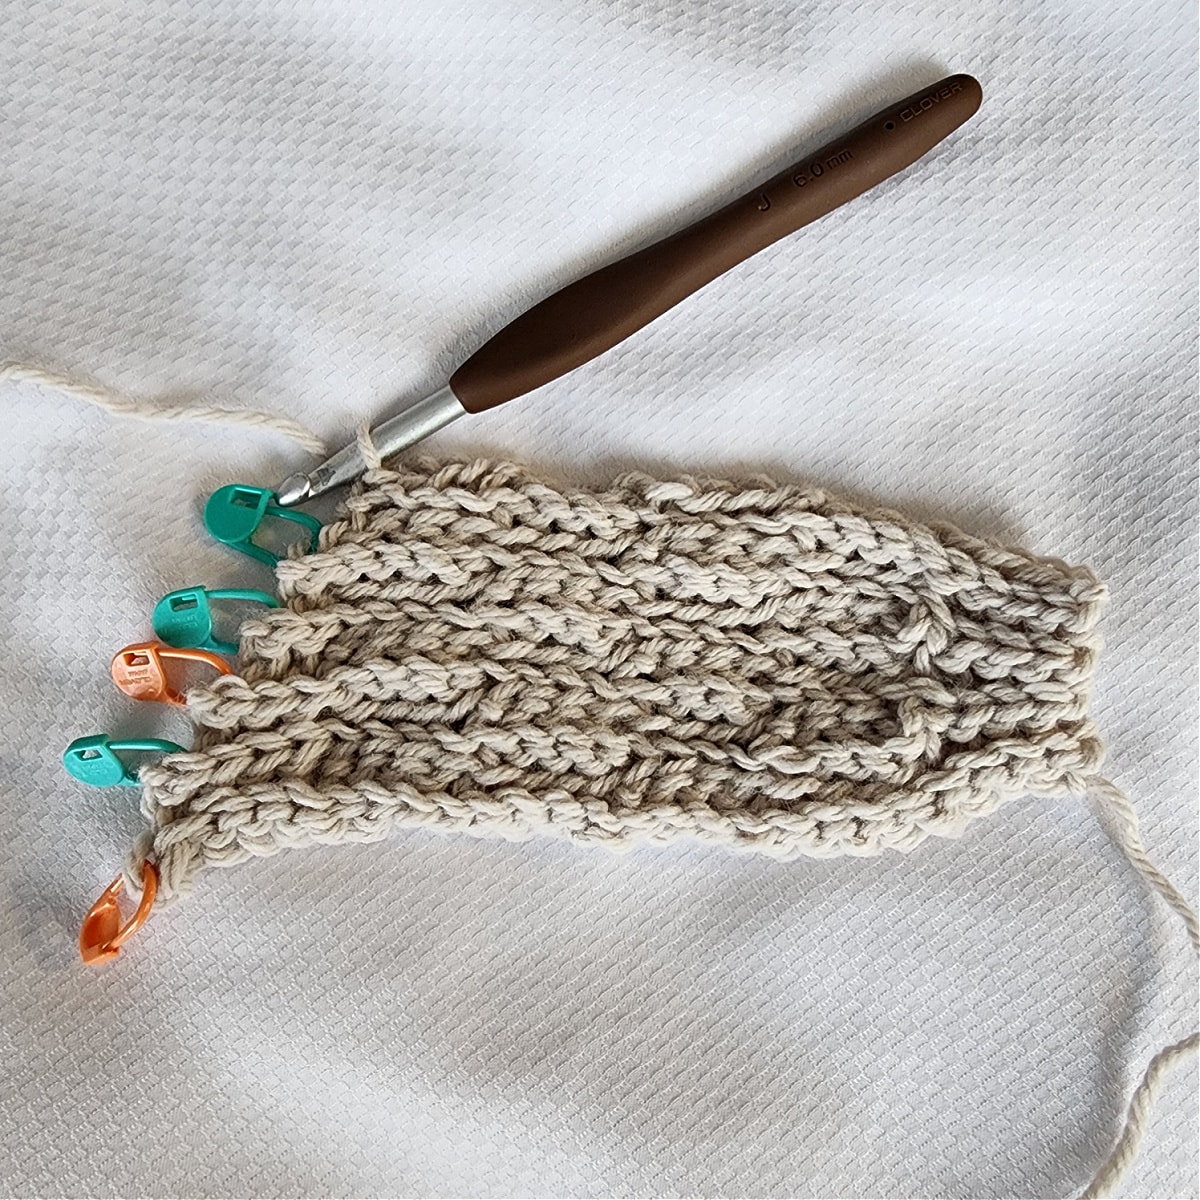
Tip: Before turning, place a SM in the FLO of the first stitch of Row 1 & every odd numbered row throughout. If you haven’t worked short rows before, this will help you complete Row 12 & the end of each short row section after Row 12.
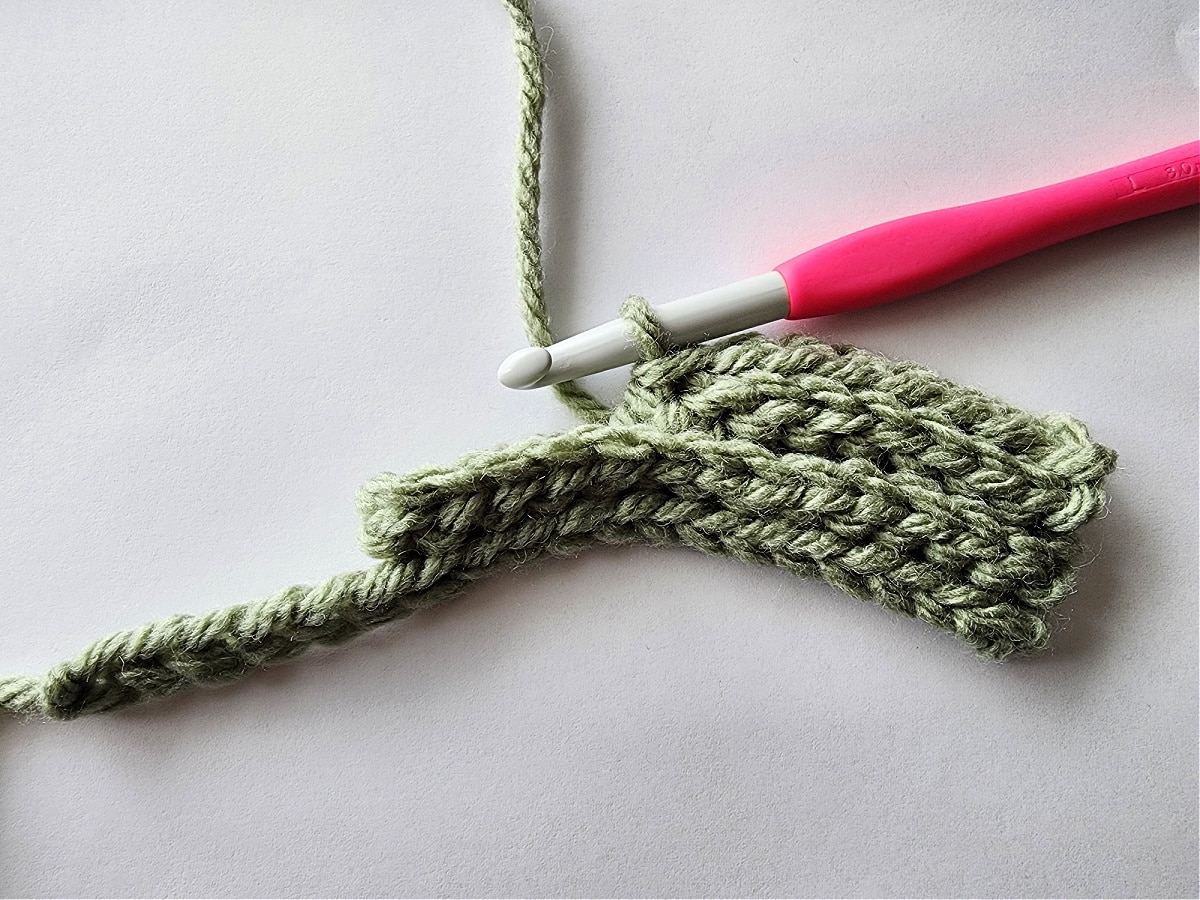
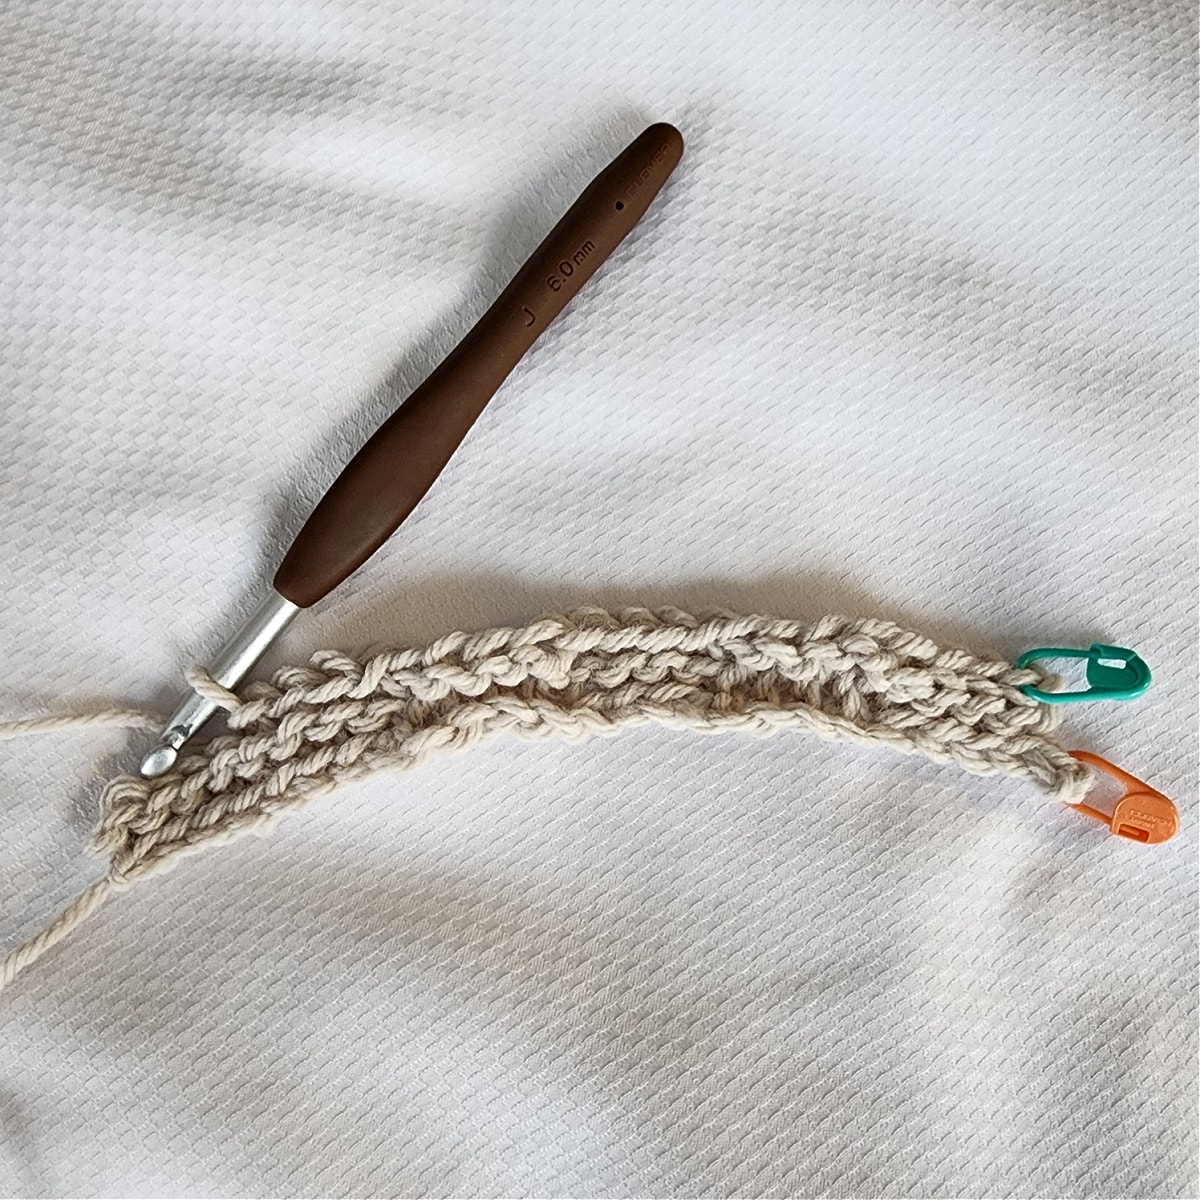
This photo shows Row 1 complete. Make sure to place a stitch marker in the FLO of the 1st st of the row.
Row 2: Ch 1, BLO sl st in each of the first 4 sts, (BLO sl st in each of the next 4 sts, Inv BLO sl st in each of the next 4 sts) work from ( to ) 2 times, BLO sl st in each of the next 4 (6) sts, skip the last st. Turn. (24, 26 sts)
This photo shows Row 2 complete.
Row 3: Ch 1, BLO sl st in each of the first 4 (6) sts, (Inv FLO sl st in each of the next 4 sts, FLO sl st in each of the next 4 sts) work from ( to ) 2 times, skip each of the last 4 sts. Turn. (20, 22 sts)
This photo shows Row 3 complete (this is a short row).
Row 4: Ch 1, (Inv BLO sl st in each of the next 4 sts, BLO sl st in each of the next 4 sts) work from ( to ) 2 times, BLO sl st in each of the next 3 (5) sts, skip the last st. Turn. (19, 21 sts)
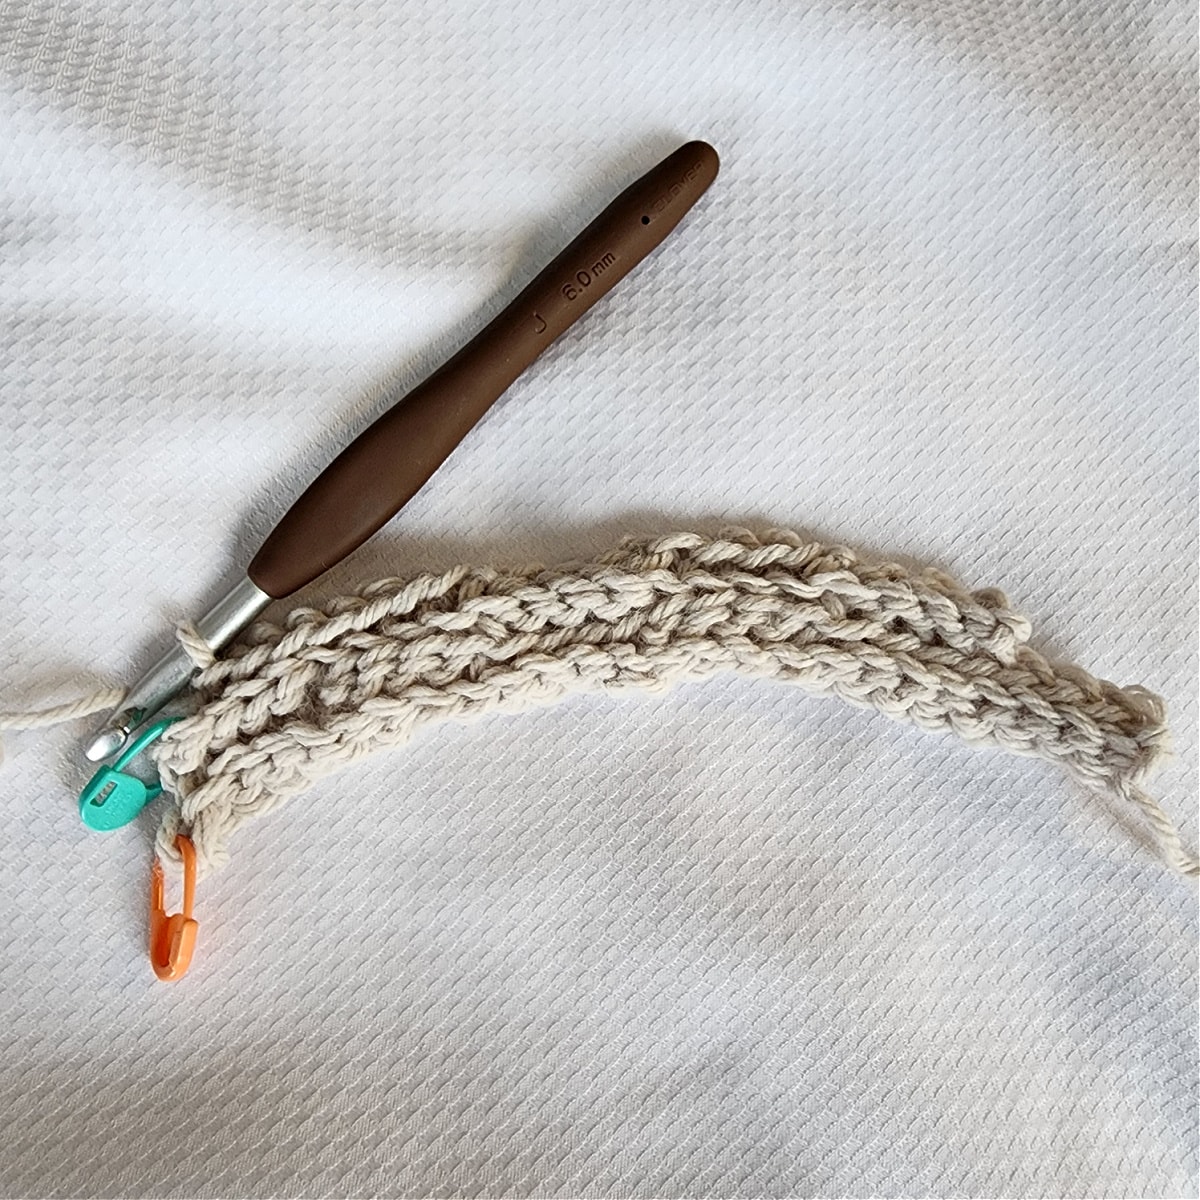
This photo shows Row 4 complete.
Row 5: Ch 1, BLO sl st in each of the first 3 (5) sts, (FLO sl st in each of the next 4 sts, Inv FLO sl st in each of the next 4 sts) work from ( to ) 2 times, BLO sl st in each of the next 4 previously skipped sts from Row 3. Turn. (23, 25 sts)
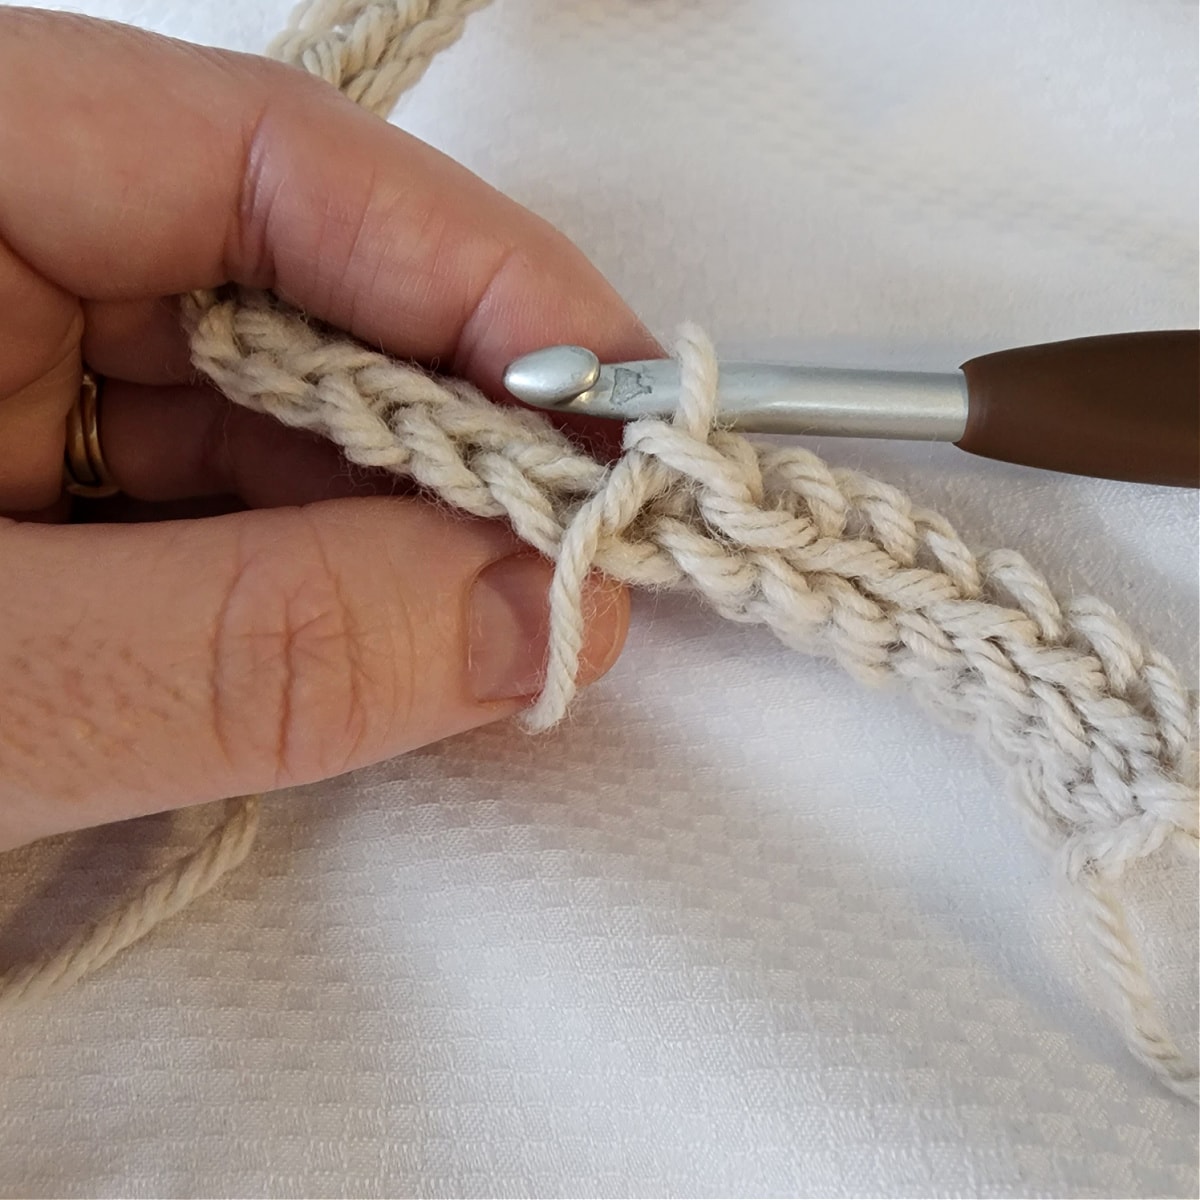
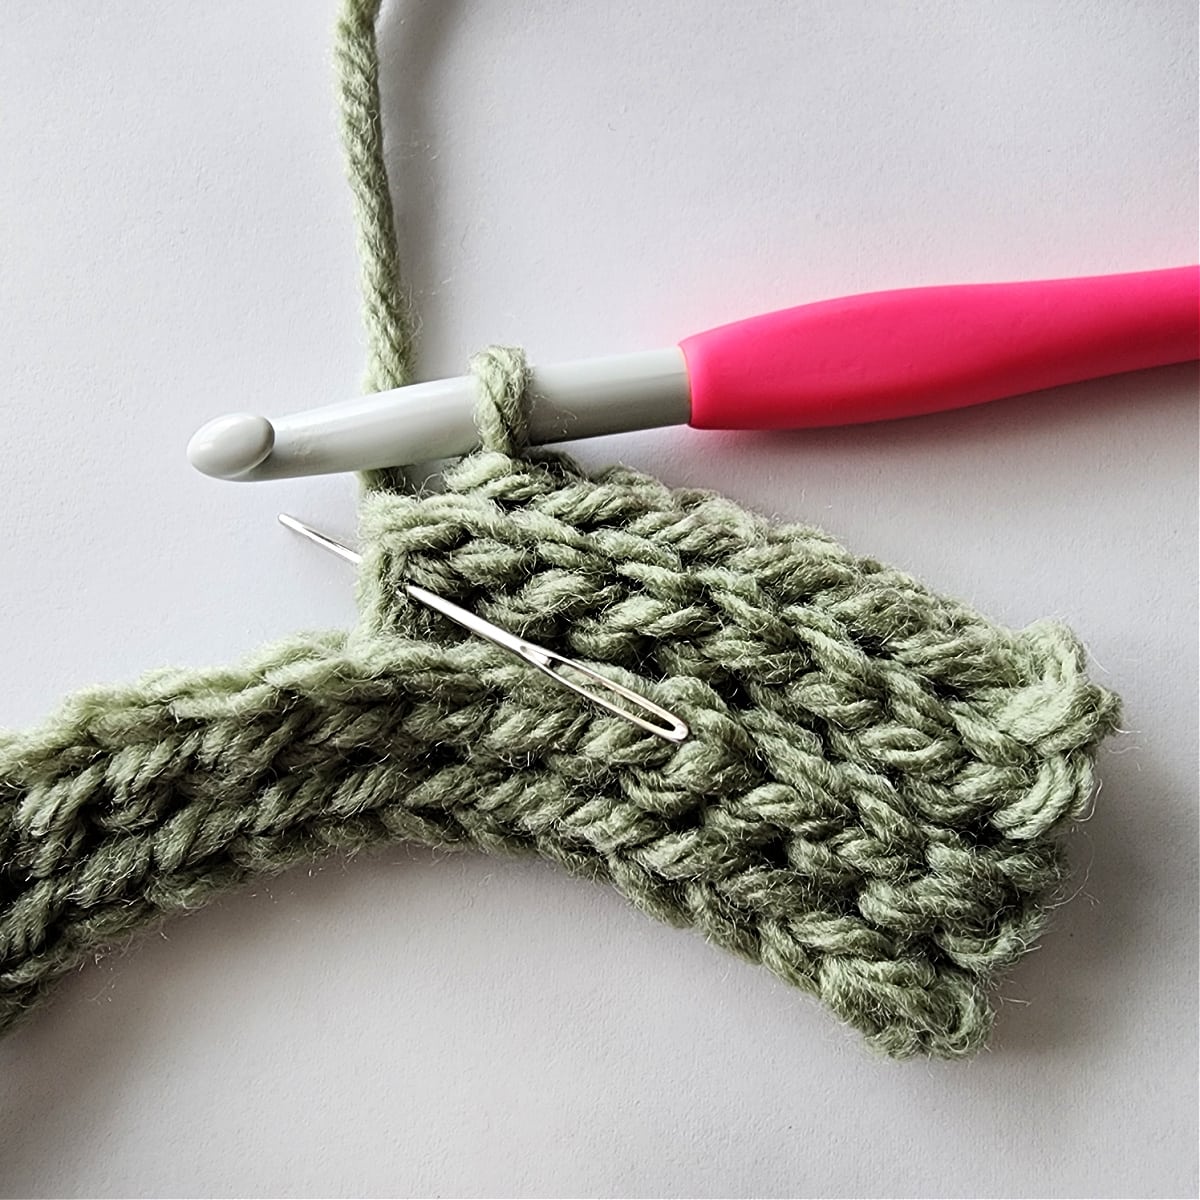
The photo above shows Row 5 worked up to the point where you need to work a smoothing stitch to smoothly transition between the short row and regular length row.
The arrow in the photo above is pointing to the Ch-1 worked at the beginning of the previous BLO sl st row. This is where we will begin the smoothing stitch.
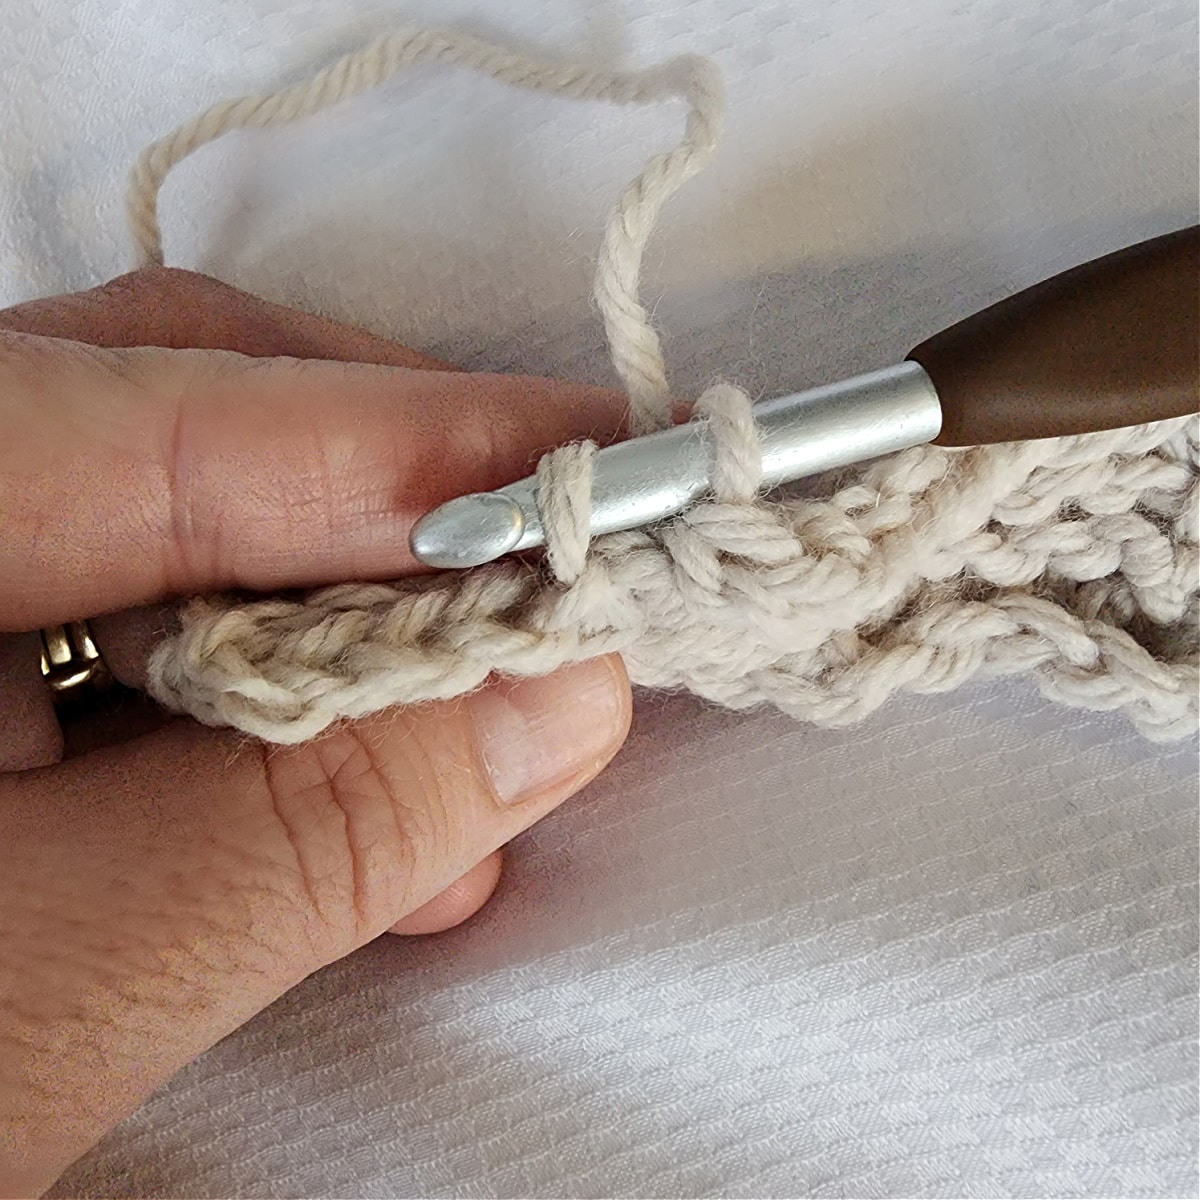
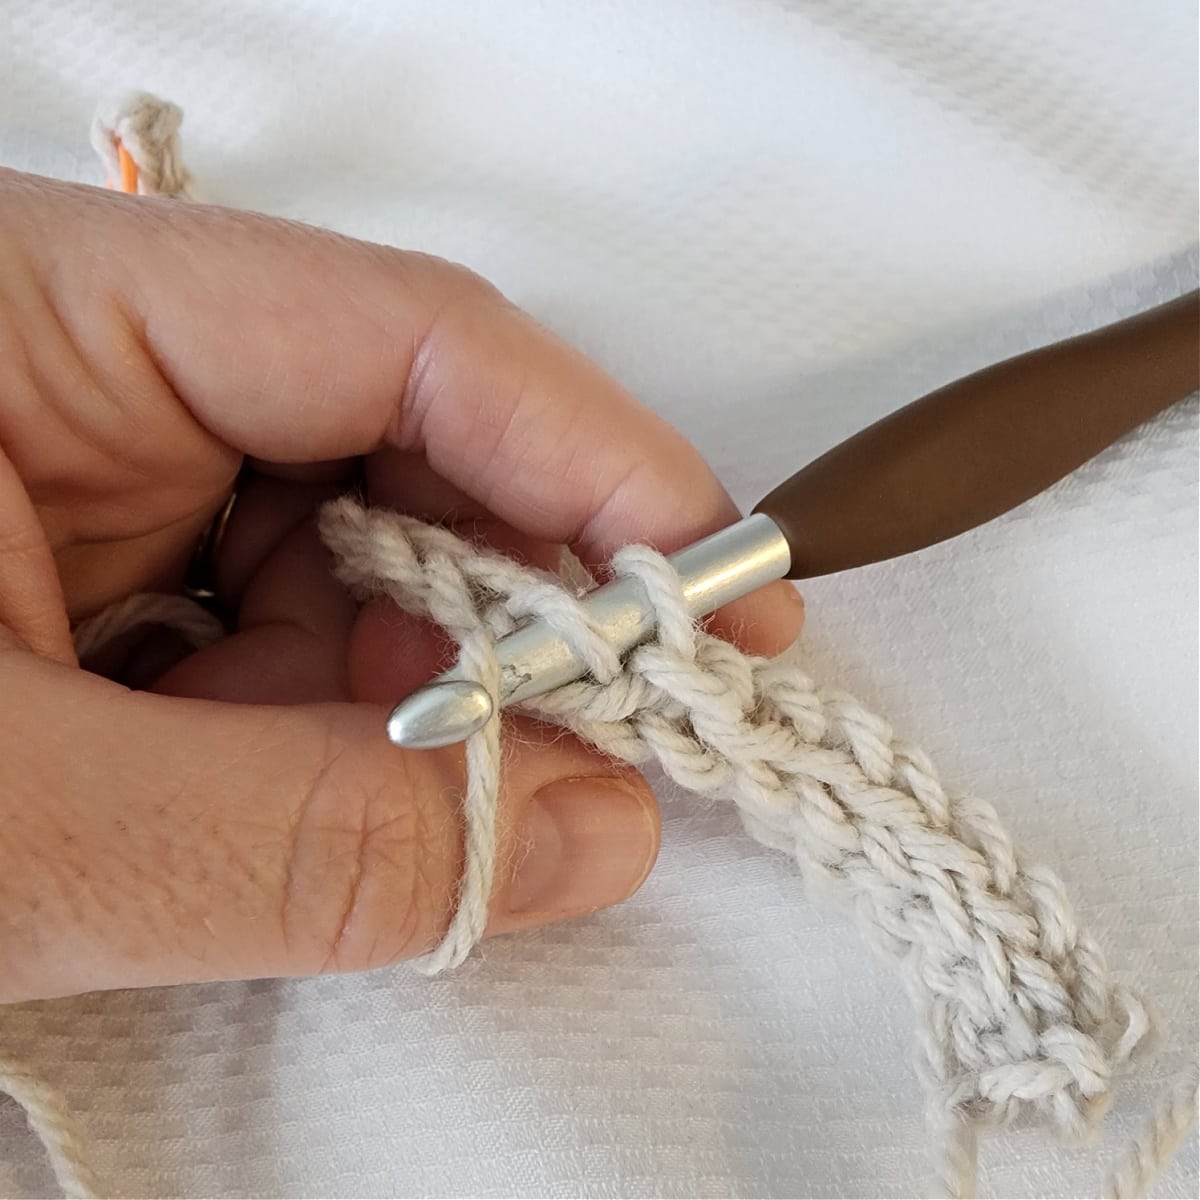
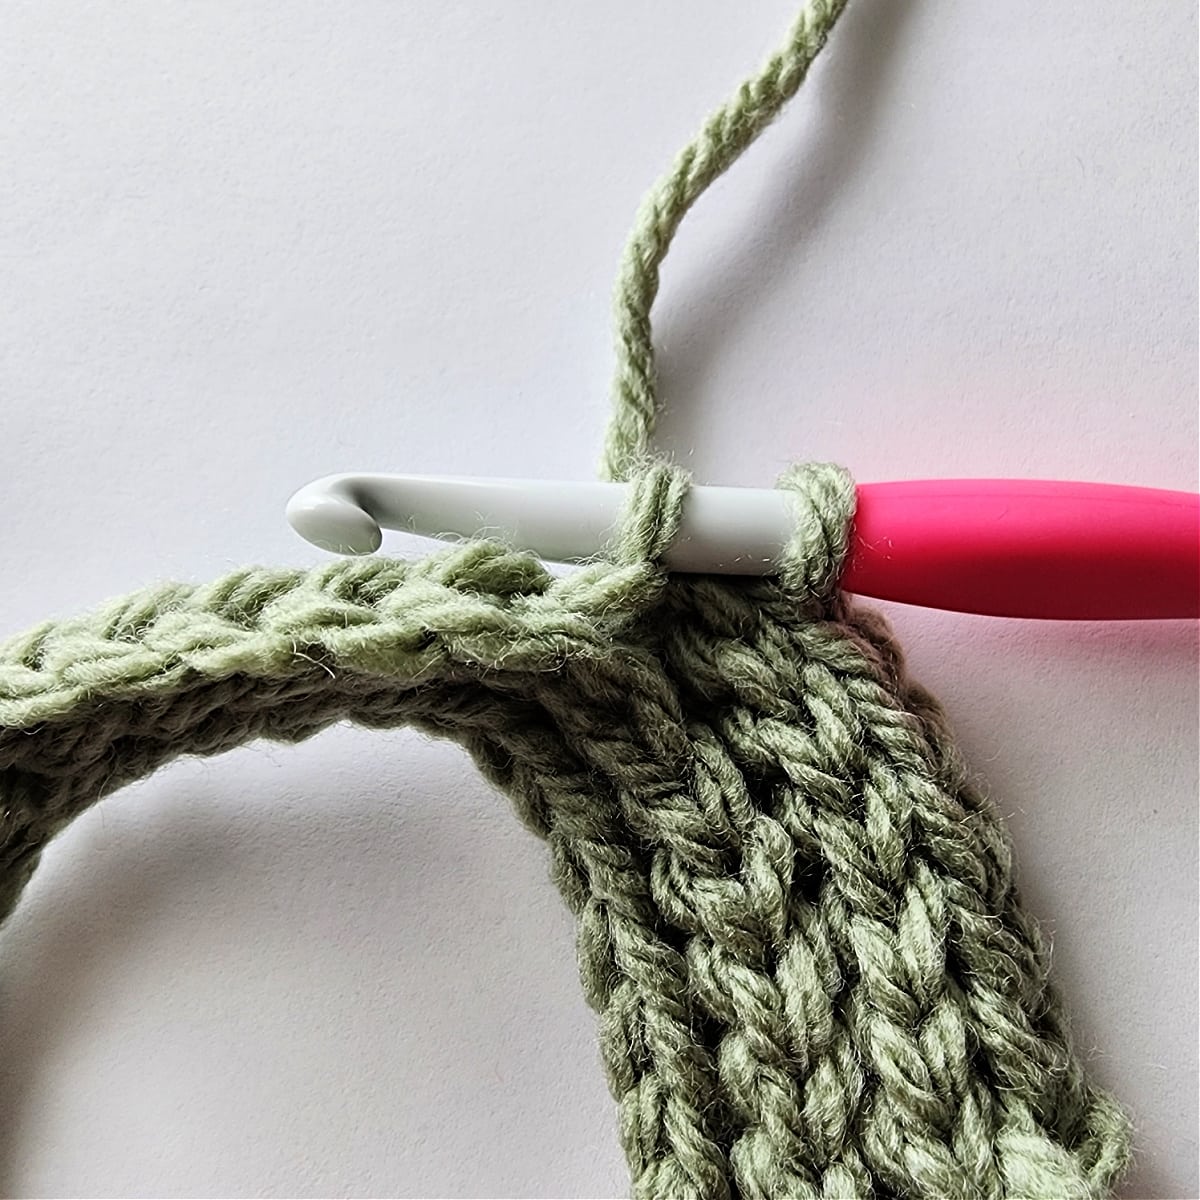
To Work a Smoothing Stitch: First, insert your hook into the loop of the ch-1 that was worked at the beginning of the previous row.

Next, insert your hook into the BLO of the next skipped stitch from 2 rows prior and yarn over.
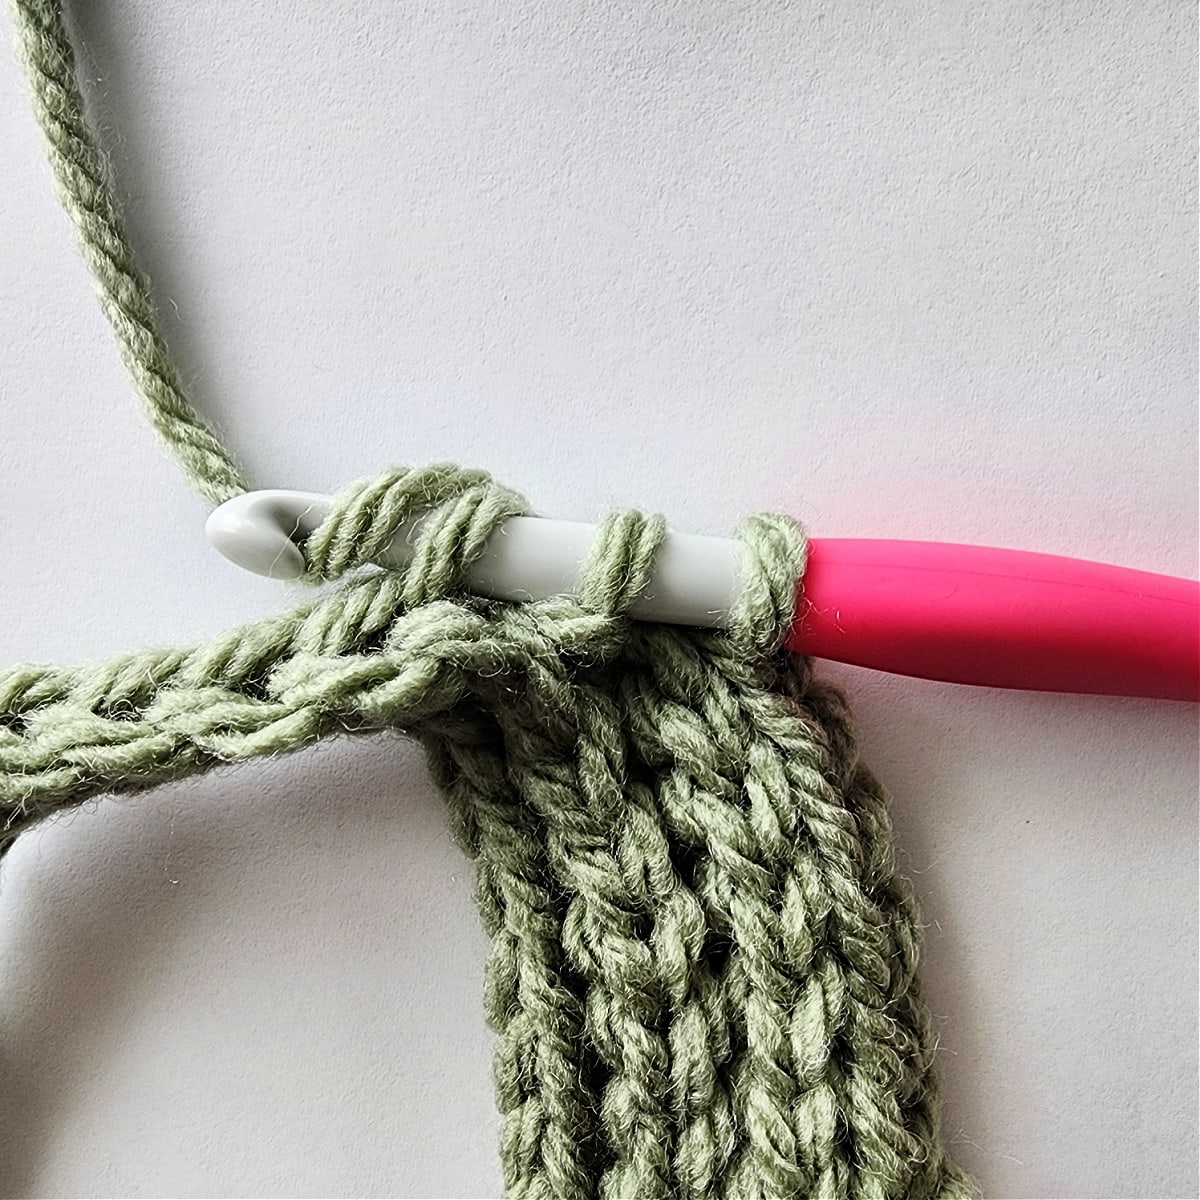
Lastly, pull up a loop, pull that loop through all 3 loops to complete what I call a “smoothing stitch”.
The photo above shows Row 5 complete.
Row 6: Ch 1, BLO sl st in each of the first 4 sts, (BLO sl st in each of the next 4 sts, Inv BLO sl st in each of the next 4 sts) work from ( to ) 2 times, BLO sl st in each of the next 2 (4) sts, skip the last st. Turn. (22, 24 sts)
The photo above shows Row 6 complete.
Row 7: Ch 1, BLO sl st in each of the first 2 (4) sts, (Inv FLO sl st in each of the next 4 sts, FLO sl st in each of the next 4 sts) work from ( to ) 2 times, skip each of the last 4 sts. Turn. (18, 20 sts)
The photo above shows Row 7 complete (this is a short row).
Row 8: Ch 1, (Inv BLO sl st in each of the next 4 sts, BLO sl st in each of the next 4 sts) work from ( to ) 2 times, BLO sl st in each of the next 1 (3) sts, skip the last st. Turn. (17, 19 sts)
The photo above shows Row 8 complete.
Row 9: Ch 1, BLO sl st in each of the first 1 (3) sts, (FLO sl st in each of the next 4 sts, Inv FLO sl st in each of the next 4 sts) work from ( to ) 2 times, BLO sl st in each of the next 4 previously skipped sts from Row 7. Turn. (21, 23 sts)
The photo above shows Row 9 complete (remember to work a smoothing stitch to transition between the short row and regular row).
Row 10: Ch 1, BLO sl st in each of the first 4 sts, (BLO sl st in each of the next 4 sts, Inv BLO sl st in each of the next 4 sts) work from ( to ) 2 times, BLO sl st in each of the next 0 (2) sts, skip the last st. Turn. (20, 22 sts)
The photo above shows Row 10 complete.
Row 11: Ch 1, BLO sl st in each of the first 0 (2) sts, (Inv FLO sl st in each of the next 4 sts, FLO sl st in each of the next 4 sts) work from ( to ) 2 times, BLO sl st in each of the last 4 sts. Turn. (20, 22 sts)
The photo above shows Row 11 complete.
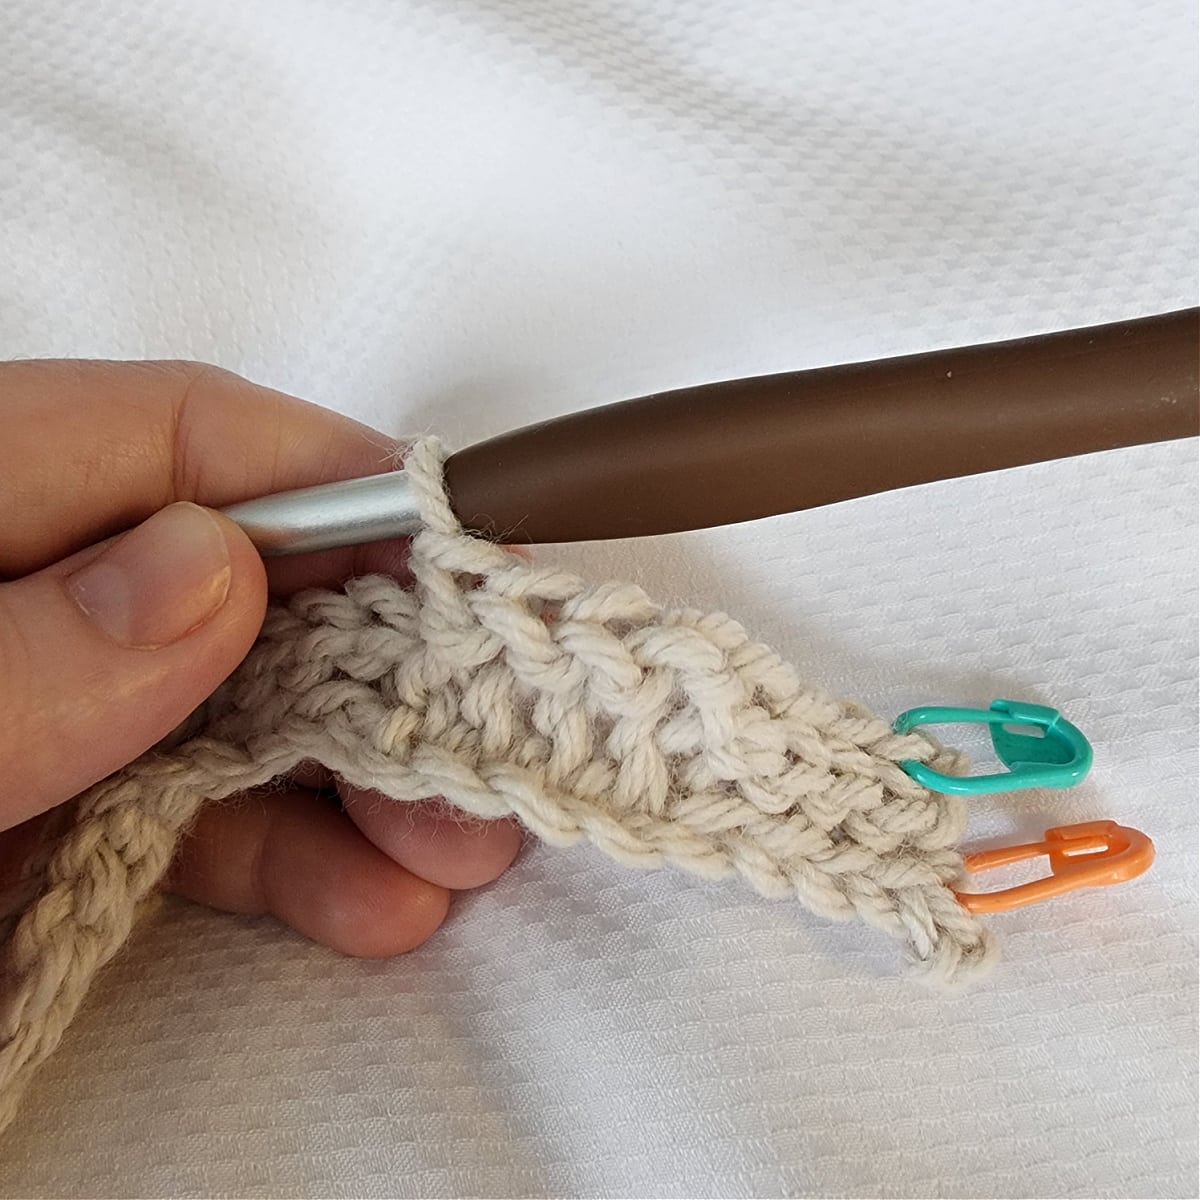
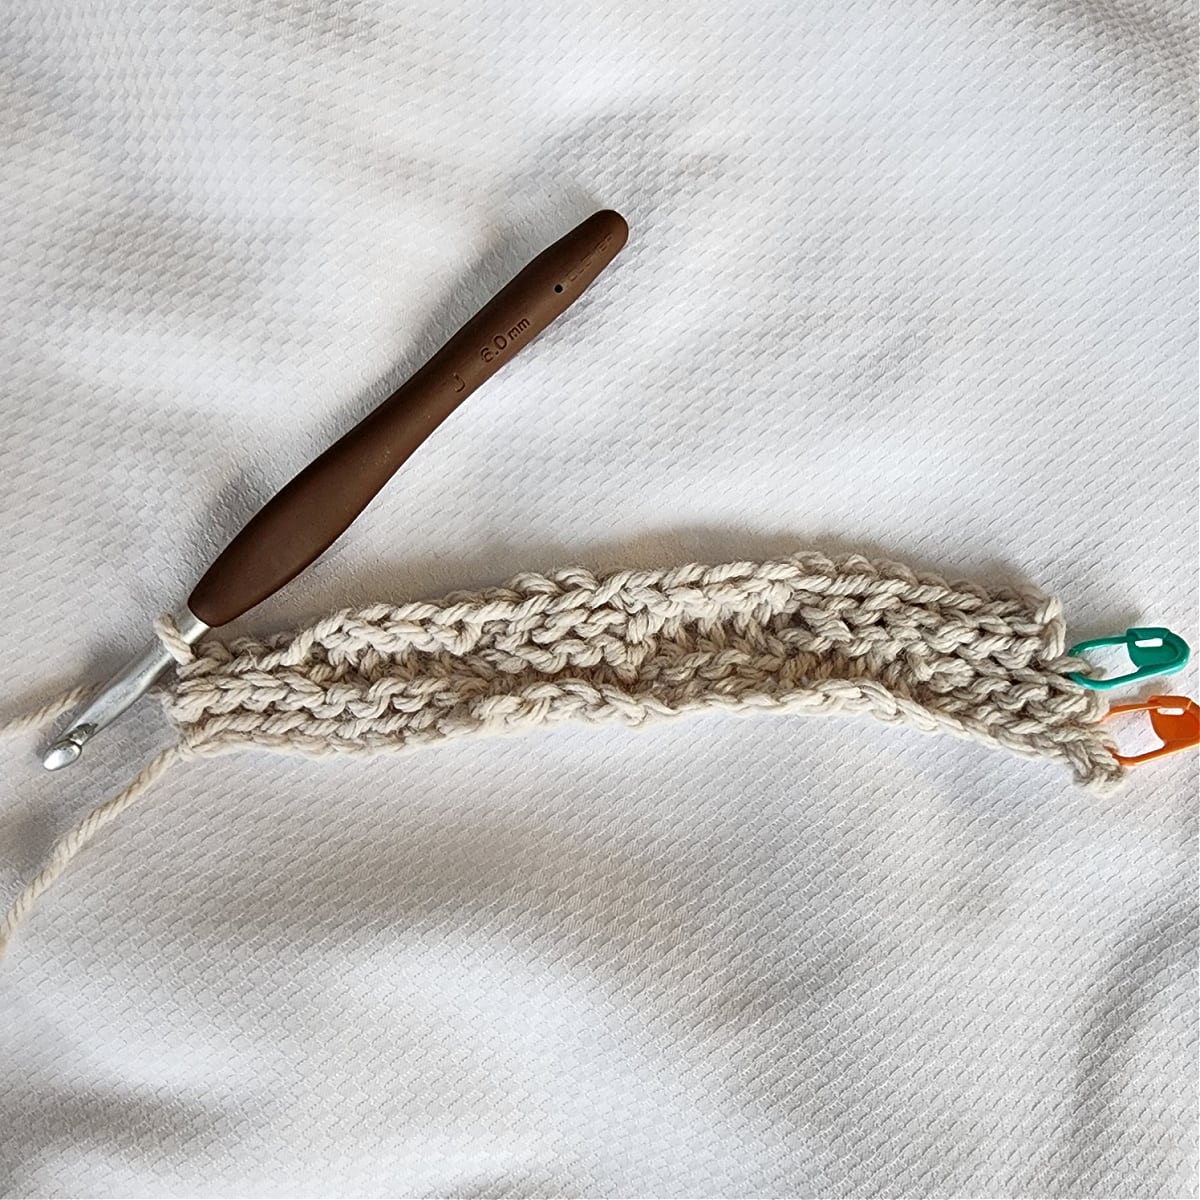
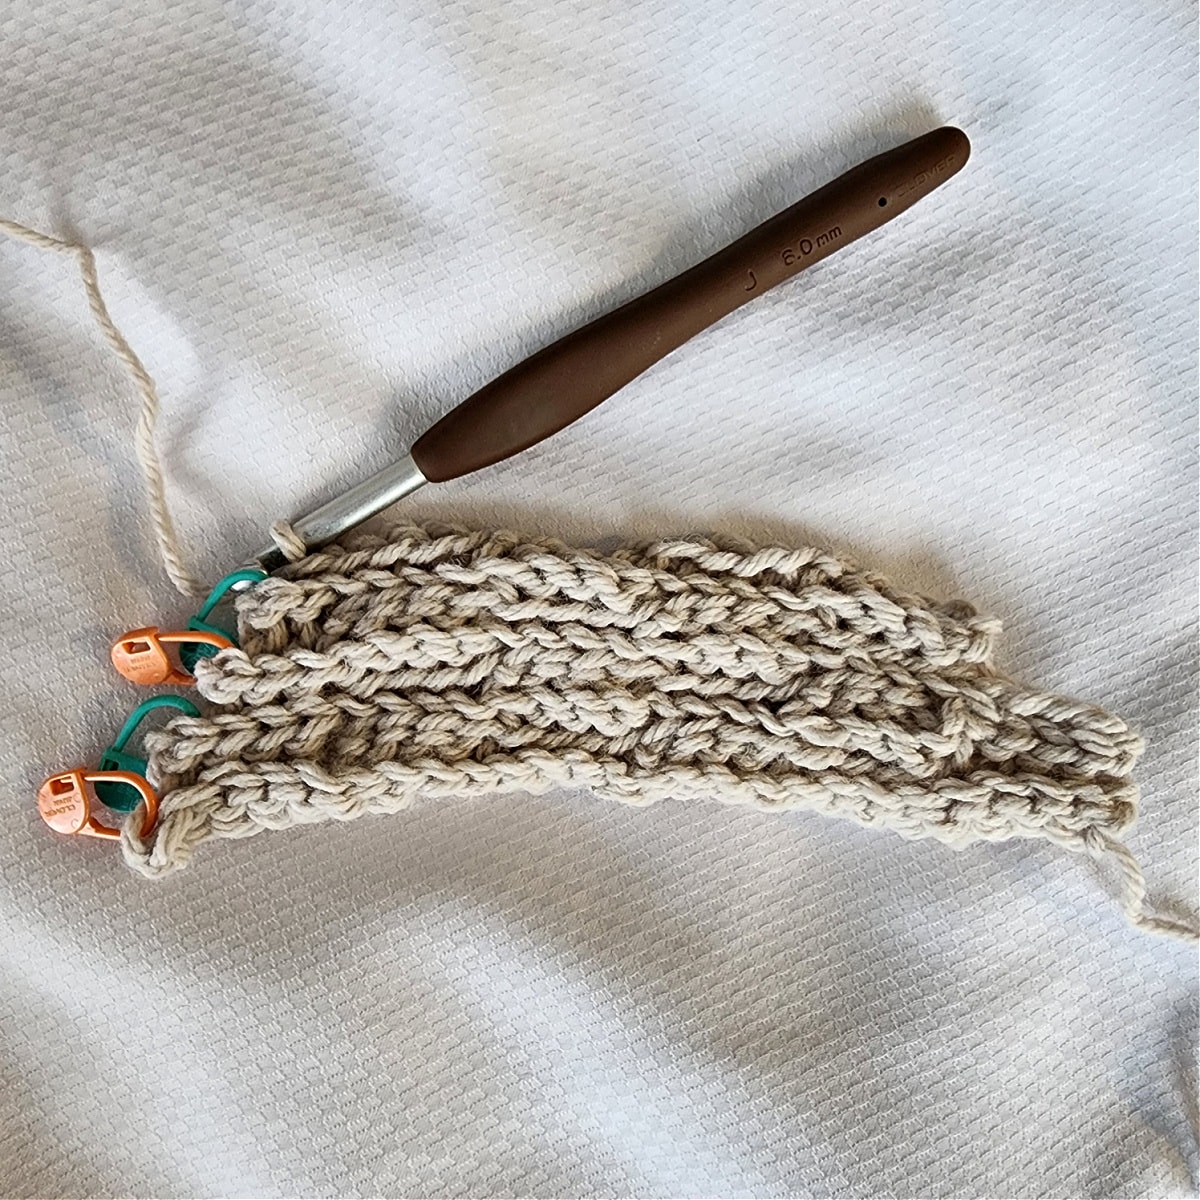
Row 12: Ch 1, BLO sl st in each of the first 4 sts, (Inv BLO sl st in each of the next 4 sts, BLO sl st in each of the next 4 sts) work from ( to ) 2 times, BLO sl st in each of the next 0 (2) sts, BLO sl st in each unworked st to Row 1. Turn. (25, 27 sts)
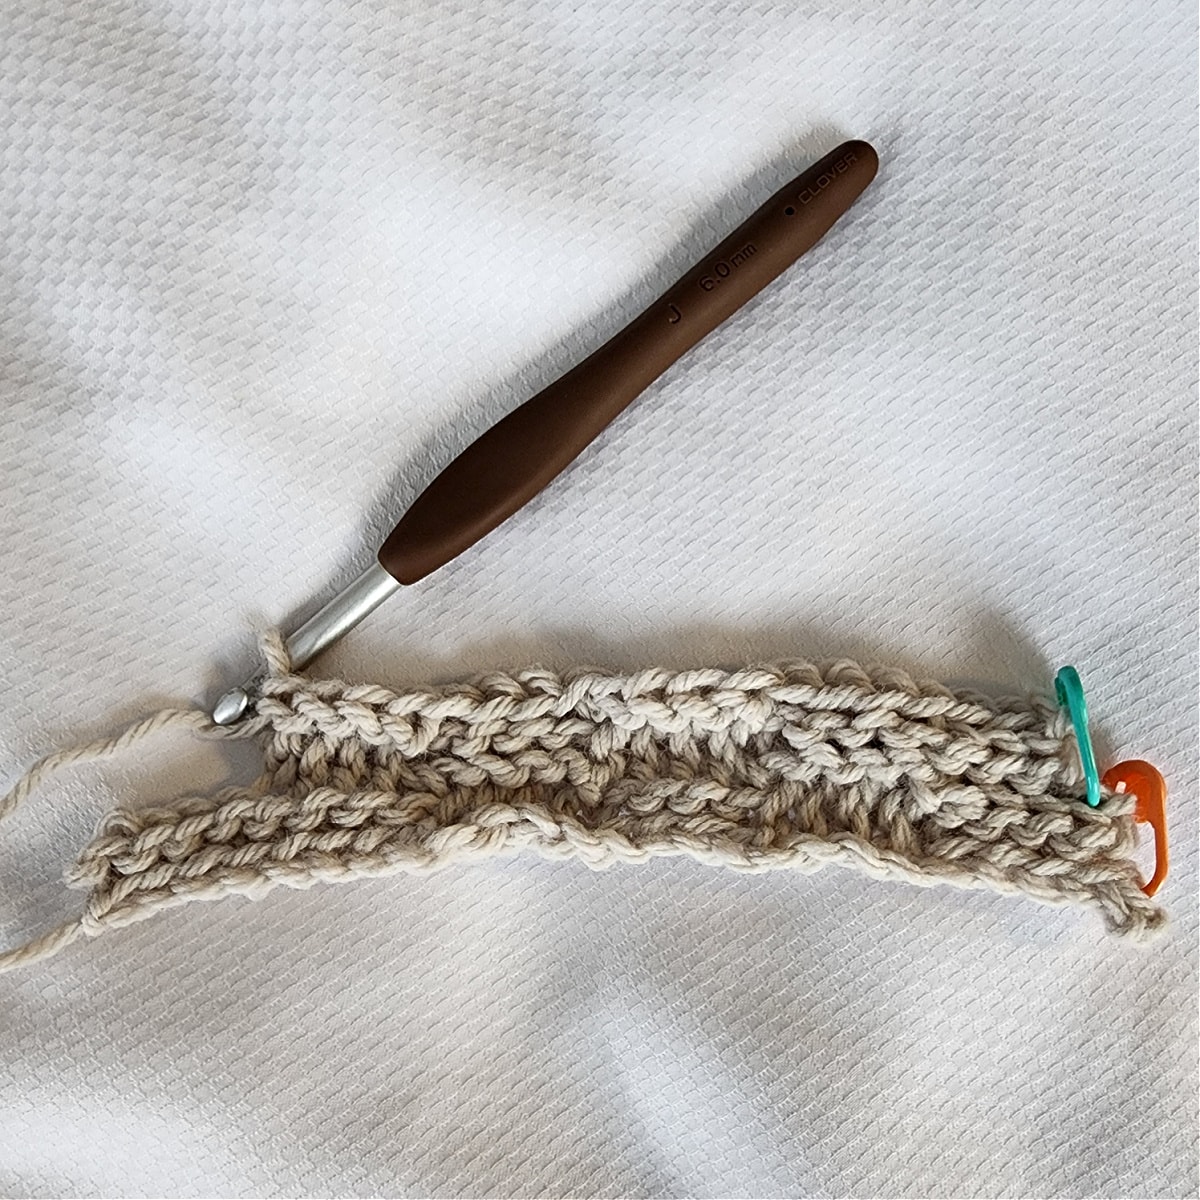
The photo above shows Row 12 being worked. All stitches have been worked across Row 11. Now to end with a BLO sl st in each of the unworked stitches to Row 1.
The photo above shows a BLO sl st in each of the unworked stitches to Row 1 to complete the first section of short rows.
The photo above shows the work turned after completing Row 12. Ready to begin Row 13.
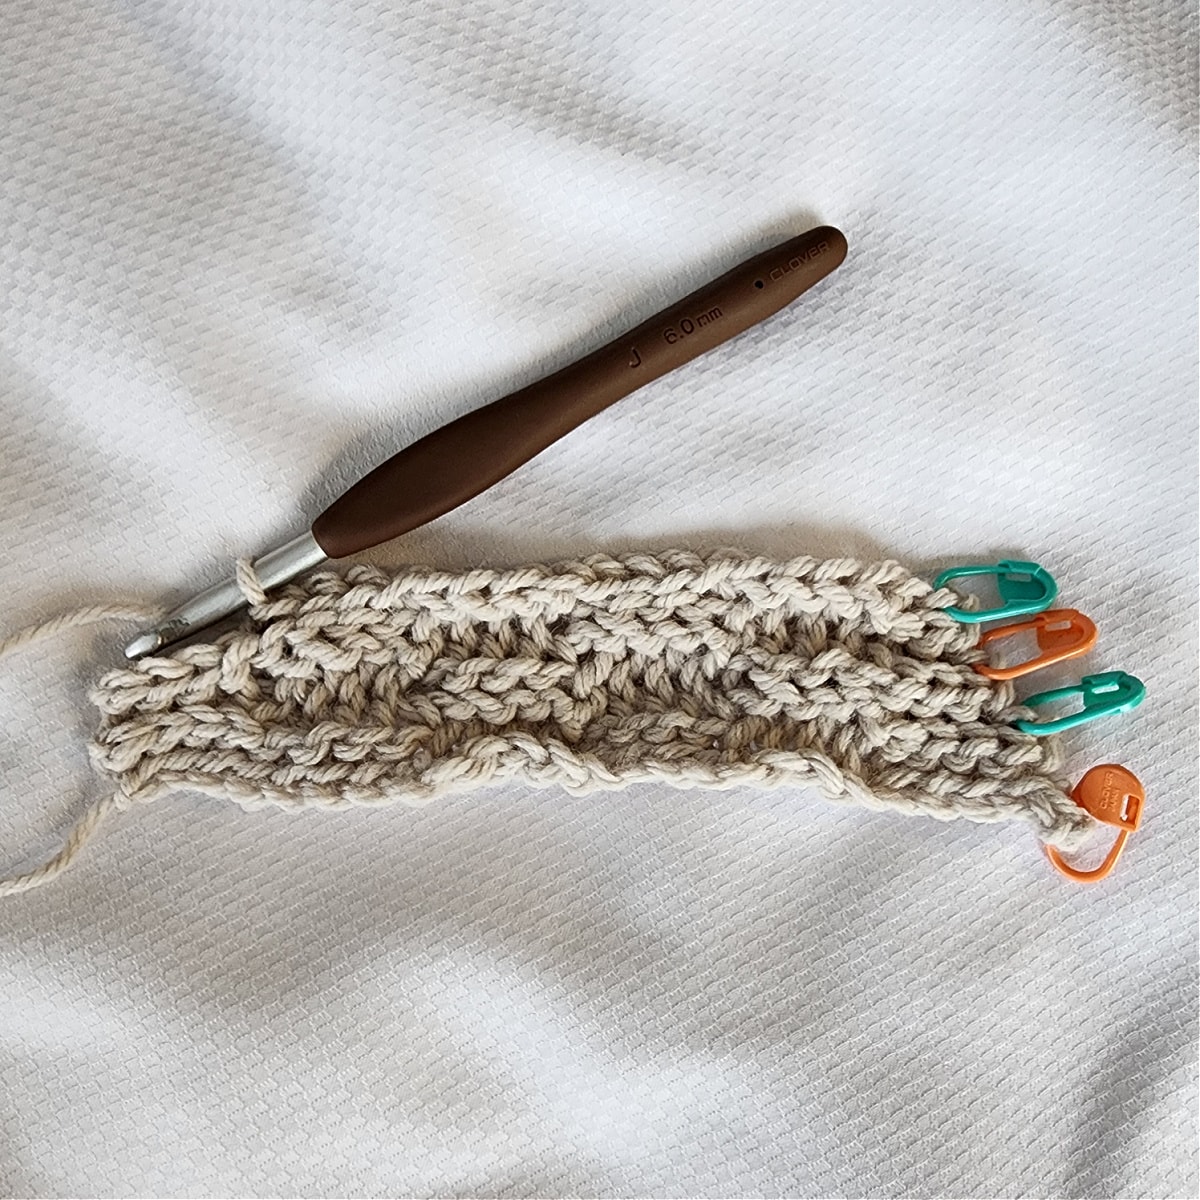
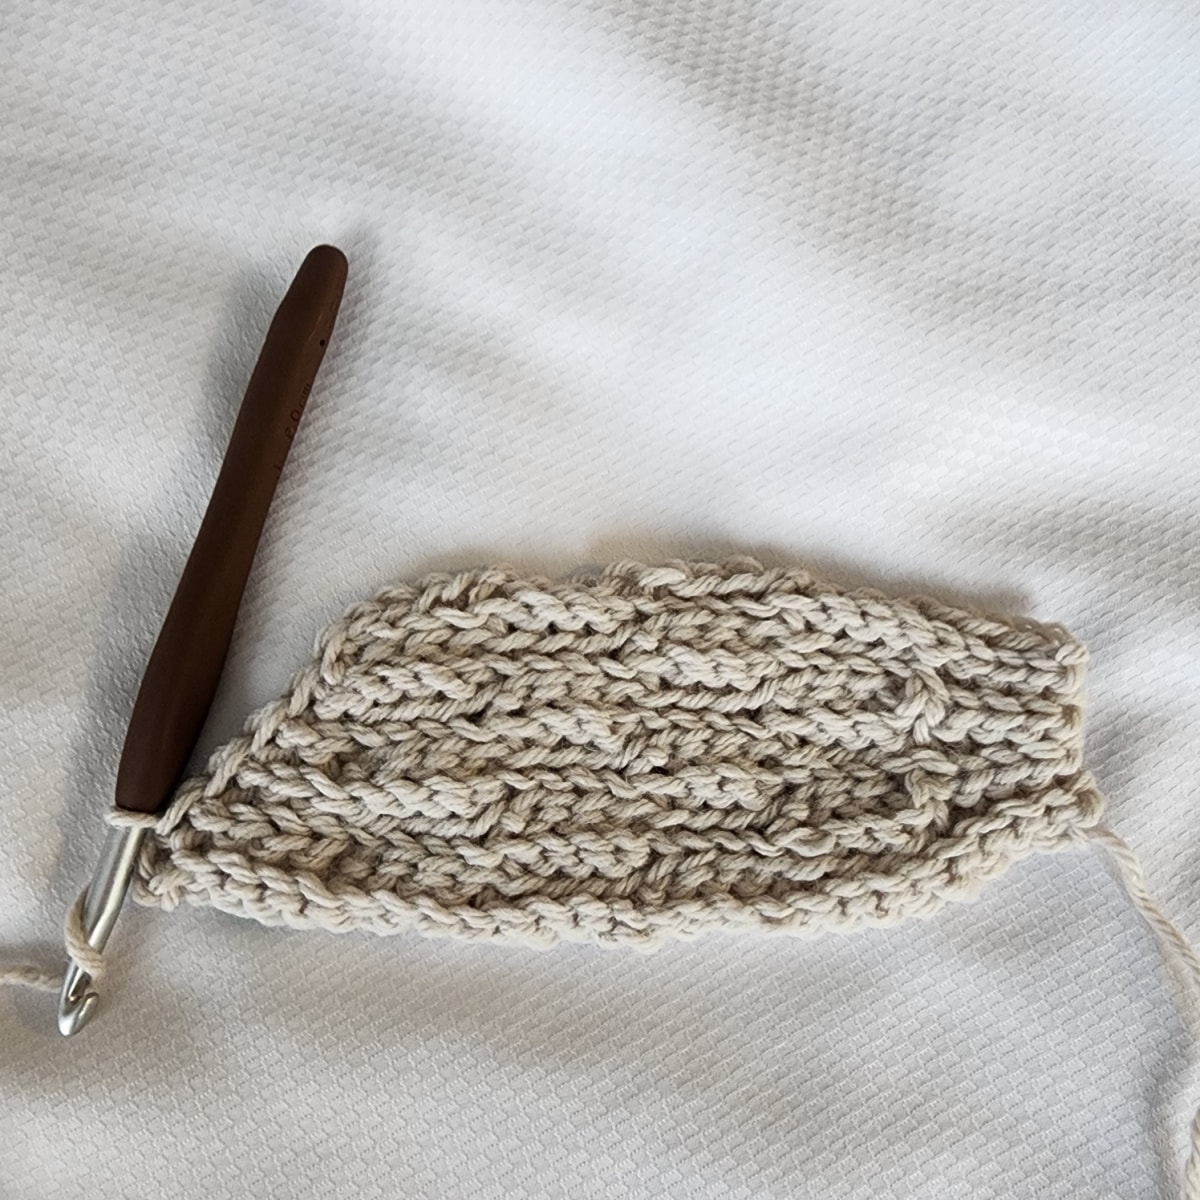
Remove SM’s after completing this row. Row height at this point should be 3.75″.
Row 13: Ch 1, BLO sl st in each of the first 5 (7) sts, (FLO sl st in each of the next 4 sts, Inv FLO sl st in each of the next 4 sts) work from ( to ) 2 times, BLO sl st in each of the last 4 sts. Turn. (25, 27 sts)
Rows 14 – 23: Rep Rows 2 – 11.
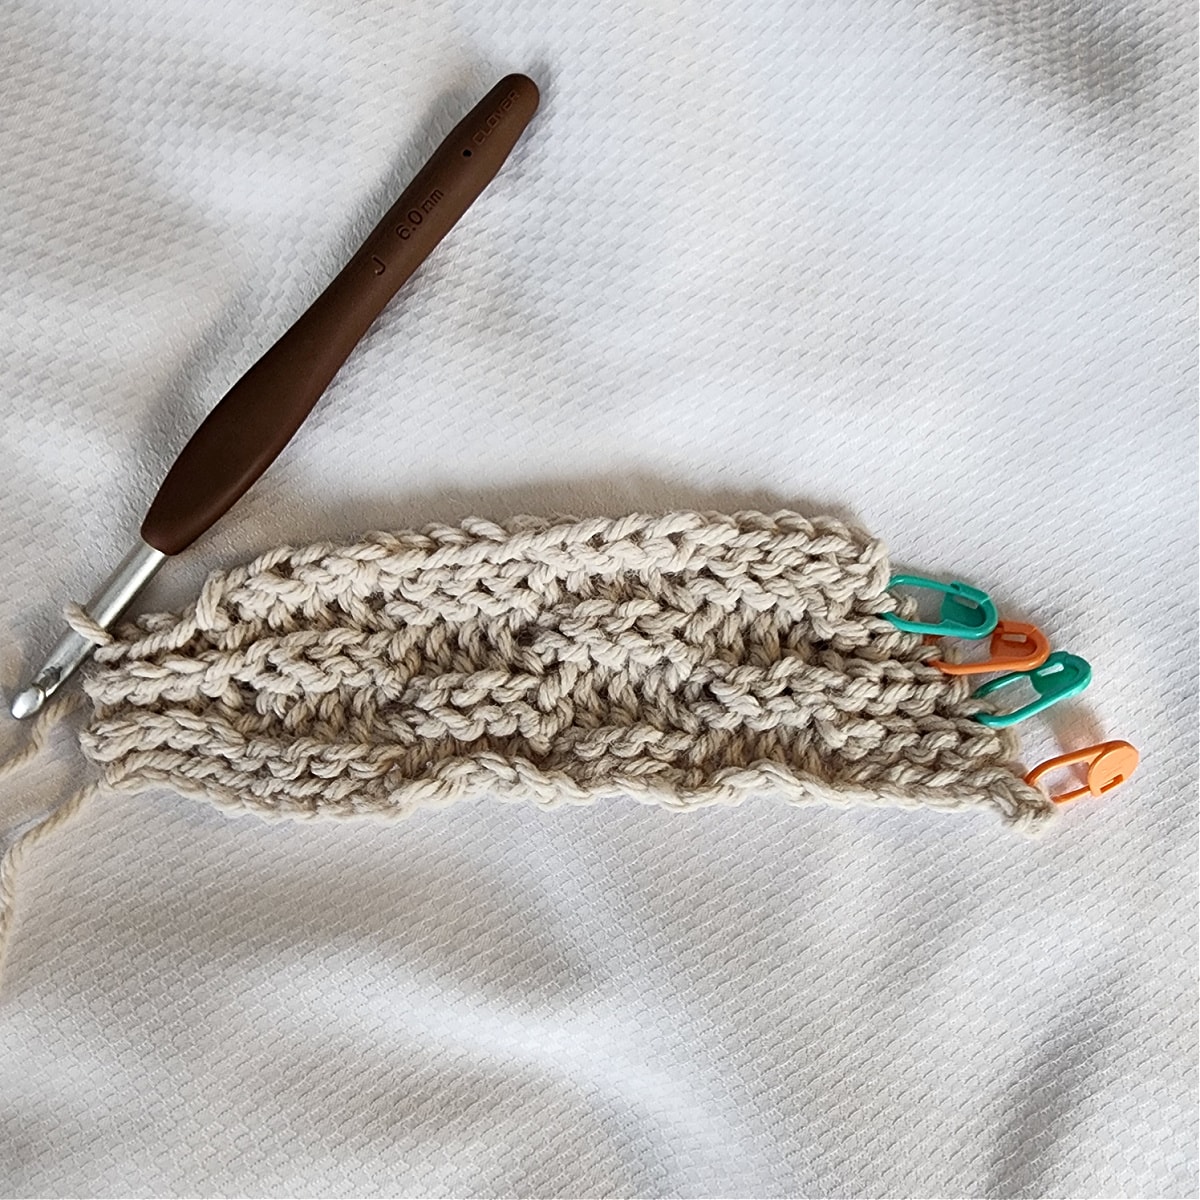
Row 24: Ch 1, BLO sl st in each of the first 4 sts, (Inv BLO sl st in each of the next 4 sts, BLO sl st in each of the next 4 sts) work from ( to ) 2 times, BLO sl st in each of the next 0 (2) sts, BLO sl st in each unworked st to Row 13. Turn. (25, 27 sts)
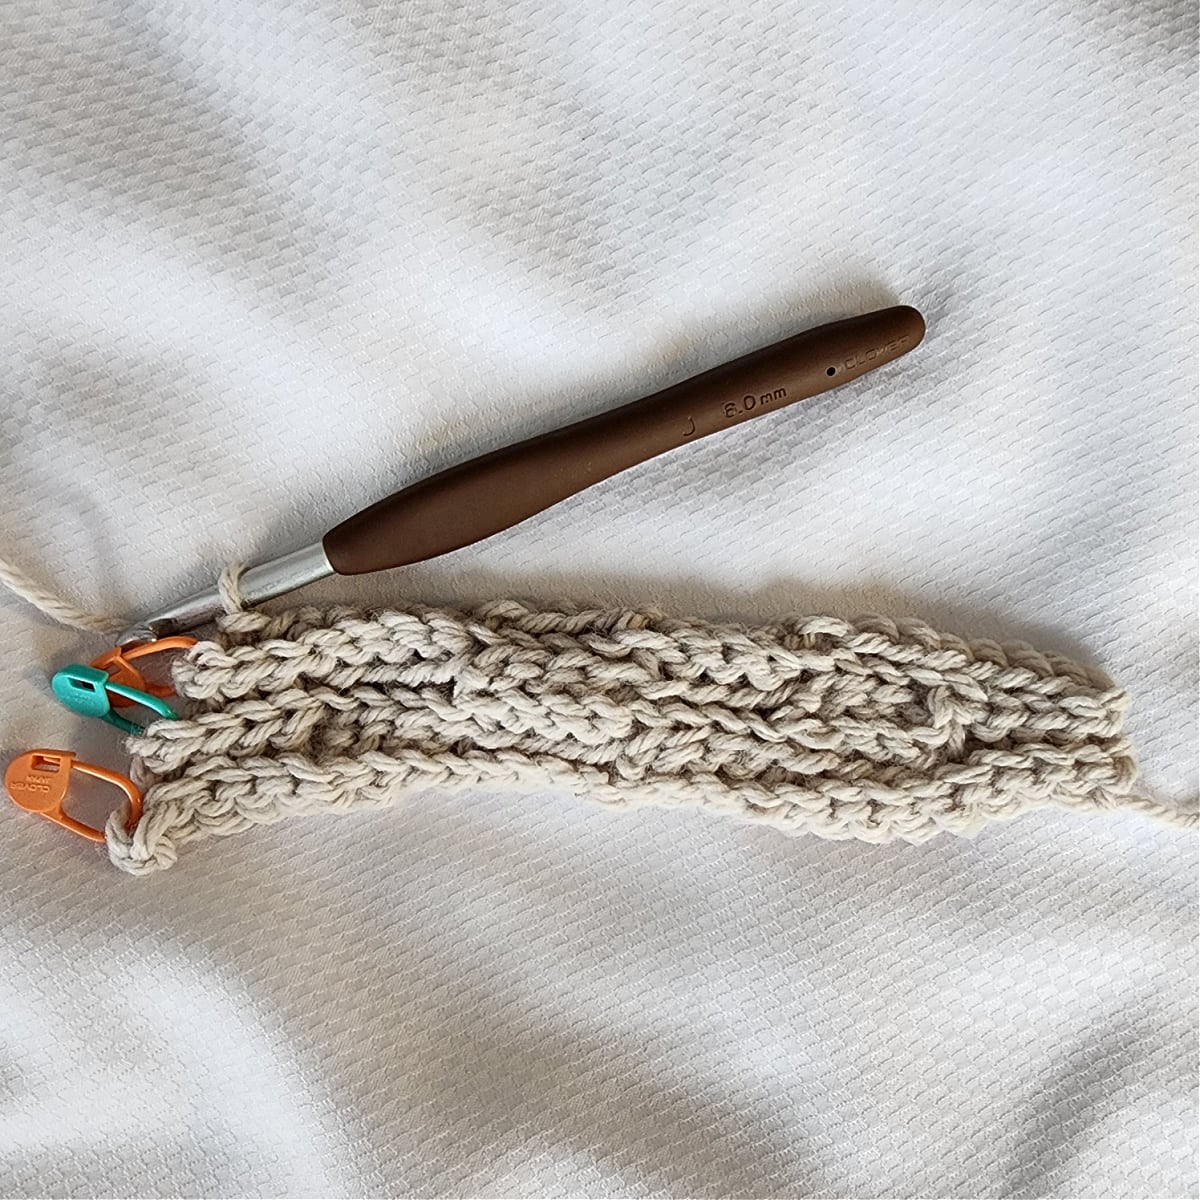
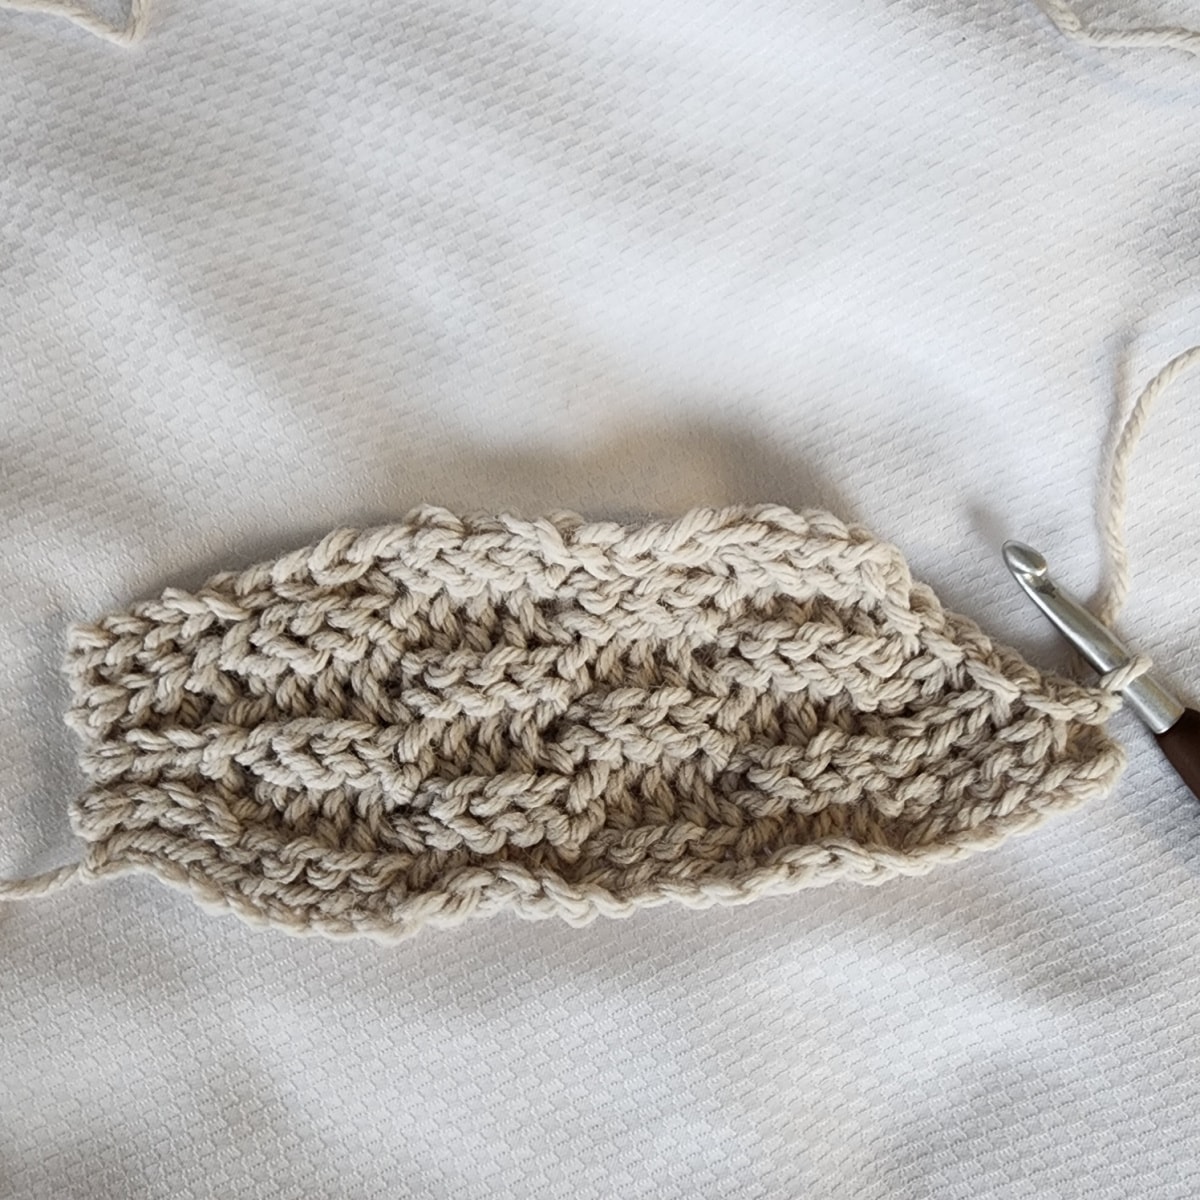
The photo above shows the next section of short rows completed, Rows 13 – 24.
Row 25: Ch 1, BLO sl st in each of the first 5 (7) sts, (FLO sl st in each of the next 4 sts, Inv FLO sl st in each of the next 4 sts) work from ( to ) 2 times, BLO sl st in each of the last 4 sts. Turn. (25, 27 sts)
Rows 26 – 35: Rep Rows 2 – 11.
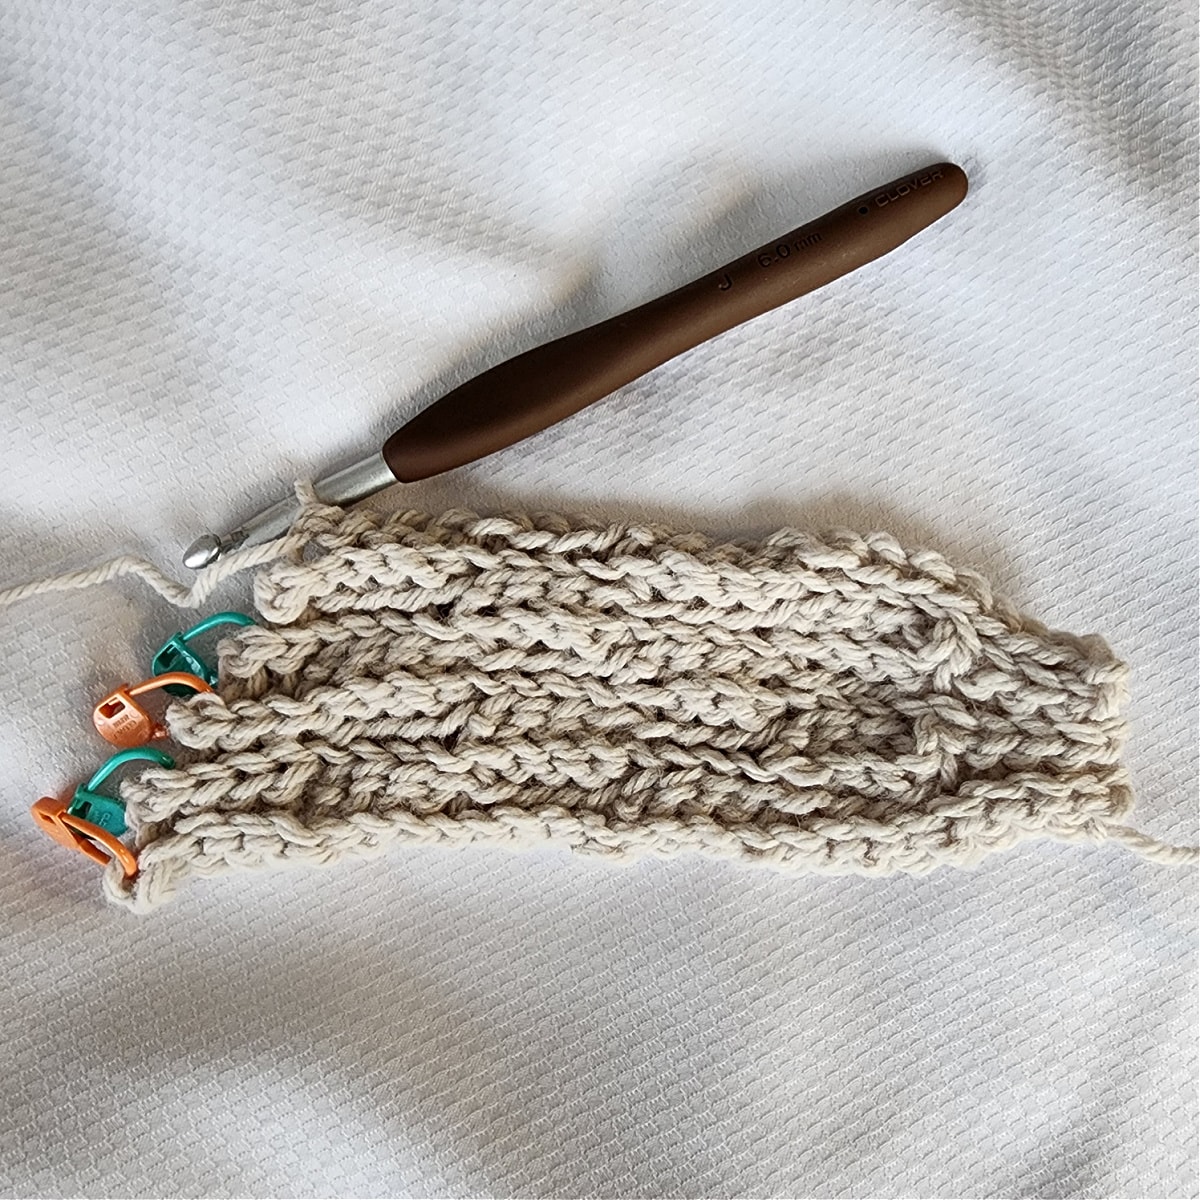
Row 36: Ch 1, BLO sl st in each of the first 4 sts, (Inv BLO sl st in each of the next 4 sts, BLO sl st in each of the next 4 sts) work from ( to ) 2 times, BLO sl st in each of the next 0 (2) sts, BLO sl st in each unworked st to Row 25. Turn. (25, 27 sts)
Row 37: Ch 1, BLO sl st in each of the first 5 (7) sts, (FLO sl st in each of the next 4 sts, Inv FLO sl st in each of the next 4 sts) work from ( to ) 2 times, BLO sl st in each of the last 4 sts. Turn. (25, 27 sts)
Rows 38 – 47: Rep Rows 2 – 11.
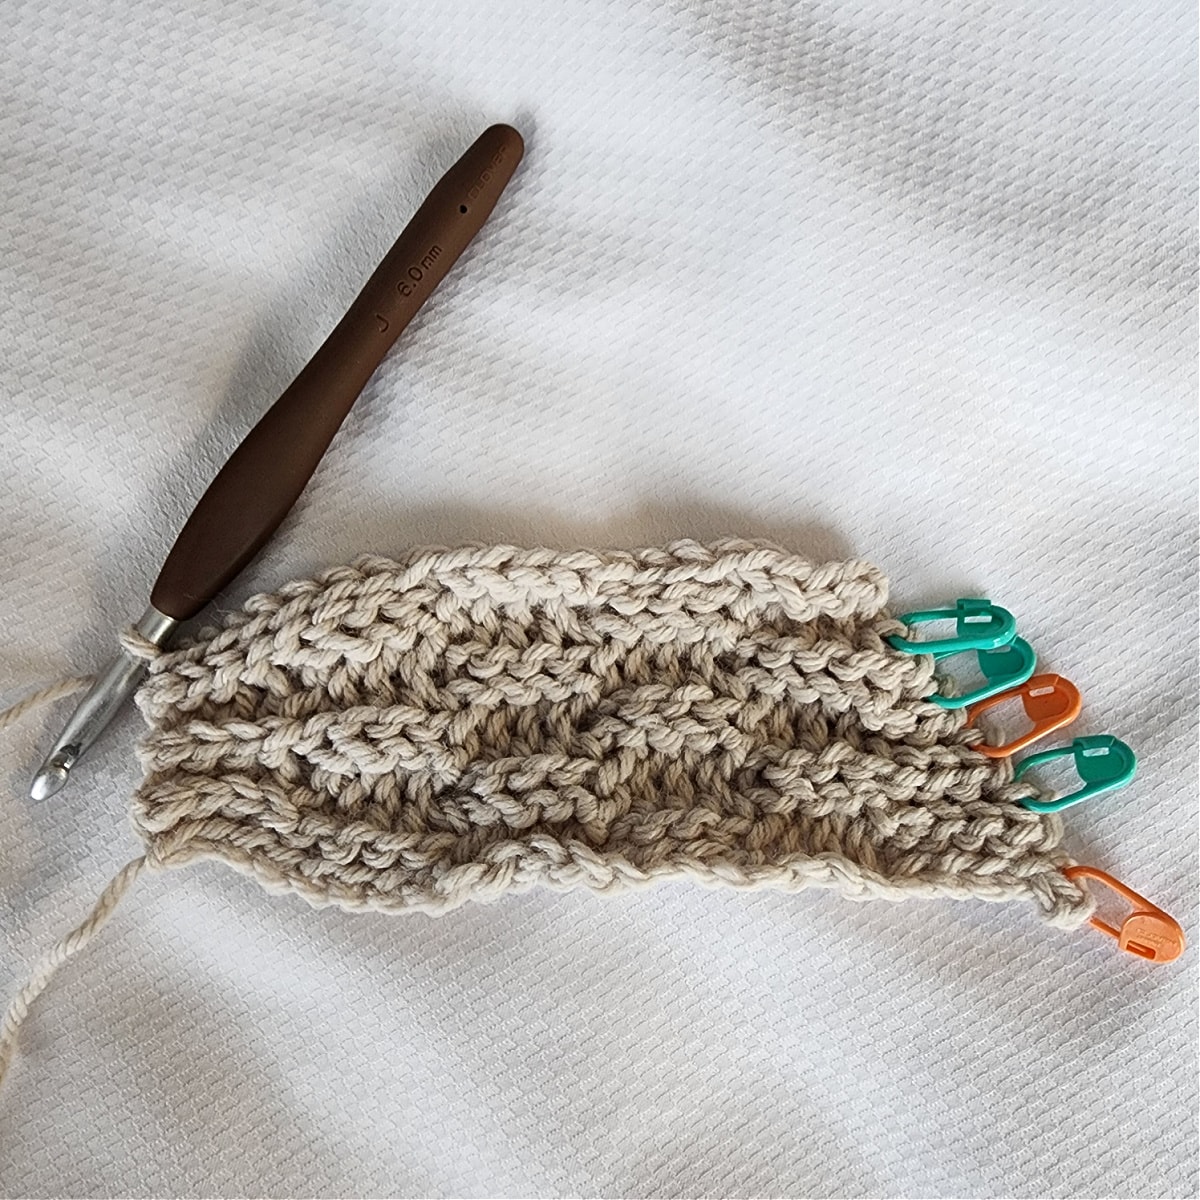
Row 48: Ch 1, BLO sl st in each of the first 4 sts, (Inv BLO sl st in each of the next 4 sts, BLO sl st in each of the next 4 sts) work from ( to ) 2 times, BLO sl st in each of the next 0 (2) sts, BLO sl st in each unworked st to Row 37. Turn. (25, 27 sts)
Row 49: Ch 1, BLO sl st in each of the first 5 (7) sts, (FLO sl st in each of the next 4 sts, Inv FLO sl st in each of the next 4 sts) work from ( to ) 2 times, BLO sl st in each of the last 4 sts. Turn. (25, 27 sts)
Rows 50 – 59: Rep Rows 2 – 11.
Row 60: Ch 1, BLO sl st in each of the first 4 sts, (Inv BLO sl st in each of the next 4 sts, BLO sl st in each of the next 4 sts) work from ( to ) 2 times, BLO sl st in each of the next 0 (2) sts, BLO sl st in each unworked st to Row 49. Turn. (25, 27 sts)
At this point, continue with the instructions for the size crochet hat you’re making.
Adult Small / Medium Hat
Row 61: Ch 1, BLO sl st in each of the first 5 sts, (FLO sl st in each of the next 4 sts, Inv FLO sl st in each of the next 4 sts) work from ( to ) 2 times, BLO sl st in each of the last 4 sts. Turn. (25 sts)
Rows 62 – 65: Rep Rows 2 – 5.
Row 66: Ch 1, BLO sl st in each of the first 4 sts, (BLO sl st in each of the next 4 sts, Inv BLO sl st in each of the next 4 sts) work from ( to ) 2 times, BLO sl st in each of the next 3 sts, BLO sl st in each unworked st to Row 61. Turn. (25 sts)
Fasten off, leaving a tail of yarn that is twice the length of your hat. Continue on to the Crochet Hat Seam.
Adult Large Hat
Row 61: Ch 1, BLO sl st in each of the first 7 sts, (FLO sl st in each of the next 4 sts, Inv FLO sl st in each of the next 4 sts) work from ( to ) 2 times, BLO sl st in each of the last 4 sts. Turn. (27 sts)
Rows 62 – 71: Rep Rows 2 – 11.
Row 72: Ch 1, BLO sl st in each of the first 4 sts, (Inv BLO sl st in each of the next 4 sts, BLO sl st in each of the next 4 sts) work from ( to ) 2 times, BLO sl st in each of the next 2 sts, BLO sl st in each unworked st to Row 61. Turn. (27 sts)
Fasten off, leaving a tail of yarn that is twice the length of your hat. Continue on to the Crochet Hat Seam.
Crochet Hat Seam
With the right side of the beanie facing out, line up the first row with the last row.
Using a yarn needle and tail of yarn, you’ll now whipstitch the stitches from the last row to the stitches from the first row.
Whipstitch the rows together working through the following loops for each size.
Begin at the crown and work towards the hat band.
First 9 (11) Stitches: Whipstitch the BLO of the last row to the BLO of the first row.
Next 4 Stitches: Whip stitch the FLO of the last row to the FLO of the first row.
Next 4 Stitches: Whip stitch the BLO of the last row to the BLO of the first row.
Next 4 Stitches: Whip stitch the FLO of the last row to the FLO of the first row.
Next 4 Stitches: Whip stitch the BLO of the last row to the BLO of the first row.
Weave in ends. Continue on to Closing the Gap in the Crown.
Closing the Gap in the Crown
With a yarn needle and an 8″ piece of yarn, weave in and out of the stitches around the opening in the crown, pull ends to tighten and close the gap in the crown. Weave in ends.
PERSONALIZE YOUR WINTER CROCHET HAT USING ONE OF THESE FUN OPTIONS!
- Chain Loop Yarn Pom
- Faux Fur Pom
- Personalized Tags
- Faux Fur Pom shown in photo was purchased on Etsy (aff)
Questions Crocheters Frequently Ask About Chunky Crochet Beanie Patterns
In addition to questions I’ve answered in this blog post above, below are some commonly asked questions about a winter crochet hat.
What is the difference between chunky and bulky yarn?
There is no difference between chunky and bulky yarns. They are one in the same. Both ‘bulky’ and ‘chunky’ are terms that refer to a size 5 yarn weight.
How much yarn do you need to crochet a hat?
The answer to this question varies from crochet pattern to crochet pattern depending on the weight of yarn used and even the crochet stitches that are used. Knit-look crochet hats typically use less yarn than otheres.
For this knit look beanie pattern, depending on the size you’re making, you will need approximately 125 – 135 yards. This is less than one ball of Hue & Me yarn.
How many hours does it take to crochet a beanie?
Again, the answer to this question will vary from one crochet hat pattern to the next, but the Frosty Air knit look beanie can be completed in about an hour.
How do you finish the top of a crochet beanie?
The easiest way to finish the top of a crochet beanie is to take a yarn needle and an 8″ piece of yarn, weave in and out of the stitches around the opening in the crown, pull ends to tighten and close the gap in the crown. Weave in ends.
What can I make with one ball of yarn crochet?
There are many different projects you can crochet with one ball of yarn. Hats, mittens, scarves, and dishcloths seem to be the most common.
I MADE IT! NOW WHAT?
Pin this post! Save this crochet beanie pattern free to your Pinterest boards so that you can come back and make it again.
Leave a comment below: We love to hear your feedback.
Share Your Finished Projects on Facebook or Instagram: I love to see your finished projects! Share with us on social media and tag me @acrochetedsimplicity or use the hashtag #ACrochetedSimplicity so I can find your posts.
JOIN US IN THE FACEBOOK COMMUNITY GROUP!
I hope you’ve enjoyed this adult crochet hat pattern! Make sure to check out our other crochet beanie hat patterns.
Come share your finished projects with us in the A Crocheted Simplicity Crochet Community Group on Facebook. Join us for fun community events such as crochet alongs, join in on crochet conversations, ask questions, get advice, and share your love for crochet!

I think this pattern is so cute, but I’ve gotten almost done (at row 65) and there is no way this hat will fit my head (and I have a small head). Am I going to have to add 50 more rows? Is my tension too tight? I didn’t notice any notes about tension in the description.
Hi Finn,
Did you check your gauge and what weight yarn are you using? There’s a note after Row 12 that gives you a measurement for row height to make sure you’re on track.
If you need more help, please send me an e-mail: [email protected]
Jennifer
Hi, this is a beautiful hat that I would love to make my 11 year old daughter. I’m a little confused regarding gauging yarn. I have a Bulky yarn 5, Loops & Thread Charisma Acrylic (daughter picked this because of the colour). The requirement is a 8mm hook but it looks like the measurements might be off. Would this work out to fit her smaller head? Any advice would be much appreciated. Thanks
Hi Nichola,
I apologize for the late response. For some reason I stopped receiving e-mail notifications of blog post questions and just now realized this. If you are still struggling with this, please send me an e-mail so I can help get you on track: [email protected]
Jennifer