Snowflake Keyhole Scarf Crochet Pattern
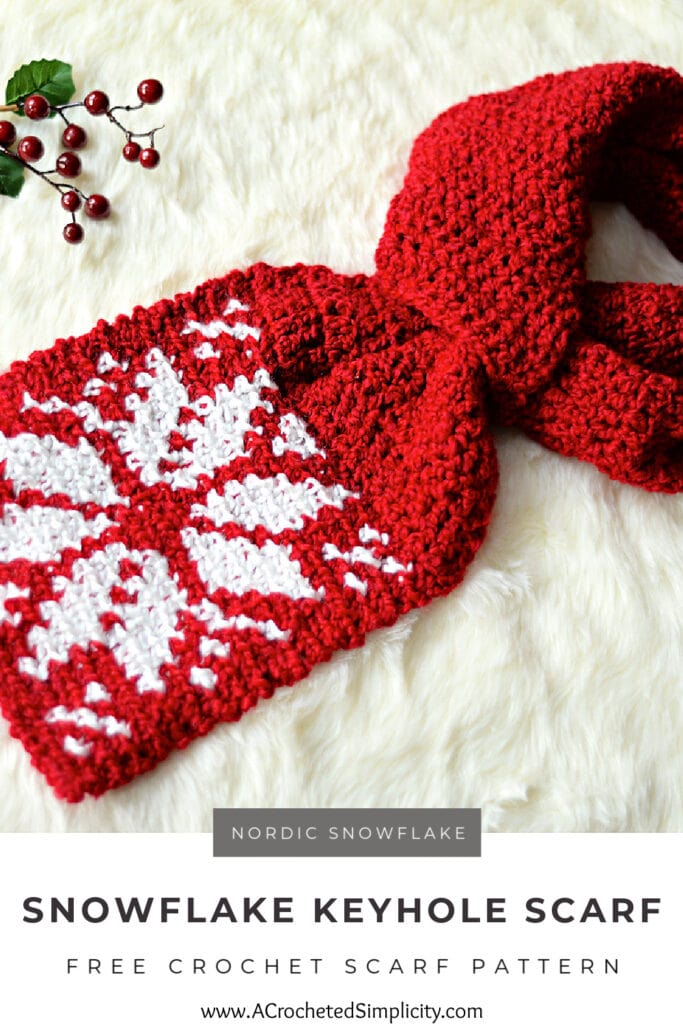
Learn to crochet a keyhole scarf with a tapestry crochet nordic snowflake.
I designed the snowflake keyhole scarf crochet pattern for a special friend who, like myself, grew up in the 80’s with a mom who forced her to wear turtlenecks. And now, as an adult, she can’t stand to wear anything tight around her neck.
Raise your hand if your mom made you wear tight knit turtlenecks and dickies too.
You’ll find the free crochet keyhole scarf pattern below, or you can find an ad-free print friendly version (that includes all photo tutorials) on Ravelry, or on Etsy (aff).
What is a Keyhole Scarf?
A keyhole scarf is a scarf that has a slit on one end that you pull the opposite end through to secure it. The keyhole opening is a design feature that allows the scarf to stay in place around your neck.
Keyhole scarves are unique crochet scarf patterns that allow you to wear a scarf loosely around your neck without the worry of it falling off.
Related: The Aveline Reversible Crochet Scarf is another keyhole scarf pattern free on my blog that you may love.
How to Wear a Keyhole Scarf
To wear a keyhole scarf, simply place the scarf around your neck, as you would a traditional, rectangular scarf.
Then, insert the end without the keyhole, through the keyhole opening and pull it through. The further you pull the end through the keyhole, the tighter your crochet keyhole scarf will fit.
Yarn
I chose Lion Brand Homespun yarn for this easy keyhole scarf crochet pattern for a couple different reasons. 1) It has a great sheen to it, and 2) It creates a crochet fabric with a wonderfully soft and cozy drape.
Lion Brand Homespun yarn is a Craft Yarn Council 5 weight / bulky / chunky yarn and it’s an acrylic and polyester blend. It’s currently available in 25 colors.
Lion Brand Yarns Hue & Me would make a great substitution for those would prefer a wool blend.

Snowflake Keyhole Crochet Scarf – Free Keyhole Scarf Pattern
The crochet scarf with keyhole is free below, but if you love to work offline, I’ve got a couple other great options for you.
Purchase the ad-free, printable PDF, including all photo tutorials, on Ravelry, or on Etsy (aff).
This post contains affiliate links.
Materials
- Yarn: Yarn used for the sample shown above is Lion Brand Yarn Homespun in Candy Apple & White; 5 / Bulky Weight Yarn; (185 yards / 169 m / 6 oz / 170 g / 98% acrylic, 2% other)
- Candy Apple Red: (165 yards / 1 ball)
- White: (20 yards / 1 ball)
- Crochet Hook: K/10.5/6.5mm (my favorite hooks are Clover Amour Hooks, I’ve never had an ache in my hand since switching)
- Scissors
- Tapestry Needle
Abbreviations (U.S. Terms)
- ch(s): chain
- st(s): stitch(es)
- sl st(s): slip stitch(es)
- sc: single crochet
- dc: double crochet
- Alt-dc: alternate double crochet
- sc2tog: single crochet decrease
- yo: yarn over
- RS: right side
- WS: wrong side
- BLO: back loop only
- sp(s): space(es)
- Rep: repeat
- Join yarn with a standing sc
- Color Change Tutorial
Gauge
- Motif in sc: 8 sts = 3″; 7 rows = 3.25″
- Scarf in dc: 8 sts = 3″ (height isn’t crucial)
Finished Sizes
- One Size: 8.5″ W x 39″ L
- Easily adjust the length.
Pattern Notes
- Turning chains are not included in stitch count, unless noted otherwise.
- I tend to crochet on the tighter side. You may find yourself needing to go down a hook size (or two) to properly meet gauge. Because this is a scarf, gauge isn’t as critical with this design.
- The first stitch of each row is worked into the same stitch as turning chain, unless stated otherwise.
- I used Lion Brand Homespun yarn for the tapestry crochet snowflake pattern shown in the photos. (185 yards / 169 m / 6 oz / 170 g / 98% acrylic, 2% other)
- Yardage & Colors
- Candy Apple Red: #790-375 (165 yards / 1 ball)
- Hepplewhite: #790-300A (20 yards / 1 ball)
- Color Change Tutorial: All color changes are worked on the last pull thru of the last stitch of the previous color. Make sure to keep your color changes all on the wrong side of your work.
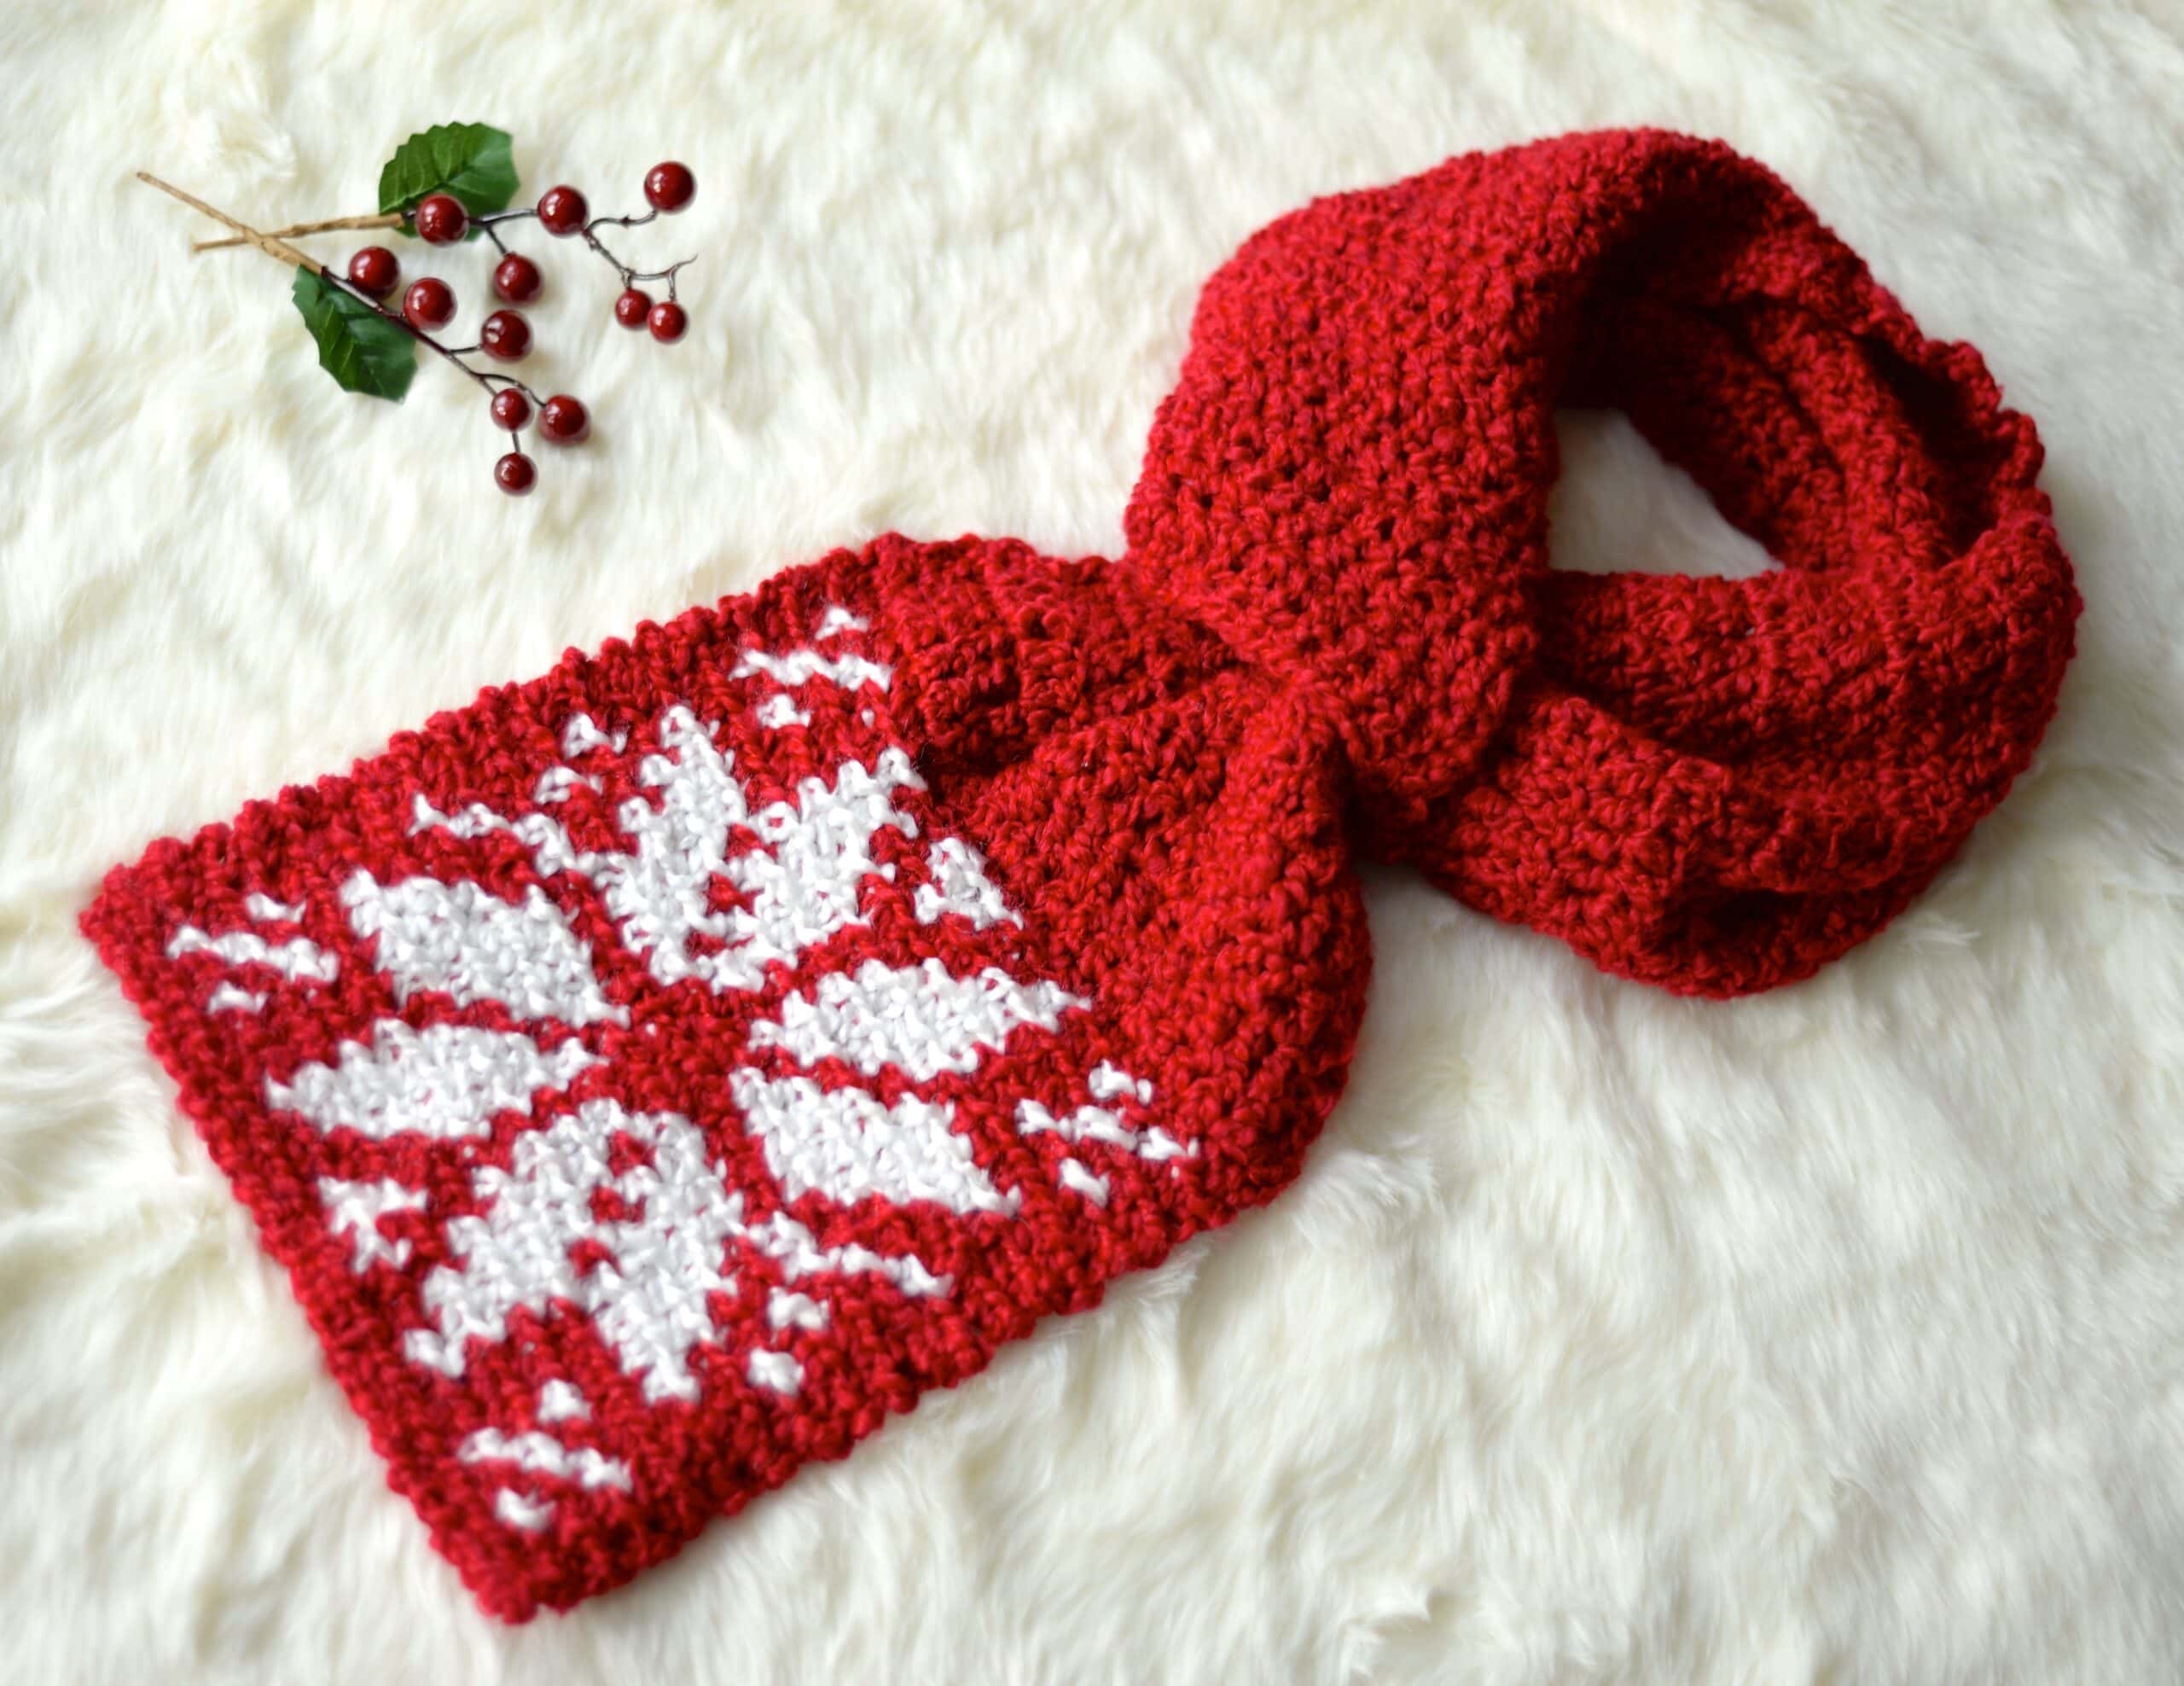
- Keyhole Scarf Construction: You begin your keyhole scarf with the tapestry crochet snowflake motif end. After completing the nordic snowflake, you’ll crochet the middle scarf section. This is where you can adjust the length of your scarf, if you prefer a longer or shorter scarf. Lastly, you’ll create a crochet keyhole at the end.
Special Stitches
- Single Crochet Decrease (sc2tog): Insert your hook into the next st and draw up a loop, (two loops on hook), insert your hook into the next stitch, draw up a loop (3 loops on hook), yarn over and draw through all 3 loops.
- Alternate Double Crochet (alt-dc): After turning your work, do not ch, instead, insert your hook into the first st, yo, pull up a loop, yo, pull thru both loops, insert your hook between the legs of the st just made, (yo, pull up a loop) twice, yo, pull thru remaining loops.
- Join yarn with a standing single crochet: Begin with a slip knot on your hook, insert your hook into the stitch or space indicated, yo, pull up a loop, yo and draw thru both loops on hook.
Keyhole Scarf Crochet Pattern
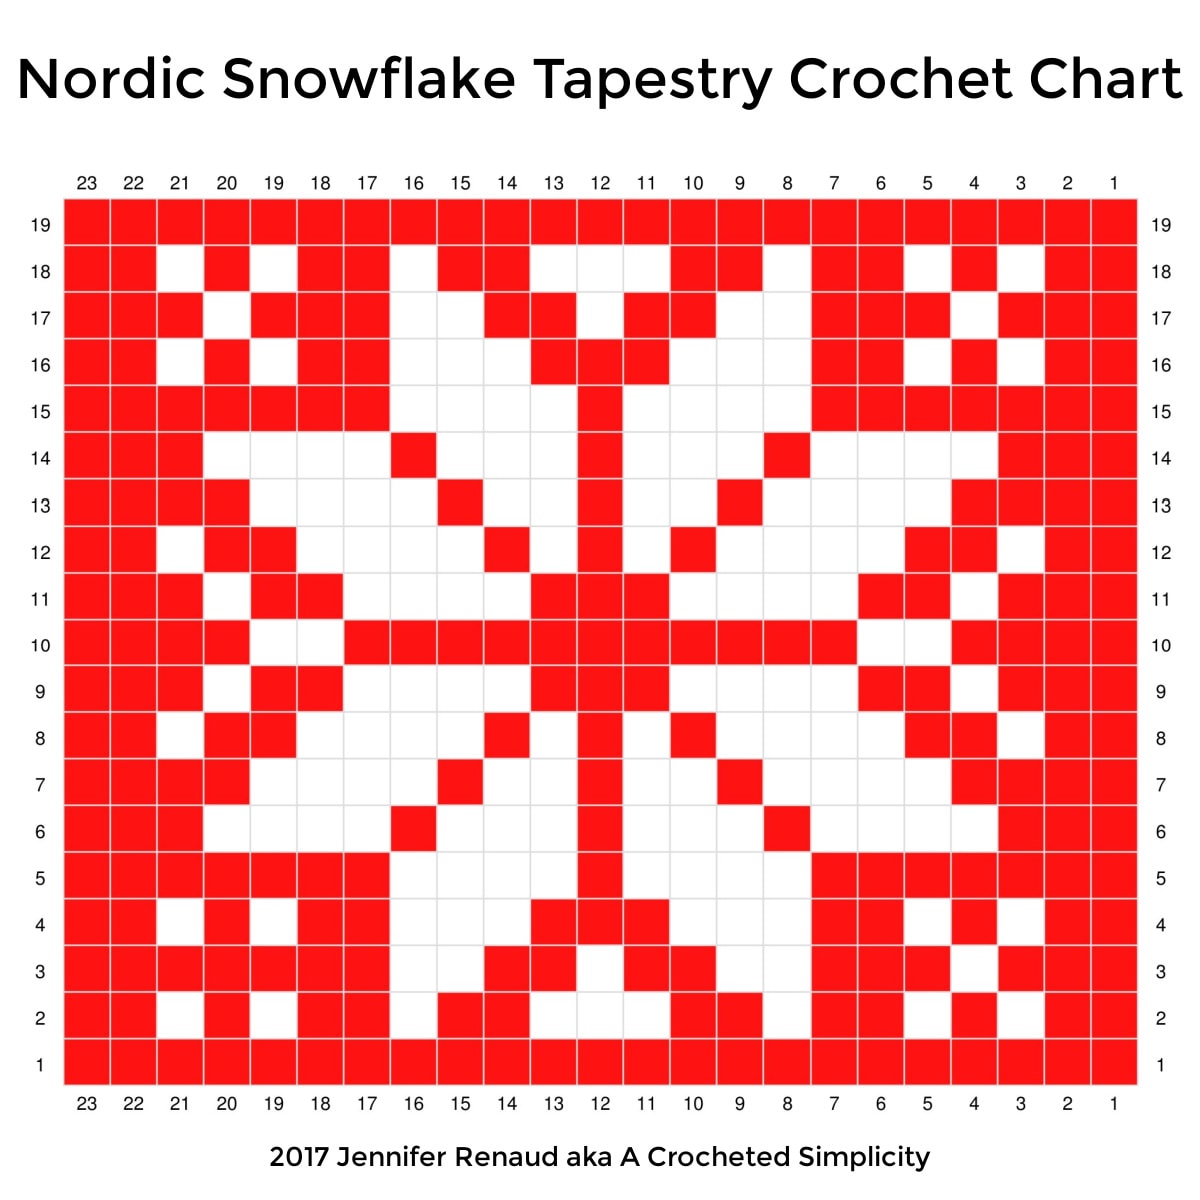
Tapestry Crochet Motif Notes
- Tapestry crochet can be worked a couple different ways, but for this design you will be working & reading the graph from right to left for Rows 2 – 19 of the motif.
- In order to keep the stitches lined up more neatly, and to provide more movement in the fabric, you will be working the motif in back loops only.
Related: If you need help working color changes, check out my Crochet Color Change Tutorial.
Snowflake Motif Instructions
Reading the Graph Below: Since you will begin each row in the stitch furthest to the right, you will read the graph from right to left for every row.
Note: If you’d like to add a pocket to your Snowflake Keyhole Scarf (as shown in a photo below), scroll down to the Pocket Instructions. These instructions will tell you an alternate way to begin your scarf, to create a pocket.
Row 1 (RS): With red yarn & a 6.50mm crochet hook, ch 24, working into the back hump of the foundation chain, sc in the 2nd ch from your hook, sc in each ch across. Do not turn. Fasten off. (23 sts)
Note: In Rows 2 – 18, you will work tapestry crochet to create the crochet nordic snowflake pattern. In the tapestry crochet chart below, one square represents one single crochet worked in the back loops only. You will begin and end each row with red yarn and work color changes throughout the row, as the chart shows.
Rows 2 – 18: Join yarn with a standing sc in the BLO of the st furthest to the right, BLO sc in each st across. Do not turn. Fasten off. (23 sts)
Row 19: Join red yarn with a standing sc in the BLO of the st furthest to the right, BLO sc in each st across. Turn. (23 sts)
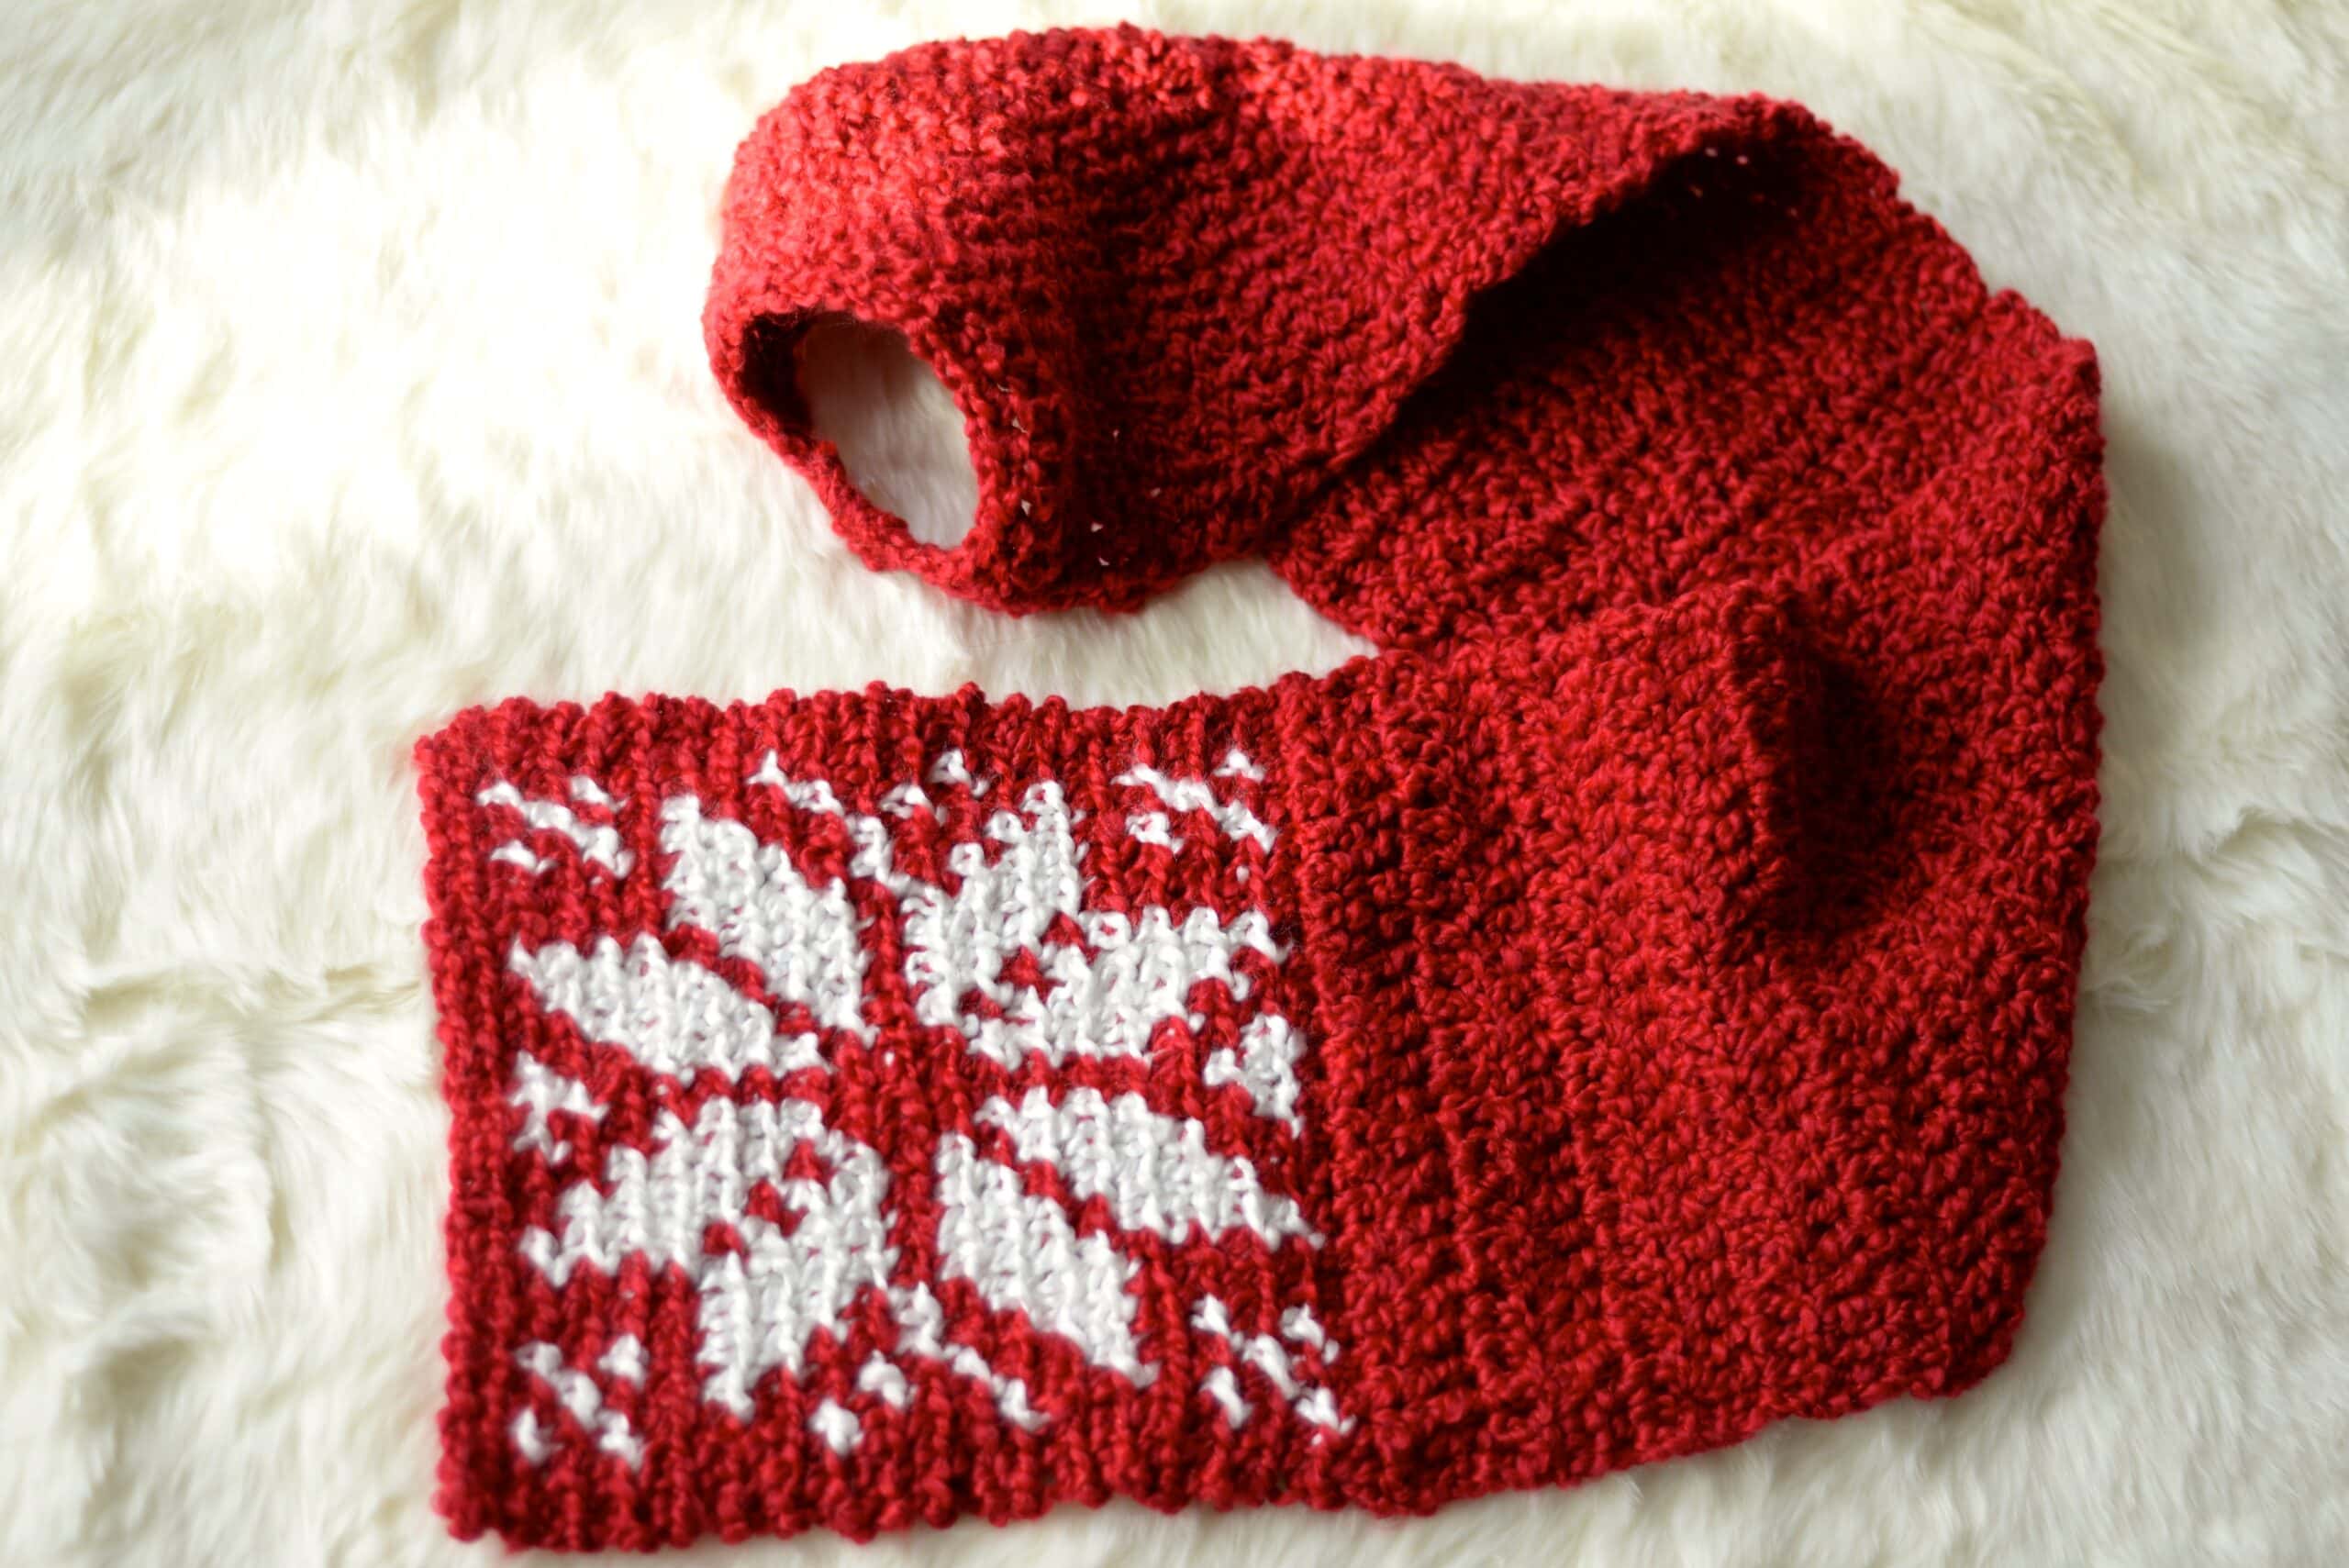
Do not fasten off. Your nordic snowflake motif square should be approximately 8.5″ W x 8.75″ H. Continue on to the Scarf Section.
Scarf Section
Note: The remainder of the scarf is worked in both loops.
Gauge: In dc, 8 sts = 3″ (stitch height isn’t crucial)
Row 1 (WS): Ch 1, sc in each st across. Turn. (23 sts)
Row 2: Alt-dc in the first st, dc in each st across. Turn. (23 sts)
Rep Row 2 until your scarf measures 39″ L (including the snowflake motif).
Do not fasten off. Continue on to the Keyhole.
Crochet Keyhole
Row 1: Ch 1, sc2tog, ch 2, skip each of the next 19 sts, sc2tog in last 2 sts. Turn. (2 sts + ch-2)
Row 2: Ch 1, sc in the first st, 2 sc in the ch-2 sp, sc in the last st. (4 sts)
Fasten off. Weave in ends.
Wearing Your Scarf
With the snowflake motif facing outward and placed on your left side, wrap the scarf around the back of your neck (from your left to your right).
With the keyhole end on top, put the snowflake motif end through the keyhole and gently pull to adjust fit.
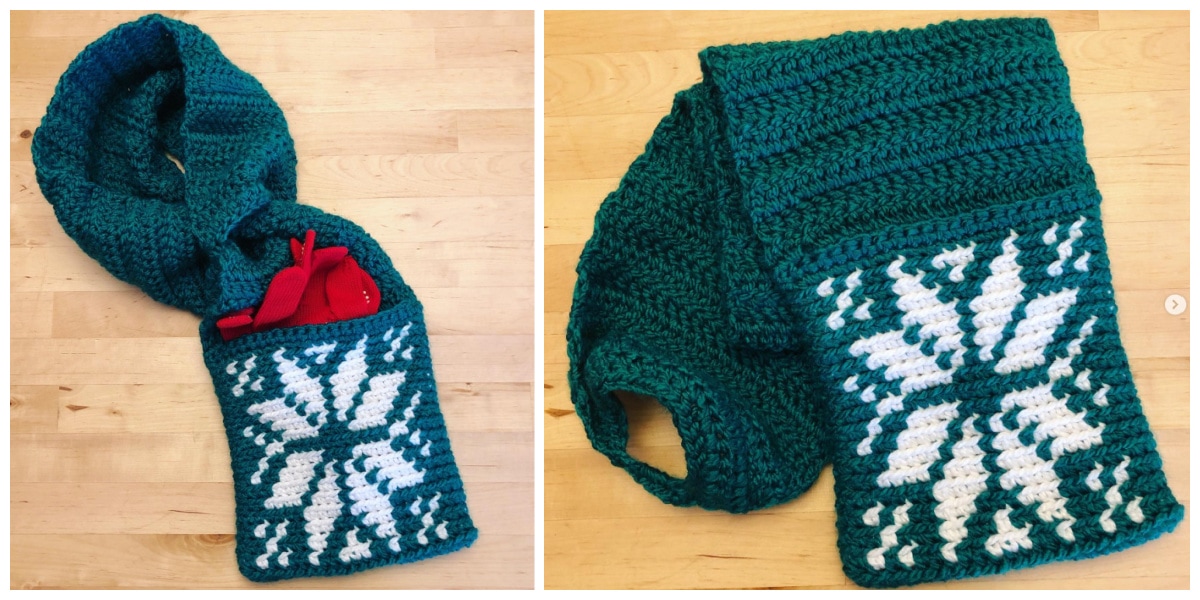
How to Add a Pocket to Your Keyhole Scarf
Christopher M. added a pocket to his Snowflake Keyhole Scarf to hold keys and other small items. It’s a great way to walk around hands-free!
If you’d like to add a pocket to your snowflake crochet scarf, follow these instructions for working the Snowflake Motif section. Then, you’ll continue with the Scarf Section above, to complete your keyhole scarf.
Unlike the original snowflake motif (above), the snowflake pocket is worked in the round. You will join at the end of each round.
For the first 23 sts of each round, you will follow the color changes in the nordic snowflake chart above.
Snowflake Pocket Instructions
Set-Up: With red yarn & a 6.50mm crochet hook, ch 46. Join with a sl st to the 1st ch. (46 chs)
Rnd 1 (RS): Ch 1, working into the back hump of the foundation chain, sc in each ch around. Join. (46 sts)
Note: Beginning with Rnd 2, work color changes following the tapestry crochet chart above. In the tapestry crochet chart, one square represents one single crochet worked in the back loops only.
In Rnds 2 – 18, work the first 23 stitches of each round following the color chart above, work the remaining stitches of each round in red.
Rnds 2 – 18: Ch 1, BLO sc in each st around. Join. (46 sts)
Rnd 19: Ch 1, BLO sc in each st around. Join. (46 sts)
Rnd 20: Ch 1, working in both loops, sc in each st around. Join. TURN. (46 sts)
Row 21: Ch 1, sc in each of the next 23 sts. Turn. (23 sts)
Do not fasten off. Your snowflake motif pocket should be approximately 8.5″ W x 8.75″ H. Continue on to the Scarf Section to complete your crochet pocket scarf.
I MADE IT! NOW WHAT?
Pin this post! Save this keyhole scarf crochet pattern to your Pinterest boards so that you can come back and make it again.
Leave a comment below: We love to hear your feedback.
Share Your Finished Projects on Facebook or Instagram: I love to see your finished projects! Share with us on social media and tag me @acrochetedsimplicity or use the hashtag #ACrochetedSimplicity so I can find your posts.
JOIN US IN THE FACEBOOK COMMUNITY GROUP!
I hope you’ve enjoyed this crochet keyhole scarf pattern! Make sure to check out our other crochet scarf patterns.
Come share your finished projects with us in the A Crocheted Simplicity Crochet Community Group on Facebook. Join us for fun community events such as crochet alongs, join in on crochet conversations, ask questions, get advice, and share your love for crochet!

More Crochet Patterns for Winter I Think You’ll Love
More Crochet Scarf Patterns
Are you looking for more modern crochet scarf patterns free? We have several free crochet patterns for men and women, right here on our blog.
We have a variety of crochet patterns for winter wear, such as crochet sweaters, crochet hats, crochet shawls & scarves, crochet mittens, and more!
Just beautiful. I love the colors and the design and Thank you so much for making it free. I can’t wait to start making it.
Oh, Jennifer, how did you know I was looking for exactly this pattern?! 🙂 I saw someone wearing a scarf with a motif like this (NOT handmade) and knew I had to figure out to replicate it in crochet. Thank you so much for saving me all that time or the scarf I made would have been for next year, not this year. And with your talent, I know the scarf will be so much prettier than anything I could have designed. Thank you!
I really like the keyhole scarf! Thank you for making it a free pattern.
I intend to make a few of these for my friends in Central NY. I miss making warm “snugglies” as I now am retired in southern Texas.