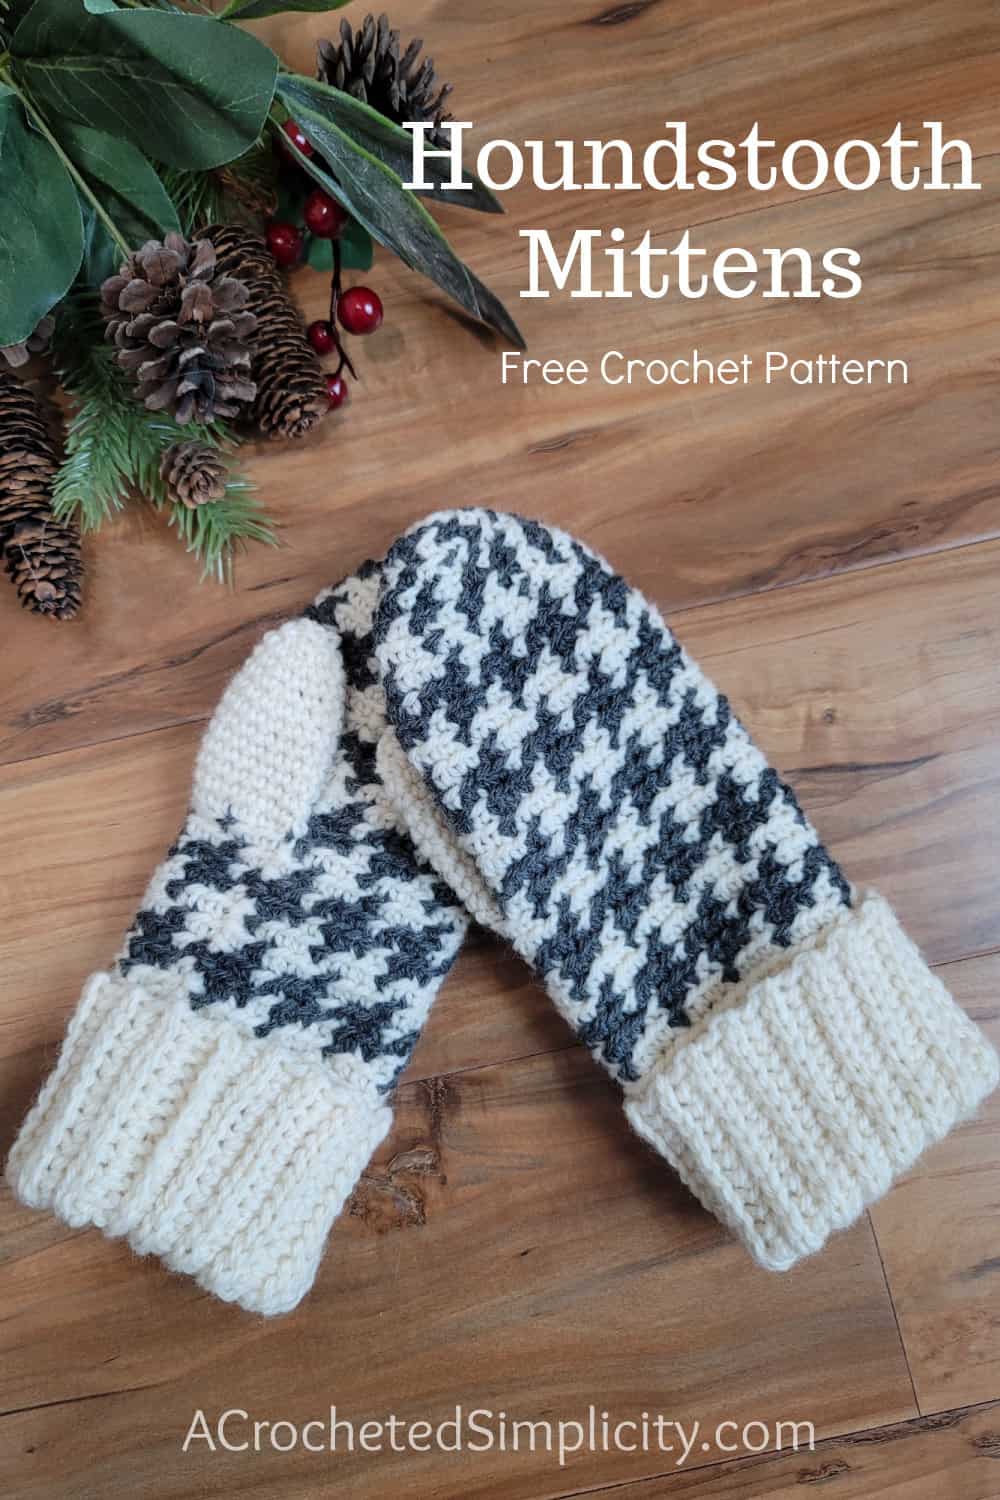
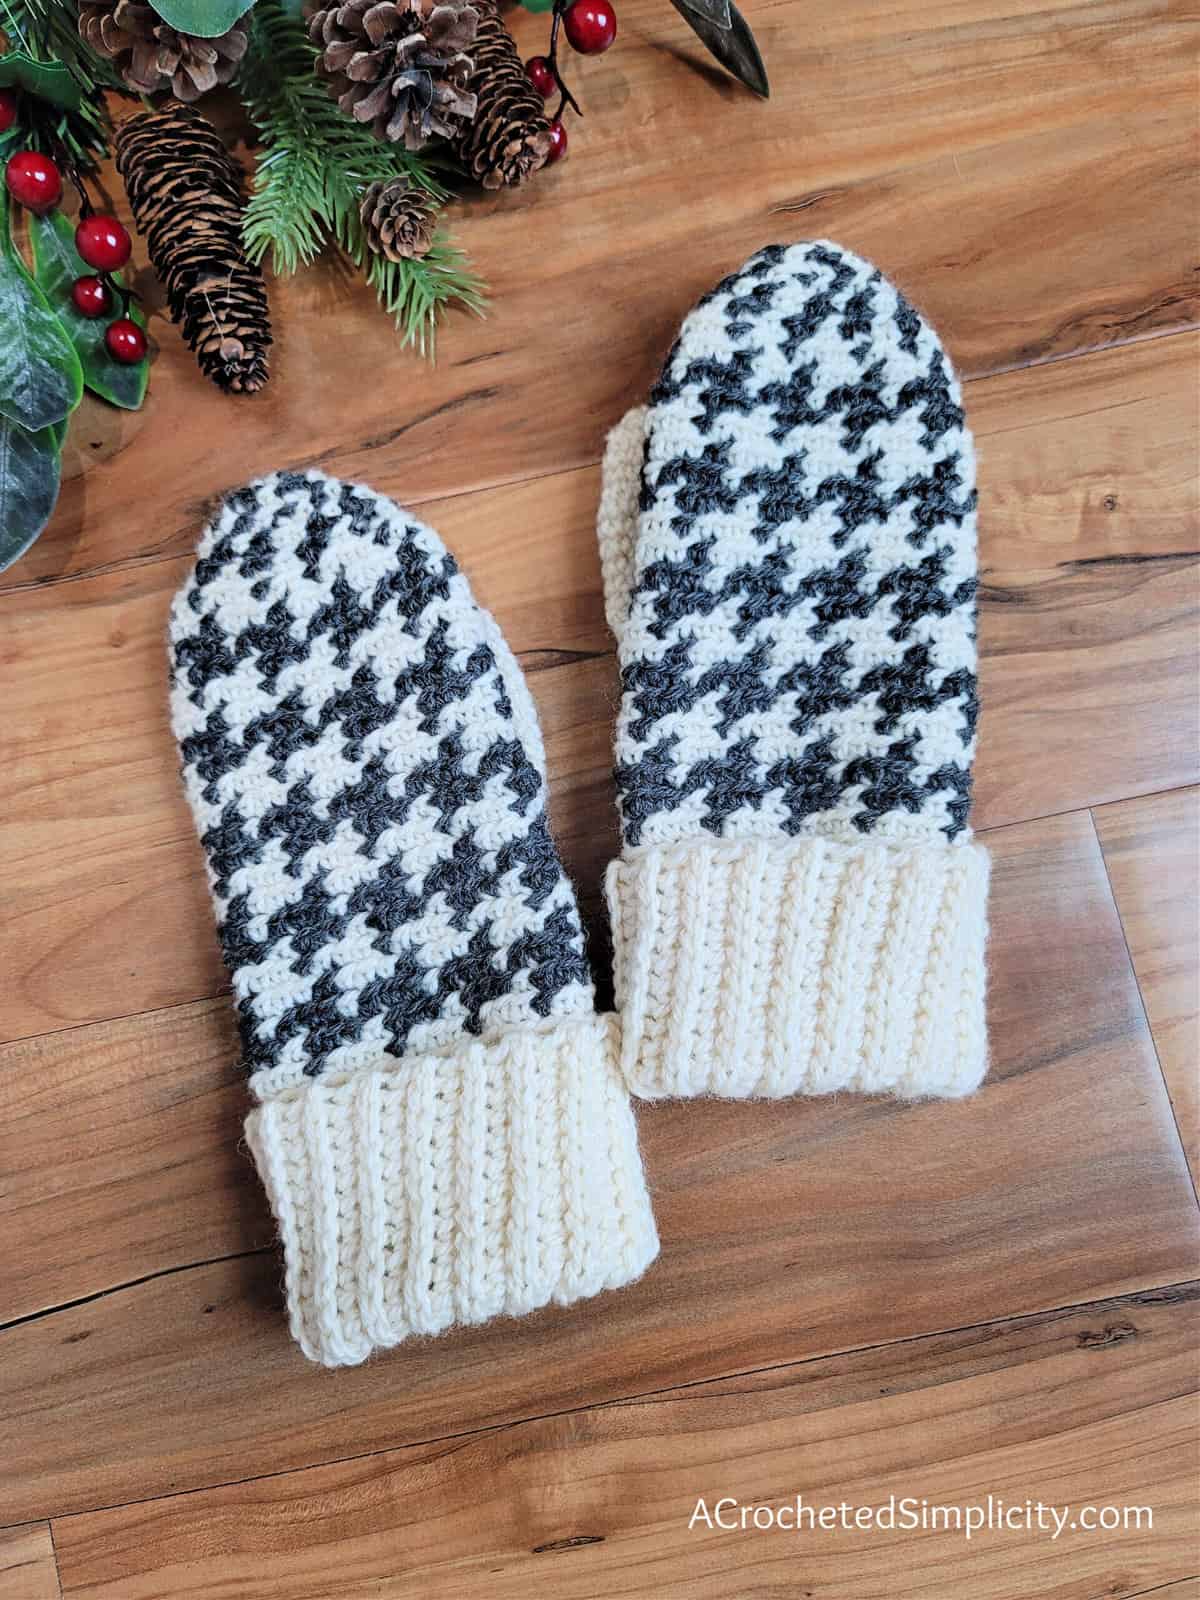
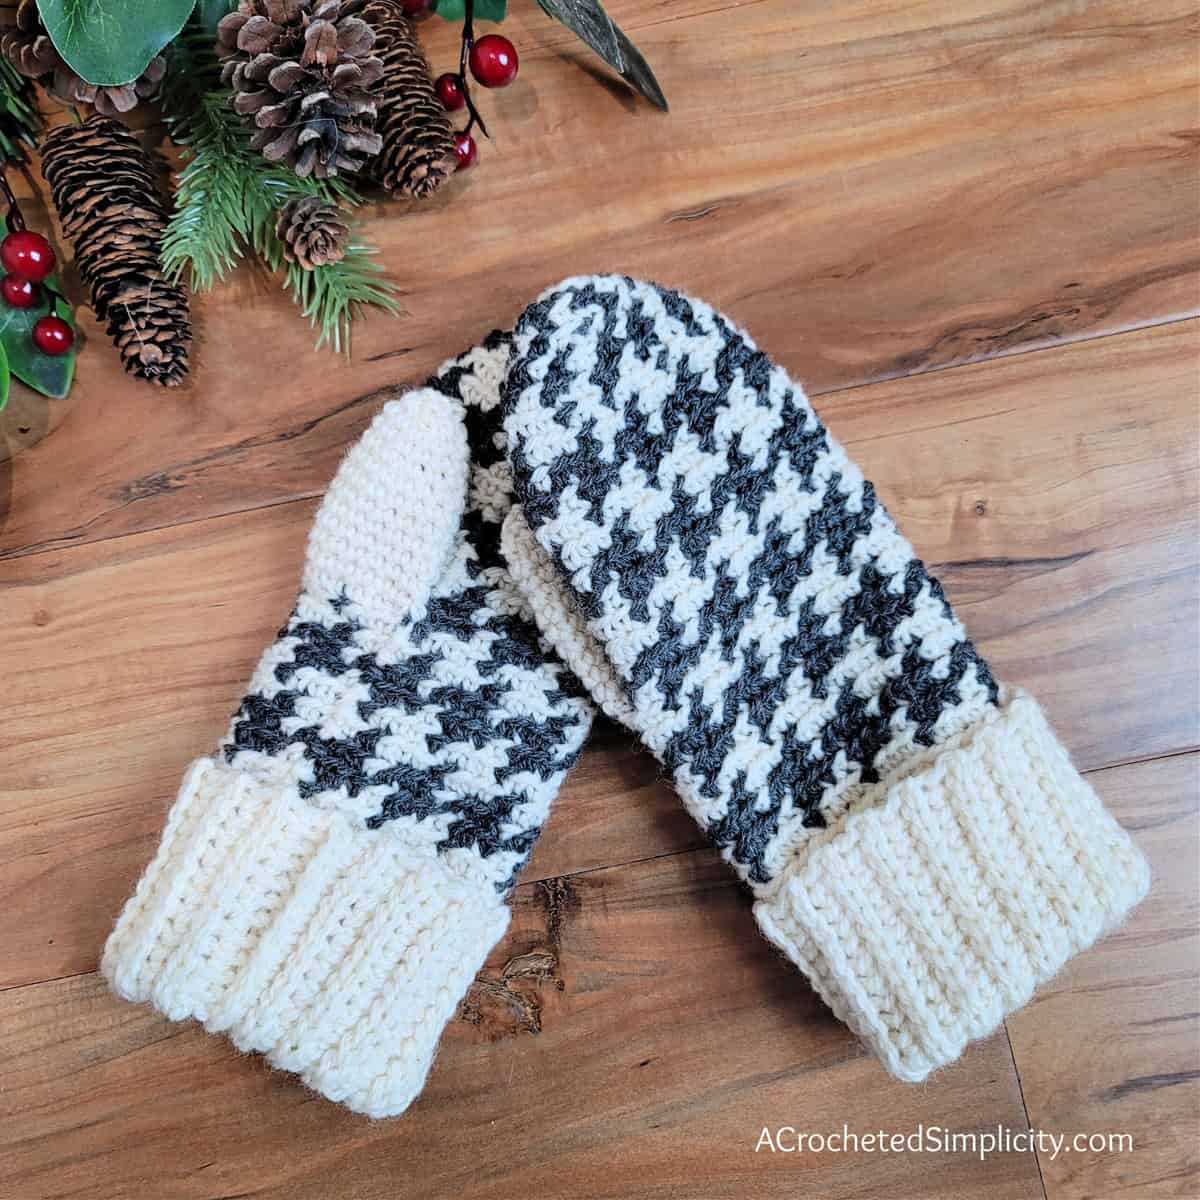
Houndstooth Mittens – Free Crochet Mitten Pattern
I can’t believe it’s December already and Christmas will be here in only 24 days! Have you started to feel the crunch of getting all of your crochet gifts made in time for Christmas? I know I sure feel it already. If you’re still looking for a few great quick crochet makes for gifts, look no further. Marly Bird and her team have pulled together many knit and crochet designers to bring you 24 Days of Quickies. Follow along each day to find brand-new, free crochet and knit patterns that are all quick makes and perfect for gift giving!
The free crochet pattern for the Houndstooth Mittens can be found below, or you can find an ad-free print friendly version on Love Crafts here, Ravelry here, or on Etsy here. P.S. The matching hat and cowl are coming real soon! 😉
>CLICK HERE TO SIGN-UP TO RECEIVE OUR NEWSLETTER!<
I’m excited to be participating in Marly’s 24 Days of Quickies 2021, a knit & crochet event that Marly has organized with the help of her assistant, Cryssi. They’ve pulled together 24 of Marly’s favorite designer friends to bring you a fantastic collection of quick knit & crochet projects that are all perfect for last-minute gift giving! You can find all of the information about this event on Marly’s blog HERE.
YARN
For my Houndstooth Mittens, I chose Patons Classic Wool Worsted Yarn. Patons Classic Wool Worsted is a 100% wool yarn and it really is a classic. It is available in a wide shade range that covers everything from neutrals to neons.
HOUNDSTOOTH MITTENS – FREE CROCHET MITTEN PATTERN
The free pattern is below, but if you love to work offline, or need to order your yarn, I’ve got a couple other great options for you.
Purchase the ad-free, printable PDF that includes all photo tutorials and charts, on Love Crafts here, Ravelry here, or Etsy here.
Save this pattern to your Ravelry favorites here.
Pin it for later here.
This post contains affiliate links.
Materials
- Yarn: Worsted Weight / 4; Patons Classic Wool Worsted in Aran & Dark Gray Mix were used for the sample shown on this page.
- Main Color (Aran): 180 yards
- Contrasting Color (Dark Gray Mix): 100 yards
- Crochet Hook: H/8/5.00mm; or size needed to obtain gauge (My favorite crochet hooks are the Clover Amour Crochet Hooks, I’ve never had an ache in my hand since switching).
- Scissors
- Yarn Needle
- Scrap of yarn
Many of these materials are available for purchase through our affiliates below:
 Patons Classic Wool Yarn Co...Shop on Amazon
  Clover 1047/H Deep Blue Amo...Shop on Amazon
  Fiskars All Purpose Scissor...Shop on Amazon
  Outus 9 Pcs Large Eye Blunt...Shop on Amazon
Experience Level
- Easy
Gauge
- Cuff as written in pattern: 20 sts = 5″; 37 rows = 6″
- Body of Mitten in sc w/ 5mm hook: 13 sts = 3″; 11.5 rows = 3″
Size
- One Size Fits Most Adult Women
- Laid Flat (cuff folded): 4″ W x 9.5″ L (at widest & longest points)
Abbreviations (US Terms)
- ch(s): chain(s)
- st(s): stitch(es)
- sl st(s): slip stitch(es)
- sc: single crochet
- yo: yarn over
- rep: repeat
- Rnd: round
- BLO: back loop only
- FLO: front loop only
- RS: right side
- WS: wrong side
- SM: stitch marker
- MC: Main Color
- CC: Contrasting Color
- See Special Stitches below
- inv sc2tog: invisible single crochet decrease
- Join yarn with a standing single crochet: click HERE for tutorial
Special Stitches
- Invisible Single Crochet 2 Together (inv sc2tog): Insert hook into the BLO of stitch indicated, insert hook into BLO of next stitch, yo, pull up a loop, yo, pull thru all loops on hook.
- Join with a standing sc: When instructed to “Join with a standing sc”, begin with a slip knot on your hook. Insert your hook into the stitch or space indicated, yo, pull up a loop, yo and draw thru both loops on hook. (click here for tutorial)
Notes
- I tend to crochet on the tighter side. You may need to go down a hook size (or two) to meet gauge if you crochet on the looser side.
- Beginning chain(s) are not included in stitch count, unless stated otherwise.
- First stitch of each row is worked into the same stitch as beginning chain, unless stated otherwise.
- Another comparable worsted weight / 4 yarn may be used as long as gauge is met.
- Paton’s Classic Wool Worsted in Aran & Dark Gray Mix, was used for the sample shown in the photos. 100% Pure New Wool, (3.5 oz / 100g / 210 yd / 192 m )
- Yardage
- Main Color (Aran): 180 yards
- Contrasting Color (Dark Gray Mix): 100 yards
- The cuff is worked flat and then seamed. The mitten is then worked from cuff to fingertip. The thumb is then added.
- Color Changes: Click HERE for a color change photo tutorial.
- Personalized Tags for your crochet: read this blog post to find out where I purchase mine & how to add them!
HOUNDSTOOTH MITTENS INSTRUCTIONS
Stretchy Cuff
Row 1 (RS): With MC yarn & a 5.00mm crochet hook, ch 21, working into the back hump of the foundation ch, sc in the 2nd ch from your hook and in each ch across. Turn. (20 sts)
Row 2: Ch 1, BLO sl st in each st across. Turn.
Row 3: Ch 1, BLO sc in each st across. Turn.
Rows 4 – 31: Rep Rows 2 – 3.
Row 32 – Seam Row: With RS facing out, bring the first row up to meet the last row (the first row should be in front if you kept the RS facing out). Position your working yarn so that it’s on the inside of the cuff (See photo & video tutorial here for seam). Ch 1, slip stitch the rows together using the following method: insert your hook (from front to back) into the FLO of the 1st stitch of Row 1, insert your hook (from back to front) into the BLO of the 1st stitch of the last row, yo, pull thru all loops on your hook. Continue in this way across the cuff to complete the seam. (20 sts)
Do not fasten off. Continue on to Body of Mitten.
Body of Mitten
Step 1: Turn the cuff inside out. The RS of the body of mitten will be worked on the WS of the cuff so that when the cuff is folded down, the RS is showing.
Rnd 1 (RS): With MC yarn & a 5.00mm crochet hook, work into the sides of the rows of the cuff, ch 1, work 32 sc evenly around. Join with a sl st to the 1st st. (32 sts)
Rnd 2: Ch 1, (BLO sc in each of the next 7 sts, BLO 2 sc in the next st) 4 times. Join. (36 sts)
For the remainder of the Body of Mitten you will work BLO sc in each stitch around, but changing colors to achieve the houndstooth design. To keep the pattern shorter, I’ve used a number and letter to tell you how many of each color sc you’ll work for the pattern. W = White & B = Black. For example, 3 W sc = 3 single crochet using white yarn.
Continue using the written instructions below, or if you prefer charts, use the houndstooth chart below.
Color Changes: Click HERE for a color change photo tutorial.
Rnd 3: Ch 1, BLO, (3 W sc, 1 B sc) rep around. Join.
Rnd 4: Ch 1, BLO, (1 W sc, 3 B sc) rep around. Join.
Rnd 5: Ch 1, BLO, (1 B sc, 1 W sc, 2 B sc) rep around. Join.
Rnd 6: Ch 1, BLO, (2 W sc, 1 B sc, 1 W sc) rep around. Join.
Rnds 7 – 11: Rep Rnds 3 – 6, ending with a Rnd 3 rep.
Continue on to Create Thumbhole for either the left or right mitten.
Create Thumbhole for Right Mitten
Rnd 12: Ch 1, BLO, (1 W sc, 3 B sc) 7 times, 1 W sc, 1 B sc, ch 6, skip each of the last 6 sts. Join. (30 sc + 6 chs = 36 sts)
Create Thumbhole for Left Mitten
Rnd 12: Ch 6, skip each of the next 6 sts, BLO, 2 B sc, (1 W sc, 3 B sc) 7 times. Join. (30 sc + 6 chs = 36 sts)
Continue for Both Mittens
Rnds 13 – 14: Rep Rnds 5 – 6. (Note: for Rnd 13, you’ll be working into chs as well as sts.)
Rnds 15 – 22: Rep Rnds 3 – 6.
Do not fasten off. Continue on to Decreasing.
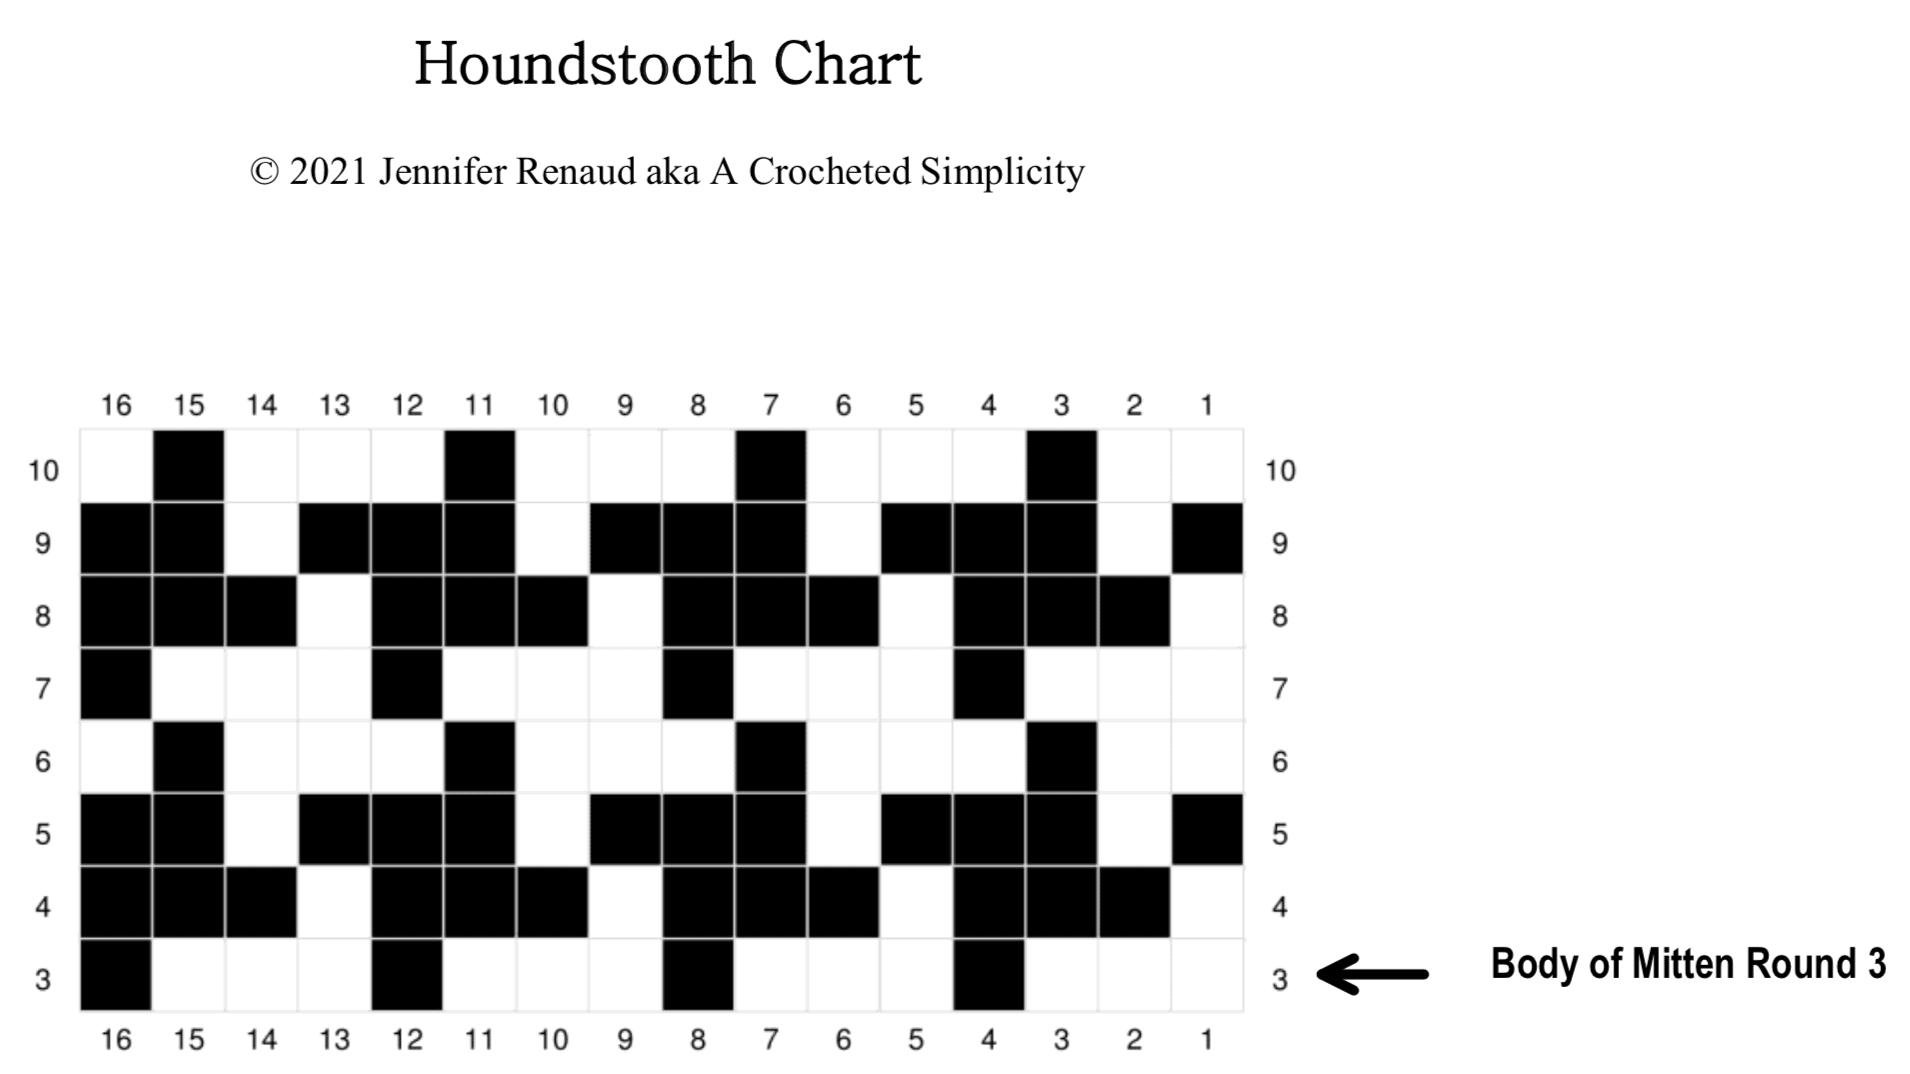
How to read the chart above:
- Read the chart from right to left, bottom to top.
- The White Squares indicate when you’ll work a single crochet in your Main Color.
- The Black Squares indicate when you’ll work a single crochet in your Contrasting Color.
- Carry your yarn with you and work over the color you’re not using. Refer to the color change tutorial HERE.
- Begin following the chart in Round 3 of Body of Mitten.
- The horizontal numbers represent the stitch number. This stitch pattern is worked in a multiple of 4 stitches.
- The vertical numbers represent the number of the round. This stitch pattern is working in a multiple of 4 rounds.
Decreasing
Rnd 1: Ch 1, (MC BLO inv sc2tog, MC BLO sc, CC BLO sc, MC BLO sc in each of the next 3 sts, CC BLO sc ) 4 times, then MC BLO invsc2tog, MC BLO sc, CC BLO sc. Join. (31 sts)
Rnd 2: Ch 1, (MC BLO sc, CC BLO invsc2tog, CC BLO sc, MC BLO sc, CC BLO sc in each of the next 2 sts) 4 times, then MC BLO sc, CC BLO invsc2tog. Join. (26 sts)
Rnd 3: Ch 1, (MC BLO sc, CC BLO sc, MC BLO invsc2tog, CC BLO sc, MC BLO sc) 4 times, then MC BLO sc, CC BLO sc. Join. (22 sts)
Rnd 4: BLO sl st in the 1st st (sl st does not count as a st and this moves the seam to the left 1 st), Ch 1, (MC BLO sc, CC BLO sc, MC BLO sc, CC BLO invsc2tog) 4 times, then MC BLO sc, CC BLO sc. Join. (18 sts) *The last stitch of the round is worked into the same st as the beginning slip stitch.
Rnd 5: Ch 1, (MC BLO sc, CC BLO sc, CC BLO invsc2tog) 4 times, then MC BLO sc, CC BLO sc. Join. (14 sts)
Rnd 6: Ch 1, (MC BLO invsc2tog) rep around. Join. (7 sts)
Fasten off leaving a 6 – 8″ tail of yarn. Continue on to Thumb.
Thumb
Note: Thumb is worked in continuous rounds (spiral). I suggest using a scrap of yarn as a stitch marker to help keep track of rounds.
Rnd 1: With a 5.00mm crochet hook, join MC yarn with a standing sc (click here for tutorial) in the BLO of the 1st skipped st of the thumbhole opening, BLO sc in each of the next 5 sts, sc into the side of the exposed sc from Rnd 12, sc in each of the next 6 sts, sc into the side of the exposed sc from Rnd 12. (14 sts)
Tip! If you’re left with a small gap at each corner of the thumb where you work into the side of the exposed sc’s, use a scrap piece of yarn and stitch the gap closed after completing Rnd 2.
Rnds 2 – 8: Sc in each st around. (14 sts)
Rnd 9: ( FLO inv sc2tog, sc in each of the next 2 sts ) 3 times, sc in each of the last 2 sts. (11 sts)
Rnds 10 – 11: Sc in each st around. (11 sts)
Rnd 12: (FLO invsc2tog ) 5 times, sc in the last st. (6 sts)
Fasten off leaving a 6″ tail of yarn. Continue on to Finishing.
Finishing
Turn mitten inside out. Using a yarn needle and yarn tails, whipstitch both the tip of the mitten and thumb closed. Weave in ends. Repeat all instructions to make the second mitten.
MORE FREE CROCHET PATTERNS FROM A CROCHETED SIMPLICITY
If you enjoy this crochet mitten pattern, you may enjoy these other projects as well. And if you just want to browse, you can find all of our free crochet patterns HERE.


Are you intimidated by knit-look crochet? Would you love to learn my tips & tricks? Take an Annies Video Class with me and let me ease your fears and help you increase your skills! Click on the photo below to watch a free preview. You can also see the other 4 video classes I have available!

Please share your finished ACS projects with us in the A Crocheted Simplicity Crochet Community Group on Facebook! Use hashtag #ACrochetedSimplicity when sharing on social media so I can find your posts!

Hello,
I just wanted to tell you that you had me hooked (no pun intended) when I saw the Houndstooth design on these mittens!
Thank you for the pattern, and your willingness to share with others. These aren’t just plain mittens they are HOUNDSTOOTH!
Mittens are such a wonderful gift to receive at Christmas but up here in Northern Canada we need them several months of the year. I thank you again and I think I shall have fun making these mittens. I may not get them done in time for Christmas (because I’m already behind schedule) but why not a New Year’s gift. 🙂