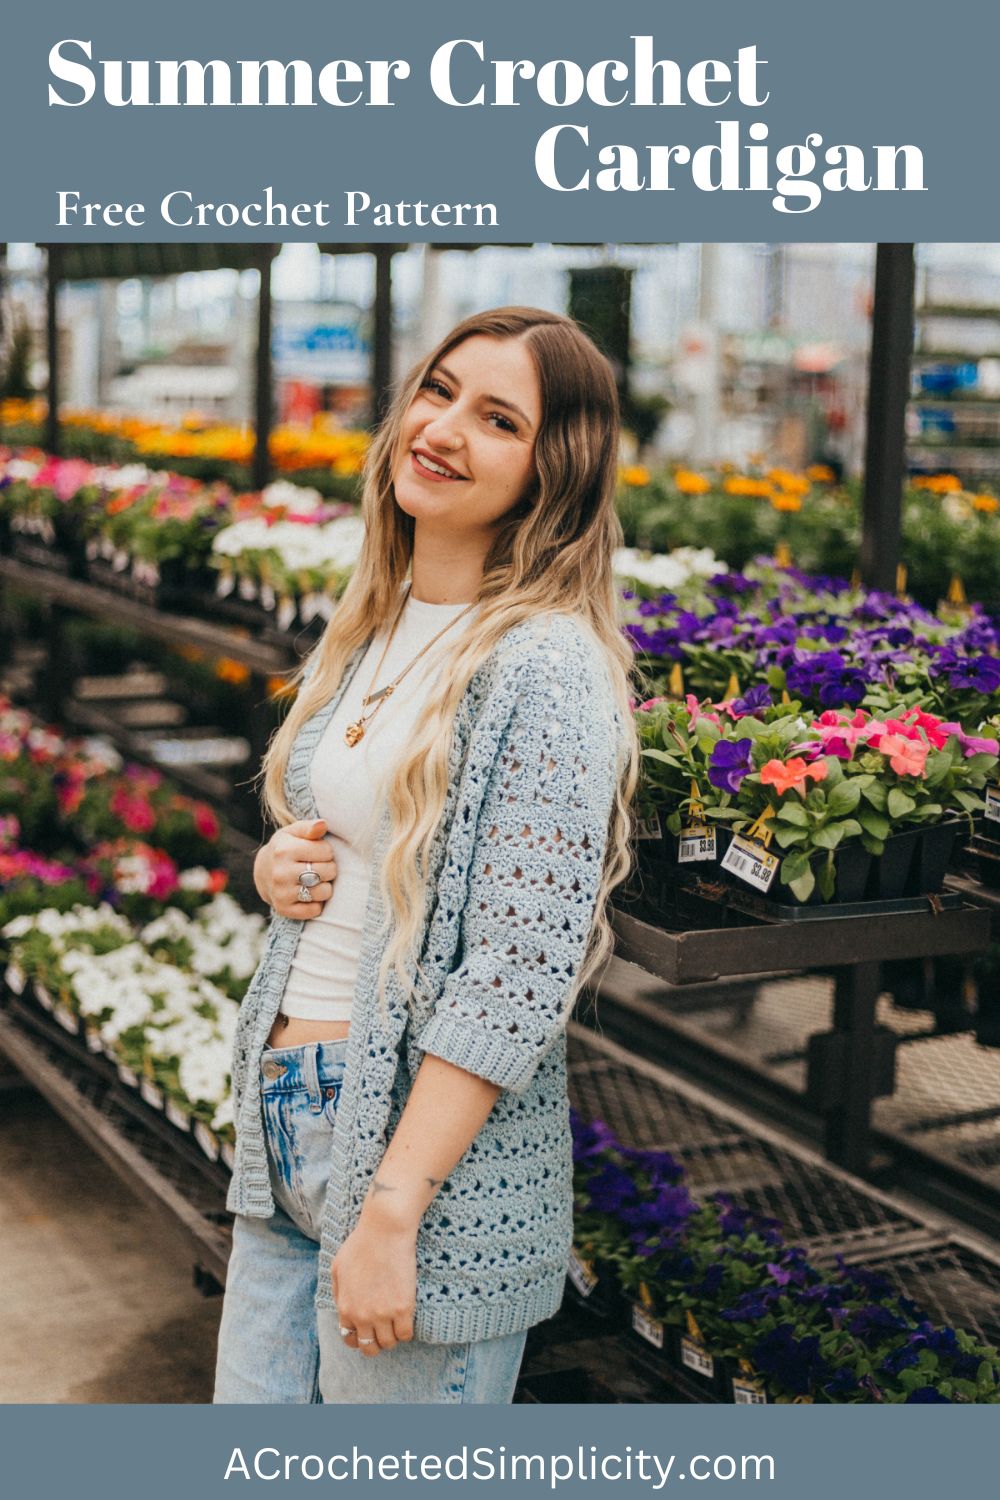
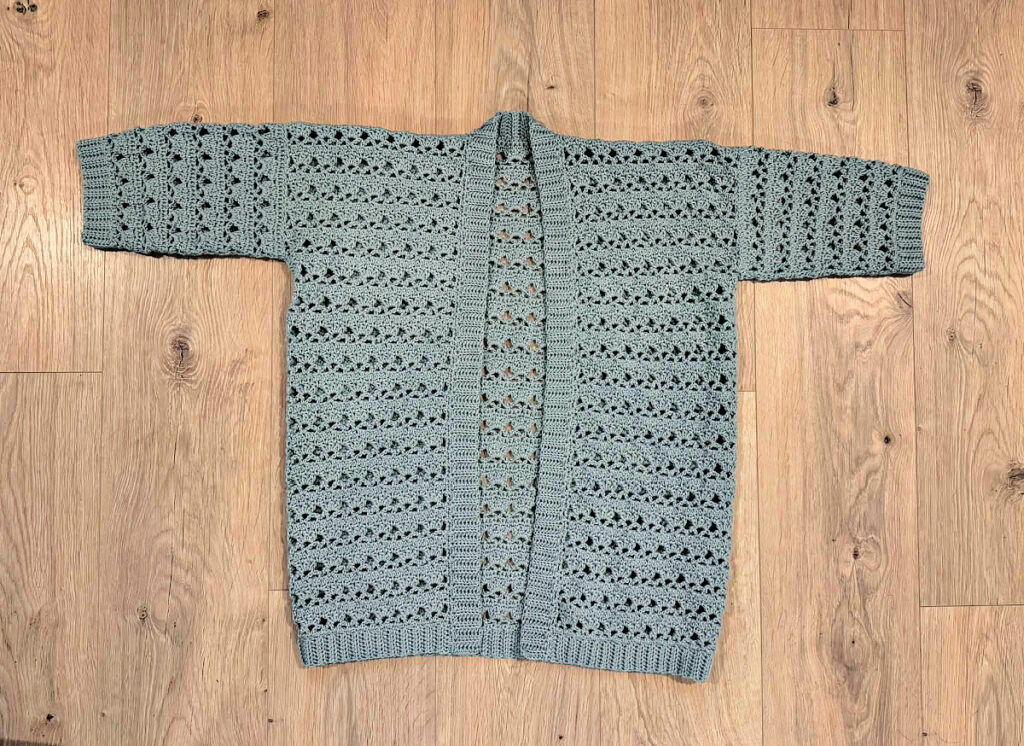
Suvi Summer Crochet Cardigan
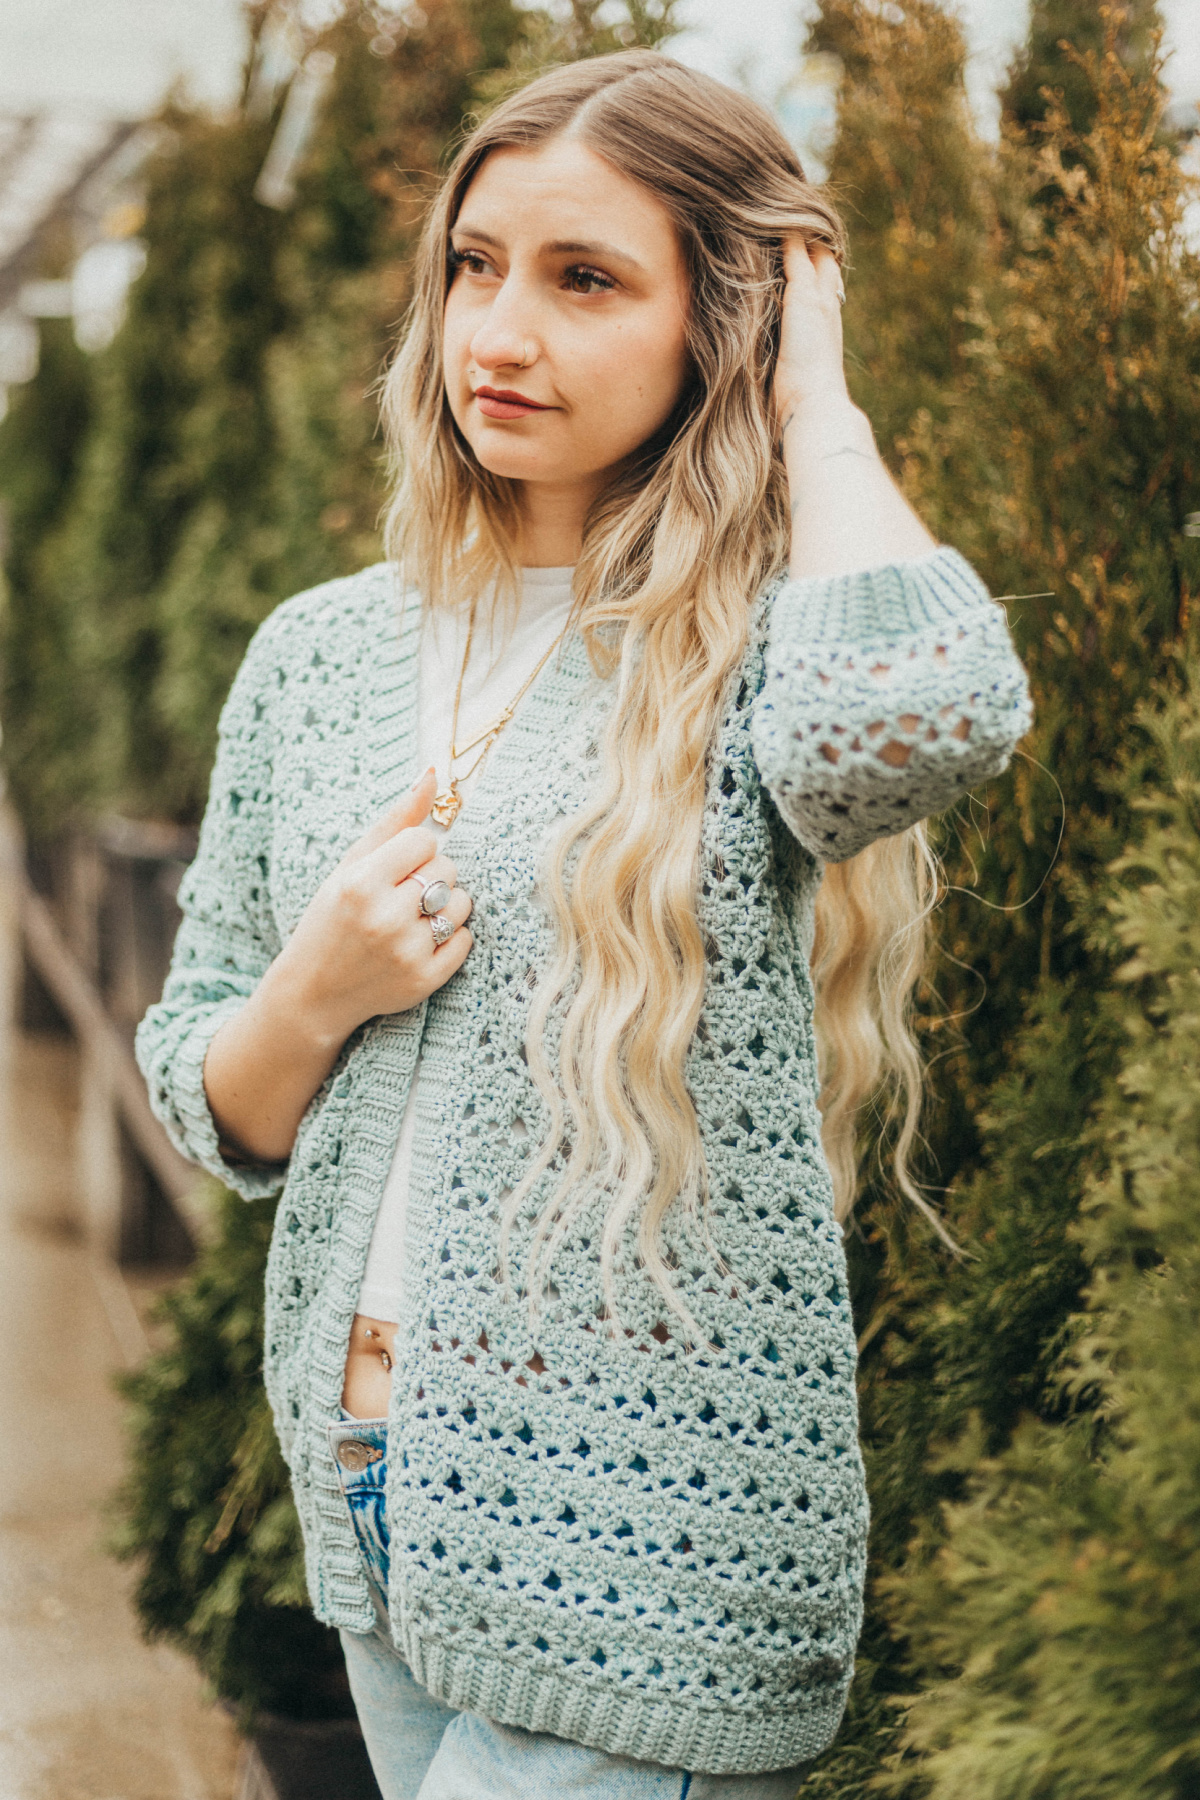
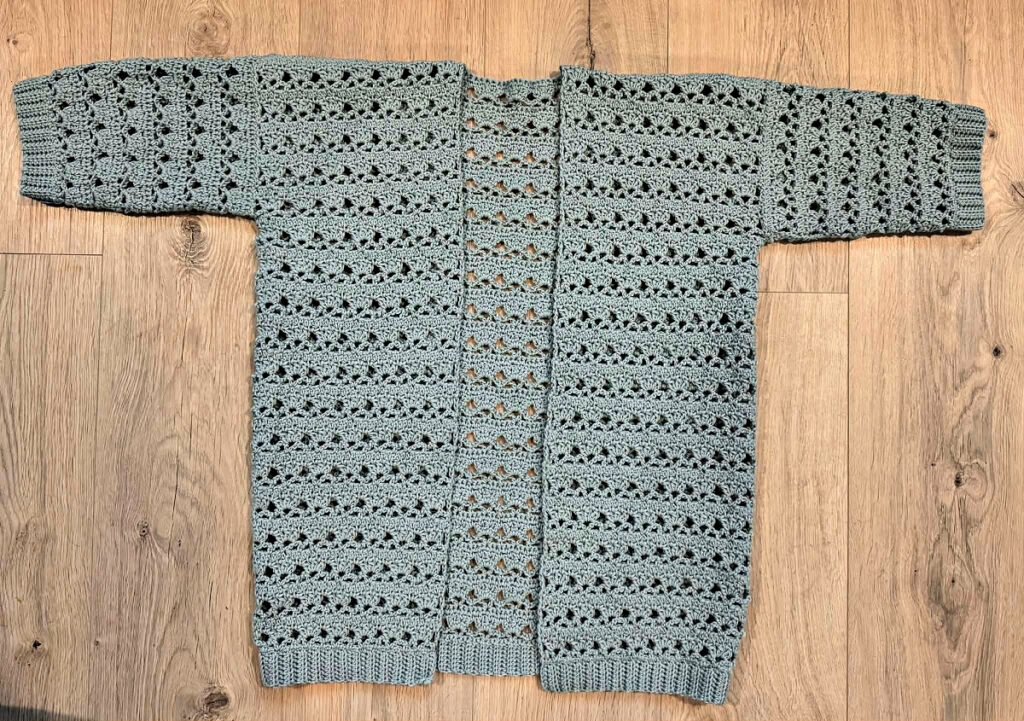
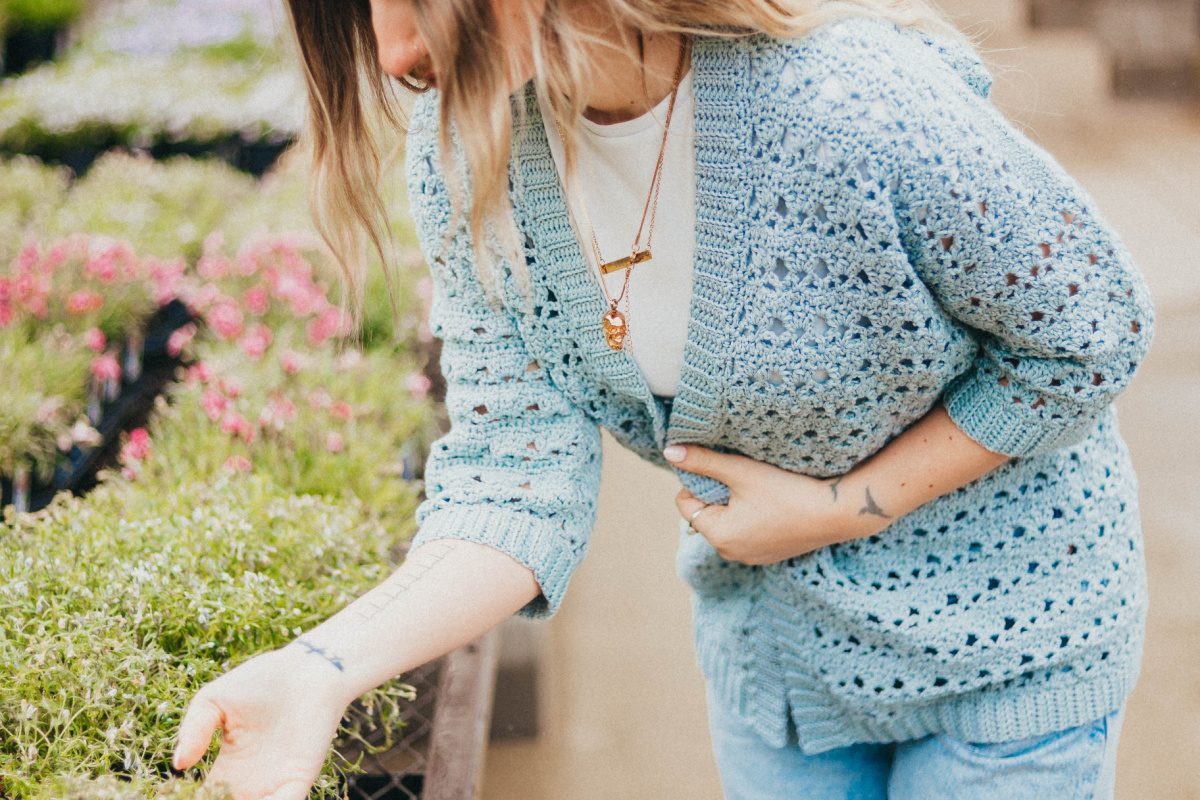
Who said we can’t have gorgeous crochet outerwear in the summers? It’s generally thought that cardigans and sweaters are a thing of winter but that’s not true! You can definitely make a chic summer crochet cardigan like this one to wear in the warmer months.
The construction is simple, the stitch combination is unique, there’s ribbing to pull it all together, and the laciness of it allows for ventilation. That all sounds great, right? So why not dive into this crochet pattern today so you’re summer-ready?
There are step-by-step instructions for every row of this lightweight cardigan and progression photos so that you can ensure your piece turns out right.
You’ll find the free crochet summer cardigan pattern in the post below, or you can find an ad-free printable PDF (that includes all photo tutorials + schematic), on Ravelry, or Etsy (aff).
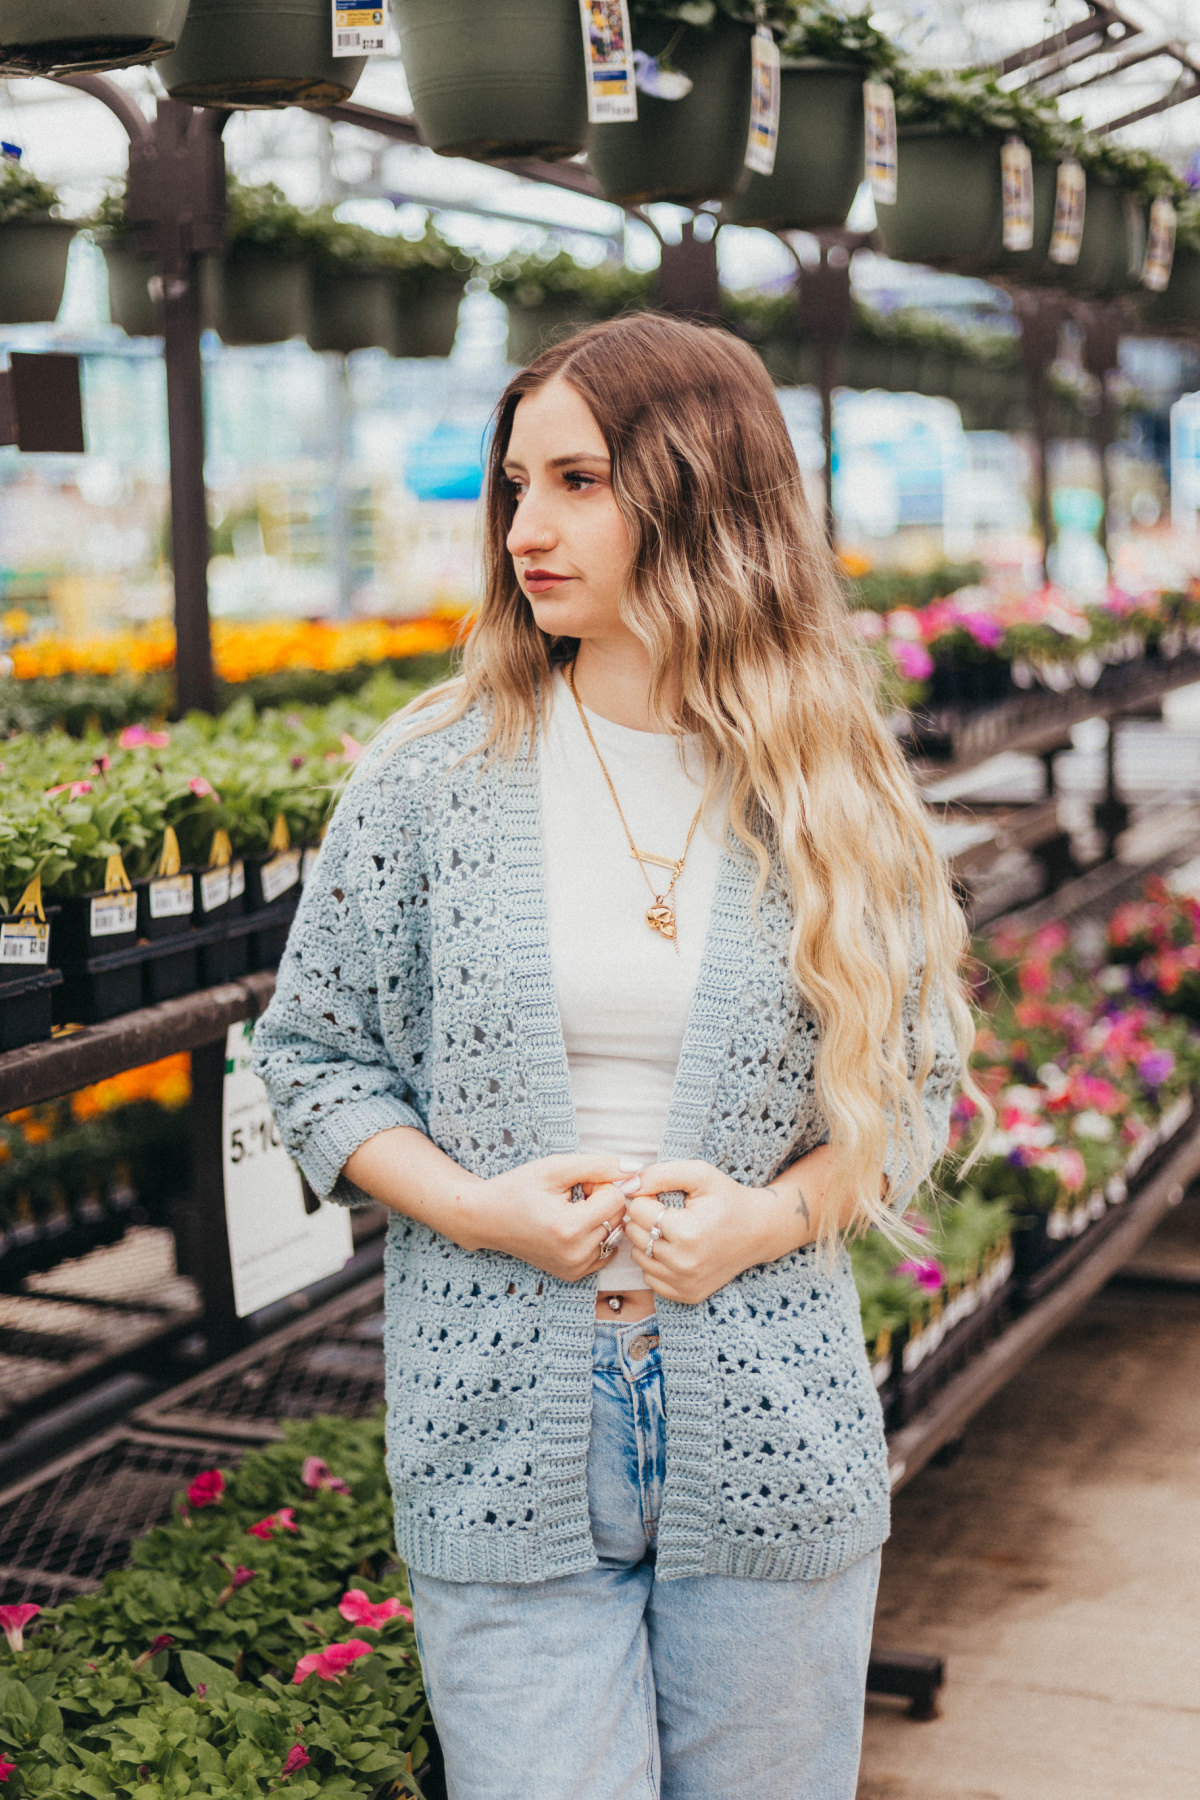
The Suvi Summer Crochet Cardigan will be your go-to choice for an evening walk post-dinner, a relaxed hangout with friends, or trip to the supermarket to get your groceries. As with all handmade items, you get to choose what color you want your sweater to be, whether that’s a nice neutral shade or a vibrant one.
If you don’t have a lot of experience working crochet cardigan patterns, that’s all right. The construction details are mentioned down below and you can tie them up with the pictures so that you don’t get lost.
Related: If you want to make another summer crochet cardigan from square motifs, you should check out the Reina Lacy Granny Square Cardigan.
How to Crochet a Cardigan
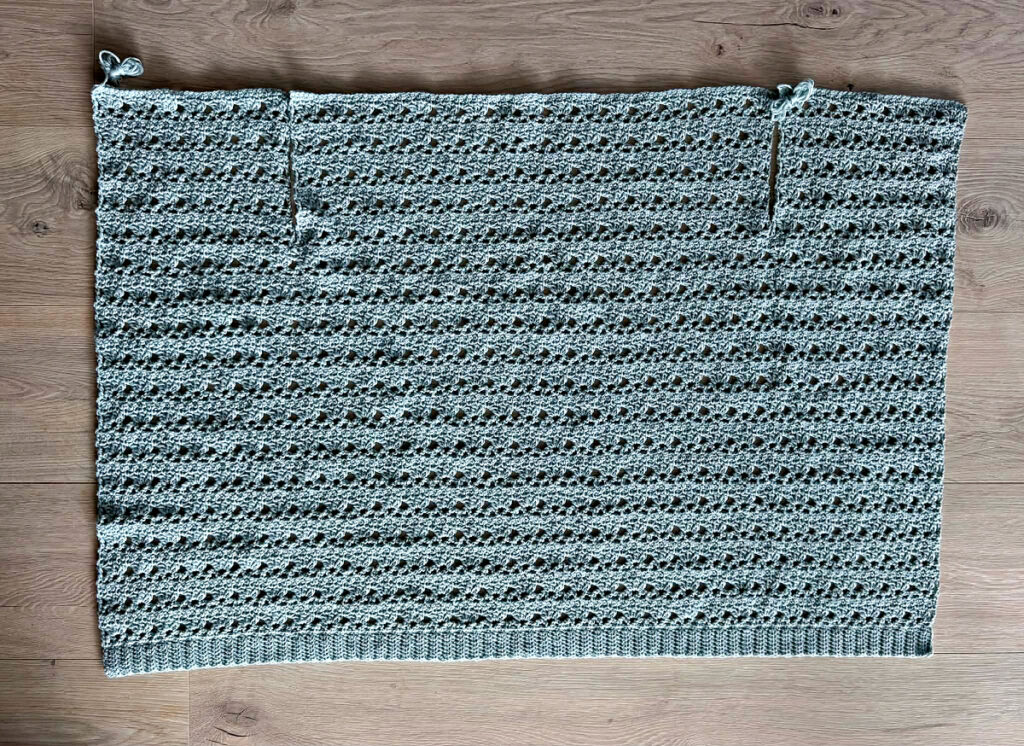
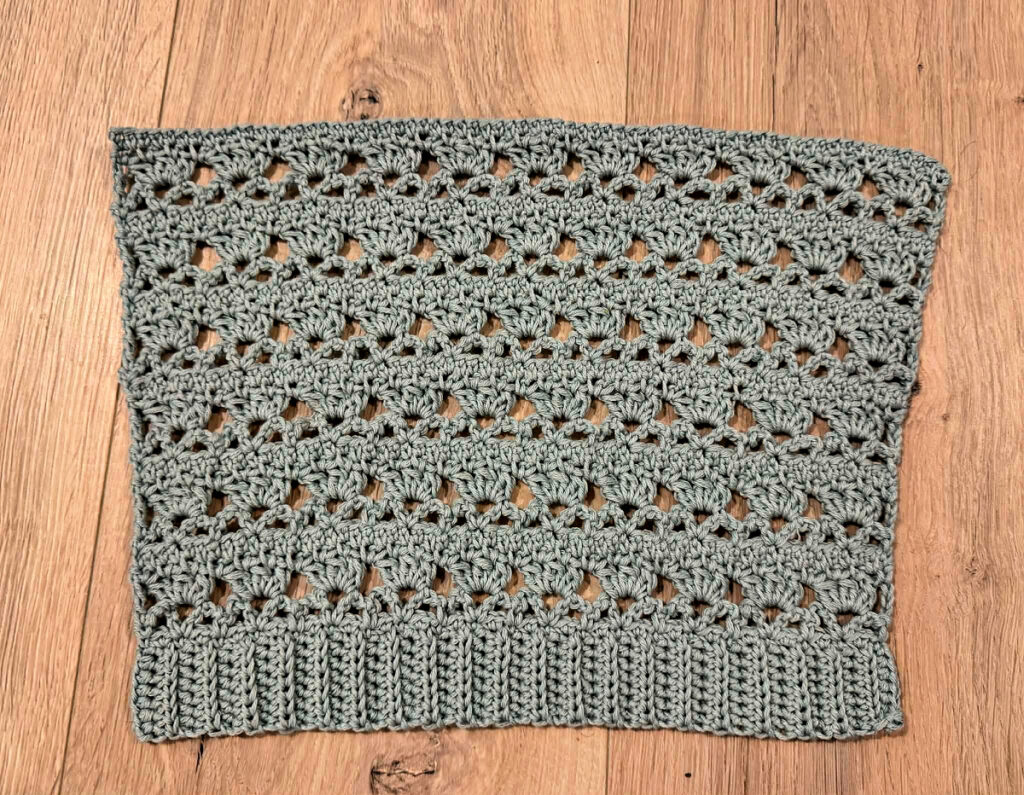
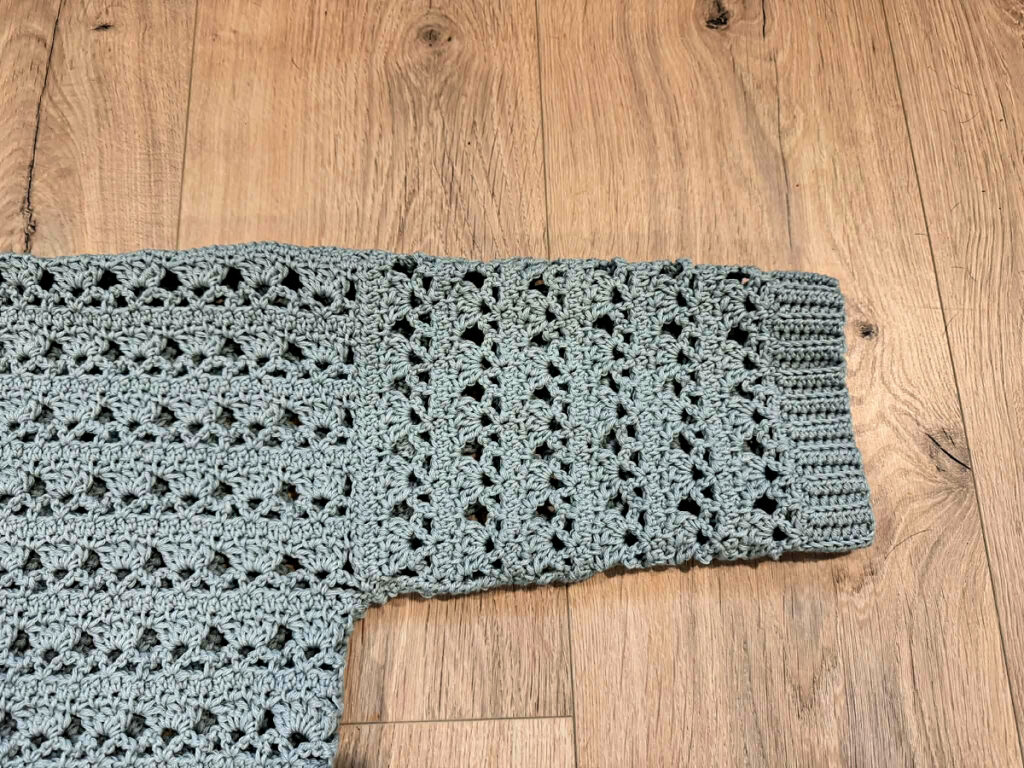
There’s nothing complicated about making this summer crochet cardigan and it has minimal seaming. It is worked from the bottom hem up to the shoulders. First, you’ll crochet the bottom ribbing, then crochet the body onto the long edge of this ribbing.
Once you reach the bottom of the armholes, you’ll split this into three panels and crochet the upper left panel, then back panel, then upper right panel. You’ll then seam the shoulders to start bringing it into shape.
Next, crochet the sleeves flat separately, seam the edges, then attach them to the cardigan’s armhole openings.
This is the main body of your cardigan complete. Then you’ll add a simple edging around the front opening of the cardigan. And lastly, add ribbing to the front opening edge to bring it all together neatly.
How To Get The
Suvi Summer Cardigan Pattern
Option 1: Scroll down for the free summer cardigan crochet pattern right here in this blog post.
Option 2: Purchase the ad-free printable PDF from one of my shops:
Best Yarn for Crochet Sweaters
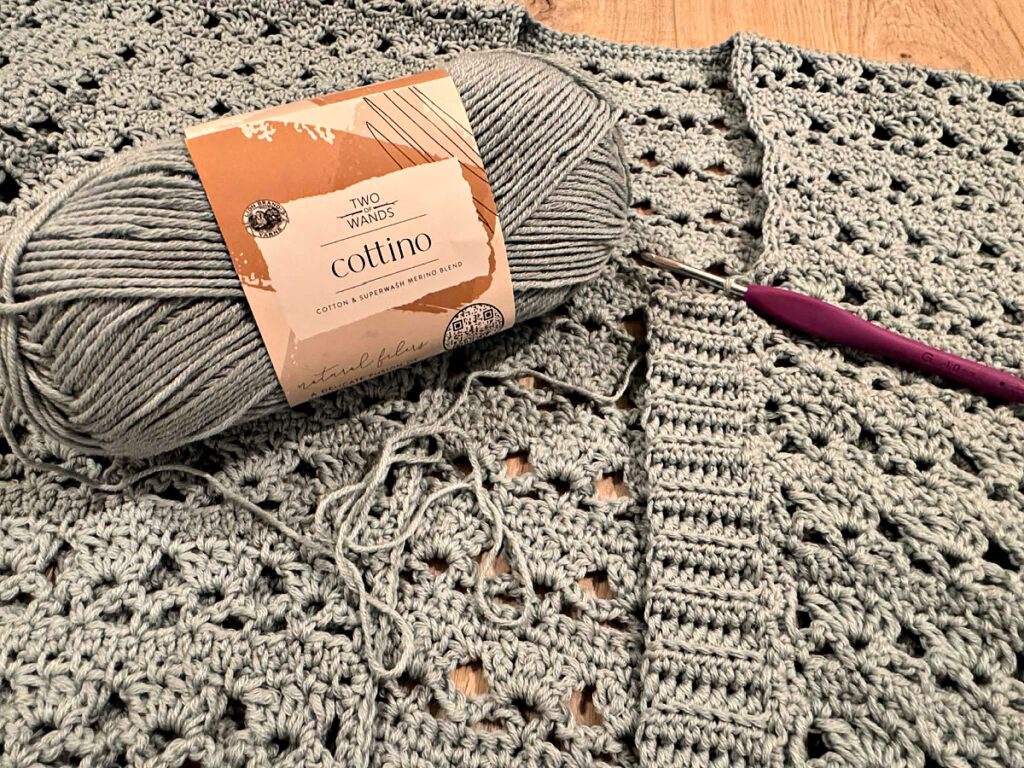
For crochet summer sweaters, while there are many options to choose from, I used a cotton and merino wool blend yarn. It is the perfect choice for a lightweight garment because it is breathable, soft, and gentle on the skin. Its natural fibers, paired with the openwork of the cardigan, allow air to circulate, keeping the body comfortable.
Cotton yarn can also usually be washed regularly without the worry of unraveling or distorting your work. Offering comfort, functionality, and durability, it was the best option for this cardigan. It’s also readily available and can come in a variety of colors which allows you to choose just the right one for whoever is receiving this summer crochet sweater.
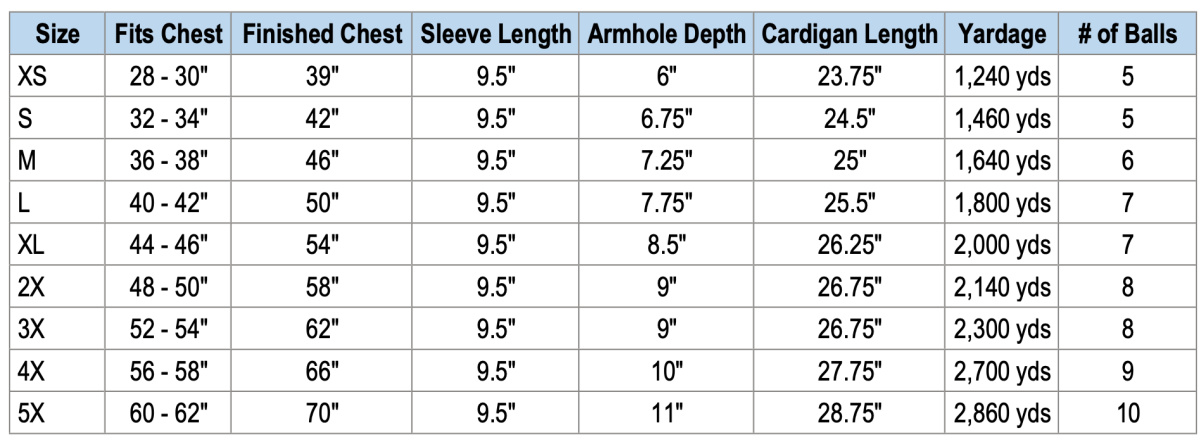
Choosing Which Size to Crochet
To choose your size, look over the size chart below. Model wears a women’s small and is wearing a small sample.
- Finished Chest, Sleeve Length, and Cardigan Length are measurements of the finished garment.
- This cardigan has 8 – 12″+ of positive ease built in for an oversized fit.
- If you prefer more of an oversized cardigan, I would suggest making one size larger than chest size.
- If you prefer a more fitted look, I would suggest sizing down (as long as your chest size is within the range of the smaller size).
- Cardigan length is measured from the nape of the neck down.
- Sleeve length is measured from the underarm of the cardigan to edge of the cuff.
- Adjusting Cardigan Length: See the notes at in the Body of Cardigan section for adjusting length.
- Adjusting Sleeve Length: If you need to adjust sleeve length, either lengthening or shortening, please do so by working more or fewer regular rows where noted in the pattern instructions.
Size & Yardage Chart
The notes above refer to this size chart.
Yarn
This women’s crochet summer sweater was designed with a DK weight yarn to make sure it would have a beautiful drape to it while also being lightweight enough for the warmer months. I chose not to use a bulkier yarn for fear it would then be too thick to be worn as a summer cardigan (we want to get the most wear out of this everyday piece).
I chose Lion Brand Cottino in Powder for my summer crochet sweater. This is a DK weight / 3, cotton and wool blend yarn and it’s currently available in beautiful colors. This yarn offers a smooth even texture in a contemporary color palette with plenty of neutral tones.
Suvi Summer Cardigan – Free Pattern
The summer crochet cardigan pattern is free below, but if you love to work offline, I’ve got a couple other great options for you.
Purchase the ad-free, printable PDF, (that includes all photo tutorials, + a garment schematic), on Ravelry, or on Etsy (aff).
Purchase the kit here! (aff) Lion Brand has a full kit of the Suvi Summer Crochet Cardigan, available on their website. The kit includes your choice of color and a digital copy of the pattern.
This post contains affiliate links.
Materials
- Yarn: DK Weight / 3 / Yarn, Lion Brand Cottino was used for the sample in the photos [55% cotton / 45% merino wool (296 yds / 271 m / 100 g / 3.5 oz)].
- Yardage: See Size Chart Above
- Crochet Hook: G/6/4.00mm or size needed to obtain gauge (My favorite crochet hooks are the Clover Amour Crochet Hooks, I’ve never had an ache in my hand since switching).
- Measuring Tape
- Locking Stitch Markers (3 – 4)
- Scissors
- Yarn Needle
Abbreviations (US Terms)
- ch(s): chain(s)
- sl st(s): slip stitch(es)
- st(s): stitch(es)
- sp(s): space(s)
- sc: single crochet
- hdc: half double crochet
- dc: double crochet
- ext sc: extended single crochet
- 2dc-cl: two double crochet cluster
- Rep: repeat
- RS / WS: right side / wrong side
- SM: stitch marker
- BLO: back loop only
- yo: yarn over
- Join with a standing sc
Experience Level
- Easy / Intermediate
Gauge
- See individual sections for gauge.
- See Swatch Instructions below.
Sizes
- Women’s XS – 5XL
- See Size & Yardage Chart above.
Special Stitches
- Extended Single Crochet (ext sc): Insert hook into stitch indicated, yo, pull up a loop, yo, pull thru 1 loop on hook, yo, pull thru remaining two loops on hook.
- 2 Double Crochet Cluster (2dc-cl): Yo, insert hook where indicated, yo, pull up a loop, yo, pull thru 2 loops, yo, insert hook in same st, yo, pull up a loop, yo, pull thru 2 loops, yo, pull thru remaining loops.
- Join yarn with a standing single crochet: Begin with a slip knot on your hook, insert your hook into the stitch or space indicated, yo, pull up a loop, yo and draw thru both loops on hook.
Pattern Notes
- Turning chains are not counted as stitches, unless noted otherwise.
- Yarn Notes: Lion Brand Cottino [55% cotton / 45% merino wool (296 yds / 271 m / 100 g / 3.5 oz)] was used for the sample in the pictures. Other comparable yarns may be used as long as gauge is met.
- Color & Yardage
- Powder #614-105BM
- See Size & Yardage Chart above.
- Changes for Sizes as Follows: XS (S, M, L, XL, 2XL, 3XL, 4XL, 5XL)
- Stitch Counts as Follows: (XS, S, M, L, XL, 2XL, 3XL, 4XL, 5XL)
- Model wears a women’s small and is wearing a small sample.
- Construction Notes: This summer crochet cardigan is worked from the bottom hem up to the shoulders. First, you’ll crochet the bottom ribbing, then crochet the body onto the long edge of this ribbing. Once you reach the bottom of the armholes, you’ll split this into three panels and crochet the upper left panel, then back panel, then upper right panel. You’ll then seam the shoulders. Next, crochet the sleeves flat, seam the edges, then attach them to the cardigan’s armhole openings. Next, you’ll add a simple edging around the front opening of the cardigan. Lastly, add ribbing to the front opening edge.
- Once done, you can block if desired.
- Find the progression photos for the pattern at the bottom.
Suvi Summer Crochet Cardigan – Written Pattern
Swatch Instructions
Ribbing
Gauge: In BLO hdc, with a 4.00mm crochet hook: 7 sts = 1-1/4″; 17 rows = 5″
Row 1: With yarn & a 4.00mm crochet hook, ch 8, working in the back humps of the foundation ch, hdc in the 2nd ch from your hook and in each ch across. Turn. (7 sts)
Rows 2 – 17: Ch 1, working in BLO hdc in each st across. Turn. (7 sts)
Do not fasten off. Continue on to Prepare Ribbing for Body of Cardigan Stitch Pattern.
Prepare Ribbing for Body of Cardigan Stitch Pattern
Gauge: 25 sts = 5″
Row 1 (RS): Rotate your ribbing to work along the long edge. Ch 1, sc in the first st, (sc in the next st, 2 sc in the next st) rep from ( to ) across. Turn. (25 sts)
Do not fasten off. Continue on to Body of Cardigan Stitch Pattern.
Body of Cardigan Stitch Pattern
Gauge: In pattern stitch written below, with a 4.00mm crochet hook: 25 sts = 5″; 12 rows = 4-1/8″
Row 1: Ch 1, sc in the first st, * ch 2, skip each of the next 2 sts, (dc, ch 2, dc) in the next st, ch 2, skip each of the next 2 sts, sc in the next st, rep from * across. Turn. (8 dc + 5 sc + 12 ch-2’s)
Row 2: Ch 4 (counts as a tr), skip the next ch-2 sp, (2dc-cl, ch 1, 2dc-cl, ch 1, 2dc-cl) in the next ch-2 sp, * ch 1, skip each of the next 2 ch-2 sps, (2dc-cl, ch 1, 2dc-cl, ch 1, 2dc-cl) in the next ch-2 sp, rep from * across to the last ch-2 sp, skip the last ch-2 sp, tr in the last st. Turn. (12 2dc-cl + 2 tr + 11 ch-1’s)
Row 3: Ch 1, sc in the first st, ch 1, (sc, ch 1) in each ch-1 sp across, sc in top of the ch-4. Turn. (25 sts)
Row 4: Ch 1, ext sc in each sc and ch-1 sp across. Turn. (25 sts)
Rows 5 – 12: Rep Rows 1 – 4.
Swatch should be 5″ W x 5-1/2″ H.
Adjust hook size as needed to meet gauge.
Cardigan Instructions
Progression Photos can be found below.
Changes for Sizes Written as Follows: XS (S, M, L, XL, 2X, 3X, 4X, 5X)
Stitch Counts Written as Follows: (XS, S, M, L, XL, 2X, 3X, 4X, 5X)
Bottom Ribbing
This section is worked back and forth in rows. To check gauge, work the first 17 rows.
Gauge: 7 sts = 1-1/4″; 17 rows = 5″ H
Row 1: With yarn & a 4.00mm crochet hook, ch 8, working in the back humps of the chain, hdc in the 2nd ch from your hook and in each ch across. Turn. (7 sts)
Rows 2 – 109 (125, 137, 153, 165, 181, 193, 209, 221): Ch 1, BLO hdc in each st across. Turn. (7 sts) Place a SM in the first stitch of the last row of Bottom Ribbing to mark where you will later begin the Front Cardigan Edging.
Bottom Ribbing should measure approximately (32″, 36-3/4″, 40-1/4″, 45″, 48-1/2″, 53-1/4″, 56-3/4″, 61-1/2″, 65″). Note that the ribbing width measurement may differ a little from the width measurement of the body of cardigan. This is intentional because the ribbing stretches easily.
Do not fasten off. Continue to Prepare Ribbing for Body of Cardigan.
Prepare Ribbing for Body of Cardigan
Gauge: 25 sts = 5″
Row 1 (RS): Rotate to work along the long edge of the waistband. Ch 1, (sc in the next st, 2 sc in the next st) work from ( to ) across to the last st, sc in the last st. Turn. (163, 187, 205, 229, 247, 271, 289, 313, 331 sts)
Do not fasten off. Continue on to Body of Cardigan.
Body of Cardigan
This section is worked back and forth in rows from the bottom ribbing to the bottom of the armhole opening.
Gauge: In pattern stitch of the body with a 4mm hook: 25 sts = 5″; 12 rows = 4-1/8″ H (rows 1 – 4 as written below, 3 times)
Note: Aside from the beginning ch 1, all other ch-1’s worked within a row are counted as stitches.
Continuing with a 4.00mm crochet hook.
Row 1 (WS): Ch 1, sc in the first st,* ch 2, skip each of the next 2 sts, (dc, ch 2, dc) in the next st, ch 2, skip each of the next 2 sts, sc in the next st, rep from * across. Turn. (54 dc + 28 sc + 81 ch-2’s) (62 dc + 32 sc + 93 ch-2’s) (68 dc + 35 sc + 102 ch-2’s) (76 dc + 39 sc + 114 ch-2’s) (82 dc + 42 sc + 123 ch-2’s) (90 dc + 46 sc + 135 ch-2’s) (96 dc + 49 sc + 144 ch-2’s) (104 dc + 53 sc + 156 ch-2’s) (110 dc + 56 sc + 165 ch-2’s)
Row 2: Ch 4 (counts as a tr), skip the next ch-2 sp, (2dc-cl, ch 1, 2dc-cl, ch 1, 2dc-cl) in the next ch-2 sp, * ch 1, skip each of the next 2 ch-2 sps, (2dc-cl, ch 1, 2dc-cl, ch 1, 2dc-cl) in the next ch-2 sp, rep from * across to the last ch-2 sp, skip the last ch-2 sp, tr in the last st. Turn. (81 2dc-cl + 2 tr + 80 ch-1’s) (93 2dc-cl + 2 tr + 92 ch-1’s) (102 2dc-cl + 2 tr + 101 ch-1’s) (114 2dc-cl + 2 tr + 113 ch-1’s) (123 2dc-cl + 2 tr + 122 ch-1’s) (135 2dc-cl + 2 tr + 134 ch-1’s) (144 2dc-cl + 2 tr + 143 ch-1’s) (156 2dc-cl + 2 tr + 155 ch-1’s) (165 2dc-cl + 2 tr + 164 ch-1’s)
Row 3: Ch 1, sc in the first st, ch 1, (sc, ch 1) in each ch-1 sp across, sc in top of the ch-4. Turn. (163, 187, 205, 229, 247, 271, 289, 313, 331 sts)
Row 4: Ch 1, ext sc in each sc and ch-1 sp across. Turn. (163, 187, 205, 229, 247, 271, 289, 313, 331 sts)
Rows 5 – 48: Rep Rows 1 – 4. (163, 187, 205, 229, 247, 271, 289, 313, 331 sts)
Do not fasten off. Continue on to Front Left Panel. Body of Cardigan should measure approximately (32″, 36-3/4″, 40-1/4″, 45″, 48-1/2″, 53-1/4″, 56-3/4″, 61-1/2″, 65″) W x 17-3/4″ H at this point.
Adjusting Length: If you prefer a longer or shorter cardigan, here is where you’ll want to adjust. The length stated above is the cardigan’s length from the bottom of the armhole to the bottom hem. If at all possible, check length, at this point, on the intended wearer.
- Longer: If you’d like a longer cardigan, repeat Rows 1 – 4 in multiples of 4 (make sure to end with a Row 4 repeat).
- Shorter: If you’d like a shorter cardigan, work fewer rows in multiples of 4 (make sure to end with a Row 4 repeat).
Front Left Panel
This section is worked back and forth in rows to create the front upper left portion of the cardigan.
Continuing with a 4.00mm crochet hook.
Row 1 (WS): Ch 1, sc in the first st,* ch 2, skip each of the next 2 sts, (dc, ch 2, dc) in the next st, ch 2, skip each of the next 2 sts, sc in the next st, work from * 6 (7, 8, 9, 10, 11, 11, 12, 13) times. Place a SM in the same stitch you worked the last sc into. This marks where you will later join yarn to begin the Back Panel. Turn. (12 dc + 7 sc + 18 ch-2’s) (14 dc + 8 sc + 21 ch-2’s) (16 dc + 9 sc + 24 ch-2’s) (18 dc + 10 sc + 27 ch-2’s) (20 dc + 11 sc + 30 ch-2’s) (22 dc + 12 sc + 33 ch-2’s) (22 dc + 12 sc + 33 ch-2’s) (24 dc + 13 sc + 36 ch-2’s) (26 dc + 14 sc + 39 ch-2’s)
Row 2: Ch 4 (counts as a tr), skip the next ch-2 sp, (2dc-cl, ch 1, 2dc-cl, ch 1, 2dc-cl) in the next ch-2 sp, * ch 1, skip each of the next 2 ch-2 sps, (2dc-cl, ch 1, 2dc-cl, ch 1, 2dc-cl) in the next ch-2 sp, rep from * across to the last ch-2 sp, skip the last ch-2 sp, tr in the last st. Turn. (18 2dc-cl + 2 tr + 17 ch-1’s) (21 2dc-cl + 2 tr + 20 ch-1’s) (24 2dc-cl + 2 tr + 23 ch-1’s) (27 2dc-cl + 2 tr + 26 ch-1’s) (30 2dc-cl + 2 tr + 29 ch-1’s) (33 2dc-cl + 2 tr + 32 ch-1’s) (33 2dc-cl + 2 tr + 32 ch-1’s) (36 2dc-cl + 2 tr + 35 ch-1’s) (39 2dc-cl + 2 tr + 38 ch-1’s)
Row 3: Ch 1, sc in the first st, ch 1, (sc, ch 1) in each ch-1 sp across, sc in top of the ch-4. Turn. (37, 43, 49, 55, 61, 67, 67, 73, 79 sts)
Row 4: Ch 1, ext sc in each sc and ch-1 sp across. Turn. (37, 43, 49, 55, 61, 67, 67, 73, 79 sts)
Rows 5 – 16 (20, 20, 20, 24, 24, 24, 28, 32): Rep Rows 1 – 4. (37, 43, 49, 55, 61, 67, 67, 73, 79 sts)
Sizes S & 5X: Fasten off, leaving a tail of yarn 3 times the width of the last row. Continue to Back Panel. Front Left Panel should measure approximately (8-1/2″ W x 6-7/8″ H) (15-3/4″ W x 11″ H).
Sizes XS (M, L, XL, 2X, 3X, 4X): Do not fasten off. Continue on to the instructions for the size you’re making.
Sizes XS (2X, 3X)
Rows 17 – 18 (25 – 26, 25 – 26): Rep Rows 1 – 2. (37, 67, 67 sts)
Fasten off, leaving a tail of yarn 3 times the width of the last row. Continue to Back Panel. Front Left Panel should measure approximately (7-1/4″ W x 6″ H) (13-1/2″ W x 9″ H) (13-1/2″ W x 9″ H).
Sizes M (XL, 4X)
Row 21 (25, 25): Rep Row 1. (49, 61, 73 sts)
Fasten off, leaving a tail of yarn 3 times the width of the last row. Continue to Back Panel. Front Left Panel should measure approximately (9-3/4″ W x 7-1/4″ H) (12-1/4″ W x 8-1/2″ H) (14-1/2″ W x 10″ H).
Size L
Rows 21 – 23: Rep Rows 1 – 3. (55 sts)
Fasten off, leaving a tail of yarn 3 times the width of the last row. Continue to Back Panel. Front Left Panel should measure approximately (11″ W x 7-3/4″ H).
Back Panel
This section is worked back and forth in rows to create the back panel of the cardigan.
Set-Up: With yarn & a 4.00mm crochet hook, join yarn with a sl st in the stitch marked with a SM.
Row 1 (WS): Ch 1, sc in the first st,* ch 2, skip each of the next 2 sts, (dc, ch 2, dc) in the next st, ch 2, skip each of the next 2 sts, sc in the next st, work from * 15 (17, 18, 20, 21, 23, 26, 28, 29) times. Place a SM in the same stitch you worked the last sc into. This marks where you will later join yarn to begin the Front Right Panel. Turn. (30 dc + 16 sc + 45 ch-2’s) (34 dc + 18 sc + 51 ch-2’s) (36 dc + 19 sc + 54 ch-2’s) (40 dc + 21 sc + 60 ch-2’s) (42 dc + 22 sc + 63 ch-2’s) (46 dc + 24 sc + 69 ch-2’s) (52 dc + 27 sc + 78 ch-2’s) (56 dc + 29 sc + 84 ch-2’s) (58 dc + 30 sc + 87 ch-2’s)
Row 2: Ch 4 (counts as a tr), skip the next ch-2 sp, (2dc-cl, ch 1, 2dc-cl, ch 1, 2dc-cl) in the next ch-2 sp, * ch 1, skip each of the next 2 ch-2 sps, (2dc-cl, ch 1, 2dc-cl, ch 1, 2dc-cl) in the next ch-2 sp, rep from * across to the last ch-2 sp, skip the last ch-2 sp, tr in the last st. Turn. (45 2dc-cl + 2 tr + 44 ch-1’s) (51 2dc-cl + 2 tr + 50 ch-1’s) (54 2dc-cl + 2 tr + 53 ch-1’s) (60 2dc- cl + 2 tr + 59 ch-1’s) (63 2dc-cl + 2 tr + 62 ch-1’s) (69 2dc-cl + 2 tr + 68 ch-1’s) (78 2dc-cl + 2 tr + 77 ch-1’s) (84 2dc-cl + 2 tr + 83 ch-1’s) (87 2dc-cl + 2 tr + 86 ch-1’s)
Row 3: Ch 1, sc in the first st, ch 1, (sc, ch 1) in each ch-1 sp across, sc in top of the ch-4. Turn. (91, 103, 109, 121, 127, 139, 157, 169, 175 sts)
Row 4: Ch 1, ext sc in each sc and ch-1 sp across. Turn. (91, 103, 109, 121, 127, 139, 157, 169, 175 sts)
Rows 5 – 16 (20, 20, 20, 24, 24, 24, 28, 32): Rep Rows 1 – 4. (91, 103, 109, 121, 127, 139, 157, 169, 175 sts)
Sizes S & 5X: Fasten off. Weave in ends. Continue to Front Right Panel. Back Panel should measure approximately (20-1/2″ W x 6-7/8″ H) (35″ W x 11″ H).
Sizes XS (M, L, XL, 2X, 3X, 4X): Do not fasten off. Continue on to the instructions for the size you’re making. Sizes XS (2X, 3X)
Rows 17 – 18 (25 – 26, 25 – 26): Rep Rows 1 – 2. (91, 139, 157 sts)
Fasten off. Weave in ends. Continue to Front Right Panel. Back Panel should measure approximately (18-1/4″ W x 6″ H) (27-3/4″ W x 9″ H) (31-1/2″ W x 9″ H).
Sizes M (XL, 4X)
Row 21 (25, 25): Rep Row 1. (109, 127, 169 sts)
Fasten off. Weave in ends. Continue to Front Right Panel. Back Panel should measure approximately (21-3/4″ W x 7-1/4″ H) (25-1/2″ W x 8-1/2″ H) (33-3/4″ W x 10″ H).
Size L
Rows 21 – 23: Rep Rows 1 – 3. (121 sts)
Fasten off. Weave in ends. Continue to Front Right Panel. Back Panel should measure approximately (24-1/4″ W x 7-3/4″ H).
Front Right Panel
This section is worked back and forth in rows to create the front upper right portion of the cardigan.
Set-Up: With yarn & a 4.00mm crochet hook, join yarn with a sl st in the stitch marked with a SM.
Row 1 (WS): Ch 1, sc in the first st,* ch 2, skip each of the next 2 sts, (dc, ch 2, dc) in the next st, ch 2, skip each of the next 2 sts, sc in the next st, work from * 6 (7, 8, 9, 10, 11, 11, 12, 13) times. Turn. (12 dc + 7 sc + 18 ch-2’s) (14 dc + 8 sc + 21 ch-2’s) (16 dc + 9 sc + 24 ch-2’s) (18 dc + 10 sc + 27 ch-2’s) (20 dc + 11 sc + 30 ch-2’s) (22 dc + 12 sc + 33 ch-2’s) (22 dc + 12 sc + 33 ch-2’s) (24 dc + 13 sc + 36 ch-2’s) (26 dc + 14 sc + 39 ch-2’s)
Row 2: Ch 4 (counts as a tr), skip the next ch-2 sp, (2dc-cl, ch 1, 2dc-cl, ch 1, 2dc-cl) in the next ch-2 sp, * ch 1, skip each of the next 2 ch-2 sps, (2dc-cl, ch 1, 2dc-cl, ch 1, 2dc-cl) in the next ch-2 sp, rep from * across to the last ch-2 sp, skip the last ch-2 sp, tr in the last st. Turn. (18 2dc-cl + 2 tr + 17 ch-1’s) (21 2dc-cl + 2 tr + 20 ch-1’s) (24 2dc-cl + 2 tr + 23 ch-1’s) (27 2dc-cl + 2 tr + 26 ch-1’s) (30 2dc-cl + 2 tr + 29 ch-1’s) (33 2dc-cl + 2 tr + 32 ch-1’s) (33 2dc-cl + 2 tr + 32 ch-1’s) (36 2dc-cl + 2 tr + 35 ch-1’s) (39 2dc-cl + 2 tr + 38 ch-1’s)
Row 3: Ch 1, sc in the first st, ch 1, (sc, ch 1) in each ch-1 sp across, sc in top of the ch-4. Turn. (37, 43, 49, 55, 61, 67, 67, 73, 79 sts)
Row 4: Ch 1, ext sc in each sc and ch-1 sp across. Turn. (37, 43, 49, 55, 61, 67, 67, 73, 79 sts)
Rows 5 – 16 (20, 20, 20, 24, 24, 24, 28, 32): Rep Rows 1 – 4. (37, 43, 49, 55, 61, 67, 67, 73, 79 sts)
Sizes S & 5X: Fasten off, leaving a tail of yarn 3 times the width of the last row. Continue to Seam Shoulders. Front Right Panel should measure approximately (8-1/2″ W x 6-7/8″ H) (15-3/4″ W x 11″ H).
Sizes XS (M, L, XL, 2X, 3X, 4X): Do not fasten off. Continue on to the instructions for the size you’re making.
Sizes XS (2X, 3X)
Rows 17 – 18 (25 – 26, 25 – 26): Rep Rows 1 – 2. (37, 67, 67 sts)
Fasten off, leaving a tail of yarn 3 times the width of the last row. Continue to Seam Shoulders. Front Right Panel should measure approximately (7-1/4″ W x 6″ H) (13-1/2″ W x 9″ H) (13-1/2″ W x 9″ H).
Sizes M (XL, 4X)
Row 21 (25, 25): Rep Row 1. (49, 61, 73 sts)
Fasten off, leaving a tail of yarn 3 times the width of the last row. Continue to Seam Shoulders. Front Right Panel should measure approximately (9-3/4″ W x 7-1/4″ H) (12-1/4″ W x 8-1/2″ H) (14-1/2″ W x 10″ H).
Size L
Rows 21 – 23: Rep Rows 1 – 3. (55 sts)
Fasten off, leaving a tail of yarn 3 times the width of the last row. Continue to Seam Shoulders. Front Right Panel should measure approximately (11″ W x 7-3/4″ H).
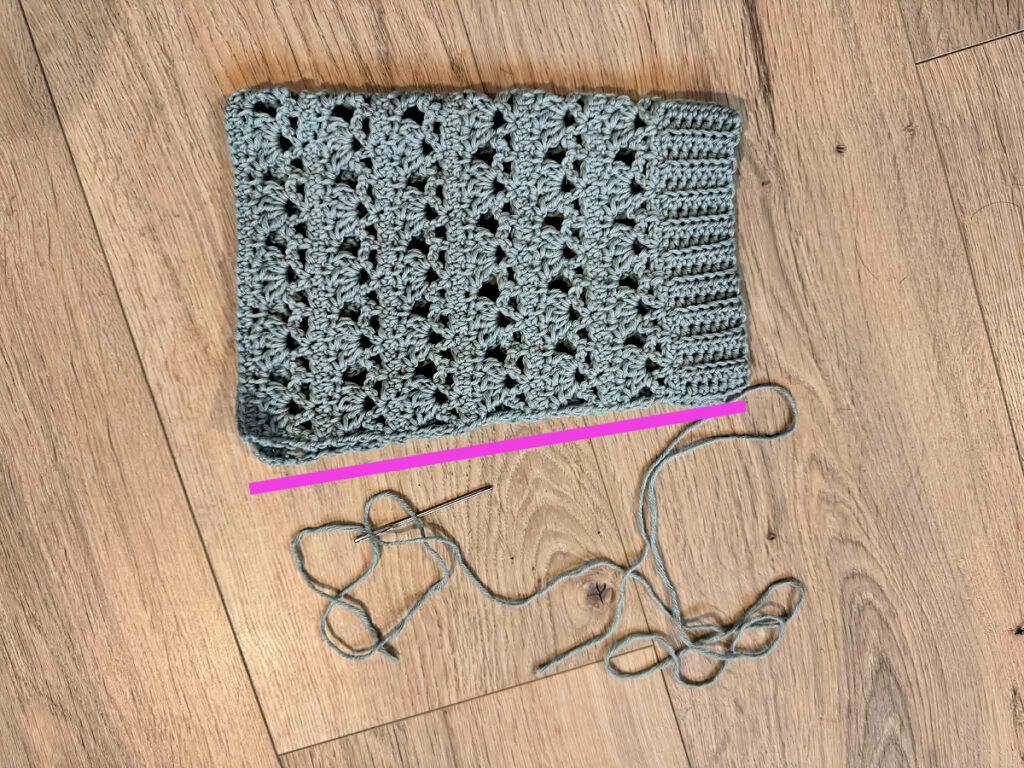
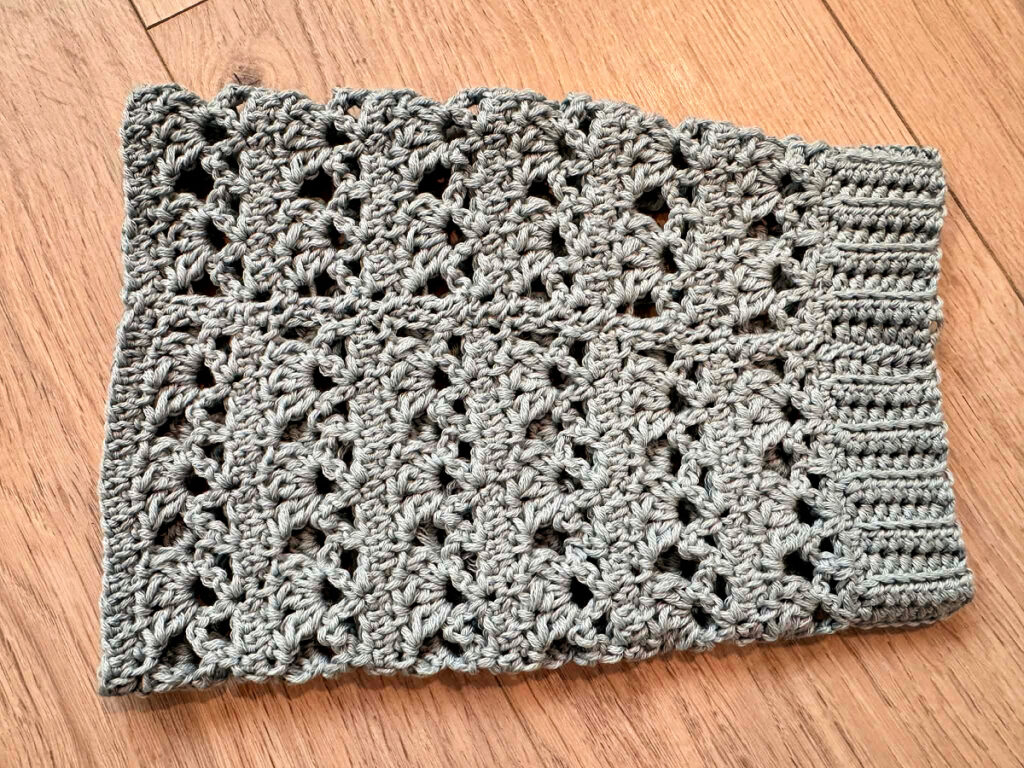
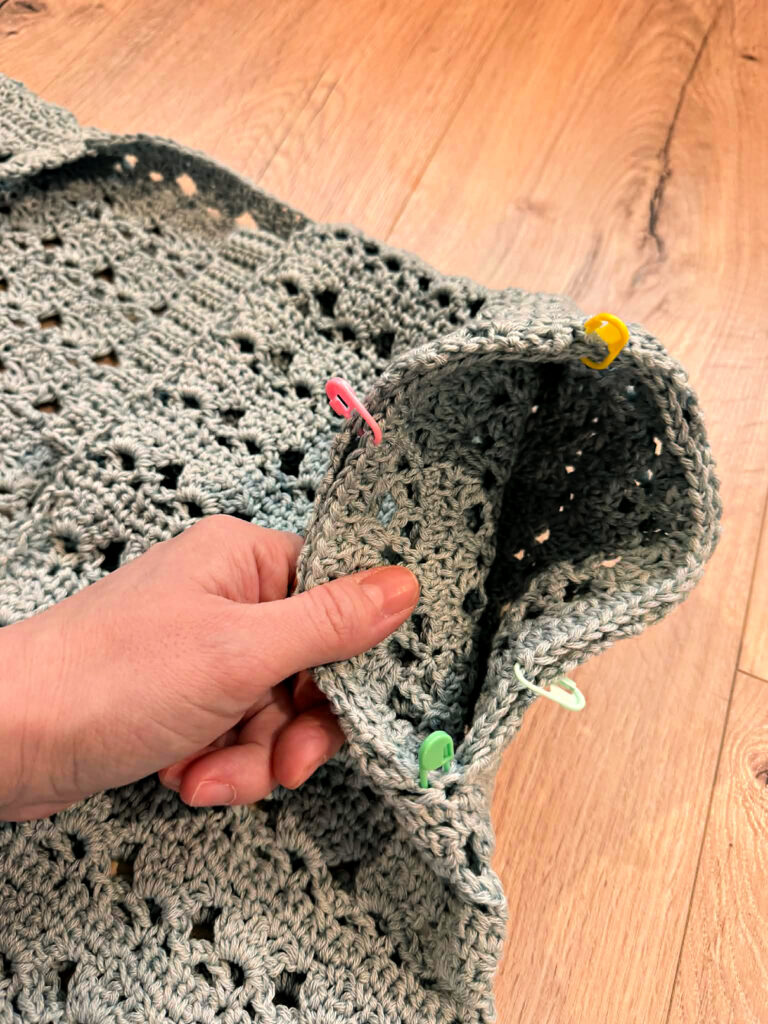
Seam Shoulders
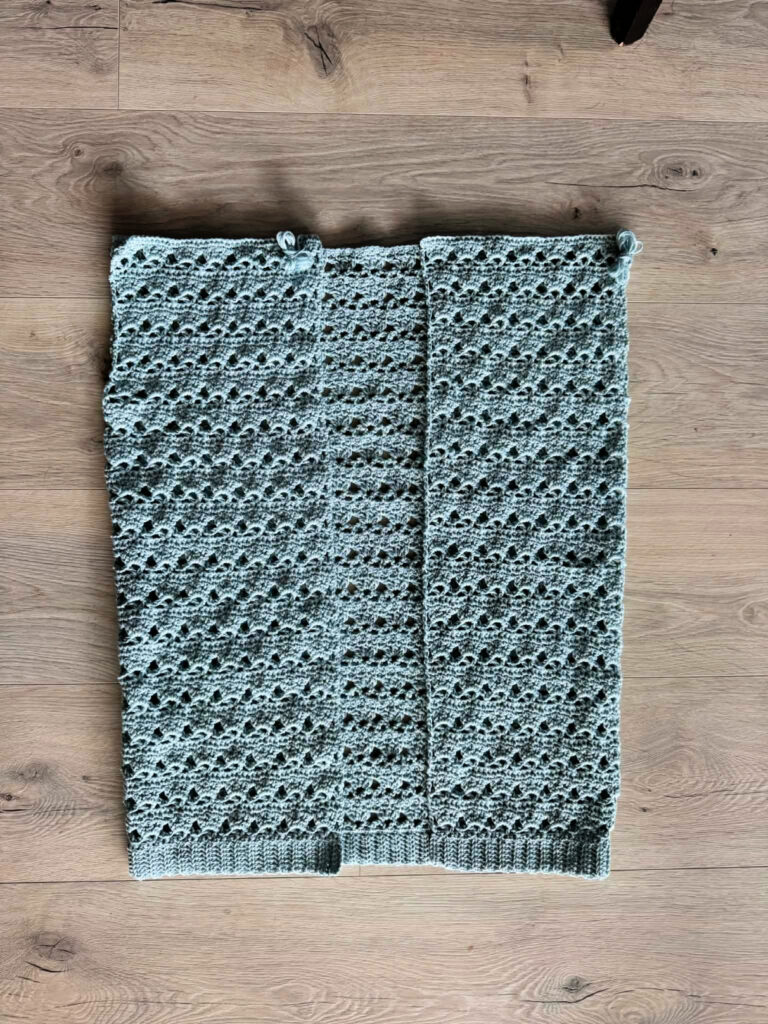
Step 1: Lay your cardigan out flat with the RS facing up, fold the two front panels in towards the center of the cardigan (as shown below), creating a fold where it splits for the armhole openings. Line up the corners of the upper front panels with the corners of the back panel. Match up the stitches on the front panel with corresponding stitches along the back panel. To make it easier, I recommend using locking stitch markers to hold the panels in place during seaming.
Step 2: With the tail of yarn and a yarn needle, whipstitch the top edge of a front panel to the top edge of the back panel. Repeat for the top edge of the second front panel.
Weave in ends. Continue on to Sleeves.
Sleeves – Make 2
Sleeve Ribbing
Gauge: In BLO hdc, 7 sts = 1-1/4″; 17 rows = 5″
Row 1: With yarn & a 4.00mm crochet hook, ch 8, working in the back humps of the chain, hdc in the 2nd ch from your hook and in each ch across. Turn. (7 sts)
Rows 2 – 37 (41, 45, 49, 53, 57, 57, 61, 65): Ch 1, BLO hdc in each st across. Turn. (7 sts)
Do not fasten off. Continue on to Prepare Ribbing for Sleeve. Sleeve Ribbing should measure approximately (11″, 12″, 13-1/4″, 14-1/2″, 15-1/2″, 16-3/4″, 16-3/4″, 18″, 19″).
Prepare Ribbing for Sleeve
Gauge: 25 sts = 5″
Row 1 (RS): Rotate to work along the long edge of the ribbing. Ch 1, (sc in the next st, 2 sc in the next st) work from ( to ) across to the last st, sc in the last st. Turn. (55, 61, 67, 73, 79, 85, 85, 91, 97 sts)
Do not fasten off. Continue on to Body of Sleeve.
Body of Sleeve
This section is worked back and forth in rows from the ribbing to the top of the sleeve. The sleeve is then seamed. Continuing with a 4.00mm crochet hook.
Row 1 (WS): Ch 1, sc in the first st,* ch 2, skip each of the next 2 sts, (dc, ch 2, dc) in the next st, ch 2, skip each of the next 2 sts, sc in the next st, rep from * across. Turn. (18 dc + 10 sc + 27 ch-2’s) (20 dc + 11 sc + 30 ch-2’s) (22 dc + 12 sc + 33 ch-2’s) (24 dc + 13 sc + 36 ch-2’s) (26 dc + 14 sc + 39 ch-2’s) (28 dc + 15 sc + 42 ch-2’s) (28 dc + 15 sc + 42 ch-2’s) (30 dc + 16 sc + 45 ch-2’s) (32 dc + 17 sc + 48 ch-2’s)
Row 2: Ch 4 (counts as a tr), skip the next ch-2 sp, (2dc-cl, ch 1, 2dc-cl, ch 1, 2dc-cl) in the next ch-2 sp, * ch 1, skip each of the next 2 ch-2 sps, (2dc-cl, ch 1, 2dc-cl, ch 1, 2dc-cl) in the next ch-2 sp, rep from * across to the last ch-2 sp, skip the last ch-2 sp, tr in the last st. Turn. (27 2dc-cl + 2 tr + 26 ch-1’s) (30 2dc-cl + 2 tr + 29 ch-1’s) (33 2dc-cl + 2 tr + 32 ch-1’s) (36 2dc-cl + 2 tr + 35 ch-1’s) (39 2dc-cl + 2 tr + 38 ch-1’s) (42 2dc-cl + 2 tr + 41 ch-1’s) (42 2dc-cl + 2 tr + 41 ch-1’s) (45 2dc-cl + 2 tr + 44 ch-1’s) (48 2dc-cl + 2 tr + 47 ch-1’s)
Row 3: Ch 1, sc in the first st, ch 1, (sc, ch 1) in each ch-1 sp across, sc in top of the ch-4. Turn. (55, 61, 67, 73, 79, 85, 85, 91, 97 sts)
Row 4: Ch 1, ext sc in each sc and ch-1 sp across. Turn. (55, 61, 67, 73, 79, 85, 85, 91, 97 sts)
Rows 5 – 8: Rep Rows 1 – 4. (55, 61, 67, 73, 79, 85, 85, 91, 97 sts)
Rows 9 – 11: Rep Rows 1 – 3. (55, 61, 67, 73, 79, 85, 85, 91, 97 sts)
Row 12: Ch 1, 2 ext sc in the first st,* ext sc in each of the next 11 sts, 2 ext sc in the next st, work from * 4 times, then ext sc in each st across to the last st, 2 ext sc in the last st. Turn. (61, 67, 73, 79, 85, 91, 91, 97, 103 sts)
Row 13: Ch 1, sc in the first st,* ch 2, skip each of the next 2 sts, (dc, ch 2, dc) in the next st, ch 2, skip each of the next 2 sts, sc in the next st, rep from * across. Turn. (20 dc + 11 sc + 30 ch-2’s) (22 dc + 12 sc + 33 ch-2’s) (24 dc + 13 sc + 36 ch-2’s) (26 dc + 14 sc + 39 ch-2’s) (28 dc + 15 sc + 42 ch-2’s) (30 dc + 16 sc + 45 ch-2’s) (30 dc + 16 sc + 45 ch-2’s) (32 dc + 17 sc + 48 ch-2’s) (34 dc + 18 sc + 51 ch-2’s)
Row 14: Ch 4 (counts as a tr), skip the next ch-2 sp, (2dc-cl, ch 1, 2dc-cl, ch 1, 2dc-cl) in the next ch-2 sp, * ch 1, skip each of the next 2 ch-2 sps, (2dc-cl, ch 1, 2dc-cl, ch 1, 2dc-cl) in the next ch-2 sp, rep from * across to the last ch-2 sp, skip the last ch-2 sp, tr in the last st. Turn. (30 2dc-cl + 2 tr + 29 ch-1’s) (33 2dc-cl + 2 tr + 32 ch-1’s) (36 2dc-cl + 2 tr + 35 ch-1’s) (39 2dc-cl + 2 tr + 38 ch-1’s) (42 2dc-cl + 2 tr + 41 ch-1’s) (45 2dc-cl + 2 tr + 44 ch-1’s) (45 2dc-cl + 2 tr + 44 ch-1’s) (48 2dc-cl + 2 tr + 47 ch-1’s) (51 2dc-cl + 2 tr + 50 ch-1’s)
Row 15: Ch 1, sc in the first st, ch 1, (sc, ch 1) in each ch-1 sp across, sc in top of the ch-4. Turn. (61, 67, 73, 79, 85, 91, 91, 97, 103 sts)
Row 16: Ch 1, ext sc in each sc and ch-1 sp across. Turn. (61, 67, 73, 79, 85, 91, 91, 97, 103 sts)
Rows 17 – 24: Rep Rows 13 – 16. (61, 67, 73, 79, 85, 91, 91, 97, 103 sts)
Fasten off. Weave in ends. Make a second sleeve, then continue to Seaming Sleeves. Your sleeves should measure approximately 9-1/2″ L.
Adjusting Sleeve Length: If you prefer a longer or shorter sleeve, here is where you’ll want to adjust. The length stated above is the sleeve’s length from the ribbing to the top of the sleeve.
- Longer: If you’d like a longer sleeve, repeat Rows 13 – 16 in multiples of 4.
- Shorter: If you’d like a shorter sleeve, work fewer rows in multiples of 4.
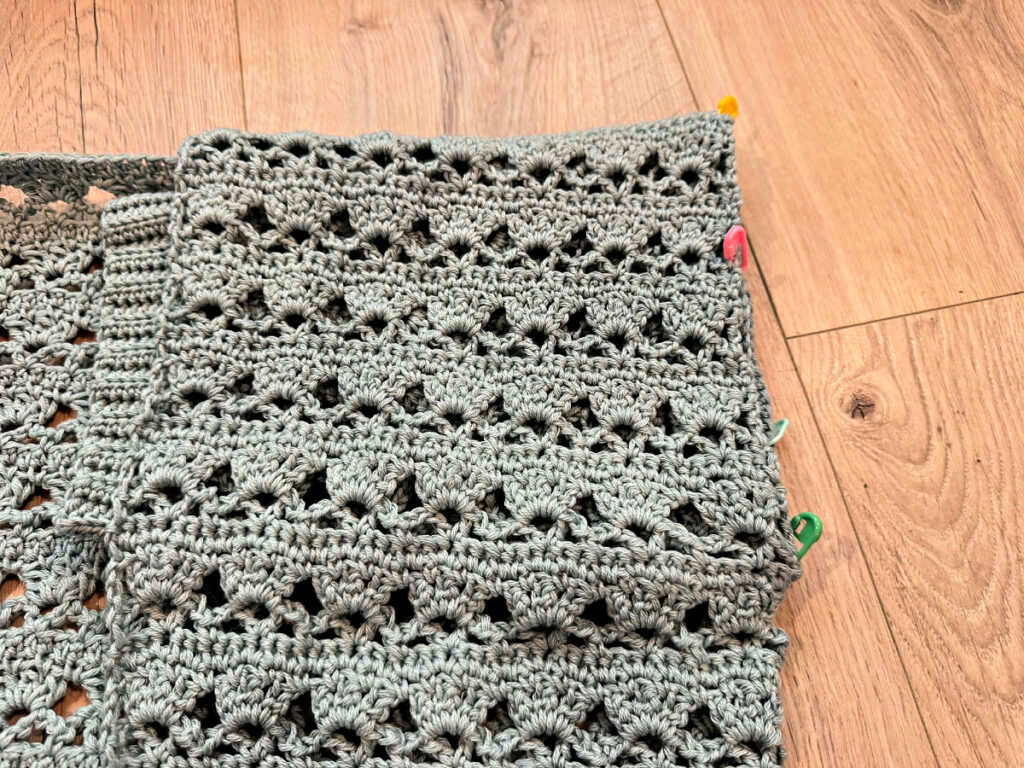
Seaming Sleeves
Step 1: With the RS of a sleeve facing out, fold it in half lengthwise (as shown in the photo below). Line up the stitches from the first and last rows of the sleeve ribbing and the stitches from the rest of the long edge of the sleeve. To make it easier, I recommend using locking stitch markers to hold the edges of the sleeve in place during seaming.
Step 2: With the right side facing out, use a yarn needle and a length of yarn that is 3 – 4 times the length of the seam you’ll be creating, and whipstitch the underarm seam of the sleeve. Repeat for the second sleeve.
Weave in ends. Continue on to Attaching Sleeves.
Attaching Sleeves
Step 1: Turn the sleeve inside out so that the WS is facing out. With the RS of the cardigan facing out, insert the sleeve into the armhole. When you do this, the WS of the cardigan will be facing the WS of the sleeve. Line up the sleeve seam with the bottom of the armhole opening. To make it easier, I recommend using at least 4 locking stitch markers to hold the sleeve in place while seaming.
Step 2: Use a yarn needle and a length of yarn that is 3 – 4 times the length of the seam you’ll be creating, and whipstitch the sleeve to the armhole. Repeat for the second sleeve.
Weave in ends. Continue on to Front Cardigan Edging.
Front Cardigan Edging
Row 1 (RS): With a 4.00mm crochet hook, join yarn with a standing sc in the st marked with a SM, sc in each of the next 6 sts along the bottom ribbing, then working up the right side of the front opening of the cardigan, work 1 sc into each sc and ext sc and work 3 sc into each tr, when you reach the back neck opening work 1 sc into each st, then rotate to work down the left side of the front opening of the cardigan, work 1 sc into each sc and ext sc and work 3 sc into each tr. Stitch count isn’t crucial.
Do not fasten off. Continue on to Front Cardigan Ribbing.
Front Cardigan Ribbing
Gauge Note & Tip: Exact gauge is not crucial. Simply adjust your hook size so that your ribbing lays flat. As you’re working the Front Cardigan Ribbing, if your ribbing becomes wavy, this means that your row height is too tall. Try going down a hook size or two.
Ribbing is approximately 1-1/4″ wide.
Row 1 (WS): Ch 8, working into the back humps of the ch, hdc in the 2nd ch from your hook, hdc in each of the next 5 chs, hdc2tog in the next ch & same st as ch 8. Do not turn. (7 sts)
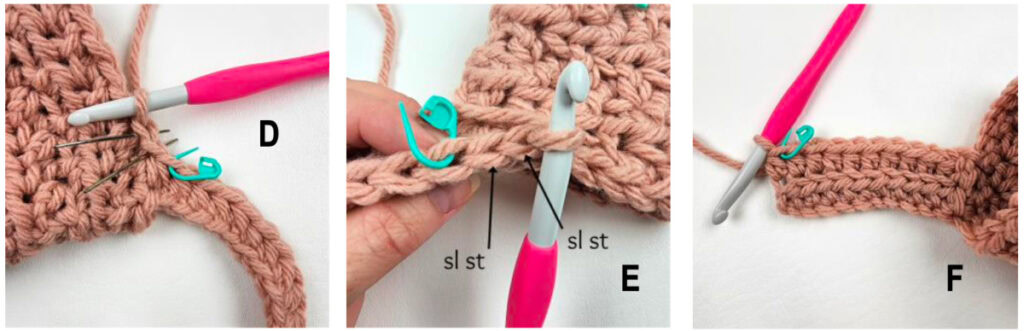
Row 2 (RS): (sl st into the next st along the edge of the cardigan) 2 times (these 2 sl sts do not count as sts), TURN, BLO hdc in each st across the previous row. Turn. (7 sts)
Row 3: Ch 1, BLO hdc in the first st, BLO hdc in each of the next 5 sts, hdc2tog in the BLO of the next st and both loops of the next st along the edge of the cardigan. Do not turn. (7 sts)
Row 4: (sl st into the next st along the edge of the cardigan) 2 times (these 2 sl sts do not count as sts), TURN, BLO hdc in each st across the previous row. Turn. (7 sts)
Rep Rows 3 – 4, ending with a Row 4 Rep, all the way around the front opening of the cardigan.
Working the Final Rows of Front Cardigan Ribbing:
- If you work all the way around the front opening of the cardigan and end perfectly with a Row 4, then fasten off and weave in ends.
- If you work all the way around the front opening of the cardigan, ending with a Row 4 Rep and still have 1 stitch remaining from the Front Cardigan Edging, then work one final Row 3 Rep. Fasten off and weave in ends.
- If you work all the way around the front opening of the cardigan, ending with a Row 4 Rep and still have 2 stitches remaining from the Front Cardigan Edging, work a Row 3 Rep. Then work a modified Row 4 Rep, only sl st into 1 st along the edge of the cardigan (not 2 as you have been doing), then turn and complete the Row 4 Rep. Fasten off and weave in ends.
Ribbing Photo Tutorial
The photos in the following tutorial are of a basic ribbing. The stitch count varies from this written pattern. Follow the written instructions and use the photos as a visual aid.
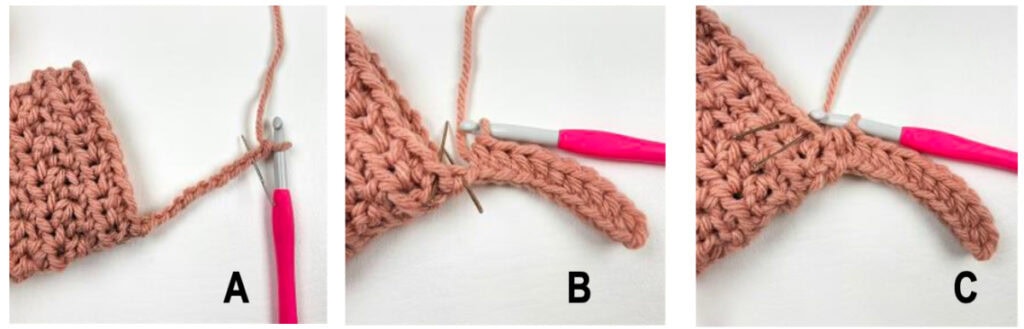
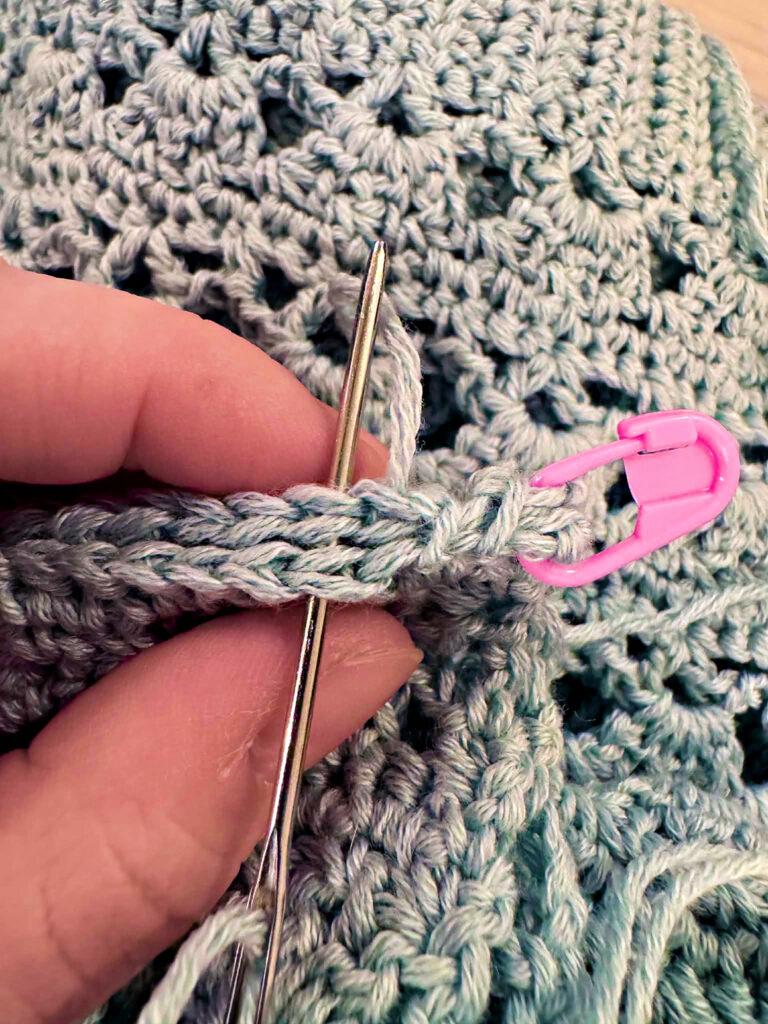
Photo B: Photo shows Row 1 complete to the hdc2tog. The yarn needles are showing where to work the hdc2tog.
Photo C: This photo shows the hdc2tog complete. The yarn needles are inserted into the next 2 sts along the edge of the cardigan where you will work the 2 sl sts at the beginning of row 2.
we turn to finish working Row 2.
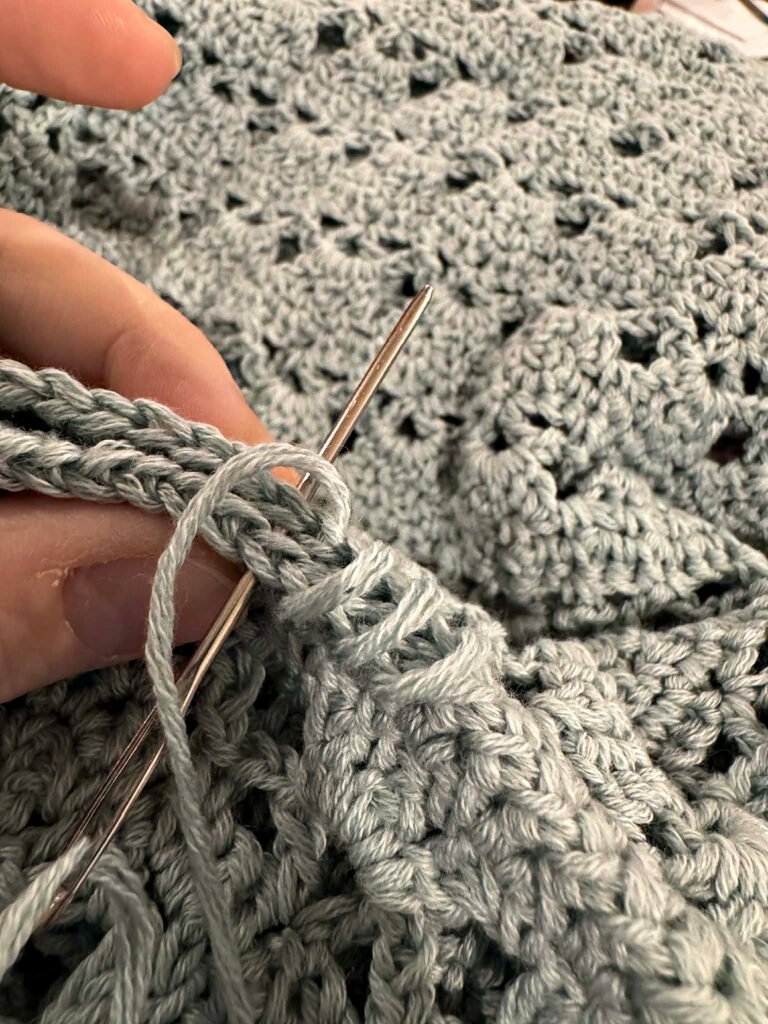
Photo E: After turning to work the rest of Row 2, you can see the 2 sl sts and the stitch marker where you will work the first hdc.
Photo F: This photo shows Row 2 of the ribbing complete. I placed a SM in the FLO of the last stitch of the row to mark the loop where I need to begin the next row.
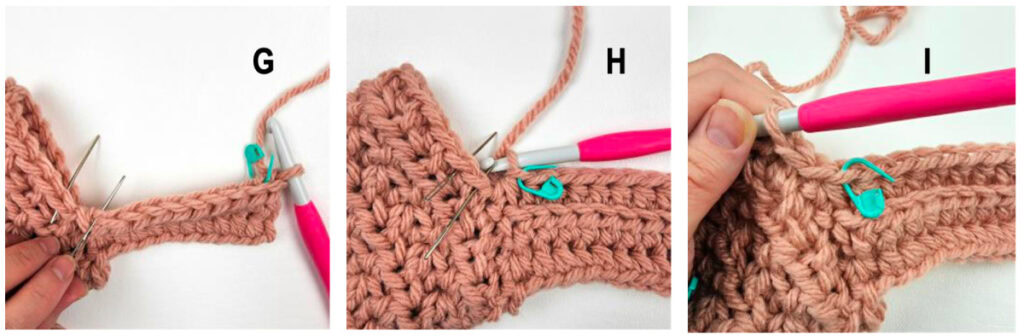
Photo H: The yarn needles are showing the 2 sts along the edge where you will work the first two sl sts of Row 4. The SM is placed in the FLO of the hdc2tog to mark where to work the first hdc in the next row.
Photo I: Begin Row 4 by sl st in the next 2 stitches along the edge of the cardigan.
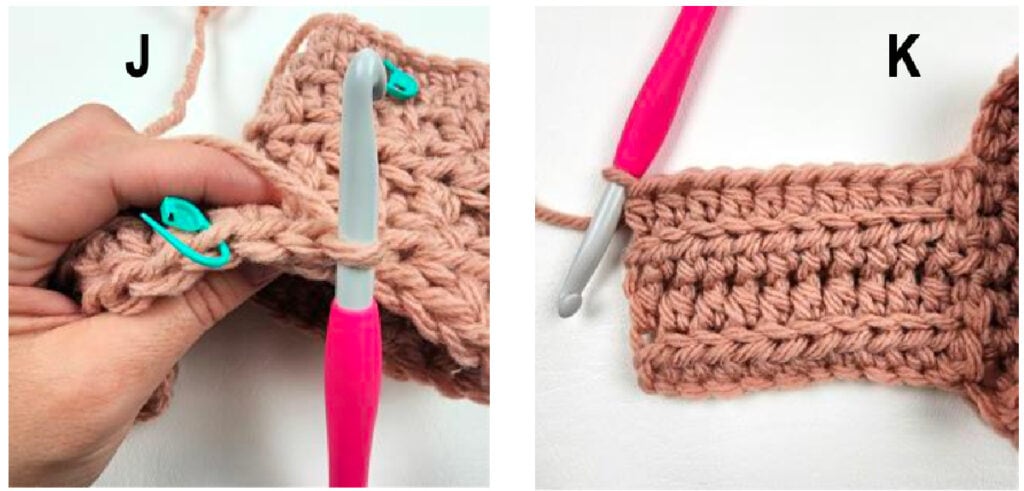
Photo K: This photo shows Rows 1 – 4 complete.
I MADE IT! NOW WHAT?
Pin this post!: Save this crochet summer cardigan pattern to your Pinterest boards so that you can come back and make it again.
Leave a comment below: We love to hear your feedback.
Share Your Finished Projects on Facebook or Instagram: I love to see your finished projects! Share with us on social media and tag me @acrochetedsimplicity or use the hashtag #ACrochetedSimplicity so I can find your posts.
Join us in the Facebook Community Group!
Come share your finished projects with us in the A Crocheted Simplicity Crochet Community Group on Facebook. Join us for fun community events such as crochet alongs, join in on crochet conversations, ask questions, get advice, and share your love for crochet!

More Crochet Cardigan Patterns I Think You’ll Love
- Celsea Button Up Cardigan
- Aurora Womens Crochet Cardigan
- Fireside Crochet Cardigan
- Summer Splendor Cardigan
- Mens Shawl Collar Cardigan
More Crochet Sweater Patterns
Are you looking for more crochet cardigan sweater patterns? We have several more patterns for crochet clothes, including matching sweaters for mothers and daughters and even for fathers and sons.
What was the color yarn on the original email sent out. That’s the one I want
Hi Jean,
The colorway is Powder.