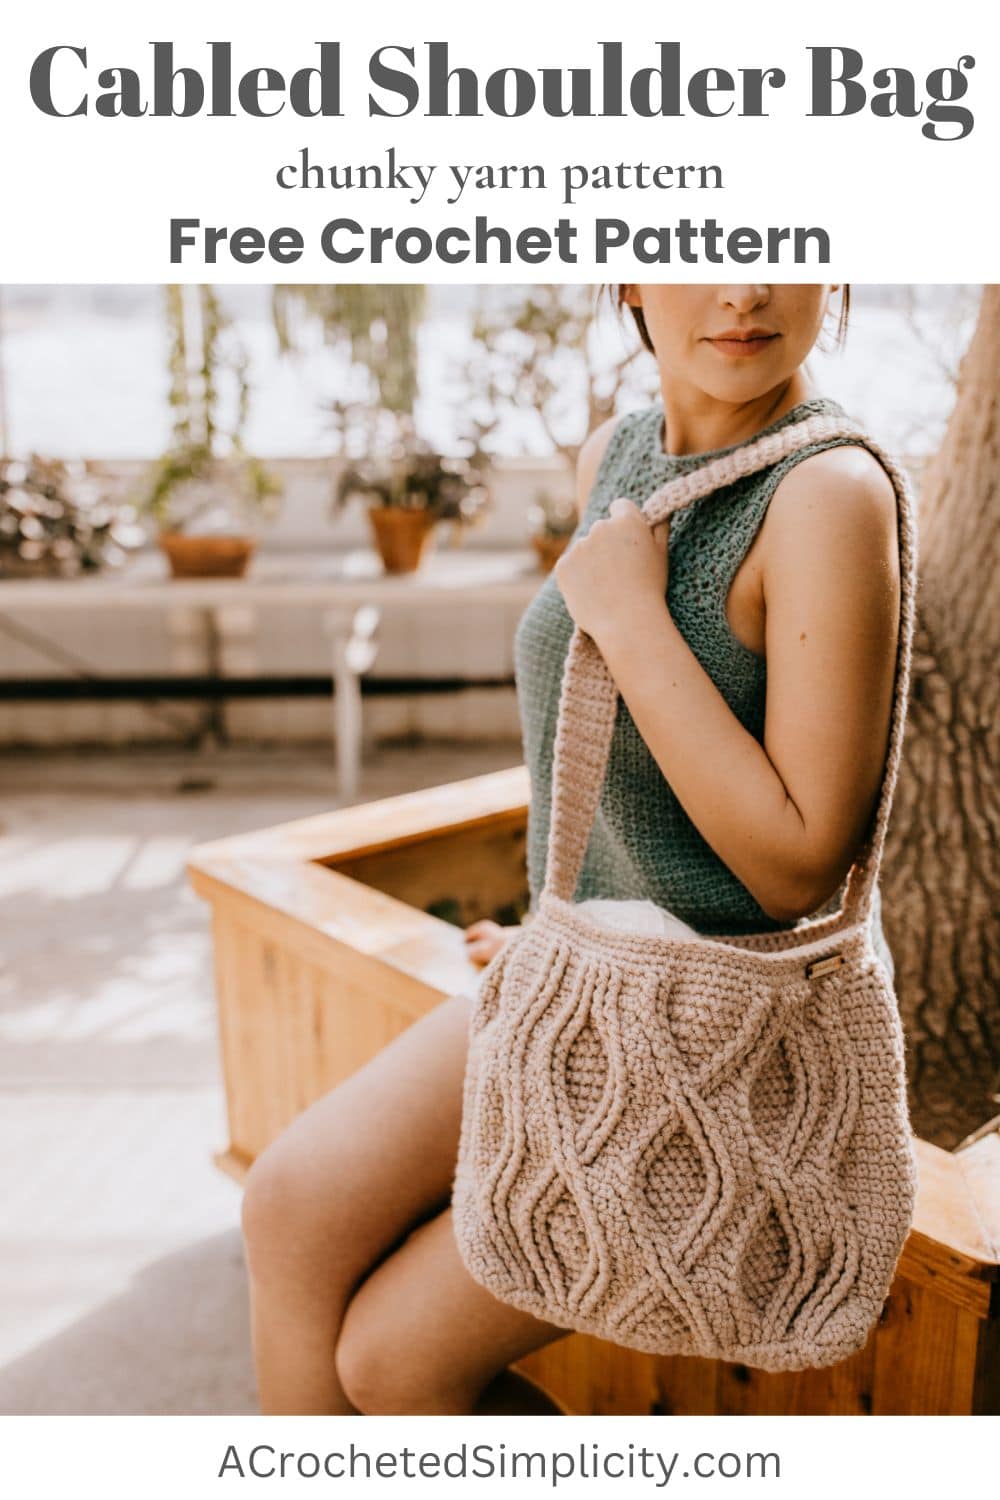
Lille Crochet Shoulder Bag
For a quick visit to the market, stop at the coffee shop for your favorite beverage, or run to complete some miscellaneous errands, having a crochet shoulder bag on hand adds both convenience and style to your outing.
I’m excited to share the Lille Cabled Shoulder Bag pattern which will fast become a favorite because of its minimalist design, chunky cabled look, and durability to carry everything you need on your trip out.
You’ll find the free crochet shoulder bag pattern below, or an ad-free print friendly PDF (including all photo tutorials + a BONUS crochet stitch chart) on Ravelry, or on Etsy (aff).
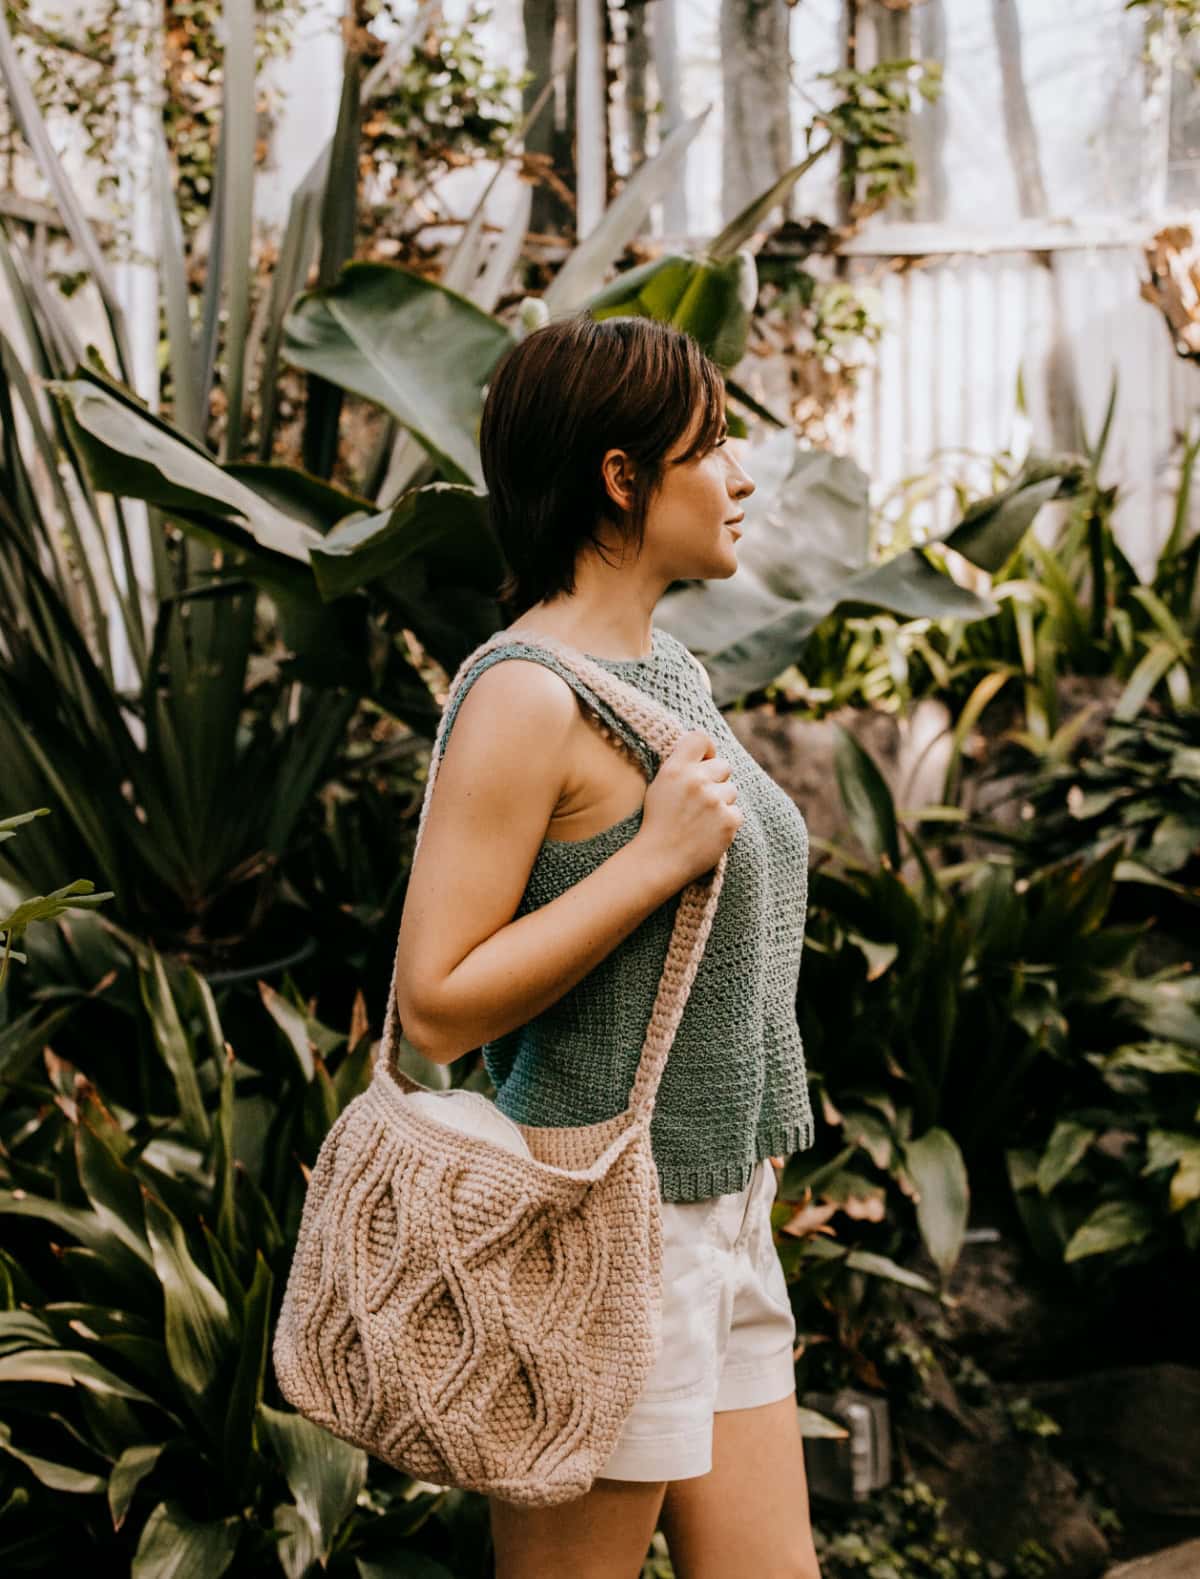
The strap length is customizable and you can make it as long or as short as you like. To get the proper look of a shoulder bag, I’d recommend sticking to the number of rows I crocheted.
How to Crochet the Lille Cabled Shoulder Bag
The trendy Lille Cabled Shoulder Bag is crocheted in one piece from the bottom up.
First, you’ll crochet the base of the bag in rows. After you’ve got your sturdy base ready (we have to make sure the essentials remain secured), you’ll single crochet around the perimeter of the base. This will set the stage for the height of the bag as well as the pleated area.
Next up, you’ll crochet the body of bag onto the base. This is done in continuous rounds (you’ll be crocheting in a spiral) around the perimeter of the base without joining. You can keep your place with a stitch marker, paper clip, safety pin, scrap piece of yarn — whatever you like!
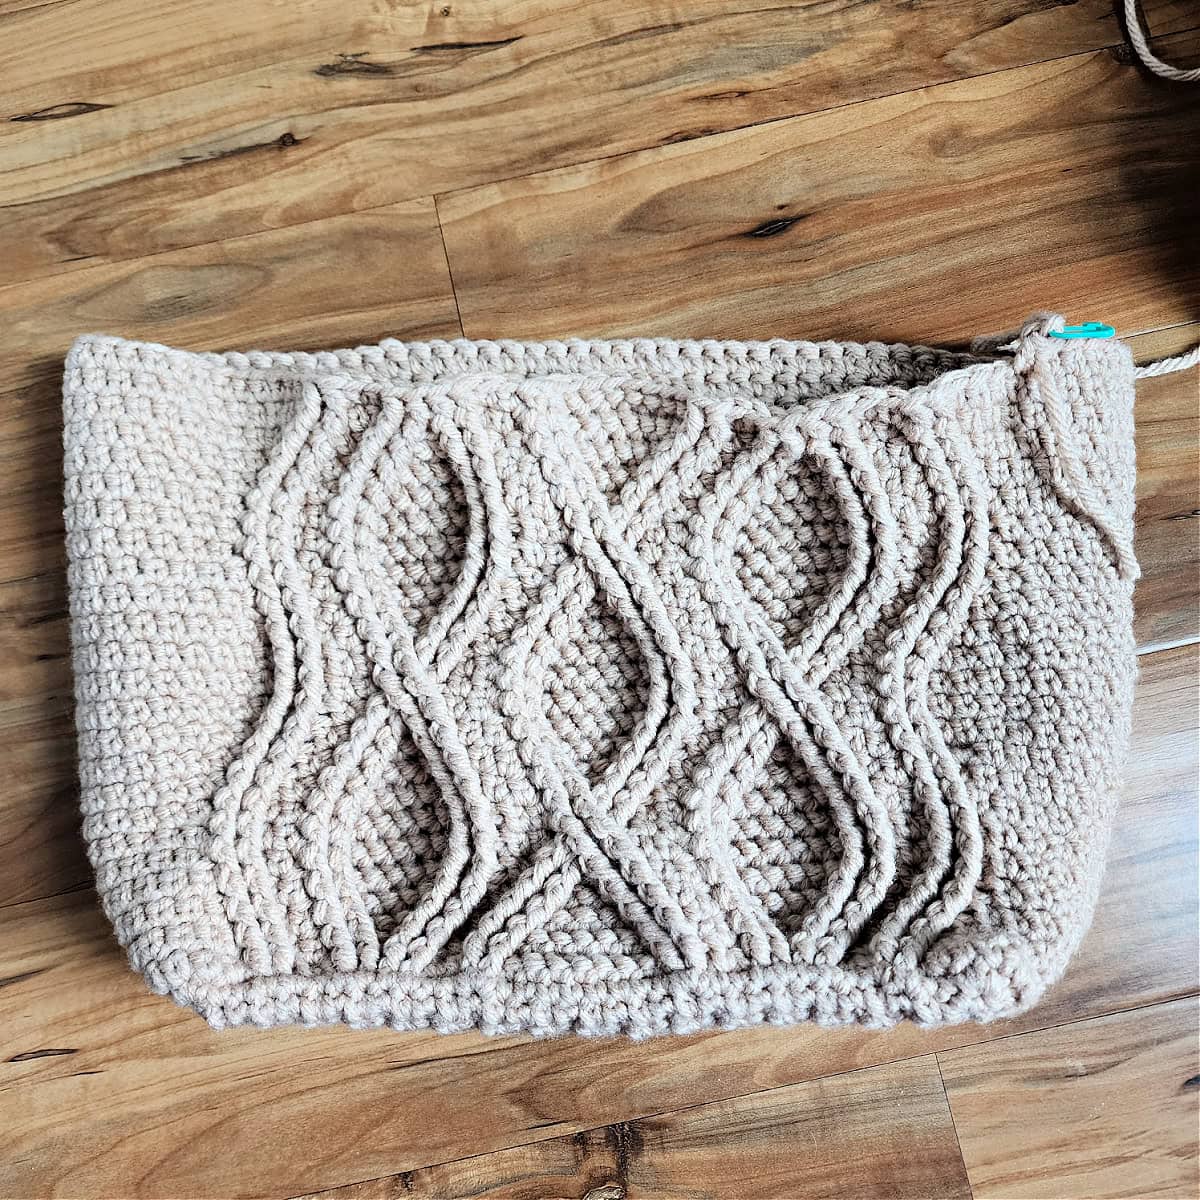
Once your crochet shoulder bag is the intended height, you’ll create simple pleats on the short edges of the bag. This is the fun (and slightly challenging) part in which your bag will come together. All that’s left after this is to crochet the shoulder strap right onto the bag.
Related: If you like working from stitch charts, the ad-free PDF includes a BONUS crochet stitch chart.
Tips for Crocheting Cables
- Master the Basics: Cable stitches often involve post stitches, like front post and back post double crochet. Practice these before starting your project.
- Follow the Chart: Many patterns include charts to help visualize cable designs. These are especially helpful for keeping your stitches aligned. The Ad-Free PDF includes a BONUS crochet stitch chart!
- Work Slowly: Cables require attention to detail. Take your time to ensure your stitches are precise and uniform. Check out my 2 Tips for Proper Post Stitch Placement that are a huge help when crocheting cables!
- Block Your Work: After finishing, blocking your stocking can enhance the cable definition and give your project a polished look.

How To Get The
Lille Cabled Shoulder Bag Pattern
Option 1: Scroll down for the free shoulder bag crochet pattern right here in this blog post.
Option 2: Purchase the ad-free printable PDF from one of my shops:
Best Yarn for Crochet Bags
I typically recommend using 100% cotton yarn for a crochet bag for several reasons:
- Cotton yarns are soft and durable.
- Cotton yarns don’t pill easily.
- They hold up well to several washes in a washing machine.
- They show crochet stitch definition really well.
- They keep their shape.
- They don’t snag easily.
- They’re fairly inexpensive.
My second favorite yarn to crochet a bag with is 100% worsted weight wool, but keep in mind that animal fibers have a tendency to felt. And my third choice is double stranded acrylic yarn with a smaller hook than what’s recommended on the yarn label (because acrylic is stretchier).
If you’re going to line a crochet bag with fabric, you can use any yarn you’d like because the fabric will bear the weight of the items you place in the bag.
Related: If you love crochet cables and bags, you may also love the Charlene Cabled Purse.
Yarn
Although I love to use cotton for crochet bags, for the Lille Cabled Shoulder Bag, I chose a blend of acrylic and wool yarn.
For the beige colored bag shown in the photos, I chose Lion Brand Yarns Hue & Me in Desert. Hue & Me is a beautiful collection of yarn that’s known for its rich, muted color palette where all of the shades are great for stylish projects since they mix and match very well. Since it’s machine washable, your handmade shoulder bag can easily get a lot of wear before you clean it.
The weight of this yarn and slight wool content give it a firmness and density that help the bag hold its shape better compared to lighter yarns, and the acrylic portion makes it strong and resistant to rough use. In my opinion, all of this is great for a crochet shoulder bag.
Crochet Shoulder Bag Pattern
The free shoulder bag crochet pattern can be found below, but if you love to work offline, I’ve got a couple other great options for you.
Purchase the ad-free, printable PDF (includes a BONUS crochet cables chart), on Ravelry, or on Etsy (aff).
Purchase the Crochet Shoulder Bag Kit (aff): Lion Brand has a full kit of the Lille Cabled Crochet Shoulder Bag, available on their website. The crochet kit includes your choice of colors of yarn yarn and a digital copy of the crochet shoulder bag pattern.
This post contains affiliate links.
Materials
- Yarn: Bulky / 5 weight yarn was used for this crochet shoulder bag pattern. Lion Brand Yarns Hue & Me was used for the sample. Other comparable yarns may be used as long as gauge is met.
- Lion Brand Yarns Hue & Me in Desert, bulky weight / 5 yarn, 80% Acrylic / 20% Wool (137 yards / 125 m / 125 g / 4.4 oz)
- Desert #617-099U (4 balls) (480 yards)
- Lion Brand Yarns Hue & Me in Desert, bulky weight / 5 yarn, 80% Acrylic / 20% Wool (137 yards / 125 m / 125 g / 4.4 oz)
- Crochet Hook: J/10/6.00mm; or size needed to obtain gauge (My favorite crochet hooks are the Clover Amour Crochet Hooks, I’ve never had an ache in my hand since switching).
- Scissors
- Yarn Needle
- Stitch Markers
- Scrap piece of yarn
Abbreviations (U.S. Terms)
- ch(s): chain(s)
- sl st: slip stitch
- st(s): stitch(es)
- sp: space
- yo: yarn over
- sc: single crochet
- dc: double crochet
- ext sc: extended single crochet
- Hhdc: herringbone half double crochet
- fpdc: front post double crochet
- fptr: front post treble crochet
- BLO / FLO: back loop only / front loop only
- Rep: repeat
- Rnd: round
- SM: stitch marker
Experience Level
- Intermediate
Size
- One Size: 13″ W x 3.5″ D x 12″ H (not including strap)
Gauge
- See individual sections for gauge.
Special Stitches
- Extended Single Crochet (ext sc): Insert hook into stitch indicated, yo, pull up a loop, yo, pull thru 1 loop on hook, yo, pull thru remaining two loops on hook.
- Herringbone Half Double Crochet (Hhdc): Yo, insert hook into stitch indicated, yo, pull up a loop and pull it thru 1 loop on hook, yo, pull thru remaining loops.
- Front Post Double Crochet (fpdc): Yo, insert hook from front to back to front around the post of the indicated stitch, yo, pull up a loop, yo, pull thru 2 loops, yo, pull thru remaining 2 loops.
- Front Post Treble Crochet (fptr): Yo 2 twice, insert hook from front to back to front around the post of the designated stitch, yo, pull up a loop, (yo, pull thru 2 loops) 3 times.
- Join yarn with a standing single crochet: Begin with a slip knot on your hook, insert your hook into the stitch or space indicated, yo, pull up a loop, yo and draw thru both loops on hook.
Pattern Notes
- Turning chains are not included in stitch count unless noted otherwise.
- Yarn Notes: Lion Brand Yarns Hue & Me was used for the sample. Other comparable yarns may be used as long as gauge is met.
- Lion Brand Yarns Hue & Me in Desert, bulky weight / 5 yarn, 80% Acrylic / 20% Wool (137 yards / 125 m / 125 g / 4.4 oz)
- Yardage & Color
- Desert #617-099U (4 balls) (480 yards)
- Gauge Note: The gauge for the body of bag is written in extended single crochet because the height and width of the cabled post stitches is the same as the extended single crochet stitches.
- Cabled Bag Construction: This crochet shoulder bag is crocheted in one piece from the bottom up. First, you’ll crochet the base of the bag in rows. Next, you’ll single crochet around the perimeter of the base. Then you’ll crochet the body of bag onto the base. Once the bag is the intended height, you’ll create simple pleats on the short edges of the bag. Lastly, you’ll crochet the shoulder strap right onto the bag.
Important Notes About Cables & Post Stitches
Keep these notes in mind while working your bag. They will help you properly place your stitches, especially when your post stitches are moving horizontally, outward and inward.
- Unwritten Rule of Post Stitches: When working post stitches, you are working around the post of a stitch. This means that you always skip over the top loops of 1 stitch behind each post stitch. If you do not skip over those top loops, you’ll end up increasing your overall stitch count. **I believe that most of us do this without even thinking about it, but when it comes to using the post stitches to create cables that move, we forget about that little tidbit.
- Pay REALLY close attention to wording; it is very literal. The pattern always says “fpXX around next post st“. Except for Round 1 (which is the first round of post sts) you will work EVERY post st around a post st from the previous round (not around an ext sc). In short, make sure to work EVERY post st from Round 2 or later, around the post of a post st from the previous round and your post sts will be where they need to be.
- To achieve proper movement of post stitches, you may be working into BOTH the top loops of a post stitch and around it. Watch wording carefully and make sure to always skip the top loops of 1 stitch behind every post st.
- To maintain post stitch movement and stitch count, there are also times when you will not be working into an ext sc. Count stitches and pay special attention to wording.
Lille Free Shoulder Bag Crochet Pattern
Bag Base
Gauge: In sc: 8 sts = 2.875″; 32 rows = 10″
Row 1: With yarn & a 6.00mm crochet hook, ch 9. working into the back hump of the foundation ch, sc in the 2nd ch from your hook and in each ch across. Turn. (8 sts)
Rows 2 – 32: Ch 1, sc in each st across. Turn. (8 sts)
Do NOT turn at the end of Row 32.
Do not fasten off. Continue on to Prepare Base for Body of Bag. Your base should measure approximately 2.875″ W x 10″ L.
Prepare Base for Body of Bag
Gauge: In sc: 8 sts = 2.875″; 32 rows = 10″
Note: Place a locking stitch marker in the middle sc at each corner as you crochet around the perimeter of the base.
Rnd 1: Rotate to work along the long edge of the base, with a 6.00 mm crochet hook, ch 1, work 2 sc in the first st, sc in each st across to the next corner, work 3 sc in the corner st, sc in each of the next 6 sts along the short edge, 3 sc in the last st, rotate to work along the next long edge, sc in each st across to the next corner, 3 sc in the corner st, sc in each of the next 6 sts along the short edge, work 1 more sc in the same st as the beginning 2 sc. Join with a sl st to the 1st st. (84 sts)
Your base should measure approximately 3.25″ W x 10.5″ L at this point.
Rnd 2: Ch 1, [ 3 sc in the corner st, sc in each of the next 3 sts, 2 sc in the next st, sc in each of the next 7 sts, 2 sc in the next st, sc in each of the next 8 sts, 2 sc in the next st, sc in each of the next 7 sts, 2 sc in the next st, sc in each of the next 3 sts, 3 sc in the next corner st, sc in each of the next 8 sts ] work from [ to ] 2 times. Join. (100 sts)
Do not fasten off. Continue on to the Body of Bag.

Body of Bag
Gauge: In ext sc: 11 sts = 4″; 9.75 rows = 4″
Note: The Body of Bag is worked in continuous rounds (also referred to as working in a spiral). Instead of joining at the end of each round, place a scrap piece of yarn between the first and last stitch of the round to help keep your place. Move the scrap of yarn up as you complete each round. I like to use a scrap of yarn in a contrasting color so it’s easy to see.
Important Round 1 Tips
Round 1 is the cable set-up round. You will work the post stitches in Round 1, around the posts of the stitches from Round 2 of Prepare Base for Body of Bag.
If you’re struggling with finding exactly where the post of the stitch is that you need to work a Round 1 post stitch around, make sure to check out my 2 Tips for Proper Post Stitch Placement. There is a quick video and a photo tutorial that will not only help you with this crochet cable purse, it will help you with all other crochet cable patterns.
Rnd 1: Blo sl st in the first st, BLO sl st in the next corner st (this is only to move the working yarn over, these sl sts are not included in st count), ch 1, ext sc in each of the next 4 sts, fpdc around each of the next 2 sts, ext sc in each of the next 2 sts, fpdc around each of the next 4 sts, ext sc in each of the next 2 sts, fpdc around each of the next 2 sts, Hhdc in each of the next 8 sts, fpdc around each of the next 2 sts, ext sc in each of the next 2 sts, fpdc around each of the next 4 sts, ext sc in each of the next 2 sts, fpdc around each of the next 2 sts, ext sc in each remaining st around. Do not join. (100 sts)
Rnd 2: Ext sc in each of the next 3 sts, skip the next st, fpdc around each of the next 2 post sts, ext sc in the top of the same st as the fpdc just worked, ext sc in the next st, skip the next st, fpdc around each of the next 2 post sts, Hhdc in the top of the same st as the fpdc just worked, Hhdc in the next st, fpdc around the same post st as the Hhdc just worked, fpdc around the next post st, skip the next st, ext sc in each of the next 2 sts, fpdc around the same post st as the ext sc just worked, fpdc around the next post st, skip the next st, Hhdc in each of the next 6 sts, skip the next st, fpdc around each of the next 2 post sts, ext sc in the top of the same st as the fpdc just worked, ext sc in the next st, skip the next st, fpdc around each of the next 2 post sts, Hhdc in the top of the same st as the fpdc just worked, Hhdc in the next st, fpdc around the same post st as the Hhdc just worked, fpdc around the next post st, skip the next st, ext sc in each of the next 2 sts, fpdc around the same post st as the ext sc just worked, fpdc around the next post st, skip the next st, ext sc in each remaining st around. Do not join. (100 sts)
Rnd 3: Ext sc in each of the next 2 sts, skip the next st, fpdc around each of the next 2 post sts, ext sc in the top of the same st as the fpdc just worked, ext sc in the next st, skip the next st, fpdc around each of the next 2 post sts, Hhdc in the top of the same st as the fpdc just worked, Hhdc in each of the next 3 sts, fpdc around the same post st as the Hhdc just worked, fpdc around the next post st, skip the next st, ext sc in each of the next 2 sts, fpdc around the same post st as the ext sc just worked, fpdc around the next post st, skip the next st, Hhdc in each of the next 4 sts, skip the next st, fpdc around each of the next 2 post sts, ext sc in the top of the same st as the fpdc just worked, ext sc in the next st, skip the next st, fpdc around each of the next 2 post sts, Hhdc in the top of the same st as the fpdc just worked, Hhdc in each of the next 3 sts, fpdc around the same post st as the Hhdc just worked, fpdc around the next post st, skip the next st, ext sc in each of the next 2 sts, fpdc around the same post st as the ext sc just worked, fpdc around the next post st, skip the next st, ext sc in each remaining st around. Do not join. (100 sts)
Rnd 4: Ext sc in the next st, skip the next st, fpdc around each of the next 2 post sts, ext sc in the top of the same st as the fpdc just worked, ext sc in the next st, skip the next st, fpdc around each of the next 2 post sts, Hhdc in the top of the same st as the fpdc just worked, Hhdc in each of the next 5 sts, fpdc around the same post st as the Hhdc just worked, fpdc around the next post st, skip the next st, ext sc in each of the next 2 sts, fpdc around the same post st as the ext sc just worked, fpdc around the next post st, skip the next st, Hhdc in each of the next 2 sts, skip the next st, fpdc around each of the next 2 post sts, ext sc in the top of the same st as the fpdc just worked, ext sc in the next st, skip the next st, fpdc around each of the next 2 post sts, Hhdc in the top of the same st as the fpdc just worked, Hhdc in each of the next 5 sts, fpdc around the same post st as the Hhdc just worked, fpdc around the next post st, skip the next st, ext sc in each of the next 2 sts, fpdc around the same post st as the ext sc just worked, fpdc around the next post st, skip the next st, ext sc in each remaining st around. Do not join. (100 sts)
Rnd 5: Skip the first st, fpdc around each of the next 2 post sts, ext sc in the top of the same st as the fpdc just worked, ext sc in the next st, skip the next st, fpdc around each of the next 2 post sts, Hhdc in the top of the same st as the fpdc just worked, Hhdc in each of the next 7 sts, fpdc around the same post st as the Hhdc just worked, fpdc around the next post st, skip the next st, ext sc in each of the next 2 sts, fpdc around the same post st as the ext sc just worked, fpdc around the next post st, skip each of the next 2 sts, fpdc around each of the next 2 post sts, ext sc in the top of the same st as the fpdc just worked, ext sc in the next st, skip the next st, fpdc around each of the next 2 post sts, Hhdc in the top of the same st as the fpdc just worked, Hhdc in each of the next 7 sts, fpdc around the same post st as the Hhdc just worked, fpdc around the next post st, skip the next st, ext sc in each of the next 2 sts, fpdc around the same post st as the ext sc just worked, fpdc around the next post st, skip the next st, ext sc in each remaining st around. Do not join. (100 sts)
Rnd 6: Fpdc around each of the next 2 post sts, ext sc in each of the next 2 sts, fpdc around each of the next 2 post sts, Hhdc in each of the next 8 sts, fpdc around each of the next 2 post sts, ext sc in each of the next 2 sts, skip each of the next 2 post sts, fptr around each of the next 2 post sts, working in front of the fptr just made, fptr around each of the 2 skipped post sts, ext sc in each of the next 2 sts, fpdc around each of the next 2 post sts, Hhdc in each of the next 8 sts, fpdc around each of the next 2 post sts, ext sc in each of the next 2 sts, fpdc around each of the next 2 post sts, ext sc in each remaining st around. Do not join. (100 sts)
Rnd 7: Fpdc around each of the next 2 post sts, ext sc in each of the next 2 sts, fpdc around each of the next 2 post sts, Hhdc in each of the next 8 sts, fpdc around each of the next 2 post sts, ext sc in each of the next 2 sts, fpdc around each of the next 4 post sts, ext sc in each of the next 2 sts, fpdc around each of the next 2 post sts, Hhdc in each of the next 8 sts, fpdc around each of the next 2 post sts, ext sc in each of the next 2 sts, fpdc around each of the next 2 post sts, ext sc in each remaining st around. Do not join. (100 sts)
Rnd 8: Ext sc in the first st, fpdc around the same post as the ext sc just worked, fpdc around the next post st, skip the next st, ext sc in each of the next 2 sts, fpdc around the same post st as the ext sc just worked, fpdc around the next post st, skip the next st, Hhdc in each of the next 6 sts, skip the next st, fpdc around each of the next 2 post sts, ext sc in the top of the same st as the fpdc just worked, ext sc in the next st, skip the next st, fpdc around each of the next 2 post sts, Hhdc in the top of the same st as the fpdc just worked, Hhdc in the next st, fpdc around the same post as the Hhdc just worked, fpdc around the next post st, skip the next st, ext sc in each of the next 2 sts, fpdc around the same post st as the ext sc just worked, fpdc around the next post st, skip the next st, Hhdc in each of the next 6 sts, skip the next st, fpdc around each of the next 2 post sts, ext sc in the top of the same st as the fpdc just worked, ext sc in the next st, skip the next st, fpdc around each of the next 2 post sts, ext sc in the top of the same st as the fpdc just worked, ext sc in each remaining st around. Do not join. (100 sts)
Rnd 9: Ext sc in each of the next 2 sts, fpdc around the same post as the ext sc just worked, fpdc around the next post st, skip the next st, ext sc in each of the next 2 sts, fpdc around the same post st as the ext sc just worked, fpdc around the next post st, skip the next st, Hhdc in each of the next 4 sts, skip the next st, fpdc around each of the next 2 post sts, ext sc in the top of the same st as the fpdc just worked, ext sc in the next st, skip the next st, fpdc around each of the next 2 post sts, Hhdc in the top of the same st as the fpdc just worked, Hhdc in each of the next 3 sts, fpdc around the same post as the Hhdc just worked, fpdc around the next post st, skip the next st, ext sc in each of the next 2 sts, fpdc around the same post st as the ext sc just worked, fpdc around the next post st, skip the next st, Hhdc in each of the next 4 sts, skip the next st, fpdc around each of the next 2 post sts, ext sc in the top of the same st as the fpdc just worked, ext sc in the next st, skip the next st, fpdc around each of the next 2 post sts, ext sc in the top of the same st as the fpdc just worked, ext sc in each remaining st around. Do not join. (100 sts)
Rnd 10: Ext sc in each of the next 3 sts, fpdc around the same post as the ext sc just worked, fpdc around the next post st, skip the next st, ext sc in each of the next 2 sts, fpdc around the same post st as the ext sc just worked, fpdc around the next post st, skip the next st, Hhdc in each of the next 2 sts, skip the next st, fpdc around each of the next 2 post sts, ext sc in the top of the same st as the fpdc just worked, ext sc in the next st, skip the next st, fpdc around each of the next 2 post sts, Hhdc in the top of the same st as the fpdc just worked, Hhdc in each of the next 5 sts, fpdc around the same post as the Hhdc just worked, fpdc around the next post st, skip the next st, ext sc in each of the next 2 sts, fpdc around the same post st as the ext sc just worked, fpdc around the next post st, skip the next st, Hhdc in each of the next 2 sts, skip the next st, fpdc around each of the next 2 post sts, ext sc in the top of the same st as the fpdc just worked, ext sc in the next st, skip the next st, fpdc around each of the next 2 post sts, ext sc in the top of the same st as the fpdc just worked, ext sc in each remaining st around. Do not join. (100 sts)
Rnd 11: Ext sc in each of the next 4 sts, fpdc around the same post as the ext sc just worked, fpdc around the next post st, skip the next st, ext sc in each of the next 2 sts, fpdc around the same post st as the ext sc just worked, fpdc around the next post st, skip each of the next 2 sts, fpdc around each of the next 2 post sts, ext sc in the top of the same st as the fpdc just worked, ext sc in the next st, skip the next st, fpdc around each of the next 2 post sts, Hhdc in the top of the same st as the fpdc just worked, Hhdc in each of the next 7 sts, fpdc around the same post as the Hhdc just worked, fpdc around the next post st, skip the next st, ext sc in each of the next 2 sts, fpdc around the same post st as the ext sc just worked, fpdc around the next post st, skip each of the next 2 sts, fpdc around each of the next 2 post sts, ext sc in the top of the same st as the fpdc just worked, ext sc in the next st, skip the next st, fpdc around each of the next 2 post sts, ext sc in the top of the same st as the fpdc just worked, ext sc in each remaining st around. Do not join. (100 sts)
Rnd 12: Ext sc in each of the next 4 sts, fpdc around each of the next 2 post sts, ext sc in each of the next 2 sts, skip each of the next 2 post sts, fptr around each of the next 2 post sts, working in front of the fptr just made, fptr around each of the 2 skipped post sts, ext sc in each of the next 2 sts, fpdc around each of the next 2 post sts, Hhdc in each of the next 8 sts, fpdc around each of the next 2 post sts, ext sc in each of the next 2 sts, skip each of the next 2 post sts, fptr around each of the next 2 post sts, working in front of the fptr just made, fptr around each of the 2 skipped post sts, ext sc in each of the next 2 sts, fpdc around each of the next 2 post sts, ext sc in each remaining st around. Do not join. (100 sts)
Rnd 13: Ext sc in each of the next 4 sts, fpdc around each of the next 2 post sts, ext sc in each of the next 2 sts, fpdc around each of the next 4 post sts, ext sc in each of the next 2 sts, fpdc around each of the next 2 post sts, Hhdc in each of the next 8 sts, fpdc around each of the next 2 post sts, ext sc in each of the next 2 sts, fpdc around each of the next 4 post sts, ext sc in each of the next 2 sts, fpdc around each of the next 2 post sts, ext sc in each remaining st around. Do not join. (100 sts)
Rnds 14 – 23: Repeat Rounds 2 – 11.
Rnd 24: Ext sc in each ext sc, Hhdc in each Hhdc, and fpdc around each fpdc around. Do not join. (100 sts)
Rnd 25: Sc in each ext sc and Hhdc, fpdc around each fpdc around. Join with a sl st to the 1st st. (100 sts)
Do not fasten off. Continue on to Bag Pleats.
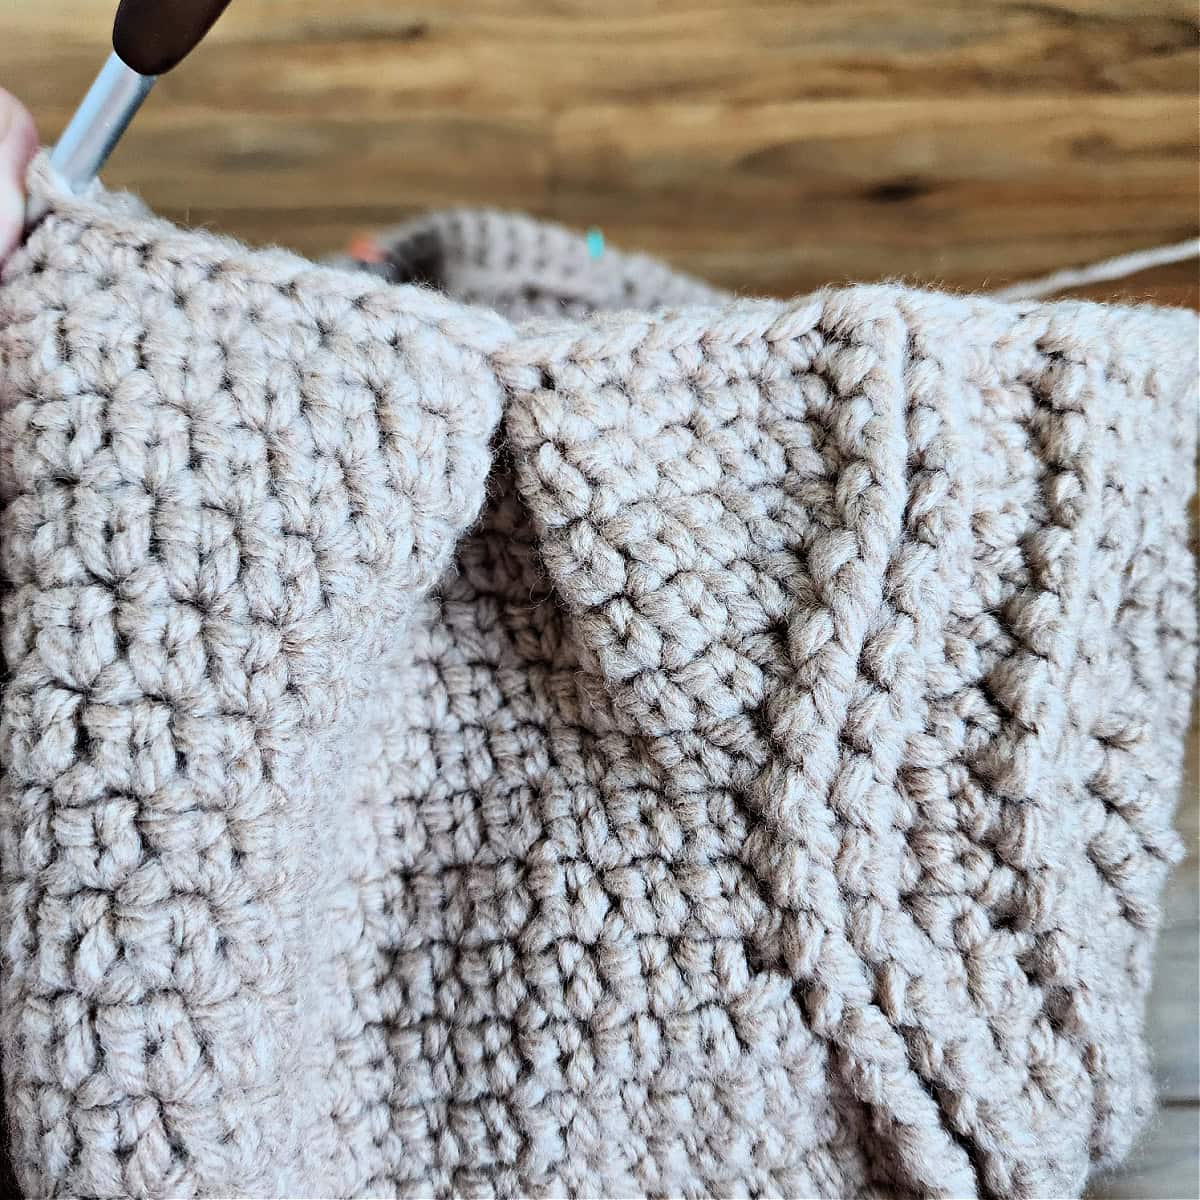
Bag Pleats
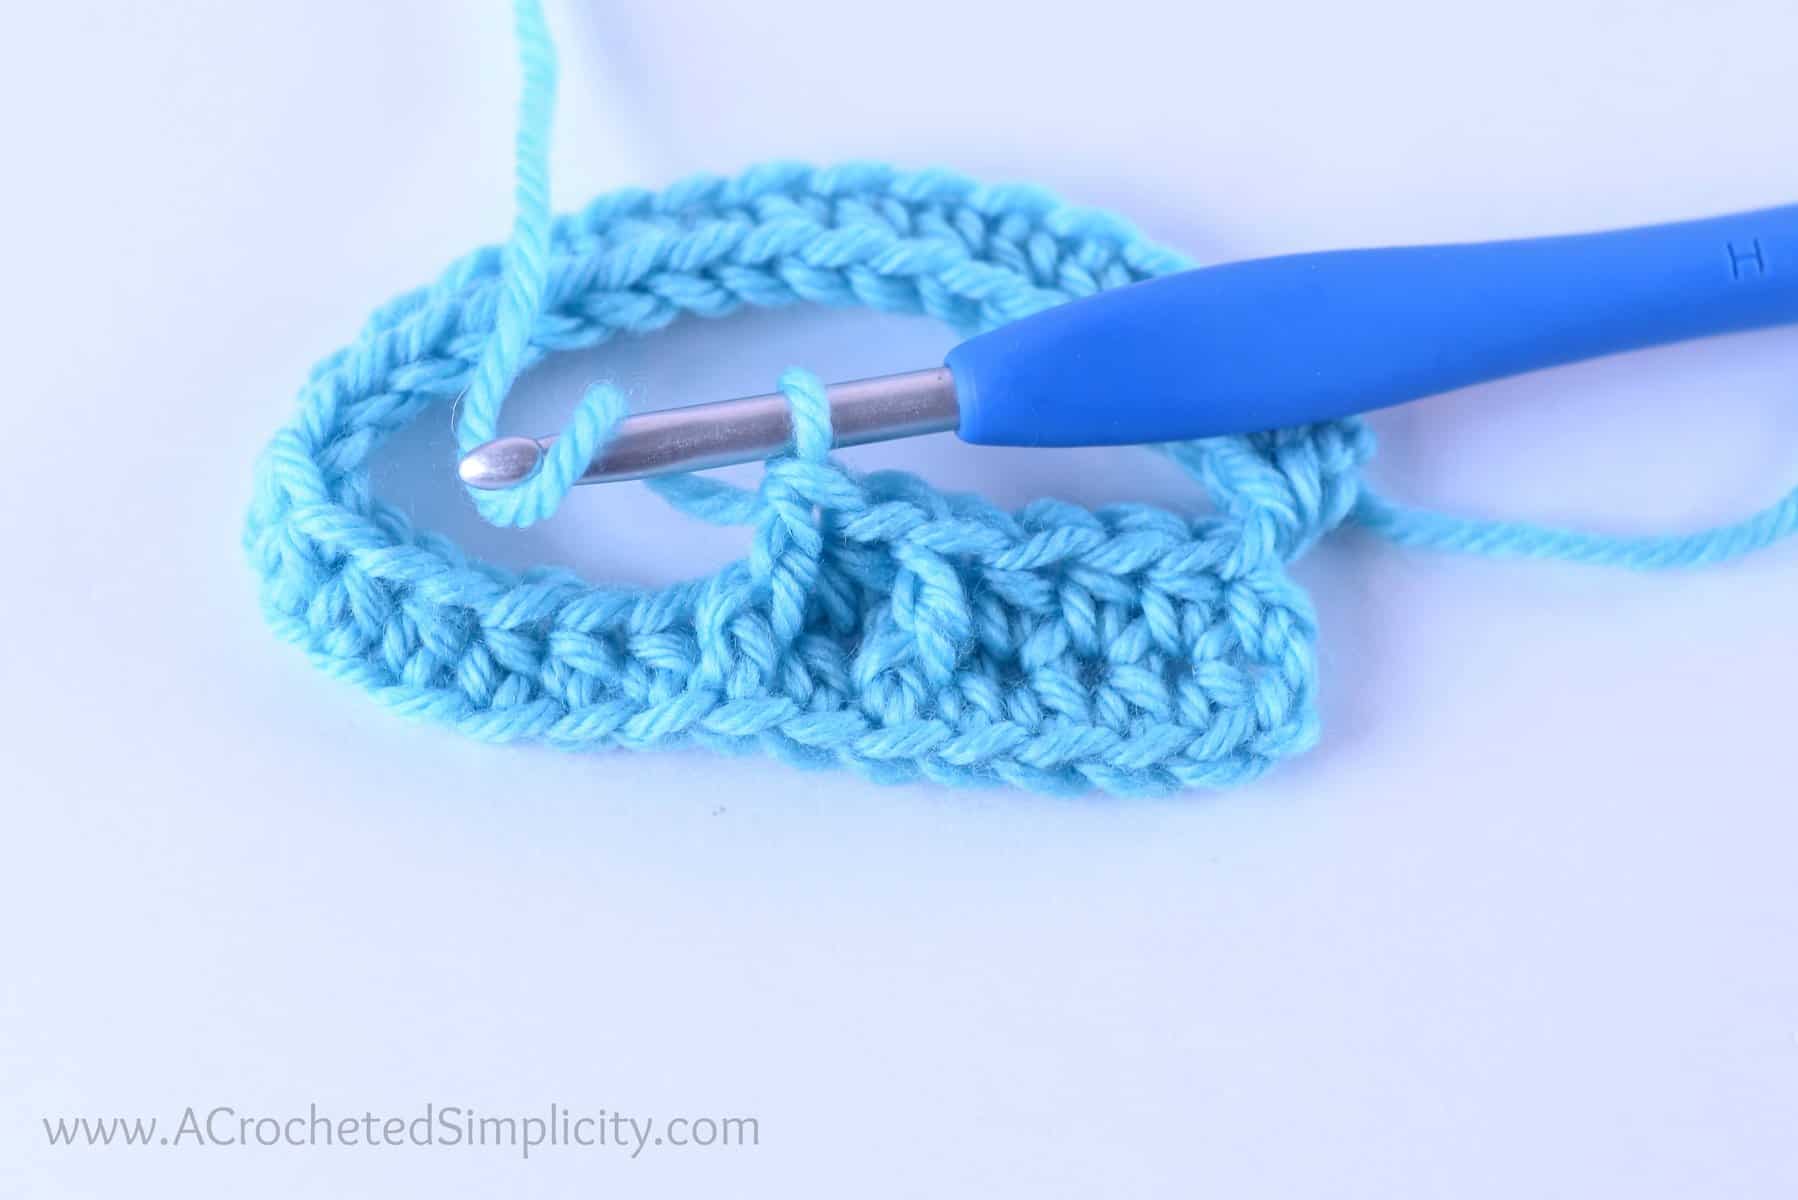
In this section, you will create pleats on the short sides of the top opening of the bag. There is a photo tutorial after the written instructions.
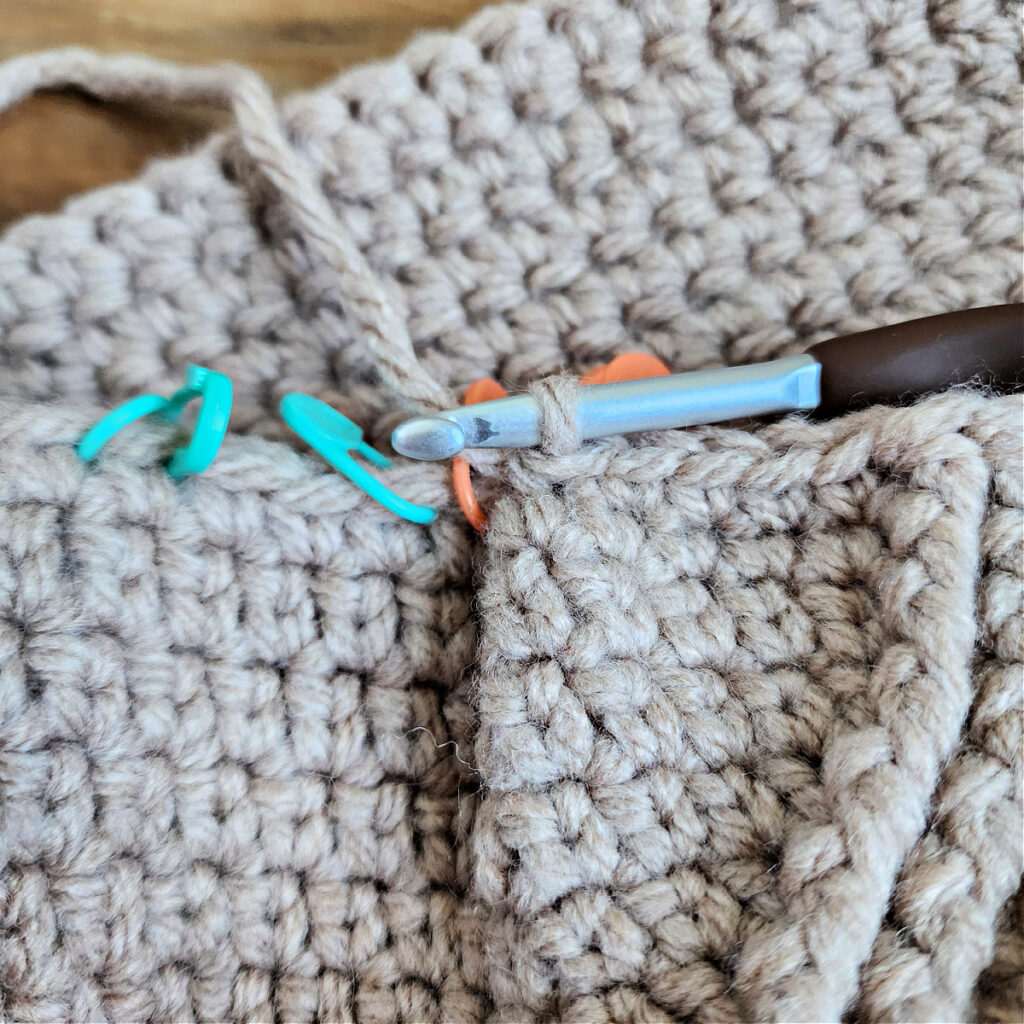
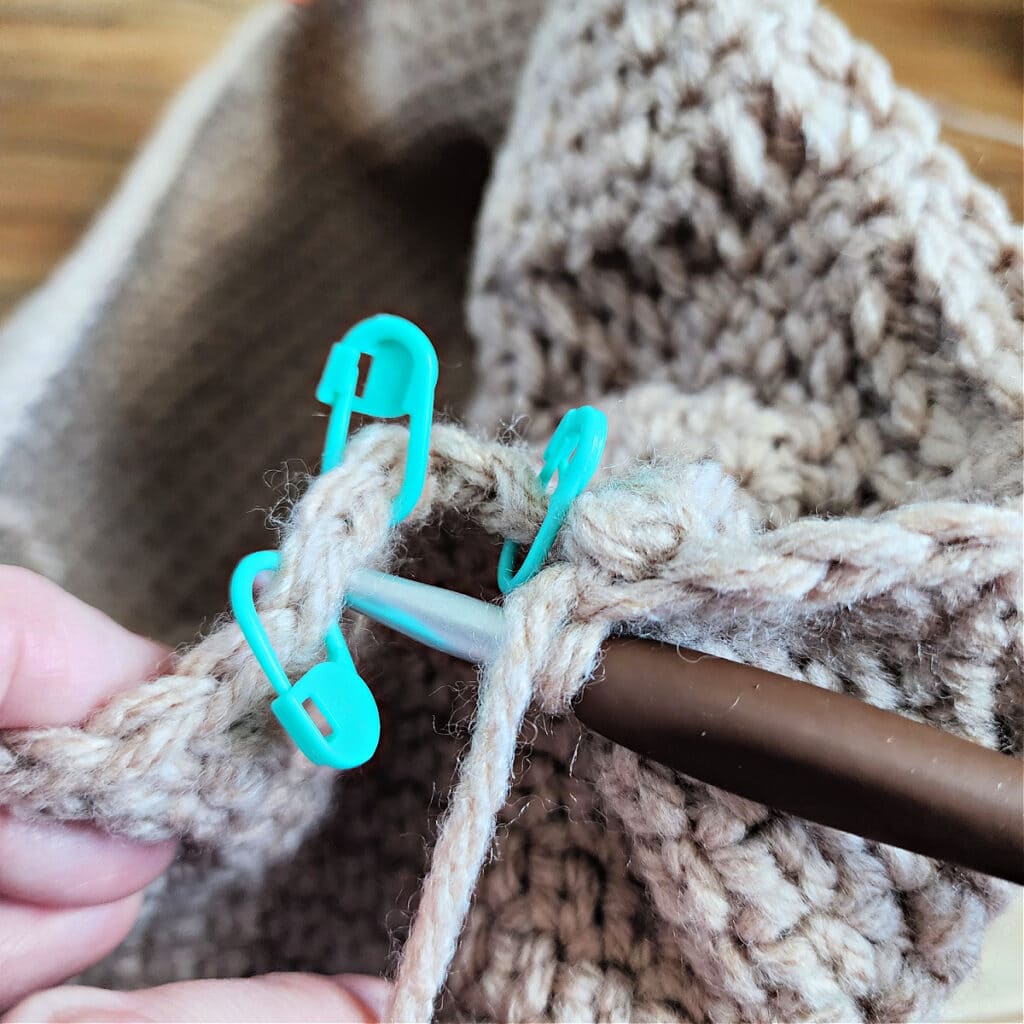
Place a stitch marker in each of the following stitches before working Round 1: 41, 42, 45, 46, 49, 50, 91, 92, 95, 96, 99, & 100.
Rnd 1: Sc in each of the first 40 sts, insert your hook from front to back thru st 41, insert your hook from back to front thru st 42, skip the next 2 sts, insert your hook from front to back thru st 45, yo, pull up a loop, yo, pull thru both loops on your hook to complete a sc, insert your hook from front to back thru st 50, insert your hook from back to front thru st 49, insert your hook from front to back thru st 46, yo, pull up a loop, yo, pull thru both loops on your hook to complete a sc, sc in each st around to st 91 (the next st marked with a SM), insert your hook from front to back thru st 91, insert your hook from back to front thru st 92, skip the next 2 sts, insert your hook from front to back thru st 95, yo, pull up a loop, yo, pull thru both loops on your hook to complete a sc, insert your hook from front to back thru st 100, insert your hook from back to front thru st 99, insert your hook from front to back thru st 96, yo, pull up a loop, yo, pull thru both loops on your hook to complete a sc. Do not join. (84 sts)
Rnd 2: Sc in each of the next 16 sts, skip 1 st, sc in each of the next 6 sts, skip 1 st, sc in each remaining st around. (82 sts)
Rnds 3 – 4: Sc in each st around. Do not join. (82 sts)
Rnd 5: Sl st (aka surface crochet) in each st around. Join with a Special Join Technique.
Fasten off. Weave in ends. Continue on to the Strap.
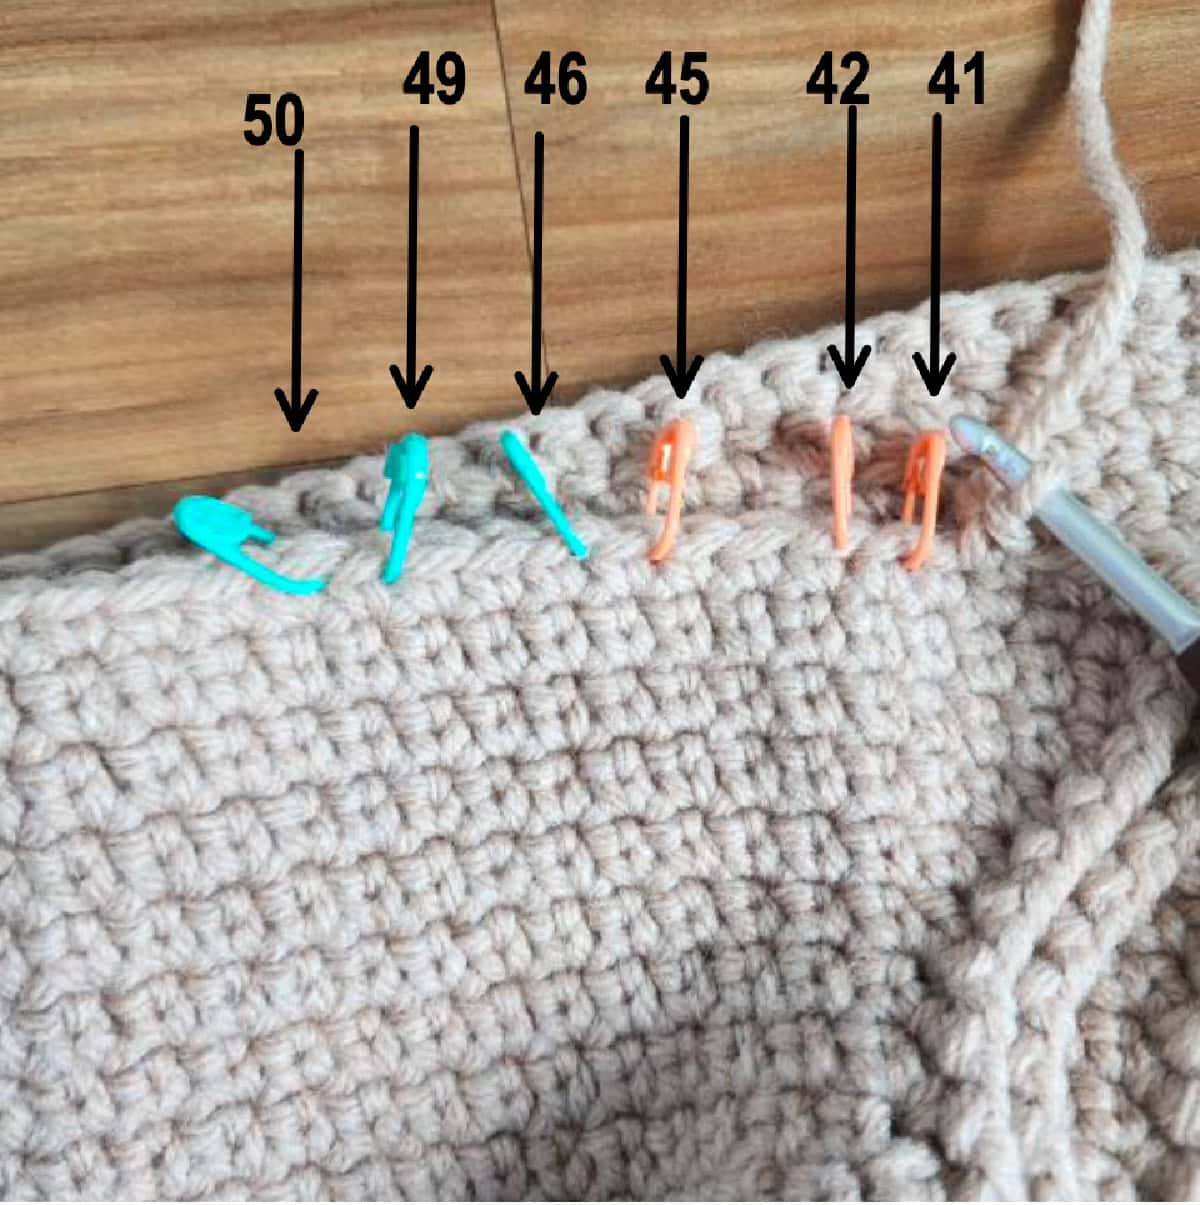
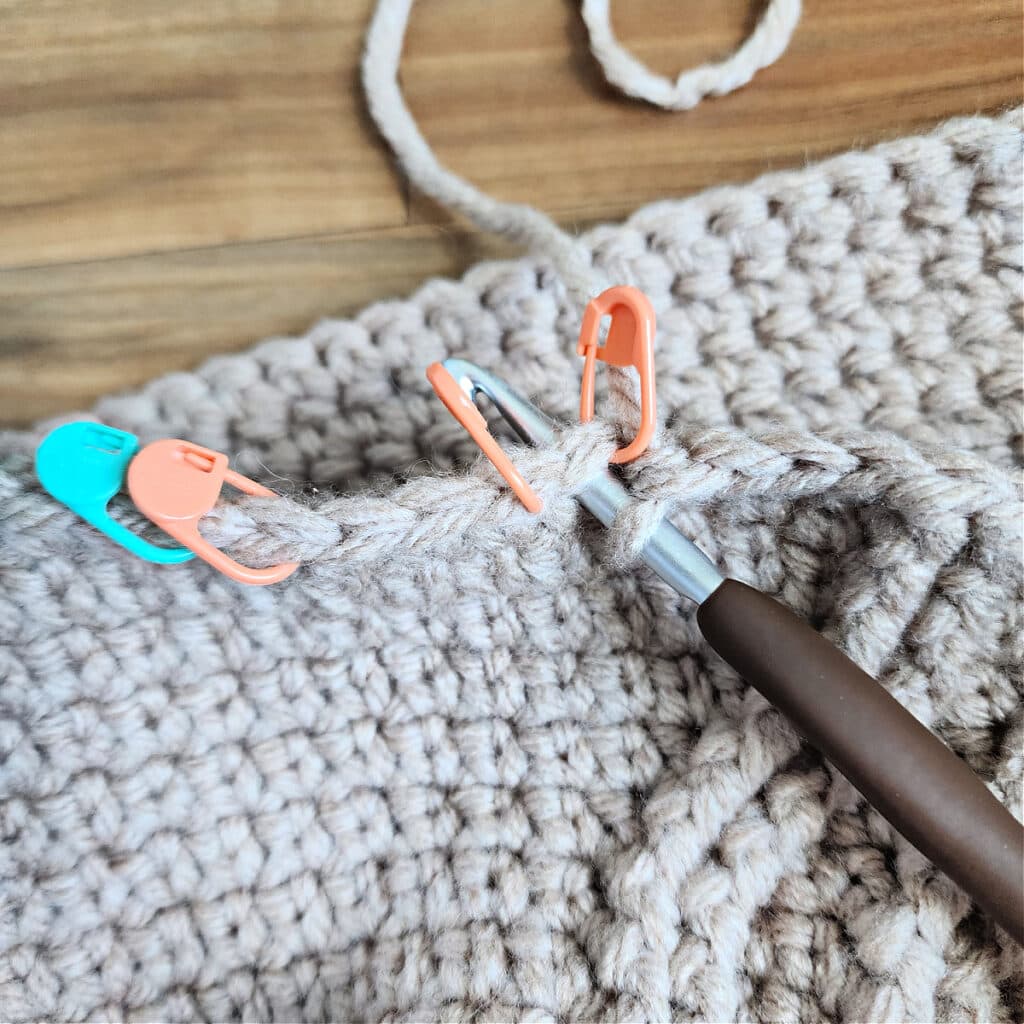
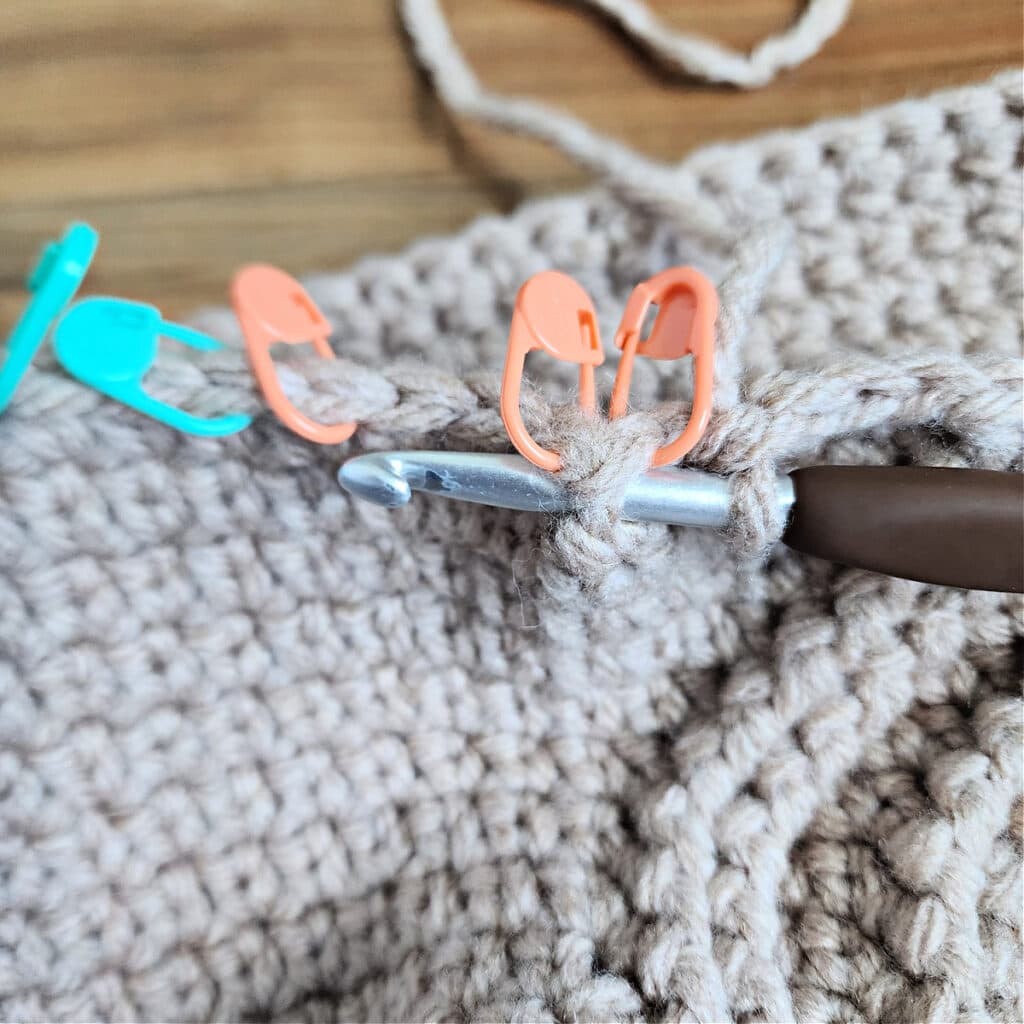
Photos Above: Rnd 1: Insert your hook from front to back thru st 41, insert your hook from back to front thru st 42, skip the next 2 sts, insert your hook from front to back thru st 45, yo, pull up a loop, yo, pull thru both loops on your hook to complete a sc.
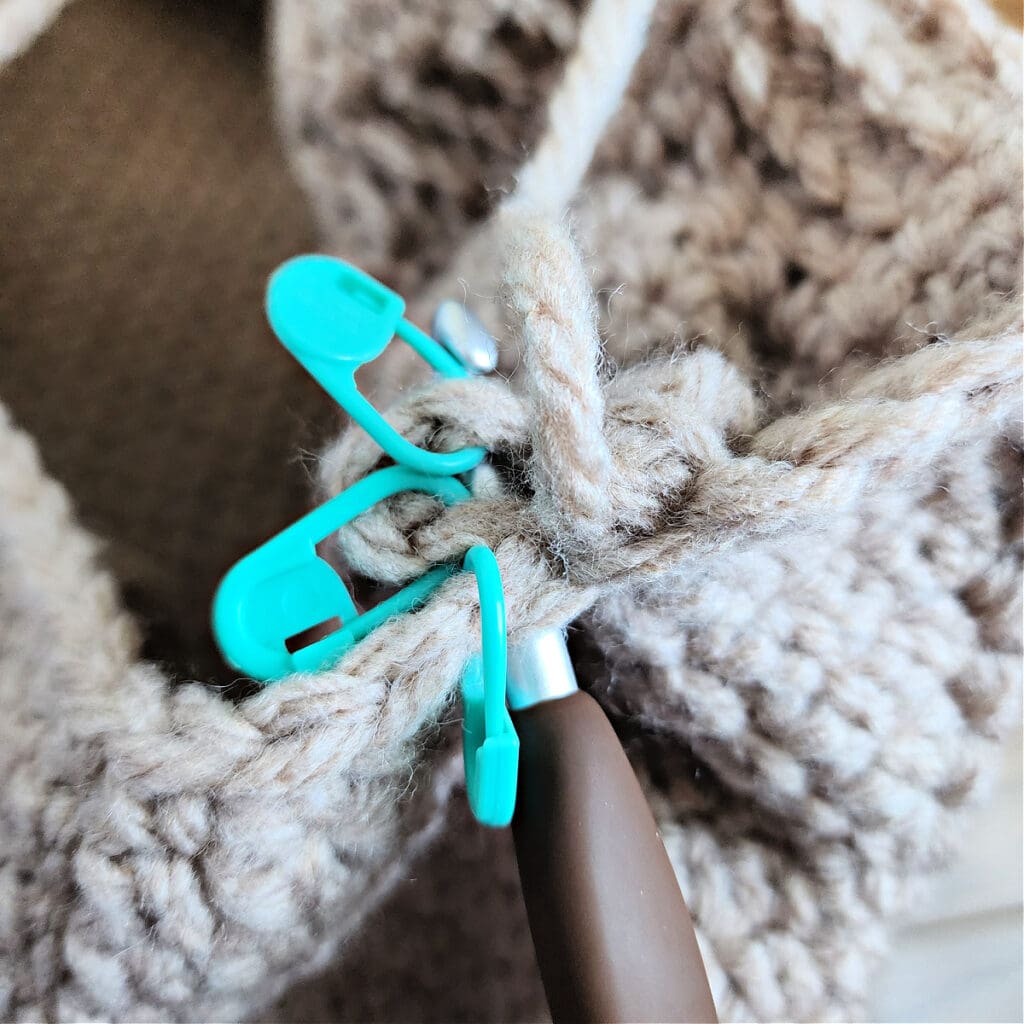
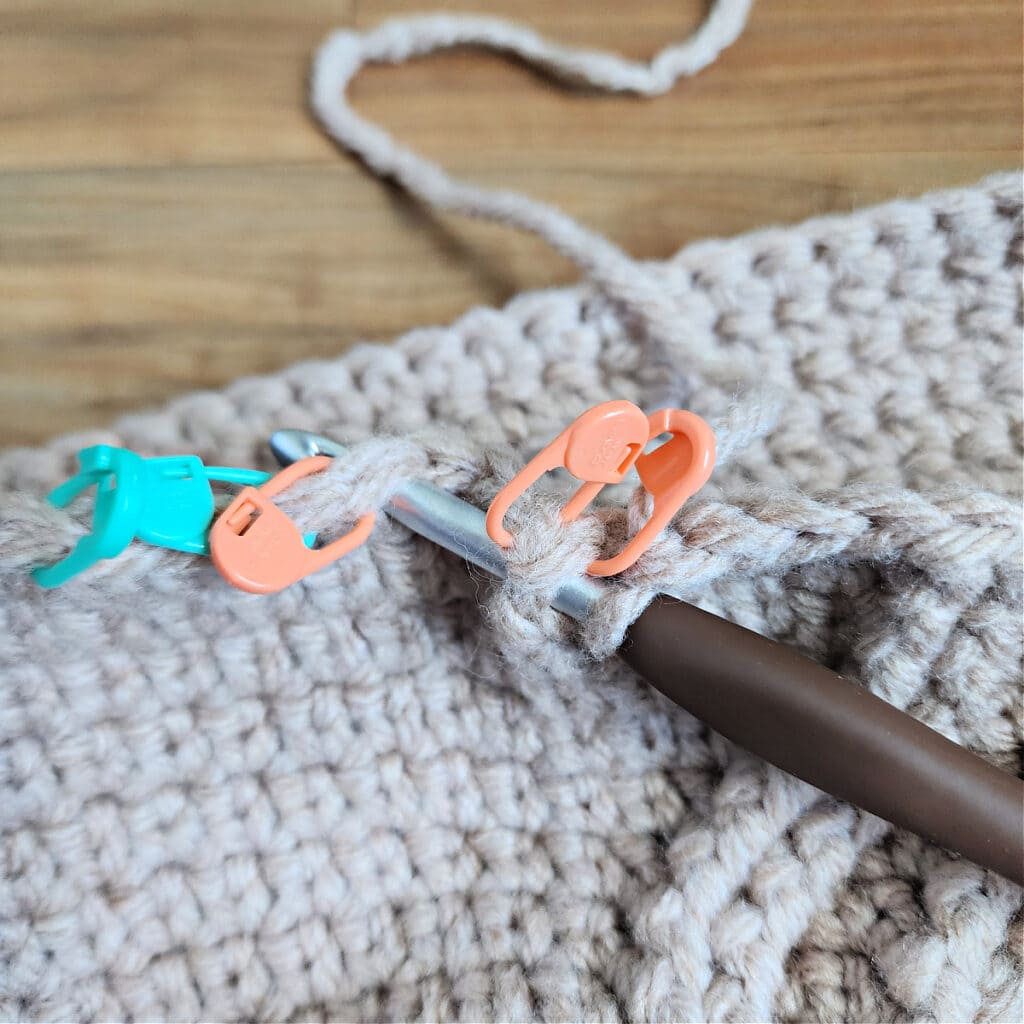
Photos Above: Rnd 1 Continued: insert your hook from front to back thru st 50, insert your hook from back to front thru st 49, insert your hook from front to back thru st 46, yo, pull up a loop, yo, pull thru both loops on your hook to complete a sc.
Strap
Before beginning the Strap, mark the centermost 6 stitches on each of the short sides of the bag.
Row 1 (RS): With either short side facing you and working into the last round of sc (not the final round of sl sts), with yarn & a 6.00mm crochet hook, join yarn with a standing sc in the stitch on the right, sc in each of the next 5 sts. Turn. (6 sts)
Row 2: Ch 1, sc in each st across. Turn. (6 sts)
Repeat Row 2 until the strap measures 28″, or desired length.
Fasten off, leaving a tail of yarn that is 3 – 4 times the length of the last row. Use a yarn needle to sew the last row of the strap to the 6 sts on the opposite side of the bag. Weave in ends. The strap should measure 2-1/8″ W x 28″ L.

There is no limit to the designs you can crochet up when you have a hook and a ball of yarn with you. With quality materials, imagination, and a little dedication, you can craft a fashionable and durable bag that perfectly matches your personal style in any color you prefer.
I MADE IT! NOW WHAT?
Pin this post! Save this free shoulder bag crochet pattern to your Pinterest boards so that you can come back and make it again.
Leave a comment below: We love to hear your feedback.
Share Your Finished Projects on Facebook or Instagram: I love to see your finished projects! Share with us on social media and tag me @acrochetedsimplicity or use the hashtag #ACrochetedSimplicity so I can find your posts.
Join us in the Facebook Community Group!
Come share your finished projects with us in the A Crocheted Simplicity Crochet Community Group on Facebook. Join us for fun community events such as crochet alongs, join in on crochet conversations, ask questions, get advice, and share your love for crochet!

More Free Patterns for Crochet Bags I Think You’ll Love
More Crochet Patterns for Crochet Purses & Handbags
Are you looking for more crocheted purse patterns? We have several more free & premium crochet patterns for bags, backpacks, purses, and totes. We have a variety of free crochet bag patterns and premium crochet bag patterns.