How to Crochet: Surface Crochet Technique
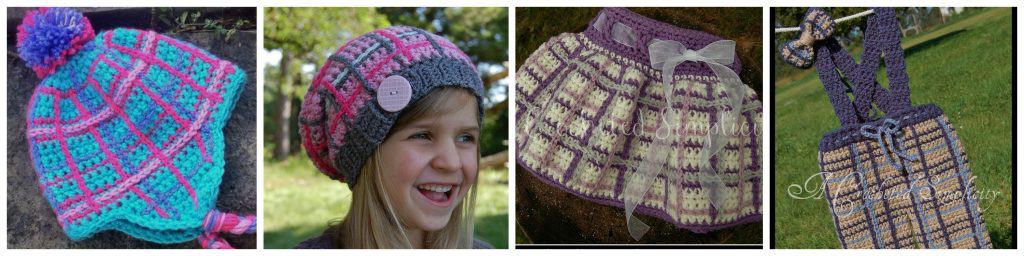
Have you ever wanted to add a monogram to a garment, an abstract design to a handbag, or plaid…have you ever wanted to create a plaid design? I did…several in fact! The Surface Crochet Technique came in really handy with my “Perfectly Plaid” line (the photos below show just a few of those designs). Surface Crochet, sometimes referred to as Surface Slip Stitch, is a fun way to personalize your work.
Before we begin, let’s have a little chit chat about the most important part of surface crochet: TENSION. Tension control is very important when using the surface crochet technique. I cannot stress this enough!
- If your tension is too tight, your garment will not fit properly as it will affect the garment’s natural positive ease.
- If your tension is too tight, it may cause your garment to pucker.
- If your tension is too loose, your surface crochet will have a sloppy appearance and it may leave loops to later be caught on things and create unsightly snags on your hard work.
As with any other crochet technique, adjusting your hook size may help you to get the proper tension needed to achieve the finished look you desire. I prefer to use a smaller hook when working my surface crochet because I like the look of the narrower stitches it creates. However, I have to adjust my “drag” to loosen up my slip stitches so that my tension is loose enough.
Surface crochet is not only easiest to work on an item that is worked in rows all in single crochet (sc), but it will also give you the neatest look. Note: When working single crochet in rows, it’s almost like you’re making your own graph paper, a blank canvas to paint on! I know what you’re thinking. You’re thinking, “Ah, man. I wanted to try surface crochet on a hat worked in the round.” No worries! Simply join at the end of each round and then turn and work the next round in the opposite direction. This will keep your stitches all lined up.
Now that I’ve bored you with a short lecture on tension control and tips with preparing your work for surface crochet, let’s get on with the show already!
Surface Crochet Tutorial
Note: Your working yarn will remain on the underside of your work while you surface crochet.
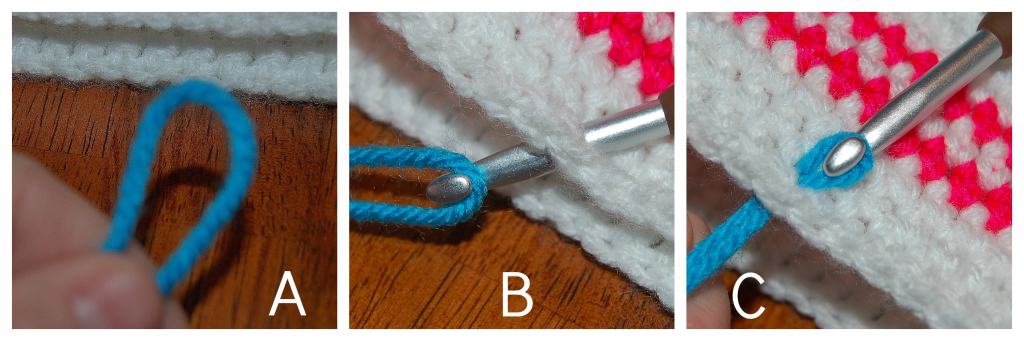
Step 1: Begin by folding your working yarn in half, as shown in photo A. (you can also begin with a slip knot on your hook, but I prefer not to…that bugger seems to want to work his way through to the front of my work)
Step 2: Insert your hook into the desired st (where your surface crochet will begin), place loop of yarn onto your hook, as shown in photo B.
Step 3: Pull the loop of yarn up thru to the top side of your garment, as shown in photo C.
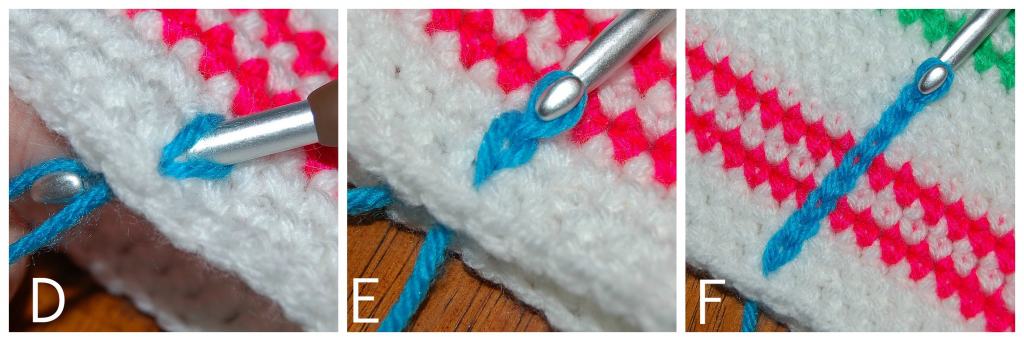
Step 4: Insert your hook into the next desired st, as shown in photo D.
Step 5: Yarn over and pull up a loop, pulling it thru the previous loop, as shown in photo E.
Photo F: Repeat Steps 4 & 5 until your surface crochet is complete and then finish with the fastening off technique below.
Fastening Off Your Surface Crochet
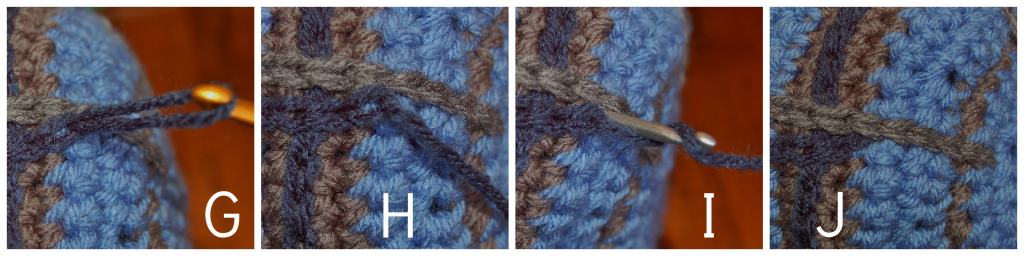
Step 1: In the last st of your design, pull up a loop of working yarn, as shown in photo G.
Step 2: Cut the working yarn and pull the tail all the way through to the front of your work, as shown in photo H.
Step 3: Insert a hook (any size), from the bottom of your work to the top, in the last st. Wrap the yarn tail around the hook, as shown in photo I.
Step 4: Pull the tail of yarn through to the underside of your garment and secure it by weaving in your ends.
Voila! You’re now armed with the knowledge of how to embellish your items with surface crochet.
Practice What You’ve Learned
Create a single crochet swatch that is approximately 4″ X 4″. I suggest starting with vertical and horizontal rows to get the feel of this technique and to find your own groove. You will find that you have to hold your hook, yarn and project differently to create a nice clean surface crochet design. Once you’ve gotten into a groove and are ready to move on, grab a piece of graph paper and layout a simple design…the sky is the limit!
Give Surface Crochet a try on your next project and let me know how you did! If you’d like to try out this new technique in a plaid design, pop on over to my shops where you’ll find several patterns to choose from. Ravelry, Etsy, Craftsy

Thank you, Jennifer, for leaving such simple, easy, complete instructions for surface crochet! I crocheted a hot pad in a grapefruit design, using surface crochet to mark the sections. It came out beautifully! I wish I could send you a pic.
Hi Diana,
I’m so glad you found my tutorial helpful for your project! I’d love to see a photo. Please send me an e-mail: [email protected]
Happy Crocheting,
Jennifer
What helpful simple suggestion. I like the ease and flexibility of your instructions. I will bookmark this —- and your page for later use.. thank you very much
Ms. Rose