Everett Crochet Mens Cardigan
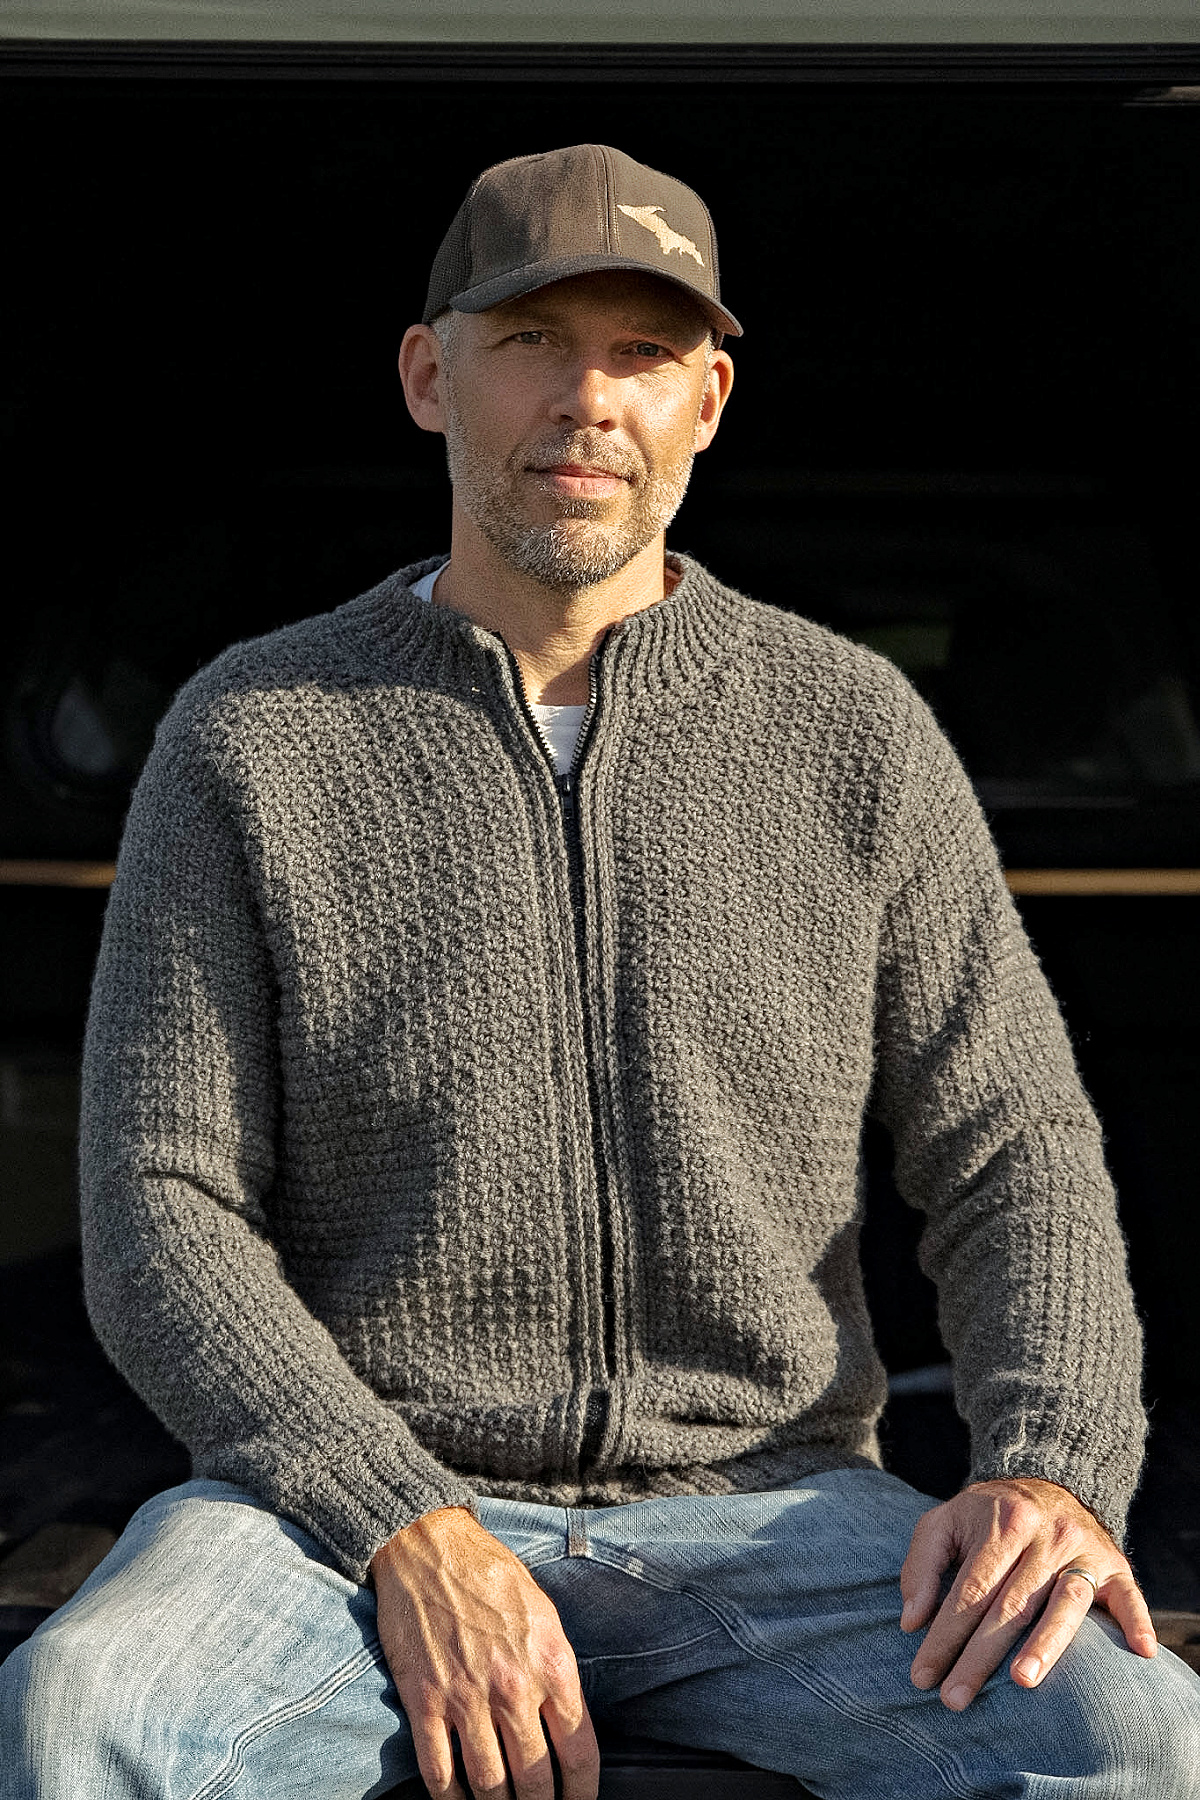
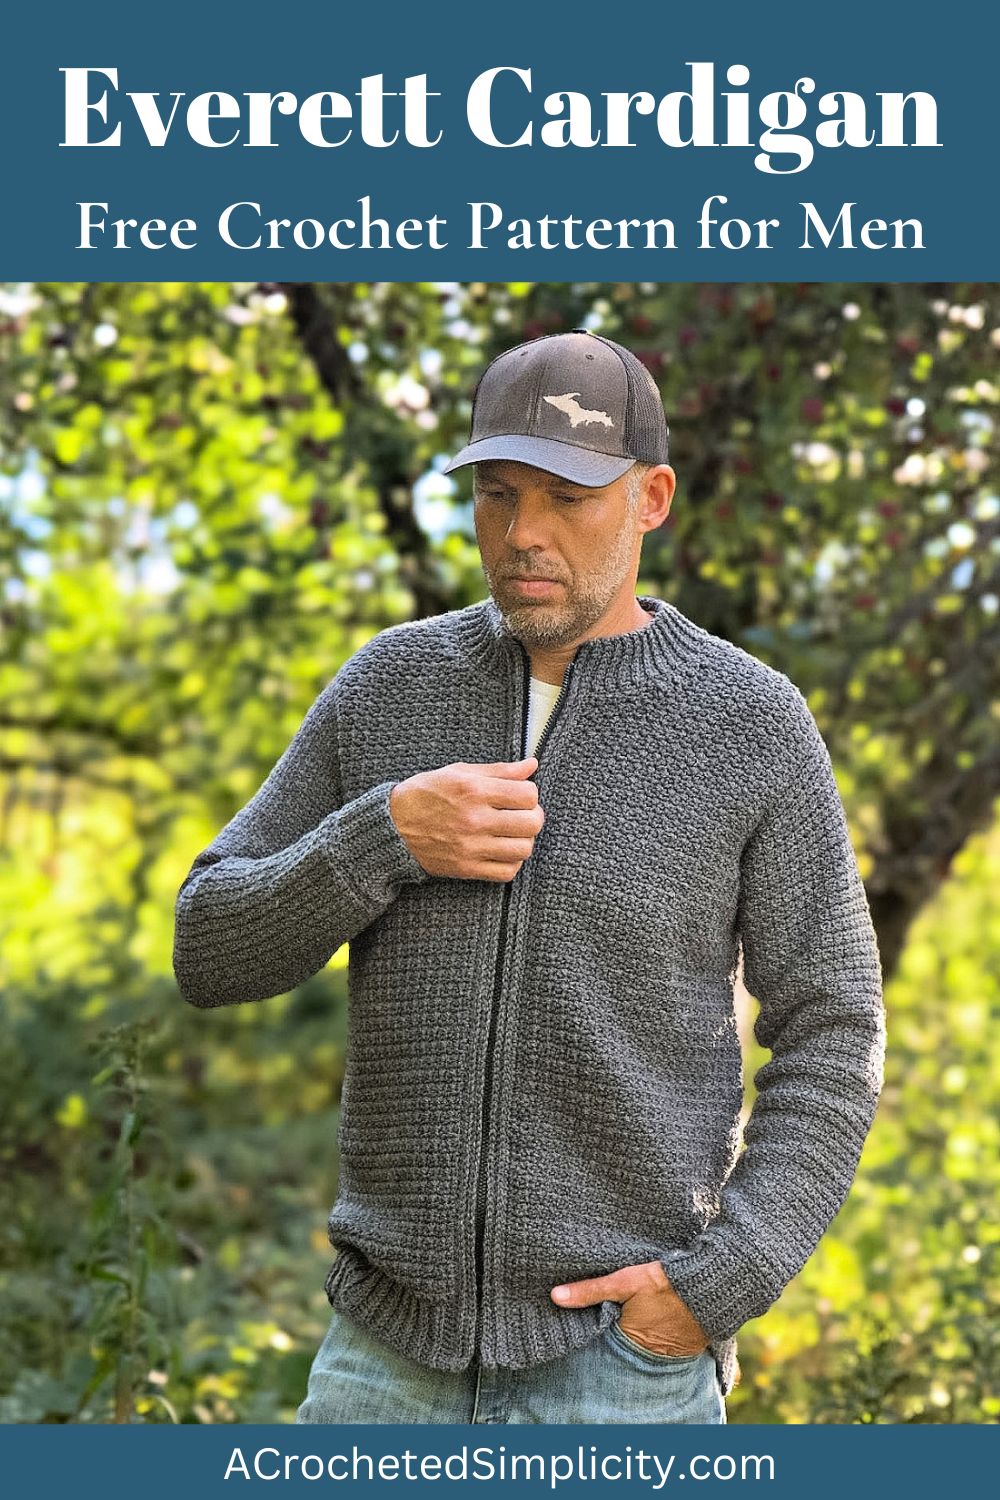
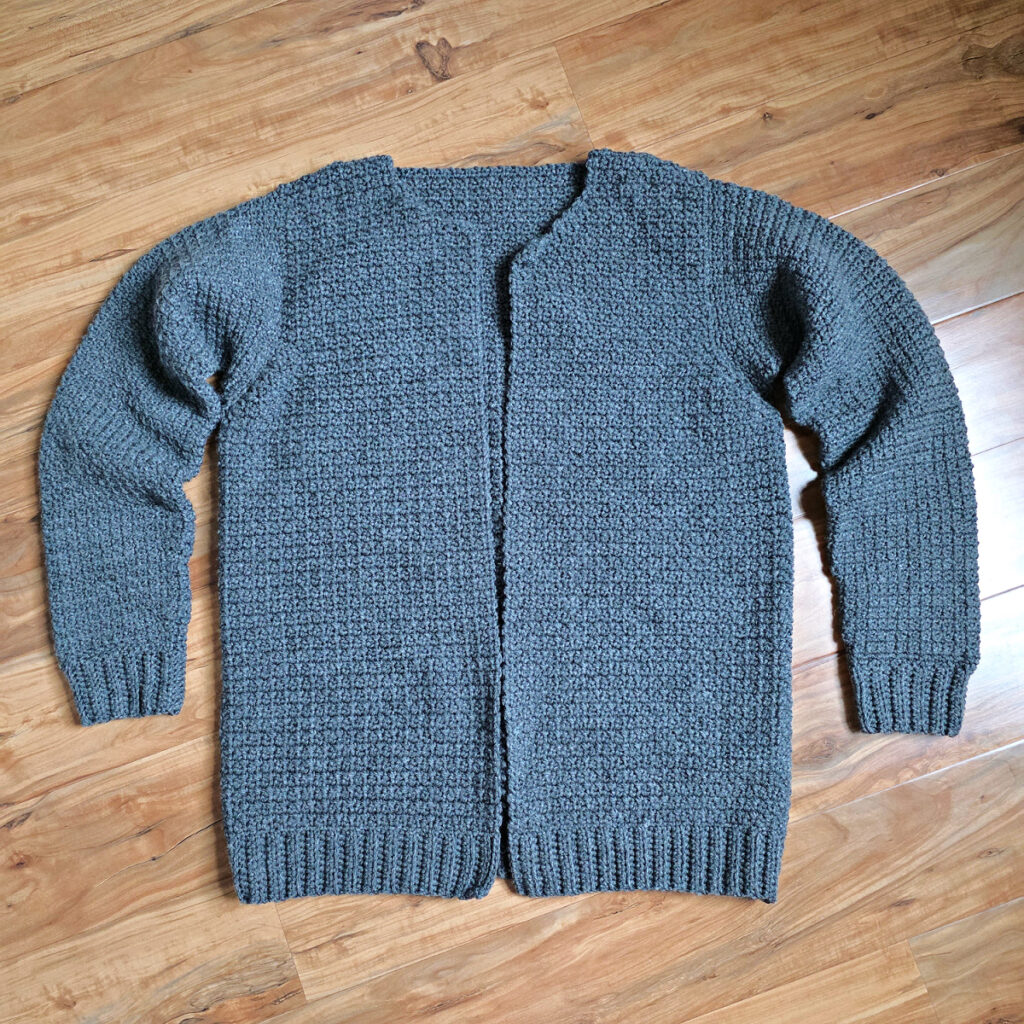
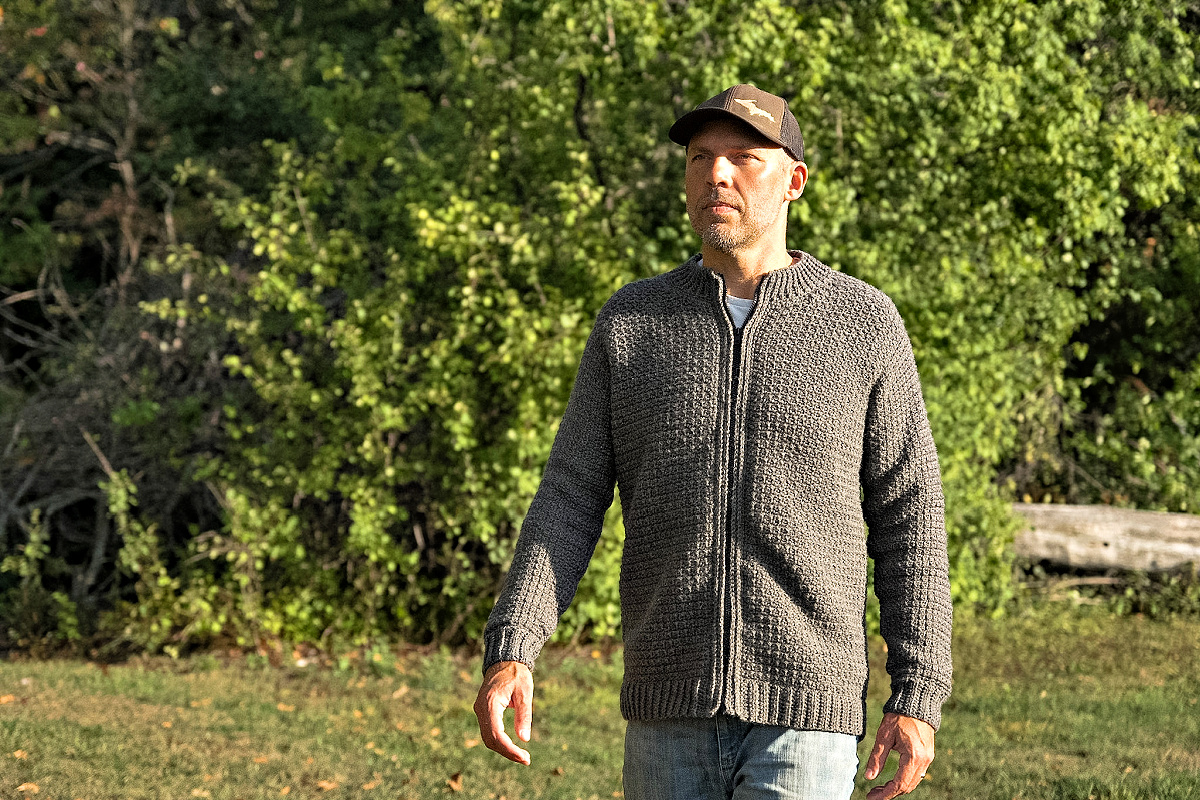
Everett was designed to be a man’s favorite piece of outerwear, especially for transitional seasons. This modified drop shoulder crochet mens cardigan is secured with a zipper in the front and has ribbing in all of the right places to add both structure and style to the final look.
This is that zippered cardigan they’ll love to put on as soon as the weather starts cooling down and winds start blowing in the evening. It gives just the right amount of warmth without being too bulky and restrictive in its make.
You’ll find the free crochet mens cardigan pattern in the post below, or you can find an ad-free printable PDF (that includes all photo tutorials + garment schematics), on Ravelry, or Etsy (aff).
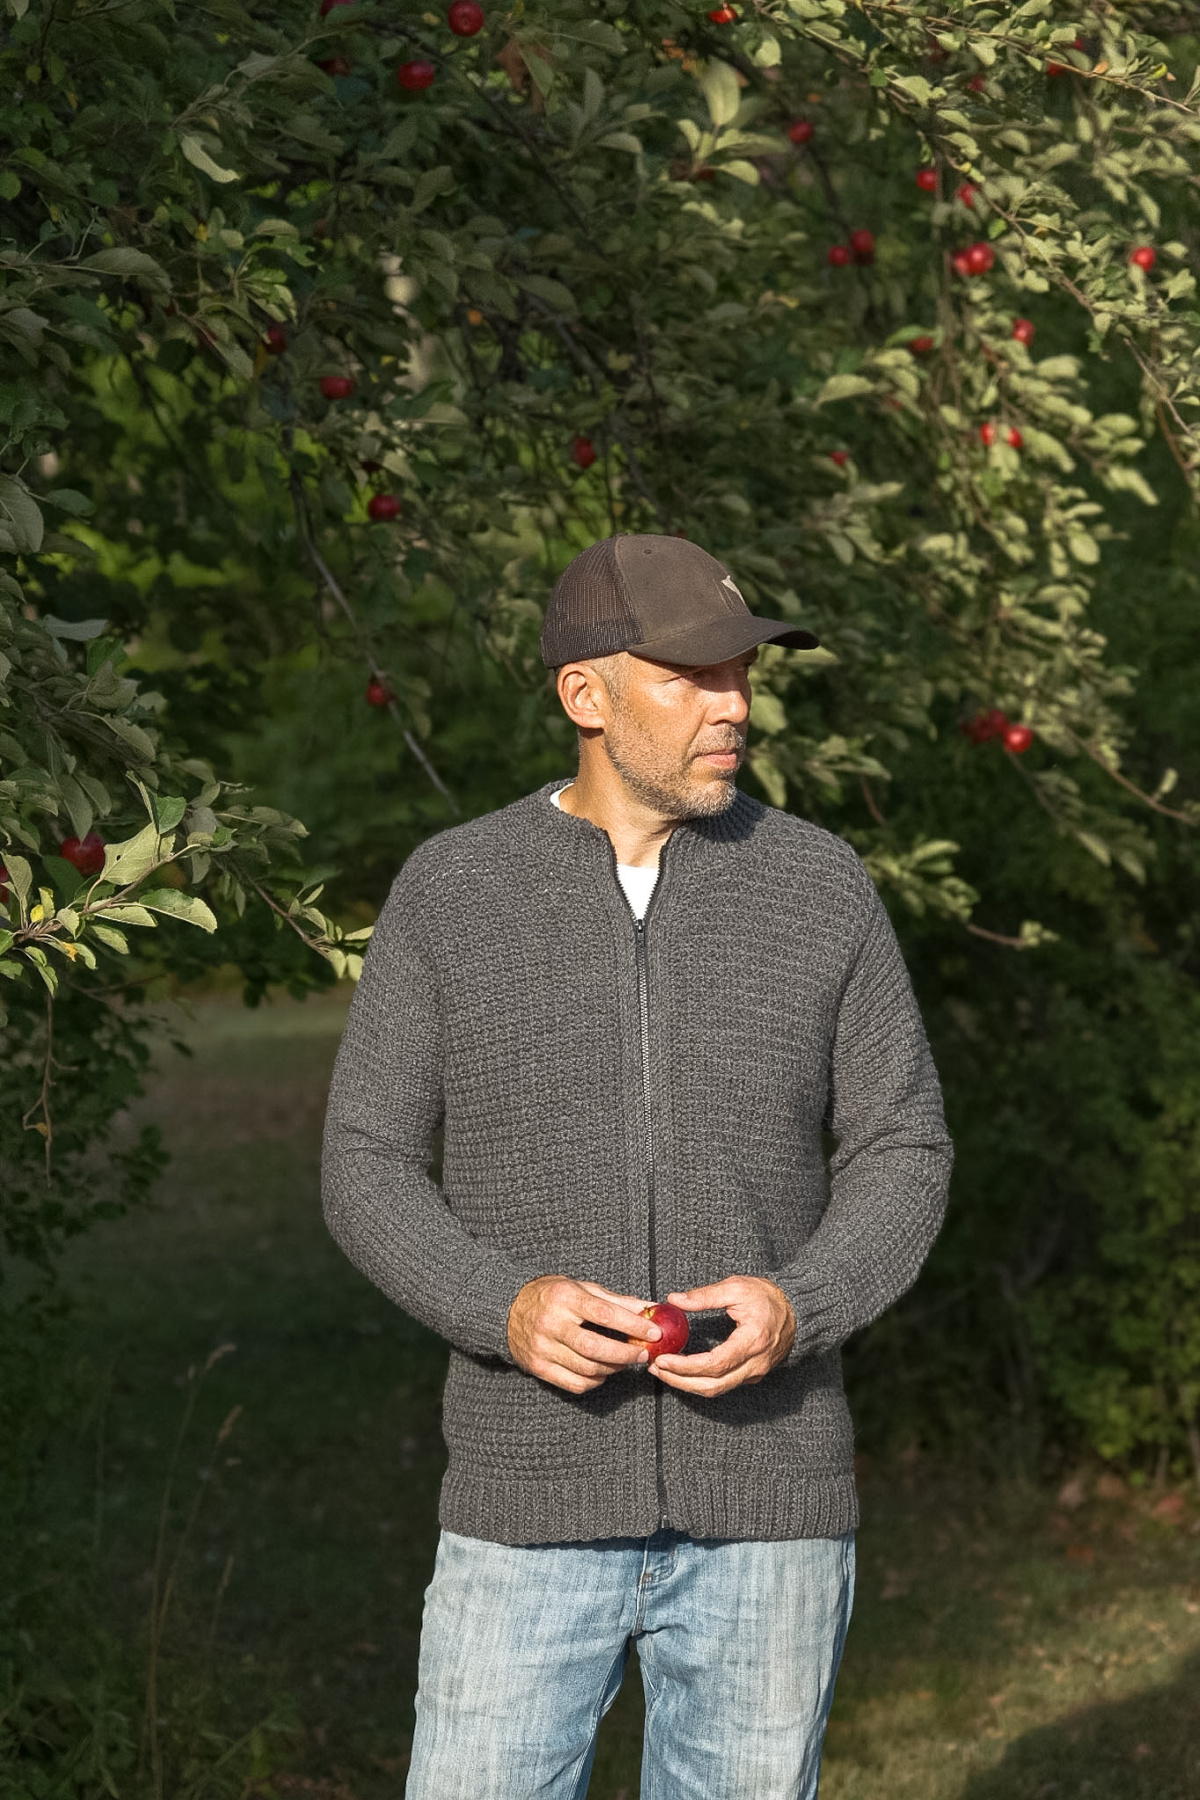
There are so many wonderful crochet mens sweater patterns out there, made from different techniques and stitch combinations. The Everett Sweater has its own place because of the easy-to-achieve construction, fitted look, and zipper that secures the front. It’s worked up step-by-step to ensure you have a stress-free crocheting journey and you’re proud of the final piece.
You’ll especially enjoying working it up if you’ve been searching everywhere for Gifts for Him and haven’t come across anything both functional and trendy. A handmade sweater such as this one carries affection and care in each of its stitches and tells the intended wearer how much thought you put into making it, especially if crocheted in their favorite colors.
Related: If you want to make a similar fitting crochet sweater for men with buttons instead of a zipper, check out my Ambrose Quarter Button Sweater.
How to Crochet a Men’s Cardigan
There’s nothing complicated about working up this zippered crochet cardigan and it has minimal seaming. It is crocheted from the bottom up, meaning you’ll start at the hem. You’ll crochet the back panel and both front panels, then seam the shoulders and the sides.
The sleeves are then crocheted directly onto the sweater, giving them that extra bit of security, and worked from armhole to cuff. Next, you’ll crochet a collar in rows perpendicular to the sweater. Then, you’ll crochet a few rows of simple edging on the front left and right panels.
Lastly, you’ll sew the zipper onto the cardigan. Make sure each stitch is done up securely so that it can go through many washings.
How To Get The
Everett Crochet Mens Cardigan Pattern
Option 1: Scroll down for the free zippered cardigan pattern right here in this blog post.
Option 2: Purchase the ad-free printable PDF from one of my shops:
Best Yarn for Crochet Sweaters
For a crochet mens cardigan, while there are many options to choose from, I used an acrylic and wool blend yarn. The added wool content gives it extra warmth and makes it the ideal garment for cold winters. Because of the acrylic, it holds its shape well and has good stitch definition, which is especially great for patterns that have ribbing such as this one.
It’s also readily available and can come in a variety of colors which allows you to choose just the right one for whoever is receiving this crochet sweater.
Choosing Which Size to Crochet
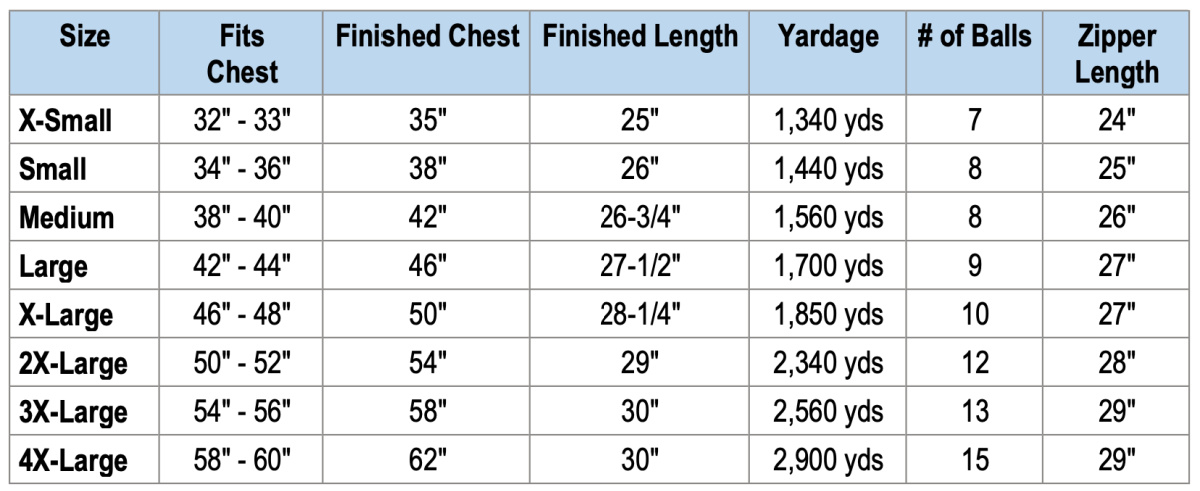
To choose your size, look over the size chart below. Model wears a men’s large and is wearing a large sample.
- Finished Chest and Finished Length are measurements of the finished garment.
- This men’s crochet sweater has 2 – 4″+ of positive ease built in for a relaxed fit.
- If you prefer a more fitted look, I would suggest sizing down (as long as your chest size fits range of the smaller size).
- Sweater length is measured from the top of the shoulder to the bottom edge of sweater (including the bottom ribbing).
- Adjusting Sweater Length: See the notes at the end of the Body of Sweater section for adjusting length. Note: If you add length to your sweater, you will need more yarn that what is listed in the chart below.
- Adding Length to the Sleeves: See the notes at the end of each sleeve section for adding length.
Size & Yardage Chart
The notes above refer to this size chart.
Yarn
This crochet mens cardigan was designed with a worsted weight yarn to make sure it would be warm enough to be worn on colder winter days. I chose not to use a bulky yarn for fear it would then be too thick to be worn in the transitioning months of autumn and spring (we want to get the most wear out of this everyday piece).
I chose Lion Brand Wool-Ease in Oxford Grey for my crochet sweater. This is a worsted weight / 4, acrylic and wool blend yarn and it’s currently available in glitter, multi, prints, and frosts. This yarn offers a smooth even texture in a contemporary color palette with plenty of neutral tones.
Everett Crochet Mens Cardigan – Free Pattern
The crochet mens cardigan pattern is free below, but if you love to work offline, I’ve got a couple other great options for you.
Purchase the ad-free, printable PDF, (that includes all photo tutorials, + garment schematics), on Ravelry, or on Etsy (aff).
Purchase the Crochet Kit (aff): Lion Brand has a full kit of the Everett Crochet Mens Cardigan, available on their website. The kit includes your choice of color and a digital copy of the pattern.
This post contains affiliate links.
Materials
- Yarn: Worsted Weight / 4 / Yarn, Lion Brand Wool-Ease was used for the sample in the photos [80% acrylic / 20% wool (197 yds / 180 m / 85 g / 3 oz)].
- Yardage: See Size Chart Above
- Crochet Hook: H/8/5.00mm or size needed to obtain gauge (My favorite crochet hooks are the Clover Amour Crochet Hooks, I’ve never had an ache in my hand since switching).
- Measuring Tape
- Stitch Markers
- Scissors
- Yarn Needle
- Separating Zipper (lengths listed in the chart above)
Abbreviations (US Terms)
- ch(s): chain(s)
- sl st: slip stitch
- st(s): stitch(es)
- sc: single crochet
- hdc: half double crochet
- sc2tog: single crochet decrease
- hdc2tog: half double crochet 2 together
- RS: Right Side
- WS: Wrong Side
- Rnd(s): round(s)
- Rep: repeat
- SM: stitch marker
- BLO / FLO: back loop only, front loop only
- yo: yarn over
- Join yarn with a standing sc
Experience Level
- Easy / Intermediate
Gauge
- See Individual Sections for Gauge.
Sizes
- Men’s Sizes: X-Small (Small, Medium, Large, X-Large, 2X-Large, 3X-Large, 4X-Large)
- See Size & Yardage Chart above.
Special Stitches
- Single Crochet Decrease (sc2tog): Insert hook into stitch indicated, yo, pull up a loop, insert hook into the next st indicated, yo, pull up a loop, yo, pull thru remaining loops on hook.
- Half Double Crochet Two Together (hdc2tog): (Yo, insert hook into next stitch, yo, pull up a loop) twice, yo, pull through all loops on your hook.
- Join yarn with a standing single crochet: Begin with a slip knot on your hook, insert your hook into the stitch or space indicated, yo, pull up a loop, yo and draw thru both loops on hook.
Pattern Notes
- The first stitch of a row or round is worked in the same stitch as the turning chain, unless otherwise specified.
- Yarn Notes: Lion Brand Wool Ease (3 oz / 85 g / 197 yards / 180 m / 80% acrylic / 20% wool) was used for the sample in the pictures. Other worsted weight yarns may be substituted as long as you are able to meet gauge and you’re satisfied with the drape of the fabric.
- Color & Yardage
- Oxford Grey: #620-152
- See Size & Yardage Chart above for yardage per size.
- Changes for sizes are written as follows: X-Small (Small, Medium, Large, X-Large, 2X-Large, 3X-Large, 4X-Large)
- Stitch Counts Written as Follows: (XS, S, M, L, XL, 2X, 3X, 4X sts)
- Model wears a men’s large. Shown wearing a large sample.
- TIP: To help keep your gauge on track, I suggest comparing your work to the schematic, as your sweater progresses.
- Construction Notes: The Everett Zippered Cardigan is a modified drop shoulder sweater that is crocheted from the bottom up. You’ll crochet the back panel and both front panels, then seam the shoulders and the sides. The sleeves are then crocheted directly onto the sweater and worked from armhole to cuff. Next, you’ll crochet a collar in rows perpendicular to the sweater. Then, you’ll crochet a few rows of simple edging on the front left and right panels. Lastly, you’ll sew the zipper onto the cardigan.
- Once done, you can block if desired.
Everett Crochet Mens Cardigan – Written Pattern
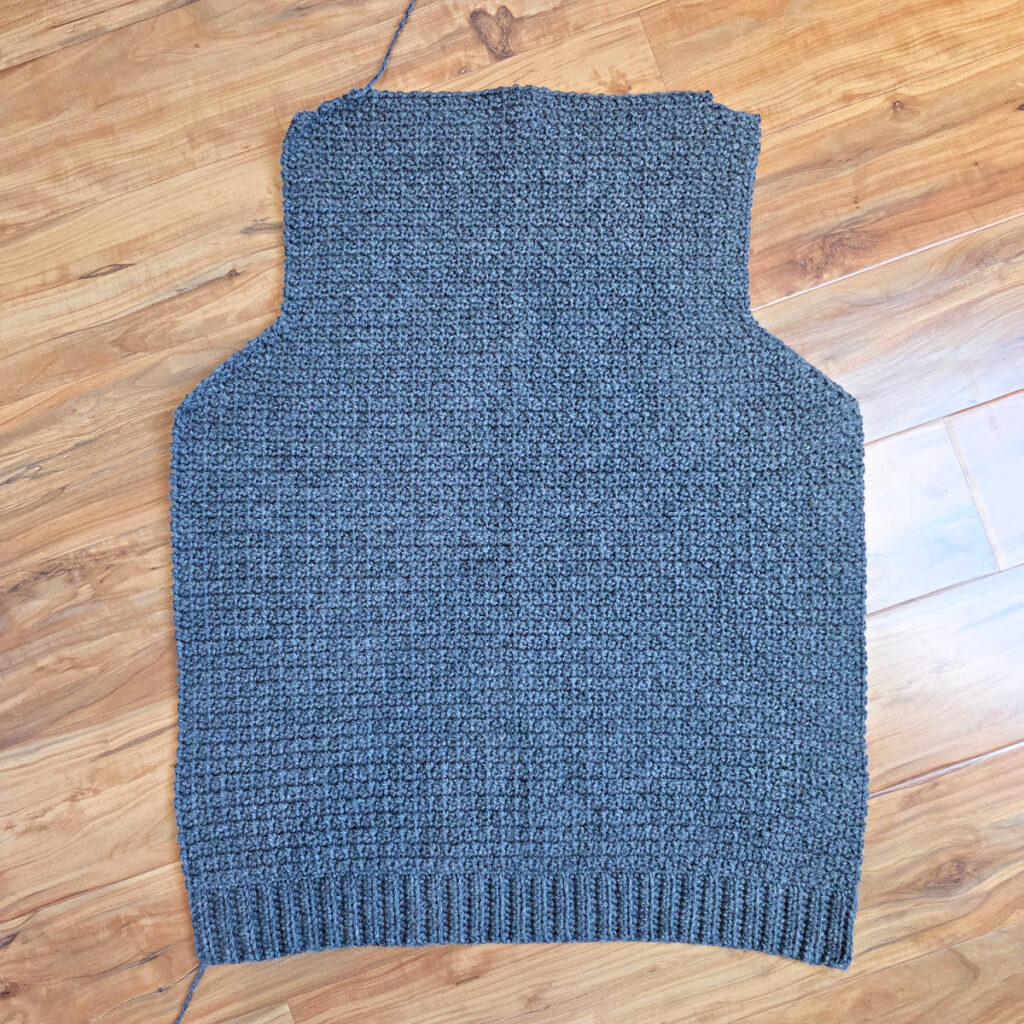
Back Panel Waistband
In this section, you’ll crochet the back panel waistband in rows.
Changes for Sizes Written as Follows: XS (S, M, L, XL, 2X, 3X, 4X)
Stitch Counts Written as Follows: (XS, S, M, L, XL, 2X, 3X, 4X sts)
Gauge: In waistband pattern as written below, with 5.00mm hook, 10 sts = 2.375″; 10 rows = 3.75″ H
Row 1: With yarn & a 5.00mm crochet hook, ch 11, working in the back humps of the chain, hdc in the 2nd ch from your hook and in each ch across. Turn. (10 sts)
Rows 2 – 47 (51, 57, 62, 67, 73, 78, 83): Ch 1, BLO hdc in each st across. Turn. (10 sts)
Do not fasten off. Continue on to Prepare Waistband for Back Panel Body of Sweater for the size you’re making.
Waistband should measure approximately (17-1/2″, 19″, 21-1/4″, 23-1/4″, 25″, 27-1/4″, 29-1/4″, 31″) L.
Prepare Waistband for Back Panel Body of Sweater
In this section, you’ll crochet along the long edge of the waistband.
Gauge: In sc with 5.00mm: = 15 sc = 3.75″
Size XS
Row 1 (RS): Ch 1, 2 sc in the first st, then (sc in the next st, 2 sc in the next st) work from ( to ) 23 times. Turn. (71 sts)
Do not fasten off. Continue on to the Back Panel Body of Sweater.
Size S
Row 1 (RS): Ch 1, 2 sc in the first st, then (sc in the next st, 2 sc in the next st) work from ( to ) 25 times. Turn. (77 sts)
Do not fasten off. Continue on to the Back Panel Body of Sweater.
Size M
Row 1 (RS): Ch 1, sc in the first st, then (sc in the next st, 2 sc in the next st) work from ( to ) 28 times. Turn. (85 sts)
Do not fasten off. Continue on to the Back Panel Body of Sweater.
Size L
Row 1 (RS): Ch 1, (sc in the next st, 2 sc in the next st) work from ( to ) 31 times. Turn. (93 sts)
Do not fasten off. Continue on to the Back Panel Body of Sweater.
Size XL
Row 1 (RS): Ch 1, 2 sc in the first st, then (sc in the next st, 2 sc in the next st) work from ( to ) 33 times. Turn. (101 sts)
Do not fasten off. Continue on to the Back Panel Body of Sweater.
Size 2X
Row 1 (RS): Ch 1, sc in the first st, (sc in the next st, 2 sc in the next st) work from ( to ) 36 times. Turn. (109 sts)
Do not fasten off. Continue on to the Back Panel Body of Sweater.
Size 3X
Row 1 (RS): Ch 1, (sc in the next st, 2 sc in the next st) work from ( to ) 39 times. Turn. (117 sts)
Do not fasten off. Continue on to the Back Panel Body of Sweater.
Size 4X
Row 1 (RS): Ch 1, 2 sc in the first st, then (sc in the next st, 2 sc in the next st) work from ( to ) 41 times. (125 sts)
Do not fasten off. Continue on to the Back Panel Body of Sweater.
Back Panel Body of Sweater – All Sizes
Changes for Sizes as Follows: XS (S, M, L, XL, 2X, 3X, 4X)
Stitch Counts as Follows: (XS, S, M, L, XL, 2X, 3X, 4X sts)
Gauge: In sc mesh st with a 5.00mm crochet hook: 15 sts = 3.75″; 17 rows = 4″
In this section, you’ll be working from the top of the long edge of the waistband up to the bottom of the armhole openings.
Note: The body of your zippered cardigan sweater may flare out a bit from the waistband as you work. This is intentional because the waistband is stretchy. As long as you compare your cardigan to the schematic and the measurements included throughout the pattern, it will turn out to be the correct size as it’s written. Do this frequently as you work.
See the note below for instructions on lengthening the torso of the sweater.
Rnd 1 (WS): Ch 1, sc in the first st, (ch 1, skip the next st, sc in the next st) work from ( to ) across. Turn. (71, 77, 85, 93, 101, 109, 117, 125 sts)
Rep Row 1, ending with a WS row, until your sweater measures 16″ (16.5″, 16.75″, 17″, 17.25″, 17.5″, 18″, 18″) H (including the waistband).
Write down the number of rows worked for this section. You’ll need to work the same number of rows for the body of each of the front panels.
Adding Length: If you’d like to add length to the torso of your cardigan, continue to repeat row 1 until you’ve added the extra length. Make sure to end with a WS row so that your stitches line up with the next section.
Note: If you add length to your sweater, you will need more yarn than what is listed in the chart above.
Do not fasten off. Continue on to the Upper Back Panel – Armhole Shaping.
Upper Back Panel – Armhole Shaping
Changes for Sizes as Follows: XS (S, M, L, XL, 2X, 3X, 4X)
Stitch Counts as Follows: (XS, S, M, L, XL, 2X, 3X, 4X sts)
Gauge: In sc mesh st with a 5.00mm crochet hook: 15 sts = 3.75″; 17 rows = 4″
In this section, you’ll continue the back panel with the upper back panel – armhole shaping. You’ll add simple shaping to the armholes by working decrease stitches when you begin and end each row.
Row 1 (RS): With a 5.00mm crochet hook, continue on from the back panel. Ch 1, sc2tog in the first sc & ch-1, (sc in the next sc, ch 1, skip the next ch-1) work from ( to ) 33 (36, 40, 44, 48, 52, 56, 60) times, sc in the next st, sc2tog in the next ch-1 & sc. Turn. (69, 75, 83, 91, 99, 107, 115, 123 sts)
Row 2: Ch 1, sc2tog in the first 2 sc’s, (ch 1, skip the next ch-1, sc in the next sc) work from ( to ) across to the last 3 sts, ch 1, skip the next ch-1, sc2tog in the last 2 sc’s. Turn. (67, 73, 81, 89, 97, 105, 113, 121 sts)
Row 3: Ch 1, sc2tog in the first sc & ch-1, (sc in the next sc, ch 1, skip the next ch-1) work from ( to ) across to the last 3 sts, sc in the next st, sc2tog in the next ch-1 & sc. Turn. (65, 71, 79, 87, 95, 103, 111, 119 sts)
Rows 4 – 9 (9, 11, 13, 15, 17, 21, 21): Rep Rows 2 – 3. (53, 59, 63, 67, 71, 75, 75, 83 sts) at the end of the last row.
Row 10 (10, 12, 14, 16, 18, 22, 22): Rep Row 2. (51, 57, 61, 65, 69, 73, 73, 81 sts)
After working the armhole shaping, the Upper Back Panel should measure 12.25″ W x 2.25″ H (14.25″ W x 2.25″ H) (15.25″ W x 2.75″ H) (16.25″ W x 3.25″ H) (17.25″ W x 3.75″ H) (18.25″ W x 4.25″ H) (18.25″ W x 5″ H) (20.25″ W x 5″ H).
Do not fasten off. Continue on to Upper Back Panel.
Upper Back Panel
Changes for Sizes as Follows: XS (S, M, L, XL, 2X, 3X, 4X)
Stitch Counts as Follows: (XS, S, M, L, XL, 2X, 3X, 4X sts)
Gauge: In sc mesh st with a 5.00mm crochet hook: 15 sts = 3.75″; 17 rows = 4″
In this section, you’ll continue the upper back panel without decreasing.
Row 1 (RS): Ch 1, sc in the first sc, (ch 1, skip the next ch-1, sc in the next sc) work from ( to ) across. Turn. (51, 57, 61, 65, 69, 73, 73, 81 sts)
Rows 2 – 26 (28, 28, 28, 28, 28, 26, 26): Rep Row 1. (51, 57, 61, 65, 69, 73, 73, 81 sts)
Do not fasten off. Continue on to Upper Back Panel – Shoulder Shaping.
Upper Back Panel – Shoulder Shaping
Changes for Sizes as Follows: XS (S, M, L, XL, 2X, 3X, 4X)
Stitch Counts as Follows: (XS, S, M, L, XL, 2X, 3X, 4X sts)
Gauge: In sc mesh st with a 5.00mm crochet hook: 15 sts = 3.75″; 17 rows = 4″
In this section, you’ll add a little shoulder shaping to the last few rows of the upper back panel.
Row 1 (WS): Ch 1, BLO sl st in each of the first 4 sts (do not count as sts), working in both loops for the remainder of the row, sc in the next sc, (ch 1, skip the next ch-1, sc in the next sc) work from ( to ) across to the last 4 sts, skip each of the last 4 sts. Turn. (43, 49, 53, 57, 61, 65, 65, 73 sts)
Row 2: Ch 1, BLO sl st in each of the first 2 sts (do not count as sts), working in both loops for the remainder of the row, sc in the next sc, (ch 1, skip the next ch-1, sc in the next sc) work from ( to ) across to the last 2 sts, skip each of the last 2 sts. Turn. (39, 45, 49, 53, 57, 61, 61, 69 sts)
Row 3: Ch 1, BLO sl st in each of the first 2 sts (do not count as sts), working in both loops for the remainder of the row, sc in the next sc, (ch 1, skip the next ch-1, sc in the next sc) work from ( to ) across to the last 2 sts, skip each of the last 2 sts. Turn. (35, 41, 45, 49, 53, 57, 57, 65 sts)
The entire back panel should measure 13.25″ W x 9″ H (14.75″ W x 9.5″ H) (15.75″ W x 10″ H) (16.75″ W x 10.5″ H) (17.75″ W x 11″ H) (18.75″ W x 11.5″ H) (18.75″ W x 12″ H) (20.75″ W x 12″ H).
Fasten off. Continue on to Front Panel Waistband.
Front Panel Construction
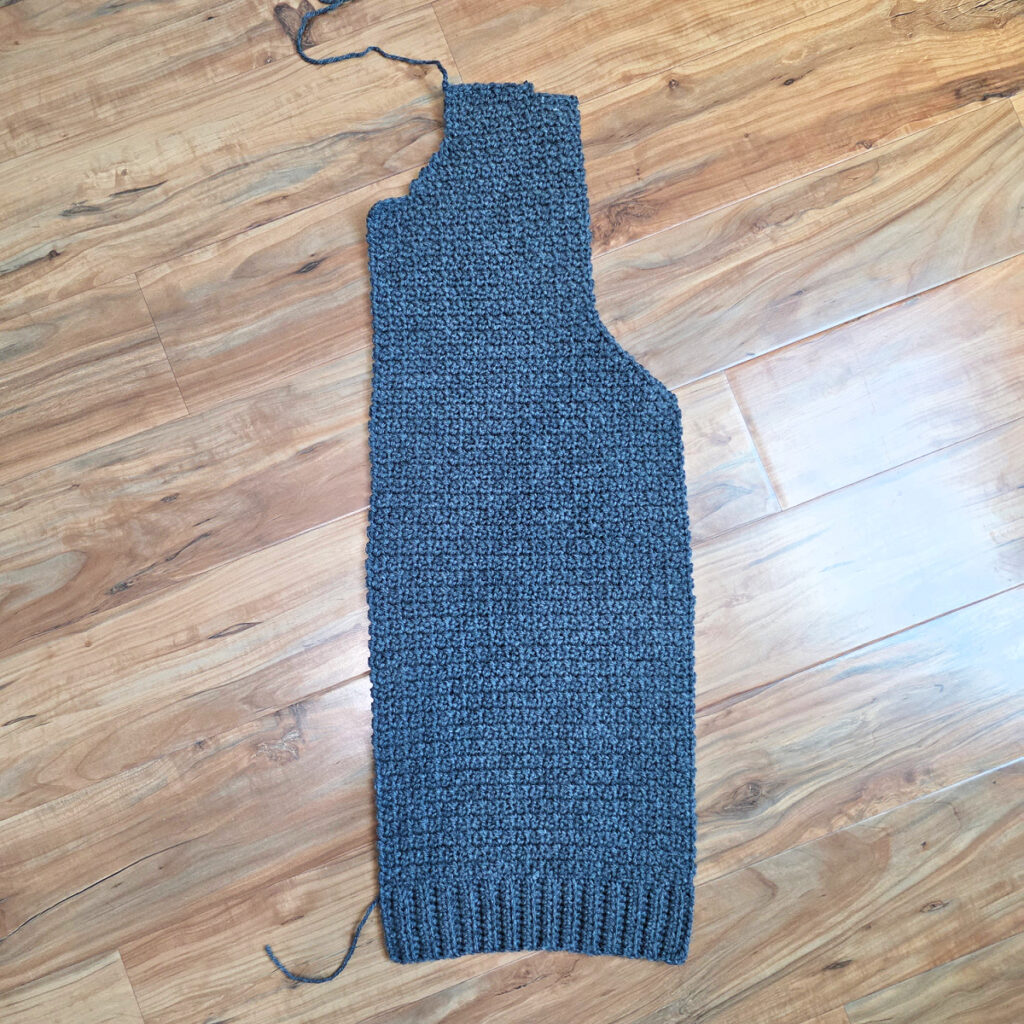
Front Left Panel: Begin with the Front Panel Waistband. Next, work the Prepare Waistband for Front Body of Sweater for the size you’re making. Then, work the Front Panel Body of Sweater. Next, work the Front Left Panel Armhole Shaping. Then, work the Upper Left Front Panel. Next, Left Panel – Neck Shaping. Lastly, complete the Left Panel – Shoulder Shaping.
Front Right Panel: Begin with the Front Panel Waistband. Next, work the Prepare Waistband for Front Body of Sweater for the size you’re making. Then, work the Front Panel Body of Sweater. Next, work the Front Right Panel Armhole Shaping. Then, work the Upper Right Front Panel. Next, Right Panel – Neck Shaping. Lastly, complete the Right Panel – Shoulder Shaping.
Front Panel Waistband
In this section, you’ll crochet the front panel waistband in rows. Use these waistband instructions for both right and left front panels.
Changes for Sizes Written as Follows: XS (S, M, L, XL, 2X, 3X, 4X)
Stitch Counts Written as Follows: (XS, S, M, L, XL, 2X, 3X, 4X sts)
Gauge: In waistband pattern as written below, with 5.00mm hook, 10 sts = 2.375″; 10 rows = 3.75″ H
Row 1: With yarn & a 5.00mm crochet hook, ch 11, working in the back humps of the chain, hdc in the 2nd ch from your hook and in each ch across. Turn. (10 sts)
Rows 2 – 22 (23, 26, 29, 31, 34, 37, 39): Ch 1, BLO hdc in each st across. Turn. (10 sts)
Do not fasten off. Continue on to Prepare Waistband for Front Panel Body of Sweater for the size you’re making.
Waistband should measure approximately (8-1/4″, 8-1/2″, 9-3/4″, 10-3/4″, 11-1/2″, 12-3/4″, 13-3/4″, 14-1/2″) L.
Prepare Waistband for Front Panel Body of Sweater
In this section, you’ll crochet along the long edge of the waistband.
Gauge: In sc with 5.00mm: = 15 sc = 3.75″
Size XS
Row 1 (RS): Ch 1, (sc in the next st, 2 sc in the next st) work from ( to ) 11 times. Turn. (33 sts)
Do not fasten off. Continue on to the Front Panel Body of Sweater.
Size S
Row 1 (RS): Ch 1, 2 sc in the first st, then (sc in the next st, 2 sc in the next st) work from ( to ) 11 times. Turn. (35 sts)
Do not fasten off. Continue on to the Front Panel Body of Sweater.
Size M
Row 1 (RS): Ch 1, (sc in the next st, 2 sc in the next st) work from ( to ) 13 times. Turn. (39 sts)
Do not fasten off. Continue on to the Front Panel Body of Sweater.
Size L
Row 1 (RS): Ch 1, sc in the first st, then (sc in the next st, 2 sc in the next st) work from ( to ) 14 times. Turn. (43 sts)
Do not fasten off. Continue on to the Front Panel Body of Sweater.
Size XL
Row 1 (RS): Ch 1, 2 sc in the first st, then (sc in the next st, 2 sc in the next st) work from ( to ) 15 times. Turn. (47 sts)
Do not fasten off. Continue on to the Front Panel Body of Sweater.
Size 2X
Row 1 (RS): Ch 1, (sc in the next st, 2 sc in the next st) work from ( to ) 17 times. Turn. (51 sts)
Do not fasten off. Continue on to the Front Panel Body of Sweater.
Size 3X
Row 1 (RS): Ch 1, sc in the first st, then (sc in the next st, 2 sc in the next st) work from ( to ) 18 times. Turn. (55 sts)
Do not fasten off. Continue on to the Front Panel Body of Sweater.
Size 4X
Row 1 (RS): Ch 1, 2 sc in the first st, then (sc in the next st, 2 sc in the next st) work from ( to ) 19 times. (59 sts)
Do not fasten off. Continue on to the Front Panel Body of Sweater.
Front Panel Body of Sweater
Changes for Sizes as Follows: XS (S, M, L, XL, 2X, 3X, 4X)
Stitch Counts as Follows: (XS, S, M, L, XL, 2X, 3X, 4X sts)
Gauge: In sc mesh st with a 5.00mm crochet hook: 15 sts = 3.75″; 17 rows = 4″
In this section, you’ll be working from the top of the long edge of the waistband up to the bottom of the armhole openings.
Note: The body of your zippered cardigan sweater may flare out a bit from the waistband as you work. This is intentional because the waistband is stretchy. As long as you compare your cardigan to the schematic and the measurements included throughout the pattern, it will turn out to be the correct size as it’s written. Do this frequently as you work.
Rnd 1 (WS): Ch 1, sc in the first st, (ch 1, skip the next st, sc in the next st) work from ( to ) across. Turn. (33, 35, 39, 43, 47, 51, 55, 59 sts)
Rep Row 1, until you have worked the same number of rows as the Back Panel Body of Sweater.
Do not fasten off. Continue on to the Front Panel Armhole Shaping for whichever panel you’re making, Left or Right.
Front Left Panel Armhole Shaping
Changes for Sizes as Follows: XS (S, M, L, XL, 2X, 3X, 4X)
Stitch Counts as Follows: (XS, S, M, L, XL, 2X, 3X, 4X sts)
Gauge: In sc mesh st with a 5.00mm crochet hook: 15 sts = 3.75″; 17 rows = 4″
In this section, you’ll begin this section from the sweater’s left side, working towards the cardigan’s front opening. You’ll add simple shaping to the armhole by working decrease stitches.
Row 1 (RS): Ch 1, sc2tog in the first sc & ch-1, (sc in the next sc, ch 1, skip the next ch-1) work from ( to ) across to the last st, sc in the last st. Turn. (32, 34, 38, 42, 46, 50, 54, 58 sts)
Row 2: Ch 1, sc in the first st, ch 1, skip the next ch-1, (sc in the next sc, ch 1, skip the next ch-1) work from ( to ) across to the last 2 sts, sc2tog over the last 2 sts. Turn. (31, 33, 37, 41, 45, 49, 53, 57 sts)
Rows 3 – 8 (8, 10, 12, 14, 16, 20, 20): Rep Rows 1 – 2. (25, 27, 29, 31, 33, 35, 35, 39 sts) at the end of the last row.
After working the armhole shaping, this section should measure 6.25″ W x 1.75″ H (6.75″ W x 1.75″ H) (7.25″ W x 2.25″ H) (7.75″ W x 2.75″ H) (8.75″ W x 3.25″ H) (8.75″ W x 3.75″ H) (8.75″ W x 4.75″ H) (9.75″ W x 4.75″ H).
Do not fasten off. Continue on to the Upper Left Front Panel.
Upper Left Front Panel
Gauge: In sc mesh st with a 5.00mm crochet hook: 15 sts = 3.75″; 17 rows = 4″
In this section, you’ll continue the upper left front panel without decreasing.
Row 1 (RS): Ch 1, sc in the first sc, (ch 1, skip the next ch-1, sc in the next sc) work from ( to ) across. Turn. (25, 27, 29, 31, 33, 35, 35, 39 sts)
Rows 2 – 16 (18, 18, 18, 18, 18, 16, 16): Rep Row 1. (25, 27, 29, 31, 33, 35, 35, 39 sts)
Do not fasten off. Continue on to the Left Panel – Neck Shaping for the size you’re making.
Left Panel – Neck Shaping – Size XS
Gauge: In sc mesh st with a 5.00mm crochet hook: 15 sts = 3.75″; 17 rows = 4″
In this section, you’ll add decreases for the neck shaping. Once this section reaches a specific height, you’ll finish with a little simple shoulder shaping.
Row 1 (RS): Ch 1, sc in the first sc, (ch 1, skip the next ch-1, sc in the next sc) work from ( to ) across to the last 6 sts, skip the remaining sts. Turn. (19 sts)
Row 2: Ch 1, sc2tog in the first sc & ch-1, sc in the next sc, (ch 1, skip the next ch-1, sc in the next sc) work from ( to ) across. Turn. (18 sts)
Row 3: Ch 1, sc in the first sc, ch-1, skip the next ch-1, (sc in the next sc, ch 1, skip the next ch-1) work from ( to ) across to the last 2 sts, sc2tog. Turn. (17 sts)
Rows 4 – 7: Rep Rows 2 – 3. (13 sts) at the end of Row 7.
Rows 8 – 12: Ch 1, sc in the first sc, (ch 1, skip the next ch-1, sc in the next sc) work from ( to ) across. Turn. (13 sts)
Do not fasten off. Continue on to Left Panel – Shoulder Shaping. Your Left Panel should measure 3.25″ W.
Left Panel – Shoulder Shaping – Size XS
Gauge: In sc mesh st with a 5.00mm crochet hook: 15 sts = 3.75″; 17 rows = 4″
In this section, you’ll add simple shoulder shaping and finish your left panel.
Row 1 (RS): Ch 1, BLO sl st in each of the first 4 sts (not included in st count), sc in the next st, (ch 1, skip the next ch-1, sc in the next sc) work from ( to ) across. Turn. (9 sts)
Row 2: Ch 1, sc in the first st, (ch 1, skip the next ch-1, sc in the next sc) work from ( to ) (3) times, skip the remaining 2 sts. Turn. (7 sts)
Row 3: Ch 1, BLO sl st in each of the first 2 sts (not included in st count), sc in the next st, (ch 1, skip the next ch-1, sc in the next sc) work from ( to ) across. (5 sts)
Fasten off. Weave in ends. Make the Front Right Panel.
Left Panel – Neck Shaping – Sizes S, XL, 2X, 3X
Changes for Sizes as Follows: (S, XL, 2X, 3X)
Stitch Counts as Follows: (S, XL, 2X, 3X sts)
Gauge: In sc mesh st with a 5.00mm crochet hook: 15 sts = 3.75″; 17 rows = 4″
In this section, you’ll add decreases for the neck shaping. Once this section reaches a specific height, you’ll finish with a little simple shoulder shaping.
Row 1 (RS): Ch 1, sc in the first sc, (ch 1, skip the next ch-1, sc in the next sc) work from ( to ) across to the last (6, 8, 8, 8) sts, skip the remaining sts. Turn. (21, 25, 27, 27 sts)
Row 2: Ch 1, sc2tog in the first sc & ch-1, sc in the next sc, (ch 1, skip the next ch-1, sc in the next sc) work from ( to ) across. Turn. (20, 24, 26, 26 sts)
Row 3: Ch 1, sc in the first sc, ch-1, skip the next ch-1, (sc in the next sc, ch 1, skip the next ch-1) work from ( to ) across to the last 2 sts, sc2tog. Turn. (19, 23, 25, 25 sts)
Rows 4 – 7: Rep Rows 2 – 3. (15, 19, 21, 21 sts) at the end of Row 7.
Rows 8 – 12: Ch 1, sc in the first st, (ch 1, skip the next ch-1, sc in the next sc) work from ( to ) across. Turn. (15, 19, 21, 21 sts)
Do not fasten off. Continue on to Left Panel – Shoulder Shaping for the size you’re making. Your Left Panel should measure (3.75″, 4.75″, 5.25″, 5.25″) W.
Left Panel – Shoulder Shaping – Sizes S, XL, 2X, 3X
Changes for Sizes as Follows: (S, XL, 2X, 3X)
Stitch Counts as Follows: (S, XL, 2X, 3X sts)
Gauge: In sc mesh st with a 5.00mm crochet hook: 15 sts = 3.75″; 17 rows = 4″
In this section, you’ll add simple shoulder shaping and finish your left panel.
Row 1 (RS): Ch 1, BLO sl st in each of the first 4 sts (not included in st count), sc in the next st, (ch 1, skip the next ch-1, sc in the next sc) work from ( to ) across. Turn. (11, 15, 17, 17 sts)
Row 2: Ch 1, sc in the first st, (ch 1, skip the next ch-1, sc in the next sc) work from ( to ) (4, 6, 7, 7) times, skip the remaining 2 sts. Turn. (9, 13, 15, 15 sts)
Row 3: Ch 1, BLO sl st in each of the first 2 sts (not included in st count), sc in the next st, (ch 1, skip the next ch-1, sc in the next sc) work from ( to ) across. (7, 11, 13, 13 sts)
Fasten off. Weave in ends. Make the Front Right Panel.
Left Panel – Neck Shaping – Sizes M, L, 4X
Changes for Sizes as Follows: (M, L, 4X)
Stitch Counts as Follows: (M, L, 4X sts)
Gauge: In sc mesh st with a 5.00mm crochet hook: 15 sts = 3.75″; 17 rows = 4″
In this section, you’ll add decreases for the neck shaping. Once this section reaches a specific height, you’ll finish with a little simple shoulder shaping.
Row 1 (RS): Ch 1, sc in the first st, (ch 1, skip the next ch-1, sc in the next sc) work from ( to ) across to the last (6, 6, 8) sts, skip the remaining sts. Turn. (23, 25, 31 sts)
Row 2: Ch 1, sc2tog in the first sc & ch-1, sc in the next sc, (ch 1, skip the next ch-1, sc in the next sc) work from ( to ) across. Turn. (22, 24, 30 sts)
Row 3: Ch 1, sc in the first sc, ch-1, skip the next ch-1, (sc in the next sc, ch 1, skip the next ch-1) work from ( to ) across to the last 2 sts, sc2tog. Turn. (21, 23, 29 sts)
Rows 4 – 7: Rep Rows 2 – 3. (17, 19, 25 sts) at the end of Row 7.
Row 8: Rep Row 2. (16, 18, 24 sts)
Row 9: Ch 1, sc in the first st, (ch 1, skip the next ch-1, sc in the next sc) work from ( to ) across to the last st, sc in the last st. Turn. (16, 18, 24 sts)
Row 10: Ch 1, sc in each of the first 2 sts, (ch 1, skip the next ch-1, sc in the next sc) work from ( to ) across. Turn. (16, 18, 24 sts)
Rows 11 – 12: Rep Rows 9 – 10. (16, 18, 24 sts)
Do not fasten off. Continue on to Left Panel – Shoulder Shaping for the size you’re making. Your Left Panel should measure (4″, 4.5″, 6″) W.
Left Panel – Shoulder Shaping – Sizes M, L, 4X
Changes for Sizes as Follows: (M, L, 4X)
Stitch Counts as Follows: (M, L, 4X sts)
Gauge: In sc mesh st with a 5.00mm crochet hook: 15 sts = 3.75″; 17 rows = 4″
In this section, you’ll add simple shoulder shaping and finish your left panel.
Row 1 (RS): Ch 1, BLO sl st in each of the first 4 sts (not included in st count), sc in the next st, (ch 1, skip the next ch-1, sc in the next sc) work from ( to ) across to the last st, sc in the last st. Turn. (12, 14, 20 sts)
Row 2: Ch 1, sc in each of the first 2 sts, (ch 1, skip the next ch-1, sc in the next sc) work from ( to ) (4, 5, 8) times, skip the remaining 2 sts. Turn. (10, 12, 18 sts)
Row 3: Ch 1, BLO sl st in each of the first 2 sts (not included in st count), sc in the next st, (ch 1, skip the next ch-1, sc in the next sc) work from ( to ) across to the last st, sc in the last st. Turn. (8, 10, 16 sts)
Fasten off. Weave in ends. Make the Front Right Panel.
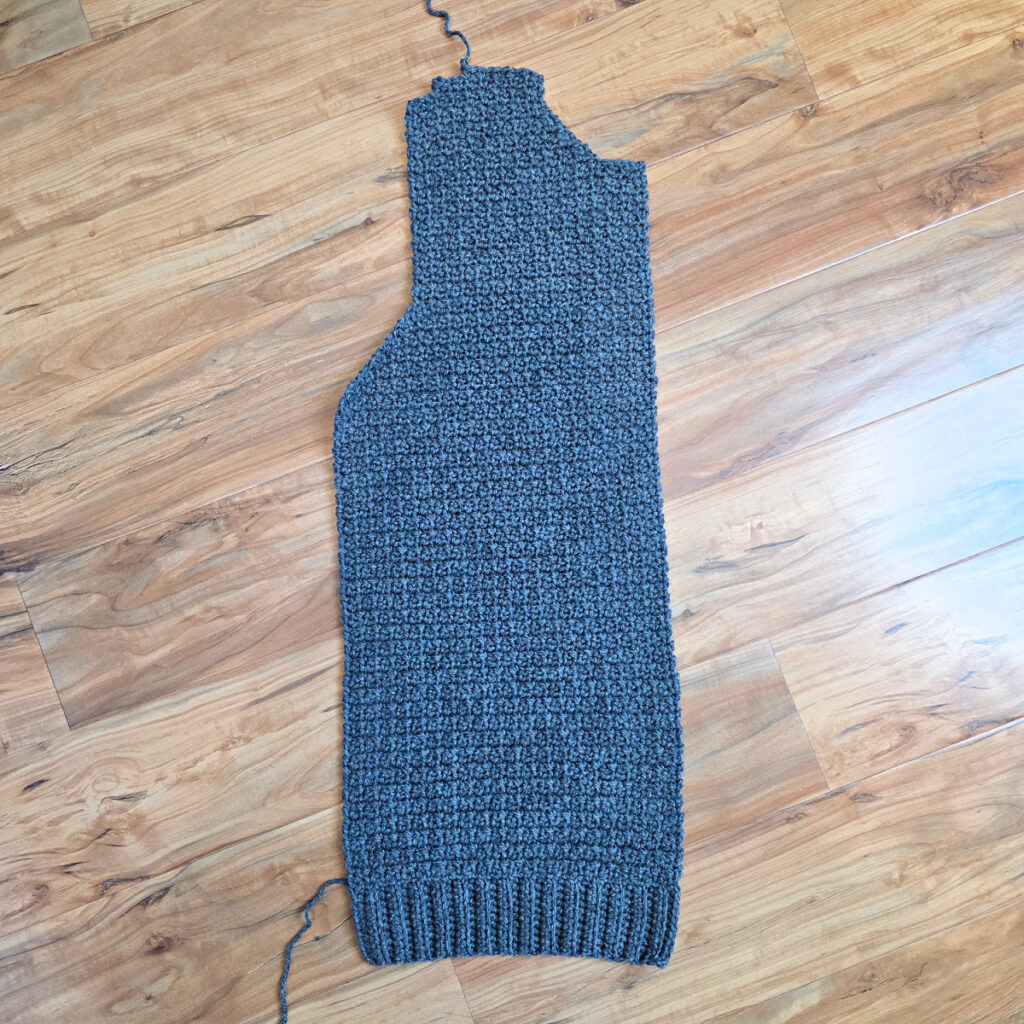
Front Right Panel – Armhole Shaping
Changes for Sizes as Follows: XS (S, M, L, XL, 2X, 3X, 4X)
Stitch Counts as Follows: (XS, S, M, L, XL, 2X, 3X, 4X sts)
Gauge: In sc mesh st with a 5.00mm crochet hook: 15 sts = 3.75″; 17 rows = 4″
In this section, you’ll begin this section from the cardigan’s front opening, working towards the right armhole. You’ll add simple shaping to the armhole by working decrease stitches.
Row 1 (RS): Ch 1, sc in the first st, (ch 1, skip the next ch-1, sc in the next sc,) work from ( to ) across to the last 2 sts, sc2tog in the last ch-1 & sc. Turn. (32, 34, 38, 42, 46, 50, 54, 58 sts)
Row 2: Ch 1, sc2tog over the first 2 sc, (ch 1, skip the next ch-1, sc in the next sc) work from ( to ) across. Turn. (31, 33, 37, 41, 45, 49, 53, 57 sts)
Rows 3 – 8 (8, 10, 12, 14, 16, 20, 20): Rep Rows 1 – 2. (25, 27, 29, 31, 33, 35, 35, 39 sts) at the end of the last row.
After working the armhole shaping, this section should measure 6.25″ W x 1.75″ H (6.75″ W x 1.75″ H) (7.25″ W x 2.25″ H) (7.75″ W x 2.75″ H) (8.75″ W x 3.25″ H) (8.75″ W x 3.75″ H) (8.75″ W x 4.75″ H) (9.75″ W x 4.75″ H).
Do not fasten off. Continue on to the Upper Right Front Panel.
Upper Right Front Panel
Gauge: In sc mesh st with a 5.00mm crochet hook: 15 sts = 3.75″; 17 rows = 4″
In this section, you’ll continue the upper right front panel without decreasing.
Row 1 (RS): Ch 1, sc in the first sc, (ch 1, skip the next ch-1, sc in the next sc) work from ( to ) across. Turn. (25, 27, 29, 31, 33, 35, 35, 39 sts)
Rows 2 – 16 (18, 18, 18, 18, 18, 16, 16): Rep Row 1. (25, 27, 29, 31, 33, 35, 35, 39 sts)
Do not fasten off. Continue on to the Right Panel – Neck Shaping for the size you’re making.
Right Panel – Neck Shaping – Size XS
Gauge: In sc mesh st with a 5.00mm crochet hook: 15 sts = 3.75″; 17 rows = 4″
In this section, you’ll add decreases for the neck shaping. Once this section reaches a specific height, you’ll finish with a little simple shoulder shaping.
Row 1 (RS): Ch 1, BLO sl st in each of the first 6 sts, sc in the next sc, (ch 1, skip the next ch-1, sc in the next sc) work from ( to ) across. Turn. (19 sts)
Row 2: Ch 1, sc in the first sc, (ch 1, skip the next ch-1, sc in the next sc) work from ( to ) 8 times, sc2tog (in the next ch-1 and sc). Turn. (18 sts)
Row 3: Ch 1, sc2tog in the first 2 sc’s, (ch 1, skip the next ch-1, sc in the next sc) work from ( to ) across. Turn. (17 sts)
Row 4: Ch 1, sc in the first sc, (ch 1, skip the next ch-1, sc in the next sc) work from ( to ) across to the last ch-1 & sc, sc2tog (in the next ch-1 and sc). Turn. (16 sts)
Row 5: Rep Row 3. (15 sts)
Row 6: Rep Row 4. (14 sts)
Row 7: Rep Row 3. (13 sts)
Rows 8 – 12: Ch 1, sc in the first sc, (ch 1, skip the next ch-1, sc in the next sc) work from ( to ) across. Turn. (13 sts)
Do not fasten off. Continue on to Right Panel – Shoulder Shaping. Your Right Panel should measure 3.25″ W.
Right Panel – Shoulder Shaping – Size XS
Gauge: In sc mesh st with a 5.00mm crochet hook: 15 sts = 3.75″; 17 rows = 4″
In this section, you’ll add simple shoulder shaping and finish your right panel.
Row 1 (RS): Ch 1, sc in the first sc, (ch 1, skip the next ch-1, sc in the next sc) work from ( to ) 4 times, skip the remaining 4 sts. Turn. (9 sts)
Row 2: Ch 1, BLO sl st in each of the first 2 sts (not included in st count), sc in the next sc, (ch 1, skip the next ch-1, sc in the next sc) work from ( to ) 3 times. Turn. (7 sts)
Row 3: Ch 1, sc in the first sc, (ch 1, skip the next ch-1, sc in the next sc) work from ( to ) 2 times, skip the remaining 2 sl sts. (5 sts)
Fasten off. Weave in ends. Continue on to Seaming the Sweater.
Right Panel – Neck Shaping – Sizes S, XL, 2X, 3X
Changes for Sizes as Follows: (S, XL, 2X, 3X)
Stitch Counts as Follows: (S, XL, 2X, 3X sts)
Gauge: In sc mesh st with a 5.00mm crochet hook: 15 sts = 3.75″; 17 rows = 4″
In this section, you’ll add decreases for the neck shaping. Once this section reaches a specific height, you’ll finish with a little simple shoulder shaping.
Row 1 (RS): Ch 1, BLO sl st in each of the first (6, 8, 8, 8) sts, sc in the next sc, (ch 1, skip the next ch-1, sc in the next sc) work from ( to ) across. Turn. (21, 25, 27, 27 sts)
Row 2: Ch 1, sc in the first sc, (ch 1, skip the next ch-1, sc in the next sc) work from ( to ) (9, 11, 12, 12) times, sc2tog (in the next ch-1 and sc). Turn. (20, 24, 26, 26 sts)
Row 3: Ch 1, sc2tog in the first 2 sc’s, (ch 1, skip the next ch-1, sc in the next sc) work from ( to ) across. Turn. (19, 23, 25, 25 sts)
Row 4: Ch 1, sc in the first sc, (ch 1, skip the next ch-1, sc in the next sc) work from ( to ) across to the last ch-1 & sc, sc2tog (in the next ch-1 and sc). Turn. (18, 22, 24, 24 sts)
Row 5: Rep Row 3. (17, 21, 23, 23 sts)
Row 6: Rep Row 4. (16, 20, 22, 22 sts)
Row 7: Rep Row 3. (15, 19, 21, 21 sts)
Rows 8 – 12: Ch 1, sc in the first st, (ch 1, skip the next ch-1, sc in the next sc) work from ( to ) across. Turn. (15, 19, 21, 21 sts)
Do not fasten off. Continue on to Right Panel – Shoulder Shaping for the size you’re making. Your Right Panel should measure (3.75″, 4.75″, 5.25″, 5.25″) W.
Right Panel – Shoulder Shaping – Sizes S, XL, 2X, 3X
Changes for Sizes as Follows: (S, XL, 2X, 3X)
Stitch Counts as Follows: (S, XL, 2X, 3X sts)
Gauge: In sc mesh st with a 5.00mm crochet hook: 15 sts = 3.75″; 17 rows = 4″
In this section, you’ll add simple shoulder shaping and finish your right panel.
Row 1 (RS): Ch 1, sc in the first st, (ch 1, skip the next ch-1, sc in the next sc) work from ( to ) (5, 7, 8, 8) times, skip the remaining 4 sts. Turn. (11, 15, 17, 17 sts)
Row 2: Ch 1, BLO sl st in each of the first 2 sts (not included in st count), sc in the next sc, (ch 1, skip the next ch-1, sc in the next sc) work from ( to ) across. Turn. (9, 13, 15, 15 sts)
Row 3: Ch 1, sc in the first st, (ch 1, skip the next ch-1, sc in the next sc) work from ( to ) (3, 5, 6, 6) times, skip the remaining 2 sts. (7, 11, 13, 13 sts)
Fasten off. Weave in ends. Continue on to Seaming the Sweater.
Right Panel – Neck Shaping – Sizes M, L, 4X
Changes for Sizes as Follows: (M, L, 4X)
Stitch Counts as Follows: (M, L, 4X sts)
Gauge: In sc mesh st with a 5.00mm crochet hook: 15 sts = 3.75″; 17 rows = 4″
In this section, you’ll add decreases for the neck shaping. Once this section reaches a specific height, you’ll finish with a little simple shoulder shaping.
Row 1 (RS): Ch 1, BLO sl st in each of the first (6, 6, 8) sts, sc in the next sc, (ch 1, skip the next ch-1, sc in the next sc) work from ( to ) across. Turn. (23, 25, 31 sts)
Row 2: Ch 1, sc in the first sc, (ch 1, skip the next ch-1, sc in the next sc) work from ( to ) (10, 11, 14) times, sc2tog (in the next ch-1 and sc). Turn. (22, 24, 30 sts)
Row 3: Ch 1, sc2tog in the first 2 sc’s, (ch 1, skip the next ch-1, sc in the next sc) work from ( to ) across. Turn. (21, 23, 29 sts)
Row 4: Ch 1, sc in the first sc, (ch 1, skip the next ch-1, sc in the next sc) work from ( to ) across to the last ch-1 & sc, sc2tog (in the next ch-1 and sc). Turn. (20, 22, 28 sts)
Row 5: Rep Row 3. (19, 21, 27 sts)
Row 6: Rep Row 4. (18, 20, 26 sts)
Row 7: Rep Row 3. (17, 19, 25 sts)
Row 8: Rep Row 4. (16, 18, 24 sts)
Row 9: Ch 1, sc in each of the first 2 sts, (ch 1, skip the next ch-1, sc in the next sc) work from ( to ) across. Turn. (16, 18, 24 sts)
Row 10: Ch 1, sc in the first st, (ch 1, skip the next ch-1, sc in the next sc) work from ( to ) across to the last st, sc in the last st. Turn. (16, 18, 24 sts)
Rows 11 – 12: Rep Rows 9 – 10. (16, 18, 24 sts)
Do not fasten off. Continue on to Right Panel – Shoulder Shaping for the size you’re making. Your Right Panel should measure (4″, 4.5″, 6″) W.
Right Panel – Shoulder Shaping – Sizes M, L, 4X
Changes for Sizes as Follows: (M, L, 4X)
Stitch Counts as Follows: (M, L, 4X sts)
Gauge: In sc mesh st with a 5.00mm crochet hook: 15 sts = 3.75″; 17 rows = 4″
In this section, you’ll add simple shoulder shaping and finish your right panel.
Row 1 (RS): Ch 1, sc in each of the first 2 sts, (ch 1, skip the next ch-1, sc in the next sc) work from ( to ) (5, 6, 9) times, skip the remaining 4 sts. Turn. (12, 14, 20 sts)
Row 2: Ch 1, BLO sl st in each of the first 2 sts (not included in st count), sc in the next sc, (ch 1, skip the next ch-1, sc in the next sc) work from ( to ) (4, 5, 8) times, sc in the last st. Turn. (10, 12, 18 sts)
Row 3: Ch 1, sc in each of the first 2 sts, (ch 1, skip the next ch-1, sc in the next sc) work from ( to ) (3, 4, 7) times, skip the remaining 2 sts. (8, 10, 16 sts)
Fasten off. Weave in ends. Continue on to Seaming the Sweater.
Seaming the Sweater
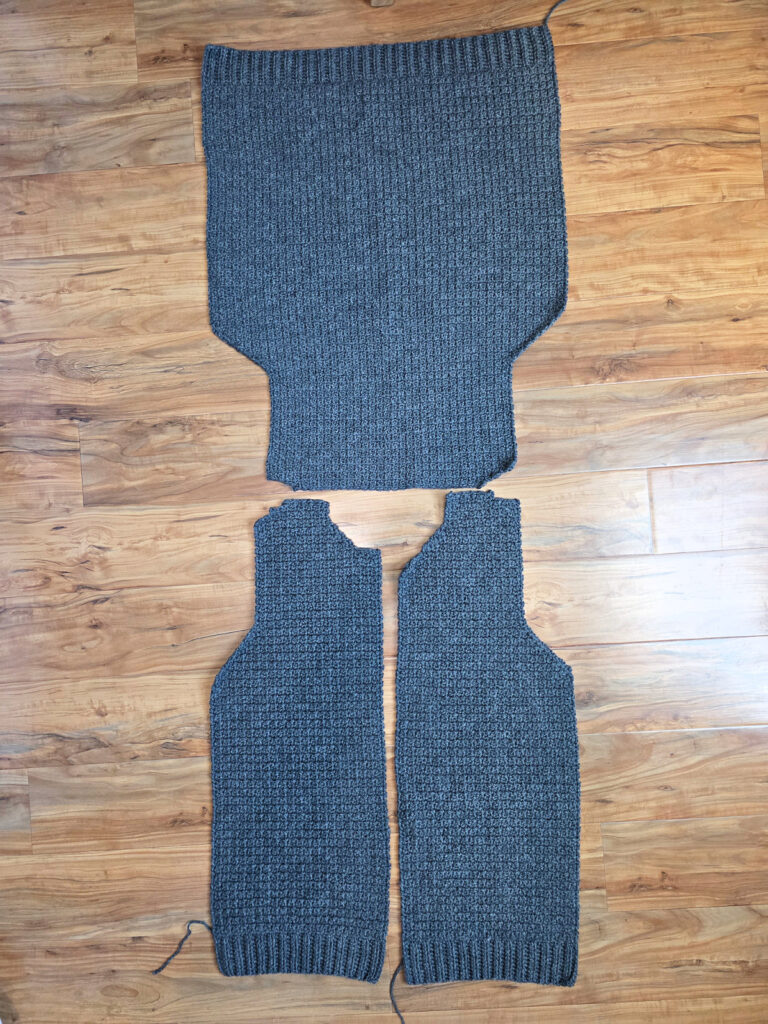
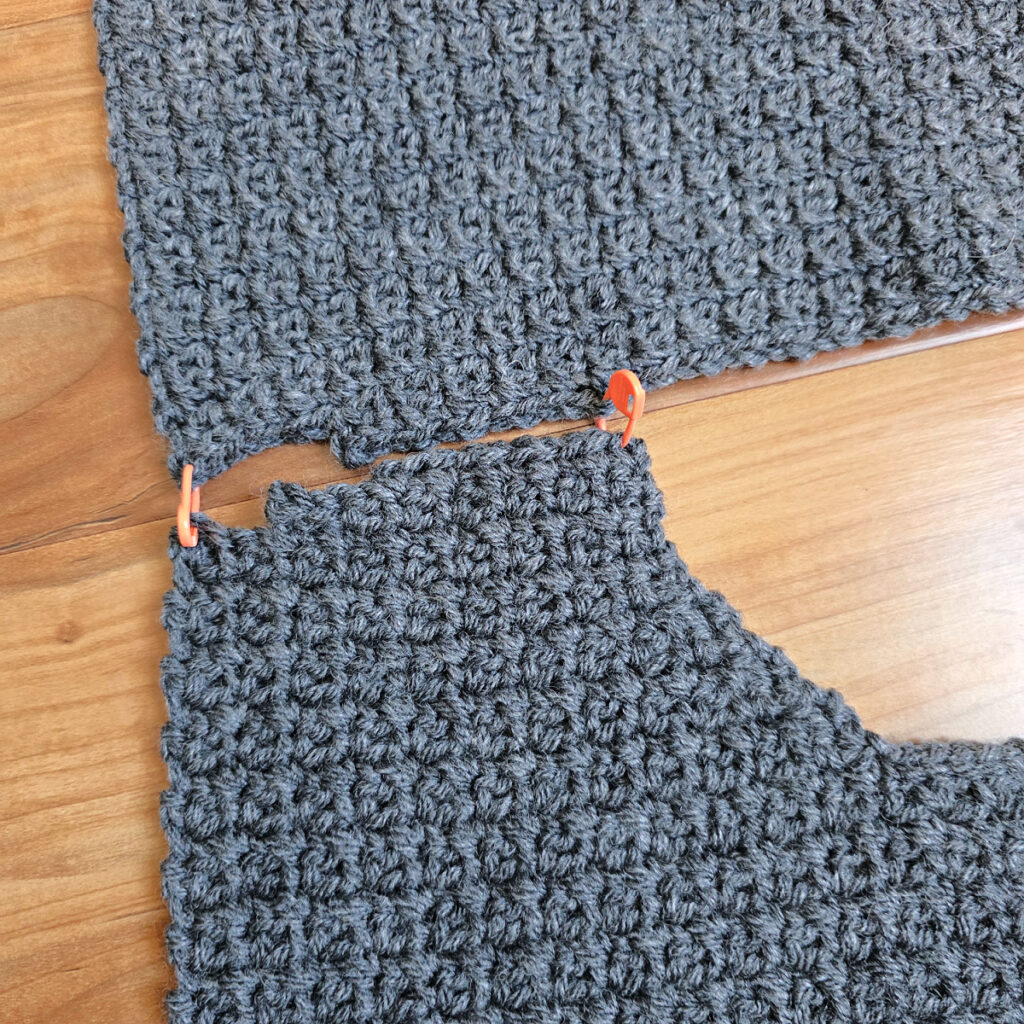
Step 1: With the RS facing out, line up the outer corners of each shoulder panel with the corners of the back panel. To make it easier, I recommend using locking stitch markers to hold the panels in place during seaming.
Step 2: Line up the 13 (15, 16, 18, 19, 21, 21, 24) sts of each shoulder panel with corresponding stitches along the upper back panel. Use locking stitch markers to hold the panels together.
Step 3: With the right side facing out, use a yarn needle and piece of yarn 3 times the width of the shoulder and whipstitch each shoulder panel to the back panel.
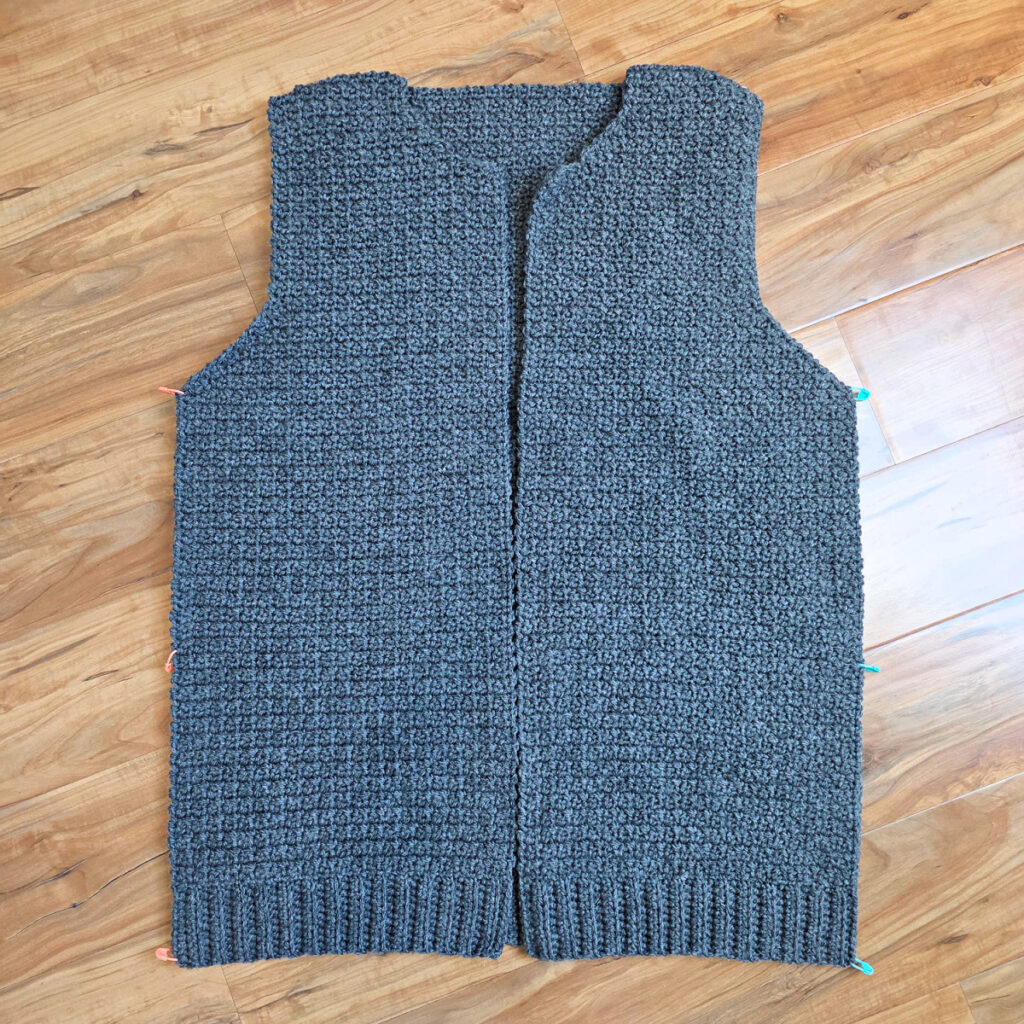
Step 4: Fold the sweater at the shoulders so that the front panels are laying on top of the back panel. Line up the bottom edges of the panels and the bottom of the armhole openings. Use locking stitch markers to hold the panels together.
Step 5: With the right side facing out, use a yarn needle and piece of yarn 3 times the width of the side seam and whipstitch each front panel to the back panel.
Weave in ends. Continue on to the Sleeves.
Sleeves
Gauge: In sc mesh st with a 5.00mm crochet hook: 18 sts = 4″; 10 rows = 2″
Note that even though I continued with a 5.00mm crochet hook for the sleeves, I intentionally worked slightly tighter stitches for this section. Adjust your hook size, if needed. In this section, you’ll begin the sleeve by working a single crochet into each stitch around the armhole opening. As you work the tapered sleeves, you’ll add rounds that include simple shaping by working decrease stitches when you begin and end certain rounds.
Rnd 1 (RS): With yarn & a 5.00mm crochet hook and RS facing you, join yarn with a sc nearest center st at underarm, sc in each st and the side of each row around armhole opening. Join with a sl st to the 1st st. (70, 74, 78, 82, 86, 90, 94, 98 sts)
Rnd 2 (RS): Ch 1, sc in the first st, ch 1, skip the next st, (sc in the next st, ch 1, skip the next st) work from ( to ) around. Join with a sl st to the first st. Turn. (70, 74, 78, 82, 86, 90, 94, 98 sts)
Rnd 3: Ch 1, sc2tog in the first ch-1 & sc, (ch 1, skip the next ch-1, sc in the next sc) work from ( to ) around to the last 2 sts, sc2tog in the last ch-1 sp & sc. Join. Turn. (68, 72, 76, 80, 84, 88, 92, 96 sts)
Rnd 4: Ch 1, sc2tog in the first 2 sc, (ch 1, skip the next ch-1, sc in the next sc) work from ( to ) around to the last 2 sts, sc2tog in the last ch-1 sp & sc. Join. Turn. (66, 70, 74, 78, 82, 86, 90, 94 sts)
Rnd 5: Ch 1, sc in each of the first 2 sts, (ch 1, skip the next ch-1, sc in the next sc) work from ( to ) around. Join. Turn. (66, 70, 74, 78, 82, 86, 90, 94 sts)
Rnd 6: Ch 1, sc in the first st, (ch 1, skip the next ch-1, sc in the next sc) work from ( to ) around to the last st, sc in the last st. Join. Turn. (66, 70, 74, 78, 82, 86, 90, 94 sts)
Do not fasten off. Continue on to the sleeve instructions for the size sweater you’re making.
Sleeves – Size X-Small
Rnds 7 – 8: Rep Rnd 4. (62 sts)
Rnds 9 – 20: Rep Rnds 5 – 6. (62 sts)
Rnds 21 – 22: Rep Rnd 4. (58 sts)
Rnds 23 – 34: Rep Rnds 5 – 6. (58 sts)
Rnds 35 – 36: Rep Rnd 4. (54 sts)
Rnds 37 – 48: Rep Rnds 5 – 6. (54 sts)
Rnds 49 – 50: Rep Rnd 4. (50 sts)
Rnds 51 – 62: Rep Rnds 5 – 6. (50 sts)
Rnds 63 – 64: Rep Rnd 4. (46 sts)
Rnds 65 – 76: Rep Rnds 5 – 6. (46 sts)
Rnds 77 – 78: Rep Rnd 4. (42 sts)
Rep Rnds 5 – 6, ending with a Rnd 6, until sleeve measures 20″ L. (42 sts)
Sleeve Measurement: Measure sleeve length at the underarm, from the Body of Sweater outward.
Adding Length to the Sleeves: If you’d like to add length to your sleeves, continue to repeat rounds 5 – 6 until you’ve added the extra length. Make sure to end with a repeat of Round 6 so that your stitches line up with the next section. Keep in mind that the cuff will add 2-1/2″ to the sleeve length.
Note: If you add length to your sweater, you will need more yarn than what is listed in the chart above.
Do not fasten off. Continue on to the Sleeve Cuff.
Sleeves – Size Small
Rnds 7 – 8: Rep Rnd 4. (66 sts)
Rnds 9 – 18: Rep Rnds 5 – 6. (66 sts)
Rnds 19 – 20: Rep Rnd 4. (62 sts)
Rnds 21 – 30: Rep Rnds 5 – 6. (62 sts)
Rnds 31 – 32: Rep Rnd 4. (58 sts)
Rnds 33 – 42: Rep Rnds 5 – 6. (58 sts)
Rnds 43 – 44: Rep Rnd 4. (54 sts)
Rnds 45 – 54: Rep Rnds 5 – 6. (54 sts)
Rnds 55 – 56: Rep Rnd 4. (50 sts)
Rnds 57 – 66: Rep Rnds 5 – 6. (50 sts)
Rnds 67 – 68: Rep Rnd 4. (46 sts)
Rnds 69 – 78: Rep Rnds 5 – 6. (46 sts)
Rnds 79 – 80: Rep Rnd 4. (42 sts)
Rep Rnds 5 – 6, ending with a Rnd 6, until sleeve measures 20-1/2″ L. (42 sts)
Sleeve Measurement: Measure sleeve length at the underarm, from the Body of Sweater outward.
Adding Length to the Sleeves: If you’d like to add length to your sleeves, continue to repeat rounds 5 – 6 until you’ve added the extra length. Make sure to end with a repeat of Round 6 so that your stitches line up with the next section. Keep in mind that the cuff will add 2-1/2″ to the sleeve length.
Note: If you add length to your sweater, you will need more yarn than what is listed in the chart above.
Do not fasten off. Continue on to the Sleeve Cuff.
Sleeves – Size Medium
Rnds 7 – 8: Rep Rnd 4. (70 sts)
Rnds 9 – 18: Rep Rnds 5 – 6. (70 sts)
Rnds 19 – 20: Rep Rnd 4. (66 sts)
Rnds 21 – 30: Rep Rnds 5 – 6. (66 sts)
Rnds 31 – 32: Rep Rnd 4. (62 sts)
Rnds 33 – 42: Rep Rnds 5 – 6. (62 sts)
Rnds 43 – 44: Rep Rnd 4. (58 sts)
Rnds 45 – 54: Rep Rnds 5 – 6. (58 sts)
Rnds 55 – 56: Rep Rnd 4. (54 sts)
Rnds 57 – 66: Rep Rnds 5 – 6. (54 sts)
Rnds 67 – 68: Rep Rnd 4. (50 sts)
Rnds 69 – 78: Rep Rnds 5 – 6. (50 sts)
Rnds 79 – 80: Rep Rnd 4. (46 sts)
Rep Rnds 5 – 6, ending with a Rnd 6, until sleeve measures 20-1/2″ L. (46 sts)
Sleeve Measurement: Measure sleeve length at the underarm, from the Body of Sweater outward.
Adding Length to the Sleeves: If you’d like to add length to your sleeves, continue to repeat rounds 5 – 6 until you’ve added the extra length. Make sure to end with a repeat of Round 6 so that your stitches line up with the next section. Keep in mind that the cuff will add 2-1/2″ to the sleeve length.
Note: If you add length to your sweater, you will need more yarn than what is listed in the chart above.
Do not fasten off. Continue on to the Sleeve Cuff.
Sleeves – Size Large
Rnds 7 – 8: Rep Rnd 4. (74 sts)
Rnds 9 – 18: Rep Rnds 5 – 6. (74 sts)
Rnds 19 – 20: Rep Rnd 4. (70 sts)
Rnds 21 – 30: Rep Rnds 5 – 6. (70 sts)
Rnds 31 – 32: Rep Rnd 4. (66 sts)
Rnds 33 – 42: Rep Rnds 5 – 6. (66 sts)
Rnds 43 – 44: Rep Rnd 4. (62 sts)
Rnds 45 – 54: Rep Rnds 5 – 6. (62 sts)
Rnds 55 – 56: Rep Rnd 4. (58 sts)
Rnds 57 – 66: Rep Rnds 5 – 6. (58 sts)
Rnds 67 – 68: Rep Rnd 4. (54 sts)
Rnds 69 – 78: Rep Rnds 5 – 6. (54 sts)
Rnds 79 – 80: Rep Rnd 4. (50 sts)
Rnds 81 – 90: Rep Rnds 5 – 6. (50 sts)
Rnds 91 – 92: Rep Rnd 4. (46 sts)
Rep Rnds 5 – 6, ending with a Rnd 6, until sleeve measures 20-1/2″ L. (46 sts)
Sleeve Measurement: Measure sleeve length at the underarm, from the Body of Sweater outward.
Adding Length to the Sleeves: If you’d like to add length to your sleeves, continue to repeat rounds 5 – 6 until you’ve added the extra length. Make sure to end with a repeat of Round 6 so that your stitches line up with the next section. Keep in mind that the cuff will add 2-1/2″ to the sleeve length.
Note: If you add length to your sweater, you will need more yarn than what is listed in the chart above.
Do not fasten off. Continue on to the Sleeve Cuff.
Sleeves – Size X-Large
Rnds 7 – 8: Rep Rnd 4. (78 sts)
Rnds 9 – 18: Rep Rnds 5 – 6. (78 sts)
Rnds 19 – 20: Rep Rnd 4. (74 sts)
Rnds 21 – 30: Rep Rnds 5 – 6. (74 sts)
Rnds 31 – 32: Rep Rnd 4. (70 sts)
Rnds 33 – 42: Rep Rnds 5 – 6. (70 sts)
Rnds 43 – 44: Rep Rnd 4. (66 sts)
Rnds 45 – 54: Rep Rnds 5 – 6. (66 sts)
Rnds 55 – 56: Rep Rnd 4. (62 sts)
Rnds 57 – 66: Rep Rnds 5 – 6. (62 sts)
Rnds 67 – 68: Rep Rnd 4. (58 sts)
Rnds 69 – 78: Rep Rnds 5 – 6. (58 sts)
Rnds 79 – 80: Rep Rnd 4. (54 sts)
Rnds 81 – 90: Rep Rnds 5 – 6. (54 sts)
Rnds 91 – 92: Rep Rnd 4. (50 sts)
Rnds 93 – 102: Rep Rnds 5 – 6. (50 sts)
Rnds 103 – 104: Rep Rnd 4. (46 sts)
Rep Rnds 5 – 6, ending with a Rnd 6, until sleeve measures 21″ L. (46 sts)
Sleeve Measurement: Measure sleeve length at the underarm, from the Body of Sweater outward.
Adding Length to the Sleeves: If you’d like to add length to your sleeves, continue to repeat rounds 5 – 6 until you’ve added the extra length. Make sure to end with a repeat of Round 6 so that your stitches line up with the next section. Keep in mind that the cuff will add 2-1/2″ to the sleeve length.
Note: If you add length to your sweater, you will need more yarn than what is listed in the chart above.
Do not fasten off. Continue on to the Sleeve Cuff.
Sleeves – Size 2X
Rnds 7 – 8: Rep Rnd 4. (82 sts)
Rnds 9 – 16: Rep Rnds 5 – 6. (82 sts)
Rnds 17 – 18: Rep Rnd 4. (78 sts)
Rnds 19 – 26: Rep Rnds 5 – 6. (78 sts)
Rnds 27 – 28: Rep Rnd 4. (74 sts)
Rnds 29 – 36: Rep Rnds 5 – 6. (74 sts)
Rnds 37 – 38: Rep Rnd 4. (70 sts)
Rnds 39 – 46: Rep Rnds 5 – 6. (70 sts)
Rnds 47 – 48: Rep Rnd 4. (66 sts)
Rnds 49 – 56: Rep Rnds 5 – 6. (66 sts)
Rnds 57 – 58: Rep Rnd 4. (62 sts)
Rnds 59 – 66: Rep Rnds 5 – 6. (62 sts)
Rnds 67 – 68: Rep Rnd 4. (58 sts)
Rnds 69 – 76: Rep Rnds 5 – 6. (58 sts)
Rnds 77 – 78: Rep Rnd 4. (54 sts)
Rnds 79 – 86: Rep Rnds 5 – 6. (54 sts)
Rnds 87 – 88: Rep Rnd 4. (50 sts)
Rnds 89 – 96: Rep Rnds 5 – 6. (50 sts)
Rnds 97 – 98: Rep Rnd 4. (46 sts)
Rep Rnds 5 – 6, ending with a Rnd 6, until sleeve measures 21″ L. (46 sts)
Sleeve Measurement: Measure sleeve length at the underarm, from the Body of Sweater outward.
Adding Length to the Sleeves: If you’d like to add length to your sleeves, continue to repeat rounds 5 – 6 until you’ve added the extra length. Make sure to end with a repeat of Round 6 so that your stitches line up with the next section. Keep in mind that the cuff will add 2-1/2″ to the sleeve length.
Note: If you add length to your sweater, you will need more yarn than what is listed in the chart above.
Do not fasten off. Continue on to the Sleeve Cuff.
Sleeves – Size 3X
Rnds 7 – 8: Rep Rnd 4. (86 sts)
Rnds 9 – 16: Rep Rnds 5 – 6. (86 sts)
Rnds 17 – 18: Rep Rnd 4. (82 sts)
Rnds 19 – 26: Rep Rnds 5 – 6. (82 sts)
Rnds 27 – 28: Rep Rnd 4. (78 sts)
Rnds 29 – 36: Rep Rnds 5 – 6. (78 sts)
Rnds 37 – 38: Rep Rnd 4. (74 sts)
Rnds 39 – 46: Rep Rnds 5 – 6. (74 sts)
Rnds 47 – 48: Rep Rnd 4. (70 sts)
Rnds 49 – 56: Rep Rnds 5 – 6. (70 sts)
Rnds 57 – 58: Rep Rnd 4. (66 sts)
Rnds 59 – 66: Rep Rnds 5 – 6. (66 sts)
Rnds 67 – 68: Rep Rnd 4. (62 sts)
Rnds 69 – 76: Rep Rnds 5 – 6. (62 sts)
Rnds 77 – 78: Rep Rnd 4. (58 sts)
Rnds 79 – 86: Rep Rnds 5 – 6. (58 sts)
Rnds 87 – 88: Rep Rnd 4. (54 sts)
Rnds 89 – 96: Rep Rnds 5 – 6. (54 sts)
Rnds 97 – 98: Rep Rnd 4. (50 sts)
Rep Rnds 5 – 6, ending with a Rnd 6, until sleeve measures 22″ L. (50 sts)
Sleeve Measurement: Measure sleeve length at the underarm, from the Body of Sweater outward.
Adding Length to the Sleeves: If you’d like to add length to your sleeves, continue to repeat rounds 5 – 6 until you’ve added the extra length. Make sure to end with a repeat of Round 6 so that your stitches line up with the next section. Keep in mind that the cuff will add 2-1/2″ to the sleeve length.
Note: If you add length to your sweater, you will need more yarn than what is listed in the chart above.
Do not fasten off. Continue on to the Sleeve Cuff.
Sleeves – Size 4X
Rnds 7 – 8: Rep Rnd 4. (90 sts)
Rnds 9 – 16: Rep Rnds 5 – 6. (90 sts)
Rnds 17 – 18: Rep Rnd 4. (86 sts)
Rnds 19 – 26: Rep Rnds 5 – 6. (86 sts)
Rnds 27 – 28: Rep Rnd 4. (82 sts)
Rnds 29 – 36: Rep Rnds 5 – 6. (82 sts)
Rnds 37 – 38: Rep Rnd 4. (78 sts)
Rnds 39 – 46: Rep Rnds 5 – 6. (78 sts)
Rnds 47 – 48: Rep Rnd 4. (74 sts)
Rnds 49 – 56: Rep Rnds 5 – 6. (74 sts)
Rnds 57 – 58: Rep Rnd 4. (70 sts)
Rnds 59 – 66: Rep Rnds 5 – 6. (70 sts)
Rnds 67 – 68: Rep Rnd 4. (66 sts)
Rnds 69 – 76: Rep Rnds 5 – 6. (66 sts)
Rnds 77 – 78: Rep Rnd 4. (62 sts)
Rnds 79 – 86: Rep Rnds 5 – 6. (62 sts)
Rnds 87 – 88: Rep Rnd 4. (58 sts)
Rnds 89 – 96: Rep Rnds 5 – 6. (58 sts)
Rnds 97 – 98: Rep Rnd 4. (54 sts)
Rnds 99 – 106: Rep Rnds 5 – 6. (54 sts)
Rnds 107 – 108: Rep Rnd 4. (50 sts)
Rep Rnds 5 – 6, ending with a Rnd 6, until sleeve measures 22″ L. (50 sts)
Sleeve Measurement: Measure sleeve length at the underarm, from the Body of Sweater outward.
Adding Length to the Sleeves: If you’d like to add length to your sleeves, continue to repeat rounds 5 – 6 until you’ve added the extra length. Make sure to end with a repeat of Round 6 so that your stitches line up with the next section. Keep in mind that the cuff will add 2-1/2″ to the sleeve length.
Note: If you add length to your sweater, you will need more yarn than what is listed in the chart above.
Do not fasten off. Continue on to the Sleeve Cuff.
Sleeve Cuff
In this section, you’ll first add a round of single crochet around the last round of the sleeve. Then, you’ll crochet cuff ribbing perpendicular to the sleeve.
Set-Up
Rnd 1 (RS): With yarn & a 5.00mm crochet hook, ch 1, work 1 sc into each sc & ch-1 sp around. Join with a sl st to the 1st st. (42, 42, 46, 46, 46, 46, 50, 50 sts)
Do not fasten off. Continue on to Cuff Ribbing.
Cuff Ribbing
Gauge: In stitch pattern as written below, with 5.00mm hook, 11 sts = 2.5″; 10 rows = 3.75″ H
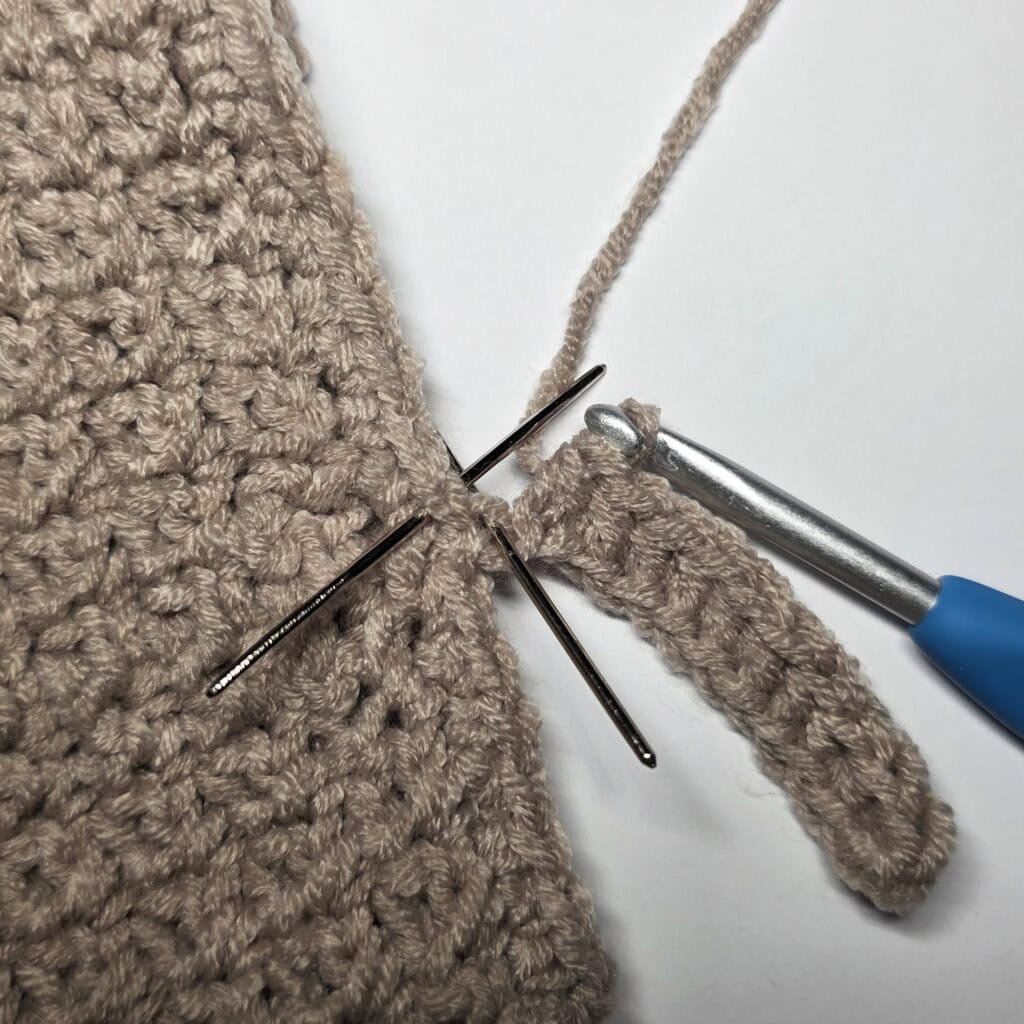
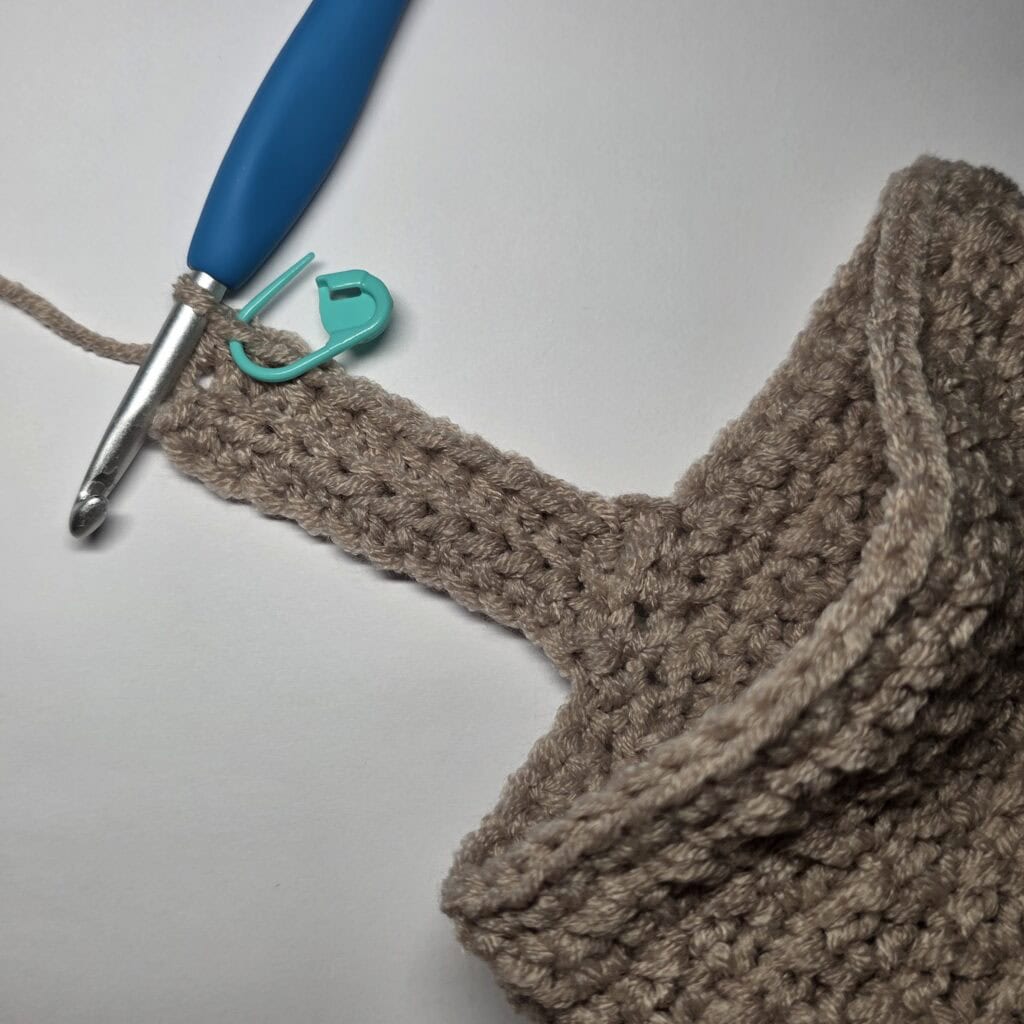
Row 1 (RS): Ch 12, working in the back humps of the ch, hdc in the 2nd ch from your hook, hdc in each of the next 9 chs, hdc2tog in the next ch & same st as ch 12. Do not turn. (11 sts)
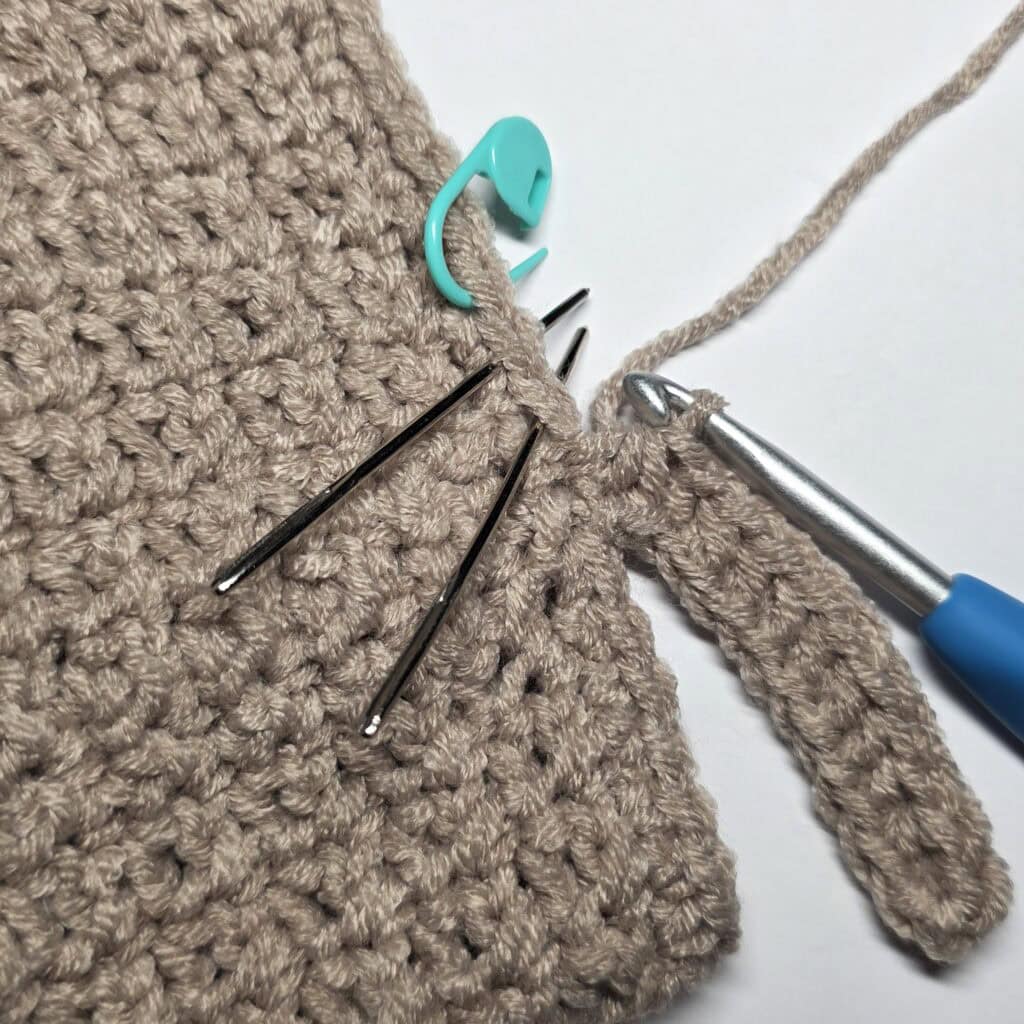
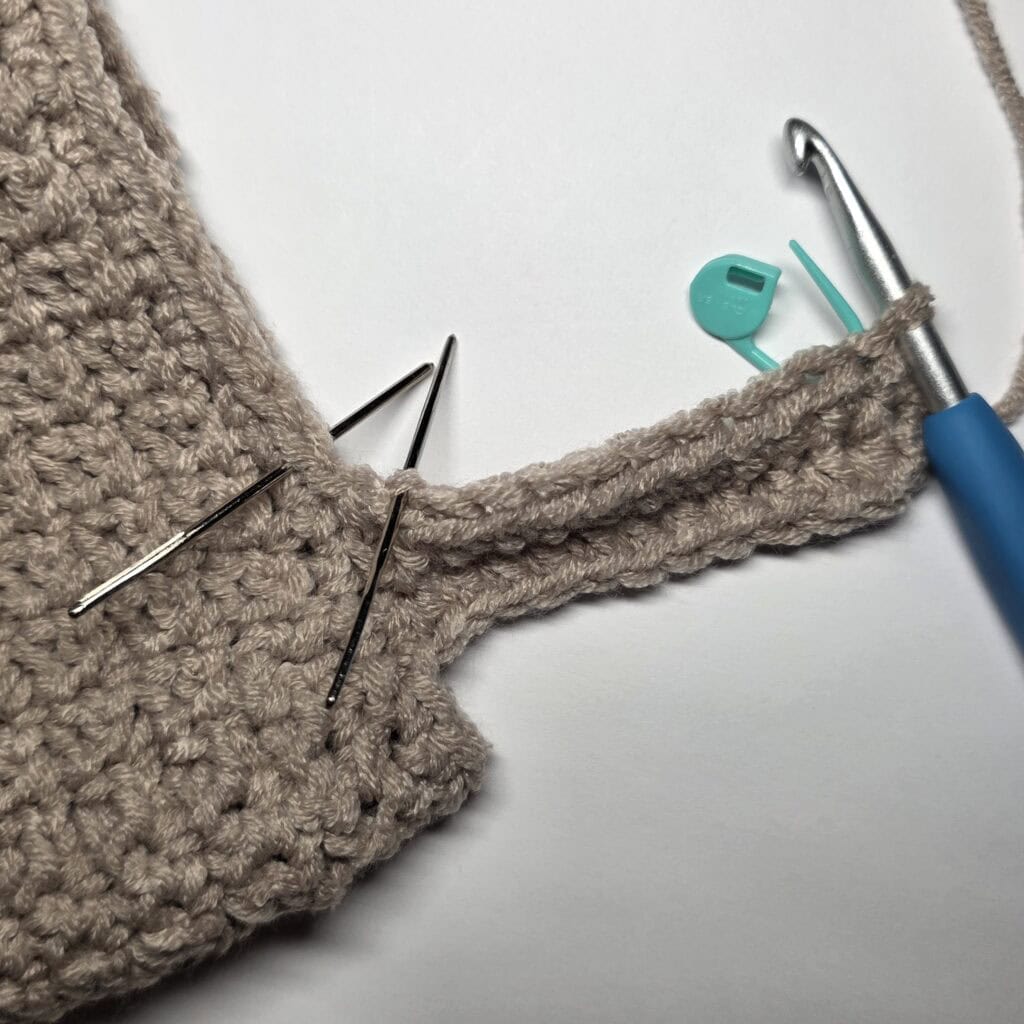
Row 2: ( sl st into the next st along the edge of the sleeve opening ) 3 times (these 3 sl sts do not count as sts), TURN, BLO hdc in each st across the previous row. Turn. (11 sts)
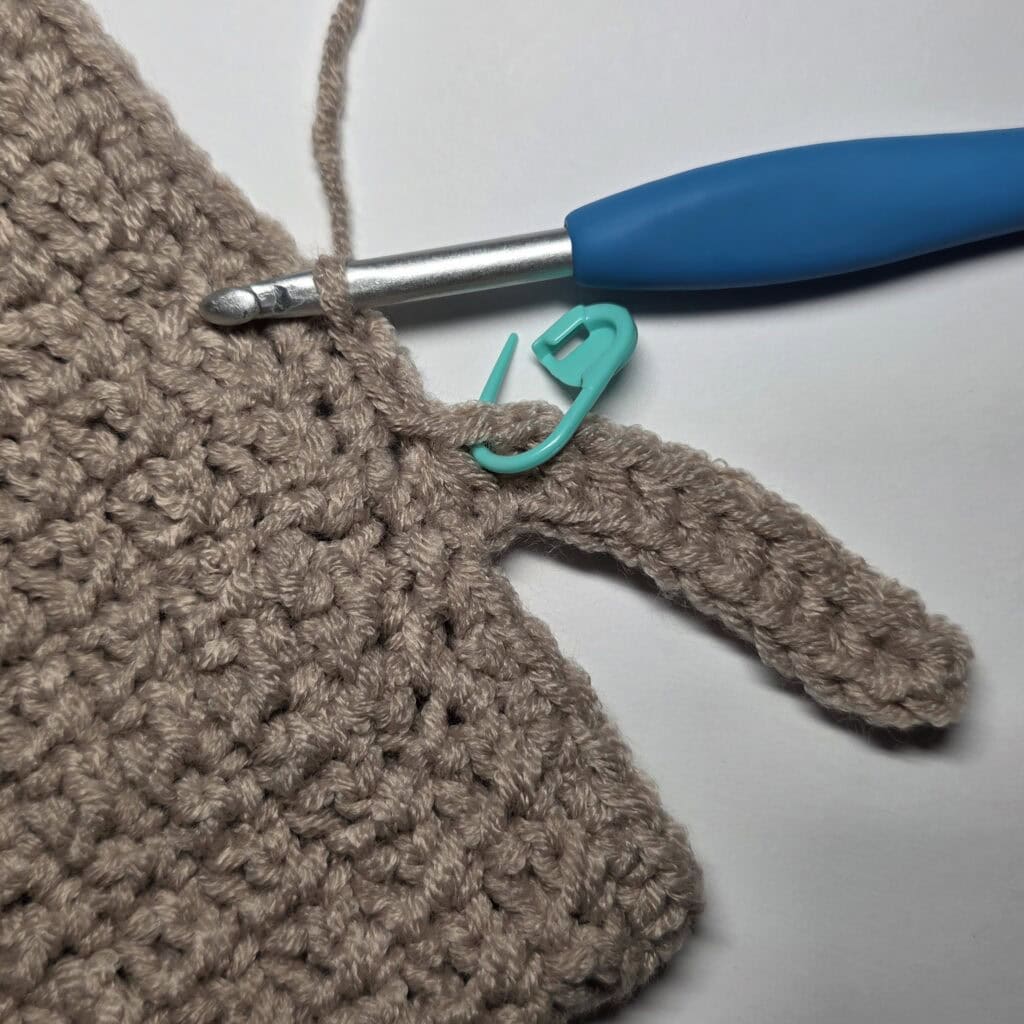
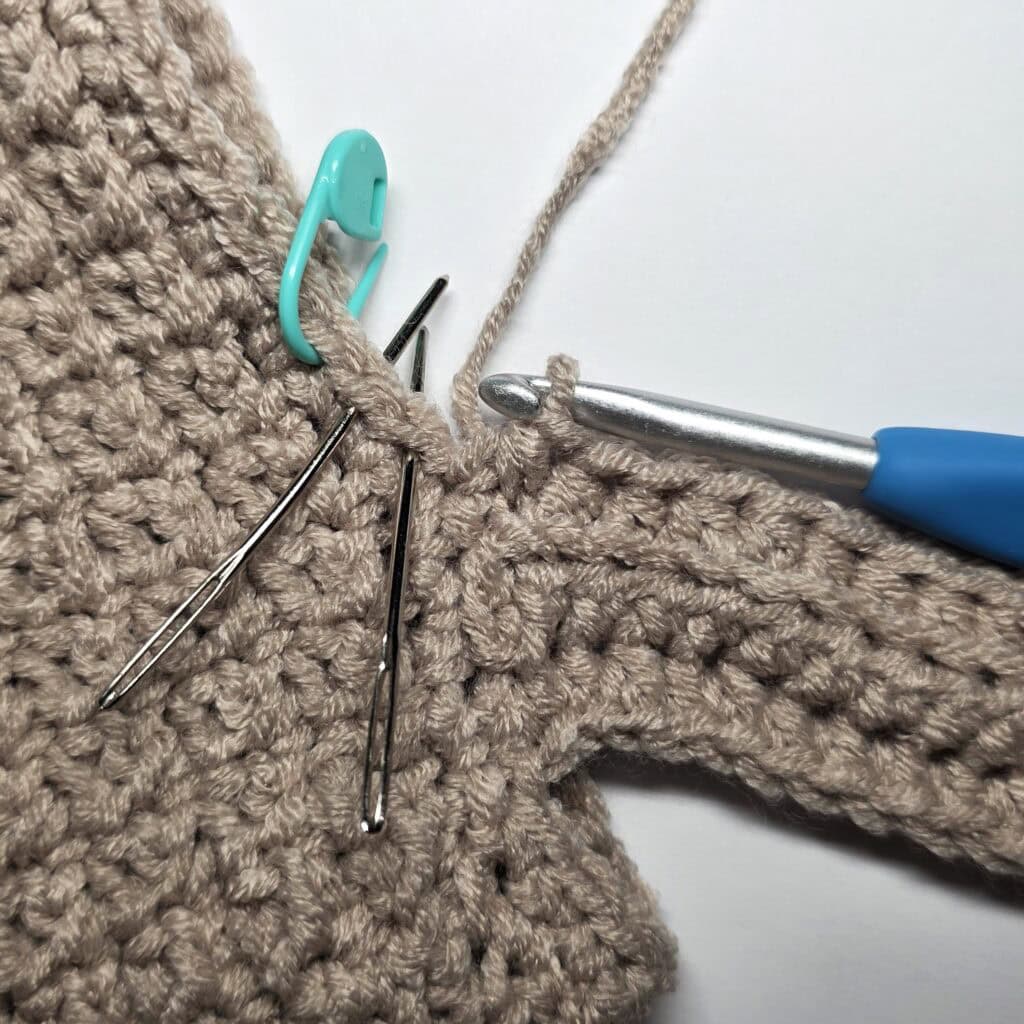
Row 3: Ch 1, BLO hdc in the first st, BLO hdc in each of the next 9 sts, hdc2tog in the BLO of the next st and both loops of the next st along the edge of the sleeve opening. Do not turn. (11 sts)
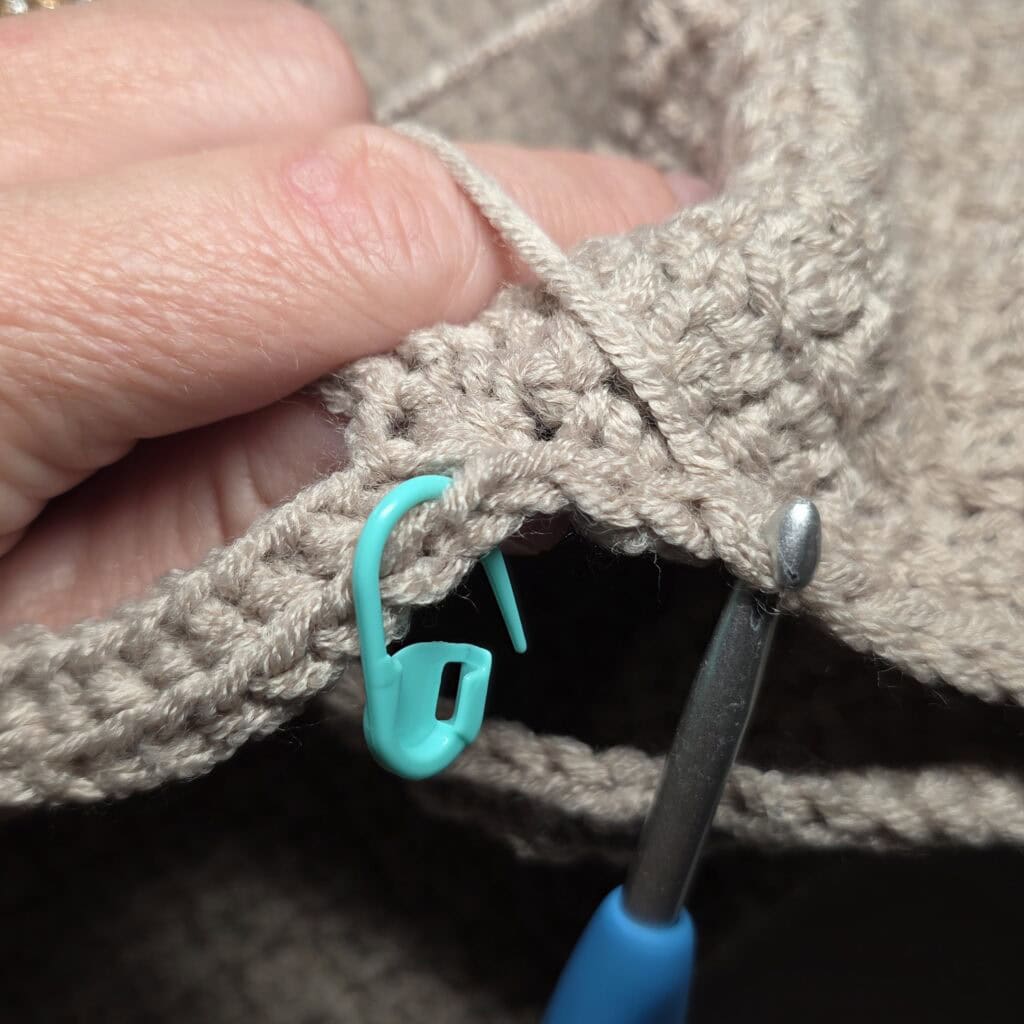
Row 4: ( sl st into the next st along the edge of the sleeve opening ) 3 times (these 3 sl sts do not count as sts), TURN, BLO hdc in each st across the previous row. Turn. (11 sts)
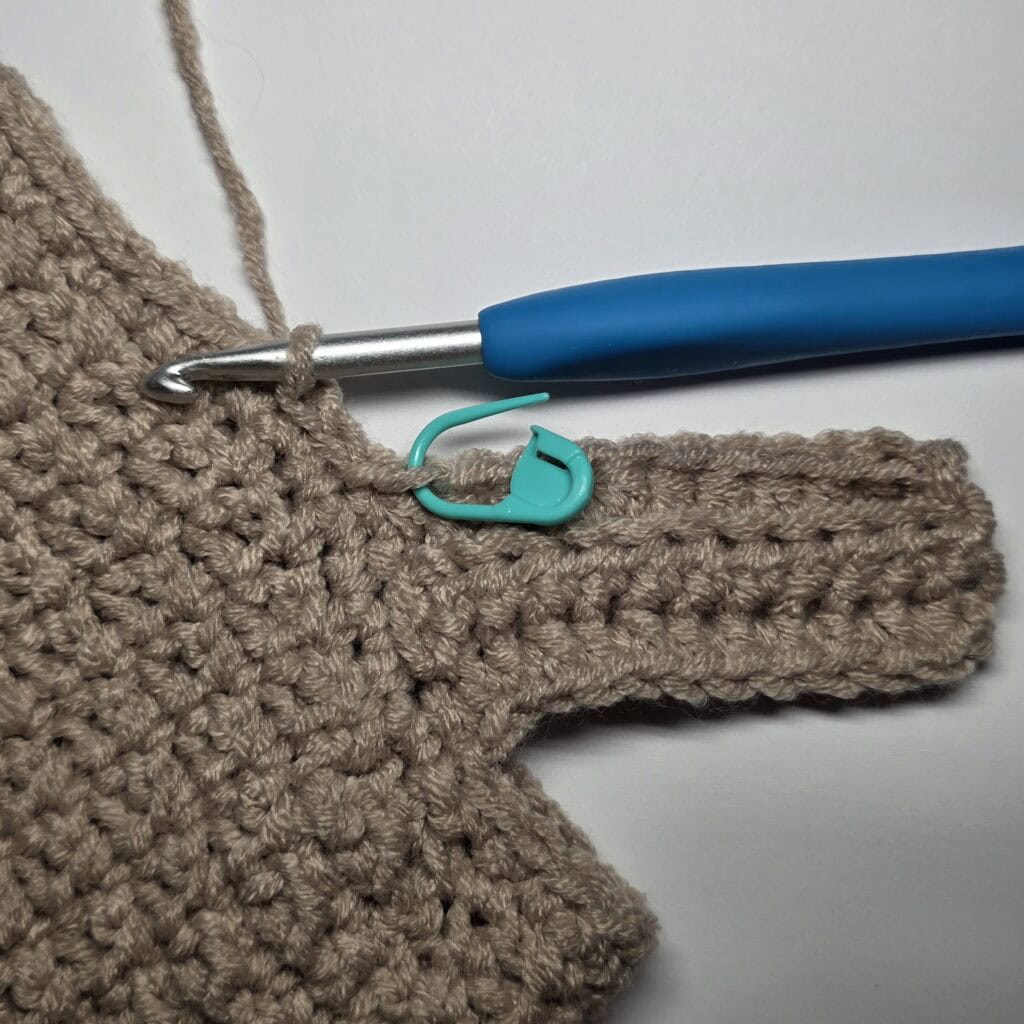
Rep Rows 3 – 4 around the sleeve opening.
Fasten off leaving a 6″ tail of yarn. Using a yarn needle and the tail of yarn to whipstitch the last row to the first row.
Weave in ends. Add the second sleeve and cuff, then continue to Prepare Front Opening Edge.
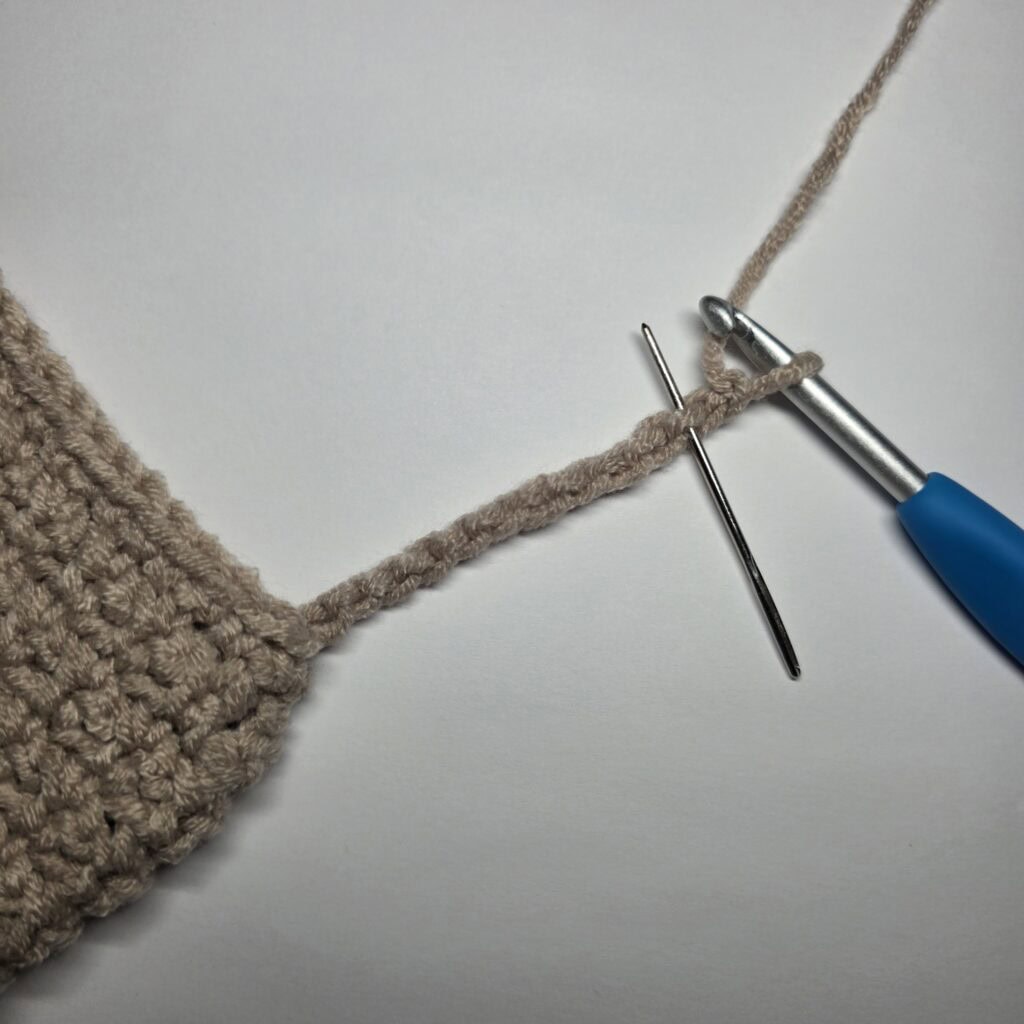
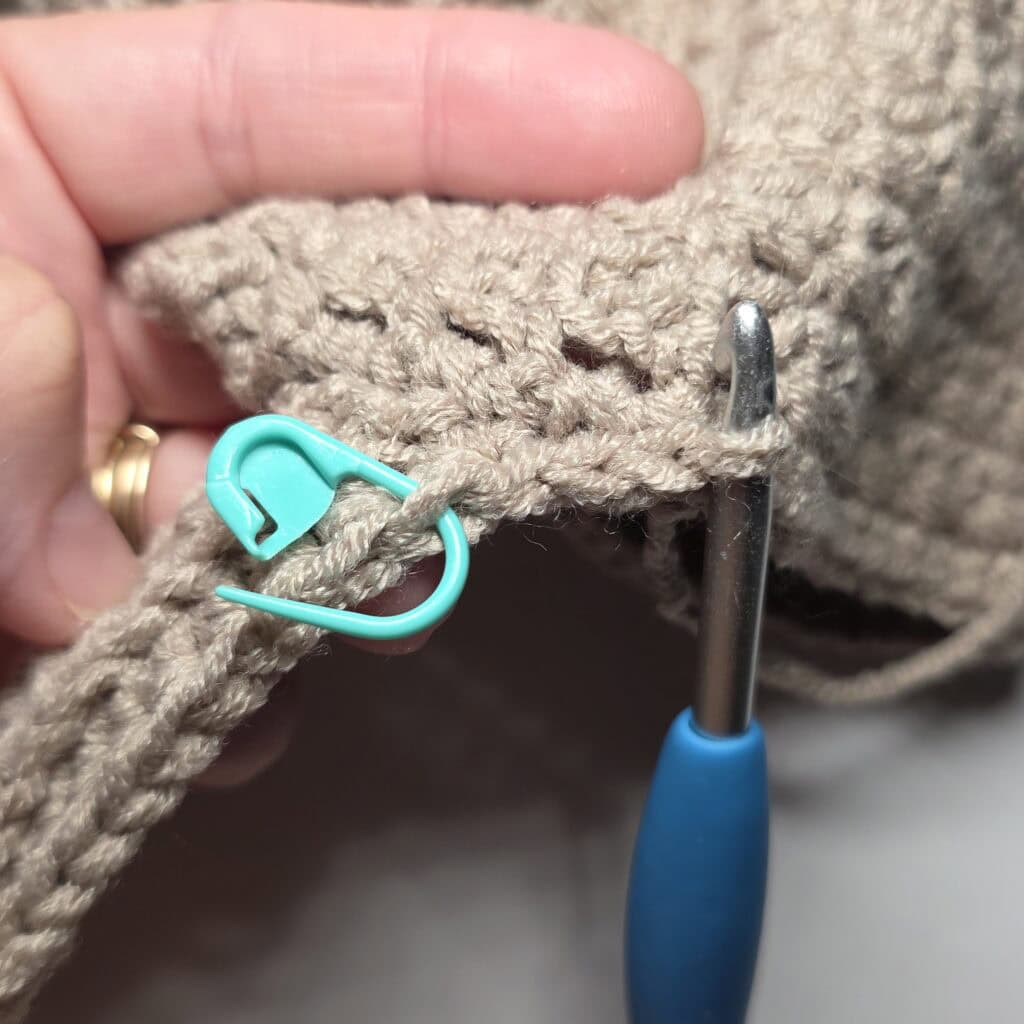
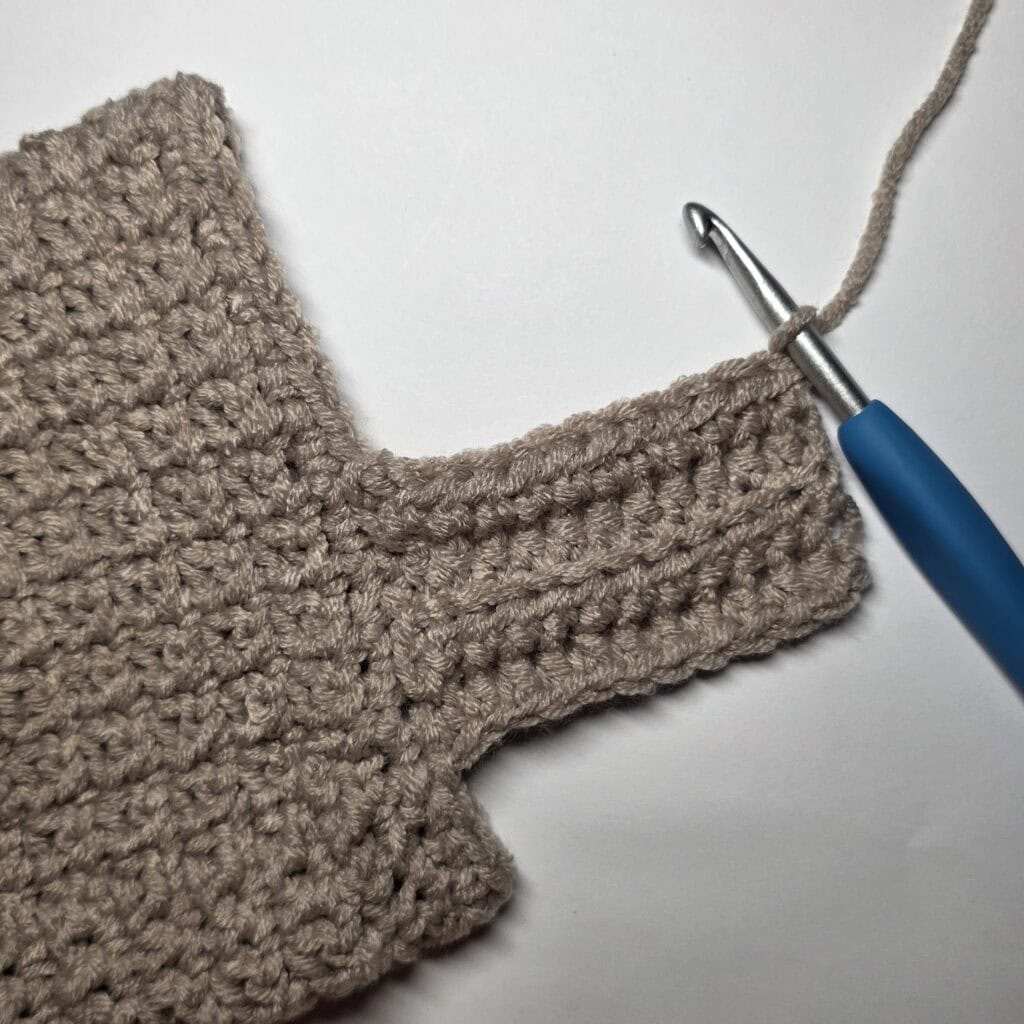
Progression Photos – Sleeve Cuff & Collar Ribbing
The photos below show the Sleeve Cuff Ribbing, but the Collar Ribbing is worked the same exact way, even though the stitch count is less than the sleeve cuff.
Prepare Front Opening Edge
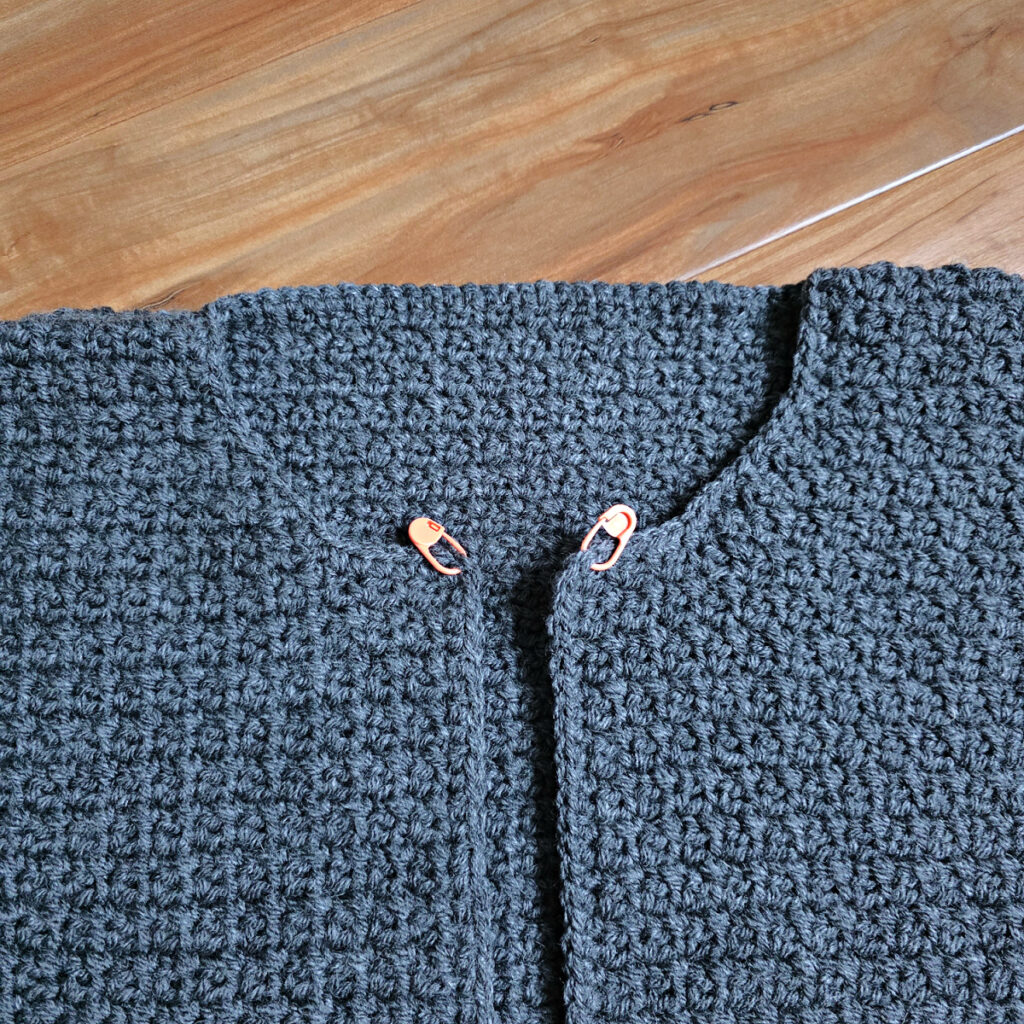
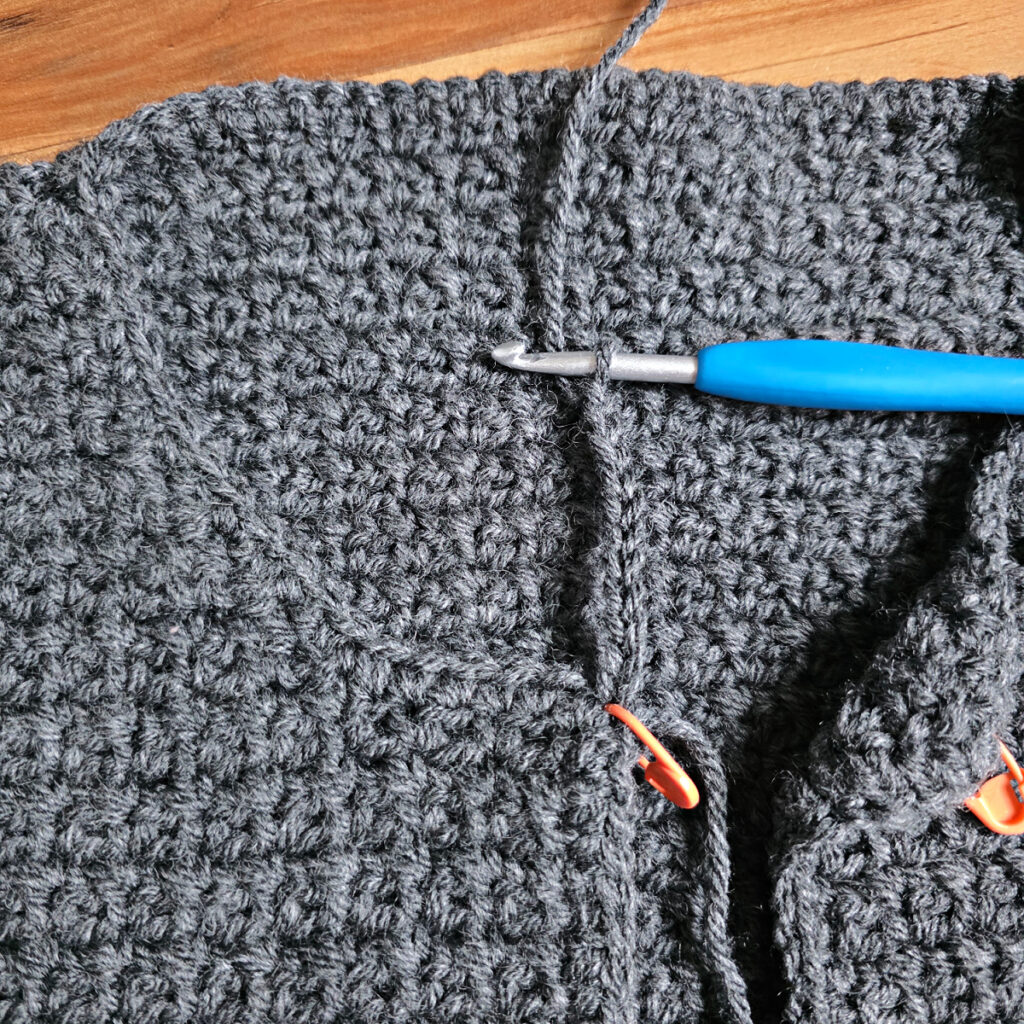
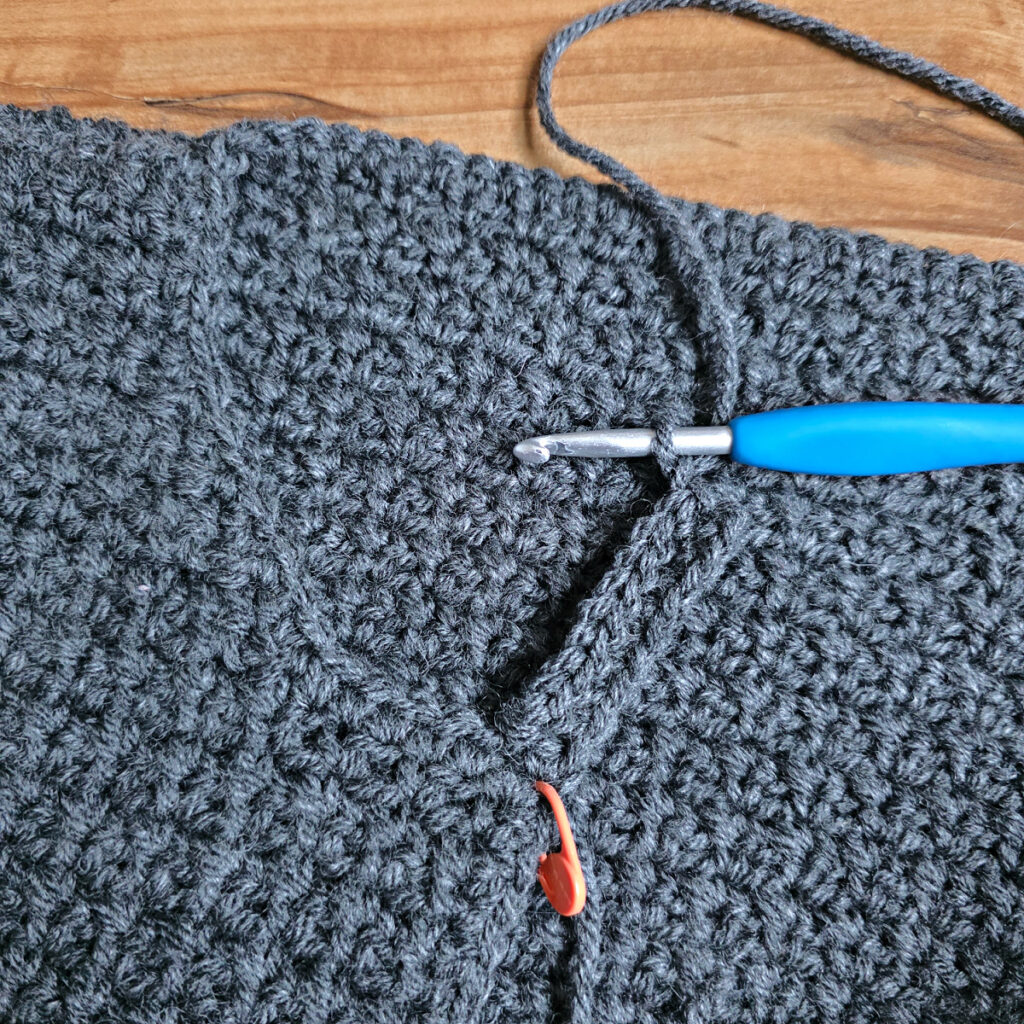
In this section, you’ll work single crochet stitches around the front opening of the cardigan to prepare the edges for the front zippered edges and the collar.
Row 1 (RS): With yarn & a 5.00mm crochet hook, join yarn with a standing sc in the bottom corner of the garment’s front right panel, sc up the front right panel, work 2 sc into the corner where the front right edge meets the neck opening (place a SM in the 2nd of these 2 sc), sc around the neck opening (work an EVEN number of stitches around the neck opening), work 2 sc into the corner where the neck opening meets the front left edge (place a SM in the 1st of these 2 sc), sc down the front left panel. Stitch count isn’t crucial. Just make sure to have an even number of stitches around the neck opening from SM to SM.
Fasten off. Weave in ends. Continue on to the Collar.
Collar
Gauge: In pattern as written: 10 sts = 2-1/8″; 14 rows = 3″
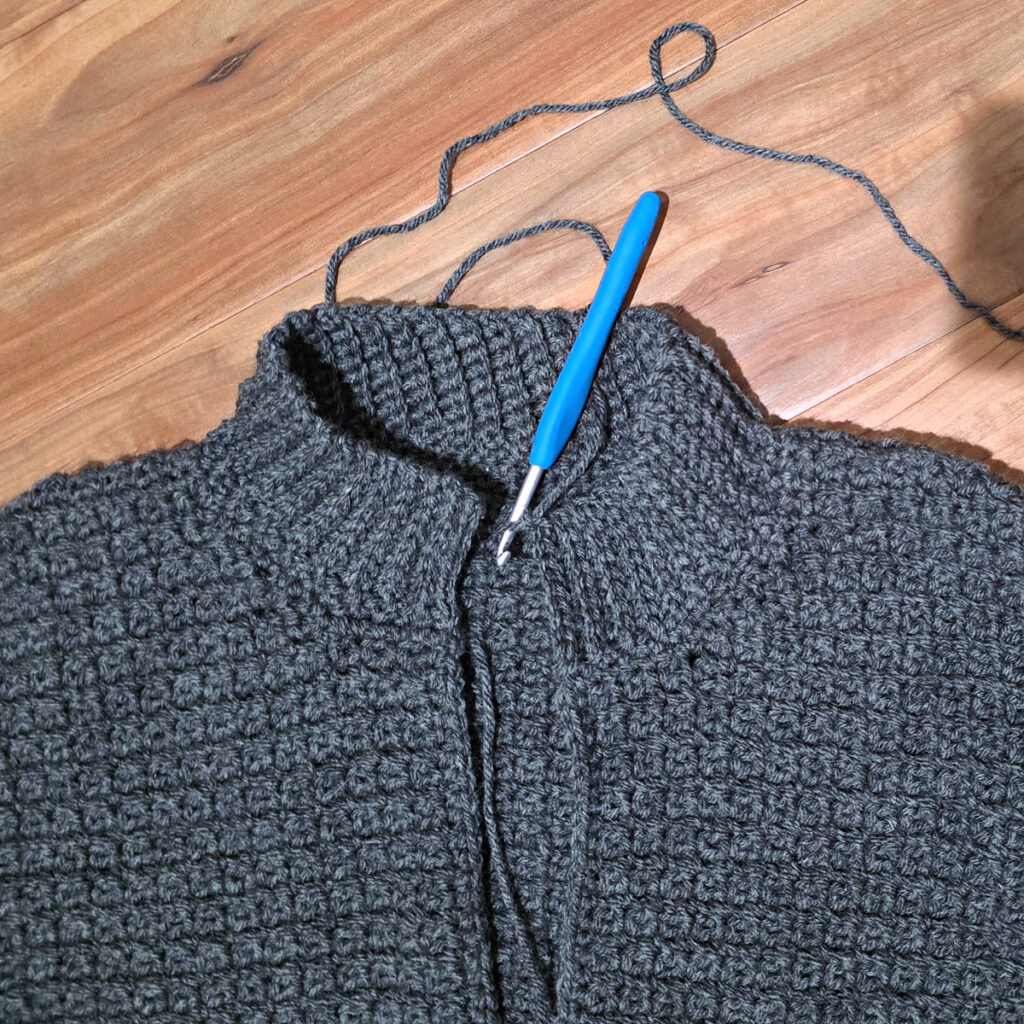
In this section, you’ll work the collar back and forth in rows perpendicular to the cardigan.
Row 1 (RS): Position the cardigan so the front RS is facing you. With yarn & a 5.00mm crochet hook, join yarn with a sl st in the st marked with a SM on the left (cardigan’s front right), ch 10, sc into the 2nd ch from your hook, sc in each of the next 7 chs, sc2tog in next ch and same st as ch 10. (9 sts)
Row 2: Sl st into the next st along the neck opening of vest (does not count as a st), Turn, BLO sl st in each st across. Turn. (9 sts)
Row 3: Ch 1, BLO sc in each of the first 8 sts, sc2tog in next st & next st along the edge of the vest. (9 sts)
Rep Rows 2 – 3 around neck opening, ending with a Row 2 rep.
Do not fasten off. Continue on to Front Left Edging.
Front Left Edging
Row 1 (RS): Continuing with a 5.00mm crochet hook, ch 1, BLO sc in each of the 9 sts from the Collar, working in both loops, sc in each st down the front left edge of the cardigan. Turn. Stitch count isn’t crucial.
Row 2: Ch 1, BLO sl st in each st across. Turn.
Row 3: Ch 1, BLO sc in each st across. Turn.
Row 4: Rep Row 2.
Fasten off. Weave in ends. Continue on to the Front Right Edging.
Front Right Edging
Row 1 (RS): Position the cardigan so the front RS is facing you. With a 5.00mm crochet hook, join yarn with a standing sc in the st nearest the bottom of the front right opening, sc in each st up the front right edge of the cardigan (including collar). Turn. Stitch count isn’t crucial.
Row 2: Ch 1, BLO sl st in each st across. Turn.
Row 3: Ch 1, BLO sc in each st across. Turn.
Row 4: Rep Row 2.
Fasten off. Weave in ends. Continue on to Finishing.
Finishing
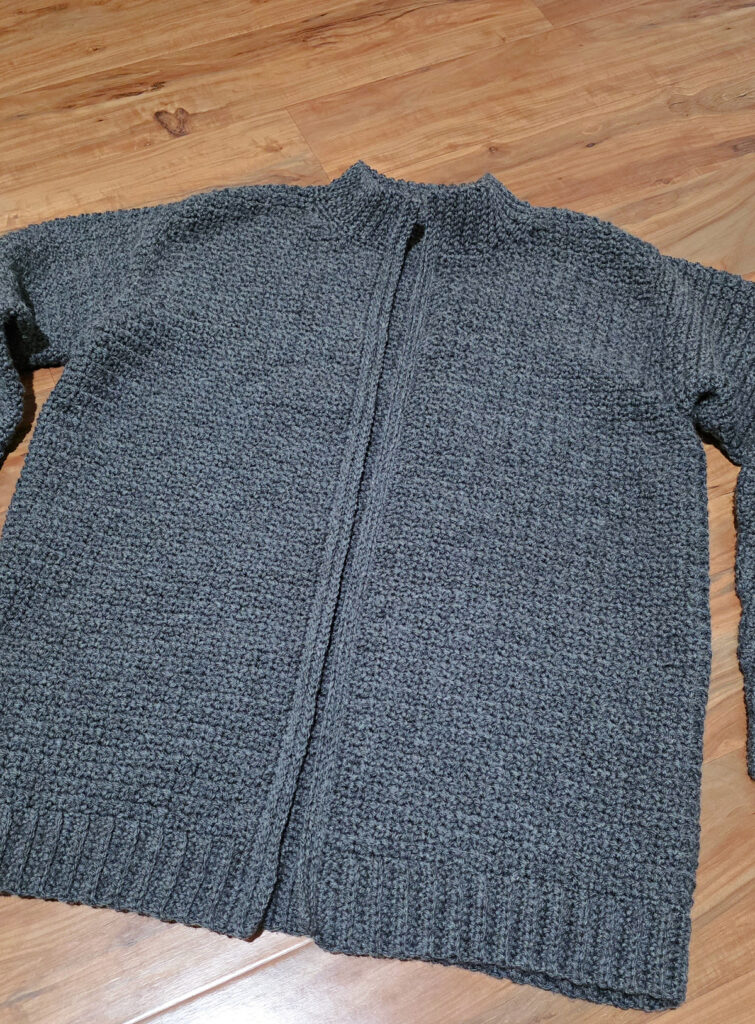
Adding a Zipper: Line up one side of the zipper on each side of the cardigan opening, about 1/2″ up from the bottom edge of the cardigan. With the zipper facing up, pin it to the WS of the last row of the front edging, every couple inches, to hold it in place while you sew it on.
Then, use this tutorial to attach the zipper to your cardigan.
I MADE IT! NOW WHAT?
Pin this post!: Save this crochet mens cardigan pattern to your Pinterest boards so that you can come back and make it again.
Leave a comment below: We love to hear your feedback.
Share Your Finished Projects on Facebook or Instagram: I love to see your finished projects! Share with us on social media and tag me @acrochetedsimplicity or use the hashtag #ACrochetedSimplicity so I can find your posts.
Join us in the Facebook Community Group!
Come share your finished projects with us in the A Crocheted Simplicity Crochet Community Group on Facebook. Join us for fun community events such as crochet alongs, join in on crochet conversations, ask questions, get advice, and share your love for crochet!
More Crochet Cardigan Patterns I Think You’ll Love
- Celsea Button Up Cardigan
- Aurora Womens Crochet Cardigan
- Fireside Crochet Cardigan
- Summer Splendor Cardigan
- Mens Shawl Collar Cardigan
More Crochet Sweater Patterns
Are you looking for more crochet cardigan sweater patterns? We have several more patterns for crochet clothes, including matching sweaters for mothers and daughters and even for fathers and sons.
