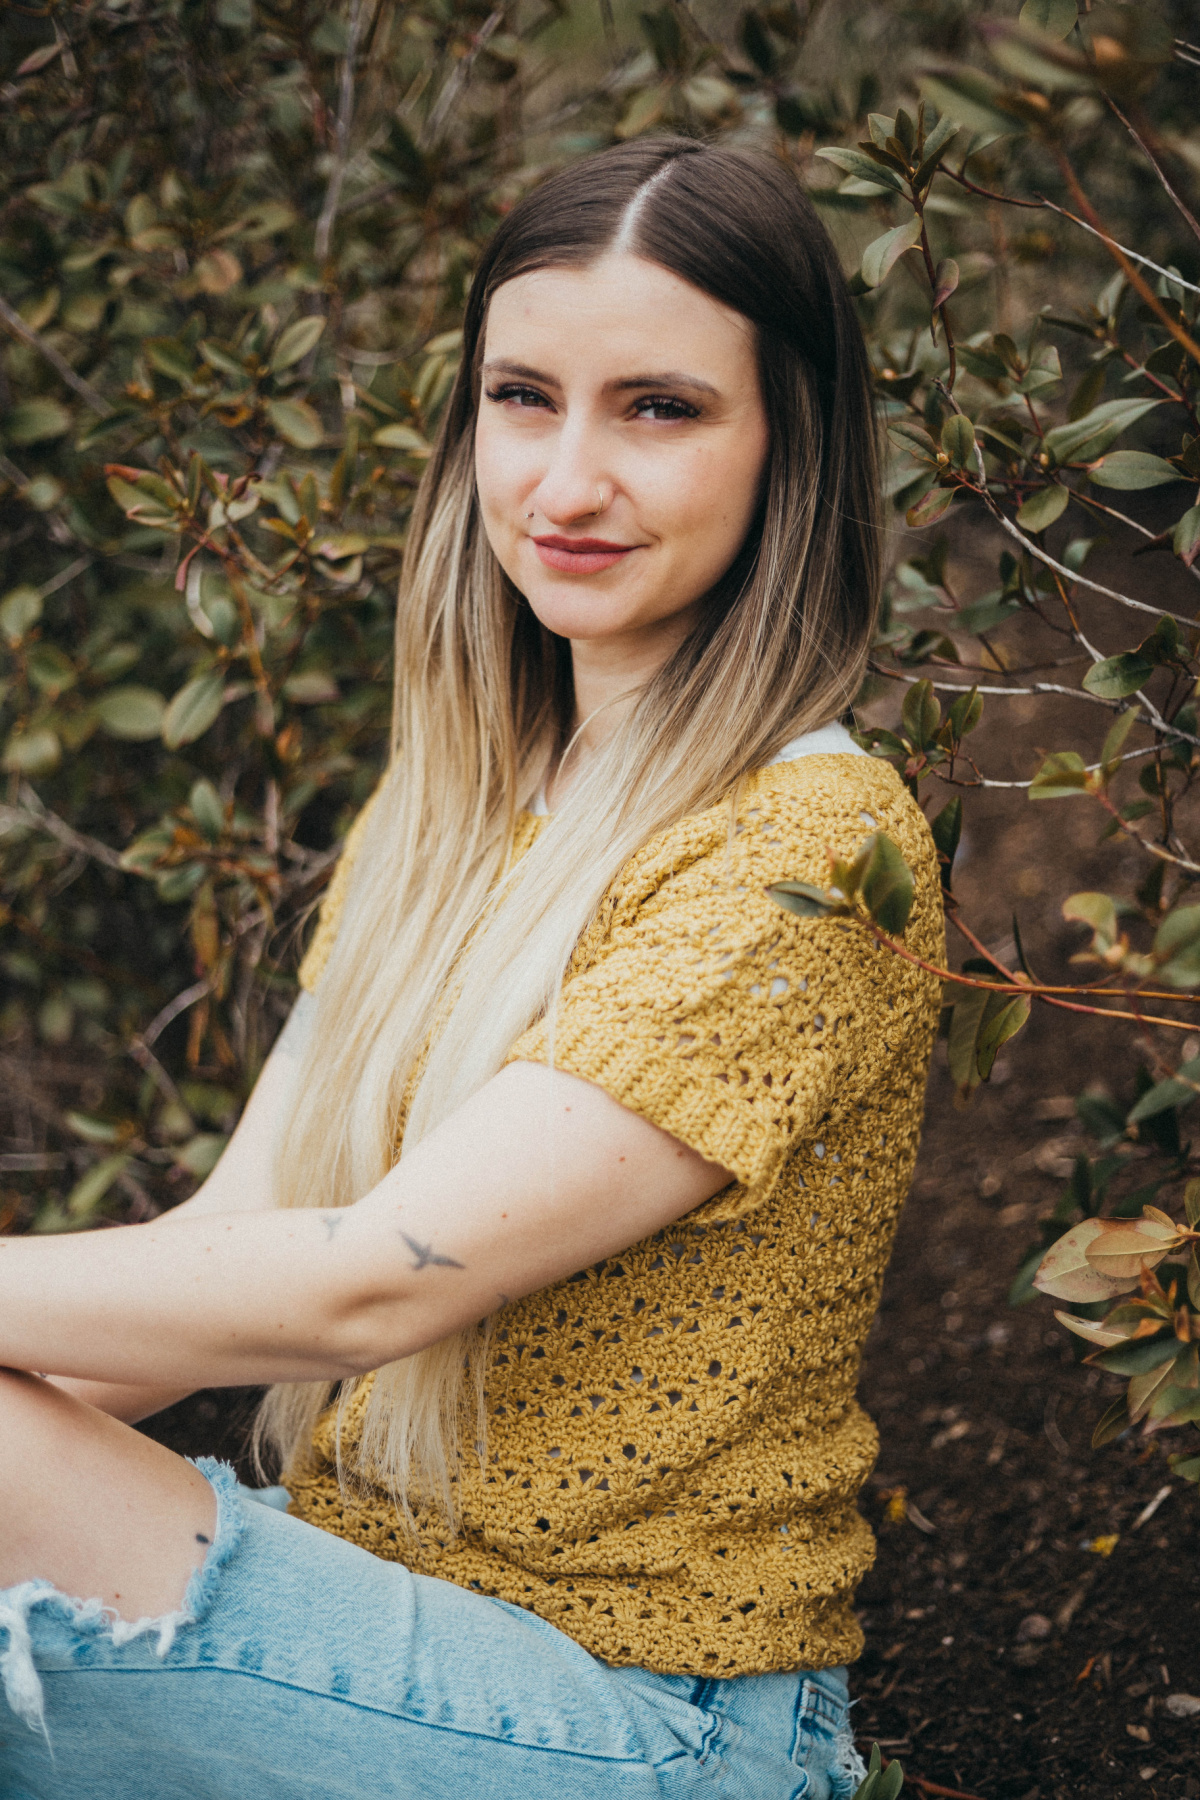
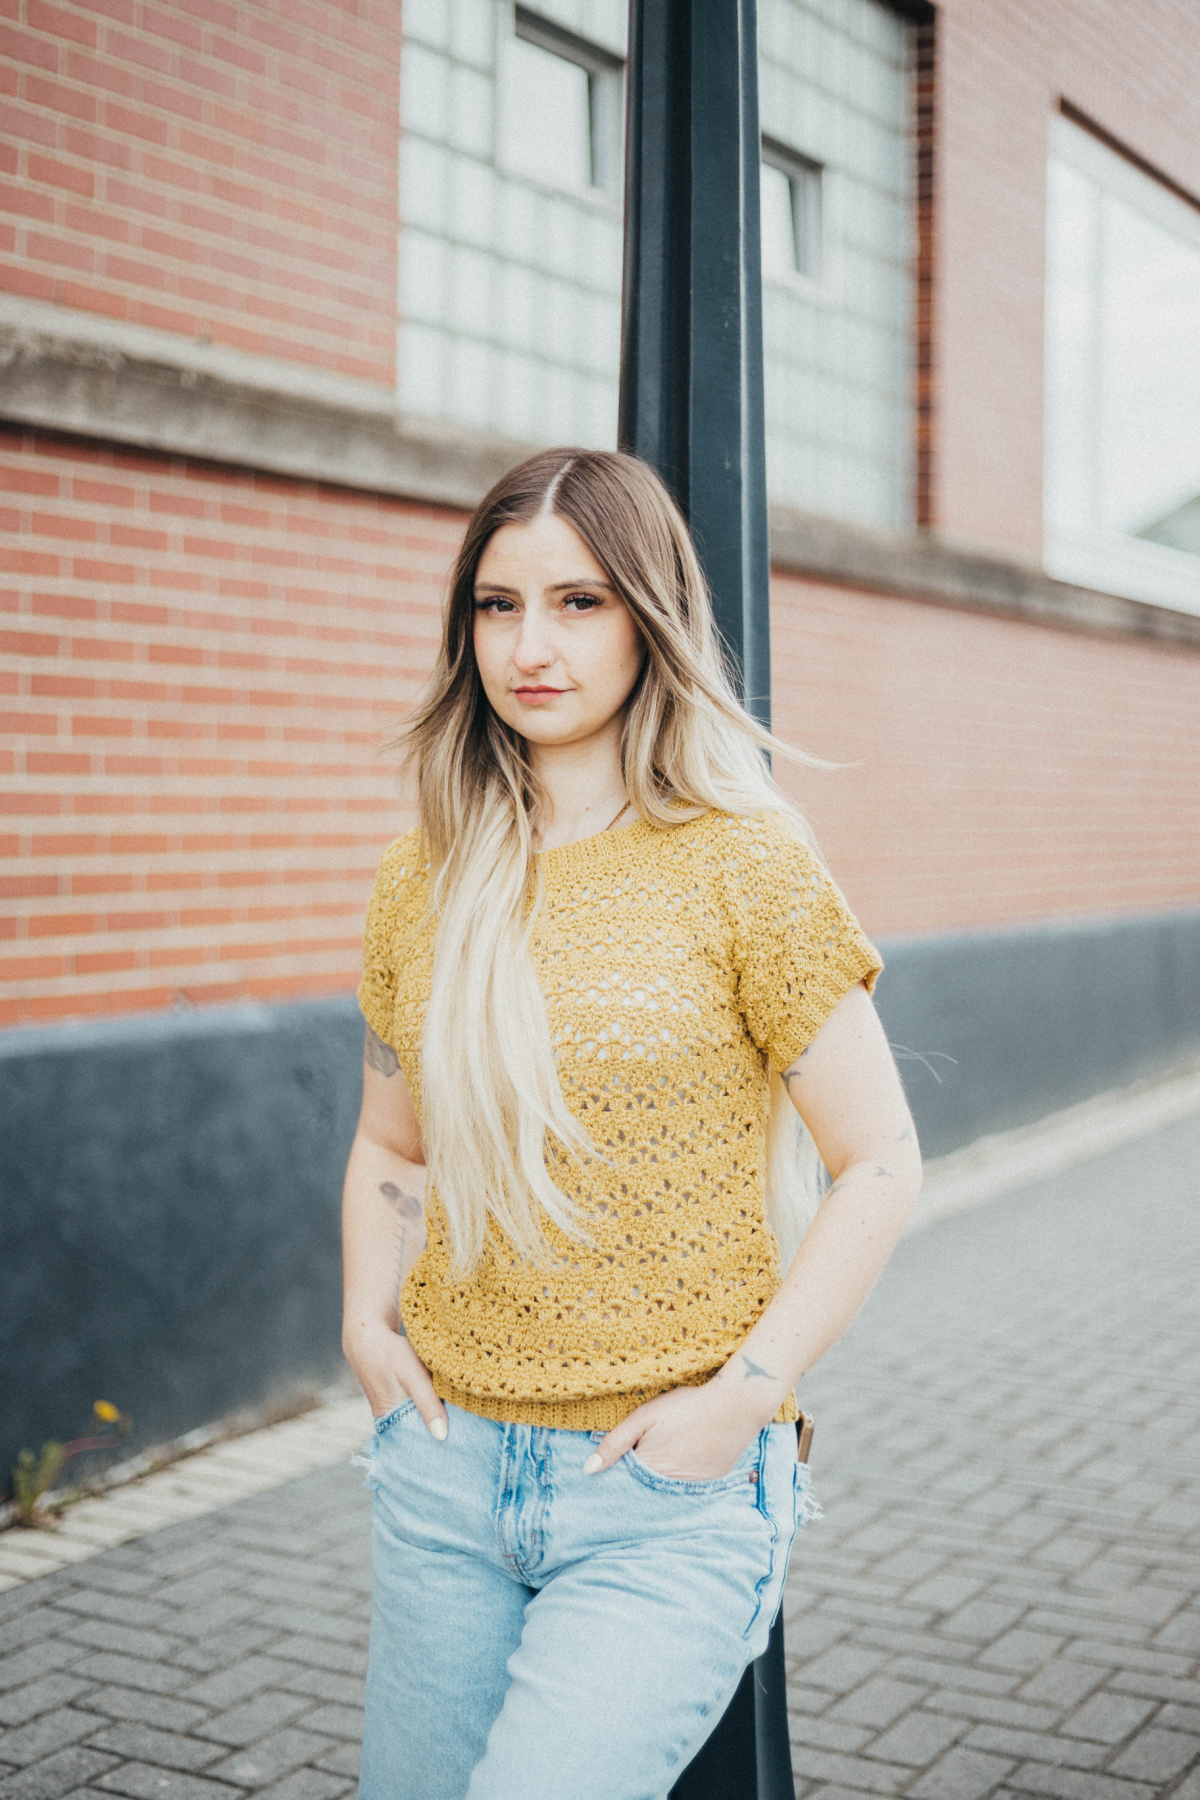
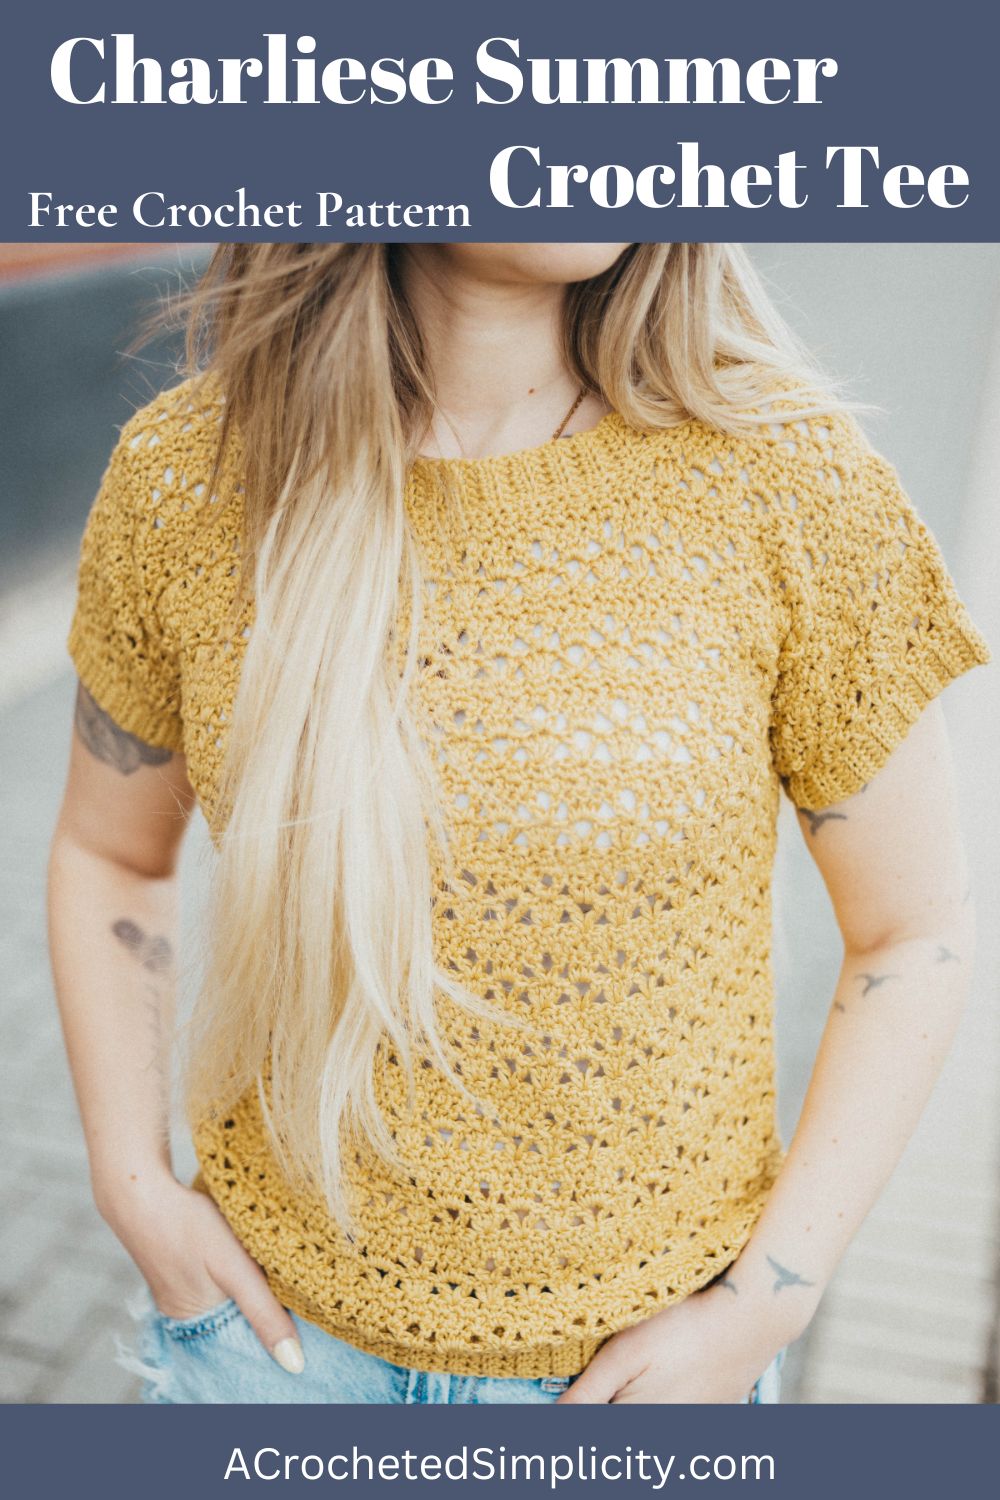
Charliese Summer Crochet Tee
There are so many things to love about a classic crochet tee including the fact that it can by styled in plenty of different ways, whether over some jeans, a skirt, or even as a layering option over a dress.
While this has been categorized as a summer pattern, you can easily use it all year round even if there’s snow in your area! Because this would look just as great under a denim jacket or over a high-neck (in which case, you might have to crochet it to be a bit on the looser side so there’s room).
You’ll find the free summer crochet tee pattern in the post below, or you can find an ad-free printable PDF (that includes all photo tutorials + BONUS stitch chart and garment schematic), on Ravelry, or Etsy (aff).
In the summers, a lot of crocheters tend to put their crochet hooks down for fear that yarn is too “heavy” or “hot” for these months. This pattern is one of the many that beg to differ!
There are a variety of yarn types that result in breathable, lightweight fabric and there are also a lot of patterns that have openwork which allows for ventilation. You don’t have to put your yarn stash away or stick to only home decor patterns during this time (although those are pretty great too). Now’s the perfect time to work up the Charliese Summer Crochet Tee!
Related: If you want to make a summer crochet cardigan that’s also airy and breathable, you should check out my Suvi Summer Crochet Cardigan.
How to Crochet a Tee
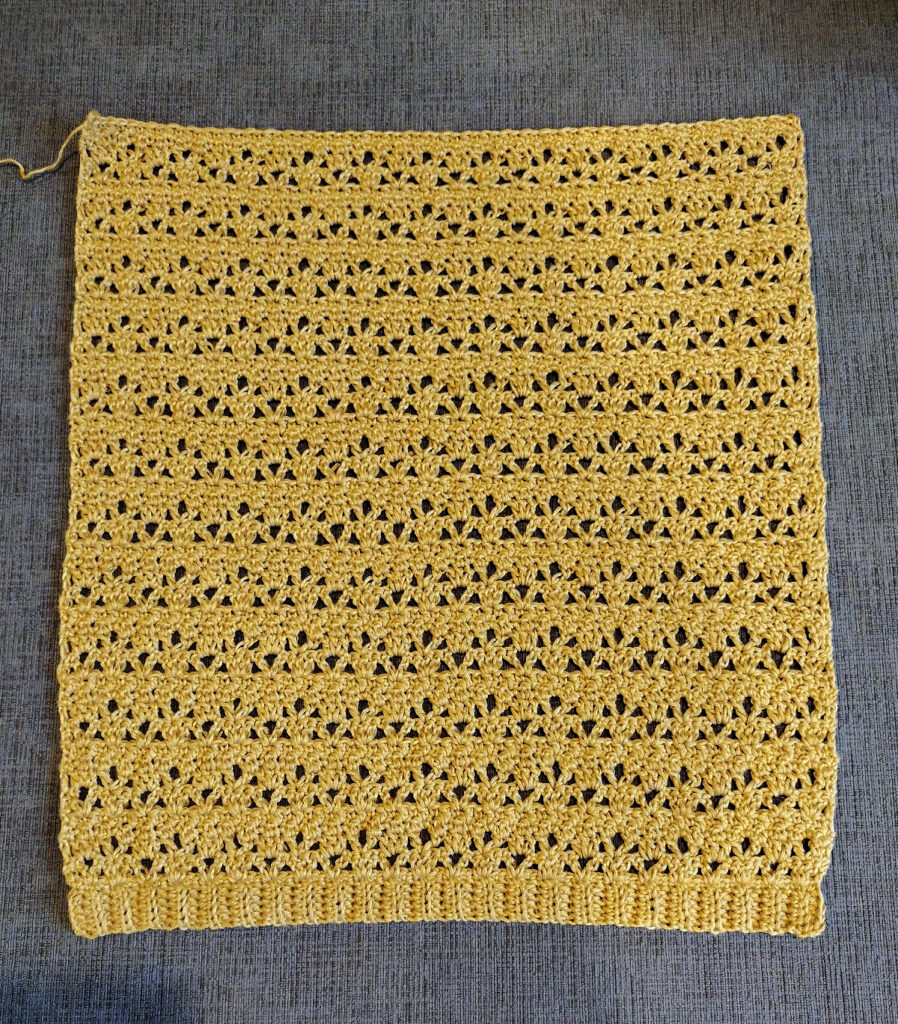
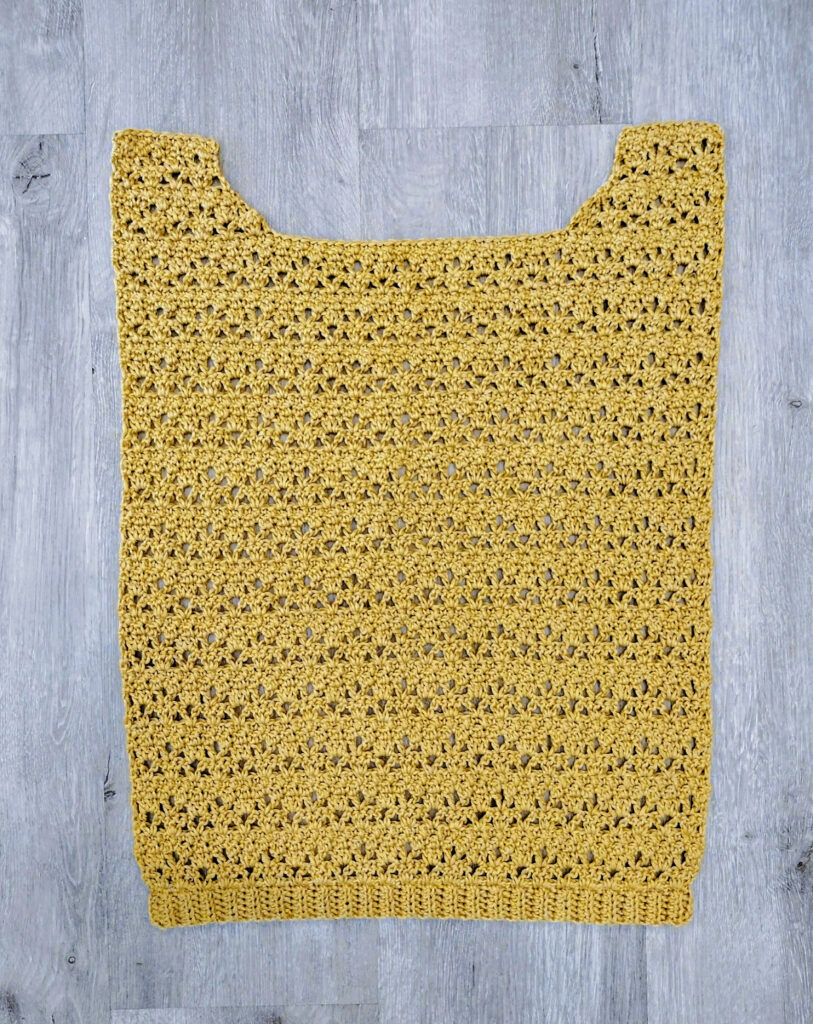
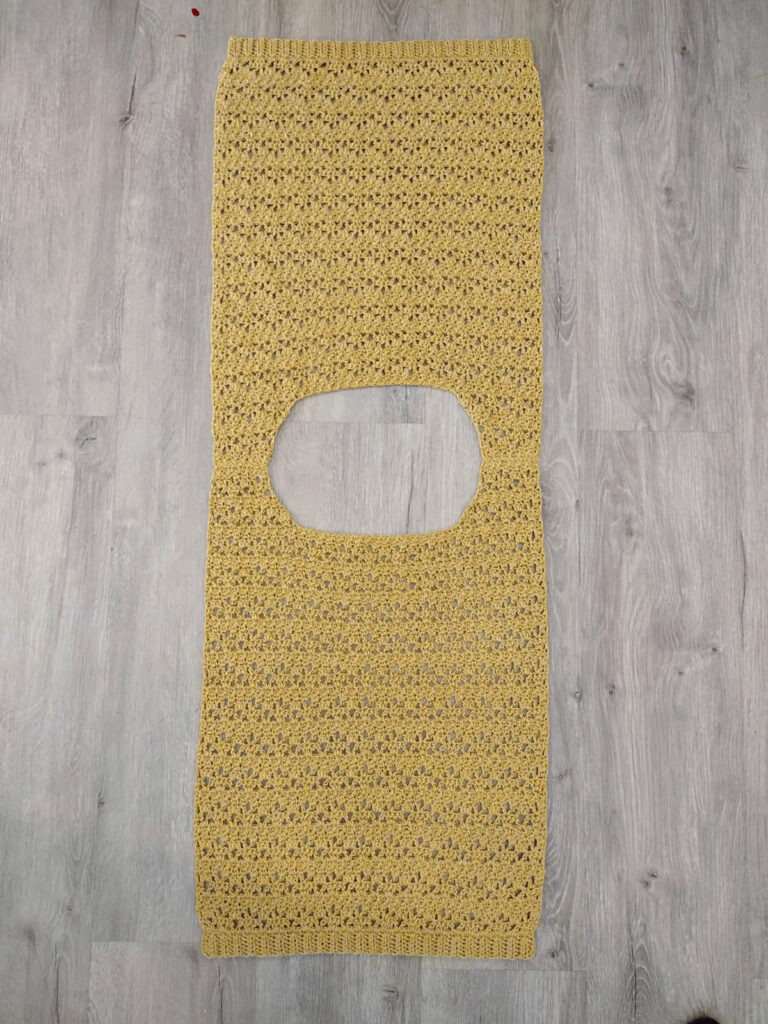
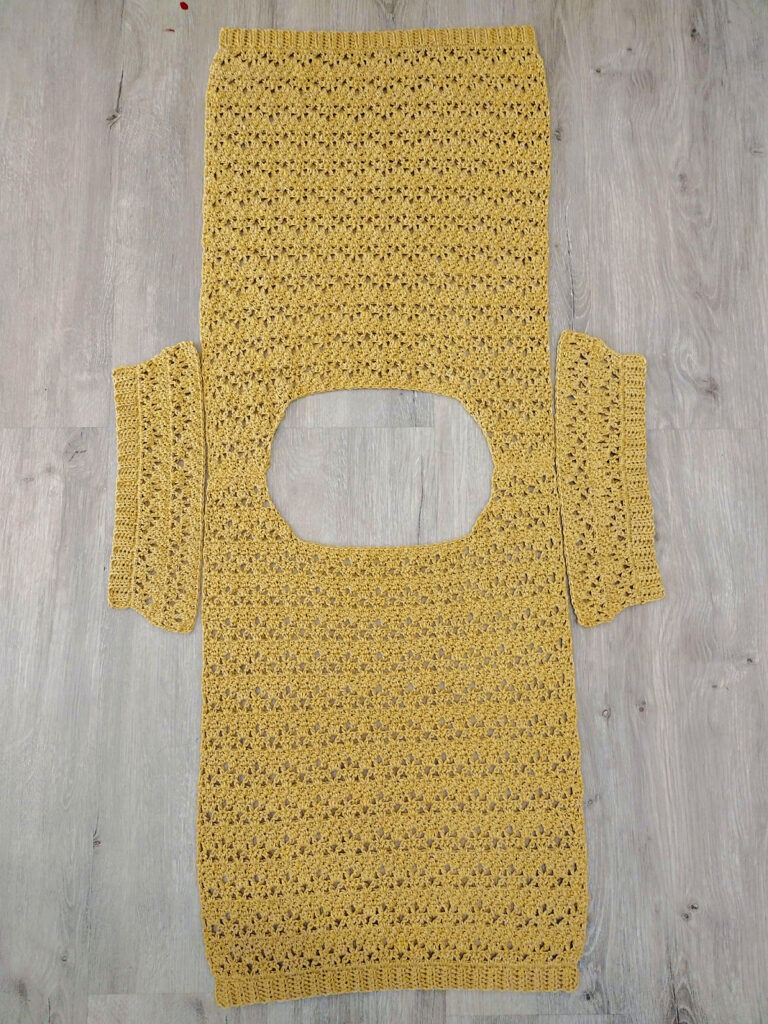
Before you dive into the pattern, be sure to get a good understanding of the construction first so you know what to do with all of the pieces. This crochet tee is made with two identical panels. Each panel has a little neck shaping.
First, you’ll crochet the bottom ribbing in rows. Then you’ll work the body of top onto the bottom ribbing and crochet from the bottom up to the neck opening. You’ll finish each panel with shoulder shaping.
After crocheting both main panels, you’ll crochet both sleeves. Next, you’ll seam the shoulders, attach the top edge of the sleeves to the top, then seam the bottom of the sleeves and the sides of the top. Lastly, you’ll add neck ribbing around the neck opening. And that’s your summer crochet tee done!
How To Get The
Charliese Summer Tee Pattern
Option 1: Scroll down for the free summer crochet tee pattern right here in this blog post.
Option 2: Purchase the ad-free printable PDF from one of my shops:
Best Yarn for Crochet Tees
For crochet tank tops, while there are many options to choose from, I used 100% rayon from bamboo yarn. Its soft texture feels gentle against the skin, making it ideal for warm-weather wear when you want something lightweight and non-irritating. It has a beautiful natural finish that accentuates the stitch combination used in this crochet tee pattern.
Rayon from bamboo is generally a cool and comfortable yarn and projects that are made from it have a very flattering look to them. If you haven’t used it before, try it out for this tank top!
Choosing Which Size to Crochet
To choose your size, look over the size chart below. Model wears a women’s small and is wearing a small sample.
- ‘Fits Bust’ measurement is the measurement of the intended wearer, not the garment’s finished measurement.
- Finished Bust, Panel Width, and Top Length are measurements of the finished garment.
- This crochet top has 0″ – 2″ of positive ease. For best fit, choose your size based on your actual bust size.
- If you prefer a more loosely fitted top, I would suggest making a top one size larger than chest size.
- Top length is measured from the top of the shoulder to the bottom edge of the top (including the bottom ribbing).
- Adjusting Top Length: See the notes at the end of the Body of Top section for adjusting length.
- Lengthening Sleeves: See the notes at the end of the Body of Sleeves section.
Size & Yardage Chart
The notes above refer to this size chart.

Yarn
This women’s crochet tee pattern was designed with a DK weight yarn to make sure it would be cool and light enough to be worn in the summers. I chose not to use a heavier yarn so that, along with the openwork, you can easily wear this tank top on a hot day out.
I chose Lion Brand Truboo Yarn in the color Goldenrod for my sample. This is a DK weight / 3, rayon from bamboo yarn and is currently available in multiple colors with a subtle shine to them. Whether you want something in a neutral shade or a bolder color, you’ll find many options in this yarn.
Charliese Summer Crochet Tee – Free Pattern
The summer crochet tee cardigan pattern is free below, but if you love to work offline, I’ve got a couple other great options for you.
Purchase the ad-free, printable PDF, (that includes all photo tutorials, + BONUS stitch chart and garment schematic), on Ravelry, or on Etsy (aff).
Purchase the Crochet Kit Here! (aff): Lion Brand has a full kit of the Charliese Summer Crochet Tee, available on their website. The kit includes your choice of color and a digital copy of the pattern.
This post contains affiliate links.
Materials
- Yarn: DK Weight / 3 / Yarn, Lion Brand Truboo was used for the sample in the photos [100% Rayon from Bamboo (241 yds / 220 m / 100 g / 3.5 oz)].
- Yardage: See Size Chart Above
- Crochet Hook: G/6/4.00mm or size needed to obtain gauge (My favorite crochet hooks are the Clover Amour Crochet Hooks, I’ve never had an ache in my hand since switching).
- Measuring Tape
- Locking Stitch Markers
- Scissors
- Yarn Needle
Abbreviations (US Terms)
- ch(s): chain(s)
- sl st(s): slip stitch(es)
- st(s): stitch(es)
- sc: single crochet
- hdc: half double crochet
- dc: double crochet
- sc2tog: single crochet decrease
- hdc2tog: half double crochet 2 together
- Alt-dc: alternate double crochet
- Rep: repeat
- RS / WS: right side / wrong side
- SM: stitch marker
- BLO: back loop only
- yo: yarn over
- sp: space
- Mattress Stitch Seam
- Join with a standing sc
Experience Level
- Easy
Gauge
- See individual sections for gauge.
- See Swatch Instructions below.
Sizes
- Women’s XS – 5XL
- See Size & Yardage Chart above.
Special Stitches
- Alternate Double Crochet (alt-dc): After turning your work, do not ch, instead, insert your hook into the first st, yo, pull up a loop, yo, pull thru both loops, insert your hook between the legs of the st just made, yo, pull up a loop, yo, pull through one loop, yo, pull thru remaining loops.
- Join yarn with a standing single crochet: Begin with a slip knot on your hook, insert your hook into the stitch or space indicated, yo, pull up a loop, yo and draw thru both loops on hook.
Pattern Notes
- Turning chains are not included in stitch count unless noted otherwise.
- Yarn Notes: Lion Brand Truboo (100 g / 3.5oz / 241 yards / 220 m / 100% rayon from bamboo) was used for the sample in the pictures. Other comparable yarns may be used as long as gauge is met.
- Color & Yardage
- Goldenrod #837-187
- See Size & Yardage Chart above.
- Changes for Sizes as Follows: XS (S, M, L, XL, 2XL, 3XL, 4XL, 5XL)
- Stitch Counts as Follows: (XS, S, M, L, XL, 2XL, 3XL, 4XL, 5XL sts)
- Model wears a women’s small and is wearing a small sample.
- Construction Notes: This crochet top is made with two identical panels. Each panel has a little neck shaping. First, you’ll crochet the bottom ribbing in rows. Then you’ll work the body of top onto the bottom ribbing and crochet from the bottom up to the neck opening. You’ll finish each panel with shoulder shaping. After crocheting both main panels, you’ll crochet both sleeves. Next, you’ll seam the shoulders, attach the top edge of the sleeves to the top, then seam the bottom of the sleeves and the sides of the top. Lastly, you’ll add neck ribbing around the neck opening.
- Once done, you can block if desired.
Charliese Summer Crochet Tee – Written Pattern
Swatch Instructions
Swatch Note: The ribbing will be a tad narrower than the Body of Top Section. This is intentional because the ribbing stretches.
Ribbing
Gauge: In BLO hdc, with a 4.00mm crochet hook: 5 sts = 1-1/8″; 17 rows = 4-7/8″
Row 1: With yarn & a 4.00mm crochet hook, ch 6, working in the back humps of the foundation ch, hdc in the 2nd ch from your hook and in each ch across. Turn. (5 sts)
Rows 2 – 17: Ch 1, working in BLO hdc in each st across. Turn. (5 sts)
Do not fasten off. Continue on to Prepare Ribbing for Body of Top Stitch Pattern. Ribbing should measure 4-7/8″ L.
Prepare Ribbing for Body of Top Stitch Pattern
Gauge: 26 sts = 5-3/4″
Row 1 (RS): Rotate your ribbing to work along the long edge. Ch 1, 2 sc in the first st, (sc in the next st, 2 sc in the next st) rep from ( to ) across. Turn. (26 sts)
Do not fasten off. Continue on to Body of Top Stitch Pattern.
Body of Top Stitch Pattern
Gauge: In pattern stitch written below, with a 4.00mm crochet hook: 26 sts = 5-3/4″; 12 rows = 4″
Row 1: Alt-dc in the first st, skip the next st, (dc, ch 3, dc) in the next st, skip each of the next 2 sts, 3 dc in the next st, * skip each of the next 2 sts, (dc, ch 3, dc) in the next st, skip each of the next 2 sts, 3 dc in the next st, rep from * across to the last 2 sts, skip the next st, dc in the last st. Turn. (22 dc + 4 ch-3’s)
Row 2: Alt-dc in the first st, skip the next st, (dc, ch 3, dc) in the next st, skip each of the next 2 sts, 3 dc in the next ch-3 sp, * skip each of the next 2 sts, (dc, ch 3, dc) in the next st, skip each of the next 2 sts, 3 dc in the next ch-3 sp, rep from * across to the last 2 sts, skip the next st, dc in the last st. Turn. (22 dc + 4 ch-3’s)
Row 3: Alt-dc in the first st, (sc in the next st, dc in the next st) 2 times, sc in the next ch-3 sp, * dc in the next st, (sc in the next st, dc in the next st) 2 times, sc in the next ch-3 sp, rep from * across to the last 2 sts, dc in the next st, sc in the last st. Turn. (26 sts)
Row 4: Alt-dc in the first st, sc in the next st, * dc in the next st, sc in the next st rep from * across. Turn. (26 sts)
Rows 5 – 12: Rep Rows 1 – 4.
Swatch should measure 5-3/4″ W x 5-1/8″ H (at the widest and highest points).
Adjust hook size as needed to meet gauge.
Summer Top Instructions
Make 2 Identical Panels
Changes for Sizes Written as Follows: XS (S, M, L, XL, 2X, 3X, 4X, 5X)
Stitch Counts Written as Follows: (XS, S, M, L, XL, 2X, 3X, 4X, 5X sts)
Bottom Ribbing
Gauge: With a 4.00mm crochet hook, in BLO hdc: 5 sts = 1-1/8″; 17 rows = 4-7/8″
Row 1: With a 4.00mm crochet hook, ch 6, working into the back humps of the ch, hdc in the 2nd ch from your hook and in each ch across. Turn. (5 sts)
Rows 2 – 45 (49, 57, 61, 69, 73, 81, 85, 93): Ch 1, BLO hdc in each st across. Turn. (5 sts)
Bottom Ribbing should measure approximately 13″ (14″, 16-1/4″, 17-1/2″, 19-3/4″, 21″, 23-1/4″, 24-3/8″, 26-1/2″). Note that the ribbing width measurement may differ a little from the width measurement of the body of top. This is intentional because the ribbing stretches easily.
Do not fasten off. Continue to Prepare Ribbing for Body of Top.
Prepare Ribbing for Body of Top
Gauge: 26 sts = 5-3/4″
Row 1 (RS): Rotate to work along the long edge of the waistband. Ch 1, 2 sc in the first st, (sc in the next st, 2 sc in the next st) work from ( to ) across. Turn. (68, 74, 86, 92, 104, 110, 122, 128, 140 sts)
Do not fasten off. Continue on to Body of Top.
Body of Top
In this section, you’ll crochet from the ribbing up to the bottom of the neck opening.
Gauge: With a 4.00mm crochet hook, in pattern as written: 26 sts = 5-3/4″; 12 rows = 4″.
Row 1 (WS): Alt-dc in the first st, skip the next st, (dc, ch 3, dc) in the next st, skip each of the next 2 sts, 3 dc in the next st, * skip each of the next 2 sts, (dc, ch 3, dc) in the next st, skip each of the next 2 sts, 3 dc in the next st, rep from * across to the last 2 sts, skip the next st, dc in the last st. Turn. (57 dc + 11 ch-3’s) (62 dc + 12 ch-3’s) (72 dc + 14 ch-3’s) (77 dc + 15 ch-3’s) (87 dc + 17 ch-3’s) (92 dc + 18 ch-3’s) (102 dc + 20 ch-3’s) (107 dc + 21 ch-3’s) (117 dc + 23 ch-3’s)
Row 2 (RS): Alt-dc in the first st, skip the next st, (dc, ch 3, dc) in the next st, skip each of the next 2 sts, 3 dc in the next ch-3 sp, * skip each of the next 2 sts, (dc, ch 3, dc) in the next st, skip each of the next 2 sts, 3 dc in the next ch-3 sp, rep from * across to the last 2 sts, skip the next st, dc in the last st. Turn. (57 dc + 11 ch-3’s) (62 dc + 12 ch-3’s) (72 dc + 14 ch-3’s) (77 dc + 15 ch-3’s) (87 dc + 17 ch-3’s) (92 dc + 18 ch-3’s) (102 dc + 20 ch-3’s) (107 dc + 21 ch-3’s) (117 dc + 23 ch-3’s)
Row 3: Alt-dc in the first st, (sc in the next st, dc in the next st) 2 times, sc in the next ch-3 sp, * dc in the next st, (sc in the next st, dc in the next st) 2 times, sc in the next ch-3 sp, rep from * across to the last 2 sts, dc in the next st, sc in the last st. Turn. (68, 74, 86, 92, 104, 110, 122, 128, 140 sts)
Row 4: Alt-dc in the first st, sc in the next st, * dc in the next st, sc in the next st rep from * across. Turn. (68, 74, 86, 92, 104, 110, 122, 128, 140 sts)
Rows 5 – 44 (48, 52, 52, 56, 56, 56, 60, 60): Rep Rows 1 – 4.
Do not fasten off. Continue to Right Shoulder. At this point, panel should measure (15″ W x 15-3/4″ H) (16-1/4″ W x 17″ H) (19″ W x 18-1/2″ H) (20-1/4″ W x 18-1/2″ H) (23″ W x 19-3/4″ H) (24-1/4″ W x 19-3/4″ H) (27″ W x 19-3/4″ H) (28-1/4″ W x 21″ H) (31″ W x 21″ H).
Adjusting Length: If you prefer a longer or shorter top, here is where you’ll want to adjust. The length stated in the chart is measured from the top of the shoulder to the bottom edge of the top (including the bottom ribbing).
Note: The shoulder sections will add approximately 2-3/4″ to the length of your top.
- Longer: If you’d like a longer top, work more rows in multiples of 4.
- Shorter: If you’d like a shorter top, work fewer rows in multiples of 4.
Right Shoulder
In this section, you’ll crochet the garment’s right shoulder.
Changes for Sizes Written as Follows: XS (S, M, L, XL, 2X, 3X, 4X, 5X)
Stitch Counts Written as Follows: (XS, S, M, L, XL, 2X, 3X, 4X, 5X sts)
Row 1 (WS): Alt-dc in the first st, skip the next st, (dc, ch 3, dc) in the next st, skip each of the next 2 sts, 3 dc in the next st, * skip each of the next 2 sts, (dc, ch 3, dc) in the next st, skip each of the next 2 sts, 3 dc in the next st, work from * 2 (2, 3, 3, 4, 4, 5, 5, 6) times, skip the next st, dc in the next st. Skip each of the next 28 (34, 34, 40, 40, 46, 46, 52, 52) sts, place a locking SM in the next stitch to mark where you’ll later join yarn to begin the Left Shoulder. Turn. (17 dc + 3 ch-3’s) (17 dc + 3 ch-3’s) (22 dc + 4 ch-3’s) (22 dc + 4 ch-3’s) (27 dc + 5 ch-3’s) (27 dc + 5 ch-3’s) (32 dc + 6 ch-3’s) (32 dc + 6 ch-3’s) (37 dc + 7 ch-3’s)
Row 2 (RS): Ch 2 (does not count as a st), skip the first 2 sts, dc in the next st, skip each of the next 2 sts, 3 dc in the next ch-3 sp, * skip each of the next 2 sts, (dc, ch 3, dc) in the next st, skip each of the next 2 sts, 3 dc in the next ch-3 sp, work from * 2 (2, 3, 3, 4, 4, 5, 5, 6) times, skip the next st, dc in the last st. Turn. (15 dc + 2 ch-3’s) (15 dc + 2 ch-3’s) (20 dc + 3 ch-3’s) (20 dc + 3 ch-3’s) (25 dc + 4 ch-3’s) (25 dc + 4 ch-3’s) (30 dc + 5 ch-3’s) (30 dc + 5 ch-3’s) (35 dc + 6 ch-3’s)
Row 3: Alt-dc in the first st, (sc in the next st, dc in the next st) 2 times, sc in the next ch-3 sp, * dc in the next st, (sc in the next st, dc in the next st) 2 times, sc in the next ch-3 sp, rep from * across to the last 5 sts, then dc in the next st, sc in the next st, dc in the next st, sc2tog. Turn. (16, 16, 22, 22, 28, 28, 34, 34, 40 sts)
Row 4: Ch 1, sc2tog, * dc in the next st, sc in the next st rep from * across. Turn. (15, 15, 21, 21, 27, 27, 33, 33, 39 sts)
Row 5: Alt-dc in the first st, skip the next st, (dc, ch 3, dc) in the next st, skip each of the next 2 sts, 3 dc in the next st, * skip each of the next 2 sts, (dc, ch 3, dc) in the next st, skip each of the next 2 sts, 3 dc in the next st, rep from * across to the last 3 sts, skip the next 2 sts, dc in the last st. Turn. (12 dc + 2 ch-3’s) (12 dc + 2 ch-3’s) (17 dc + 3 ch-3’s) (17 dc + 3 ch-3’s) (22 dc + 4 ch-3’s) (22 dc + 4 ch-3’s) (27 dc + 5 ch-3’s) (27 dc + 5 ch-3’s) (32 dc + 6 ch-3’s)
Row 6: Alt-dc in the first st, skip the next st, (dc, ch 3, dc) in the next st, skip each of the next 2 sts, 3 dc in the next ch-3 sp, * skip each of the next 2 sts, (dc, ch 3, dc) in the next st, skip each of the next 2 sts, 3 dc in the next ch-3 sp, rep from * across to the last 2 sts, skip the next st, dc in the last st. Turn. (12 dc + 2 ch-3’s) (12 dc + 2 ch-3’s) (17 dc + 3 ch-3’s) (17 dc + 3 ch-3’s) (22 dc + 4 ch-3’s) (22 dc + 4 ch-3’s) (27 dc + 5 ch-3’s) (27 dc + 5 ch-3’s) (32 dc + 6 ch-3’s)
Row 7: Alt-dc in the first st, (sc in the next st, dc in the next st) 2 times, sc in the next ch-3 sp, * dc in the next st, (sc in the next st, dc in the next st) 2 times, sc in the next ch-3 sp, rep from * across to the last 2 sts, dc in the next st, sc in the last st. Turn. (14, 14, 20, 20, 26, 26, 32, 32, 38 sts)
Row 8: Alt-dc in the first st, sc in the next st, * dc in the next st, sc in the next st rep from * across. Turn. (14, 14, 20, 20, 26, 26, 32, 32, 38 sts)
Fasten off. Continue to Left Shoulder. The last row of the shoulder should measure (3″ W x 2-3/4″ H) (3″ W x 2-3/4″ H) (4-1/2″ W x 2-3/4″ H) (4-1/2″ W x 2-3/4″ H) (5-3/4″ W x 2-3/4″ H) (5-3/4″ W x 2-3/4″ H) (7″ W x 2-3/4″ H) (7″ W x 2-3/4″ H) (8-1/2″ W x 2-3/4″ H).
Left Shoulder
In this section, you’ll crochet the garment’s left shoulder.
Changes for Sizes Written as Follows: XS (S, M, L, XL, 2X, 3X, 4X, 5X)
Stitch Counts Written as Follows: (XS, S, M, L, XL, 2X, 3X, 4X, 5X sts)
Row 1 (WS): With yarn & a 4.00mm crochet hook, join yarn with a standing dc in the marked st, skip the next st, (dc, ch 3, dc) in the next st, skip each of the next 2 sts, 3 dc in the next st, * skip each of the next 2 sts, (dc, ch 3, dc) in the next st, skip each of the next 2 sts, 3 dc in the next st, work from * 2 (2, 3, 3, 4, 4, 5, 5, 6) times, skip the next st, dc in the next st. Turn. (17 dc + 3 ch-3’s) (17 dc + 3 ch-3’s) (22 dc + 4 ch-3’s) (22 dc + 4 ch-3’s) (27 dc + 5 ch-3’s) (27 dc + 5 ch-3’s) (32 dc + 6 ch-3’s) (32 dc + 6 ch-3’s) (37 dc + 7 ch-3’s)
Row 2 (RS): Alt-dc in the first st, skip the next st, (dc, ch 3, dc) in the next st, * skip each of the next 2 sts, 3 dc in the next ch-3 sp, skip each of the next 2 sts, (dc, ch 3, dc) in the next st, work from * 2 (2, 3, 3, 4, 4, 5, 5, 6) times, skip each of the next 2 sts, dc2tog in the next ch-3 sp and last st of the row. Turn. (14 dc + 3 ch-3’s) (14 dc + 3 ch-3’s) (19 dc + 4 ch-3’s) (19 dc + 4 ch-3’s) (24 dc + 5 ch-3’s) (24 dc + 5 ch-3’s) (29 dc + 6 ch-3’s) (29 dc + 6 ch-3’s) (34 dc + 7 ch-3’s)
Row 3: Ch 1, sc2tog, sc in the next ch-3 sp, * dc in the next st, (sc in the next st, dc in the next st) 2 times, sc in the next ch-3 sp, rep from * across to the last 2 sts, then dc in the next st, sc in the last st. Turn. (16, 16, 22, 22, 28, 28, 34, 34, 40 sts)
Row 4: Alt-dc in the first st, * sc in the next st, dc in the next st rep from * across to the last 3 sts, sc in the next st, sc2tog. Turn. (15, 15, 21, 21, 27, 27, 33, 33, 39 sts)
Row 5: Alt-dc in the first st, skip each of the next 2 sts, (dc, ch 3, dc) in the next st, skip each of the next 2 sts, 3 dc in the next st, * skip each of the next 2 sts, (dc, ch 3, dc) in the next st, skip each of the next 2 sts, 3 dc in the next st, rep from * across to the last 2 sts, skip the next st, dc in the last st. Turn. (12 dc + 2 ch-3’s) (12 dc + 2 ch-3’s) (17 dc + 3 ch-3’s) (17 dc + 3 ch-3’s) (22 dc + 4 ch-3’s) (22 dc + 4 ch-3’s) (27 dc + 5 ch-3’s) (27 dc + 5 ch-3’s) (32 dc + 6 ch-3’s)
Row 6: Alt-dc in the first st, skip the next st, (dc, ch 3, dc) in the next st, skip each of the next 2 sts, 3 dc in the next ch-3 sp, * skip each of the next 2 sts, (dc, ch 3, dc) in the next st, skip each of the next 2 sts, 3 dc in the next ch-3 sp, rep from * across to the last 2 sts, skip the next st, dc in the last st. Turn. (12 dc + 2 ch-3’s) (12 dc + 2 ch-3’s) (17 dc + 3 ch-3’s) (17 dc + 3 ch-3’s) (22 dc + 4 ch-3’s) (22 dc + 4 ch-3’s) (27 dc + 5 ch-3’s) (27 dc + 5 ch-3’s) (32 dc + 6 ch-3’s)
Row 7: Alt-dc in the first st, (sc in the next st, dc in the next st) 2 times, sc in the next ch-3 sp, * dc in the next st, (sc in the next st, dc in the next st) 2 times, sc in the next ch-3 sp, rep from * across to the last 2 sts, dc in the next st, sc in the last st. Turn. (14, 14, 20, 20, 26, 26, 32, 32, 38 sts)
Row 8: Alt-dc in the first st, sc in the next st, * dc in the next st, sc in the next st rep from * across. Turn. (14, 14, 20, 20, 26, 26, 32, 32, 38 sts)
Fasten off. Make the second panel then continue to Sleeves. The last row of the shoulder should measure (3″ W x 2-3/4″ H) (3″ W x 2-3/4″ H) (4-1/2″ W x 2-3/4″ H) (4-1/2″ W x 2-3/4″ H) (5-3/4″ W x 2-3/4″ H) (5-3/4″ W x 2-3/4″ H) (7″ W x 2-3/4″ H) (7″ W x 2-3/4″ H) (8-1/2″ W x 2-3/4″ H).
The finished panel should measure (15″ W x 18-1/2″ H) (16-1/4″ W x 19-3/4″ H) (19″ W x 21″ H) (20-1/4″ W x 21″ H) (23″ W x 22-1/2″ H) (24-1/4″ W x 22-1/2″ H) (27″ W x 22-1/2″ H) (28-1/4″ W x 23-3/4″ H) (31″ W x 23-3/4″ H).
Sleeves
In this section, you’ll crochet the sleeves. The sleeves are crocheted flat. First, you’ll crochet the sleeve ribbing. Then you’ll work the body of sleeve along the long edge of the ribbing.
Changes for Sizes Written as Follows: XS (S, M, L, XL, 2X, 3X, 4X, 5X)
Stitch Counts Written as Follows: (XS, S, M, L, XL, 2X, 3X, 4X, 5X sts)
Sleeve Ribbing
Gauge: With a 4.00mm crochet hook, in BLO hdc: 5 sts = 1-1/8″; 17 rows = 4-7/8″
Row 1: With a 4.00mm crochet hook, ch 6, working into the back humps of the ch, hdc in the 2nd ch from your hook and in each ch across. Turn. (5 sts)
Rows 2 – 33 (37, 45, 49, 53, 57, 57, 61, 61): Ch 1, BLO hdc in each st across. Turn. (5 sts)
Sleeve Ribbing should measure approximately 9-1/2″ (10-1/2″, 13″, 14″, 15-1/4″, 16-1/4″, 16-1/4″, 17-1/2″, 17-1/2″). Note that the ribbing width measurement may differ a little from the width measurement of the body of sleeve. This is intentional because the ribbing stretches easily.
Do not fasten off. Continue to Prepare Ribbing for Body of Sleeve.
Prepare Ribbing for Body of Sleeve
Gauge: 26 sts = 5-3/4″
Row 1 (RS): Rotate to work along the long edge of the waistband. Ch 1, 2 sc in the first st, (sc in the next st, 2 sc in the next st) work from ( to ) across. Turn. (50, 56, 68, 74, 80, 86, 86, 92, 92 sts)
Do not fasten off. Continue on to Body of Sleeve.
Body of Sleeves
In this section, you’ll crochet from the sleeve ribbing up to the top edge of the sleeve.
Gauge: With a 4.00mm crochet hook, in pattern as written: 26 sts = 5-3/4″; 12 rows = 4″.
Row 1 (WS): Alt-dc in the first st, skip the next st, (dc, ch 3, dc) in the next st, skip each of the next 2 sts, 3 dc in the next st, * skip each of the next 2 sts, (dc, ch 3, dc) in the next st, skip each of the next 2 sts, 3 dc in the next st, rep from * across to the last 2 sts, skip the next st, dc in the last st. Turn. (42 dc + 8 ch-3’s) (47 dc + 9 ch-3’s) (57 dc + 11 ch-3’s) (62 dc + 12 ch-3’s) (67 dc + 13 ch-3’s) (72 dc + 14 ch-3’s) (72 dc + 14 ch-3’s) (77 dc + 15 ch-3’s) (77 dc + 15 ch-3’s)
Row 2 (RS): Alt-dc in the first st, skip the next st, (dc, ch 3, dc) in the next st, skip each of the next 2 sts, 3 dc in the next ch-3 sp, * skip each of the next 2 sts, (dc, ch 3, dc) in the next st, skip each of the next 2 sts, 3 dc in the next ch-3 sp, rep from * across to the last 2 sts, skip the next st, dc in the last st. Turn. (42 dc + 8 ch-3’s) (47 dc + 9 ch-3’s) (57 dc + 11 ch-3’s) (62 dc + 12 ch-3’s) (67 dc + 13 ch-3’s) (72 dc + 14 ch-3’s) (72 dc + 14 ch-3’s) (77 dc + 15 ch-3’s) (77 dc + 15 ch-3’s)
Row 3: Alt-dc in the first st, work 1 more dc in the first st, (sc in the next st, dc in the next st) 2 times, sc in the next ch-3 sp, * dc in the next st, (sc in the next st, dc in the next st) 2 times, sc in the next ch-3 sp, rep from * across to the last 2 sts, (dc, sc) in each of the last 2 sts. Turn. (53, 59, 71, 77, 83, 89, 89, 95, 95 sts)
Row 4: Alt-dc in the first st, work 1 more dc in the first st, * dc in the next st, sc in the next st rep from * across to the last 2 sts, (dc, sc) in each of the last 2 sts. Turn. (56, 62, 74, 80, 86, 92, 92, 98, 98 sts)
Row 5: Alt-dc in the first st, skip the next st, (dc, ch 3, dc) in the next st, skip each of the next 2 sts, 3 dc in the next st, * skip each of the next 2 sts, (dc, ch 3, dc) in the next st, skip each of the next 2 sts, 3 dc in the next st, rep from * across to the last 2 sts, skip the next st, dc in the last st. Turn. (47 dc + 9 ch-3’s) (52 dc + 10 ch-3’s) (62 dc + 12 ch-3’s) (67 dc + 13 ch-3’s) (72 dc + 14 ch-3’s) (77 dc + 15 ch-3’s) (77 dc + 15 ch-3’s) (82 dc + 16 ch-3’s) (82 dc + 16 ch-3’s)
Row 6: Alt-dc in the first st, skip the next st, (dc, ch 3, dc) in the next st, skip each of the next 2 sts, 3 dc in the next ch-3 sp, * skip each of the next 2 sts, (dc, ch 3, dc) in the next st, skip each of the next 2 sts, 3 dc in the next ch-3 sp, rep from * across to the last 2 sts, skip the next st, dc in the last st. Turn. (47 dc + 9 ch-3’s) (52 dc + 10 ch-3’s) (62 dc + 12 ch-3’s) (67 dc + 13 ch-3’s) (72 dc + 14 ch-3’s) (77 dc + 15 ch-3’s) (77 dc + 15 ch-3’s) (82 dc + 16 ch-3’s) (82 dc + 16 ch-3’s)
Row 7: Alt-dc in the first st, (sc in the next st, dc in the next st) 2 times, sc in the next ch-3 sp, * dc in the next st, (sc in the next st, dc in the next st) 2 times, sc in the next ch-3 sp, rep from * across to the last 2 sts, dc in the next st, sc in the last st. Turn. (56, 62, 74, 80, 86, 92, 92, 98, 98 sts)
Row 8: Alt-dc in the first st, sc in the next st, * dc in the next st, sc in the next st rep from * across. Turn. (56, 62, 74, 80, 86, 92, 92, 98, 98 sts)
Fasten off, leaving a tail of yarn 3-4 times the width of the sleeve. Continue to Seaming.
The finished sleeve should measure (12″ W x 3-3/4″ H) (13-3/4″ W x 3-3/4″ H) (16-1/4″ W x 3-3/4″ H) (17-1/2″ W x 3-3/4″ H) (19″ W x 3-3/4″ H) (20-1/4″ W x 3-3/4″ H) (20-1/4″ W x 3-3/4″ H) (21-1/2″ W x 3-3/4″ H) (21-1/2″ W x 3-3/4″ H), at the widest part.
Lengthening Sleeves: If you prefer a longer sleeve, repeat Rows 5 – 8 until your sleeve measures the desired length.

Seaming
Step 1 – Shoulder Seams: Lay out the two panels with the RS facing up, as shown in the photo below. Line up the stitches from each shoulder. Use locking stitch markers to hold the panels together. With a yarn needle and piece of yarn that is 4 times the width of a shoulder, seam the shoulder using a mattress stitch.
Weave in ends. Seam the second shoulder, then continue to Attaching the Sleeves.
Step 2 – Attaching the Sleeves: First, mark the armhole openings. Measure down 6″ (6-3/4″, 8″, 8-3/4″, 9-1/2″, 10″, 10″, 10-3/4″, 10-3/4″) on each side of the shoulder seam and place a locking SM. Find the center of the last row of a sleeve and line it up with a shoulder seam. Hold the corners of the sleeve in place with the locking stitch markers you just placed. With a yarn needle and tail of yarn, attach the top edge of the sleeve to the top with a mattress stitch.
Weave in ends. Seam the second sleeve, then continue to Side Seams.
Step 3 – Side Seams: Fold the top at the shoulder seams with the RS facing out. Line up the stitches along the bottom of the sleeve and down the side of the top. Use locking stitch markers to hold the panels together. With a yarn needle and piece of yarn, seam the bottom of the sleeve and side of the top.
Weave in ends. Seam the opposite side, then continue to Neck Ribbing.


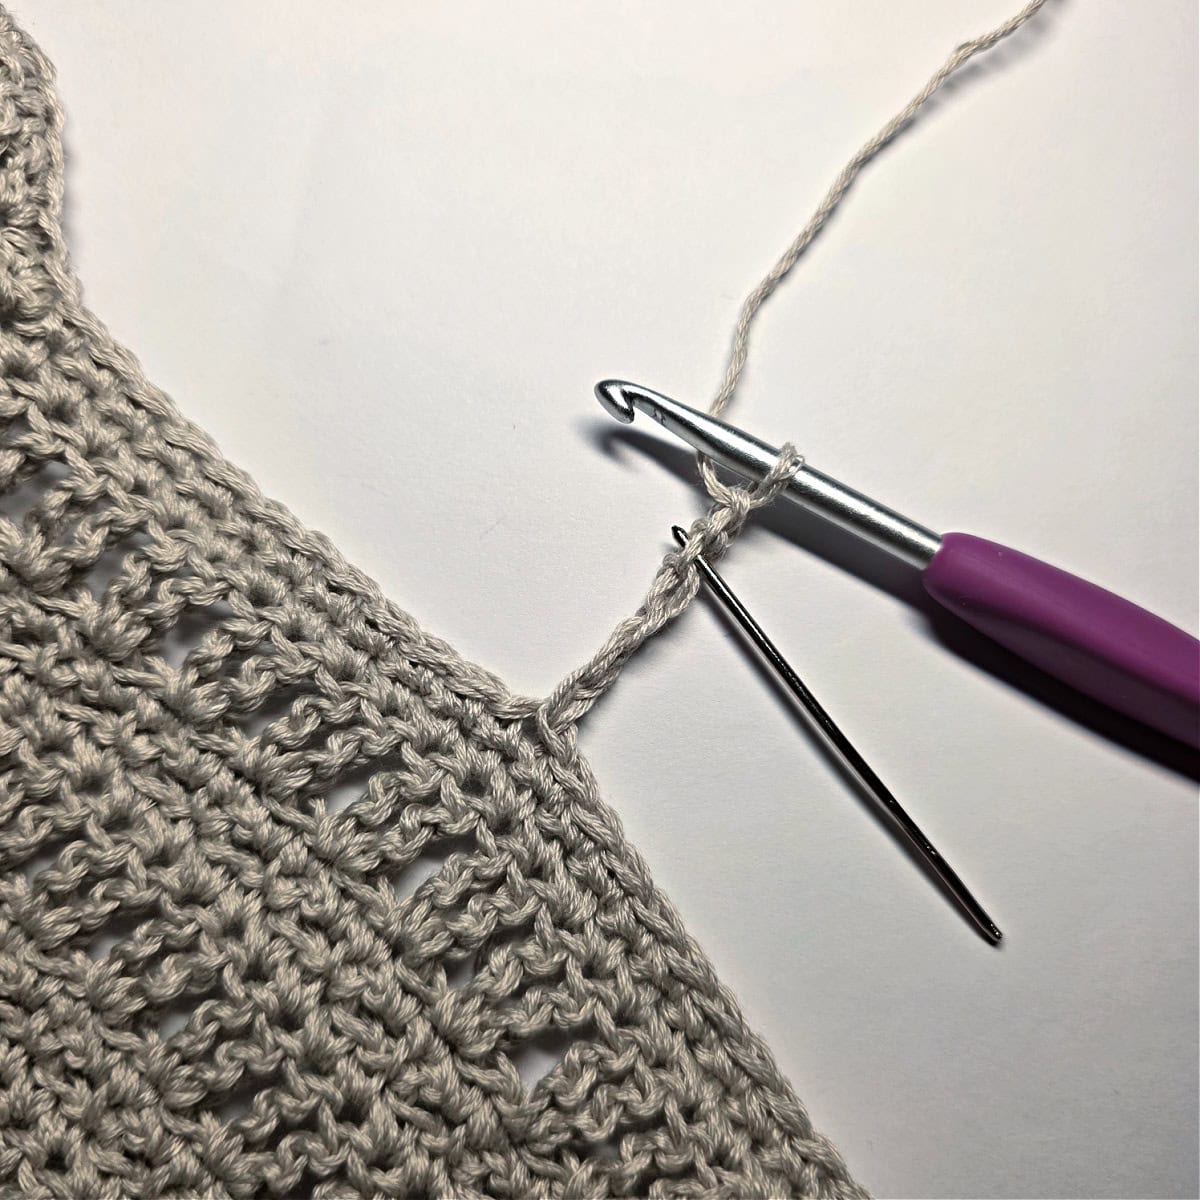
Neck Ribbing
In this section, you’ll first add a round of single crochet around the neck opening. Then, you’ll crochet ribbing perpendicularly to the neck opening.
Gauge Tip: When working set-up round 1, the most important thing is that your work lays flat. If your edge is rippling, try going down a hook size or two. If your edge is cinching inward, try going up a hook size or two. If you end up needing to adjust your hook size. After you complete set-up round 1, switch to a crochet hook that’s one size down from the hook you used for the set-up round. If adjusting your hook size narrows the width of your ribbing too much, you can add an extra stitch or two by adding a chain or two to the chain at the beginning of the ribbing.
Continue to Set-Up.
Set-Up
Rnd 1 (RS): With yarn & a 4.00mm crochet hook, join yarn with a standing sc in the stitch closest to the center of the back of the neck opening, sc around the neck opening. Join with a sl st to the 1st st. Stitch count isn’t crucial, but will work best if it’s a multiple of 3.
Do not fasten off. Continue on to Ribbing.
Ribbing
Gauge: With a 4.00mm crochet hook, in BLO hdc: 5 sts = 1-1/8″; 17 rows = 4-7/8″
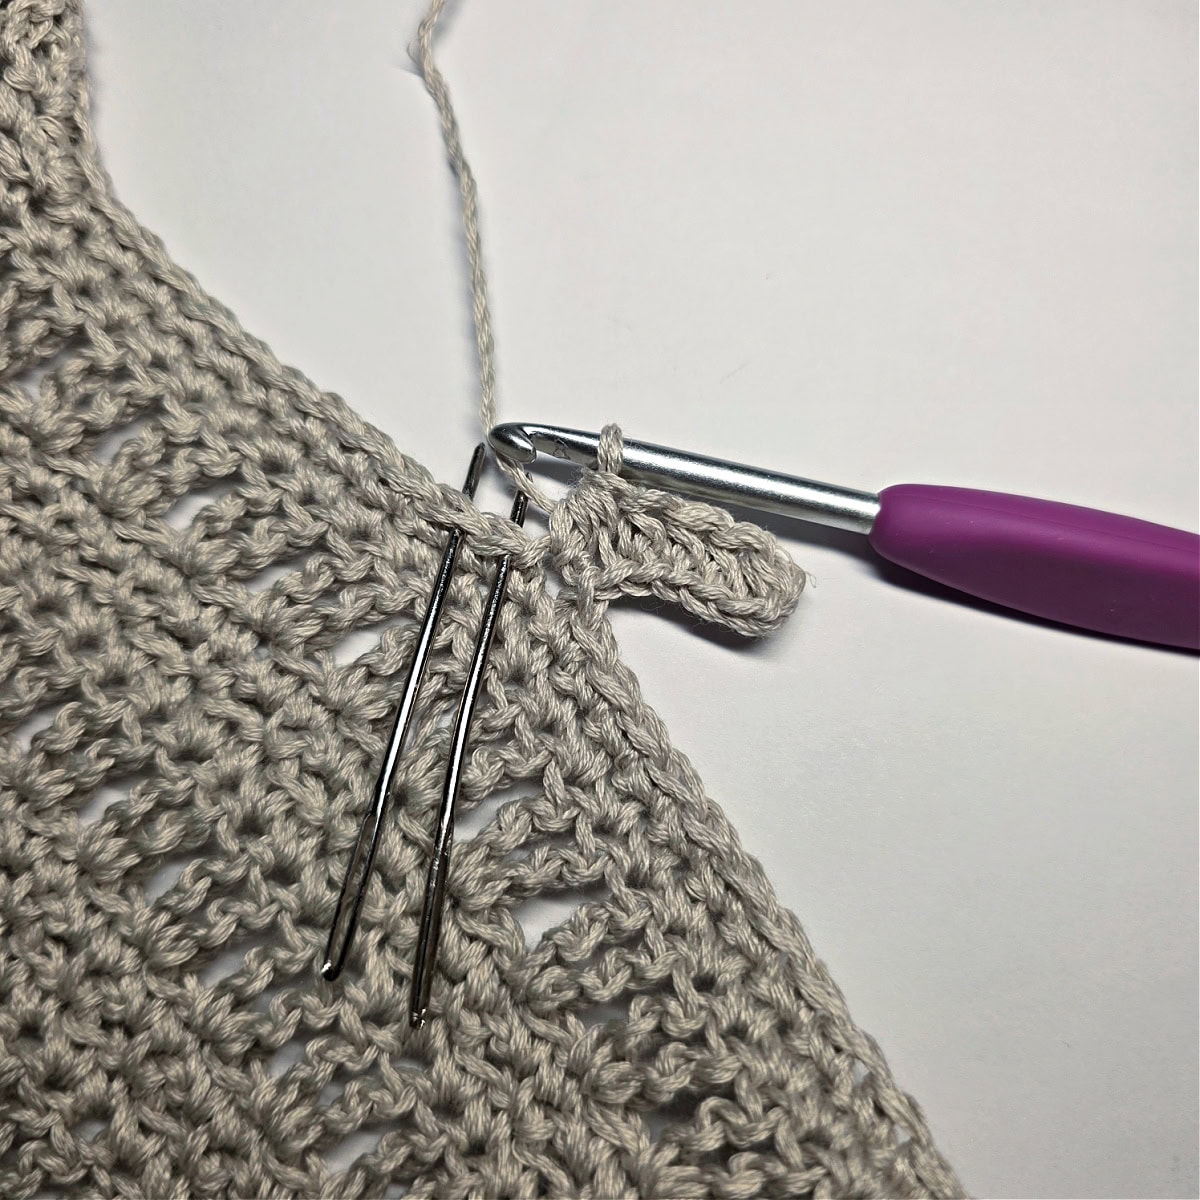
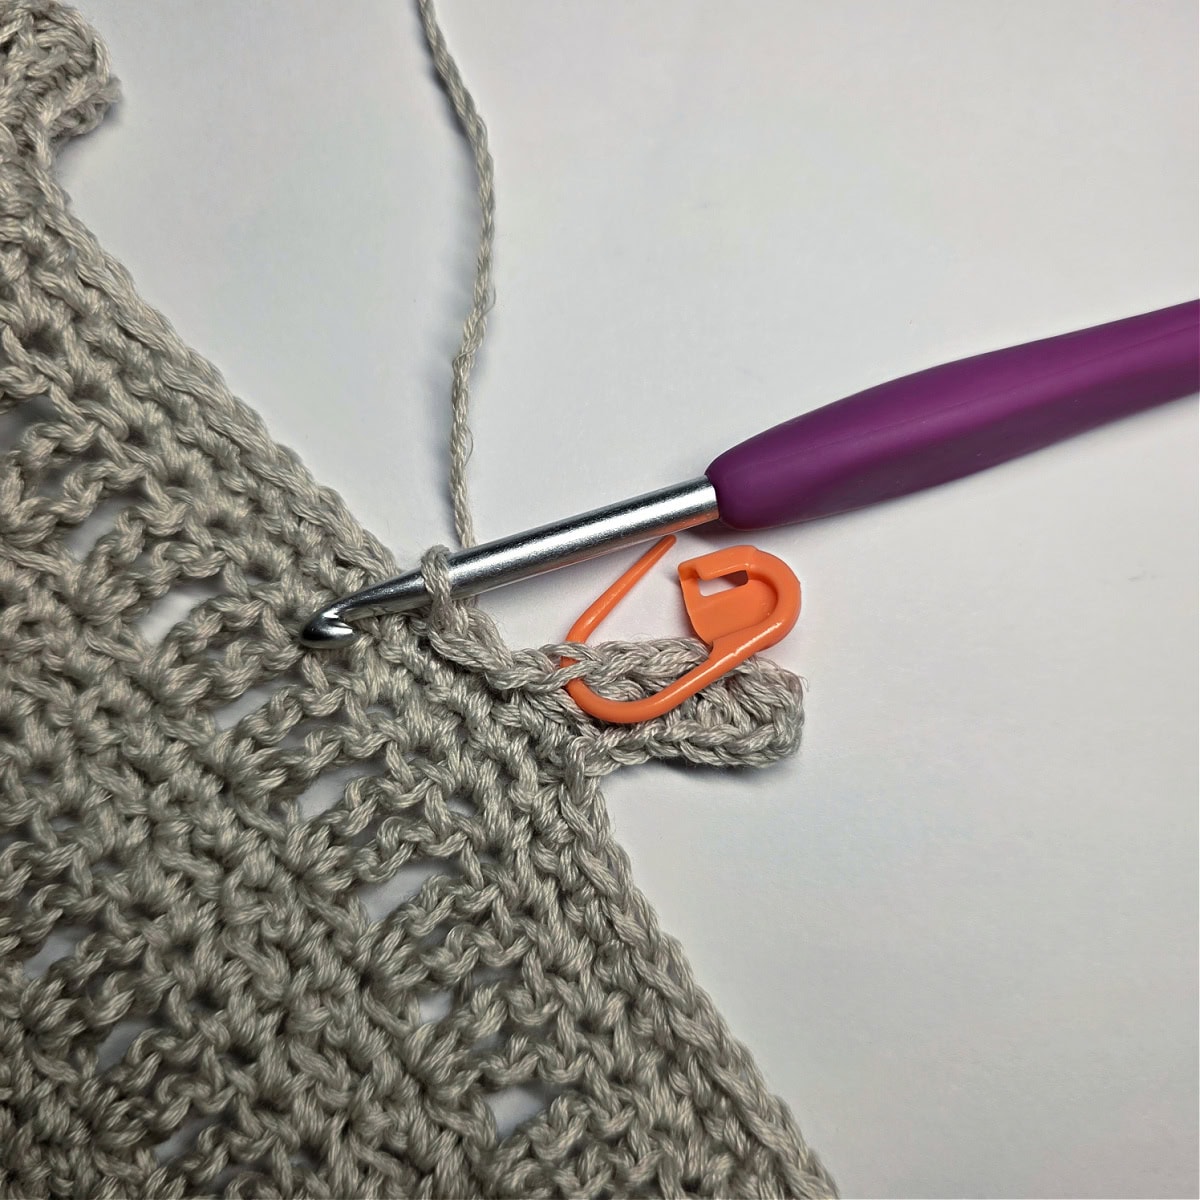
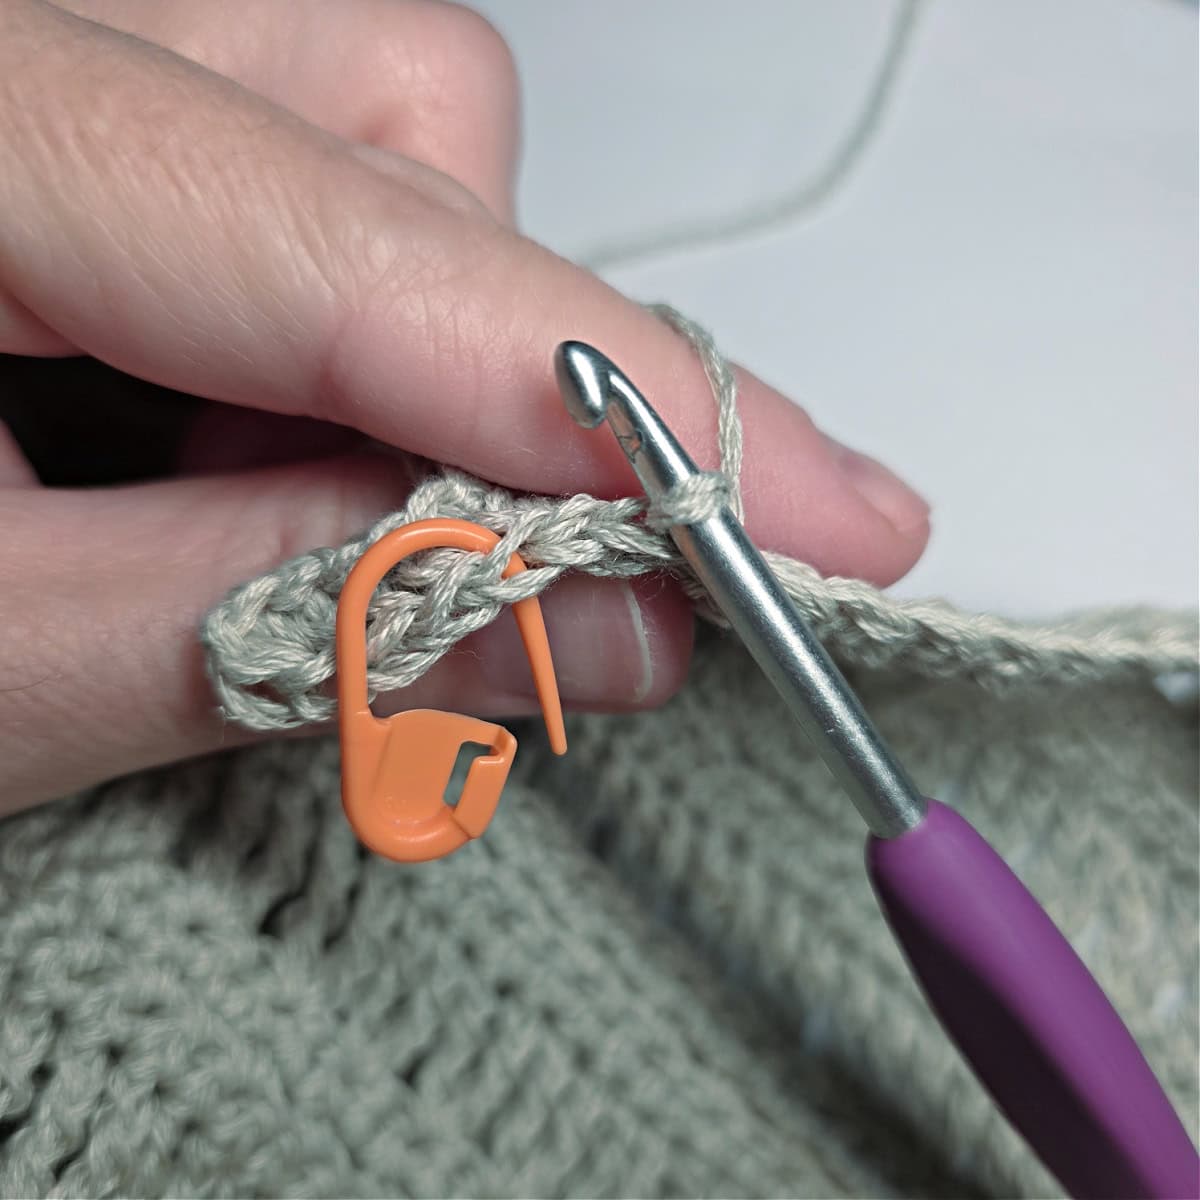
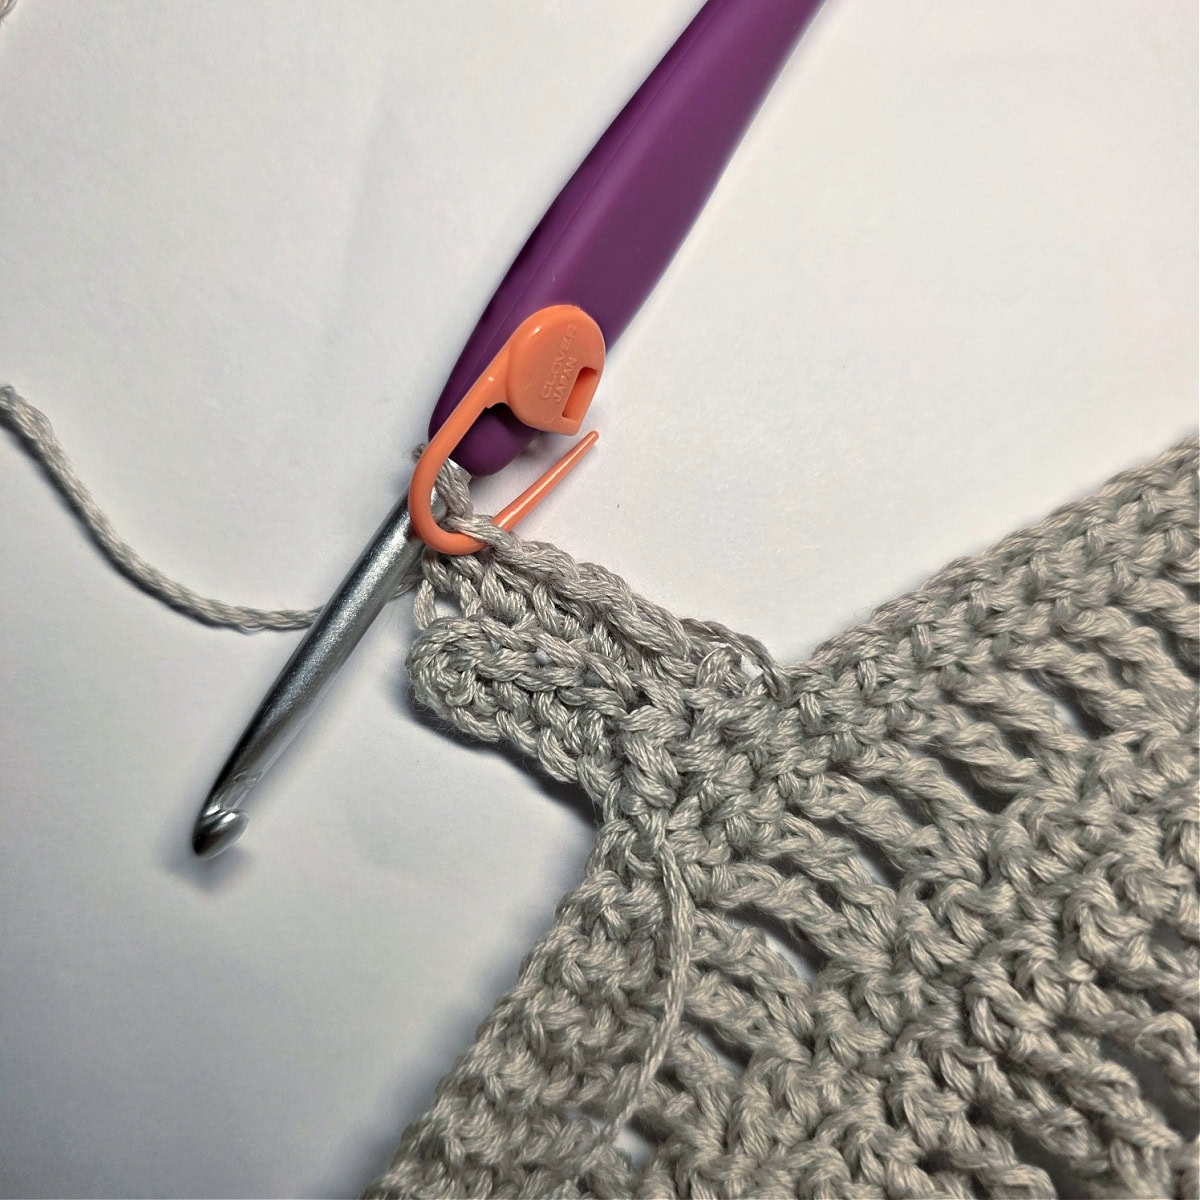
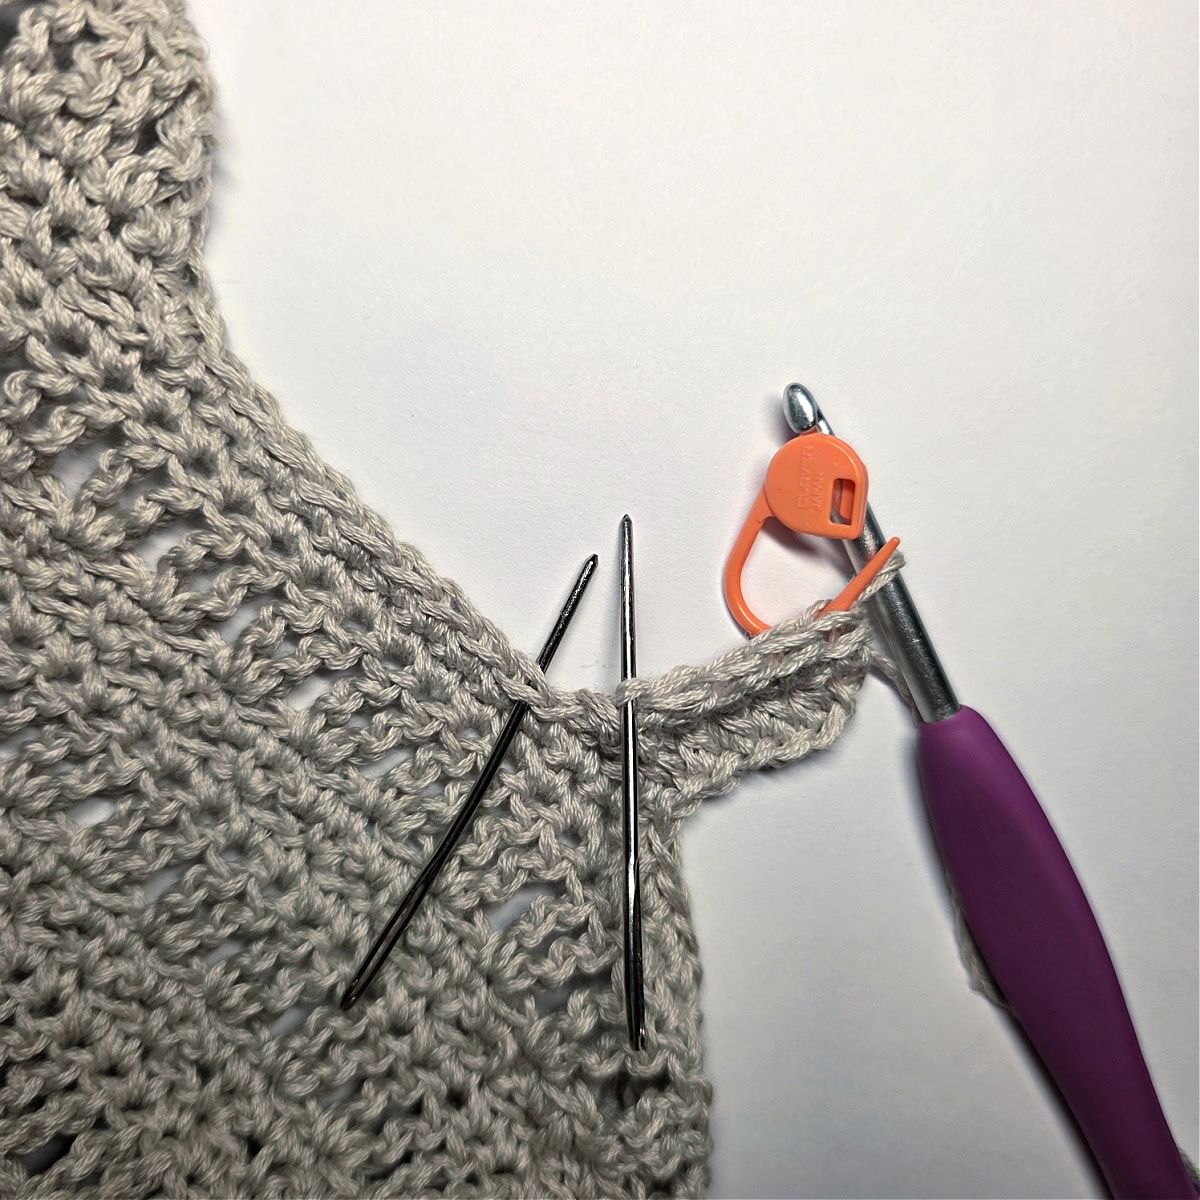
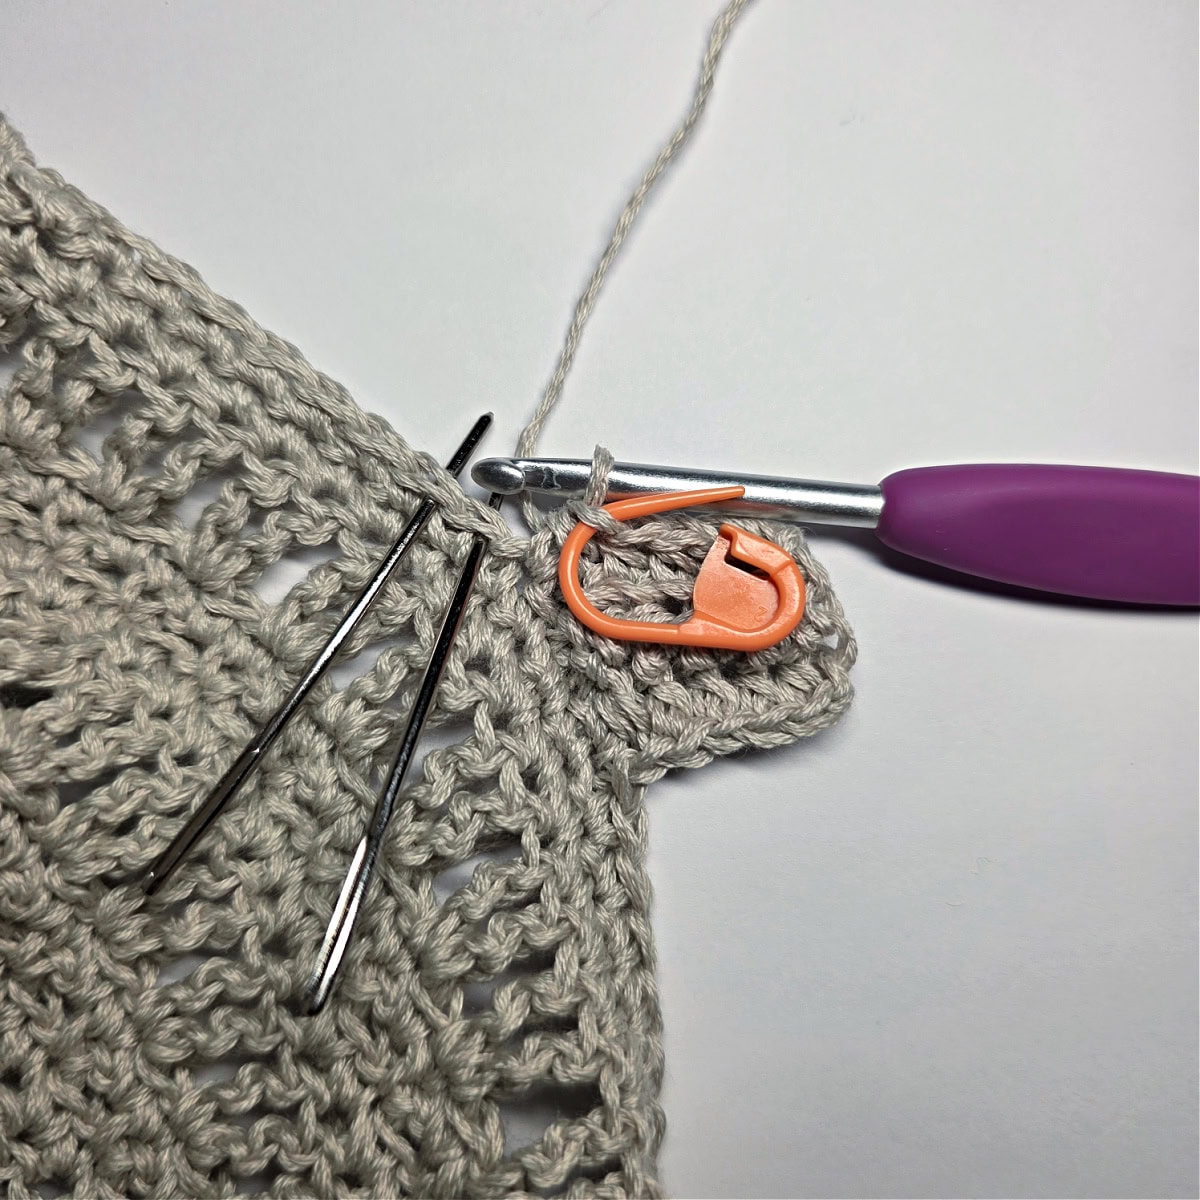
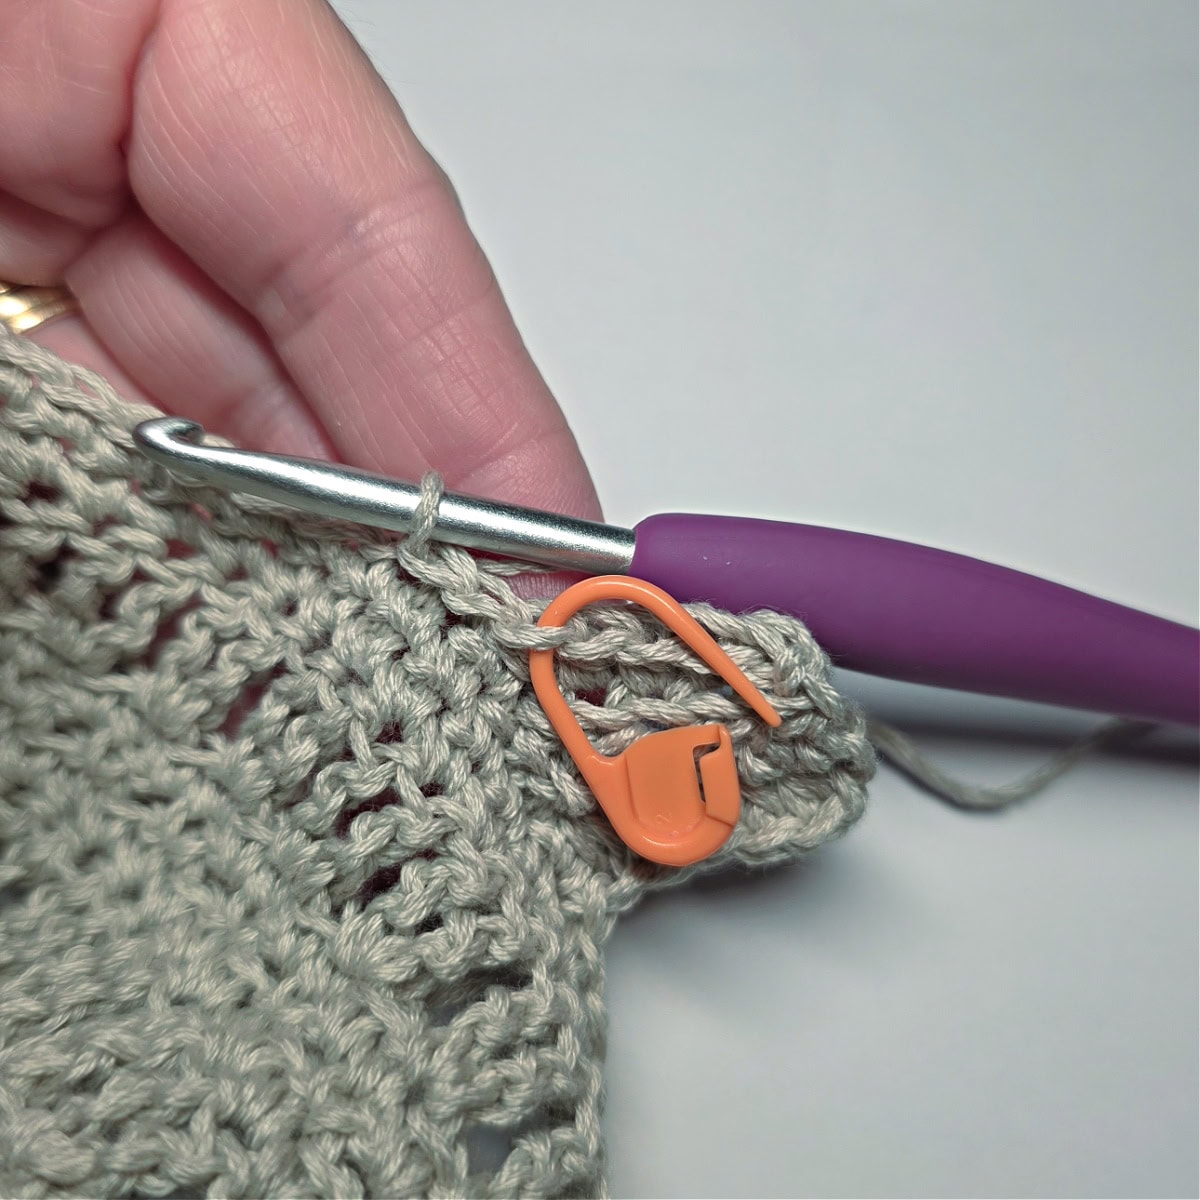
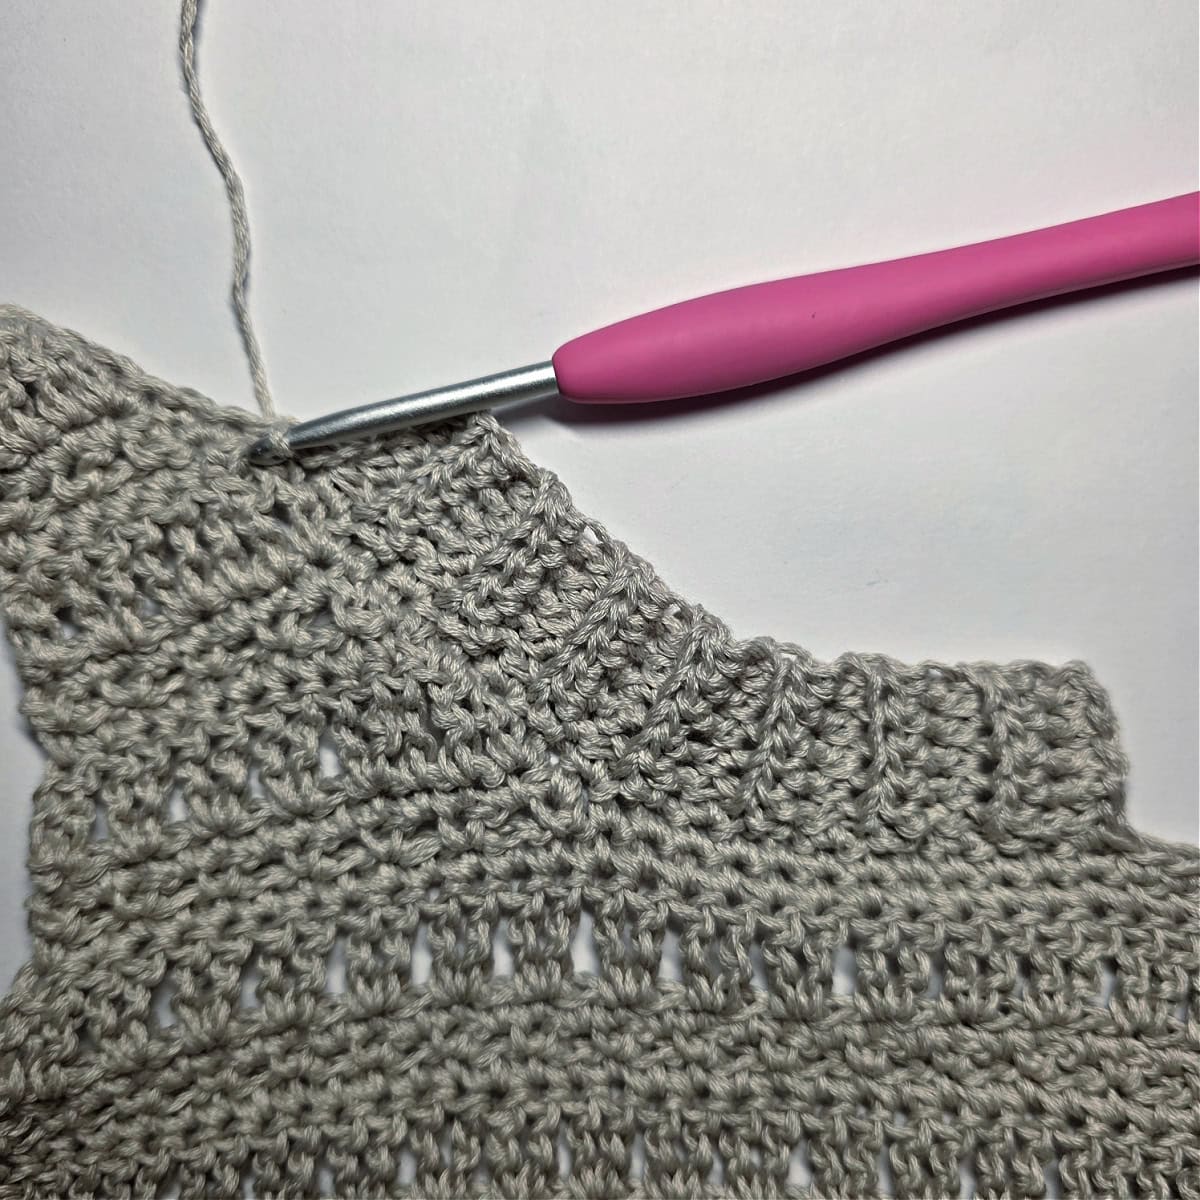
See crochet ribbing tutorial photos below.
Row 1 (RS): Switch to a 3.75mm crochet hook, ch 6, working in the back humps of the ch, hdc in the 2nd ch from your hook, hdc in each of the next 3 chs, hdc2tog in the next ch & same st as ch 6. Do not turn. (5 sts)
Row 2: ( sl st into the next st along the edge of the neck opening ) 2 times (these 2 sl sts do not count as sts), TURN, BLO hdc in each st across the previous row. Turn. (5 sts)
Row 3: Ch 1, BLO hdc in the first st, BLO hdc in each of the next 3 sts, hdc2tog in the BLO of the next st and both loops of the next st along the edge of the neck opening. Do not turn. (5 sts)
Row 4: ( sl st into the next st along the edge of the neck opening ) 2 times (these 2 sl sts do not count as sts), TURN, BLO hdc in each st across the previous row. Turn. (5 sts)
Rows 3 -4 around the neck opening.
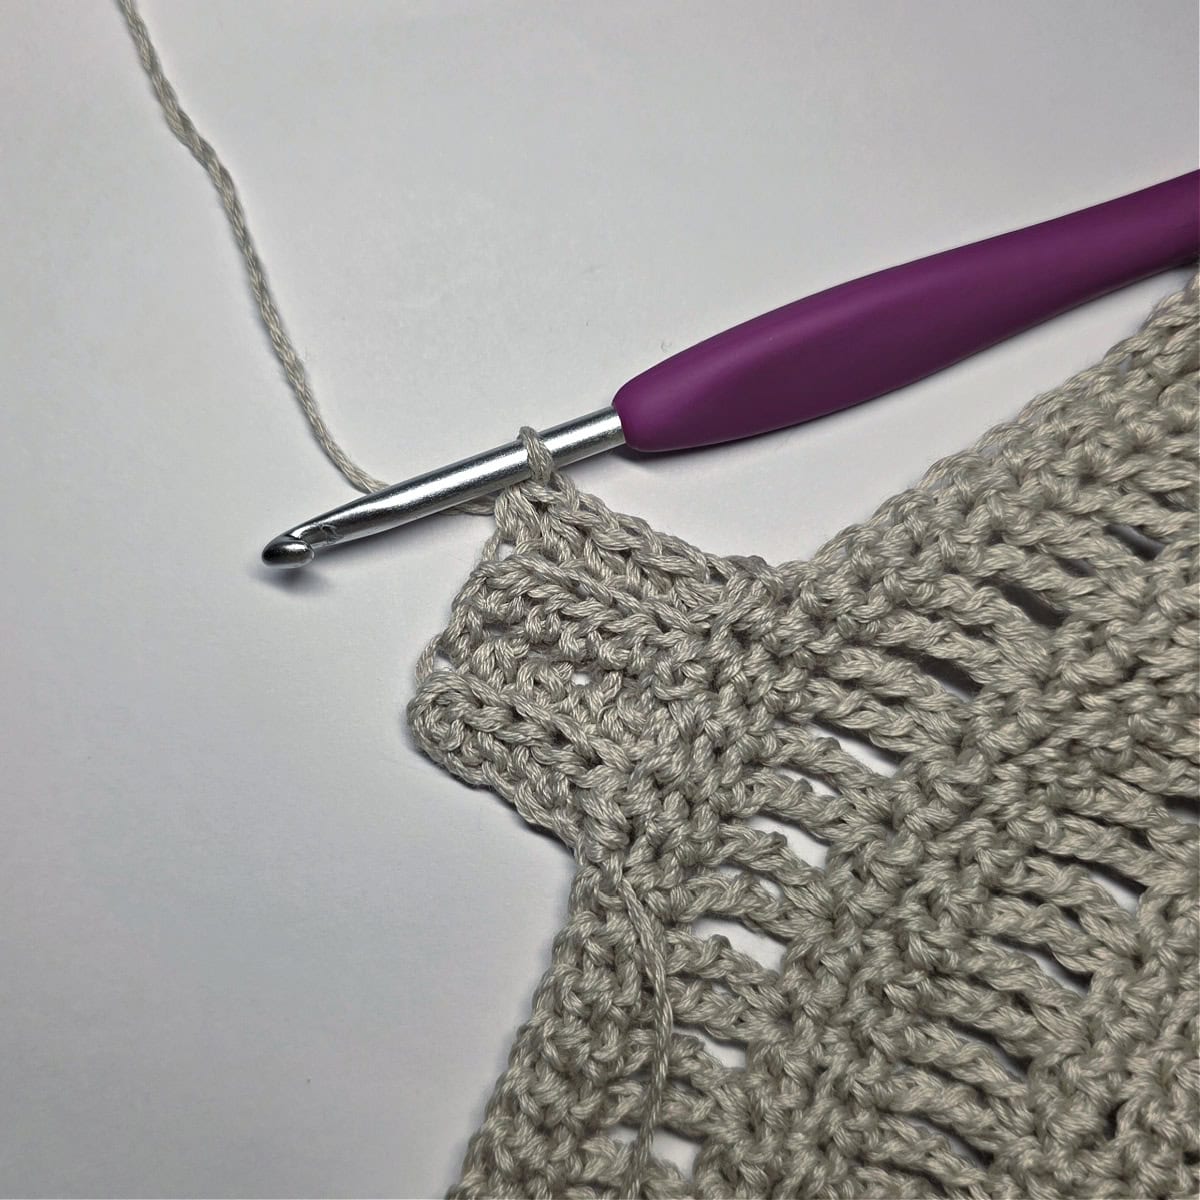
Fasten off leaving a 6″ tail of yarn. Using a yarn needle and the tail of yarn to whipstitch the last row to the first row.
Weave in ends.
Ribbing Tutorial
The photos in the tutorial are of another design, but the ribbing is worked the exact same.


I MADE IT! NOW WHAT?
Pin this post!: Save this crochet tee pattern to your Pinterest boards so that you can come back and make it again.
Leave a comment below: We love to hear your feedback.
Share Your Finished Projects on Facebook or Instagram: I love to see your finished projects! Share with us on social media and tag me @acrochetedsimplicity or use the hashtag #ACrochetedSimplicity so I can find your posts.
Join us in the Facebook Community Group!
Come share your finished projects with us in the A Crocheted Simplicity Crochet Community Group on Facebook. Join us for fun community events such as crochet alongs, join in on crochet conversations, ask questions, get advice, and share your love for crochet!

Looking for More Crochet Patterns?
Check out our other free crochet patterns for scarves/shawls, hats, and cozy accessories.