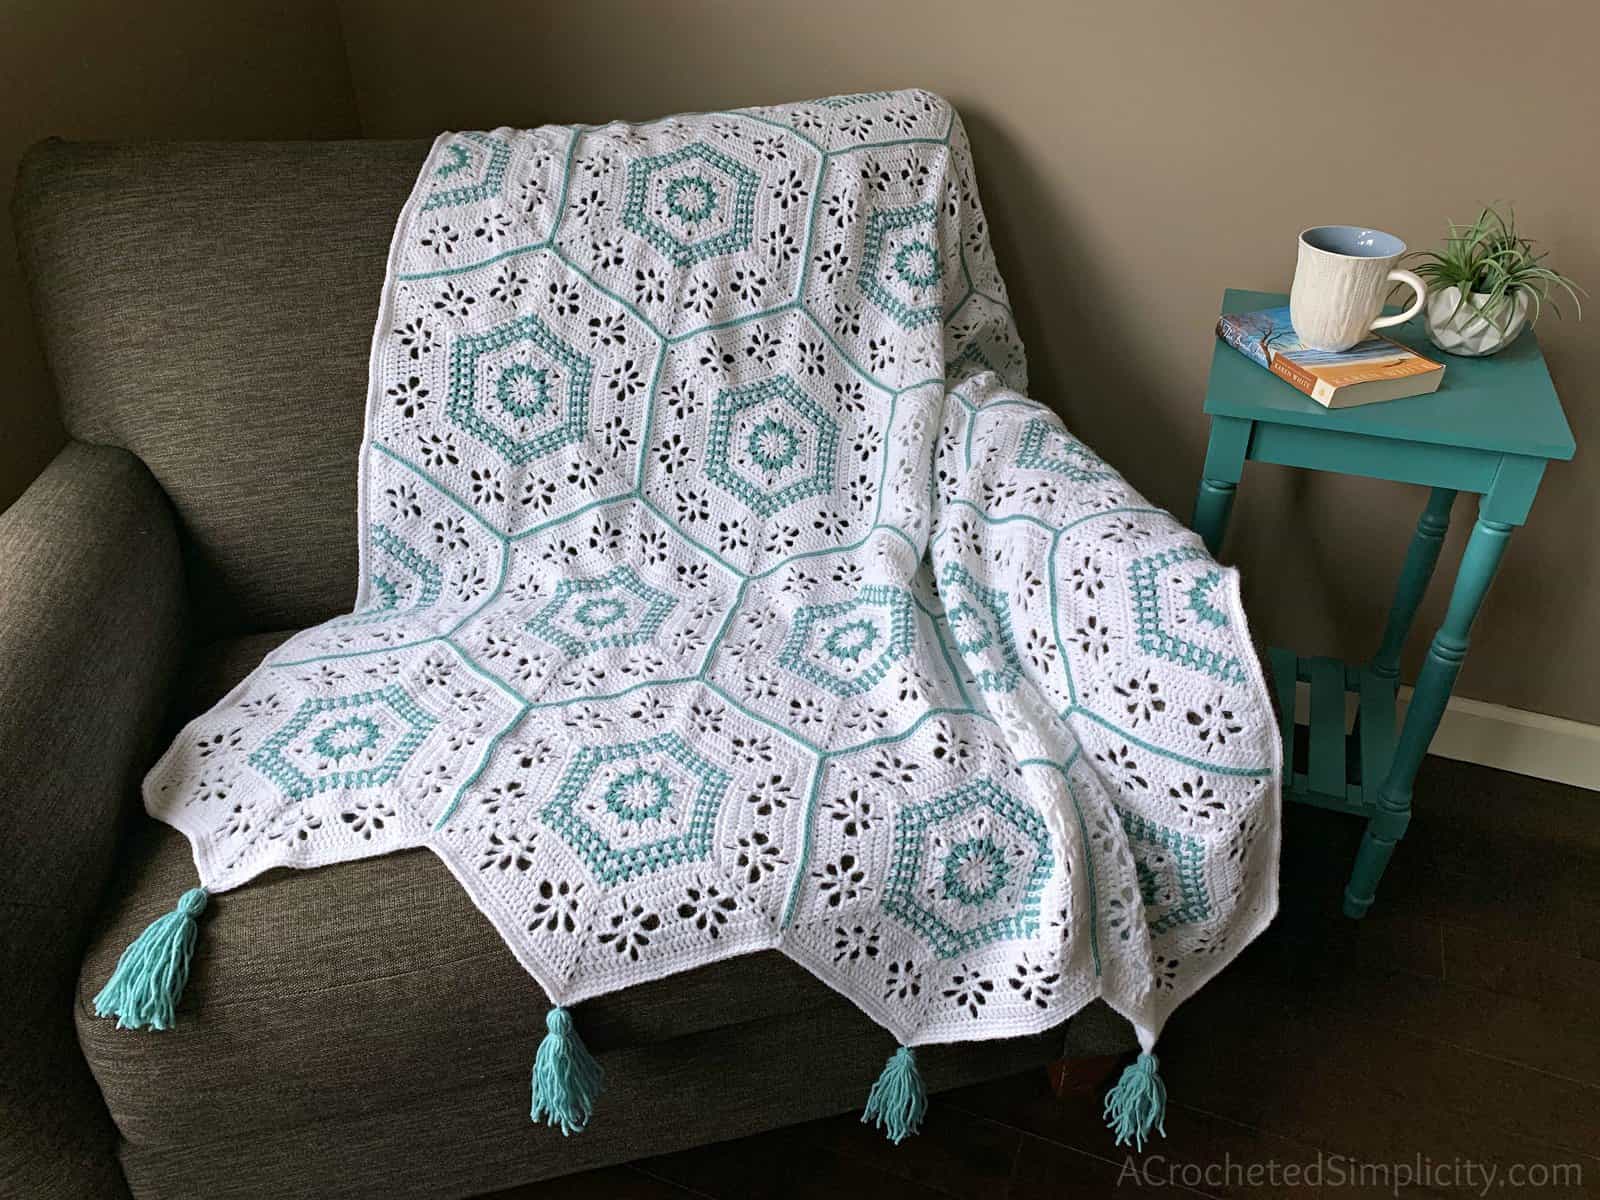
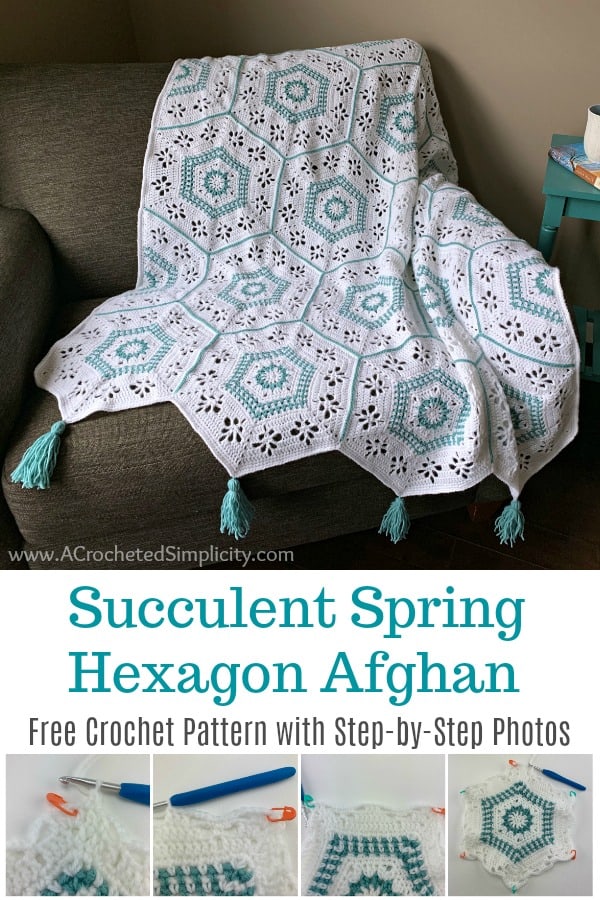
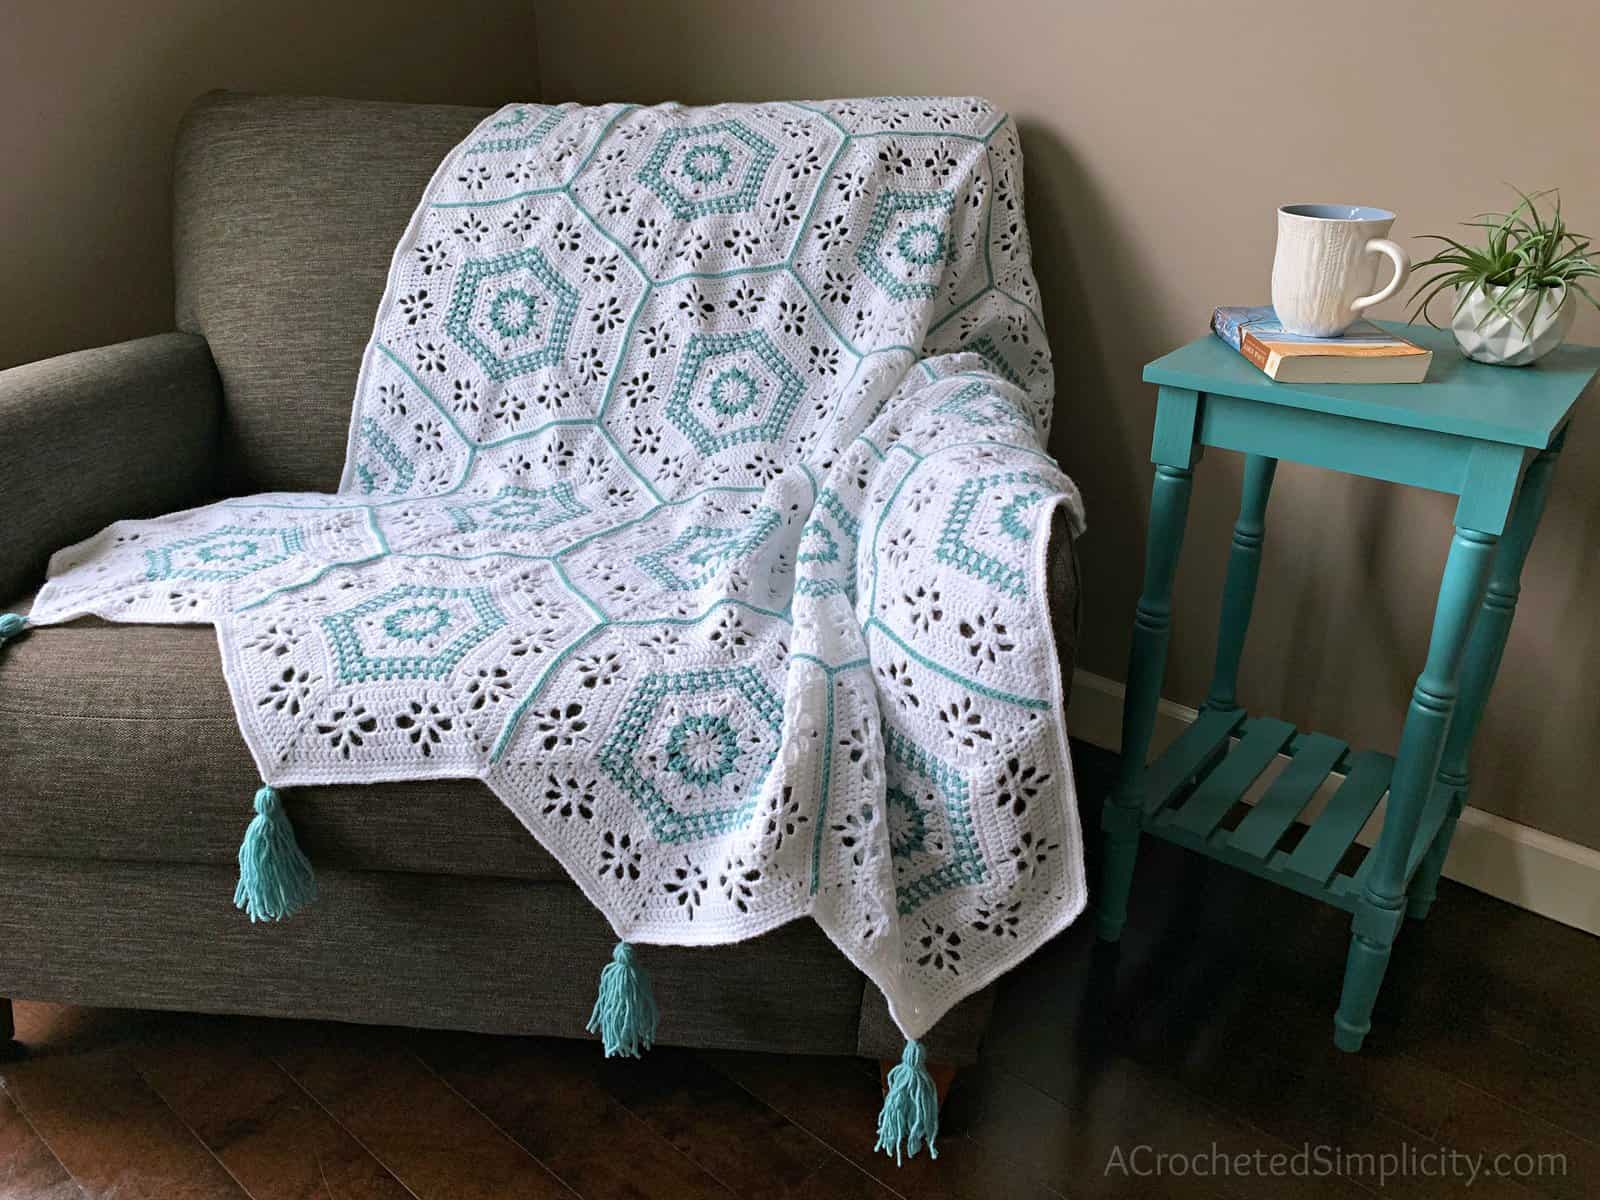
Succulent Spring Hexagon Afghan – Free Crochet Blanket Pattern
My love for making crochet afghans has grown a lot over the past year. I released a variety of styles in 2019, but I hadn’t made a hexagon afghan before so I thought that should be next on my list of projects. The Succulent Spring Hexagon Afghan was designed while traveling to visit crochet friends a couple months ago. It ended up being the perfect project for the airport and plane rides as I didn’t have to carry around a half finished afghan all at once. I packed the finished hexagons in my luggage and kept the pieces I was working on in my carry-on.
You can find the free crochet hexagon blanket pattern in this post below, or an ad-free print friendly version on Love Crafts here, Ravelry here, and Etsy here. *The ad-free PDF includes a BONUS stitch chart.
Beginners and seasoned crocheters alike will love that the Succulent Spring Hexagon Afghan pattern uses simple crochet stitch patterns to create visual interest in the design. This hexagon afghan pattern is simple enough that advanced beginners can successfully complete it and the combination of changing stitch patterns (and colors) will keep others from losing interest.
Pair this crochet blanket pattern with a variegated or self-striping yarn, and all of the colorwork is done for you. I don’t know about you, but my favorite part of self-striping yarns is that I’m not left with a bunch of ends to weave in. If you choose a self-striping or variegated yarn, I’d suggest using a solid, contrasting yarn for the seams so they pop! And if you don’t want to change colors like I did, I believe a solid colored afghan would be absolutely stunning!
THE YARN
For this crochet hexagon afghan, I chose Lion Brand Yarns Pound of Love, which is a worsted weight yarn. Pound of Love is a 100% premium acrylic yarn that is available in 22 gorgeous colors. Although Pound of Love is classified as a Craft Yarn Council 4 / worsted weight yarn, I’ve found that it is on the lighter side of most worsted weight yarns.
I’ve had many tell me that they don’t like the feel of acrylic yarns, but Pound of Love becomes SO incredibly soft after a quick wash and dry! It’s the perfect yarn for so many different projects and the yardage in one ball is incredible at 1,020 yards!
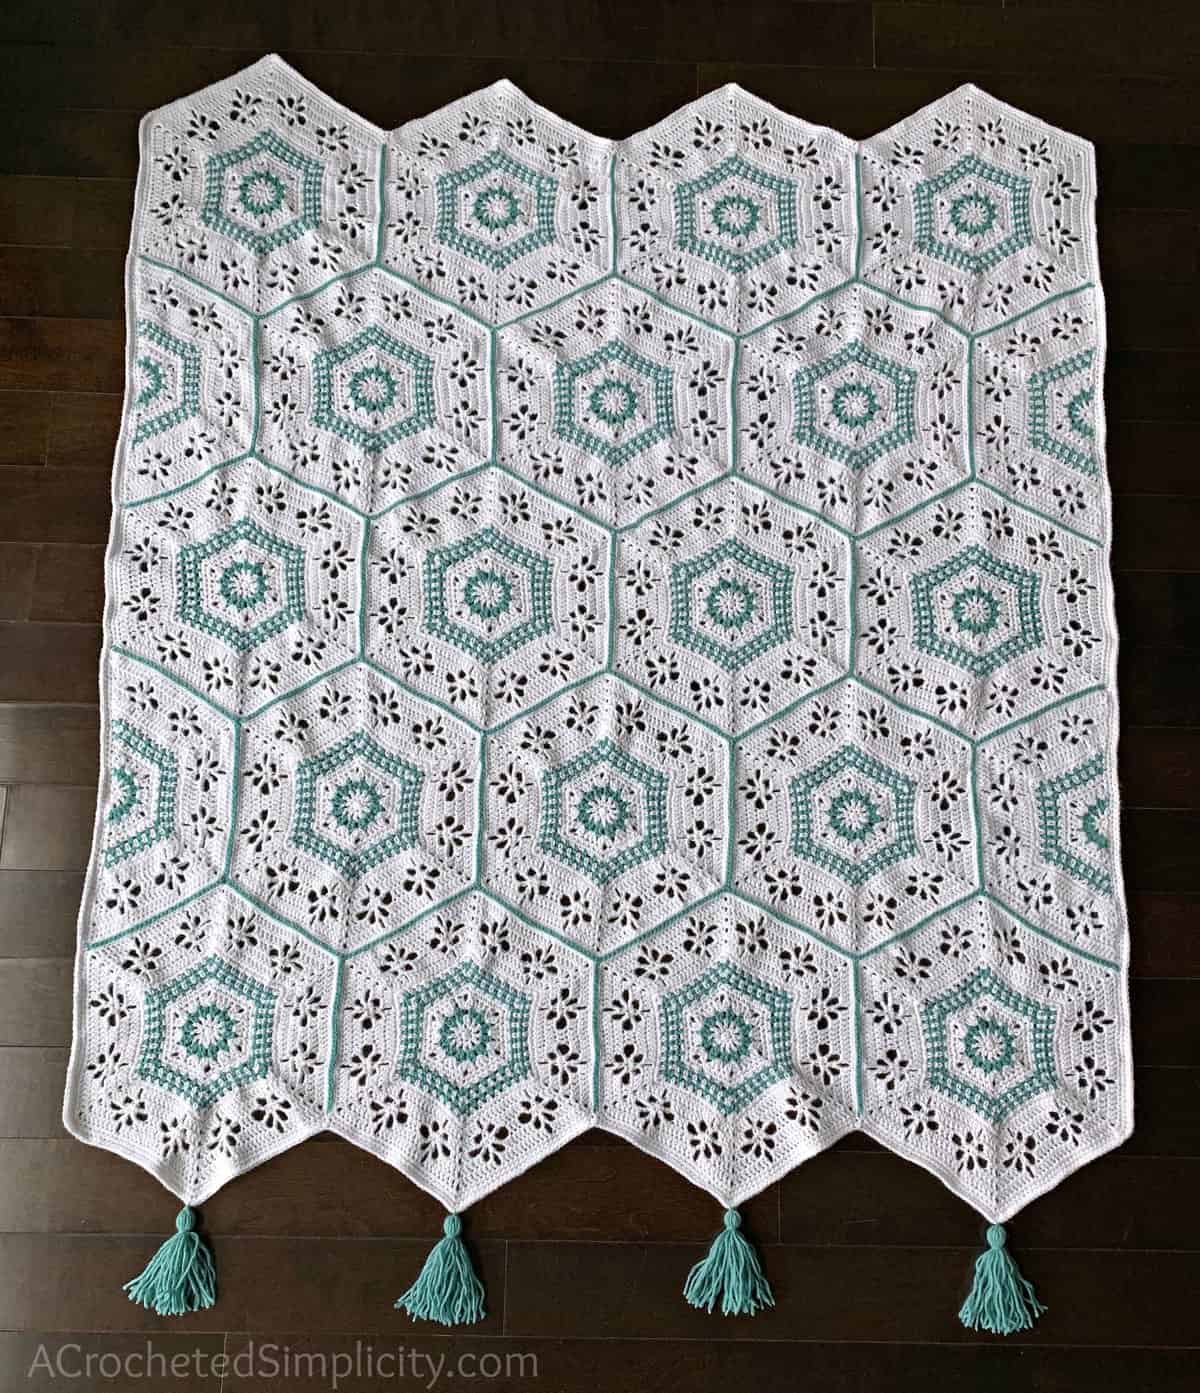
For the Succulent Spring Hexagon Afghan, I’ve combined several simple crochet stitches and a little colorwork to add visual interest. The size is easily customizable so you can make it smaller for a baby shower gift or larger for a wedding gift! Look at the layout graphic in the pattern below so that you can see where you could add or subtract hexagons to customize the size of your blanket. Check out my Blanket Size Chart, for standard blanket sizes.
Succulent Spring Hexagon Afghan – Free Crochet Pattern
The free pattern is below, but if you love to work offline, or need to order your yarn, I’ve got a couple other great options for you.
Purchase the ad-free, printable PDF, including all photo tutorials, on Love Crafts here, Ravelry here, and Etsy here. *The ad-free PDF includes a BONUS stitch chart.
Purchase the kit here! Lion Brand also has a full kit of the Succulent Spring Hexagon Afghan, available on their website.
Save this pattern to your Ravelry favorites here.
Pin it for later here.
This post contains affiliate links.
Materials
- Yarn: Worsted Weight / 4 / Yarn, (Lion Brand Yarns Pound of Love, in White & Succulent were used for the sample in the photos) (454 g / 16oz / 1,020 yards / 932 meters / 100% premium acrylic) per ball.
- Crochet Hooks: I/9/5.50mm, H/8/5.00mm (My favorite crochet hooks are the Clover Amour Hooks, I’ve never had an ache in my hand since switching)
- Scissors
- Yarn Needle
Many of these materials are available for purchase through our affiliates below:
 Lion Brand Yarn 550-151 Pou...Shop on Amazon
  Clover 1048/I Green Amour C...Shop on Amazon
  Clover 1047/H Deep Blue Amo...Shop on Amazon
  Fiskars 154110-1001 Non-sti...Shop on Amazon
  Clover 3672 Amour Crochet H...Shop on Amazon
Skill Level
- Easy
Gauge
- See each specific section. Dimensions are given as you work.
- Gauge isn’t crucial for this project.
Size
- One Size: 49″ W x 57″ L
- You can easily increase the size of your afghan by making more hexagons and half hexagons.
- Check out my Blanket Size Chart HERE, for standard blanket sizes.
Abbreviations (US Terms)
- ch(s): chain(s)
- sl st(s): slip stitch(es)
- st(s): stitch(es)
- sc: single crochet
- dc: double crochet
- sc3tog: single crochet decrease by 2
- 2 dc-cl: 2 double crochet cluster (click here for tutorial)
- Alt-dc: alternate chainless double crochet (click here for tutorial)
- standing sc: standing single crochet (click here for tutorial)
- standing dc: standing double crochet (click here for tutorial)
- yo: yarn over
- sp: space
- Rep: repeat
- Rnd: round
- SM: stitch marker
- RS / WS: right side / wrong side
- MC / CC: Main Color / Contrasting Color
Notes
- I tend to crochet on the tighter side. You may need to go down a hook size (or two) to meet gauge if you crochet on the looser side.
- Yarn Notes: Lion Brand Pound of Love in White & Succulent, 100% Acrylic (1020 yards / 932 m / 454 g / 16 oz).
- Yardage
- Main Color (White): 2,250 yards
- Contrasting Color (Succulent): 300 yards
- Standard Blanket Sizes – Check out my Blanket Size Chart HERE.
- Yarns similar in fiber and weight can be substituted.
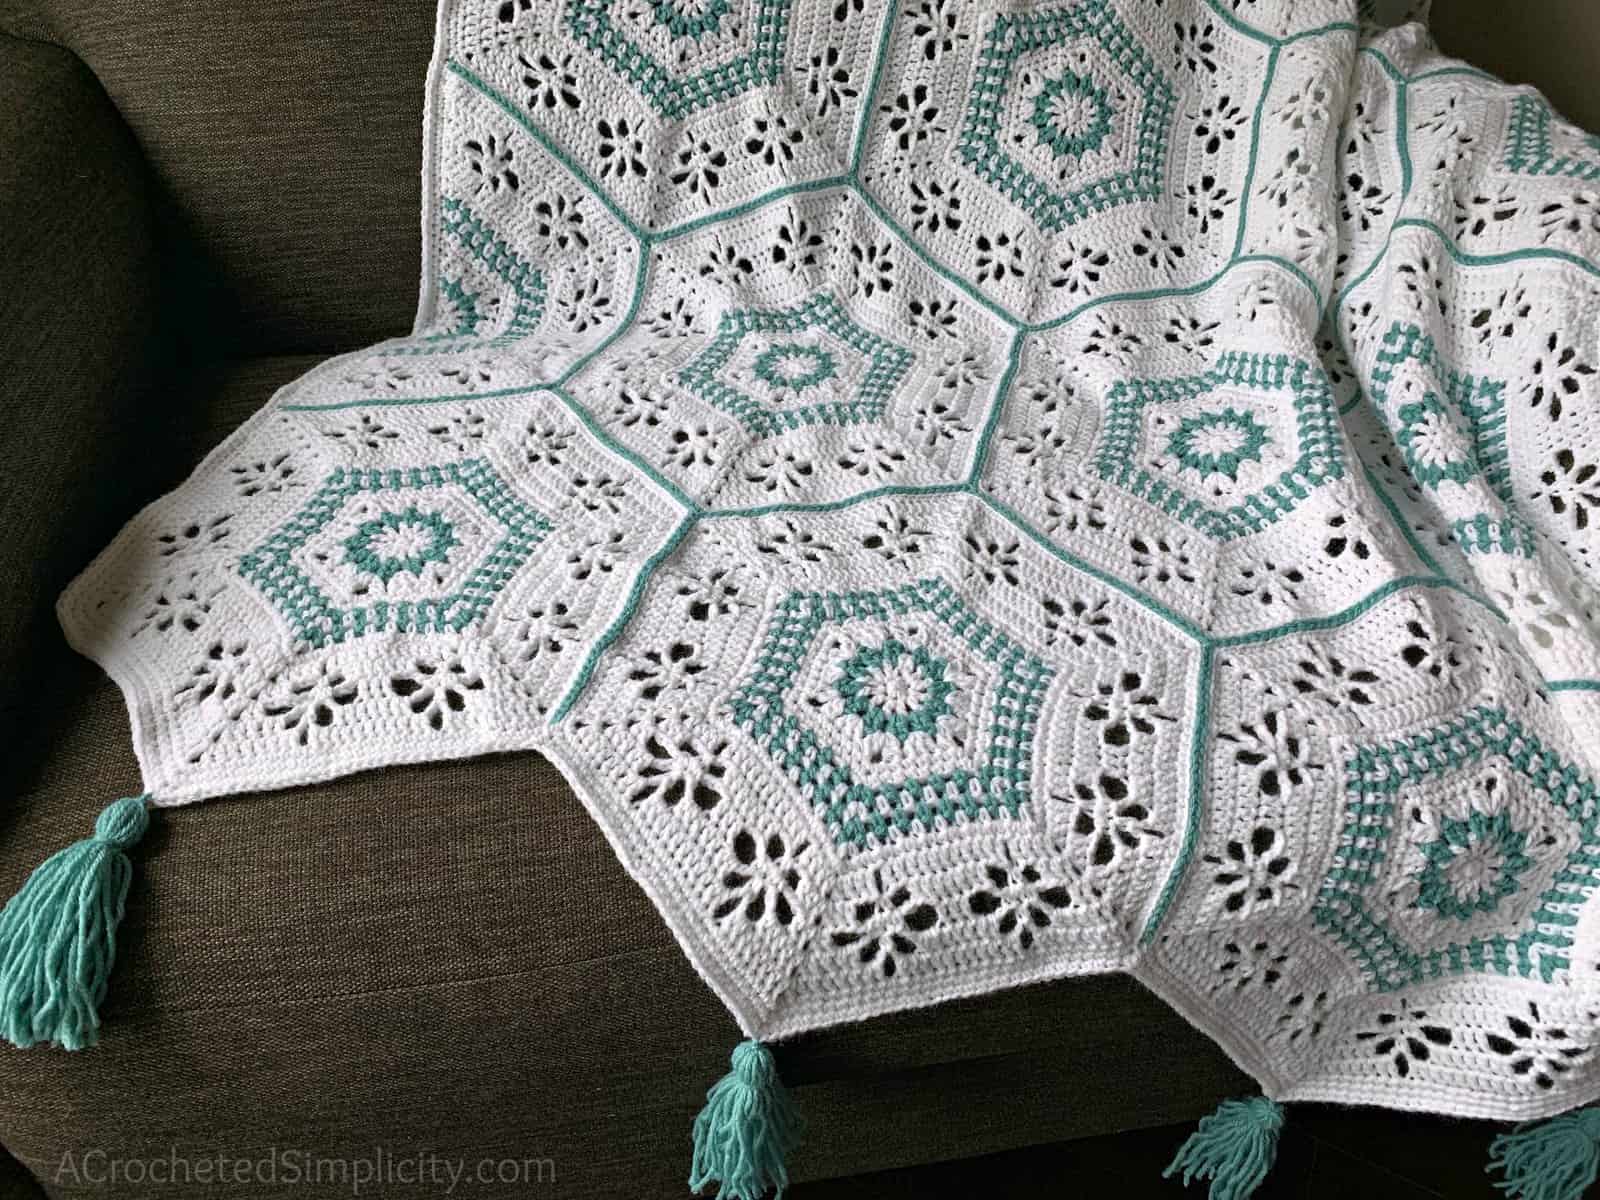
- This afghan is made by crocheting full and half hexagons, then seaming them together. After seaming all of the hexagons, you’ll add a simple border. Add tassels, if desired.
Special Stitches
- 2 Double Crochet Cluster (2dc-cl): Yo, insert hook where indicated, yo, pull up a loop, yo, pull thru 2 loops, yo, insert hook in same st, yo, pull up a loop, yo, pull thru 2 loops, yo, pull thru remaining loops. (Click here for photo tutorial)
- Join yarn with a standing sc: When instructed to “Join with a standing sc”, begin with a slip knot on your hook. Insert your hook into the stitch or space indicated, yo, pull up a loop, yo and draw thru both loops on hook. (Click here for photo tutorial)
- Join yarn with a standing dc: When instructed to “Join with a standing sc”, begin with a slip knot on your hook. Insert your hook into the stitch or space indicated, yo, pull up a loop, yo and draw thru 2 loops, yo, draw thru remaining loops. (Click here for tutorial)
- Alternate Double Crochet (Alt-dc): After turning your work, do not ch, instead, insert your hook into the first st, yo, pull up a loop, yo, pull thru both loops, insert your hook between the legs of the st just made, yo, pull up a loop, yo, pull thru one loop, yo, pull thru remaining loops. Click HERE for tutorial.
Succulent Spring Hexagon Afghan Instructions
12″ Full Hexagon Instructions – Make 18
Note: Most of this hexagon is worked in a spiral (continuous rounds). There are a few rounds that are joined at the end of them. Pay close attention to the instructions.
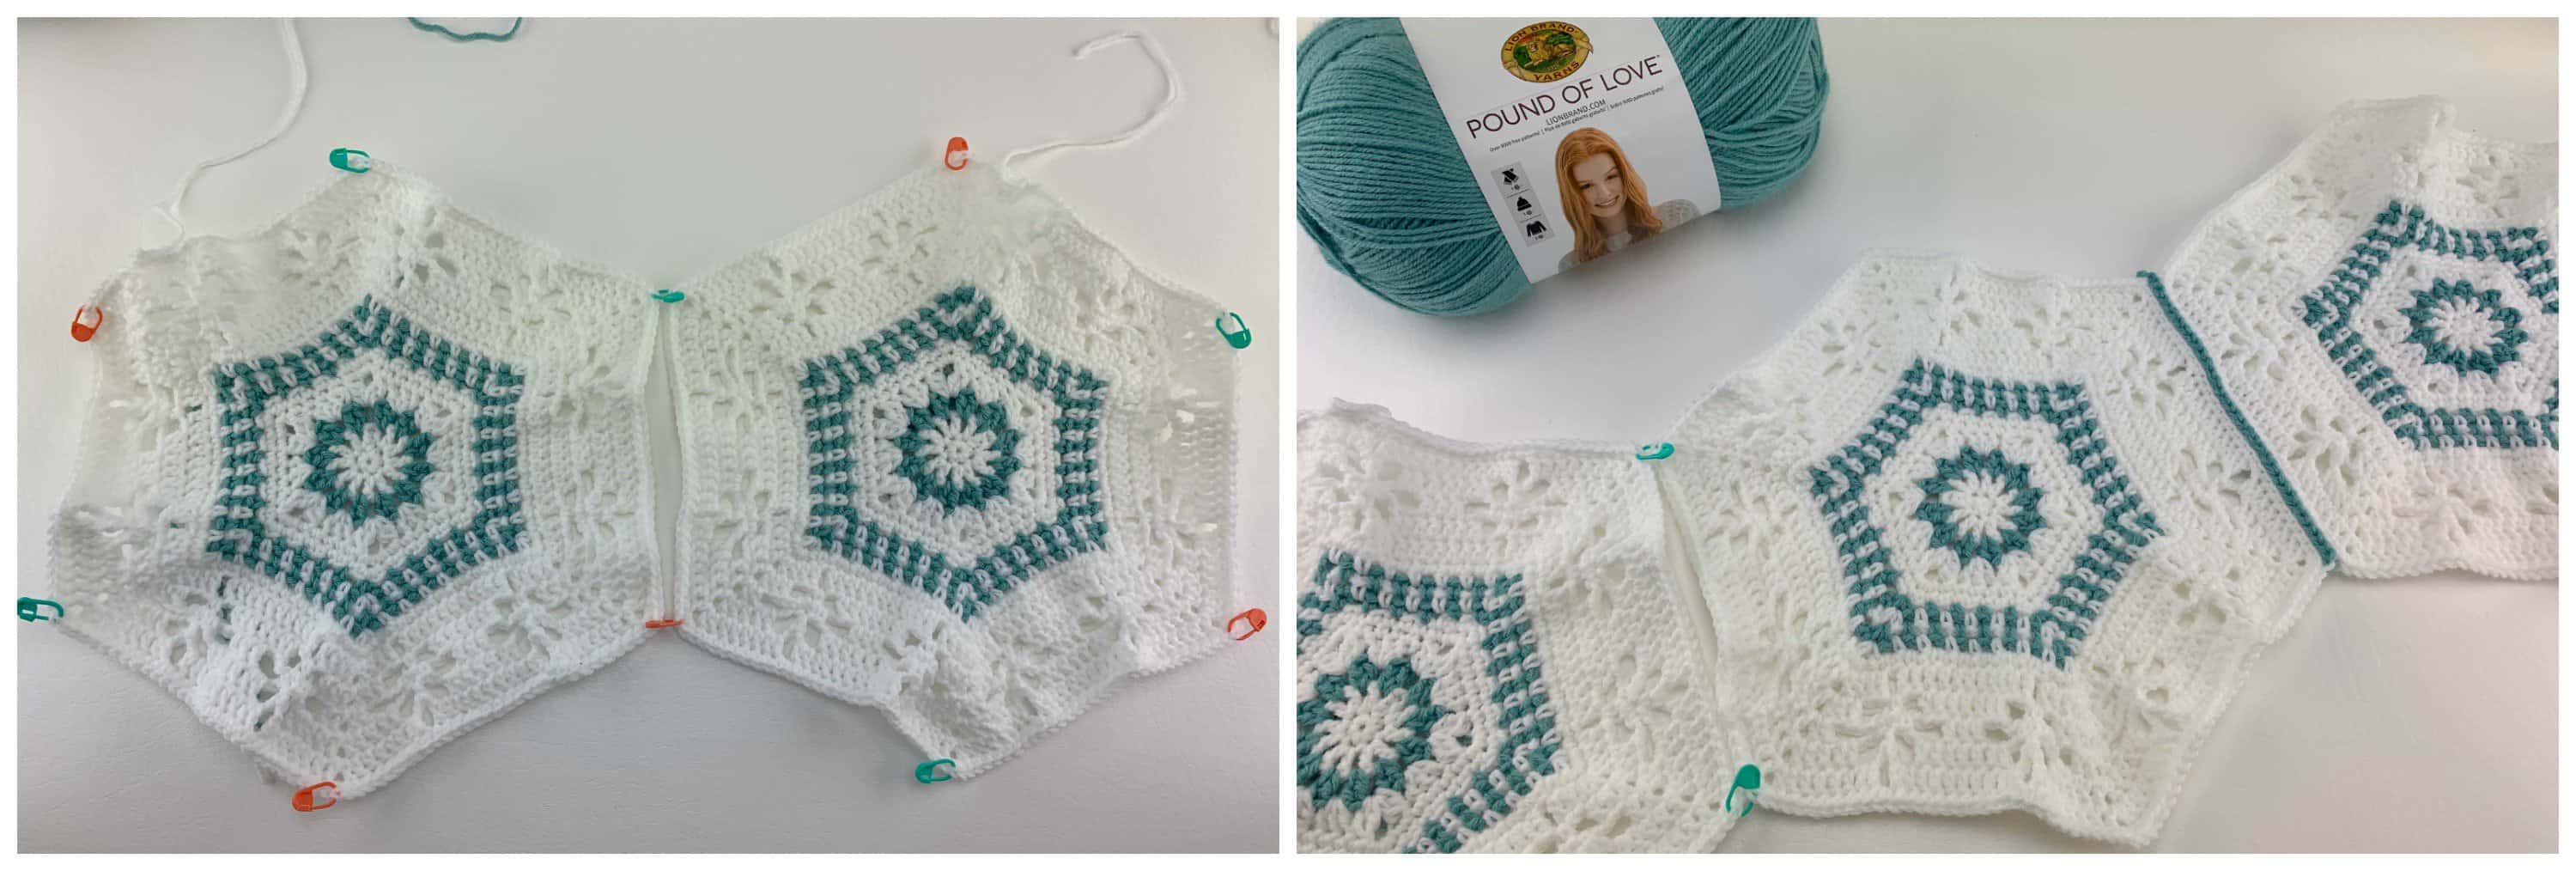
Tip! I highly suggest using locking stitch markers where noted. They will help to keep you on track while you crochet and they come in very handy when seaming the hexagons together.
Rnd 1 (RS / MC): With a 5.50mm crochet hook & MC yarn, ch 2, work 6 sc into the 2nd ch from your hook. Do not join. (6 sts)
Rnd 2 (MC): Alt-dc in the first st, work 1 more dc in the first st, work 2 dc in each remaining st around. Join with a sl st to the alt-dc. Fasten off MC. (12 sts)
Rnd 3 (CC): With a 5.50mm crochet hook & CC yarn, join yarn with a standing dc in the space between the first 2 sts of round 2, work 1 more dc in the same space, work 2 dc in the space between each 2 dc’s around. Join with a sl st to the standing dc. Fasten off CC. (24 sts)
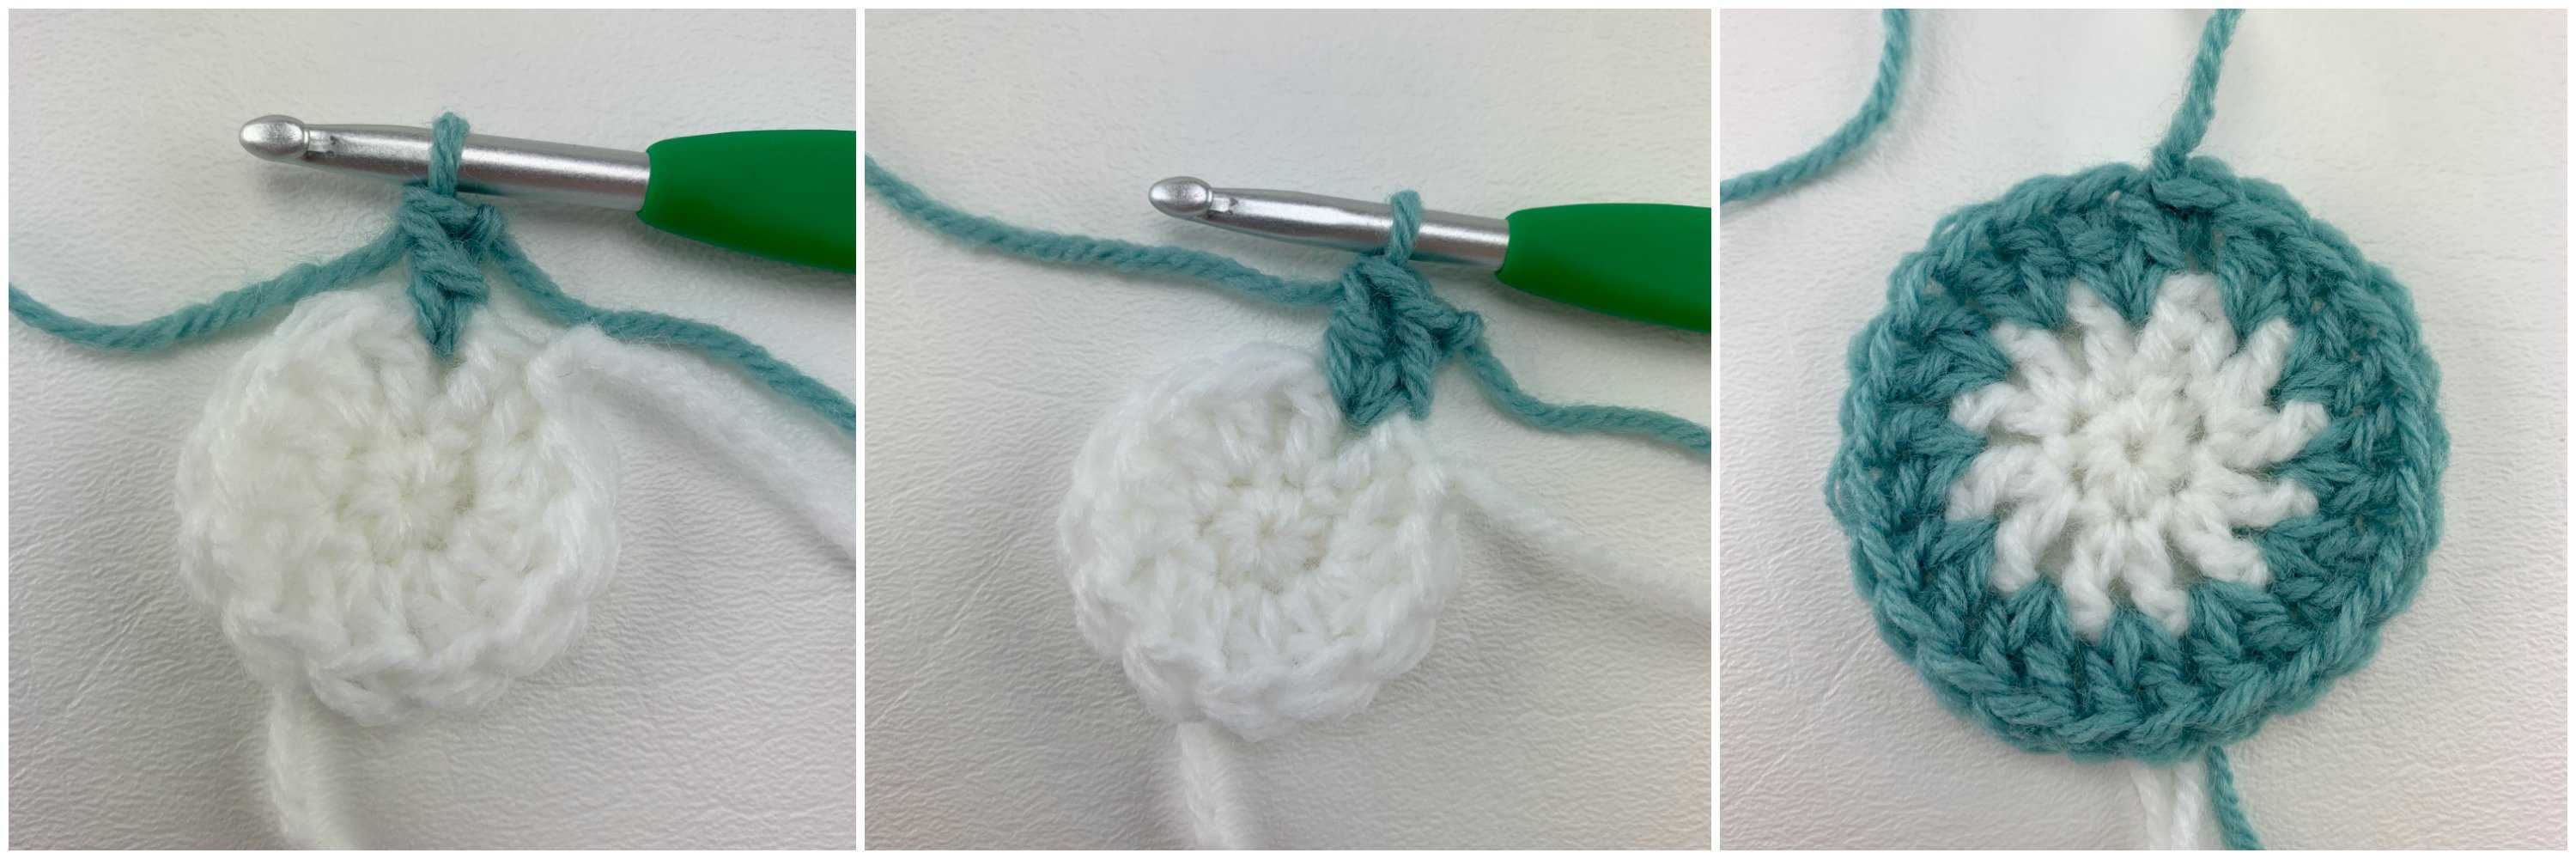
Rnd 4 (MC): With a 5.50mm crochet hook & MC yarn, skip the first 2 dc, join yarn with a standing dc in the space after the skipped dc’s, work 2 more dc in the same space, skip each of the next 2 dc, work (2 dc-cl, ch 2, 2 dc-cl) in the space after the skipped dc’s, * skip each of the next 2 dc, work 3 dc in the space after the skipped dc’s, skip each of the next 2 dc, work (2 dc-cl, ch 2, 2d c-cl) in the space after the skipped dc’s, rep from * around. Do not join. (30 sts + 6 ch-2 sps)
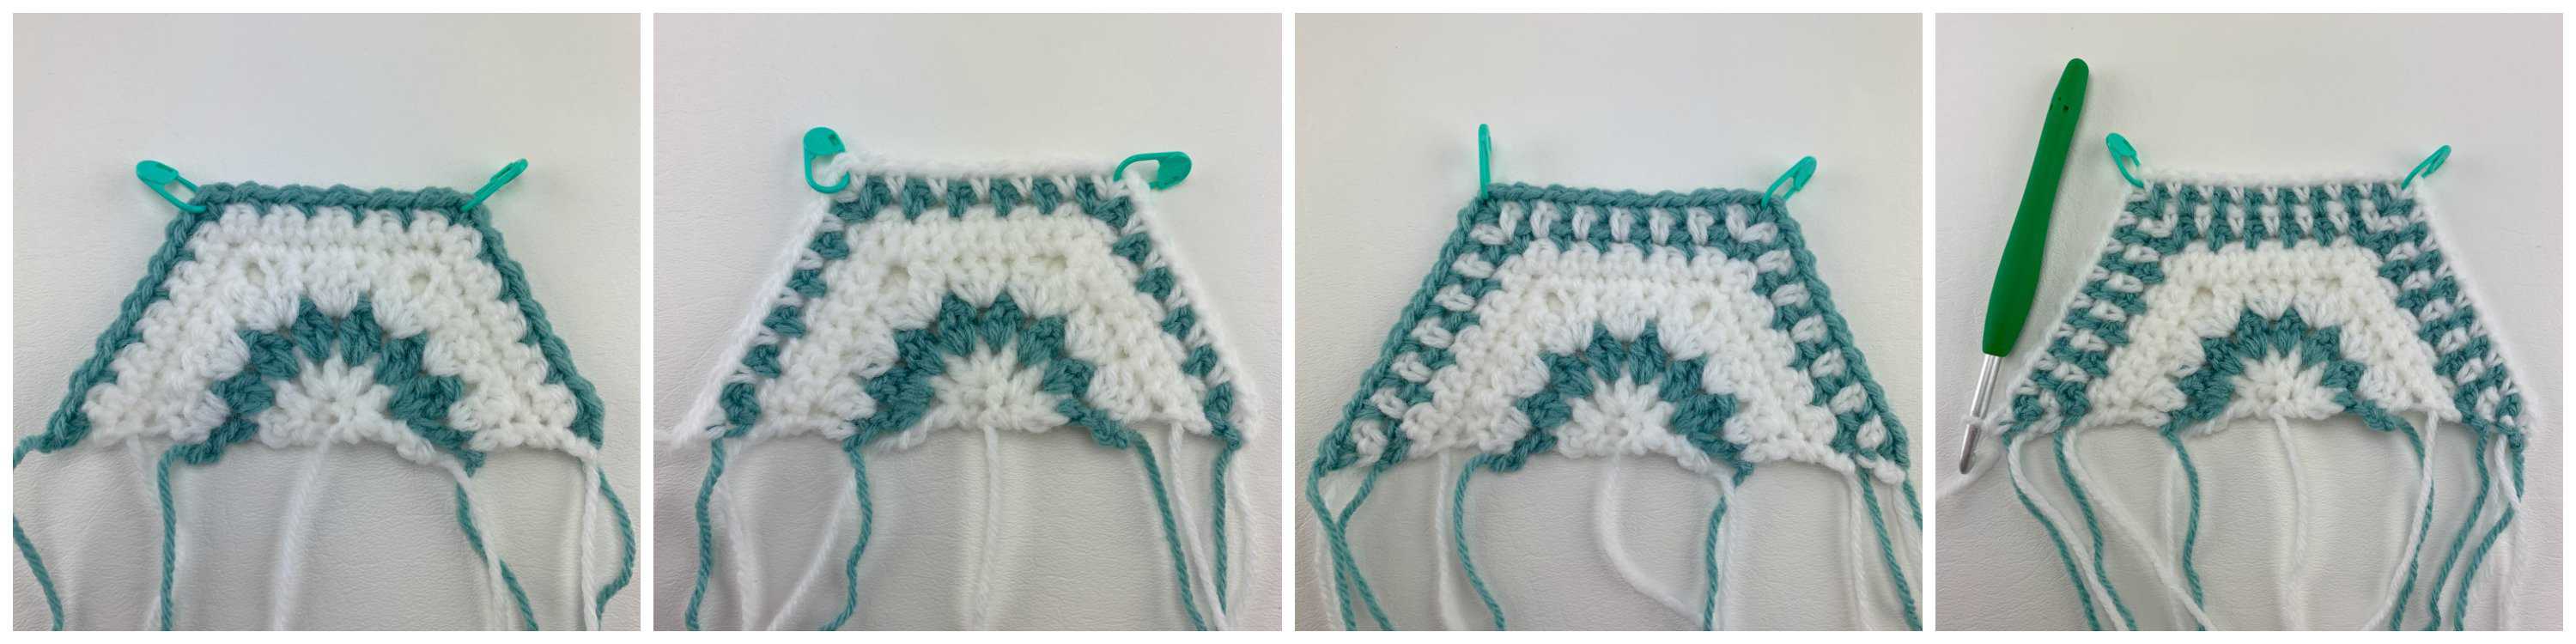
Tip! In rounds 5 & 6, you may find it helpful to place a locking stich marker in the 2nd sc of each 3 sc worked into the corners of the hexagon.
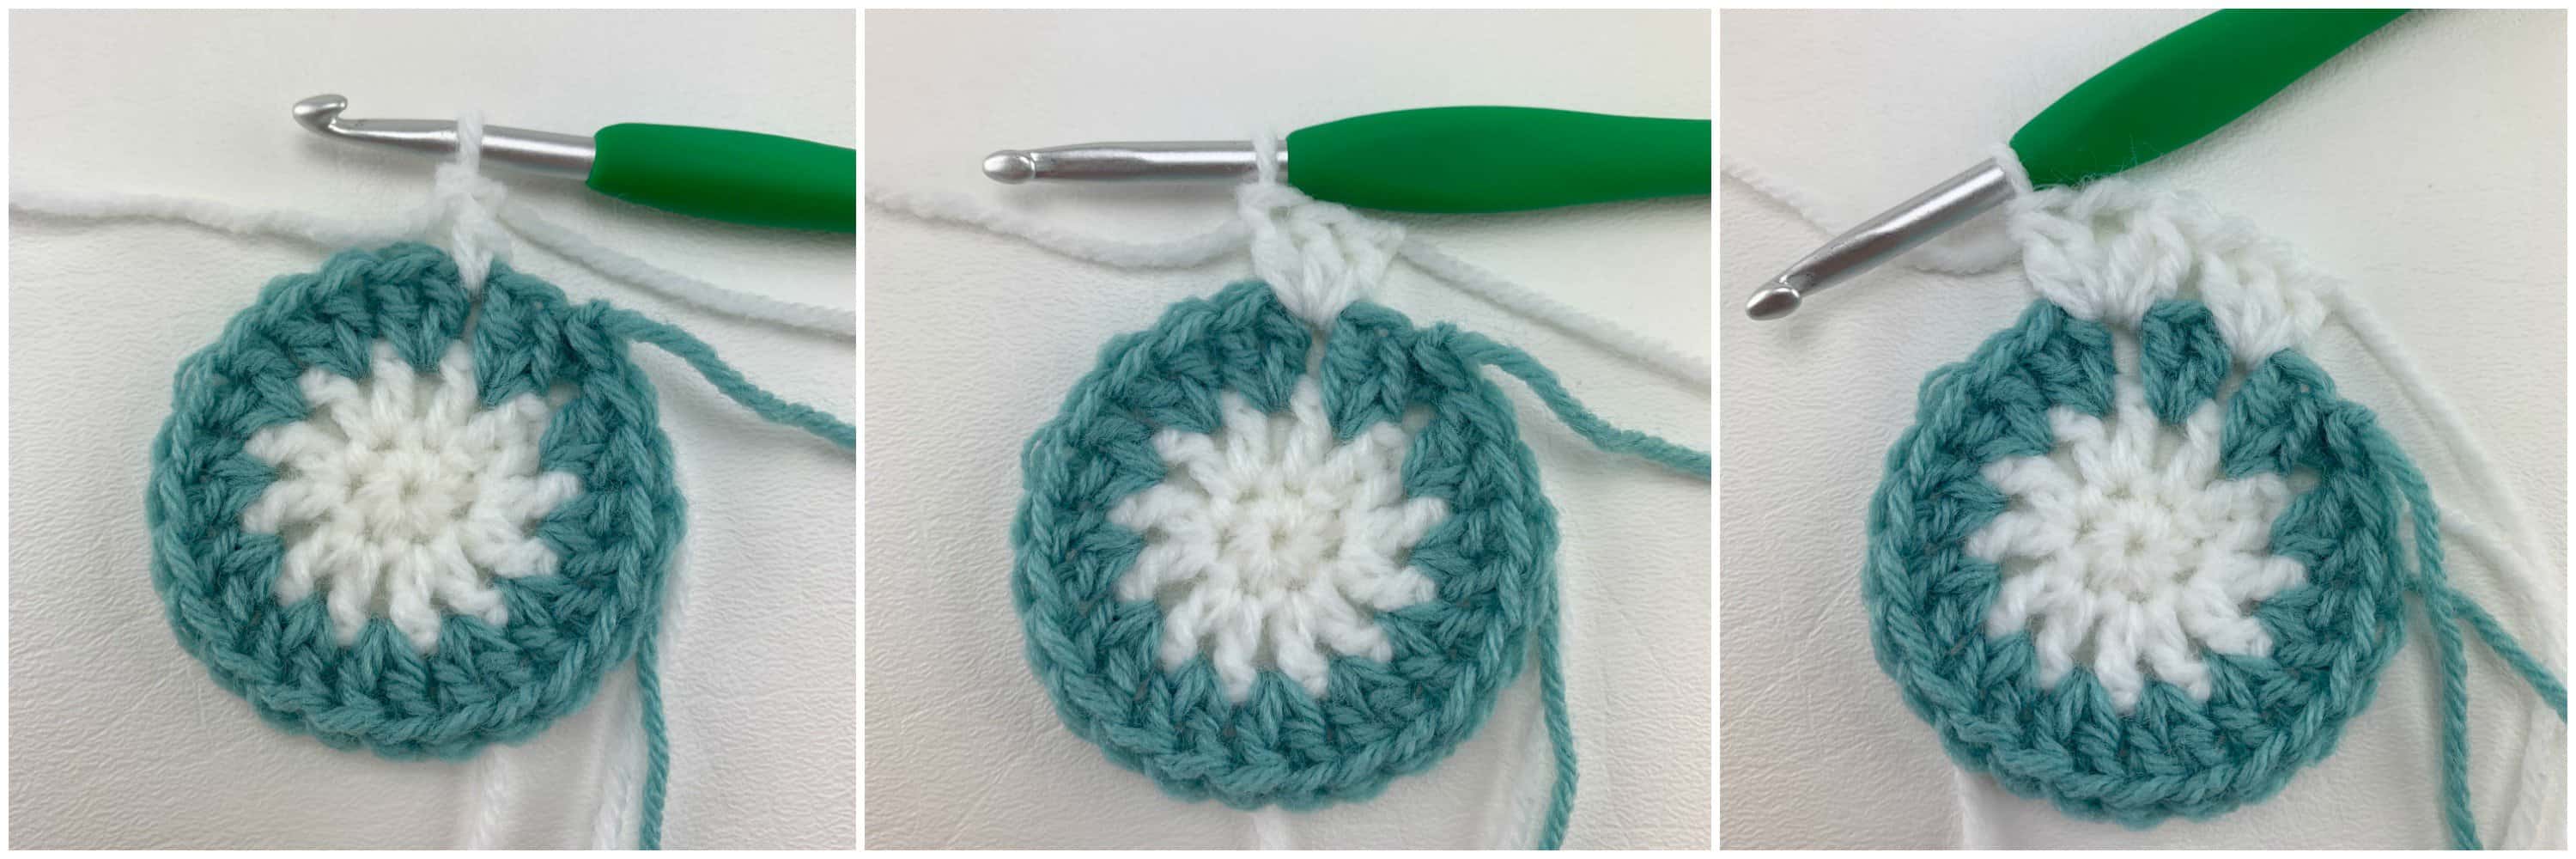
Rnd 5 (MC): Sc in each of the next 4 sts, 3 sc in the next ch-2 sp, * sc in each of the next 5 sts, 3 sc in the next ch-2 sp, rep from * around to the last st, sc in the last st. Do not join. (48 sts)
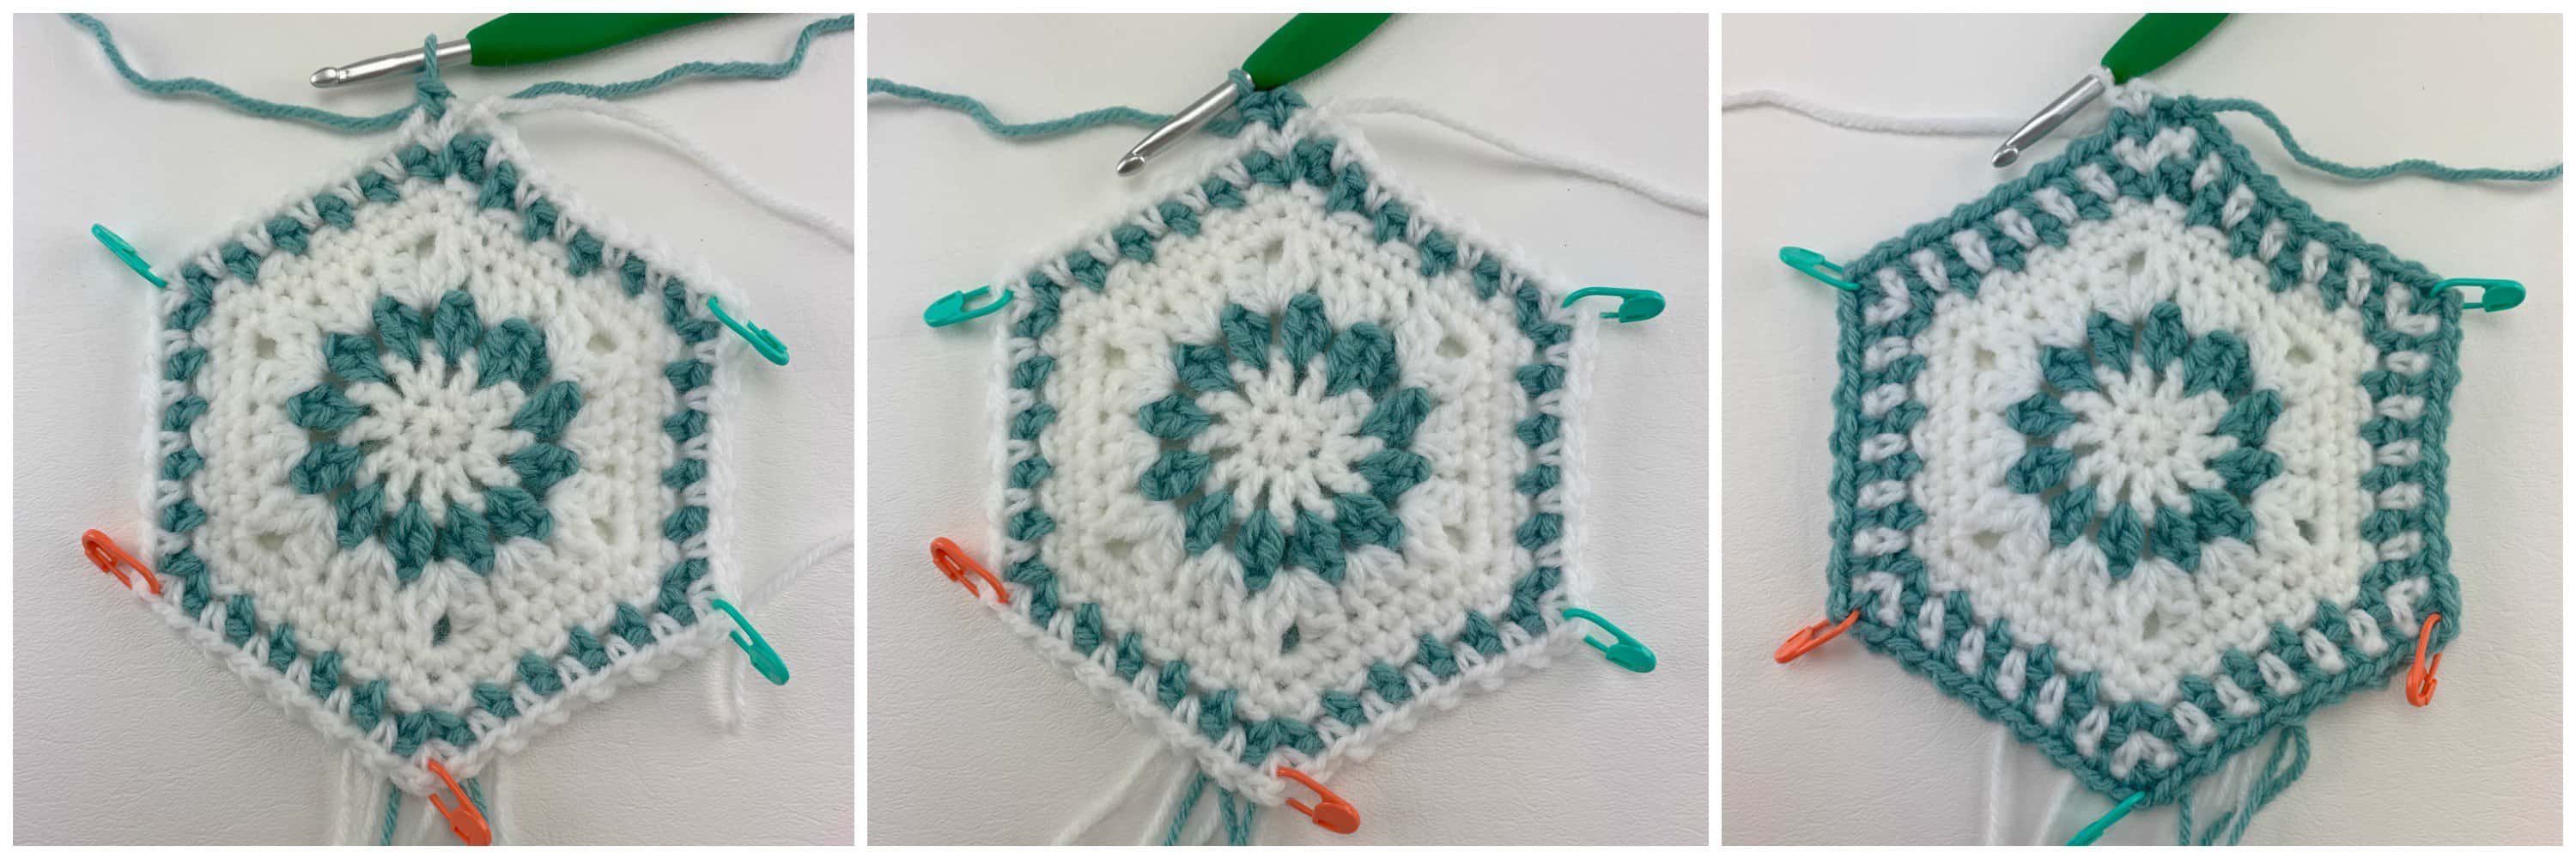
Rnd 6 (MC): Sc in each of the next 5 sts, 3 sc in the next st, * sc in each of the next 7 sts, 3 sc in the next st, rep from * around to the last 2 sts, sc in each of the last 2 sts. Do not join. Fasten off MC. (60 sts) Make sure you’ve placed stitch markers in the 2nd sc of each 3 sc group, in each corner of the hexagon. Approximate size at this point is 4.5″ from flat edge to flat edge.
Rnd 7 (CC): With a 5.50mm crochet hook & CC yarn, join yarn with a standing sc in the st marked with a SM in the corner to the left of where you fastened off round 6, (ch 1, sc) in the same st, * ch 1, skip the next st, (sc in the next st, ch 1, skip the next st) 4 times, (sc, ch 1, sc) in the next st marked with a SM, work from * a total of 5 times, then ch 1, skip the next st, (sc in the next st, ch 1, skip the next st) 4 times. Join with a sl st to the standing sc. Fasten off CC. (72 sts including ch-1s) Place a SM in the ch-1 spaces at each corner of the hexagon.
Rnd 8 (MC): With a 5.50mm crochet hook & MC yarn, join yarn with a standing sc in the ch-1 sp marked with a SM in the corner nearest to where you fastened off round 7, (ch 1, sc) in the same ch-1 sp, * ch 1, skip the next st, (sc in the next ch-1 sp, ch 1, skip the next st) 5 times, (sc, ch 1, sc) in the next ch-1 sp marked with a SM, work from * a total of 5 times, then ch 1, skip the next st, (sc in the next ch-1 sp, ch 1, skip the next st) 5 times. Join with a sl st to the standing sc. Fasten off MC. (84 sts including ch-1s) Place a SM in the ch-1 spaces at each corner of the hexagon.
Rnd 9 (CC): With a 5.50mm crochet hook & CC yarn, join yarn with a standing sc in the ch-1 sp marked with a SM in the corner nearest to where you fastened off round 8, (ch 1, sc) in the same ch-1 sp, * ch 1, skip the next st, (sc in the next ch-1 sp, ch 1, skip the next st) 6 times, (sc, ch 1, sc) in the next ch-1 sp marked with a SM, work from * a total of 5 times, then ch 1, skip the next st, (sc in the next ch-1 sp, ch 1, skip the next st) 6 times. Join with a sl st to the standing sc. Fasten off CC. (96 sts including ch-1s) Place a SM in the ch-1 spaces at each corner of the hexagon.
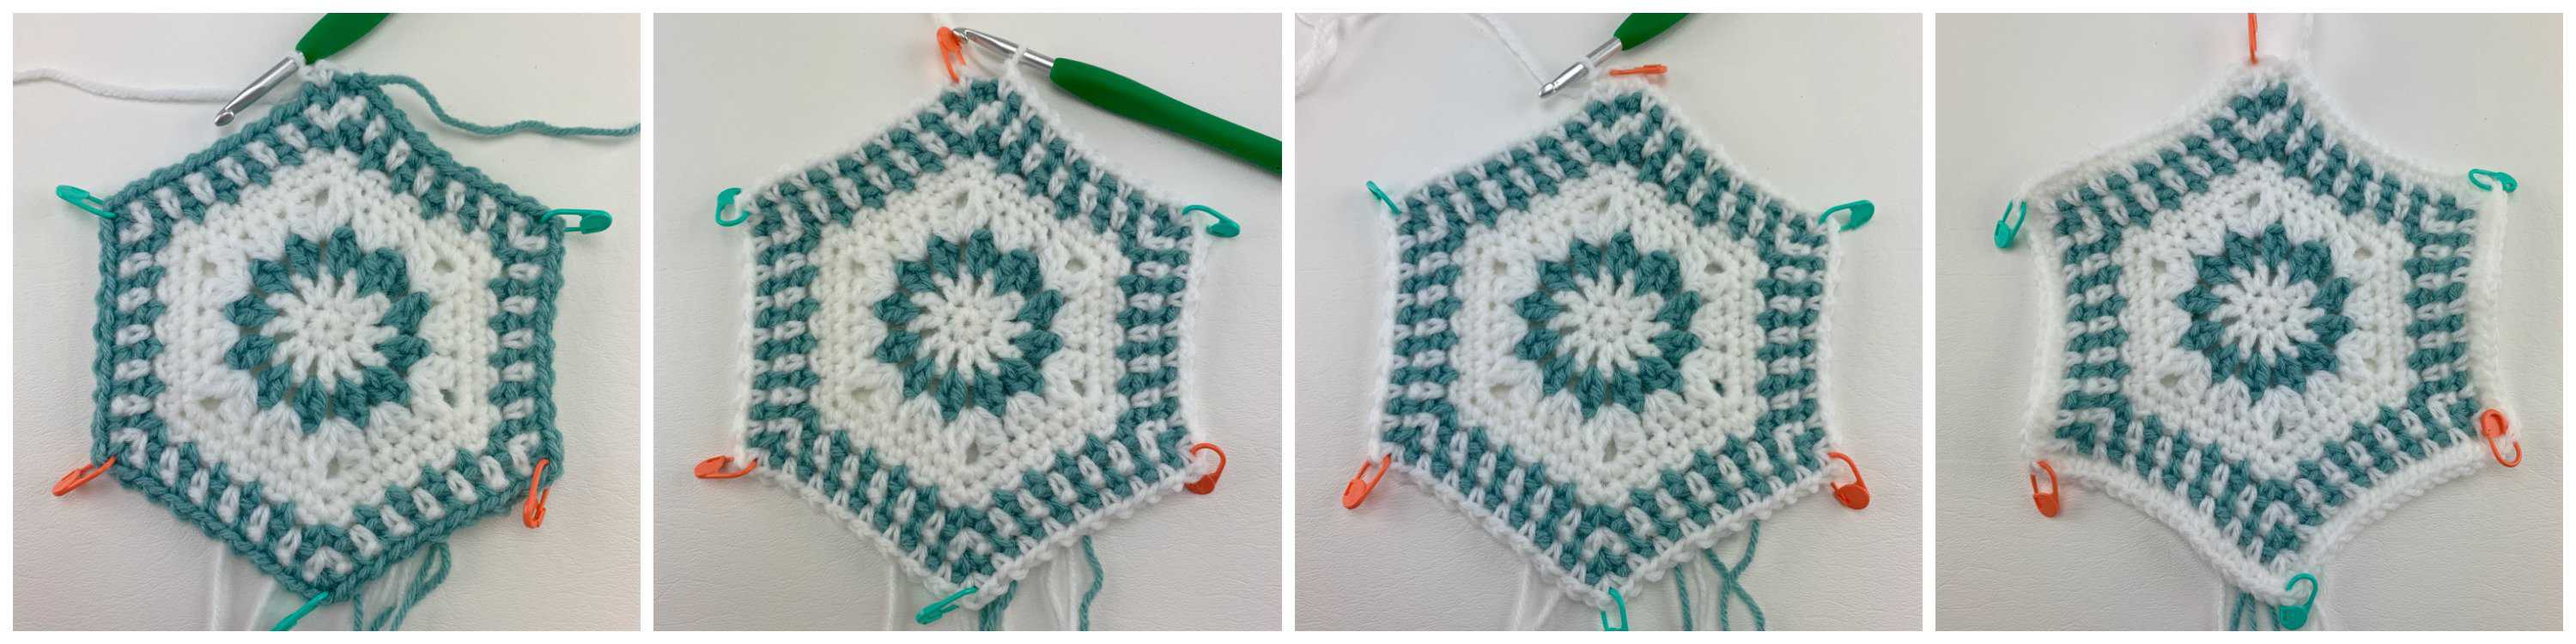
Rnd 10 (MC): With a 5.50mm crochet hook & MC yarn, join yarn with a standing sc in the ch-1 sp marked with a SM in the corner nearest to where you fastened off round 9, (ch 1, sc) in the same ch-1 sp, * ch 1, skip the next st, (sc in the next ch-1 sp, ch 1, skip the next st) 7 times, (sc, ch 1, sc) in the next ch-1 sp marked with a SM, work from * a total of 5 times, then ch 1, skip the next st, (sc in the next ch-1 sp, ch 1, skip the next st) 7 times. Do not join. Do not fasten off. (108 sts includes ch-1s) Place a SM in the ch-1 spaces at each corner of the hexagon.
Tip! In round 11, you may find it helpful to place a locking stitch marker in the 2nd sc of each 3 sc worked into the ch-1 sps. These stitches mark the corners of our hexagon.
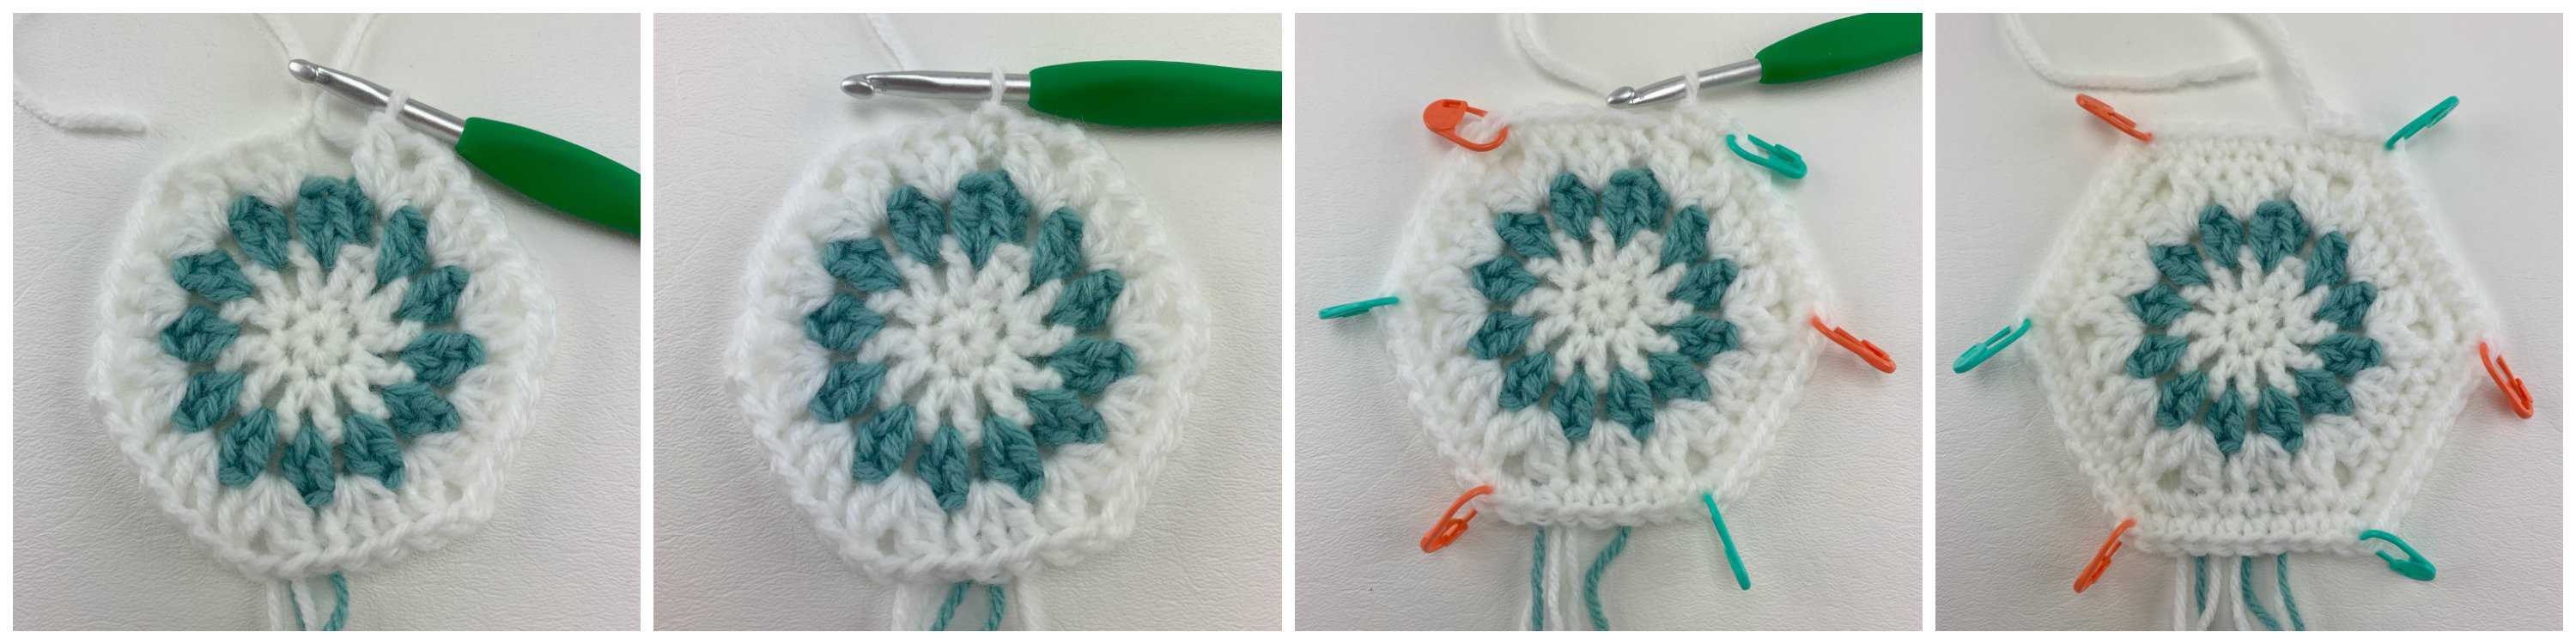
Rnd 11 (MC): Sc in the next st, * 3 sc in the next ch-1 sp, sc in each of the next 17 sts & ch-1’s, work from * a total of 5 times, then 3 sc in the next ch-1 sp, sc in each of the next 16 sts & ch-1’s. Join with a sl st to the 1st sc. Fasten off MC. (120 sts) Make sure you’ve placed stitch markers in the 2nd sc of each 3 sc group, in each corner of the hexagon. Approximate size at this point is 7″ from flat edge to flat edge.
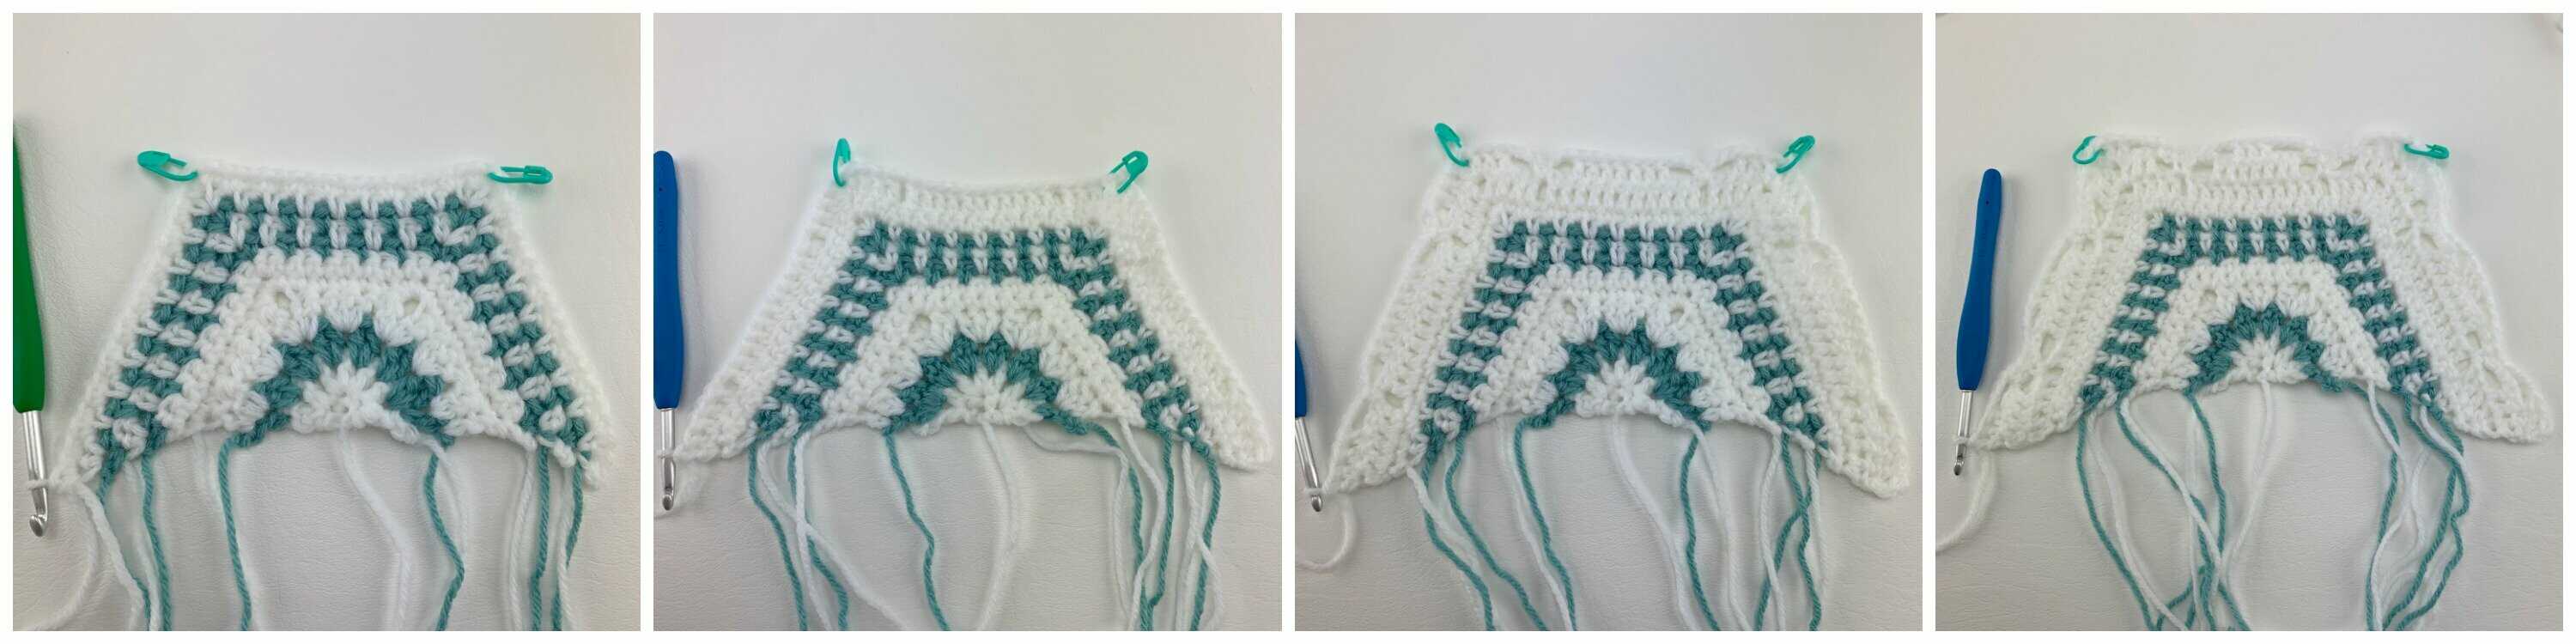
Switch Hooks: For the remainder of the hexagon instructions, I decided to use a smaller hook to help the hexagon lay more nicely. I’ve gone down only 1 hook size to a 5.00mm hook, but if you crochet more loosely than I do, you may feel the need to go down a couple hook sizes.
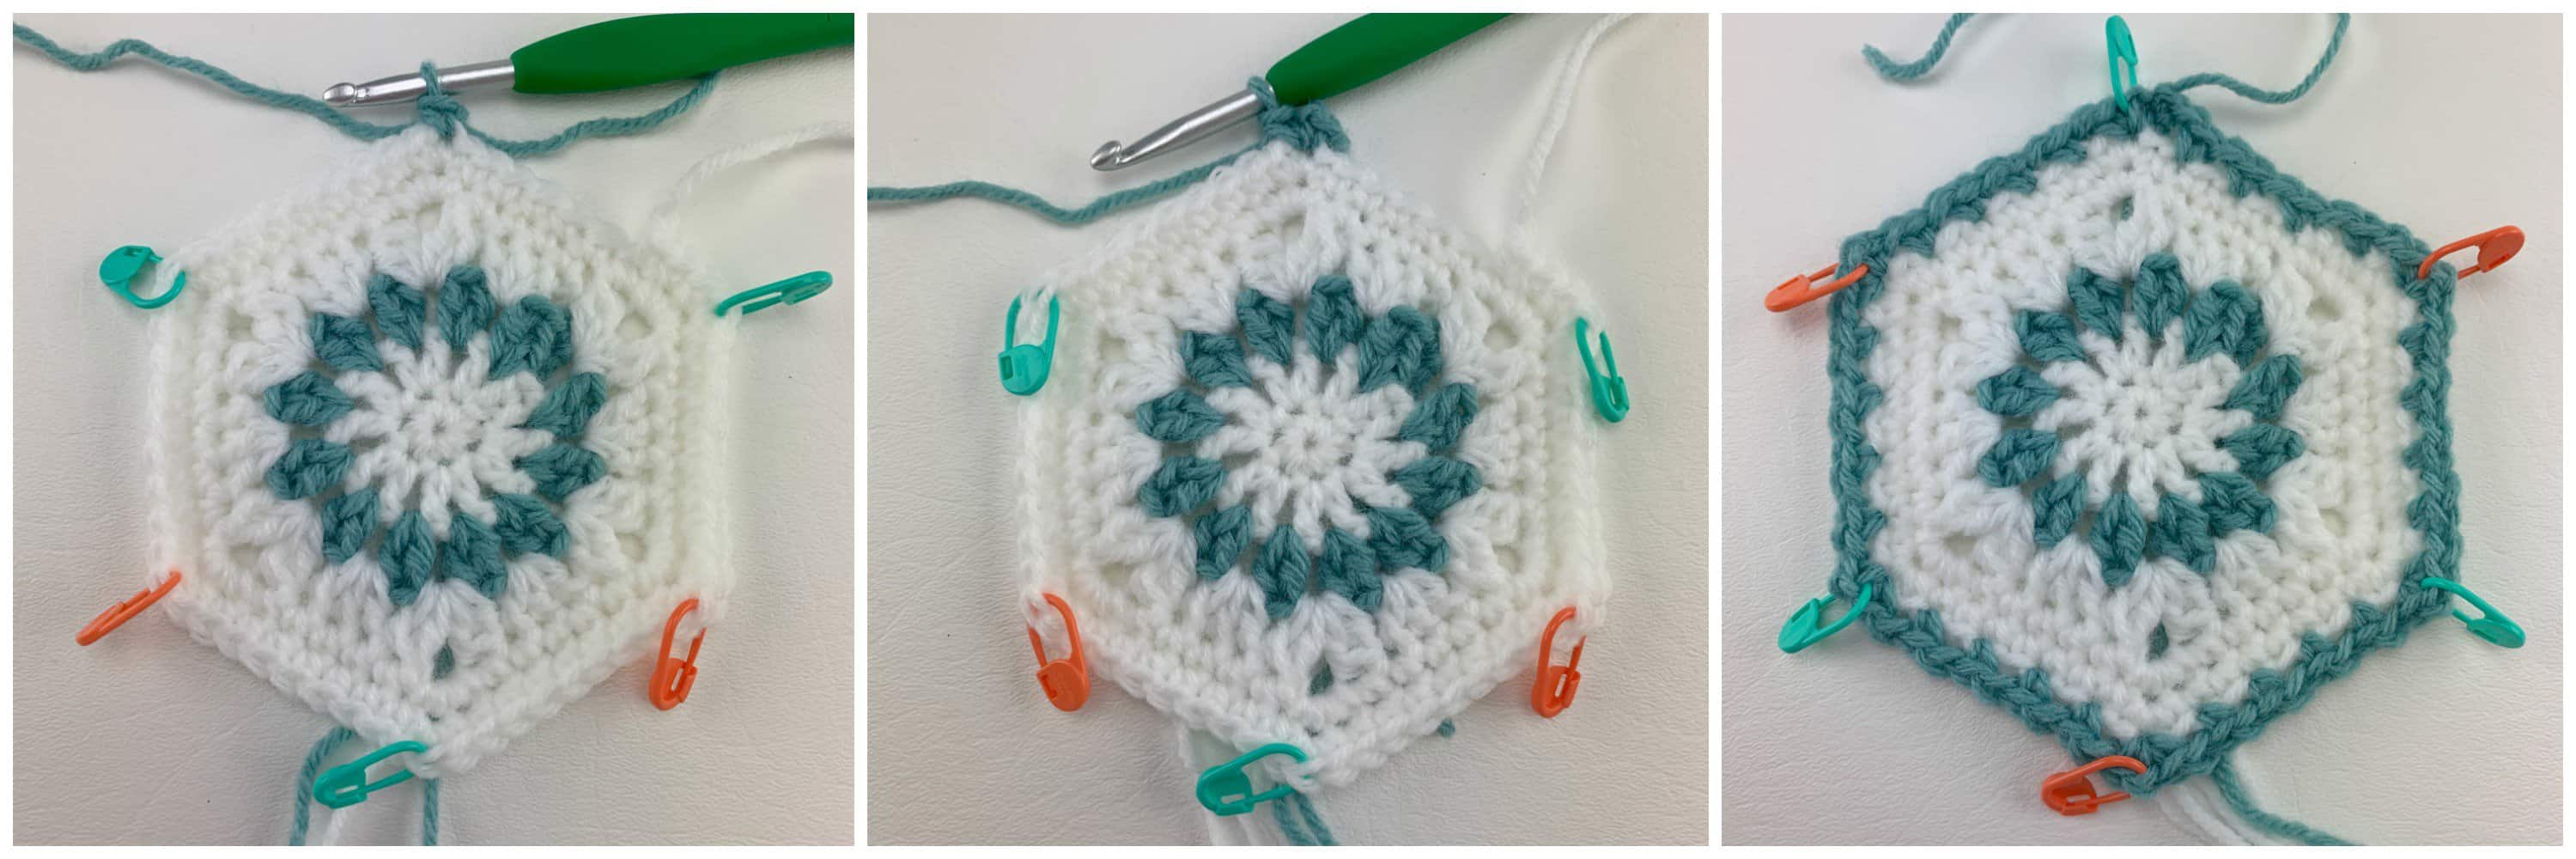
Rnd 12 (MC): With a 5.00mm crochet hook & MC yarn, join yarn with a standing dc in the st marked with a SM in the corner to the left of where you fastened off round 11, (ch 1, dc) in the same st, * dc in each of the next 3 sts, ch 1, skip the next st, dc in each of the next 11 sts, ch 1, skip the next st, dc in each of the next 3 sts, (dc, ch 1, dc) in the next corner st, work from * for a total of 5 times, then dc in each of the next 3 sts, ch 1, skip the next st, dc in each of the next 11 sts, ch 1, skip the next st, dc in each of the next 3 sts. Do not join. (132 sts includes ch-1’s) Place a SM in the ch-1 spaces at each corner of the hexagon.
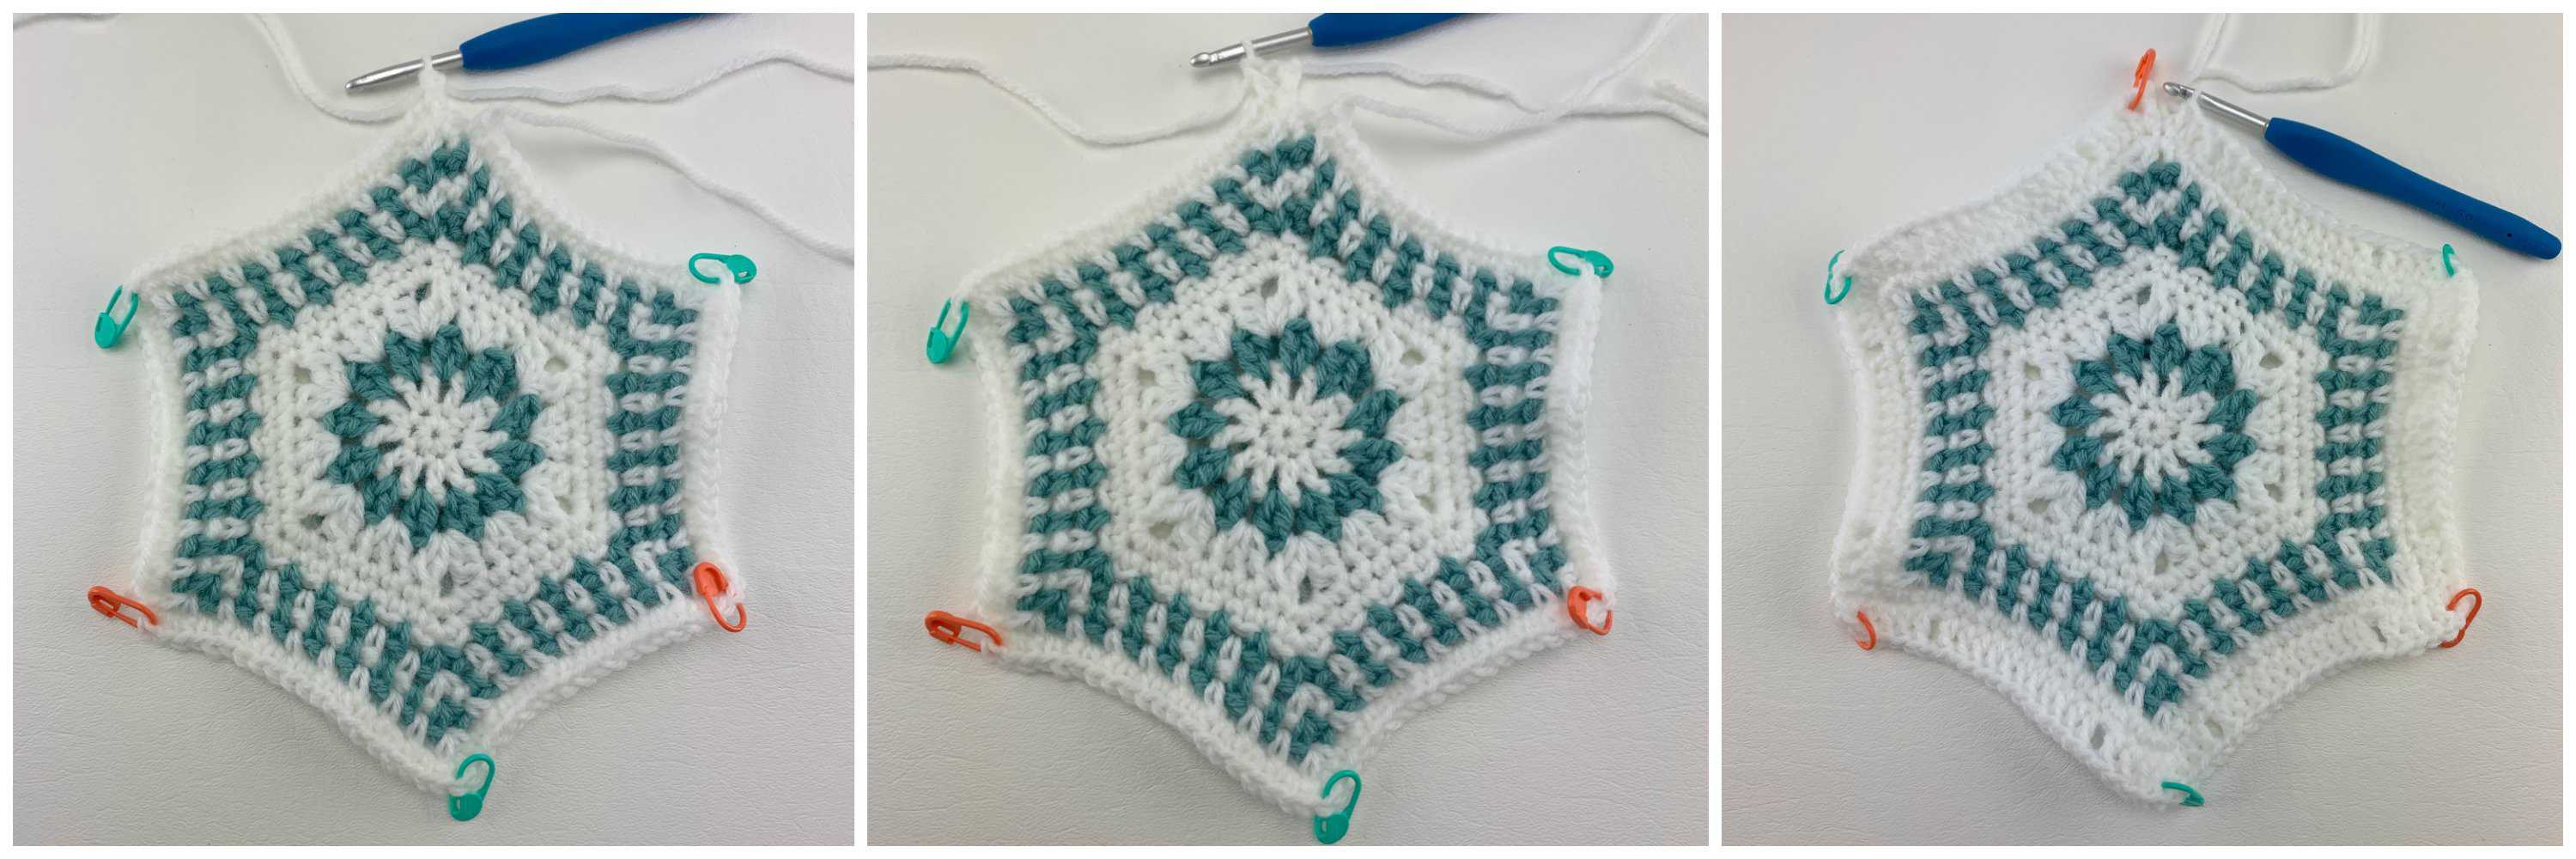
Rnd 13 (MC): Alt-dc in the first st, (dc, ch 1, dc) in the next ch-1 sp, * dc in each of the next 2 sts, ch 3, skip each of the next 2 sts, sc in the next ch-1 sp, ch 3, skip each of the next 2 sts, dc in each of the next 7 sts, ch 3, skip each of the next 2 sts, sc in the next ch-1 sp, ch 3, skip each of the next 2 sts, dc in each of the next 2 sts, (dc, ch 1, dc) in the next ch-1 sp, work from * for a total of 5 times, then dc in each of the next 2 sts, ch 3, skip each of the next 2 sts, sc in the next ch-1 sp, ch 3, skip each of the next 2 sts, dc in each of the next 7 sts, ch 3, skip each of the next 2 sts, sc in the next ch-1 sp, ch 3, skip each of the next 2 sts, dc in the last st. Do not join. (90 sts + 6 ch-1’s + 24 ch-3’s) Place a SM in the ch-1 spaces at each corner of the hexagon.
Rnd 14 (MC): Sl st into the BLO of the first st, alt-dc in the next st, * (dc, ch 1, dc) in the next ch-1 sp, dc in the next st, ch 3, skip each of the next 2 dc & 2 ch’s, sc in the next ch, sc in the next sc, sc in the next ch, ch 3, skip each of the next 2 ch’s & 2 dc, dc in each of the next 3 sts, ch 3, skip each of the next 2 dc & 2 ch’s, sc in the next ch, sc in the next sc, sc in the next ch, ch 3, skip each of the next 2 ch’s & 2 dc, dc in the next st, work from * a total of 5 times, then (dc, ch 1, dc) in the next ch-1 sp, dc in the next st, ch 3, skip each of the next 2 dc & 2 ch’s, sc in the next ch, sc in the next sc, sc in the next ch, ch 3, skip each of the next 2 ch’s & 2 dc, dc in each of the next 3 sts, ch 3, skip each of the next 2 dc & 2 ch’s, sc in the next ch, sc in the next sc, sc in the next ch, ch 3, skip each of the next 2 ch’s & 2 dc. Do not join (the first stitch of the next round will act as your join). (78 sts + 6 ch-1’s + 24 ch-3’s) Place a SM in the ch-1 spaces at each corner of the hexagon.

Rnd 15 (MC): Alt-dc in the first st, dc in the next st, (dc, ch 1, dc) in the next ch-1 sp, * dc in each of the next 2 sts, 2 dc in the next ch-3 sp, ch 3, skip the next sc, sc in the next sc, ch 3, skip the next sc, 2 dc in the next ch-3 sp, dc in each of the next 3 sts, 2 dc in the next ch-3 sp, ch 3, skip the next sc, sc in the next sc, ch 3, skip the next sc, 2 dc in the next ch-3 sp, dc in each of the next 2 sts, (dc, ch 1, dc) in the next ch-1 sp, work from * 5 times, then dc in each of the next 2 sts, 2 dc in the next ch-3 sp, ch 3, skip the next sc, sc in the next sc, ch 3, skip the next sc, 2 dc in the next ch-3 sp, dc in each of the next 3 sts, 2 dc in the next ch-3 sp, ch 3, skip the next sc, sc in the next sc, ch 3, skip the next sc, 2 dc in the next ch-3 sp. Do not join. (114 sts + 6 ch-1’s + 24 ch-3’s) Place a SM in the ch-1 spaces at each corner of the hexagon.
Rnd 16 (MC): Alt-dc in the first st, dc in each of the next 2 sts, * (dc, ch 1, dc) in the next ch-1 sp, dc in each of the next 5 sts, 2 dc in the next ch-3 sp, ch 1, skip the next sc, 2 dc in the next ch-3 sp, dc in each of the next 7 sts, 2 dc in the next ch-3 sp, ch 1, skip the next sc, 2 dc in the next ch-3 sp, dc in each of the next 5 sts, work from * 5 times, then (dc, ch 1, dc) in the next ch-1 sp, dc in each of the next 5 sts, 2 dc in the next ch-3 sp, ch 1, skip the next sc, 2 dc in the next ch-3 sp, dc in each of the next 7 sts, 2 dc in the next ch-3 sp, ch 1, skip the next sc, 2 dc in the next ch-3 sp, dc in each of the last 2 sts. Do not join. (162 sts + 18 ch-1’s) Place a SM in the ch-1 spaces at each corner of the hexagon.
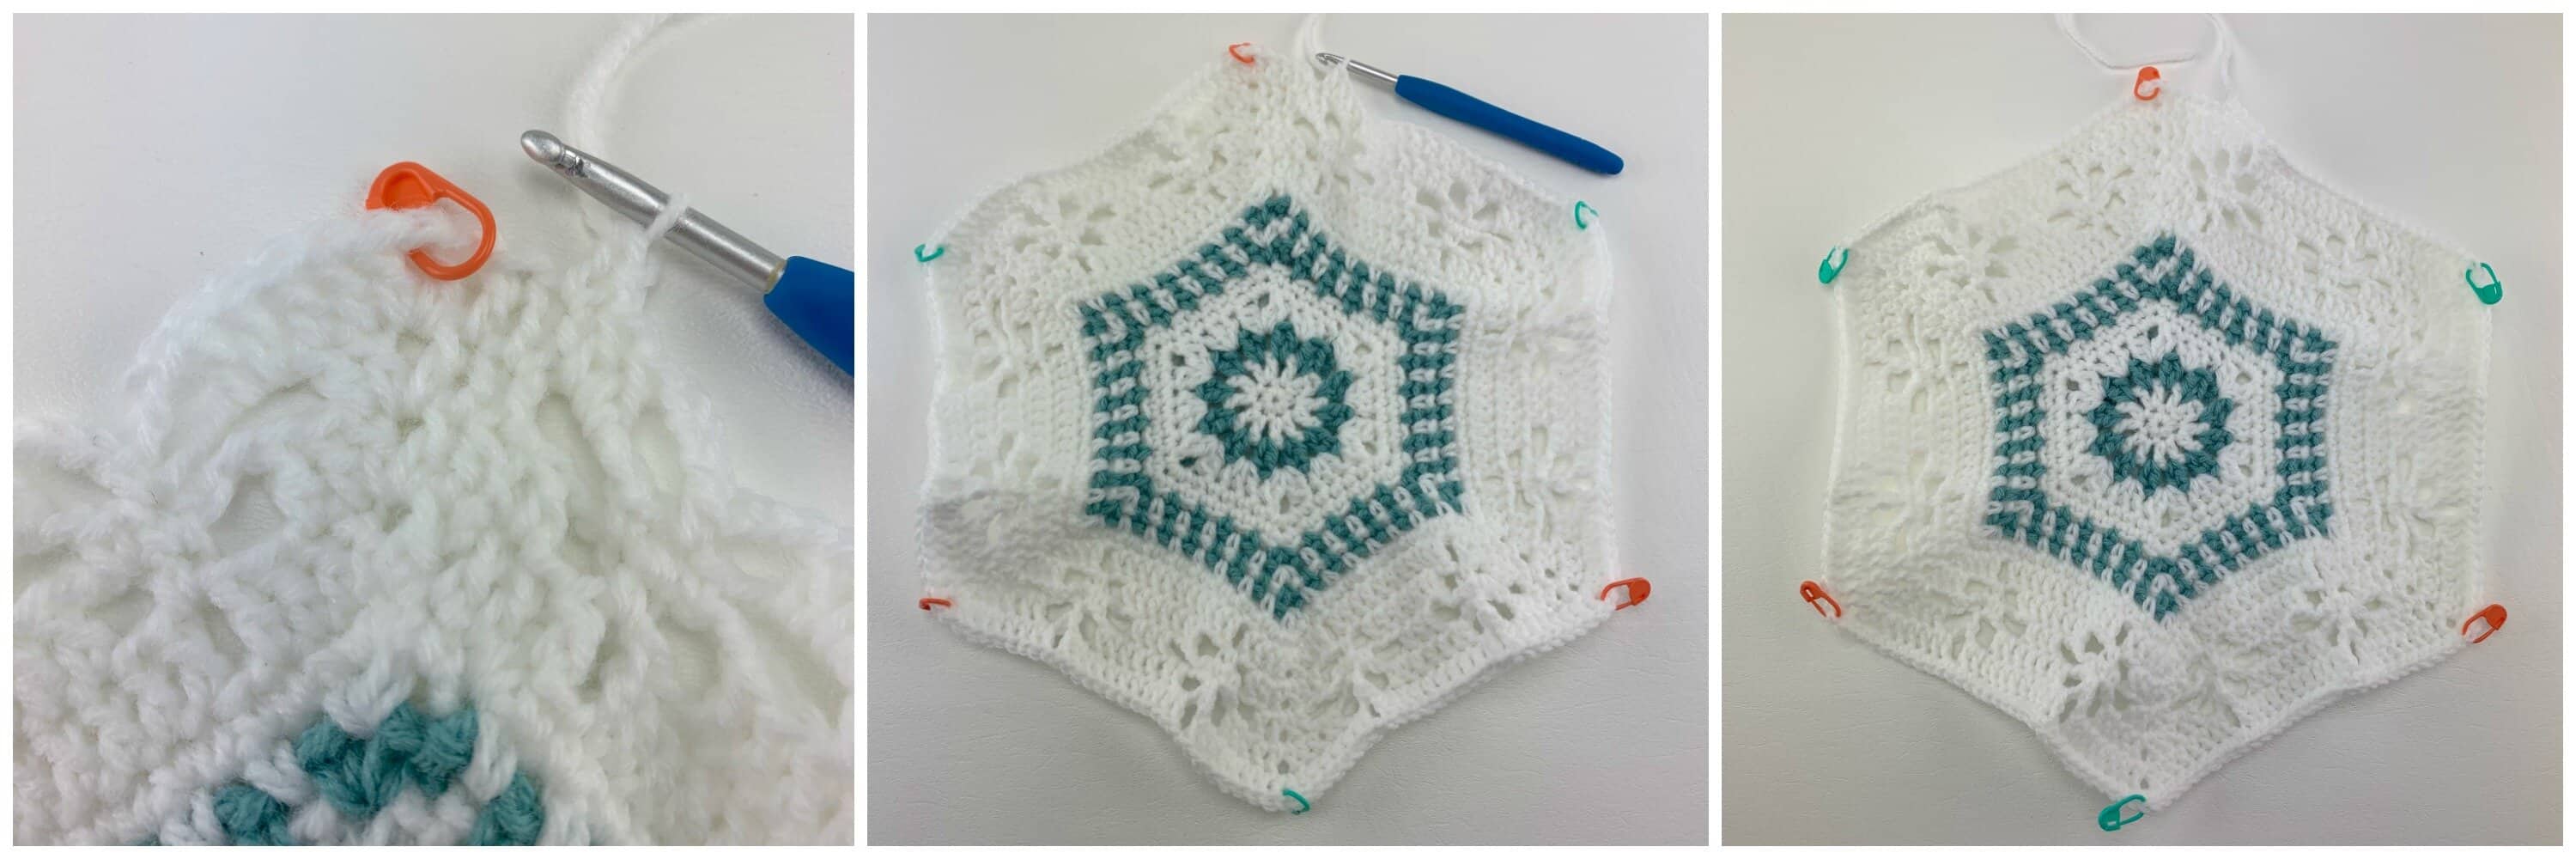
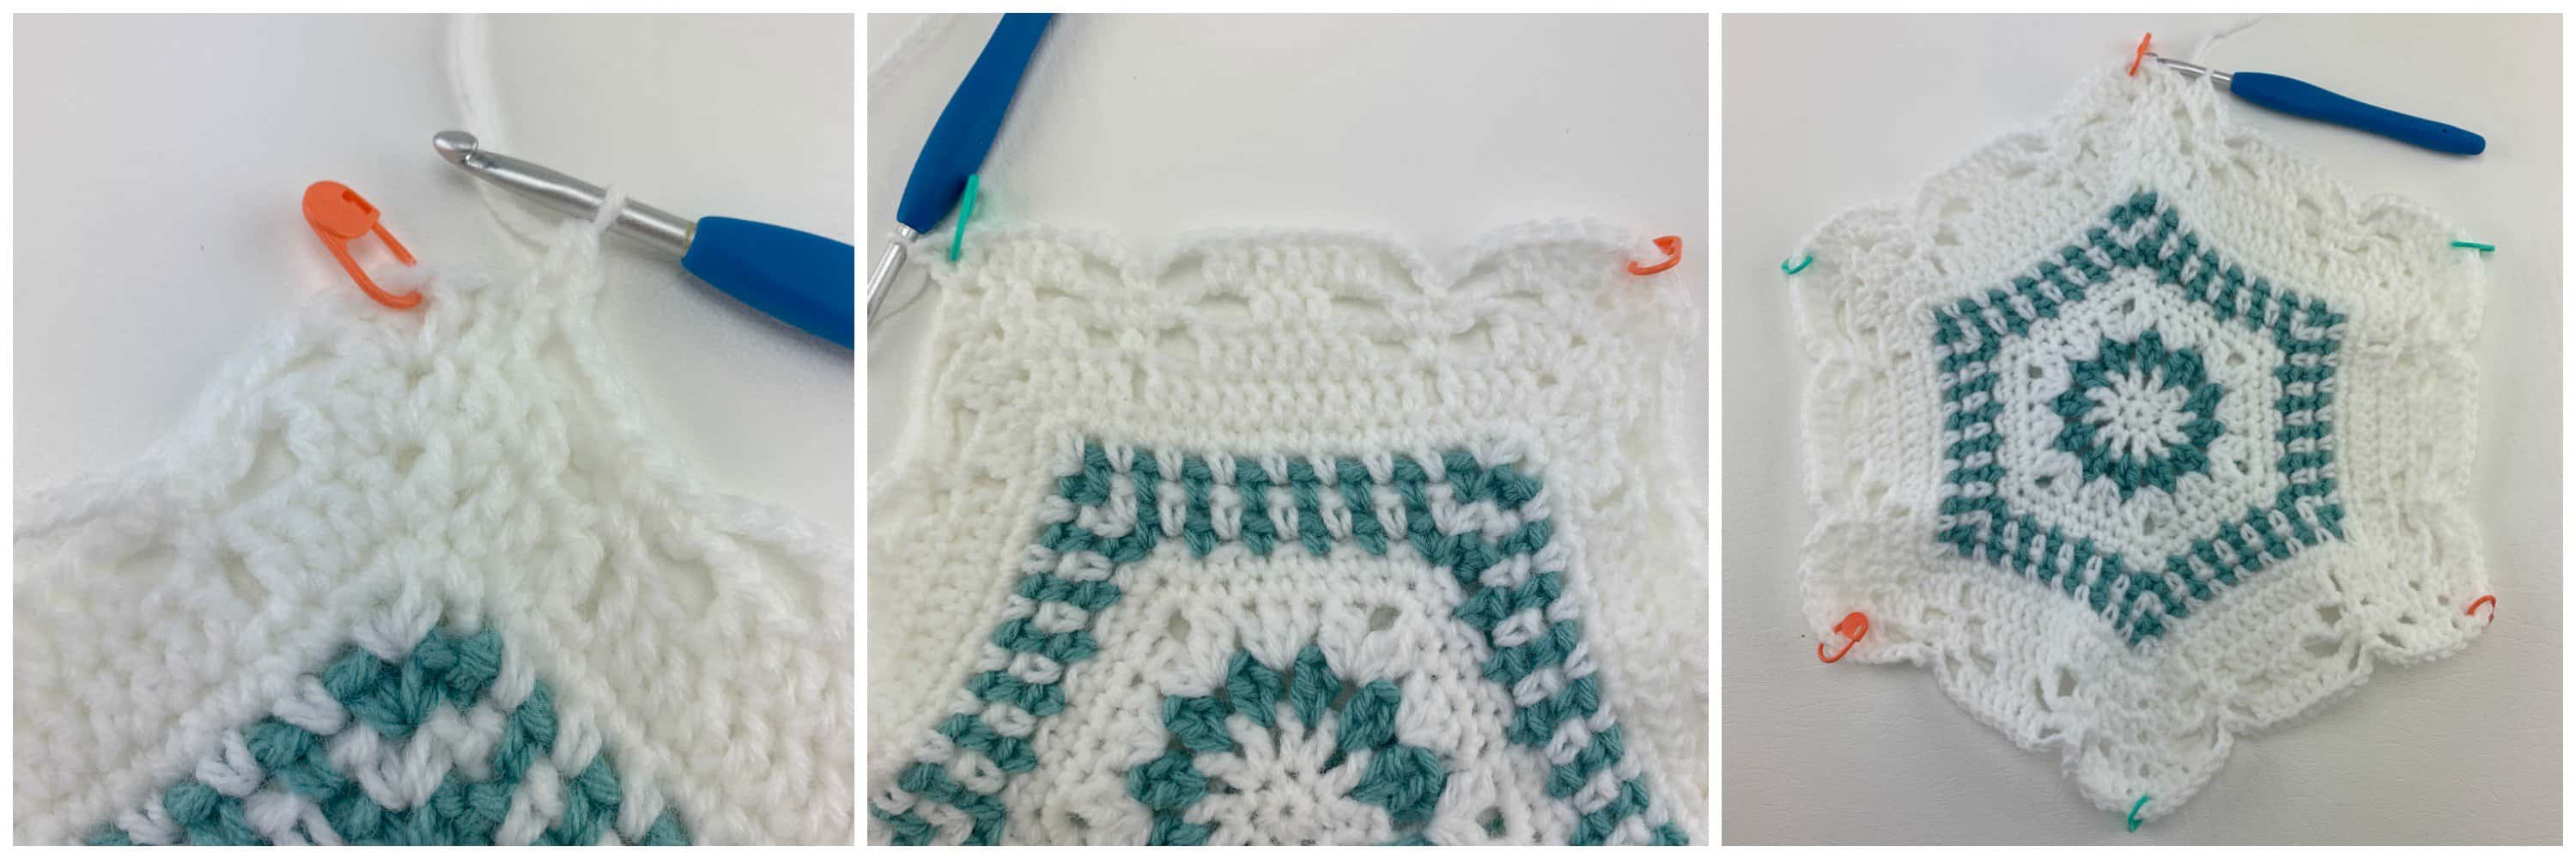
Rnd 17 (MC): Sc in each st and ch around, except add 3 sc in each ch-1 sp at all 6 of the corners. Do not join. (192 sts) Place stitch markers in the 2nd sc of each 3 sc group, in each corner of the hexagon. These will help make seaming go much more smoothly.
Fasten off. Weave in ends. Finished size should be approximately 12″ from flat edge to flat edge. Continue on to Half Hexagons.
Half Hexagon Instructions – Make 4
Tip! I highly suggest using locking stitch markers where noted. They will help to keep you on track while you crochet and they come in very handy when seaming the hexagons together.
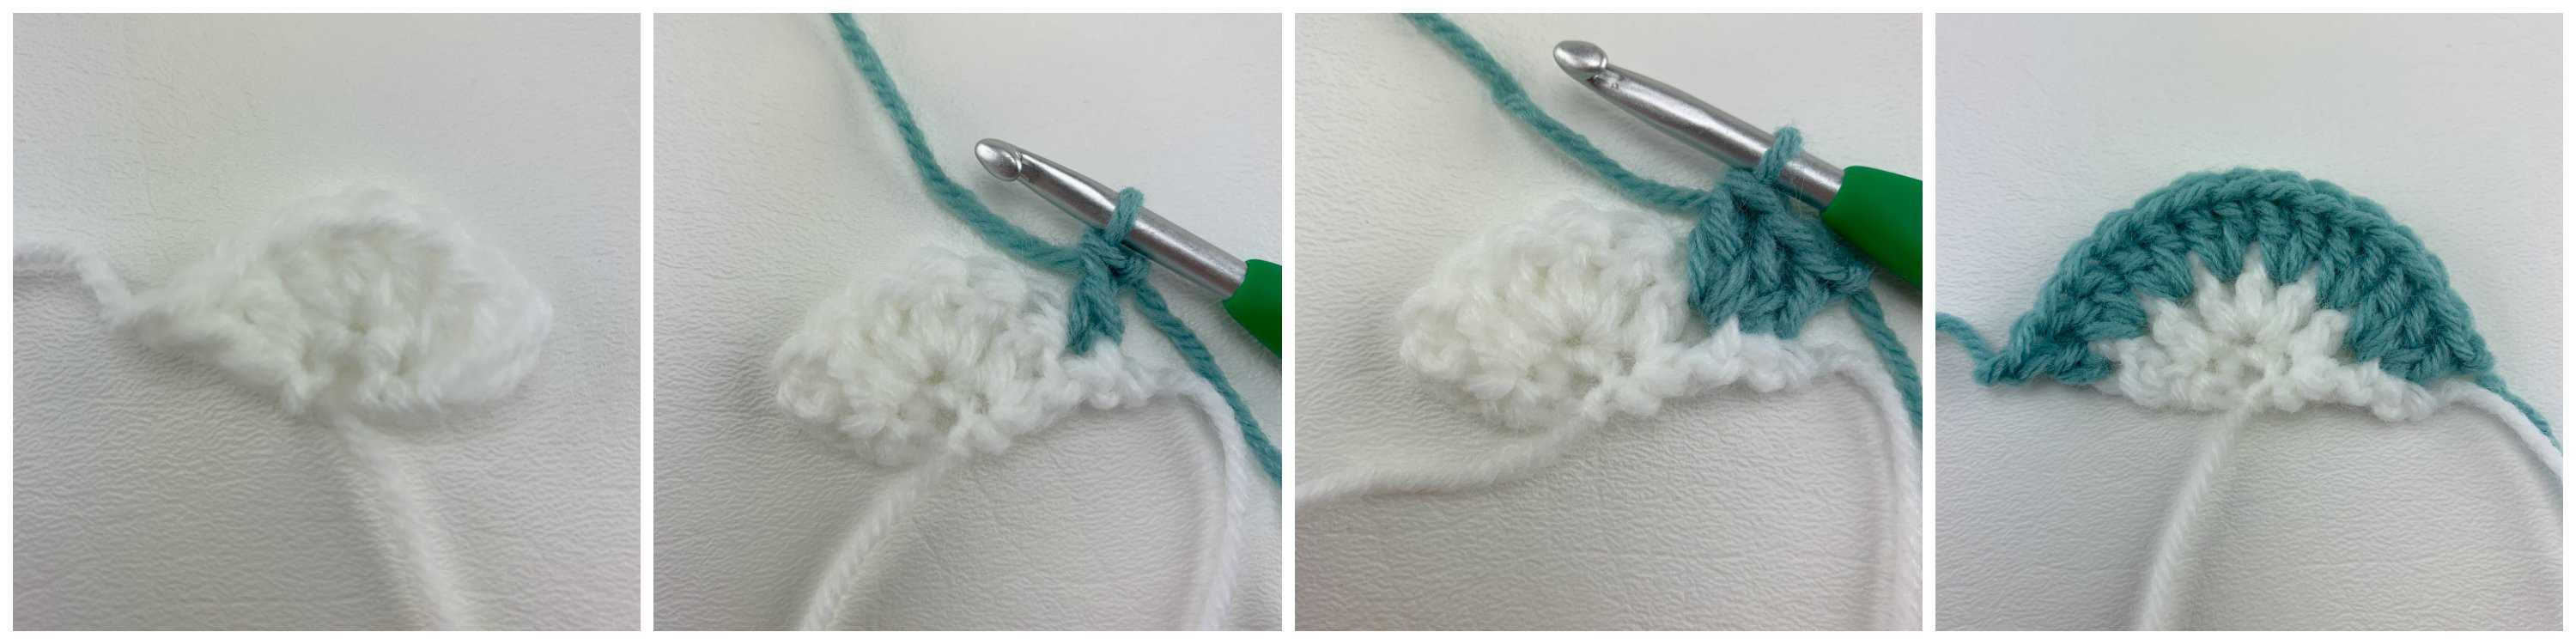
Row 1 (RS / MC): With a 5.50mm crochet hook & MC yarn, ch 2, work 3 sc into the 2nd ch from your hook. Turn. (3 sts)
Row 2 (MC): Alt-dc in the first st, work 1 more dc in the first st, 3 dc in the next st, 2 dc in the last st. Fasten off MC. Turn. (7 sts)
Row 3 (CC): With a 5.50mm crochet hook & CC yarn, join yarn with a standing dc in the first st, * work 2 dc in the sp before the next dc, skip the next st, rep from * across to the last st, dc in the last st. Fasten off CC. Turn. (14 sts)
Row 4 (MC): With a 5.50mm crochet hook & MC yarn, join yarn with a standing dc in the first st, 2 dc-cl in the sp before the next st, skip each of the next 2 sts, 3 dc in the sp after the skipped sts, * skip each of the next 2 sts, (2 dc-cl, ch 2, 2 dc-cl) in the next sp, skip each of the next 2 sts, 3 dc in the sp after the skipped sts, work from * twice, then skip each of the next 2 sts, 2 dc-cl in the sp after the skipped sts, dc in the last st. Turn. (17 sts + 2 ch-2’s)
Row 5 (MC): Ch 1, 2 sc in the first st, (sc in each of the next 5 sts, 3 sc in the next ch-2 sp) twice, sc in each of the next 5 sts, 2 sc in the last st. Turn. (25 sts) Place stitch markers in the 2nd sc of each 3 sc group.
Row 6 (MC): Ch 1, 2 sc in the first st, (sc in each of the next 7 sts, 3 sc in the next st) twice, sc in each of the next 7 sts, 2 sc in the last st. Fasten off MC. Turn. (31 sts) Place stitch markers in the 2nd sc of each 3 sc group.
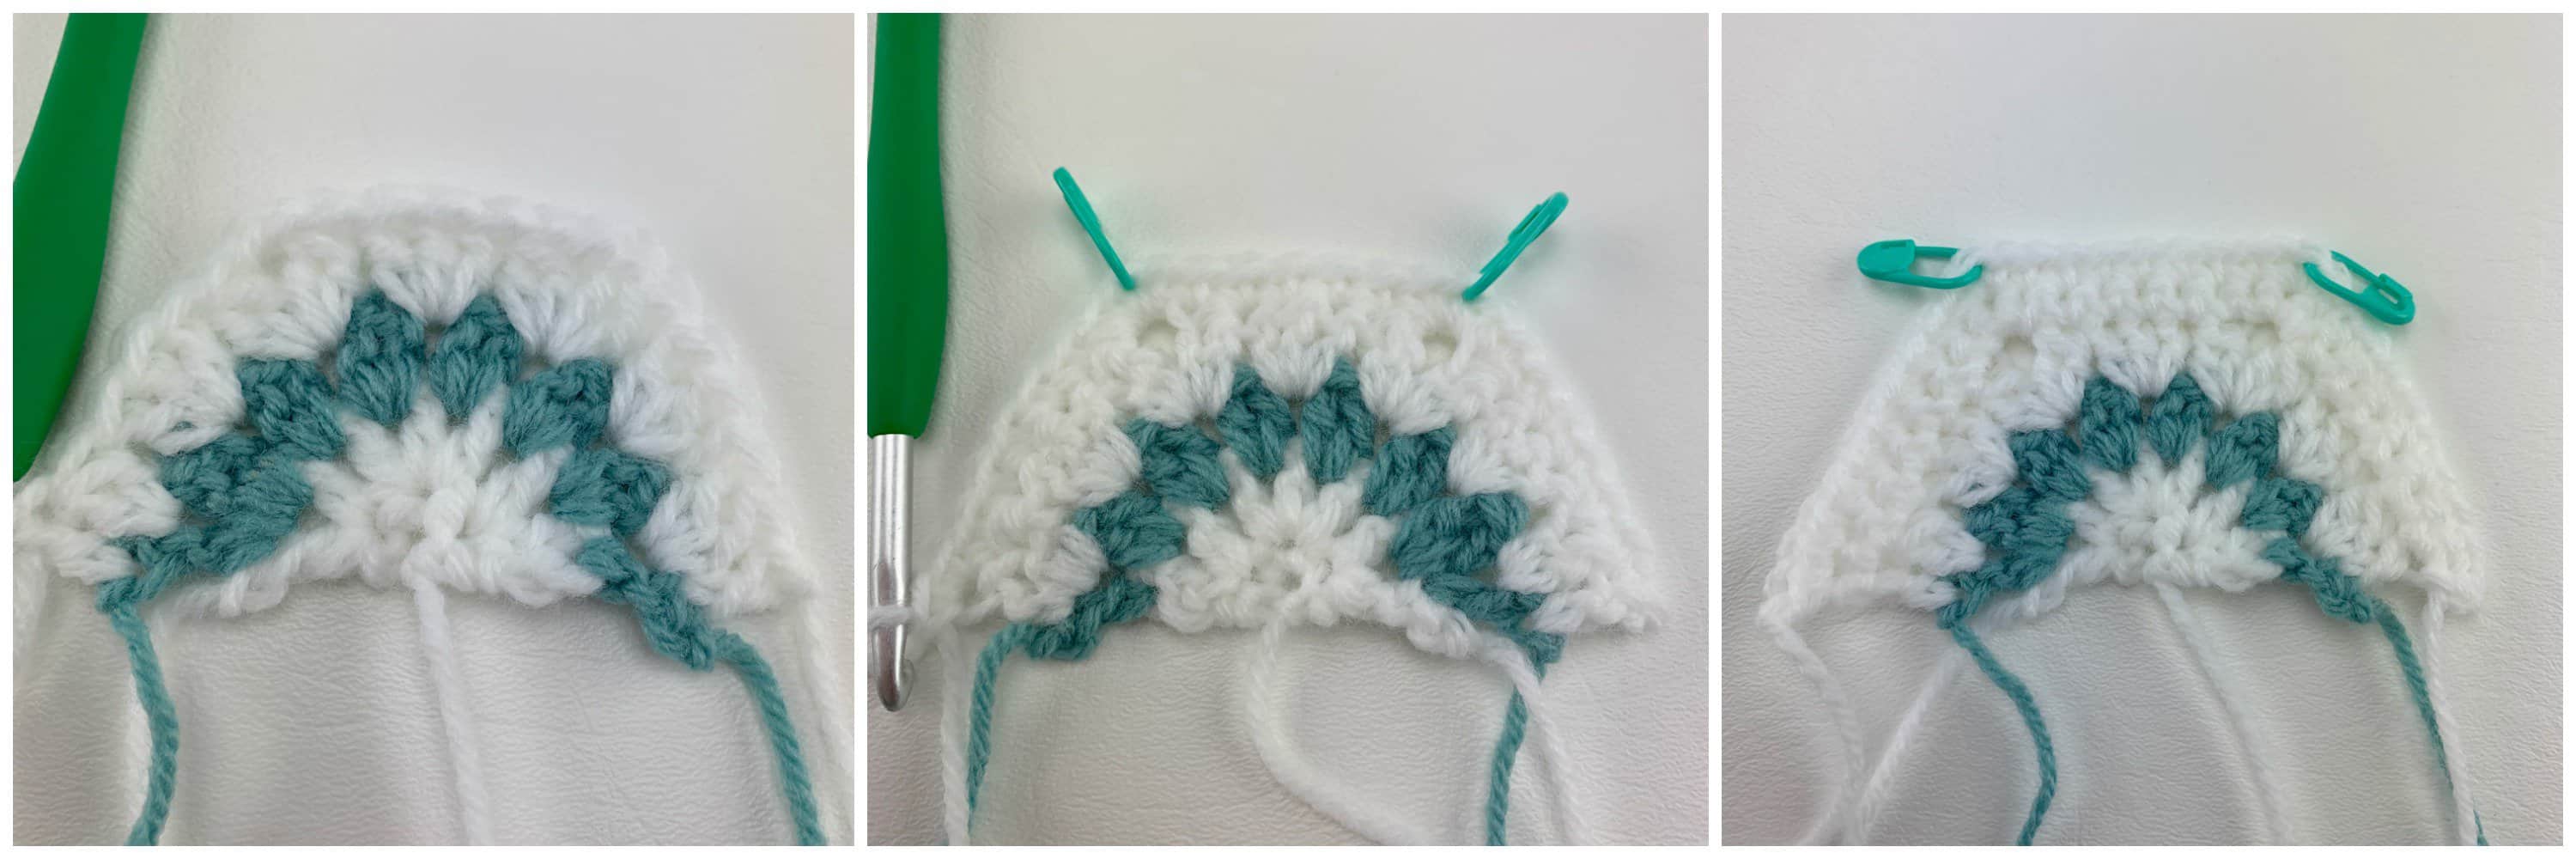
Row 7 (CC): With a 5.50mm crochet hook & CC yarn, join yarn with a standing sc in the first st, work 1 more sc in the same st, * ch 1, skip the next st, (sc in the next st, ch 1, skip the next st) 4 times, (sc, ch 1, sc) in the next st, work from * twice, ch 1, skip the next st, (sc in the next st, ch 1, skip the next st) 4 times, 2 sc in the last st. Fasten off CC. Turn. (37 sts includes ch-1 sps) Place a SM in the ch-1 spaces at each of the 2 corners of the half hexagon.
Row 8 (MC): With a 5.50mm crochet hook & MC yarn, join yarn with a standing sc in the first st, work 1 more sc in the same st, * ch 1, skip the next st, (sc in the next ch-1 sp, ch 1, skip the next st) 5 times, (sc, ch 1, sc) in the next ch-1 sp, work from * twice, ch 1, skip the next st, (sc in the next ch-1 sp, ch 1, skip the next st) 5 times, 2 sc in the last st. Fasten off MC. Turn. (43 sts includes ch-1 sps) Place a SM in the ch-1 spaces at each of the 2 corners of the half hexagon.
Row 9 (CC): With a 5.50mm crochet hook & CC yarn, join yarn with a standing sc in the first st, work 1 more sc in the same st, * ch 1, skip the next st, (sc in the next ch-1 sp, ch 1, skip the next st) 6 times, (sc, ch 1, sc) in the next ch-1 sp, work from * twice, ch 1, skip the next st, (sc in the next ch-1 sp, ch 1, skip the next st) 6 times, 2 sc in the last st. Fasten off CC. Turn. (49 sts includes ch-1 sps) Place a SM in the ch-1 spaces at each of the 2 corners of the half hexagon.
Row 10 (MC): With a 5.50mm crochet hook & MC yarn, join yarn with a standing sc in the first st, work 1 more sc in the same st, * ch 1, skip the next st, (sc in the next ch-1 sp, ch 1, skip the next st) 7 times, (sc, ch 1, sc) in the next ch-1 sp, work from * twice, ch 1, skip the next st, (sc in the next ch-1 sp, ch 1, skip the next st) 7 times, 2 sc in the last st. Turn. (55 sts includes ch-1 sps) Place a SM in the ch-1 spaces at each of the 2 corners of the half hexagon.
Row 11 (MC): Ch 1, 2 sc in the first st, (sc in each of the next 17 sts & ch-1’s, 3 sc in the next ch-1 sp) twice, sc in each of the next 17 sts & ch-1’s, 2 sc in the last st. Turn. (61 sts) Place a SM in the ch-1 spaces at each of the 2 corners of the half hexagon.
Switch Hooks: For the remainder of the hexagon instructions, I decided to use a smaller hook to help the hexagon lay more nicely. I’ve gone down only 1 hook size to a 5.00mm hook, but if you crochet more loosely than I do, you may feel the need to go down a couple hook sizes.
Row 12 (MC): With a 5.00mm crochet hook, alt-dc in the first st, work 1 more dc in the same st, * dc in each of the next 3 sts, ch 1, skip the next st, dc in each of the next 11 sts, ch 1, skip the next st, dc in each of the next 3 sts, (dc, ch 1, dc) in the next st, work from * twice, then dc in each of the next 3 sts, ch 1, skip the next st, dc in each of the next 11 sts, ch 1, skip the next st, dc in each of the next 3 sts, 2 dc in the last st. Turn. (59 sts + 8 ch-1’s) Place a SM in the ch-1 spaces at each of the 2 corners of the half hexagon.
Row 13 (MC): Alt-dc in the first st, work 1 more dc in the same st, * dc in each of the next 2 sts, ch 3, skip each of the next 2 sts, sc in the next ch-1 sp, ch 3, skip each of the next 2 sts, dc in each of the next 7 sts, ch 3, skip each of the next 2 sts, sc in the next ch-1 sp, ch 3, skip each of the next 2 sts, dc in each of the next 2 sts, (dc, ch 1, dc) in the next ch-1 sp, work from * twice, then dc in each of the next 2 sts, ch 3, skip each of the next 2 sts, sc in the next ch-1 sp, ch 3, skip each of the next 2 sts, dc in each of the next 7 sts, ch 3, skip each of the next 2 sts, sc in the next ch-1 sp, ch 3, skip each of the next 2 sts, dc in each of the next 2 sts, 2 dc in the last st. Turn. (47 sts + 2 ch-1’s + 12 ch-3’s) Place a SM in the ch-1 spaces at each of the 2 corners of the half hexagon.
Row 14 (MC): Alt-dc in the first st, work 1 more dc in the same st, * dc in the next st, ch 3, skip each of the next 2 dc & 2 ch’s, sc in the next ch, sc in the next sc, sc in the next ch, ch 3, skip each of the next 2 ch’s & 2 dc, dc in each of the next 3 sts, ch 3, skip each of the next 2 dc & 2 ch’s, sc in the next ch, sc in the next sc, sc in the next ch, ch 3, skip each of the next 2 ch’s & 2 dc, dc in the next st, (dc, ch 1, dc) in the next ch-1 sp, work from * twice, then dc in the next st, ch 3, skip each of the next 2 dc & 2 ch’s, sc in the next ch, sc in the next sc, sc in the next ch, ch 3, skip each of the next 2 ch’s & 2 dc, dc in each of the next 3 sts, ch 3, skip each of the next 2 dc & 2 ch’s, sc in the next ch, sc in the next sc, sc in the next ch, ch 3, skip each of the next 2 ch’s & 2 dc, dc in the next st, 2 dc in the last st. Turn. (41 sts + 2 ch-1’s + 12 ch-3’s) Place a SM in the ch-1 spaces at each of the 2 corners of the half hexagon.
Row 15 (MC): Alt-dc in the first st, work 1 more dc in the same st, * dc in each of the next 2 sts, 2 dc in the next ch-3 sp, ch 3, skip the next sc, sc in the next sc, ch 3, skip the next sc, 2 dc in the next ch-3 sp, dc in each of the next 3 sts, 2 dc in the next ch-3 sp, ch 3, skip the next sc, sc in the next sc, ch 3, skip the next sc, 2 dc in the next ch-3 sp, dc in each of the next 2 sts, (dc, ch 1, dc) in the next ch-1 sp, work from * twice, then dc in each of the next 2 sts, 2 dc in the next ch-3 sp, ch 3, skip the next sc, sc in the next sc, ch 3, skip the next sc, 2 dc in the next ch-3 sp, dc in each of the next 3 sts, 2 dc in the next ch-3 sp, ch 3, skip the next sc, sc in the next sc, ch 3, skip the next sc, 2 dc in the next ch-3 sp, dc in each of the next 2 sts, 2 dc in the last st. Turn. (59 sts + 2 ch-1’s + 12 ch-3’s) Place a SM in the ch-1 spaces at each of the 2 corners of the half hexagon.
Row 16 (MC): Alt-dc in the first st, work 1 more dc in the same st, * dc in each of the next 5 sts, 2 dc in the next ch-3 sp, ch 1, skip the next sc, 2 dc in the next ch-3 sp, dc in each of the next 7 sts, 2 dc in the next ch-3 sp, ch 1, skip the next sc, 2 dc in the next ch-3 sp, dc in each of the next 5 sts, (dc, ch 1, dc) in the next ch-1 sp, work from * twice, then dc in each of the next 5 sts, 2 dc in the next ch-3 sp, ch 1, skip the next sc, 2 dc in the next ch-3 sp, dc in each of the next 7 sts, 2 dc in the next ch-3 sp, ch 1, skip the next sc, 2 dc in the next ch-3 sp, dc in each of the next 5 sts, 2 dc in the last st. Turn. (83 sts + 8 ch-1’s) Place a SM in the ch-1 spaces at each of the 2 corners of the half hexagon.
Row 17 (RS / MC): Ch 1, 2 sc in the first st (place a SM in the 1st st), * sc in each of the next 29 sts & chs, 3 sc in the next ch-1 sp, work from * twice, then sc in each of the next 29 sts & chs, 2 sc in the last st (place a SM in the last st). Do not turn. (97 sts) Place stitch markers in the 2nd sc of each 3 sc group, in each corner of the half hexagon. These will help make seaming go much more smoothly.
Do not turn. Do not fasten off. Continue on to Edging the Unfinished Edge.
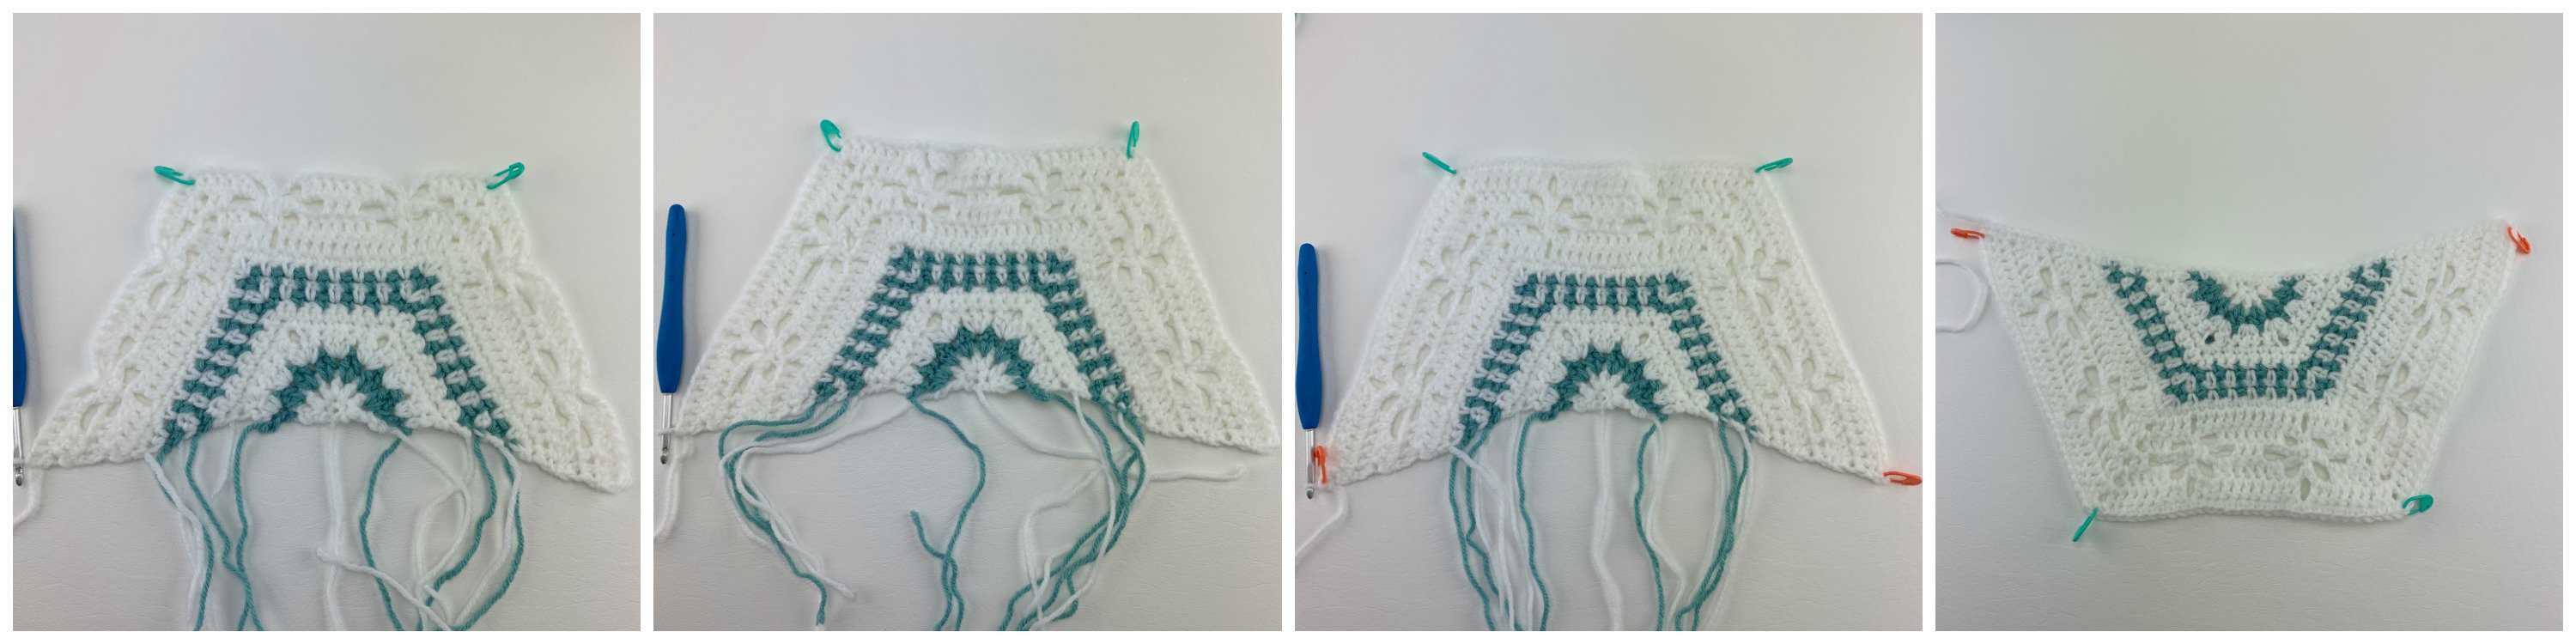
Edging the Unfinished Edge
In this section, you’ll add a single crochet edge to the sides of the rows of the half hexagon.
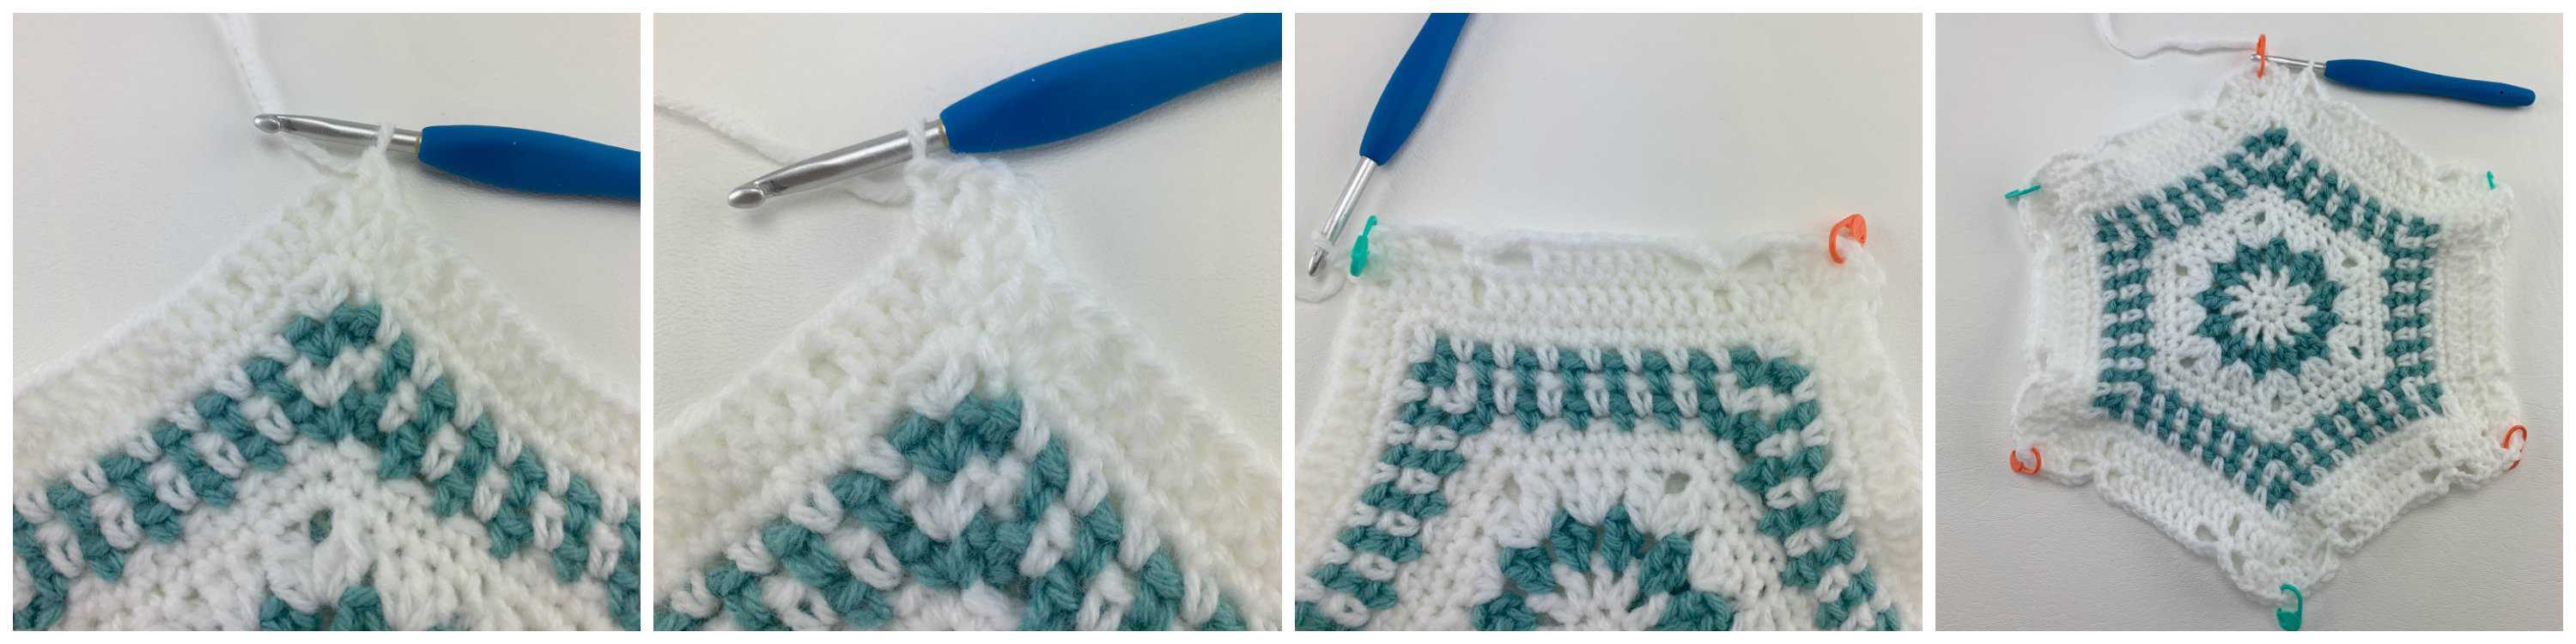
Row 1 (RS / MC): Do not move the 4 SM you placed in Row 17, rotate your half hexagon so that you can work into the sides of the rows, work 1 sc in the side of each sc row and 2 sc in the side of each dc row across, I also added a sc in the ch-2 from Row 1. Do not join. (51 sts) Do not move the SM’s.
Fasten off. Weave in ends. Approximate length of the longest edge should be 13.85″. Continue on to Layout & Seaming.
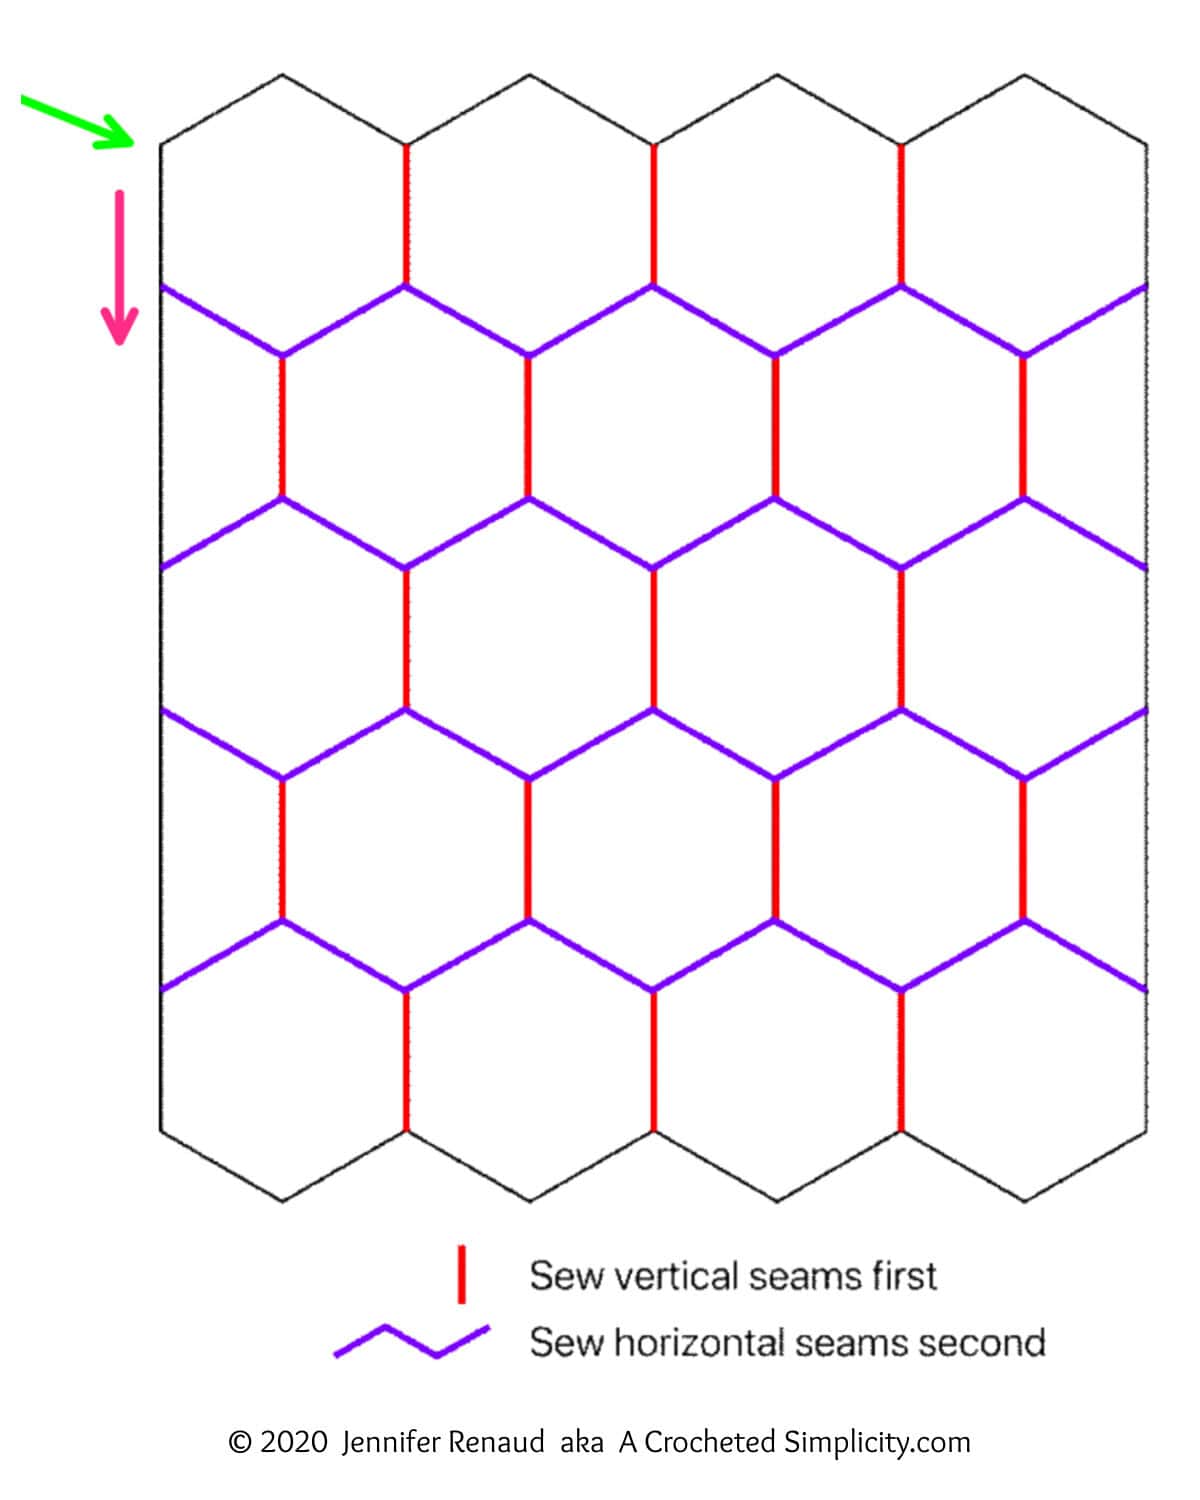
Layout & Seaming
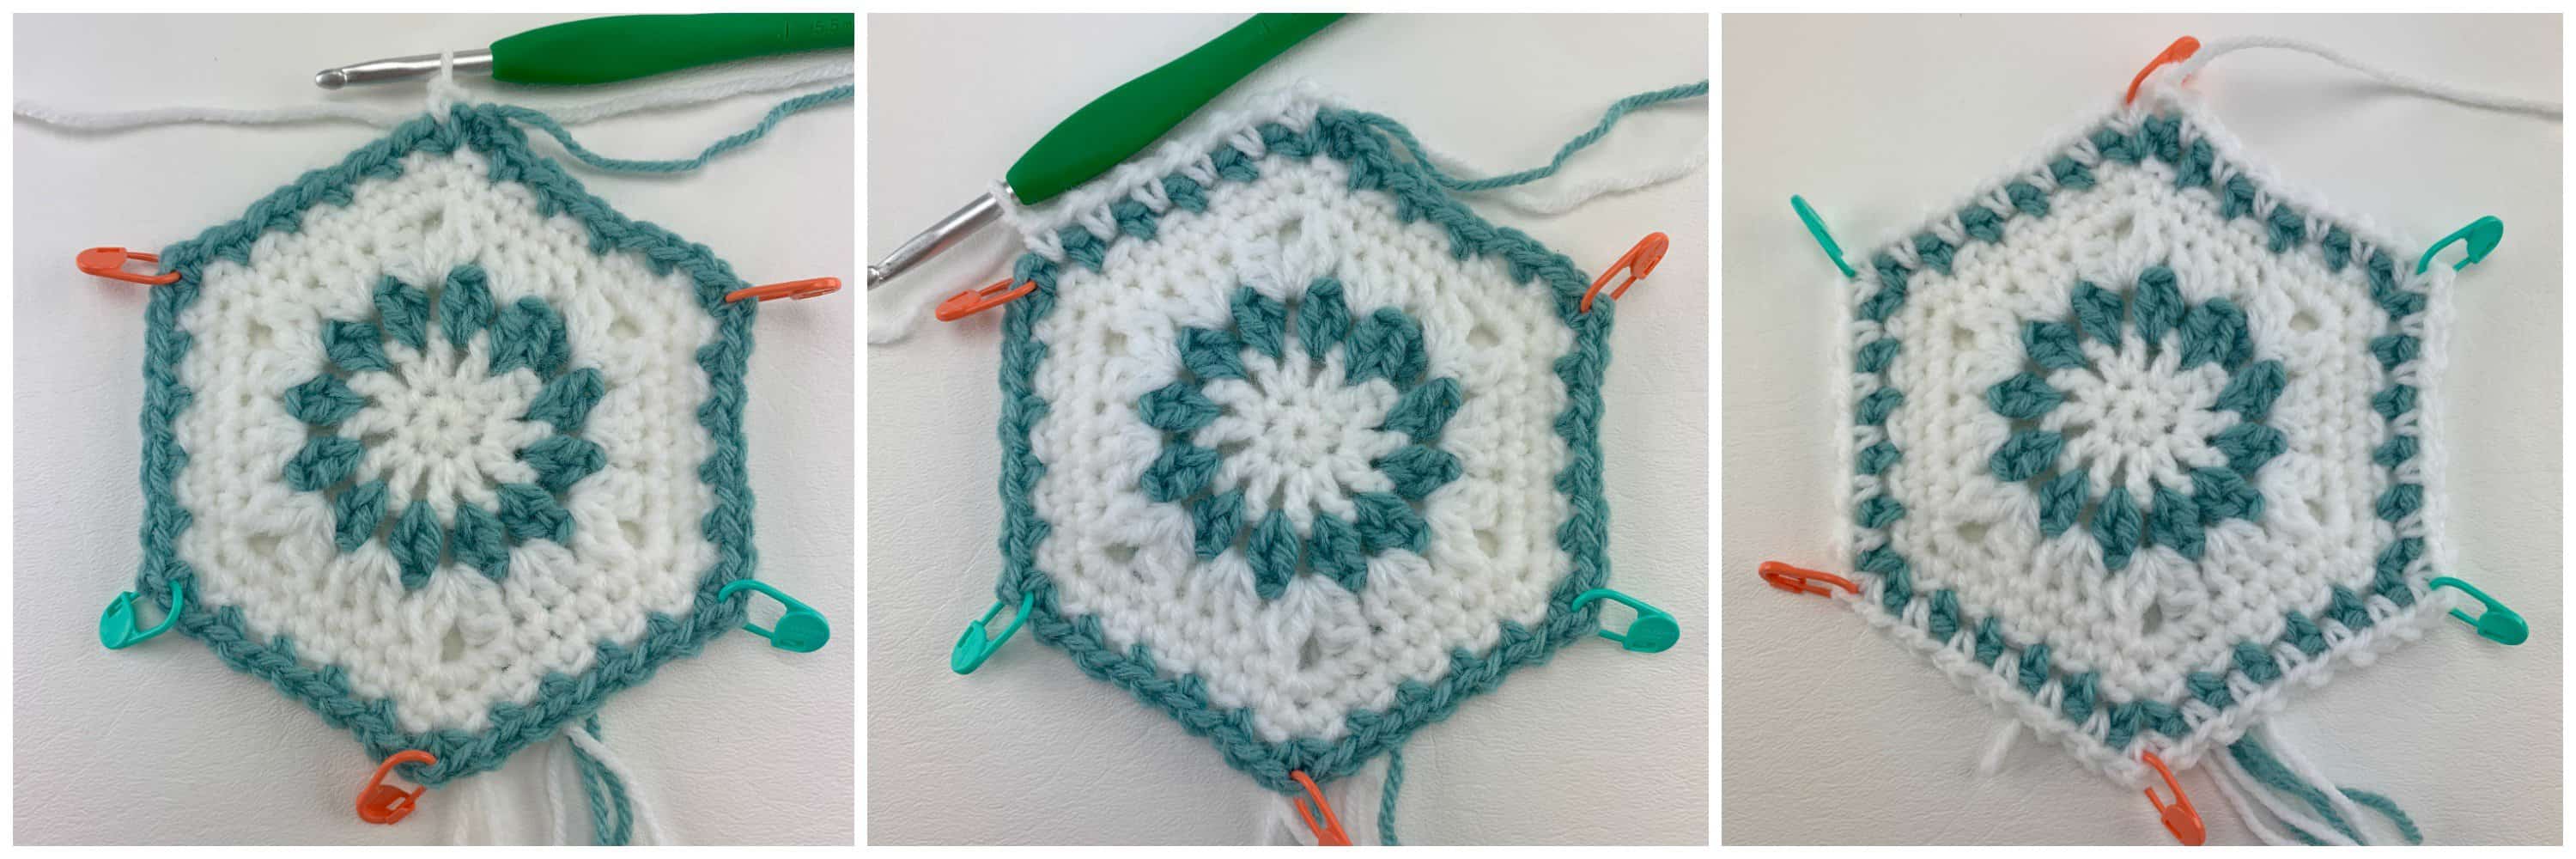
Step 1: Use the layout shown in the schematic above to arrange your hexagons.
Step 2: Use locking stitch markers or scrap pieces of yarn to hold the hexagons together while you seam. Make sure to place the stitch markers in the middle single crochet at each corner to keep your hexagons lined up straight. See photos below.
Step 3: Use a 5.00mm crochet hook to work a flat slip stitch seam, work all vertical seams shown in red.
Flat Slip Stitch Seam Tutorial
Step 4: Using a flat slip stitch seam, work all horizontal zig-zag seams.
Weave in all ends. Continue on to Edging.
Edging
Tip! If your edge starts to become wavy, go down a hook size or two until it’s nice and flat. If your edge starts to cinch inward, go up a hook size or two.
Rnd 1 (RS/MC): Refer to the green arrow on the schematic from above, using a 5.00mm crochet hook and MC yarn, join yarn with a standing sc in the corner that the green arrow is pointing to then work in the direction of the pink arrow. Work 1 sc in each st around the afghan, except work 3 sc in each of the peaks at the top and bottom edge of the afghan and work a sc3tog in each valley along the top and bottom edge of the afghan. Do not join. Stitch count isn’t crucial.
Rnd 2 (MC): Work 1 sc in each st around the afghan, except work 3 sc in each of the peaks at the top and bottom edge of the afghan and work a sc3tog in each valley along the top and bottom edge of the afghan. Join with a sl st to the first st of the round. Stitch count isn’t crucial.
Rep Round 2 as many times as you’d like. The afghan edging shown in the photos only has 2 rounds.
Fasten off. Weave in ends. Professionally finish your afghan by blocking it. Click HERE for my Super Easy Blocking Tutorial. Add tassels, if desired (click here for tutorial).
MORE FREE CROCHET PATTERNS FROM A CROCHETED SIMPLICITY
If you enjoyed this crochet blanket pattern, you may enjoy these other projects as well. And if you just want to browse, you can find all of our free crochet patterns HERE.
Are you intimidated by knit-look crochet? Would you love to learn my tips & tricks? Take an Annies Video Class with me and let me ease your fears and help you increase your skills! Click on the photo below to watch a free preview. You can also see the other 4 video classes I have available!

Please share your finished ACS projects with us in the A Crocheted Simplicity Crochet Community Group on Facebook! Use hashtag #ACrochetedSimplicity when sharing on social media so I can find your posts!

I am currently beginning this project and was wondering if I could block the hexagon’s before I begin joining them together.
This blanket is beautiful. Will definitely be giving this one a try.
Soo pretty. Love the pattern.
would love to make this someday for me, after I’m done everyone elses
Love this hexagon blanket. I made it once and now, looking at it again, makes me want to make another. The pattern was complete and easy to follow.
This is such a beautiful design. It is on my to-do wish list.
This is such a lovely pattern, it’s still on my (endless) to do list.
This is a gorgeous blanket, and I plan on making it in the new year. I also see that I am not the only one with that plan. 🙂
This makes me think of snowflakes. I would probably do it in an icy blue and white. Where I am, we don’t get a lot of super cold days so it would be perfect all winter long.
I am scouting patterns for projects THIS coming year. This pattern intrigues me. Working in hexagons will be easy and very portable. The design is very pretty. Over the next few weeks I will be looking for the correct color combination and the perfect yarn. Then I will do some sample hexagons to see which like best. Thank you for such a pretty design.
Love this blanket. So pretty. I like a blanket project where you can take your work with you and work on small sections at a time in waiting rooms etc. no worries about transporting a big project around!
I love this pattern – the colour combination is soothing to the eyes. The eyelets are add a cute tone to the blanket. I would love to take up this project. I am just a beginner
This is beautiful! I am going to get the kit from Lion yarn. I would love to win a YEAR of FREE PDFs!
I love the look of this blanket & it has been on my to make list for awhile.
I could see me making this sometime in the future! Very pretty!
This blanket is beautiful. Simply gorgeous work
What a beautiful blanket! I like that it only uses 2 colors and can be worked in segments which makes the project portable and manageable. Definitely putting this on my To Do list.