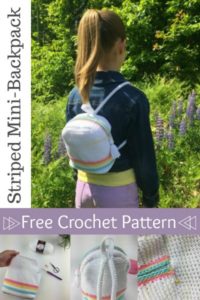
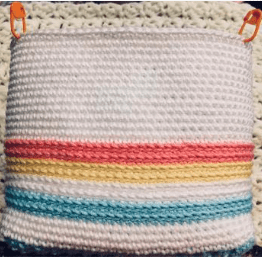
Striped Mini-Backpack – Free Crochet Backpack Pattern
Here we are, it’s mid-July and almost the middle of summer already. I’m knee deep into projects using cotton yarns. Aside from making great dishcloths & scrubbies, cotton yarns also make fantastic crocheted bags.
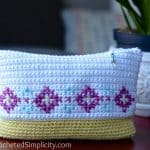
If you’ve popped into a clothing store within the past several months, you’ve likely seen cute mini-backpacks in their accessory aisle. Claire has fallen in love with them so I decided that the next crocheted bag I made had to be a mini-backpack just for her. You can find the free crochet pattern in this post below, or an ad-free print friendly version on Love Crafts here or on Etsy here.
>Click HERE to sign-up to receive our newsletter!<
Since we’re already halfway through summer vacation, I’ve been looking ahead and working on new back-to-school and fall designs for Claire. I started a really cute cardigan for girls that will be great for everyday wear and I’ve also been working on a new winter hat design. It’s tough to think about the cold and snow during the middle of July, but if I don’t start crocheting winter hats now, I’ll never have enough time to make all of us new hats before winter arrives again.
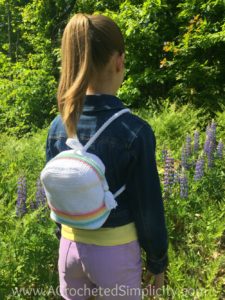
Mini-backpacks are the perfect size bags to take on short adventures when all you’ll need are a few small items. They’ll easily hold a pair of sunglasses, small bottle of sunscreen, chapstick, cell phone, earbuds, and many more items.
Yarn
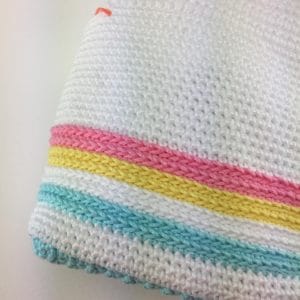
I chose Lion Brand 24/7 Cotton, a 100% mercerized cotton, for this design. The mercerization process gives the yarn an incredible sheen and stitch definition (perfect for crocheted bags). It is available in 24 wonderful colors that include brights (perfect for summer fun!) and neutrals (perfect for everyday). Since I was making this mini-backpack for Claire, I let her choose colors. She chose white, pink, aqua, and yellow for her mini-backpack. This yarn is great for a variety of projects ranging from various home decor items to accessories. I recently used it for my Simple Striped Tote Bag and previously for my Cross Stitch Make-up Pouch and Sunny Days Swim Cover-up.
Striped Mini-Backpack – FREE CROCHET BACKPACK PATTERN
The free pattern is below, but if you love to work offline, I’ve got a couple other great options for you.
Purchase the ad-free, printable PDF, including all photo tutorials, on Love Crafts here, or on Etsy here.
Pin it for later here.

Description
The Striped Mini-Backpack is perfect for boys and girls of all ages to carry all of their most beloved possessions. The combination of Lion Brand Yarn’s 24/7 cotton and simple crochet stitches give this crochet backpack its classic appeal. Crocheted ropes work great for the straps because they do not stretch out like most other crocheted straps have a tendency to do.
This post contains affiliate links.
Materials
- Yarn: Worsted Weight / 4; Lion Brand Yarns 24/7 Cotton was used for the sample. 100% Mercerized Cotton Yarn (186 yards / 170 m / 3.5 oz / 100 g). Available for purchase on the Lion Brand Website or AMAZON
- White (300 yards / 2 balls)
- Aqua (20 yards / 1 ball)
- Yellow (20 yards / 1 ball)
- Pink (20 yards / 1 ball)
- Crochet Hook: G/6/4.00mm, or size needed to obtain gauge (My favorite crochet hooks are the Clover Amour Hooks, I’ve never had an ache in my hand since switching)
- Scissors
- Yarn Needle
- Plastic Canvas (2) 4″ W x 6″ L (optional)
- Locking Stitch Markers (4 or more)
- 9″ Zipper
- Needle & Thread
Many of these materials are available for purchase through our affiliates below:
 24/7 Cotton® Yarn, Lemon") Lion Brand Yarn (1 Skein) 2...Shop on Amazon
Lion Brand Yarn (1 Skein) 2...Shop on Amazon  Clover 1045/G Purple Amour ...Shop on Amazon
  - Clear") Darice Plastic Canvas 14 Co...Shop on Amazon
Darice Plastic Canvas 14 Co...Shop on Amazon  Westcott 13525 5-Inch Point...Shop on Amazon
  Clover Lock Ring Markers, 2...Shop on Amazon
Abbreviations (US Terms)
- ch(s): chain(s)
- sl st(s): slip stitch(es)
- st(s): stitch(es)
- sc: single crochet
- inverse sc: inverse single crochet (click HERE for tutorial)
- sp: space
- Rnd(s): round(s)
- RS / WS: right side / wrong side
- SM: stitch marker
- Rep: repeat
Size
- One Size: 6.25″ W x 7.5″ H x 4.25″ D (does not include hanging loop or straps)
Gauge
-
In sc: 13 sts + 15.75 rows = 3″
Notes
- I tend to crochet on the tighter side. You may need to go down a hook size (or two) to meet gauge if you crochet on the looser side.
- The first stitch of every row is worked into the same stitch as the turning chain, unless stated otherwise.
- Yarn Notes: Lion Brand Yarn 24/7 Cotton was used for the sample on page 1. (3.5oz / 100 g / 186 yards / 170 meters / 100% mercerized cotton). Another comparable worsted weight yarn may be substituted.
- Colors & Yardage: White (300 yards), Aqua (20 yards), Yellow (20 yards), Pink (20 yards)
- If you prefer to make your mini-backpack in a solid color, you’ll need 2 balls of 24/7 yarn. Approximately 360 yards.
Special Stitch
- Inverse Single Crochet Stitch (inverse sc): With the working yarn IN FRONT of your work, insert your hook from back to front through the indicated stitch, yo, pull up a loop, yo, pull through both loops on your hook. Click HERE for tutorial.
Striped Mini-Backpack Instructions
Base (Make 2)
Note: I chose to make my bases in Aqua. You can choose to use white, if you prefer.
Row 1: With Aqua & a 4.00 mm crochet hook, ch 17, working into the back hump of the chain, sc in the 2nd ch from your hook and in each ch across. Turn. (16 sts)
Rows 2 – 30: Ch 1, sc in each st across. Turn.
Base #1: Fasten off. Weave in ends.
Base #2: Do not fasten off. Continue below to Base Assembly.
Base Assembly
Note: Whether or not you choose to add plastic canvas between the two base layers, the assembly of the bases is the same.
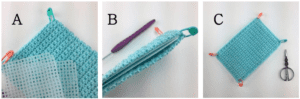
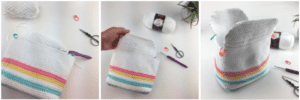
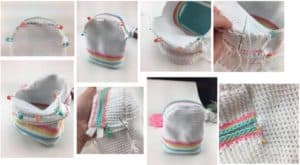
Step 1: (Skip Step 1 & go to Step 2 if you’re not adding plastic canvas) Cut 2 rectangles of plastic canvas that are 1/4″ to 3/8″ less in width and length of your base, then slightly snip the corners off. **See Photo A.
Step 2: Line up the last rows of each base and lay one on top of the other. If you’re using plastic canvas, make sure to put both pieces between the two bases. **See Photo B.
Step 3: Use stitch markers to hold the bases together (make sure you secure them thru both bases). I prefer to place stitch markers in the 1st and last sts of Rows 1 & 30. If it helps, you can also add one near the middle of each long side.
Step 4: Working through both layers of fabric at once, continue on to Seaming the Bases. **Photo C shows the bases completely seamed.
Seaming the Bases
Rnd 1: Working around the perimeter of the base & beginning with a short edge, sc in each st along both short edges (16 sts along each short edge), sc in the side of each row along both long edges (30 sts along each long edge), and add 1 extra sc in each corner (1 st in each corner). Join w/ a sl st to the 1st st. (96 sts)
Do not fasten off. Continue on to Body of Backpack. If you used a contrasting color for your base, switch to white.
Body of Backpack
Note: Rounds 1 – 4 & Rounds 21 – 35 are worked in continuous rounds (a spiral). Do not join at the end of each round, instead use a scrap piece of yarn or a stitch marker to keep track of the beginning of each round. Move your marker up as you complete each round.
Rnd 1 (RS): With white, ch 1, sc in each st around. (96 sts)
Rnds 2 – 3: Do not ch, sc in each st around. Do not join.
Rnd 4: Do not ch, sc in each st around. Join w/ a sl st to the 1st st. *Change colors to Aqua. Fasten off White.
Rnd 5 (Aqua): Do not ch, sc in each st around. Do not join.
Rnd 6: Do not ch, sl st in each st around. Join with Special Join Technique (click HERE for tutorial).
Rnd 7: Do not ch, sc around in each st from Rnd 5. Join w/ a sl st to the 1st st.
Rnd 8: Do not ch, sl st in each st around. Join with special Join Technique. *Change colors to White. Fasten off Aqua.
Rnd 9 (White): Do not ch, sc around in each st from Rnd 7. Do not join.
Rnd 10: Do not ch, sl st in each st around. Join with special Join Technique.
Rnd 11: Do not ch, sc around in each st from Rnd 9. Join w/ a sl st to the 1st st.
Rnd 12: Do not ch, sl st in each st around. Join with special Join Technique. *Change colors to Yellow. Fasten off White.
Rnd 13 (Yellow): Do not ch, sc around in each st from Rnd 11. Do not join.
Rnd 14: Do not ch, sl st in each st around. Join with special Join Technique.
Rnd 15: Do not ch, sc around in each st from Rnd 13. Join w/ a sl st to the 1st st.
Rnd 16: Do not ch, sl st in each st around. Join with special Join Technique. *Change colors to Pink. Fasten off Yellow.
Rnd 17 (Pink): Do not ch, sc around in each st from Rnd 15. Do not join.
Rnd 18: Do not ch, sl st in each st around. Join with special Join Technique.
Rnd 19: Do not ch, sc around in each st from Rnd 17. Join w/ a sl st to the 1st st.
Rnd 20: Do not ch, sl st in each st around. Join with special Join Technique. *Change colors to White. Fasten off Pink.
Rnd 21 (White): Do not ch, sc around in each st from Rnd 19. Do not join. Begin working in continuous rounds (a spiral) again.
Rnds 22 – 34: Do not ch, sc in each st around. Do not join.
Rnd 35: Do not ch, sc in each st around. Join w/ a sl st to the 1st st.
Fasten off. Weave in ends. Approximate height at this point: 5″ H from the bottom of Rnd 1. Continue on to Marking Front & Back Panels.
Marking Front & Back Panels
- Use locking stitch markers to mark the 30 centermost stitches along the front and back of the bag (long edges).
- The side where your rounds begin/end will become the back side of the backpack.
Continue on to the Front & Back Panels.
Front & Back Panels
Note: The front and back panels are identical so it doesn’t matter which one you begin with.
Row 1 (RS): With the RS and the front or back facing you, join white yarn w/ a sc (click here for tutorial) in the stitch marked with a stitch marker on the right, sc in each st across to the next stitch marker, sc in the stitch marked with the second stitch marker. Turn. (30 sts)
Row 2: Do not ch, inverse sc (click here for tutorial) in each st across. Turn.
Row 3: Ch 1, sc in each st across. Turn.
Rows 4 – 7: Rep Rows 2 – 3.
Row 8: Skip the 1st st, do not ch, inverse sc in each st across to the last st, skip the last st. Turn. (28 sts)
Row 9: Ch 1, skip the first st, sc in the next st, sc in each st across to the last st, skip the last st. Turn. (26 sts)
Rows 10 – 13: Rep Rows 8 – 9. Stitch count decreases by 2 sts each row. (18 sts at the end of Row 13)
Fasten off. Weave in ends. Repeat for the second panel then continue on to Zipper Panels.
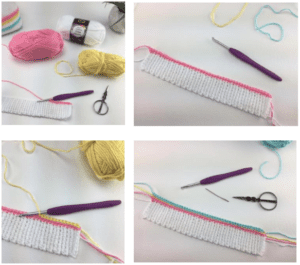
Zipper Panel (Make 2)
Row 1 (RS): With white yarn & a 4.00mm crochet hook, ch 8, working into the back hump of the ch, sc in the 2nd ch from your hook and in each ch across. Turn. (7 sts)
Row 2: Do not ch, inverse sc in each st across. Turn.
Row 3: Ch 1, sc in each st across. Turn.
Rows 4 – 45: Rep Rows 2 – 3.
Note: Before you continue on to edging, check the length of your zipper panel against the arch of the front or back panels. Make sure they’re the same length (or relatively close). If needed, adjust the length of your zipper panel by adding more rows in multiples of 2, or shorten the length by removing rows in multiples of 2. Make sure to end with a RS row (a row of regular sc).
Do not fasten off. Switch to Pink yarn. Continue on to Zipper Panel Edging.
Zipper Panel Edging
Tip! When working Row 1, if the long edge becomes wavy, you may want to consider going down a hook size. If the long edge starts to cinch inward, you may want to go up a hook size.
Row 1 (RS): With pink yarn, continuing on from Zipper Panel, rotate piece to work into the sides of the rows along the long edge, work 1 sc into the side of each row. Stitch Count isn’t crucial.
Fasten off pink yarn. Do not turn.
Row 2: With yellow yarn, join with a sl st in the BLO of the first st of Row 1, BLO sl st in each st across.
Fasten off yellow yarn. Do not turn.
Row 3: With blue yarn, join with a sl st in the BLO of the first st of Row 2, BLO sl st in each st across.
Fasten off blue yarn.
Weave in ends. Make the second zipper panel, edge it, then continue on to Attaching the Zipper to the Zipper Panels.
Attaching the Zipper to the Zipper Panels
- Click HERE to see my Super Easy Way to Add a Zipper Tutorial.
- Gather your supplies: Use the zipper length suggested in the pattern. You’ll also need thread to coordinate with the yarn you used for your backpack (I used white thread), a sewing needle, and pins.
- Center one long edge of the zipper along the long edge of the zipper panel that has the colorful edging. With the RS of the zipper facing up, pin it to the WS of the zipper panel, every couple inches, to hold it in place while you sew it on.
- Using a needle and thread, knot your thread, then beginning on the WS of the zipper panel, sew the zipper to the zipper panel using a basting stitch. Weave in ends and fasten off. Note: I worked only one row of stitches to secure my zipper to the zipper panel, you may choose to work 2 rows of parallel basting stitches per side if you’re worried about strength.
- How to work a basting (or tack) stitch: Make evenly spaced stitches by working the needle in and out of the fabric from top to bottom. End on the inside of your project with a knot. Click HERE to see more close-up photos of the basting stitch in my How to Add a Zipper tutorial.
- After you’ve sewn the zipper to one of the zipper panels, open it up and pin the opposite side to the second zipper panel (along the long edge with the colorful edging) and sew it on in the same manner.
After you’ve sewn one long edge of the zipper to one long edge of the zipper panel, continue on to Attaching Zipper Assembly to Backpack.
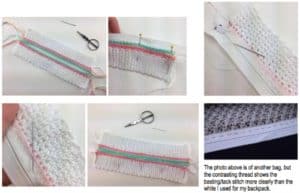
Attaching Zipper Assembly to Backpack
Note: When attaching the zipper assembly to the front & back panels, make sure to position the backpack so that you can whipstitch on the WS of it.
Tip! You may find it easier to line up the edges in step 1 on the RS of the backpack and then switch to the WS for seaming.
Step 1: Line up the long edge of the zipper panel (opposite the zipper) with the arch of a front or back panel. Use stitch markers to hold it in place.
- First, line up the corners of the zipper assembly with the bottom of the arch. See green stitch markers.
- Second, line up the center edge of the zipper assembly with the top center of the arch on the front or back panel.
- Third, line up the zipper assembly with the top “corners” of the arch.
- I used a total of 5 stitch markers to hold my zipper assembly in place.
Step 2: Cut piece of yarn 3.5 times the length of the arch. Use a yarn needle and piece of yarn just cut and whipstitch the long edge of the zipper assembly to the arch of the front or back panel.
- Make sure to pull both ends of the yarn tight, every inch or two, as you whipstitch so the seam is nice and tight.
Step 3: Using a 10″ piece of yarn, whipstitch the short edges of the zipper assembly to the sides of the backpack. You should have 7 sts to the right and left of the zipper to whipstitch on each end.
Step 4: You should be left with a small opening along the short edge of the zipper assembly where the zipper is. Use a pin to pin it in place. Then, use a needle and thread to sew this small opening closed.
Weave in ends. Open zipper up and repeat for the opposite side then continue on to Hanging Loop.
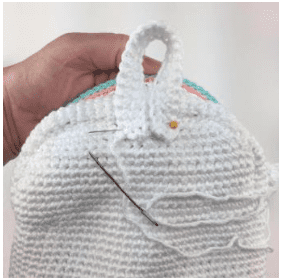
Hanging Loop
Row 1: With white yarn & a 4.00mm crochet hook, ch 25, working into the back hump of the ch, sc in the 2nd ch from your hook and in each ch across. Turn. (24 sts)
Row 2: Ch 1, sc in each st across.
Fasten off leaving a 10″ piece of yarn for sewing. Continue on to Attaching the Hanging Loop.
Attaching the Hanging Loop
Fold the hanging loop in half. With the back of the backpack facing you, pin the short edges of the hanging loop to the upper center of the back panel (approximately 2 – 3 rows from the top edge). Using a yarn needle and tail of yarn, sew the hanging loop onto the backpack.
Weave in ends. Continue on to Crochet Rope Instructions.
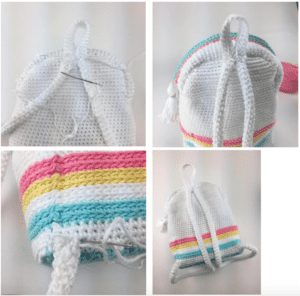
Crochet Rope Instructions (Make 2)
Use the Crochet Rope Instructions found HERE to make 2 crochet rope straps for your mini-backpack.
Rep Rnd 3 of the crochet rope instructions until your crocheted rope measures 17″ – 18″ long, or desired length.
Fasten off leaving a 12″ tail of yarn for sewing. Repeat for the 2nd crocheted rope then continue on to Attaching the Straps.
Attaching the Straps
- With the back side of the backpack facing you, use a yarn needle and tail of yarn to sew one end of each strap, onto the back of the backpack, just under the hanging loop.
- With a yarn needle and tail of yarn, sew the opposite ends of the straps to the bottom left or right corners of the bag.
Weave in ends. Continue on to make a Tassel to hang from the zipper pull, if desired.
TASSELS
- For the tassel shown, I used a 2.5″ – 3″ piece of cardboard and wrapped the yarn around it 20 times.
- Click HERE for my Tassel Tutorial

More Free Crochet Patterns from A Crocheted Simplicity
If you enjoy making crochet bags, you may enjoy these other projects as well. And if you just want to browse, you can find all of our free crochet patterns HERE.

Are you intimidated by knit-look crochet? Would you love to learn my tips & tricks? Take an Annies Video Class with me and let me ease your fears and help you increase your skills! Click on the photo below to watch a free preview. You can also see the other 4 video classes I have available!


Thank you Jenn!
You’re welcome!
I was wondering if the striped mini backpack is made with the plastic canvas in the bottom
can it be machine washed and dried if so what settings.
Hi Cynthia,
Yes, I used plastic canvas in the bottom of mine as shown in the photo tutorial. I’ve made bags before with cotton yarns and the plastic canvas base and have thrown them in the washer to wash, but laid flat to dry and they cleaned up great!
wow! it is amazing that you give away this lovely design and step by step picture tutorial for free. thank you!
You’re very welcome!