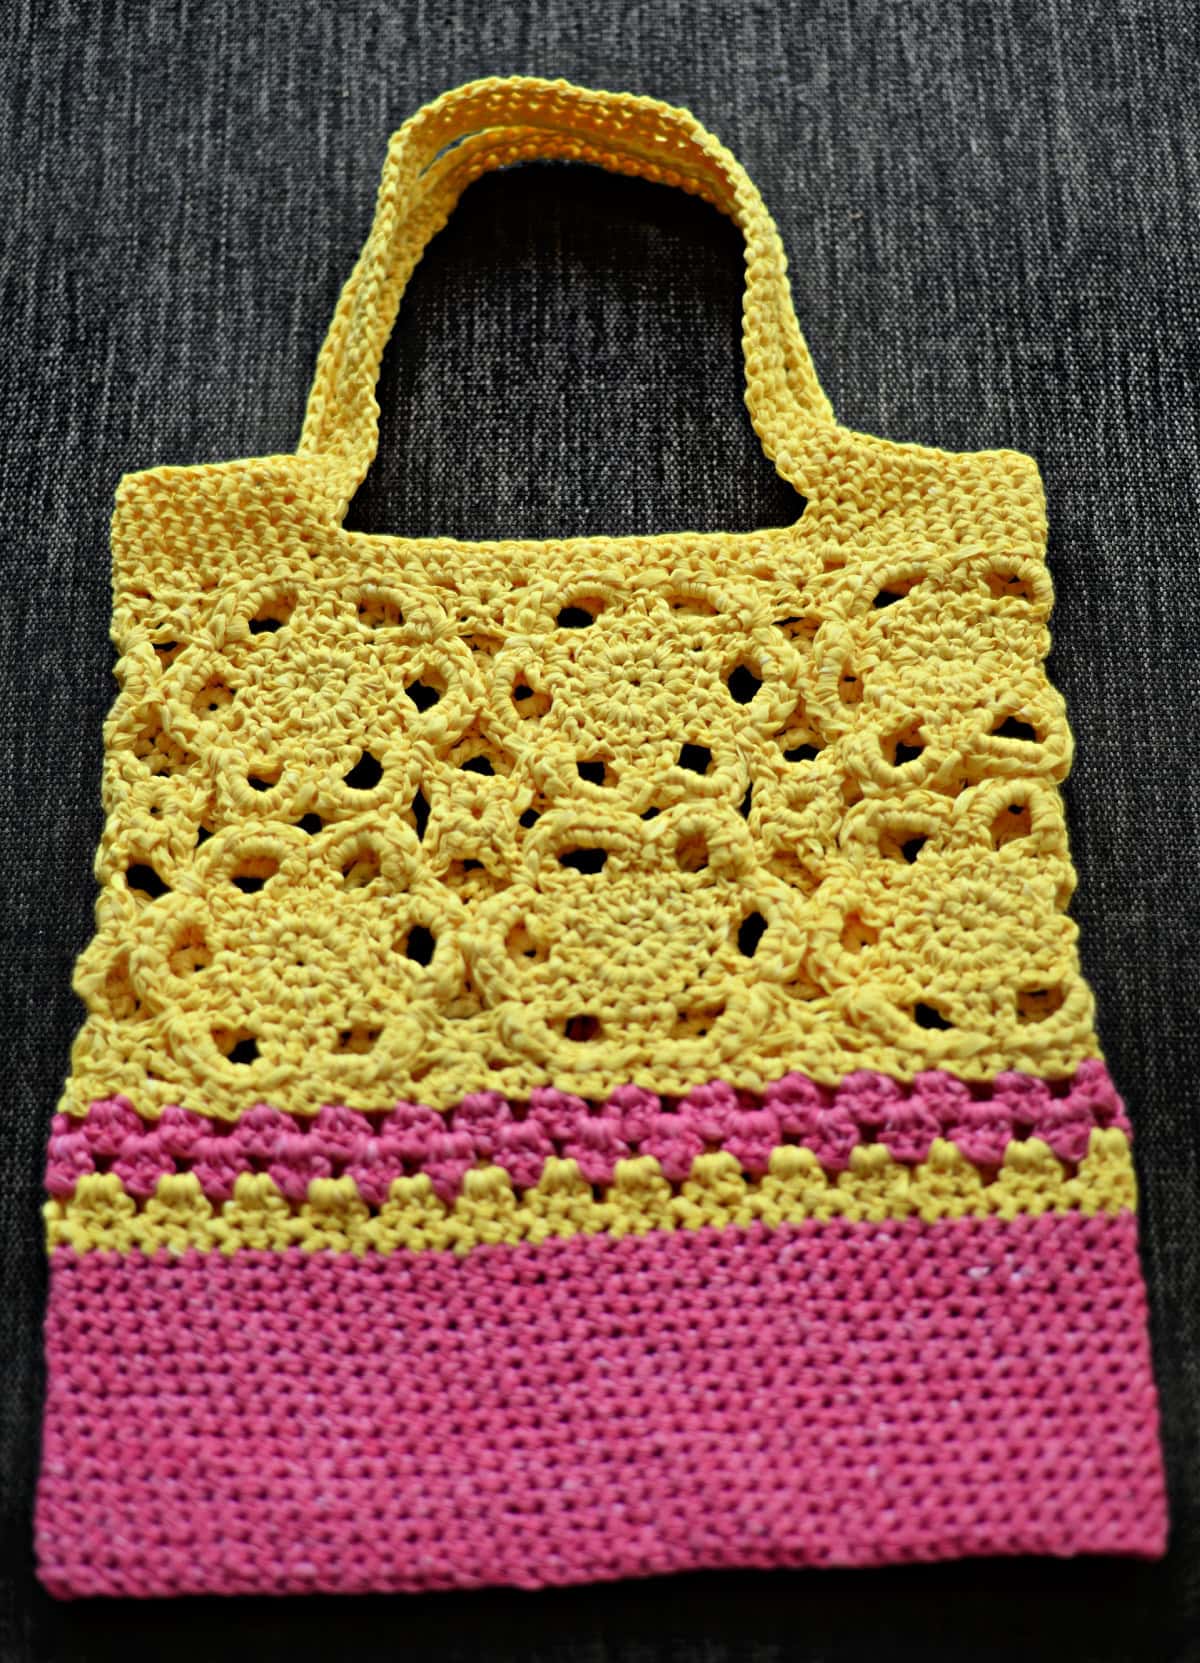
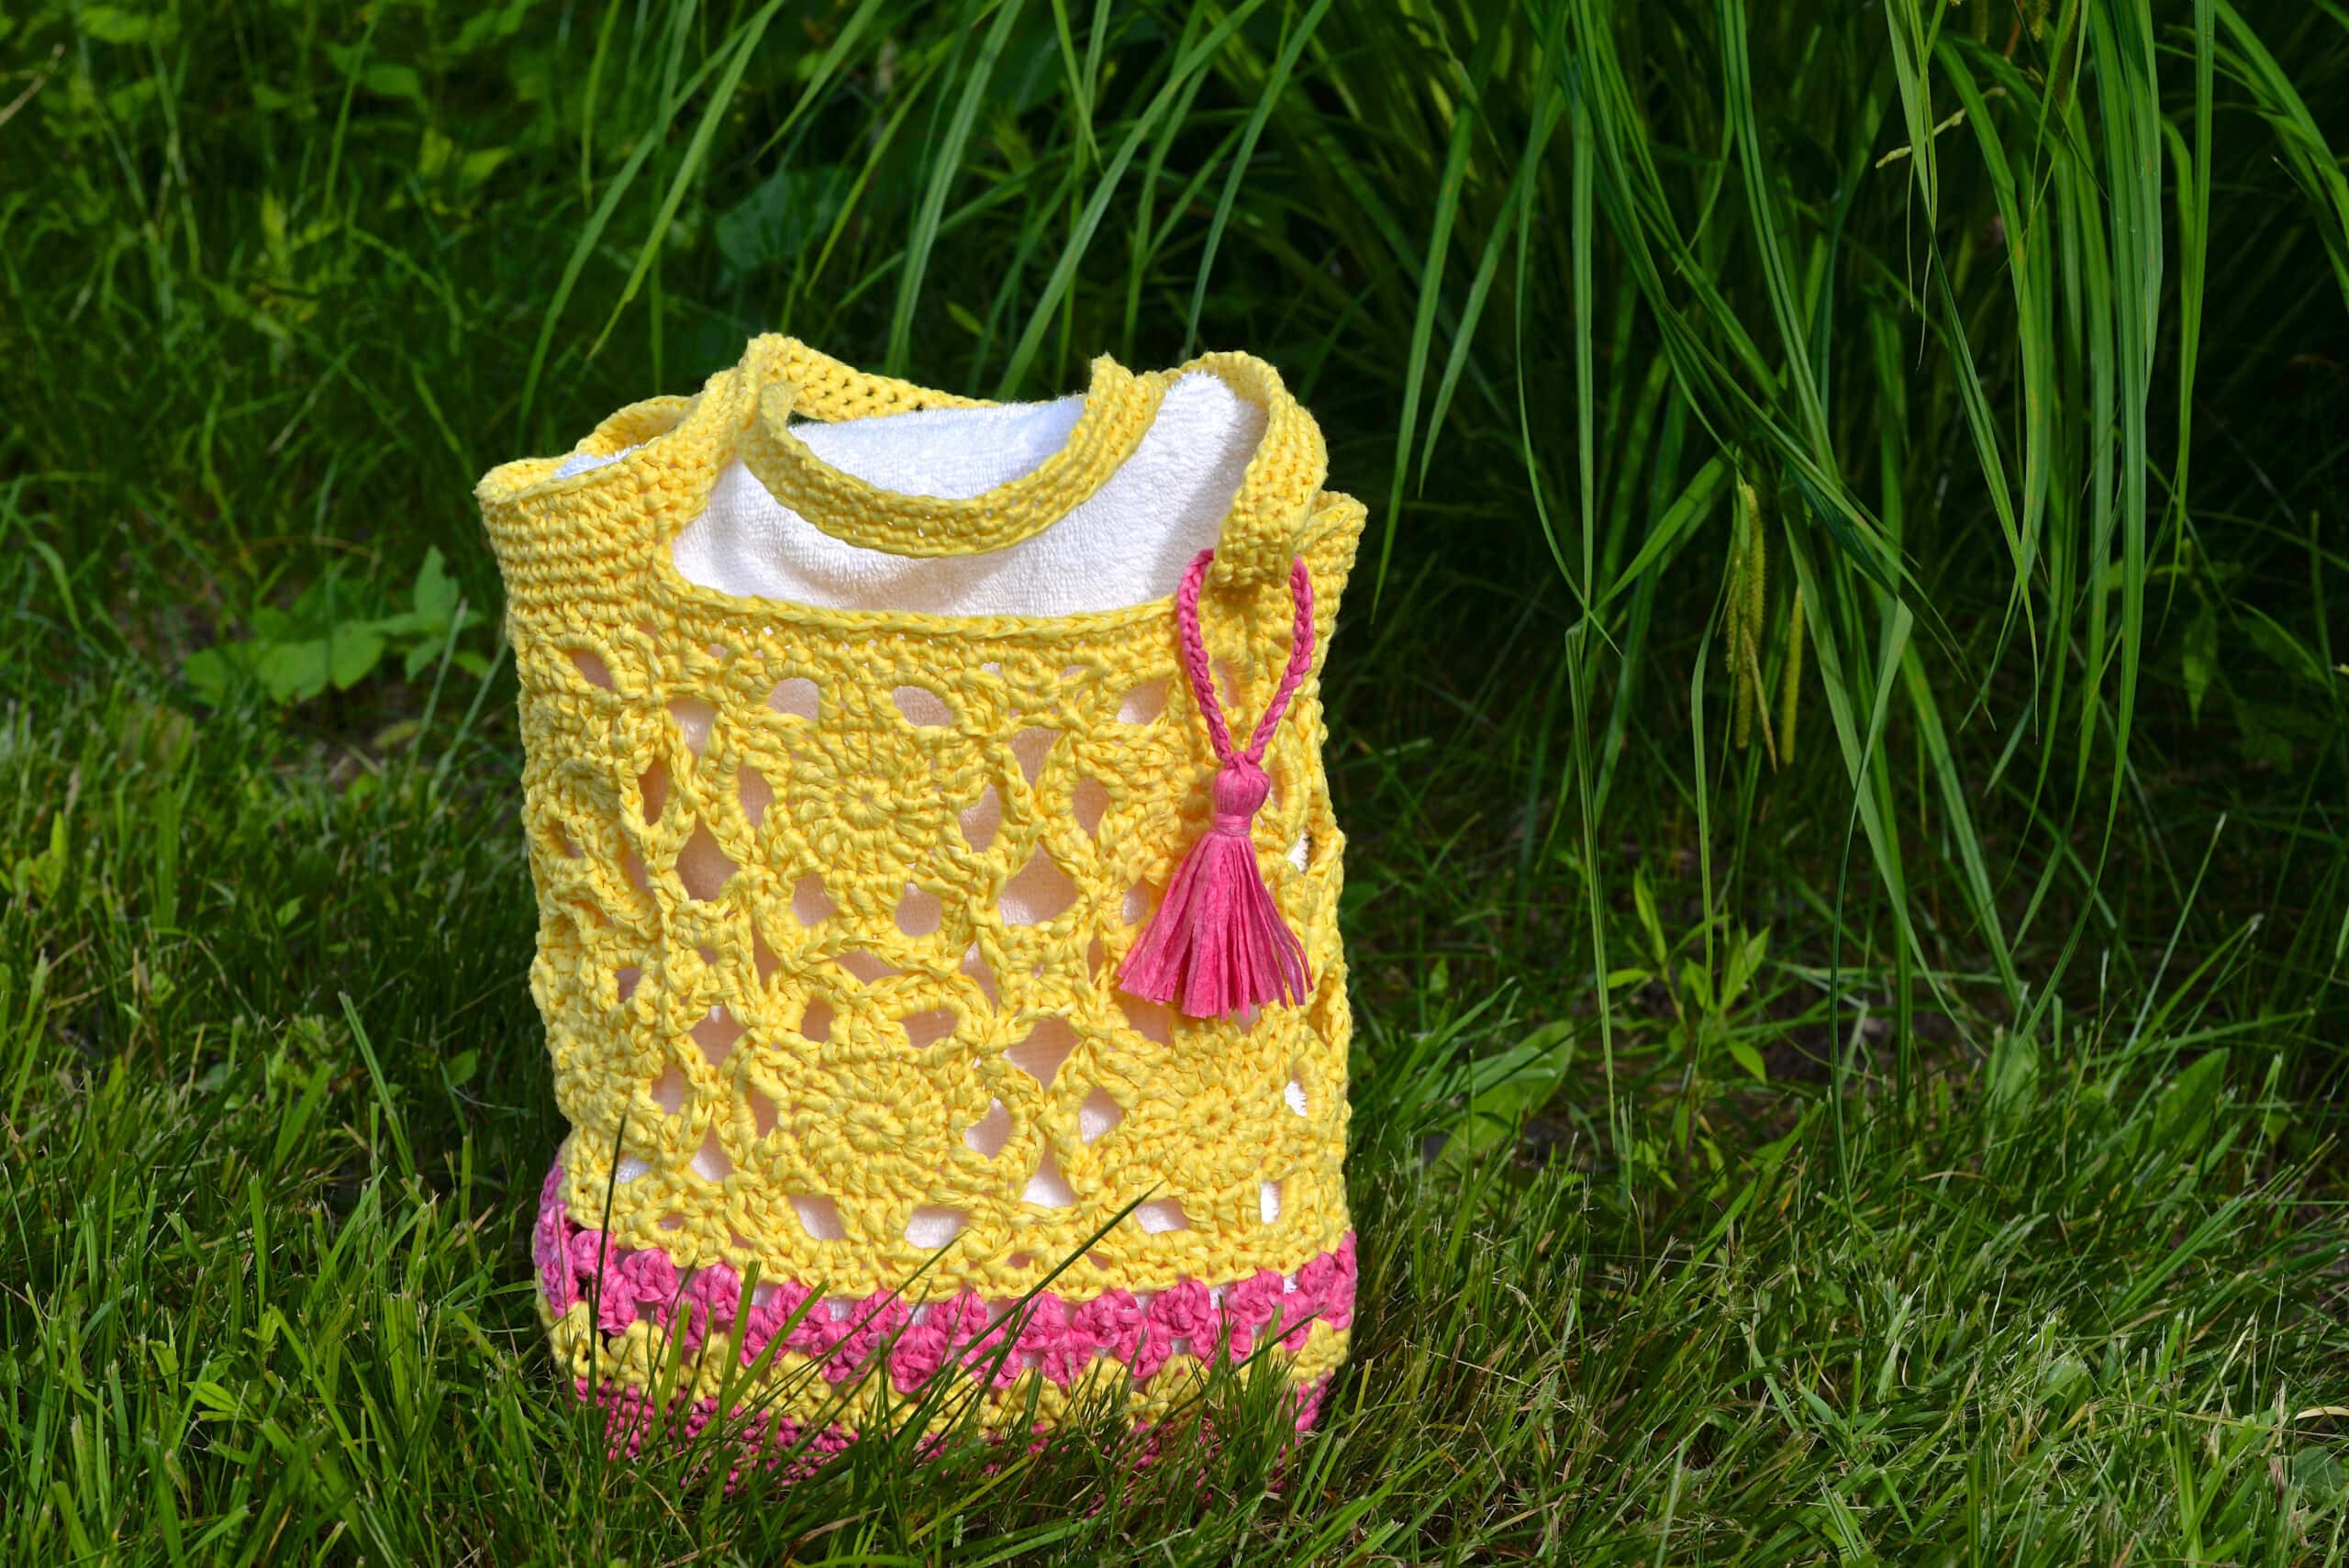
Strawberry Lemonade Crochet Tote Bag
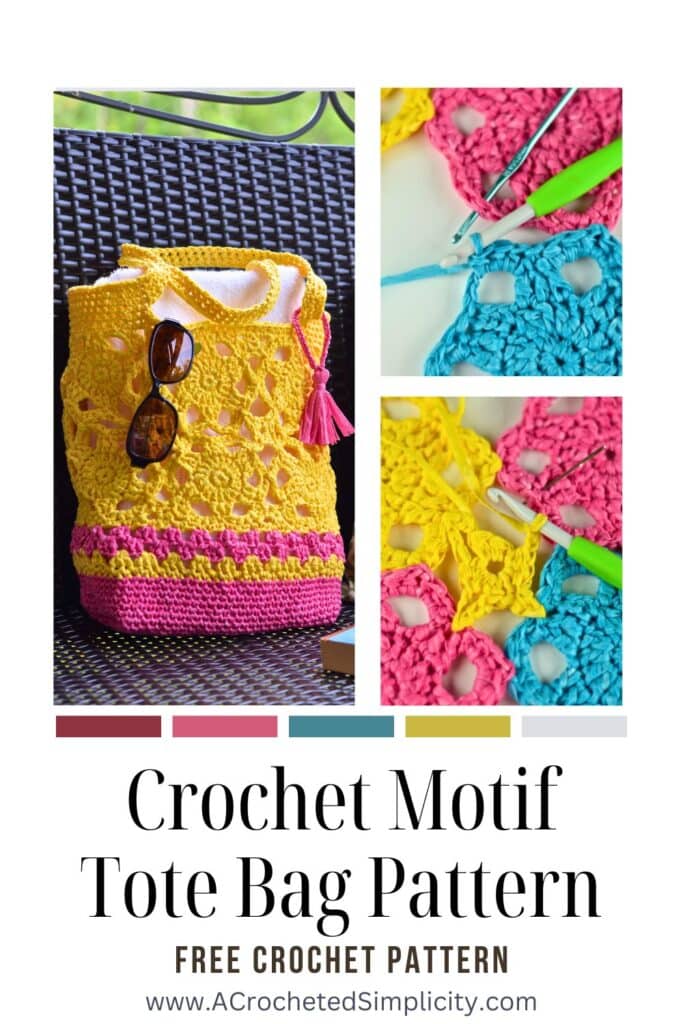
Learn to make a crochet tote bag with join-as-you-go flower crochet motifs and a square bottom!
The Strawberry Lemonade Crochet Tote Bag is the perfect size for an afternoon outing, or to be used as a crochet project bag.
You’ll find the crochet tote bag free pattern below, or an ad-free print friendly PDF (including a all photo tutorials) on Ravelry, or on Etsy (aff).
Summer Crochet Projects
When I caught my first glimpse of Lion Brand’s new tape yarn, Rewind, I knew right away that it would be perfect to make myself a new sun hat and a crochet tote bag!
With summer quickly approaching and the sun’s rays getting hotter by the day, I decided to design a new crochet sun hat first. I designed the Stop & Rewind Sun Hat for myself. Then Claire asked for a new sun hat too, so I made her the Makin’ Lemonade Sun Hat.
Even after crocheting a couple of sun hats, I had plenty of Rewind yarn left to make my Strawberry Lemonade Crochet Tote Bag!
Summer Tote Bag Made With Crochet Motifs
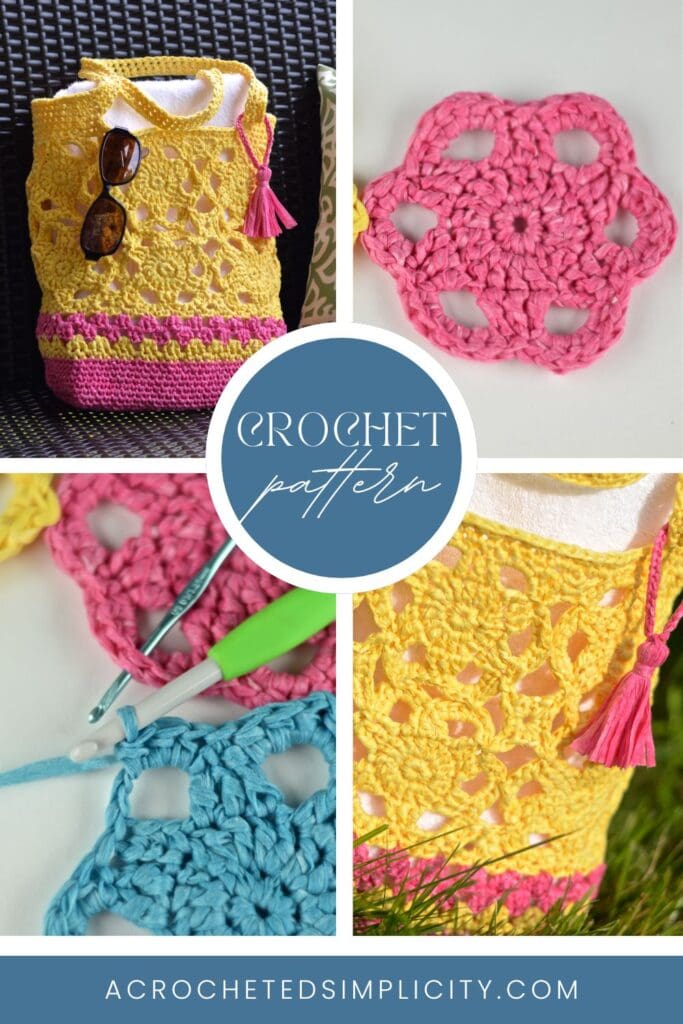
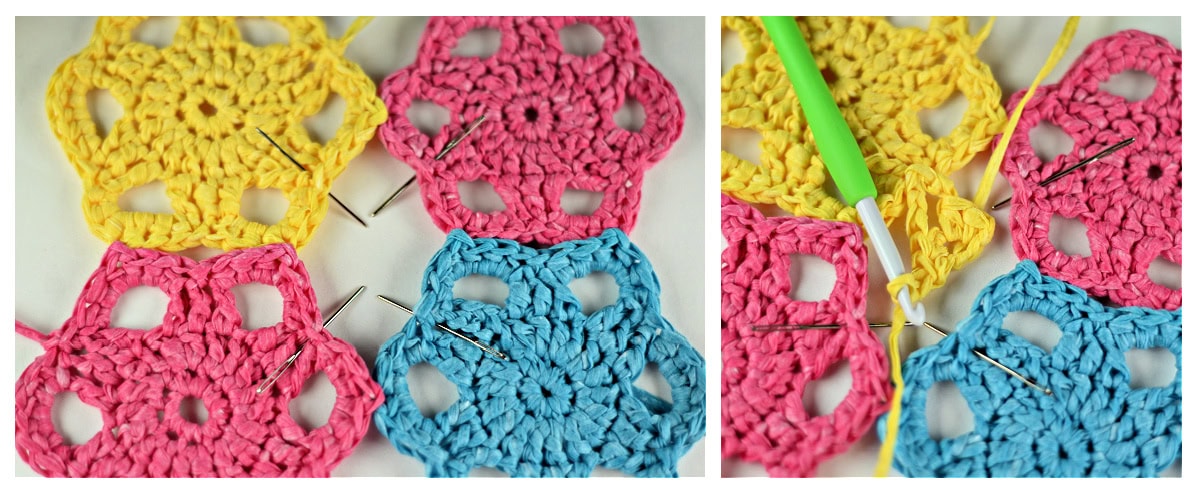
This cute crochet tote bag is first constructed by making 12 join-as-you-go flower motifs. You’ll then add small star motifs in the center of every four crochet flower motifs.
Next, you’ll edge the top of the crocheted tote and add handles. Then, you’ll edge the opposite side of the motifs and crochet a solid bag in single crochet. Lastly, you’ll seam the bottom of the bag and create the square bottom.
I originally intended to make a small beach bag with the Rewind yarn because I felt the sand would shake right out. But with the solid bottom, it also makes a fun crochet project bag!
Yarn
Lion Brand Yarns Rewind is a polyester/viscose blend. It’s super soft, great to work with, and easy on your hands. It’s currently available in 11 wonderful colors that include brights (perfect for summer fun!) and neutrals (perfect for everyday of the year).
This yarn is classified as a bulky / 5 weight yarn, however, I found that while designing my sun hats & tote bag, it worked up more comparably to a worsted / 4 weight yarn.
This yarn is great for a variety of projects ranging from year-round sweaters, shawls, and cowls to various home decor items.
Yarn Substitutions
As I mentioned earlier, I felt that the bulky Rewind yarn worked up more closely to a worsted weight yarn. Many of my crochet pattern testers used 100% worsted weight cotton yarns to make their bags. Lion Brand Yarns 24/7 Cotton is a great alternative!

Strawberry Lemonade Crochet Tote Bag – Free Pattern
The free crochet tote bag pattern is below, but if you love to work offline, I’ve got a couple other great options for you.
Purchase the ad-free, printable PDF, including all photo tutorials, on Ravelry, or on Etsy (aff).
Save this pattern to your Ravelry favorites.
Subscribe to my YouTube Channel!
This post contains affiliate links.
Materials
- Yarn: Lion Brand Rewind Yarn (See Yarn Note Below) in the colors Make Lemonade (2 balls) & Think Pink (1 ball). Available for purchase on the Lion Brand Website or Amazon
- Crochet Hooks: K/10.5/6.50mm; G/6/4.00mm, or size needed to obtain gauge (My favorite crochet hooks are the Clover Amour Hooks, I’ve never had an ache in my hand since switching)
- Scissors
- Yarn Needle
- Scrap Piece of yarn to use as a stitch marker
Abbreviations (U.S. Terms)
- ch: chain
- sl st: slip stitch
- st(s): stitch(es)
- sp(s): space(s)
- sc: single crochet
- hdc: half double crochet
- dc: double crochet
- Alt-dc: alternate double crochet
- Rep: repeat
- Rnd: round
- yo: yarn over
- MC: main color
- CC: coordinating color
Size
- One Size: 8.5″ W a 4.5″ D x 12.5″ H (not including handles)
Gauge
- Flower Motif: 4.25″ diameter
- In sc: 10 sts + 12 rows = 3″
Experience Level
- Easy / Intermediate
Special Stitches
- Alternate Double Crochet (alt-dc): After turning your work, do not ch, instead, insert your hook into the first st, yo, pull up a loop, yo, pull thru both loops, insert your hook between the legs of the st just made, yo, pull up a loop, yo, pull through one loop, yo, pull thru remaining loops.
Pattern Notes
- Yarn Notes & Substitutions: Lion Brand Rewind tape yarn was used for the sample in the pattern. Although it is classified as a 5 bulky weight yarn because it is a tape yarn, it works up more similarly to a worsted weight 4 yarn. So keep that in mind if you’re looking for substitutions. Testers had great luck using worsted weight 4 cotton yarns such as Lion Brand Yarns 24/7 cotton and acrylic yarns such as Lion Brand Vanna’s Choice.
- Lion Brand Rewind Yarn – 70% Polyester / 30% Viscose (3.5 oz / 100g / 242 yds / 221 m)
- Yardage Needed: (MC – 320 yards) / (CC – 170 yards)
- MC Yellow (Make Lemonade): 2 balls
- CC Pink (Think Pink): 1 ball
- Construction Notes: This cute crochet tote bag is first constructed by making 12 join-as-you-go flower motifs. You’ll then add small stars in the center of every four crochet motifs. Next, you’ll edge the top of the crocheted tote and add handles. Then, you’ll edge the opposite end of the motifs and crochet a solid bag in single crochet. Lastly, you’ll seam the bottom of the bag and create the square bottom.
Crochet Tote Bag Written Pattern
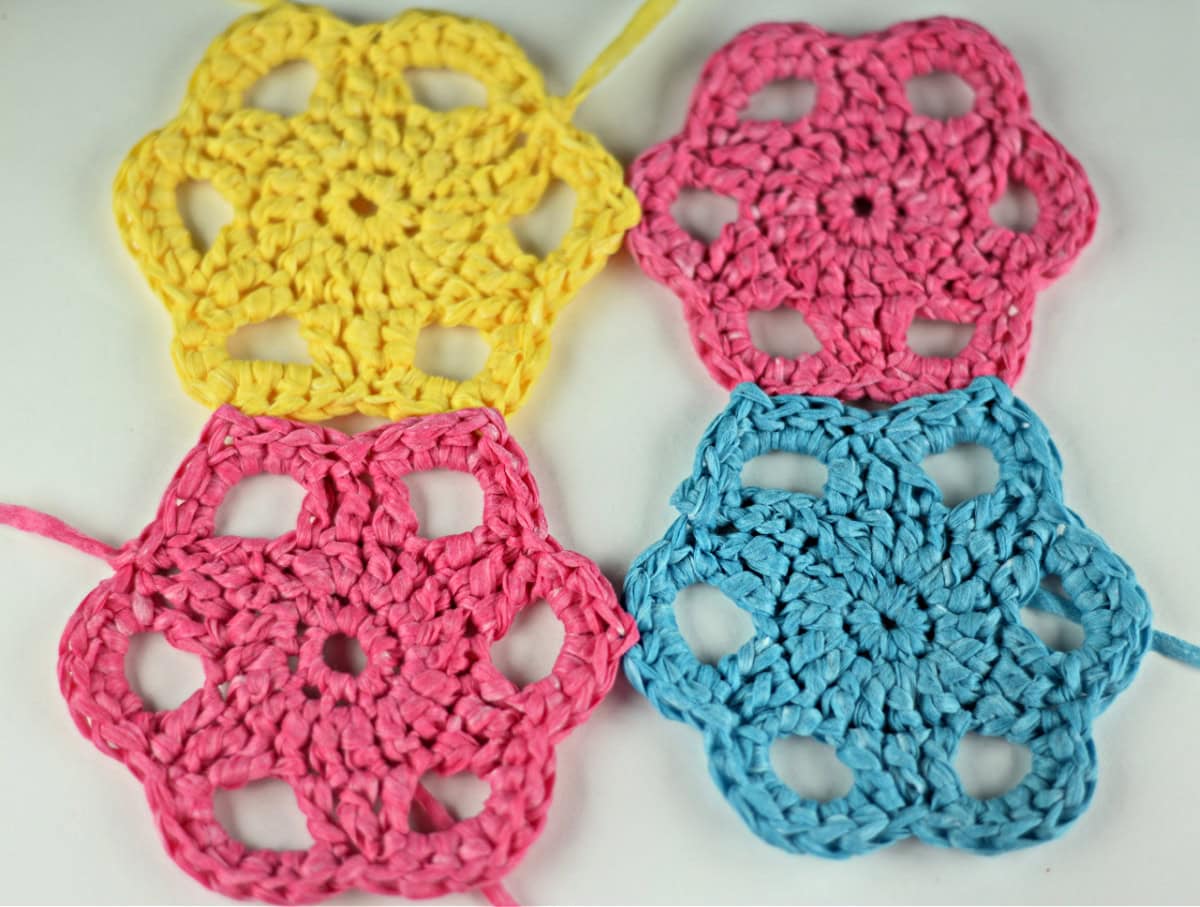
Crochet Flower Motif (Make 12)
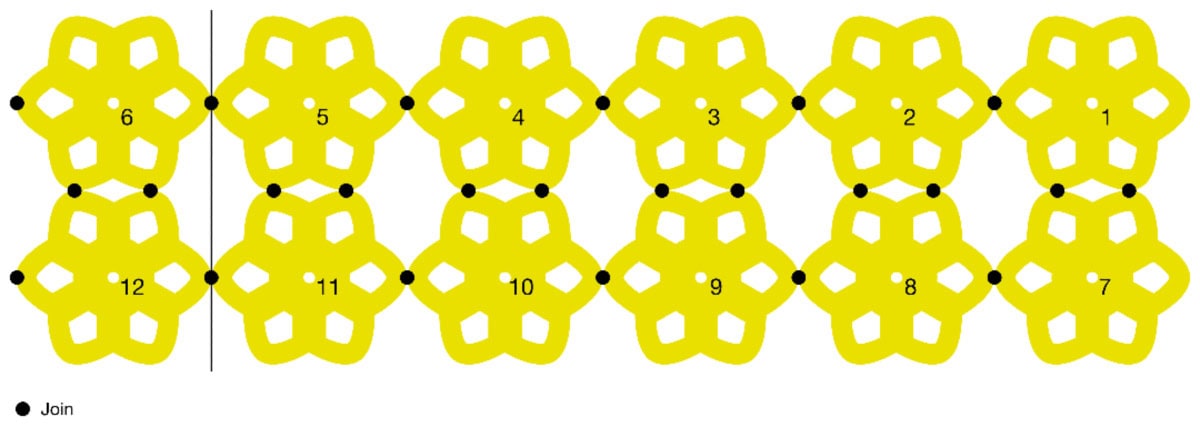
Crochet your Motifs in the Following Sequence:
- First, make motif 1.
- Second, make & join-as-you-go motifs #2 – 5.
- Third, make & join-as-you-go motif #7.
- Fourth, make & join-as-you-go motifs #8 – 11.
- Fifth, make & join-as-you-go motif #6. Last, make & join-as-you-go motif #12.
- See instructions and schematic below.
Note: Rounds 1 – 3 are the same for all 12 motifs. Then, Round 4 is differed for the different numbered motifs.
Rounds 1 – 3 for ALL Flower Motifs
Rnd 1: Using a 6.5mm crochet hook, ch 2, work 9 sc in 2nd ch from your hook. Join with a sl st to the 1st sc. (9 sts)
Rnd 2: (Alt-dc, dc) in 1st st, 2 dc in each remaining st around. Join with a sl st to the alt-dc. (18 sts)
Rnd 3: Alt-dc in 1st st, dc in each of the next 2 sts, ch 4, (dc in each of the next 3 sts, ch 4) 5 times. Join with a sl st to the alt-dc. (18 dc + 6 ch-4 sps)
Motif # 1 – Rnd 4: (sl st in the next dc, skip the next dc, 6 hdc in next ch-4 sp, skip the next dc) 6 times. Join with a sl st in the same st as the 1st sl st. (36 hdc + 6 sl sts)
Fasten off. Weave in ends. Continue on to Motifs #2 – 5.
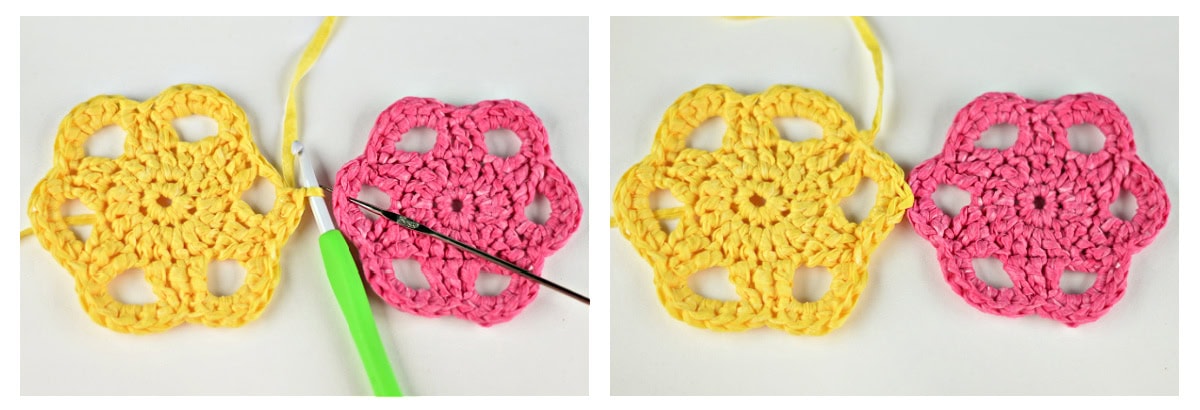
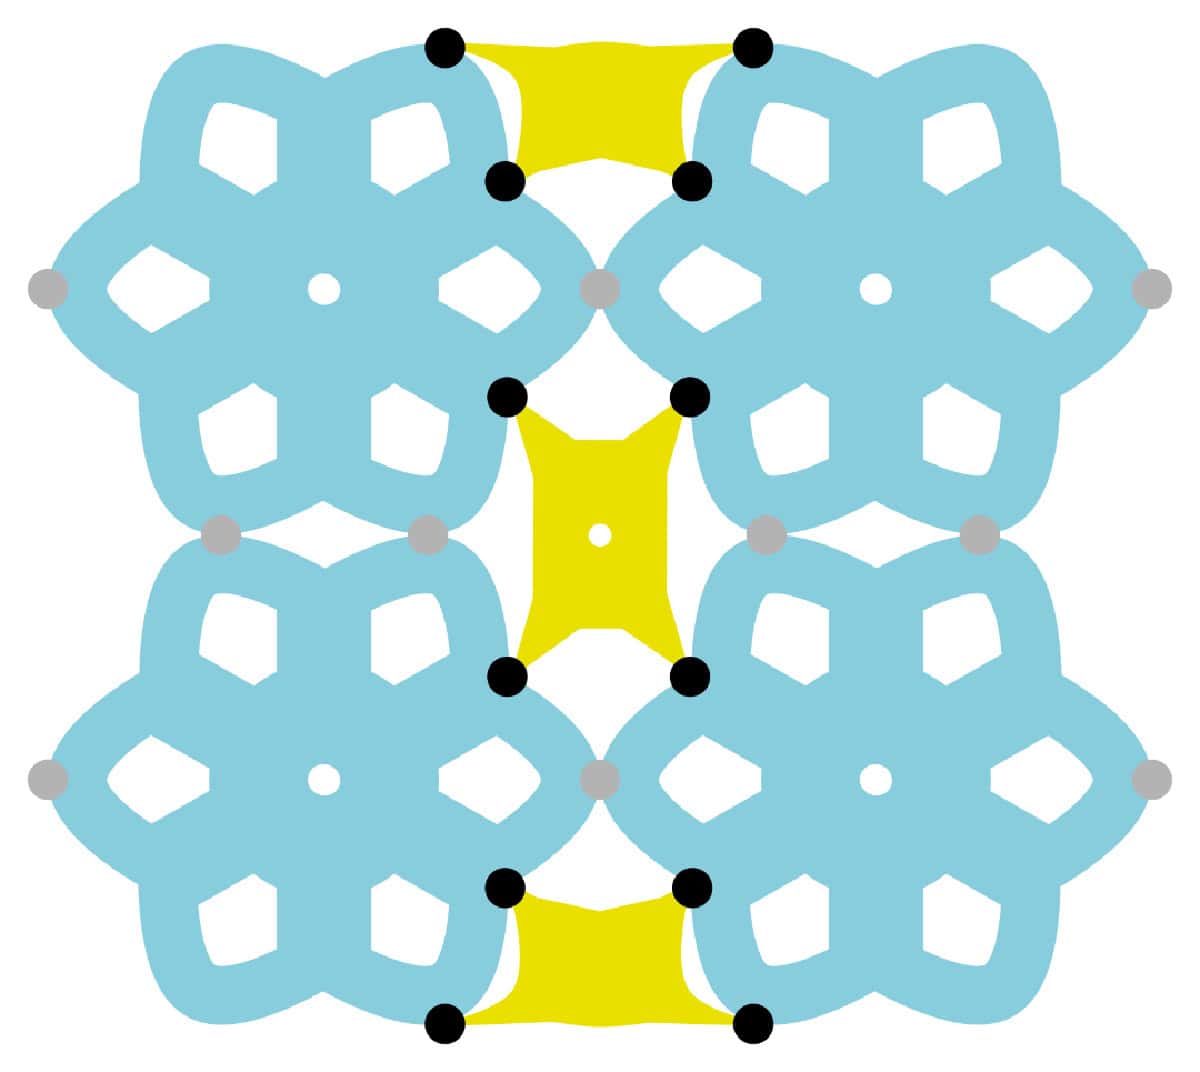
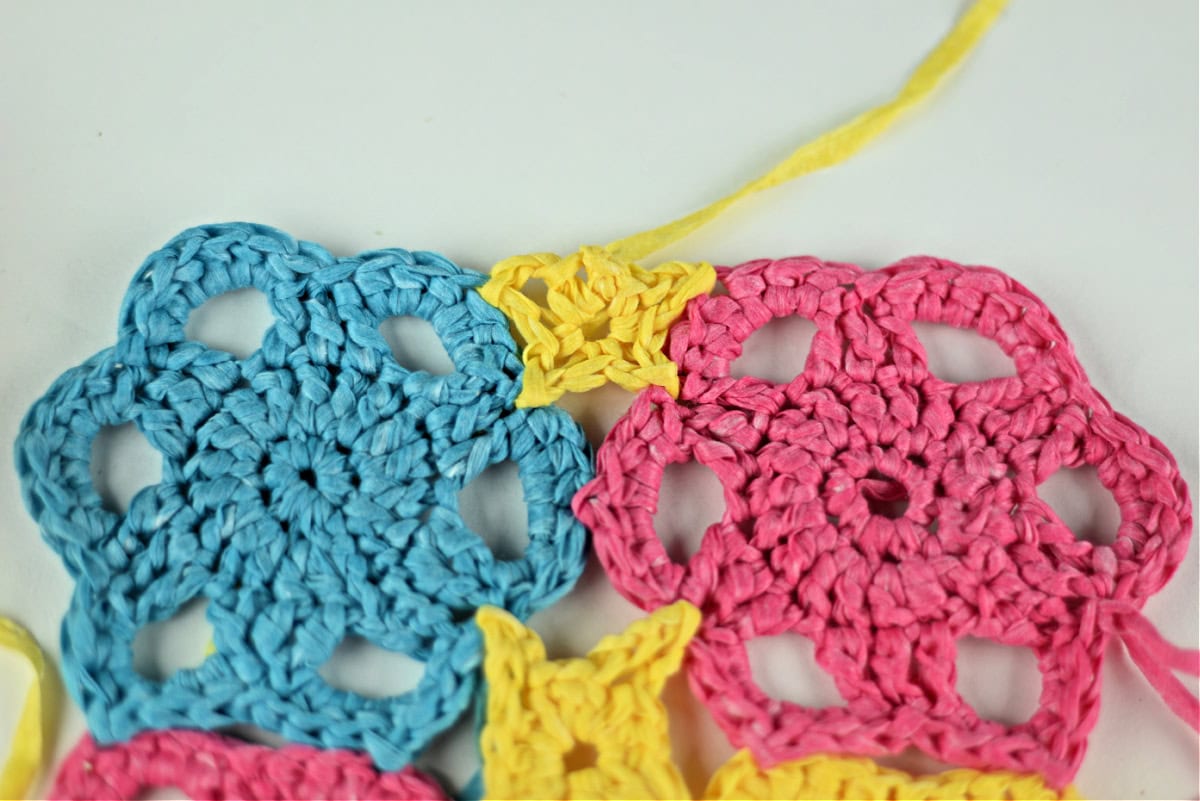
See the schematic below for a visual of how all motifs are joined.
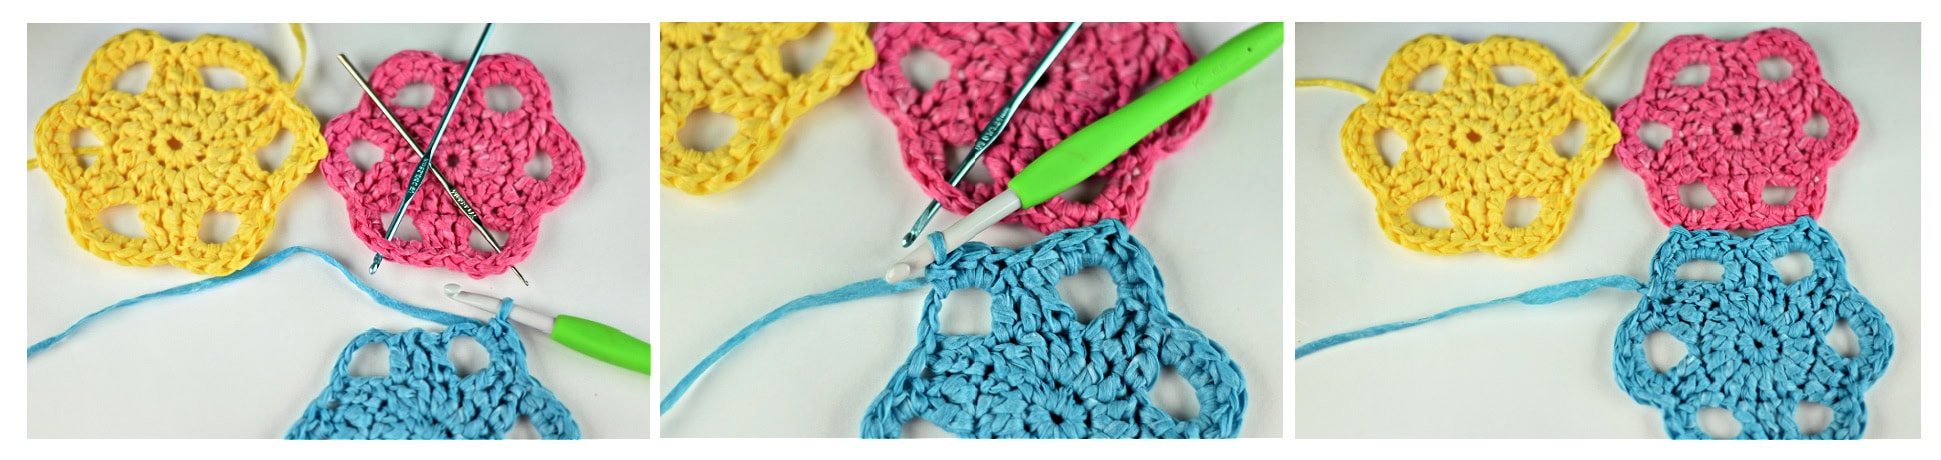
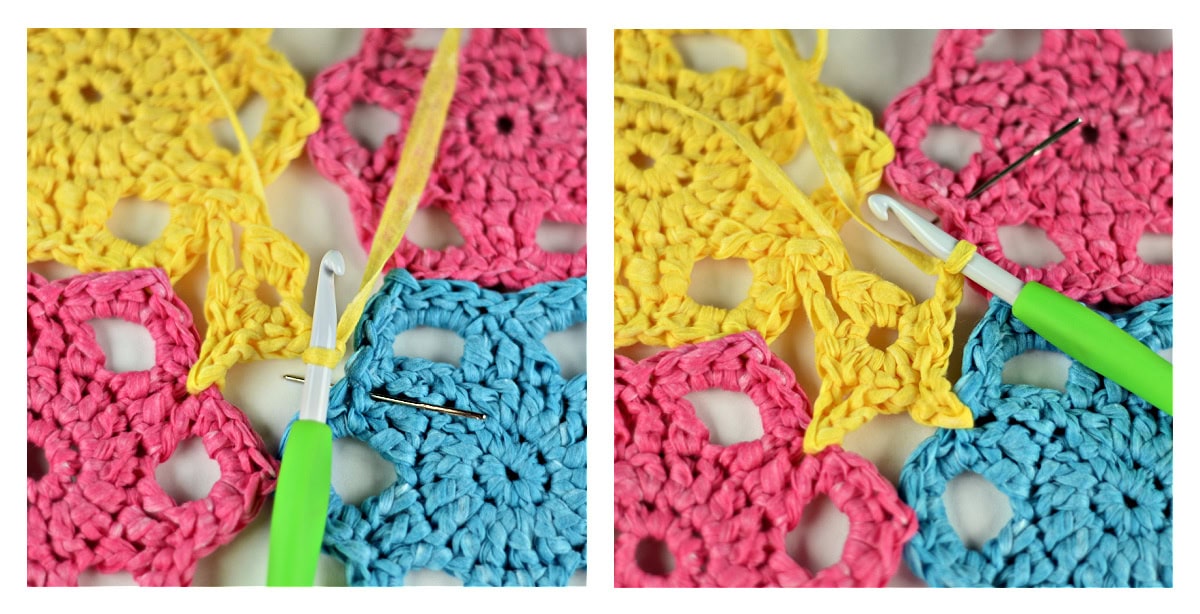
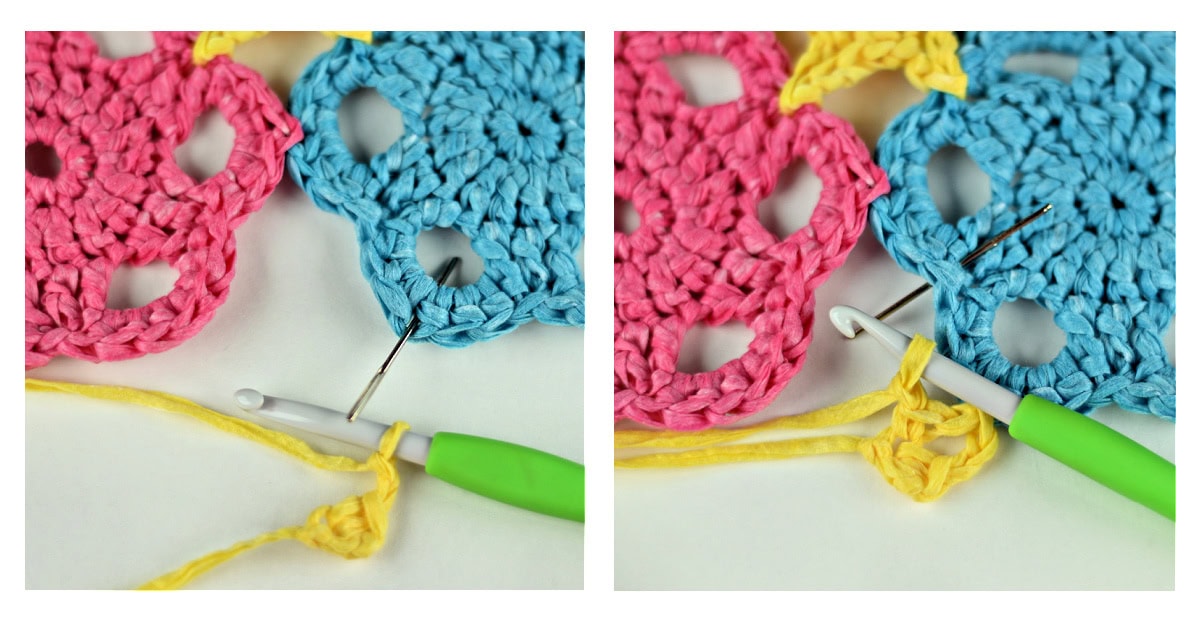
Motifs #2 – 5 Rnd 4: (sl st in the next dc, skip the next dc, 6 hdc in next ch-4 sp, skip the next dc) 5 times, sl st in the next dc, skip the next dc, 3 hdc in next ch-4 sp, sl st to other flower motif between 3rd & 4th dc of flower petal (see pics below), 3 hdc in same ch-4 sp, skip the next dc. Join with a sl st in the same st as the 1st sl st. (36 hdc + 6 sl sts)
Fasten off. Weave in ends. Complete motifs #2 – 5. You should have 5 motifs joined in a row. Continue on to motif #7.
Motif #7 Rnd 4: (sl st in the next dc, skip the next dc, 6 hdc in next ch-4 sp, skip the next dc) 4 times, then (sl st in the next dc, skip the next dc, 3 hdc in next ch-4 sp, sl st to flower motif #1 between 3rd & 4th dc of flower petal (see pics below), 3 hdc in same ch-4 sp, skip the next dc) twice. Join with a sl st in the same st as the 1st sl st. (36 hdc + 6 sl sts)
Fasten off. Weave in ends. Continue on to motifs #8 – 11.
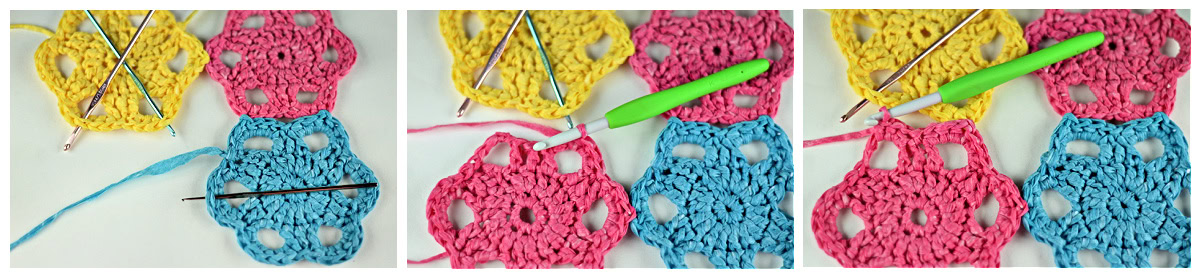
Motifs # 8 – 11 Rnd 4: (sl st in the next dc, skip the next dc, 6 hdc in next ch-4 sp, skip the next dc) 3 times, then (sl st in the next dc, skip the next dc, 3 hdc in next ch-4 sp, sl st to other flower motif between 3rd & 4th dc of flower petal (see pics below), 3 hdc in same ch-4 sp, skip the next dc) 3 times. Join with a sl st in the same st as the 1st sl st. (36 hdc + 6 sl sts)
Fasten off. Weave in ends. Complete motifs #8 – 11. You should have 10 motifs joined in two rows of 5. Continue on to motif #6.
Motif #6 Rnd 4: (sl st in the next dc, skip the next dc, 6 hdc in next ch-4 sp, skip the next dc) twice, then sl st in the next dc, skip the next dc, 3 hdc in next ch-4 sp, sl st to flower motif #5 between 3rd & 4th dc of flower petal (see pics), 3 hdc in same ch-4 sp, skip the next dc, then (sl st in the next dc, skip the next dc, 6 hdc in next ch-4 sp, skip the next dc) twice, then sl st in the next dc, skip the next dc, 3 hdc in next ch-4 sp, sl st to flower motif #1 between 3rd & 4th dc of flower petal (form a tube), 3 hdc in same ch-4 sp, skip the next dc. Join with a sl st in the same st as the 1st sl st. (36 hdc + 6 sl sts)
Fasten off. Weave in ends. Continue on to Motif #12.
Motif #12 Rnd 4: (sl st in the next dc, skip the next dc, 6 hdc in next ch-4 sp, skip the next dc) twice, sl st in the next dc, skip the next dc, 3 hdc in next ch-4 sp, sl st to flower motif # 11 between 3rd & 4th dc of flower petal (see pics), 3 hdc in same ch-4 sp, skip the next dc, then (sl st in the next dc, skip the next dc, 3 hdc in next ch-4 sp, sl st to flower motif # 6 between 3rd & 4th dc of flower petal (see pics), 3 hdc in same ch-4 sp, skip the next dc) twice, then sl st in the next dc, skip the next dc, 3 hdc in next ch-4 sp, sl st to flower motif # 7 between 3rd & 4th dc of flower petal (complete forming a tube), 3 hdc in same ch-4 sp, skip the next dc. Join with a sl st in the same st as the 1st sl st. (36 hdc + 6 sl sts)
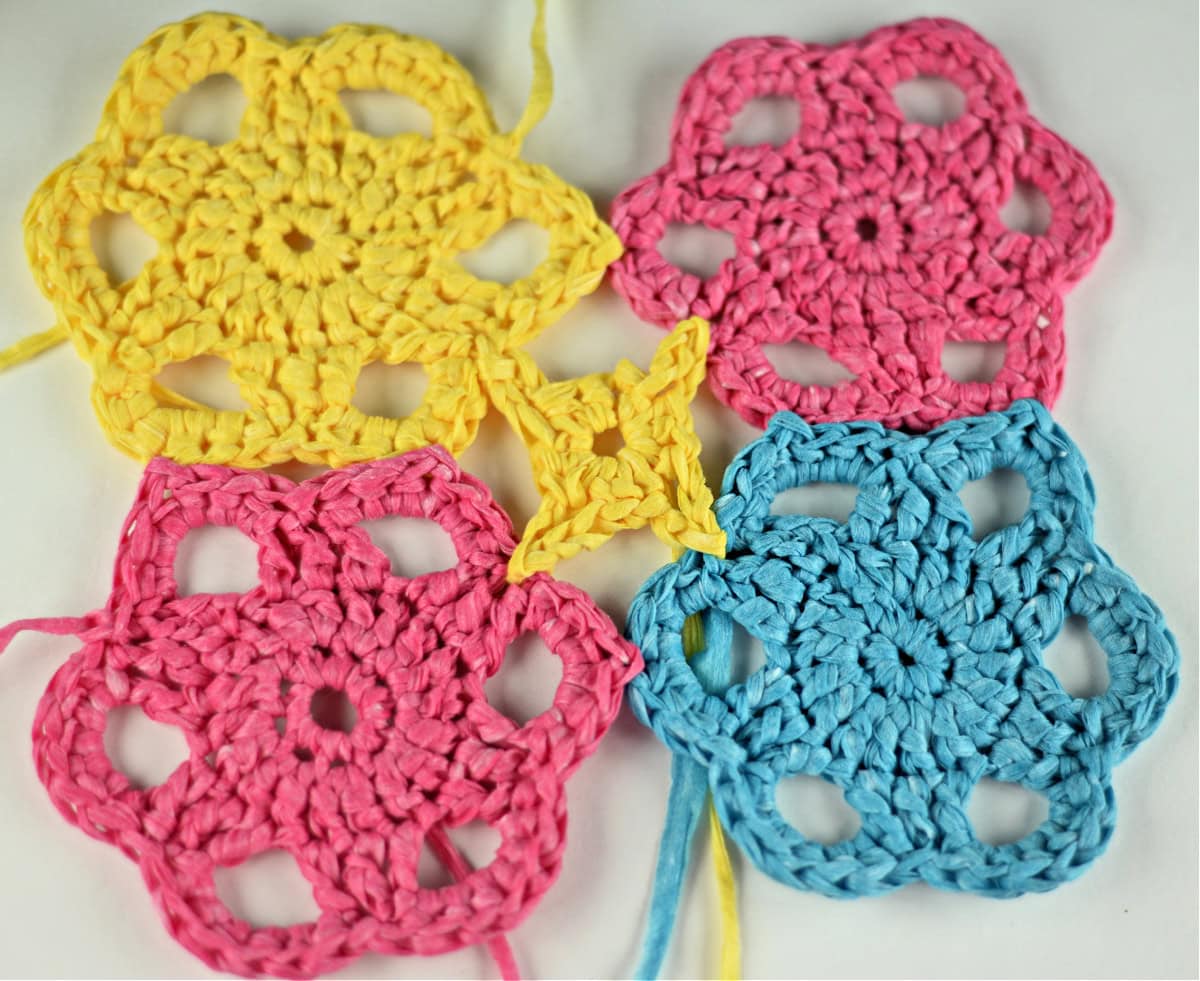
Fasten off. Weave in ends. Continue on to Small Center Motifs.
See schematic below that shows how all motifs are connected (before joining 1 & 6 and 7 & 12 to make the tube).
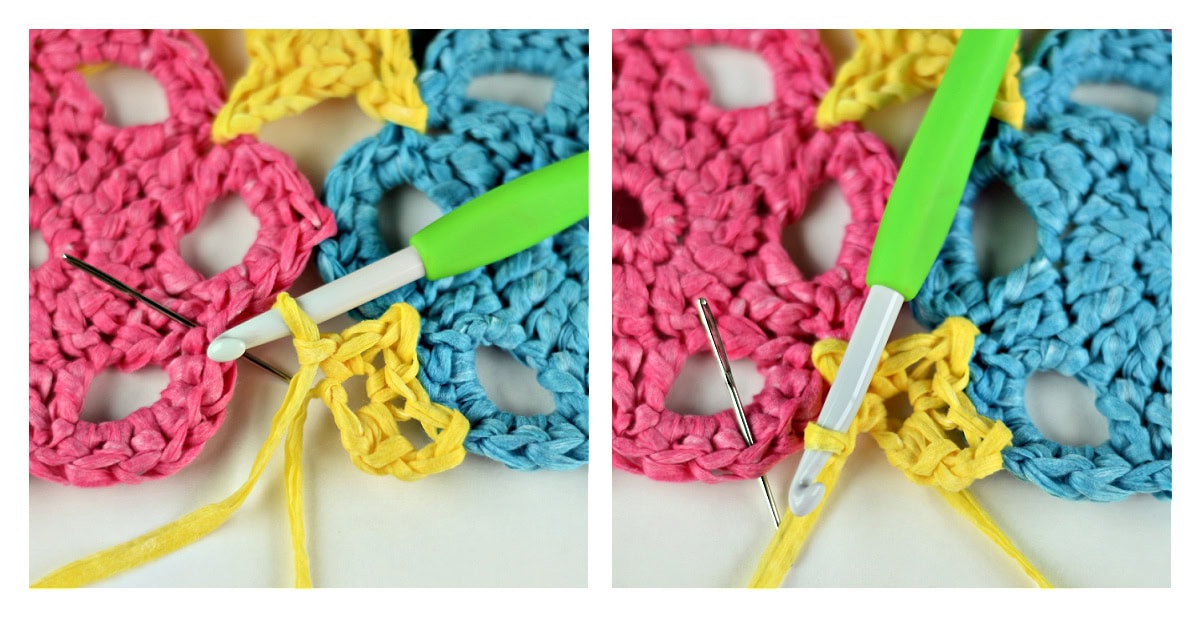
Small Center Star Motif
Refer to the schematic below that shows how the small center star motif is joined.
Note: You will work 1 small center motif in each of the 6 center spaces around the bag.
Rnd 1: Ch 2, 2 hdc in 2nd ch from your hook, ch 2, sl st in st marked with a PINK DOT, ch 2, 3 hdc in center ch, ch 2, sl st in st marked with a GREEN DOT, ch 2, 3 hdc in center ch, ch 2, sl st in st marked with a YELLOW DOT, ch 2, 3 hdc in center ch, ch 2, sl st in st marked with a BLUE DOT, ch 2, hdc in center ch. Join with sl st to the 1st hdc. (12 hdc + 8 ch-2 sps)
Fasten off. Repeat for all 6 center spaces around the bag. Continue on to Small Half Star Motifs.
Small Half Star Motif
Refer to the blue and yellow schematic above that shows how the small half star motif is joined.
Note: You will work 1 small half star motif in each space between the flower motifs along the top and bottom edge of the bag.
Rnd 1: Ch 2, sc in 2nd ch from your hook, ch 2, sl st in st marked with PINK DOT, ch 1, sc in center ch, ch 1, sl st in st marked with GREEN DOT, ch 1, sc in center ch, ch 1, sl st in st marked with BLUE DOT, ch 1, sc in center ch, ch 1, sl st in st marked with YELLOW DOT, ch 2, sc in center ch. Join with a sl st to the 1st sc.
Fasten off. Repeat for all other spaces along the top and bottom edge of the bag. Continue on to Top Edge of Motif Assembly & Handles.
Top Edge of Motif Assembly & Handles
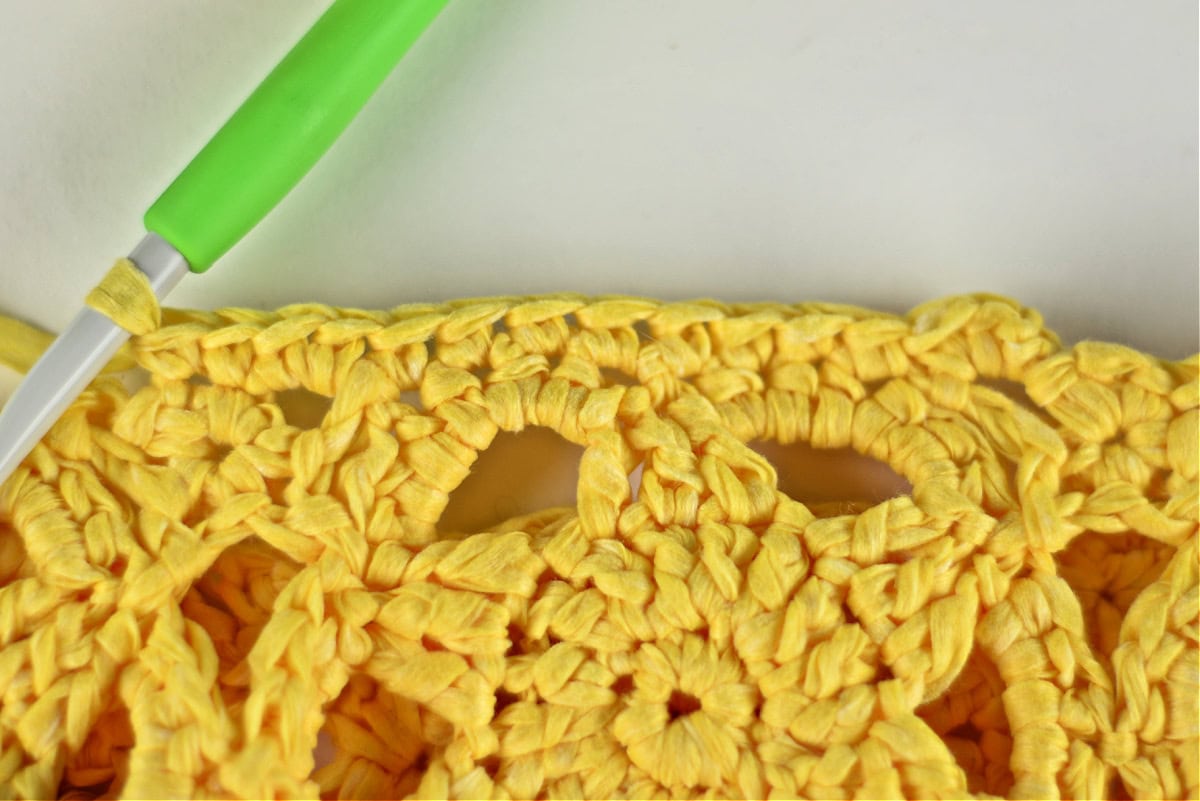
Rnd 1 (RS): Join MC yarn with a sl st in the 1st ch-2 sp you created in a small half star motif (that is around the top edge), ch 1, (2 sc in the ch-2 sp, sc in each of the next 8 sts across to the next ch-2 sp, 2 sc in ch-2 sp, sc in each of the next 2 sts) 6 times. Join with a sl st to the 1st sc. (84 sts)
Rnd 2: Ch 1, sc in each st around. Join.
Rnd 3: Ch 1, sc in each of the next 21 sts, ch 50 (to create first handle), skip the next 21 sts, sc in each of the next 21 sts, ch 50 (to create the second handle), skip each of the remaining 21 sts. Join to the 1st sc. (42 sc + 100 chs)
Rnds 4 – 6: Ch 1, sc in each st and ch around. Join. (142 sts)
Fasten off. Weave in ends. Continue on to Bottom Edge of Motif Assembly.
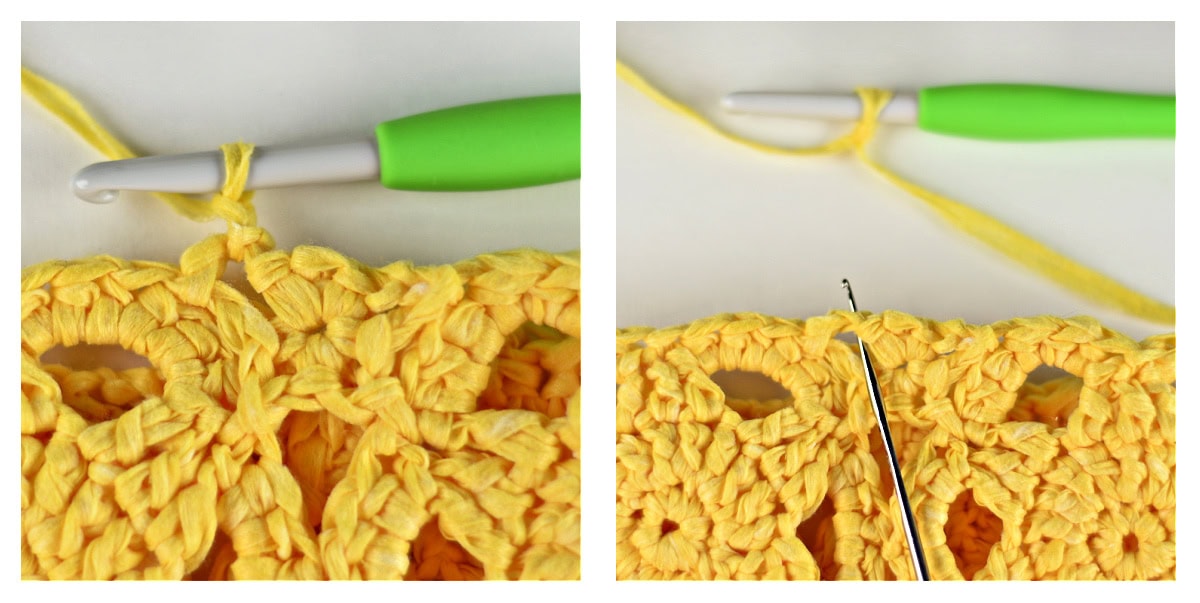
Photo Above Right: Shows join with a sl st & ch 1 complete.
Bottom Edge of Motif Assembly
Rnd 1 (RS): Join MC yarn with a sl st in the 1st ch-2 sp you created in a small half star motif (that is around the bottom edge), ch 1, (2 sc in the ch-2 sp, sc in each of the next 8 sts across to the next ch-2 sp, 2 sc in ch-2 sp, sc in each of the next 2 sts) 6 times. Join with a sl st to the 1st sc. (84 sts)
Do not fasten off. Switch to CC and continue on to Bottom Section of the Bag.
Bottom Section of the Bag
Rnd 1 (RS) (CC): Work 1 alt-dc & 2 dc in first st, (skip the next 2 sts, work 3 dc in the next st) rep around to the last 2 sts, skip the last 2 sts. Join with a sl st to the alt-dc. (84 sts)
Rnd 2 (CC): Sl st in each of the next 2 dc to get to the next sp between the dc’s (do not count as sts), working into the space between the sets of 3 dc’s, work 1 alt-dc & 2 dc in the first sp, work 3 dc in each remaining sp around. Join with a sl st to the alt-dc. (84 sts)
Rnd 3: With CC, sl st in each of the next 2 dc to get to the next sp between the dc’s (do not count as sts), switch to MC, working into the space between the sets of 3 dc’s, work 1 alt-dc & 2 dc in the first sp, work 3 dc in each remaining sp around. Join with a sl st to the alt-dc. (84 sts)
Rnd 4 (MC): Ch 1, sc in each st around. Join. (84 sts)
Rnds 5 – 20 (CC): Ch 1, sc in each st around. Join. (84 sts)
Fasten off. Weave in ends. Continue on to Seaming the Bottom of the Bag.
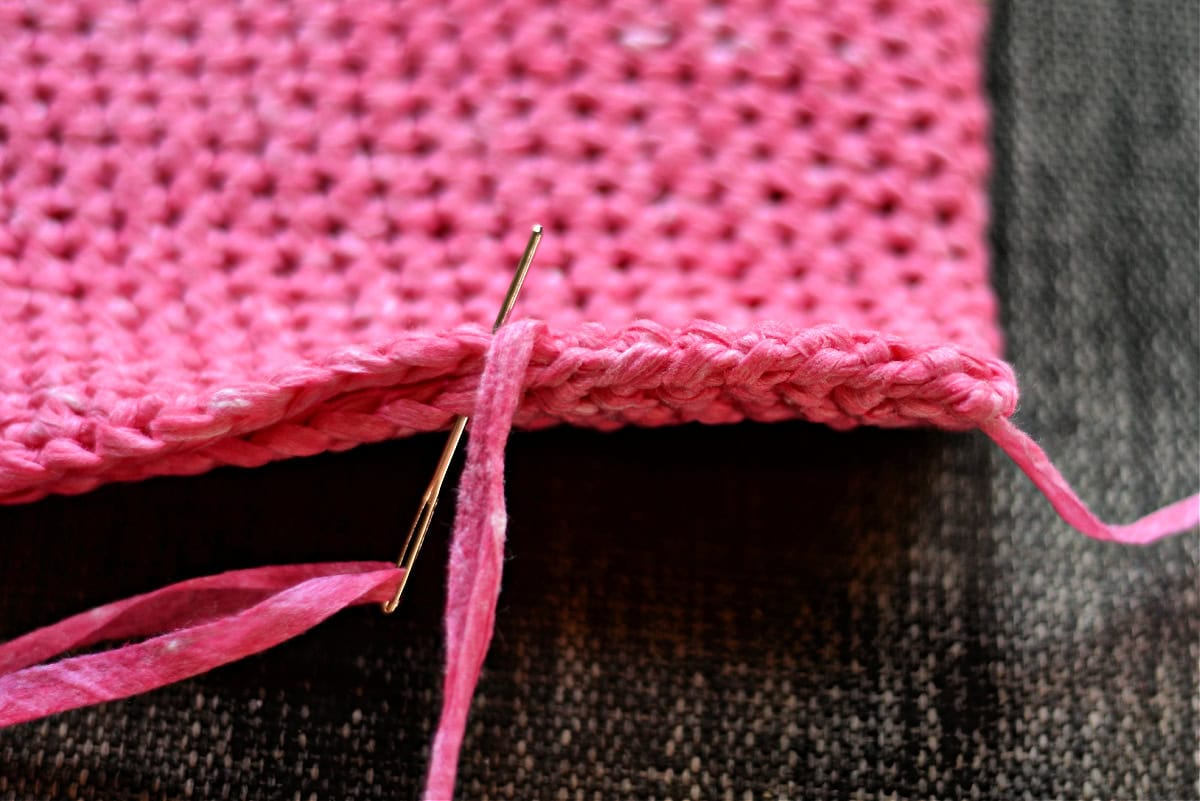
Seaming the Bottom of the Bag
Step 1: Turn the bag inside out, lay it flat in front of you, and line up the handles on the front and back (this will help you find the center of the bag). (see photo below)
Step 2: Using a yarn needle and length of CC approximately 3 times the width of the bag, whipstitch the bottom of the bag closed making sure to work into every stitch. Weave in ends. (see photo below)
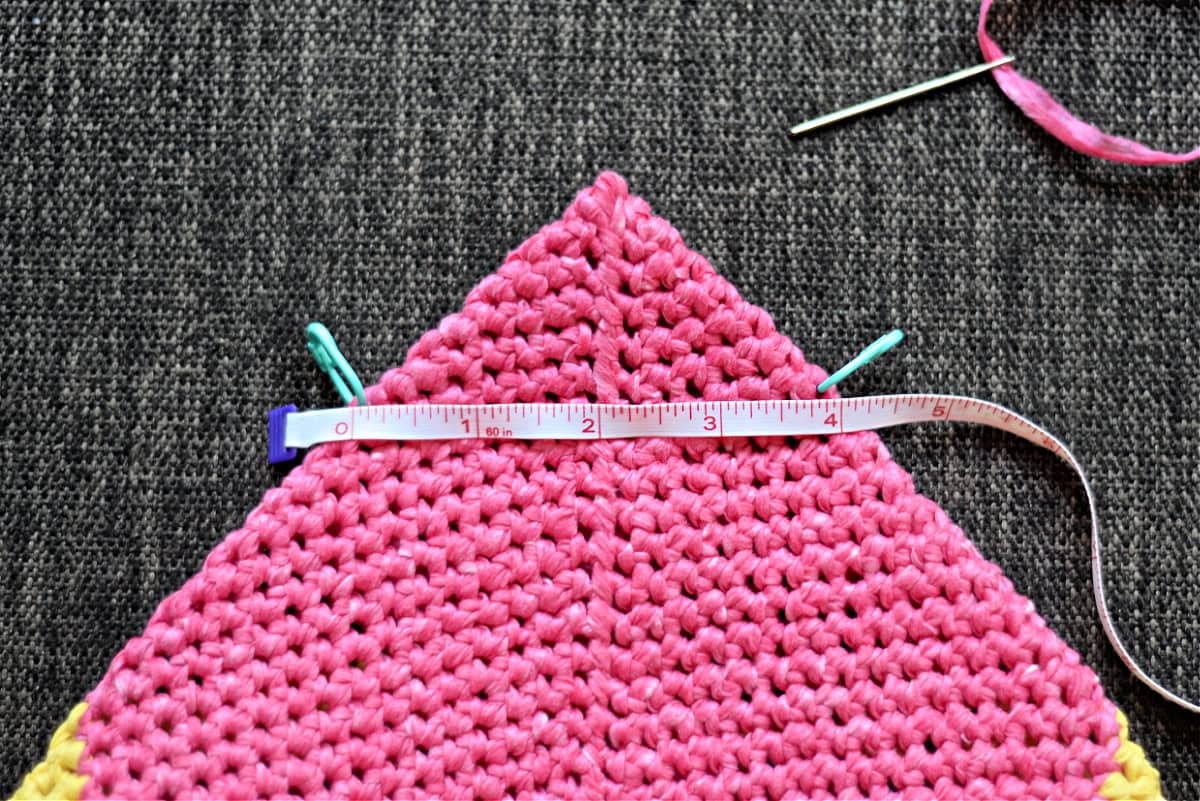
Step 3: Keep your bag inside out and position it so that one corner of the seam becomes the tip of the triangle (shown in the photo to the right). Note that the seam is centered vertically in the triangle. (see photo below)
Step 4: Use a measuring tape and find the points on the triangle where it measures 4″ across. Mark both the right and left side with a stitch marker. (see photo below)
Step 5: Use a yarn needle and 12″ piece of yarn and sew from one stitch marker to the next, working thru both layers of the bag. (see photo below)
Repeat for the opposite corner.
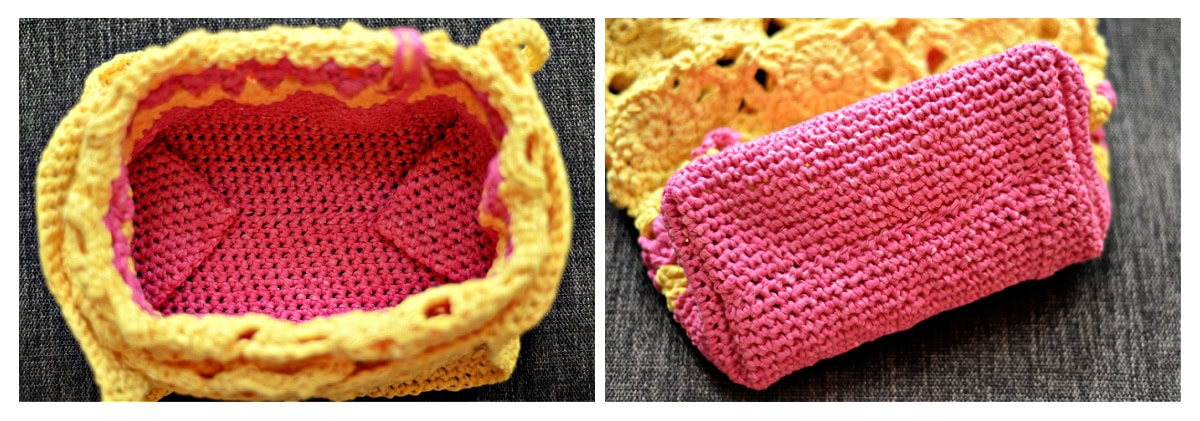
Step 6: Turn your bag right side out. The photo below left shows what the inside of your bag will look like. The photo below right shows what the bottom of your bag will look like. Add a tassel if you’d like and then your bag will be complete!
Tassel & Chain Loop
If you’ve never made a yarn tassel before, I have a Yarn Tassel Tutorial you may find handy.
Chain Loop: Leaving a 6″ tail of yarn & using a 4.00mm crochet hook, ch 30. Fasten off leaving a 6″ tail of yarn.
Attach Chain Loop to Tassel: Tie one 6″ tail from the chain to the top of the tassel, tuck in end. Loop the chain around one of the handles, tie the other 6″ tail from the chain to the top of the tassel, tuck in end. Trim ends.
Related: Pair the Strawberry Lemonade Crochet Tote Bag with the Stop & Rewind Crochet Sun Hat and Chantilly Crochet Summer Top for a fun day out on the beach.
I MADE IT! NOW WHAT?
Pin this post!: Save this free crochet tote bag pattern to your Pinterest boards so that you can come back and make it again.
Leave a comment below: We love to hear your feedback.
Share Your Finished Projects on Facebook or Instagram: I love to see your finished projects! Share with us on social media and tag me @acrochetedsimplicity or use the hashtag #ACrochetedSimplicity so I can find your posts.
Join us in the Facebook Community Group!
Come share your finished projects with us in the A Crocheted Simplicity Crochet Community Group on Facebook. Join us for fun community events such as crochet alongs, join in on crochet conversations, ask questions, get advice, and share your love for crochet!

More Crochet Tote Bag Patterns I Think You’ll Love
- On the Bias Tote Bag
- Summer Retro Tote Bag
- Motif Market Tote Bag
- Summer Breeze Tote Bag
- Chevron Bobble Tote Bag
More Crochet Patterns for Bags & Totes
Are you looking for more crochet tote bag patterns? We have several more free & premium crochet patterns for bags, backpacks, purses, and totes. We have a variety of free crochet bag patterns and premium crochet bag patterns.