Simple Striped Tote Bag – Free Crochet Tote Bag Pattern
It’s that time of year again when I’m ready to break out the cotton yarn and make myself a dozen different crochet bags. After all, one can never have too many bags, especially tote bags! I consider tote bags to be a summer essential… who am I kidding? I use my crochet tote bags all year round. You can find the free crochet pattern in this post below, an ad-free print friendly version in my Ravelry shop here, or you can purchase the kit from Lion Brand here.
>Click HERE to sign-up to receive our newsletter!<
Why do I historically design new tote bags this time of year? I think it’s because I’m being optimistic that, eventually, spring and summer will arrive here in Michigan’s Upper Peninsula. Maybe it’s my way of willing the warmer weather to come, or maybe I just love my growing collection of bags. 😉
On May 1st, I woke up to over an inch of frozen slush all over the ground. Where did that come from? I’m ready to wake up, grab a cup of coffee, sit on my front porch swing, and listen to the birds singing. Maybe in July?
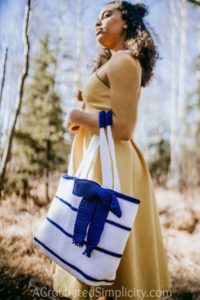
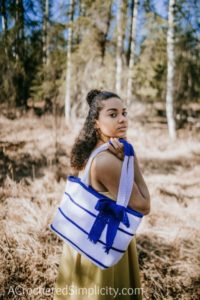
Photography Credit: Frozen Moments Photography
Tote bags are the perfect bags to carry a large variety of things. They’re great for carrying everything you need for a day at the beach (towels, sunscreen, a good book to read and a bottle of water). I’m looking forward to getting lost in a good book on the beach this summer. They also make wonderful crochet project bags. *Raise your hand if you have 1 or 2 (or more) project bags packed and ready to go at all times.
Yarn
I chose Lion Brand 24/7 Cotton, a 100% mercerized cotton, for this design. The mercerization process gives the yarn an incredible sheen and stitch definition (perfect for crochet bags). It is available in 24 wonderful colors that include brights (perfect for summer fun!) and neutrals (perfect for everyday). I chose to go with a classic navy and white as this color combination has always made my heart sing, especially for a bag that I’m planning to take to the beach. This yarn is great for a variety of projects ranging from various home decor items to accessories. I recently used it for my Moroccan Grocery Bag Holder and previously for my Cross Stitch Make-up Pouch and Sunny Days Swim Cover-up.
Cotton & cotton blend yarns are fabulous for summer projects (especially bags and garments) and Lion Brand has put together a collection of 12 Must-Have Cotton Kits. Each of these kits are currently 20% off and use cotton and cotton blend yarns. See them all, here.
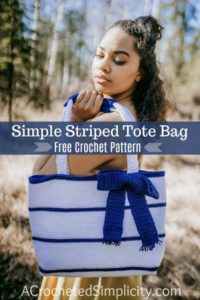
Simple Striped Tote Bag – FREE CROCHET BAG PATTERN
The free pattern is below, but if you love to work offline, or need to order your yarn, I’ve got a couple other great options for you.
Purchase the ad-free, printable PDF, including all photo tutorials, on Ravelry here.
Purchase the kit here! Lion Brand also has a full kit of the Simple Striped Tote Bag, available on their website. **On Sale now, 20% off for a limited time!
Save this pattern to your Ravelry favorites here.
Pin it for later here.
Description
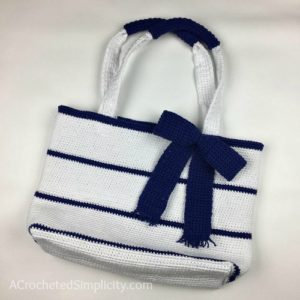
A large, square bottom bag, the Simple Striped Tote Bag is perfect for a day at the beach, or everyday use. The combination of Lion Brand Yarn’s 24/7 cotton in navy and white and simple crochet stitches give this bag its classic appeal. A floppy, fringed bow and padded handles are added for a finishing touch.
This post contains affiliate links.
Materials
- Yarn: Worsted Weight / 4; Lion Brand Yarns 24/7 Cotton was used for the sample. 100% Mercerized Cotton Yarn (186 yards / 170 m / 3.5 oz / 100 g). Available for purchase on the Lion Brand Website or AMAZON
- White (640 yards / 4 balls)
- Navy (280 yards / 2 balls)
- Crochet Hooks: G/6/4.00mm, H/8/5.00mm, or size needed to obtain gauge (My favorite crochet hooks are the Clover Amour Hooks, I’ve never had an ache in my hand since switching)
- Scissors
- Yarn Needle
- Scrap Piece of Yarn to use as a stitch marker
Many of these materials are available for purchase through our affiliates below:
 24/7 Cotton® Yarn, Lemon") Lion Brand Yarn (1 Skein) 2...Shop on Amazon
Lion Brand Yarn (1 Skein) 2...Shop on Amazon  Clover 1045/G Purple Amour ...Shop on Amazon
  Clover 1047/H Deep Blue Amo...Shop on Amazon
  Fiskars 154110-1001 Non-sti...Shop on Amazon
  Lion Brand Yarn 400-5-5002 ...Shop on Amazon
Abbreviations (US Terms)
- ch(s): chain(s)
- sl st(s): slip stitch(es)
- st(s): stitch(es)
- sc: single crochet
- Rnd(s): round(s)
- RS: right side
- SM: stitch marker
- Rep: repeat
Size
- One Size: 12.75″ W x 3.75″ D x 11″ H
Gauge
- In sc, using a 4mm hook: 17 sts + 13 rows = 3″
Notes
- I tend to crochet on the tighter side. You may need to go down a hook size (or two) to meet gauge if you crochet on the looser side.
- Yarn Notes: Lion Brand Yarn 24/7 Cotton in White & Navy were used for the sample. (3.5oz / 100 g / 186 yards / 170 meters / 100% mercerized cotton). Another comparable worsted weight cotton yarn may be substituted.
- Yardage: White (640 yards / 4 balls); Navy (280 yards / 2 balls)
- Construction: This bag is worked in the round from the bottom up. It will begin as a tube and then you’ll learn how to create a square bottom during seaming. The straps and bow are crocheted separately then sewn on.

Striped Tote Bag Instructions
Body of Bag
Note: The Body of Bag will be approximately 16.5″, wide when laid flat, before seaming the bottom of the bag.
Set-Up: With a 4.00mm crochet hook & white yarn, ch 150. Being careful not to twist the chain, join w/ a sl st to the 1st ch. (150 sts)
Rnd 1 (RS) (White): Ch 1, working in the back hump of the foundation chain, sc in each ch around. Join. (150 sts)
Rnds 2 – 12 (White): Ch 1, sc in each st around. Join. (150 sts)
Rnds 13 – 14 (Navy): Ch 1, sc in each st around. Join. (150 sts)
Rnds 15 – 30 (White): Ch 1, sc in each st around. Join. (150 sts)
Rnds 31 – 66: Rep Rnds 13 – 30.
Rnds 67 – 71 (Navy): Ch 1, sc in each st around. Join. (150 sts)
Fasten off. Continue on to Top Edge of Bag.
Top Edge of Bag
To finish the top edge of the bag, fold the last 5 (navy) rounds of the bag, in half. Fold them towards the inside of the bag. Use a yarn needle and navy yarn to hand stitch it down. Weave in ends.
Continue on to Straps.
Straps (Make 2)
Row 1: With a 4.00mm crochet hook & white yarn, leave an 8″ tail of yarn, then ch 3, working in the back hump of the foundation chain, sc in the 2nd ch from your hook, sc in the next ch. Turn. (2 sts)
Row 2: Ch 1, 2 sc in each st across. Turn. (4 sts)
Row 3: Ch 1, sc in each st across. Turn. (4 sts)
Rep Row 3 until your strap measures 22″ (or longer, if desired, but remember it will stretch 4-5″). Then work 1 decrease row.
Decrease Row: Ch 1, (sc2tog) twice. (2 sts)
Do not fasten off. Continue on to Strap Edging.
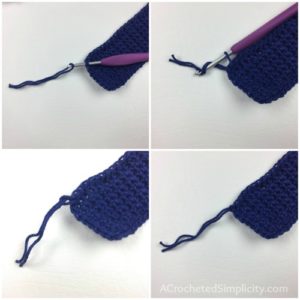
Strap Edging
Tip! When working into the sides of the rows along the long edges of the strap, if your strap starts to become wavy, go down a hook size for the edging.
Rnd 1 (RS): Ch 1, rotate strap to work into the sides of the rows along the first long edge, work 1 sc into the side of each row, ch 1, rotate to work into the bottom of Row 1, sc in each st across, ch 1, rotate to work into the sides of the rows along the second long edge, work 1 sc into the side of each row, ch 1, rotate to work into the top of the decrease row, sc in each st across. Join w/ a sl st to the 1st st of the rnd. (stitch count isn’t crucial)
Fasten off leaving an 8″ tail. Make the second strap then continue on to Strap Padding.
Strap Padding (Make 2)
Row 1: With a 4.00mm crochet hook & navy yarn, ch 9, working in the back hump of the foundation chain, sc in the 2nd ch from your hook, sc in each ch across. Turn. (8 sts)
Rows 2 – 34: Ch 1, sc in each st across. Turn. (8 sts)
Fasten off, leaving a tail of yarn twice the length of your piece. Make the second strap padding then continue on to Strap Assembly. Finished size approximately 2″ W x 6.5″ L.
Strap Assembly
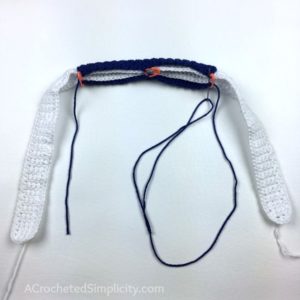
Step 1: Fold the center portion of a strap in half. Wrap a strap padding around it by folding it in half lengthwise. Use stitch markers or scraps of yarn to hold the strap padding in place while seaming.
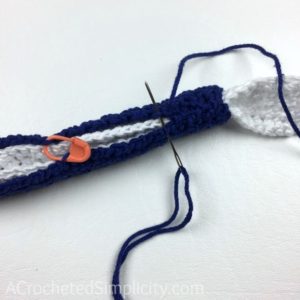
Step 2: Using a yarn needle and tail of navy yarn, whipstitch the long edges of the strap padding together, enclosing the strap.
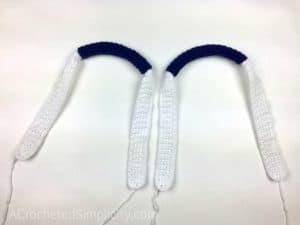
Weave in ends. Repeat for the second strap then continue on to Attaching Straps to Bag.
Attaching Straps to Bag
- With the RS of the bag facing out, lay the bag flat with the seam up the center of the back side.
- Position the ends of one strap 3.25″ from each side of the bag to the outer edge of the strap and 1.75″ down from the top edge of the bag. Use a stitch marker to keep them in place while sewing.
- Using a yarn needle and tail of yarn, sew the short edges of the strap to the top edge of the bag. Use white yarn to sew the strap to the white portion of the bag and navy yarn to sew the strap to the top navy edge of the bag. Fasten off. Weave in ends.
- Repeat steps 1 – 3 for the second strap.
Weave in ends. Continue on to Seaming the Bottom of the Bag.
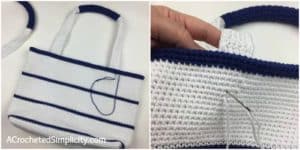
Seaming the Bottom of the Bag
Step 1: Turn the bag inside out, lay it flat in front of you, and line up the handles on the front and back (this will help you find the center of the bag). (photo above, left – notice how my handles aren’t attached yet? Do as I say and not as I did. lol)
Step 2: Using a yarn needle and length of white yarn approximately 3 times the width of the bag, whipstitch the bottom of the bag closed making sure to work into every stitch. Weave in ends. (photo above, center)
Step 3: Keep your bag inside out and position it so that one corner of the seam becomes the tip of the triangle (photo above, right). Note that the seam is centered vertically in the triangle.

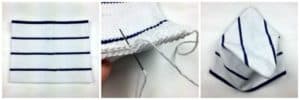
Step 4: Use a measuring tape and find the points on the triangle where it measures 3.75″ across. Mark both the right and left side with a stitch marker.
Step 5: Use a yarn needle and 12″ piece of yarn and sew from one stitch marker to the next, working thru both layers of the bag. Weave in ends.
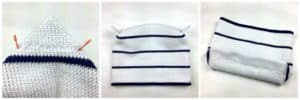
Photo Above, Left: Shows the seam finished from step 5. Remove the stitch markers once you’ve completed your seams.
Photo Above, Center: Shows what the Wrong Side of your bag will look like once you’ve completed both seams across the corners.
Step 6: Turn your bag right side out. The photo above, right shows what the Right Side of your bag bottom should look like.
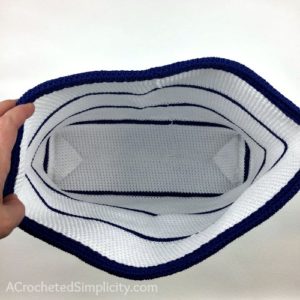
Photo Left: Shows what the inside of your bag will look like after turning it right side out.
Continue on to Bow, if desired.
Bow
Row 1: With a 5.00mm crochet hook & navy yarn, ch 8, working in the back hump of the foundation chain, sc in the 2nd ch from your hook, sc in each ch across. Turn. (7 sts)
Row 2: Ch 1, sc in each st across. Turn. (7 sts)
Rep Row 2 until your work measures 28″.
Do not fasten off. Continue on to Bow Edging.
Bow Edging
Tip! When working into the sides of the rows along the long edges of the bow, if your bow starts to become wavy, go down a hook size for the edging.
Rnd 1 (RS): Ch 1, rotate bow to work into the sides of the rows along the first long edge, work 1 sc into the side of each row, ch 1, rotate to work into the bottom of Row 1, sc in each st across, ch 1, rotate to work into the sides of the rows along the second long edge, work 1 sc into the side of each row, ch 1, rotate to work into the top of the last row, sc in each st across. Join w/ a sl st to the 1st st of the rnd. (stitch count isn’t crucial)
Fasten off. Weave in ends. Continue on to Adding Fringe to the Bow, if desired. If you do not want to add fringe, skip down to Bow Assembly.
Adding Fringe
Step 1: Cut 20 pieces of yarn, 5″ L each. Each fringe is made using 1 strand of yarn. I added 10 fringe on each short edge of the bow.
Step 2: Take 1 strand of yarn and fold it in half to create a small loop. Using a crochet hook, pull the loop (from right side to wrong side of bow) thru a corner stitch. Pull all loose ends thru the loop. Pull loose ends to tighten fringe. Repeat with remaining 9 fringe across the short edge of the bow. Repeat on opposite short edge.
Step 3: Measuring from the knot, trim each fringe to 1/2″ L, or desired length.
Bow Assembly
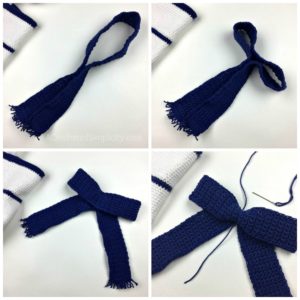
Step 1: Fold the bow in half, lengthwise.
Step 2: Push the fold at the top of the bow down to approximately the half way point.
Step 3: Lay bow flat as shown in photo.
Step 4: Using a yarn needle and 18″ piece of yarn, wrap yarn around the center of the bow tightly, to secure it in place.
Step 5: Sew the bow onto the front of the bag as shown in the photos.

More Free Crochet Patterns from A Crocheted Simplicity
If you enjoy making crochet bags, you may enjoy these other projects as well. And if you just want to browse, you can find all of our free crochet patterns HERE.

Are you intimidated by knit-look crochet? Would you love to learn my tips & tricks? Take an Annies Video Class with me and let me ease your fears and help you increase your skills! Click on the photo below to watch a free preview. You can also see the other 4 video classes I have available!