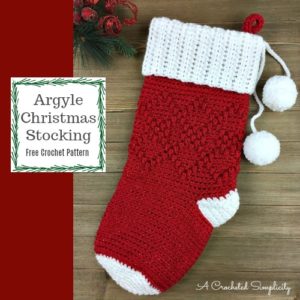
Argyle Christmas Stocking – Free Crochet Pattern
My most favorite thing to make for Christmas is a crochet Christmas stocking. While the design styles of Christmas stockings are endless, most also seem to be classic, like the Argyle Christmas Stocking. And what is the best part of a classic crochet Christmas design? The fact that you are crocheting an heirloom your family will cherish for years to come. And once a year at Christmas time, even after you’ve left this earth, that simple crocheted stocking you made years before, will fill their hearts and minds with memories of Christmases past.
You can find the Crochet Argyle Christmas Stocking Pattern in this post below, or an ad-free print friendly version on Love Crafts here, Ravelry here, or Etsy here.
>CLICK HERE TO SIGN-UP TO RECEIVE OUR NEWSLETTER!<
My Big Bold Cabled Christmas Stocking has been my favorite for several years, but this year’s designs, the Gingham Plaid Christmas Stocking and Argyle Christmas Stocking are close seconds! The Jolly Textures Christmas Stocking is also a favorite amongst many crocheters.
Yarn
I love crocheting my stockings using a nice, durable worsted weight yarn so I chose Red Heart Yarns With Love Metallic for my Argyle Christmas Stocking. The red is the perfect shade and the metallic fibers add just a little bit of sparkle for Christmas. There are many great worsted weight yarns that you can substitute for this crochet design.

ARGYLE CHRISTMAS STOCKING – FREE CROCHET STOCKING PATTERN
The free pattern is below, but if you love to work offline, or need to order your yarn, I’ve got a couple other great options for you.
Purchase the ad-free, printable PDF, including all photo tutorials & charts, on Love Crafts here, Ravelry here, or Etsy here.
Save this pattern to your Ravelry favorites here.
Pin it for later here.
This post contains affiliate links.
Materials
- Yarn: Worsted Weight / 4 yarn / I used Red Heart With Love Metallic in Red & White for my stocking / White (80 yards); Red (160 yards)
- Crochet Hook: I/9/5.50mm; or size needed to obtain gauge (My favorite crochet hooks are the Clover Amour Crochet Hooks, I’ve never had an ache in my hand since switching).
- Scissors
- Yarn Needle
- Locking Stitch Markers
 Red Heart With Love Metalli...Shop on Amazon
  Clover 1048/I Green Amour C...Shop on Amazon
  Fiskars 154110-1001 Non-sti...Shop on Amazon
  Clover Needlecraft Locking ...Shop on Amazon
Abbreviations (U.S. Terms)
- ch: chain
- sl st: slip stitch
- st(s): stitch(es)
- sc: single crochet
- hdc: half double crochet
- dc: double crochet
- invsc2tog: See special stitches below
- BLO: back loop only
- FLO: front loop only
- RS: right side
- Rep: repeat
- Rnd: round
- yo: yarn over
- Join with a standing sc: Click HERE for photo tutorial
Size
-
One Size: 7″W x 17″L (laid flat)
Gauge
- See individual sections for gauge.
Notes
- Beginning chain(s) are not included in stitch count, unless noted otherwise.
- First stitch of each row is worked in the same stitch as the turning chain, unless otherwise specified.
- I tend to crochet on the tighter side. You may find yourself needing to go down a hook size (or two) to properly meet gauge, but gauge isn’t as critical with this design.
- Red Heart With Love Metallic in Red & White were used for the stocking shown in the photos. (99% acrylic / 1% other fibers / 4.5 oz/ 127 g / 200 yards / 183 m).
- Yardage: White (80 yards); Red (160 yards)
Special Stitches
- Invisible Single Crochet Decrease (invsc2tog): Insert hook into the FLO of stitch indicated, insert hook into FLO of next stitch, yo, pull up a loop, yo, pull thru all loops on hook.
- Join yarn with a standing sc: When instructed to “Join with a standing sc”, begin with a slip knot on your hook. Insert your hook into the stitch or space indicated, yo, pull up a loop, yo and draw thru both loops on hook. Click here for photo tutorial.
Argyle Christmas Stocking Instructions
Leg of Stocking
Note: After round 1, this section is worked in back loops only.
Note: This section is worked in continuous rounds (a spiral). Do not join at the end of each round, instead use a scrap piece of yarn to keep track of the beginning of each round. Move the scrap of yarn up as you complete each round.
Gauge: In BLO sc, 10 sts = 3″; 9 rows = 3″
Rnd 1 (RS): Using a 5.5 mm crochet hook & red yarn, ch 48, join w/ a sl st to the 1st ch, ch 1, working into the back hump of the ch, sc in each st around. (48 sts) Make sure to mark this round as the Right Side as you’ll need to refer to it later.
Rnds 2 – 13: BLO sc in each st around. (48 sts)
Rounds 14 – 30: Continue using the written instructions below, or if you prefer charts, scroll down to the Argyle Chart below.
Rnd 14: BLO sc in each of the next 4 sts, ( FLO dc in the next st 2 rnds below, BLO sc in each of the next 7 sts ) rep from ( to ) around to the last 4 sts, FLO dc in the next st 2 rnds below, BLO sc in each of the last 3 sts. (48 sts)
Rnd 15: BLO sc in each of the next 3 sts, ( FLO dc in the next st 2 rnds below, BLO sc in the next st, FLO dc in the next st 2 rnds below, BLO sc in each of the next 5 sts ) rep from ( to ) around to the last 5 sts, then FLO dc in the next st 2 rnds below, BLO sc in the next st, FLO dc in the next st 2 rnds below, BLO sc in each of the last 2 sts. (48 sts)
Rnd 16: BLO sc in each of the next 2 sts, ( FLO dc in the next st 2 rnds below, BLO sc in each of the next 3 sts ) rep from ( to ) around to the last 2 sts, FLO dc in the next st 2 rnds below, BLO sc in the last st. (48 sts)
Rnd 17: ( BLO sc in the next st, FLO dc in the next st 2 rnds below, BLO sc in each of the next 5 sts, FLO dc in the next st 2 rnds below ) rep from ( to ) around. (48 sts)
Rnd 18: ( FLO dc in the next st 2 rnds below, BLO sc in each of the next 7 sts ) rep from ( to ) around. (48 sts)
Rnd 19: Rep Rnd 17. *Note: Some FLO dc will be worked into the FLO of other dc 2 rnds below.
Rnd 20: BLO sc in each of the next 2 sts, ( FLO dc in the next st 2 rnds below, BLO sc in the next st, FLO dc in the next st 2 rnds below, BLO sc in the next st, FLO dc in the next st 2 rnds below, BLO sc in each of the next 3 sts ) rep from ( to ) around to the last 6 sts, then work ( FLO dc in the next st 2 rnds below, BLO sc in the next st ) 3 times. (48 sts)
Rnd 21: Rep Rnd 15.
Rnd 22: Rep Rnd 20.
Rnd 23: Rep Rnd 15.
Rnd 24: Rep Rnd 20.
Rnd 25: Rep Rnd 17.
Rnd 26: Rep Rnd 18.
Rnd 27: Rep Rnd 17.
Rnd 28: Rep Rnd 16.
Rnd 29: Rep Rnd 15.
Rnd 30: Rep Rnd 14.
Rnd 31: BLO sc in each st around. (48 sts) At the end of Rnd 31, place a SM in st #44 to mark beginning of heel.
Fasten off. Weave in ends. Approximate length at this point is 10″. Continue on to Heel.
Argyle Chart
copyright 2018 Jennifer Renaud aka A Crocheted Simplicity

HOW TO READ THE CHART ABOVE:
- Read the chart from right to left, bottom to top.
- The Red squares indicate when you’ll work a dc.
- Make sure to work the dc in the front loops of stitches 2 rounds below the current round.
- The vertical numbers indicate the round you’re on. Begin following the chart and working long dc in round 14.
- The horizontal numbers represent the stitch number. This stitch pattern is a multiple of 16 stitches.
- After working Round 30, continue with Round 31 of Leg of Stocking.
Heel
Note: Stitches are worked under both loops. Heel is worked in rows.
Row 1 (RS): Using a 5.5 mm crochet hook and white yarn, begin by leaving an 8″ tail of yarn to sew gap closed in the next section, then join yarn with a standing sc in the st marked with a SM, sc in each of the next 15 sts. Turn. (16 sts)
Row 2: Ch 1, sc in next 11 sts. Turn. (11 sts)
Row 3: Ch 1, sc in next 6 sts. Turn. (6 sts)
Row 4: Ch 1, sc in next 6 sts, sc in next st of Row 1. Turn. (7 sts)
Row 5: Ch 1, sc in next 7 sts, sc in next st of Row 2. Turn. (8 sts)
Row 6: Ch 1, sc in next 8 sts, sc in next st of Row 1. Turn. (9 sts)
Row 7: Ch 1, sc in next 9 sts, sc in next st of Row 2. Turn. (10 sts)
Row 8: Ch 1, sc in next 10 sts, sc in next st of Row 1. Turn. (11 sts)
Row 9: Ch 1, sc in next 11 sts, sc in next st of Row 2. Turn. (12 sts)
Row 10: Ch 1, sc in next 12 sts, sc in next st of Row 1. Turn. (13 sts)
Row 11: Ch 1, sc in next 13 sts, sc in next st of Row 2. Turn. (14 sts)
Row 12: Ch 1, sc in next 14 sts, sc in next st of Row 1. Turn. (15 sts)
Row 13: Ch 1, sc in next 15 sts, sc in next st of Row 2. (16 sts) Place a SM in st #9 to mark beginning of Foot of Stocking.
Fasten off leaving an 8″ tail of yarn to sew gap closed in the next section. Continue on to Foot of Stocking.
Foot of Stocking
Note: This section is worked in back loops only.
Note: This section is worked in continuous rounds (a spiral). Do not join at the end of each round, instead use a scrap piece of yarn to keep track of the beginning of each round. Move the scrap of yarn up as you complete each round.
Tip! After working a couple rounds in the Foot of Stocking, use a yarn needle and tails of yarn to stitch closed the small gaps near the first and last stitches of the heel. It’s easier to do this now, rather than waiting until you’ve completed your stocking.
Rnd 1 (RS): Using a 5.5 mm crochet hook & red yarn, join yarn with a standing sc in the BLO of the stitch marked with a SM, sc in BLO of each st around. (48 sts)
Rnds 2 – 17: Ch 1, BLO sc in each st around. (48 sts)
Fasten off. Approximate length from last row of heel is 5″. Continue on to Toe.
Toe
Note: This section is worked in continuous rounds (a spiral). Do not join at the end of each round, instead use a scrap piece of yarn to keep track of the beginning of each round. Move the scrap of yarn up as you complete each round.
Rnd 1 (RS): Using a 5.5 mm crochet hook & white yarn, join yarn with a standing sc in the BLO of the 1st stitch of the previous rnd, BLO sc in each st around. (48 sts)
Rnd 2: * sc in each of the next 5 sts, invsc2tog, rep from * around to the last 6 sts, sc in each of the last 6 sts. (42 sts)
Rnd 3: * sc in each of the next 5 sts, invsc2tog, rep from * around. (36 sts)
Rnd 4: * sc in each of the next 4 sts, invsc2tog, rep from * around. (30 sts)
Rnd 5: * sc in each of the next 4 sts, invsc2tog, rep from * around. (25 sts)
Rnd 6: * sc in each of the next 3 sts, invsc2tog, rep from * around. (20 sts)
Rnd 7: * sc in each of the next 3 sts, invsc2tog, rep from * around. (16 sts)
Rnd 8: * sc in each of the next 2 sts, invsc2tog, rep from * around. (12 sts)
Rnd 9: Invsc2tog around. (6 sts)
Fasten off. Leave tail and sew toe closed. Weave in ends. Continue to cuff.
Cuff
Note: The cuff is worked flat, in rows, seamed, then attached to the top of the stocking.
Gauge: In BLO hdc, 14 sts = 4″; 6 rows = 2.5″
Row 1 (RS): Using a 5.5 mm crochet hook & white yarn, ch 15, working into the back humps of the ch, hdc in the 2nd ch from your hook and in each ch across. Turn. (14 sts)
Rows 2 – 34: Ch 1, BLO hdc in each st across. Turn. (14 sts)
Fasten off. Weave in ends. Approximately size: 4″ W x 14″ L. Continue to Cuff Seam.
Cuff Seam
With WS facing out, bring row 1 up to meet the last row, use a whipstitch or mattress stitch & white yarn to seam the first and last rows together. Click HERE for a tutorial on how to sew a Mattress Stitch Seam.
Complete seam. Weave in ends. Continue on to Prepare Cuff Edge for Attaching to Stocking.
Prepare Cuff Edge for Attaching to Stocking
With the RS facing out, using a 5.5 mm crochet hook & white yarn, join yarn with a standing sc along the edge of the cuff near the seam, sc into the side of the next 5 rows, then work * sc into the side of the next row, 2 sc into the side of the next row, rep from * around. Join with a sl st to the 1st st. (48 sts)
Do not fasten off. Continue on to Attaching the Cuff.
Attaching the Cuff
Crochet Hook: I/9/5.50mm
With RS of both the stocking and cuff facing out, insert the cuff into the top opening of the stocking making sure that the edge you just prepared is on top and lines up with the top opening of the stocking. The RS of the cuff will be touching the WS of the stocking. Line up the seam of the cuff as near the back center of the stocking leg as you can. Ch 1, attach the cuff to the top of the stocking by sc thru both layers of the cuff and stocking in each st around. Join w/ a sl st to the 1st st of the round. (48 sts)
Fasten off. Weave in ends. Fold cuff all the way over. Continue on to Hanging Loop.
Hanging Loop
Crochet Hook: I/9/5.50mm
Ch 31, sc in 2nd ch, sc in each ch across. (30 sts)
Fasten off. Leave a 8” tail. Using a yarn needle and the tail of yarn, fold your work in half and sew on the inside of the stocking at the center back of the leg. Weave in ends. Continue on to Poms & Tie, if desired.
Poms & Tie
Crochet Hook: I/9/5.50mm
Gauge: 9 sts = 3″
Tie: Ch 50, fasten off.
Poms: Make (2) 1-5/8” poms. I used a Clover Pom Maker to make mine. *OR if preferred, make tassels instead of poms. Attach 1 pom to each end of the tie. Fold tie in half and tack stitch it to the center back of leg of the stocking. I like to tack stitch it approximately 2″ from the fold to leave a little loop at the top. *Note: the loop created by folding the tie is the hanging loop for the stocking w/o a cuff.
If you prefer tassels instead of poms, click HERE for tutorial.
Are you intimidated by knit-look crochet? Would you love to learn my tips & tricks? Take an Annies Video Class with me and let me ease your fears and help you increase your skills! Click on the photo below to watch a free preview. You can also see the other 4 video classes I have available!

WE HOPE TO SEE YOU SOON! IN THE MEANTIME, CHECK OUT OUR FREE CROCHET PATTERNS AND JOIN US IN THE FACEBOOK COMMUNITY GROUP!

Says free PDF. But where is it I can’t find the PDF to download ornprint
Hi Joan- The pattern is free on my blog, or you can purchase an Ad-Free PDF on Ravelry for a small fee. Jennifer