Meandering Squares Modern Crochet Blanket Pattern Free
Take a gorgeous self-striping yarn with a nice neutral shade, work up some floral motifs and add borders and stripes, and you’ll have this breath-taking modern crochet blanket pattern free.
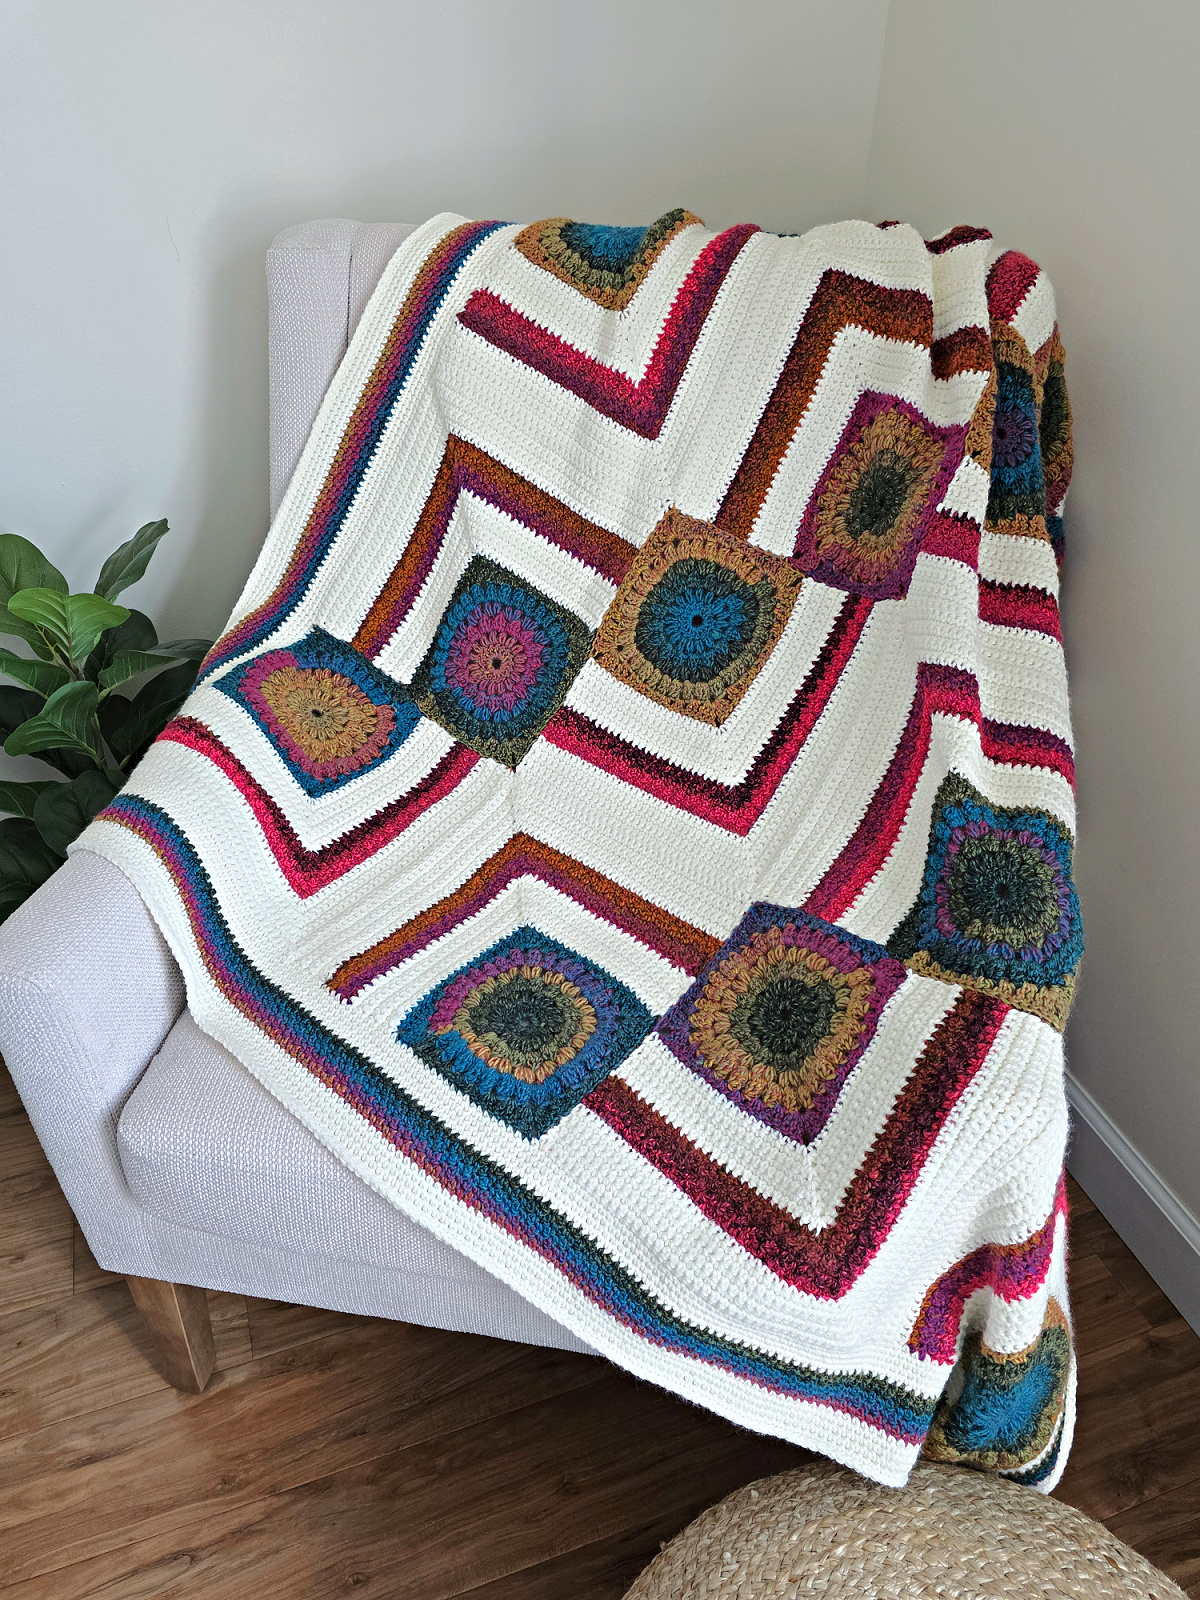
With motifs running diagonally across the piece and steps formed in between due to colorwork, there’s a lot to look at in this unique piece. It all comes together wonderfully with a thick border. If you’re looking to add pops of color to your lounge or spread over your bed, this blanket as a throw or lapghan would be perfect.
You’ll find the modern crochet blanket pattern free below, or you can find an ad-free printable PDF (that includes all photo tutorials + schematics) on Ravelry, or on Etsy (aff).
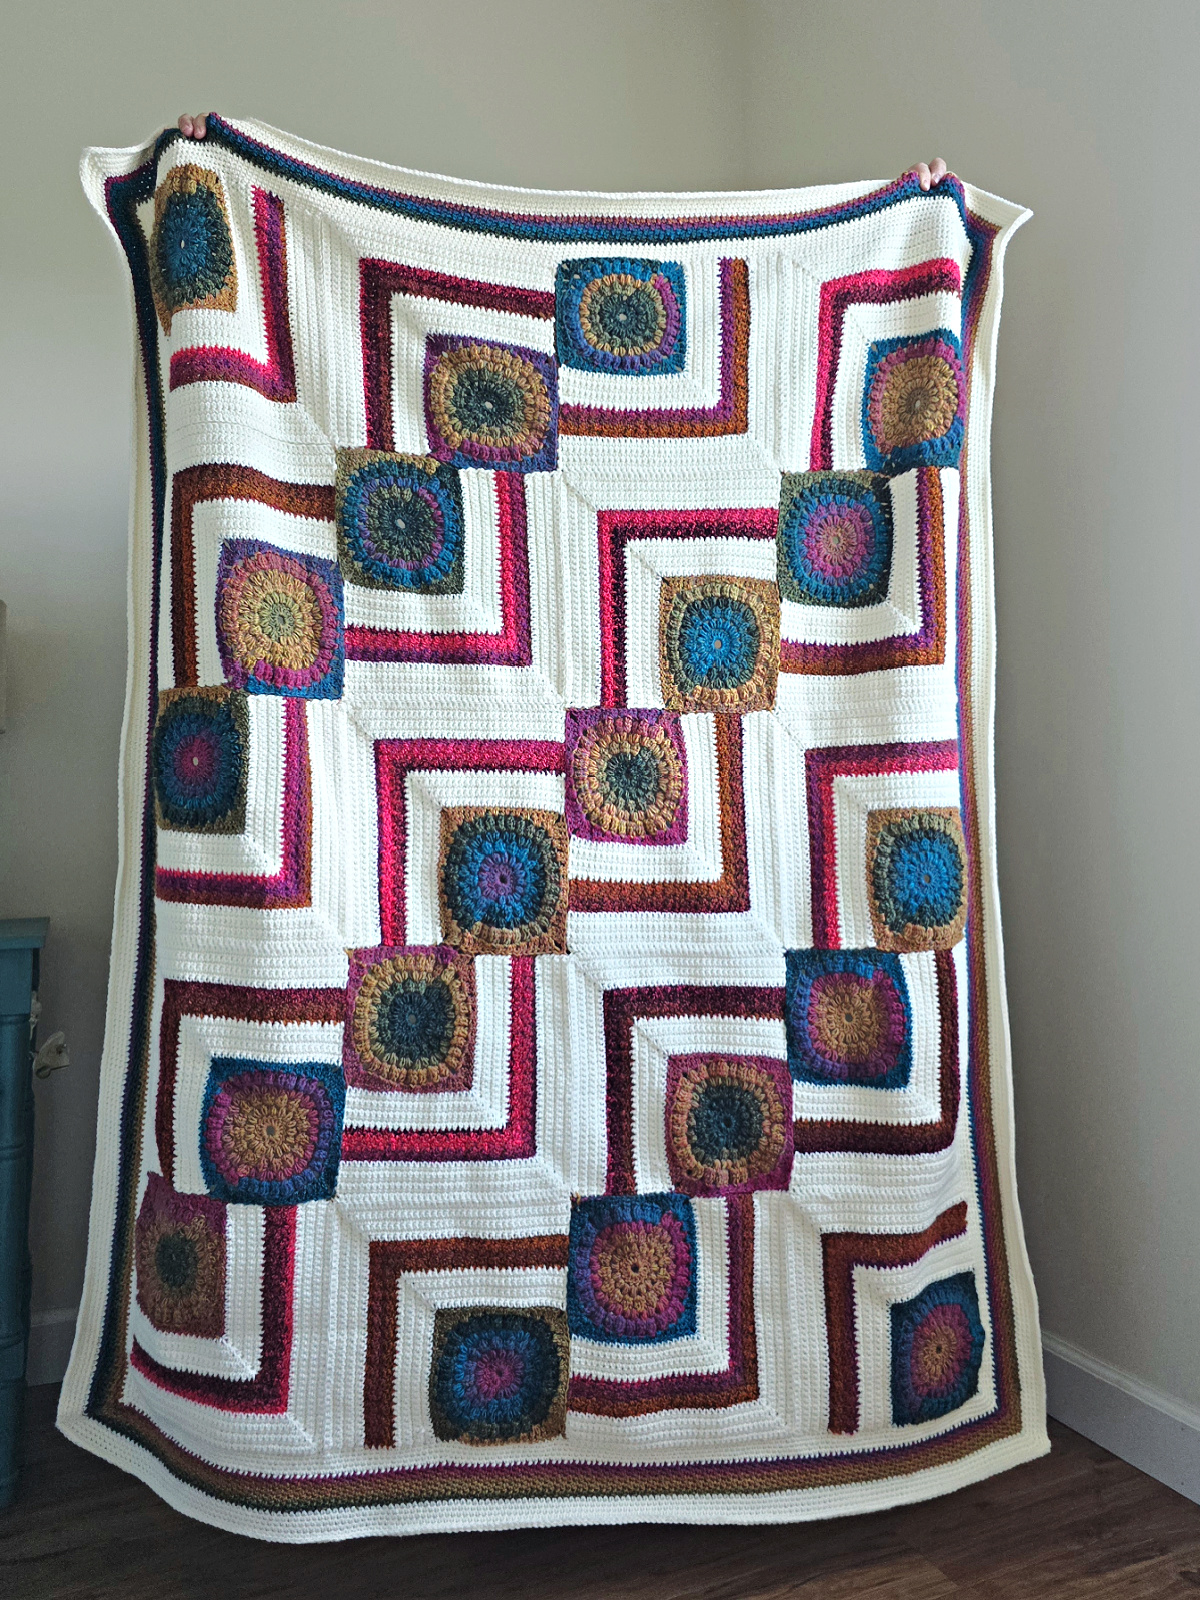
At first glance, you might be a little overwhelmed by this granny squares crochet blanket but once you work up your first square, you’ll see that it’s actually not that difficult. The layout just requires a bit of concentration and focus to ensure the final look is as it should be.
As with a lot of my crochet blankets, this one is also available in multiple sizes so you can choose just the right way to meet your requirement.
Related: If you want to make a simpler crochet blanket with both variegated and neutral shades of yarn, you should check out the Candy Stripes Blanket.
How to Crochet a Granny Squares Blanket
This modern crochet blanket pattern free is made using 10″ blanket squares with three coordinating colors. Each square is constructed by first making a 6″ floral square. Then a striped section is crocheted onto only two sides of the floral square.
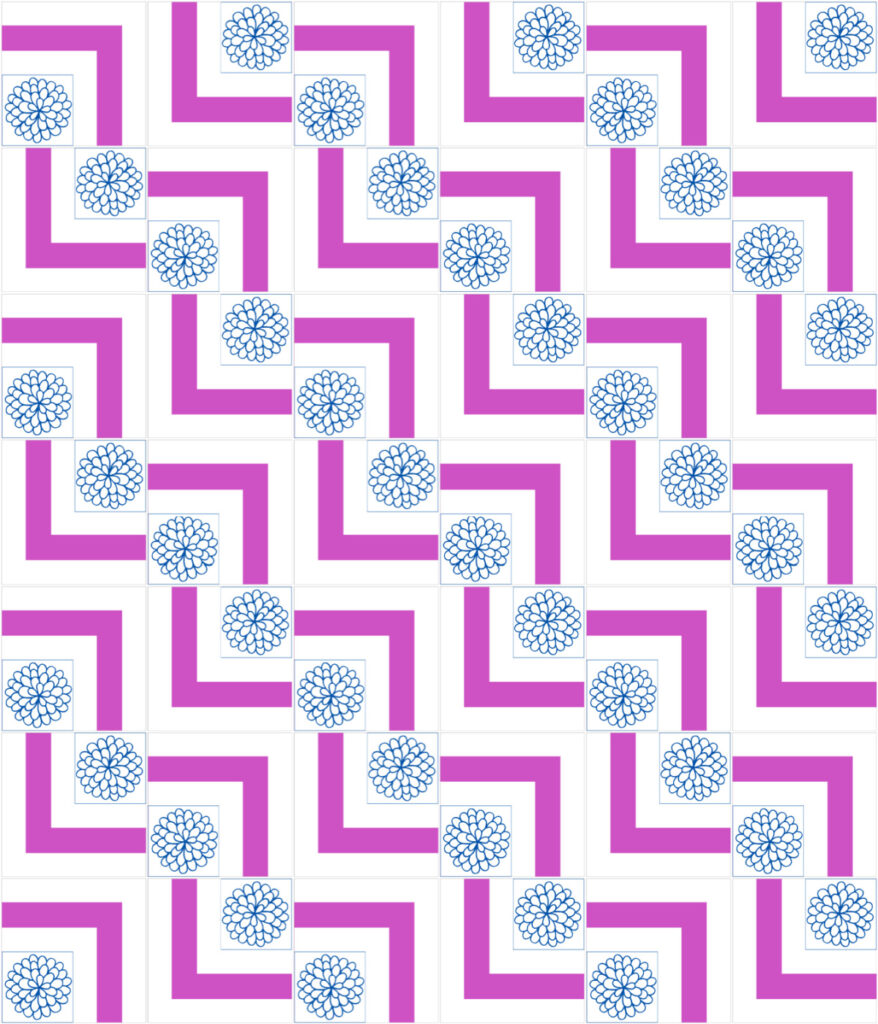
After you’ve selected the size you want and crocheted the number of squares required for it, block your squares (if needed). Then lay them out according to the provided chart for the specific size you’re making and this will help you visualize how the final look will be.
If you’re using different colored squares, move them around until you’re happy with the result. You might want it to be a gradient or bold pops of color here and there. The choice is yours!
Next, you’ll seam the squares together using a mattress stitch seam. Lastly, you’ll finish the blanket by crocheting a border.
How To Get The
Meandering Squares Modern Crochet Blanket
Option 1: Scroll down for the modern crochet blanket pattern free right here in this blog post.
Option 2: Purchase the ad-free printable PDF from one of my shops:
Adjusting the Size of Your Blanket
The written crochet pattern includes instructions to make a crochet baby blanket, lapghan, small throw, and large throw. You’ll easily be able to decide from among these sizes which one you prefer to make.
Be sure to check the number of squares and the layout before you finalize the size because you’ll be buying materials accordingly. If this is a stashbusting crochet project, the final result is sure to be very bright and colorful!
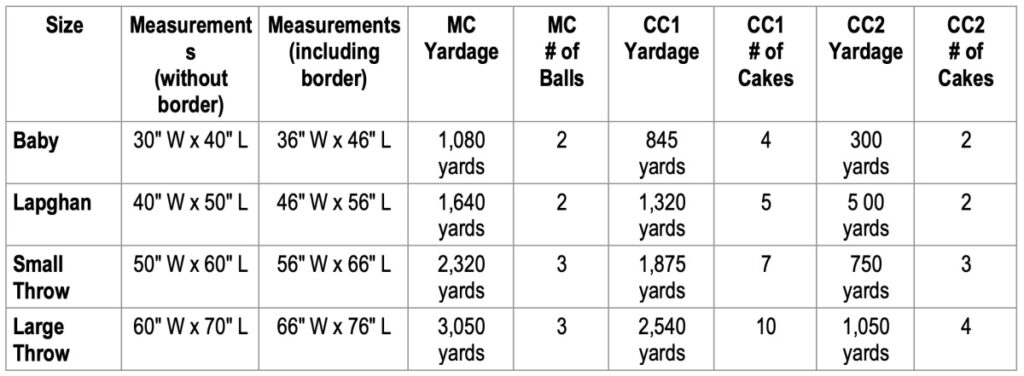
Size Chart
Use this chart to make a blanket in the size you’d like.
Yarn
For the Meandering Squares Modern Crochet Blanket Pattern Free, I chose Lion Brand Yarns Pound of Love in Antique White and Ferris Wheel in Summer Day and Pink Marmalade. Both of these are acrylic yarns and have beautiful shades with Pound of Love offering solids while Ferris Wheel comes in variegated shades.
Pound of Love is the perfect yarn for large crochet projects because the yardage in one ball is incredible at 1,020 yards, making it affordable too! And if you want to make a vibrant blanket without changing your yarn throughout, a variegated cake of yarn like Ferris Wheel is perfect.
These yarns are machine-washable and highly-durable, ideal for blankets that have a lot of wear in them.
How to Style a Crochet Blanket
1. Living Room: Drape it over the back of your sofa or an armchair for a chic yet inviting look.
2. Bedroom: Layer it at the foot of your bed for added warmth and a luxurious aesthetic.
3. Reading Nook: Pair it with a comfy chair, a good book, and a cup of tea for the ultimate cozy corner.
4. Seasonal Decor: Use crochet blankets in warm, earthy tones for fall and winter or light pastels for spring and summer.
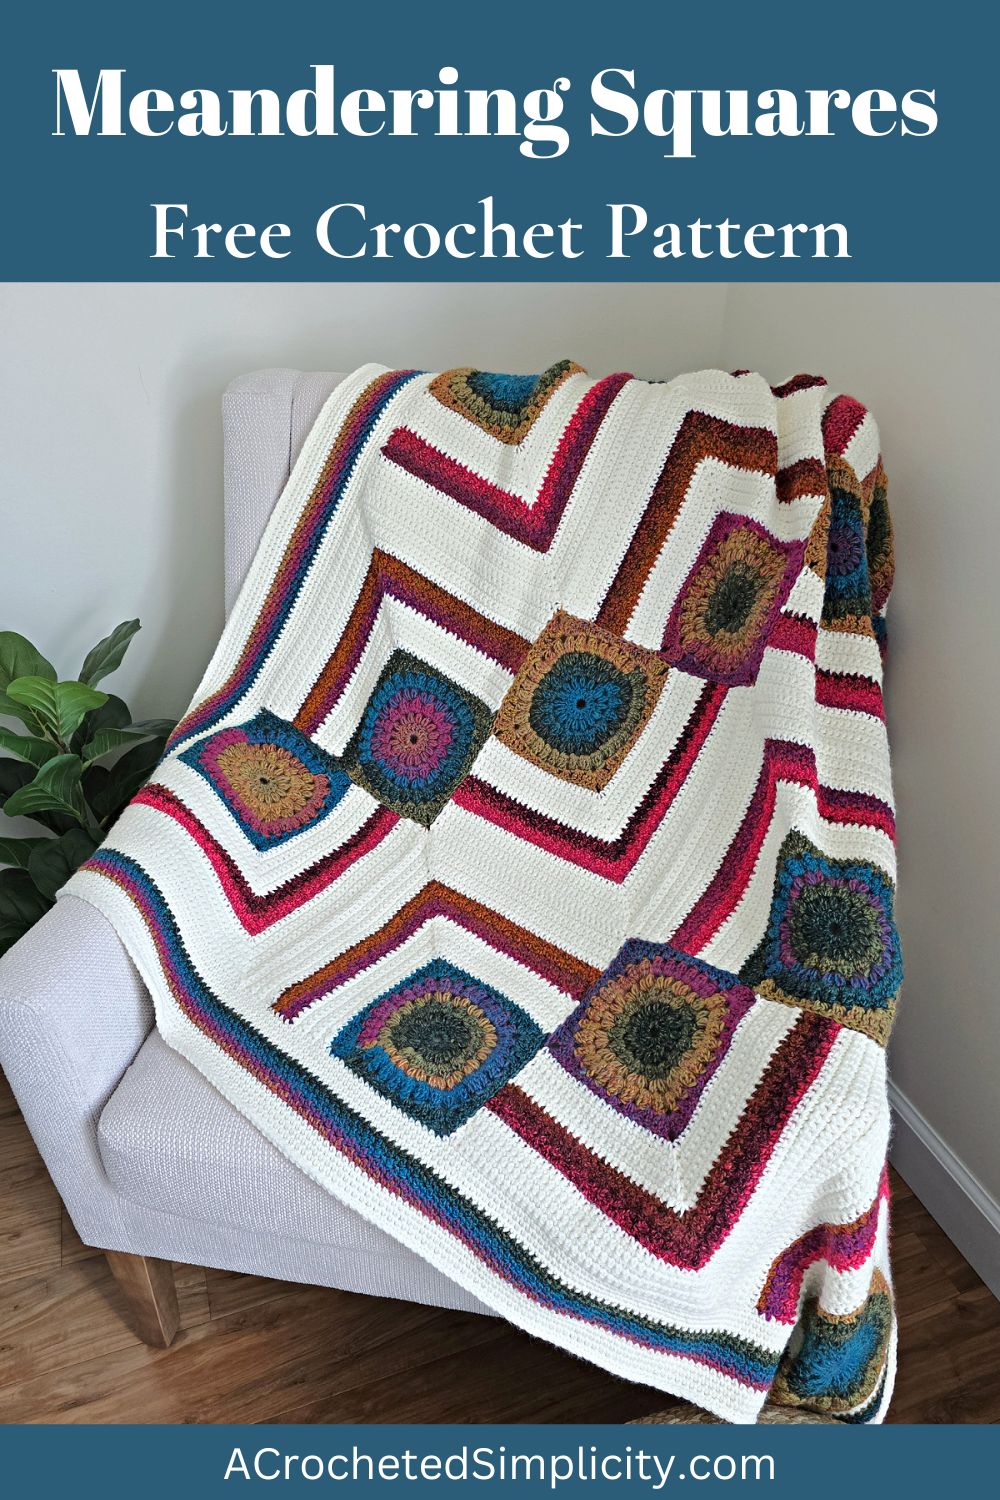
Meandering Squares Blanket – Free Crochet Pattern
The granny squares crochet blanket pattern is free below, but if you love to work offline, I’ve got a couple other great options for you.
Purchase the ad-free, printable PDF, (including all photo tutorials + schematics) on Ravelry, or on Etsy (aff).
Purchase the Meandering Squares Crochet Blanket Kit (aff): Lion Brand has a full kit of the Meandering Squares Crochet Blanket, available on their website. The includes your choice of colors and a digital copy of the crochet pattern.
This post contains affiliate links.
Materials
- Yarn: Worsted Weight / 4 / Yarn, Lion Brand Yarns Pound of Love and Lion Brand Yarns Ferris Wheel was used for the modern crochet blanket pattern free shown in the photos.
- Yardage: See Size Chart Above
- Crochet Hooks: H/8/5.00mm; or size needed to obtain gauge (My favorite crochet hooks are the Clover Amour Crochet Hooks, I’ve never had an ache in my hand since switching).
- Scissors
- Yarn Needle
- Measuring Tape
- Locking Stitch Markers
Abbreviations (US Terms)
- ch(s): chain(s)
- sl st(s): slip stitch(es)
- st(s): stitch(es)
- sc: single crochet
- hdc: half double crochet
- dc: double crochet
- tr: treble crochet
- 4dc-cl: 4 double crochet cluster
- Alt-dc: alternate double crochet
- Alt-tr: alternate treble
- yo: yarn over
- sp: space
- Rep: repeat
- RS: right side
- Rnd: round
- Join yarn with a standing sc
Special Stitches
- Puff Stitch (puff st): Yo, insert hook where indicated, yo, pull up a loop, (yo, insert hook into the same st, yo, pull up a loop) 2 times, yo, pull through all 7 loops on your hook.
- 4 Double Crochet Cluster (4dc-cl): Yo, insert hook where indicated, yo, pull up a loop, yo, pull through 2 loops, (yo, insert hook in same st, yo, pull up a loop, yo, pull through 2 loops) 3 times, yo, pull through remaining loops.
- Alternate Double Crochet (Alt-dc): After turning your work, do not ch, instead, insert your hook into the first st, yo, pull up a loop, yo, pull through both loops, insert your hook between the legs of the st just made, yo, pull up a loop, yo, pull through one loop, yo, pull through remaining loops.
- Alternate Treble Crochet (alt-tr): After turning your work, do not ch, instead, insert your hook into the first st, yo, pull up a loop, yo, pull through both loops, insert your hook between the legs of the st just made, yo, pull up a loop, yo, pull through both loops, insert your hook between the legs of the st just made, yo, pull up a loop, yo, pull through one loop, yo, pull through remaining loops.
- Join yarn with a standing single crochet: Begin with a slip knot on your hook, insert your hook into the stitch or space indicated, yo, pull up a loop, yo and draw thru both loops on hook.
Experience Level
- Easy / Intermediate
Gauge
- Small floral square = 6″
- Border gauge isn’t crucial. Adjust hook size for a flat border, if needed.
Sizes
- 4 Sizes: Baby, Lapghan, Small Throw, Large Throw
- Easily adjust to make almost any size blanket
Pattern Notes
- Turning chains are not included in stitch count.
- Yarn Notes: Lion Brand Yarns Pound of Love in Antique White and Lion Brand Yarns Ferris Wheel in Summer Day and Pink Marmalade were used for the sample shown in the photos. Other comparable yarns may be used.
- Lion Brand Yarns Pound of Love: 100% Premium Acrylic, (1,020 yards / 454 g / 16 oz / 932 m).
- Lion Brand Yarns Ferris Wheel: 100% Acrylic, (270 yards, 85 g, 3 oz, 247 m).
- Yardage & Color
- MC: Antique White #550-099B 2 (2, 3, 3) balls
- CC1: Summer Day #217-601N 4 (5, 7, 10) cakes
- CC2: Pink Marmalade #217-611K 2 (2, 3, 4) cakes
- Changes for Sizes as Follows: Baby (Lapghan, Small Throw, Large Throw)
- The sample shown in the photos is lapghan size.
- Construction Notes: This granny squares blanket is made using 10″ blanket squares with three coordinating colors. Each square is constructed by first making a 6″ floral square. Then a striped section is crocheted onto only two sides of the floral square. After you’ve crocheted the number of squares needed for the size blanket you’re making, block your squares (if needed), then lay them out according to the layout chart for the specific size you’re making. Next, you’ll seam the squares together using a mattress stitch seam. Lastly, you’ll finish the blanket by crocheting a border.
Meandering Squares Blanket – Written Pattern
6″ Floral Square
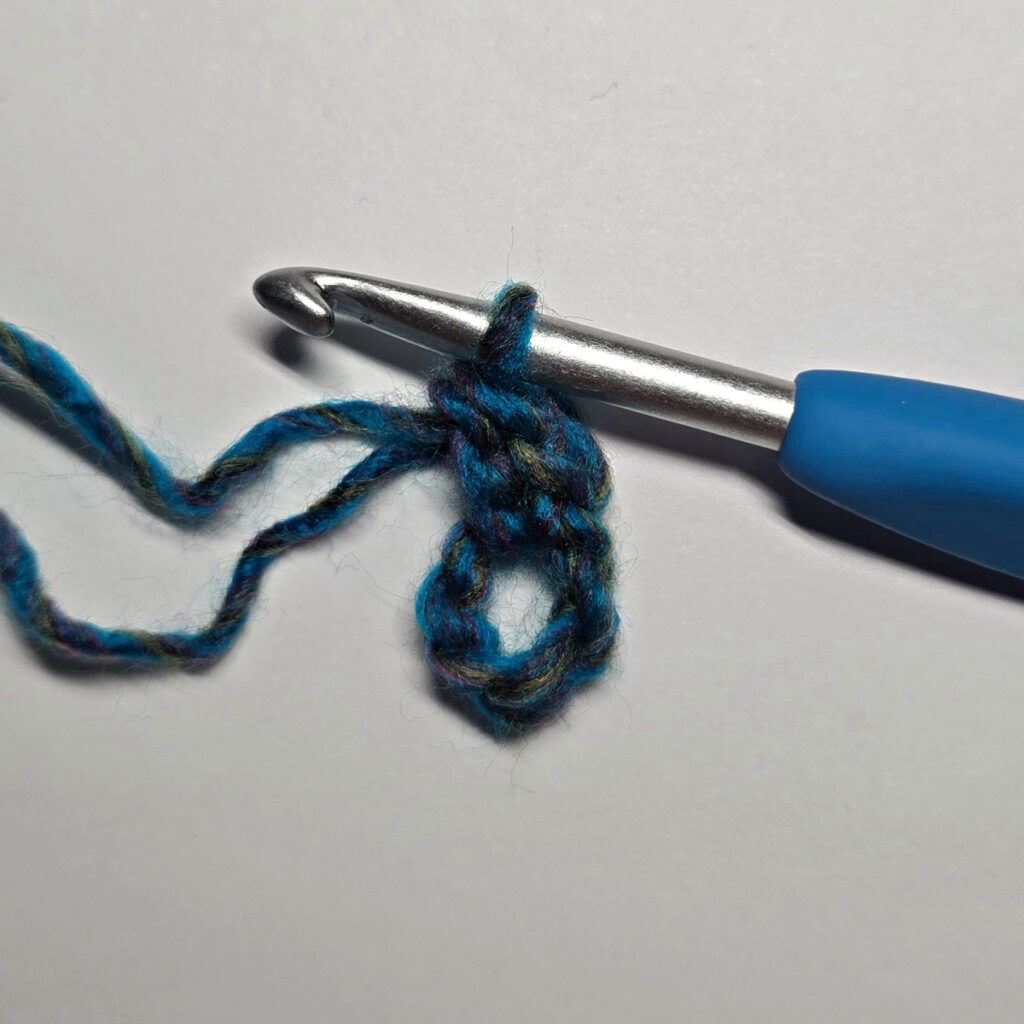
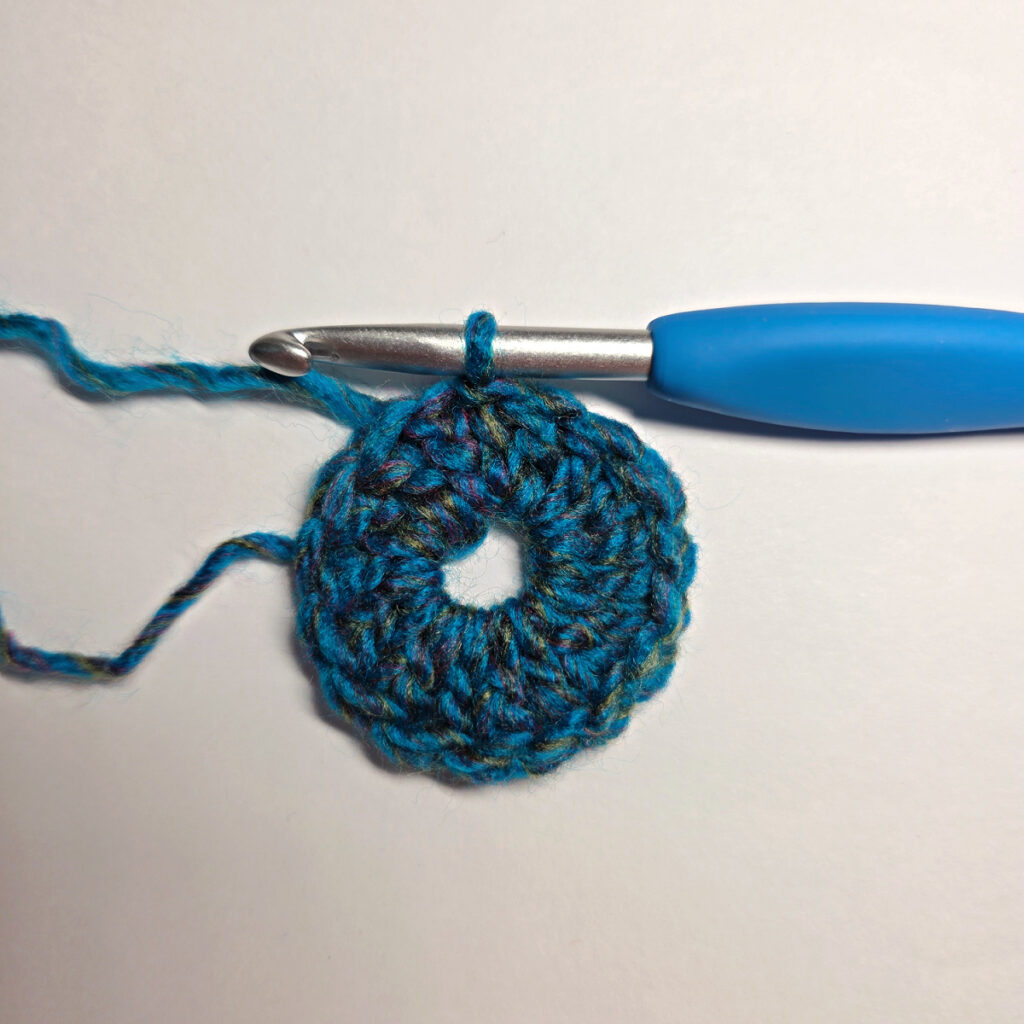
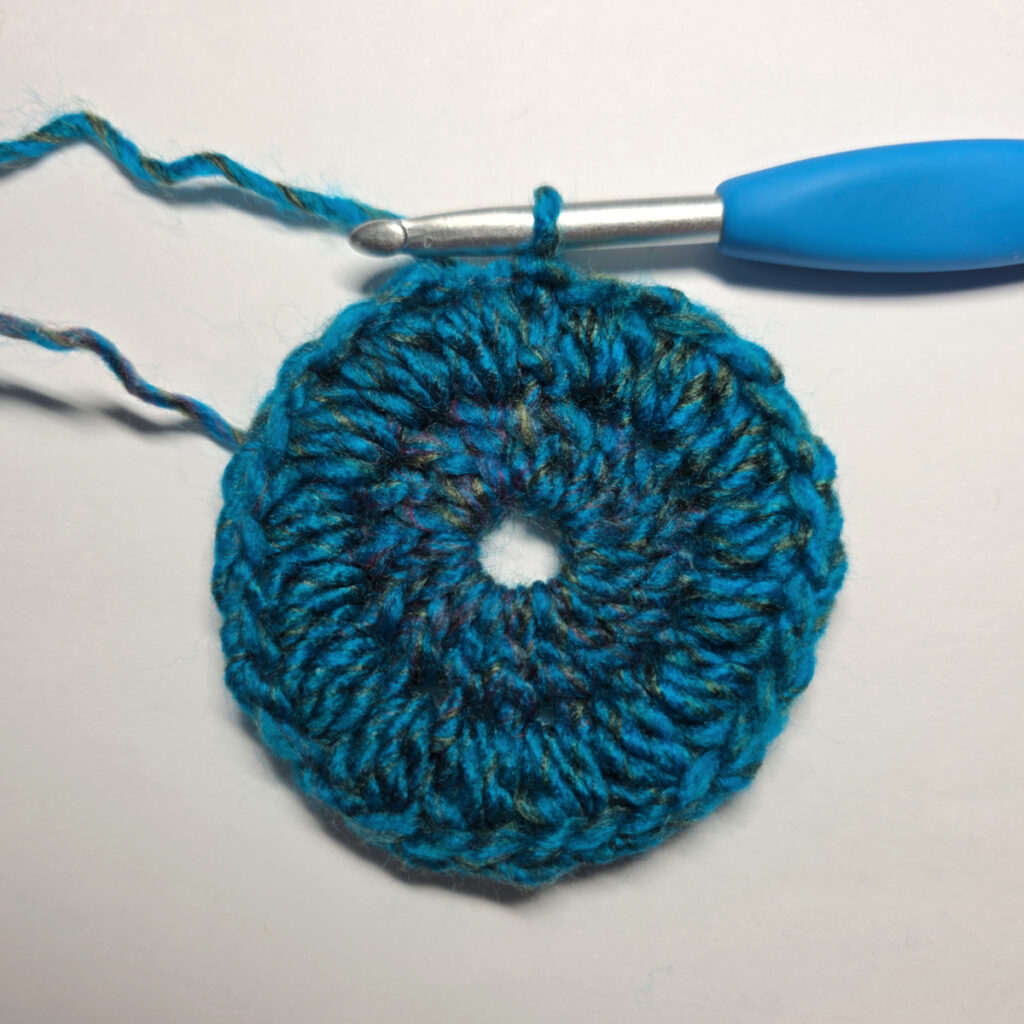
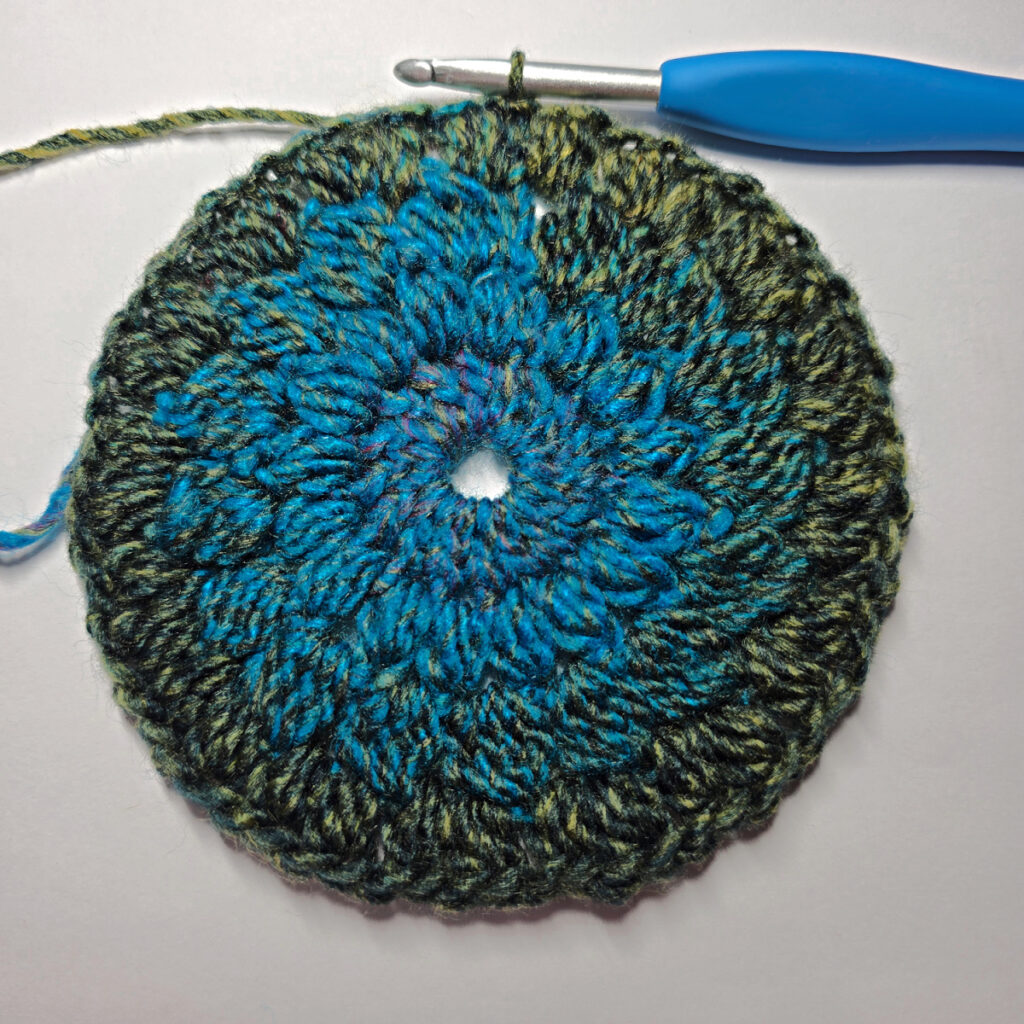
Rnd 1 (RS): With CC1 yarn & a 5.00mm crochet hook, ch 5, join with a sl st to the 1st ch to form a ring. Alt-dc in the ring, work 15 more dc into the ring. Join with a sl st to the 1st st. (16 sts)
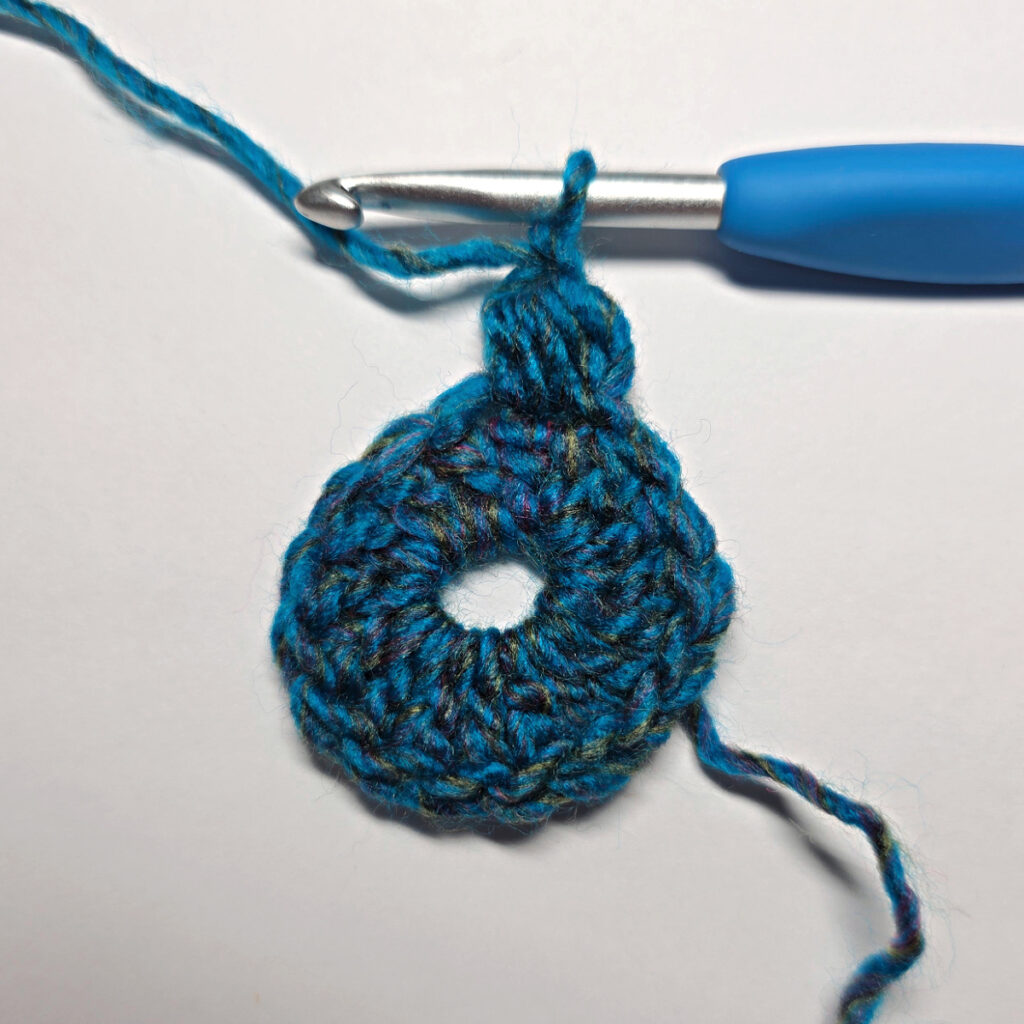
Rnd 2: Ch 1, puff st in the first st, ch 1, (puff st, ch 1) in each remaining st around. Join with a sl st to the 1st puff st. (16 puff sts + 16 ch-1’s)
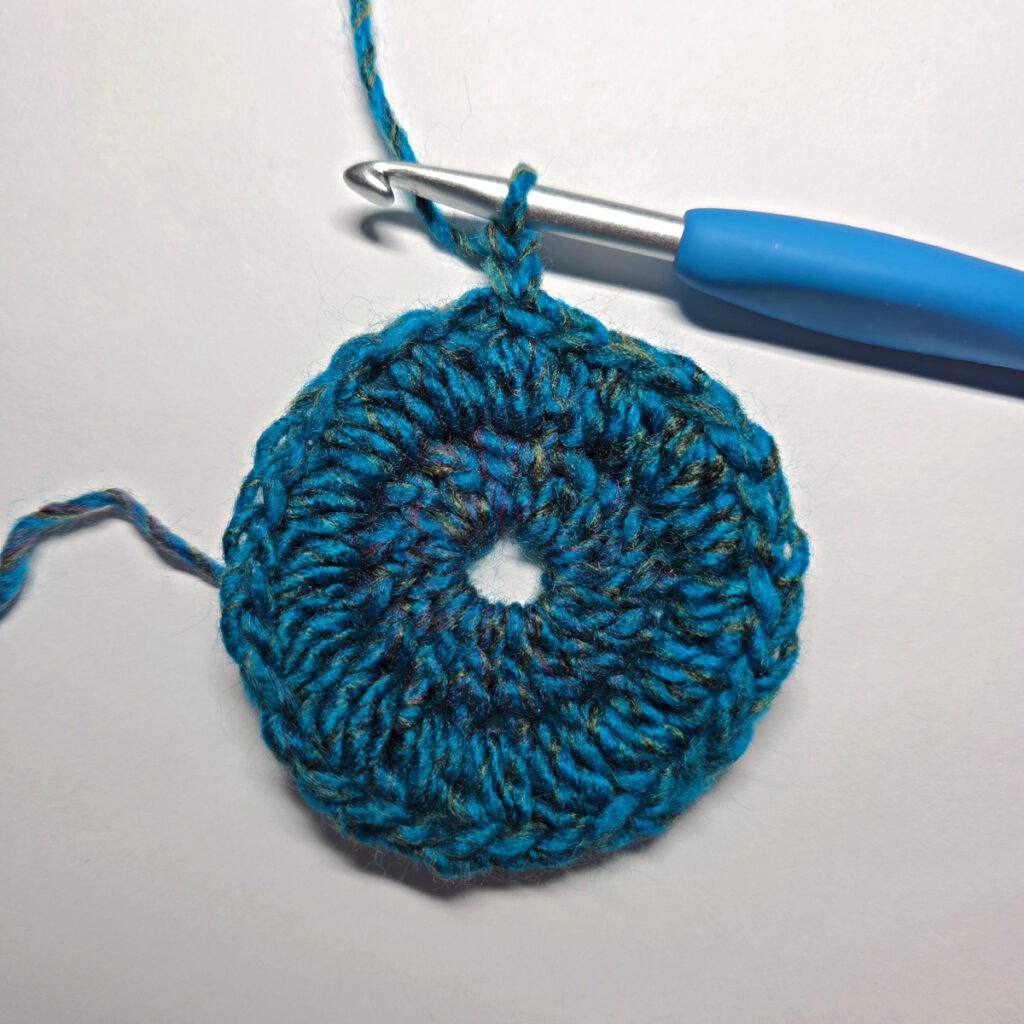
Rnd 3: Sl st over to the next ch-1 sp (does not count as a stitch), ch 2 (does not count as a stitch), (4dc-cl, ch 1) in each ch-1 sp around. Join with a sl st to the 1st 4dc-cl. (16 4dc-cl’s + 16 ch-1’s)
Rnd 4: Ch 1, puff st in the first st, ch 1, (puff st, ch 1) in each remaining 4dc-cl & ch-1 sp around. Join with a sl st to the 1st puff st. (32 puff sts + 32 ch-1’s)
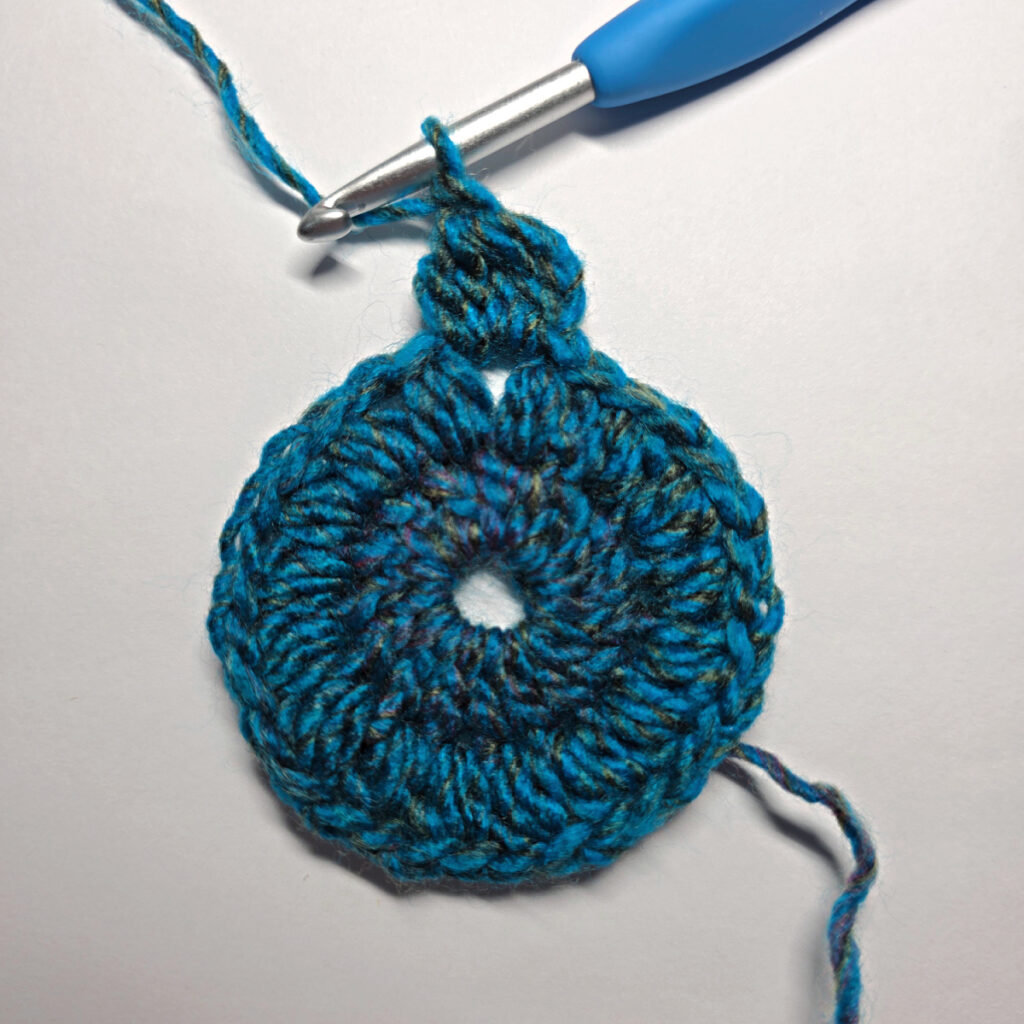
Rnd 5: Sl st over to the next ch-1 sp (does not count as a stitch), ch 2 (does not count as a stitch), (4dc-cl, ch 2) in each ch-1 sp around. Join with a sl st to the 1st 4dc-cl. (32 4dc-cl’s + 32 ch-2’s)
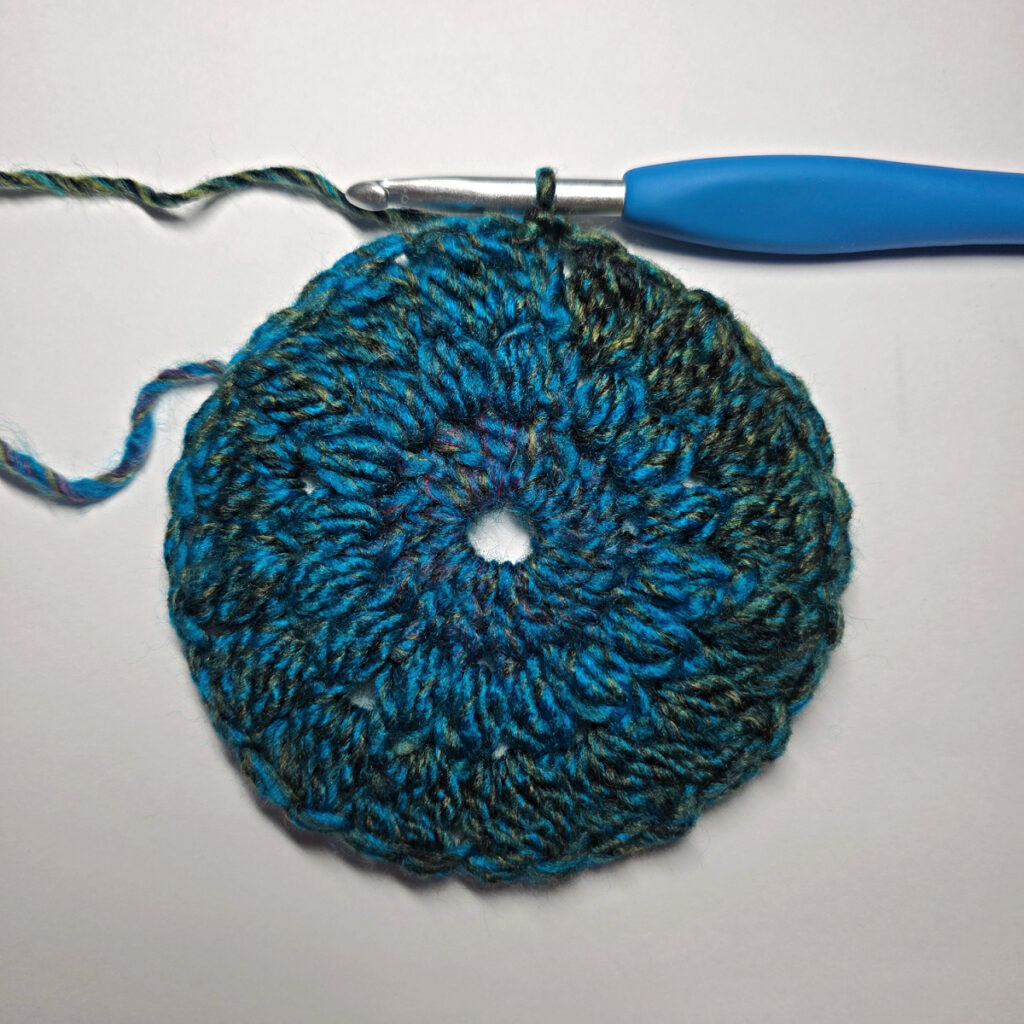
Rnd 6: Sl st over to the next ch-2 sp (does not count as a stitch), Alt-tr in the same sp, work (2 tr, ch 2, 3 tr) in the same sp, * skip the next st, 2 tr in the next ch-2 sp, skip the next st, 2 dc in the next ch-2 sp, (skip the next st, 2 hdc in the next ch-2 sp) 3 times, skip the next st, 2 dc in the next ch-2 sp, skip the next st, 2 tr in the next ch-2 sp, skip the next st, ** (3 tr, ch 2, 3 tr) in the next ch-2 sp*, rep from * to * around, ending the last rep at **. Join with a sl st to the alt-tr. (40 tr’s + 16 dc’s + 24 hdc’s + 4 ch-2’s)
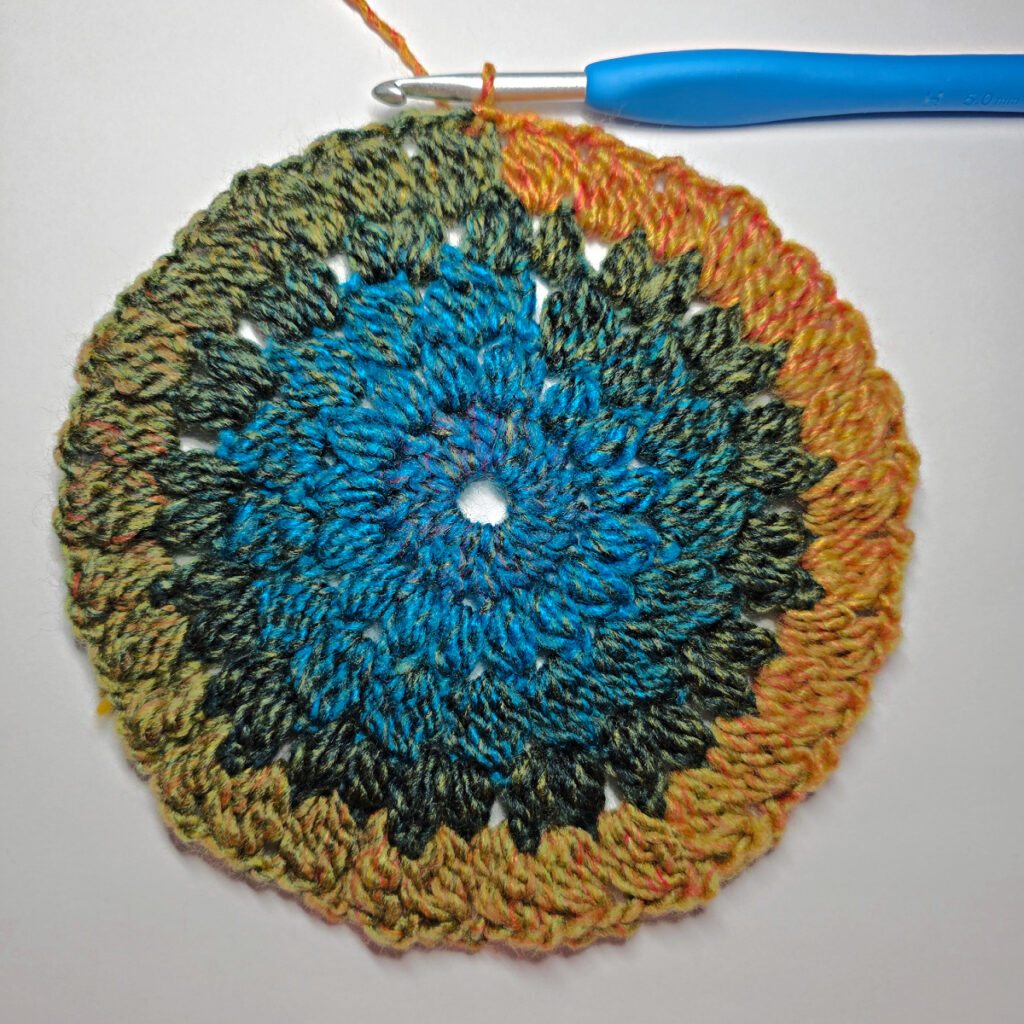
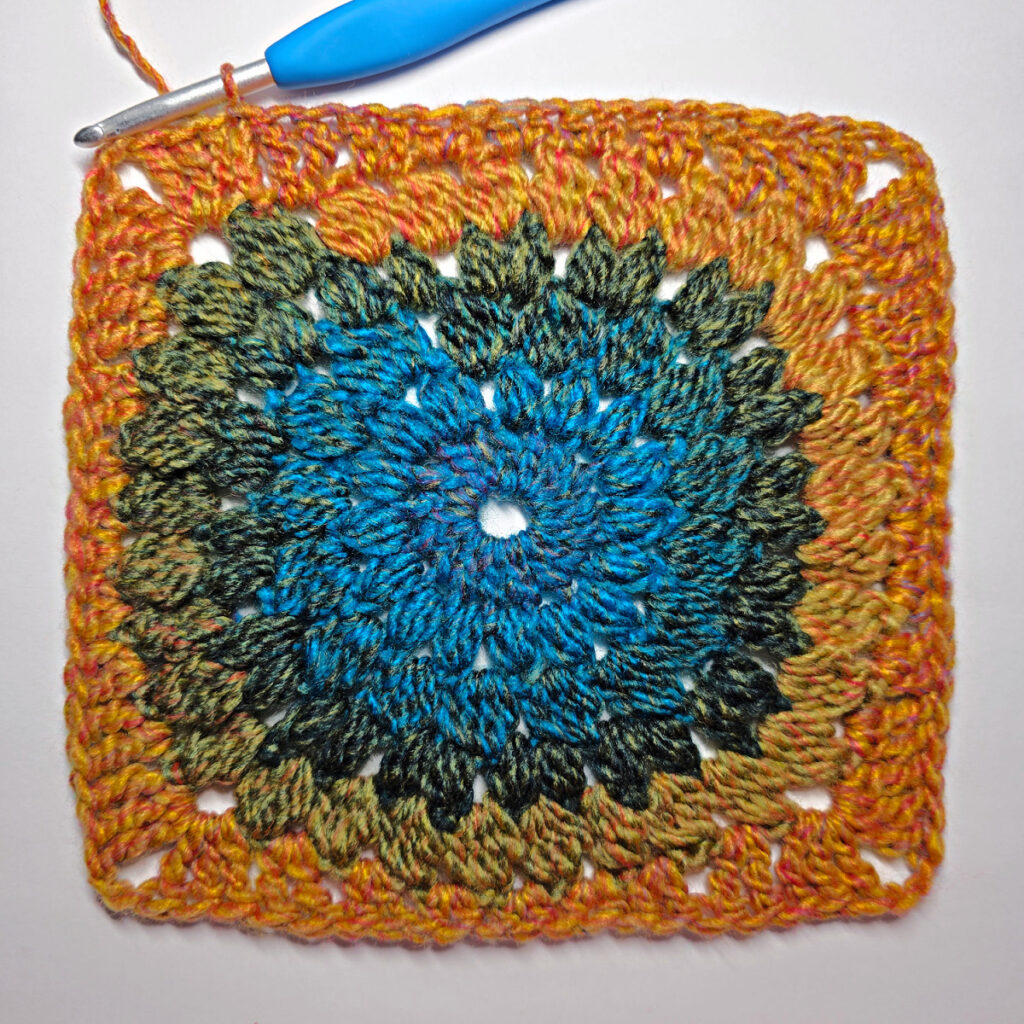
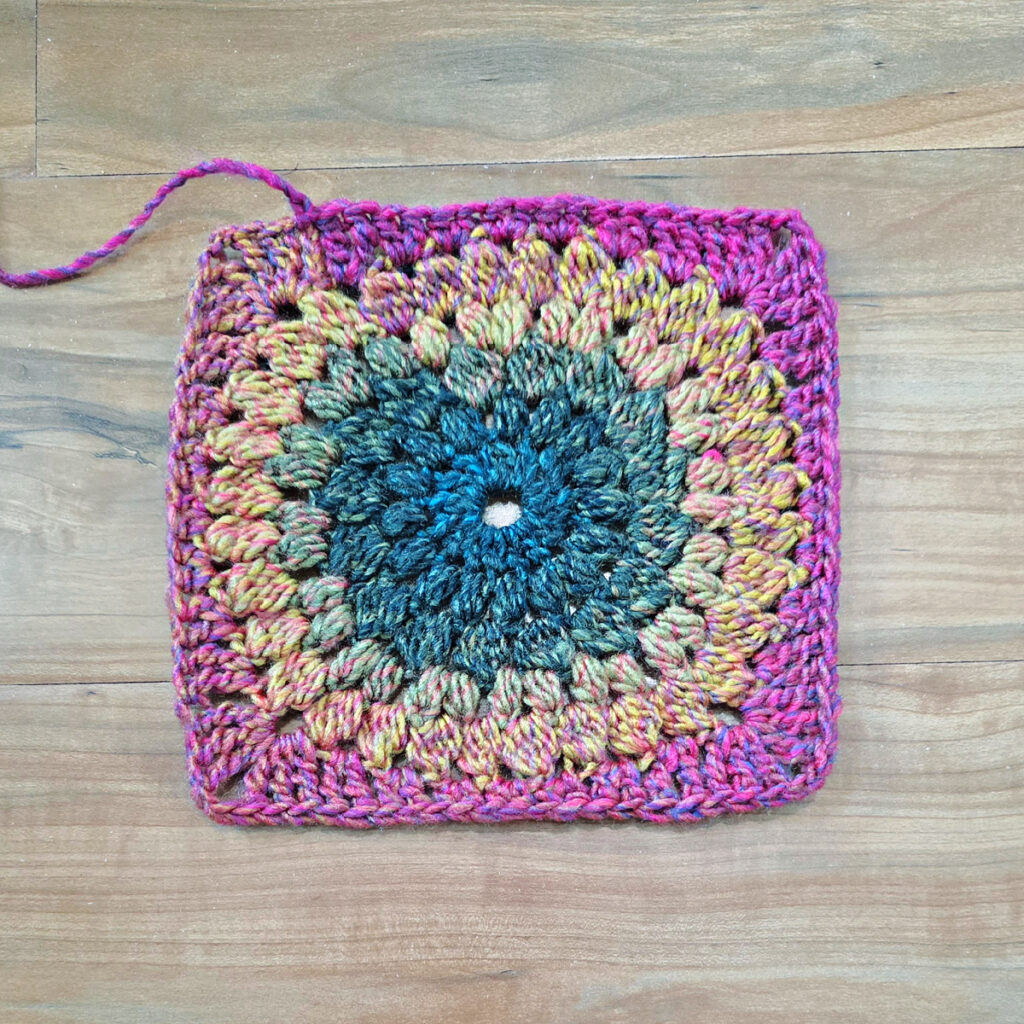
Fasten off. Floral square should measure approximately 6″ x 6″. Continue on to the Striped Section.
See completed square below.
6″ Floral Square – Progression Photos
Striped Section
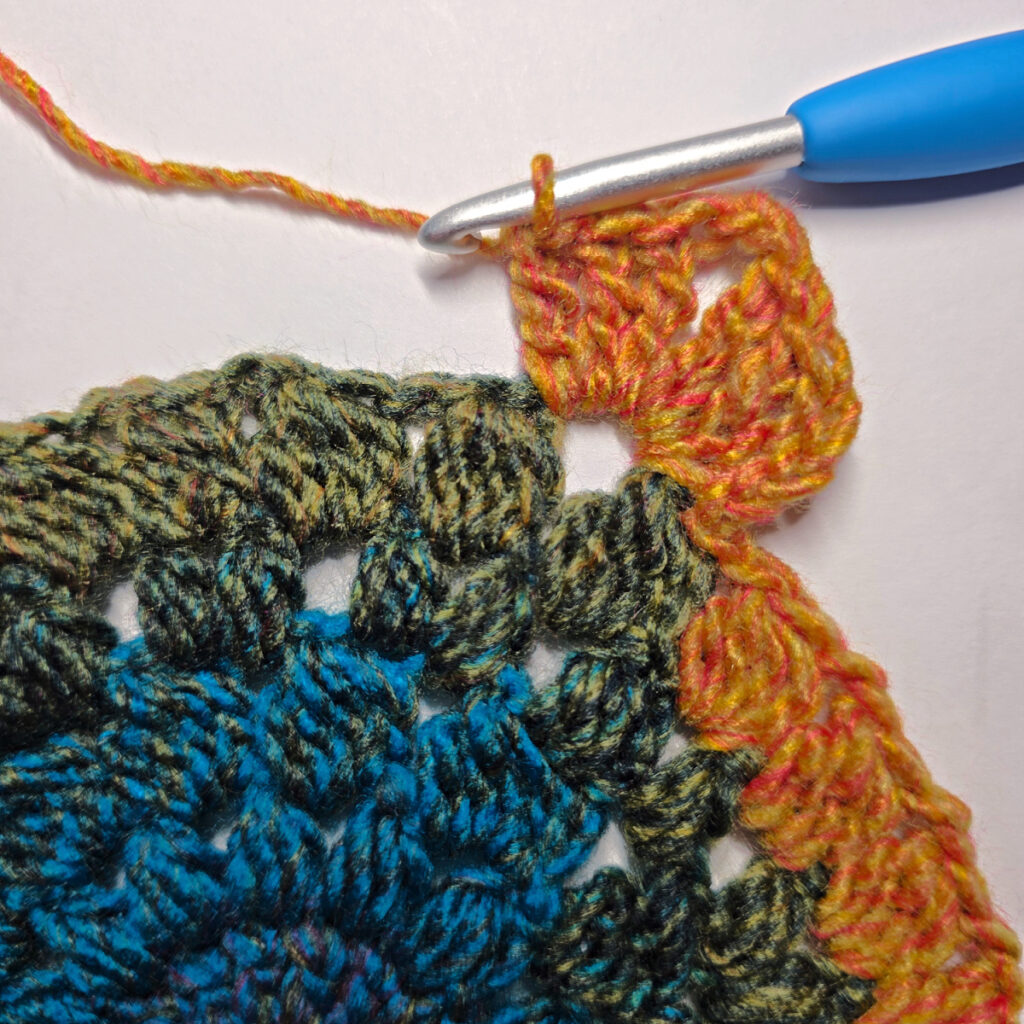
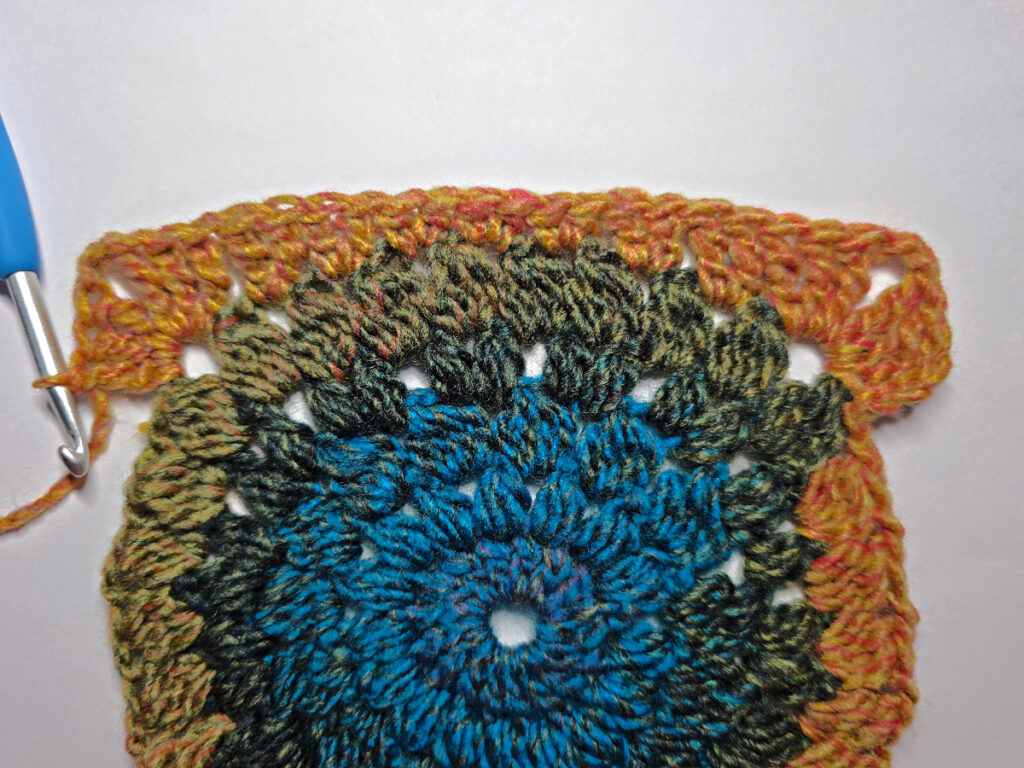
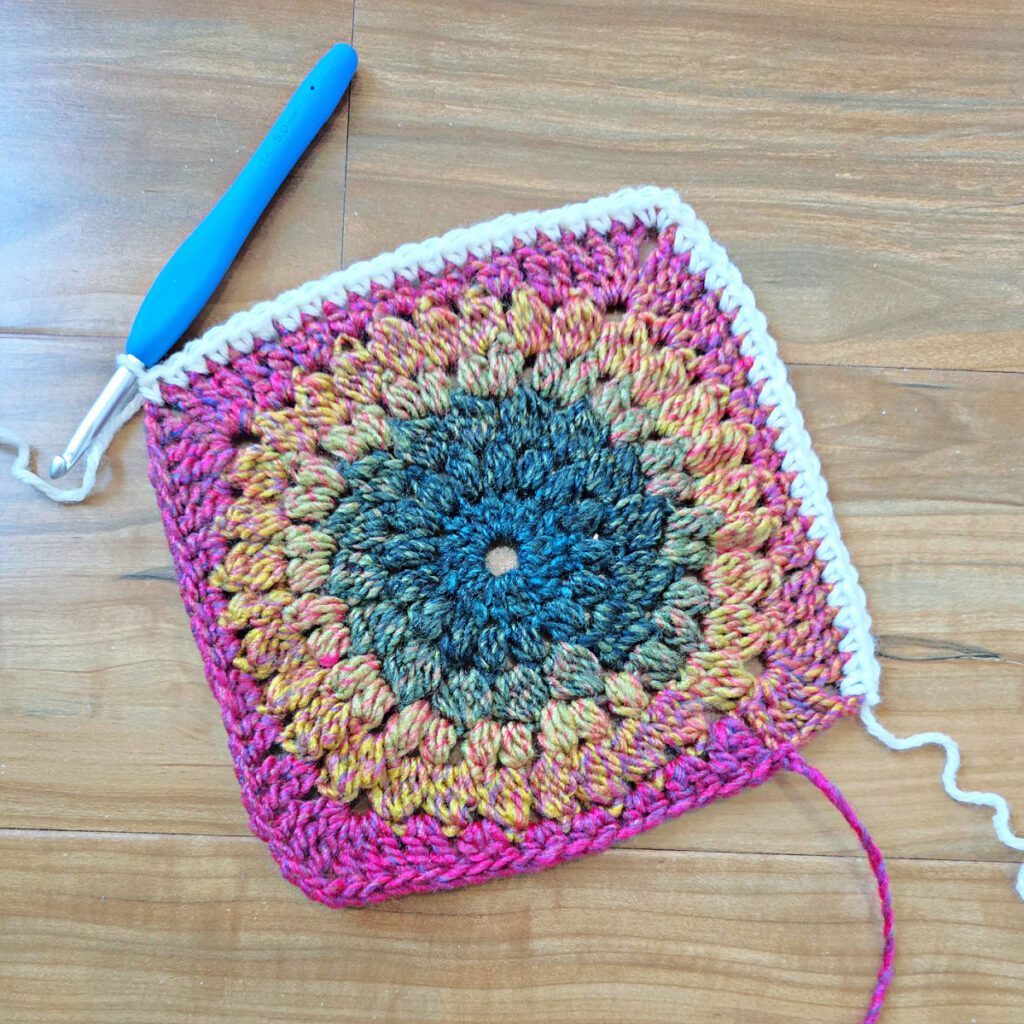
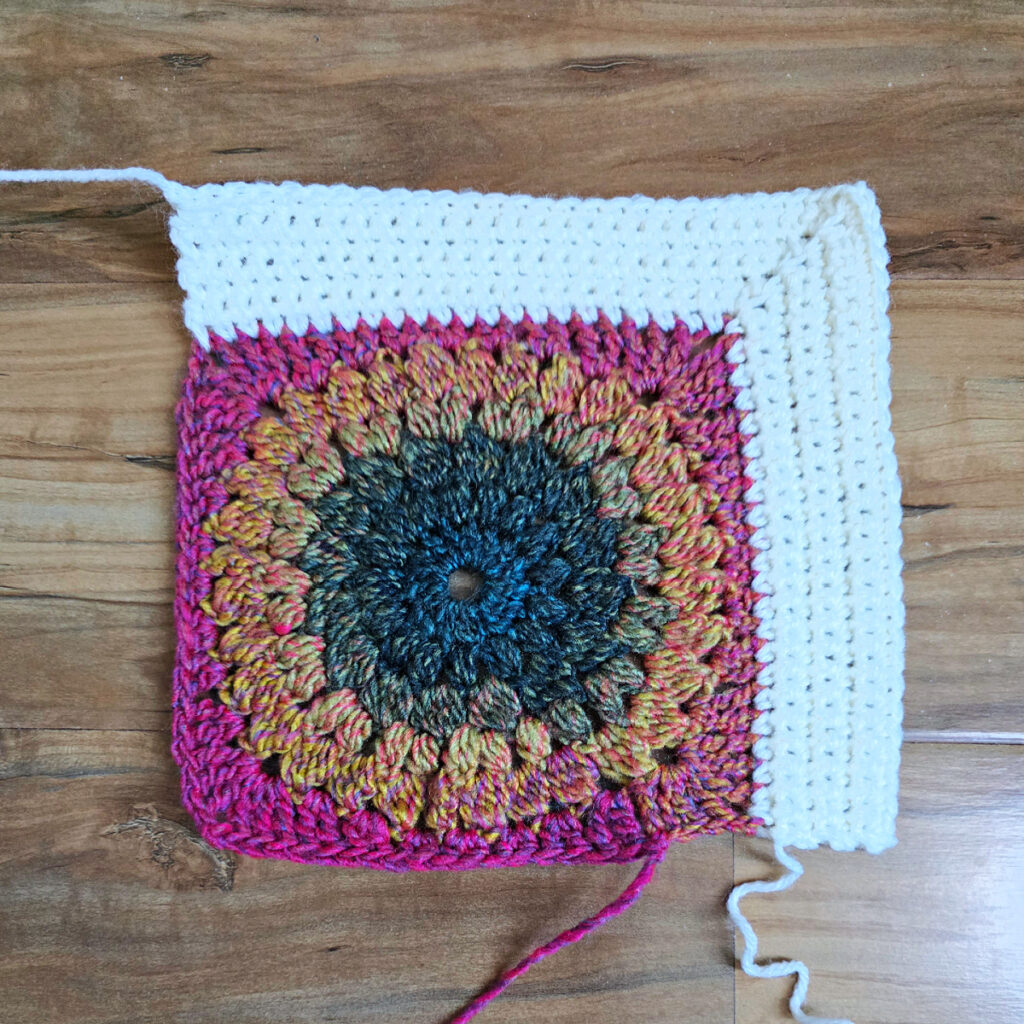
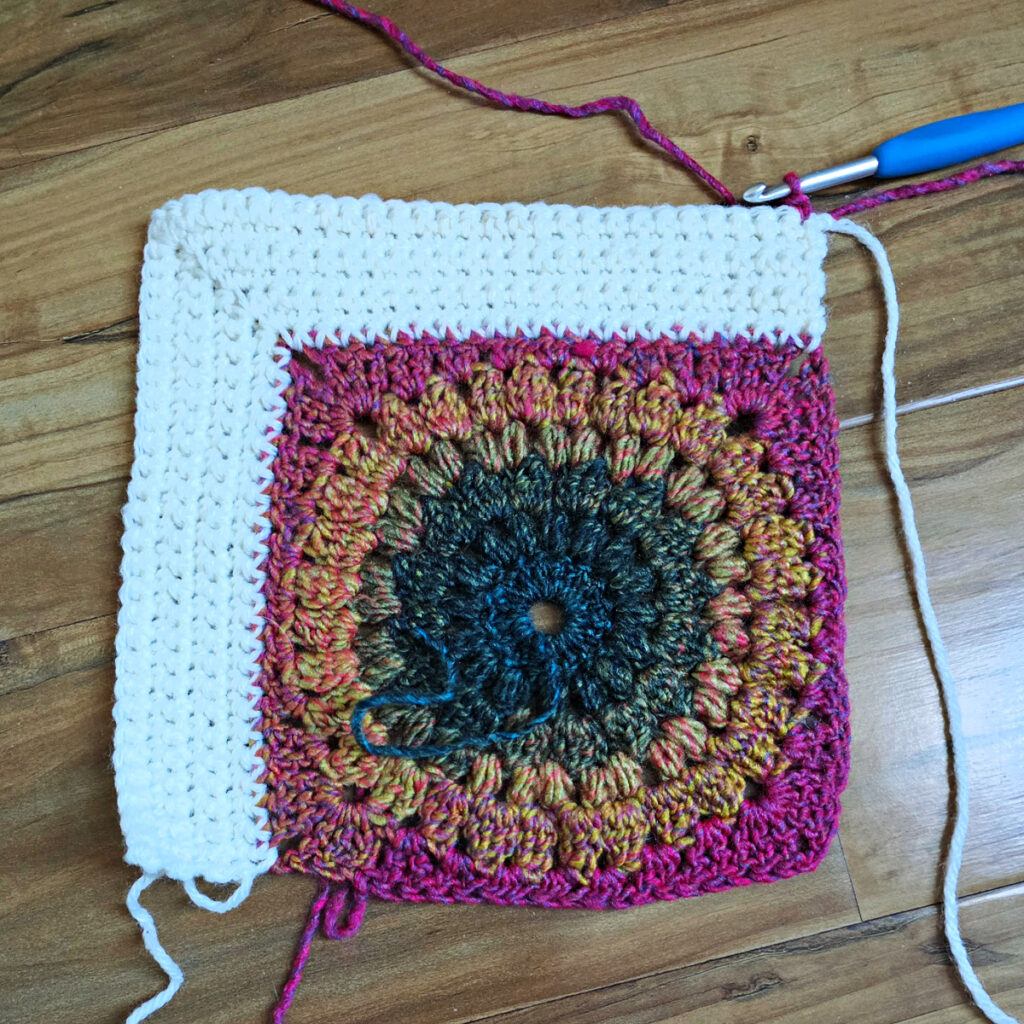
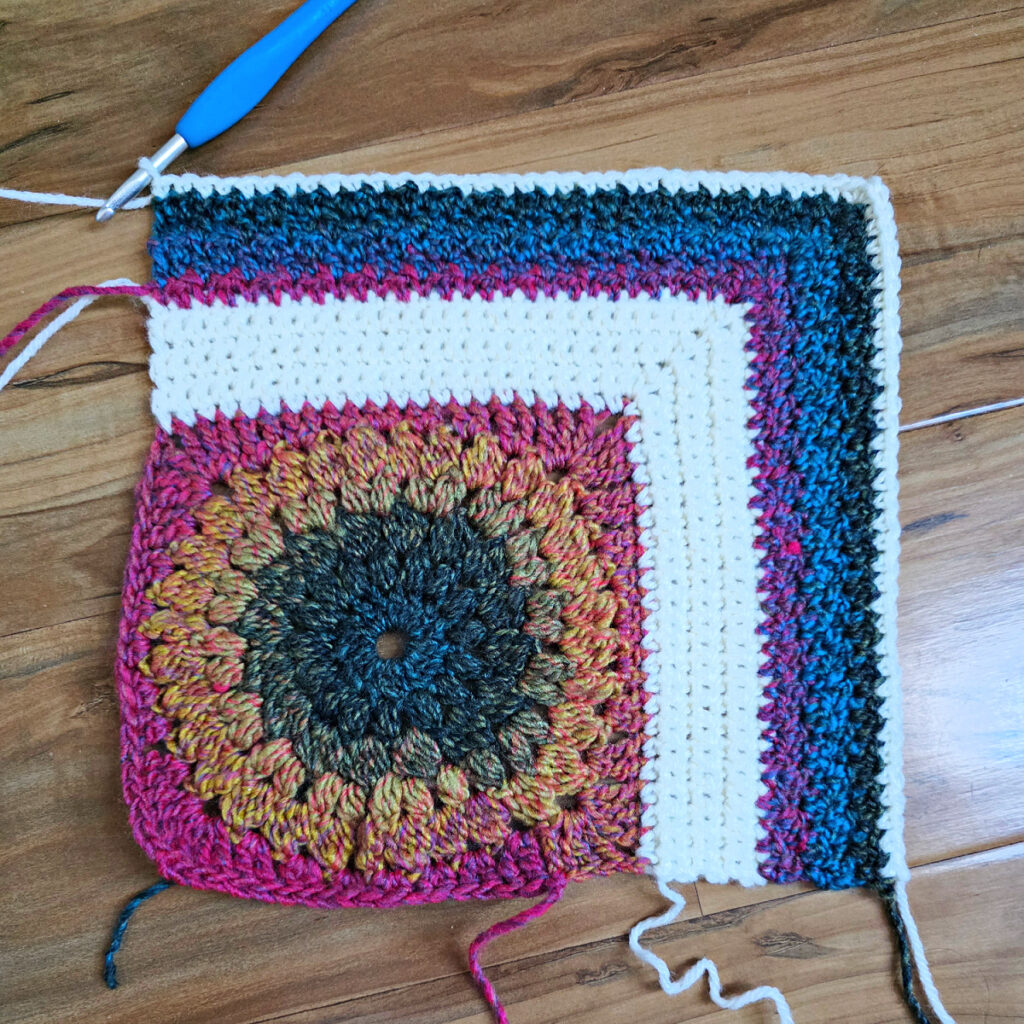
In this section, we’ll add wide stripes to only two sides of the floral square.
Rnd 1 (RS): With MC yarn & a 5.00mm crochet hook, join yarn with a sc in the ch-2 corner sp nearest to where you fastened off CC1, sc in each st across to the next ch-2 corner sp, (sc, ch 1, sc) in the ch-2 corner sp, sc in each st across to the next ch-2 corner sp, sc in the next ch-2 sp. Turn. (44 sts + 1 ch-1)
Rows 2 – 7: Ch 1, sc in each st across to the ch-1 corner sp, (sc, ch 1, sc) in the ch-1 corner sp, sc in each remaining st across. Turn. (56 sts + 1 ch-1) at the end of Row 7.
Fasten off MC.
Row 8: With CC2 yarn & a 5.00mm crochet hook, join yarn with a sc in the last st of Row 7, dc in the next st, (sc in the next st, dc in the next st) rep from ( to ) across to the ch-1 corner sp, (sc, dc, sc) in the ch-1 corner sp (place a SM in the dc corner st), (dc in the next st, sc in the next st) rep from ( to ) in each remaining st across. Turn. (59 sts)
Row 9: Alt-dc in the first st, (sc in the next st, dc in the next st) rep from ( to ) across to the corner st marked with a SM, (sc, dc, sc) in the corner st (place a SM in the dc corner st), dc in the next st, (sc in the next st, dc in the next st) rep from ( to ) in each remaining st across. Turn. (61 sts)
Row 10: Ch 1, sc in the first st, dc in the next st, (sc in the next st, dc in the next st) rep from ( to ) across to the corner st marked with a SM, (sc, dc, sc) in the corner st (place a SM in the dc corner st), (dc in the next st, sc in the next st) rep from ( to ) in each remaining st across. Turn. (63 sts)
Rows 11 – 12: Rep Rows 9 – 10. (67 sts) at the end of Row 12.
Fasten off CC2.
Row 13: With MC yarn & a 5.00mm crochet hook, join yarn with a sc in the last st of Row 12, sc in each st across to the corner st marked with a SM, (sc, ch 1, sc) in the corner st, sc in each remaining st across. Turn. (68 sts + 1 ch-1)
Rows 14 – 19: Ch 1, sc in each st across to the ch-1 corner sp, (sc, ch 1, sc) in the ch-1 corner sp, sc in each remaining st across. Turn. (80 sts + 1 ch-1) at the end of Row 19
Fasten off. Weave in ends. Crochet square should measure approximately 10″ x 10″. Make 12 (20, 30, 42) squares then continue on to Layout & Seaming.
Striped Section – Progression Photos
Layout & Seaming
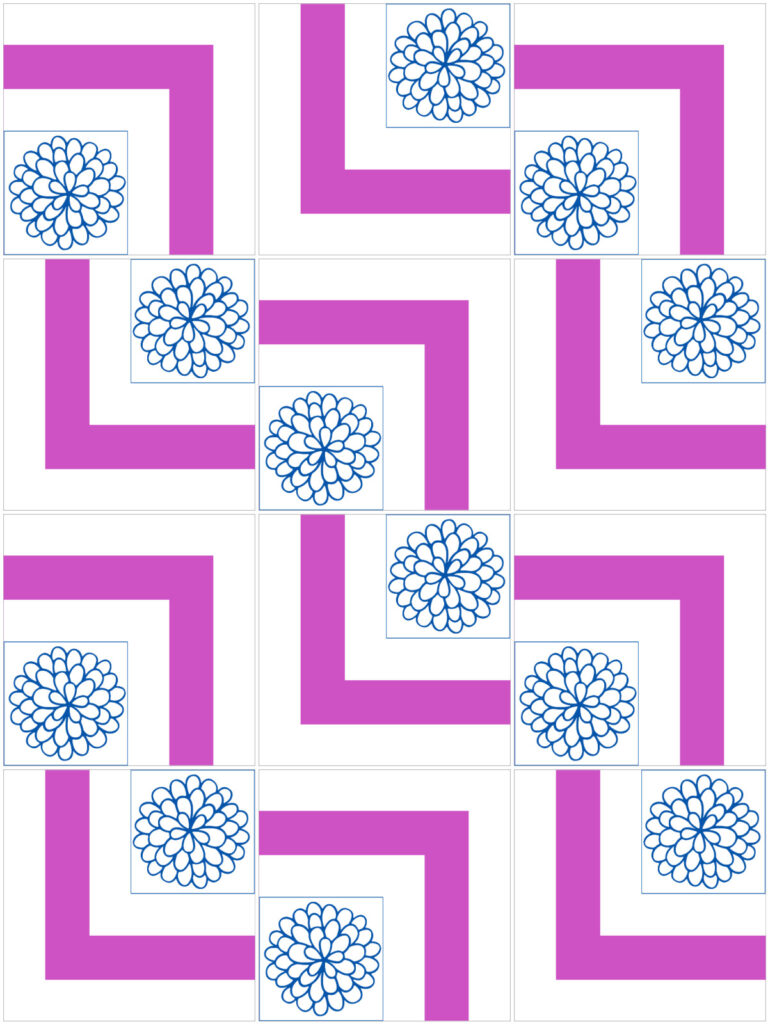
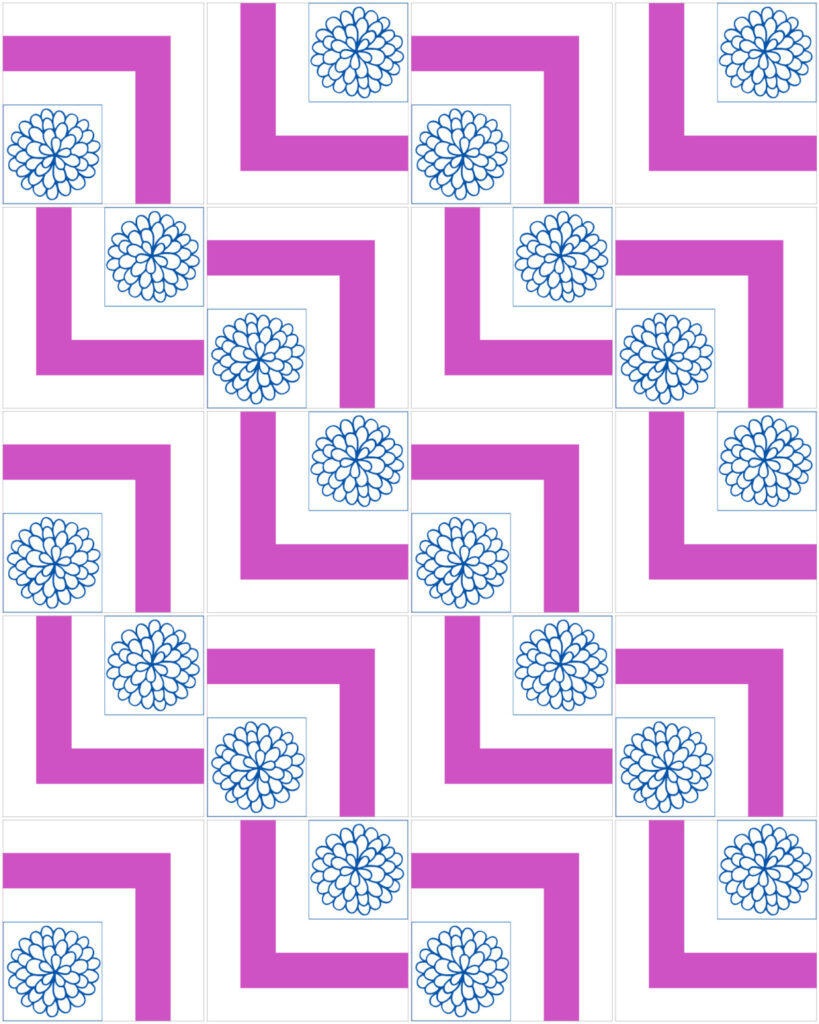
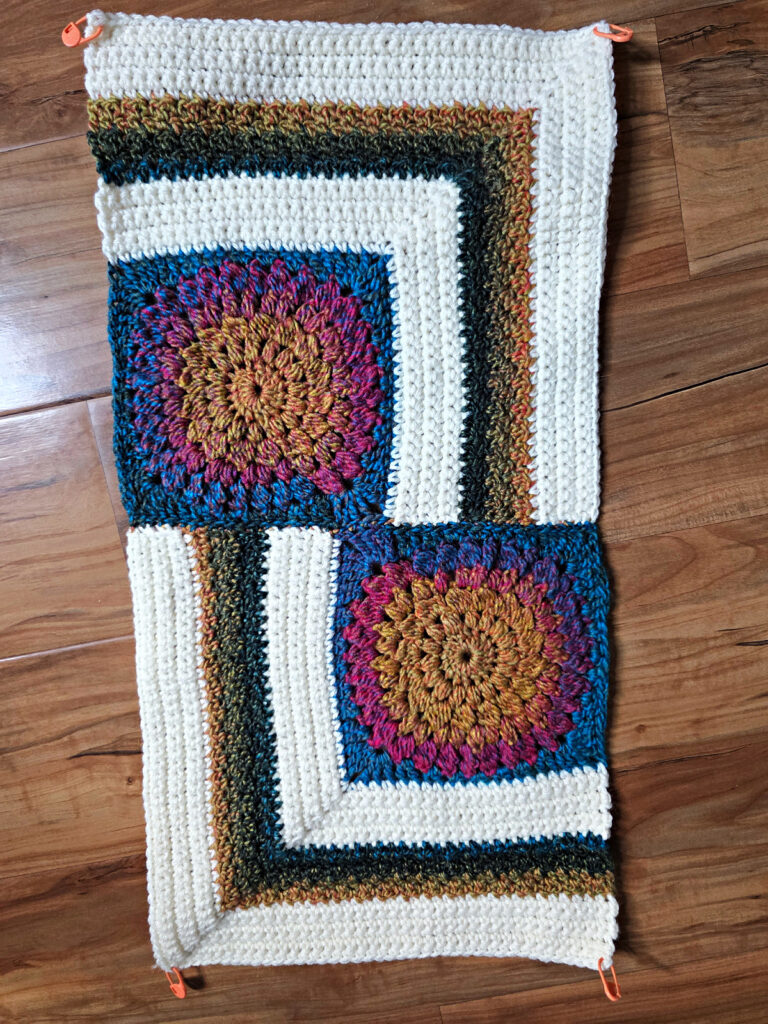
- Step One: Lay out your squares as shown in the schematic for the size you’re making (see schematics below). All right sides facing up. Note: You can choose whichever side as your right side.
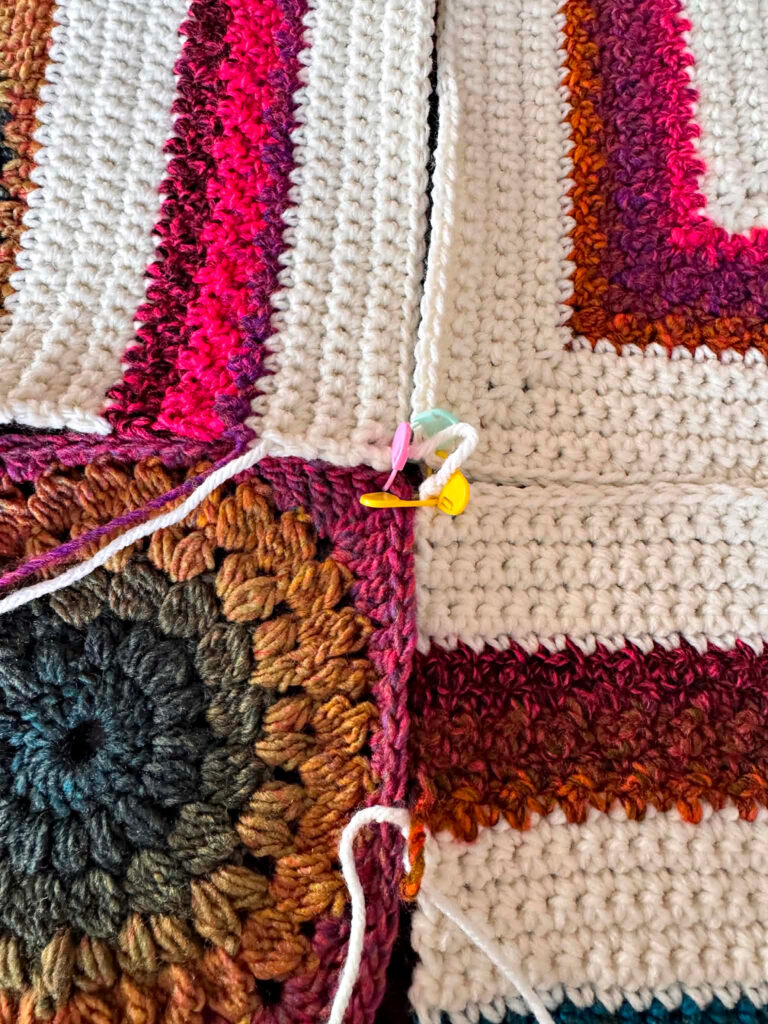
- Step Two: Use locking stitch markers to hold the squares together while seaming. Make sure that the stitches line up properly. You will have 41 stitches on each side of the square. The two edges that include the floral square have a ch-2 at the corner. Use 1 of those 2 chains for each of those two edges. The remaining two edges both use (share) the ch-1 in the corner from the (sc, ch 1, sc).
- Step Three: Use CC1 yarn (or whichever color you prefer) and a Mattress Stitch Seam to seam all of the squares together.
- Step Four: Weave in all ends.
- Step Five: Place a SM in all 4 corners.
Continue on to the Border.
Baby
3 wide x 4 high
Lapghan
4 wide x 5 high
Small Throw
5 wide x 6 high
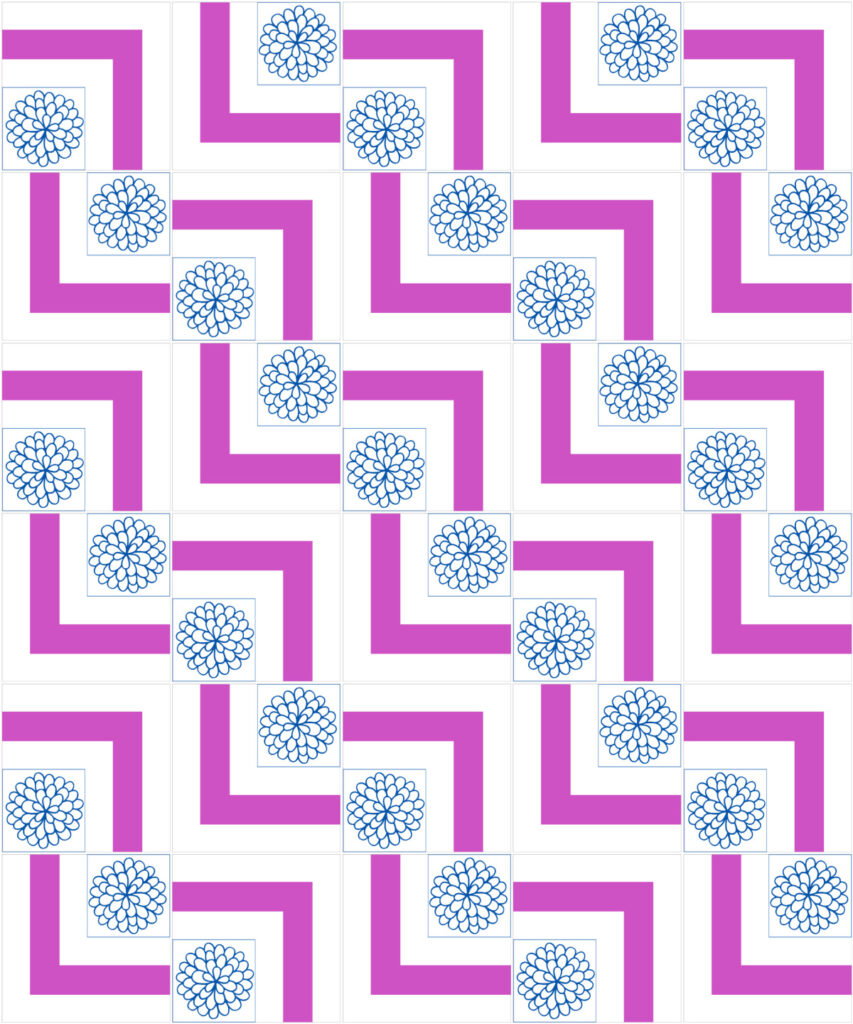
Large Throw
6 wide x 7 high
Layout & Seaming – Progression Photos
Border
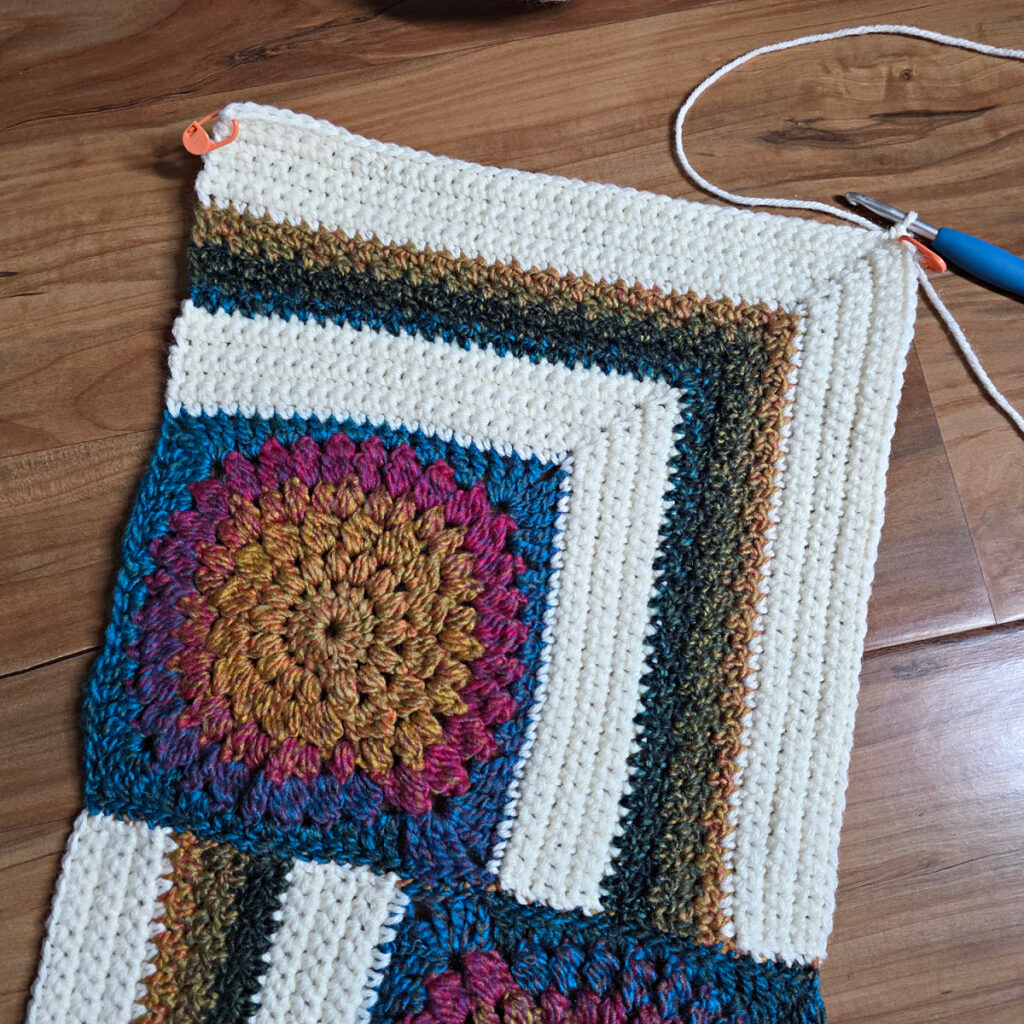
Position your blanket as shown in the layout graphics. The border is started in the top right corner, in the stitch marked by the SM.
Changes for Sizes as Follows: Baby (Lapghan, Small Throw, Large Throw).
Section #1
Note: This section is worked in continuous rounds to keep from having an unsightly seam. Do not join at the end of each round, instead use a scrap piece of yarn to keep track of the beginning of each round. Move the scrap of yarn up as you complete each round.
Rnd 1 (RS): With MC yarn & a 5.00mm crochet hook, join yarn with a standing sc in the top right corner stitch marked with a SM, place a locking SM in the first stitch made, sc in each of the next 121 (162, 203, 244) sts across to the next marked corner st, (sc, ch 1, sc) in the marked st (move the SM up to the ch-1 sp), sc in each of the next 162 (203, 244, 285) sts across to the next marked corner st, (sc, ch 1, sc) in the marked st (move the SM up to the ch-1 sp), sc in each of the next 121 (162, 203, 244) sts across to the next marked corner st, (sc, ch 1, sc) in the marked st (move the SM up to the ch-1 sp), sc in each of the next 162 (203, 244, 285) sts across to the first corner st, work a (sc, ch 1) in the first corner where you joined yarn with a standing sc (move the SM up to the ch-1 sp). Do not join. Continue working in a spiral. Stitch Count: You should have 121 (162, 203, 244) sts along each short edge, 162 (203, 244, 285) sts along each long edge, and a (sc, ch 1, sc) in each corner.
Rnd 2: Sc in each sc around and (sc, ch 1, sc) in each corner ch-1 sp. Do not join. Stitch Count: You should have 123 (164, 205, 246) sts along each short edge, 164 (205, 246, 287) sts along each long edge, and a (sc, ch 1, sc) in each corner.
Rnd 3: Sc in each sc around and (sc, ch 1, sc) in each corner ch-1 sp. Do not join. Stitch Count: You should have 125 (166, 207, 248) sts along each short edge, 166 (207, 248, 289) sts along each long edge, and a (sc, ch 1, sc) in each corner.
Rnd 4: Sc in each sc around and (sc, ch 1, sc) in each corner ch-1 sp. Do not join. Stitch Count: You should have 127 (168, 209, 250) sts along each short edge, 168 (209, 250, 291) sts along each long edge, and a (sc, ch 1, sc) in each corner.
Rnd 5: Sc in each sc around and (sc, ch 1, sc) in each corner ch-1 sp. Join with a sl st to the 1st st of the round. Stitch Count: You should have 129 (170, 211, 252) sts along each short edge, 170 (211, 252, 293) sts along each long edge, and a (sc, ch 1, sc) in each corner.
The complete stitch count at the end of Rnd 5 is: 606 (770, 934, 1,098) sts + 4 ch-1’s.
Fasten off MC. Weave in ends.
Continue on to Section #2 for the size blanket you’re making.
Section #2 – Sizes Baby & Small Throw
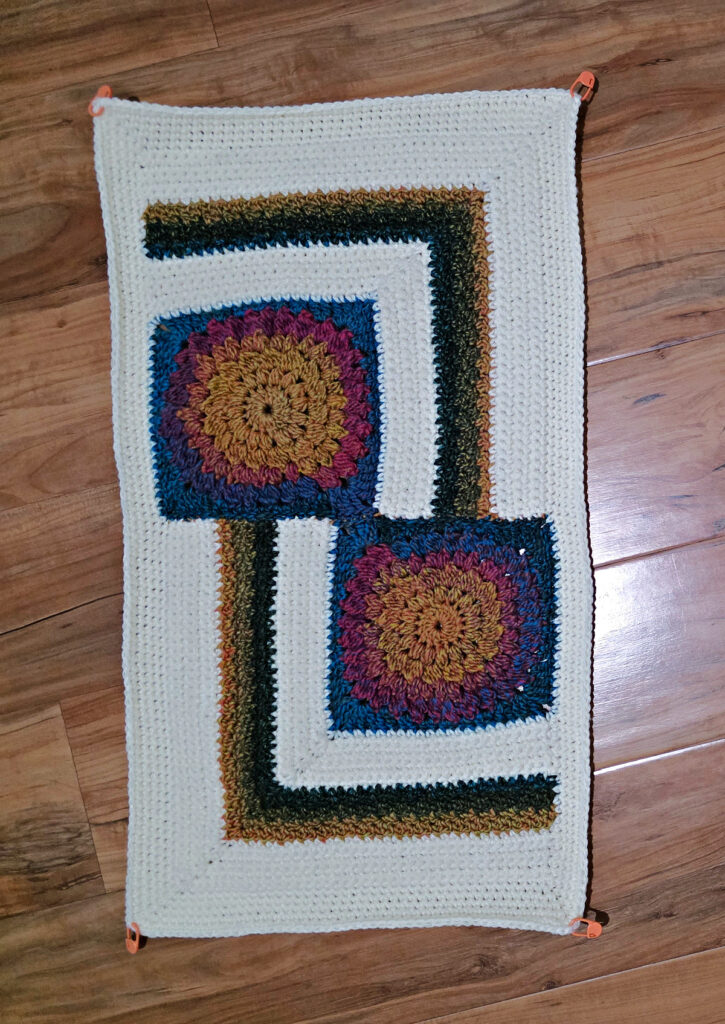
Note: Move the corner SM’s up, to the middle of the three stitches worked into each corner, as you complete each round.
Rnd 1 (RS): With CC1 yarn & a 5.00mm crochet hook, join yarn with a standing sc in the top right corner ch-1 space, (dc, sc) into the same ch-1 sp, dc in the next st, (sc in the next st, dc in the next st) rep from ( to ) across to the next ch-1 corner sp, (sc, dc, sc) in the ch-1 corner sp, (dc in the next st, sc in the next st) rep from ( to ) across to the next ch-1 corner sp, (dc, sc, dc) in the ch-1 corner sp, sc in the next st, (dc in the next st, sc in the next st) rep from ( to ) across to the next ch-1 corner sp, (dc, sc, dc) in the ch-1 corner sp, (sc in the next st, dc in the next st) rep from ( to ) across to the first st of the round. Join with a sl st to the 1st st. 614 (948) sts
Rnd 2: Sl st over to the corner st marked with a SM (does not count as a st), (sc, dc, sc) in the corner st, dc in the next st, (sc in the next st, dc in the next st) rep from ( to ) across to the next corner st, (sc, dc, sc) in the next corner st, (dc in the next st, sc in the next st) rep from ( to ) across to the next corner st, (dc, sc, dc) in the next corner st, sc in the next st, (dc in the next st, sc in the next st) rep from ( to ) across to the next corner st, (dc, sc, dc) in the next corner st, (sc in the next st, dc in the next st) rep from ( to ) across to the first st of the round. Join with a sl st to the 1st st. 622 (956) sts
Rnds 3 – 5: Rep Rnd 2. 646 (980) sts at the end of Rnd 5.
Fasten off CC1. Weave in ends. Continue on to Section #3 for the size blanket you’re making.
Section #2 – Sizes Lapghan & Large Throw
Note: Move the corner SM’s up, to the middle of the three stitches worked into each corner, as you complete each round.
Rnd 1 (RS): With CC1 yarn & a 5.00mm crochet hook, join yarn with a standing sc in the top right corner ch-1 space, (dc, sc) into the same ch-1 sp, (dc in the next st, sc in the next st) rep from ( to ) across to the next ch-1 corner sp, (dc, sc, dc) in the ch-1 corner sp, sc in the next st, (dc in the next st, sc in the next st) rep from ( to ) across to the next ch-1 corner sp, (dc, sc, dc) in the ch-1 corner sp, (sc in the next st, dc in the next st) rep from ( to ) across to the next ch-1 corner sp, (sc, dc, sc) in the ch-1 corner sp, dc in the next st, (sc in the next st, dc in the next st) rep from ( to ) across to the first st of the round. Join with a sl st to the 1st st. Turn. 778 (1,106) sts
Rnd 2: Sl st over to the corner st marked with a SM (does not count as a st), (sc, dc, sc) in the corner st, (dc in the next st, sc in the next st) rep from ( to ) across to the next corner st, (dc, sc, dc) in the next corner st, sc in the next st, (dc in the next st, sc in the next st) rep from ( to ) across to the next corner st, (dc, sc, dc) in the next corner st, (sc in the next st, dc in the next st) rep from ( to ) across to the next corner st, (sc, dc, sc) in the next corner st, dc in the next st, (sc in the next st, dc in the next st) rep from ( to ) across to the first st of the round. Join with a sl st to the 1st st. Turn. 786 (1,114) sts
Rnds 3 – 5: Rep Rnd 2. 810 (1,138) sts at the end of Rnd 5.
Fasten off CC1. Weave in ends. Continue on to Section #3 for the size blanket you’re making.
Section #3 – All Sizes
Note: Move the corner SM’s up, to the middle of the three stitches worked into each corner, as you complete each round.
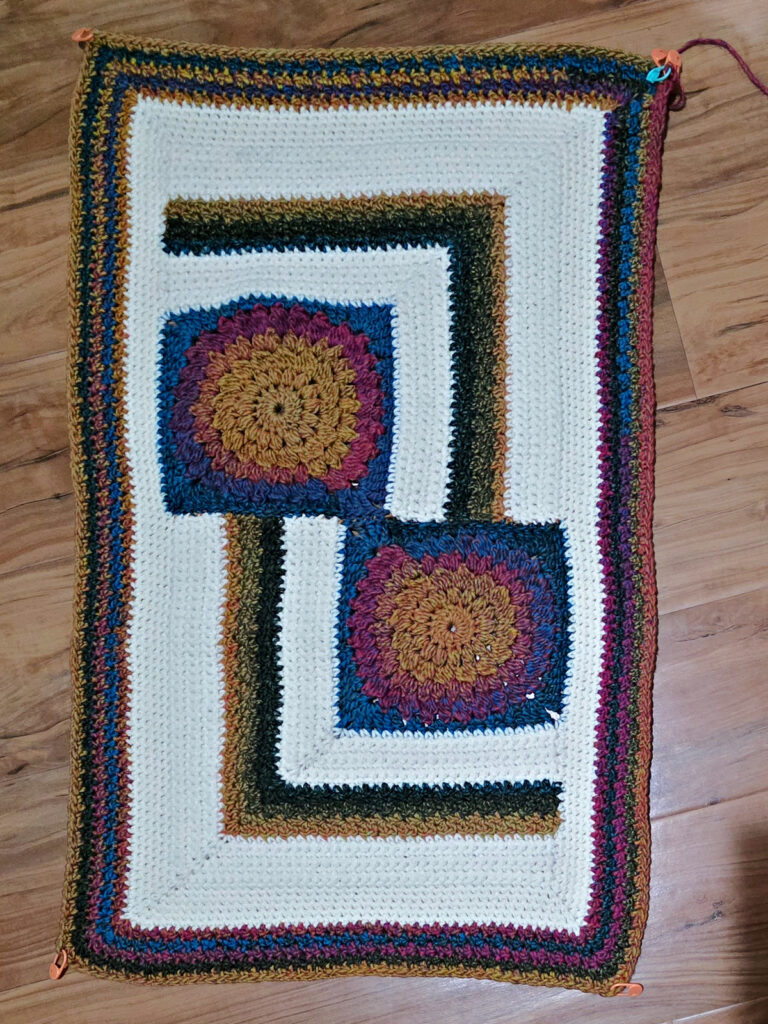
Rnd 1 (RS): With MC yarn & a 5.00mm crochet hook, join yarn with a standing sc in the top right corner stitch marked with a SM, place a locking SM in the first stitch made, * sc in each st across to the next marked corner st, (sc, ch 1, sc) in the marked st (move the SM up to the ch-1 sp), work from * 3 times, then sc in each st across to the 1st corner, work a (sc, ch 1) in the first corner where you joined yarn with a standing sc (move the SM up to the ch-1 sp). Do not join.
Continue working in a spiral. Stitch Count isn’t crucial.
Rnds 2 – 5: Sc in each sc around and (sc, ch 1, sc) in each corner ch-1 sp. Do not join. Stitch Count isn’t crucial.
Optional – Rnd 6: Sl st in each st around. Use the Special Join Technique to join the slip stitch round.
Fasten off. Weave in ends. Block, if desired.
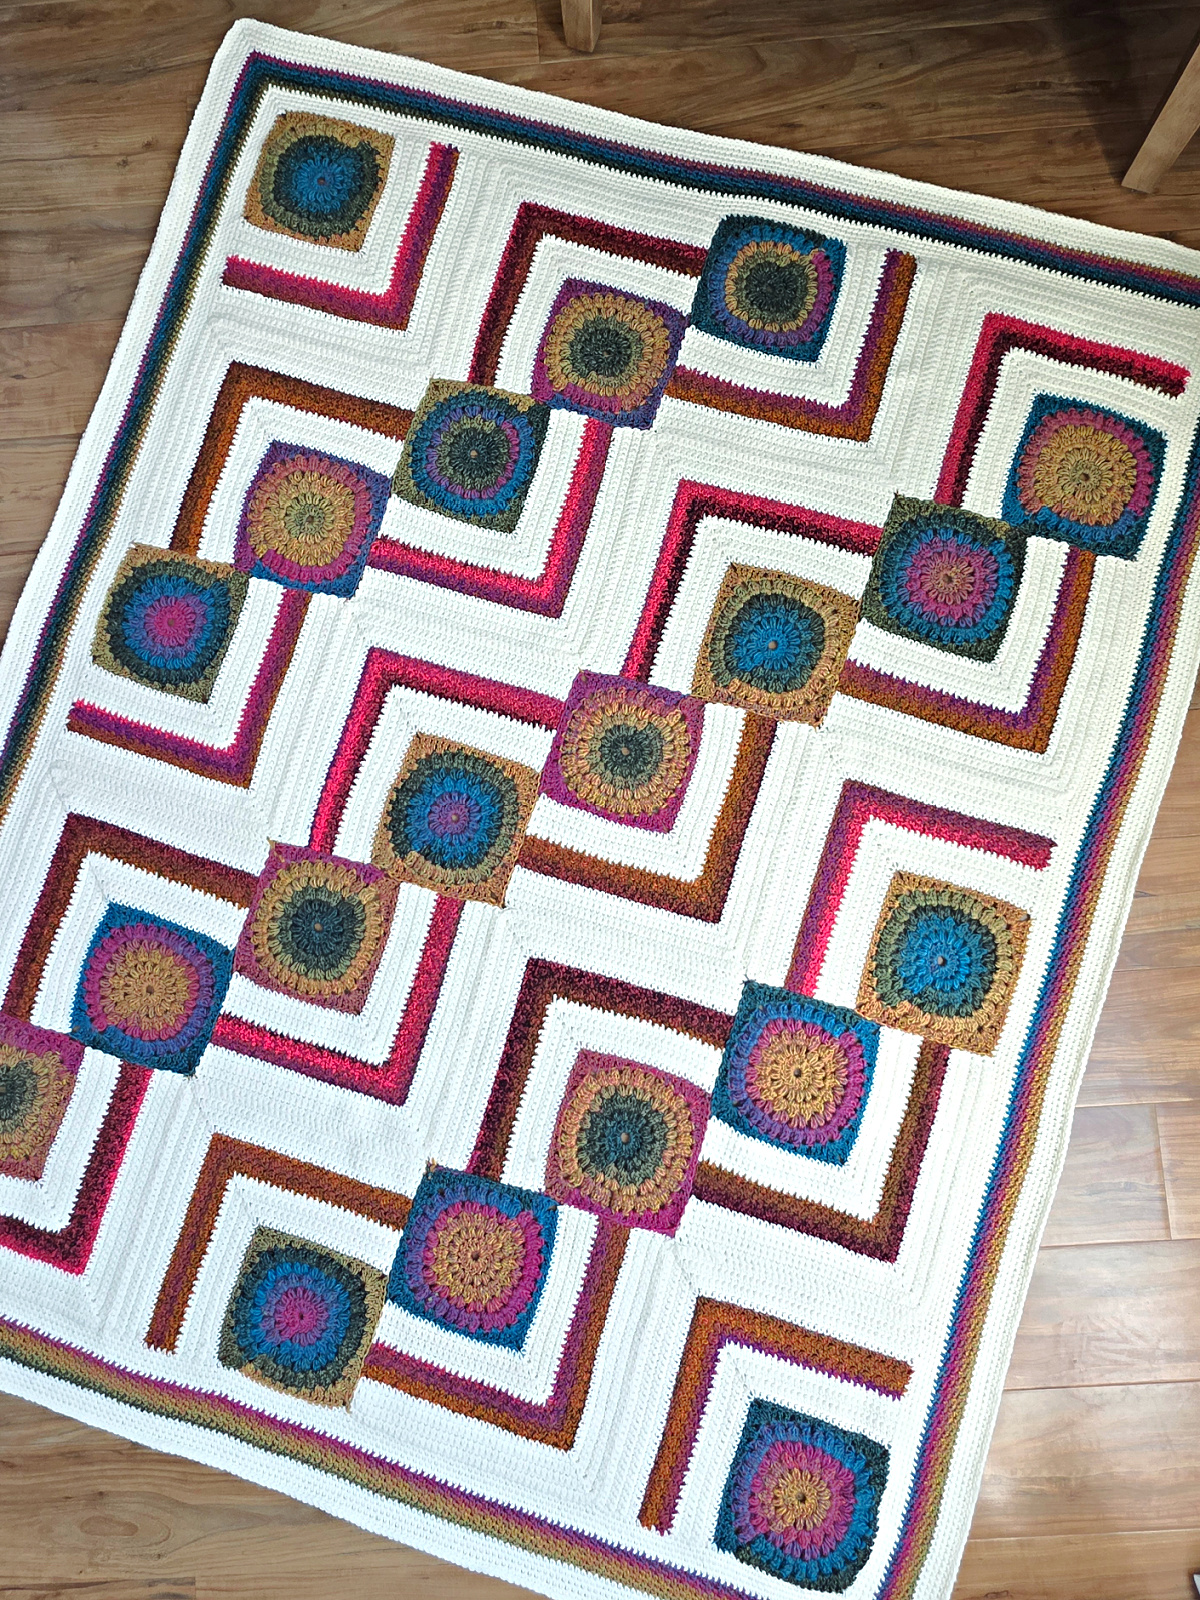
Sometimes, you feel like there’s something missing in your living room or den. A crochet throw blanket is the perfect add to any room because it’s functional (you can cozy up with it during the colder months) and adds the right colors. That’s one of the best parts about crocheting! You can make things in whichever colors you need to pull a space together.
I Made It! Now What?
Pin this post! Save this modern crochet blanket pattern free to your Pinterest boards so that you can come back and make it again.
Leave a comment below: We love to hear your feedback.
Share Your Finished Projects on Facebook or Instagram: I love to see your finished projects! Share with us on social media and tag me @acrochetedsimplicity or use the hashtag #ACrochetedSimplicity so I can find your posts.
Join us in the Facebook Community Group!
Come share your finished projects with us in the A Crocheted Simplicity Crochet Community Group on Facebook. Join us for fun community events such as crochet alongs, join in on crochet conversations, ask questions, get advice, and share your love for crochet!
More Crochet Blanket Patterns I Think You’ll Love
More Crochet Blanket Patterns Free
Are you looking for more free crochet blanket patterns? We have several more free crochet patterns for a crochet throw blanket pattern, hexagon crochet blanket, crochet baby blanket patterns, and more.
If you’re looking for how to crochet a granny square, you’ll also find several crochet squares for blanket.
