
Millie the Crochet Cat
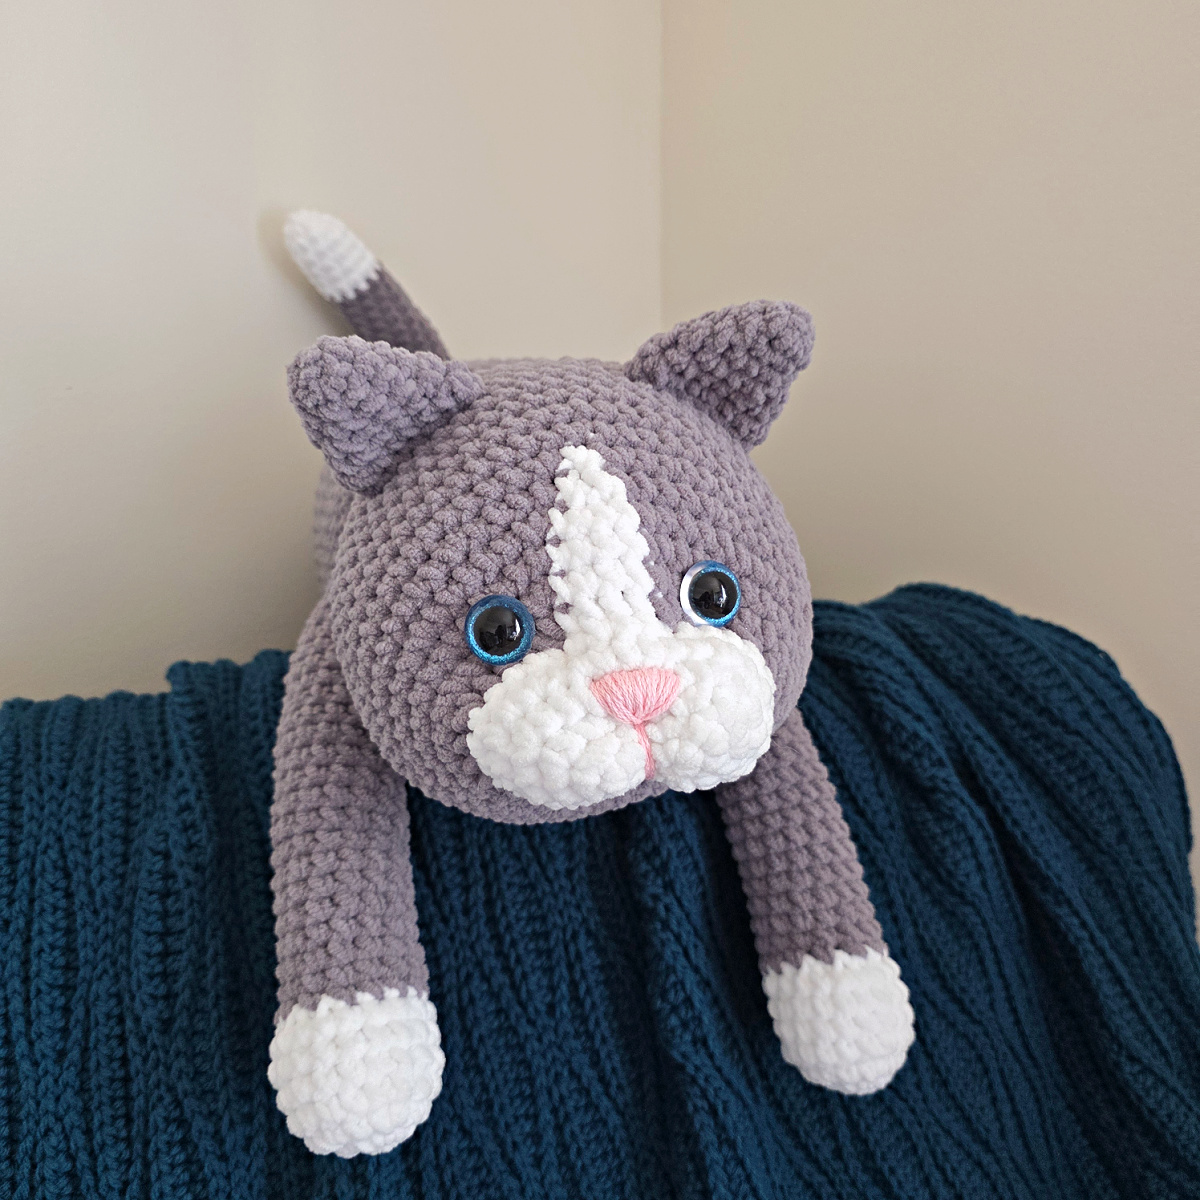
If you have a couple of cats at home, why not add a crochet cat to the mix as well? Millie is one of those adorable crochet amigurumi patterns you’ll want to work up again and again for all of those who love cats, love plushies, or love animals in general!
She’s got all of the personality of a cat too. From lounging around in comfortable spots, listening to the sounds of the birds chirp with her triangle ears, to sniffing out where the tuna is with her pink nose — Millie has it all! In a large, plush package shaped like a cat, you or a loved one will have a sweet companion.
You’ll find the free cat crochet pattern in the post below, or you can find an ad-free printable PDF (that includes all photo tutorials), on Ravelry, or Etsy (aff).
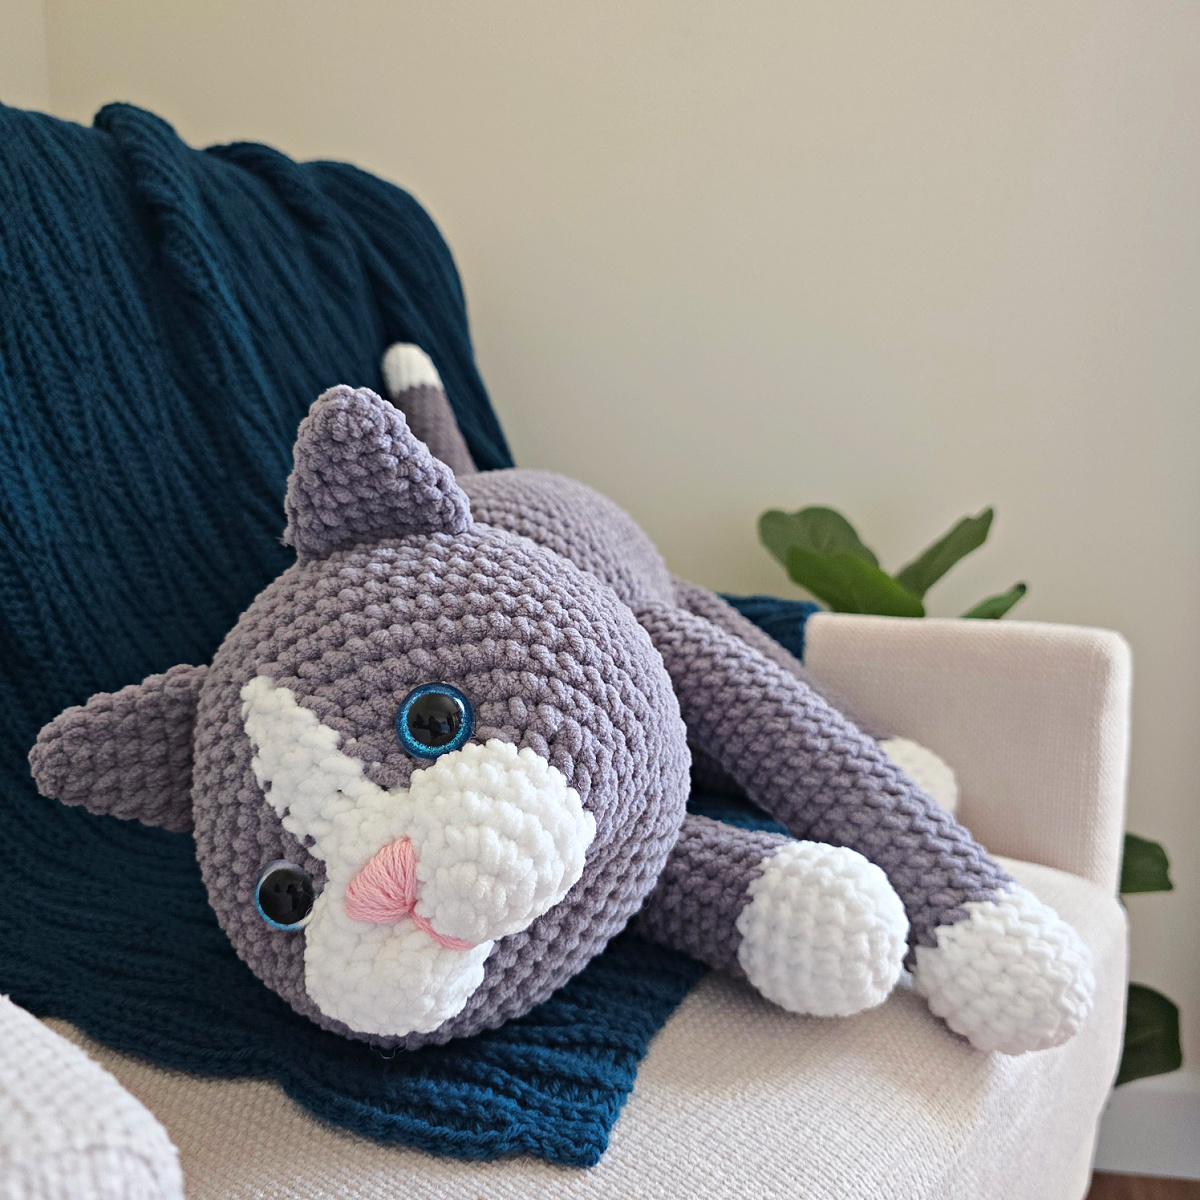
Did you know cats spend about 70% of their lives sleeping? And that’s one of the reasons they get zoomies when they’re awake — to burn up all of the energy they have stored in their little bodies!
While Millie is a mitted cat with her white paws, you can use a variety of different colors to crochet up your cat in the pattern that you like. For example, if you have a ginger cat, you could use a variegated yarn with shades of orange! The yarn that I’ve used has plenty of great options as well.
Related: If you want to crochet another large plush amigurumi to keep this one company, work on Eloise the Crochet Elephant next!
How to Crochet an Amigurumi Cat
There are a few parts to this crochet cat pattern and it’s important you have all of them so that Millie ends up looking like she’s supposed to. You’ll start off by crocheting each of the individual parts including the head, body, ears, tail, and legs.
Be sure to take your time with each one and get the right quantity too (i.e., two ears, four legs). Once all of them are ready and you’ve cross-checked, you’ll begin seaming them together.
Follow along on the assembly instructions to get everything in its right place. Be sure to make your stitches as secure as possible so your crocheted cat doesn’t unravel from all of the love she’s going to receive.
How To Get The
Millie the Crochet Cat Pattern
Option 1: Scroll down for the free cat crochet pattern right here in this blog post.
Option 2: Purchase the ad-free printable PDF from one of my shops:
Yarn
To capture the softness and cuddliness of Millie, it’s important to use the right type of yarn for your crochet cat. For my version of Millie, I used Lion Brand Yarn Posh Twist which is wonderfully plush and soft.
This is a great yarn for crochet amigurumi especially because it is strong and durable, helps the stitches look neat and defined, is low-maintenance (easily washable and dry quickly), and generally resists both shrinking and de-shaping. It is also readily available so you can make this amigurumi cat crochet pattern as many times as you want without the worry that you won’t find the same yarn again.
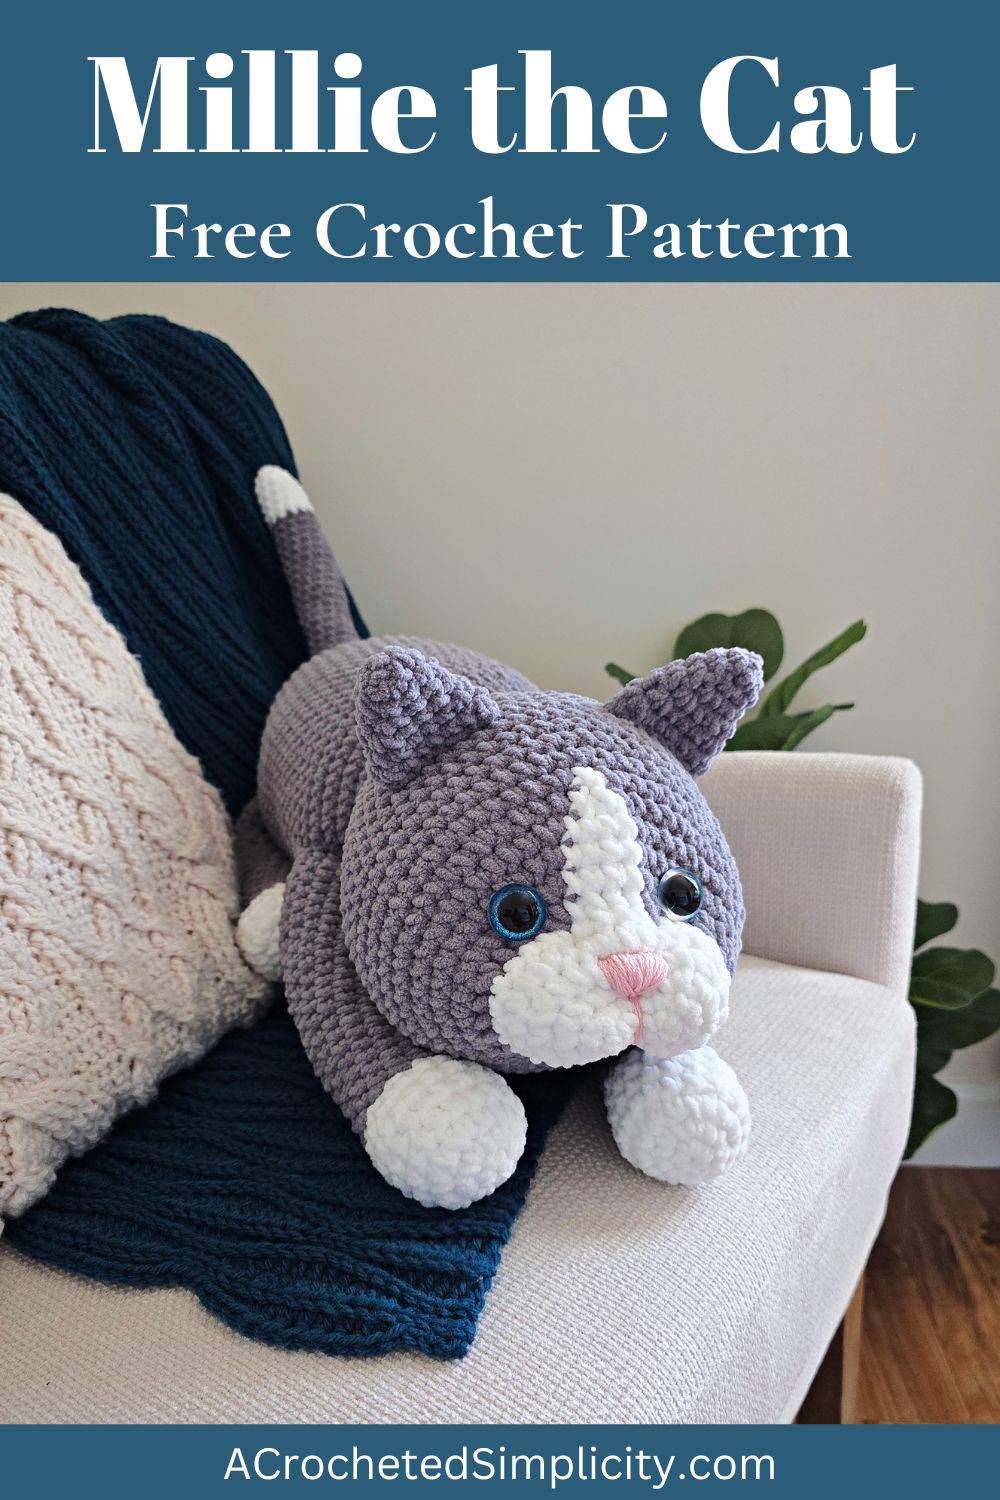
Millie the Crochet Cat – Free Pattern
The crochet cat pattern is free below, but if you love to work offline, I’ve got a couple other great options for you.
Purchase the ad-free, printable PDF, (that includes all photo tutorials), on Ravelry, or on Etsy (aff).
Purchase the Millie the Crochet Cat Kit (aff): Lion Brand has a full kit of the Millie the Crochet Cat kit, available on their website. The includes your choice of colors and a digital copy of the crochet pattern.
This post contains affiliate links.
Materials
- Yarn: Chunky Weight / 5 / Yarn, Lion Brand Yarn Posh Twist [100% polyester (232 yds / 213 m / 200 g / 7.05 oz)] and Lion Brand 24/7 [100% cotton (100 g / 3.5oz / 185 yards / 170 m)] was used for the sample in the photos.
- Yardage and Color:
- Posh Twist in Truffle #571-124AK (2 Balls / 440 yards)
- Posh Twist in Whipped Cream #571-100BB (1 Ball / 120 yards)
- 24/7 Cotton in Pink Lemonade #761-103X (1 Ball / 2 yards)
- Crochet Hook: J/10/6.00mm; or size needed to obtain gauge (My favorite crochet hooks are the Clover Amour Crochet Hooks, I’ve never had an ache in my hand since switching).
- Measuring Tape
- Locking Stitch Markers
- Scissors
- Yarn Needle
- (2) 24mm Plastic Safety Cat Eyes
- PolyFil 20 oz
Abbreviations (US Terms)
- ch(s): chain(s)
- sl st(s): slip stitch(es)
- st(s): stitch(es)
- sc: single crochet
- FPsc: front post single crochet
- Invsc2tog: invisible single crochet decrease
- Rep: repeat
- RS: right side
- SM: stitch marker
- FLO: front loop only
- MC: main color
- CC: contrasting color
- yo: yarn over
Experience Level
- Easy
Gauge
- In sc with a 6.00mm hook: 9 sts = 3″; 8.5 rows = 3″
Sizes
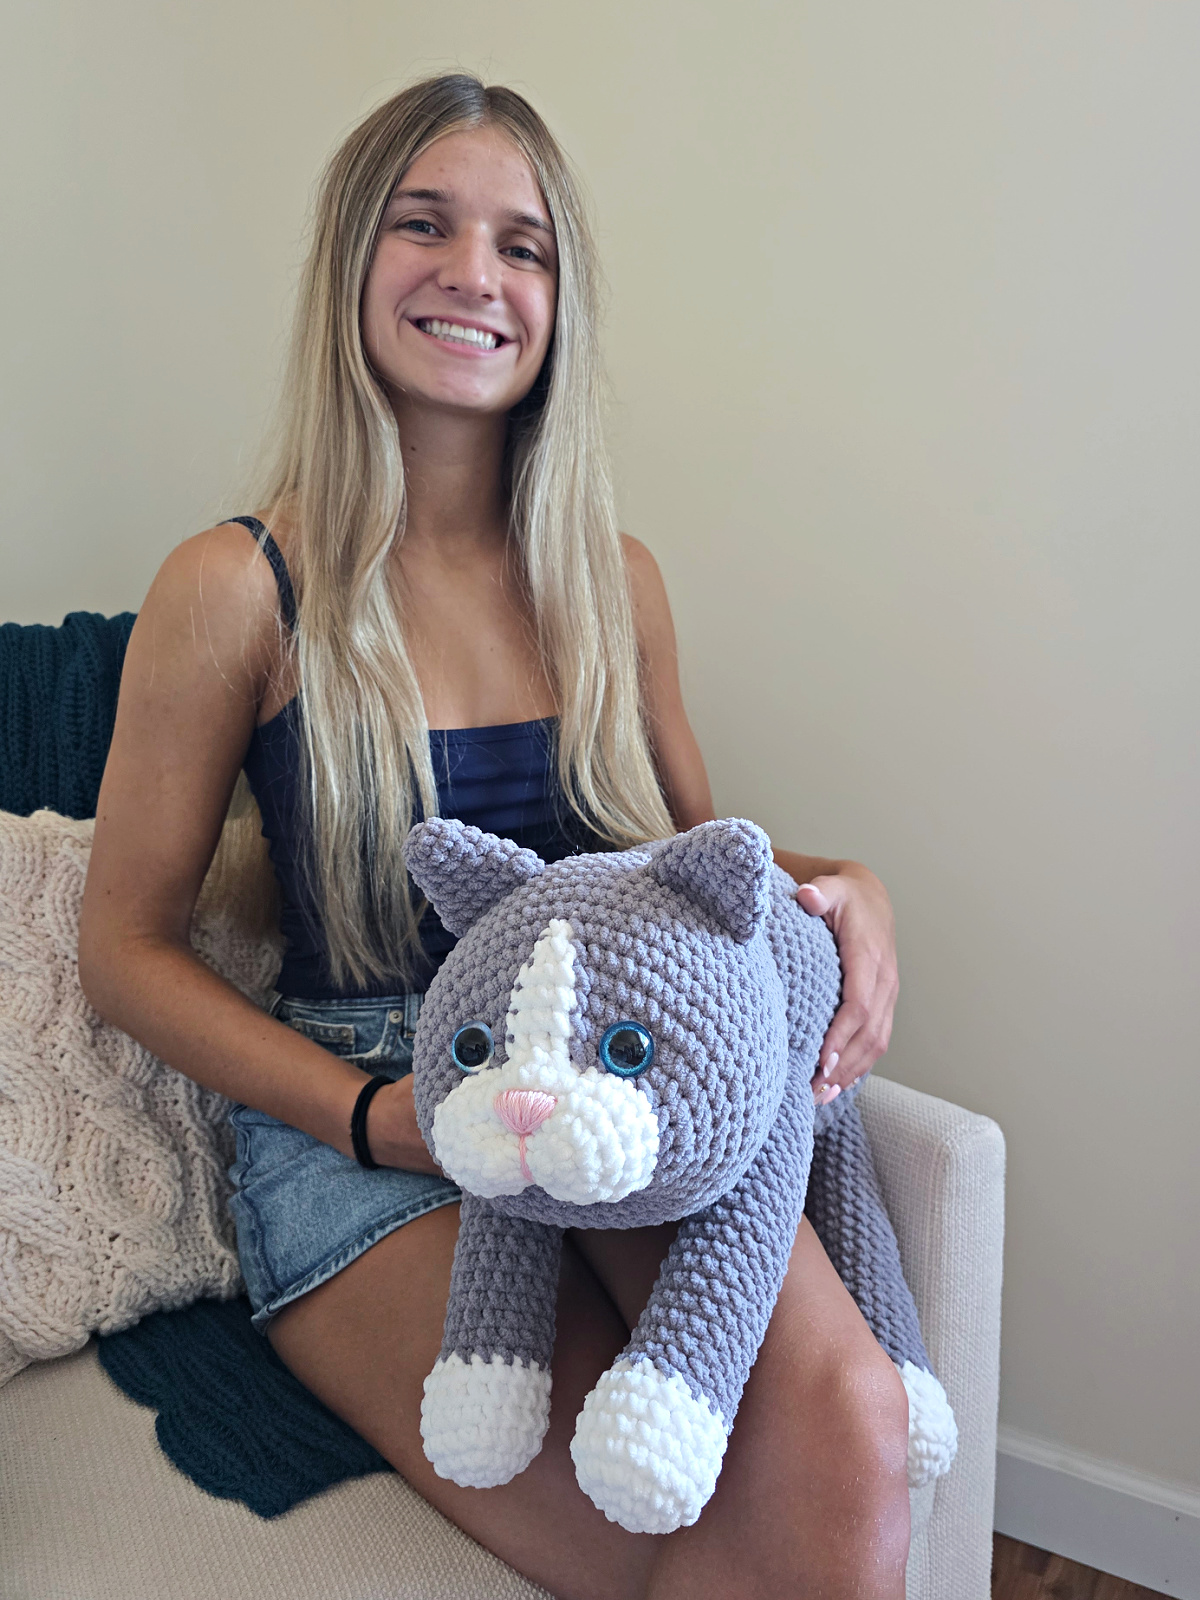
- One Size: 23″ W x 30″ L (laid flat, including legs and tail)
Special Stitches
- Front Post Single Crochet (fpsc): Insert hook from front to back to front around the post of the designated stitch, yo, pull up a loop, yo, pull thru both loops on hook.
- Invisible Single Crochet Decrease (invsc2tog): Insert hook into the FLO of stitch indicated, insert hook into the FLO of the next stitch, yo, pull up a loop, yo, pull thru all loops on hook. Decreases by 1 stitch.
Pattern Notes
- Yarn Notes: Lion Brand Yarn Posh Twist (232 yds / 213 m / 200 g / 7.05 oz / 100% polyester) and Lion Brand 24/7 (100 g / 3.5oz / 185 yards / 170 m / 100% cotton) was used for the sample. Other comparable weight yarns may be substituted.
- Yardage & Color:
- Posh Twist in Truffle #571-124AK (2 Balls / 440 yards)
- Posh Twist in Whipped Cream #571-100BB (1 Ball / 120 yards)
- 24/7 Cotton in Pink Lemonade #761-103X (1 Ball / 2 yards)
- MC: Truffle (medium grey)
- CC: Whipped Cream (white)
Millie the Crochet Cat – Written Pattern
Cat’s Head
Note: This section is worked in continuous rounds to keep from having an unsightly seam. Do not join at the end of each round, instead use a scrap piece of yarn to keep track of the beginning of each round. Move the scrap of yarn up as you complete each round.
Rnd 1: With CC yarn & a 6.00mm crochet hook, ch 4, work 3 sc into the 2nd ch from your hook, sc in the next ch, 3 sc in the next ch, rotate to work into the bottom of the foundation ch, sc in the next ch. Do not join. (8 sts)
Rnd 2: * 2 sc in each of the next 3 sts, sc in the next st, rep from * . (14 sts)
Rnd 3: * (2 sc in the next st, sc in the next st) 3 times, sc in the next st, rep from * . (20 sts)
Rnd 4: * (2 sc in the next st, sc in each of the next 2 sts) 3 times, sc in the next st, rep from * . (26 sts)
Gauge Check: Your oval should be approximately 3-1/2” W x 2-3/4” H.
Rnd 5: Sc in each of the next 3 sts, 2 sc in the next st, sc in each of the next 4 sts, 2 sc in the next st, sc in each of the next 7 sts, (2 sc in the next st, sc in each of the next 4 sts) 2 times. (30 sts)
Rnd 6: Sc in each st around. (30 sts) At the end of Rnd 6, switch to MC yarn. Do not fasten off CC yarn.
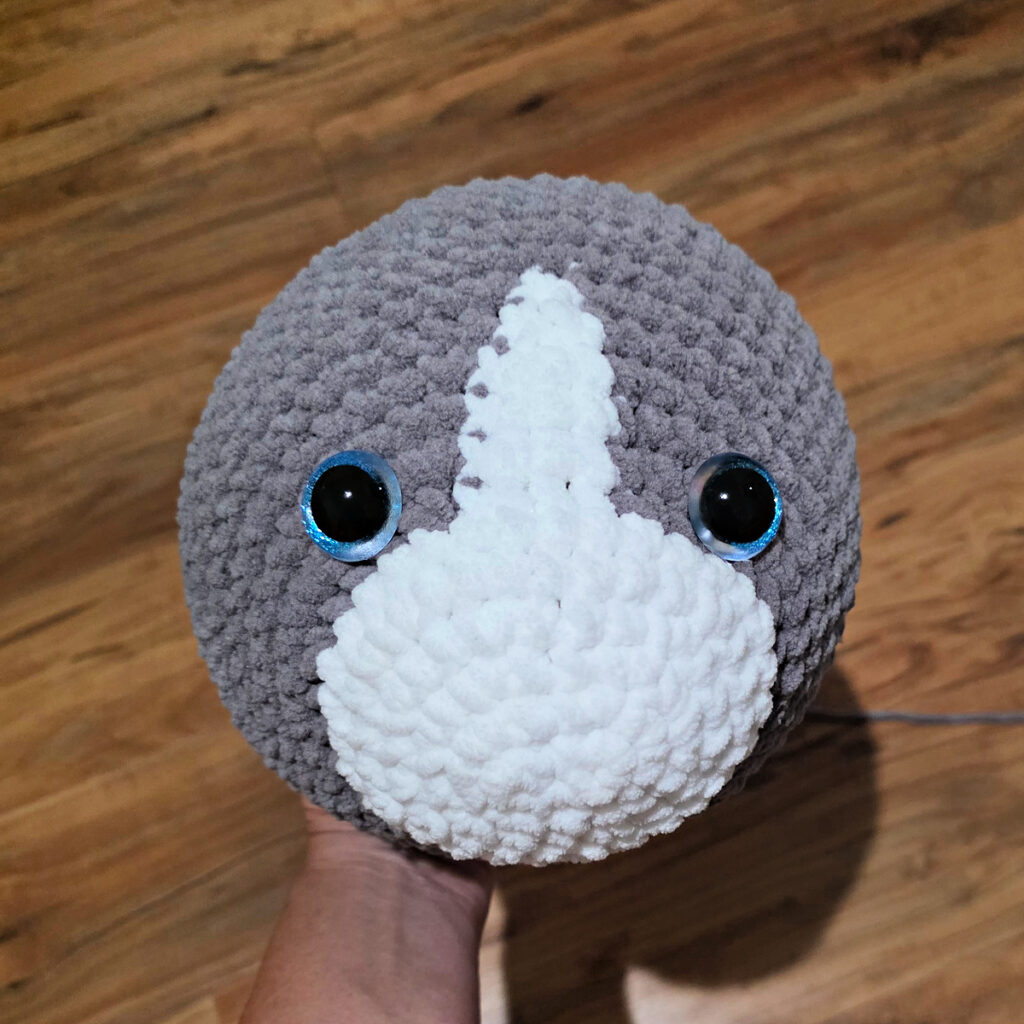
Color Changes: In Rounds 7 – 12, you’ll be working with both MC and CC yarns. The majority of the rounds are worked in grey with a few white stitches in the middle of them to create the white section between the cat’s eyes. I did not carry the white yarn all the way around and I did not cut the yarn each round. I picked it up when I need to use it and dropped it when I was done. This created a zig zag on the back side of my work. Just make sure not to pull too tightly when picking the yarn back up or it could affect the shape of your cat’s head.
Rnd 7: With MC yarn, (2 FPsc around the next st, FPsc around each of the next 3 sts) 3 times, 2 FPsc around the next st, switch to CC yarn, with CC yarn, FPsc around each of the next 4 sts, switch to MC yarn, with MC yarn, (2 FPsc around the next st, FPsc around each of the next 3 sts) 3 times, 2 FPsc around the next st. (38 sts)
Rnd 8: With MC yarn, sc in each of the next 4 sts, (2 sc in the next st, sc in each of the next 3 sts) 3 times, 2 sc in the next st, switch to CC yarn, with CC yarn, sc in each of the next 4 sts, switch to MC yarn, with MC yarn, (2 sc in the next st, sc in each of the next 3 sts) 3 times, 2 sc in the next st, sc in each of the next 4 sts. (46 sts)
Rnd 9: With MC yarn, sc in each of the next 21 sts, switch to CC yarn, with CC yarn, sc in each of the next 4 sts, switch to MC yarn, with MC yarn, sc in each of the next 21 sts. (46 sts)
Rnd 10: With MC yarn, sc in each of the next 2 sts, (2 sc in the next st, sc in each of the next 5 sts) 3 times, 2 sc in the next st, switch to CC yarn, with CC yarn, sc in each of the next 4 sts, switch to MC yarn, with MC yarn, (2 sc in the next st, sc in each of the next 5 sts) 3 times, 2 sc in the next st, sc in each of the next 2 sts. (54 sts)
Rnd 11: With MC yarn, (sc in each of the next 6 sts, 2 sc in the next st) 3 times, sc in each of the next 4 sts, switch to CC yarn, with CC yarn, (Invsc2tog) 2 times, switch to MC yarn, with MC yarn, sc in each of the next 4 sts, (2 sc in the next st, sc in each of the next 6 sts) 3 times. (58 sts)
Rnd 12: With MC yarn, sc in each of the next 27 sts, 2 sc in the next st, switch to CC yarn, with CC yarn, Invsc2tog, switch to MC yarn, with MC yarn, 2 sc in the next st, sc in each of the next 27 sts. (59 sts) Fasten off CC yarn.
Rnd 13: With MC yarn, sc in each of the next 29 sts, 2 sc in the next st, sc in each of the next 29 sts. (60 sts)
Rnds 14 – 21: Sc in each st around. (60 sts)
Gauge Check: When laid flat, the cat’s head at this point should measure approximately 9-1/2″ W (at the widest point) x 7-1/2″ H.
Rnd 22: (sc in each of the next 10 sts, Invsc2tog) 5 times. (55 sts)
Rnd 23: Sc in each of the next 4 sts, (Invsc2tog, sc in each of the next 9 sts) 4 times, Invsc2tog, sc in each of the next 5 sts. (50 sts)
Do not fasten off. Continue to Attaching Eyes before finishing the Cat’s Head.
Attaching Eyes
Step 1: Center the plastic safety eyes on the cat’s face in Round 8 sts (this is the second round of MC). Place them 9 – 10 stitches apart (approximately 2-1/4″). Secure the eyes in place.
Continue to Shaping Cat’s Head.
Shaping Cat’s Head
With Polyfil, begin stuffing the cat’s head to a medium firmness.
Continue to Finishing Cat’s Head.
Finishing Cat’s Head
Continue Cat’s Head from where you previously left off.
Rnd 24: Sc in each of the next 5 sts, Invsc2tog, (sc in each of the next 10 sts, Invsc2tog) 3 times, sc in each of the next 7 sts. (46 sts)
Rnd 25: (Invsc2tog, sc in each of the next 9 sts) 3 times, Invsc2tog, sc in each of the last 11 sts. (42 sts)
Rnd 26: Sc in each of the next 5 sts, (Invsc2tog, sc in each of the next 8 sts) 3 times, Invsc2tog, sc in each of the next 5 sts. (38 sts)
Rnd 27: (Invsc2tog, sc in each of the next 3 sts, Invsc2tog, sc in each of the next 2 sts) 4 times, sc in each of the next 2 sts. (30 sts)
Rnd 28: (Invsc2tog, sc in each of the next 3 sts) 6 times. (24 sts)
Do not fasten off. Finish stuffing cat’s head with Polyfil. Cat’s head should measure approximately 7” W x 7” H x 9” L.
Continue to Cat’s Body.
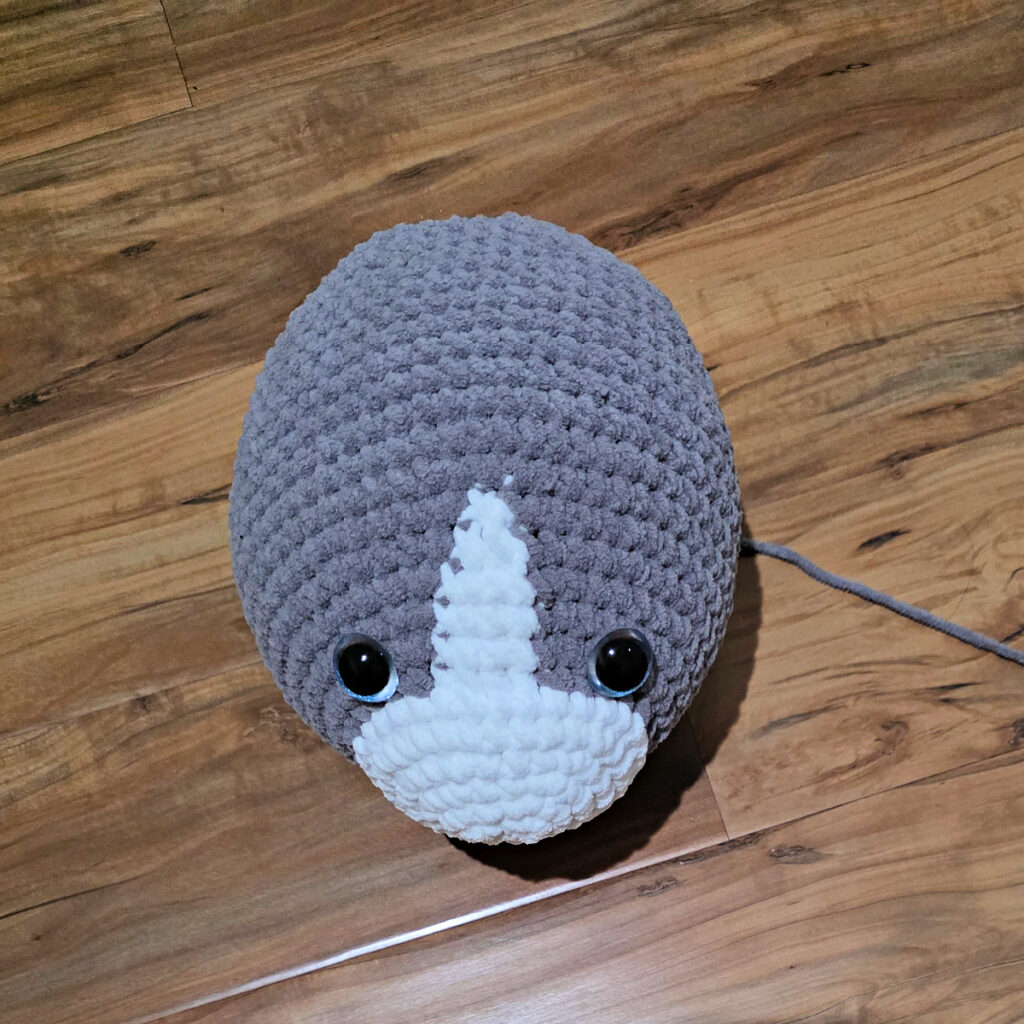
Cat’s Body
In this section, you’ll continue working in a spiral from the last round of the cat’s head.
Rnd 1: Continuing from the cat’s head with MC yarn & a 6.00mm crochet hook, 2 sc in each st around. Do not join. (48 sts)
Rnd 2: Sc in each of the next 9 sts, 2 sc in the next st, sc in each of the next 6 sts, 2 sc in the next st, sc in each of the next 16 sts, 2 sc in the next st, sc in each of the next 6 sts, 2 sc in the next st, sc in each of the next 7 sts. (52 sts) At the end of Round 2, switch to CC yarn. Do not fasten off MC.
Color Changes: In Rounds 3 – 11, you’ll be working with both MC and CC yarns. Work the color changes as you did with the cat’s head. These color changes will create a small diamond on the cat’s chest.
Rnd 3: With CC yarn, sc in each of the next 2 sts, switch to MC yarn, with MC yarn, sc in each of the next 7 sts, 2 sc in the next st, sc in each of the next 8 sts, 2 sc in the next st, sc in each of the next 16 sts, 2 sc in the next st, sc in each of the next 8 sts, 2 sc in the next st, sc in each of the next 6 sts, switch to CC yarn, with CC yarn, sc in the next st. (56 sts)
Rnd 4: With CC yarn, sc in each of the next 3 sts, switch to MC yarn, with MC yarn, sc in each st around to the last 2 sts, switch to CC yarn, with CC yarn, sc in each of the next 2 sts. (56 sts)
Rnd 5: With CC yarn, sc in each of the next 4 sts, switch to MC yarn, with MC yarn, sc in each of the next 5 sts, 2 sc in the next st, sc in each of the next 10 sts, 2 sc in the next st, sc in each of the next 16 sts, 2 sc in the next st, sc in each of the next 10 sts, 2 sc in the next st, sc in each of the next 4 sts, switch to CC yarn, with CC yarn, sc in each of the next 3 sts. (60 sts)
Rnd 6: With CC yarn, sc in each of the next 5 sts, switch to MC yarn, with MC yarn, sc in each of the next 18 sts, (2 sc in the next st, sc in each of the next 4 sts) 3 times, 2 sc in the next st, sc in each of the next 17 sts, switch to CC yarn, with CC yarn, sc in each of the next 4 sts. (64 sts)
Rnd 7: With CC yarn, sc in each of the next 5 sts, switch to MC yarn, with MC yarn, sc in each st around to the last 3 sts, switch to CC yarn, with CC yarn, sc in each of the next 3 sts. (64 sts)
Rnd 8: With CC yarn, sc in each of the next 4 sts, switch to MC yarn, with MC yarn, sc in each st around to the last 2 sts, switch to CC yarn, with CC yarn, sc in each of the next 2 sts. (64 sts)
Rnd 9: With CC yarn, sc in each of the next 3 sts, switch to MC yarn, with MC yarn, sc in each st around to the last st, switch to CC yarn, with CC yarn, sc in the next st. (64 sts)
Rnd 10: With CC yarn, sc in each of the next 2 sts, switch to MC yarn, with MC yarn, sc in each remaining st around. (64 sts) Switch to CC yarn.
Rnd 11: With CC yarn, sc in the next st, switch to MC yarn, with MC yarn, sc in each remaining st around. (64 sts)
Rnds 12 – 30: With MC yarn, sc in each st around. (64 sts)
Rnd 31: Sc in each of the next 6 sts, Invsc2tog, sc in each of the next 12 sts, Invsc2tog, (sc in each of the next 14 sts, Invsc2tog) twice, sc in each of the next 10 sts. (60 sts)
Rnd 32: (sc in each of the next 13 sts, Invsc2tog) 4 times. (56 sts)
Rnd 33: Sc in each of the next 6 sts, Invsc2tog, (sc in each of the next 12 sts, Invsc2tog) 3 times, sc in each of the next 6 sts. (52 sts)
Rnd 34: (sc in each of the next 11 sts, Invsc2tog) 4 times. (48 sts)
Rnd 35: Sc in each of the next 5 sts, Invsc2tog, (sc in each of the next 10 sts, Invsc2tog) 3 times, sc in each of the next 5 sts. (44 sts)
With Polyfil, begin stuffing the cat’s body to a medium firmness.
Rnd 36: (sc in each of the next 9 sts, Invsc2tog) 4 times. (40 sts)
Rnd 37: (sc in each of the next 3 sts, Invsc2tog) 8 times. (32 sts)
Rnd 38: (Invsc2tog, sc in each of the next 2 sts) 8 times. (24 sts)
Rnd 39: (sc in the next st, Invsc2tog) 8 times. (16 sts)
Rnd 40: (Invsc2tog) 8 times. (8 sts)
Fasten off, leaving a tail of yarn to close the last round. Finish stuffing the cat’s body. With a yarn needle, weave the tail of yarn in and out of the stitches from the last round. Pull on the end to cinch the hole closed. Weave in ends. Continue to Cat’s Paws & Legs. Cat’s Body, after being stuffed and the last round cinched closed, measures approximately 7″ W x 12” L (not including the cat’s head).
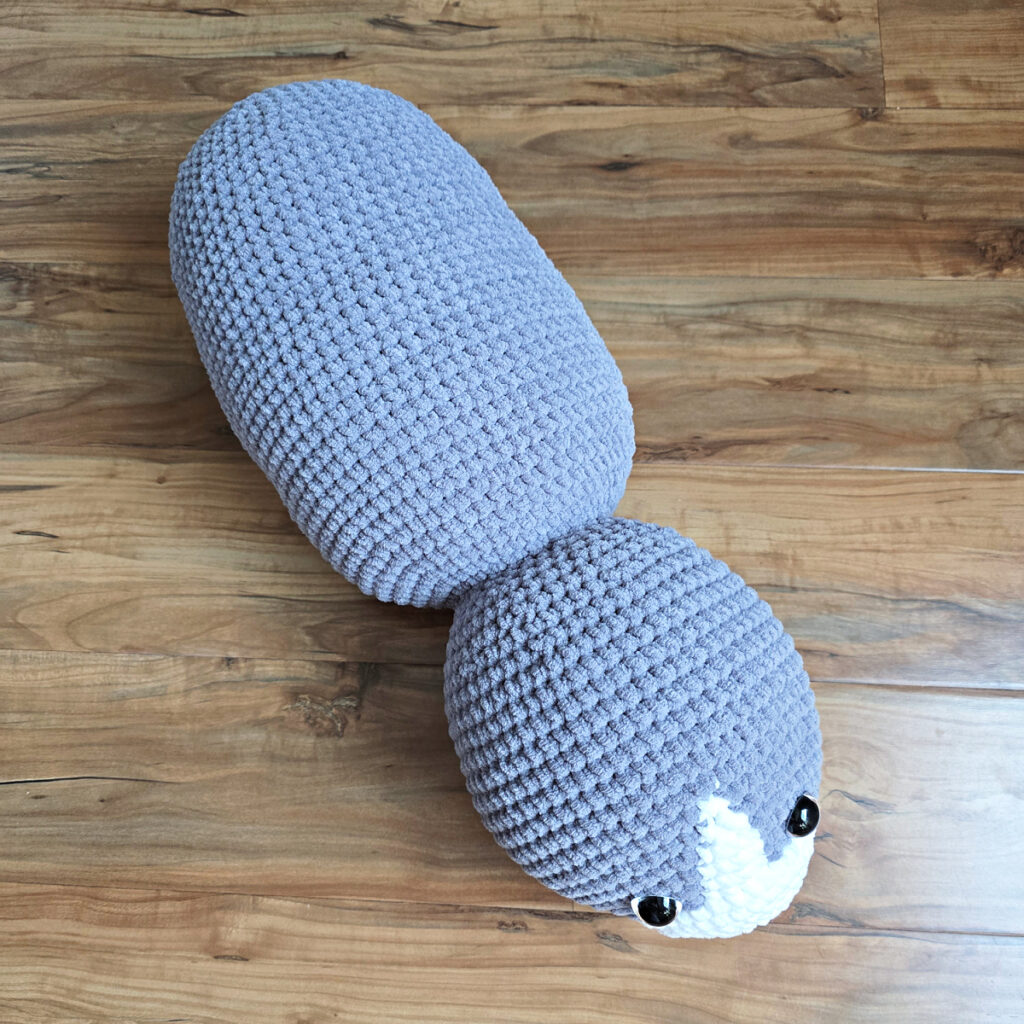
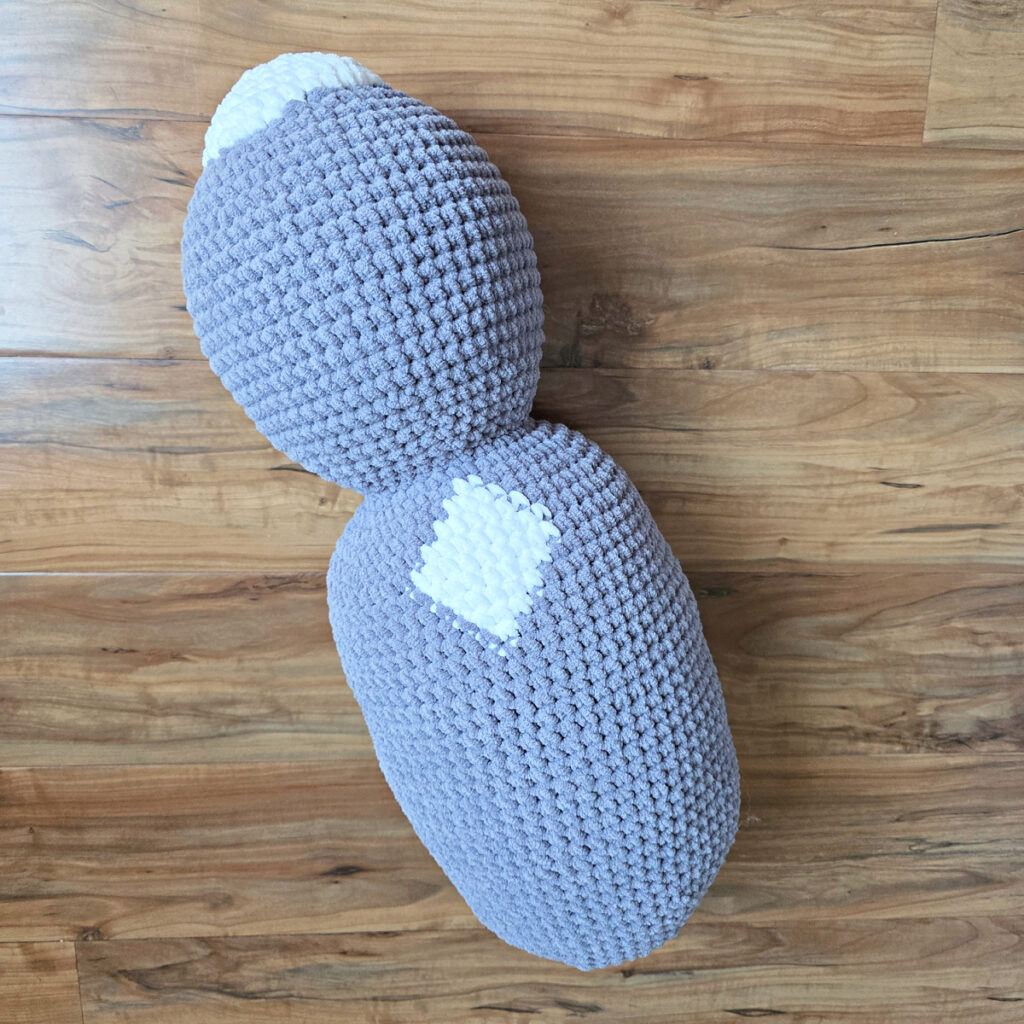
Cat’s Paws & Legs (Make 4)
In this section, you’ll crochet four paws & legs for the cat that you’ll later sew onto the cat’s body. You’ll begin the paws with CC yarn and switch to MC yarn for the leg portion.
Note: This section is worked in continuous rounds to keep from having an unsightly seam. Do not join at the end of each round, instead use a scrap piece of yarn to keep track of the beginning of each round. Move the scrap of yarn up as you complete each round.
Tip: Stuff each Paw & Leg as you crochet it to make stuffing easier. Stuff the paw more firmly. Stuff the leg to a medium firmness.
Rnd 1: With CC yarn & a 6.00mm crochet hook, ch 2, work 6 sc into the 2nd ch from your hook. (6 sts)
Rnd 2: 2 sc in each st around. (12 sts)
Rnd 3: * 2 sc in the next st, sc in the next st, rep from * around. (18 sts)
Rnds 4 – 6: Sc in each st around. (18 sts)
Switch to MC yarn. Fasten off CC yarn.
Rnd 7: With MC yarn, sc in each of the next 6 sts, (Invsc2tog) 3 times, sc in each of the next 6 sts. (15 sts)
Rnds 8 – 29: Sc in each st around. (15 sts)
Fasten off, leaving a tail of yarn long enough to later sew the leg onto the body. Make a total of four legs, then continue to Tail. When stuffed, legs should measure 2” W x 9-1/4” L (at widest and longest points).
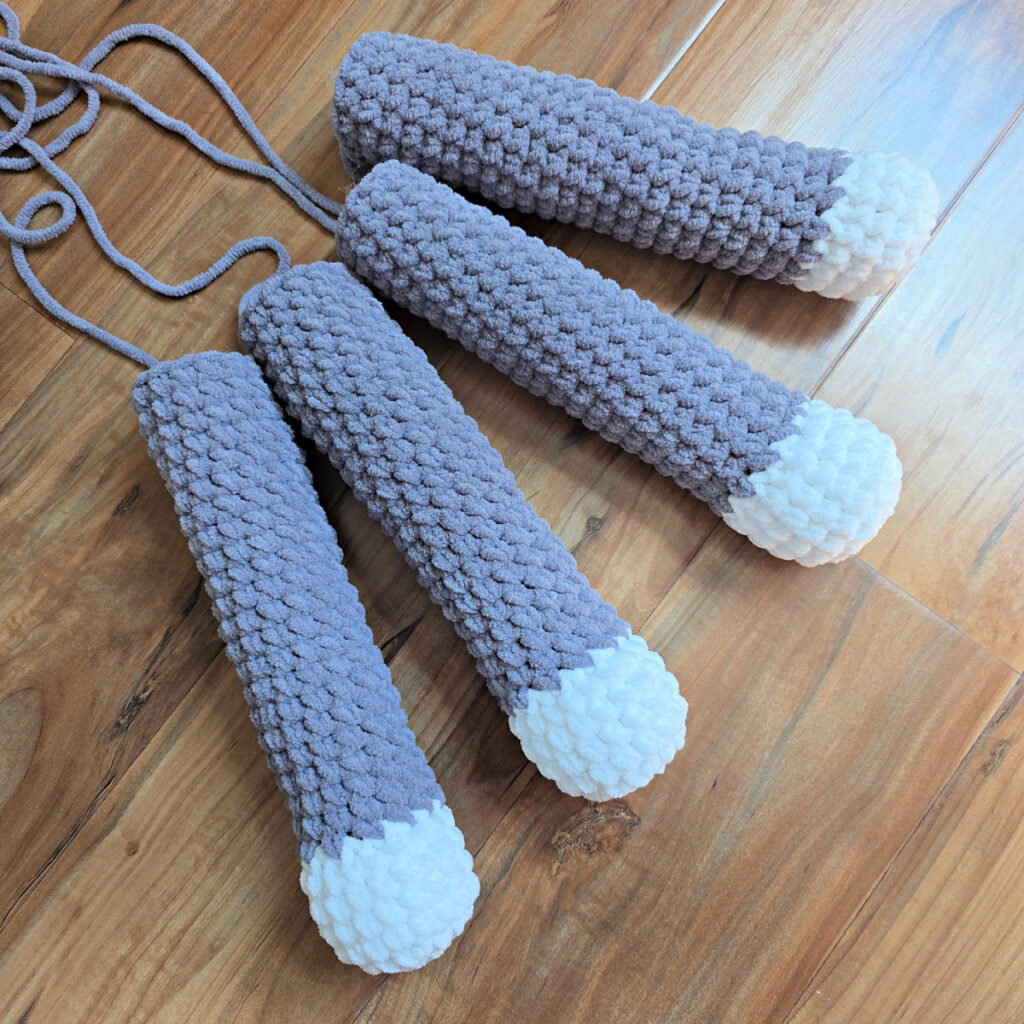
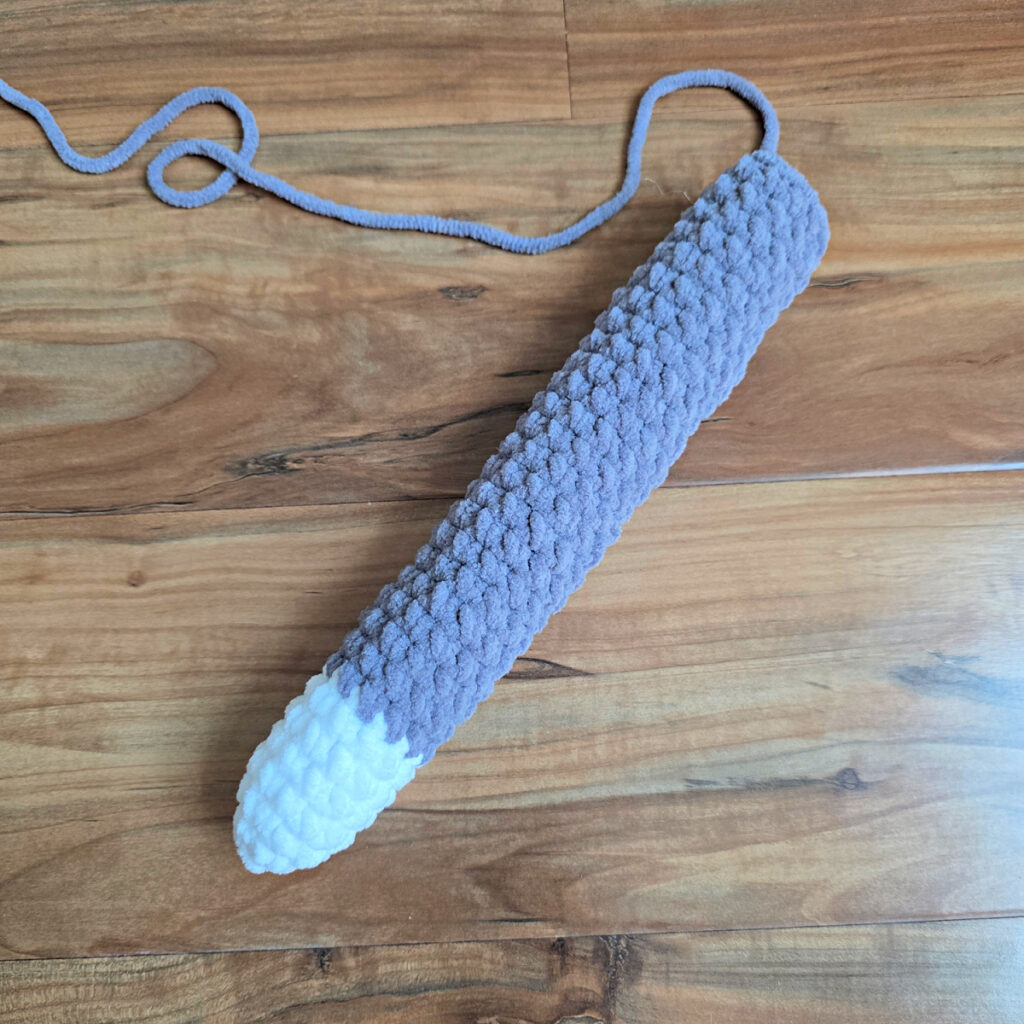
Cat’s Tail
In this section, you’ll crochet a tail for your cat. You’ll begin the tail with CC yarn for the tip then switch to MC yarn.
Note: This section is worked in continuous rounds to keep from having an unsightly seam. Do not join at the end of each round, instead use a scrap piece of yarn to keep track of the beginning of each round. Move the scrap of yarn up as you complete each round.
Tip: Stuff the tail as you crochet it to make stuffing easier. I lightly stuffed mine.
Rnd 1: With CC yarn & a 6.00mm crochet hook, ch 2, work 4 sc into the 2nd ch from your hook. (4 sts)
Rnd 2: 2 sc in each st around. (8 sts)
Rnd 3: * 2 sc in the next st, sc in the next st, rep from * around. (12 sts)
Rnds 4 – 7: Sc in each st around. (12 sts)
Switch to MC yarn. Fasten off CC yarn.
Rnd 8: With MC yarn, sc in each st around. (12 sts)
Rep Rnd 8 until tail measures 10″ L.
Fasten off, leaving a 12″ tail of yarn for attaching the tail to the cat. Tail should measure 1-3/4″ W x 10″ L. Continue to Ears.
Ears (Make 2)
Note: This section is worked in continuous rounds to keep from having an unsightly seam. Do not join at the end of each round, instead use a scrap piece of yarn to keep track of the beginning of each round. Move the scrap of yarn up as you complete each round.
Rnd 1: With MC yarn & a 6.00mm crochet hook, ch 2, work 4 sc into the 2nd ch from your hook. (4 sts)
Rnd 2: 2 sc in each st around. (8 sts)
Rnd 3: Sc in each st around. (8 sts)
Rnd 4: * 2 sc in the next st, sc in each of the next 3 sts, rep from * around. (10 sts)
Rnd 5: * 2 sc in the next st, sc in each of the next 4 sts, rep from * around. (12 sts)
Rnd 6: * 2 sc in the next st, sc in each of the next 5 sts, rep from * around. (14 sts)
Rnd 7: * 2 sc in the next st, sc in each of the next 6 sts, rep from * around. (16 sts)
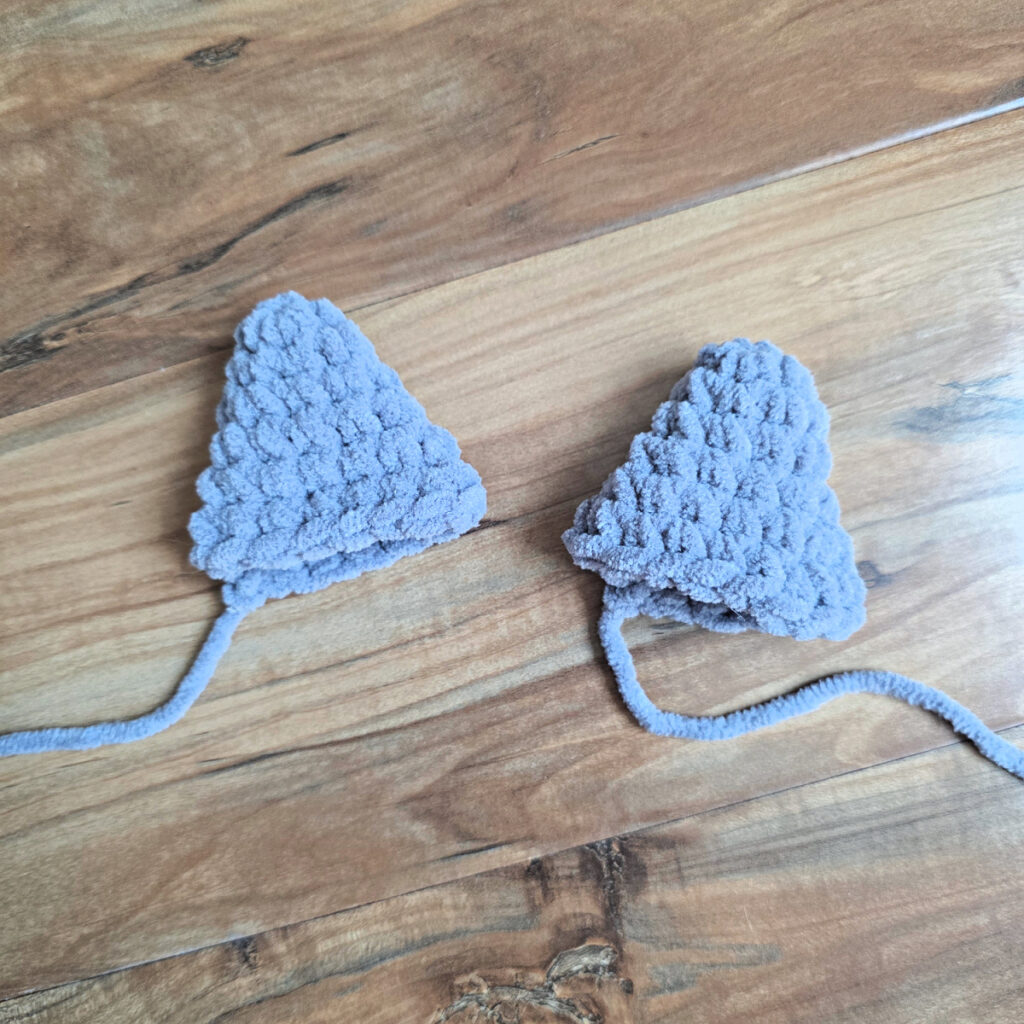
Fasten off leaving a 12″ tail of yarn. Make a second ear. Do not stuff the ears. Ears should measure approximately 2-3/4″ W x 2-1/2″ H (at widest and highest points when laid flat). Continue on to Assembly.
Assembly
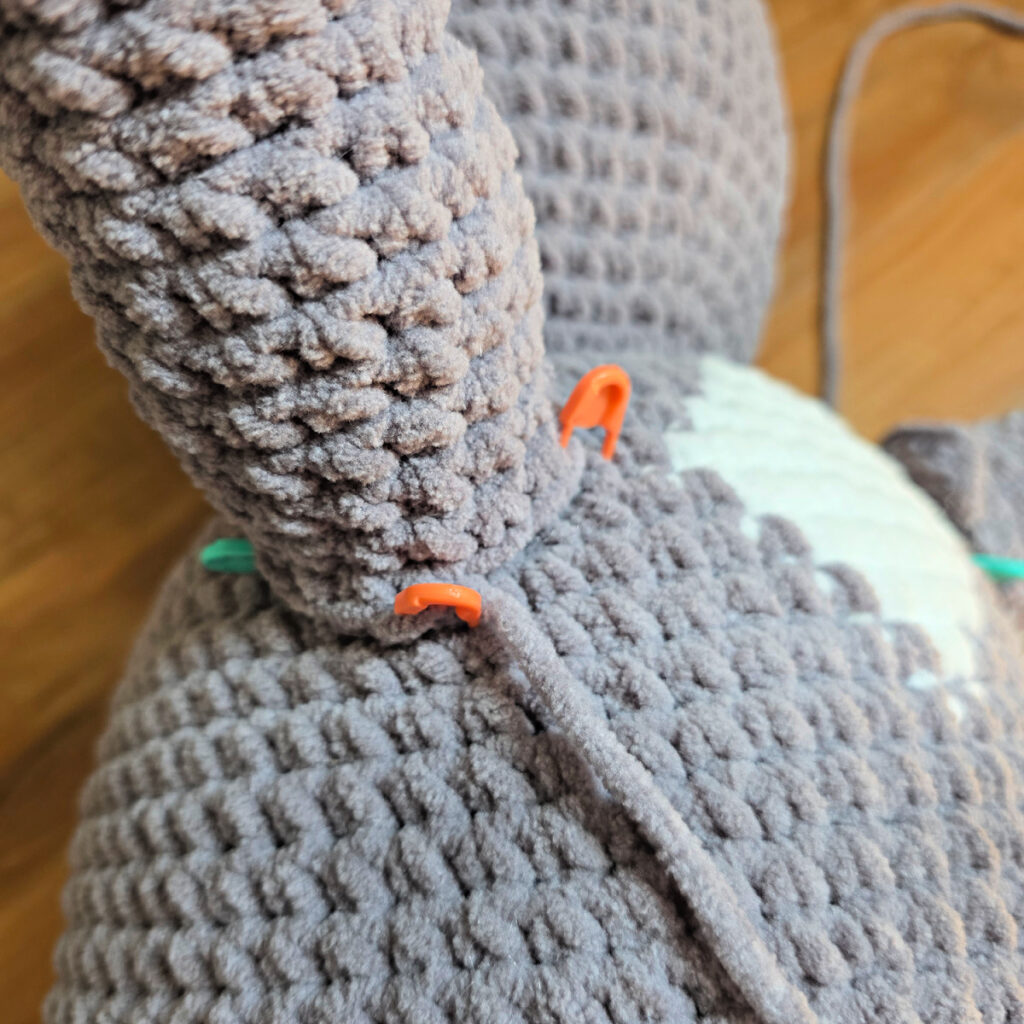
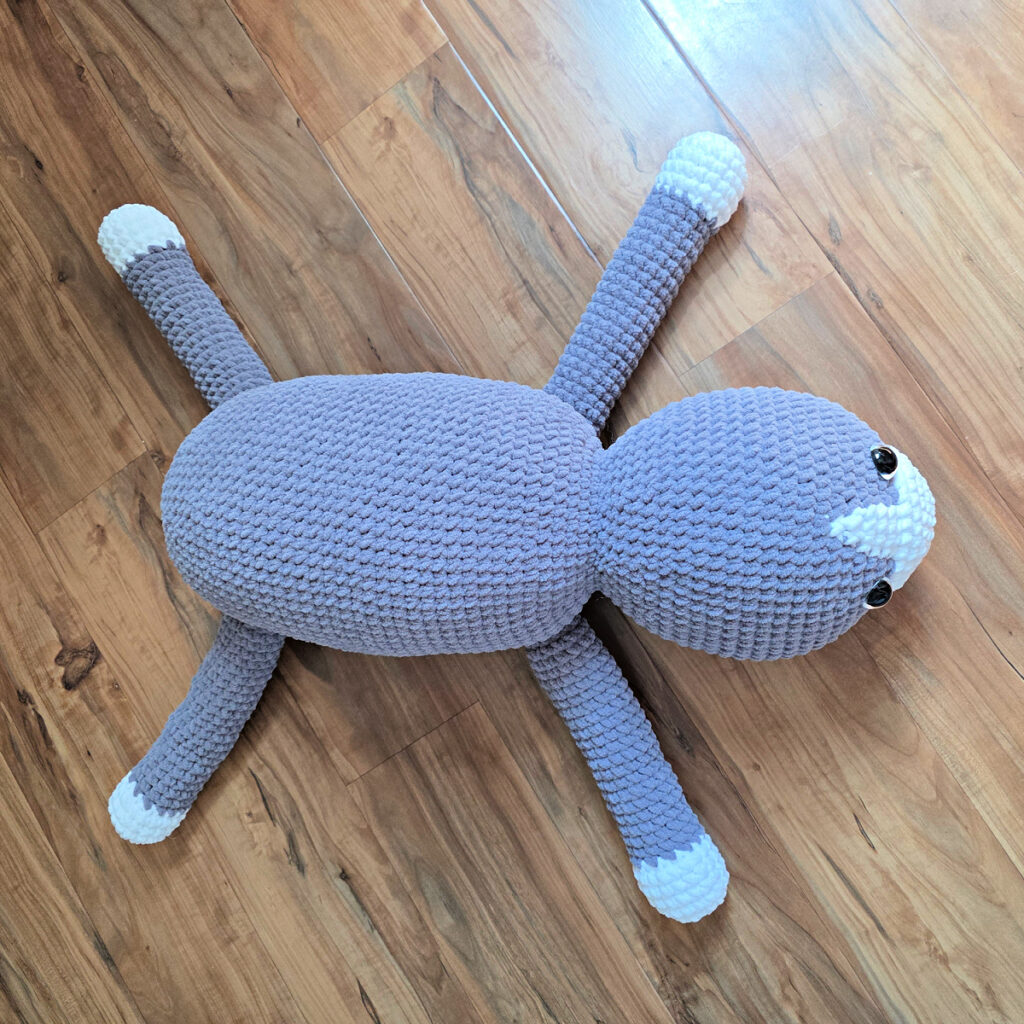
Step One: Position the back and front legs as shown in the photos below. The measurements shown between the legs were taken at the center of the legs.
Position the legs so that the little hump on the paws, that was created with the 3 Invsc2tog, is facing up.
Use locking stitch markers to hold them in place. With yarn tails and a yarn needle, attach the legs to the cat.
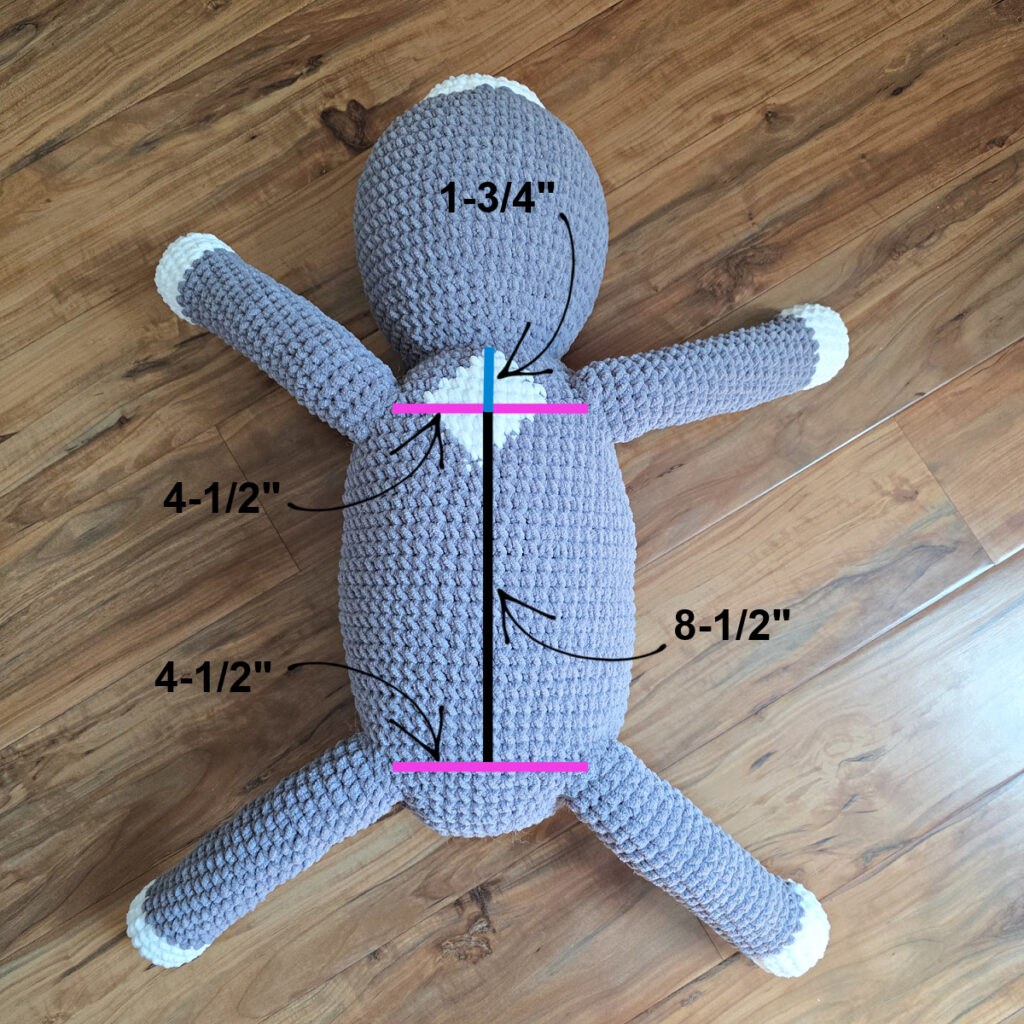
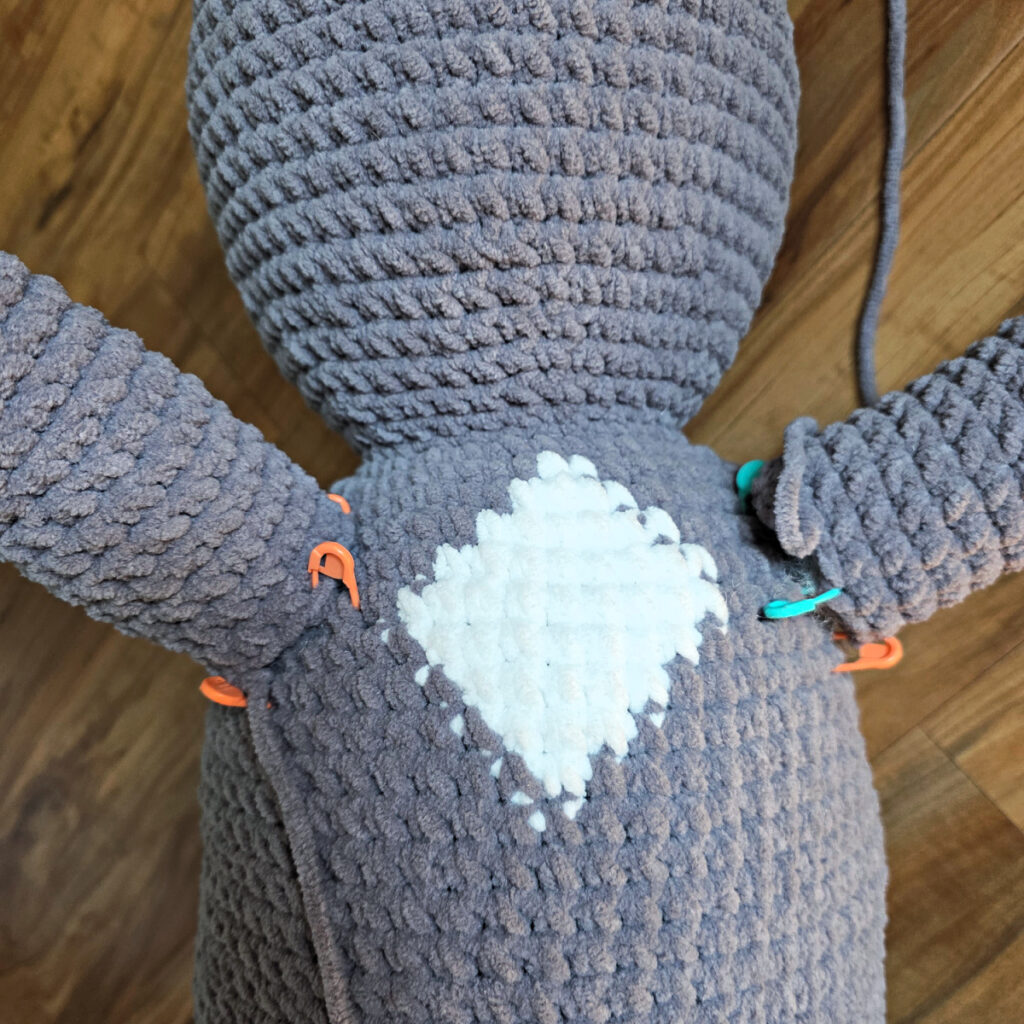
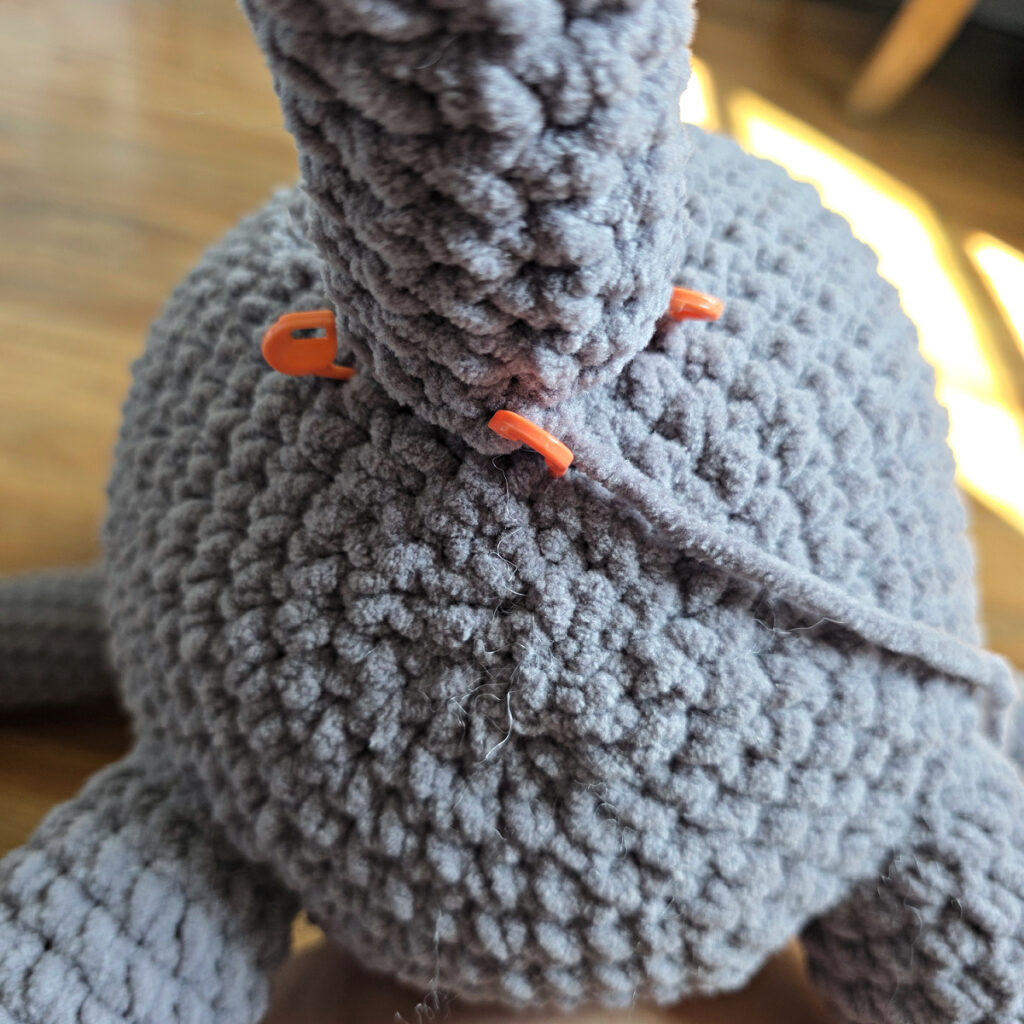
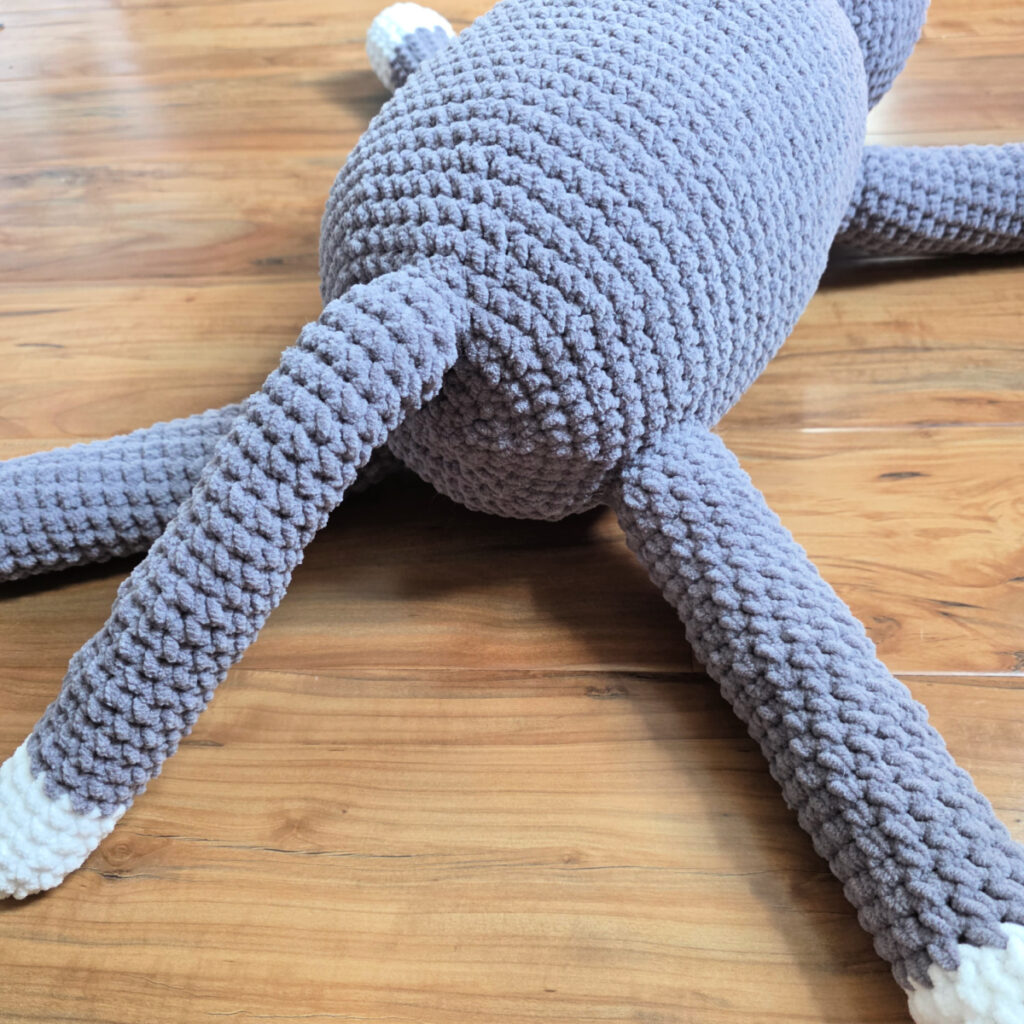
Step Two: Position the cat’s tail as shown in the photos. I positioned mine at the 12 o’clock position, between rounds 34 – 38 of the body. Use a couple locking stitch markers to hold it in place. With tail of yarn and yarn needle, attach the tail to the cat.
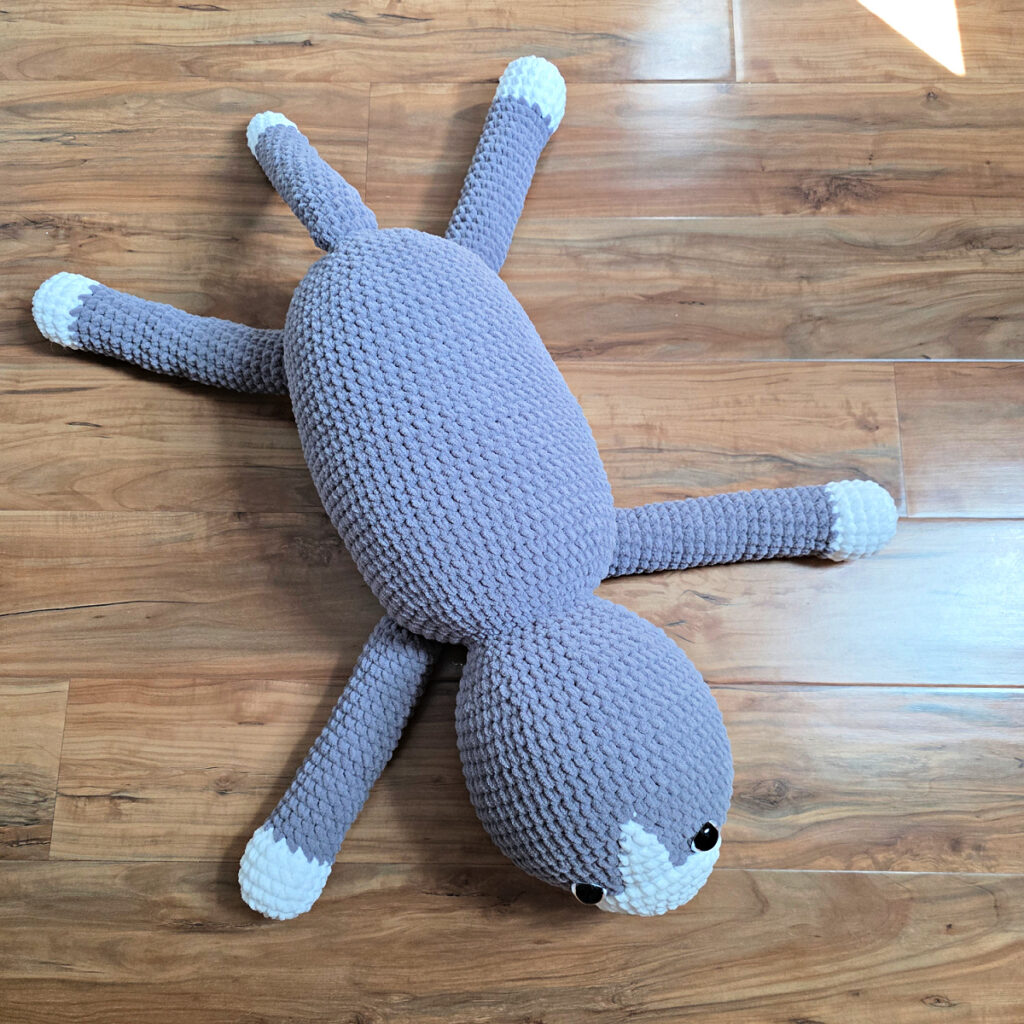
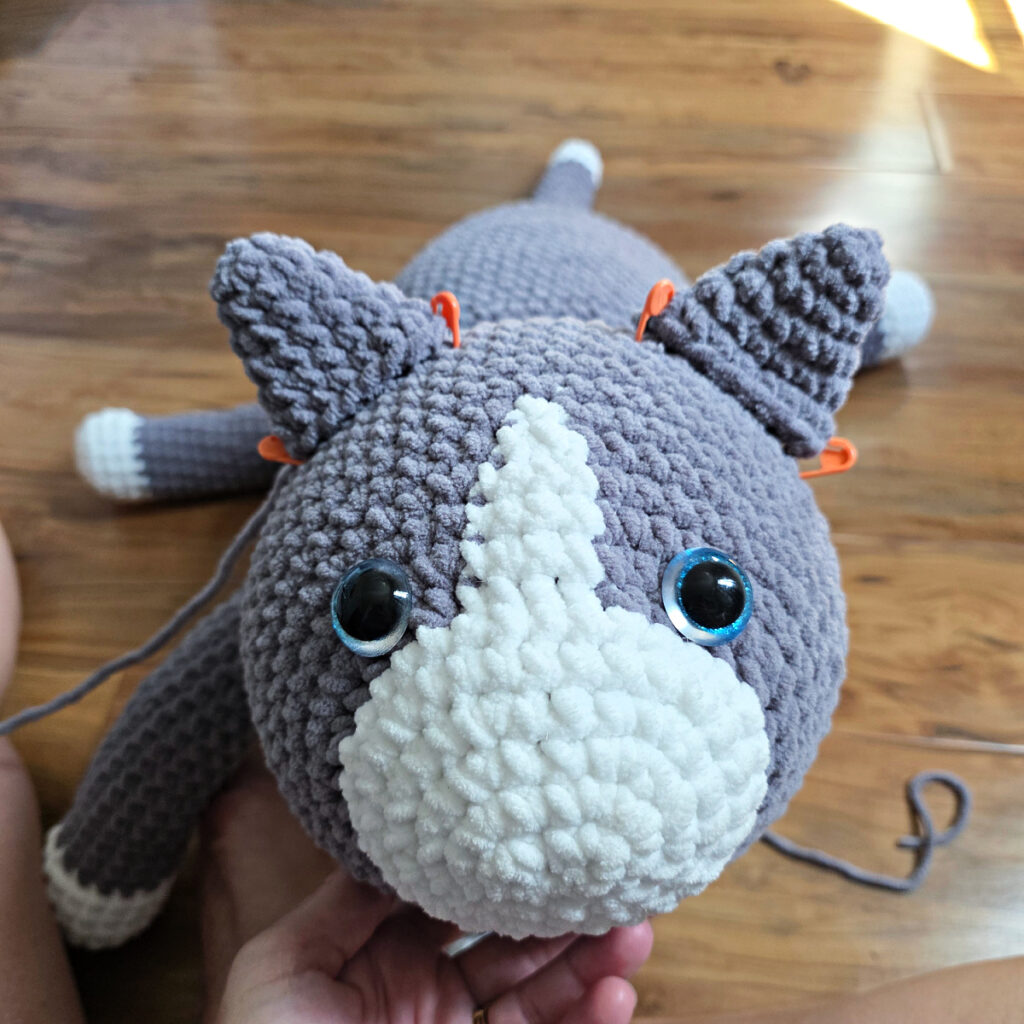
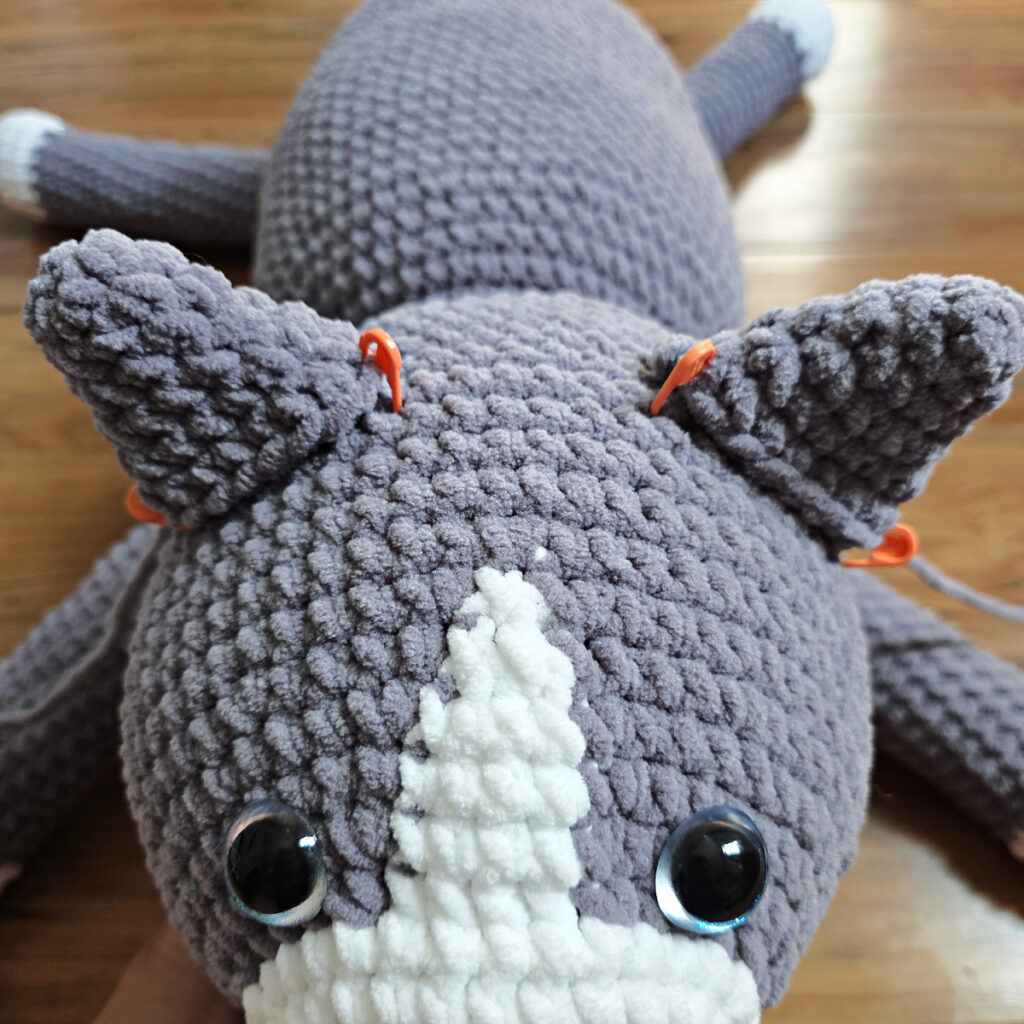
Step Three: Fold the ears so they are flat. Position the cat’s ears as shown in the photos. I attached mine to the 5th & 6th grey rounds after the white section that’s between the cat’s eyes. Position them 6 stitches apart. I sewed each ear onto 7 stitches of the cat’s head.
Use a couple locking stitch markers to hold them in place. With tail of yarn and yarn needle, attach the ear to the cat. Repeat for the second ear.
Continue to Face Shaping.
Face Shaping
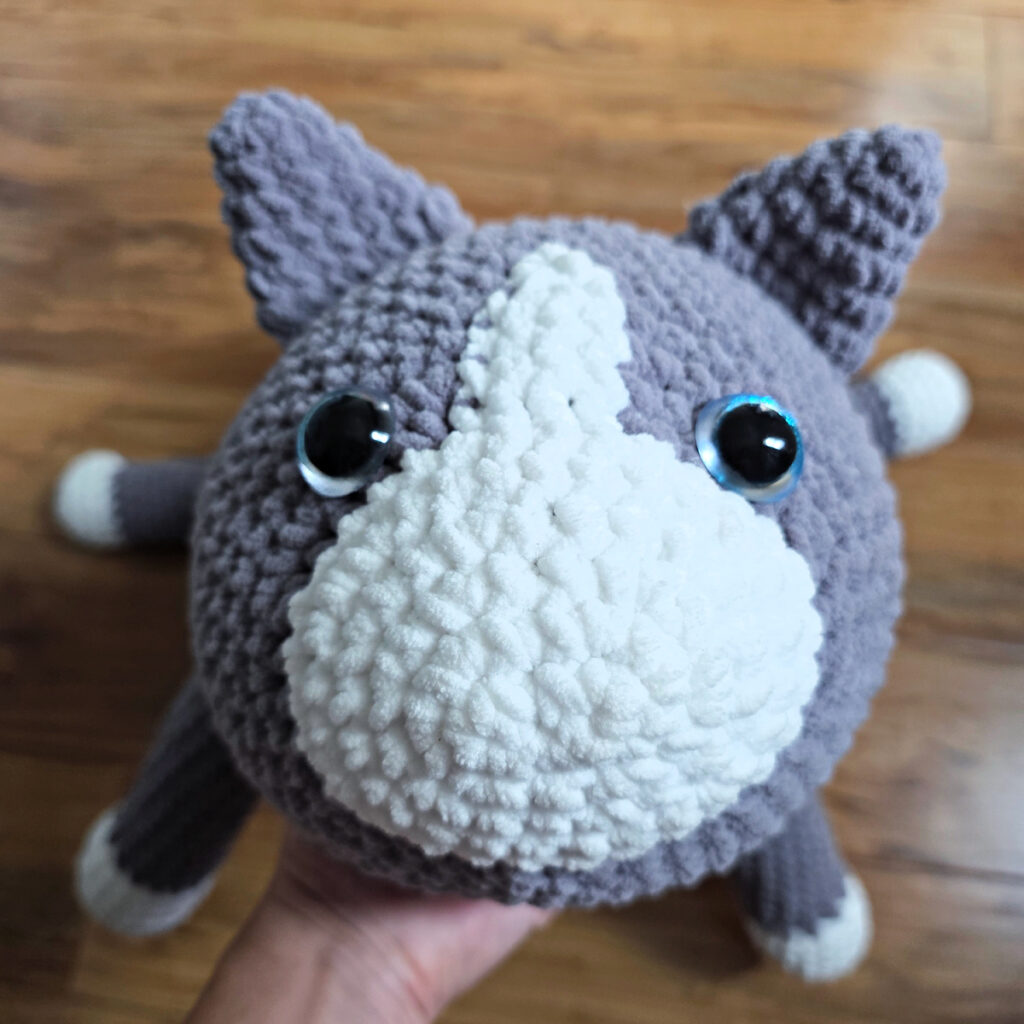
In this section, we’ll use yarn to do a little needle shaping to shape the crocheted cat’s face. First, we’ll create eye sockets. Next, we’ll begin to shape the cat’s muzzle. Lastly, we’ll embroider a small pink nose.
How to Create Cat’s Eye Sockets with Needle Shaping
I’ve created charts with arrows, followed by step-by-step photos for this section.
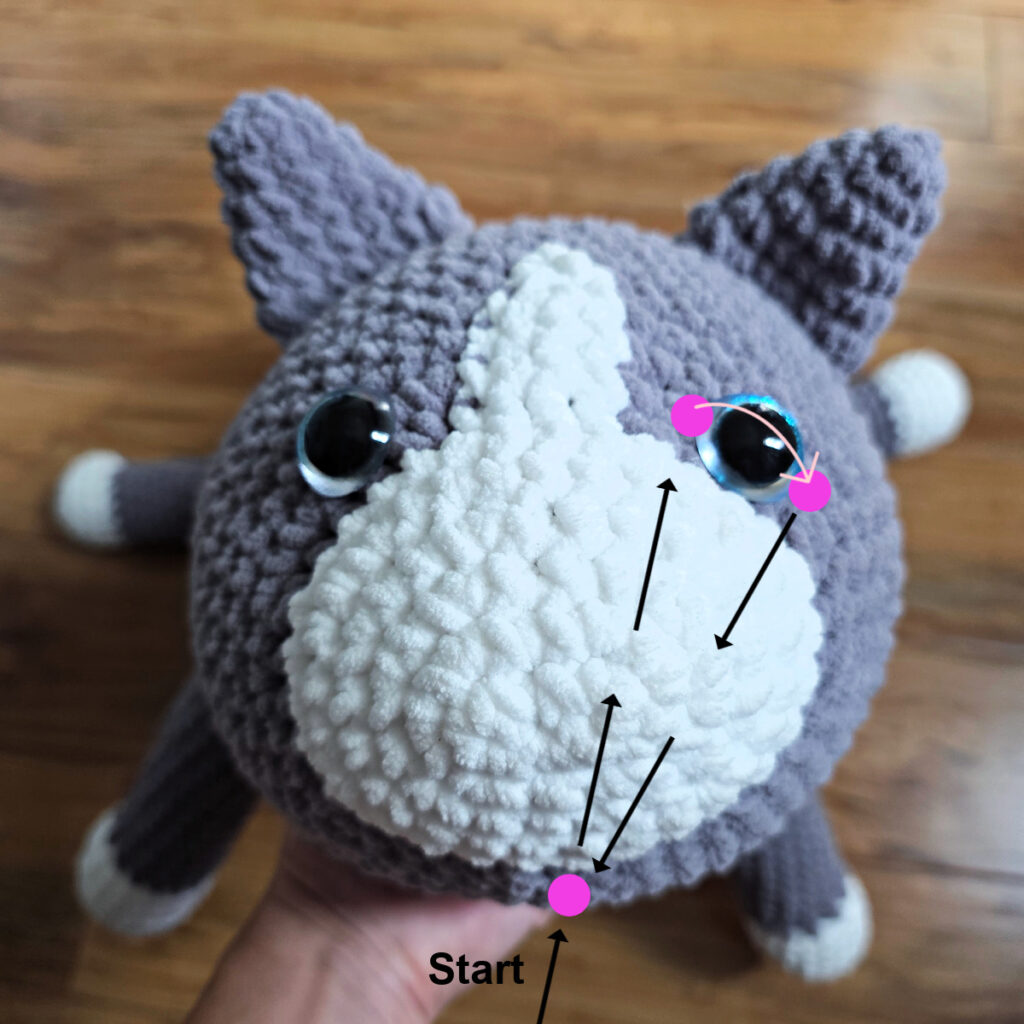
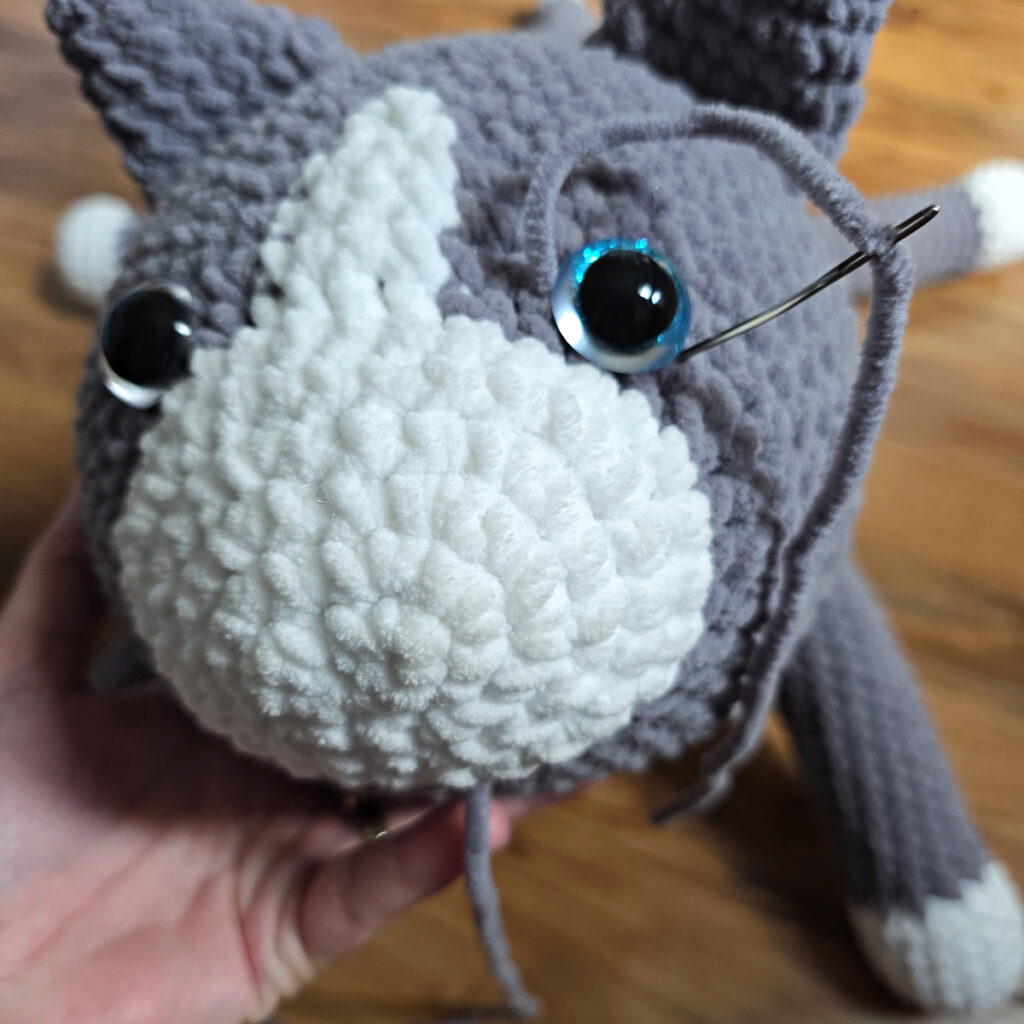
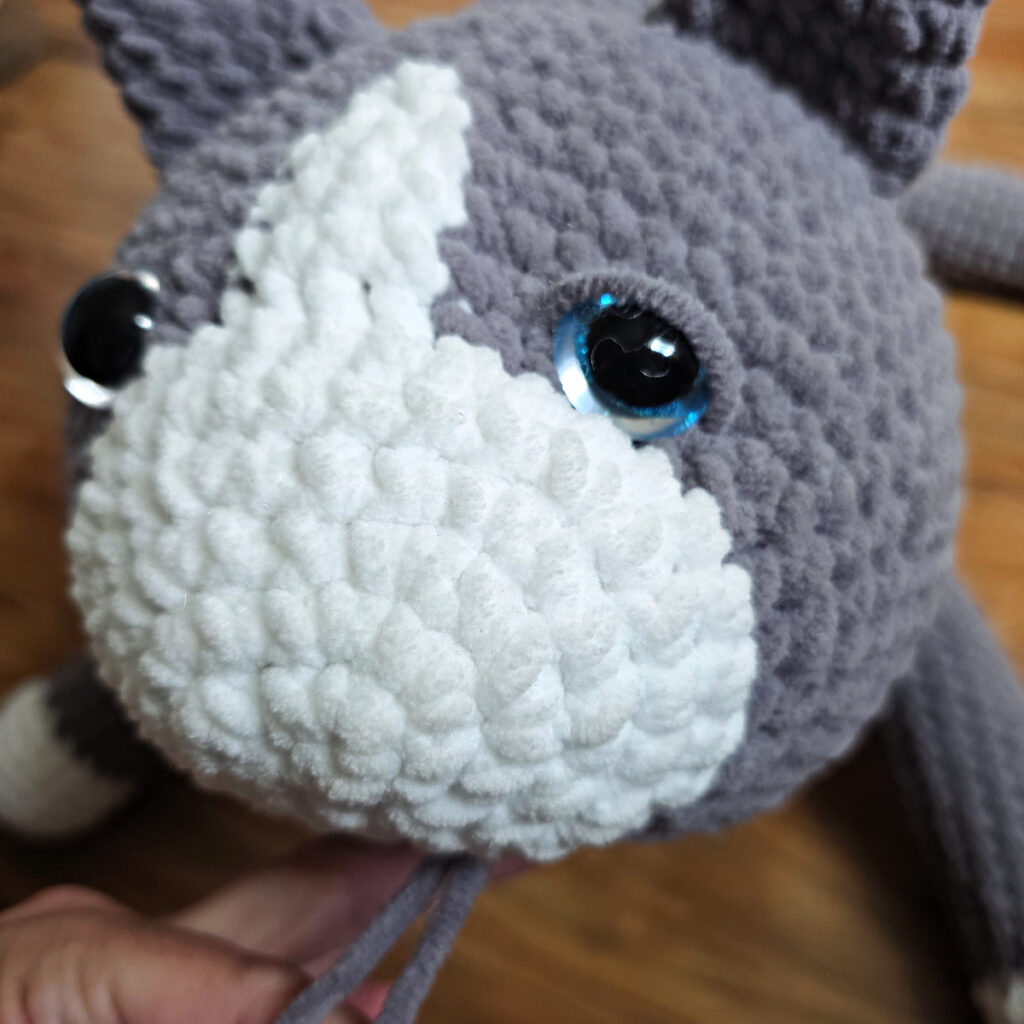
Chart #1 (above, left): Choose two stitches near the bottom center of the cat’s muzzle, in the first round of MC stitches. With a 24″ long piece of MC yarn and a yarn needle, insert the needle into the stitch on the right.
Pass the needle through the cat’s muzzle and come out a stitch on the left side of the right eye (work as close to the eye as possible). Next, insert the needle into a stitch on the right side of the same eye and pass the needle back through the cat’s muzzle and come out the same stitch you started in.
See the yarn draped over the eye (photo above right), push that loop of yarn to the bottom of the eye, under the eye.
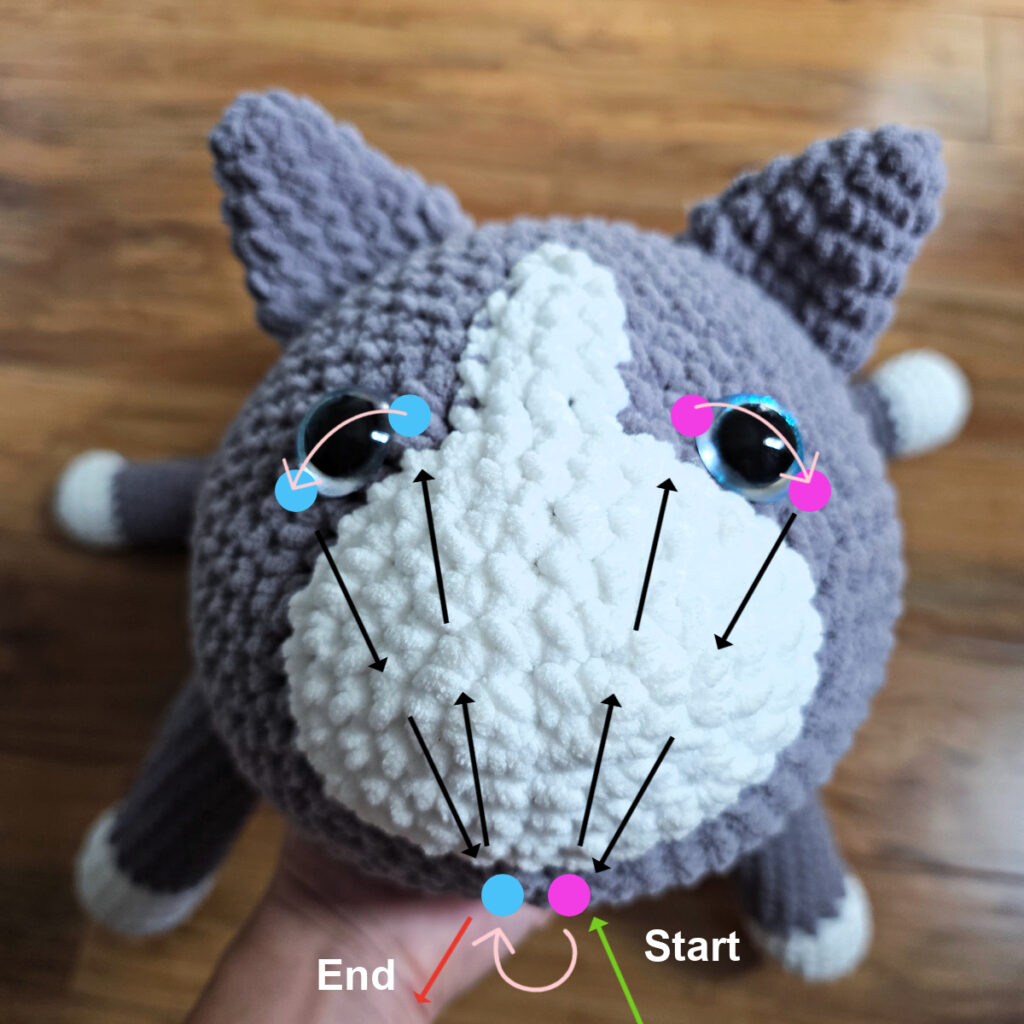
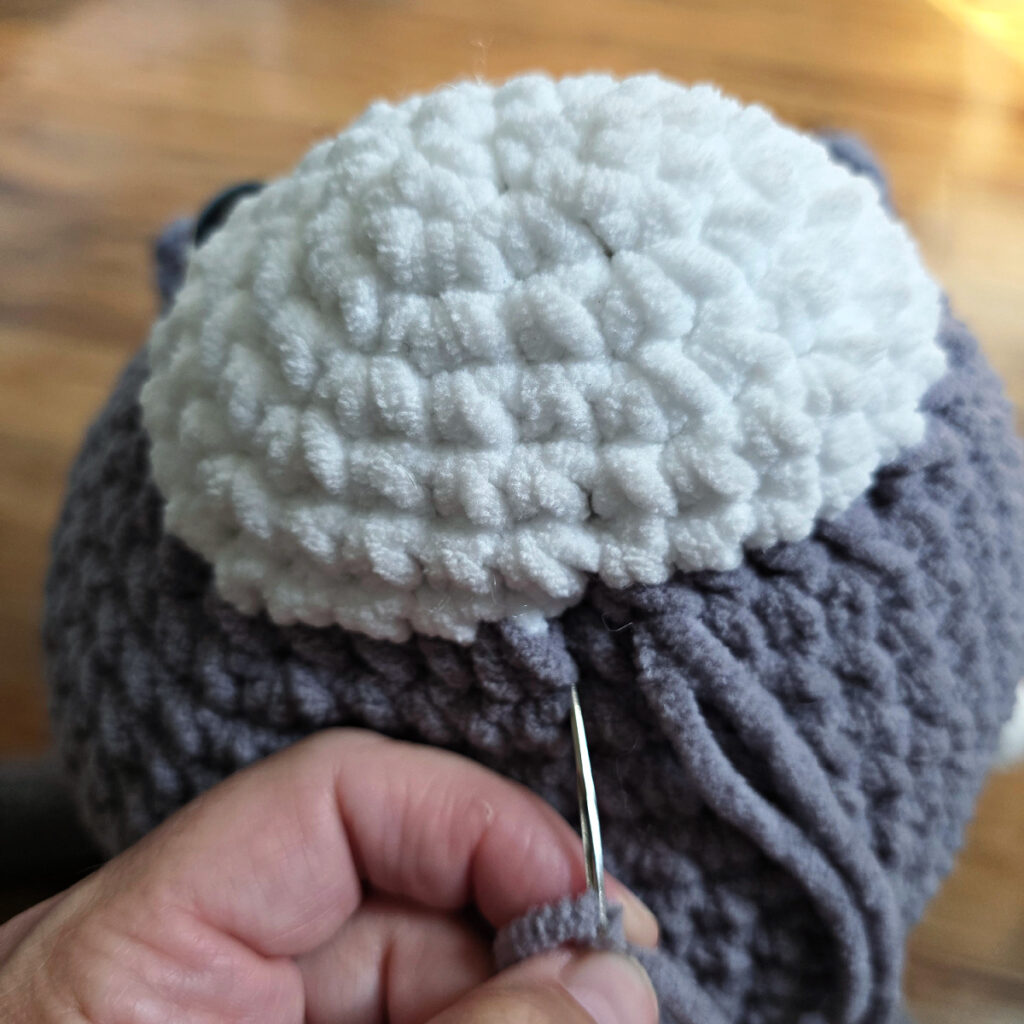
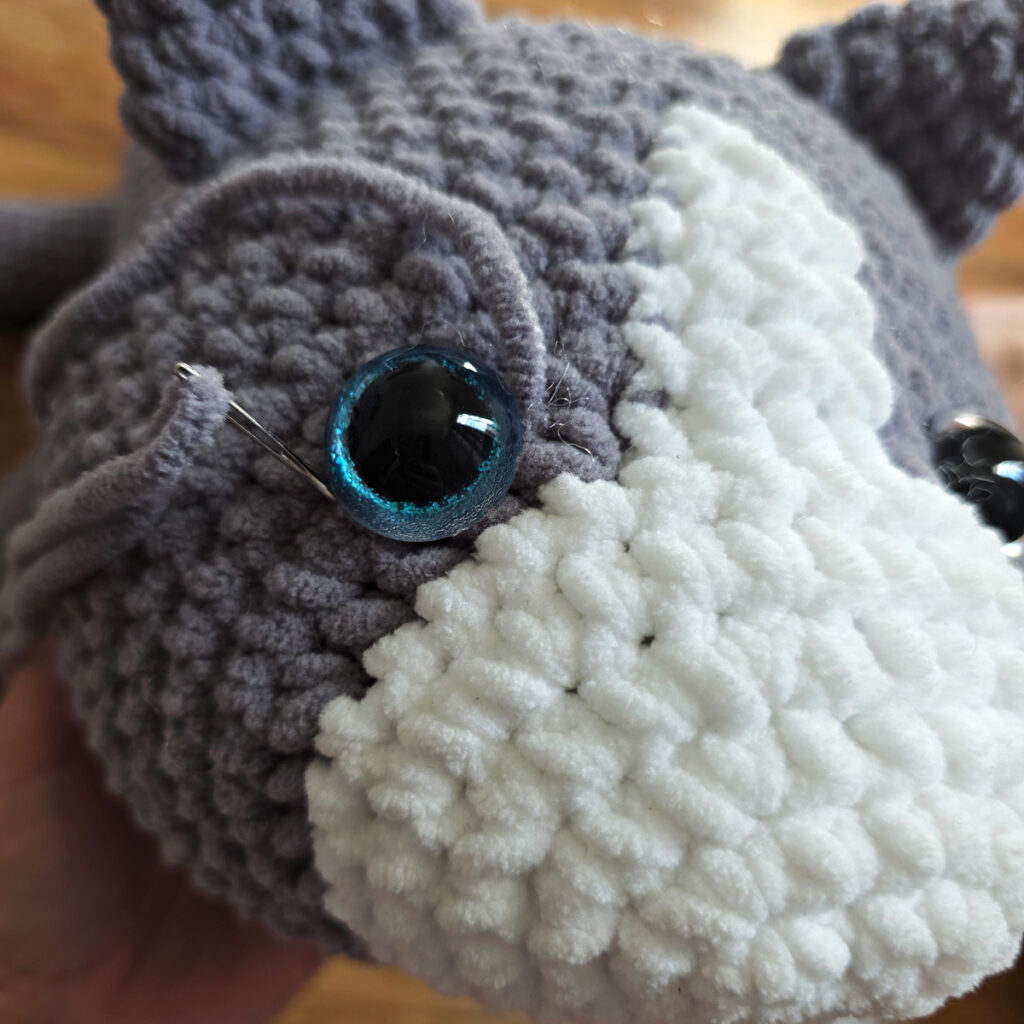
Chart #2 (above, left): Continue with the same yarn and yarn needle. Insert the yarn needle into the stitch to the left, under the cat’s muzzle.
Pass the needle through the cat’s muzzle and come out a stitch on the right side of the left eye (work as close to the eye as possible). Next, insert the needle into a stitch on the left side of the same eye and pass the needle back through the cat’s muzzle and come out the same stitch at the bottom of the muzzle.
Push the loop of yarn that is draped over the eye to the bottom of the eye, underneath it.
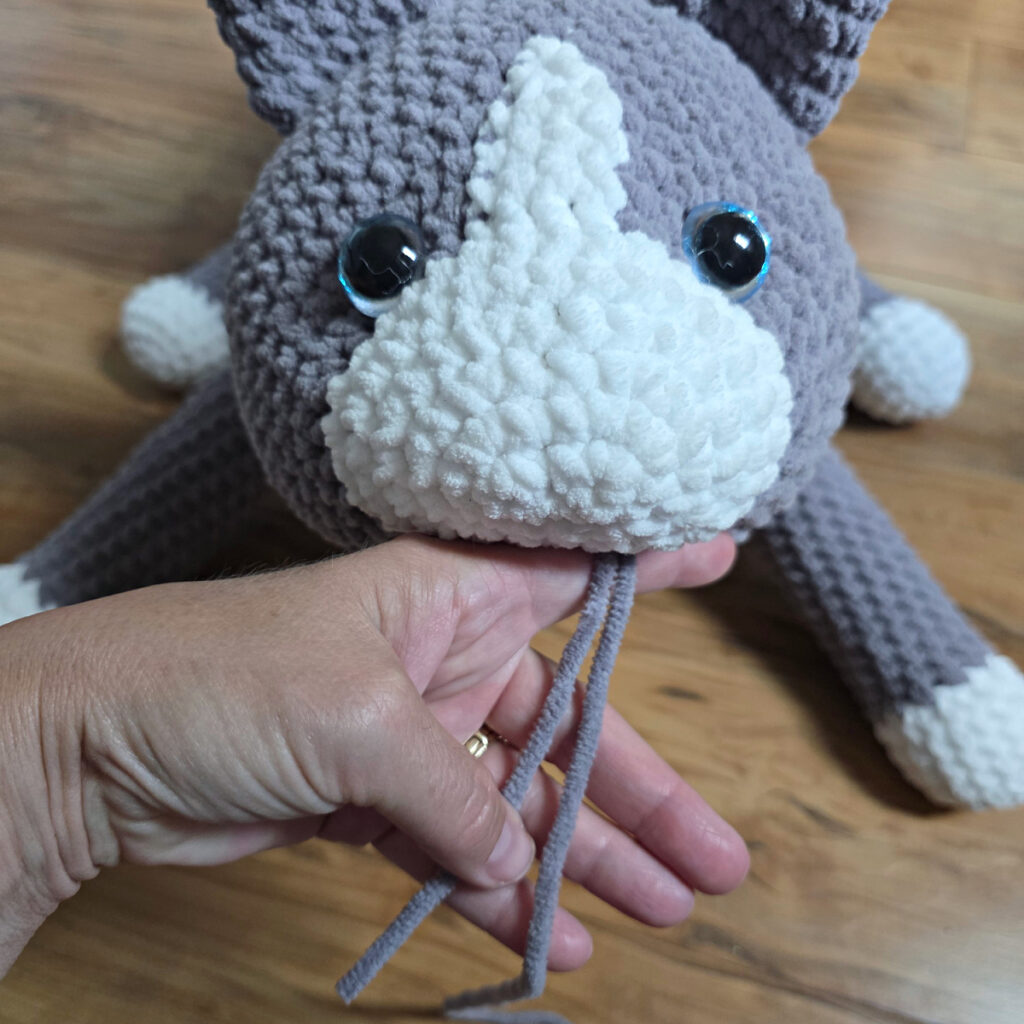
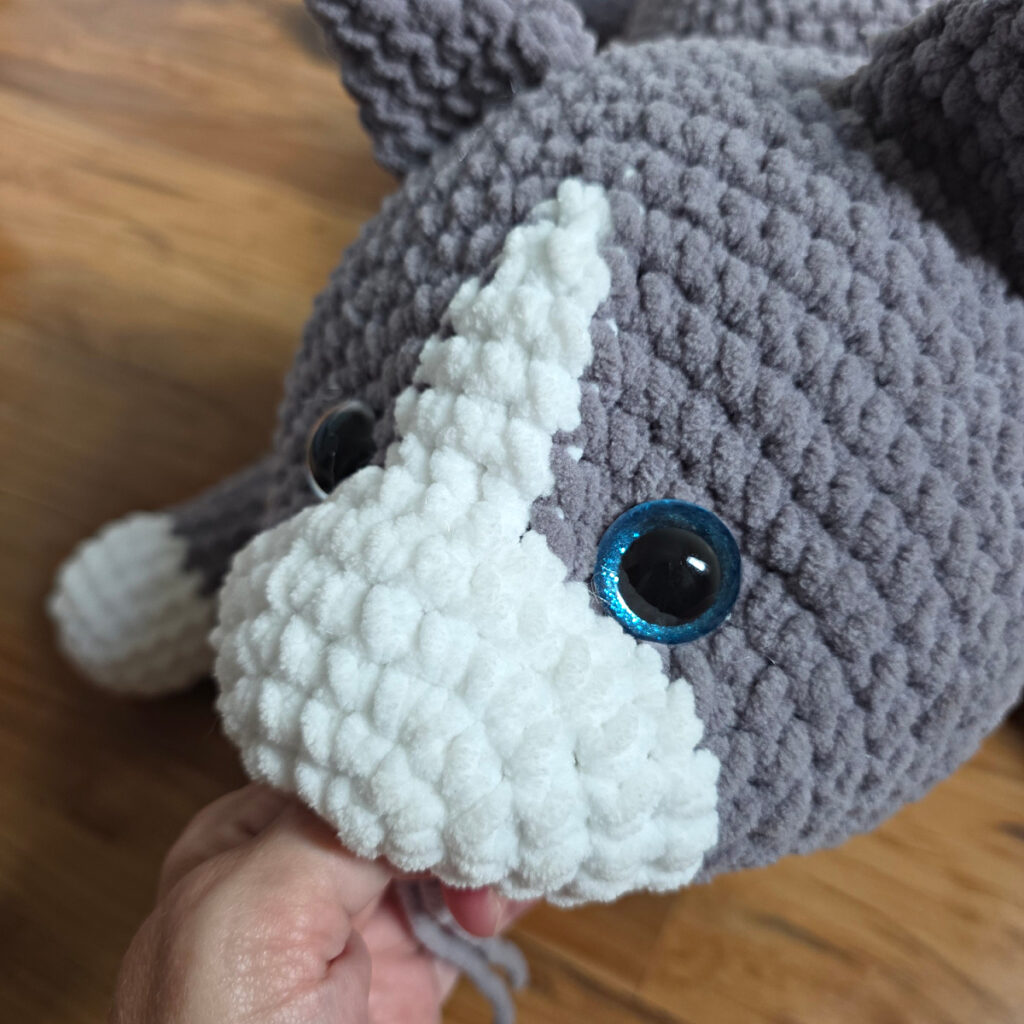
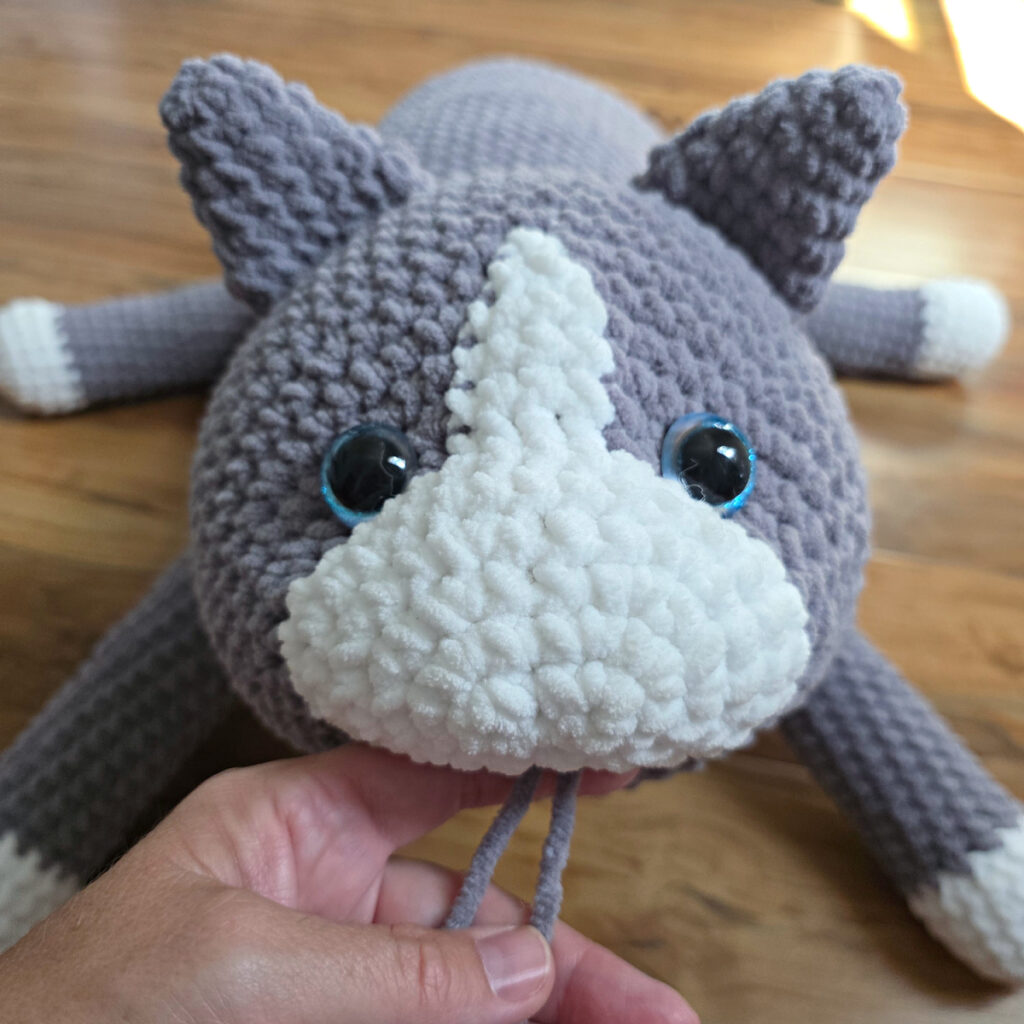
Pull on both ends of yarn to create the cat’s eye sockets. Here you can make your cat’s eye sockets deeper or more shallow, it’s your choice. Once you’re satisfied with your cat’s eye sockets, secure and weave in the tails of yarn.
Continue on to How to Needle Shape a Crochet Cat’s Muzzle.
How to Needle Shape a Crochet Cat’s Muzzle
Needle shaping the cat’s muzzle is done using the same technique as needle shaping the cat’s eye sockets.
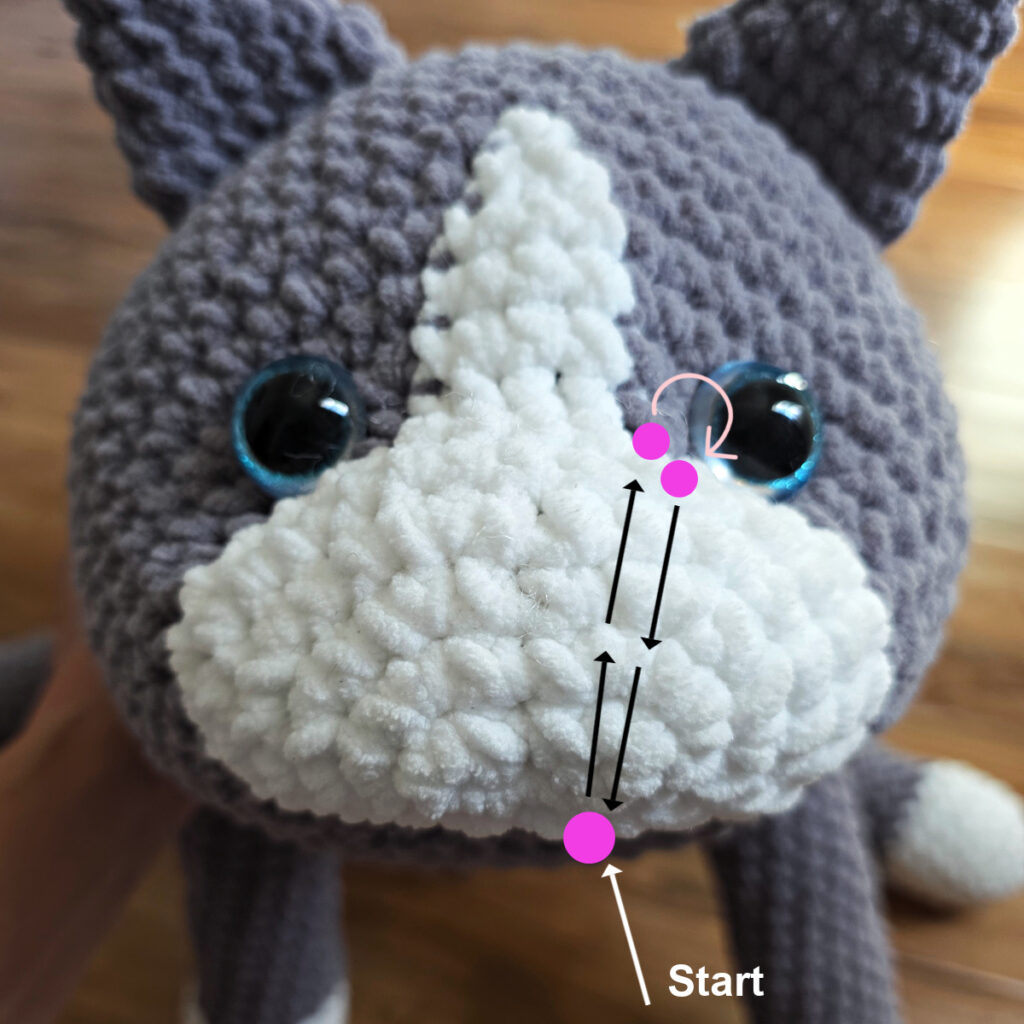
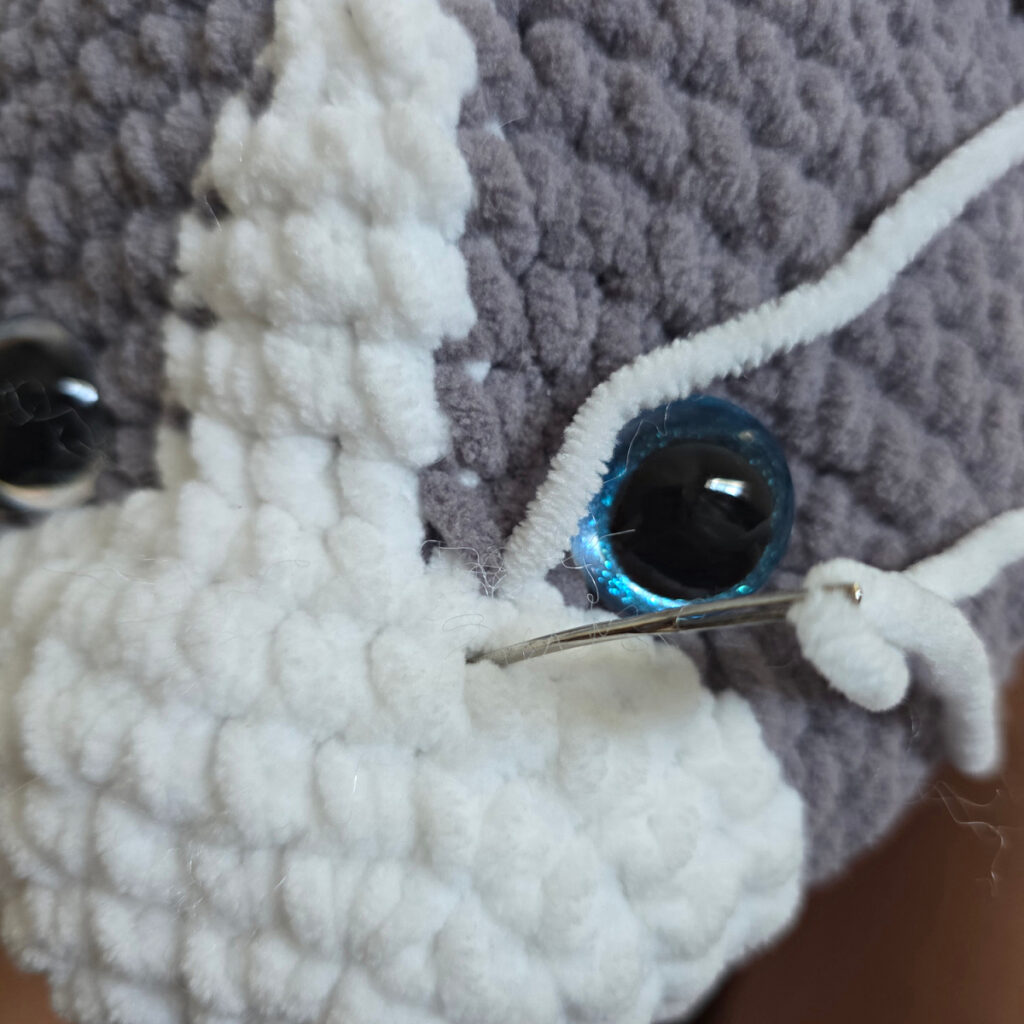
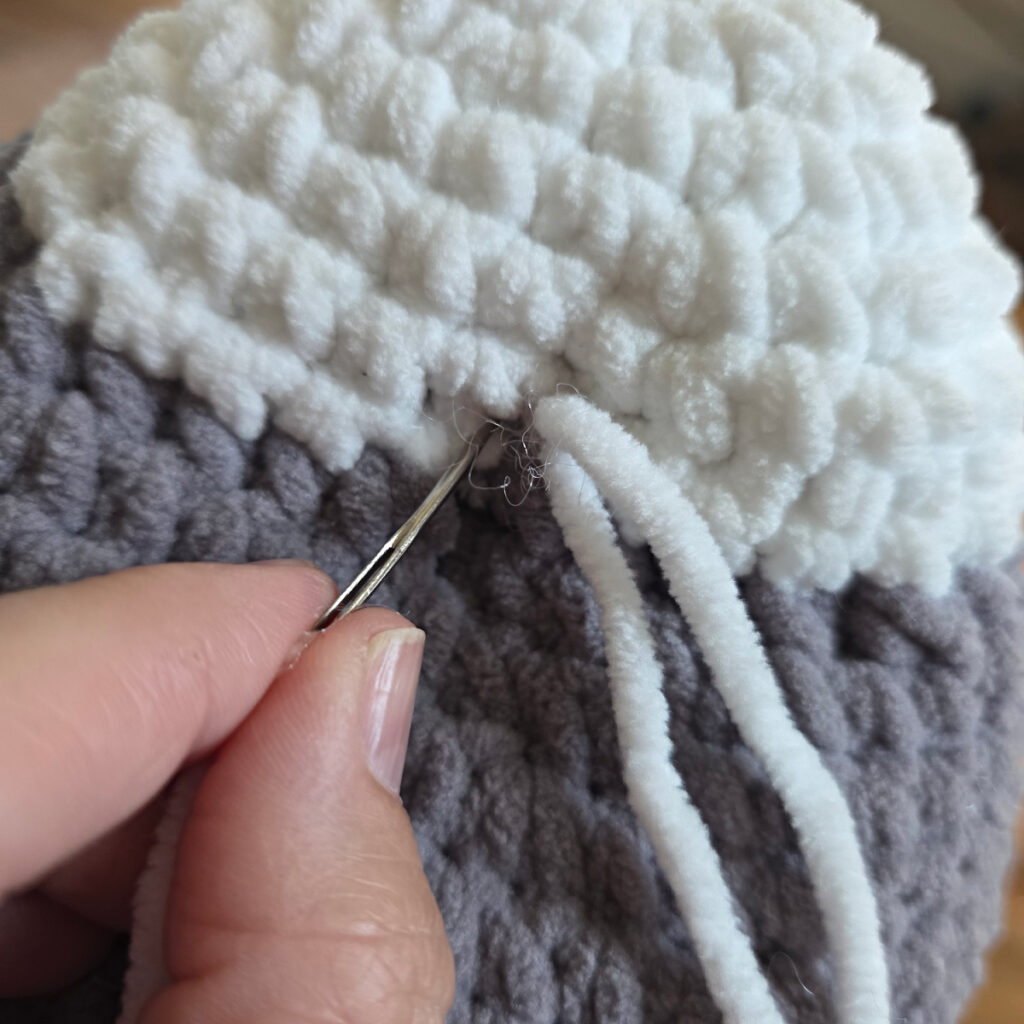
Chart #3 (above, left): Choose two stitches near the bottom center of the cat’s muzzle, in the last round of CC stitches. With a 24″ long piece of CC yarn and a yarn needle, insert the needle into the stitch on the right.
Pass the needle through the cat’s muzzle and come out a stitch in the last round of CC, near the bottom of the cat’s right eye (as shown in the photo above center). Next, insert the needle into the stitch just below the stitch you came up through and pass the needle back through the cat’s muzzle and come out the same stitch you started in.
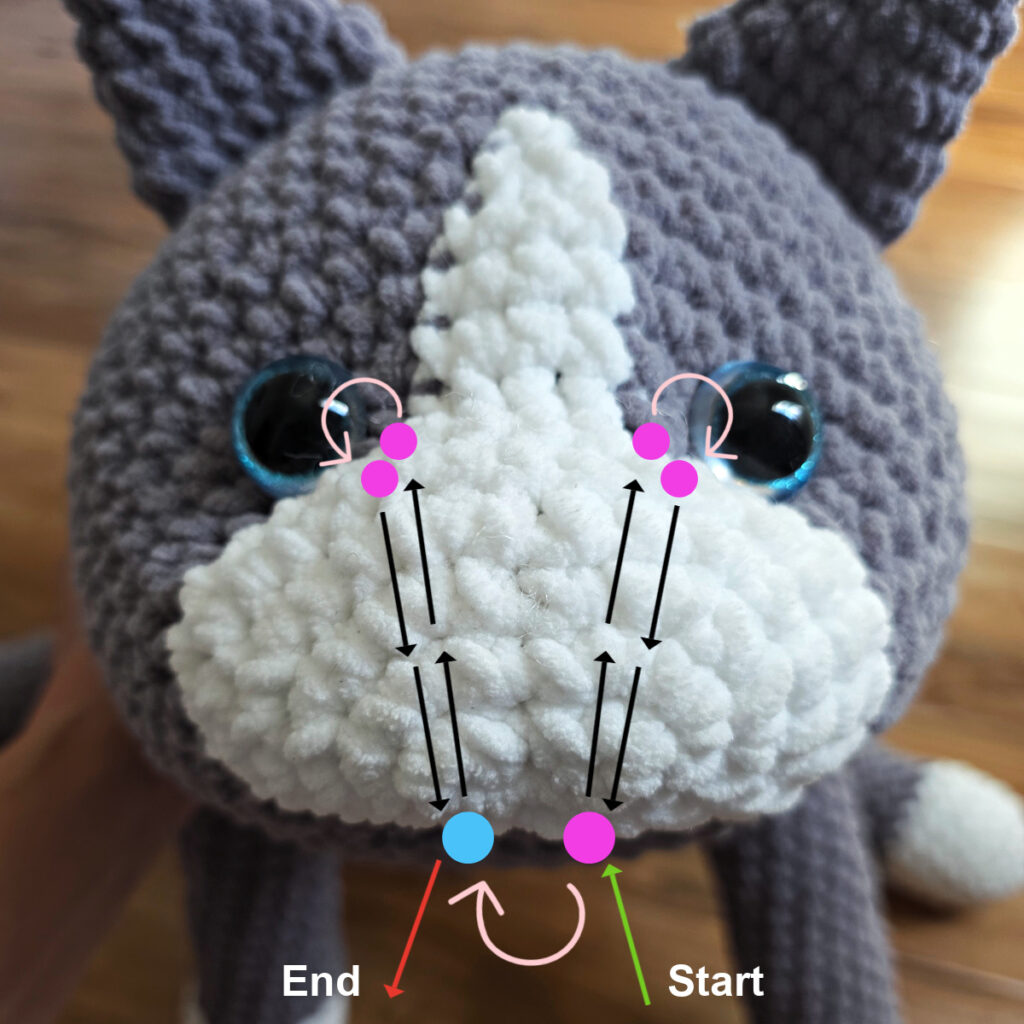
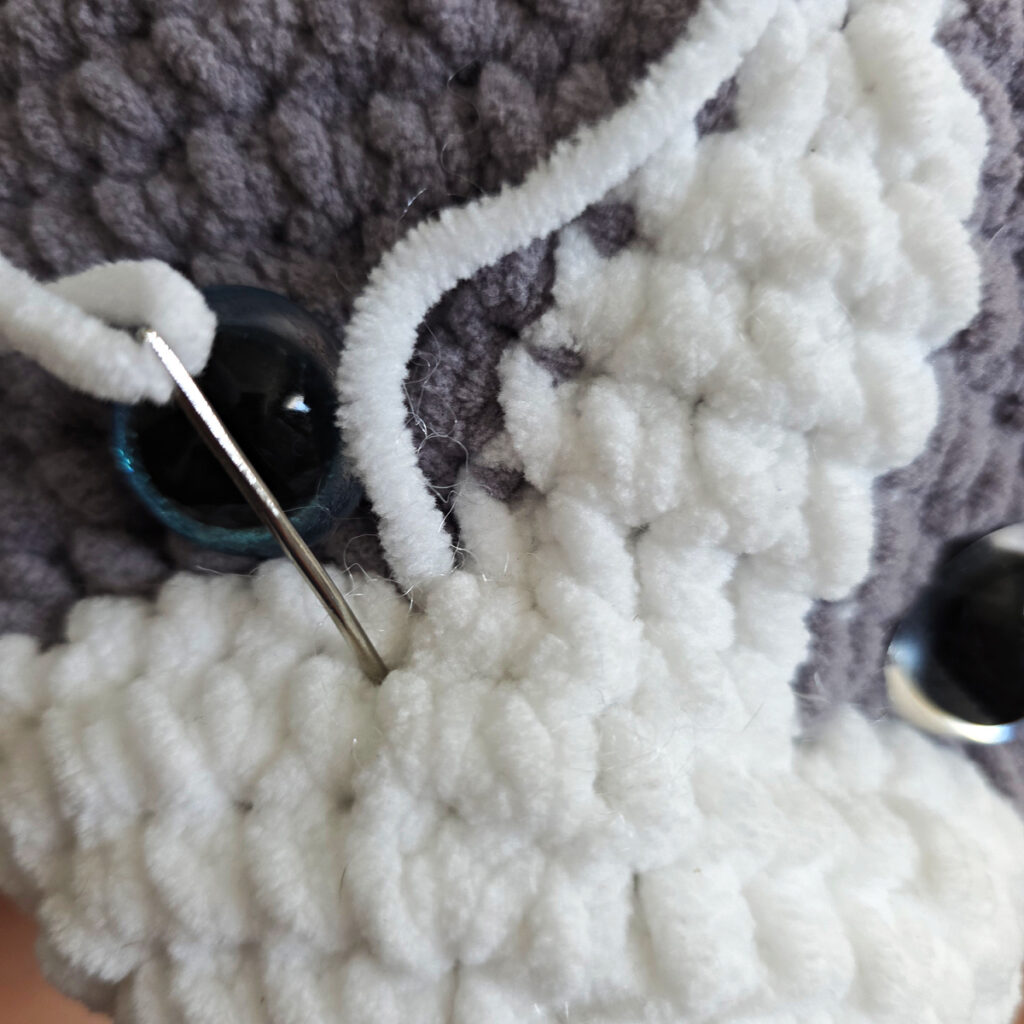
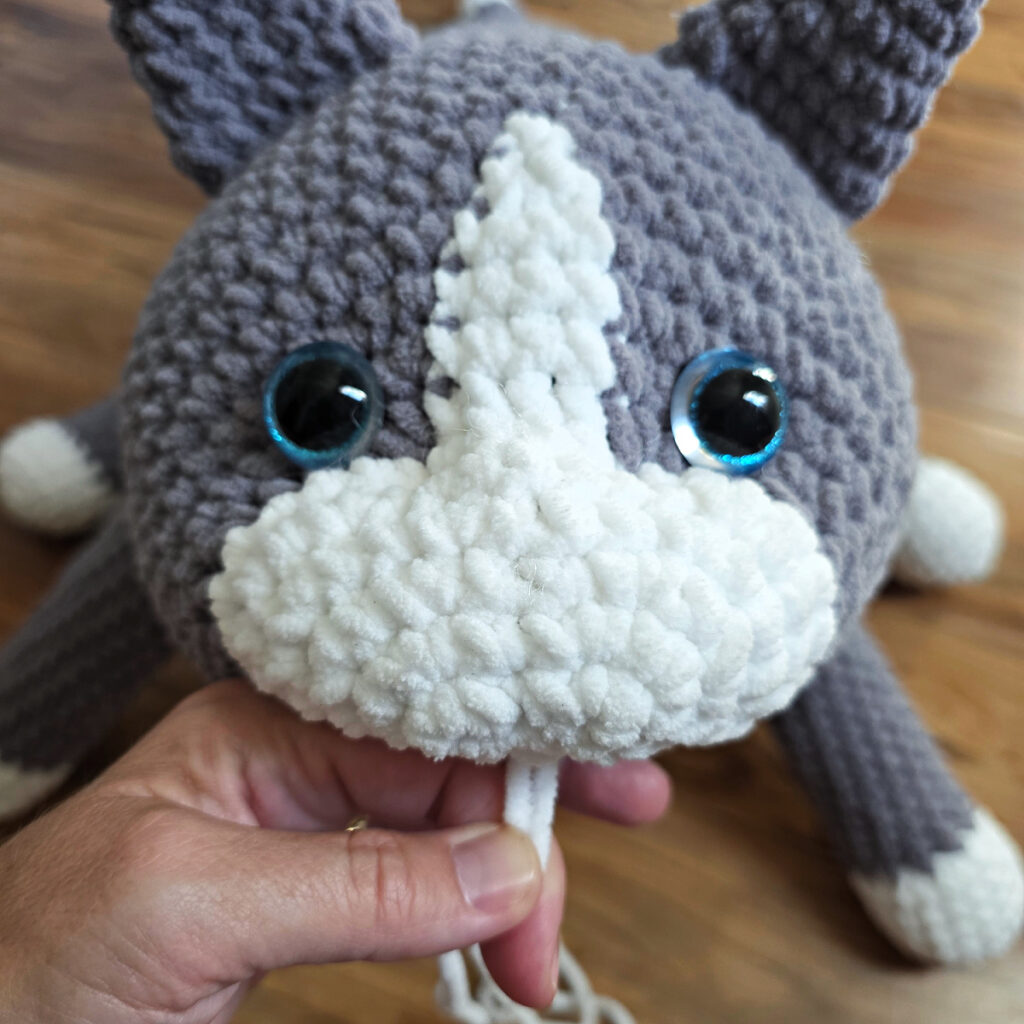
Chart #4 (above, left): Continue with the same yarn and yarn needle. Insert the yarn needle into the stitch to the left, under the cat’s muzzle.
Pass the needle through the cat’s muzzle and come out a stitch in the last round of CC, near the bottom of the cat’s left eye (as shown in the photo above center). Next, insert the needle into the stitch just below the stitch you came up through and pass the needle back through the cat’s muzzle and come out the same stitch you started in.
Gently pull on both tails of yarn and watch the top of the muzzle flatten out. Pull just enough to slightly flatten the top of the muzzle, but not too much that makes it cinch inward and creates dimples. Do not secure and weave in ends yet. Continue on to the next step.
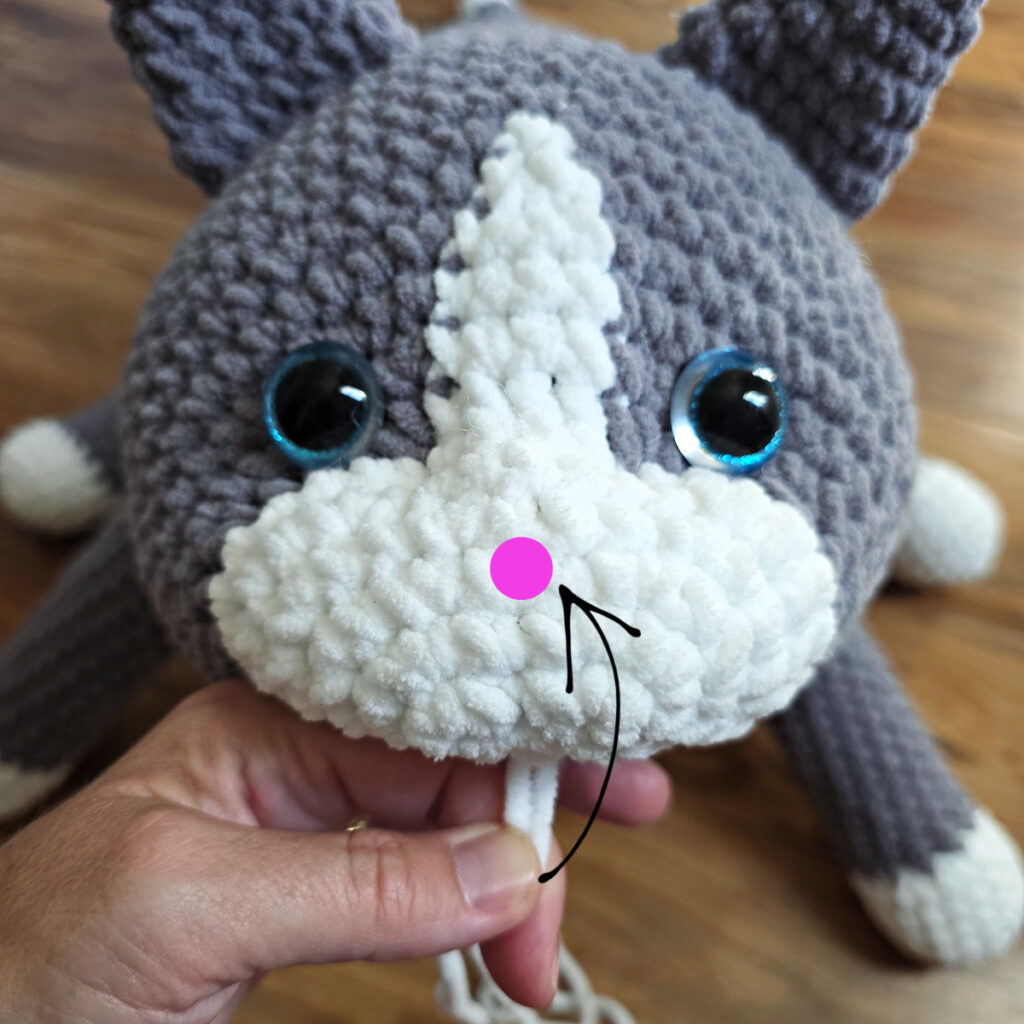
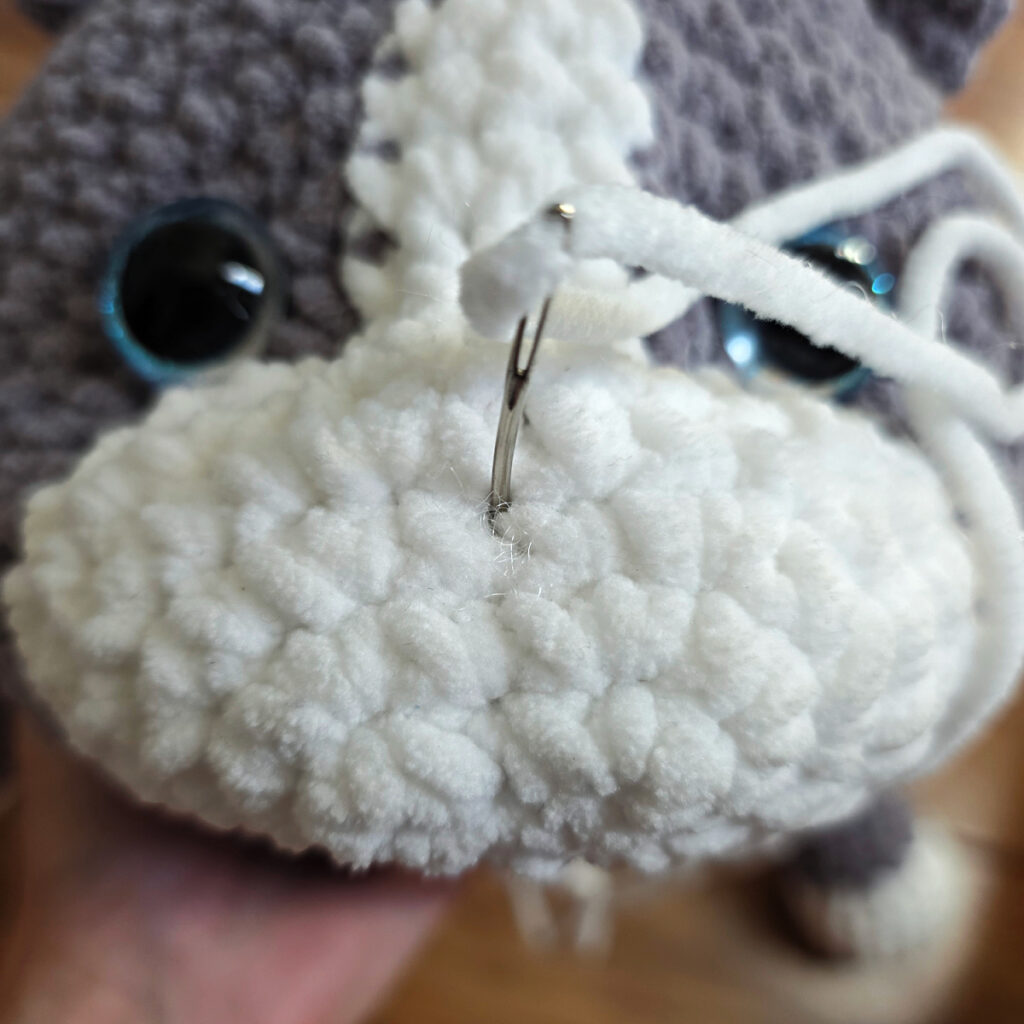
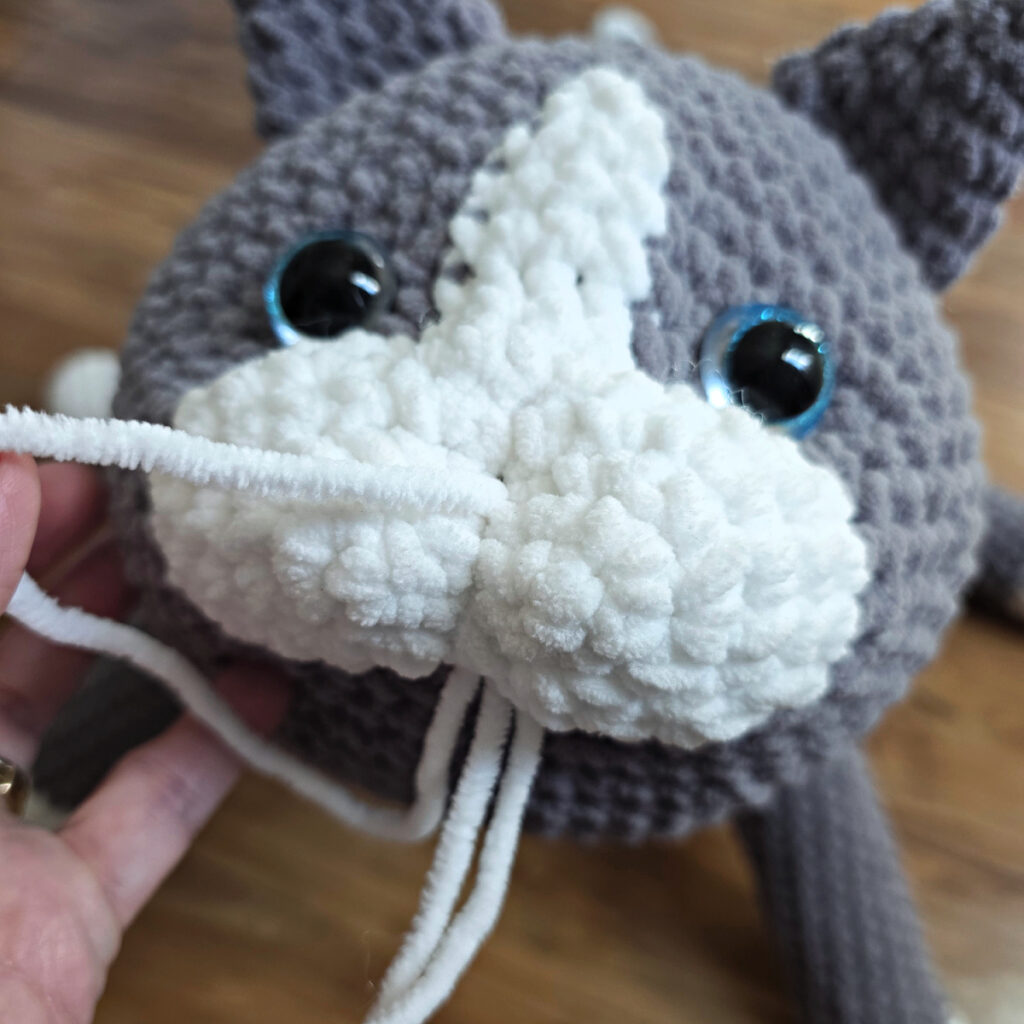
Chart #5 (above, left): Continue with the same yarn and yarn needle. Insert the yarn needle into the stitch in the center of the muzzle as shown in the photos above (this is in a Rnd 3 stitch). Pass the needle through the muzzle and come back out the bottom stitch you started in.
Pull the yarn and watch as the two cheeks start to form. I like to repeat this step once again to make sure everything is nice and secure.
After you’re satisfied with the cat’s cheeks, secure the yarn tails and weave in ends.
Continue on to How to Embroider a Cat’s Nose.
How to Embroider a Cat’s Nose
In this section, we’ll use 2 yards of pink worsted weight yarn and a yarn needle to embroider a nose on the crocheted cat.
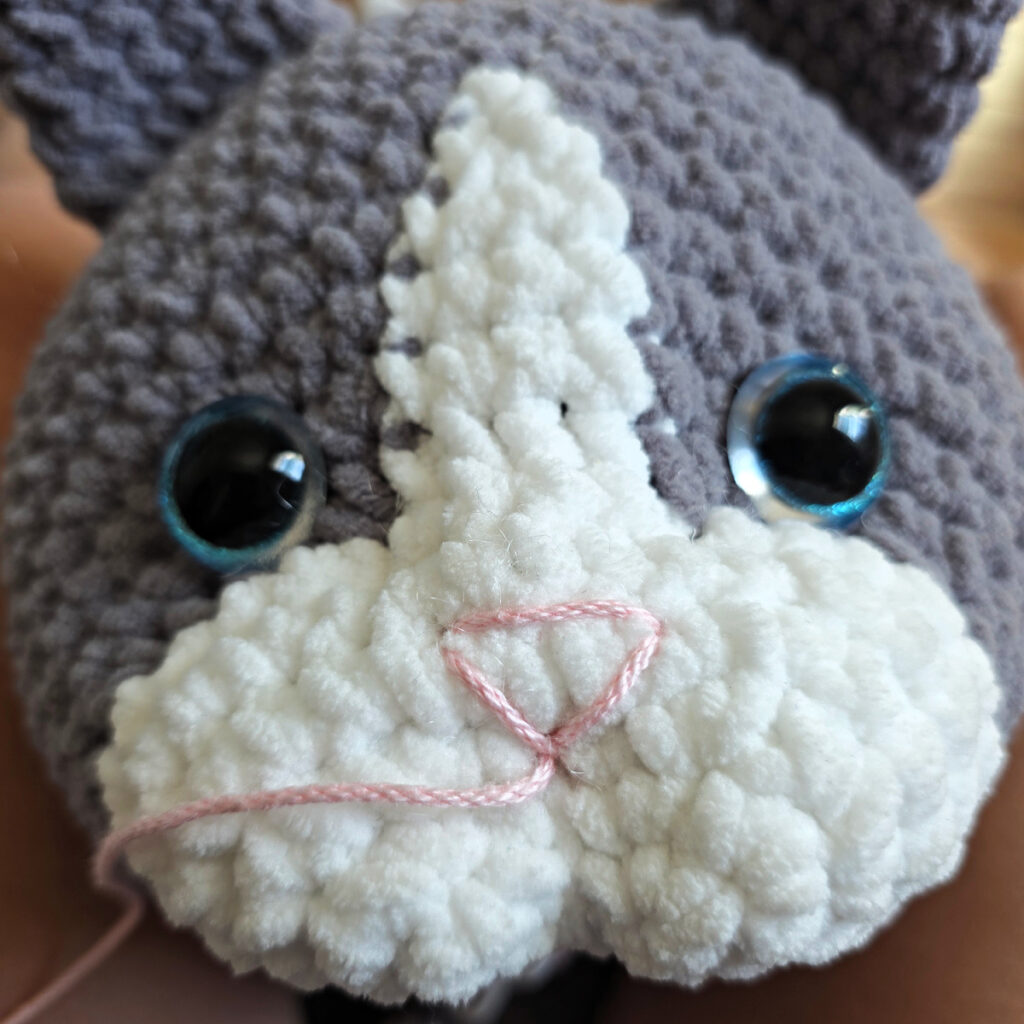
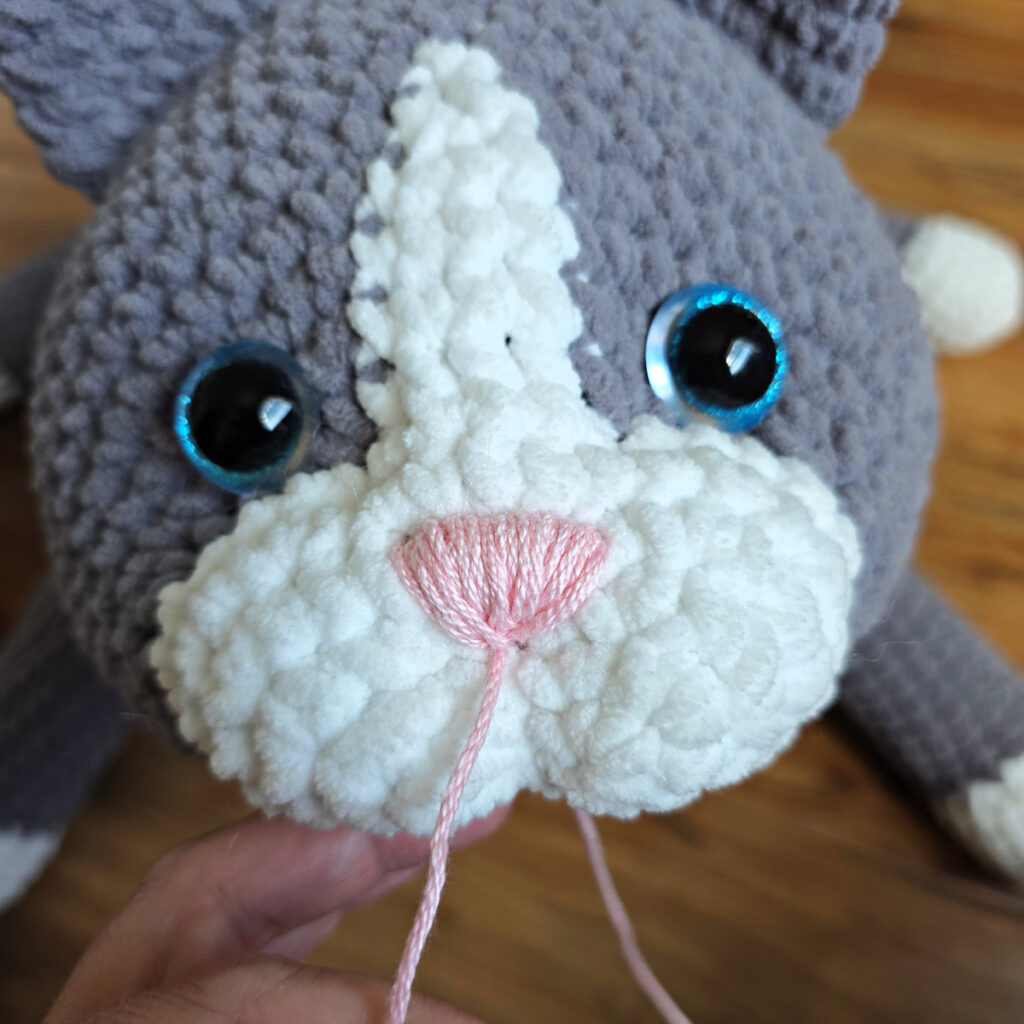
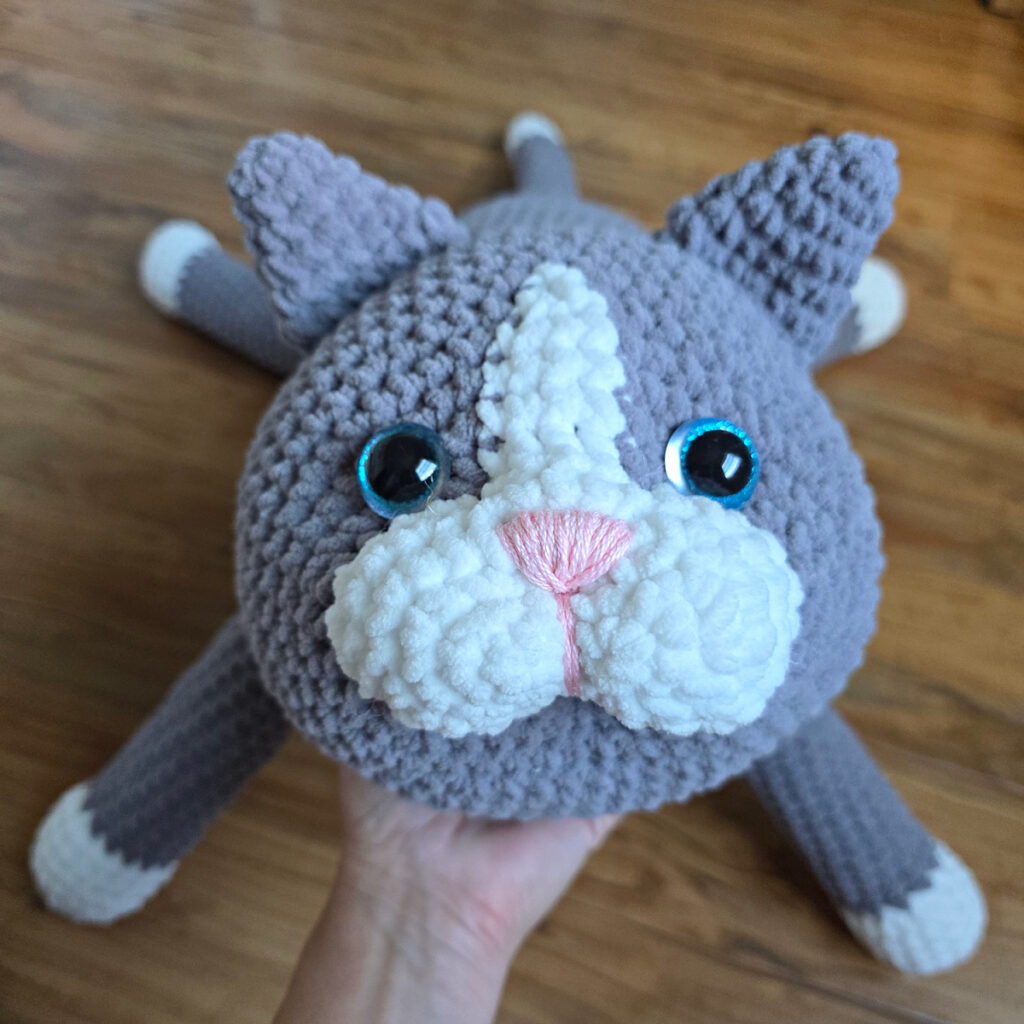
First, using a yarn needle and pink yarn, create a triangle to outline the cat’s nose. Place the bottom point of the nose in the same stitch noted by the pink dot in chart #5 above. Create a triangle that is approximately 1″ W x 3/4″ H.
Fill in the nose by bringing the yarn up through the face at the top edge of the triangle and down through the bottom point. Continue in this manner until the triangle is completely filled in.
Lastly, wrap the pink yarn over the white yarn that previously separated the muzzle into cheeks. Secure the yarn and weave in ends. Your amigurumi crochet cat is complete!
I MADE IT! NOW WHAT?
Pin this post!: Save this crochet cat pattern to your Pinterest boards so that you can come back and make it again.
Leave a comment below: We love to hear your feedback.
Share Your Finished Projects on Facebook or Instagram: I love to see your finished projects! Share with us on social media and tag me @acrochetedsimplicity or use the hashtag #ACrochetedSimplicity so I can find your posts.
Join us in the Facebook Community Group!
Come share your finished projects with us in the A Crocheted Simplicity Crochet Community Group on Facebook. Join us for fun community events such as crochet alongs, join in on crochet conversations, ask questions, get advice, and share your love for crochet!