Chic Cabled Crochet Ear Warmer Pattern
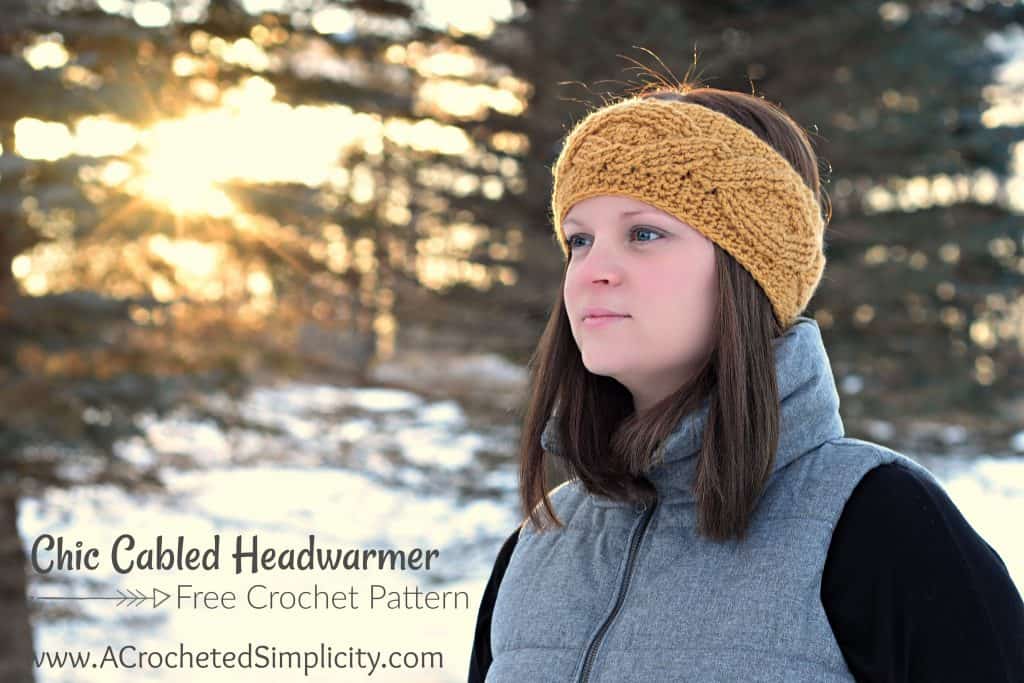
Looking for a stylish way to keep your ears warm when the temperatures drop? The Chic Cabled Crochet Ear Warmer is the perfect blend of cozy comfort and timeless style! Featuring beautiful cable texture and a classic design, this cabled crochet ear warmer is a wonderful accessory for chilly fall mornings, winter walks, and everything in between.
Whether you’re heading out for a crisp autumn stroll, enjoying a winter adventure, or looking for a cute alternative to a bulky hat, this cabled crochet headband is a lovely addition to your cold-weather wardrobe. Its elegant texture gives it a polished, boutique-inspired look that pairs beautifully with your favorite sweaters, scarves, and coats.
You’ll find the free crochet ear warmer pattern in the post below, or you can find an ad-free printable PDF (that includes all photo tutorials) on Ravelry, or Etsy (aff).
Why You’ll Love the Chic Cabled Crochet Ear Warmer
There are so many reasons to add this crochet ear warmer pattern to your project list!
- Beautiful cable texture: Crochet cables create a classic, dimensional look that adds visual interest to this stylish accessory.
- Cozy and practical: Keep your ears warm while leaving the top of your head uncovered.
- Timeless style: The chic design works beautifully with casual outfits and dressier winter looks.
- A thoughtful handmade gift: Crochet ear warmers are wonderful gifts for birthdays, holidays, stocking stuffers, and winter care packages.
- A versatile accessory: Wear it on chilly walks, outdoor adventures, or whenever you need a little extra warmth.
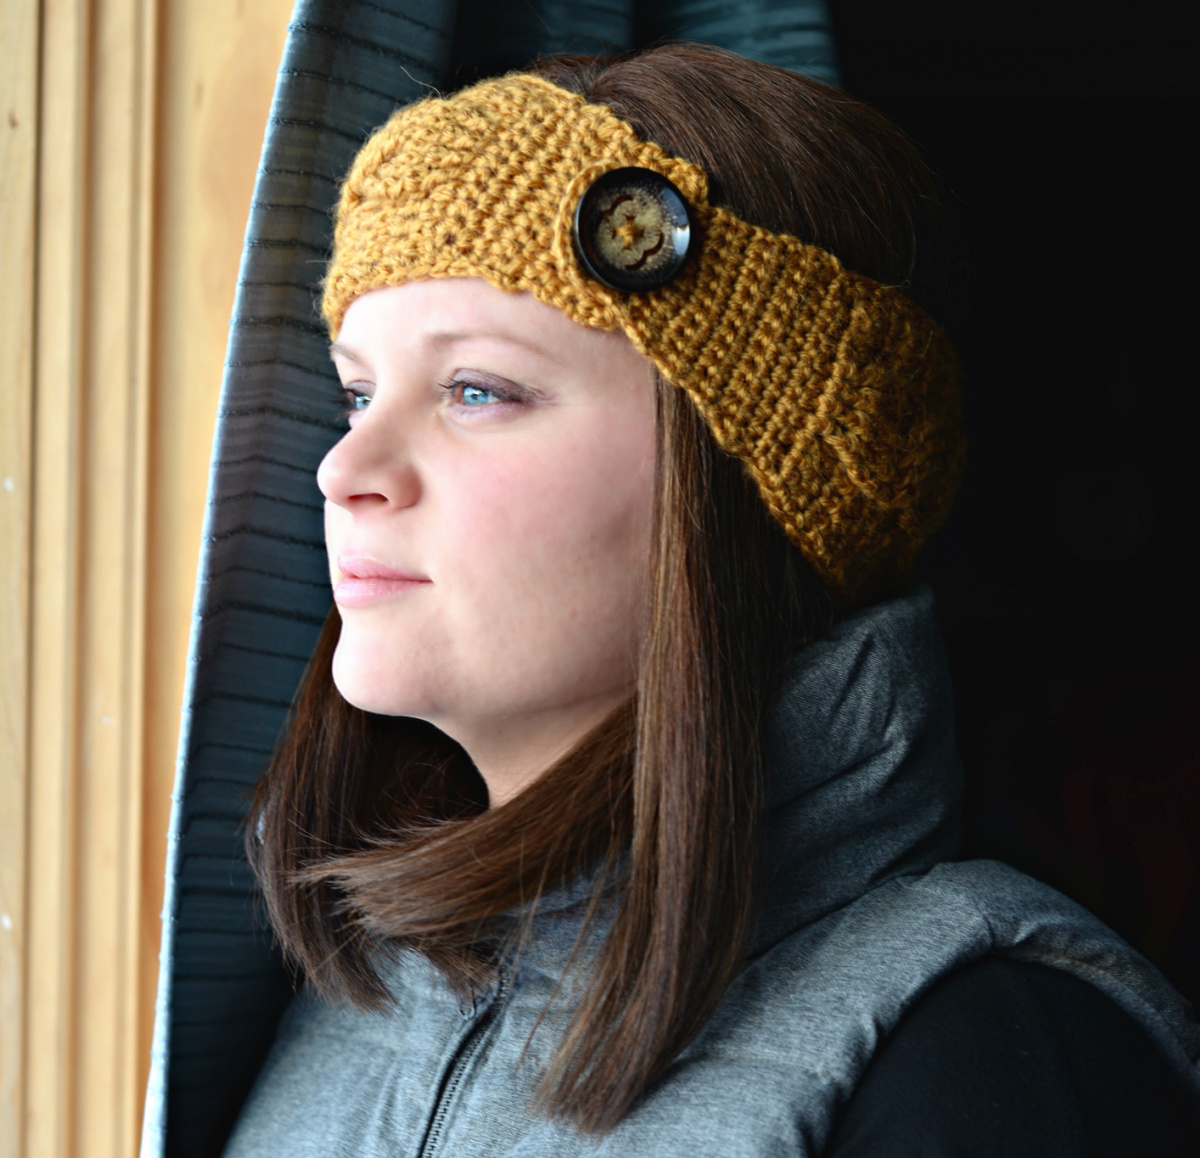
With just one ball of Lion Brand Touch of Alpaca in Goldenrod, I was able to make both the Chic Cabled Headwarmer and Chic Textures Headwarmer!
About the Chic Cabled Crochet Ear Warmer Pattern
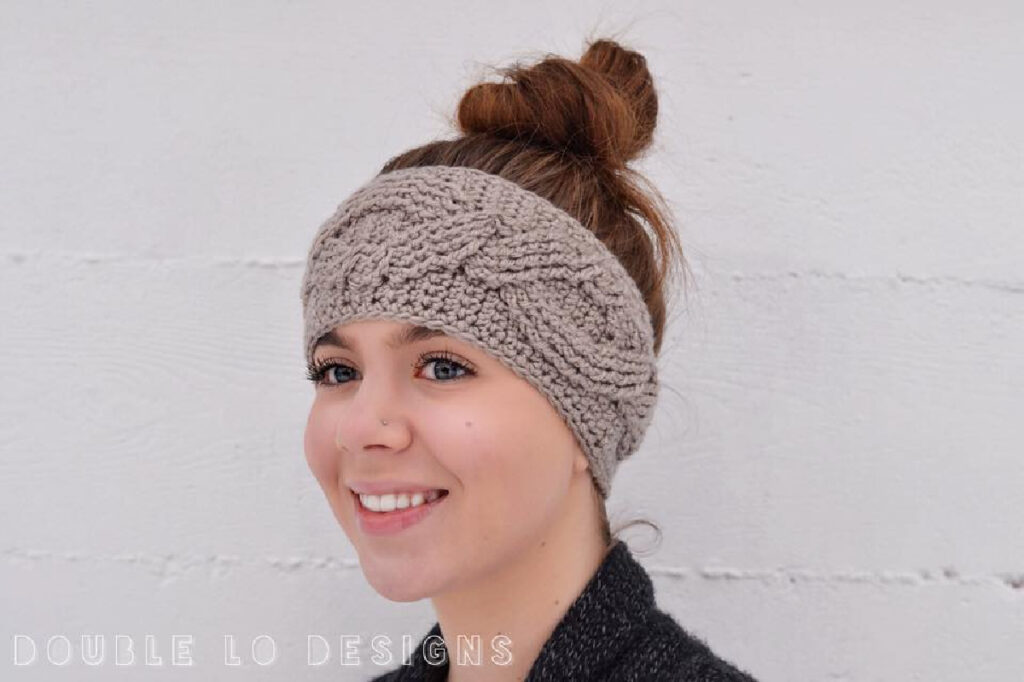
The Chic Cabled Crochet Ear Warmer combines classic cable styling with the practicality of a crochet headband. The raised texture creates a beautiful finished accessory that looks intricate and sophisticated.
Crochet cables may look complicated, but they’re a fun way to explore texture and dimension in your crochet projects. If you’ve been wanting to try a cabled crochet pattern, this ear warmer is a stylish project to add to your handmade wardrobe.
Make one in a neutral shade for a timeless accessory, or choose a favorite seasonal color to coordinate with your winter wardrobe. You can also crochet several in different colors to create thoughtful handmade gifts for everyone on your list.
How To Get The
Chic Cabled Crochet Ear Warmer Pattern
Option 1: Scroll down for the free crochet headwarmer pattern right here in this blog post.
Option 2: Purchase the ad-free printable PDF from one of my shops:
Crochet Cable Tips
Crochet cables create their distinctive raised texture by working stitches in a different order or around other stitches. The result is a beautiful woven appearance that adds depth and dimension to your finished project.
Here are a few tips to help you get started:
- Read the pattern notes first. Make sure you understand any special stitches or cable techniques before beginning.
- Check your gauge. Gauge is especially important for a fitted accessory like a crochet ear warmer.
- Keep your tension consistent. Even tension helps the cable pattern look neat and defined.
- Use stitch markers when helpful. Markers can make it easier to keep track of pattern repeats.
- Take your time with the cables. Focus on stitch placement, especially when working cable crossings.
If you’re new to crochet cables, don’t be discouraged if the texture takes a little practice. Once you get into the rhythm of the stitches, you’ll enjoy watching the cable pattern develop row by row.
Yarn
Lion Brand Touch of Alpaca yarn is a beautiful choice for the Chic Cabled Crochet Ear Warmer! This lovely blend combines the softness of acrylic with the luxurious feel of alpaca, creating a cozy, lightweight accessory with a subtle halo and beautiful stitch definition. Its gentle warmth makes it perfect for keeping your ears comfortable on chilly fall mornings and cold winter days.
The soft, elegant texture of Touch of Alpaca also enhances the raised cable stitches, giving your crochet ear warmer a polished, boutique-inspired look. Whether you’re making one to complement your favorite winter coat or creating a thoughtful handmade gift, this yarn is a wonderful choice for a stylish accessory that feels as good as it looks!
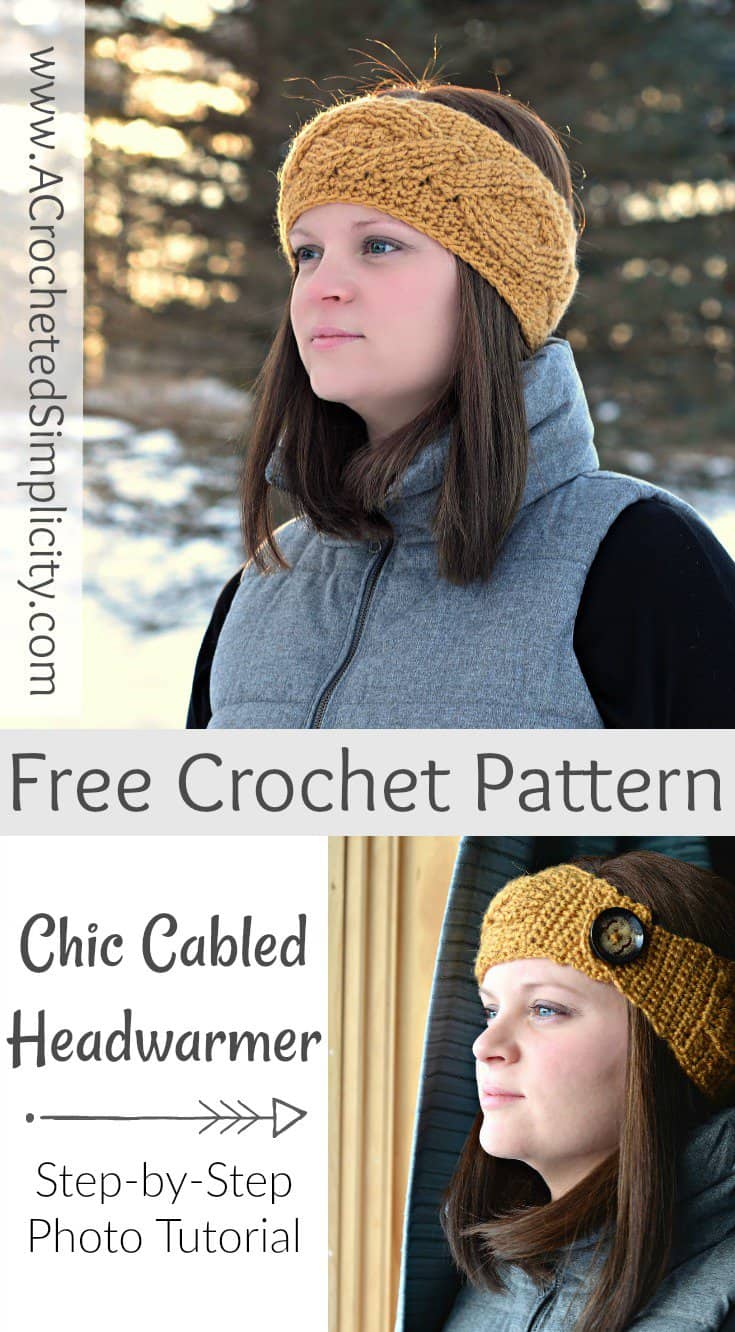
Chic Cabled Crochet Ear Warmer – Free Pattern
The cabled crochet ear warmer is a free pattern below, but if you love to work offline, I’ve got a couple other great options for you.
Purchase the ad-free, printable PDF (that includes all photo tutorials), on Ravelry, or on Etsy (aff).
This post contains affiliate links.
Materials
- Yarn: Worsted Weight / 4; Lion Brand Touch of Alpaca in Goldenrod was used for the sample shown on this page. 1 ball of yarn (or approximately 100 yards) is needed (3.5 oz / 100g / 207 yd / 290 m / 90% acrylic / 10% alpaca)
- Crochet Hook: H/8/5.00mm; or size needed to obtain gauge
- Scissors
- Yarn Needle
- (1) 1-1/2″ Button
Experience Level
- Intermediate
Gauge
- In ext sc: 16 sts + 9 rows = 4″
Size
- One Size: 4″ W x 21-1/2″ L
Abbreviations (U.S. Terms)
- ch(s): chain(s)
- st(s): stitch(es)
- sl st(s): slip stitch(es)
- sc: single crochet
- ext sc: extended single crochet
- bpdc: back post double crochet
- fpdc: front post double crochet
- fptr: front post treble crochet
- fpDtr: front post double treble
- sc2tog: single crochet decrease
- yo: yarn over
- rep: repeat
- Rnd: round
- BLO: back loop only
- RS: right side
- WS: wrong side
- SM: stitch marker
- beg: beginning
- See Special Stitches below
- Join yarn with a single crochet
Special Stitches
- Front Post Double Treble Crochet (fpDtr): yo 3 times, insert hook from front to back to front around the post of the designated stitch, yo, pull up a loop, (yo, pull thru 2 loops) 4 times.
- Forward Cable A (FWD Cbl A): Skip next 4 post sts, fpDtr around next 4 post sts, working in front of fpDtr just made, fpDtr around each skipped post st.
- Forward Cable B (FWD Cbl B): Skip next 2 post sts, fptr around next 2 post sts, working in front of fptr just made, fptr around each skipped post st.
- Join yarn with a single crochet: Begin with a slip knot on your hook, insert your hook into the stitch or space indicated, yo, pull up a loop, yo and draw thru both loops on hook.
Pattern Notes
- Beginning chain(s) are not included in stitch count, unless stated otherwise.
- Another comparable worsted weight yarn may be used as long as gauge is met.
- Please Read the “Important Notes” below, before beginning. These notes go over how the stitches are worked in this design so that the cables move horizontally outward and inward.
Important Notes
Keep these notes in mind while working your crochet ear warmer. They will help you with proper stitch placement, especially when your cables are moving horizontally, outward and inward. I’ve also included step-by-step photos that show specific stitch placement for these trickier stitches.
- Note #1: Unwritten Rule of Post Stitches: When working post stitches, you always skip over the top loops of 1 stitch behind each post stitch. If you do not skip over those top loops, you’ll end up increasing your overall stitch count. **I believe th at most of us do this without even thinking about it, but when it comes to using the post stitches to create cables that move, we forget about that little tidbit.
- Note #2: Pay REALLY close attention to wording, it is very literal. The pattern always says “fpXX around next post st”. Except for Row 3 (which is the first row of post sts) you will work EVERY post st around a post st from the previous row (not around an ext sc). In short, make sure to work EVERY post st from Row 4 or later, around the post of a post st from the previous row and your cables will be where they need to be.
- Note #3: To achieve proper movement of cables, you may be working into BOTH the top loops of a post stitch and around it. Watch wording carefully and make sure to always skip the top loops of 1 stitch behind every post st.
- Note #4: To maintain cable movement and stitch count, there are also times when you will not be working into an ext sc. Count stitches and pay special attention to wording. **And use the photos as needed, for clarification.
Cabled Swatch
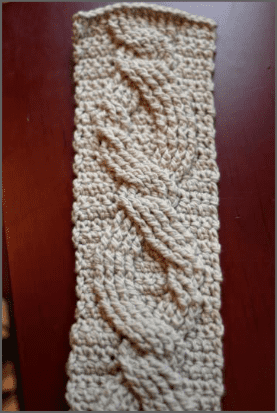
The photo below is of a swatch of the cable design you’ll be working in this pattern. Look at the portion of the cable where it widens. Notice how only one side of the “0” has a twist. This pattern alternates from side to side as the cables climb.
Important Row 3 Tip: Row 3 of the Cabled Ear Warmer is the cable set-up row. If you’re struggling with knowing exactly where the post of the stitch is that you need to work a post stitch around, make sure to check out my 2 Tips for Proper Post Stitch Placement. There is a quick video and a photo tutorial that will not only help you with the Chic Cabled Head Warmer pattern, it will help you with all other crochet cable patterns.
Cabled Headwarmer Instructions
Row 1 (RS): Using a 5mm crochet hook (or hook size needed to obtain gauge), ch 11, working into the back hump of the foundation chain, sc in the 2nd ch from your hook, sc in each ch across. Turn. (10 sts)
Row 2: Ch 1, 2 sc in first st, sc in next 8 sts, 2 sc in the last st. Turn. (12 sts)
Row 3: Ch 1, ext sc in next 4 sts, fpdc around each of the next 4 sts, ext sc in next 4 sts. Turn. (12 sts)
Row 4: Ch 1, ext sc in next 4 sts, 2 bpdc around each of the next 4 sts, ext sc in next 4 sts. Turn. (16 sts)
Row 5: Ch 1, ext sc in next 4 sts, fpdc around each of the next 8 sts, ext sc in next 4 sts. Turn. (16 sts)
Row 6: Ch 1, ext sc in next 4 sts, bpdc around each of the next 8 sts, ext sc in next 4 sts. Turn. (16 sts)
Row 7: Ch 1, ext sc in next 4 sts, FWD Cbl A, ext sc in next 4 sts. Turn. (16 sts)
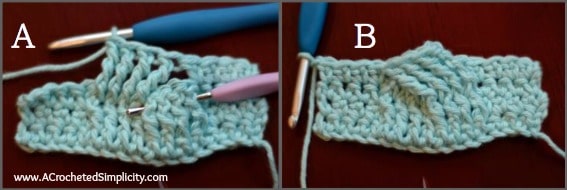
Photo A: Shows ext sc in next 4 sts, the beginning of FWD Cbl A, (skip next 4 post sts, fpDtr around next 4 post sts). The purple hook shows the 4 skipped post sts.
Photo B: Shows the rest of FWD Cbl A, (fpDtr around each of the 4 skipped post sts), ext sc in last 4 sts. Row 7 complete.
Row 8: Ch 1, ext sc in next 4 sts, bpdc around next 8 post sts, ext sc in last 4 sts. Turn. (16 sts)
Rows 9 – 10: Repeat Rows 7 – 8.
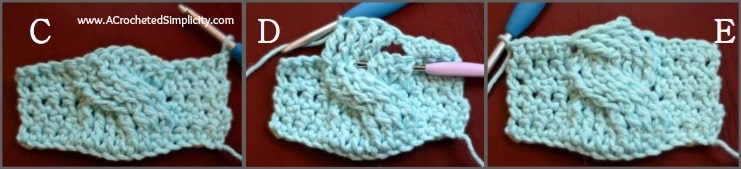
Photo C: Shows Row 8 complete.
Photo D: Shows ext sc in next 4 sts, the beginning of FWD Cbl A, (skip next 4 post sts, fpDtr around next 4 post sts). The purple hook shows the 4 skipped post sts.
Photo E: Shows the rest of FWD Cbl A, (fpDtr around each of the 4 skipped post sts), ext sc in last 4 sts. Row 9 complete.
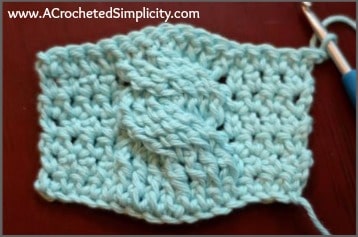
Photo below shows Row 10 complete.
Row 11: Ch 1, ext sc in next 3 sts, skip next st, fpdc around next 4 post sts, ext sc in top of same st as last fpdc worked around, ext sc in top of next post st, fpdc around same post st as last ext sc worked and around next 3 post sts, ext sc in last 3 sts. Turn.
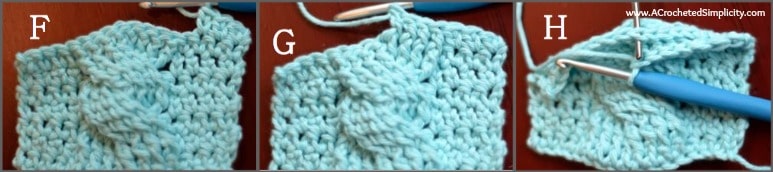
Photo F: Shows ext sc in next 3 sts.
Photo G: Shows fpdc around each of the next 4 post sts.
Photo H: To find placement of the next ext sc, bend your cables forward and make sure you skip over the top loops of 1 st for each post st just worked. In this case, skip over 4. The extra hook shows placement of your next ext sc. *Note that although you skipped over that 4th ext sc (just before the post sts), you will be counting the top loops of it when figuring placement of the next ext sc.
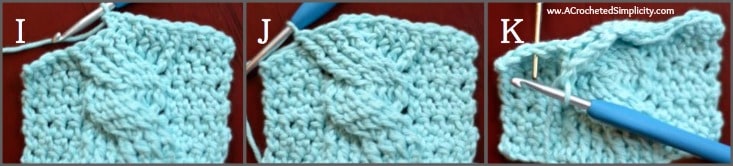
Photo I: Shows ext sc in next 2 sts. Note that they are worked into the top loops of the 4th & 5th post sts from the previous row. This is the row when you begin working into the top loops of a post st and also around the post of those same sts.
Photo J: Shows fpdc around each of the next 4 post sts.
Photo K: Bend your work forward and skip over the top loops of 4 sts. The extra hook shows placement of the next ext sc.
Photo L: Shows ext sc in last 3 sts.
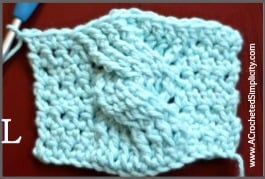
Row 12: Ch 1, ext sc in next 2 sts, skip next st, bpdc around next 4 post sts, ext sc in top of same st as last bpdc worked around, ext sc in next 2 sts, ext sc in top of next post st, bpdc around same post st as last ext sc made and around next 3 post sts, ext sc in last 2 sts. Turn.
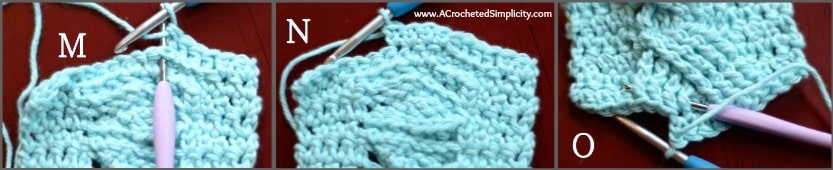
Photo M: Shows ext sc in next 2 sts, bpdc around next 4 post sts. Skip the top loops of 1 st for each bpdc. The purple hook shows where the next ext sc will be worked.
Photo N: Shows ext sc in next 4 sts. Note that you will work the 1st & 4th ext sc into the top loops of a post st and you will also work around the post of those post sts.
Photo O: Bend your work forward to see the next 4 post sts you’ll work around. The purple hook shows the 4 post sts.
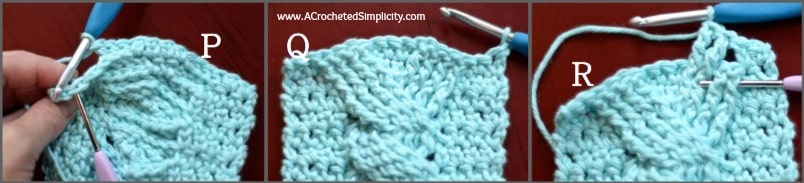
Photo P: Skip the top loops of 1 st for each bpdc. The purple hook shows where the next ext sc will be worked.
Photo Q: Shows Row 12 complete.
Photo R: (Beginning of Row 13) Shows ext sc in next 2 sts, the beginning of FWD Cbl B (skip next 2 post sts, fptr around next 2 post sts). The purple hook shows the 2 skipped post sts.
Row 13: Ch 1, ext sc in next 2 sts, FWD Cbl B, ext sc in next 4 sts, fpdc around next 4 post sts, ext sc in last 2 sts. Turn.
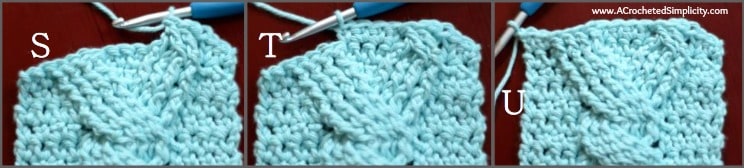
Photo S: Shows the FWD Cbl B complete.
Photo T: Shows ext sc in next 4 sts. Make sure to bend your work forward and skip the top loops of 1 st for each fptr.
Photo U: Shows fpdc around next 4 post sts, ext sc in last 2 sts.
Row 14: Ch 1, ext sc in next 2 sts, bpdc around next 4 post sts, ext sc in next 4 sts, bpdc around next 4 post sts, ext sc in last 2 sts. Turn.
Rows 15 – 16: Repeat Rows 13 – 14.
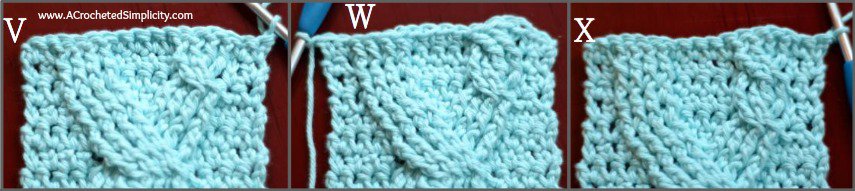
Photo V: Shows Row 14 complete.
Photo W: Shows Row 15 complete.
Photo X: Shows Row 16 complete.
Row 17: Ch 1, ext sc in next 2 sts, ext sc in top of next post st, fpdc around same post st as last ext sc worked and around next 3 post sts, skip next st, ext sc in next 2 sts, skip next st, fpdc around next 4 post sts, ext sc in top of same st as last fpdc worked around, ext sc in last 2 sts. Turn.
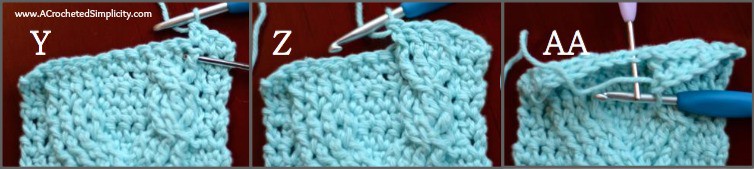
Photo Y: Shows ext sc in next 2 sts, ext sc in next post st.
Photo Z: Shows fpdc around each of the next 4 post sts.
Photo AA: Bend your work forward, skip the top loops of 1 st for each fpdc. Purple hook shows placement of the next ext sc.
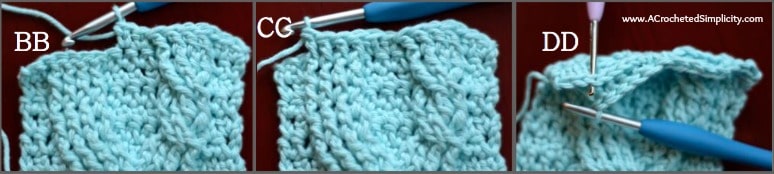
Photo BB: Shows ext sc in next 2 sts.
Photo CC: Shows fpdc around each of the next 4 post sts.
Photo DD: Bend your work forward, skip the top loops of 1 st for each fpdc. Purple hook shows placement of the next ext sc.
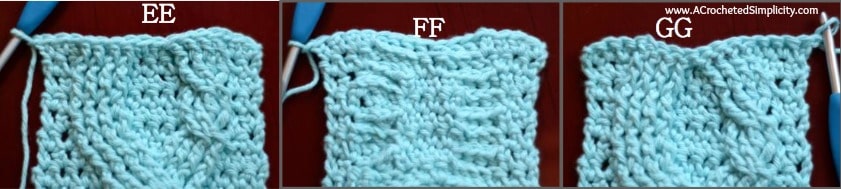
Photo EE: Shows Row 17 complete.
Photo FF: Shows Row 18 complete (WS).
Photo GG: Shows Row 18 complete (RS).
Row 18: Ch 1, ext sc in next 3 sts, ext sc in top of next post st, bpdc around same post st as last ext sc worked and around next 3 sts, skip next 2 sts, bpdc around next 4 post sts, ext sc in top of same st as last bpdc worked around, ext sc in last 3 sts. Turn.
Rows 19 – 24: Repeat Rows 7 – 12.
*See photo below for Row 25 FWD Cbl B. Notice that it is now on the left side of the cable.
Row 25: Ch 1, ext sc in next 2 sts, fpdc around next 4 sts, ext sc in next 4 sts, FWD Cbl B, ext sc in last 2 sts. Turn.
Row 26: Ch 1, ext sc in next 2 sts, bpdc around next 4 sts, ext sc in next 4 sts, bpdc around next 4 post sts, ext sc in last 2 sts. Turn.
Rows 27 – 28: Repeat Rows 25 – 26.
Row 29: Ch 1, ext sc in next 2 sts, ext sc in top of next post st, fpdc around same st as last ext sc worked and around next 3 sts, skip next st, ext sc in next 2 sts, skip next st, fpdc around next 4 sts, ext sc in top of same st as last fpdc worked around, ext sc in last 2 sts. Turn.
Row 30: Ch 1, ext sc in next 3 sts, ext sc in top of next post st, bpdc around same post st as last ext sc worked and around next 3 sts, skip next 2 sts, bpdc around next 4 post sts, ext sc in top of same st as last bpdc worked around, ext sc in last 3 sts. Turn.
Rows 31 – 46: Repeat Rows 7 – 22.
Row 47: Ch 1, ext sc in next 4 sts, fpdc around next 8 post sts, ext sc in next 4 sts. Turn. (16 sts)
Row 48: Ch 1, ext sc in next 4 sts, (bpdc2tog around next 2 post sts) 4 times, ext sc in next 4 sts. Turn. (12 sts)
Row 49: Ch 1, ext sc in next 4 sts, fpdc around next 4 post sts, ext sc in next 4 sts. Turn. (12 sts)
Row 50: Ch 1, sc2tog, sc in next 8 sts, sc2tog. Turn. (10 sts)
Row 51: Ch 1, sc in each st across.
Do not fasten off. Continue on to Edging.
Edging
Do not turn after row 51, simply rotate your work to begin working Edging along the long side of your head warmer. You will work along the first long side, then across the bottom of Row 1, then along the next long side, ending with a sc in the side of Row 51. Edging is only worked on 3 sides.
Tip: When working your stitches along the long edges, do not work them too tight or they will restrict the stretch of your ear warmer and affect fit. Go up a hook size when working along the long edges, if needed.
Edging (RS): Ch 1, working along the long edge, sc in the side of Row 51, sc in the side of each row along the long side (51 sts), ch 1 (place a SM in ch-1 sp to mark beg of buttonhole flap), rotate to work along the bottom of Row 1, sc in each st across (10 sts), ch 1, rotate to work along the long side, sc in the side of Row 1, sc in the side of each row along the long side (51 sts). (112 sts)
Do not fasten off. Continue on to Button Flap.
Button Flap
Row 1 (RS): Ch 1 (counts as a st as you will work into it in Row 2), sc in each st across the short edge of the headwarmer working the last sc into the ch-1 from the beginning of the edging. Turn. (1 ch-1 + 11 sc)
Row 2: Ch 1, sc in each st across to ch-1 sp, sc in ch-1 sp. Turn. (12 sts)
Row 3: Ch 1, sc2tog, sc in next 8 sts, sc2tog. Turn. (10 sts)
Rows 4 – 9: Ch 1, sc in each st across. Turn. (10 sts)
Fasten off. Weave in ends. Continue on to Buttonhole Flap.
Buttonhole Flap
Row 1 (RS): Join yarn with a sc in ch-1 sp marked with SM, sc in each st across to next ch-1 sp, sc in ch-1 sp. Turn. (12 sts)
Row 2: Ch 1, sc in each st across. Turn. (12 sts)
Row 3: Ch 1, sc2tog, sc in next 8 sts, sc2tog. Turn. (10 sts)
Rows 4 – 8: Ch 1, sc in each st across. Turn. (10 sts)
Row 9: Ch 1, sc2tog, sc in next st, ch 4, skip next 4 sts, sc in next st, sc2tog. Turn. (4 sts + ch-4 sp)
Row 10: Ch 1, sc in next 2 sts, 4 sc in ch-4 sp, sc in next 2 sts. Turn. (8 sts)
Row 11: Ch 1, sc in each st across. Turn. (8 sts)
Row 12: Ch 1, sc2tog, sc in next 4 sts, sc2tog. Turn. (6 sts)
Row 13: Ch 1, sc in each st across. Turn. (6 sts)
Fasten off. Weave in ends. Continue on to Finishing.
Finishing
Center the button on the button flap and secure it temporarily with a scrap piece of yarn. Try the head warmer on. Adjust placement of the button, if needed. Once the button is in the perfect spot, sew it on using a needle and thread, or a yarn needle and piece of yarn. Weave in ends.
Frequently Asked Questions
Is the Chic Cabled Crochet Ear Warmer a good crochet gift?
Absolutely! Crochet ear warmers are practical, stylish gifts for birthdays, holidays, and other special occasions. Their compact size also makes them a lovely handmade gift when you want something thoughtful and useful.
Can I make the crochet ear warmer in a different color?
Yes! Choose a color that complements your wardrobe or customize each ear warmer for the person receiving it. Neutral colors create a classic look, while rich autumn shades and winter colors make beautiful seasonal accessories.
Can I substitute a different yarn?
You may be able to substitute yarn, but choose a yarn with a similar weight and characteristics to the recommended yarn. Be sure to check your gauge, as changing yarn can affect the finished size, texture, and fit.
Where can I get the Chic Cabled Crochet Ear Warmer PDF pattern?
Use the purchase link in the ad-free PDF section above to find the printable version of the Chic Cabled Crochet Ear Warmer pattern.
More Crochet Accessories to Explore
If you love making cozy crochet accessories, be sure to explore more crochet patterns from A Crocheted Simplicity! From warm winter hats to stylish scarves and wraps, you’ll find plenty of projects to keep your hook busy throughout the cooler months.
I Made It! Now What?
Pin this post! Save this cabled crochet ear warmer pattern to your Pinterest boards so that you can come back and make it again.
Leave a comment below: We love to hear your feedback.
Share Your Finished Projects on Facebook or Instagram: I love to see your finished projects! Share with us on social media and tag me @acrochetedsimplicity or use the hashtag #ACrochetedSimplicity so I can find your posts.
Join us in the Facebook Community Group!
Come share your finished projects with us in the A Crocheted Simplicity Crochet Community Group on Facebook. Join us for fun community events such as crochet alongs, join in on crochet conversations, ask questions, get advice, and share your love for crochet!

Not my first try at cables. I’m a LEFTY but, even with lefty instructions, cables have always resulted in frogging and using the yarn for another project. Jennifer Pionk broke the cycle. I could not believe how easy it was to follow her directions and “see” the stitch even though I was crocheting from the opposite end. I am ecstatic! No holes around the cables. Practically looks knitted.
I haven’t chosen a button for the closure yet but I had to post the outcome.
Thank you SO much for sharing!!! I’d love to see a photo once you’ve finished. 🙂
It looks so elegant! Haven’t tried crochet cables before but it is definitely on my to-do list! Thanks for sharing such a detailed tutorial.
I just finished this last night (well, I still have to add the button) and I can’t believe I’ve actually done it. I’ve tried cables before and there are always problems but this came out so nice! I’m definitely going to be making one for my sister as well and maybe another for myself in another color. Thank you so much for making this pattern available and for explaining every stitch in such a clear and easy to follow way.
Hi Marta,
I’m SO glad that you were able to follow along with no troubles and master the cables!!! They’re so much fun when you get the hang of them.
Happy Crocheting,
Jennifer