Reina Lacy Granny Square Cardigan
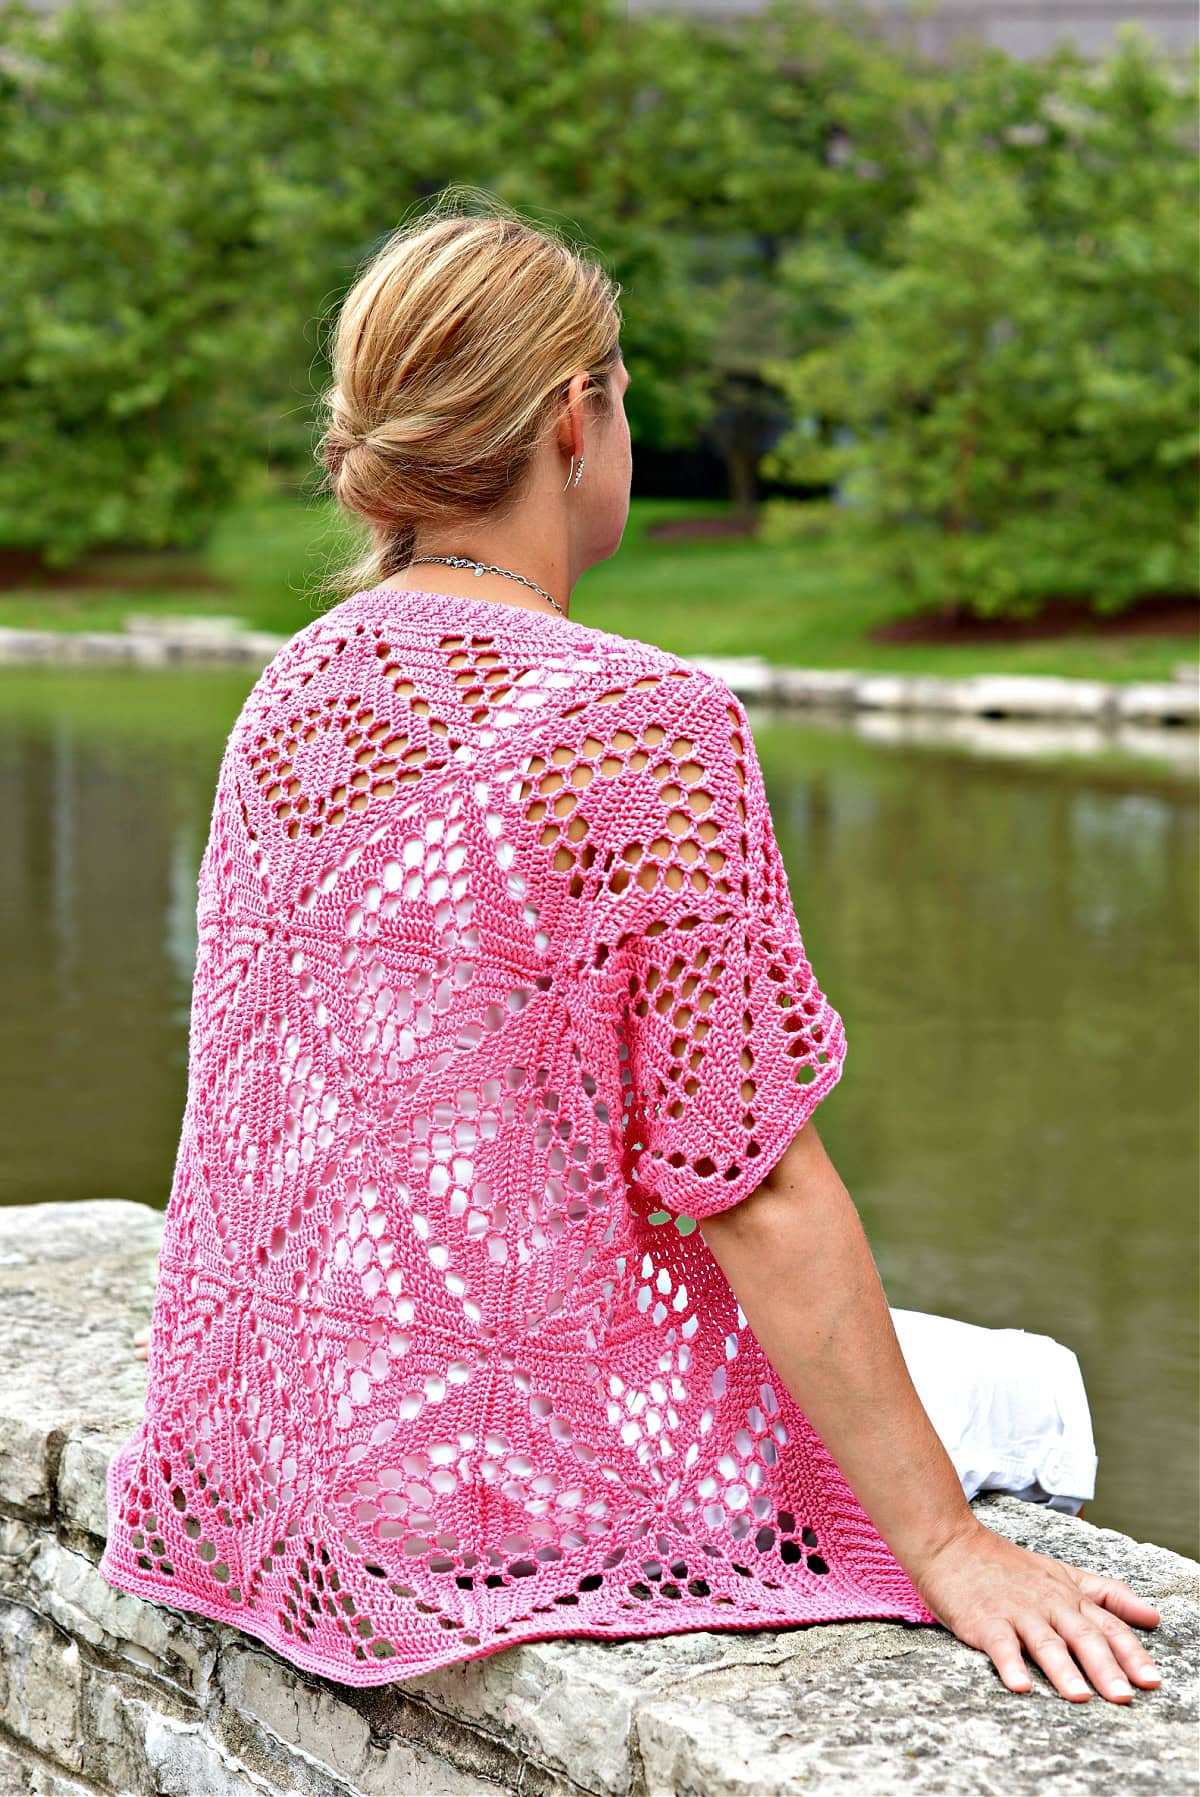
With simple square motifs, you can work this lacy granny square cardigan up quickly and add it to your wardrobe to throw on over any outfit.
Designed with a comfortable, oversized fit, it’s lightweight and airy, allowing you to wear it all year round with your jeans or dresses.
You’ll find the free lacy granny square cardigan in the post below, or you can find an ad-free printable PDF (that includes all photo tutorials + motif chart), on Ravelry, or Etsy (aff).
This is a size-inclusive crochet cardigan pattern that allows you to make it for anyone. Due to the comfortable fit, you don’t have to worry about being a size off if you plan on gifting this piece to someone. The bright color of yarn complements the stitch combination to give great definition to the granny square.
Such handmade cardigans are great as layering options because you can choose to wear literally anything underneath to suit the weather. And for those who face the heat in the mornings and chilly evenings, this lacy granny square cardigan is perfect.
The Perfect All-Year Cardigan
The Reina Lacy Granny Square Cardigan is made from a 100% cotton yarn which is the perfect choice for a lightweight garment because it is breathable, soft, and gentle on the skin. Its natural fibers, paired with the openwork of the granny square motif, allow air to circulate, keeping the body comfortable.
Cotton yarn can also usually be washed regularly without the worry of unraveling or distorting your work. Offering comfort, functionality, and durability, it was the best option for this cardigan.
How to Crochet a Cardigan
This crochet granny square cardigan is made up of motifs which are seamed together.
First, you’ll crochet up the granny square motifs, however many are required for the size you’re making. Once the motifs are ready, they’ll be blocked and seamed together.
This forms the main body of your handmade cardigan. Afterwards, you will crochet the edging and ribbing to ensure that the cardigan has a very neat finish to it.

How To Get The
Reina Granny Square Cardigan
Option 1: Scroll down for the free cardigan crochet pattern right here in this blog post.
Option 2: Purchase the ad-free printable PDF from one of my shops:
Choosing Which Size to Crochet
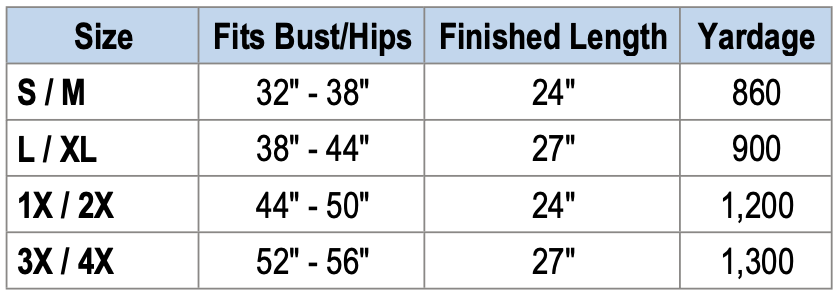
To choose your size, look over the size chart below.
- ‘Fits Bust’ measurement is the measurement of the intended wearer, not the garment’s finished measurement.
- Cardigan Length is the measurement of the finished garment before being worn or hung.
- Please note that depending on the fiber content of your yarn, your garment length will increase when worn and/or hung.
- If you’d prefer a longer cardigan than the measurement listed in the table below, you can easily add rows to the bottom hem, before beginning Row 1 of the Bottom Hem. The number of rows you add will not affect the pattern instructions, just keep in mind that your garment will lengthen naturally once worn.
Size & Yardage Chart
The notes above refer to this size chart.
Note: If you prefer a longer cardigan than what is suggested in the pattern, you will need more yarn than is listed in the chart to the left.
Yarn
For the Reina Lacy Granny Square Cardigan, I chose Cascade Yarns Ultra Pima Cotton in Primrose. Being pure cotton yarn, it is generally non-irritating and suitable for sensitive skin, making it ideal for garments worn during summers. It’s also machine-washable so you can get as much wear out of it as you need.
Cascade Yarns Ultra Pima Cotton is a #3 DK weight yarn comprised of just cotton (as you may have guessed by the name). This allows it to be extra soft, durable, and machine-washable — all of the things you would want for a garment.
Yarn Substitutions
Other DK weight yarns can be substituted as long as you meet gauge and love the drape of the fabric.
While I used a pure cotton yarn, you can choose any DK weight yarn that has a blend suitable for wearables. The greater the quality of the yarn, the longer-lasting your crochet lacy cardigan will be.
Reina Granny Square Cardigan – Free Pattern
The crochet lacy granny square cardigan pattern is free below, but if you love to work offline, I’ve got a couple other great options for you.
Purchase the ad-free, printable PDF, (that includes all photo tutorials, + motif chart), on Ravelry, or on Etsy (aff).
This post contains affiliate links.
Materials
- Yarn: DK Weight / 3 / Yarn, Cascade Yarns Ultra Pima Cotton in Primrose was used for the sample in the photos [100% Cotton (220 yds / 200 m / 100 g / 3.5 oz)].
- Yardage: See Size Chart Above
- Crochet Hook: G/6/4.00mm; D/3.25mm or size needed to obtain gauge (My favorite crochet hooks are the Clover Amour Crochet Hooks, I’ve never had an ache in my hand since switching).
- Measuring Tape
- Locking Stitch Markers
- Scissors
- Yarn Needle
Abbreviations (US Terms)
- ch: chain
- sl st: slip stitch
- st(s): stitch(es)
- sp(s): space(s)
- sc: single crochet
- dc: double crochet
- ext sc: extended single crochet
- extsc2tog: extended single crochet decrease
- invextsc3tog: invisible extended single crochet decrease 3
- invsc2tog: invisible single crochet decrease
- yo: yarn over
- Rep: repeat
- Rnd: round
- FLO: front loop only
- BLO: back loop only
- SM: stitch marker
- RS: Right Side
Experience Level
- Easy / Intermediate
Gauge
- See Motif Square Section for gauge.
Sizes
- Women’s S through 4X.
- See Size Chart above.
Special Stitches
- Extended Single Crochet (ext sc): Insert hook into stitch indicated, yo, pull up a loop, yo, pull thru 1 loop on hook, yo, pull thru remaining two loops on hook.
- Extended Single Crochet Decrease (extsc2tog): Insert hook into stitch indicated, yo, pull up a loop, yo, pull thru 1 loop on hook, insert hook into next st, yo, pull up a loop, yo, pull thru 1 loop on hook, yo, pull thru remaining loops on hook.
- Invisible Extended Single Crochet Decrease 3 (invextsc3tog): Insert hook into the BLO of stitch indicated, insert hook into BLO of the next stitch, insert hook into both loops of the next stitch along the edge of your cardigan, yo, pull up a loop, yo, pull thru one loop, yo, pull thru all remaining loops on hook. *This stitch is used to join the front opening ribbing to the cardigan and decreases by only 1 stitch each row.
- Invisible Single Crochet Decrease (invsc2tog): Insert hook into the FLO of stitch indicated, insert hook into FLO of next stitch, yo, pull up a loop, yo, pull thru all loops on hook.
- Join yarn with a standing sc: When instructed to “Join yarn with a standing sc”, begin with a slip knot on your hook. Insert your hook into the stitch or space indicated, yo, pull up a loop, yo and draw thru both loops on hook.
Pattern Notes
- I tend to crochet on the tighter side. You may need to go down a hook size (or two) to meet gauge if you crochet more loosely.
- The first stitch of each row is worked into the same stitch as the turning chain, unless otherwise specified.
- Yarn Notes: Cascade Yarns Ultra Pima Cotton 100% Pima Cotton / DK weight (Primrose was used for the sample in the photos). Another comparable #3 DK weight yarn may be used as long as gauge is met.
- Changes for Sizes Written as Follows: S/M (L/1X, 1X/2X, 3X/4X).
- Testers used a range of yarns, some sport weight and some DK weight, and were able to meet gauge by adjusting hook sizes. The squares still looked great. Other yarns used were: Bernat Cotton-ish, Premier Cotton Fair, & Red Heart Luster Sheen.
Reina Lacy Granny Square Cardigan Written Pattern
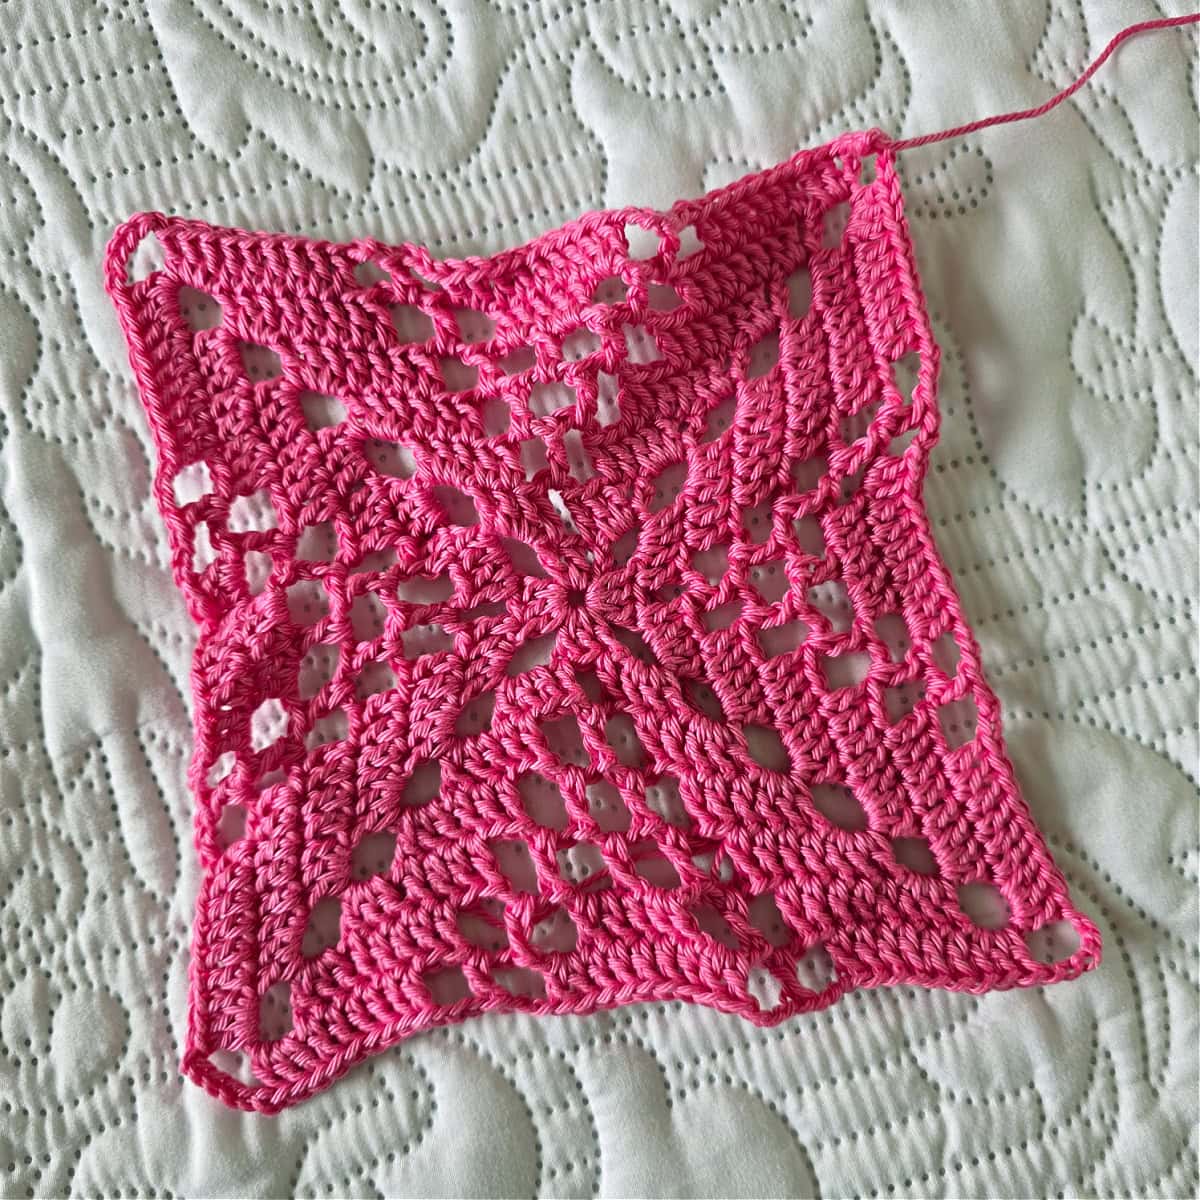
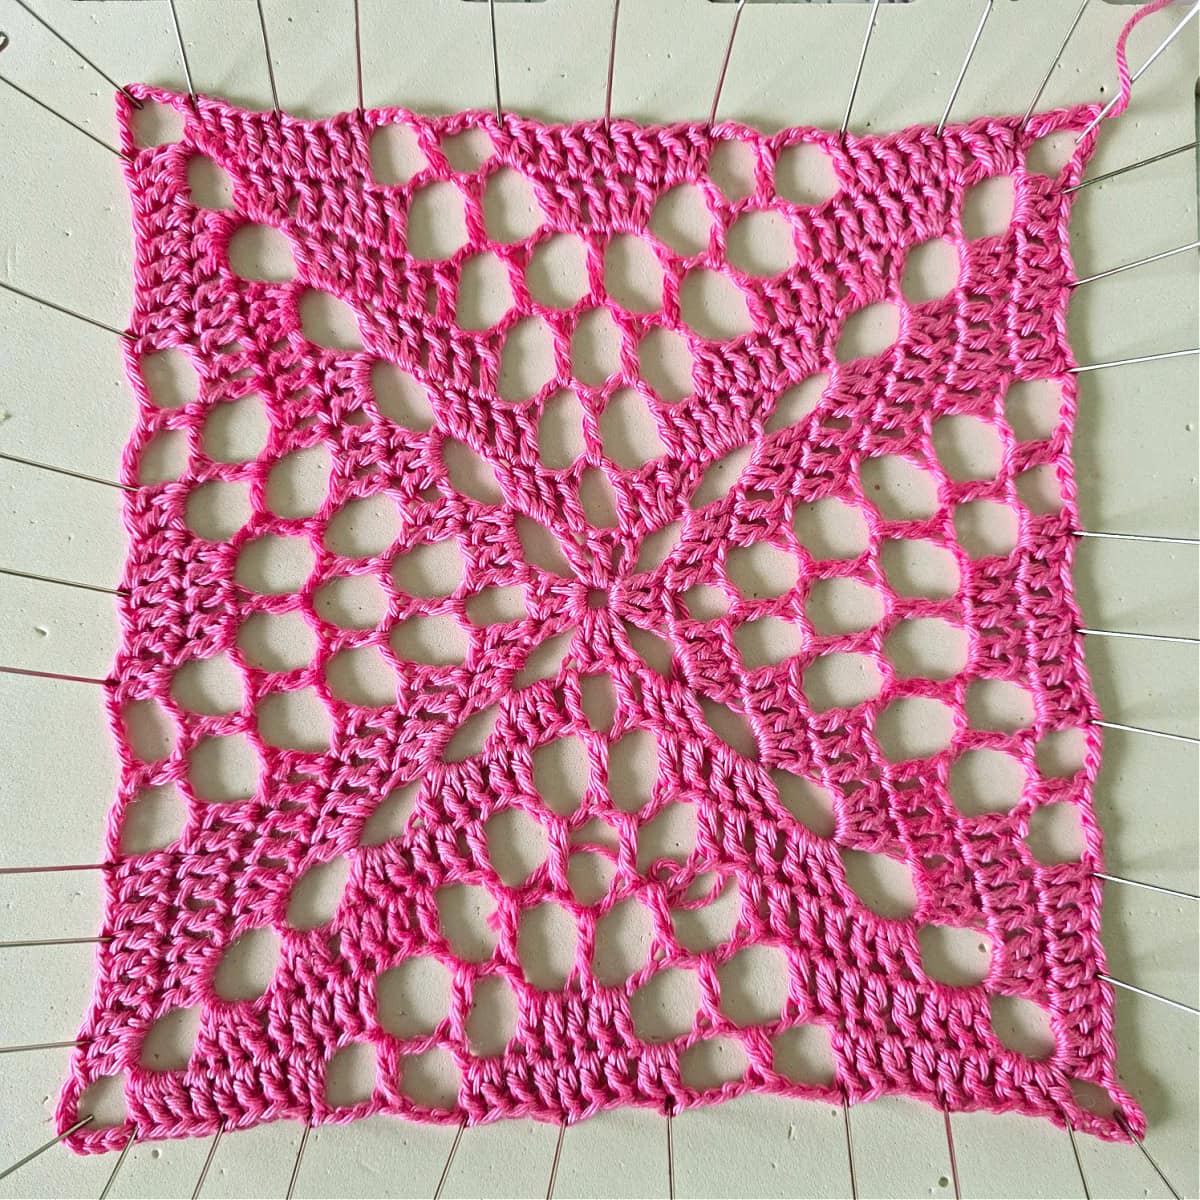
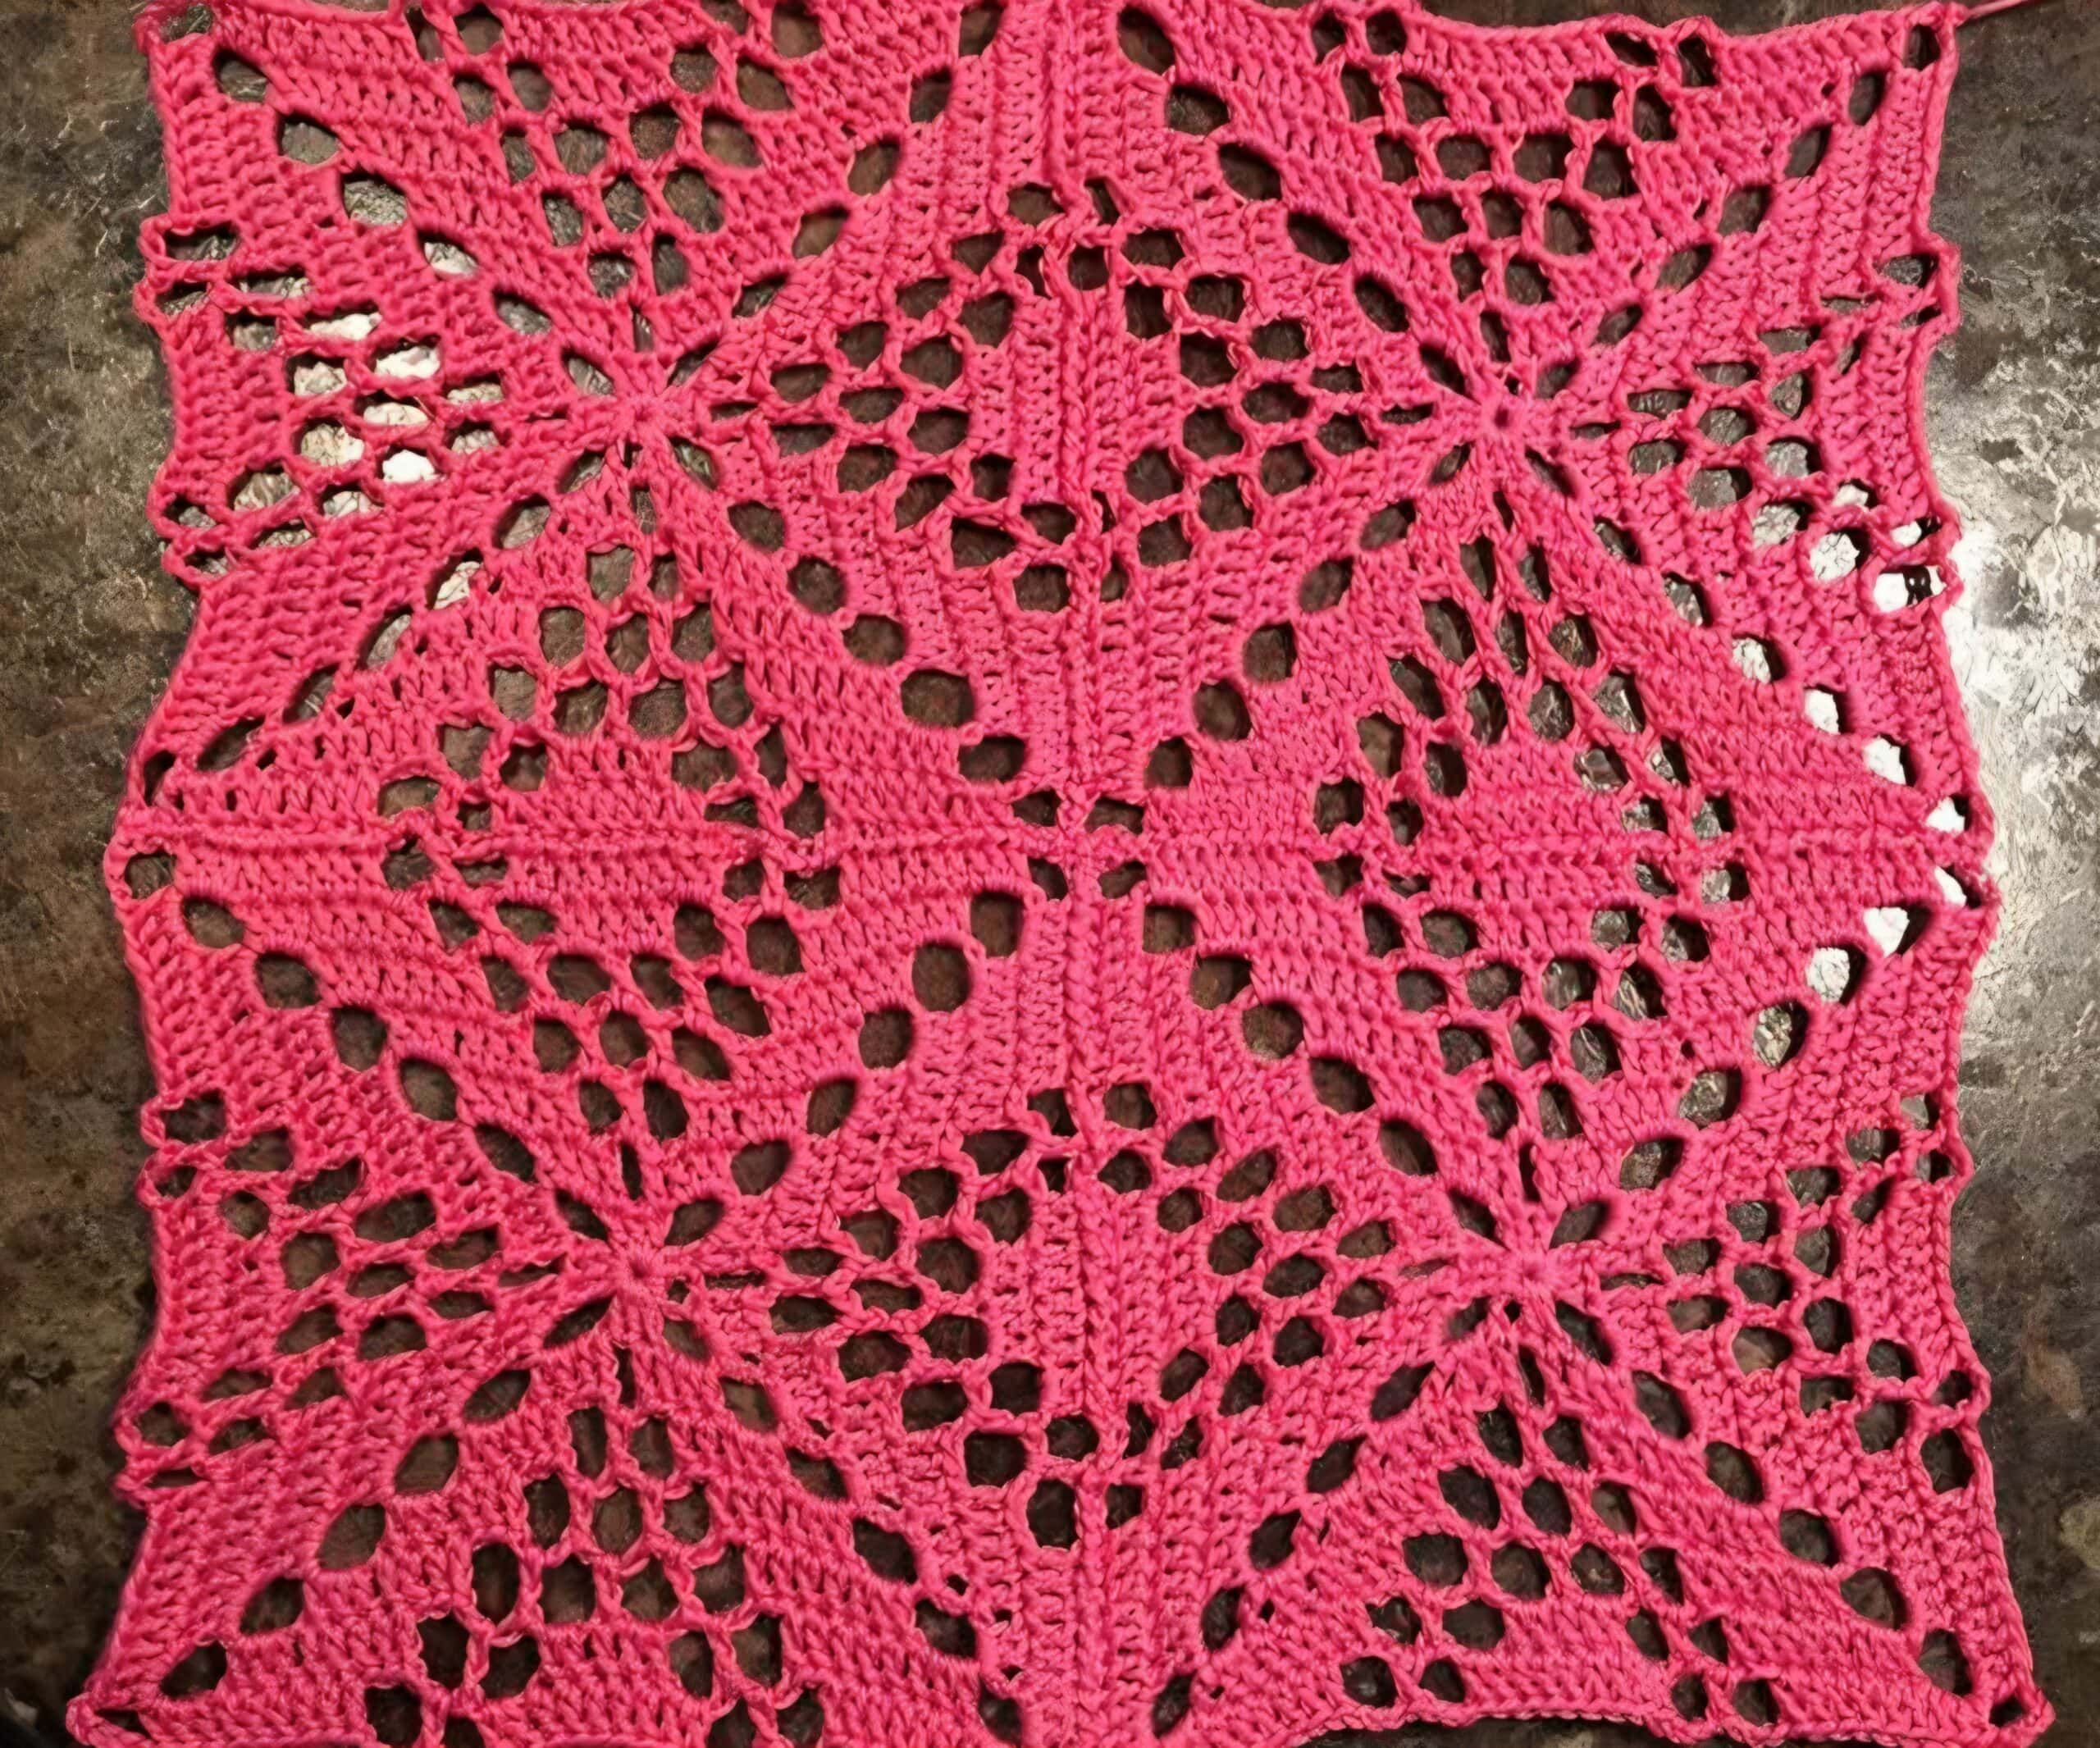
Motif Square ~Make 12 (12, 15, 15) Squares
Hook for Sizes L/1X & 3X/4X : G/6/4.00mm
Gauge with a 4mm hook: 9 dc + 4 rows = 2″
Hook for Sizes S/M & 1X/2X: D/3.25mm
Gauge with a 3.25mm hook: 10.5 dc + 4.25 rows = 2″
Tip: Keep your ch-6’s at the corners tight (you will not be working stitches into them). Keep your ch-3’s a little looser along the sides of the motif or this will affect the overall size of your motif square. If the sides of your motif square pull inward, it could be a combination of one of the following: your ch-3’s aren’t loose enough and/or the height of your dc’s isn’t tall enough.
Set-Up Rnd: With yarn & hook size listed for the size cardigan you’re making, ch 4, sl st into the 1st ch to create a ring.
Rnd 1 (RS): Working into ring, ch 3 (counts as 1st dc here and throughout), 2 dc, [ch 6, 3 dc ] 3 times, ch 3, join with a dc into the top of the beginning ch-3 (this dc will be worked perpendicular to the beginning dc as it acts as the remaining 3 chs for the last corner). (13 dc + 3 ch-6 + 1 ch-3)
Rnd 2: Ch 3, work 2 dc around last dc from previous rnd, [ dc in the next st, ch 3, skip next st, dc in next st, (3 dc, ch 6, 3 dc) in the next ch-6 sp, ] work from [ to ] 3 times, then dc in the next st, ch 3, skip next st, dc in next st, 3 dc in the next ch sp, ch 3, join with a dc into the top of the beginning ch-3. (33 dc + 3 ch-6 + 5 ch-3)
Rnd 3: Ch 3, work 2 dc around last dc from previous rnd, [ *dc in each of the next 2 sts, ch 3, skip each of the next 2 dc, dc in the next ch-3 sp, ch 3, skip each of the next 2 dc, dc in each of the next 2 sts*, (3 dc, ch 6, 3 dc) in the next ch-6 sp, ] work from [ to ] 3 times, then work from * to *, then 3 dc in the next ch sp, ch 3, join with a dc into the top of the beginning ch-3. (45 dc + 3 ch-6 + 9 ch-3)
Rnd 4: Ch 3, work 2 dc around last dc from previous rnd, [ *dc in each of the next 3 sts, ch 3, skip each of the next 2 dc, dc in the next ch-3 sp, ch 3, skip the next dc, dc in the next ch-3 sp, ch 3, skip each of the next 2 dc, dc in each of the next 3 sts*, (3 dc, ch 6, 3 dc) in the next ch-6 sp, ] work from [ to ] 3 times, then work from * to *, then 3 dc in the next ch sp, ch 3, join with a dc into the top of the beginning ch-3. (57 dc + 3 ch-6 + 13 ch-3)
Rnd 5: Ch 3, work 2 dc around last dc from previous rnd, [ *dc in each of the next 4 sts, ch 3, skip each of the next 2 dc, dc in the next ch-3 sp, (ch 3, skip the next dc, dc in the next ch-3 sp) twice, ch 3, skip each of the next 2 dc, dc in each of the next 4 sts*, (3 dc, ch 6, 3 dc) in the next ch-6 sp, ] work from [ to ] 3 times, then work from * to *, then 3 dc in the next ch sp, ch 3, join with a dc into the top of the beginning ch-3. (69 dc + 3 ch-6 + 17 ch-3)
Rnd 6: Ch 3, work 2 dc around last dc from previous rnd, [ *dc in each of the next 5 sts, ch 3, skip each of the next 2 dc, dc in the next ch-3 sp, ch 3, skip the next dc, 2 dc in the next ch-3 sp, dc in the next dc, 2 dc in the next ch-3 sp, ch 3, skip the next dc, dc in the next ch-3 sp, ch 3, skip each of the next 2 dc, dc in each of the next 5 sts*, (3 dc, ch 6, 3 dc) in the next ch-6 sp, ] work from [ to ] 3 times, then work from * to *, then 3 dc in the next ch sp, ch 3, join with a dc into the top of the beginning ch-3. (93 dc + 3 ch-6 + 17 ch-3)
Rnd 7: Ch 3, work 2 dc around last dc from previous rnd, [ *dc in each of the next 6 sts, ch 3, skip each of the next 2 dc, dc in the next ch-3 sp, ch 3, skip the next dc, 2 dc in the next ch-3 sp, dc in each of the next 5 dc, 2 dc in the next ch-3 sp, ch 3, skip the next dc, dc in the next ch-3 sp, ch 3, skip each of the next 2 dc, dc in each of the next 6 sts*, (3 dc, ch 6, 3 dc) in the next ch-6 sp, ] work from [ to ] 3 times, then work from * to *, then 3 dc in the next ch sp, ch 3, join with a dc into the top of the beginning ch-3. (117 dc + 3 ch-6 + 17 ch-3)
Fasten off. Weave in ends. After you’ve completed all motif squares for the size cardigan you’re making, continue on to Blocking & Seaming.
Blocking & Seaming Instructions Per Size
Cotton yarn blocks well with steam or spray blocking. The mattress stitch was used to seam the squares together after blocking.
Size S / M: Block all squares to 8″ x 8″, then seam with a mattress stitch, or seam and then block to 32″ x 24″. 4 blocks wide x 3 blocks high. Assembled Size should be 32″ x 24″
Size L / 1X : Block all squares to 9″ x 9″, then seam with a mattress stitch, or seam and then block to 36″ x 27″. 4 blocks wide x 3 blocks high. Assembled Size should be 36″ x 27″.
Size 1X / 2X: Block all squares to 8″ x 8″, then seam with a mattress stitch, or seam and then block to 40″ x 24″. 5 blocks wide x 3 blocks high. Assembled Size should be 40″ x 24″
Size 3X / 4X : Block all squares to 9″ x 9″, then seam with a mattress stitch, or seam and then block to 45″ x 27″. 5 blocks wide x 3 blocks high. Assembled Size should be 45″ x 27″.
After Blocking & Seaming, continue on to Edging the Motif Panel Assembly.
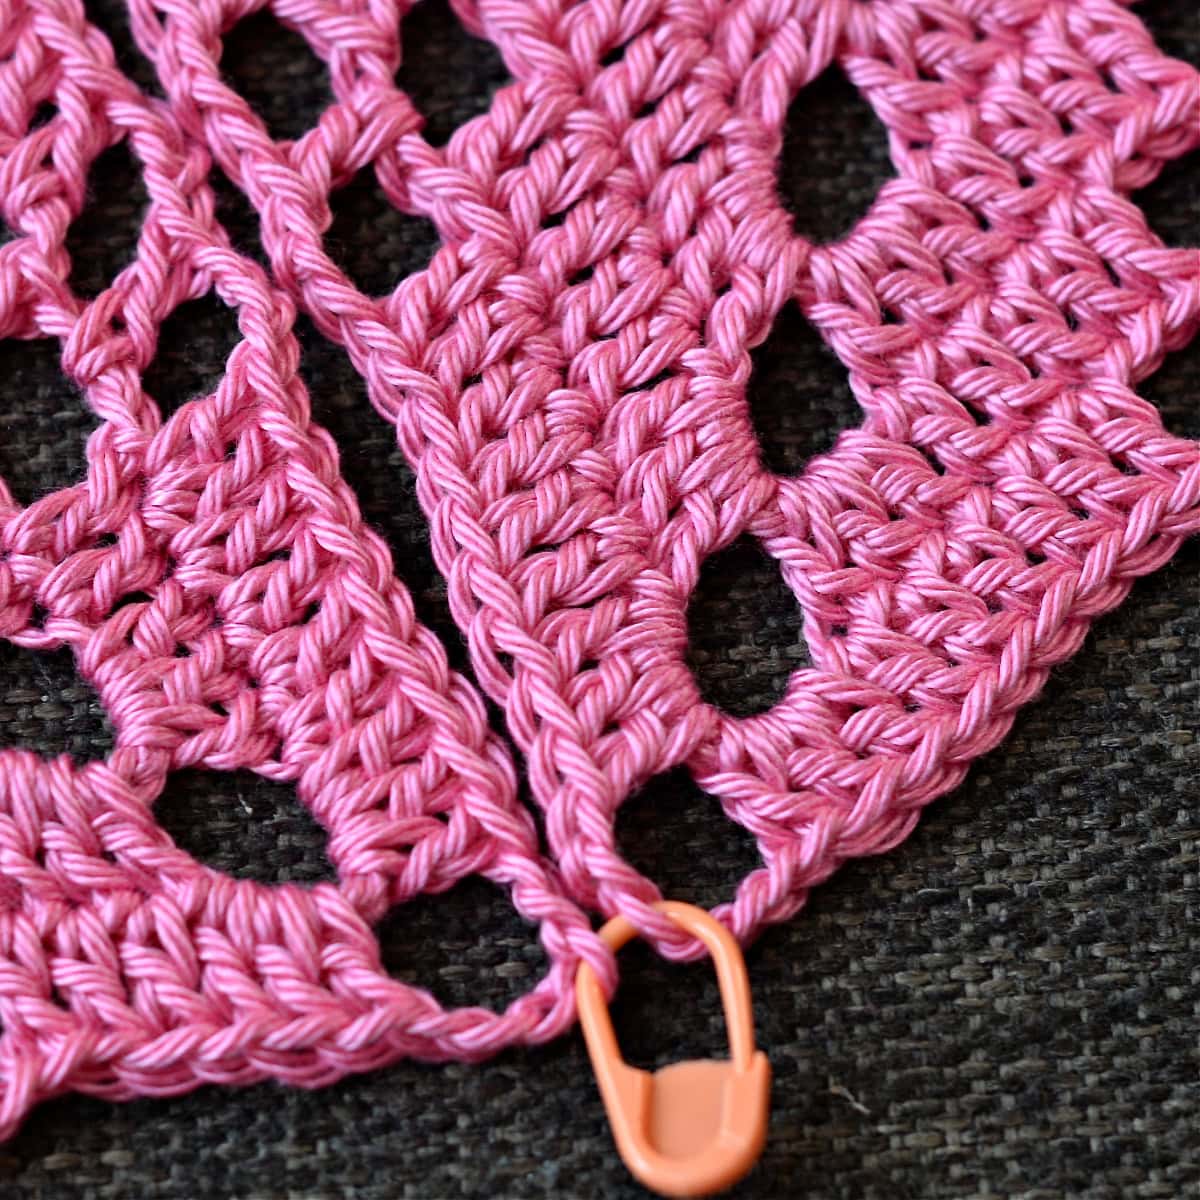
Mattress Stitch Seam Tutorial
The mattress stitch is the most common technique used to sew panels together. It’s a simple technique and I’ll give you a couple of tips to help make it easier.
TIP #1: As you’re sewing your seams, make sure to stop every couple inches and pull your yarn to tighten the seam. If you wait until you’re done sewing and then try to pull the ends through the entire length of the seam, you may end up with gaps or puckers.
TIP #2: Use several stitch markers when suggested. The stitch markers not only hold pieces together temporarily, they also help guide you to seam things evenly.
Tip #3: The most important thing to remember about this technique is to insert your yarn needle the same direction on both panels that you’re seaming. If you insert from bottom to top on the left side, make sure to insert bottom to top on the right side and vice versa.
See photos and instructions below for how to seam your squares for this garment.
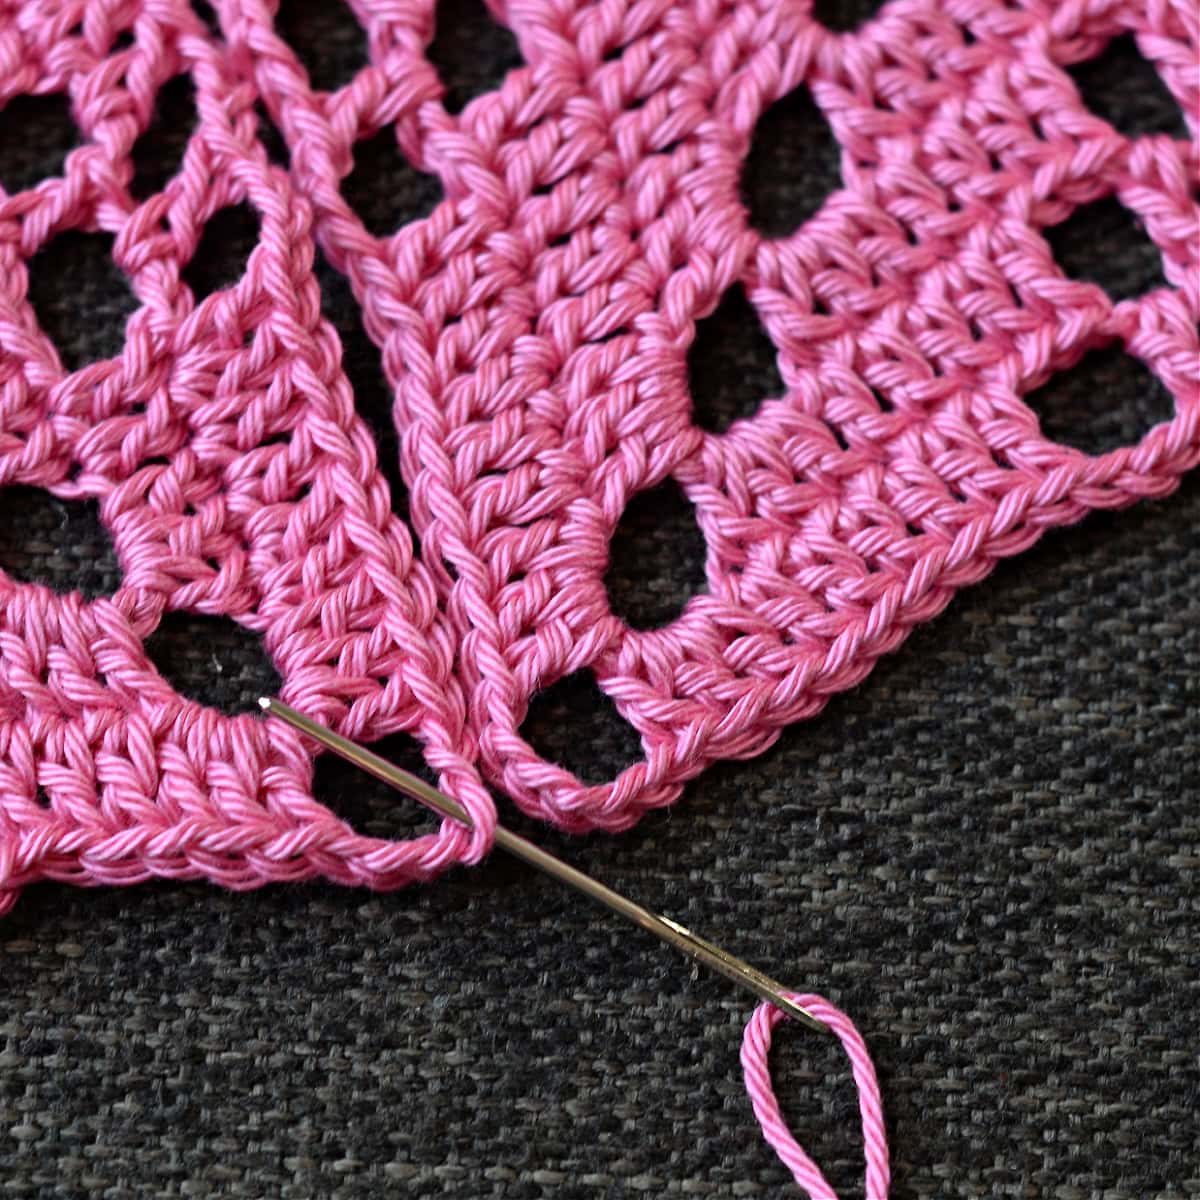
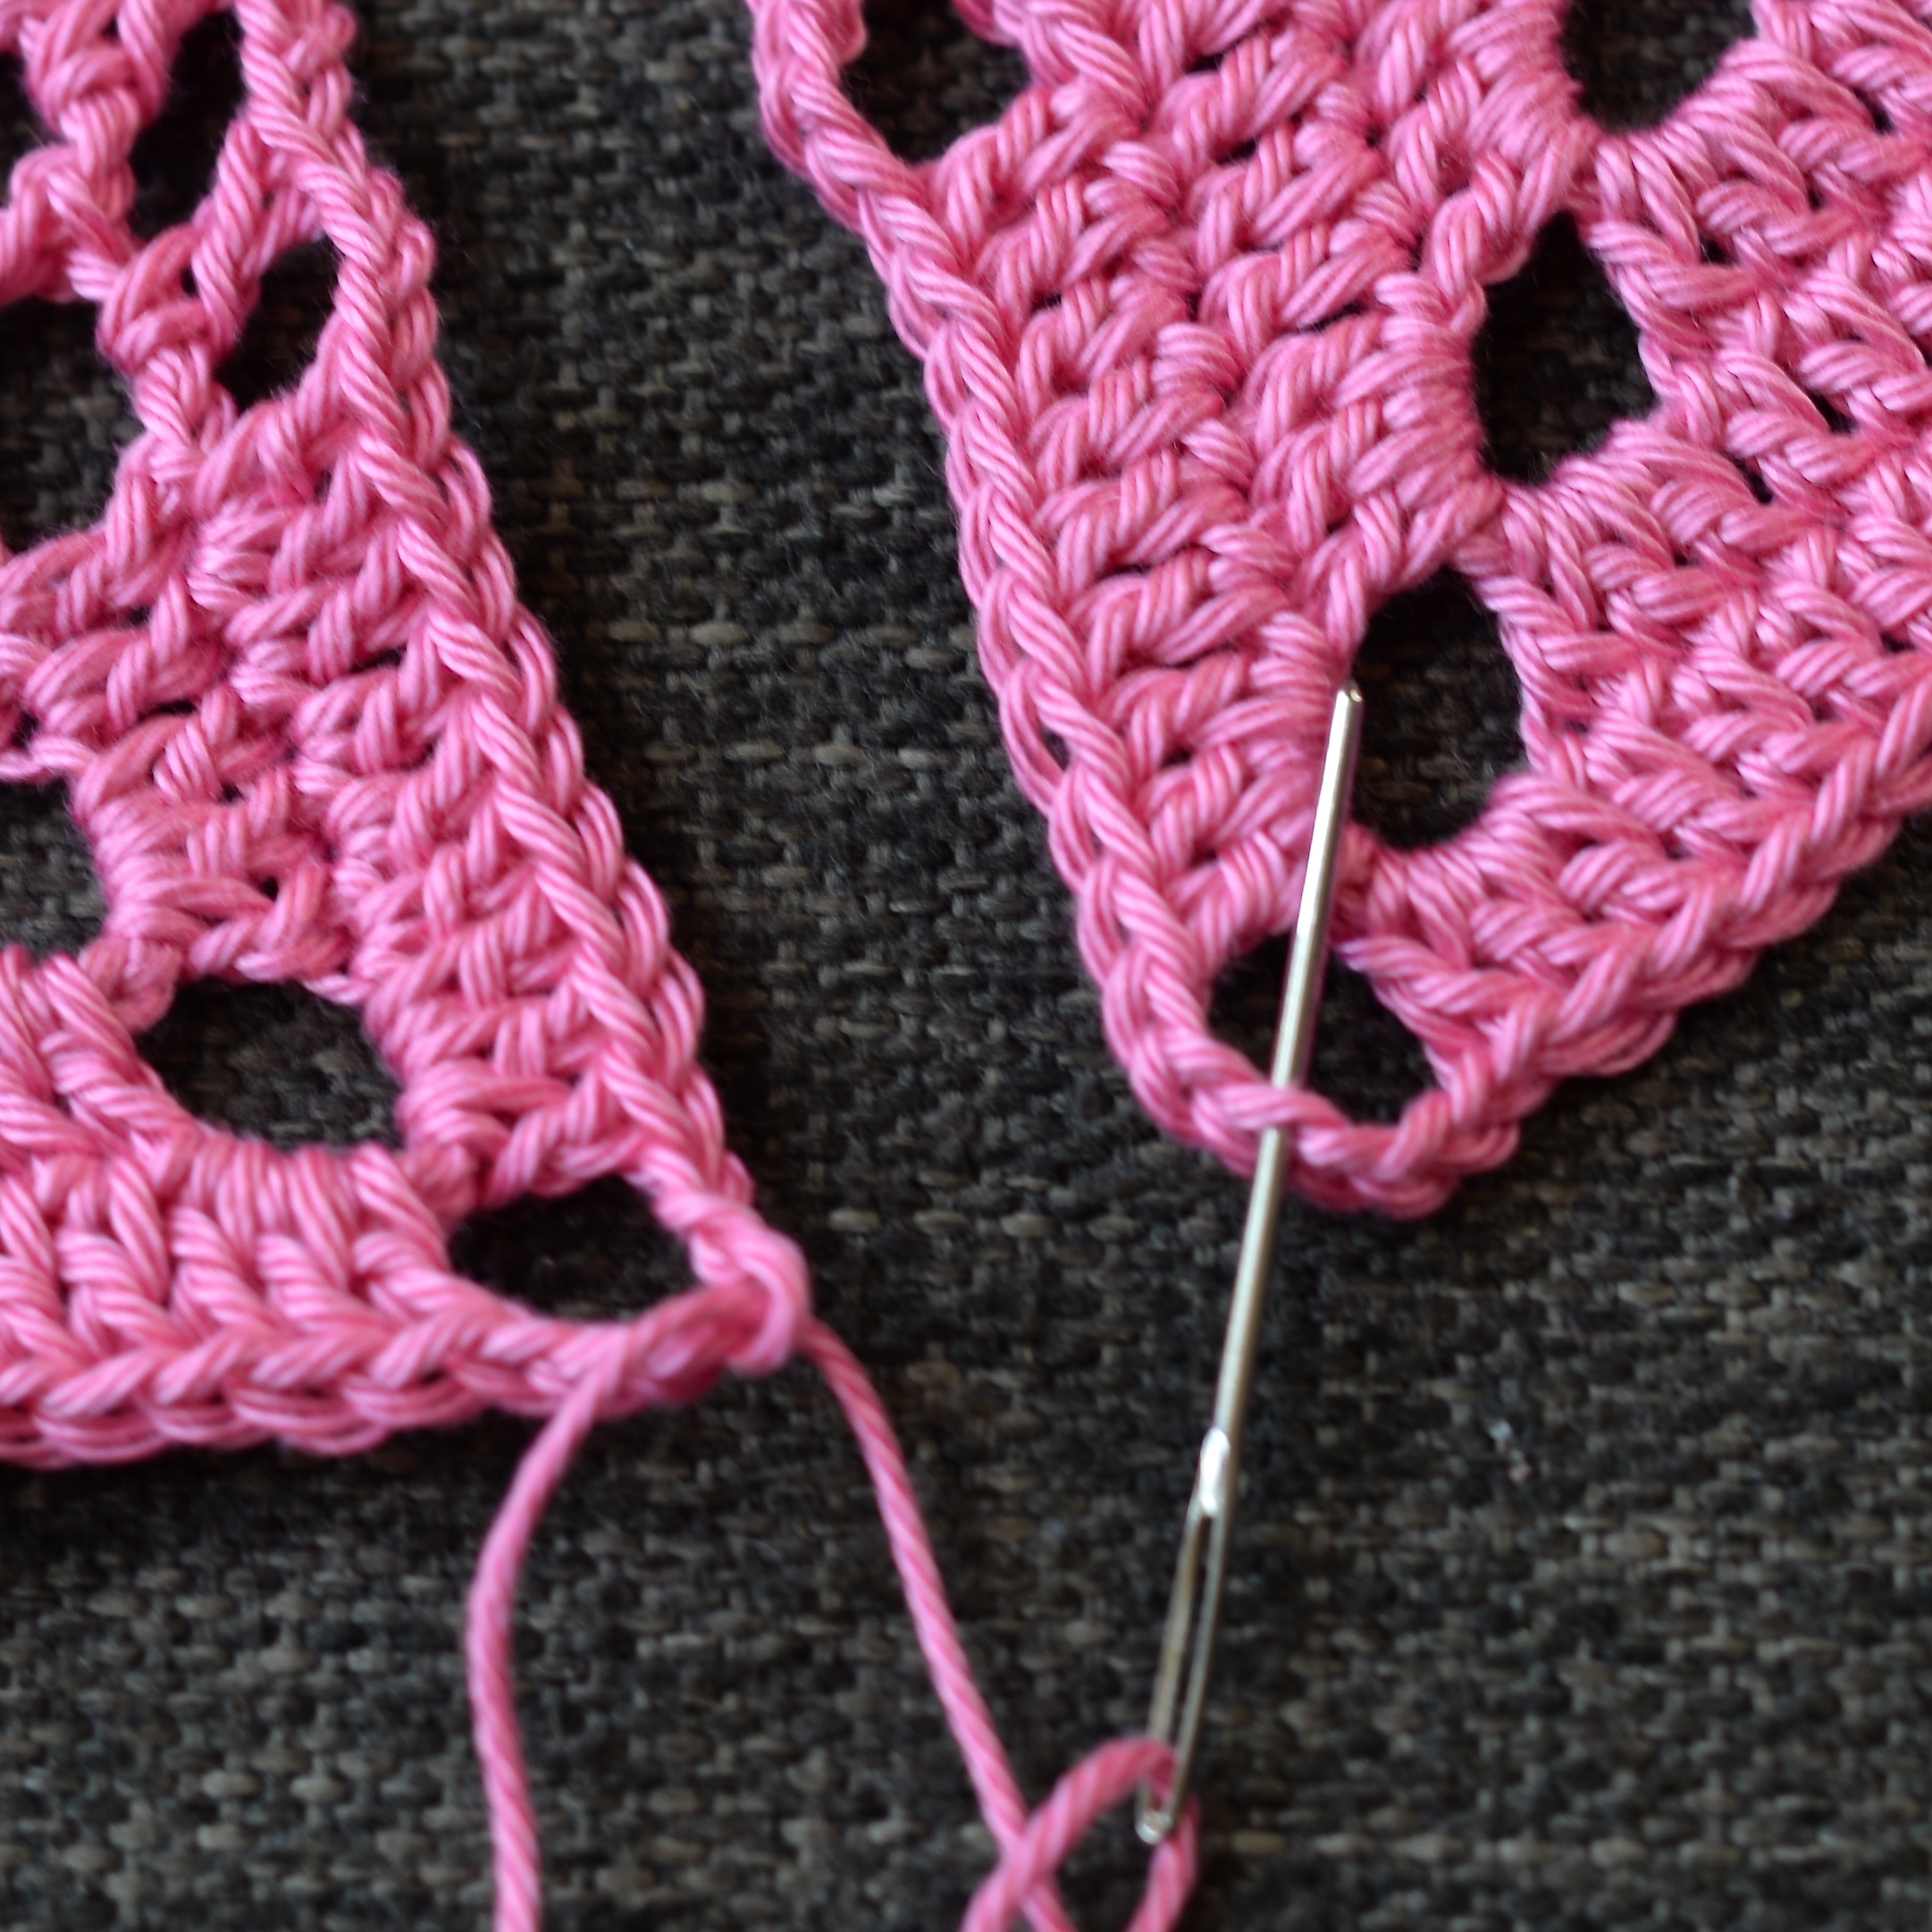
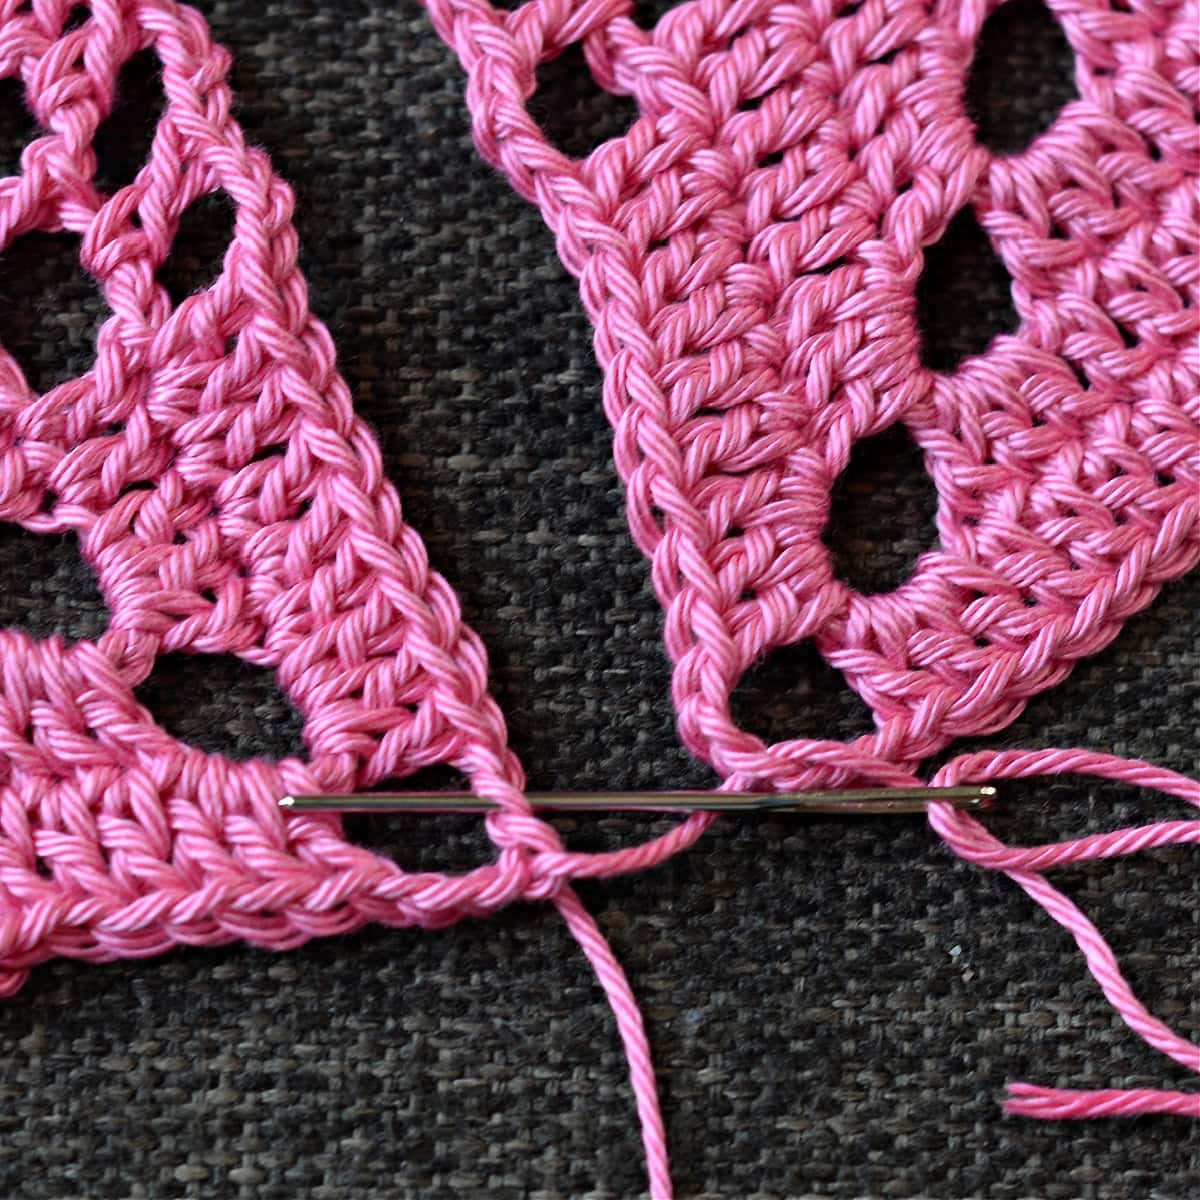
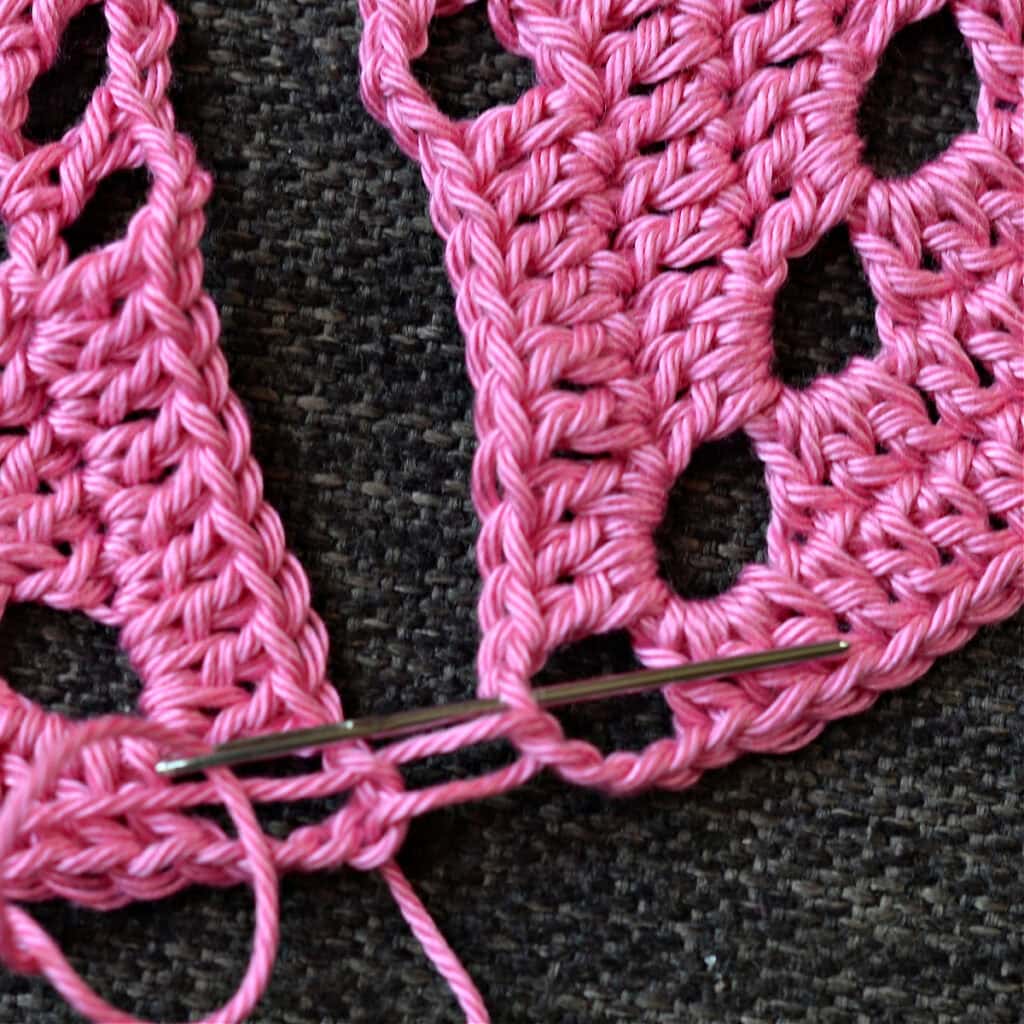
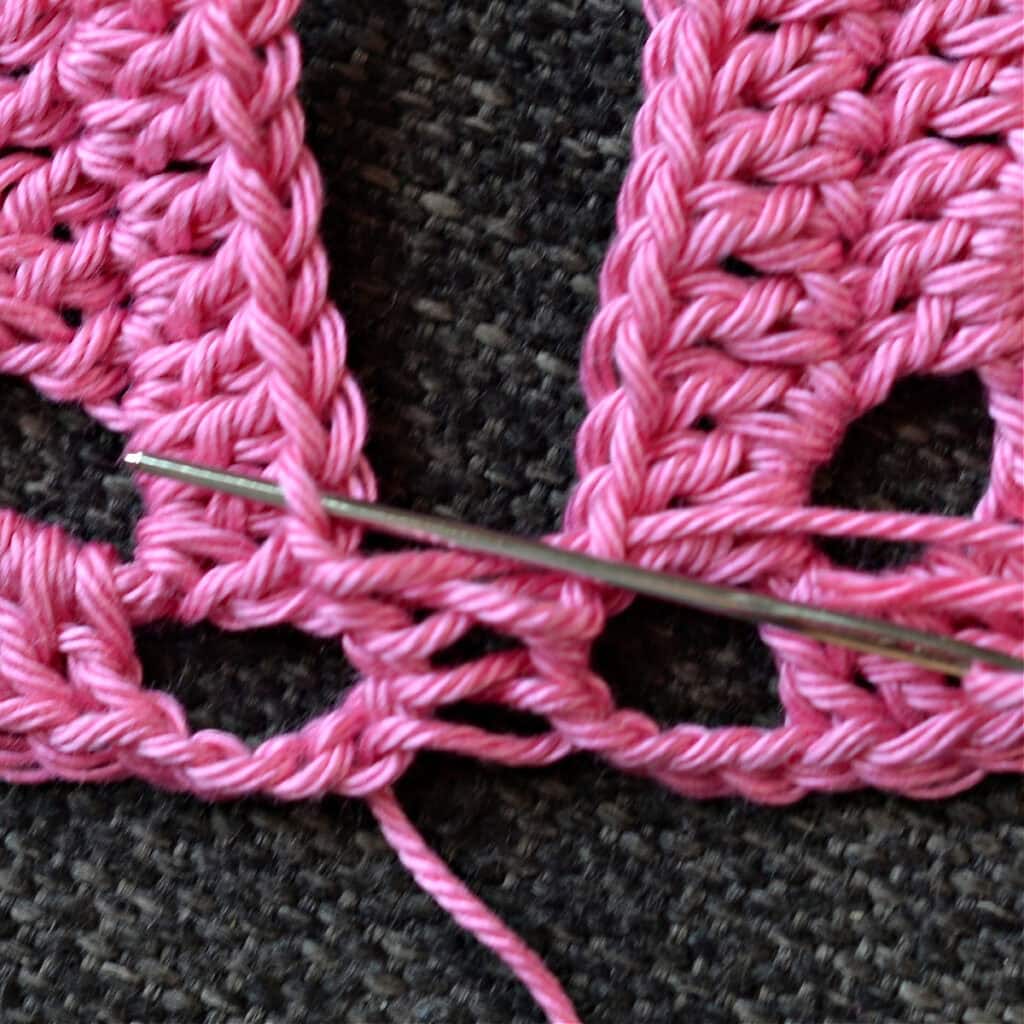
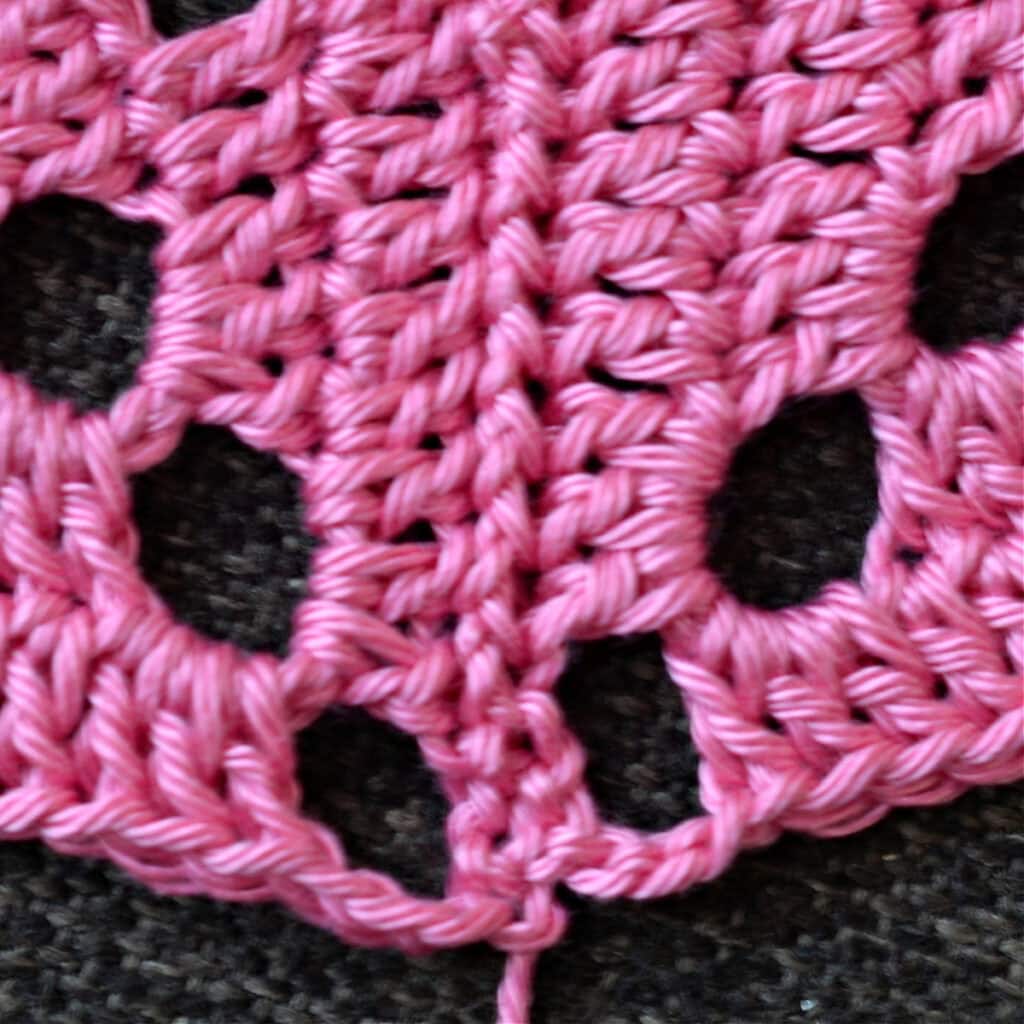
Continue working back and forth creating a zig zag with the yarn between the panels. After you’ve created a zig zag about an inch long, pull on both ends of your yarn to tighten the seam. Continue in this manner until you’ve reached the 3rd ch of the next ch-6 corner.
Edging the Motif Panel Assembly
Begin edging either of the long sides of the panel first.
Continue using the hook size you used for the Motif Square.
Changes for Sizes Written as Follows: S/M (L/1X, 1X/2X, 3X/4X)
Rnd 1 (RS): With yarn & the crochet hook for the size you’re making, join yarn with a sl st in the far right ch-6 sp at the corner, [ 3 sc into the ch-6 sp, (sc in each of the next 9 sts, 3 sc in the next ch-3 sp, sc in the next st, 3 sc in the next ch-3 sp) twice, sc in each of the next 9 sts, 3 sc in the next ch-6 sp*, sc in the middle of the joining seam ] work from [ to ] 4 times (4 times, 5 times, 5 times), ending the last time at the *, ch 1 at the corner then rotate to work along the short edge, work from [ to ] 3 times, ending the last time at the *, ch 1 at the corner then rotate to work along the next long edge, work from [ to ] 4 times (4 times, 5 times, 5 times), ending the last time at the *, ch 1 at the corner then rotate to work along the short edge, work from [ to ] 3 times, ending the last time at the *, then finish with a ch 1 at the corner and join with a sl st to the 1st sc. (672, 672, 768, 768 sts) includes ch-1’s at corners.
Fasten off. Weave in ends. Continue below to Bottom Hem.
Bottom Hem
Continue using the hook size you used for the Motif Square.
Row 1 (RS): Working in the FLO, join yarn with a sl st into the ch-1 furthest to the right, sl st in each st across, ending with a sl st in the FLO of the ch-1 at the opposite corner. Turn. (192, 192, 240, 240 sts)
Rows 2 – 3: Ch 1, Working in the FLO sl st in each st across. Turn. Place a Stitch Marker in the last stitch of Row 3 to mark the beginning of the Front Opening Edging.
Fasten off. Weave in ends. Continue on to Creating the Sleeves.
Creating the Sleeves
Continue using the hook size you used for the Motif Square.
Step 1: Lay your work out flat with the Right Side facing down, so that you have the long edges positioned horizontally and the Bottom Hem along the bottom edge closest to you.
Step 2: Beginning with the ch-1 at the corner, count 71 (81, 87, 91) sts down along the short side of the rectangle (from top to bottom). Note: If you’d like a smaller or larger armhole opening, you can simply adjust it to suit your taste. The rest of the pattern is easily adjusted.
Step 3: Bring the ch-1 at the corner down to this stitch and use a locking stitch marker to secure the ch-1 to this stitch. Repeat for the opposite side to create the second armhole opening.
Continue on to Edging the Front Opening.
Edging the Front Opening
Continue using the hook size you used for the Motif Square.
Row 1 (RS): Join yarn with a standing sc in the st where you placed a SM in the bottom hem (place a new SM in this new st), sc in each st up to the SM where you created the armhole opening, sc in each of the sts joined by the SM, then you’ll be continuing along the long edge of the cardigan (along the neckline/upper back), working across the neckline / upper back work [ sc in each of the next 2 sts, invsc2tog ] rep across to the next SM for the next armhole opening (note: if you can’t complete a full rep when you get to the SM, don’t worry, st count isn’t crucial now), then sc in each of the sts joined by the SM, lastly, sc in each remaining st down the front of the cardigan.
Note: Stitch count isn’t crucial, just make sure to have an ODD number of stitches around the front opening.
Fasten off. Weave in ends. Continue on to Front Edge Ribbing.
Front Edge Ribbing
Continue using the hook size you used for the Motif Square.
Place Stitch Markers: Before you begin the front edge ribbing, you will need to place a few stitch markers to make working this part much easier. With your cardigan laid flat, with the front opening facing you, right side out, place a stitch marker in the following 3 places.
- Place a stitch marker in the 31st st from the bottom, along the garment’s left side.
- Along the top edge, between the armholes, place a stitch marker in the seam between the first two motifs and between the last 2 motifs.
Row 1 (RS): Join yarn with a sl st in the st marked with a SM from edging the front opening, ch 25, ext sc in the 2nd ch from your hook, ext sc in each of the next 22 chs, extsc2tog in the last ch and same st as ch 25. (24 sts)
Row 2: Sl st into the next st along the edge of the cardigan (does not count as a st), turn, working in the BLO sl st in each st across. Turn. (24 sts)
Row 3: Ch 1, working in the BLO ext sc in each st across to the last 2 sts, invextsc3tog in the last 2 sts and next st along the edge of the cardigan. (23 sts)
Rows 4 – 33: Repeat Rows 2 – 3 until your stitch count is 8 sts. Your stitch count will decrease by 1 stitch every other row. (8 sts) at the end of Row 33.
Row 34: Sl st into the next st along the edge of the cardigan, turn, working in the BLO sl st in each st across. Turn. (8 sts)
Row 35: Ch 1, working in the BLO, ext sc in each st across to the last st, extsc2tog in the last st and next st along the edge of the cardigan. (8 sts)
Rep Rows 34 – 35 until you reach the point where the armhole opening was joined together. (8 sts)
Rep Rows 34 – 35 for 9 more rows past where the armhole opening was joined. (8 sts)
Switch to a slightly smaller hook (For example, I was using a 4mm hook & I switched to a 3.5mm hook).
Rep Row 3, decreasing to 7 sts.
Rep Rows 34 – 35 for 20 rows. (7 sts)
Rep Row 3, decreasing to 6 sts.
Rep Rows 34 – 35 until you reach the next SM. (6 sts)
Rep Row 3, decreasing to 5 sts.
Rep Rows 34 – 35 until you reach the next SM. (5 sts)
Instructions for working an Increase Row: Ch 1, working in the BLO, 2 ext sc in the first st, ext sc in each st across to the last st, extsc2tog in the last st and next st along the edge of the cardigan. Stitch count is increased by 1 stitch.
Work 1 Increase Row, increasing to 6 sts.
Rep Rows 34 – 35 for 9 rows. (6 sts)
Work 1 Increase Row, increasing to 7 sts.
Rep Rows 34 – 35 for 18 rows. (7 sts)
Work 1 Increase Row, increasing to 8 sts.
Switch back to the larger hook you were using. (For example, I went back to the 4mm hook.)
Rep Rows 34 – 35, ending with a Row 34 rep, until you reach the last SM. (8 sts)
[ Work 1 Increase Row, Rep Row 34 ] rep from [ to ] for the remainder of the front edge ribbing. Final stitch count: 24 sts.
Fasten off. Weave in ends. Continue on to Armhole Edging, if desired. If not, block as needed, then enjoy!
Armhole Edging
Continue using the hook size you used for the Motif Square.
Row 1 (RS): Join yarn with a sc in the st on the left of where you joined the armhole, [ sc in each of the next 3 sts, invsc2tog ] rep around armhole opening. Join with a sl st to the 1st st. Because stitch count isn’t crucial for this part, you can work more or less decreases around the armhole opening to suit your individual taste.
Fasten off. Weave in ends. Block as needed & Enjoy!

I MADE IT! NOW WHAT?
Pin this post!: Save this crochet lacy cardigan pattern to your Pinterest boards so that you can come back and make it again.
Leave a comment below: We love to hear your feedback.
Share Your Finished Projects on Facebook or Instagram: I love to see your finished projects! Share with us on social media and tag me @acrochetedsimplicity or use the hashtag #ACrochetedSimplicity so I can find your posts.
Join us in the Facebook Community Group!
Come share your finished projects with us in the A Crocheted Simplicity Crochet Community Group on Facebook. Join us for fun community events such as crochet alongs, join in on crochet conversations, ask questions, get advice, and share your love for crochet!

More Crochet Patterns for Cardigan Sweaters I Think You’ll Love
More Crochet Sweater Patterns
Are you looking for more crochet sweater patterns? We have several more patterns for crochet clothes, including matching sweaters for mothers and daughters and even for fathers and sons.