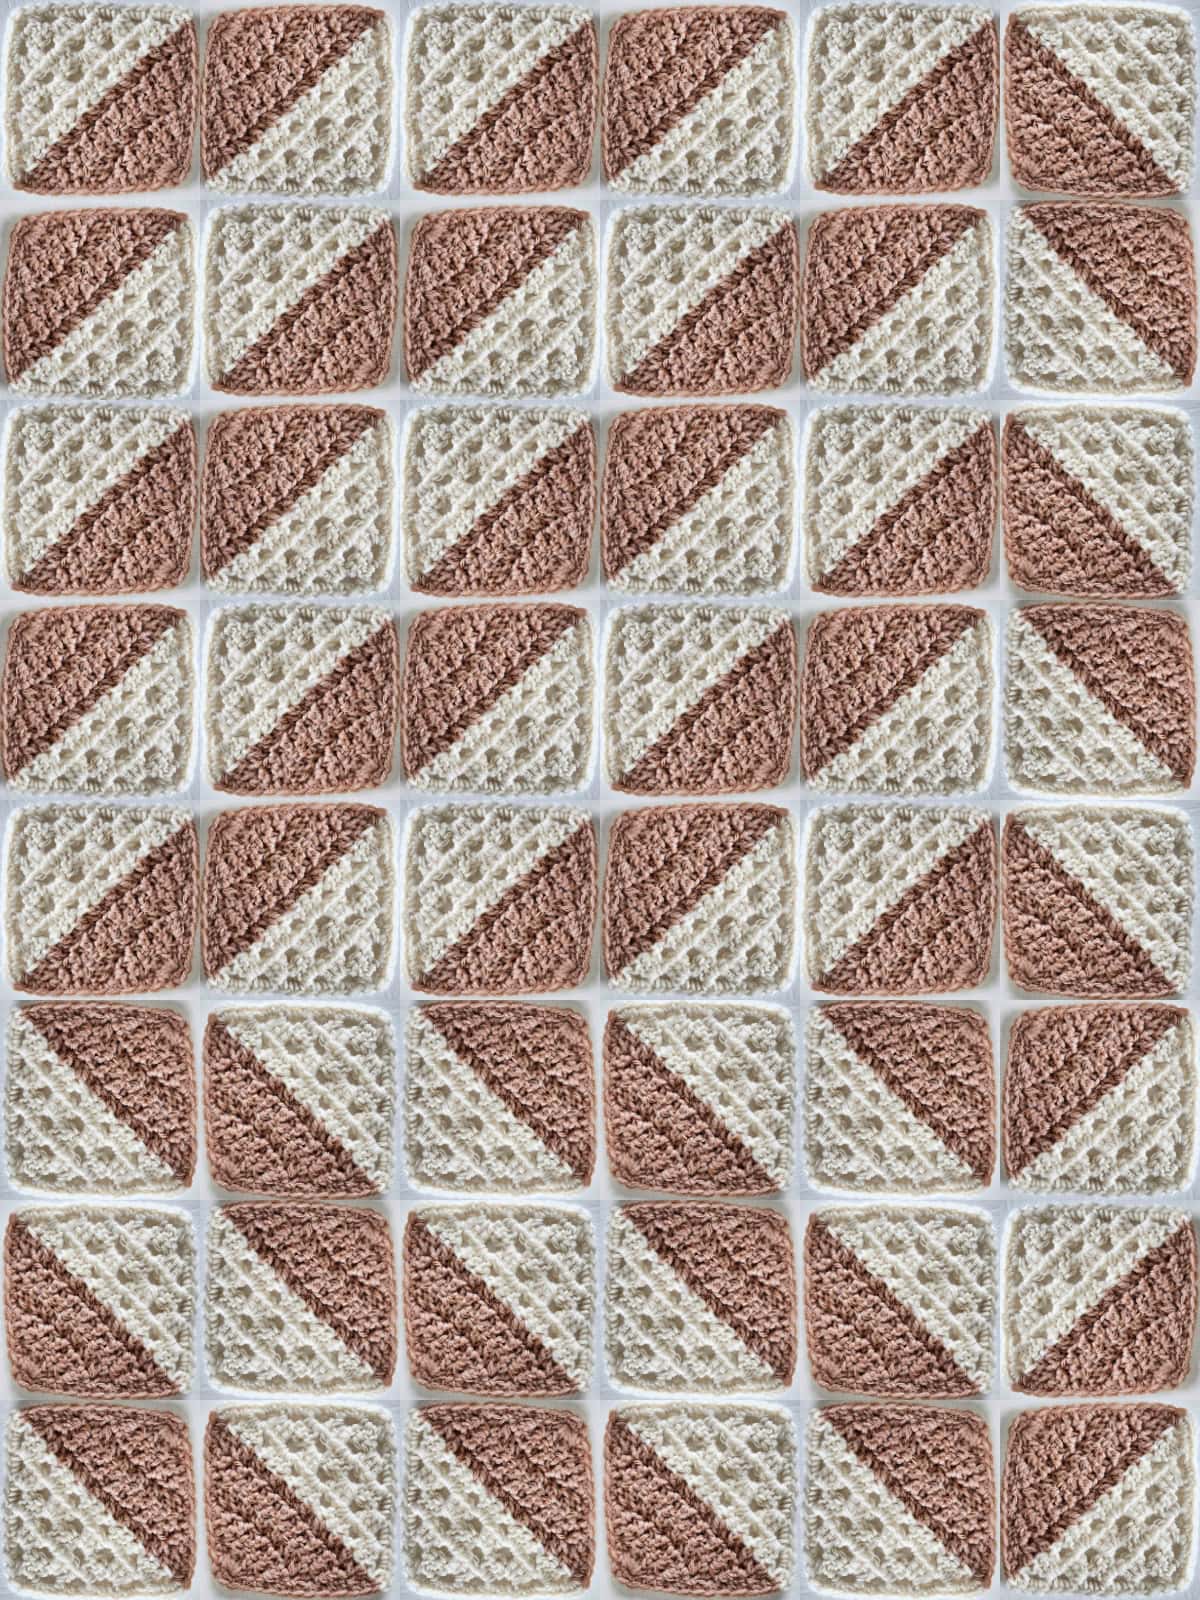
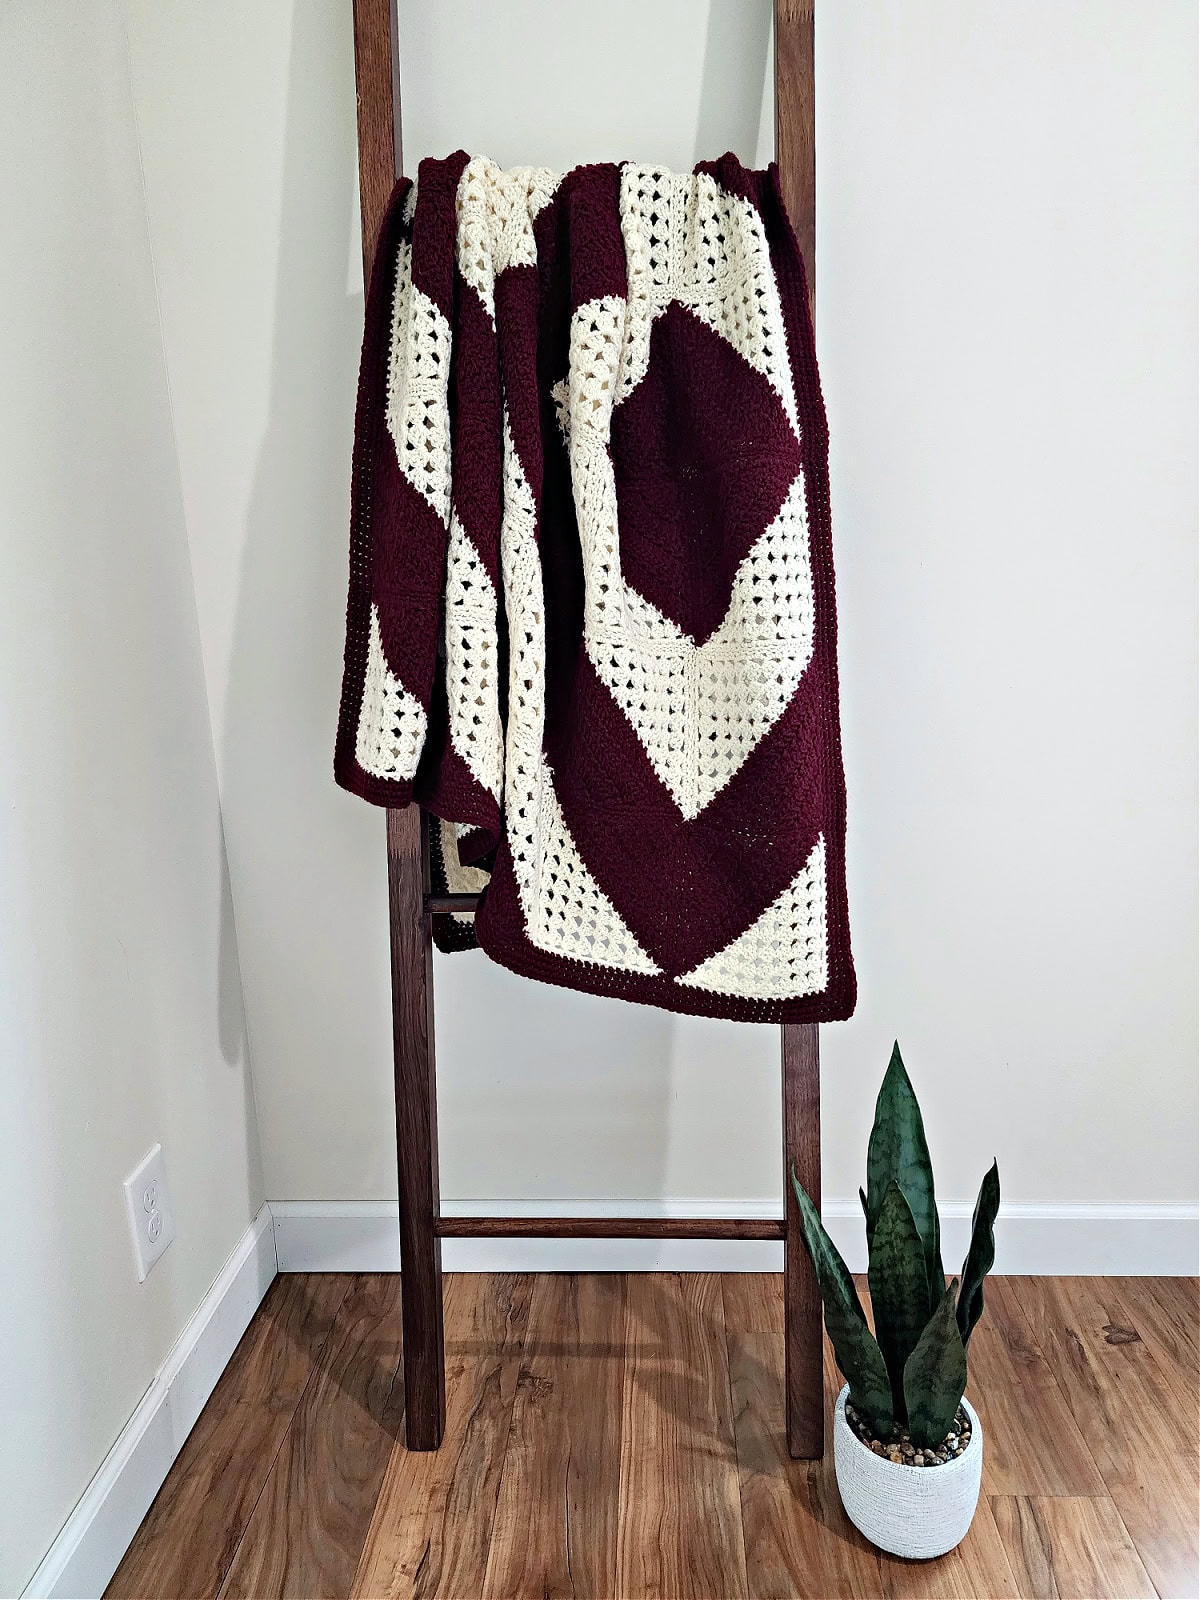
Modern Granny Squares Crochet Blanket
Do you want to add a duotone granny squares crochet blanket to your home decor or to use as a lapghan while you work? I love tossing this one over my sofa for some pizzaz or curling up with it during a movie night!
Since this is made by seaming up smaller squares together, you can work on the motifs on the go until you have enough. While I made mine with two colors, you can also turn this into a solid color blanket but remember that it’ll look vastly different!
You’ll find the free crochet granny squares blanket pattern in the post below, or you can find an ad-free printable PDF (that includes all photo tutorials, + charts), on Ravelry, or Etsy (aff).
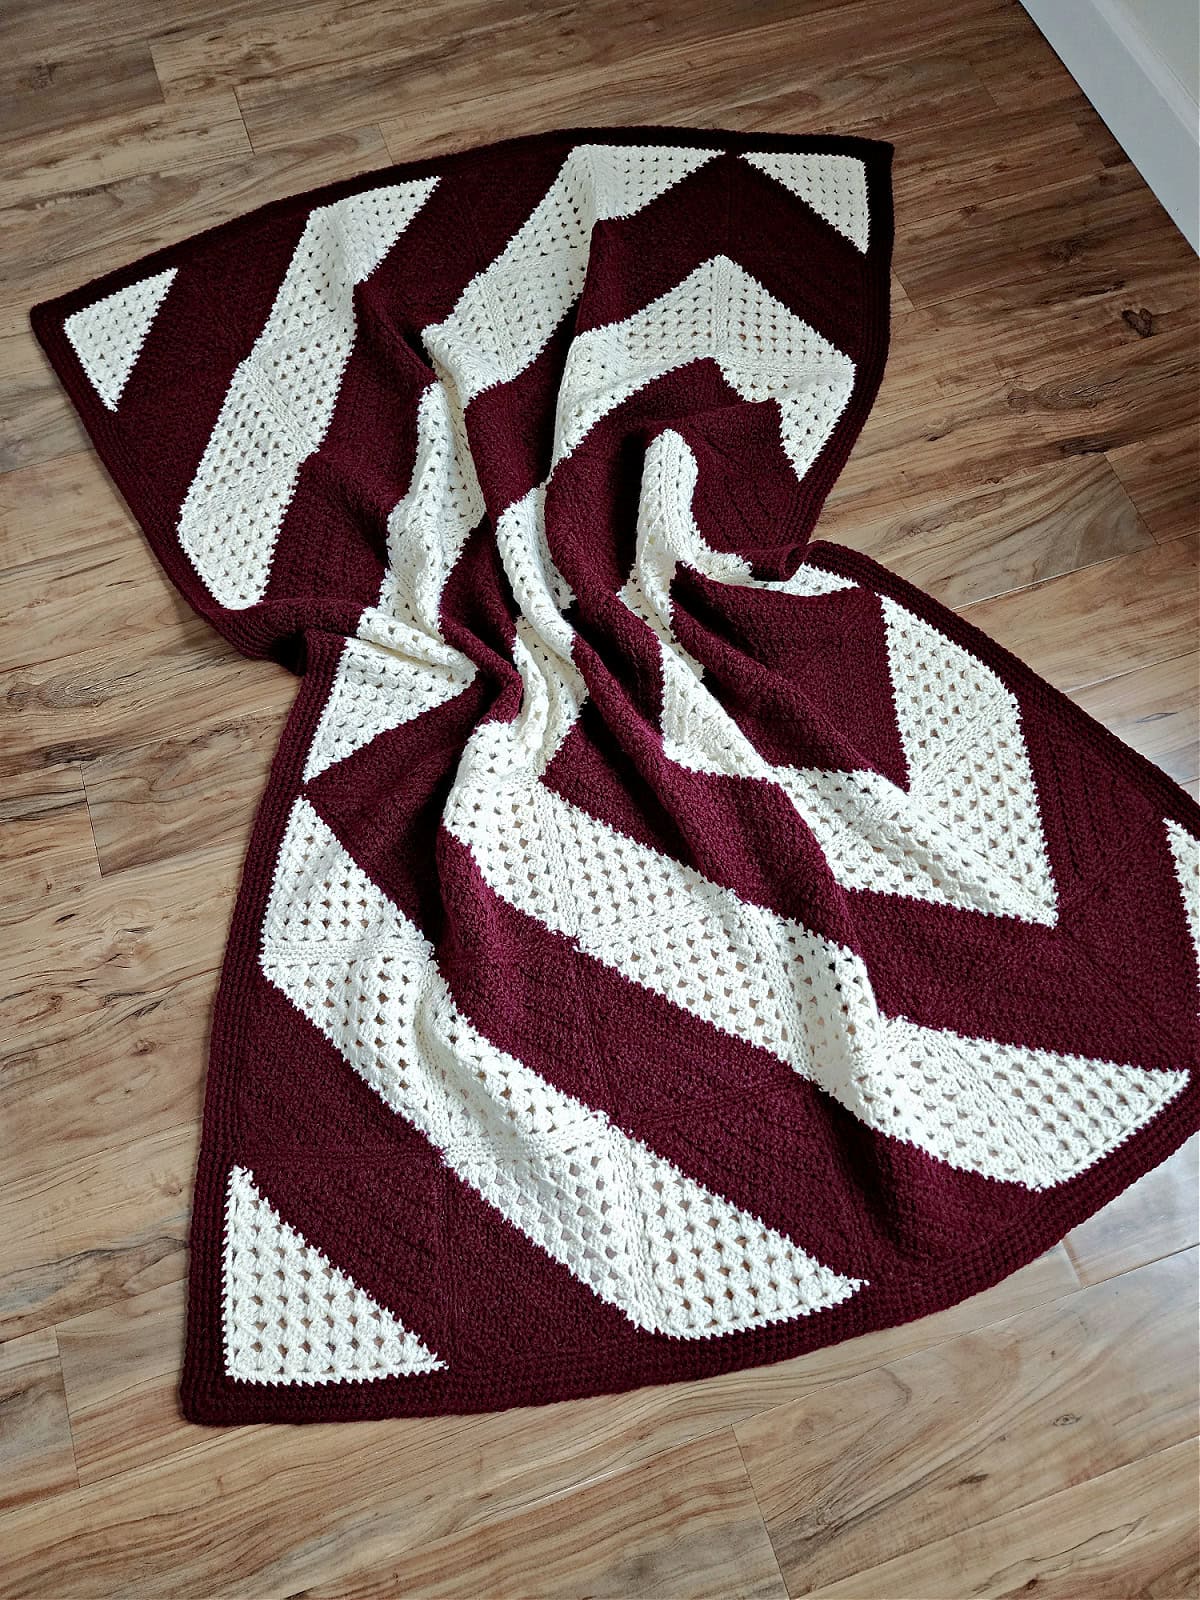
A granny square blanket made from motifs is timeless piece which is sure to be appreciated by anyone who receives it. Each motif is worked up individually and then seamed together to form a larger blanket. Once you get the hang of making the squares, the process will become both manageable and enjoyable, especially for advanced beginners looking for a challenge.
The handmade quality of this modern blanket adds a personal touch to home decor, blending comfort with creativity.
The written crochet pattern includes three crochet blanket sizes, allowing you to make this for a variety of recipients.
Why You’ll Love This Granny Squares Crochet Blanket Pattern
- Make a larger project without carrying all of it around with you.
- Beginner-friendly with an easy-to-follow step-by-step photo tutorial.
- Modern and minimalistic design that fits any home décor.
- Customizable size for throws, baby blankets, or lapghans.
- Duotone to add pops of color in any setting.
How to Crochet a Modern Granny Squares Blanket
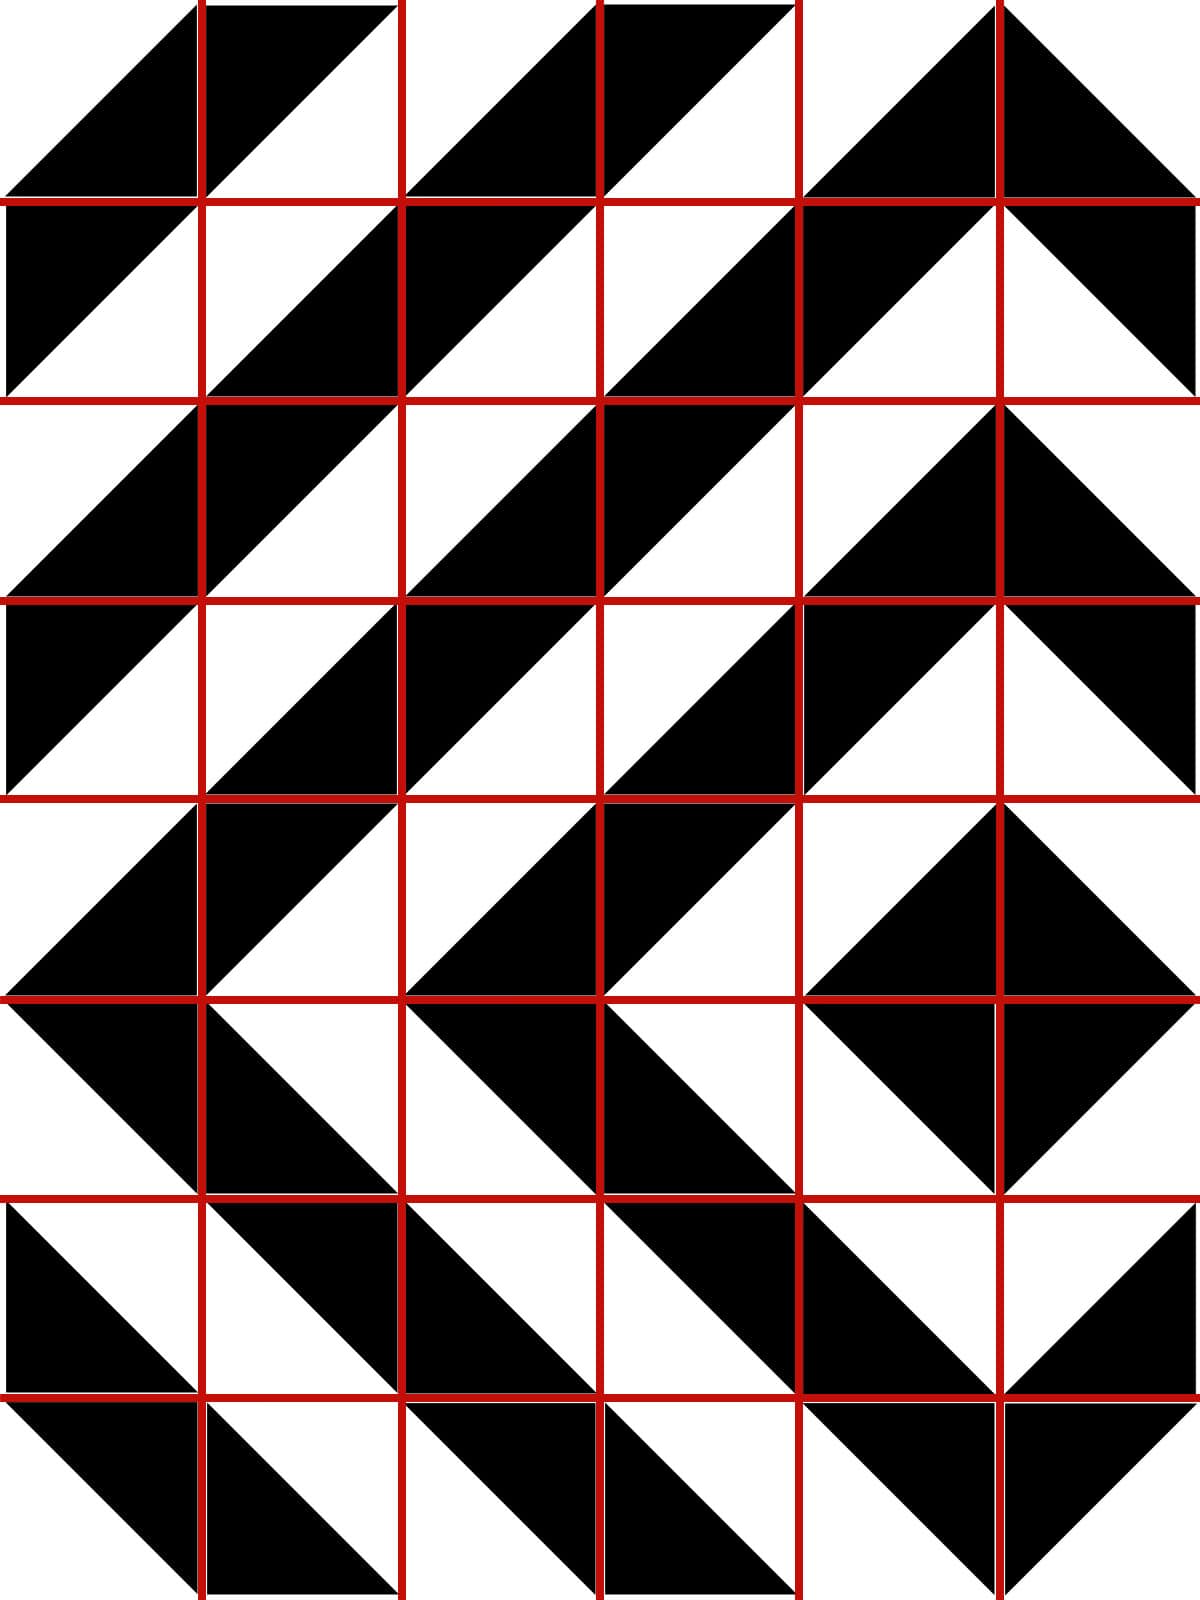
The Modern Motif Granny Squares Blanket is constructed out of C2C crochet granny squares.
To make a crochet throw blanket, you’ll crochet a total of 48 crochet quilt squares. The size of the granny squares you crochet will vary depending on the size blanket you’re crocheting.
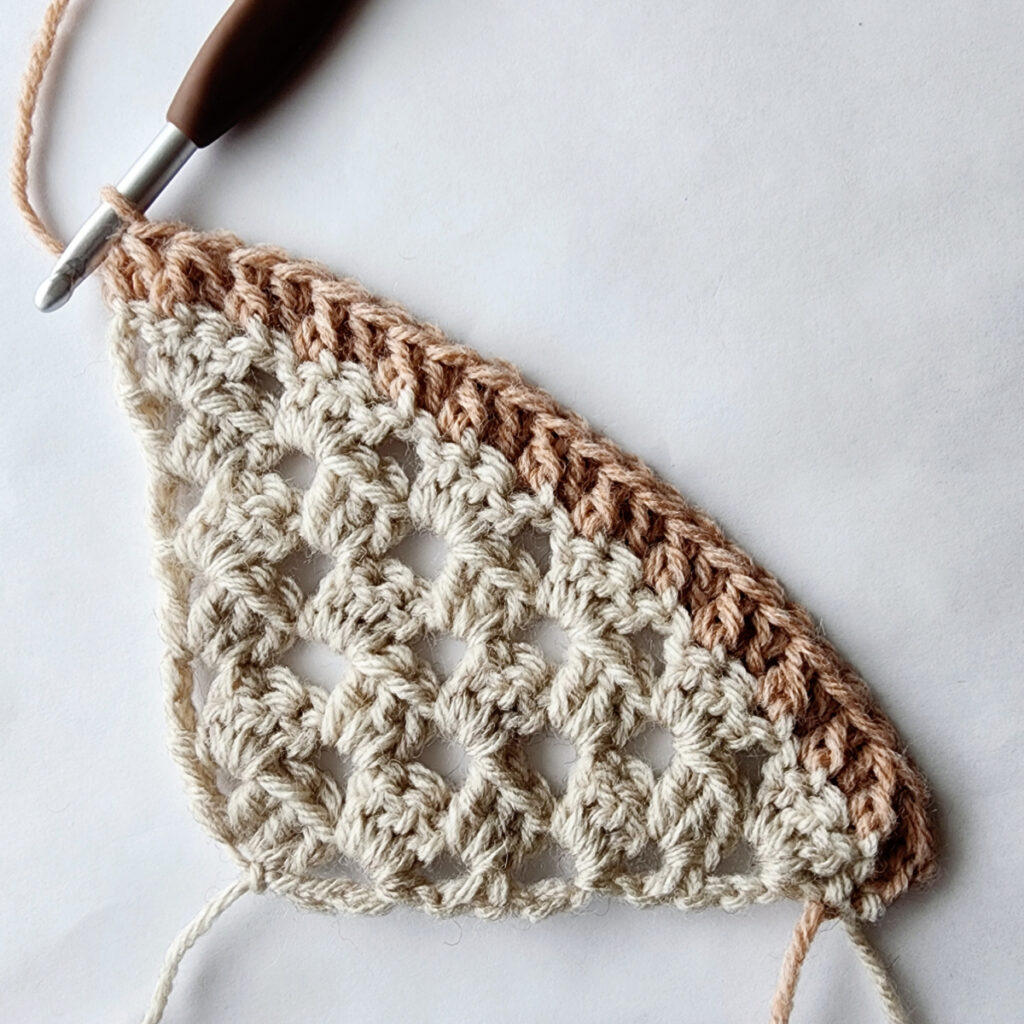
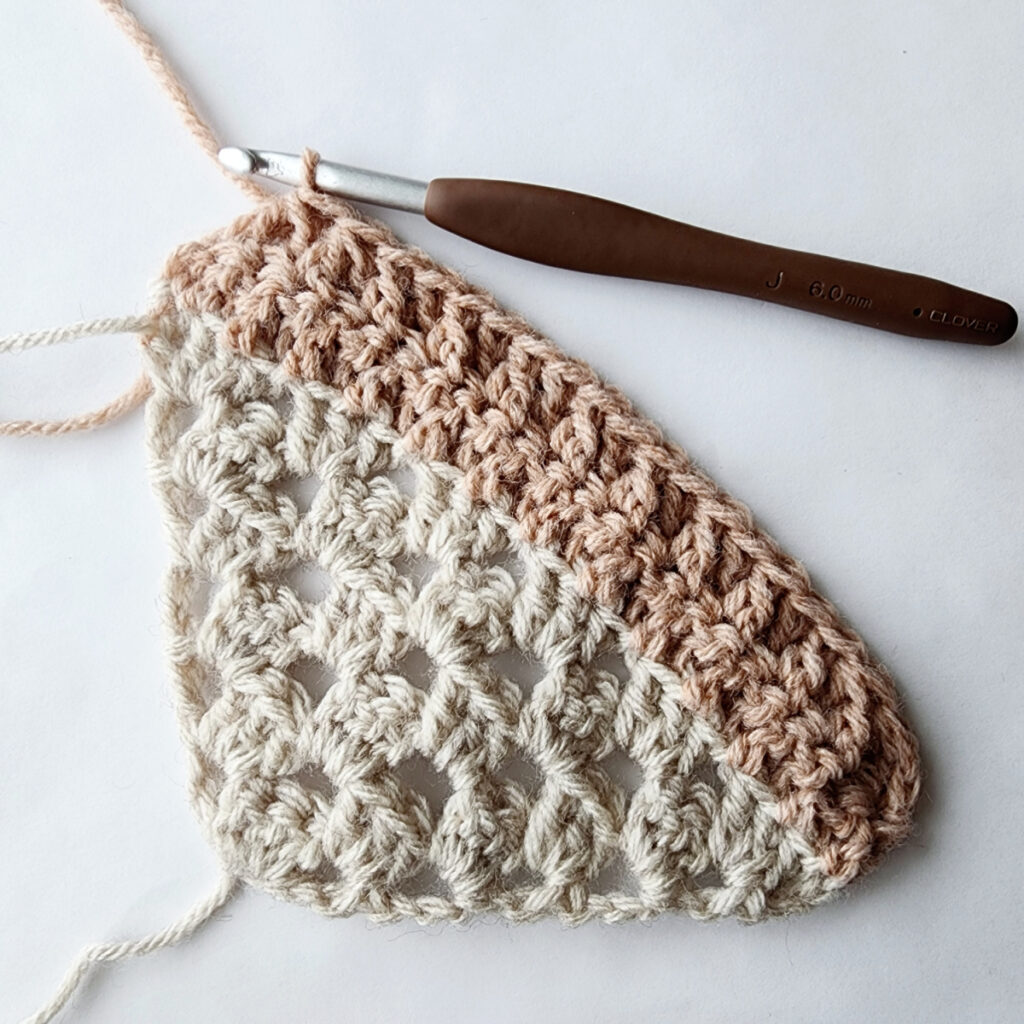
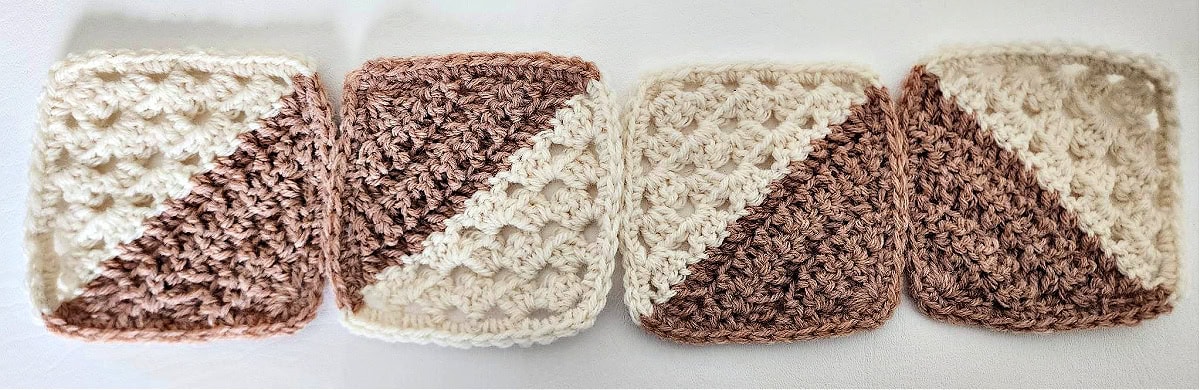
First, you’ll begin each square with your main color and crochet the granny stitch on the bias (aka corner-to-corner). Then, you’ll crochet the second half of the square using a contrasting color yarn and double crochet alternating working in BLO and FLO.
After you crochet a square, it’s best to block it before seaming it to others. Blocking before seaming makes the seaming process go much more smoothly.
Once you’ve crocheted and blocked all blanket squares, you’ll arrange them according to the layout chart and begin seaming them using the mattress stitch seam.
Lastly, you’ll add a single crochet border around the perimeter of your crochet quilt blanket.
Size & Yardage Chart

How To Get The
Modern Granny Squares Crochet Blanket Pattern
Option 1: Scroll down for the crochet blanket pattern free right here in this blog post.
Option 2: Purchase the ad-free printable PDF from one of my shops:
Yarn
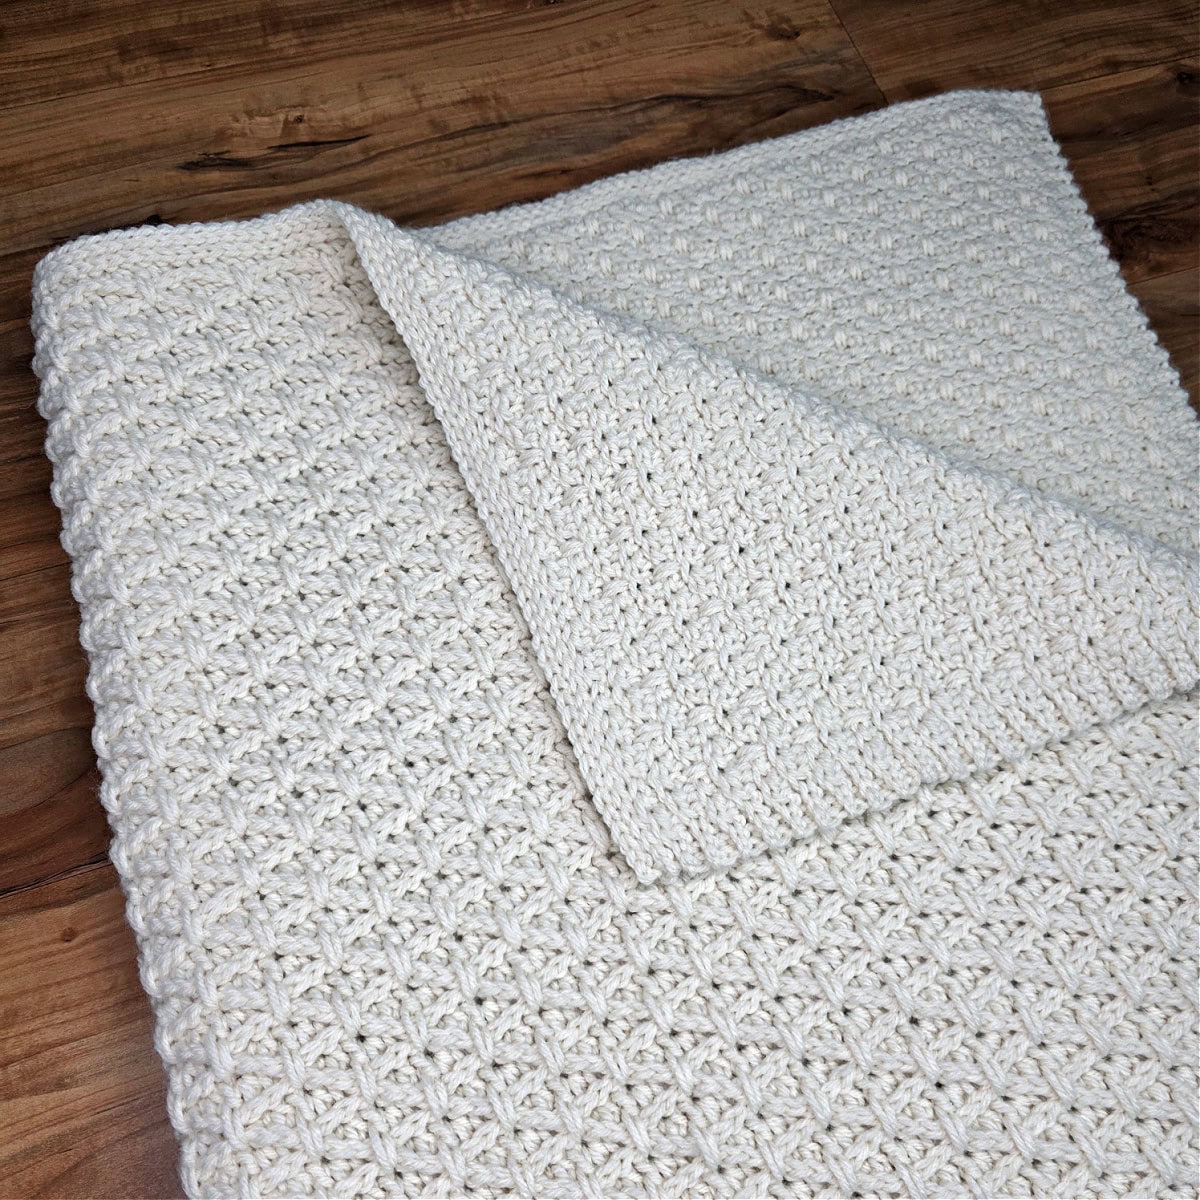
This crochet blanket pattern was designed using Lion Brand Yarn Wool Ease in the colorways Fisherman and Tawny Port. Wool Ease is my go-to worsted weight yarn for almost all crochet projects. It’s the best of both worlds with the feel, warmth and softness of wool, and the easy care of an acrylic worsted weight yarn.
You can substitute another worsted weight yarn as long as you’re able to meet gauge and you’re happy with the drape of the crochet fabric of the crochet blanket.
There are several other worsted weight yarns that would make great substitutions. Lion Brand Heartland, Lion Brand Pound of Love, Lion Brand Vanna’s Choice – just to name a few.
For help determining what size to make your crocheted blanket, check out my Standard Blanket Size Chart.
Pro tip: To really make the texture and design pop, choose one neutral shade of yarn along with a brighter, bolder shade.
Modern Granny Squares Crochet Blanket Pattern
The crochet blanket pattern is free below, but if you love to work offline, I’ve got a couple other great options for you.
Purchase the ad-free, printable PDF, on Ravelry, or on Etsy (aff).
Purchase the Modern Granny Squares Blanket kit! (aff): Lion Brand has a full kit of the Modern Granny Squares Crochet Blanket, available on their website. The blanket crochet kit includes your choice of colors and a digital copy of the crochet blanket pattern!
This post contains affiliate links.
Materials
- Yarn: Worsted Weight / 4 yarn; Lion Brand Wool Ease in Fisherman and Tawny Port was used for the crochet blanket shown in the photos. 80% Acrylic / 20% Wool (197 yards / 180 m / 85 g / 3 oz)
- Crochet Hook: J/10/6.00mm; or sizes needed to obtain gauge (my favorite crochet hooks are the Clover Amour Crochet Hooks, I’ve never had an ache in my hand since switching).
- Scissors
- Yarn Needle
- Locking Stitch Markers (3 – 4)
Experience Level
- Easy
Abbreviations (U.S. Terms)
- ch(s): chain(s)
- sl st: slip stitch
- st(s): stitch(es)
- sc: single crochet
- dc: double crochet
- dc2tog: double crochet decrease
- Alt-dc: alternate double crochet
- Alt-dc2tog: alternate double crochet decrease
- Alt-dc7tog: alternate double crochet 7 together (picture tutorial below)
- yo: yarn over
- sp: space
- BLO: back loop only
- FLO: front loop only
- SM: stitch marker
- Rep: repeat
- Rnd: round
- RS: right side
- WS: wrong side
- MC: main color
- CC: contrasting color
Gauge
- Measurements are given throughout the pattern.
Sizes
- Baby: 30″ W x 40″ L
- Lapghan: 42″ W x 56″ L
- Small Throw: 48″ W x 64″ L
Special Stitches
- Alternate Double Crochet (alt-dc): Do not ch, instead, insert your hook into the first st, yo, pull up a loop, yo, pull thru both loops, insert your hook between the legs of the st just made, yo, pull up a loop, yo, pull thru one loop, yo, pull thru remaining loops.
- Double Crochet Decrease (dc2tog): (Yo, insert hook in next st, yo, pull up a loop, yo, pull thru 2 loops on hook) twice, yo, pull thru remaining 3 loops on hook.
- Alternate Double Crochet Decrease (Alt-dc2tog): After turning your work, do not ch, instead, insert your hook into the first st, yo, pull up a loop, yo, pull thru both loops, insert your hook between the legs of the st just made, yo, pull up a loop, yo, pull thru one loop, yo, insert your hook into the next st indicated, yo, pull up a loop, yo, pull through 2 loops, yo, pull through remaining 3 loops.
- Alternate Double Crochet 7 Decrease (Alt-dc7tog): After turning your work, do not ch, instead, insert your hook into the first st, yo, pull up a loop, yo, pull thru both loops, insert your hook between the legs of the st just made, yo, pull up a loop, yo, pull thru one loop, (yo, insert your hook into the next st indicated, yo, pull up a loop, yo, pull through 2 loops) work from ( to ) 6 times, yo, pull through remaining 8 loops.
- Join yarn with a standing sc: When instructed to “Join with a standing sc”, begin with a slip knot on your hook. Insert your hook into the stitch or space indicated, yo, pull up a loop, yo and draw thru both loops on hook.
Pattern Notes
- Turning chains are not counted as stitches, unless specified otherwise.
- The first stitch of each row is worked into the same stitch as the beginning chain, unless noted otherwise.
- Yarn Notes: Lion Brand Yarns Wool Ease was used for the samples. Another comparable worsted weight yarn may be used as long as gauge is met.
- Lion Brand Yarns Wool Ease in Tawny Port & Fisherman: 80% Acrylic / 20% Wool (197 yds / 180 m / 85 g / 3 oz)
- Yardage
- Fisherman (MC): #620-099 4 (6, 9) balls
- Tawny Port (CC): #620-089 5 (7, 10) balls
- I used Fisherman for the granny stitch section and Tawny Port for the solid section.
- Changes for Sizes as Follows: Baby (Lapghan, Small Throw)
- Construction: First, you’ll crochet blanket squares that are worked on the bias (C2C). The first half of the square is made using the granny stitch. The second half of the square is made using double crochet alternating working in BLO and FLO. After crocheting all of the squares, you’ll arrange them according to the chart and begin seaming them using the mattress stitch seam. After all squares are seamed, a simple border is added.
If you ever need help determining what size blanket to make, check out and pin my Standard Blanket Size Chart.
Modern Granny Squares Blanket – Free Written Pattern
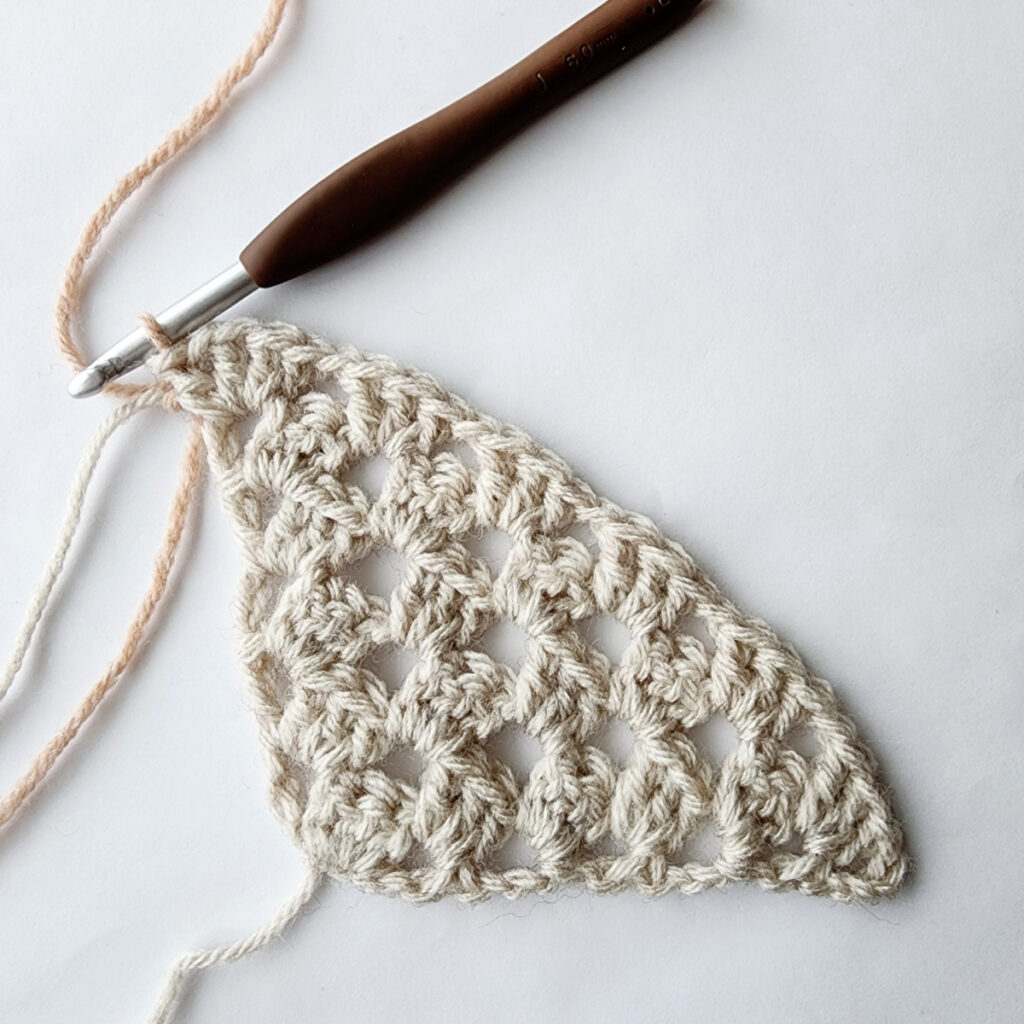
Modern Blanket Motif Instructions (Make 48)
Increase Rows
Increase Row 1: With MC yarn & a 6.00mm crochet hook, ch 5 (counts as 1st dc & ch-1), (3 dc, ch 1, dc) in the first ch. Turn. (7 sts) *Ch-1 spaces are included in stitch count.
Increase Row 2: Ch 4 (counts as 1st dc & ch-1), 3 dc in first ch-1 sp, ch 1, skip each of the next 3 dc, 3 dc in the next ch-1 sp, ch 1, dc in the same sp. Turn. (11 sts)
Increase Row 3: Ch 4, (counts as 1st dc & ch-1), 3 dc in the first ch-1 sp, (ch 1, skip each of the next 3 dc, 3 dc in the next ch-1 sp) twice, ch 1, dc in same sp as last 3 dc. Turn. (15 sts)
Increase Row 4: Ch 4, (counts as 1st dc & ch-1), 3 dc in the first ch-1 sp, (ch 1, skip each of the next 3 dc, 3 dc in the next ch-1 sp) across, ch 1, dc in same sp as last 3 dc. Turn. (19 sts) Row 4 stitch count increases by 4 sts. *Approximate Size at this point: 5″ across the top of Row 4 and 2.25″ H from the bottom of Row 1.
Baby – Rows 5 – 6: Rep Row 4. (27 sts)
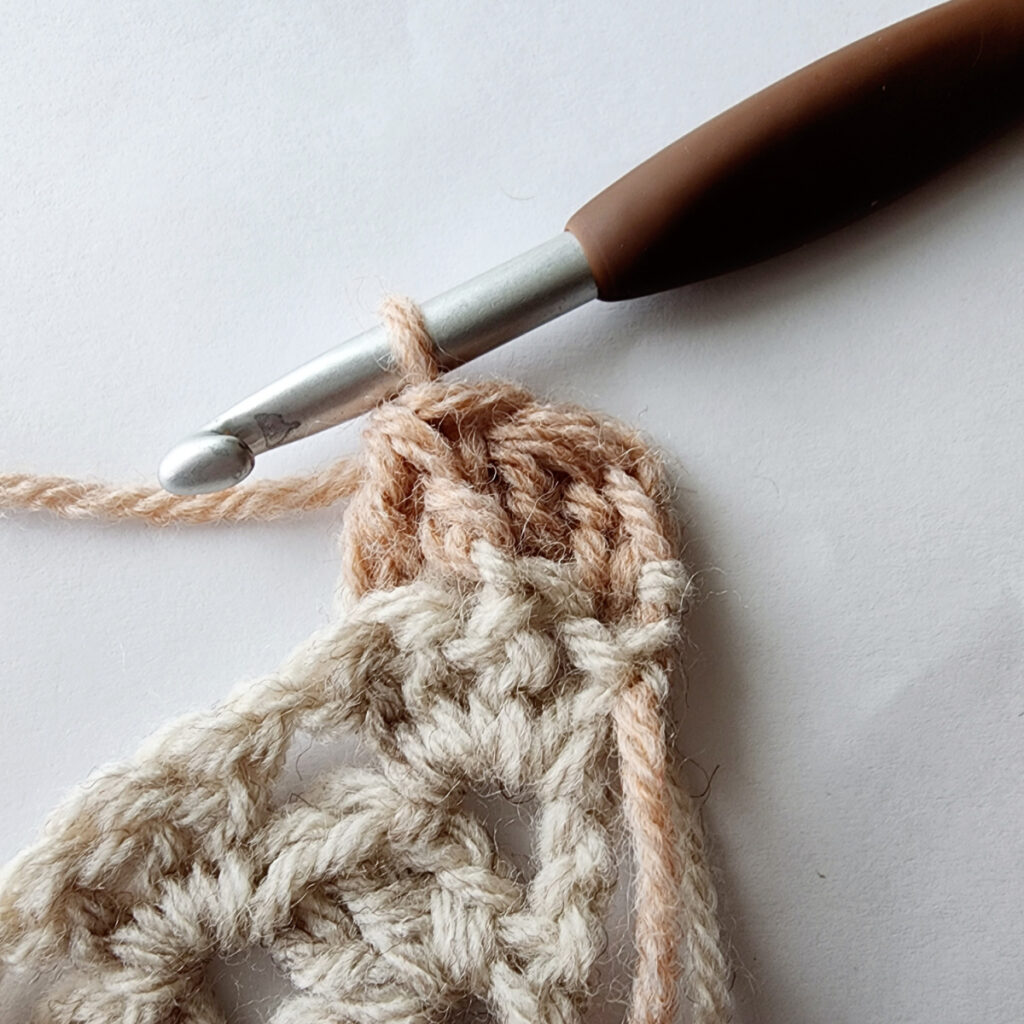
Switch to CC on the last pull through of the last dc of Row 6, but DO NOT fasten off MC (you will pick it back up later when working the blanket square border). Continue on to Decrease Rows. Width of square at this point should be 5″.
Lapghan – Rows 5 – 8: Rep Row 4. (35 sts)
Switch to CC on the last pull through of the last dc of Row 8, but DO NOT fasten off MC (you will pick it back up later when working the blanket square border). Continue on to Decrease Rows. Width of square at this point should be 7″.
Small Throw – Rows 5 – 9: Rep Row 4. (39 sts)
Switch to CC on the last pull through of the last dc of Row 9, but DO NOT fasten off MC (you will pick it back up later when working the blanket square border). Continue on to Decrease Rows. Width of square at this point should be 8″.
Increase Row 1
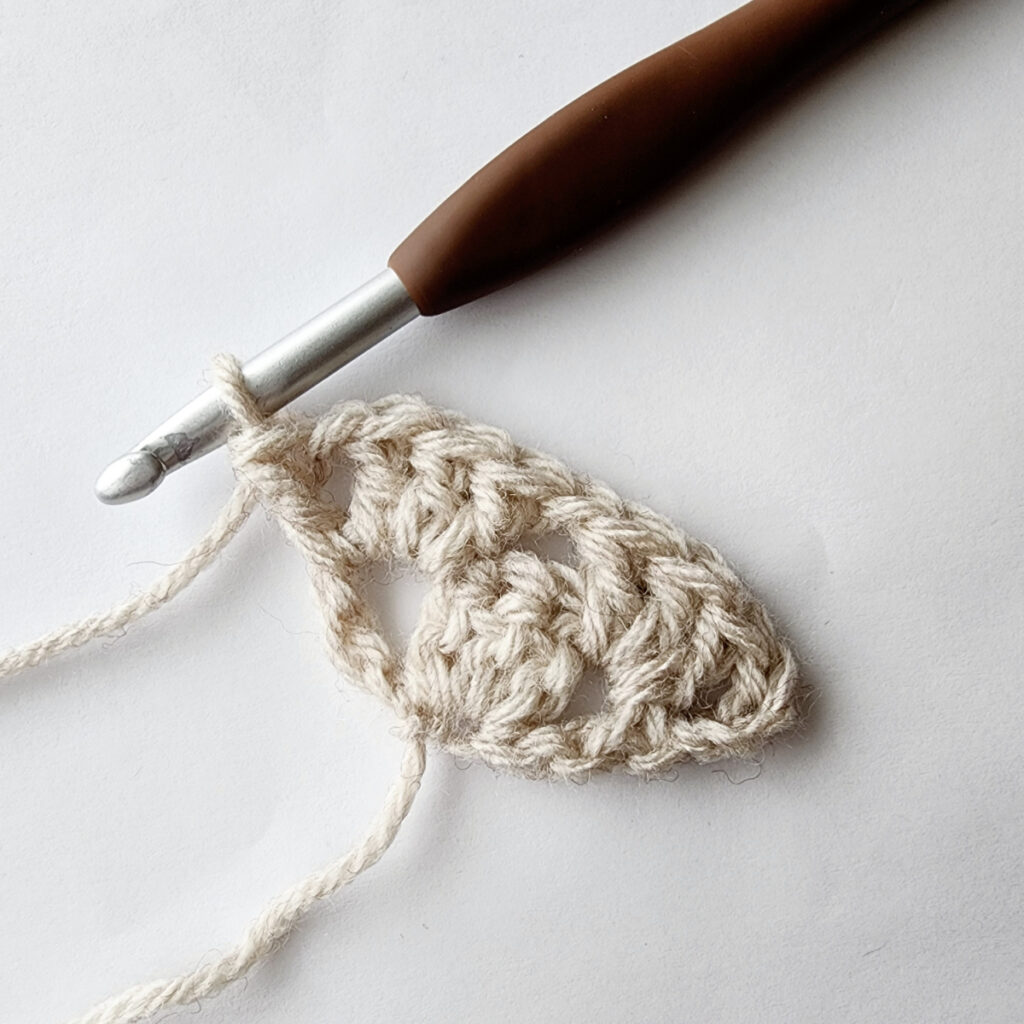
Increase Row 2
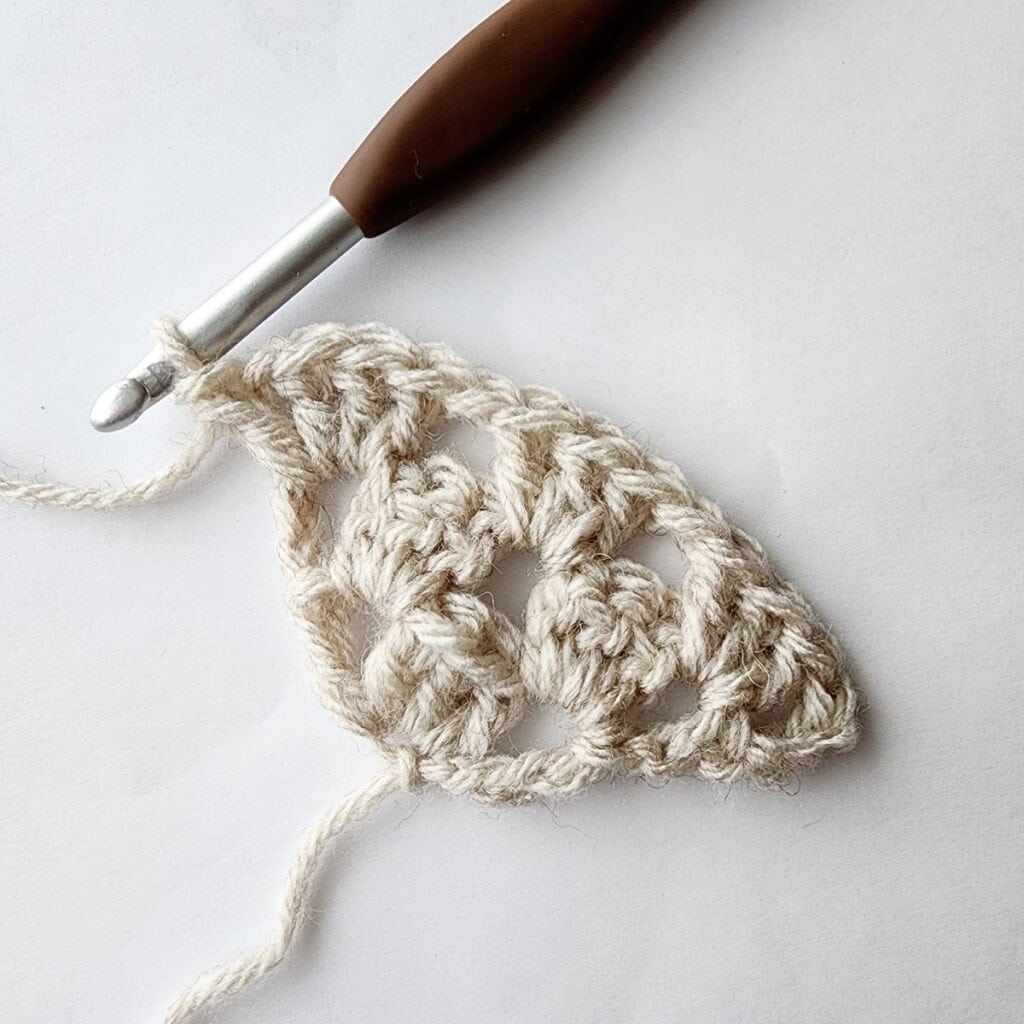
Increase Row 3
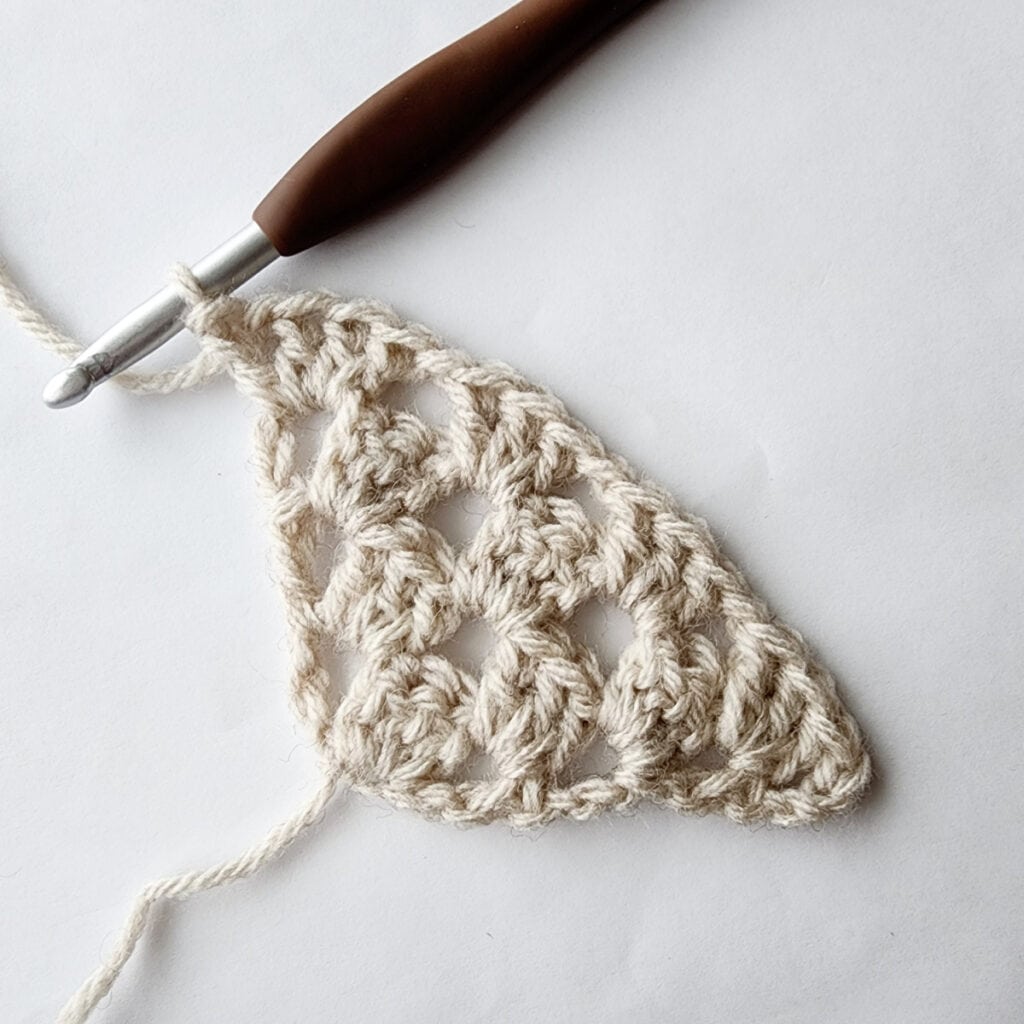
Increase Row 4
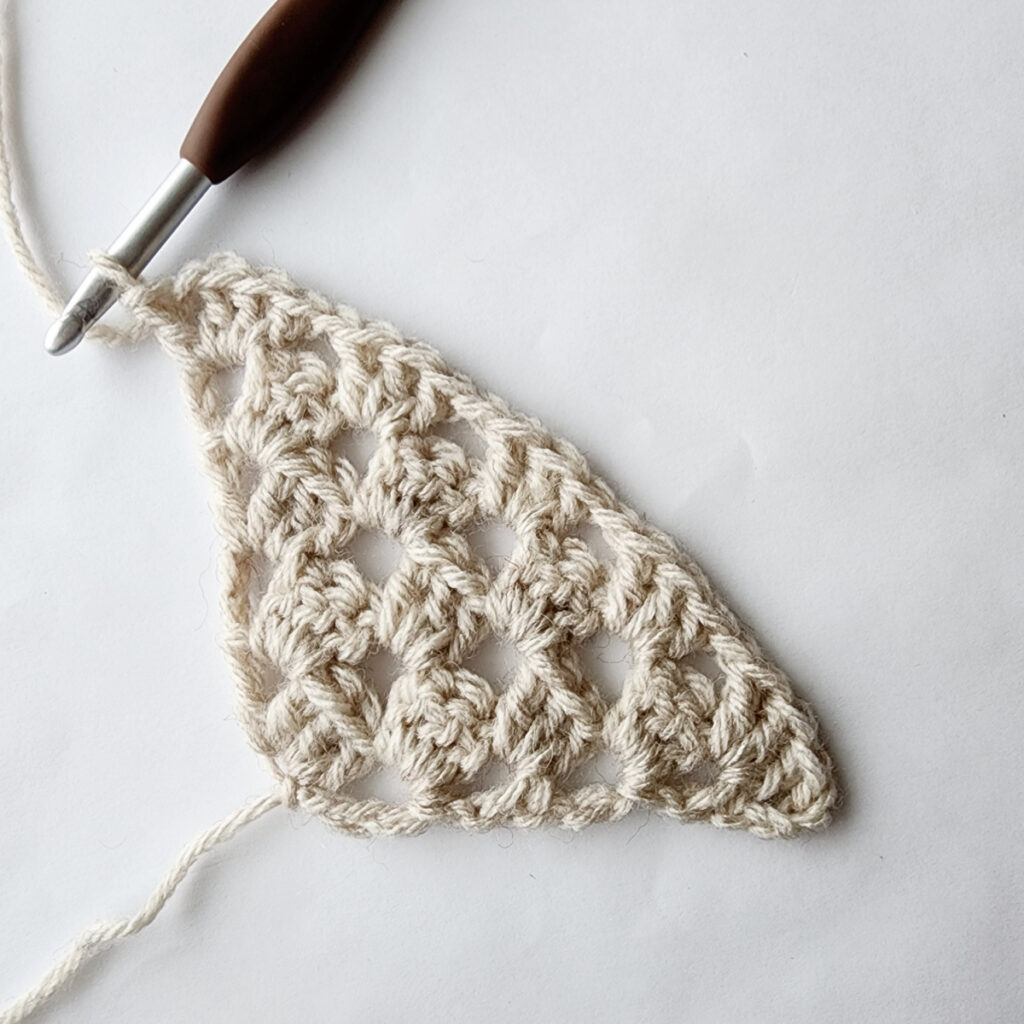
Increase Row 5
Increase Row 6
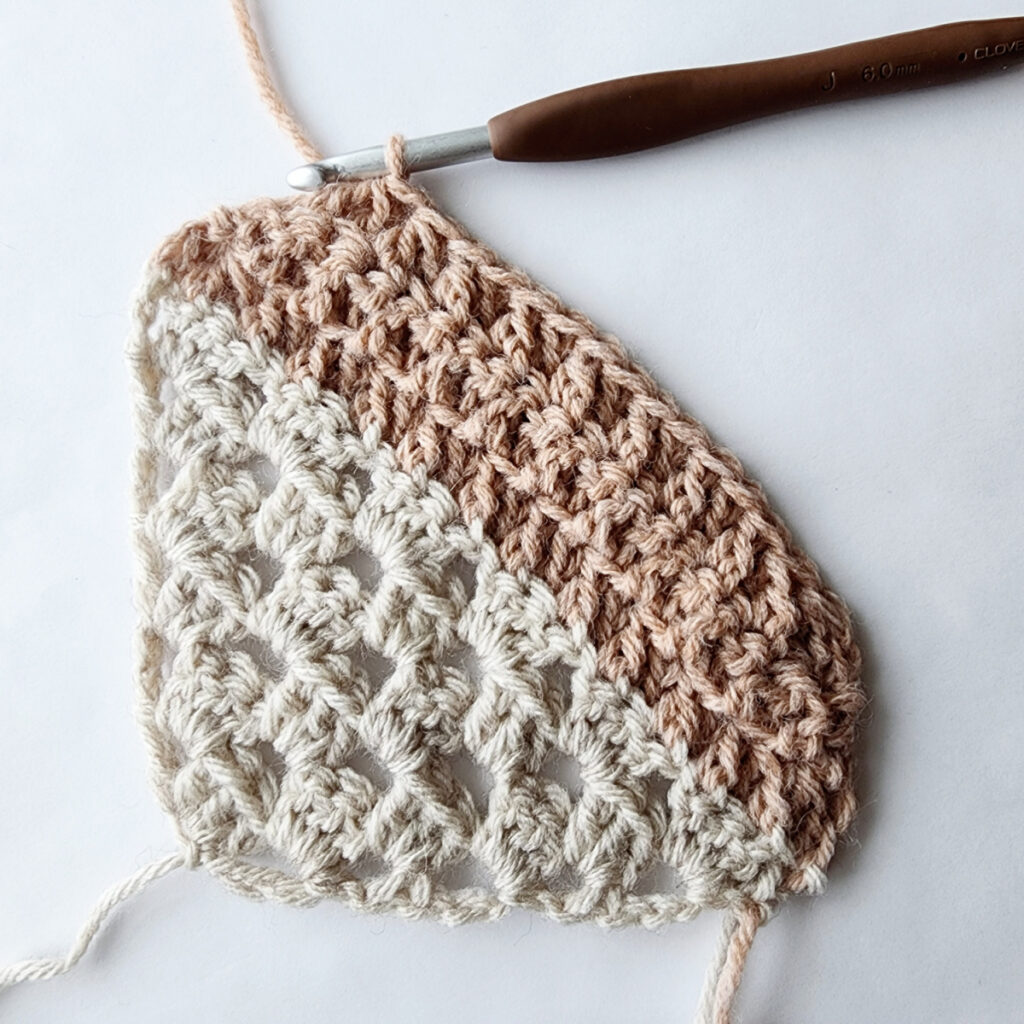
Decrease Rows
Decrease Row 1: With CC yarn, Alt-dc2tog in BOTH Loops of the first st & BLO of the next ch-1, dc2tog in FLO of next st & BLO of next st, (FLO dc in the next st, BLO dc in the next st) rep across to the last 5 sts, FLO dc in the next st, dc2tog in BLO of next st & FLO of next st, dc2tog in BLO of next ch-1 & BOTH loops of top of 3rd ch. Turn. (23, 31, 35 sts)
Decrease Row 2: Alt-dc2tog in BOTH Loops of the first st & BLO of the next st, dc2tog in FLO of next st & BLO of next st, (FLO dc in the next st, BLO dc in the next st) rep across to the last 5 sts, FLO dc in the next st, dc2tog in BLO of next st & FLO of next st, dc2tog in BLO of next st & BOTH loops of next st. Turn. (19, 27, 31 sts) Row 2 decreases by 4 sts.
Baby – Rows 3 – 5: Rep Decrease Row 2. (7 sts at the end of Row 5)
Lapghan – Rows 3 – 7: Rep Decrease Row 2. (7 sts at the end of Row 7)
Small Throw – Rows 3 – 8: Rep Decrease Row 2. (7 sts at the end of Row 8)
Do not fasten off. Continue on to the Final Row.
Beginning of Decrease Row 1
Decrease Row 1
Decrease Row 2
Decrease Row 3
Decrease Row 4
Decrease Row 5
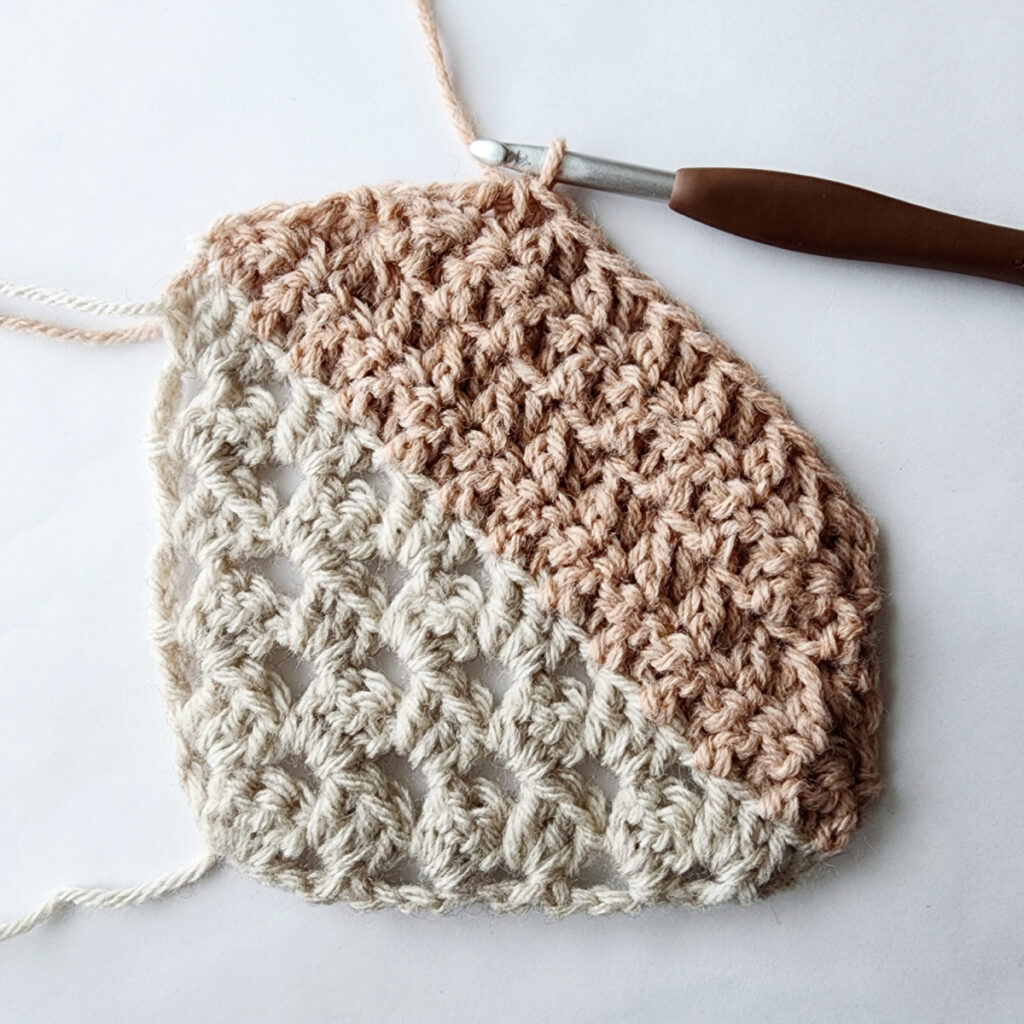
Final Row
Final Row: Alt-dc7tog across the previous row. Work into BOTH sts of the first and last sts, and alternate working into BLO & FLO in each st in between. (1 st)
Do not fasten off. Continue on to Crochet Motif Border.
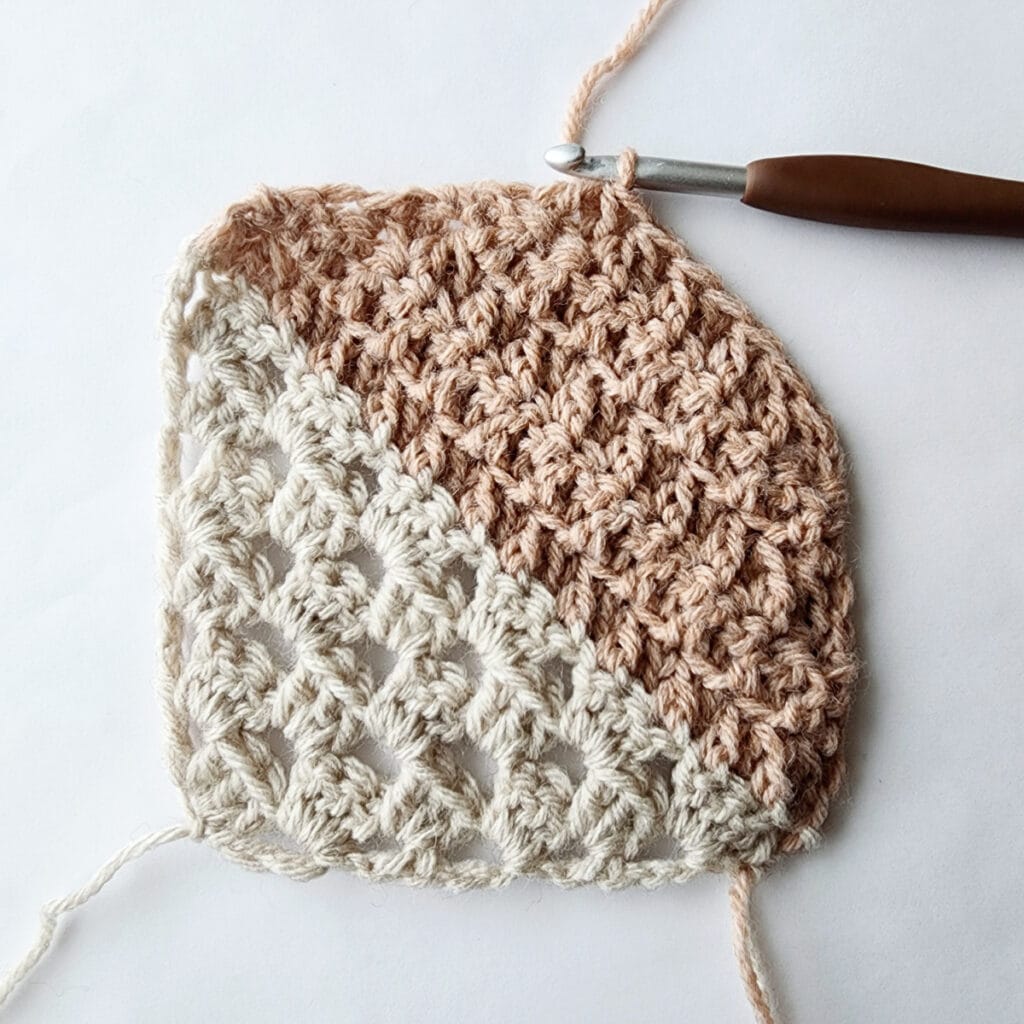
Crochet Motif Border
Tip: If your edge starts to become wavy, go down a hook size or two until it’s nice and flat. If it begins to cinch inward, go up a hook size or two.
Note: When working the border around the blanket square, you will use MC to work into MC stitches and CC to work into CC stitches. The two corners where you switched from Increase to Decrease Rows are the exception. In these corners you will work 1 CC and 2 MC sts.
Baby & Lapghan: Do not turn after the Final Row before beginning the Blanket Square Border.
Small Throw: Make sure to turn after the Final Row before beginning the Blanket Square Border.
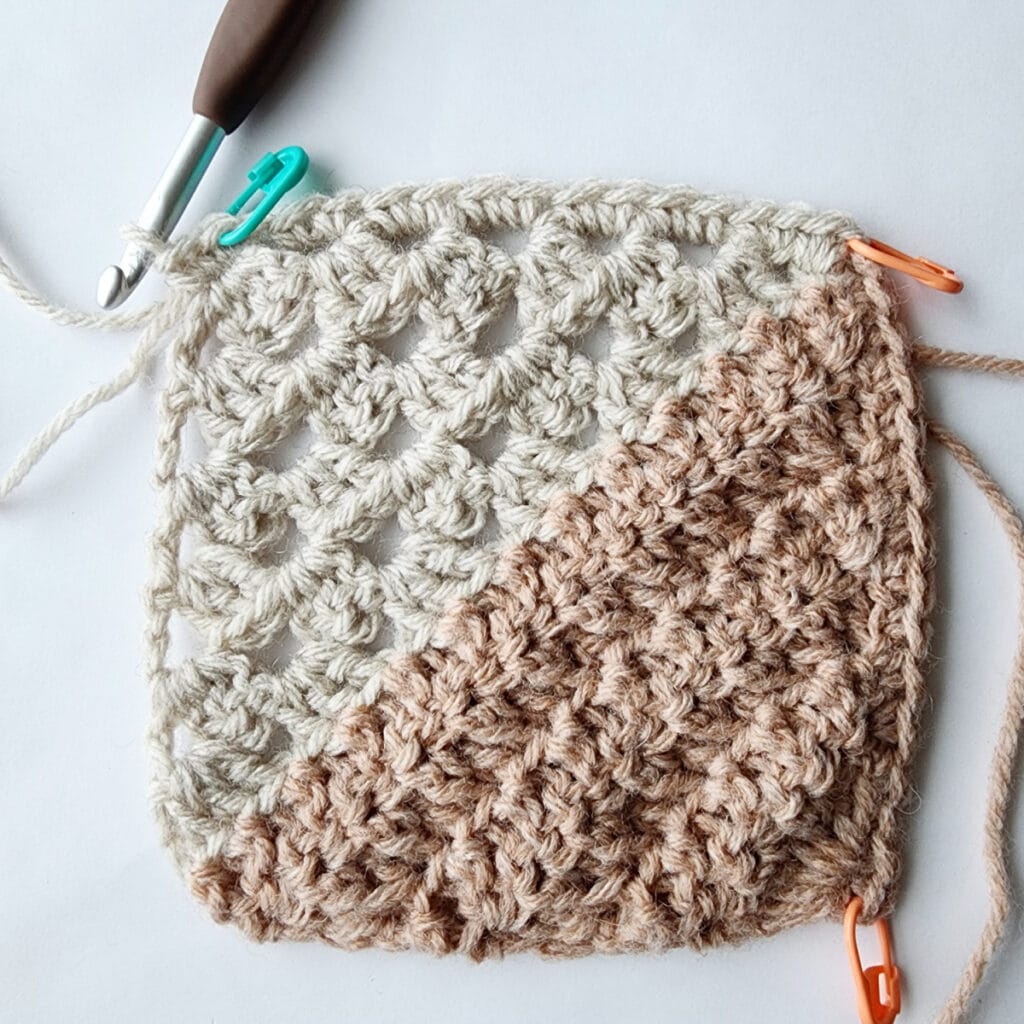
Rnd 1 (RS): Continuing on from the final row with CC, ch 1, 3 sc into the first corner, work across first side, work 2 CC sc into each dc to the next corner (12, 16, 18 sts), in this corner you will work 1 CC sc then pick up MC and fasten off CC, work 2 MC sc into same corner, work along the next edge, work 2 MC sc into each dc across to the next corner (12, 16, 18 sts), work 3 sc in the next corner, work across the next side, work 2 MC sc into each dc to the next corner (12, 16, 18 sts), in this 3rd corner you will work 2 MC sc then switch to CC and work 1 CC sc in the same corner, work across the last side, work 2 CC sc into each dc across to the next corner (12, 16, 18 sts). Join with a sl st to the 1st st. (60, 76, 84 sts)
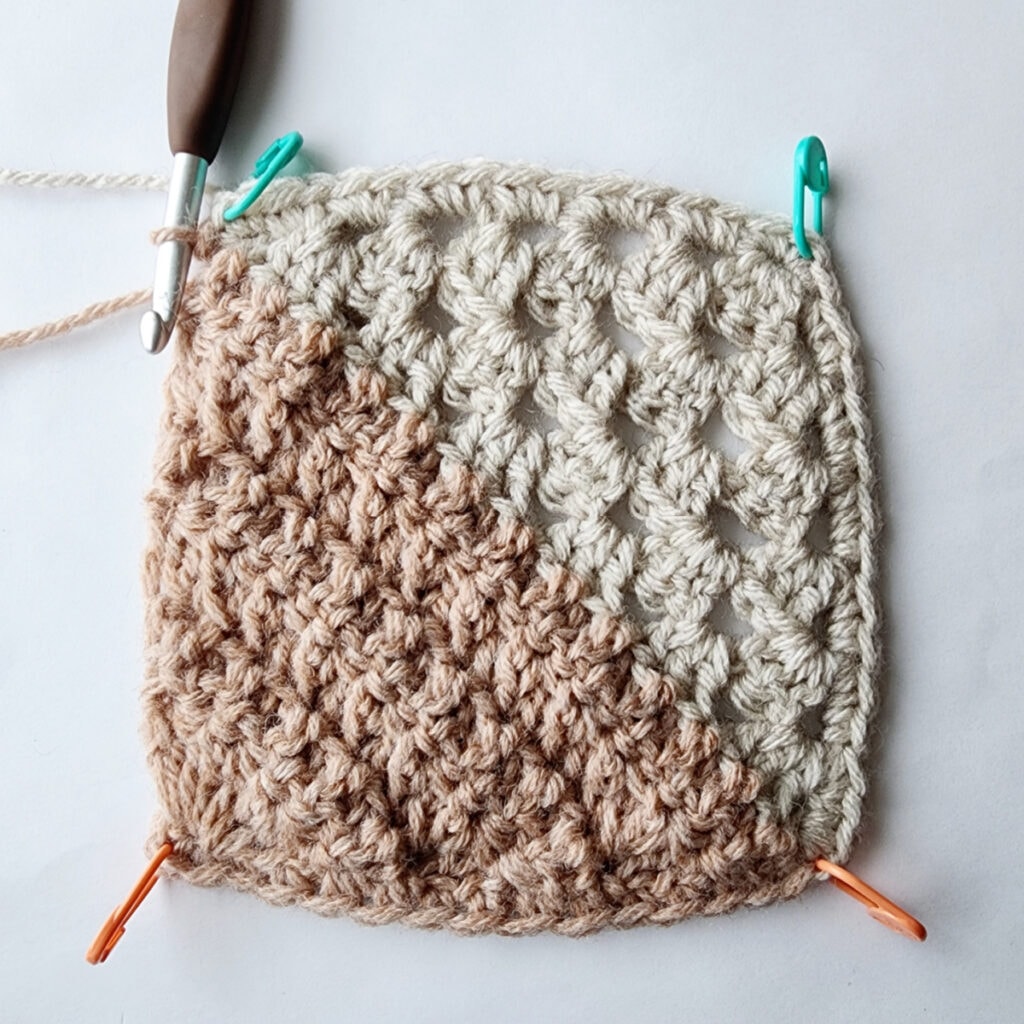
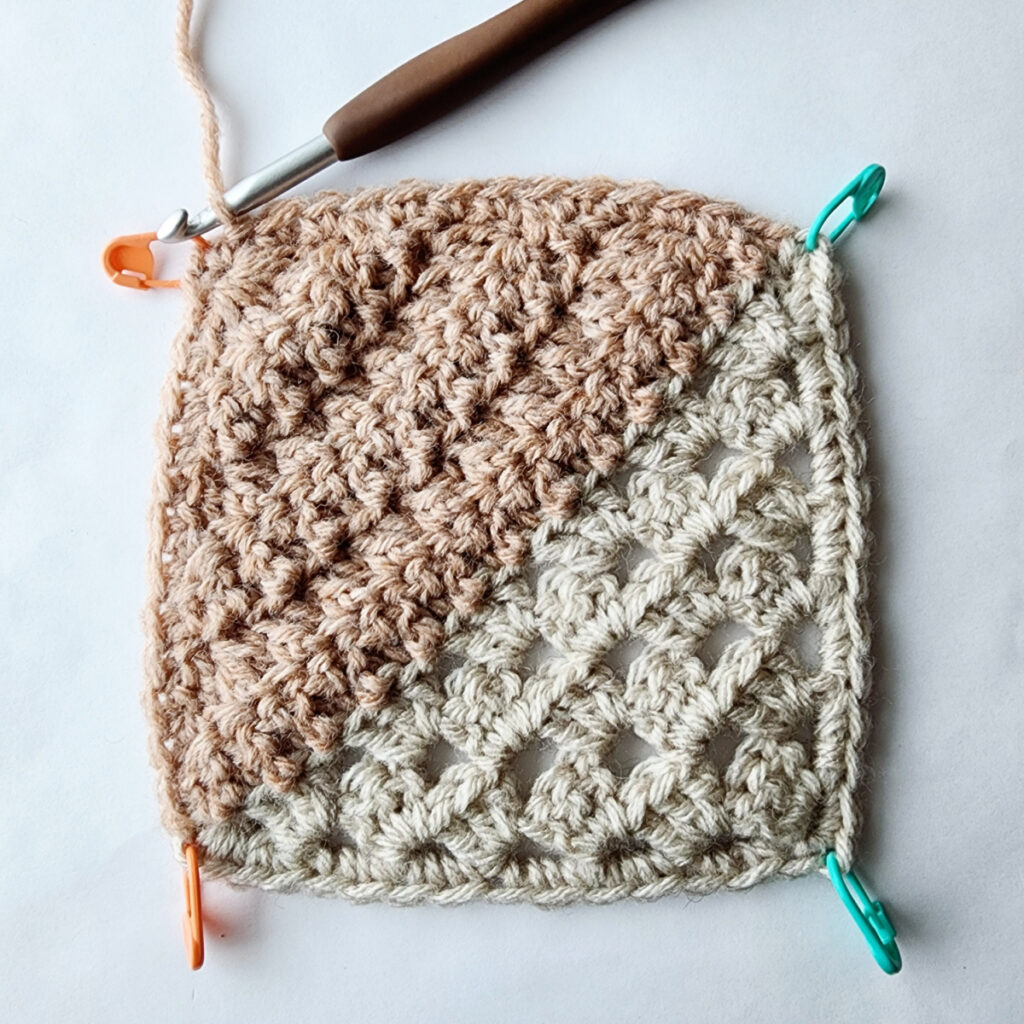
Place a SM in the middle sc of the 3 sc in each of the 4 corners.
Fasten off. Weave in ends. Block your finished square. Continue on to Assembly & Seaming.
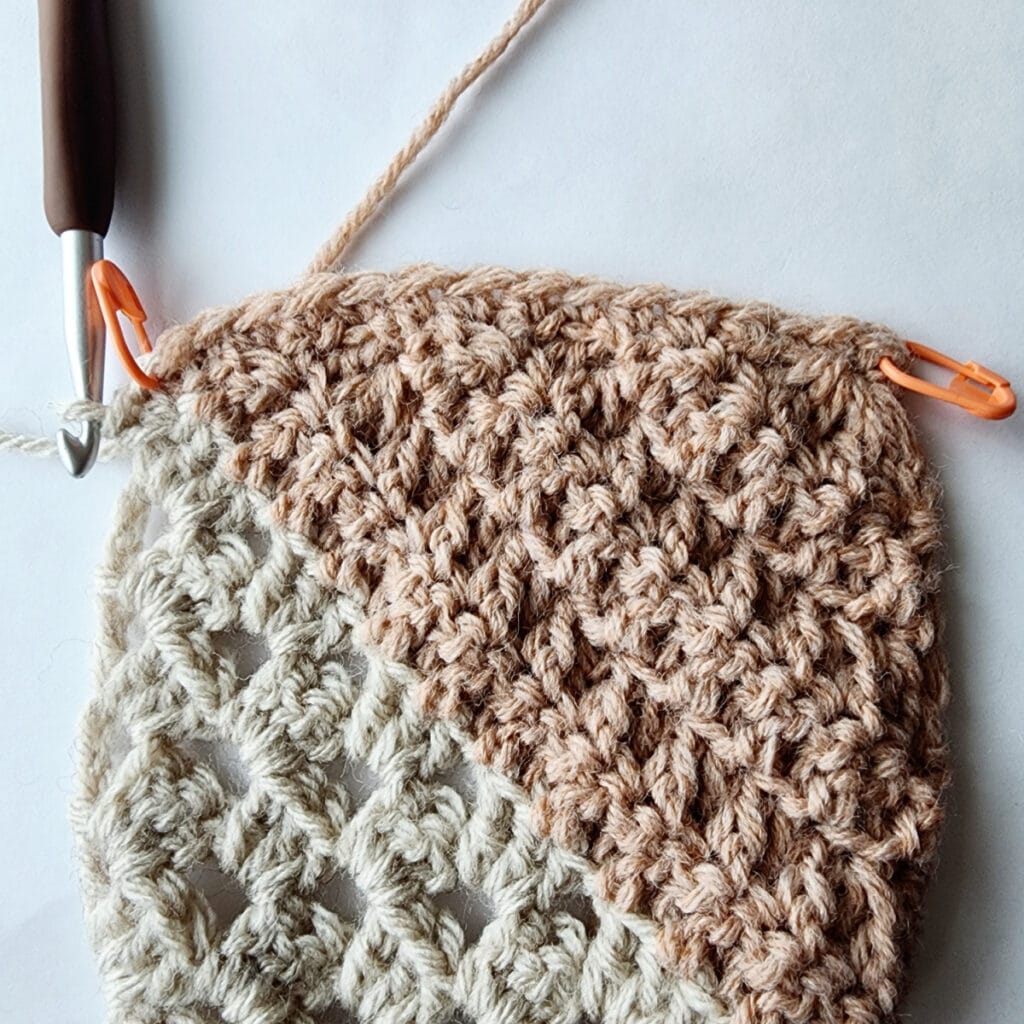
Assembly & Seaming
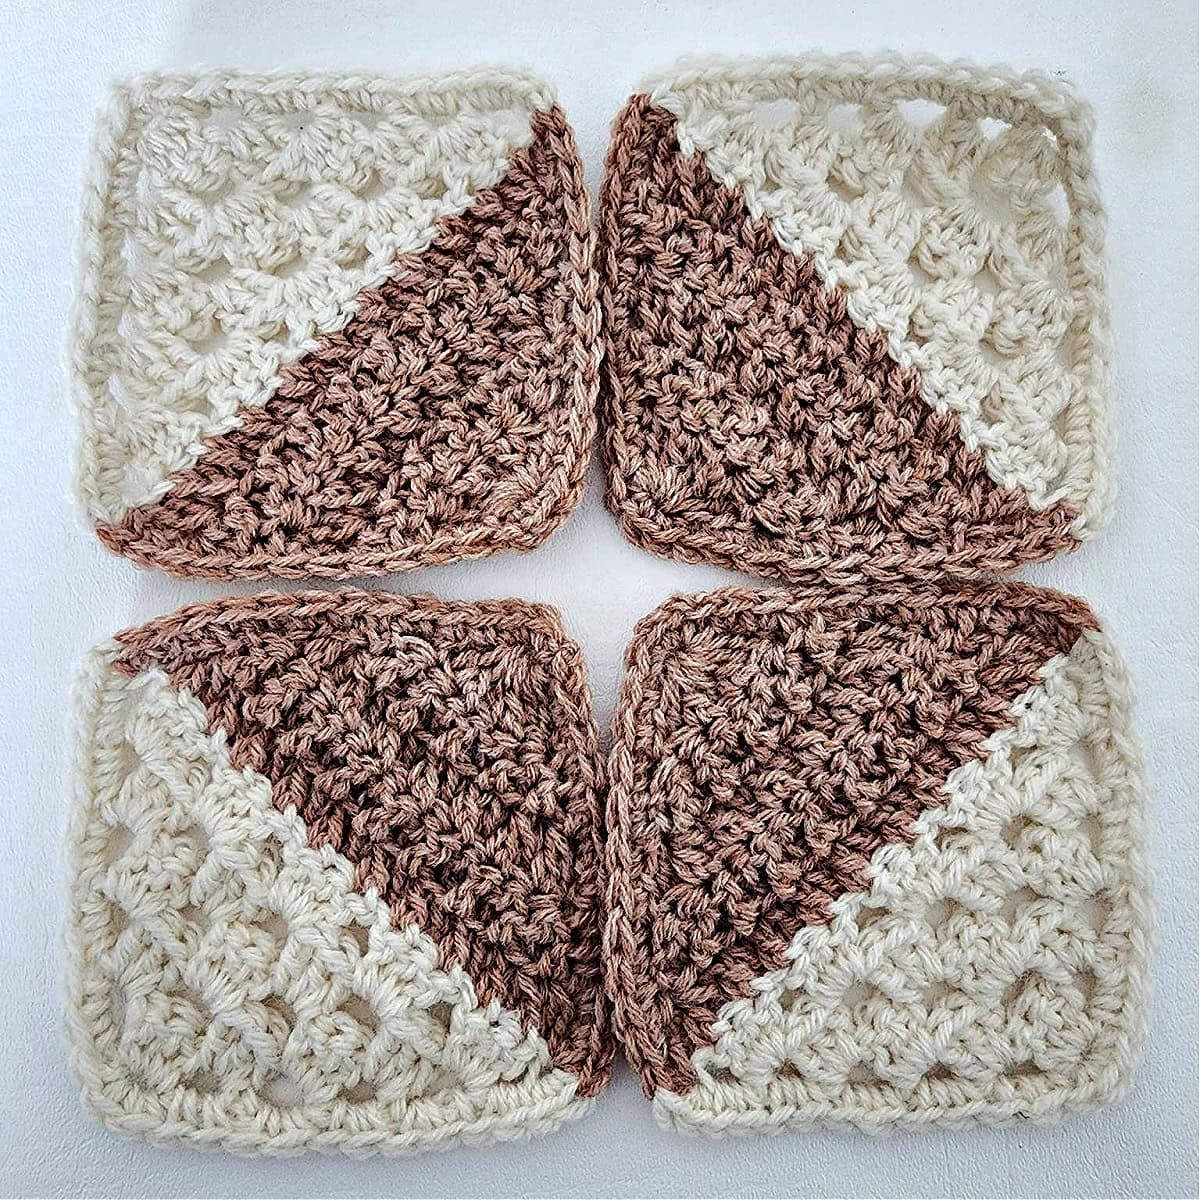
Step 1: Lay out your crochet squares as shown in the graphics below.
Step 2: Use locking stitch markers placed in the middle sc of each corner to hold two squares together while you seam them.
Step 3: For seaming, use the same color yarn as each edge to be seamed. With a yarn needle and length of yarn 2 – 3 times the length of the seam to be made, use the Mattress Stitch to seam the edges of the crochet squares together, from corner to corner.
Seam all crochet squares, weave in ends, then continue on to Blanket Border.
Mattress Stitch Seam Tutorial
Note: The photos shown below are of a smaller motif, but the mattress seam technique is the same.
Yarn Color: Use the same color yarn as the motif edges you’re seaming together. In the photos below, I used a contrasting color to make it easier to see in the photos.
The mattress stitch is the most common technique used to sew panels together. It’s a simple technique and I’ll give you a couple of tips to help make it easier.
- As you’re sewing your seams, make sure to stop every couple inches and pull your yarn to tighten the seam. If you wait until you’re done sewing and then try to pull the ends through the entire length of the seam, you may end up with gaps or puckers. These gaps and puckers can affect the finished size of your crochet squares.
- Use several stitch markers when suggested. The stitch markers not only hold pieces together temporarily, they also help guide you to seam things evenly.
- The most important thing to remember about this technique is to insert your yarn needle the same direction on both panels that you’re seaming. If you insert from bottom to top on the left side, make sure to insert bottom to top on the right side and vice versa.
See photos and instructions below for how to mattress stitch seam the crochet motifs together.
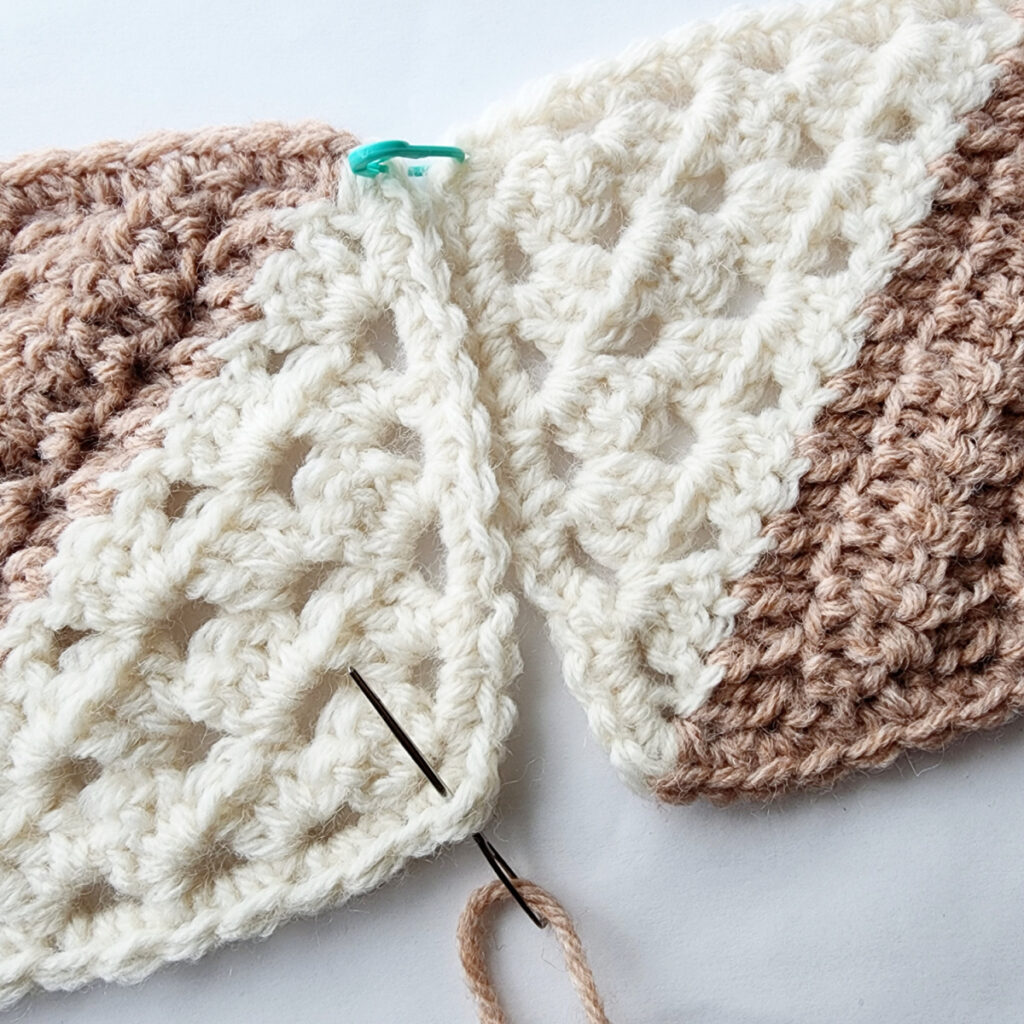
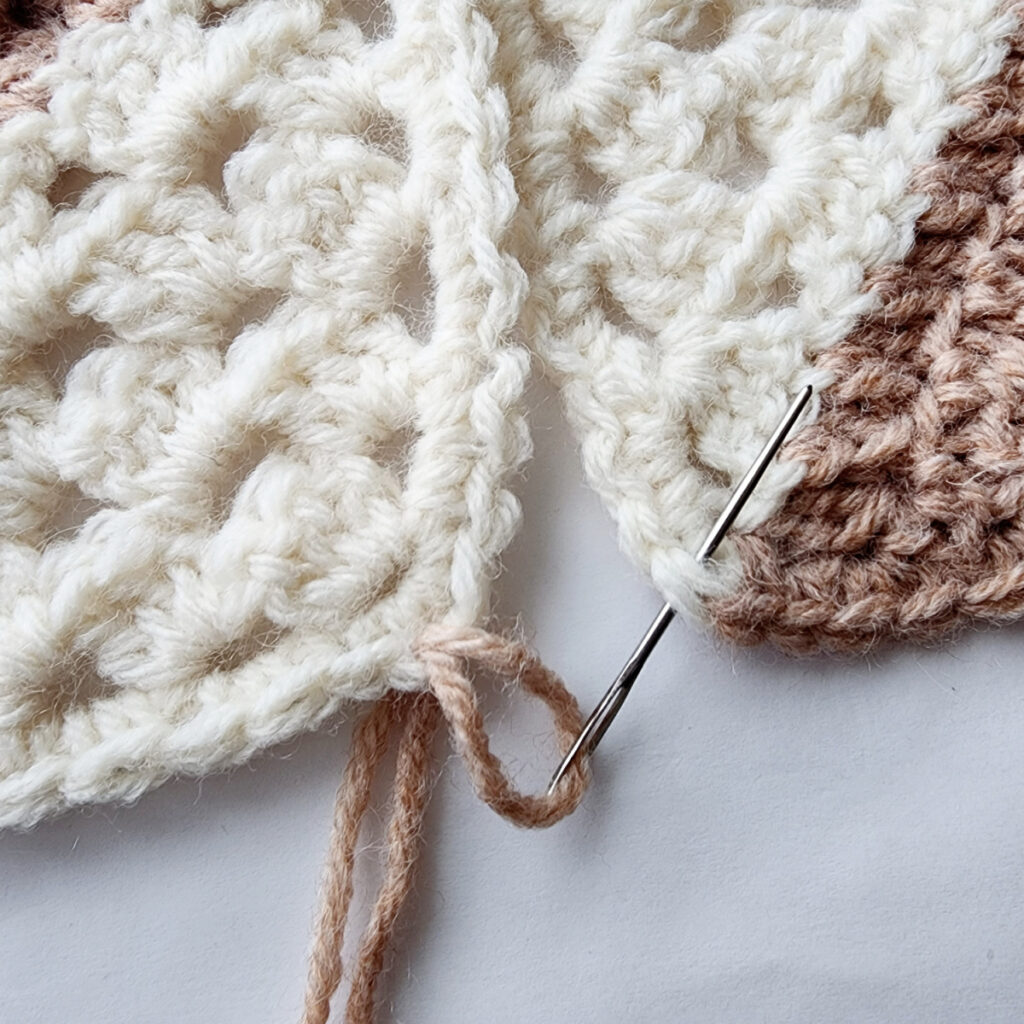
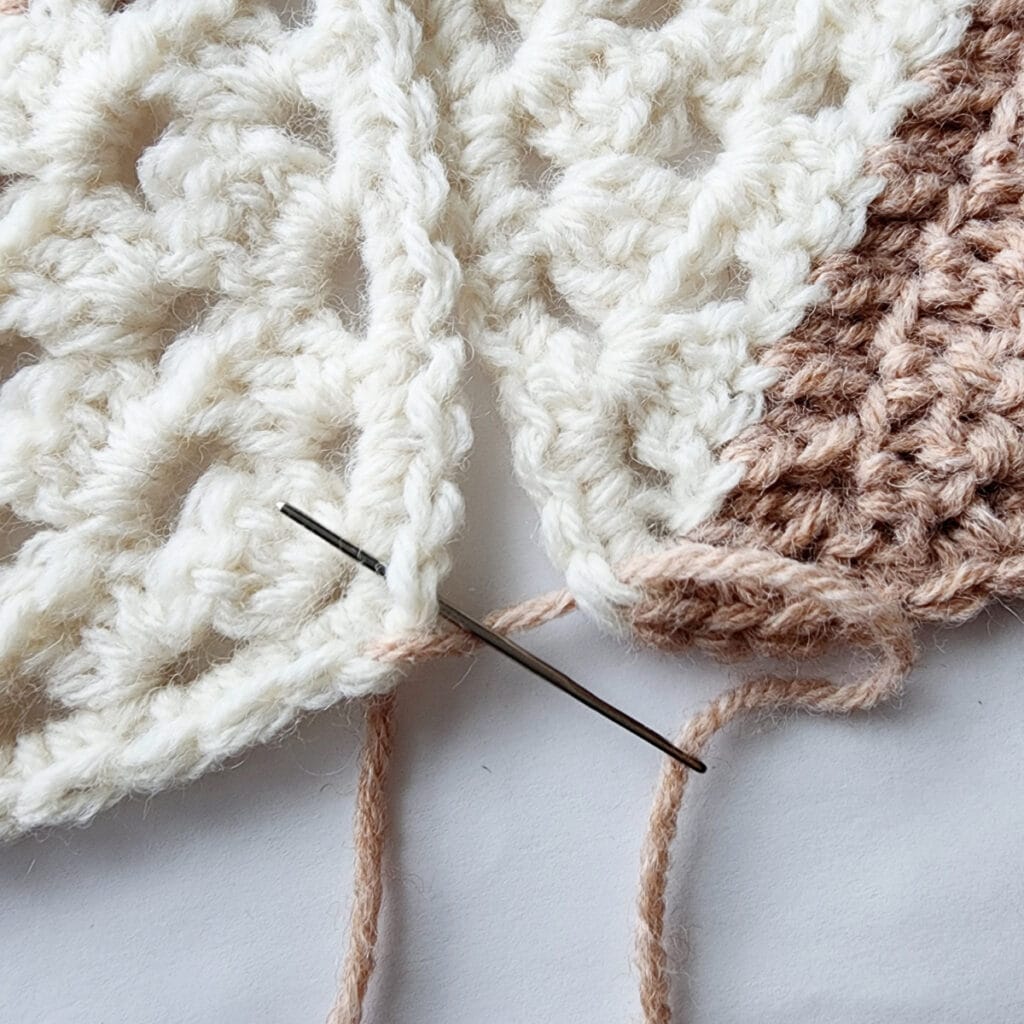
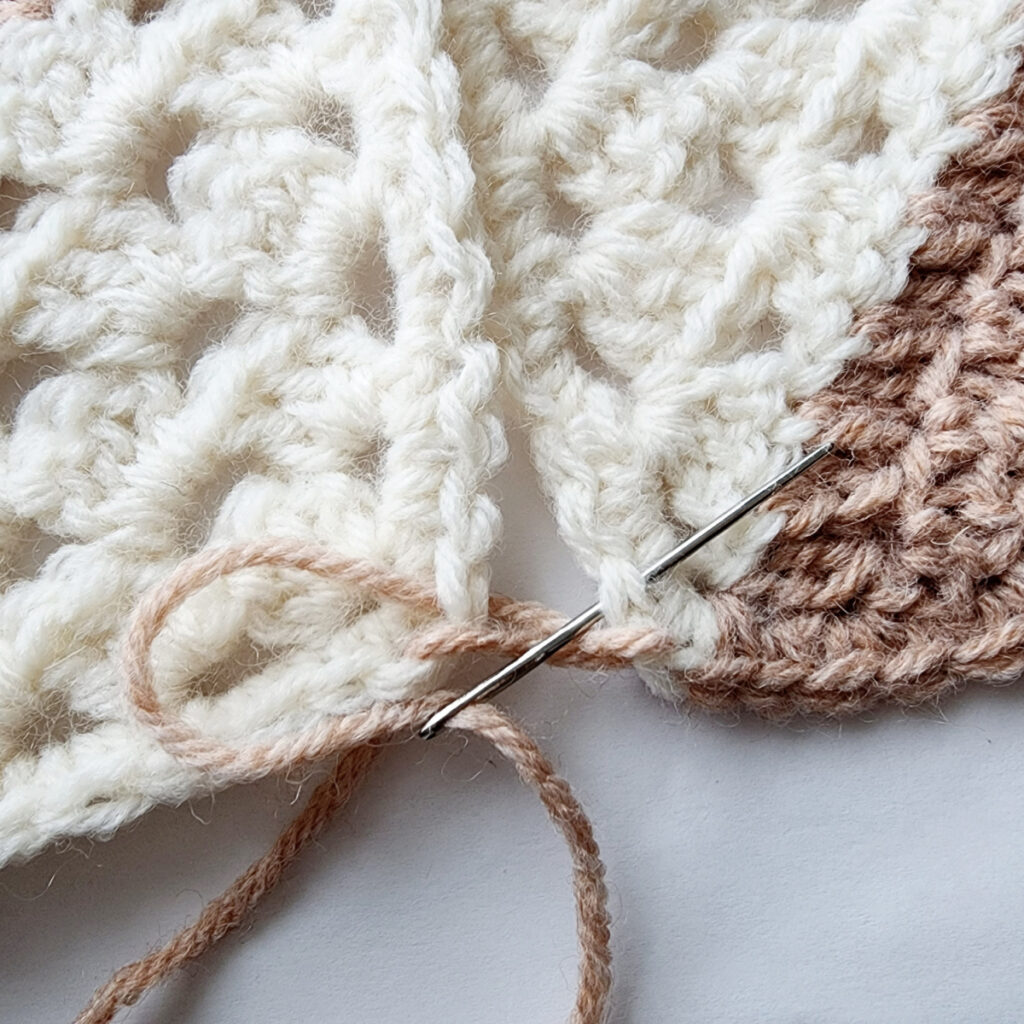
Use a locking stitch marker to hold two motifs together at the corner opposite the corner you’ll begin your seam.
Using a yarn needle and piece of yarn that is the same color as the edges you’re seaming and 3 times the length of the seam to be sewn, use the mattress stitch join to seam all edges of the crochet motifs together.
With the RS of the square facing you, insert your yarn needle from bottom to top, through a stitch on the left. Insert your yarn needle from bottom to top, through a stitch on the right. Insert your yarn needle from bottom to top, through a stitch on the left, then repeat for a stitch on the right.
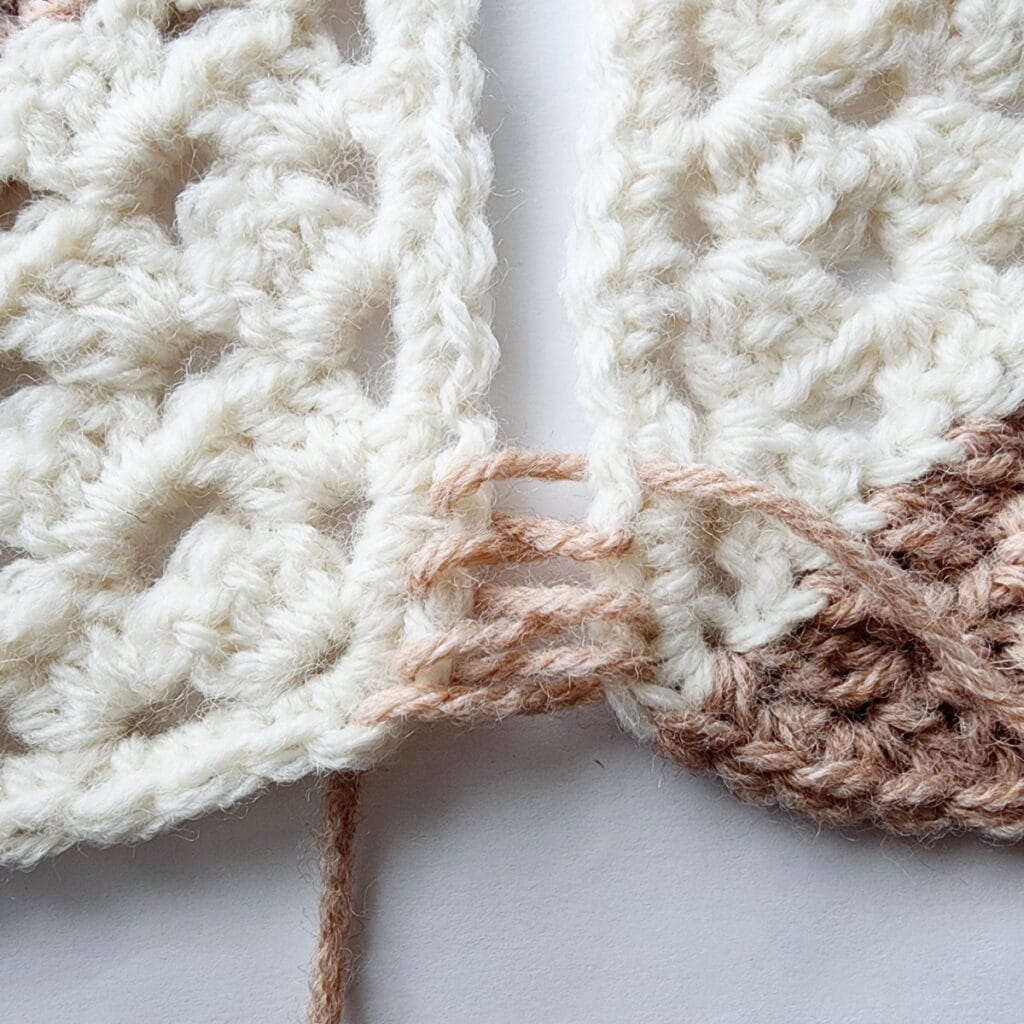
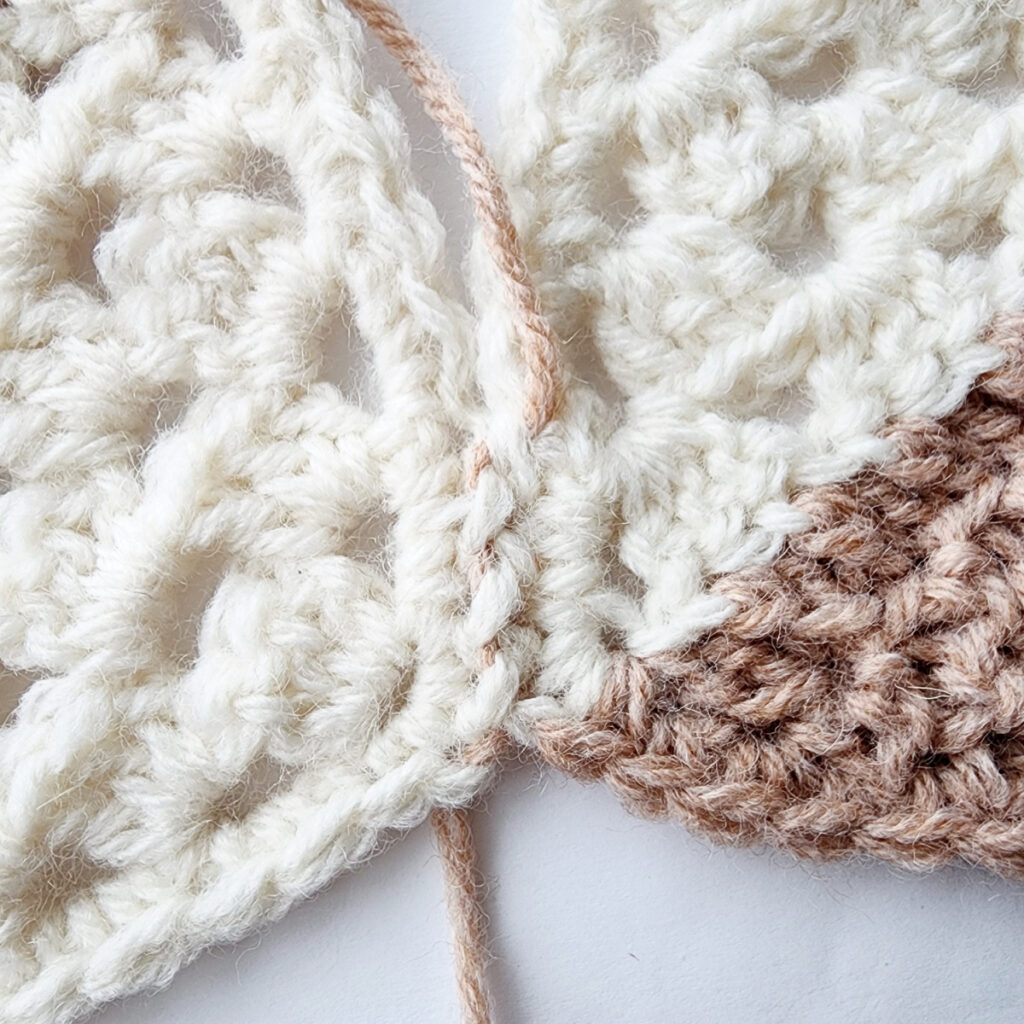

Continue working back and forth creating a zig zag with the yarn between the motifs. After you’ve created a zig zag about an inch long, pull on both ends of your yarn to tighten the seam. Continue in this manner until you’ve reached the end of the seam. Weave in ends. Repeat for each remaining seam. Once all motifs are seamed, continue on to the Blanket Border.
Blanket Border
Tip: If your edge starts to become wavy, go down a hook size or two until it’s nice and flat. If it begins to cinch inward, go up a hook size or two.
Rnd 1 (RS): With CC yarn (or desired color) & a 6.00mm crochet hook, join yarn with a standing sc in any corner, work 3 sc in each corner and 1 sc in each st along each edge. Do not join. Begin working in a spiral and use a scrap piece of yarn to keep track of the beginning of each round. Stitch count isn’t crucial.
Rnds 2 – 4: Work 3 sc in each corner stitch and 1 sc in every other st around.
If you prefer a wider border, repeat Round 2.
Fasten off. Weave in ends.
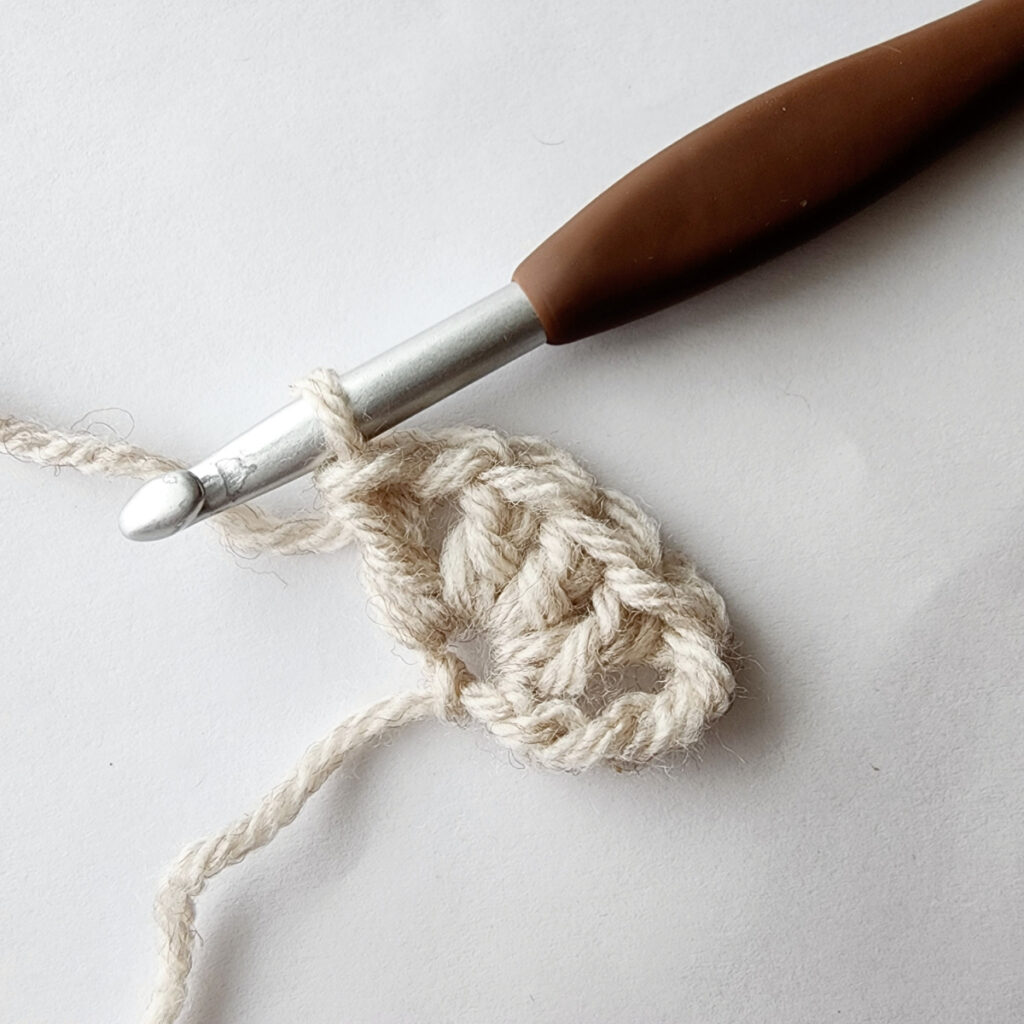
Alternate Double Crochet 7 Together (alt-dc7tog)
Instead of beginning the final row of double crochet with a ch 2, then working a dc7tog in all 7 remaining stitches, I use this technique. I love the nice finished edge it creates and there are not gaps from the turning chains.
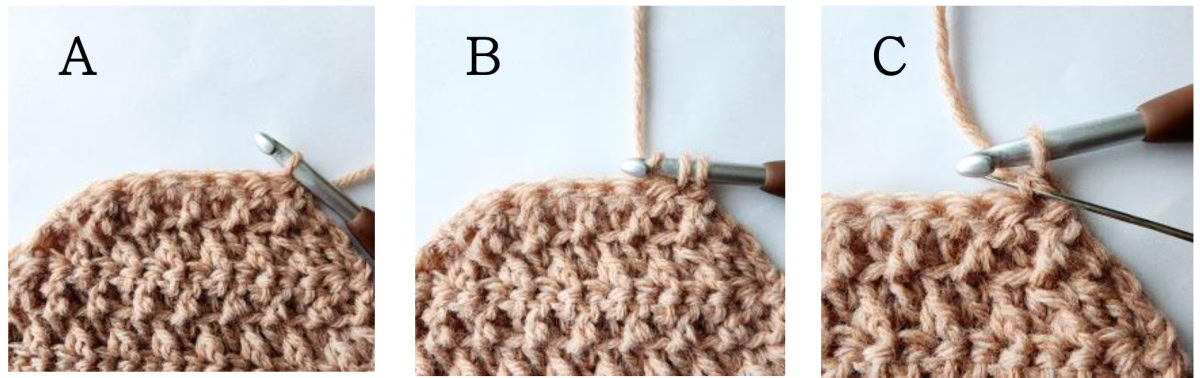
Photo B: Work a single crochet stitch (without a turning chain), insert your hook into the first stitch, yo, pull up a loop, yo, pull thru both loops (see next pic).
Photo C: See the yarn needle? It’s between the two legs of the single crochet stitch you just made. This is where you
insert your hook in the next part.
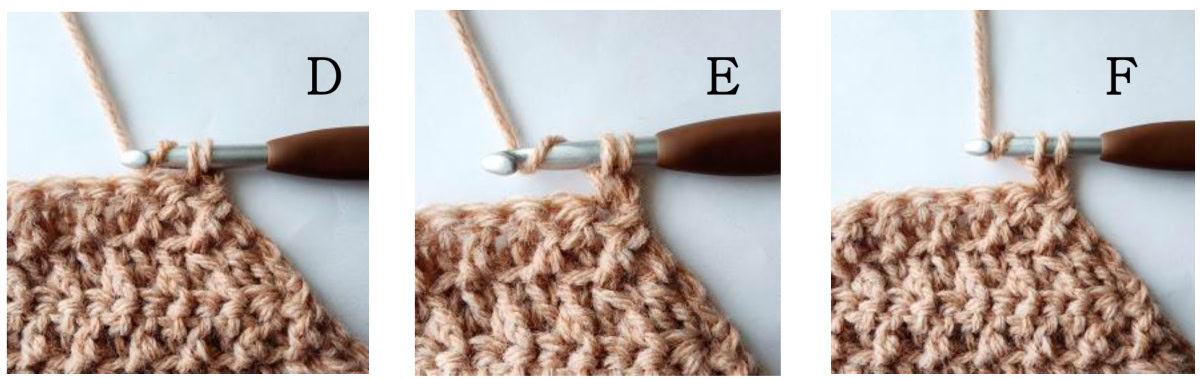
Photo E: Pull up a loop, yo.
Photo F: Pull thru one loop, yo.
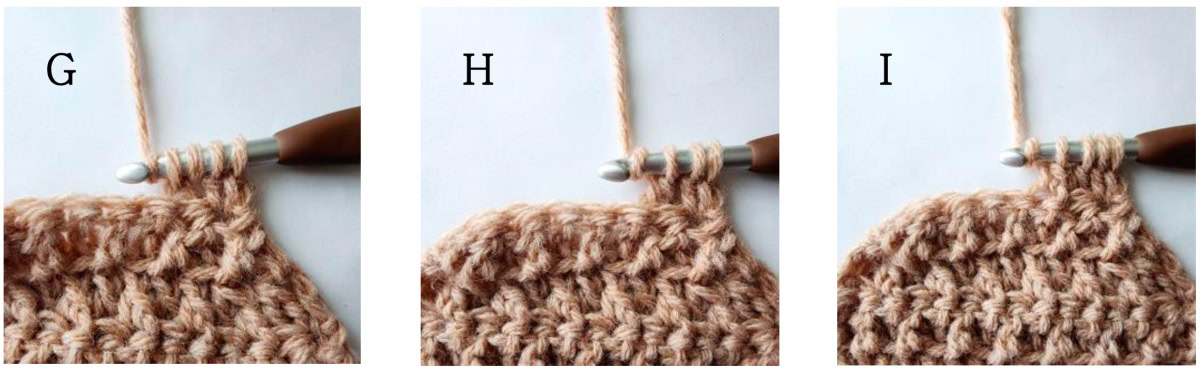
Photo H: Pull up a loop, yo, pull through 2 loops, yo.
Photo I: Insert your hook into the FLO of the next st, yo, pull up a loop, yo, pull through 2 loops, yo.
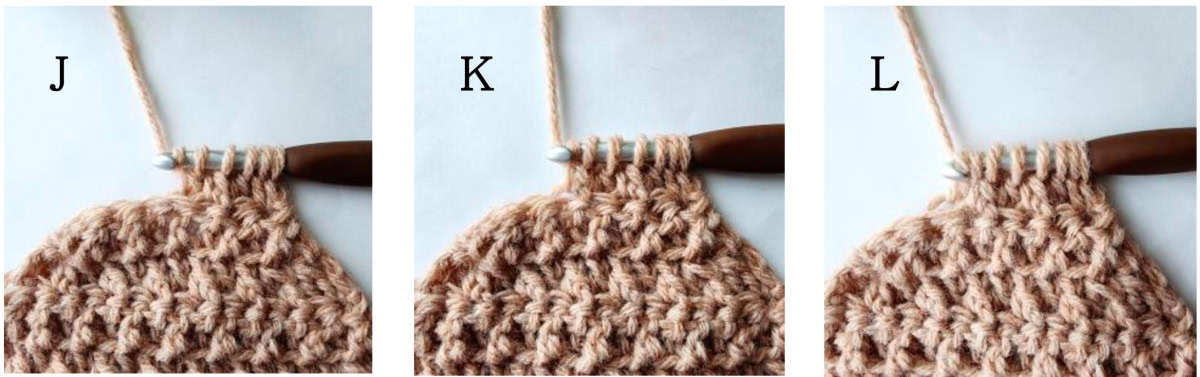
Photo K: Insert your hook into the FLO of the next st, yo, pull up a loop, yo, pull through 2 loops, yo.
Photo L: Insert your hook into the BLO of the next st, yo, pull up a loop, yo, pull through 2 loops, yo.

Photo N: Pull through remaining 8 loops to complete the stitch. Your Alt-dc7tog is complete!
With a simple two-toned square, you’re able to work up this gorgeous textured heirloom blanket that has both warmth and style. If a new neighbor has just moved in, crochet them up one of these blankets as a heartfelt gesture they’re sure to appreciate.
I Made It! Now What?
Pin this post!: Save this granny squares crochet blanket pattern to your Pinterest boards so that you can come back and make it again.
Leave a comment below: We love to hear your feedback.
Share Your Finished Projects on Facebook or Instagram: I love to see your finished projects! Share with us on social media and tag me @acrochetedsimplicity or use the hashtag #ACrochetedSimplicity so I can find your posts.
Join us in the Facebook Community Group!
Come share your finished projects with us in the A Crocheted Simplicity Crochet Community Group on Facebook. Join us for fun community events such as crochet alongs, join in on crochet conversations, ask questions, get advice, and share your love for crochet!

More Crochet Blanket Patterns I Think You’ll Love
More Free Crochet Blanket Patterns
Are you looking for more free crochet blanket patterns? We have several more free crochet patterns for blankets that use self-striping yarns, cables, simple stitch repeats, and more.