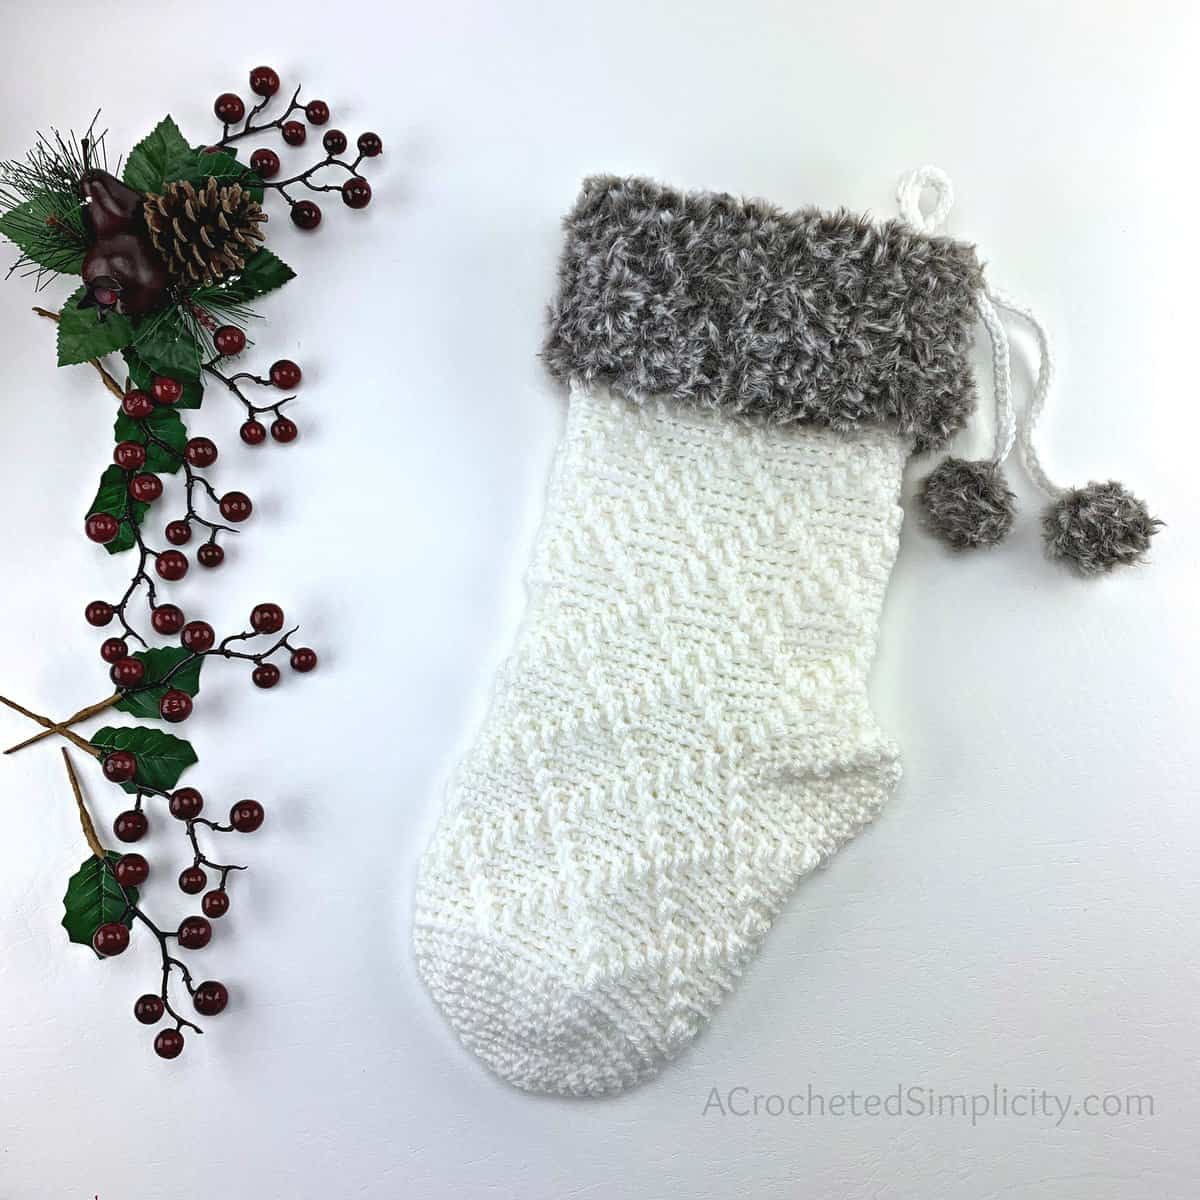
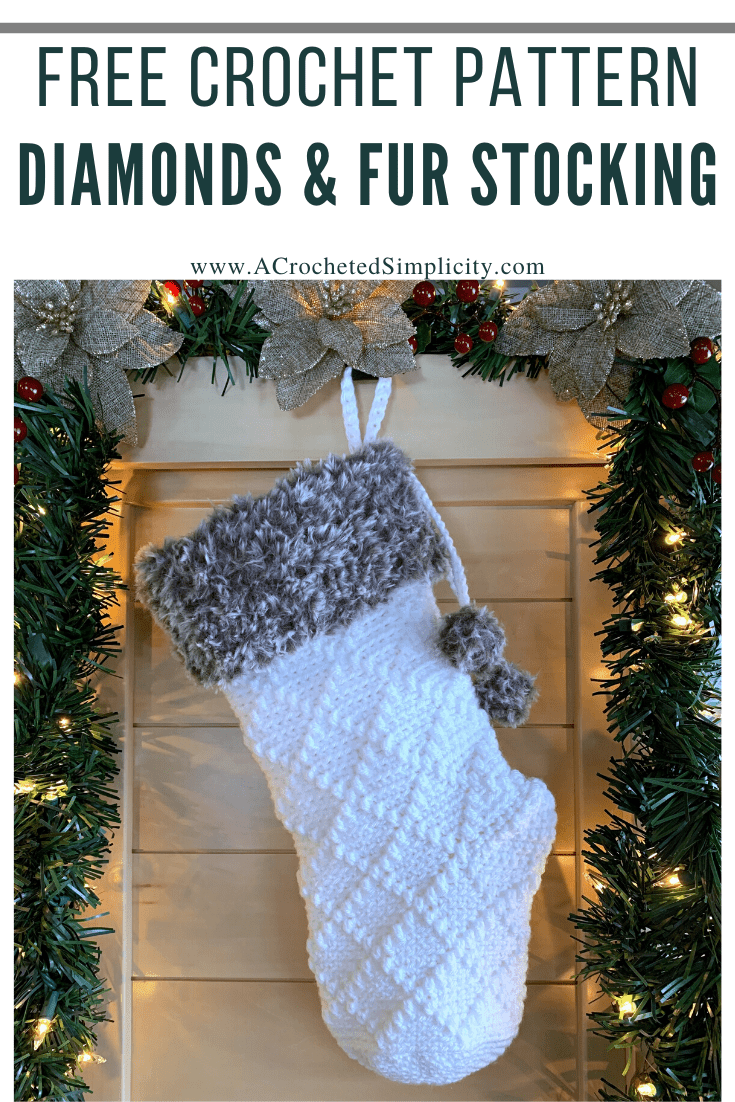
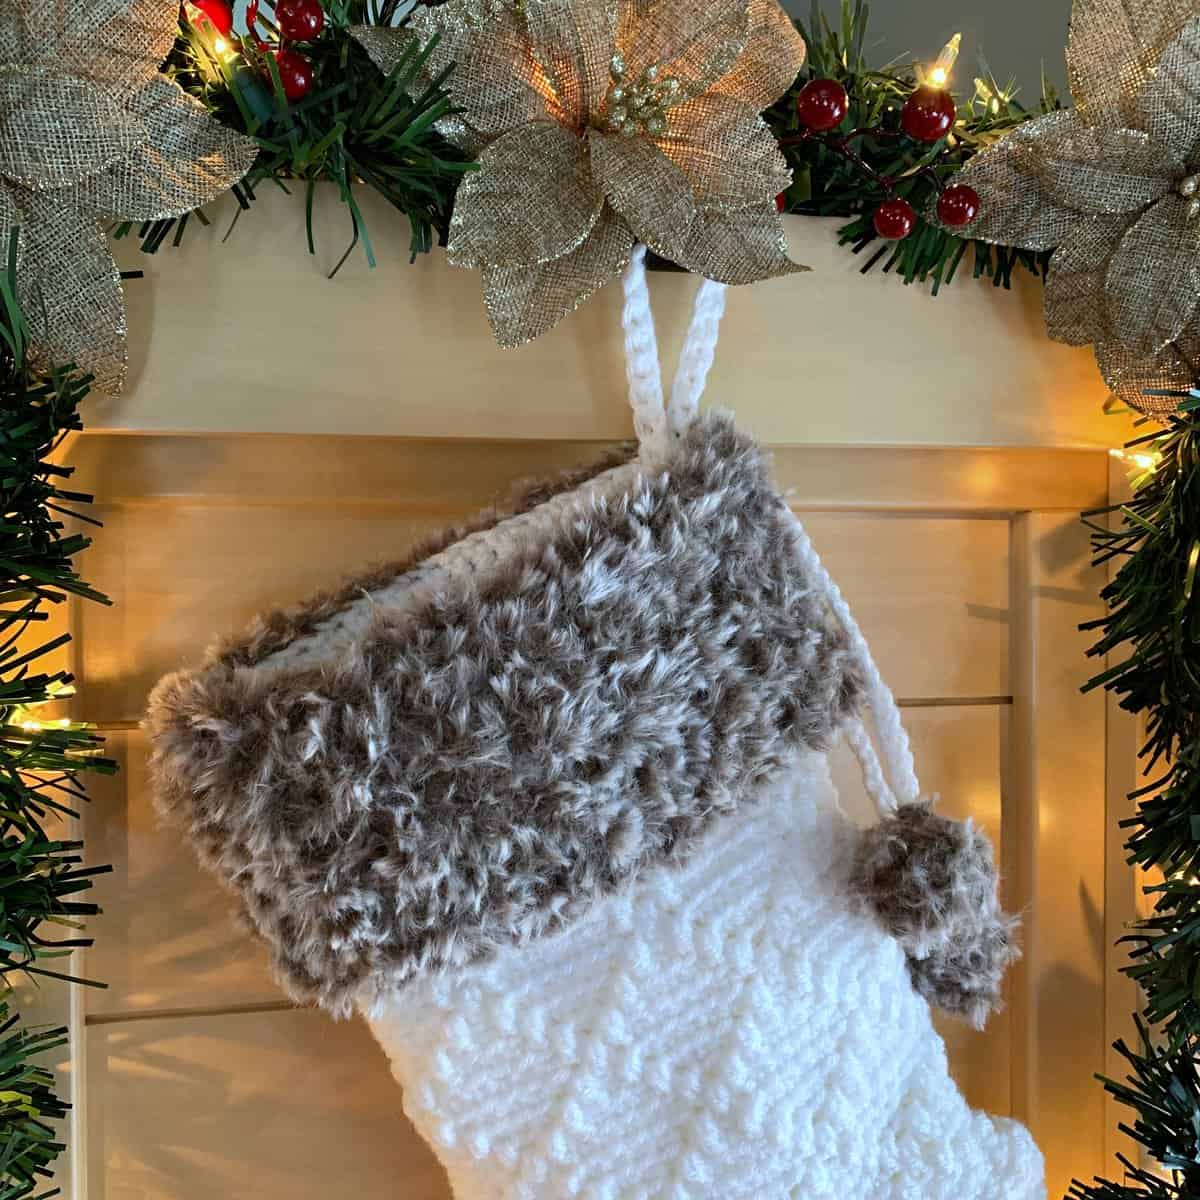
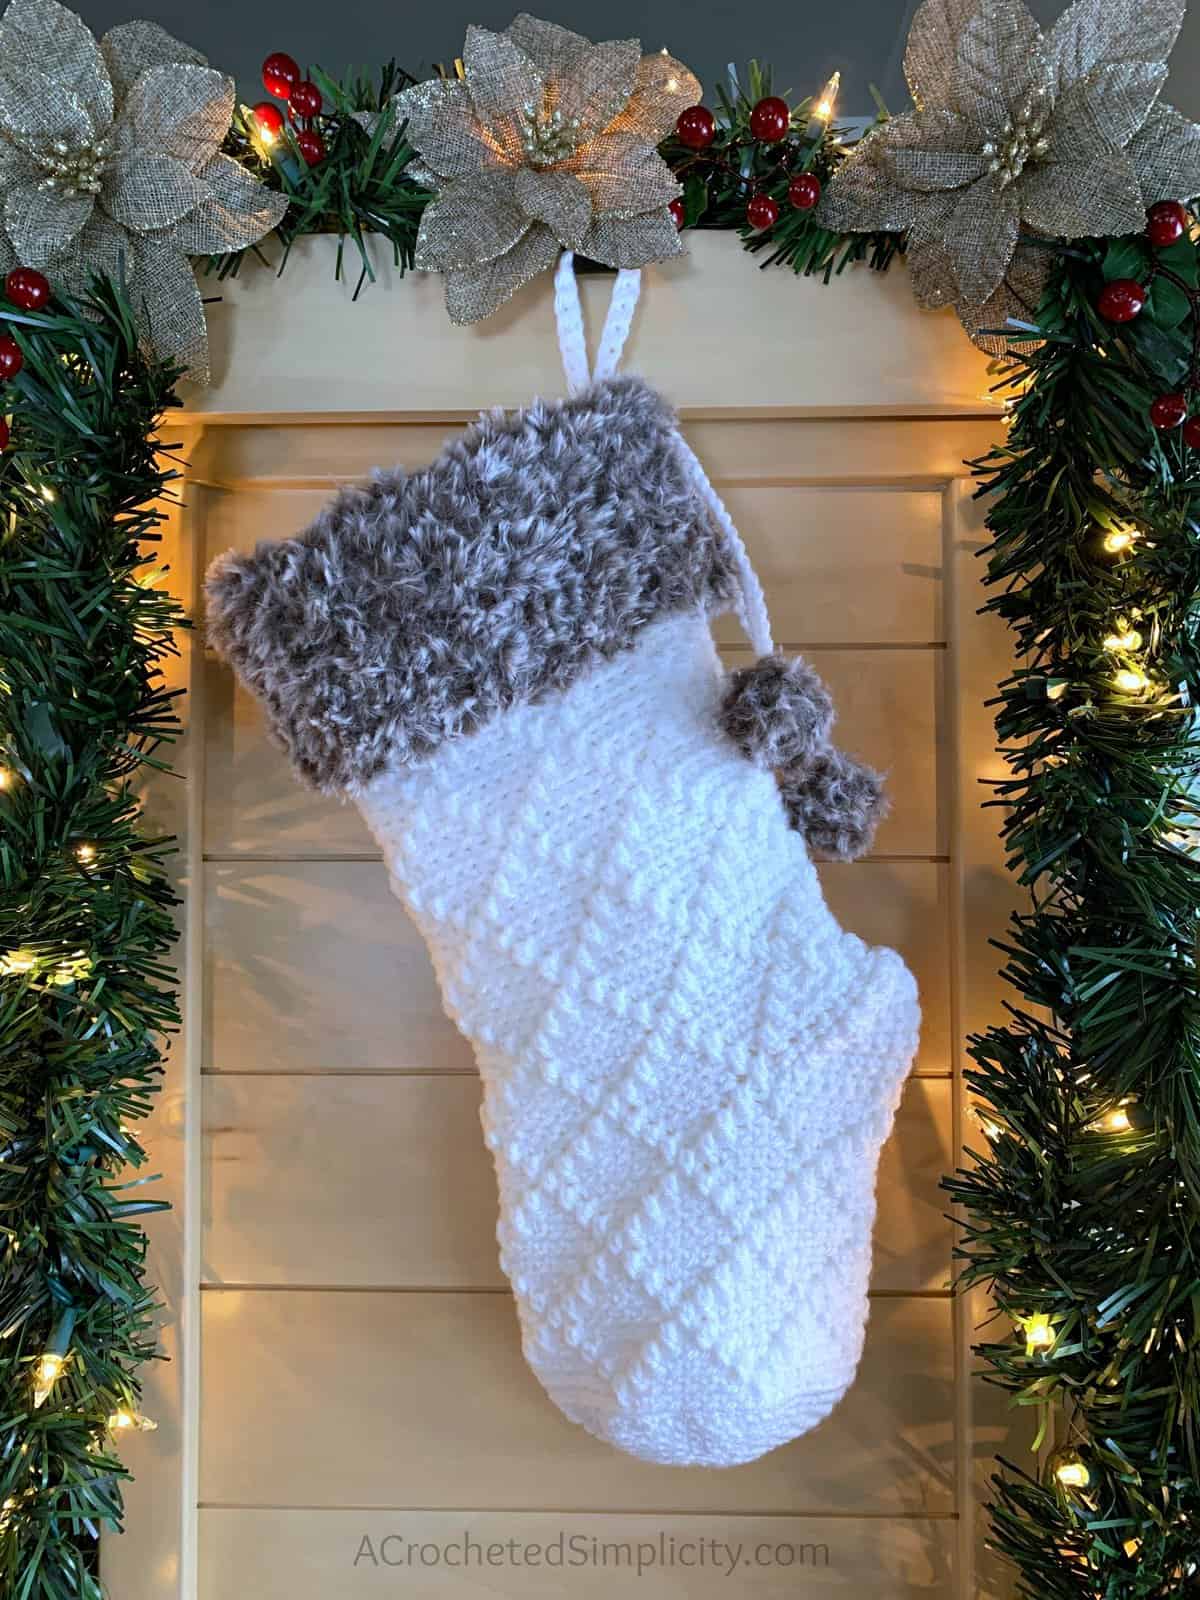
Diamonds & Fur Christmas Stocking – Free Crochet Pattern
My absolute favorite thing to make this time of year are crochet Christmas stockings! I love adding them to my crochet decor.
What’s the best part of a classic crochet Christmas stocking pattern? The simple fact that you are creating heirloom handmade Christmas stockings your family will cherish for years to come. Once a year at Christmas time, even after you’ve left this earth, the crocheted Christmas stockings you made years before will fill their hearts and minds with memories of Christmases past.
The free crochet Christmas stocking pattern for the Diamonds & Fur Christmas Stocking can be found below, or you can find an ad-free print friendly version on Love Crafts, Ravelry, or on Etsy.
My Big Bold Cabled Christmas Stocking has been a fan favorite Christmas stocking pattern for several years, but I hope you’ll find a new favorite with this year’s 2019 Christmas Stocking Crochet Along! While designing this year’s crochet stocking pattern I had a really hard time deciding on just one or two, so I ended up with five new crochet Xmas stocking patterns. I’ve included a variety of styles in hopes to provide a little something for everyone.
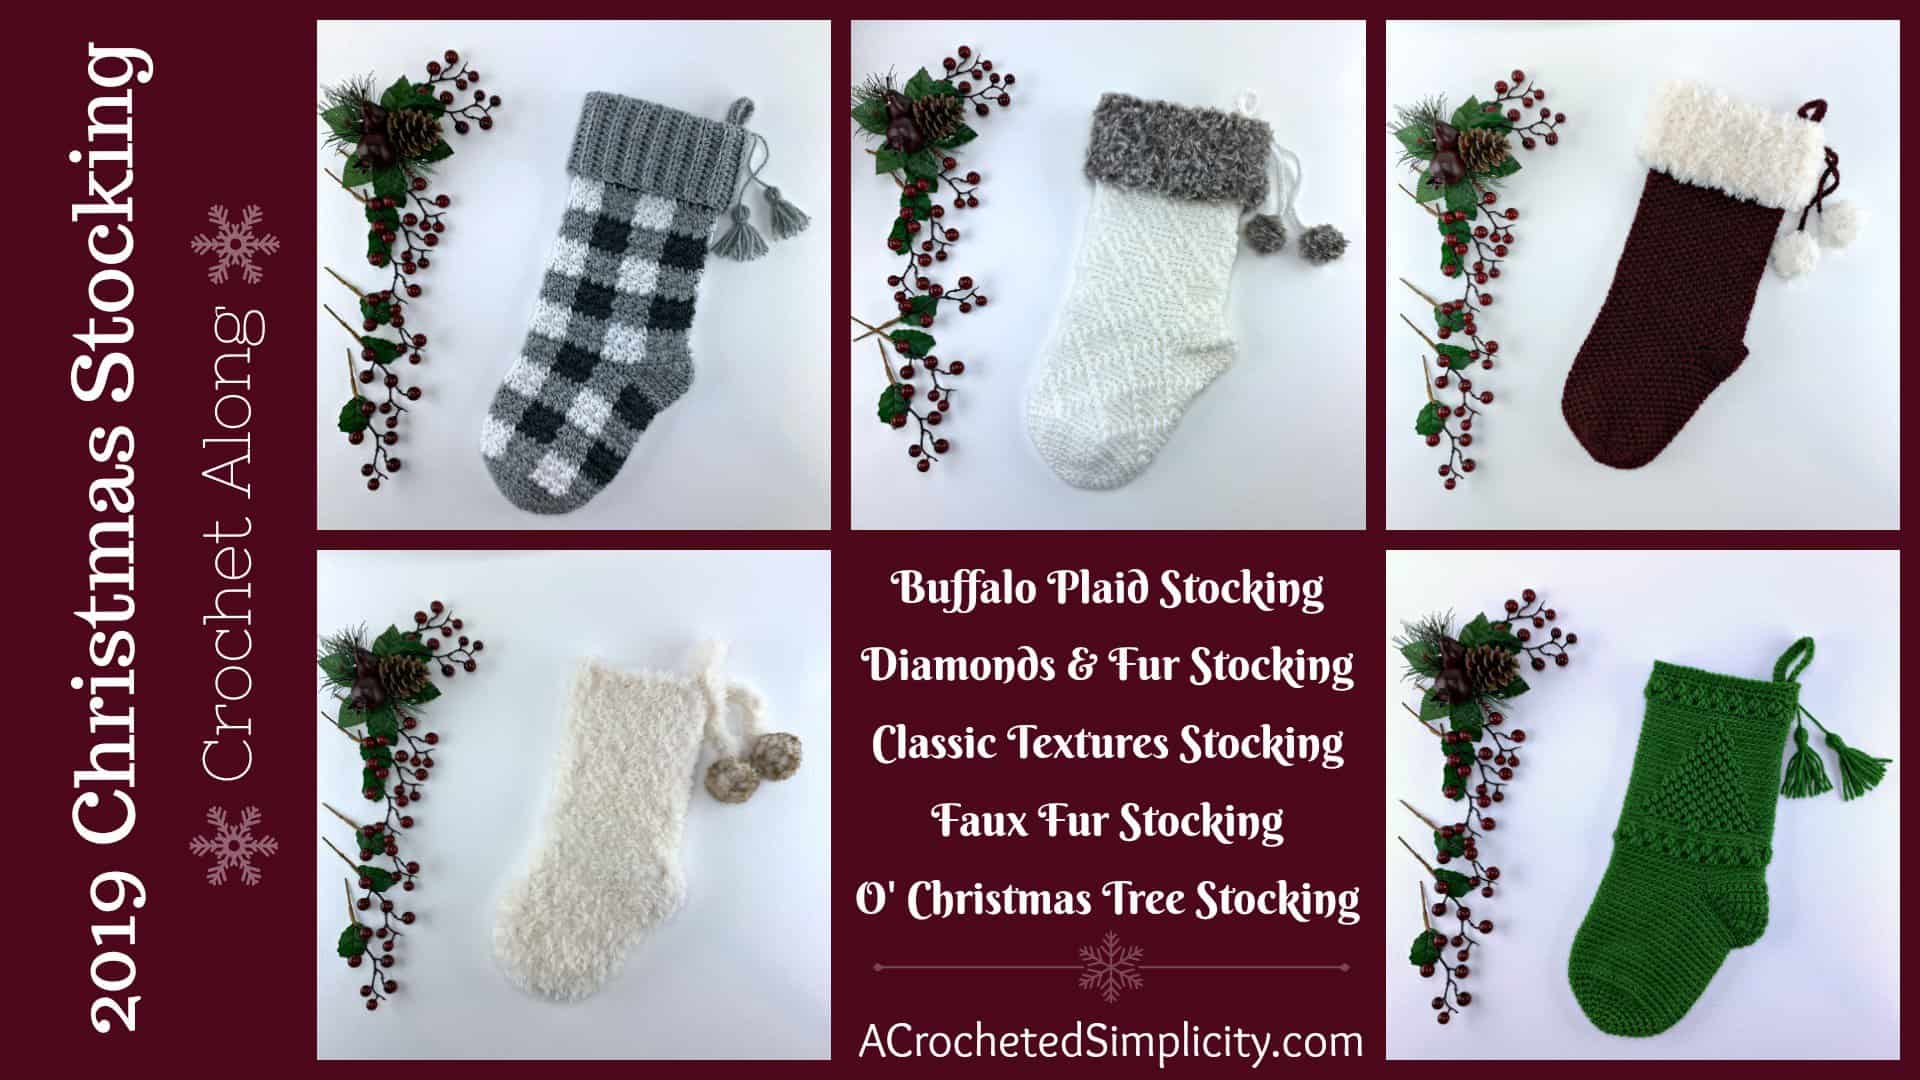
2019 Crochet Christmas Stocking Crochet Along
This stocking was designed for the 2019 Christmas Stocking Crochet Along. To find out how you can participate in this year’s CAL & enter to win PRIZES, please visit my blog post. You’ll find CAL & giveaway info, you’ll also find links to all 5 free crochet Christmas stocking patterns.
Yarn
Faux fur yarn is extremely popular this year so I knew I had to incorporate it in at least one of this year’s Christmas stocking designs. As I was making the faux fur cuff on the Diamonds & Fur Christmas Stocking, I decided that I needed to use it for the cuff on others as well.
I chose Lion Brand Yarns Go For Faux in the color Bear for the cuff and faux fur poms for this Christmas crochet stocking. Go For Faux yarn is a super bulky yarn that is available in 12 great colors. There are so many gorgeous color combinations possible!
Lion Brand Yarns also has a Go For Faux Thick & Quick. When yarn shopping, make sure to grab the original Go For Faux, super bulky 6 yarn and not the think & quick 7 weight yarn.
For the crochet Christmas socks, I chose Lion Brand Yarn’s Vanna’s Choice in White. The combination of the white yarn, the stitch pattern and the faux fur creates a stunning crochet stocking.
Diamonds & Fur Christmas Stocking – FREE CROCHET STOCKING PATTERN
The Christmas stocking crochet pattern is free below, but if you love to work offline, or need to order your yarn, I’ve got a couple other great options for you.
Purchase the ad-free, printable PDF that includes all photo tutorials, on Love Crafts, Ravelry, or Etsy.
Save this pattern to your Ravelry favorites.
This post contains affiliate links.
Materials
- Yarn: Worsted Weight / 4 yarn & Super Bulky Weight / 6 yarn / I used Lion Brand Yarns Vanna’s Choice in White and Go For Faux in Bear for my stocking. This yarn is available from Lion Brand Yarns or you can also find it on Amazon.
- Worsted Weight Yarn – White (260 yards)
- Faux Fur Yarn – Bear (28 yards)
- Crochet Hooks: I/9/5.50mm & 9.00mm; or size needed to obtain gauge (My favorite crochet hooks are the Clover Amour Crochet Hooks, I’ve never had an ache in my hand since switching).
- Scissors
- Yarn Needle
- Locking Stitch Marker
- Scrap piece of yarn
 Lion Brand Yarn Go For Faux...Shop on Amazon
  Clover 1048/I Green Amour C...Shop on Amazon
  Clover 1056/MN Amour Croche...Shop on Amazon
  Fiskars 154110-1001 Non-sti...Shop on Amazon
Abbreviations (US Terms)
- ch(s): chain(s)
- sl st: slip stitch
- st(s): stitch(es)
- sc: single crochet
- dc: double crochet
- invsc2tog: invisible single crochet decrease – see special stitches below
- RS: right side
- Rep: repeat
- Rnd: round
- yo: yarn over
- BLO / FLO: back loop only / front loop only
- Join yarn with a standing single crochet
- Join yarn with a standing double crochet
Size
-
One Size: 6.5″W x 17″L (laid flat)
Gauge
- See individual sections for gauge.
Pattern Notes
- Beginning chain(s) are not included in stitch count, unless noted otherwise.
- First stitch of each row is worked in the same stitch as the turning chain, unless otherwise specified.
- I tend to crochet on the tighter side. You may find yourself needing to go down a hook size (or two) to properly meet gauge, but gauge isn’t as critical with this design.
- Lion Brand Yarns Vanna’s Choice in white was used for the Christmas stocking shown in the photos. (100% acrylic / 3.5 oz/ 100 g / 170 yards / 156 m) (solids).
- Lion Brand Yarns Go For Faux in Bear was used for the cuff & poms shown in the photos. (100% polyester / 3.5 oz/ 100 g / 65 yards / 60 m).
- Yardage:
- Worsted Weight – White (260 yards)
- Super Bulky Faux Fur (28 yards)
- Crochet a Stocking: This Xmas pattern is worked from the top opening down to the toe. A faux fur cuff is then made and sewn on. Faux fur pompoms are then added, if desired.
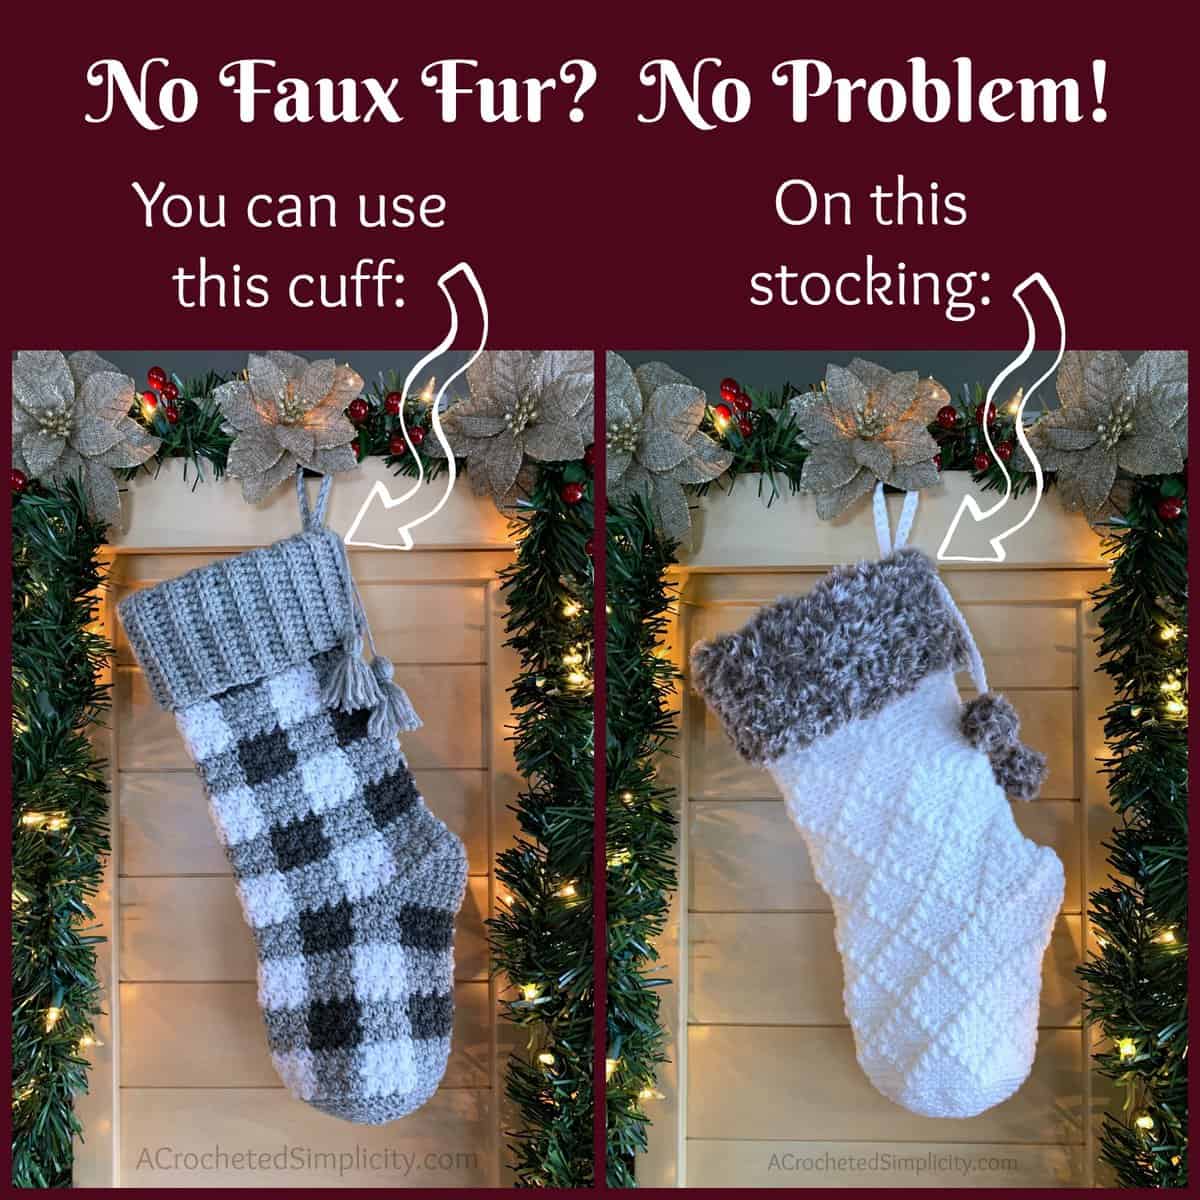
- NO FAUX FUR CUFF OPTION: If you do not want a faux fur cuff on your stocking, simply crochet the Cuff & Cuff Seam from the Buffalo Plaid Christmas Stocking here, then whipstitch it to the top of your Diamonds & (No) Fur Stocking.
- One Piece Crochet Christmas Stocking Pattern Free: If you choose to make your holiday stocking without a cuff, you will have a simple one piece crochet Christmas stocking.
Special Stitches
-
Invisible Single Crochet Decrease (inv sc2tog): Insert hook into the FLO of stitch indicated, insert hook into FLO of next stitch, yo, pull up a loop, yo, pull thru all loops on hook.
NO FAUX FUR CUFF OPTION
If you do not want a faux fur cuff on your Christmas sock, simply follow the instructions for the Cuff & Cuff Seam from the Buffalo Plaid Christmas Stocking, then whipstitch it to the top of your Diamonds & (No) Fur Stocking.
Diamonds & Fur Crochet Christmas Stocking Instructions
Leg of Stocking
Note: This section is worked in continuous rounds (a spiral). Do not join at the end of each round, instead use a scrap piece of yarn to keep track of the beginning of each round. Move the scrap of yarn up as you complete each round.
Gauge: In BLO sc, 10 sts = 3″; 9 rows = 3″
Set-up: With a 5.50 mm crochet hook and white yarn, ch 48, being careful not to twist the chain, join with a sl st to the 1st ch.
Rnd 1 (RS): Ch 1, working into the back hump of the ch, sc in each ch around. Do not join. (48 sts) Begin using a stitch marker or scrap piece of yarn to keep track of the beginning of each round as you work.
Rnds 2 – 5: Sc in each st around.
Rnds 6 – 7: BLO sc in each st around.
Do not fasten off. Continue on to Diamonds Design.
Diamonds Design
Note: This section is worked in continuous rounds (a spiral). Do not join at the end of each round, instead use a scrap piece of yarn to keep track of the beginning of each round. Move the scrap of yarn up as you complete each round.
*See the chart below for a visual of the diamonds design.*
Rnd 1: (BLO sc in each of the next 4 sts, FLO dc in the next st 2 rnds below, BLO sc in each of the next 3 sts) rep from ( to ) around. (48 sts)
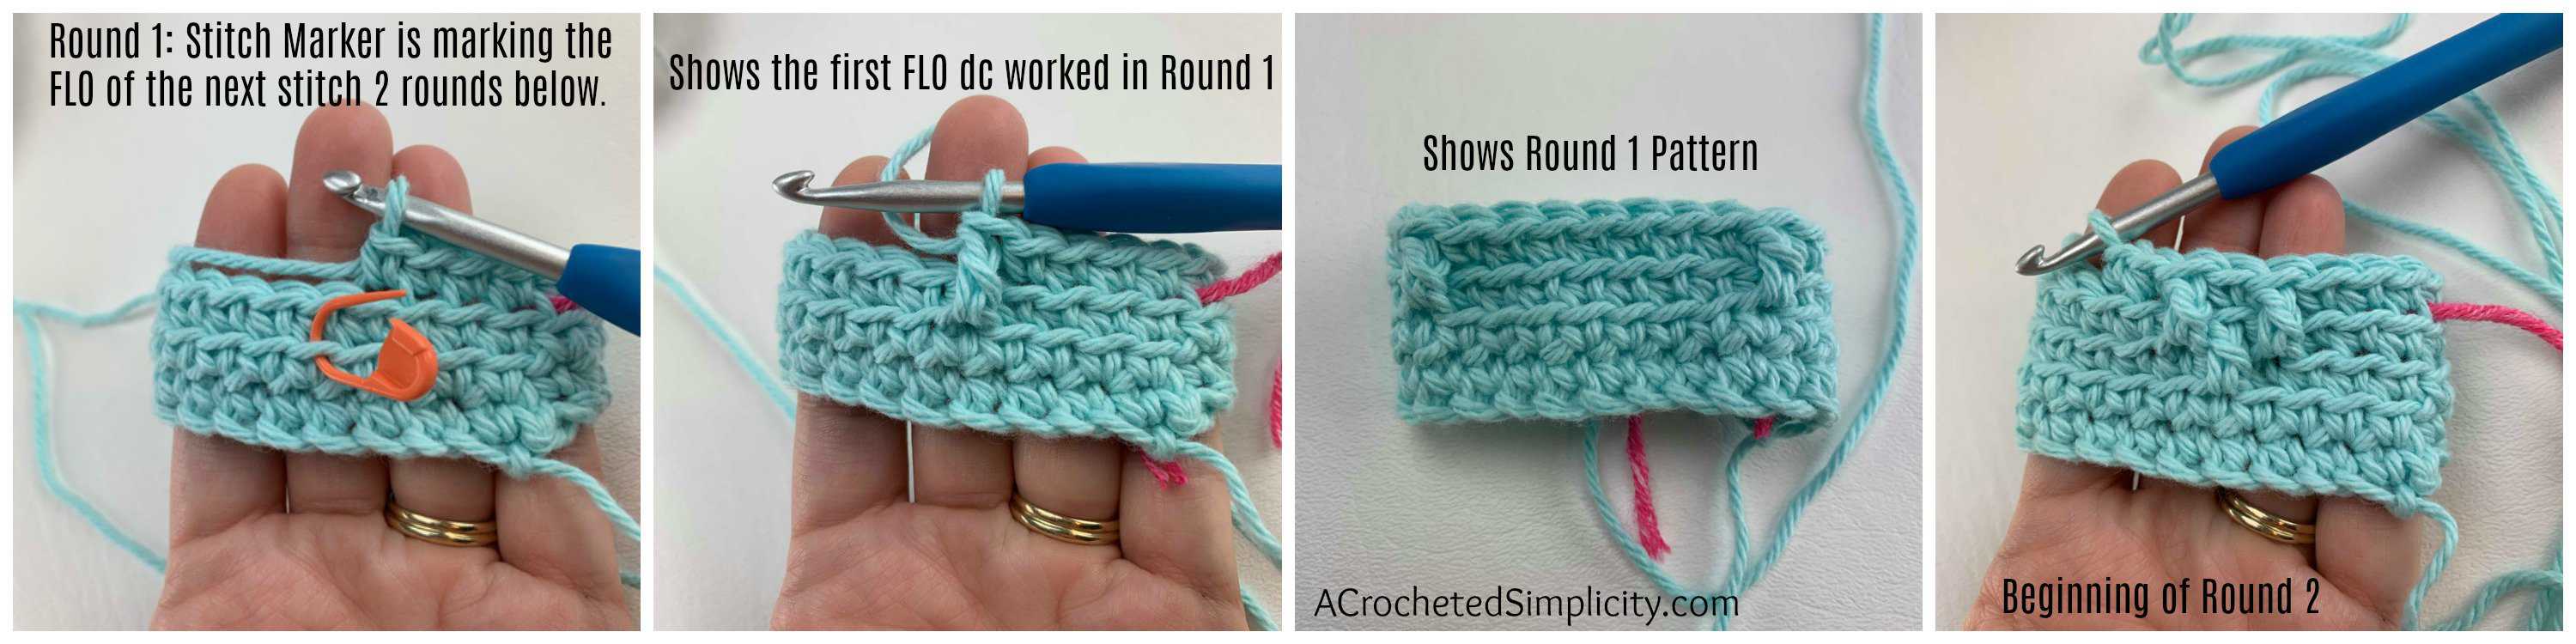
Rnd 2: (BLO sc in each of the next 3 sts, FLO dc in the next st 2 rnds below, BLO sc in the next st, FLO dc in the next st 2 rnds below, BLO sc in each of the next 2 sts ) rep from ( to ) around.
Rnd 3: (BLO sc in each of the next 2 sts, FLO dc in the next st 2 rnds below, BLO sc in each of the next 3 sts, FLO dc in the next st 2 rnds below, BLO sc in the next st) rep from ( to ) around.
Rnd 4: (BLO sc in the next st, FLO dc in the next st 2 rnds below, BLO sc in each of the next 5 sts, FLO dc in the next st 2 rnds below ) rep from ( to ) around.
Rnd 5: (FLO dc in the next st 2 rnds below, BLO sc in each of the next 7 sts) rep from ( to ) around.
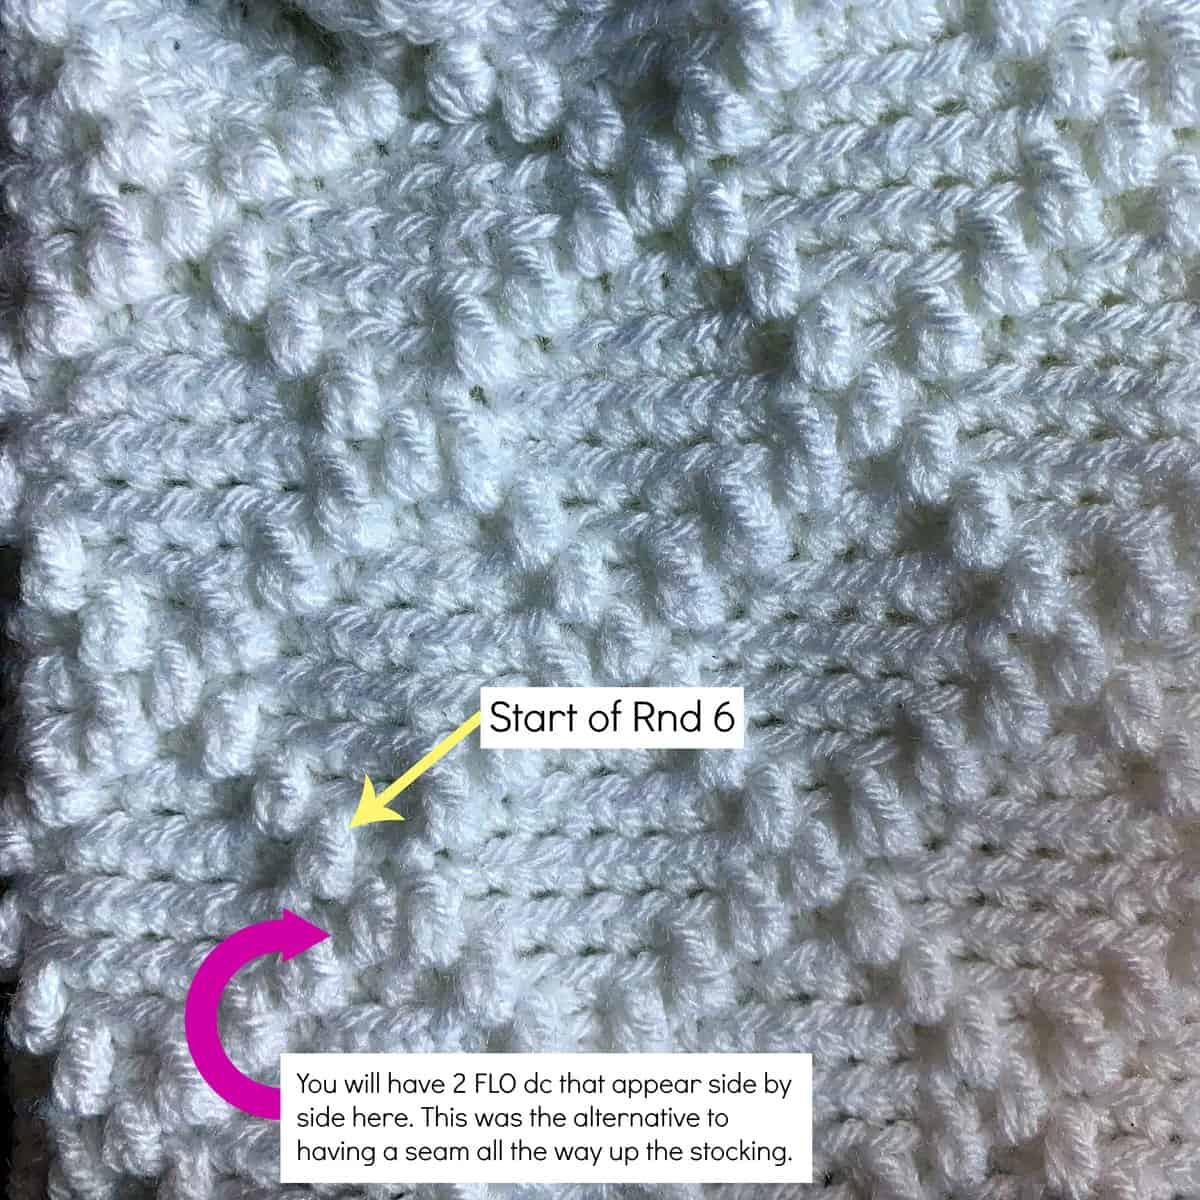
Rnd 6: Rep Rnd 4. *Note: Some FLO dc will be worked into the FLO of other dc 2 rnds below.
Rnd 7: Repeat Round 3.
Rnd 8: Rep Rnd 2.
Rnd 9: (BLO sc in each of the next 4 sts, FLO dc in the next st 2 rnds below, BLO sc in each of the next 3 sts) rep from ( to ) around.
Rnds 10 – 28: Rep Rnds 2 – 9, ending with a Rnd 4. At the end of round 28, place a stitch marker in stitch #42 to mark the beginning of the heel.
Fasten off. Weave in ends. Approximate length at this point is 10″. Continue on to Crochet Stocking Heel.
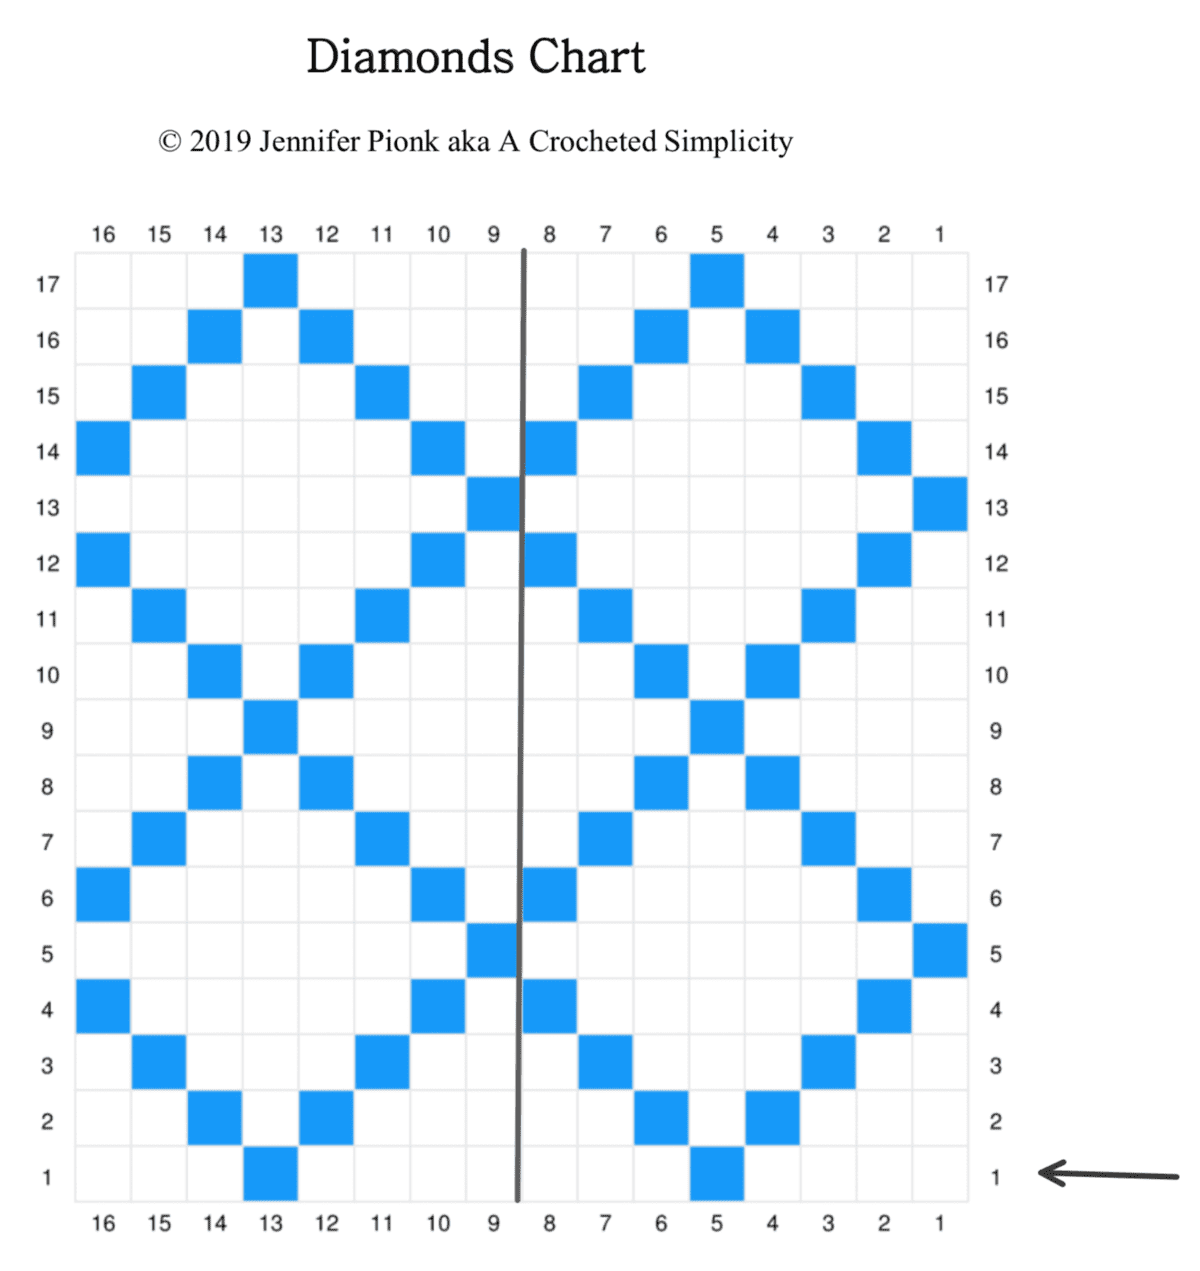
How to read the chart above:
- Read the chart from right to left, bottom to top.
- The Blue squares indicate when you’ll work a dc.
- Make sure to work the dc in the front loops of stitches 2 rounds below the current round.
- The vertical numbers indicate the round you’re on. Begin following the chart and working a dc in round 1 of Diamonds Design.
- The horizontal numbers represent the stitch number. This stitch pattern is a multiple of 8 stitches.
Crochet Stocking Heel
Note: Stitches are worked under both loops. Heel is worked in short rows.
Row 1 (RS): Using a 5.5 mm crochet hook and white yarn, begin by leaving an 8″ tail of yarn to sew gap closed in the next section, then join yarn with a standing sc in the st marked with a stitch marker, sc in each of the next 14 sts. Turn. (15 sts)
Row 2: Ch 1, sc in next 10 sts. Turn. (10 sts)
Row 3: Ch 1, sc in next 5 sts. Turn. (5 sts)
Row 4: Ch 1, sc in next 5 sts, sc in next st of Row 1. Turn. (6 sts)
Row 5: Ch 1, sc in next 6 sts, sc in next st of Row 2. Turn. (7 sts)
Row 6: Ch 1, sc in next 7 sts, sc in next st of Row 1. Turn. (8 sts)
Row 7: Ch 1, sc in next 8 sts, sc in next st of Row 2. Turn. (9 sts)
Row 8: Ch 1, sc in next 9 sts, sc in next st of Row 1. Turn. (10 sts)
Row 9: Ch 1, sc in next 10 sts, sc in next st of Row 2. Turn. (11 sts)
Row 10: Ch 1, sc in next 11 sts, sc in next st of Row 1. Turn. (12 sts)
Row 11: Ch 1, sc in next 12 sts, sc in next st of Row 2. Turn. (13 sts)
Row 12: Ch 1, sc in next 13 sts, sc in next st of Row 1. Turn. (14 sts)
Row 13: Ch 1, Both Loops sc in each of the next 7 sts, BLO sc in the next st, Both Loops sc in each of the next 6 sts, Both Loops sc in the next st of Row 2. Do not turn. (15 sts) Place a stitch marker in the FLO of st #8 to mark the beginning of the Foot of Stocking.
Fasten off leaving an 8″ tail of yarn to sew gap closed in the next section. Continue on to Foot of Stocking.
Foot of Crochet Stocking
Note: This section is crocheted in back loops only.
Note: This section is crocheted in continuous rounds (a spiral). Do not join at the end of each round, instead use a scrap piece of yarn to keep track of the beginning of each round. Move the scrap of yarn up as you complete each round.
Tip! After working a couple rounds in the Foot of Stocking, use a yarn needle and tails of yarn to stitch closed the small gaps near the first and last stitches of the heel. It’s easier to do this now, rather than waiting until you’ve completed your stocking.
Rnd 1 (RS): Using a 5.5 mm crochet hook & white yarn, join yarn with a standing dc in the FLO of the stitch marked with a stitch marker, BLO sc in each of the next 7 sts, (FLO dc in the next st 2 rnds below, BLO sc in each of the next 7 sts) rep from ( to ) around. (48 sts)
** For the remainder of the Foot of Stocking, you’re going to repeat rounds from the Diamonds Design section above. **
Rnds 2 – 5: Rep Diamonds Design Rnds 6 – 9.
Rnds 6 – 17: Rep Diamonds Design Rnds 2 – 9, ending with a Rnd 5 Rep.
Rnd 18: BLO sc in each st around.
Do not fasten off. Continue on to Toe. Approximate length from last row of heel is 5″.
Toe
Note: This section is worked in continuous rounds (a spiral). Do not join at the end of each round, instead use a scrap piece of yarn to keep track of the beginning of each round. Move the scrap of yarn up as you complete each round.
Rnd 1: Both Loops, sc in each st around. (48 sts)
Rnd 2: * sc in each of the next 5 sts, invsc2tog, rep from * around to the last 6 sts, sc in each of the last 6 sts. (42 sts)
Rnd 3: * sc in each of the next 5 sts, invsc2tog, rep from * around. (36 sts)
Rnd 4: * sc in each of the next 4 sts, invsc2tog, rep from * around. (30 sts)
Rnd 5: * sc in each of the next 4 sts, invsc2tog, rep from * around. (25 sts)
Rnd 6: * sc in each of the next 3 sts, invsc2tog, rep from * around. (20 sts)
Rnd 7: * sc in each of the next 3 sts, invsc2tog, rep from * around. (16 sts)
Rnd 8: * sc in each of the next 2 sts, invsc2tog, rep from * around. (12 sts)
Rnd 9: Invsc2tog around. (6 sts)
Fasten off leaving a tail of yarn and use a yarn needle to sew the toe closed. Weave in ends. Continue on to the Christmas Stocking Faux Fur Cuff.
Christmas Stocking Faux Fur Cuff
Note: The crochet cuff is worked flat, in rows, seamed, then attached to the top of the stocking.
Gauge: Using super bulky fur yarn, in sc: 7 sts = 3.75″
Row 1: Using a 9.00 mm crochet hook & faux fur yarn, ch 8, working into the back humps of the ch, sc in the 2nd ch from your hook and in each ch across. Turn. (7 sts)
Row 2: Ch 1, sc in each st across. Turn.
Rep Row 2 until the cuff measures 15.5″ L (or long enough to wrap around the top edge of your stocking).
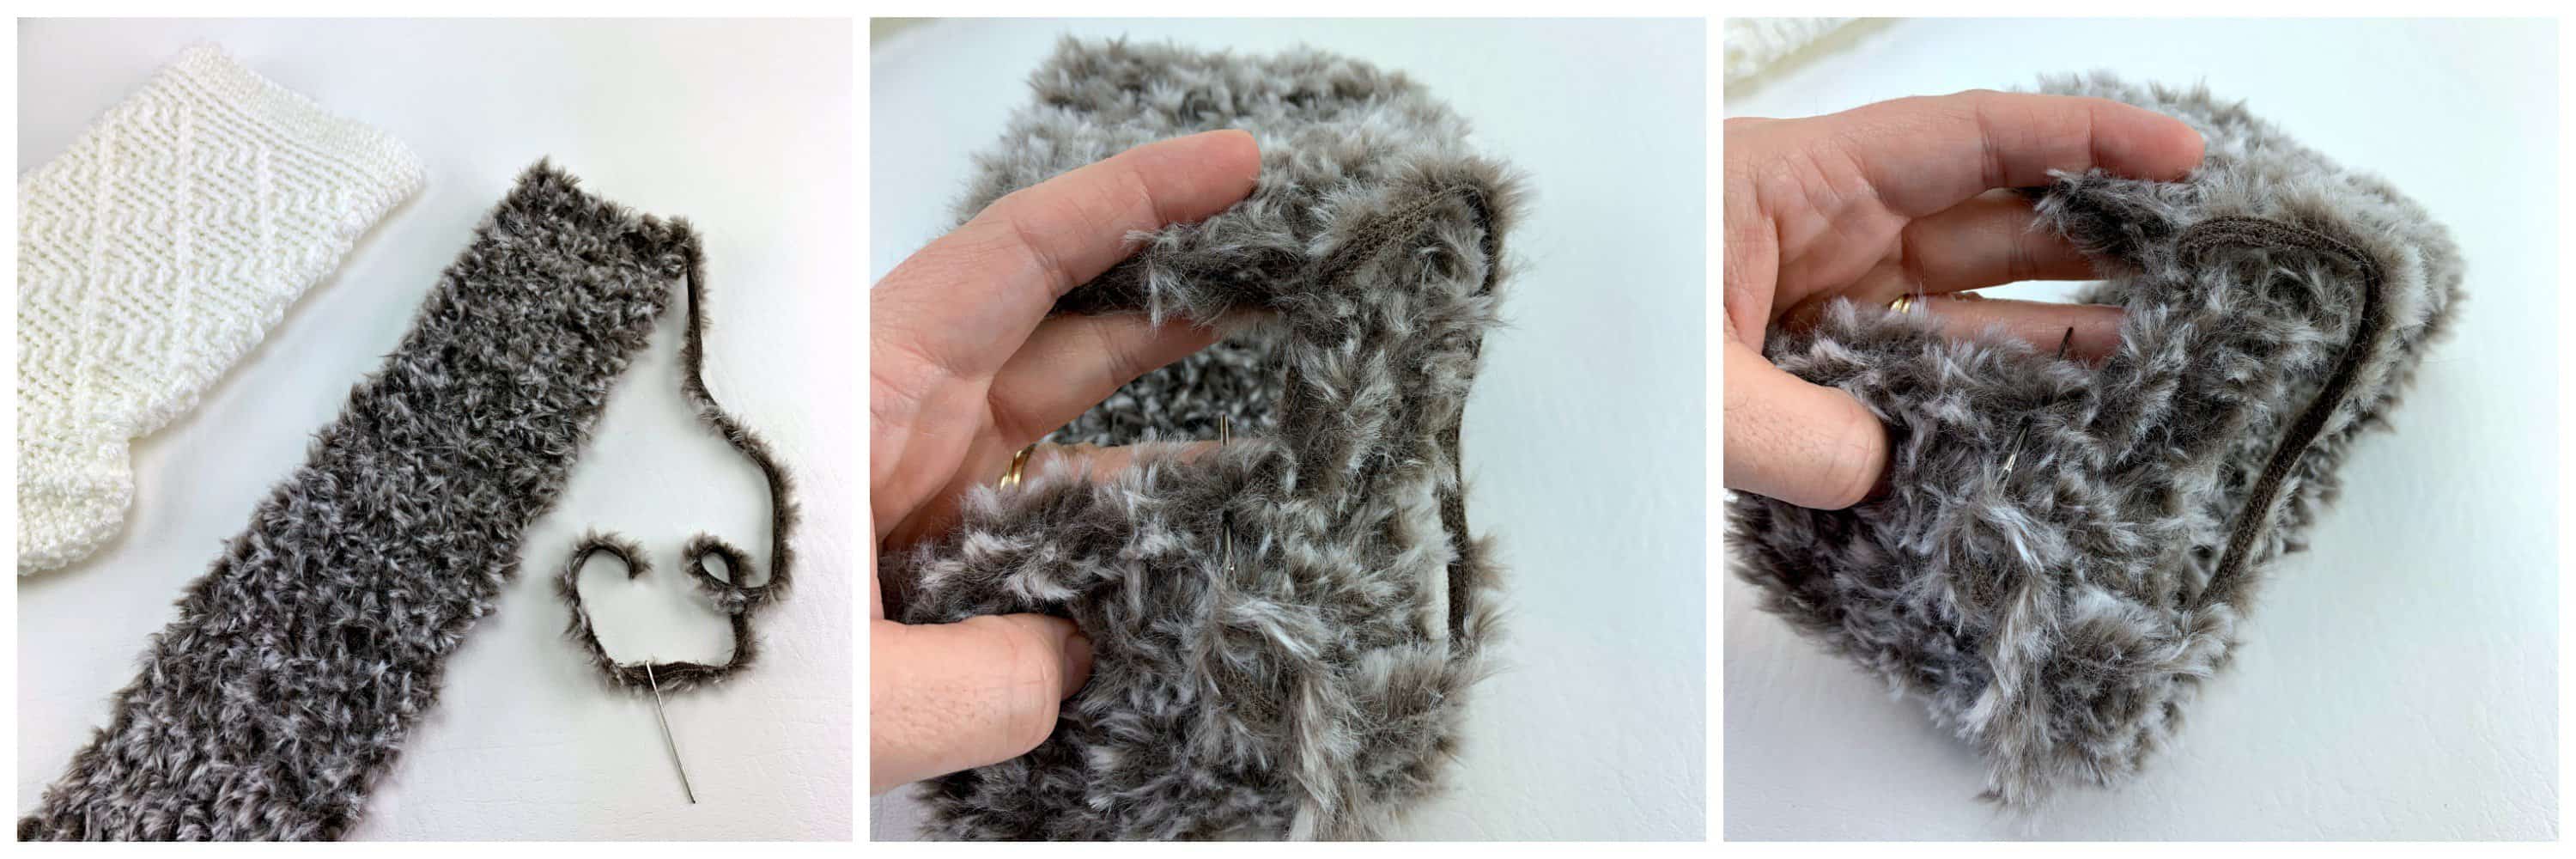
Fasten off leaving a 10″ tail of yarn for seaming the short edges of the cuff. Using a yarn needle and tail of yarn, whipstitch the short edges of your cuff together. Weave in ends. Continue on to Attaching the Cuff. Approximately size: 3.75″ W x 15.5″ L.
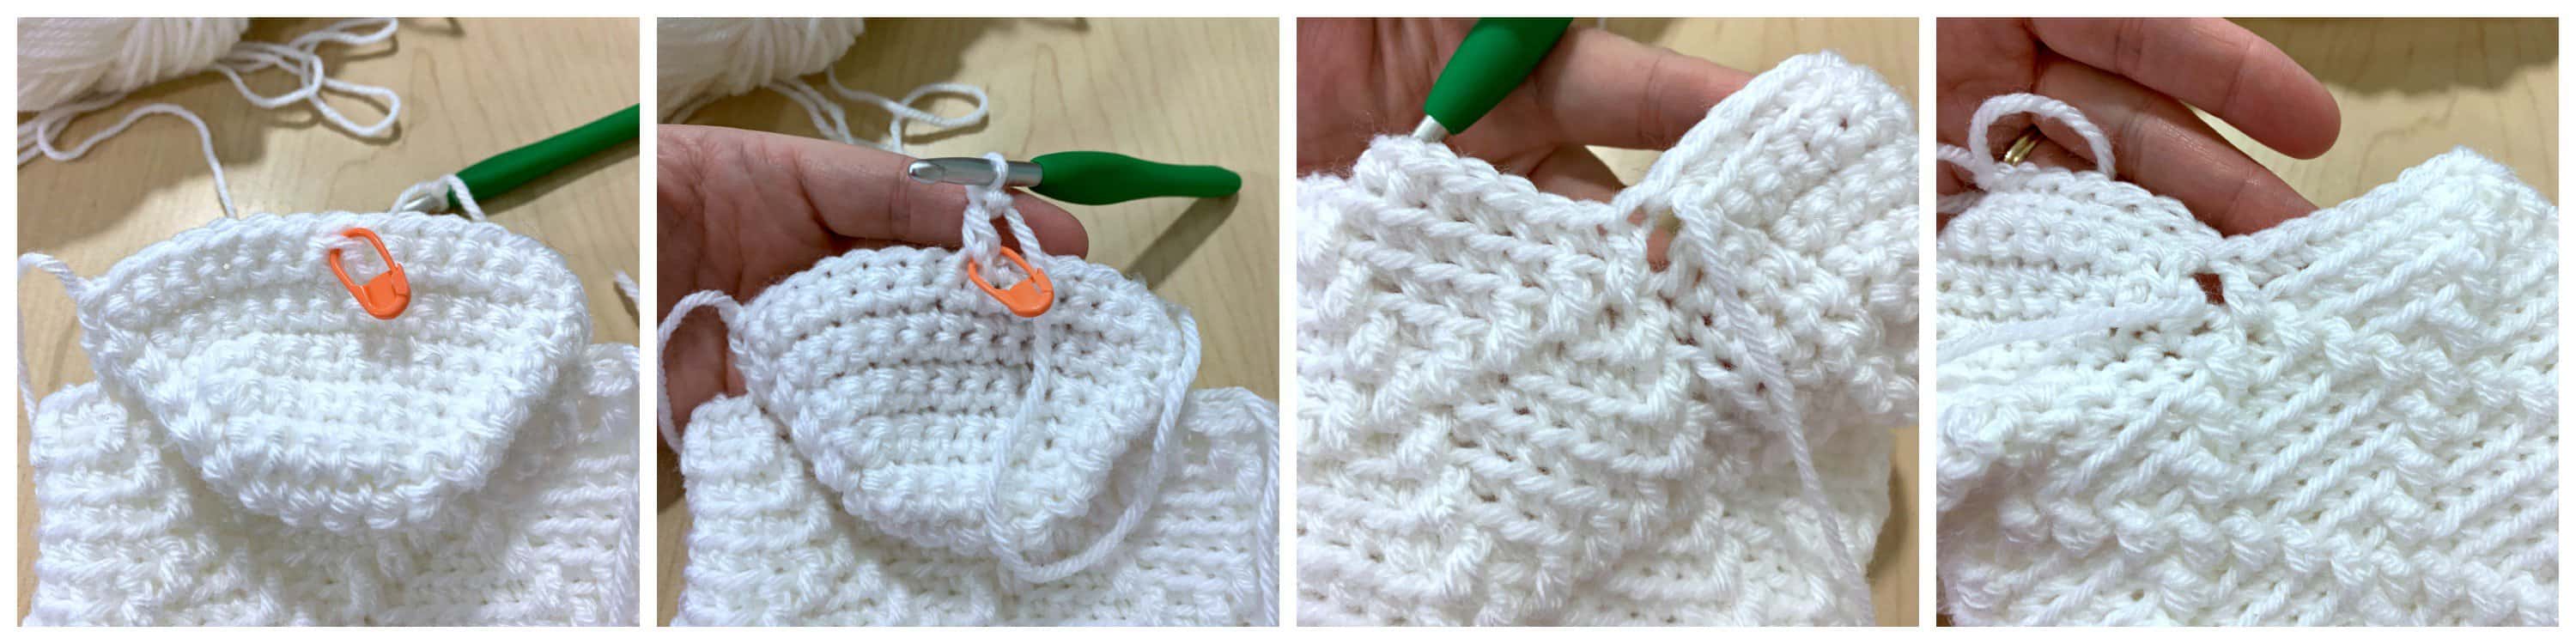
Attaching the Cuff
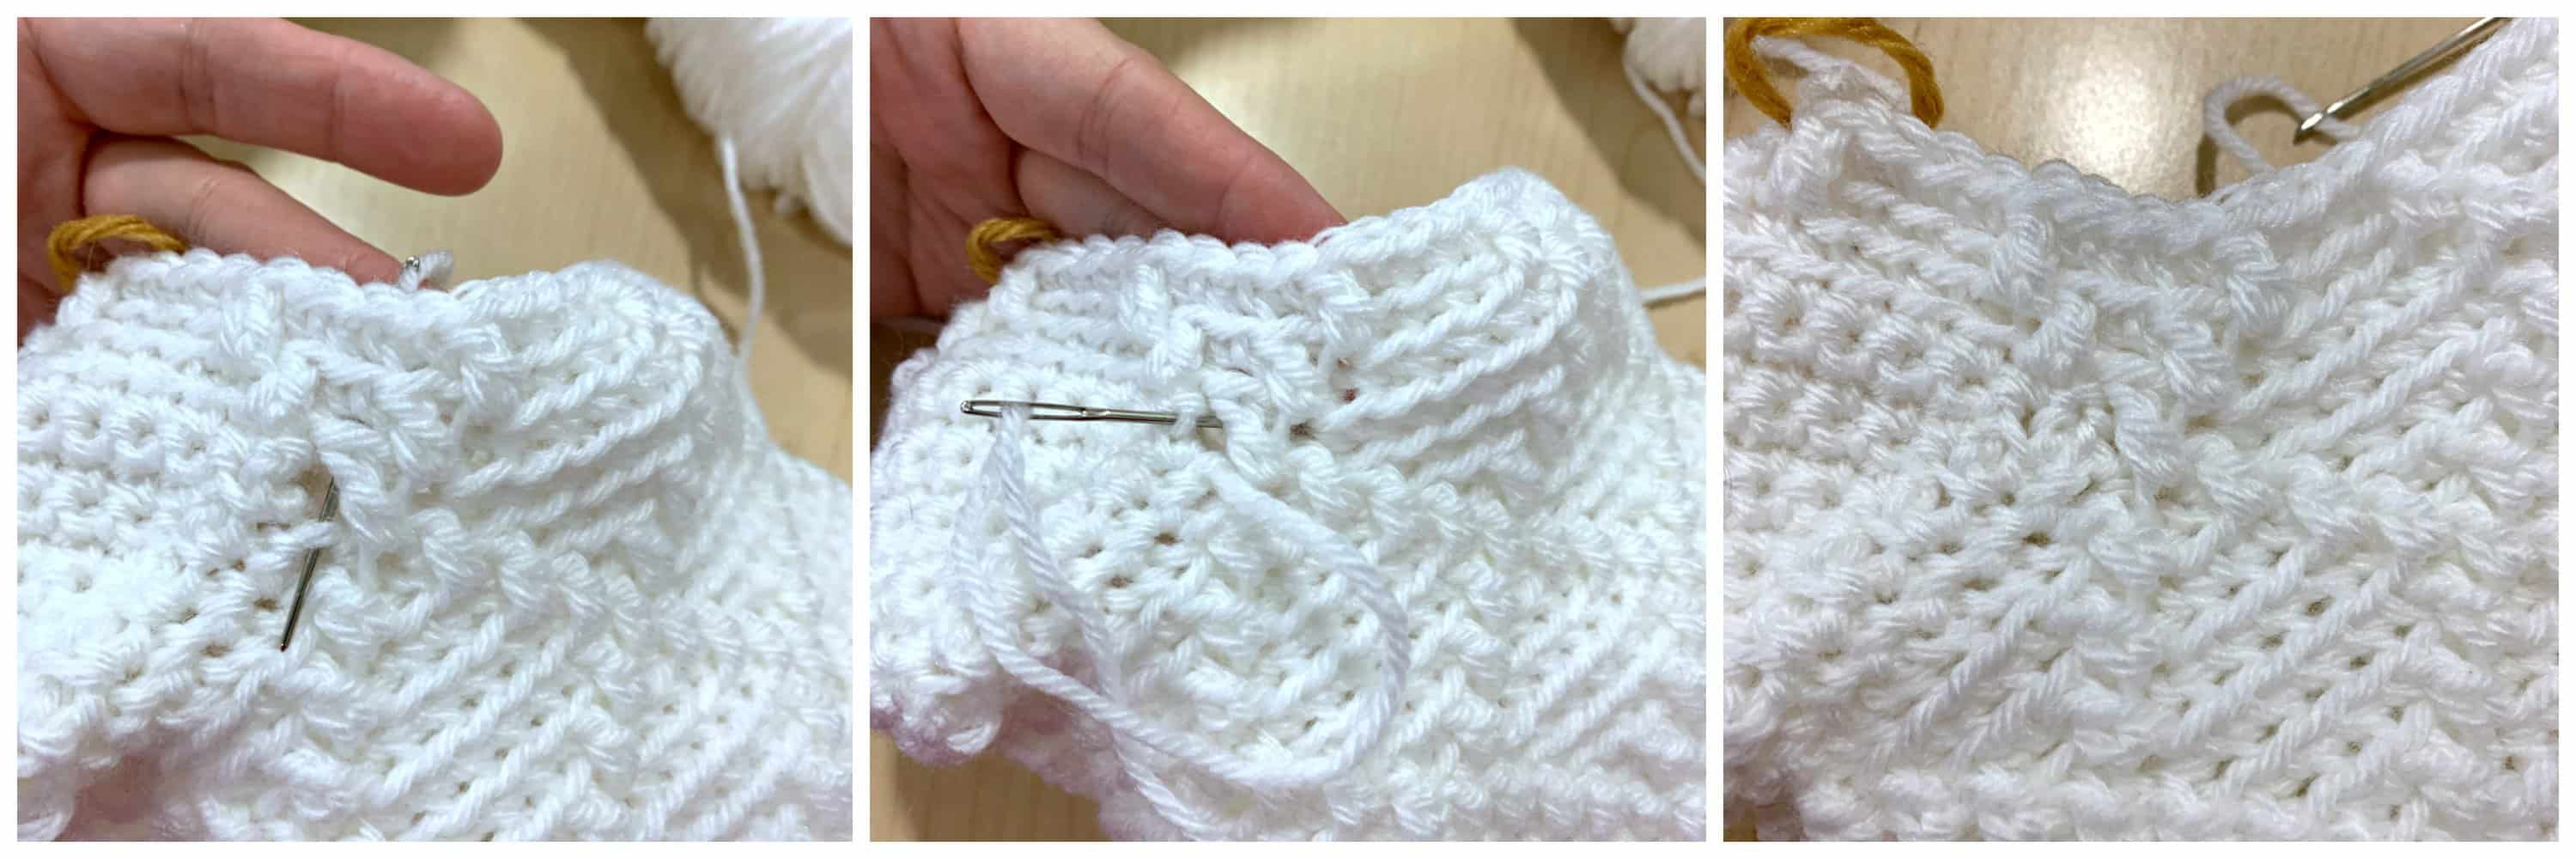
Step 1: Slide the cuff over the top edge of the stocking. Line up the top edge of the stocking with the top edge of the cuff. Use a locking stitch marker or two to hold the two edges together while you seam them.
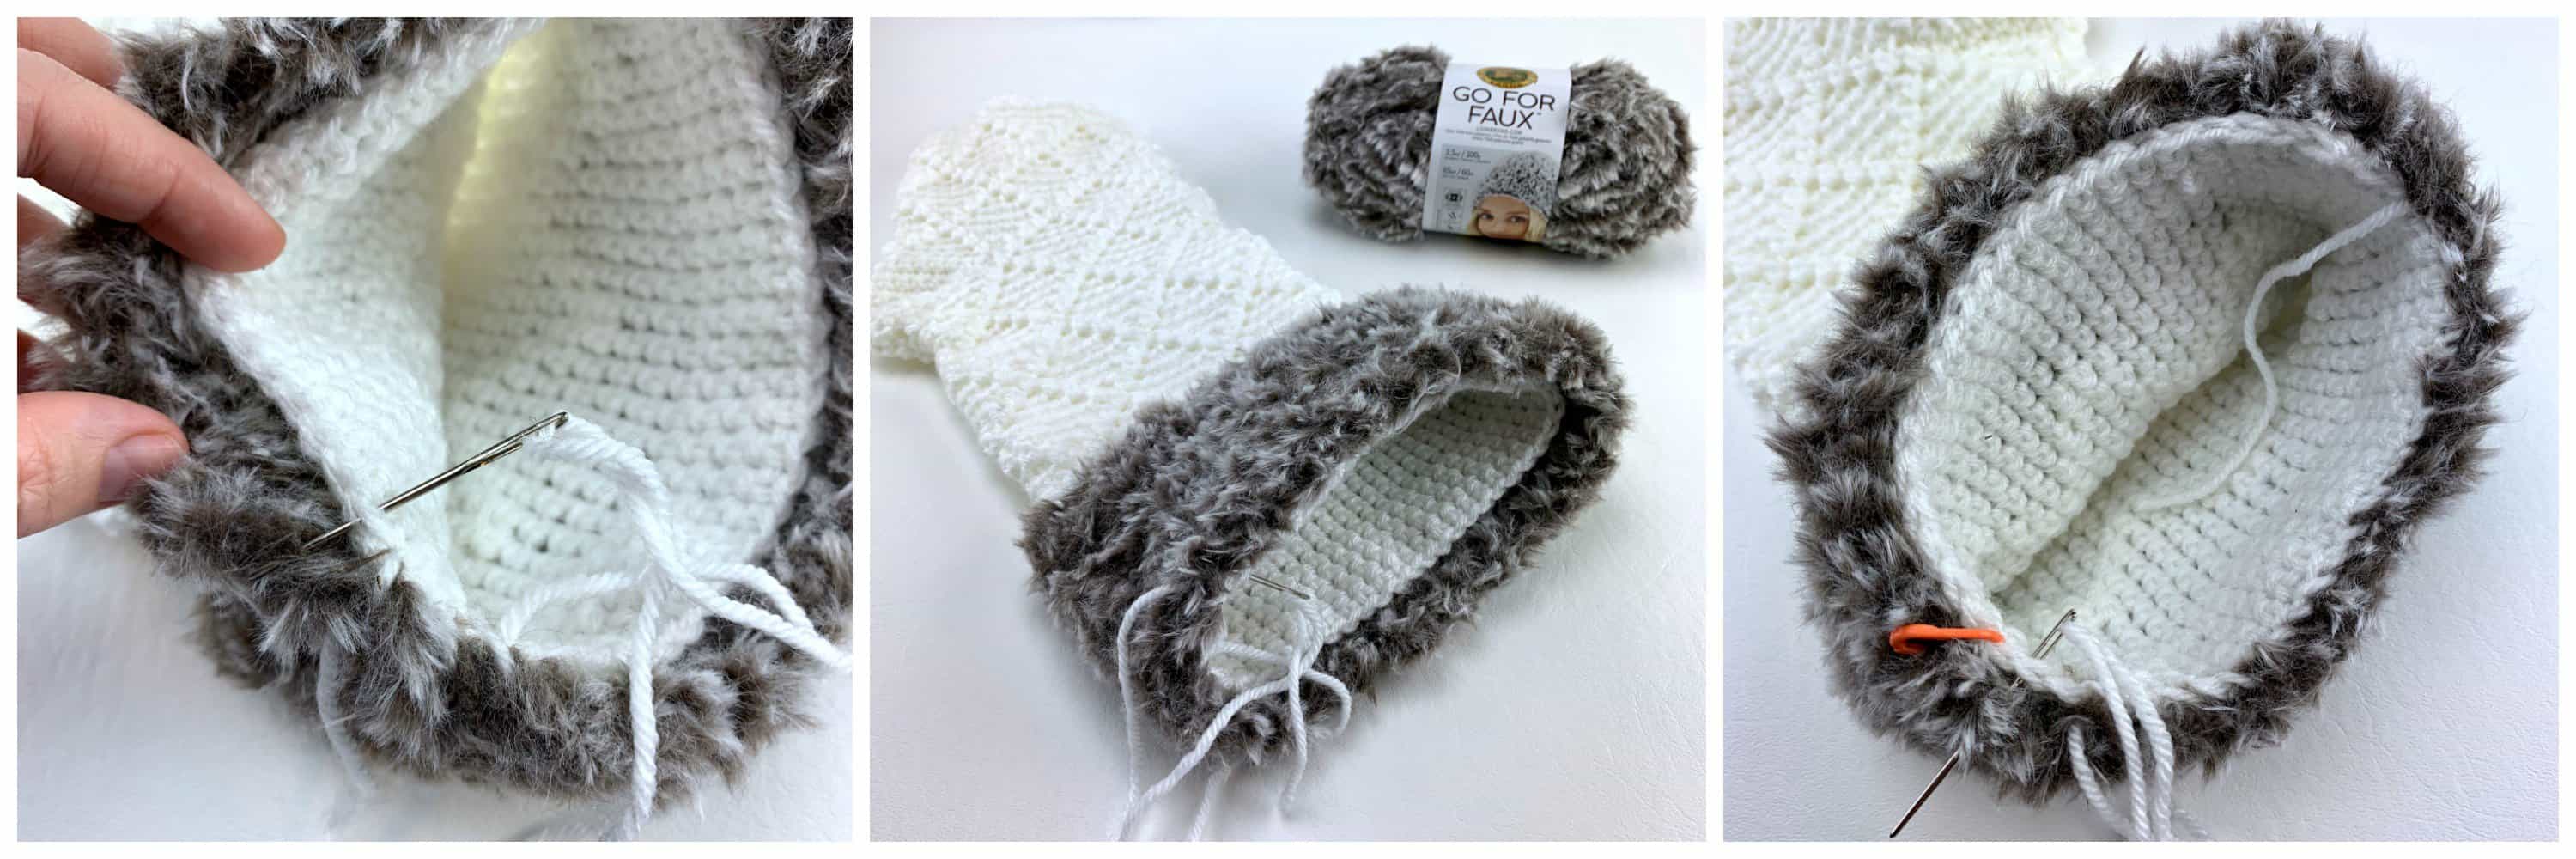
Step 2: Using a yarn needle and 30″ piece of white, worsted weight yarn, whipstitch the top edge of the cuff and top of edge of the stocking together. Make sure that when you insert the yarn needle through the faux fur cuff, that you insert it under a top loop instead of just under the fur. Whipstitch through every other stitch around the top edge of the stocking, but through nearly every stitch of the faux fur cuff.
Weave in ends. Continue on to Hanging Loop.
Hanging Loop
Using a 5.50 mm crochet hook and white yarn, ch 31, working into the back hump of the ch, sc in the 2nd ch from your hook and in each ch across. (30 sts)
Fasten off leaving an 8” tail. Using a yarn needle and the tail of yarn, fold your work in half and sew the loop onto the inside of the stocking at the center back of the leg. Weave in ends. Continue on to Faux Fur PomPoms & Tie, if desired.
Faux Fur PomPoms (Make 2)
Rnd 1: With a 9.00 mm crochet hook and faux fur yarn, ch 2, work 4 sc into the 2nd ch from your hook. Do not join. (4 sts) Use a scrap piece of yarn to keep track of the beginning of each round as you work.
Rnd 2: Work 2 sc into each st around. (8 sts)
Rnd 3: (sc2tog) 4 times. (4 sts)
Fasten off. Continue on to Tie.
Tie
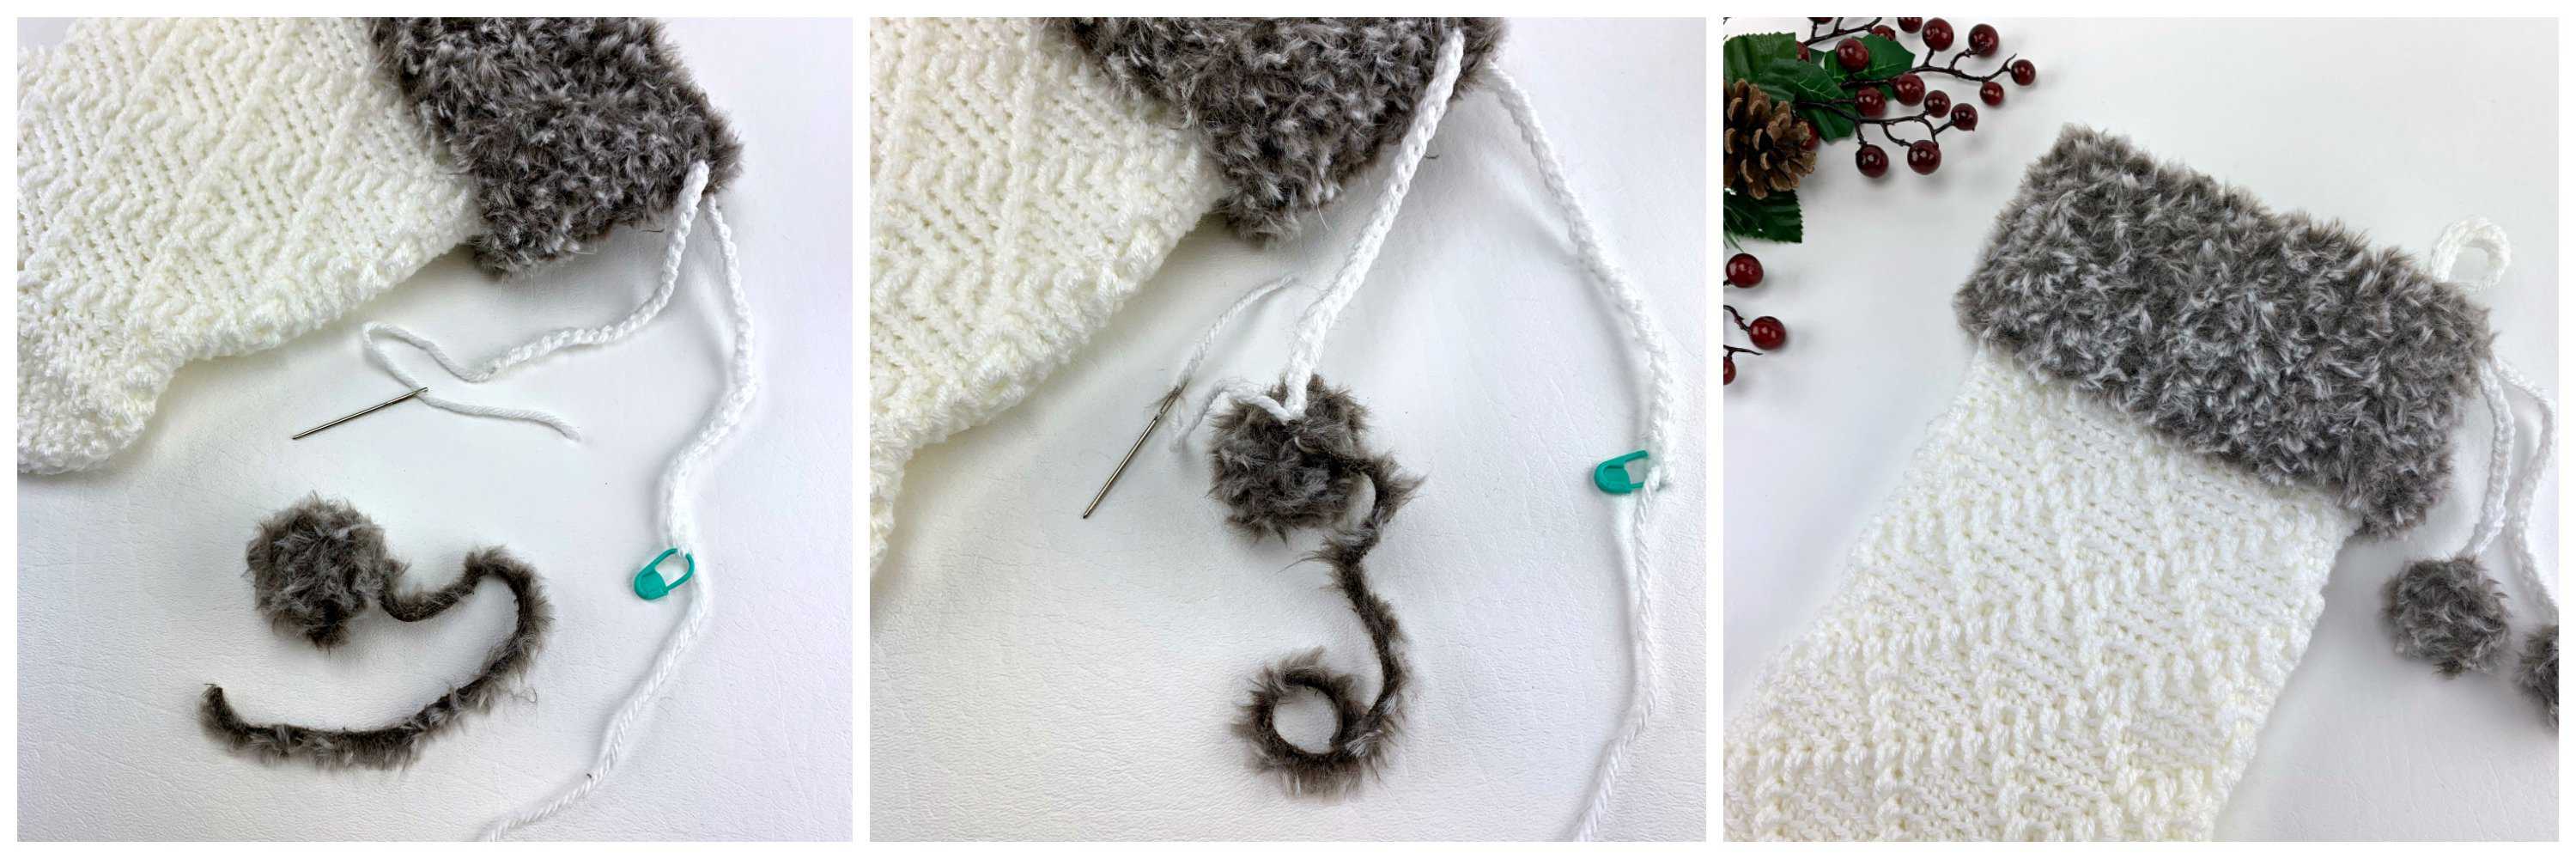
With a 5.50 mm crochet hook and white yarn, begin by leaving an 8″ tail of yarn to tie a pom onto, ch until your ch measures 11″. Do not fasten off. Place a stitch marker into the last chain to hold it so you can adjust the length later, if needed.
Using a yarn needle and beginning tail of yarn, weave the tie through a stitch at the top, center back of leg of your stocking.
Tie 1 pompom onto the end of the tie without the stitch marker. Knot to secure and weave ends into the inside of the pom.
Move the tie around to adjust it to the length you prefer. Remove chains if it’s too long, add chains if it’s too short. Once you’ve decided on the proper length, fasten off leaving a 4″ tail.
Tie 2nd pompom onto the opposite end of the tie. Knot to secure and weave ends into the inside of the pom.
QUESTIONS CROCHETERS FREQUENTLY ASK ABOUT HOW TO CROCHET STOCKINGS
If you have any questions that I haven’t answered below, always feel free to reach out to me, (e-mail me: ACrochetedSimplicity at Gmail dot Com), and I’ll do my best to help!
How much yarn do I need to crochet a Christmas stocking?
The answer to this question varies greatly depending on the weight of yarn the stocking pattern calls for, the crochet stitches used, and the size of the stocking.
- A small stocking crochet pattern will use much less yarn than a large Christmas stocking pattern.
- A stocking made using simple crochet stitches will use much less yarn than a classic Christmas stocking pattern with crochet cables, or a deeply textured crochet stitch pattern.
That said, you can plan to crochet most medium size crochet stockings with approximately 200 yards of a worsted weight yarn.
What is the BEST yarn to use for crochet Christmas stockings?
When searching for crochet Christmas patterns, you’ll find that the most popular weight of yarn used for crochet stockings is worsted weight yarn. Worsted weight yarn is not only durable, it also works up pretty quickly.
The following are my favorite worsted weight yarns to use for Christmas stockings: Lion Brand Pound of Love, Lion Brand Vanna’s Choice, and Lion Brand Wool Ease.
For a chunky crochet christmas stocking pattern (bulky yarn), here are a couple great options: Lion Brand Hue & Me and Lion Brand Basic Stitch Antimicrobial Thick & Quick.
What is a good size for a Christmas stocking?
Christmas stockings range in size from mini crochet stockings (typically used as crochet stocking ornaments) up to large stockings. They are most commonly measured by length and standard size stockings range from 18″ to 28″ long. Stocking width is a personal preference, but when laid flat, I prefer my stocking width to be approximately 1/3 to less than 1/2 the stocking length.
How to crochet a Christmas stocking?
I prefer to crochet a stocking from the top down to the toe, but you can also crochet stockings from the toe up. There is no right or wrong way to crochet a stocking.
How long does it take to crochet a stocking?
This isn’t a one size fits all answer as there are many variables such as how fast you crochet, the weight of yarn used, and the crochet stitches used. Also, if the stocking uses color changes for a fair isle stocking, this will add to the length of time it takes to crochet as well. All things considered, you should be able to crochet a stocking in a day or less.
Are stockings good crochet gifts for Christmas?
Absolutely! Stockings are always at the top of my Christmas crochet ideas list. They make excellent gifts for family (I love heirloom stockings), friends, and new homeowners. With a quick search, you’ll also find a crochet pet stocking pattern.
I MADE IT! NOW WHAT?
Pin this post!: Save this free Xmas crochet pattern to your Pinterest boards so that you can come back and make it again.
Leave a comment below: We love to hear your feedback.
Share Your Finished Projects on Facebook or Instagram: I love to see your finished projects! Share with us on social media and tag me @acrochetedsimplicity or use the hashtag #ACrochetedSimplicity so I can find your posts.
JOIN US IN THE FACEBOOK COMMUNITY GROUP!
Come share your finished projects with us in the A Crocheted Simplicity Crochet Community Group on Facebook. Join us for fun community events such as crochet alongs, join in on crochet conversations, ask questions, get advice, and share your love for crochet!

MORE FREE CROCHET CHRISTMAS STOCKING PATTERNS I THINK YOU’LL LOVE
MORE CROCHET IDEAS FOR CHRISTMAS
Are you looking for your next Christmas crochet project and Xmas patterns? We have several more crochet Christmas free patterns.
You’ll find plenty to crochet for Christmas, from a jar or candle cozy, crochet wine totes, and a Christmas crochet wreath to Christmas decor for your kitchen!
These are beautiful! Hope to make at least the Christmas tree stocking!
Amazing pattern! Easy for follow and turns out beautifully! I made 5 this holiday season for my whole family. Thanks!
Hi Karen,
Oh wow!!! 5?! You’ve been busy!! I’m so glad you love them.
Merry Christmas,
Jennifer
I made this today, I don’t know how to post a picture, but red yarn and ivory fur. I love it!
Your patterns are amazing, I’m truly such a fan. Patterns are so explicit, easy to follow and I love the graphs!!!
Thank you and Merry Christmas!
Hi Kimberly,
I’m glad you love it! And that color combination sounds gorgeous! If you’re on social media, I’d love it if you could tag me in a photo. Or if you’d like to share, you can always e-mail me at [email protected]
Thanks for stopping by to share with me!
Jennifer
I added the hashtag to my FB post. Hopefully you can see it. Thank you!!! I plan on making another this weekend ❤️
I really enjoyed making this stocking. A good pattern, easy to follow.
I love this pattern. Any chance you have a matching pattern for a tree skirt?