Ocean Reef Crochet Water Bottle Holder Pattern
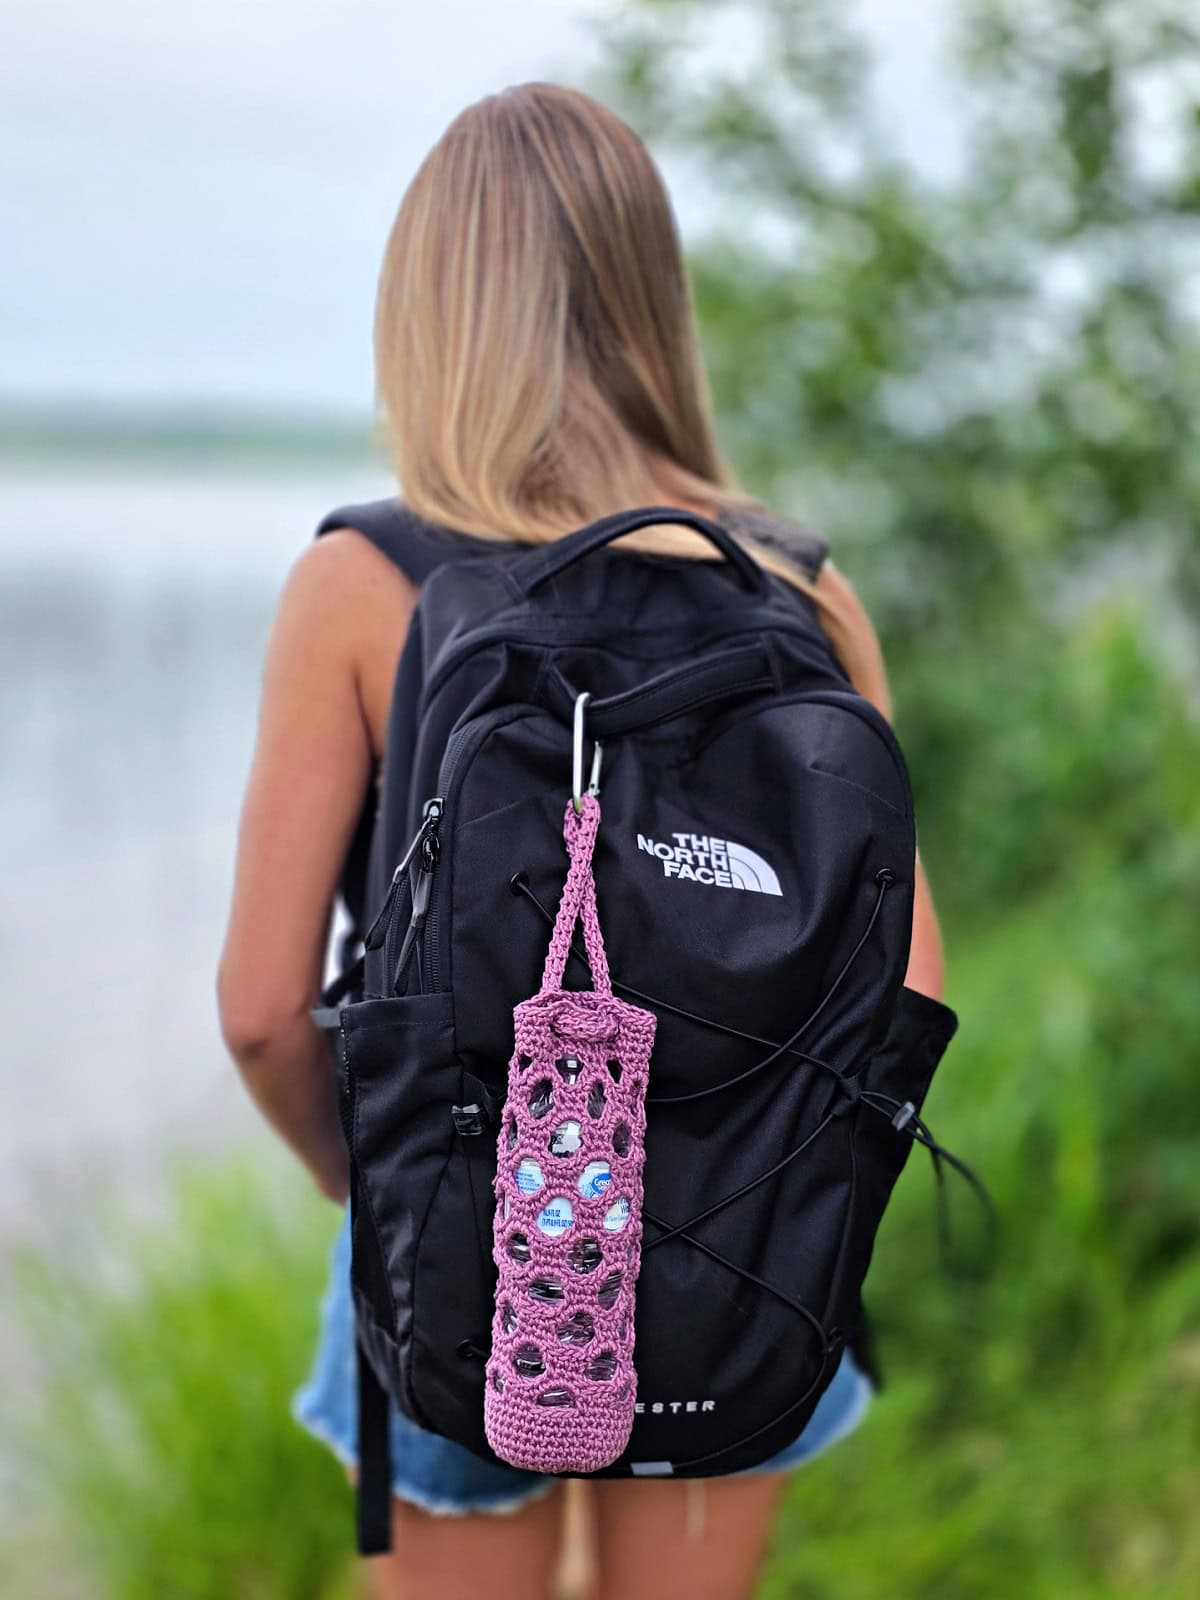
It’s time to let your hands be free when you’re running errands, on a hike or picnic, with this crochet water bottle holder pattern that gives you a chic and functional way to carry your bottle.
This handmade bottle carrier is eco-friendly, reusable, washable, and can fit so many different shapes and sizes of bottles. Make one for each member of your family in their favorite color!
You’ll find the free crochet water bottle holder pattern in the post below, or you can find an ad-free printable PDF (that includes all photo tutorials), on Ravelry, or Etsy (aff).
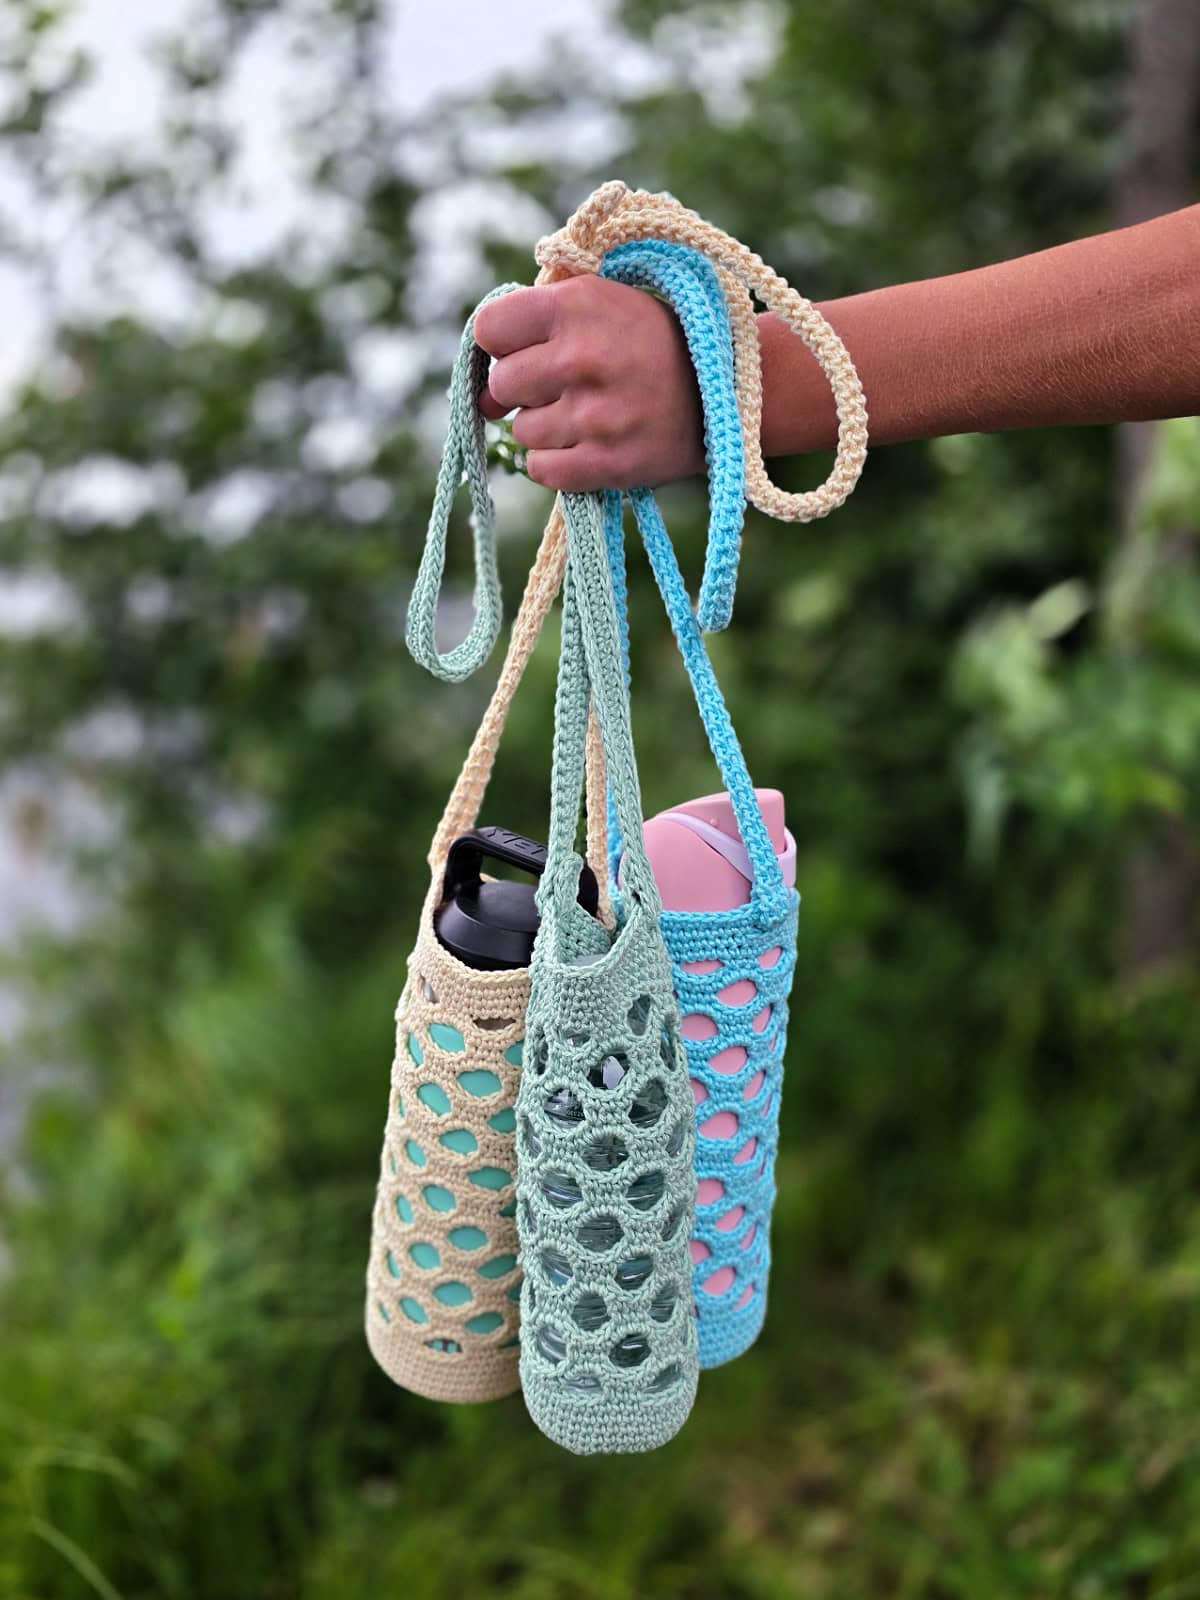
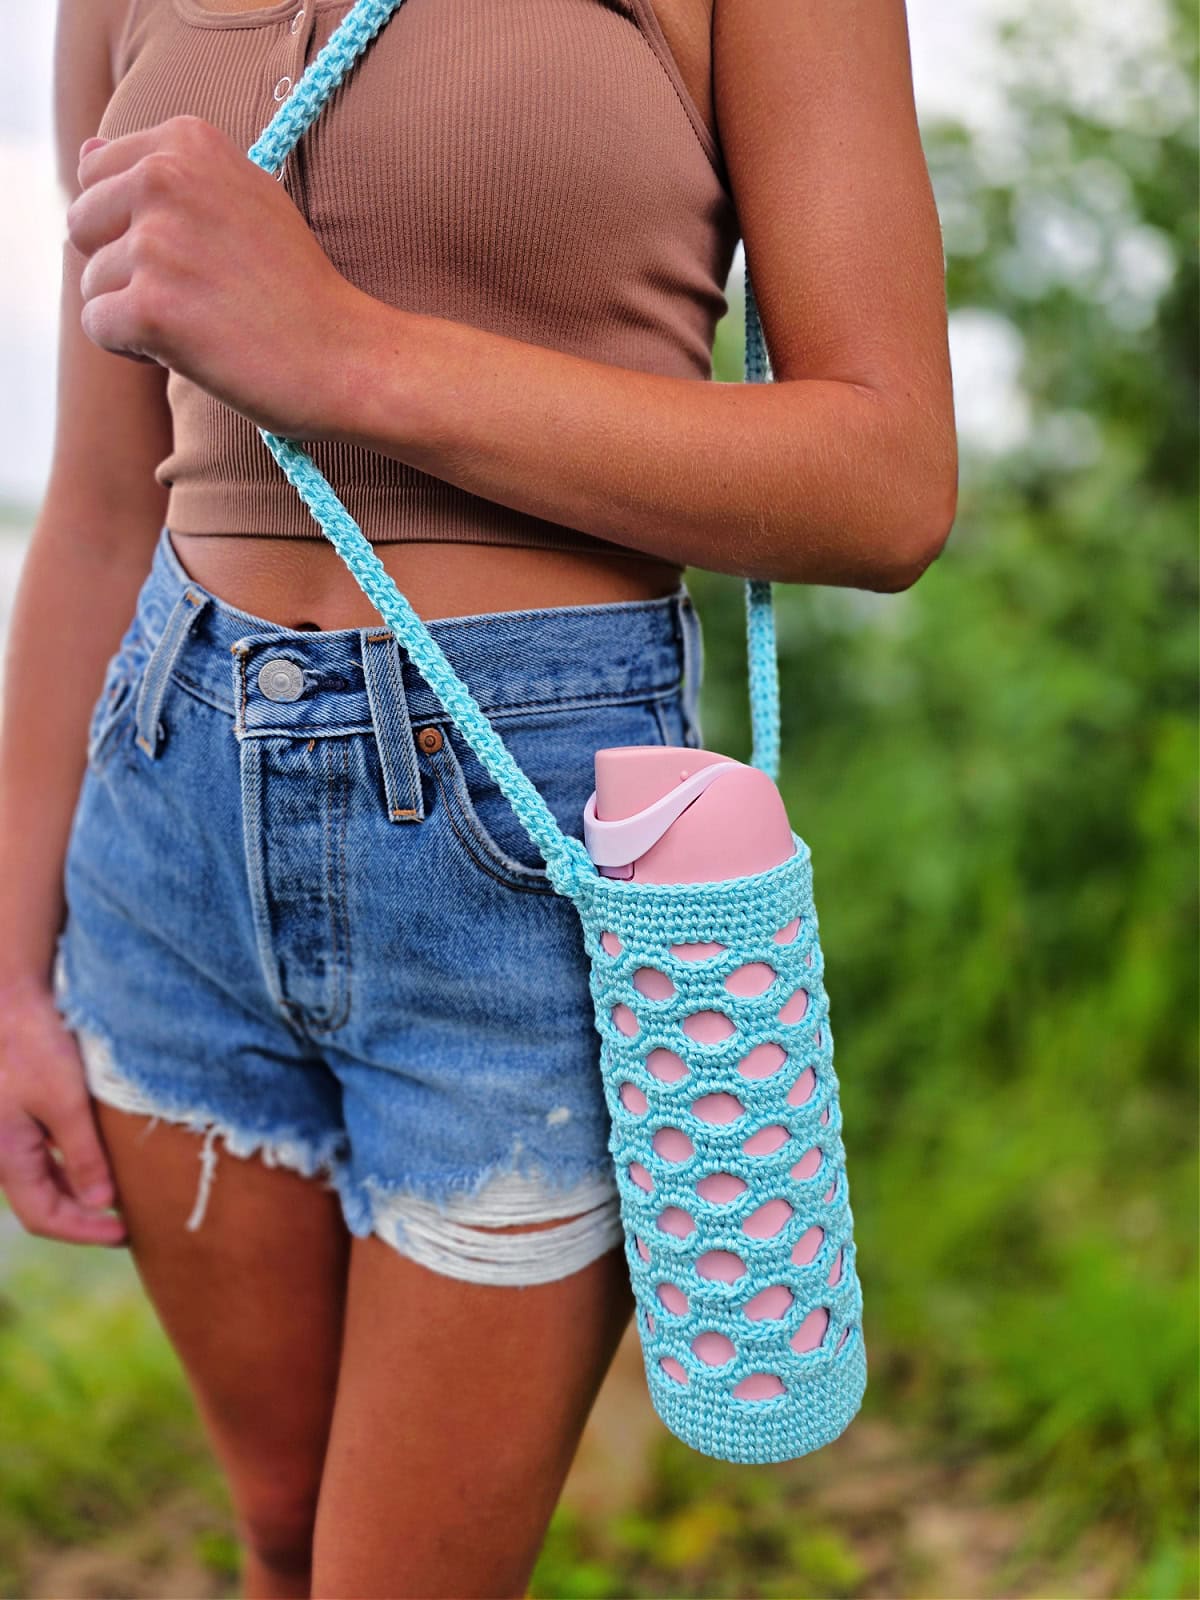
It’s not always easy carrying a water bottle when you’re going about your day. This water bottle holder doubles as a fashionable accessory too because of the ocean reef-inspired design.
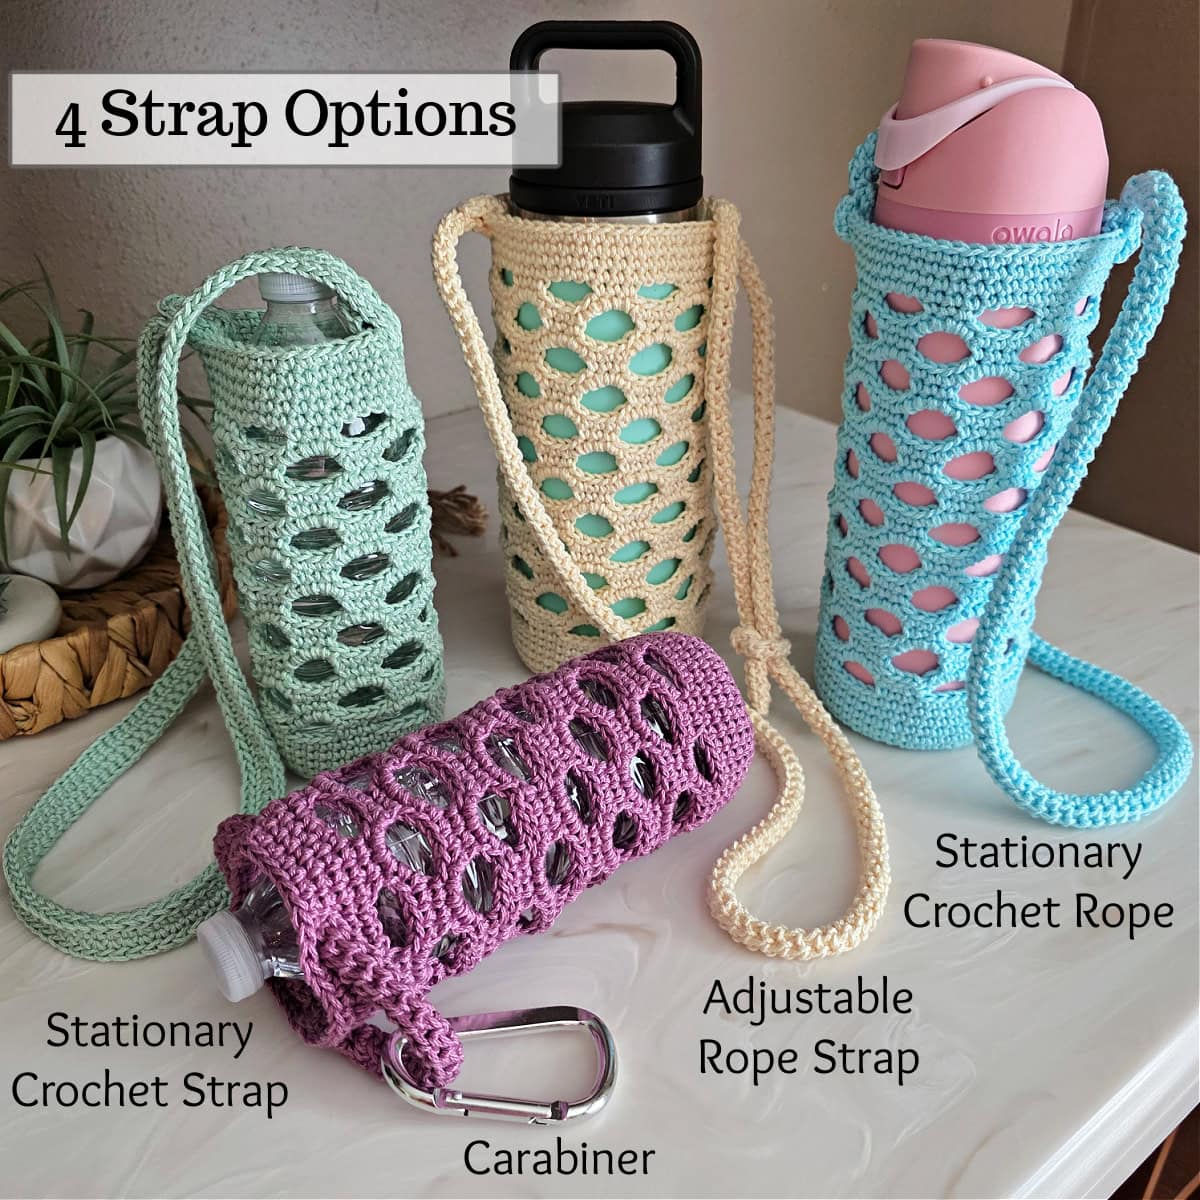
And did I mention there are FOUR different and unique strap options that come in this water bottle cozy pattern? Choose your favorite between an adjustable strap, a simple one, a rope strap, and a carabiner option. And if you’re not sure which one you’ll like more, make all of them, test them out to find out, and gift the others to your friends and family! They’re sure to love this handy gift.
How to Crochet a Water Bottle Holder
While there are a few options in this crochet water bottle holder pattern, don’t fret because the construction is quite simple.
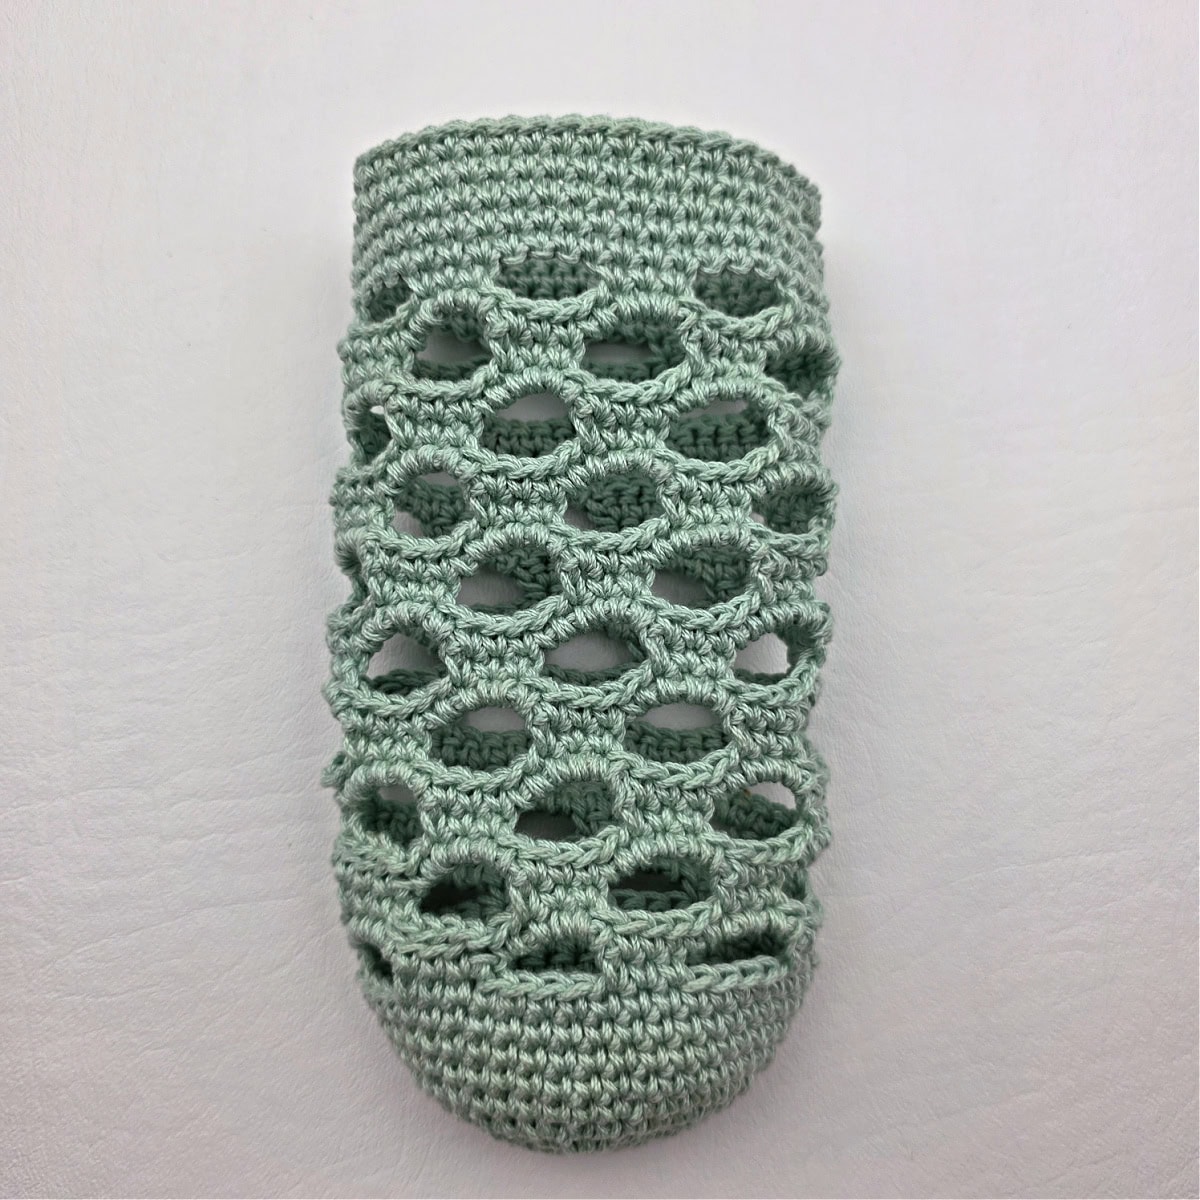
The water bottle cozy starts from a circle which forms the base. It is worked in rounds from the bottom up. The solid base is made with single crochet stitches that ensure its sturdiness and then move on to the fun openwork crochet stitch pattern.
Once the main body is done, the top edge is finished with a few rounds of single crochet. You’ll also create holes at this point where you will later attach the straps, depending on which style you opt for.
After choosing and crocheting your strap, you will attach it to the bottle. It’s all ready for your next adventure!
How To Get The
Ocean Reef Water Bottle Holder
Option 1: Scroll down for the free crochet water bottle holder pattern right here in this blog post.
Option 2: Purchase the ad-free printable PDF from one of my shops:
Best Yarn for Crochet Water Bottle Holders
You have the option to choose whatever type of yarn you want for your handmade water bottle carrier and there might be a bit of variety if you decide to bust your stash. However, I highly recommend you use a cotton yarn, like I did, because it is durable, absorbent, and easy to wash.
Unlike certain synthetic fibers, cotton generally helps prevent condensation from soaking through and making surfaces damp which is a plus point when you’re carrying cold water bottles. Its sturdy texture also ensures the water bottle holder remains in shape.
Choosing Which Size and Strap to Crochet
I’ve included three water bottle holder sizes and four different strap options to choose from in this crochet water bottle holder pattern.
See the photo below for all sizes and strap options.
3 Water Bottle Holder Sizes
- Standard Size Holder – fits a standard 16 – 20 oz disposable bottle of water.
- Medium Size Holder – fits water bottles 9″ – 10-1/2″ in circumference. This one fits my daughter’s Owala water bottle.
- Large Size Holder – fits water bottles 11″ – 13″ in circumference. This one fits a 26 oz Yeti Rambler.
4 Crochet Strap Options
- Carabiner Strap – Easy Carabiner Strap or Crochet Rope Carabiner Strap
- Easy Crochet Strap (Stationary)
- Stationary Crochet Rope Strap
- Adjustable Crochet Rope Strap

Ocean Reef Water Bottle Holder – Free Pattern
The crochet water bottle holder pattern is free below, but if you love to work offline, I’ve got a couple other great options for you.
Purchase the ad-free, printable PDF, (that includes all photo tutorials), on Ravelry, or on Etsy (aff).
This post contains affiliate links.
Materials
- Yarn: Worsted Weight / 4 / Yarn, Lion Brand Yarns 24/7 Cotton was used for the samples in the photos [100% Mercerized Cotton (186 yds / 170 m / 100 g / 3.5 oz)].
- Yardage: 140 – 180 yards depending on size
- See Pattern Notes below for a list of all colors shown.
- See Pattern Notes below for specific yardage depending on size.
- Crochet Hook: G/6/4.00mm or size needed to obtain gauge (My favorite crochet hooks are the Clover Amour Crochet Hooks, I’ve never had an ache in my hand since switching).
- Measuring Tape
- Scissors
- Yarn Needle
- Locking Stitch Markers
- Carabiner Clip
Abbreviations (US Terms)
- ch: chain
- sl st(s): slip stitch(es)
- st(s): stitch(es)
- sc: single crochet
- Rep: repeat
- RS: right side
- SM: stitch marker
- Rnd: round
- yo: yarn over
- sp: space
Experience Level
- Easy / Intermediate (depending on choice of strap).
Gauge
- Measurements given throughout pattern.
Sizes
- 3 Sizes: Small fits standard disposable water bottles. Medium fits bottles similar in size to the Owala Water Bottles. Large fits a 26oz size Yeti Rambler.
- See Size and Strap Options above.
Pattern Notes
- Turning chains are not included in stitch count unless noted otherwise.
- Yarn Notes: Lion Brand Yarn 24/7 Cotton was used for the samples. (3.5oz / 100 g / 186 yards / 170 meters / 100% mercerized cotton). Another comparable worsted weight yarn may be substituted.
- Sample Colors:
- Mint: #761-156
- Aqua: #761-102A
- Ecru: #761-098C
- Purple: #761-147B
- Sizes & Yardage
- Standard Size Holder & Stationary Strap: 140 yards
- Medium Size Holder & Stationary Strap: 160 yards
- Large Size Holder & Adjustable Strap: 180 yards
- Construction: This crochet water bottle holder pattern is worked in rounds from the bottom up. You’ll begin with a solid base made with single crochet stitches and then move on to the fun openwork crochet stitch pattern. The top edge is finished with a few rounds of single crochet and holes are created where you will later attach the straps. Next, choose and crochet your strap option. Lastly, attach the straps.
Ocean Reef Water Bottle Holder – Written Pattern
Standard Size Water Bottle Holder
Fits Water Bottles 8″ – 9″ in Circumference
Fits standard size 16 – 20 oz disposable bottles of water
Base
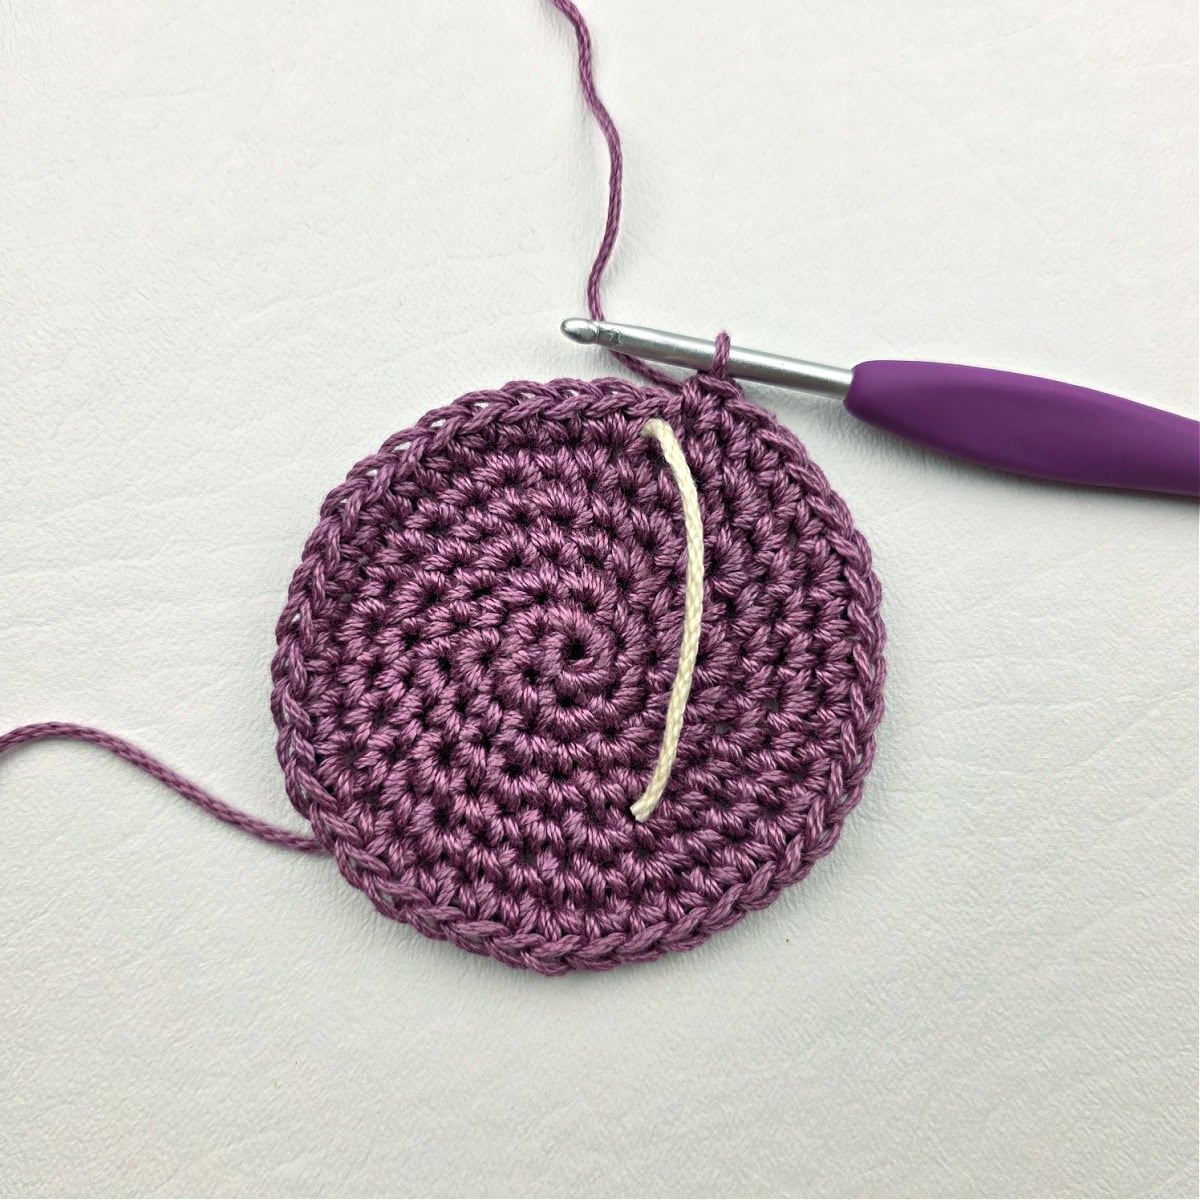
Rnd 1: With yarn & a 4.00mm crochet hook, ch 2, work 6 sc into the 2nd ch from your hook. Do not join. (6 sts) Begin working in a spiral. Use a scrap piece of yarn to mark the end of each round as you work.
Rnd 2: 2 sc in each st around. (12 sts)
Rnd 3: (2 sc in the next st, sc in the next st) 6 times. (18 sts)
Rnd 4: Sc in the first st, (2 sc in the next st, sc in each of the next 2 sts) 5 times, 2 sc in the next st, sc in the last st. (24 sts)
Rnd 5: (2 sc in the next st, sc in each of the next 3 sts) 6 times. (30 sts)
Rnd 6: Sc in each of the first 2 sts, (2 sc in the next st, sc in each of the next 4 sts) 5 times, 2 sc in the next st, sc in each of the last 2 sts. (36 sts)
Rnd 7: (2 sc in the next st, sc in each of the next 5 sts) 6 times. (42 sts) Diameter of the base should measure approximately 3″.
Rnds 8 – 11: Sc in each st around. (42 sts)
Do not fasten off. Continue on to Body of Bottle Holder.

Body of Bottle Holder
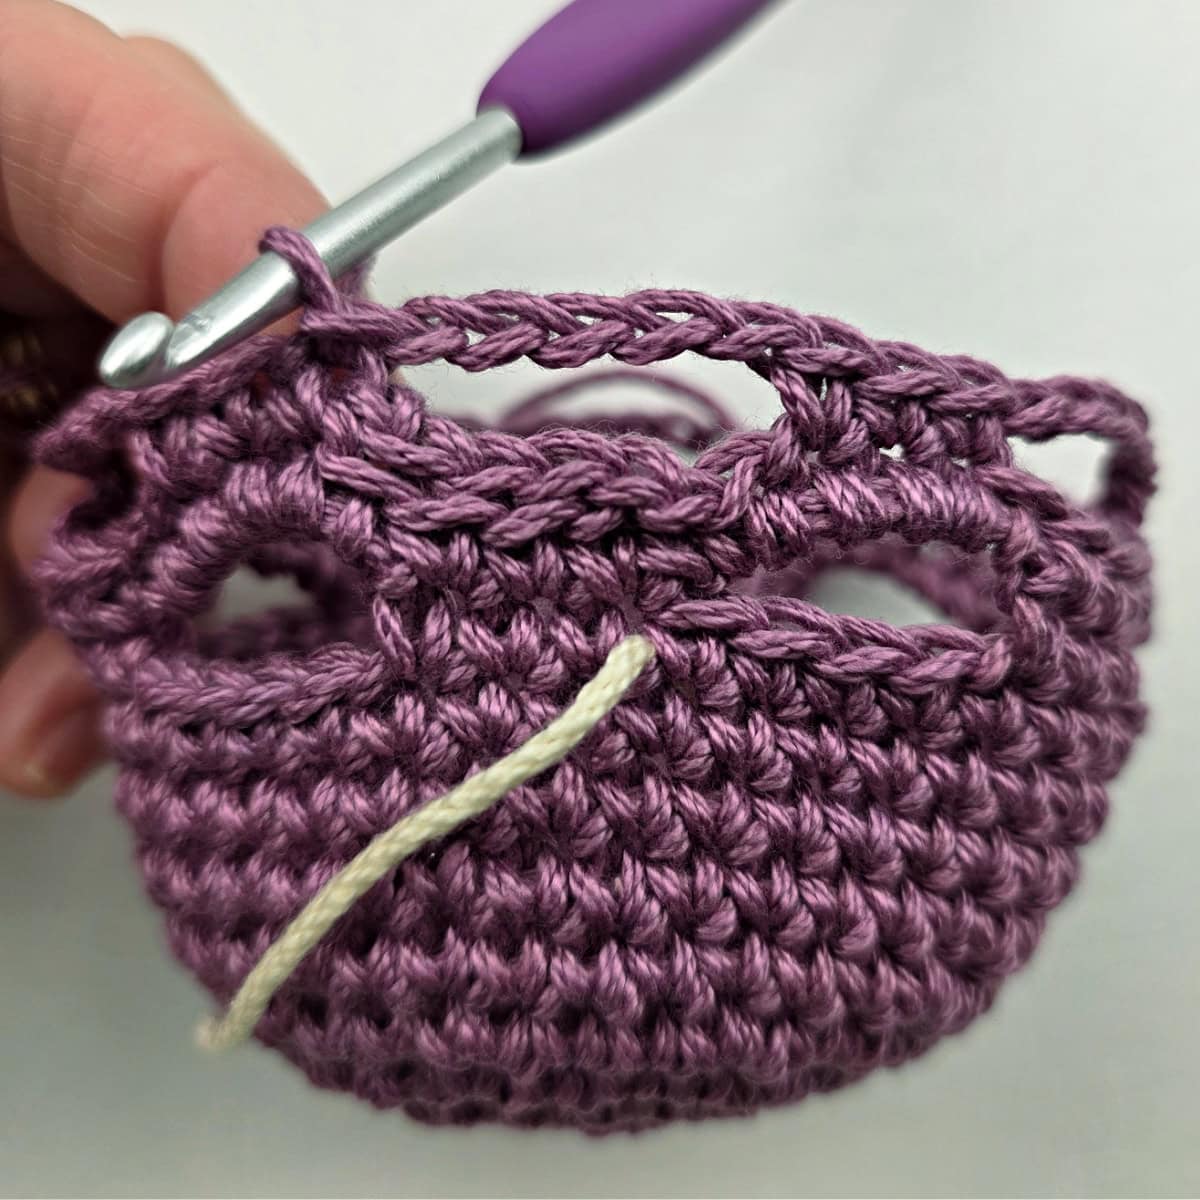
Rnd 1 (RS): (sc in each of the next 3 sts, ch 5, skip the next 4 sts) rep from ( to ) around. Join with a sl st to the 1st st. (18 sc + 6 ch-5’s)
Rnd 2: Ch 1, sc in each of the first 3 sts, 5 sc in the next ch-5 sp, (sc in each of the next 3 sts, 5 sc in the next ch-5 sp) rep from ( to ) around. Join.(48 sts)
Rnd 3: Working in back loops only, sl st in each of the first 4 sts (do not count as sts), ch 1, working in both loops, (sc in each of the next 3 sts, ch 5, skip the next 5 sts) rep from ( to ) around. Join with a sl st to the 1st st. (18 sc + 6 ch-5’s)
Rnds 4 – 17: Rep Rnds 2 – 3.
Rnd 18: Rep Rnd 2.
When the bottle holder is laid flat, it should measure approximately 7-1/4″ H at this point.
Do not fasten off. Continue on to the Top Edge for the style you’re making, either Strap Top Edge or Carabiner Top Edge.

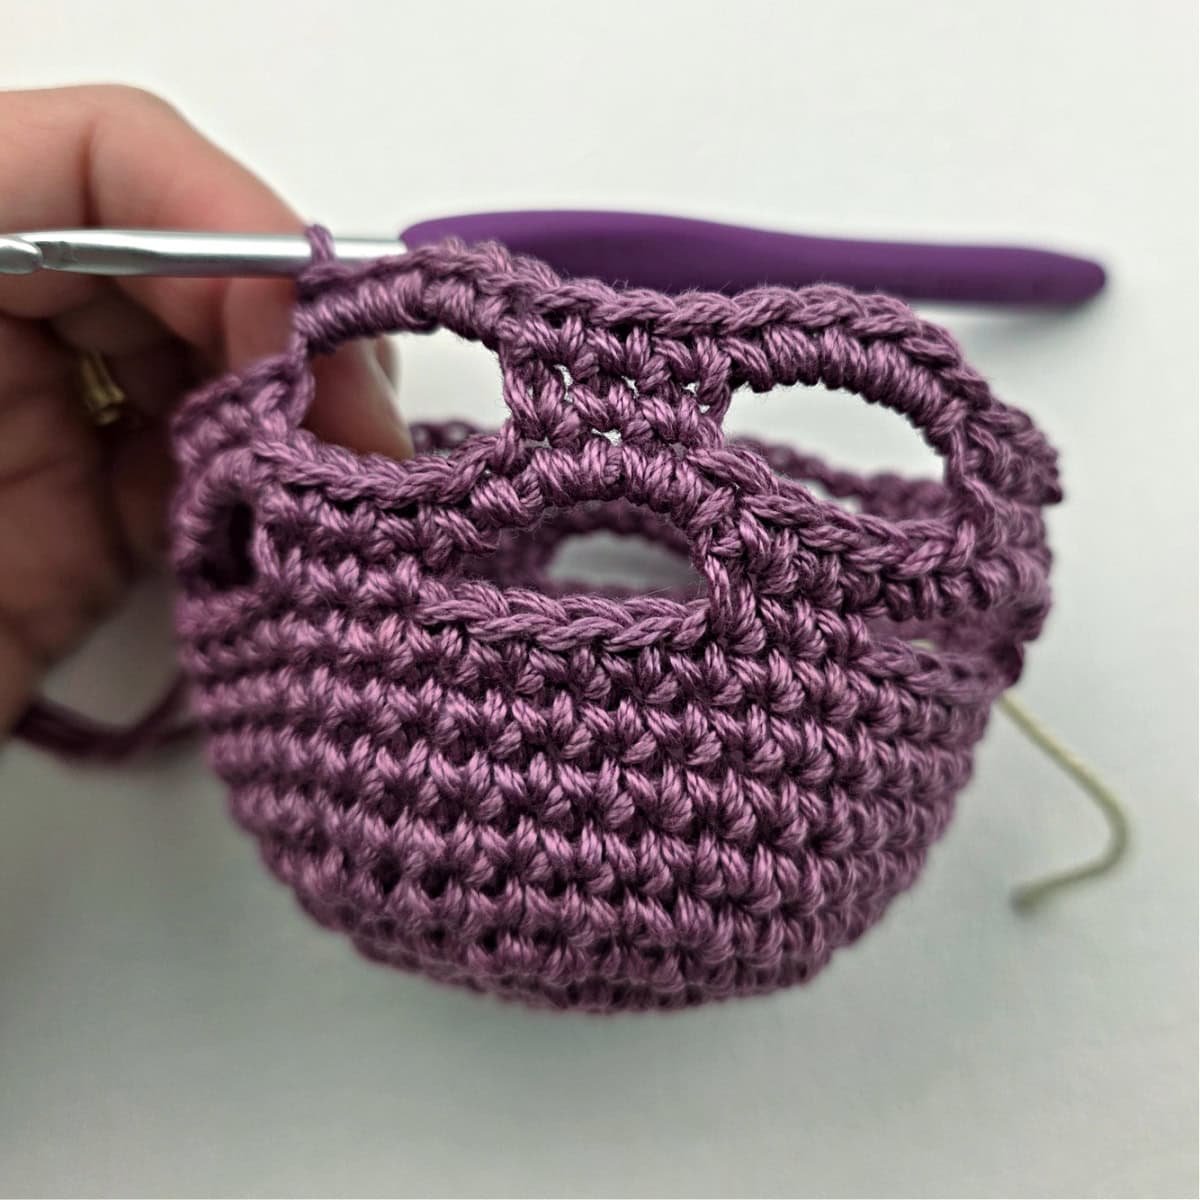
Crochet Strap Top Edge
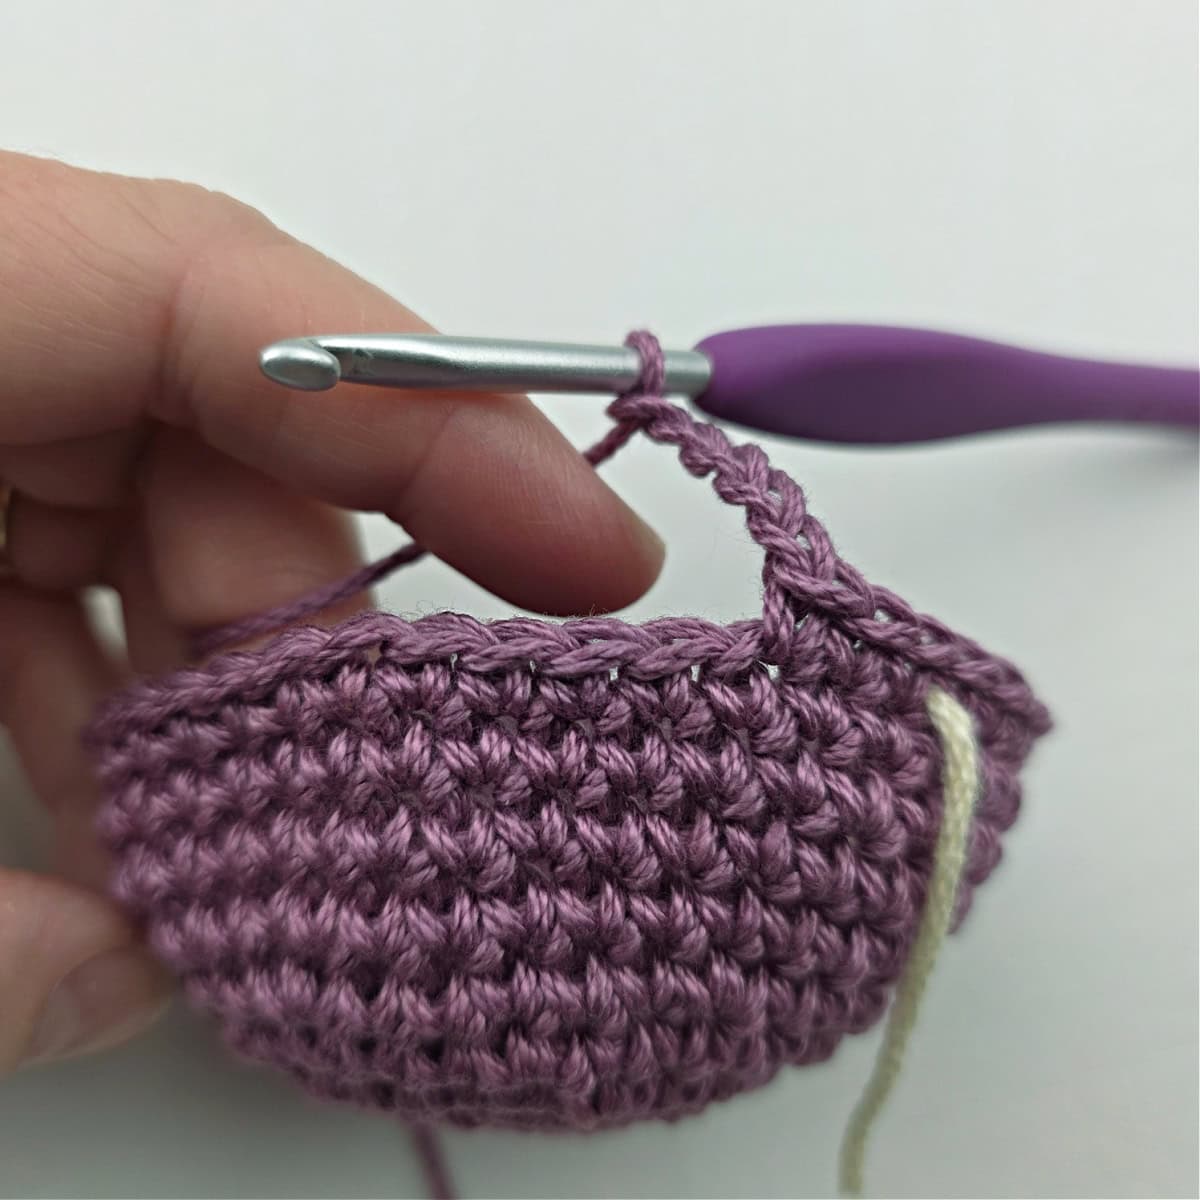
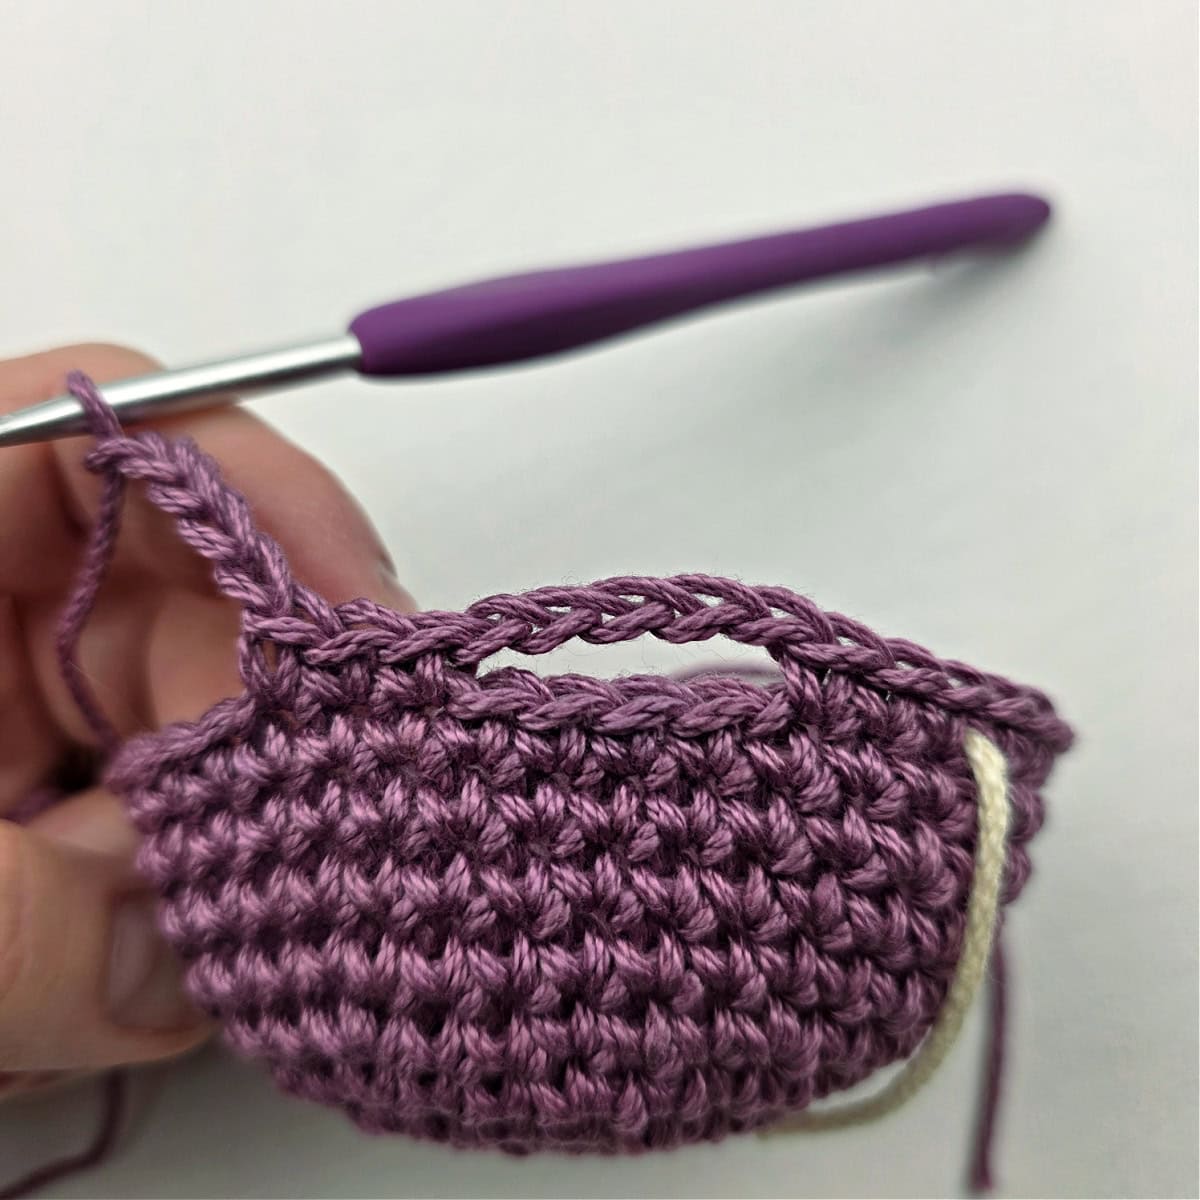
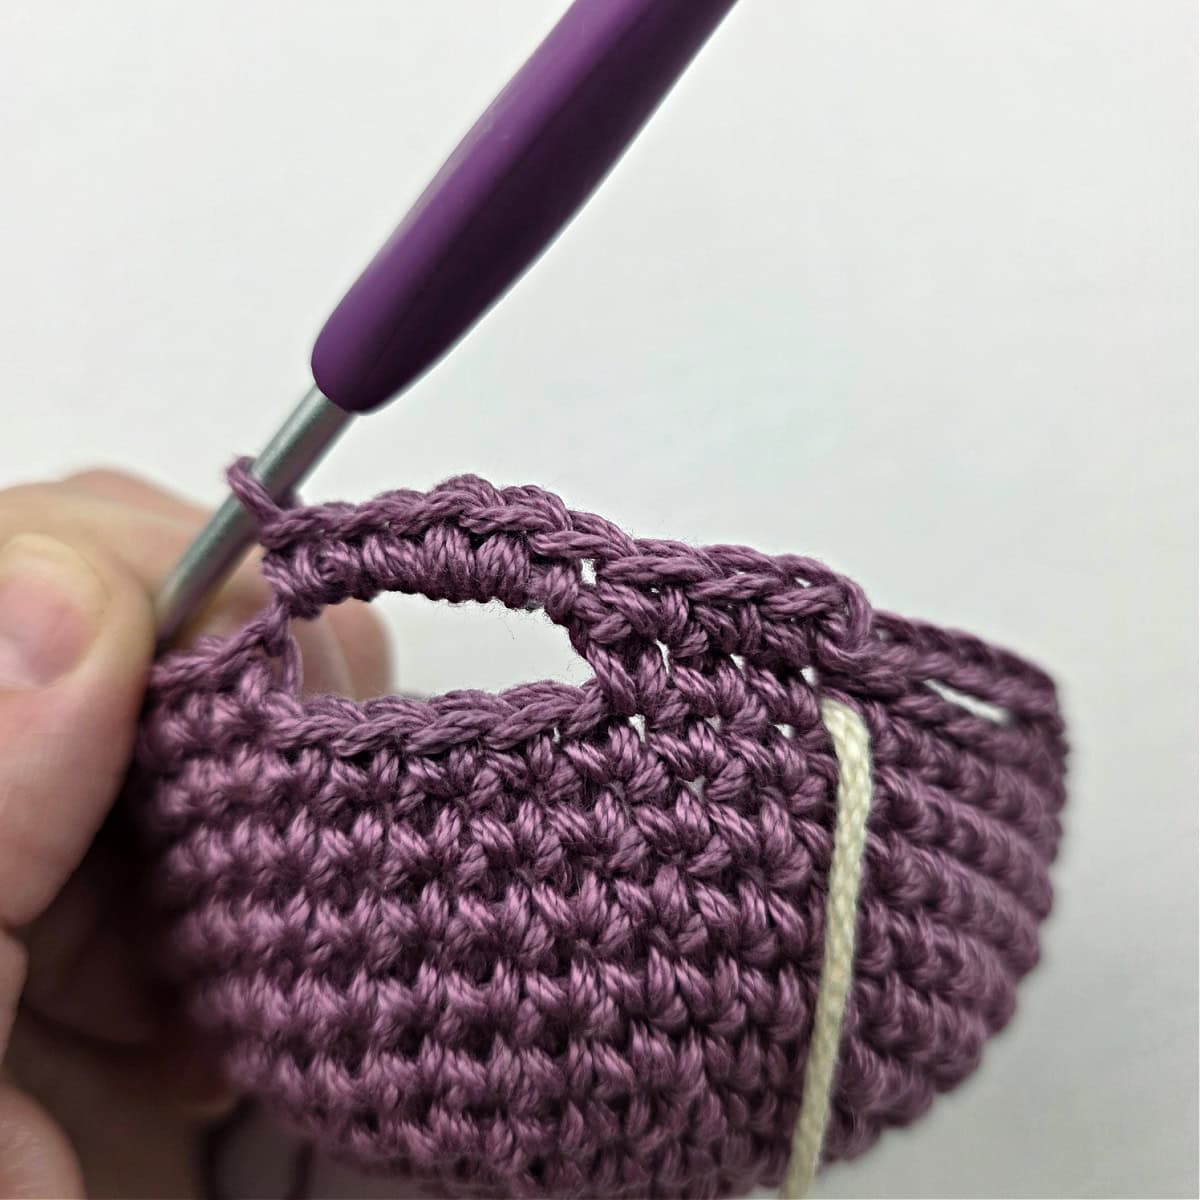
Rnd 1 (RS): Working in back loops only, sl st in each of the first 4 sts (do not count as sts), ch 1, working in both loops, (sc in each of the next 3 sts, ch 4, skip the next 5 sts) rep from ( to ) around. Join with a sl st to the 1st st. (18 sc + 6 ch-4’s)
Rnd 2: Ch 1, sc in each of the first 3 sts, sc in each of the next 4 chs, (sc in each of the next 3 sts, sc in each of the next 4 chs) rep from ( to ) around. Do not join. Crochet in a spiral using a scrap piece of yarn to mark the end of each round. (42 sts)
Rnd 3: Sc in each st around. (42 sts)
Rnd 4: (ch 3, skip each of the next 3 sts, sc in each of the next 18 sts) twice. Join with a sl st to the 1st st. (36 sts + 2 ch-3’s)
Rnd 5: Sc in each st and ch around. (42 sts)
Fasten off using the Invisible Join Technique. Weave in ends. Continue on to Strap Option #2, #3, or #4. Your water bottle holder should be approximately 8″ tall at this point.
Carabiner Top Edge
Rnd 1 (RS): Working in back loops only, sl st in each of the first 4 sts (do not count as sts), ch 1, working in both loops, (sc in each of the next 3 sts, ch 4, skip the next 5 sts) rep from ( to ) around. Join with a sl st to the 1st st. (18 sc + 6 ch-4’s)
Rnd 2: Ch 1, sc in each of the first 3 sts, sc in each of the next 4 chs, (sc in each of the next 3 sts, sc in each of the next 4 chs) rep from ( to ) around. Do not join. Crochet in a spiral using a scrap piece of yarn to mark the end of each round. (42 sts)
Rnd 3: Sc in each st around. (42 sts)
Rnd 4: (ch 3, skip each of the next 3 sts, sc in each of the next 8 sts, ch 3, skip each of the next 3 sts, sc in each of the next 7 sts) twice. Join with a sl st to the 1st st. (30 sts + 4 ch-3’s)
Rnd 5: Sc in each st and ch around. (42 sts)
Fasten off using the Invisible Join Technique. Weave in ends. Continue on to Carabiner Strap. Your water bottle holder should be approximately 8″ tall.
Medium Size Water Bottle Holder
Fits Water Bottles 9″ – 10-1/2″ in Circumference
I made this size to fit my daughter’s Owala water bottle.
Base
Rnd 1: With yarn & a 4.00mm crochet hook, ch 2, work 6 sc into the 2nd ch from your hook. Do not join. (6 sts) Begin working in a spiral. Use a scrap piece of yarn to mark the end of each round as you work.
Rnd 2: 2 sc in each st around. (12 sts)
Rnd 3: (2 sc in the next st, sc in the next st) 6 times. (18 sts)
Rnd 4: Sc in the first st, (2 sc in the next st, sc in each of the next 2 sts) 5 times, 2 sc in the next st, sc in the last st. (24 sts)
Rnd 5: (2 sc in the next st, sc in each of the next 3 sts) 6 times. (30 sts)
Rnd 6: Sc in each of the first 2 sts, (2 sc in the next st, sc in each of the next 4 sts) 5 times, 2 sc in the next st, sc in each of the last 2 sts. (36 sts)
Rnd 7: (2 sc in the next st, sc in each of the next 5 sts) 6 times. (42 sts)
Rnd 8: 2 sc in the first st, sc in each of the first 2 sts, (2 sc in the next st, sc in each of the next 6 sts) 5 times, 2 sc in the next st, sc in each of the last 3 sts. (49 sts) Diameter of the base should measure approximately 3-314″.
Rnds 9 – 13: Sc in each st around. (49 sts)
Do not fasten off. Continue on to Body of Water Bottle Holder.
*see Standard Size instructions for progression pictures of the base
Body of Water Bottle Holder
Tutorial Photos: Refer to the tutorial photos for the Body above in the Standard Size instructions. The stitch pattern is the same for each size.
Rnd 1 (RS): (sc in each of the next 3 sts, ch 5, skip the next 4 sts) rep from ( to ) around. Join with a sl st to the 1st st. (21 sc + 7 ch-5’s)
Rnd 2: Ch 1, sc in each of the first 3 sts, 5 sc in the next ch-5 sp, (sc in each of the next 3 sts, 5 sc in the next ch-5 sp) rep from ( to ) around. Join.(56 sts)
Rnd 3: Working in back loops only, sl st in each of the first 4 sts (do not count as sts), ch 1, working in both loops, (sc in each of the next 3 sts, ch 5, skip the next 5 sts) rep from ( to ) around. Join with a sl st to the 1st st. (21 sc + 7 ch-5’s)
Rnds 4 – 21: Rep Rnds 2 – 3.
Rnd 22: Rep Rnd 2.
When the bottle holder is laid flat, it should measure approximately 8″ H at this point.
Do not fasten off. Continue on to the Top Edge for the style you’re making, either Strap Top Edge or Carabiner Top Edge.
*see Standard Size instructions for progression pictures of the body of the water bottle holder
Crochet Strap Top Edge
Rnd 1 (RS): Working in back loops only, sl st in each of the first 4 sts (do not count as sts), ch 1, working in both loops, (sc in each of the next 3 sts, ch 4, skip the next 5 sts) rep from ( to ) around. Join with a sl st to the 1st st. (21 sc + 7 ch-4’s)
Rnd 2: Ch 1, sc in each of the first 3 sts, sc in each of the next 4 chs, (sc in each of the next 3 sts, sc in each of the next 4 chs) rep from ( to ) around. Do not join. Crochet in a spiral using a scrap piece of yarn to mark the end of each round. (49 sts)
Rnd 3: Sc in each st around. (49 sts)
Rnd 4: Ch 3, skip each of the next 3 sts, sc in each of the next 21 sts, ch 3, skip each of the next 3 sts, sc in each of the next 22 sts. Join with a sl st to the 1st st. (43 sts + 2 ch-3’s)
Rnd 5: Sc in each st and ch around. (49 sts)
Fasten off using the Invisible Join Technique. Weave in ends. Continue on to Strap Option #2, #3, or #4. Your water bottle holder should be approximately 9″ tall at this point.
Carabiner Top Edge
Rnd 1 (RS): Working in back loops only, sl st in each of the first 4 sts (do not count as sts), ch 1, working in both loops, (sc in each of the next 3 sts, ch 4, skip the next 5 sts) rep from ( to ) around. Join with a sl st to the 1st st. (21 sc + 7 ch-4’s)
Rnd 2: Ch 1, sc in each of the first 3 sts, sc in each of the next 4 chs, (sc in each of the next 3 sts, sc in each of the next 4 chs) rep from ( to ) around. Do not join. Crochet in a spiral using a scrap piece of yarn to mark the end of each round. (49 sts)
Rnd 3: Sc in each st around. (49 sts)
Rnd 4: Ch 3, skip each of the next 3 sts, sc in each of the next 10 sts, (ch 3, skip each of the next 3 sts, sc in each of the next 9 sts) work from ( to ) 3 times. Join with a sl st to the 1st st. (37 sts + 4 ch-3’s)
Rnd 5: Sc in each st and ch around. (49 sts)
Fasten off using the Invisible Join Technique. Weave in ends. Continue on to Carabiner Strap. Your water bottle holder should be approximately 9″ tall.
Large Size Water Bottle Holder
Fits Water Bottles 11″ – 13″ in Circumference
I made this size to fit a 26 oz Yeti Water Bottle.
Base
Rnd 1: With yarn & a 4.00mm crochet hook, ch 2, work 6 sc into the 2nd ch from your hook. Do not join. (6 sts) Begin working in a spiral. Use a scrap piece of yarn to mark the end of each round as you work.
Rnd 2: 2 sc in each st around. (12 sts)
Rnd 3: (2 sc in the next st, sc in the next st) 6 times. (18 sts)
Rnd 4: Sc in the first st, (2 sc in the next st, sc in each of the next 2 sts) 5 times, 2 sc in the next st, sc in the last st. (24 sts)
Rnd 5: (2 sc in the next st, sc in each of the next 3 sts) 6 times. (30 sts)
Rnd 6: Sc in each of the first 2 sts, (2 sc in the next st, sc in each of the next 4 sts) 5 times, 2 sc in the next st, sc in each of the last 2 sts. (36 sts)
Rnd 7: (2 sc in the next st, sc in each of the next 5 sts) 6 times. (42 sts)
Rnd 8: Sc in each of the first 3 sts, (2 sc in the next st, sc in each of the next 6 sts) 5 times, 2 sc in the next st, sc in each of the last 3 sts. (48 sts)
Rnd 9: (2 sc in the next st, sc in each of the next 5 sts) 6 times. (56 sts) Diameter of the base should measure approximately 3-3/4″.
Rnds 10 – 14: Sc in each st around. (56 sts)
Do not fasten off. Continue on to Body of Water Bottle Holder.
*see Standard Size instructions for progression pictures of the base
Body of Water Bottle Holder
Tutorial Photos: Refer to the tutorial photos for the Body above in the Standard Size instructions. The stitch pattern is the same for each size.
Rnd 1 (RS): (sc in each of the next 3 sts, ch 5, skip the next 4 sts) rep from ( to ) around. Join with a sl st to the 1st st. (24 sc + 8 ch-5’s)
Rnd 2: Ch 1, sc in each of the first 3 sts, 5 sc in the next ch-5 sp, (sc in each of the next 3 sts, 5 sc in the next ch-5 sp) rep from ( to ) around. Join. (64 sts)
Rnd 3: Working in back loops only, sl st in each of the first 4 sts (do not count as sts), ch 1, working in both loops, (sc in each of the next 3 sts, ch 5, skip the next 5 sts) rep from ( to ) around. Join with a sl st to the 1st st. (24 sc + 8 ch-5’s)
Rnds 4 – 21: Rep Rnds 2 – 3.
Rnd 22: Rep Rnd 2.
When the bottle holder is laid flat, it should measure approximately 8-1/2″ H at this point.
Do not fasten off. Continue on to the Top Edge for the style you’re making, either Strap Top Edge or Carabiner Top Edge.
*see Standard Size instructions for progression pictures of the body of the water bottle holder
Crochet Strap Top Edge
Rnd 1 (RS): Working in back loops only, sl st in each of the first 4 sts (do not count as sts), ch 1, working in both loops, (sc in each of the next 3 sts, ch 4, skip the next 5 sts) rep from ( to ) around. Join with a sl st to the 1st st. (24 sc + 8 ch-4’s)
Rnd 2: Ch 1, sc in each of the first 3 sts, sc in each of the next 4 chs, (sc in each of the next 3 sts, sc in each of the next 4 chs) rep from ( to ) around. Do not join. Crochet in a spiral using a scrap piece of yarn to mark the end of each round. (56 sts)
Rnd 3: Sc in each st around. (56 sts)
Rnd 4: (ch 3, skip each of the next 3 sts, sc in each of the next 25 sts) twice. Join with a sl st to the 1st st. (50 sts + 2 ch-3’s)
Rnd 5: Sc in each st and ch around. (56 sts)
Fasten off using the Invisible Join Technique. Weave in ends. Continue on to Strap Option #2, #3, or #4. Your water bottle holder should be approximately 9-1/4″ tall at this point.
Carabiner Top Edge
Rnd 1 (RS): Working in back loops only, sl st in each of the first 4 sts (do not count as sts), ch 1, working in both loops, (sc in each of the next 3 sts, ch 4, skip the next 5 sts) rep from ( to ) around. Join with a sl st to the 1st st. (24 sc + 8 ch-4’s)
Rnd 2: Ch 1, sc in each of the first 3 sts, sc in each of the next 4 chs, (sc in each of the next 3 sts, sc in each of the next 4 chs) rep from ( to ) around. Do not join. Crochet in a spiral using a scrap piece of yarn to mark the end of each round. (56 sts)
Rnd 3: Sc in each st around. (56 sts)
Rnd 4: (ch 3, skip each of the next 3 sts, sc in each of the next 11 sts) rep from ( to ) around. Join with a sl st to the 1st st. (44 sts + 4 ch-3’s)
Rnd 5: Sc in each st and ch around. (56 sts)
Fasten off using the Invisible Join Technique. Weave in ends. Continue on to Carabiner Strap. Your water bottle holder should be approximately 9-1/4″ tall.
Strap Option #1 – Carabiner Strap
Two Carabiner Strap Options: I’ve included two carabiner strap options for you to choose from.
Option #1: Use the instructions below to create an Easy Carabiner Strap.
Option #2: Use the Crochet Rope Strap instructions and make a crochet rope that, when stretched, is long enough to wrap around the top opening edge of your water bottle holder.
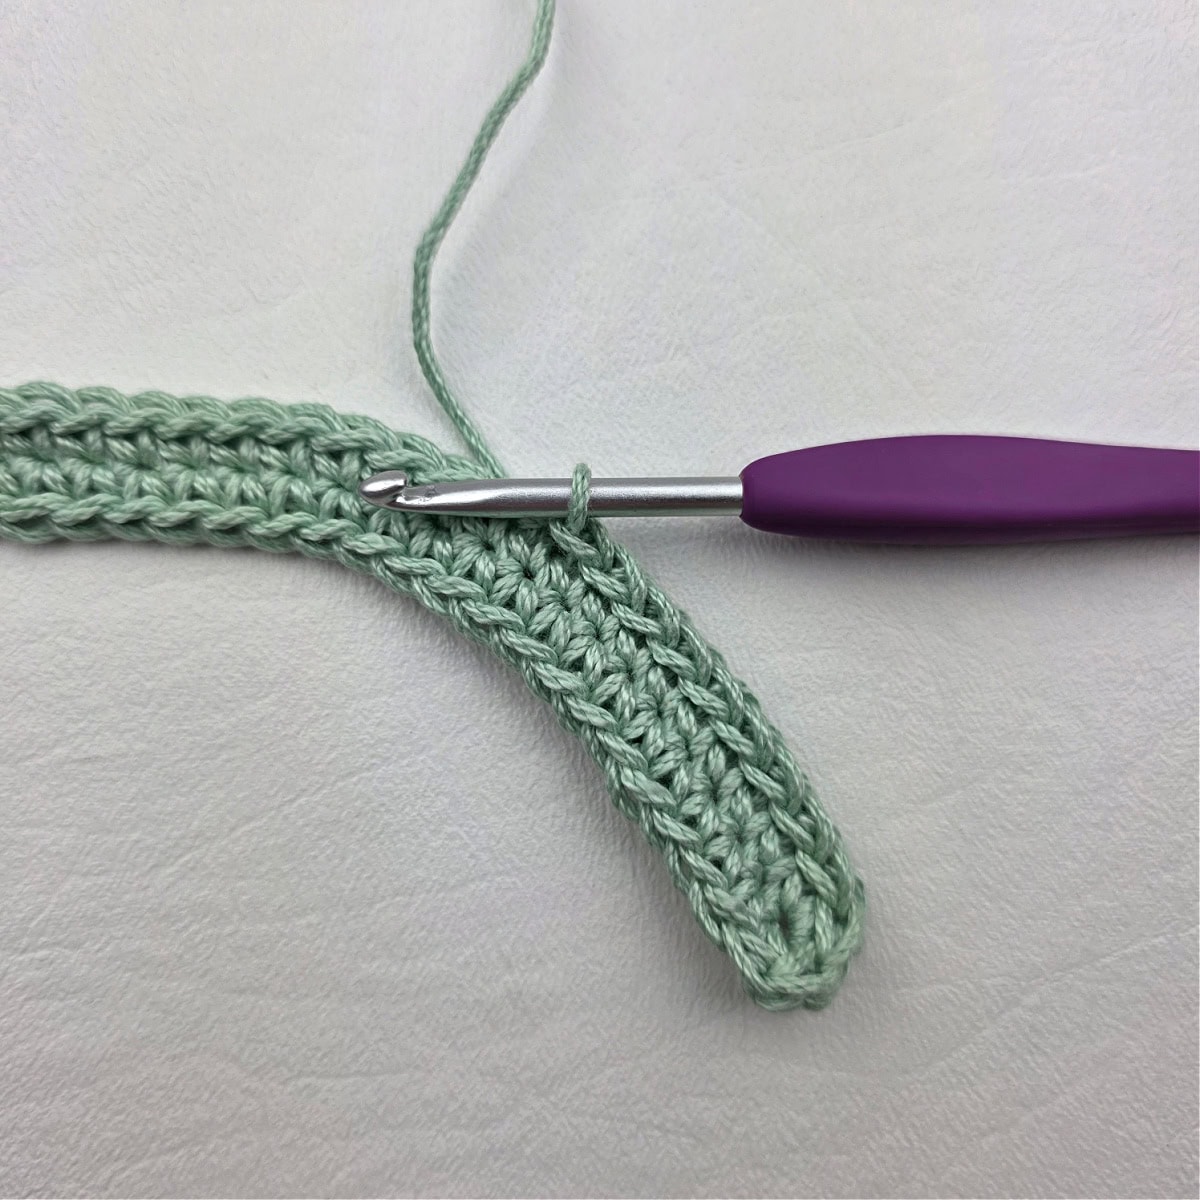
Rnd 1 (RS): With yarn and a 4.00mm crochet hook, crochet a ch that is long enough to wrap around the top opening edge of your water bottle holder, working into the back humps of the foundation ch, work 3 sc into the 2nd ch from your hook, sc in each st across to the last ch, work 3 sc into the last ch, rotate to work into the bottom of the foundation ch, sc in each ch across the bottom. Do not join. Stitch count is not crucial.
Rnd 2: Sl st in each stitch around. Use the Special Join Technique to join the round of sl sts.
Fasten off leaving a yarn tail approximately 8″ long. Continue on to Attaching the Carabiner Strap.
Strap Option #2 – Easy Crochet Strap
I prefer the length of my water bottle straps to be approximately 32″ once they’re attached so the instructions below are to make a 34″ long strap. If you prefer a longer or shorter strap, simply adjust the length of your chain by that number of inches.
Rnd 1 (RS): With yarn & a 4.00mm crochet hook, leave a beginning tail of yarn that’s approximately 8″ long, then crochet a ch that is approximately 33-1/2″ long, working into the back humps of the foundation ch, work 3 sc into the 2nd ch from your hook, sc in each st across to the last ch, work 3 sc into the last ch, rotate to work into the bottom of the foundation ch, sc in each ch across the bottom. Do not join. Stitch count is not crucial.
Rnd 2: Sl st in each stitch around. Use the Special Join Technique to join the round of sl sts.
Fasten off leaving a yarn tail approximately 8″ long. Continue on to Attaching the Strap.
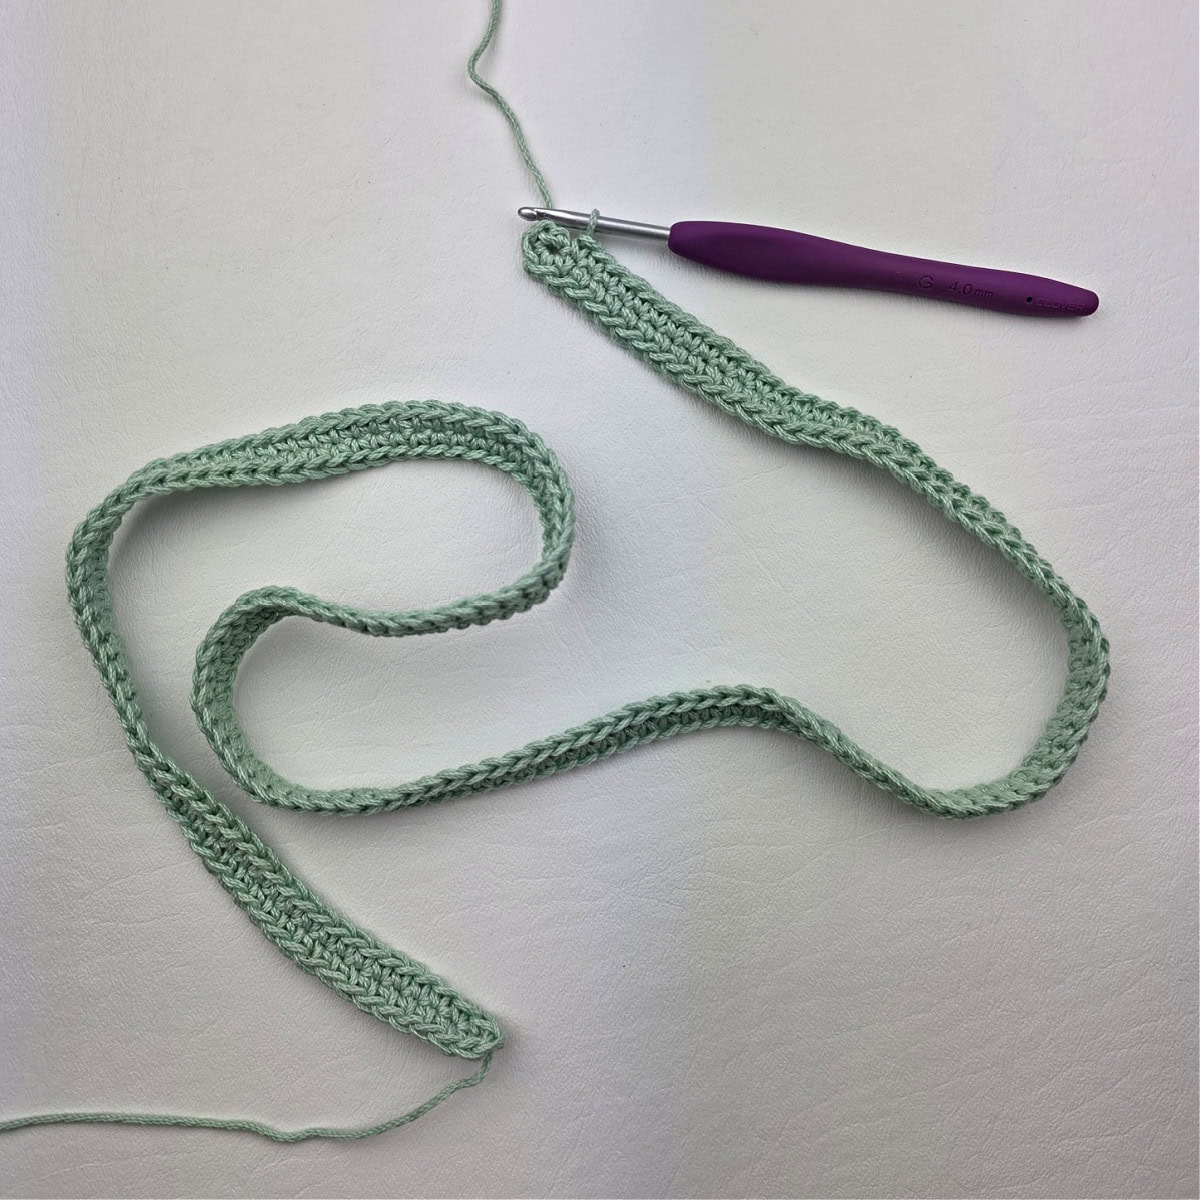
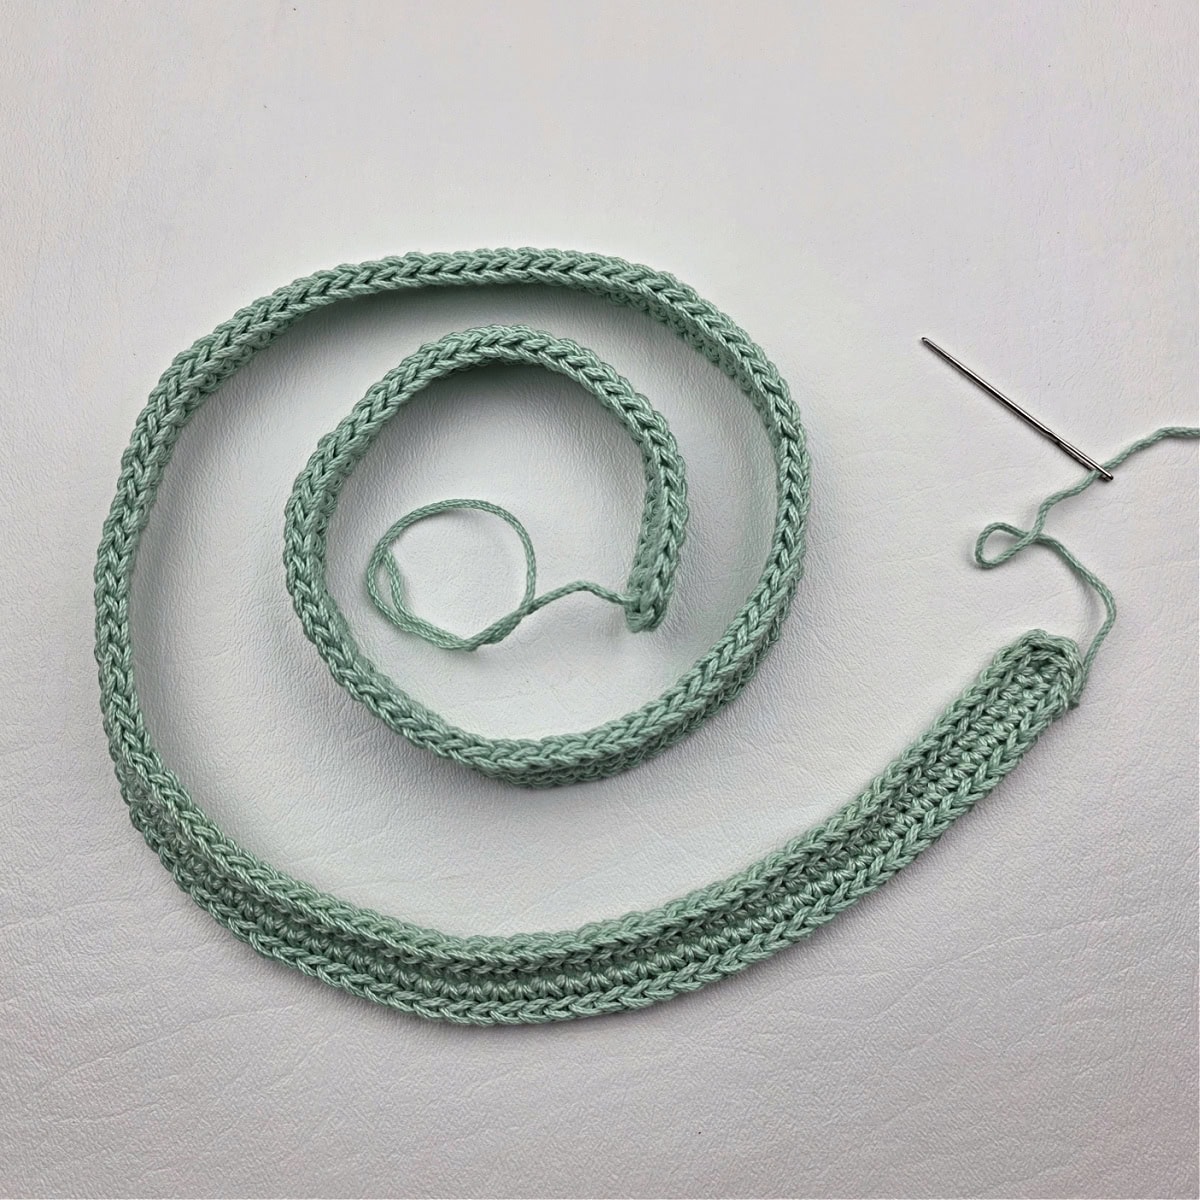
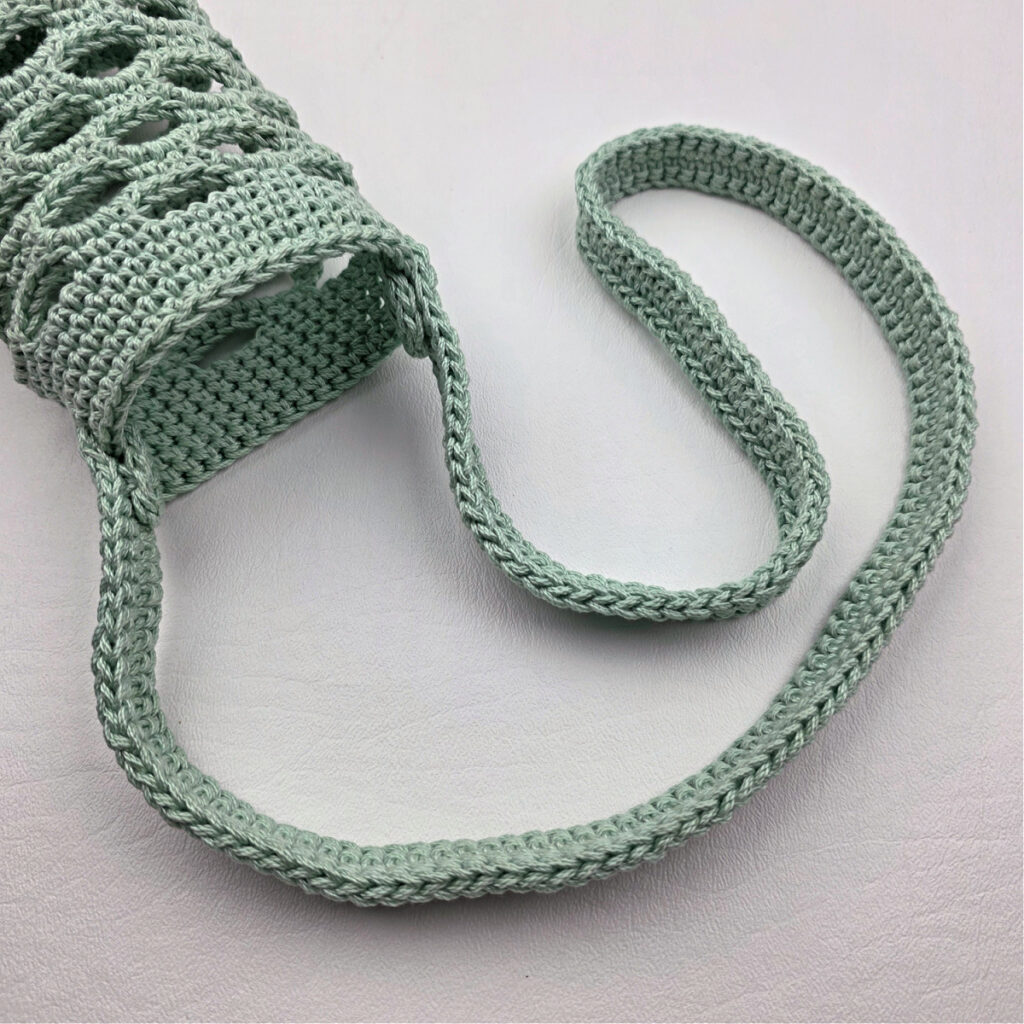
Strap Options #3 & #4 Crochet Rope Strap
Construction Notes: This crochet rope is worked in continuous rounds (a spiral). You will begin round 1 of this crocheted rope as you do other items. However, when you get to round 3, you will be working with the RS of your work facing you. BUT you will be working into the 3rd loop (back bar) that’s on the back side of the sc. As you crochet the rope, the RS of your sc will be on the inside of the rope and what is visible on the outside of the crocheted rope is actually the WS of your sc.
Rnd 1: With yarn and a 4.00mm crochet hook, ch 2, work 4 sc into the 2nd ch from your hook. Do not join. (4 sts)
Rnd 2: Do not ch, sc in each st around. Do not join.
Rnd 3: With the RS of the sc facing the center of the rope, work into the back side of the sts from the previous round and into the 3rd loop (or back bar), work 1 sc into the 3rd loop/back bar of each sc around. Do not join.
Option #3 – Stationary Strap: Rep Rnd 3 until your crocheted rope measures 34″ long, slightly stretched.
Option #4 – Adjustable Strap: Rep Rnd 3 until your crocheted rope measures 42″ long, slightly stretched.
Fasten off. Weave in ends. Continue on to Attaching the Strap.
As you continue to work, the crochet rope will begin to take shape and it’ll be easier to see how the RS ends up on the inside.
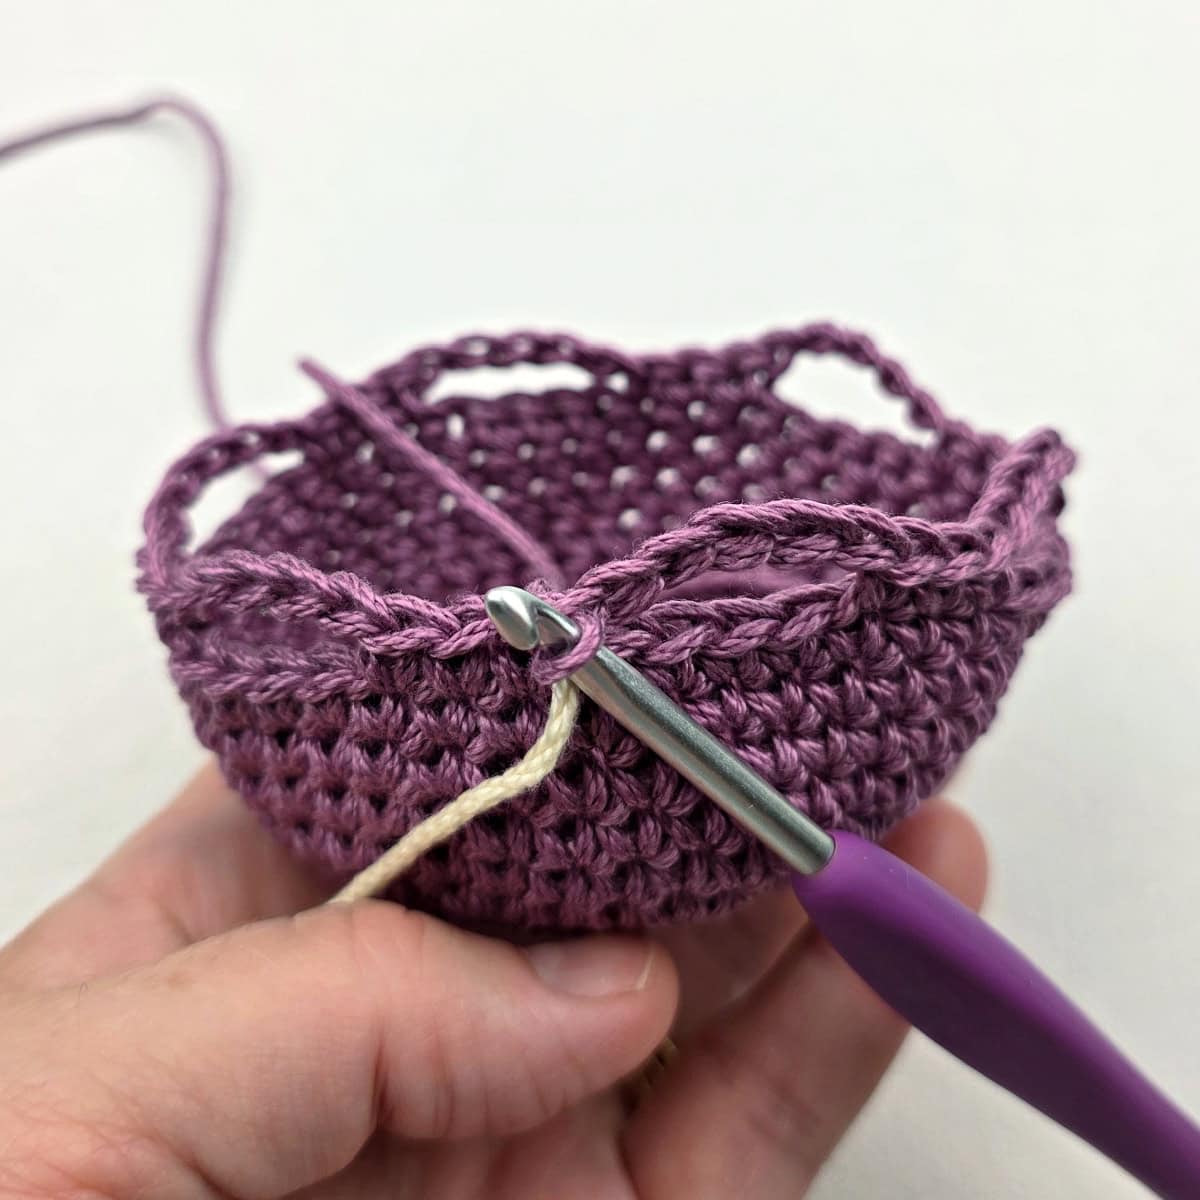
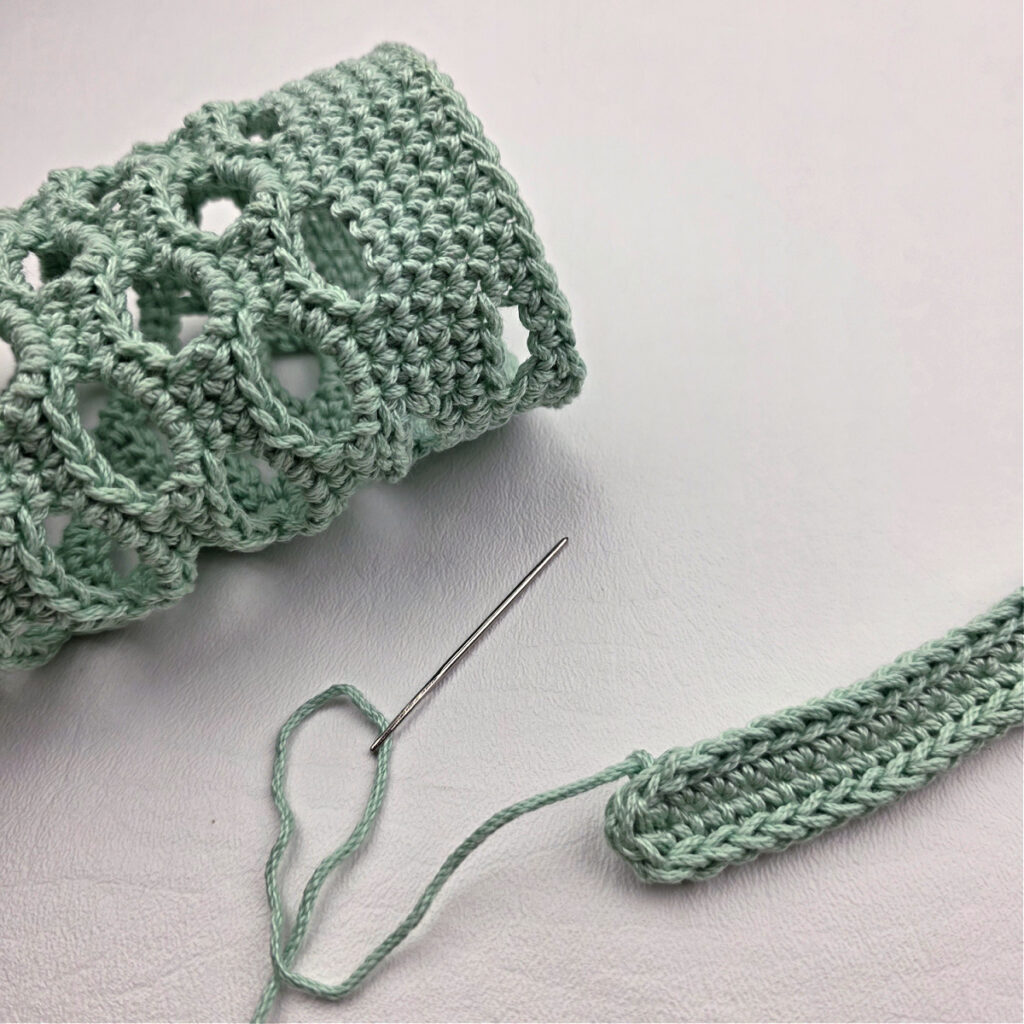
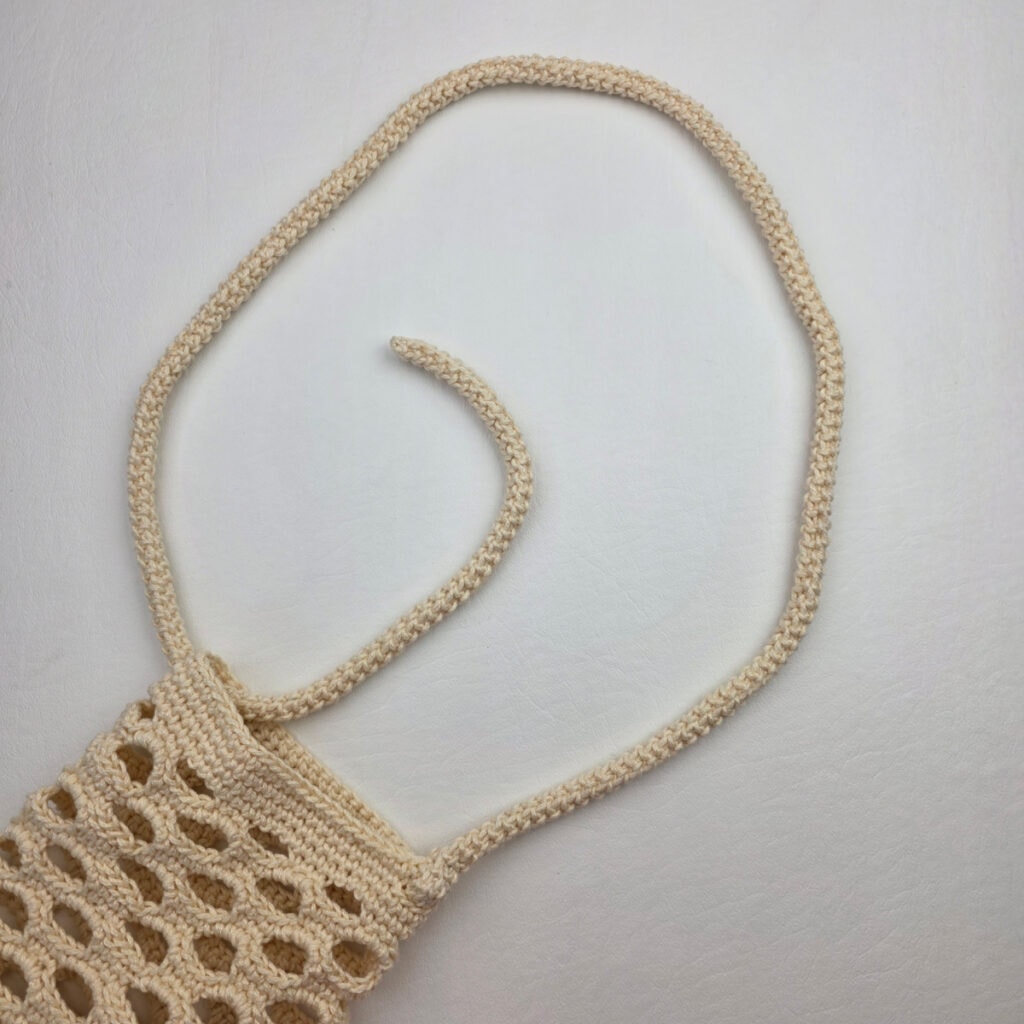
Attaching the Strap
Stationary Strap – 34″ Crochet Rope
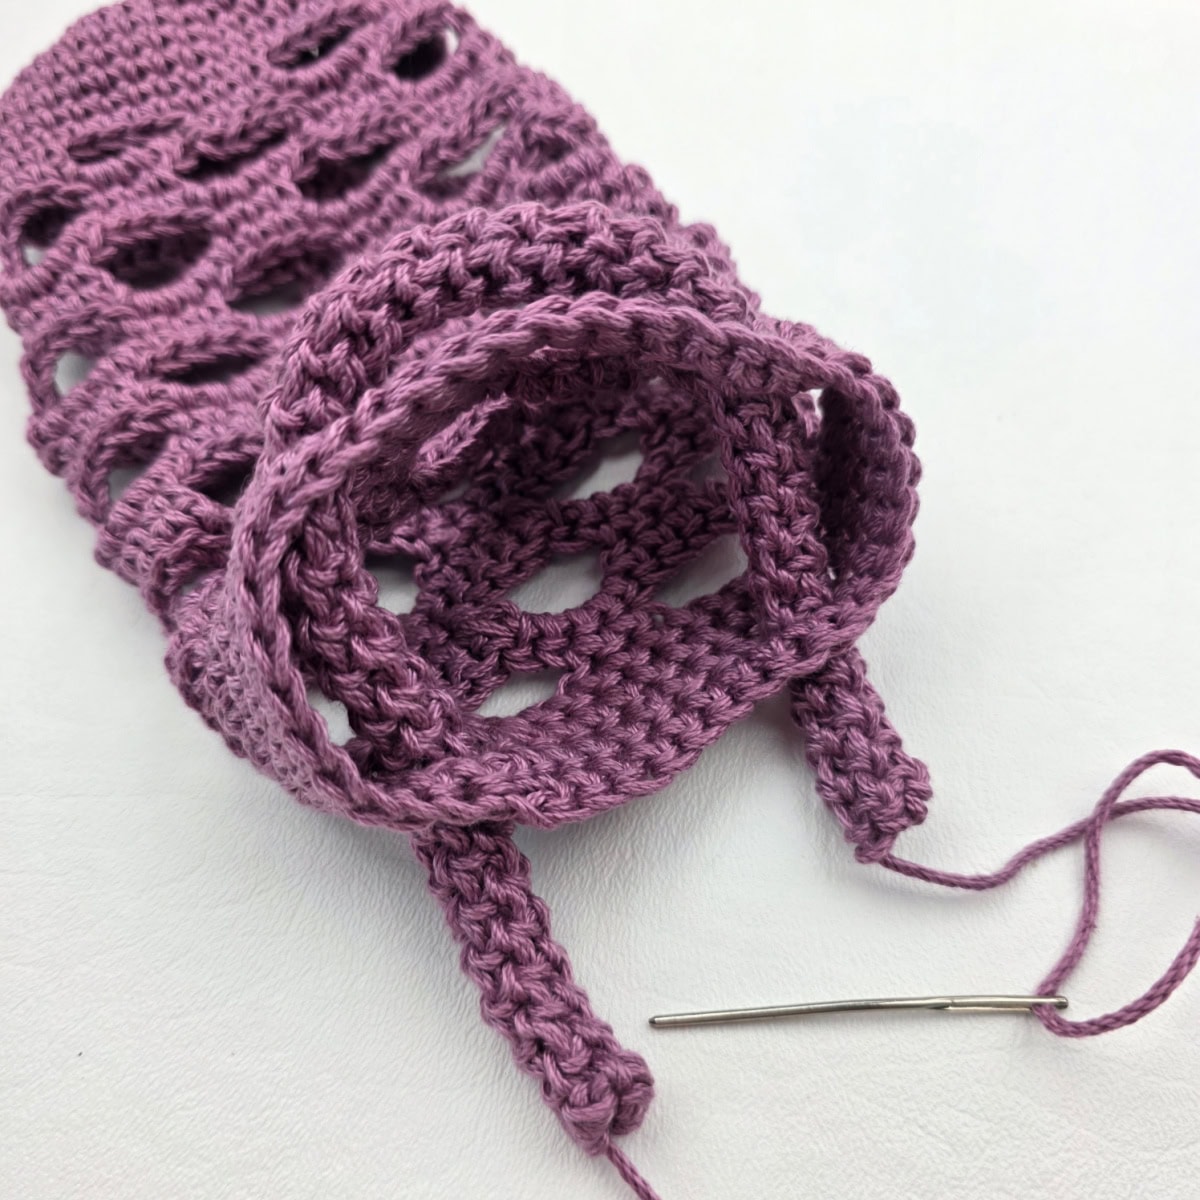
Insert one end of the crochet rope or flat crochet strap, from outside to inside, into a hole along the top edge of the bottle holder. Insert it just far enough so that it wraps around and reaches itself. Use a yarn needle and piece of yarn and sew the end of the crochet rope or flat strap to itself. Repeat for the opposite end of the strap. Weave in ends.
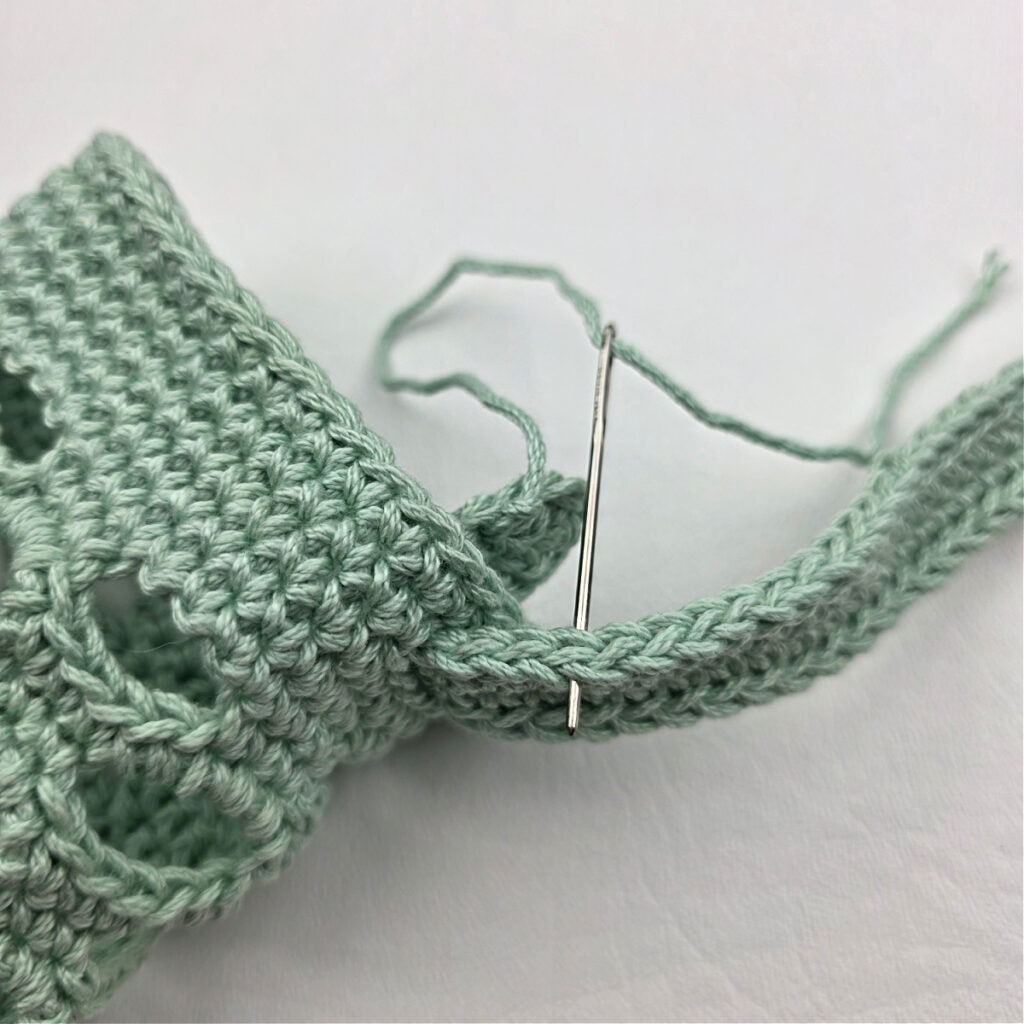
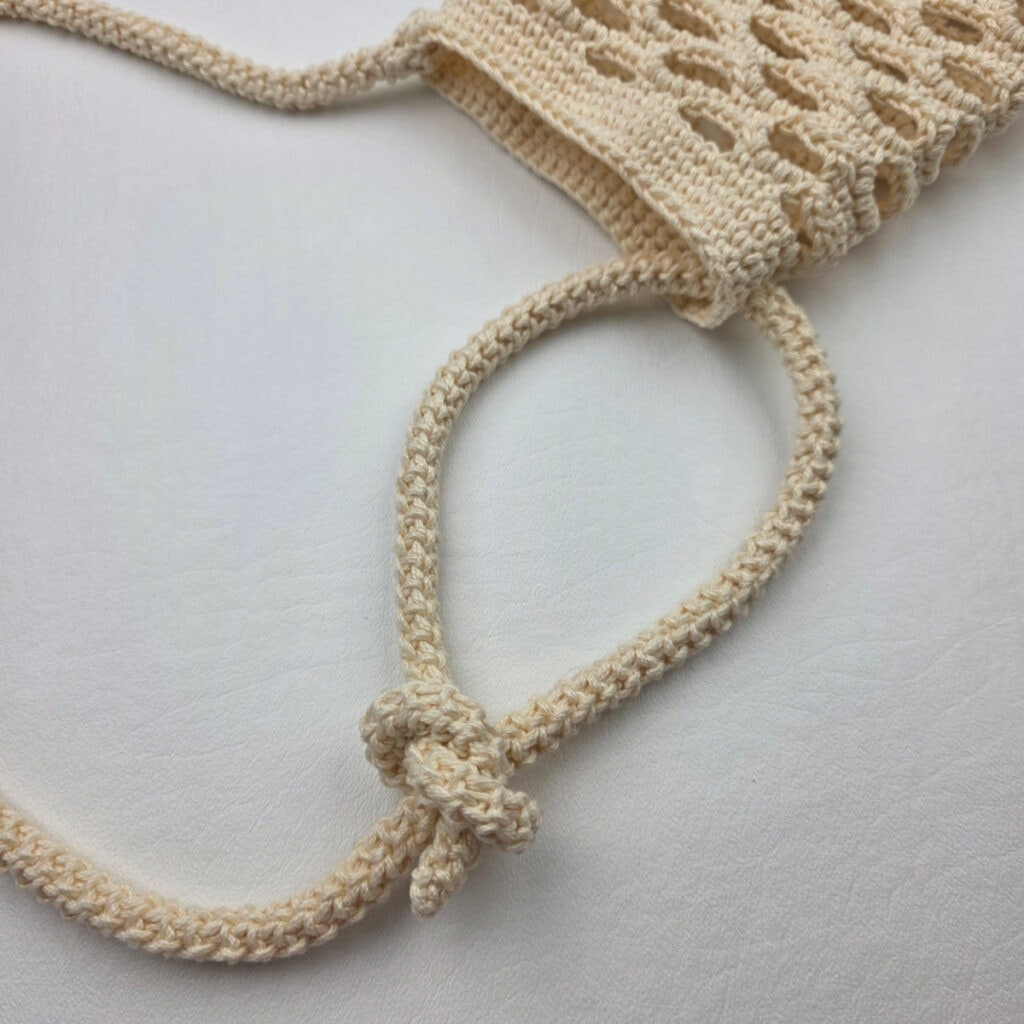
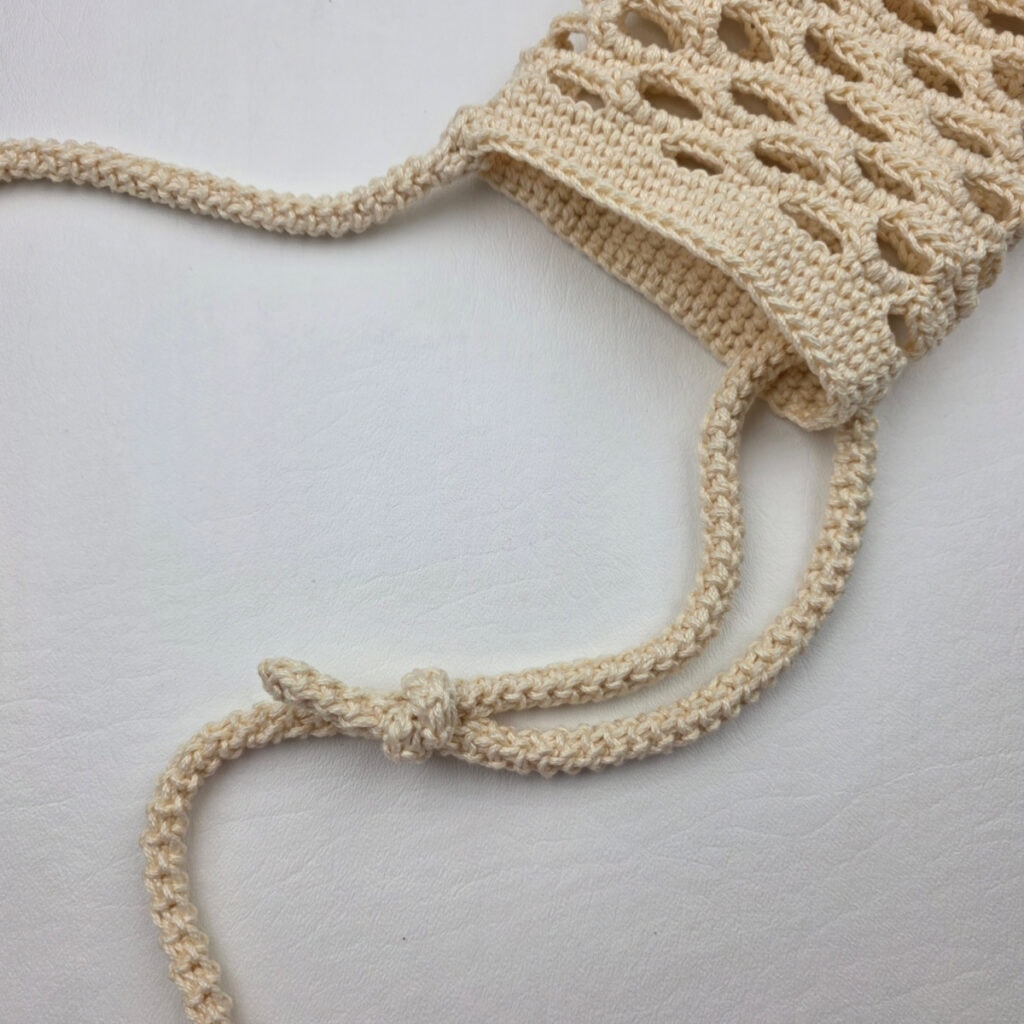
Adjustable Strap – 42″ Crochet Rope
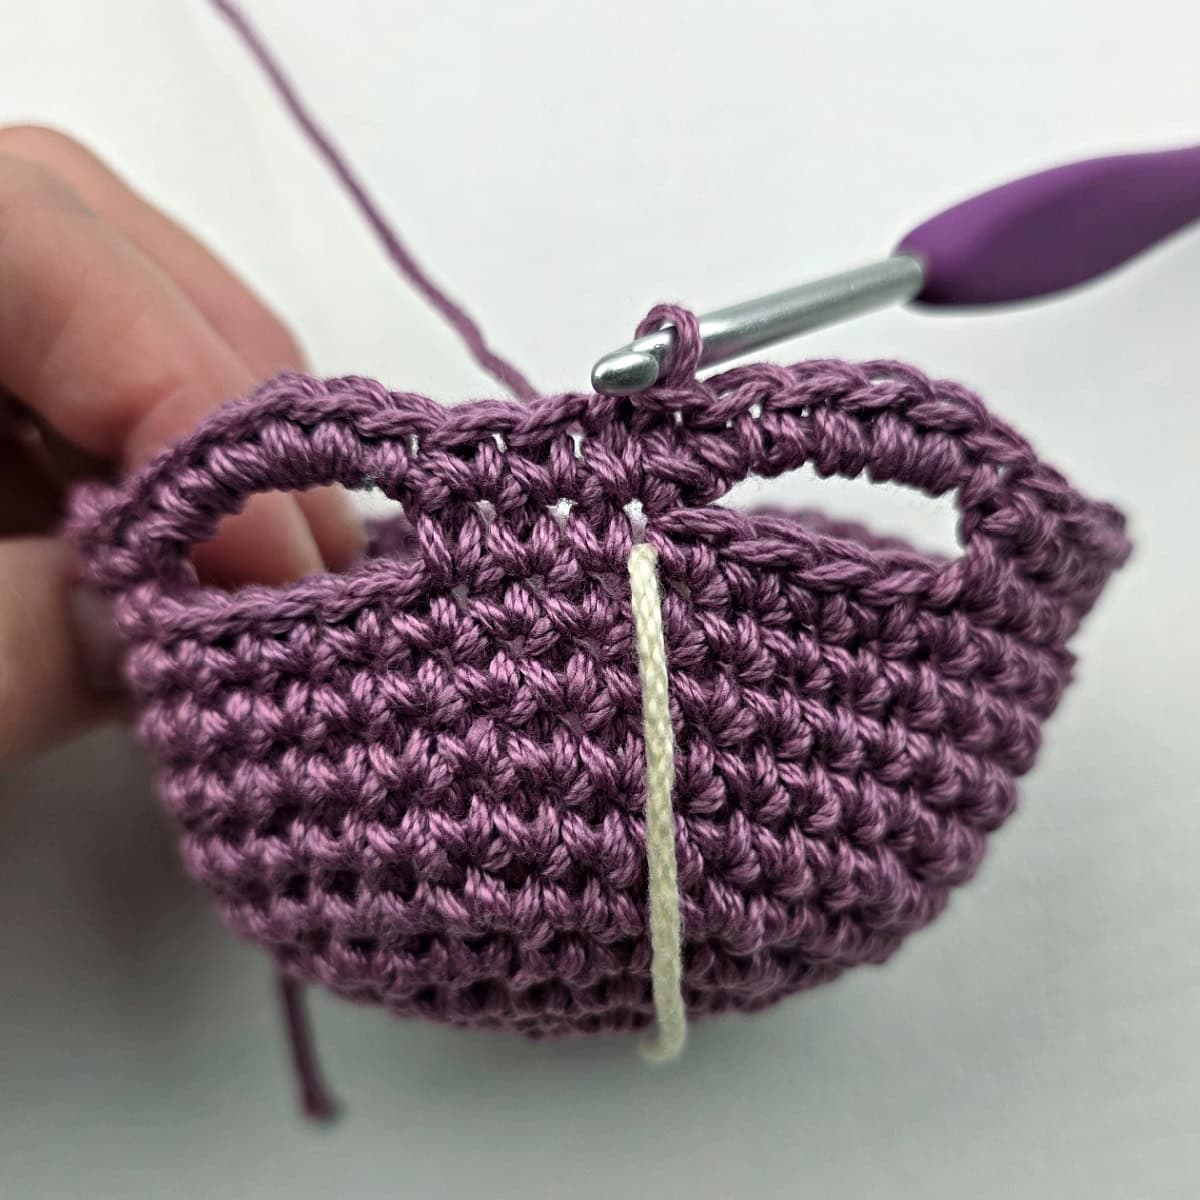
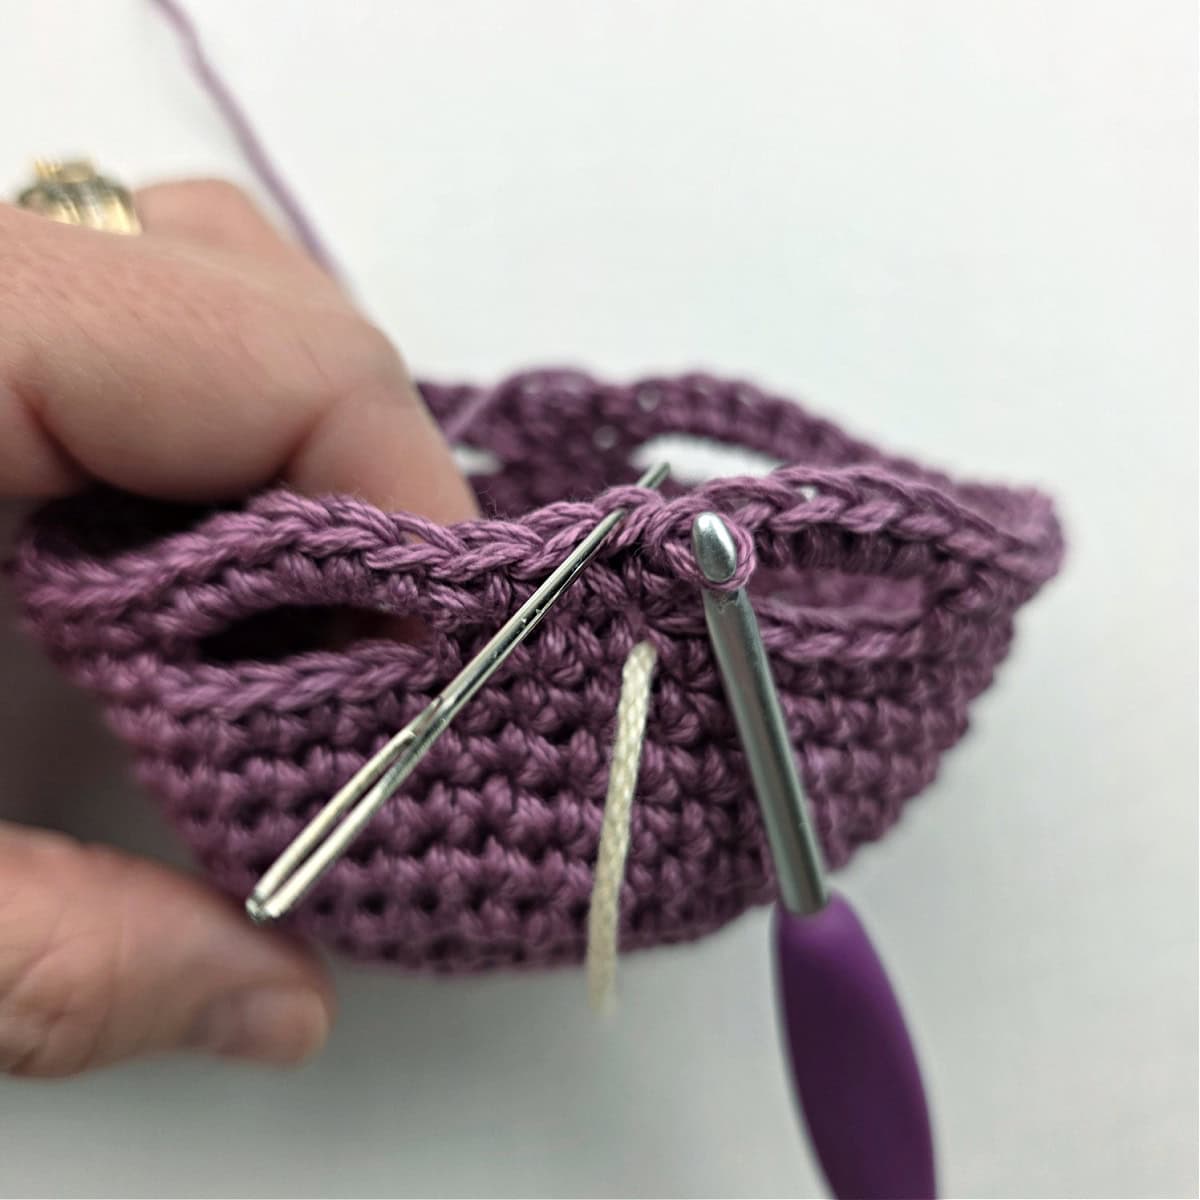
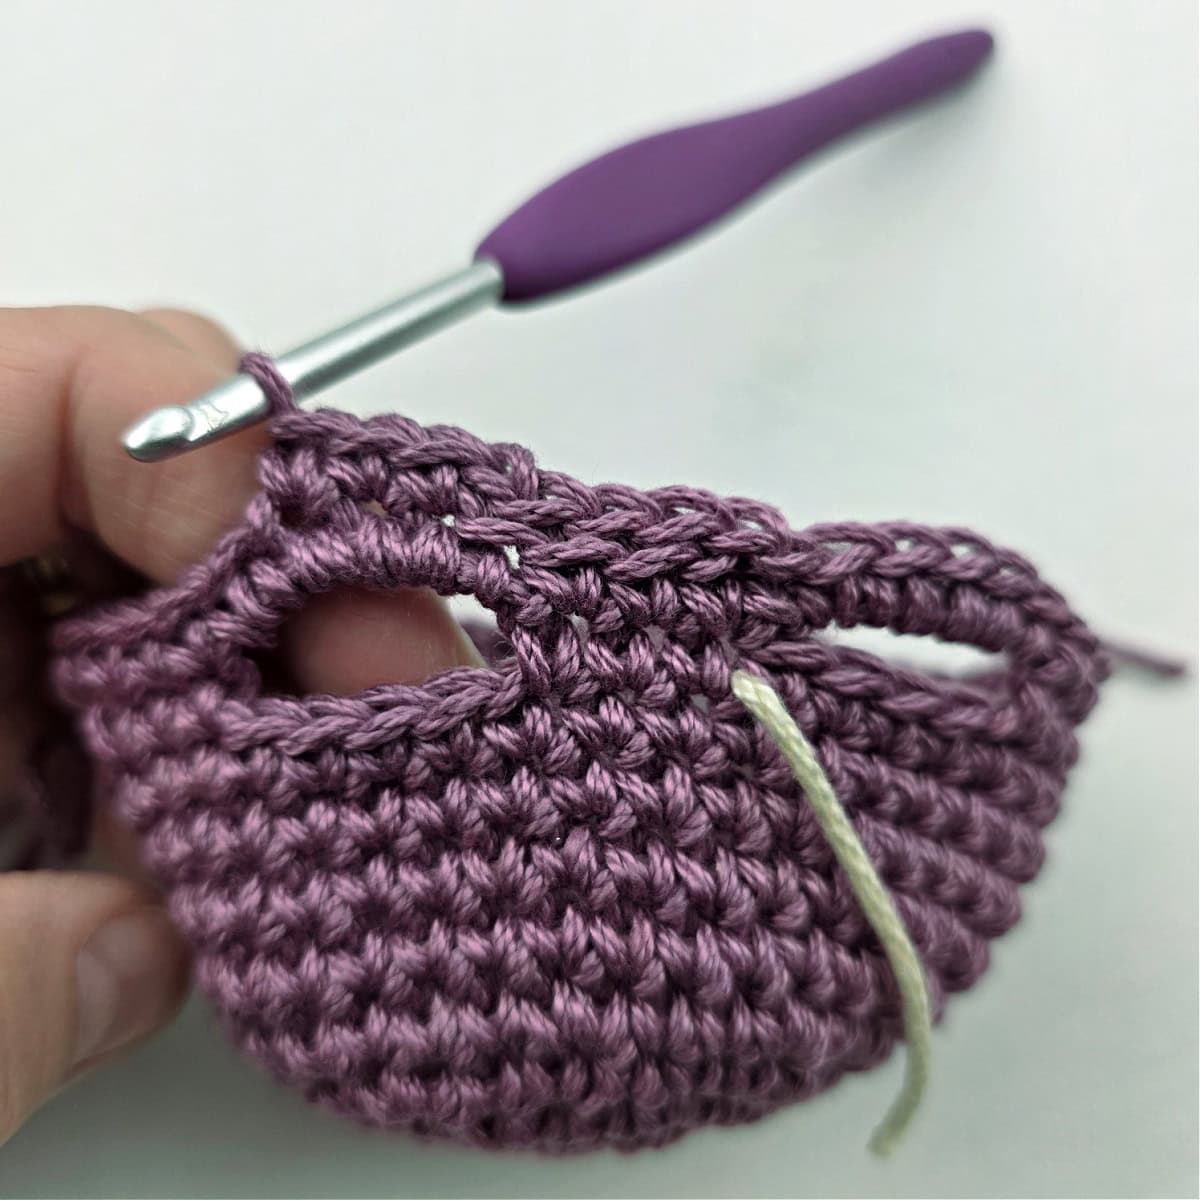
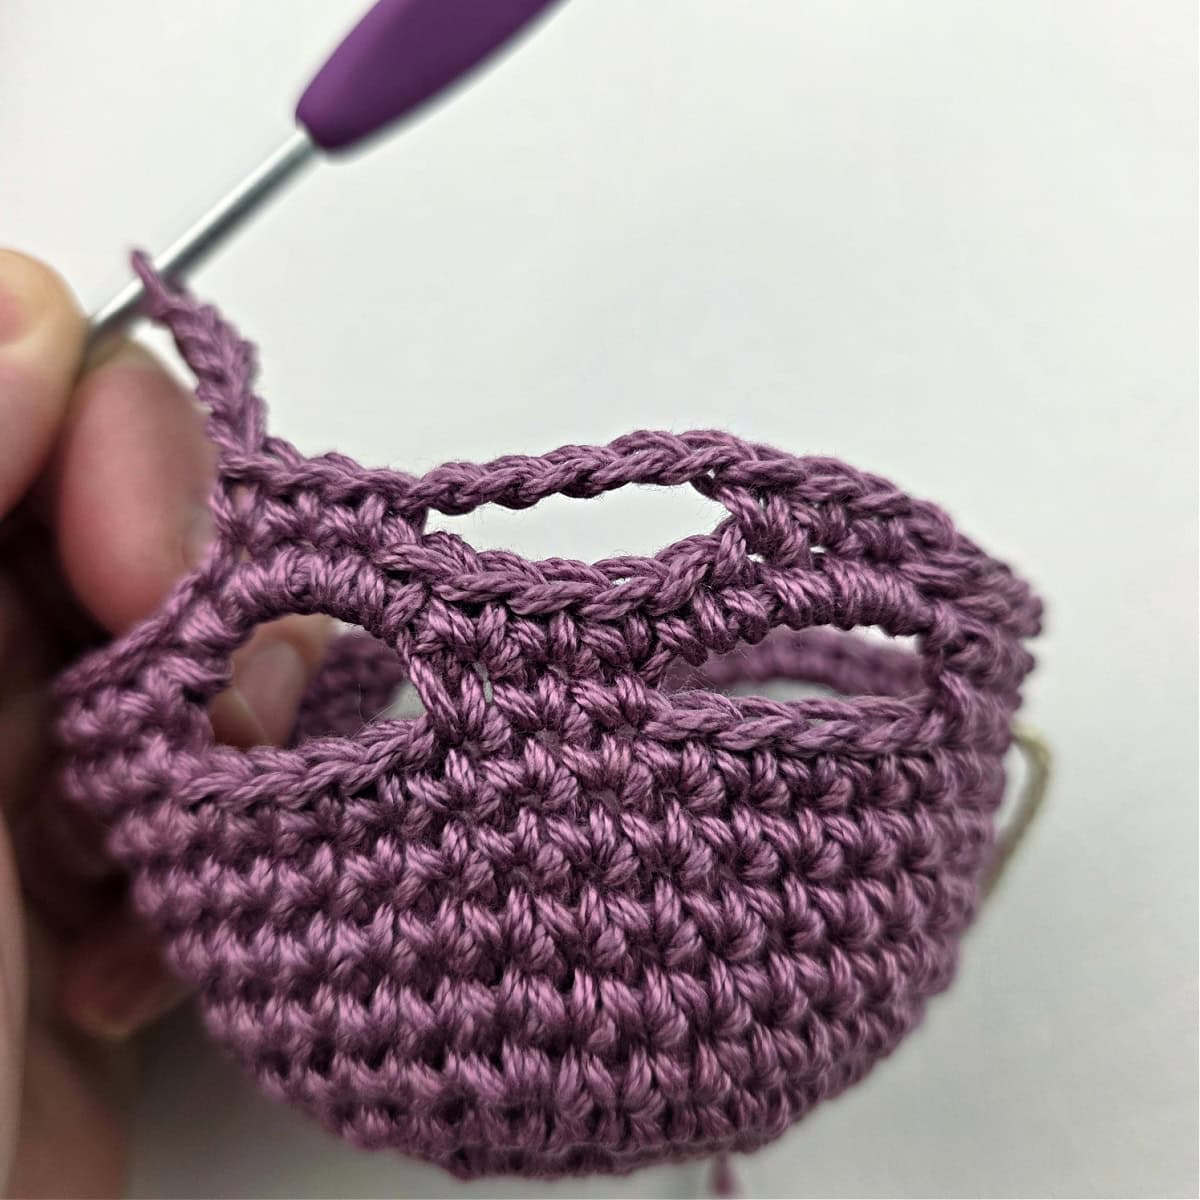
Insert one end of the crochet rope, from outside to inside, into a hole along the top edge of the bottle holder. Insert it just far enough so that it wraps around and reaches the rope. Use a yarn needle and piece of yarn and sew the end of the crochet rope to itself.
Insert the opposite end of the crochet rope, from outside to inside, into the other hole along the top edge of the bottle holder. Knot the loose end of the crochet rope around itself, as shown in the photos below. Tighten knot. Weave in any ends.
The knot you just created is what makes the strap adjustable. It slides up and down the crochet rope.
The knot you just created is what makes the strap adjustable. It slides up and down the crochet rope.
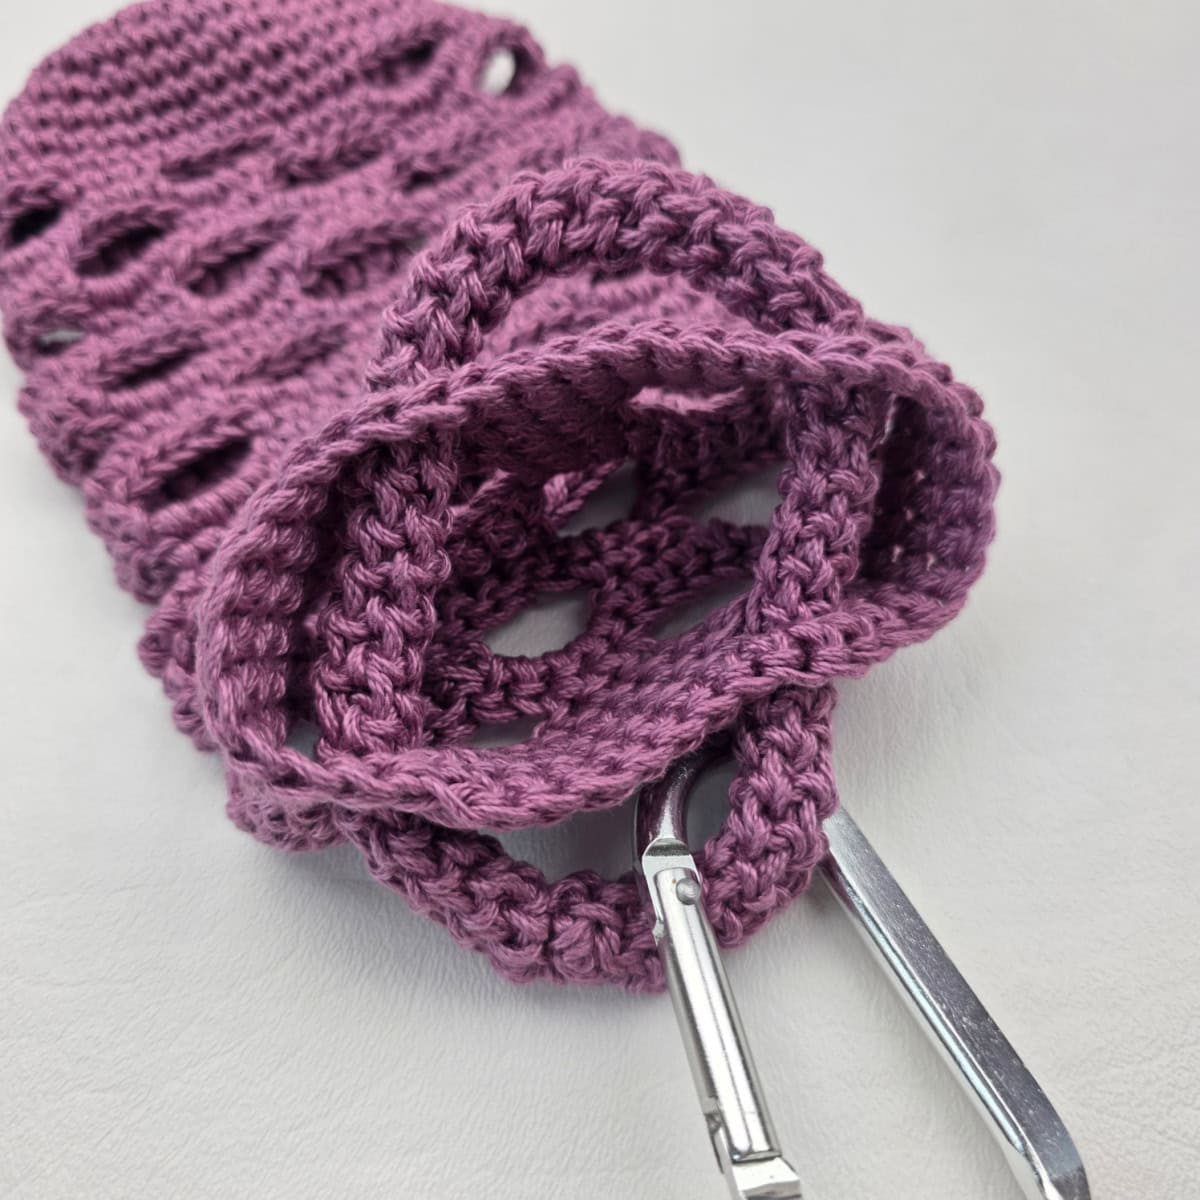
Attaching the Carabiner Strap
The photos below show how to attach the crochet rope carabiner strap option, but assembly is also the same for the easy carabiner strap option.

I MADE IT! NOW WHAT?
Pin this post!: Save this crochet water bottle holder pattern to your Pinterest boards so that you can come back and make it again.
Leave a comment below: We love to hear your feedback.
Share Your Finished Projects on Facebook or Instagram: I love to see your finished projects! Share with us on social media and tag me @acrochetedsimplicity or use the hashtag #ACrochetedSimplicity so I can find your posts.
Join us in the Facebook Community Group!
Come share your finished projects with us in the A Crocheted Simplicity Crochet Community Group on Facebook. Join us for fun community events such as crochet alongs, join in on crochet conversations, ask questions, get advice, and share your love for crochet!

More Free Crochet Drink Holders I Think You’ll Love
More Free Summer Crochet Patterns
Are you looking for your next summer crochet project? We have several more free crochet patterns for summer lovin’.
You’ll find plenty of summer crochet ideas, from an easy crochet summer top and beach bags to summer crochet projects for kids!