• Skip to primary navigation
  • Skip to main content
  • Skip to primary sidebar

A Crocheted Simplicity

Modern Crochet - Beyond the Basics

  • Home
  • Blog
  • Free Crochet Patterns
    • Crochet for Adults
    • Crochet for Kids
    • Crochet for Baby
    • Crochet for Dolls
    • Crochet Bags
    • Crochet for Home
    • Holiday Crochet
    • Crochet for Pets
    • Miscellaneous Crochet
  • Tutorials & More
    • Crochet Stitch Tutorials
    • All-Natural Homemade Lotion
    • DIY Crafts
    • Crochet Tips & Yarn Tutorials
    • Yarn Reviews
  • Crochet Patterns
    • Adult Garments
    • Kids’ Garments
    • Headgear: Beanies, Slouches, Headwarmers, Caps & More
    • Neck Gear – Cowls, Scarves, Wraps & More
    • Feet & Leg Gear – Slippers, Baby Sandals, Legwarmers & More
    • Afghans – Blankets
    • Bags, Purses & Totes
    • Christmas Stockings
    • 18″ Doll Clothes
    • Miscellaneous
    • Coffee Cozy Patterns
    • Basket Patterns
    • Linky Ladies Link Party
    • Crochet Pattern Round-Ups
  • Mini-Mystery Crochet Alongs
    • Mini-Mystery Crochet Along – Information Guide
  • Crochet Kits
  • Video Classes
  • Privacy Policy
    • About Me
  • Contact Me
  • Nav Social Menu

    • Facebook
    • Instagram
    • Pinterest
    • YouTube

Invisible Join: 2 Techniques

February 6, 2015 By Jennifer Pionk 2 Comments

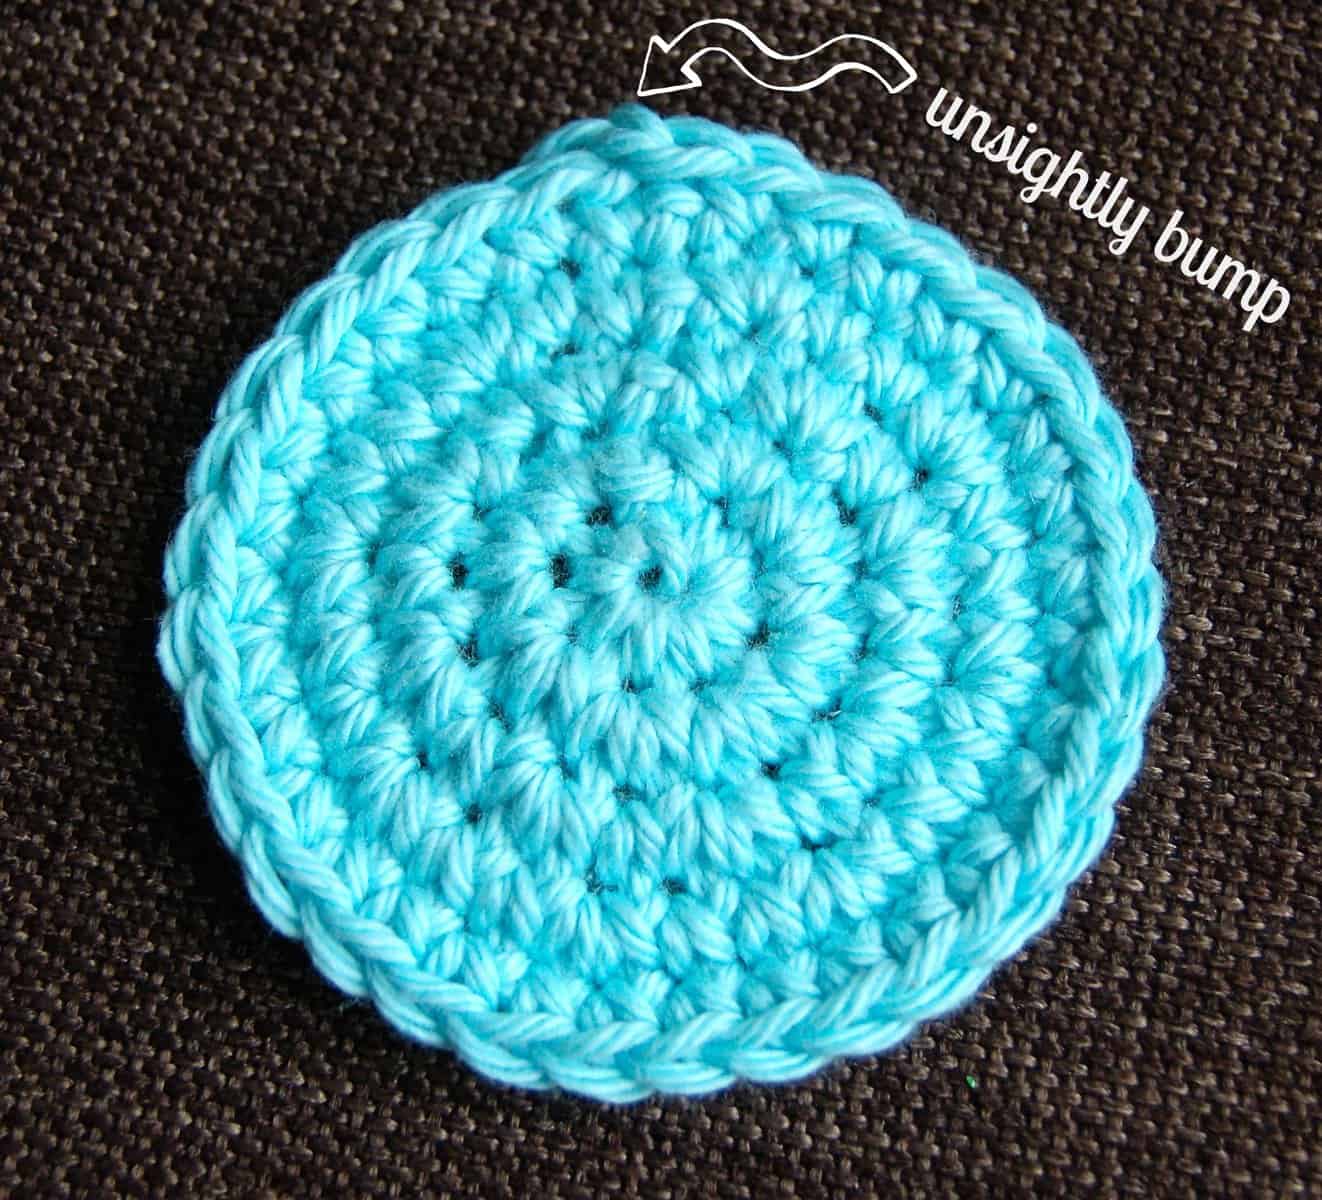
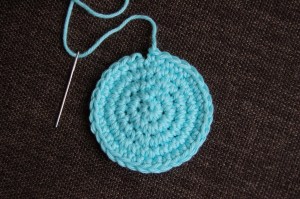
Do you have a touch of OCD (Obsessive Crochet Disorder) like I do? Does the appearance of an “unsightly bump” (see photo below), caused from joining a round, annoy you to no end? Do you have a favorite technique that you use to rid your hard work of these bumps? If so, great! (read no further)…  If not, then this tutorial is for you! Prepare yourself…your mind will be BLOWN! Well… maybe not blown, but it will decrease the symptoms of your OCD, and most importantly, teach you how to add a perfectly finished edge to your otherwise perfectly stitched garment!

InvisibleJoin1

There are several different Invisible Join Techniques. “Is one better than another?” Absolutely not. The following tutorials are 2 of the easiest techniques. One is my favorite, my “go-to” that I use for all projects and the one that most satisfies my OCD. The other will also leave you with a nice finished edge, but it may mess with your OCD as it will increase your st count by 1. Let’s begin with my favorite, shall we?

Jenn’s Favorite Invisible Join Technique

Why is this technique my favorite you ask? Well, that has to do with my OCD as well! This technique will leave you with a nicely finished edge AND will not increase your st count. It will keep things nice and symmetrical (what a perfect word for those who suffer from OCD). Let’s begin!

DSC_0838  DSC_0839

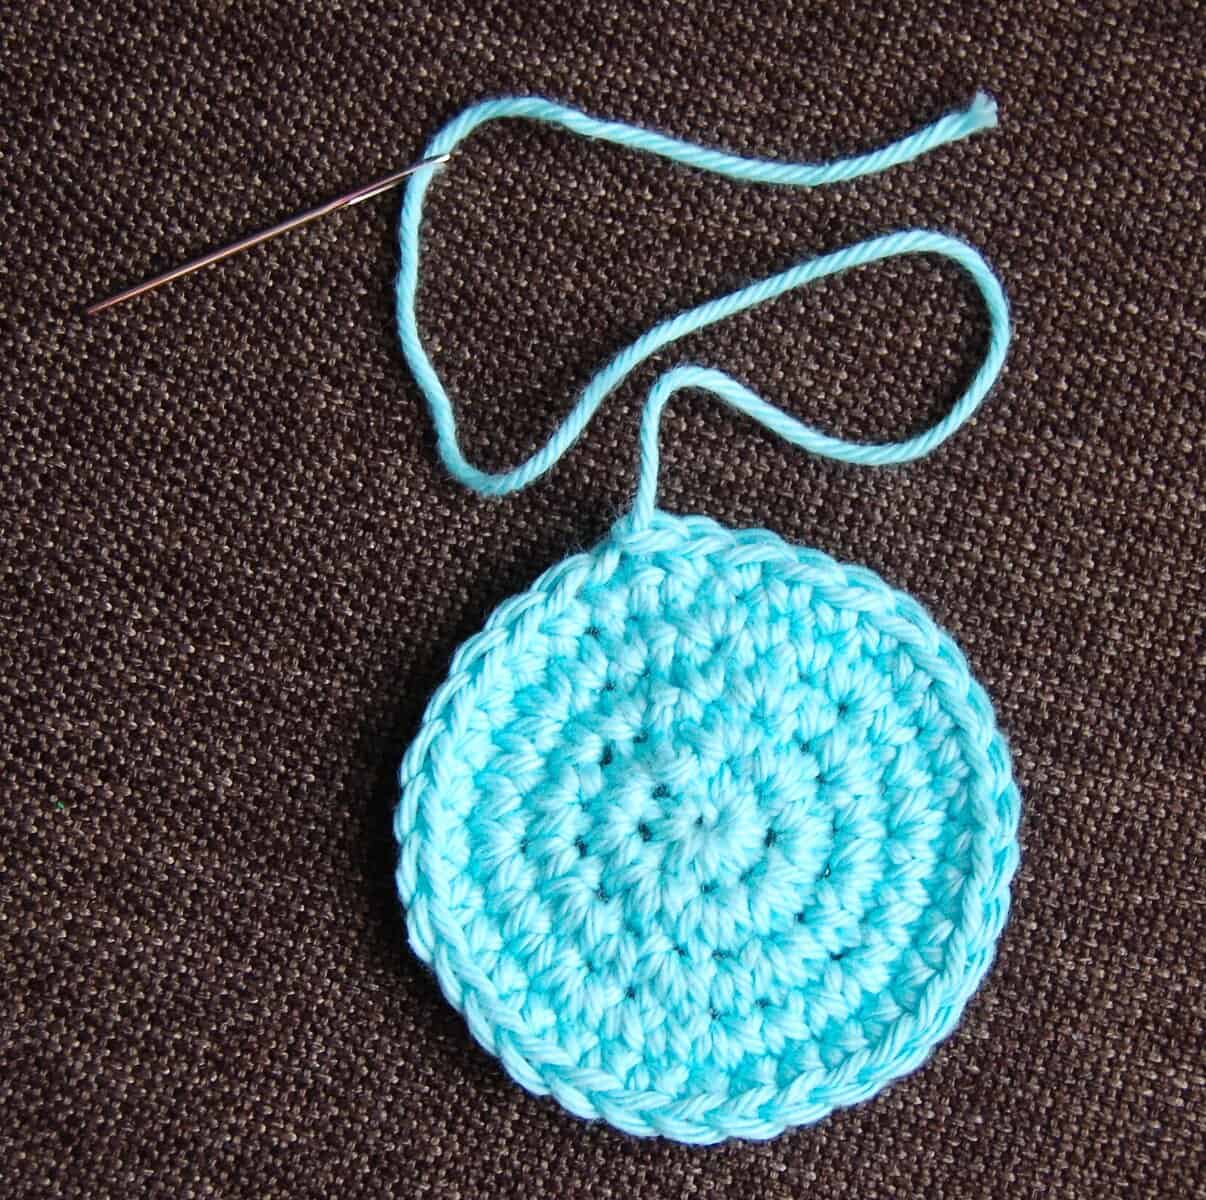
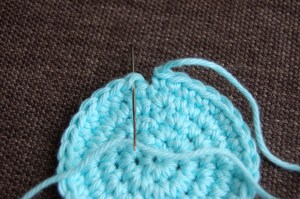
Step 1 (photo above left): Join the end of your round w/ a sl st to the 1st st of the round. Cut the yarn, leaving a tail (length is personal preference, I prefer approx. 6″). Remove your hook and pull the tail through the sl st. Thread the yarn through a yarn needle.

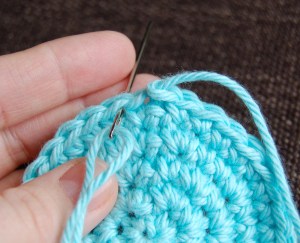
Step 2 (photo above right): Insert the yarn needle under the top loops of the 2nd st of the round (to the left of your join). **Note: Placement is important. If you insert the yarn needle under the top loops of the 1st st of the round, you will end up increasing your st count.

InvisibleJoin2  InvisibleJoin3

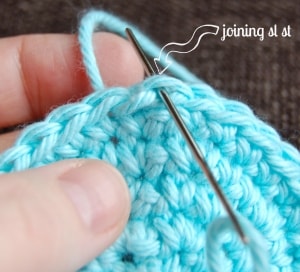
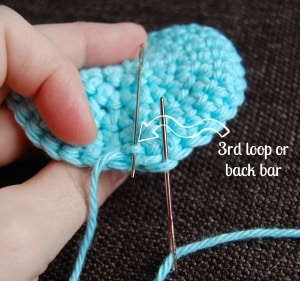
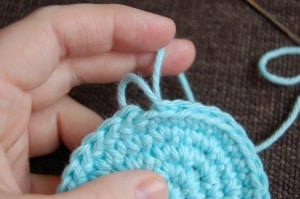
Step 3 (photo above left): Insert yarn needle under the BLO of the joining sl st.

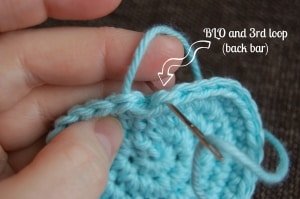
Step 4 (photo above right): The empty yarn needle is there to lift up the 3rd loop (or back bar) and make it easier for you to see. Continue by inserting yarn needle (from top to bottom) under the 3rd loop (back bar); See photo below left. **Note: the 3rd loop (back bar) is found under the BLO of a st.

InvisibleJoin4  DSC_0843

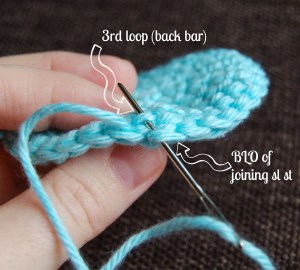
Step 5 (photo above left): This photo is a continuation of Step 4. It shows the yarn needle being inserted under the BLO of the joining sl st and under the 3rd loop (back bar).

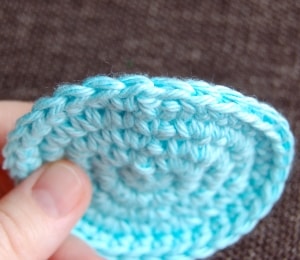
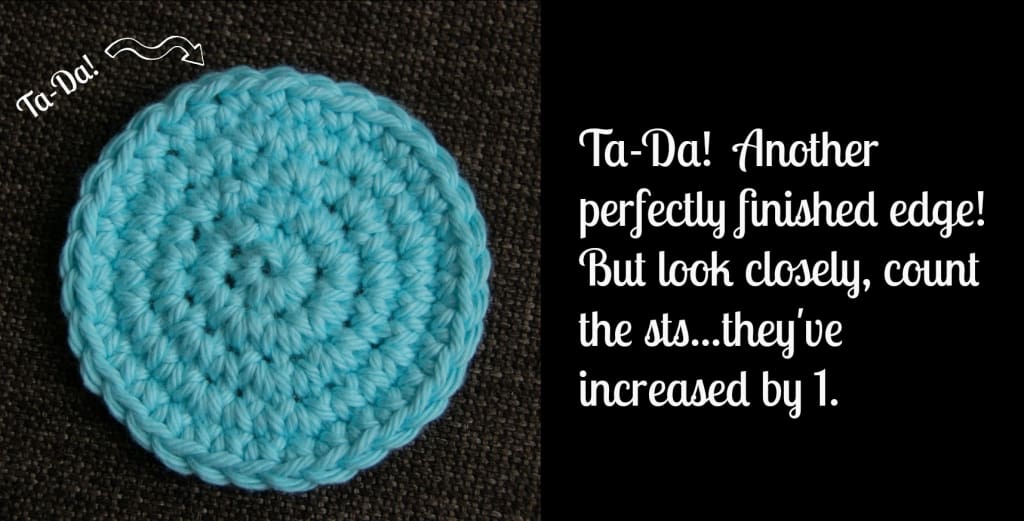
Step 6 (photo above right): Pull the yarn thru all loops. Pull it snug, but not too tight or it will cause your work to bunch. Weave in ends to secure.

InvisibleJoin6


 Another Great (slightly easier, not so OCD satisfying) Invisible Join Technique

This 2nd technique is slightly easier and will produce a nice finished edge, but it will increase your st count. This may or may not bother you, however, my OCD prefers nice, neat, symmetrical edges. Without further ado!

DSC_0849  DSC_0850

Step 1 (photo above left): Complete the last st of the round, fasten off, cut yarn leaving a 6″ tail and pull the tail through the last st of the round. Thread the yarn through the yarn needle.

Step 2 (photo above right): Insert yarn needle under both top loops of the 1st st of the round.

InvisibleJoin7  DSC_0852

Step 3 (photo above left): Insert yarn needle (from top to bottom) under the BLO & 3rd loop (back bar) of the last st of the round.

Step 4 (photo above right): Pull the yarn thru all loops. Pull it snug, but not too tight or it will cause your work to bunch. Weave in ends to secure.

InvisibleJoin9


I hope I’ve helped to satisfy your OCD for the day! As always, if you ever have any questions, don’t hesitate to ask. You can use the Contact Form at the bottom of this page or send me a message on my Facebook page: A Crocheted Simplicity.

JenniferFlowerBlogSignature

Free patterns, tutorials and more!

Signup now to get FREE crochet patterns, tutorials, giveaways & crochet along info sent straight to your inbox!

I agree to have my personal information transfered to Mad Mimi ( more information )

I will never give away, trade or sell your email address. You can unsubscribe at any time. See Privacy Policy for more info.

© Copyright 2019 Jennifer Pionk aka A Crocheted Simplicity. All Rights Reserved. All designs, posts, videos and images are property of Jennifer Pionk and are my own original work. No parts may be reproduced, altered, or distributed in any form, or by any means, without express written permission from Jennifer Pionk. If you want to share this information with someone, share the link to this post. If you want to share on your own blog / website, then you may use the first photo in this post and link back to this post. You may not give away printed copies of this post. Thank you.

This post may contain affiliate links/ads. If you purchase something from a link in this post, I may be compensated.

Previous Post: « Win a Year’s Worth of Patterns!!!
Next Post: Standing Single Crochet – Eliminate the Gap! »

Reader Interactions

Leave a Reply Cancel reply

Your email address will not be published. Required fields are marked *

Primary Sidebar

Hi there, I'm Jennifer! Welcome to my little corner of the internet where I share FREE crochet patterns, tutorials, tips, and more! More About A Crocheted Simplicity

Follow me on Social Media!

  • Facebook
  • Instagram
  • Pinterest
  • YouTube

Looking for something specific?

Subscribe to my YouTube Channel for all video tutorials

YouTube subscribe button by Skipser

Free patterns, tutorials and more!

Signup now to get FREE crochet patterns, tutorials, giveaways & crochet along info sent straight to your inbox!

I agree to have my personal information transfered to Mad Mimi ( more information )

I will never give away, trade or sell your email address. You can unsubscribe at any time. See Privacy Policy for more info.

Modern Crochet Blogs

Crocheted with in Michigan

Copyright © 2021 · Genesis Framework · WordPress · Log in

We use cookies to ensure that we give you the best experience on our website. If you continue to use this site we will assume that you are happy with it.OkRead more