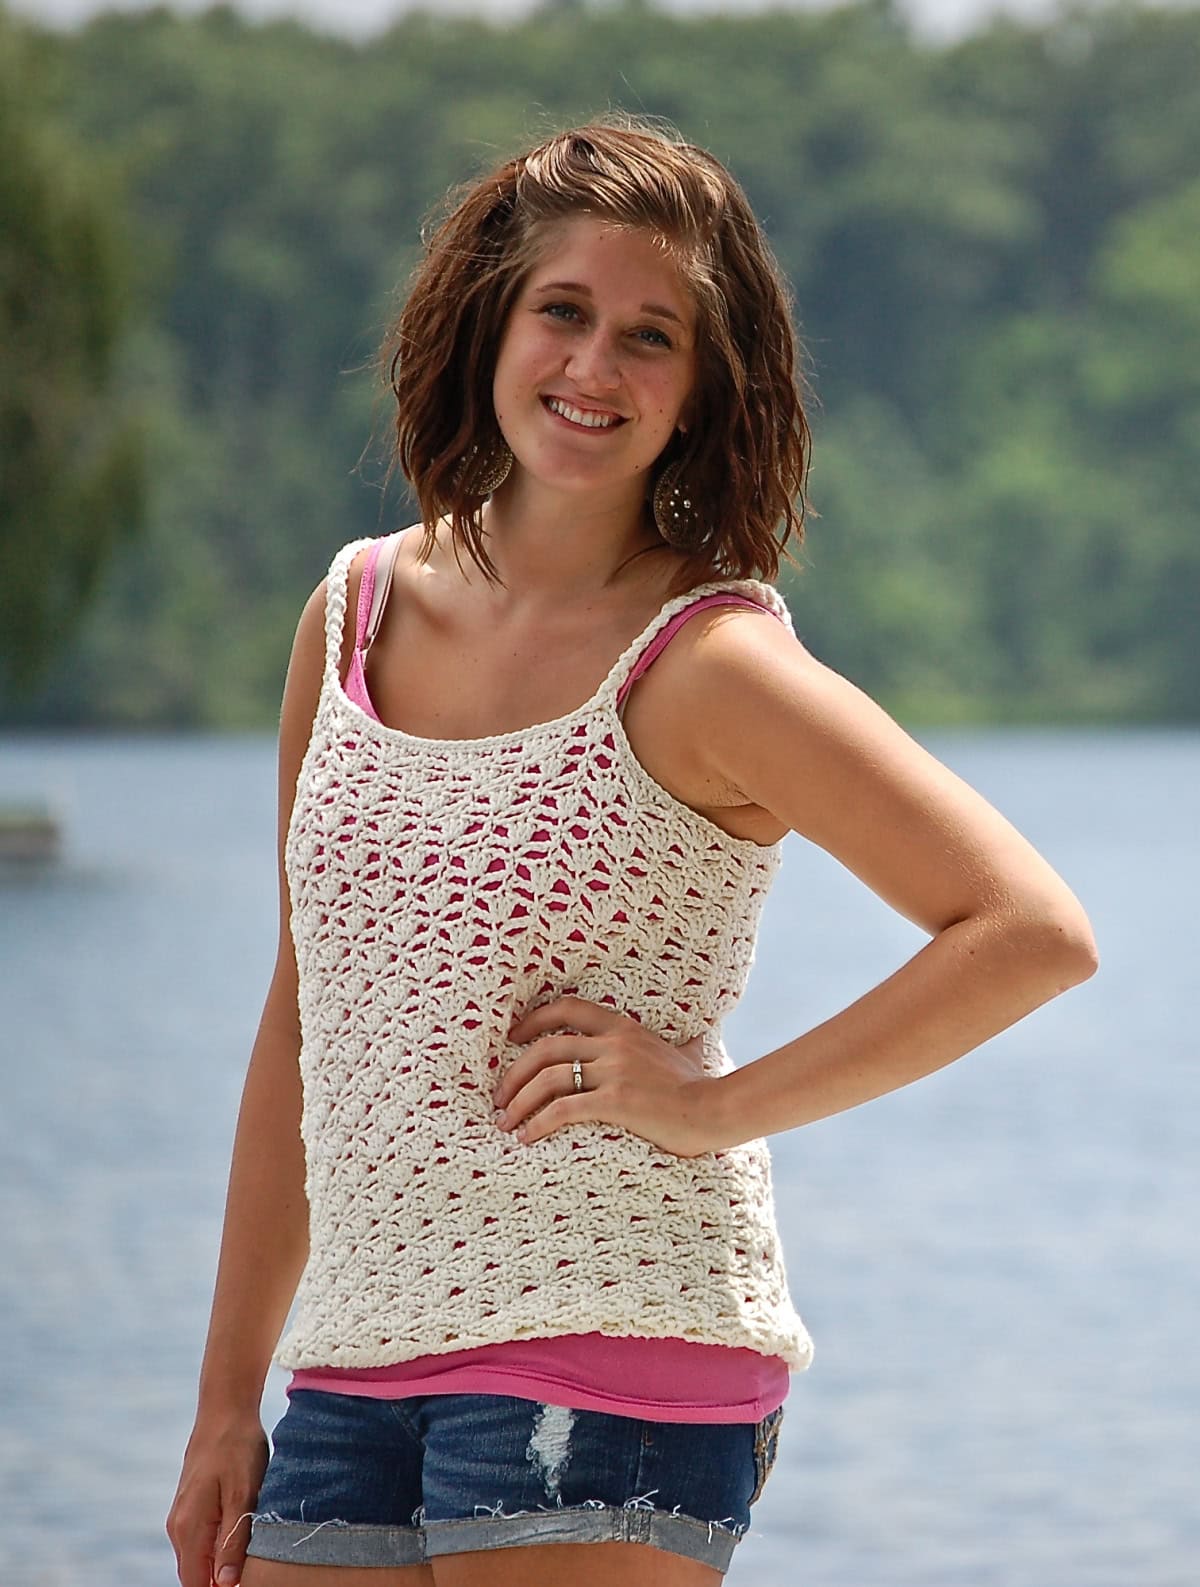
Lakeshore Crochet Tank Top
Make yourself a gorgeous crochet tank top with chic details that’ll set you apart from the crowd.
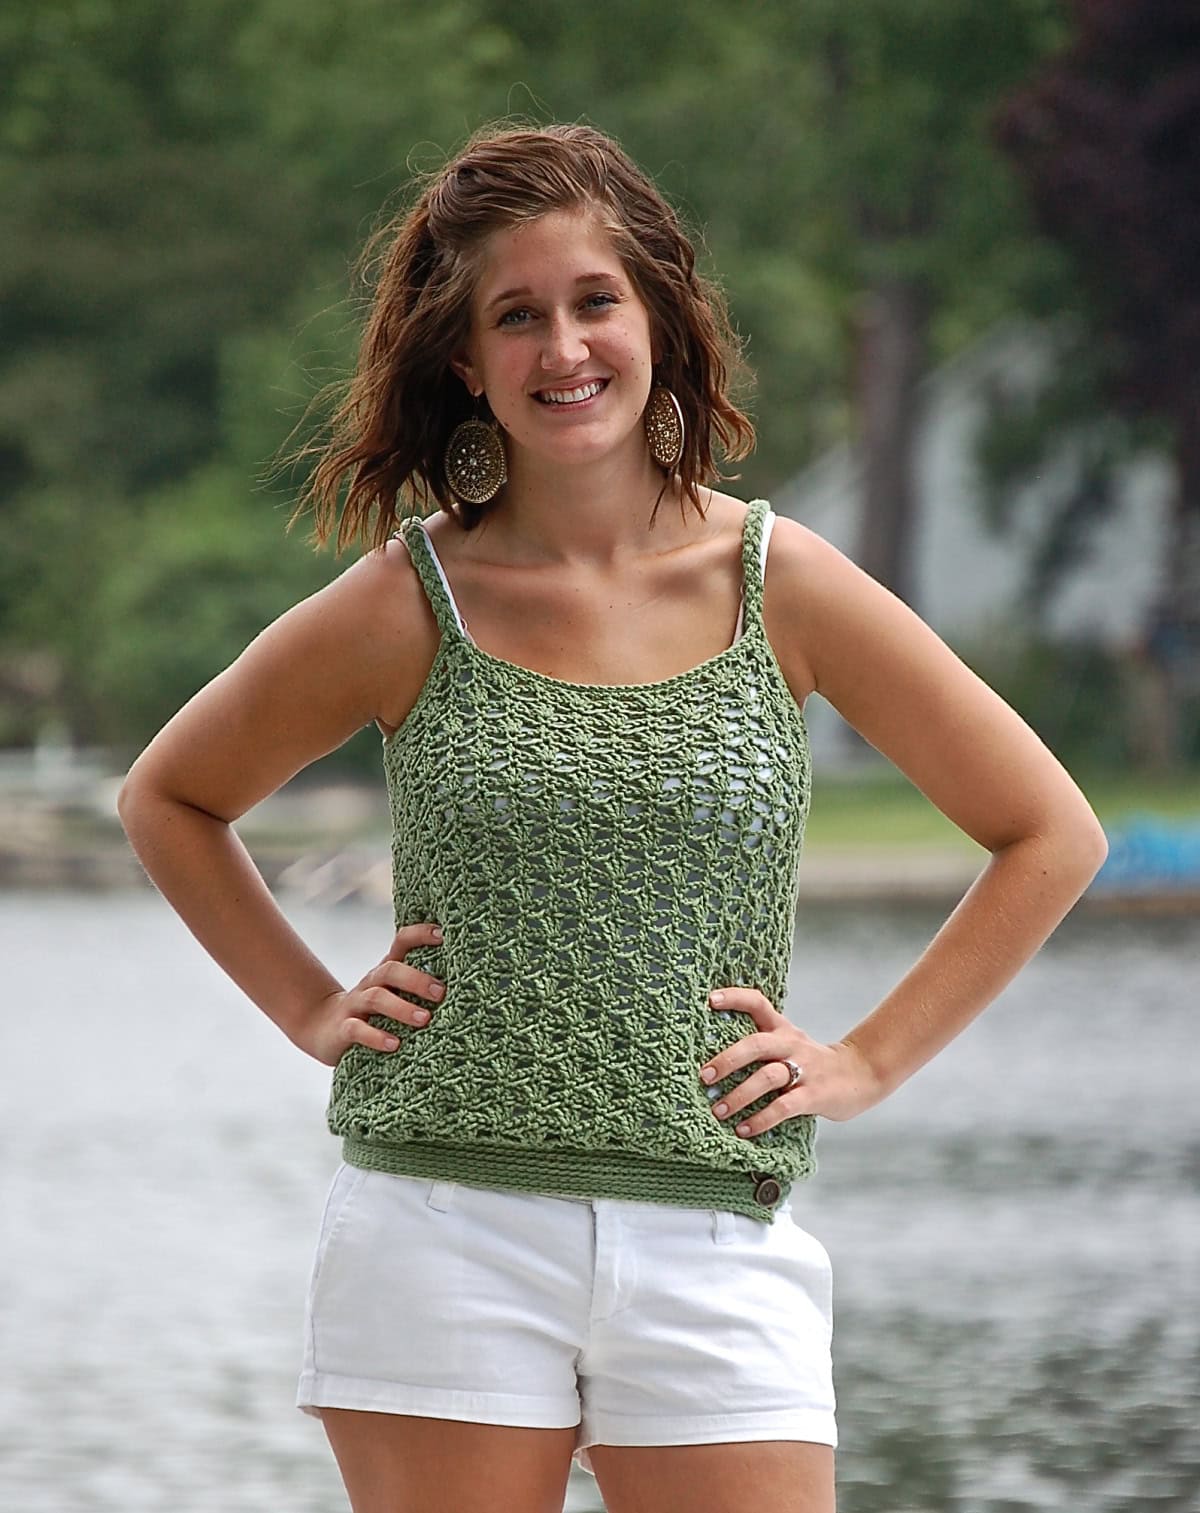
The Lakeshore Crochet Tank Top is unique because of all the little touches added to it, including buttons at the hem, braided straps, and an overall lacy look that makes it breathable and lightweight.
You’ll find the free crochet tank top pattern in the post below, or you can find an ad-free printable PDF (that includes all photo tutorials, + a stitch chart), on Ravelry, or Etsy (aff).
This summer crochet tank top features a lacy pattern that’s both breathable and stylish, allowing you to wear a shirt underneath to really make the design pop. With its lightweight, airy design and openwork stitches, it’s perfect for layering so you can dress it up or down depending on your plans for the day.
Whether you’re heading off to the beach or visiting your local market for fresh produce, the Lakeshore Crochet Tank Top ensures you look fabulous while doing so.
Your Go-To Summer Tank Top
It’s so easy to get your outfits dirty in the summers, especially when you’re handling cold beverages or popsicles. The Lakeshore Crochet Tank Top is made with a pure cotton yarn that makes it easily washable and durable (it won’t lose its shape). Cotton, being a natural fiber, allows air to circulate, keeping you cool in warm weather. Since this is a lacy top, choosing this type of yarn provides for crisp, clear stitch definition.
Related: If you love the lace crochet stitch pattern on this crochet tank top, make sure to check out the Chantilly Summer Top.
How to Crochet a Tank Top
This summer crochet tank top is constructed in one piece, from the hem to the top.
First, you’ll crochet the body of the top from the bottom up to reach your desired measurements. This is done in joined and turned rounds meaning you’ll join at the end of each round and then turn your work to start the next round.
You can decide what kind of fit you want with the sizing chart and there are also instructions to adjust the length.
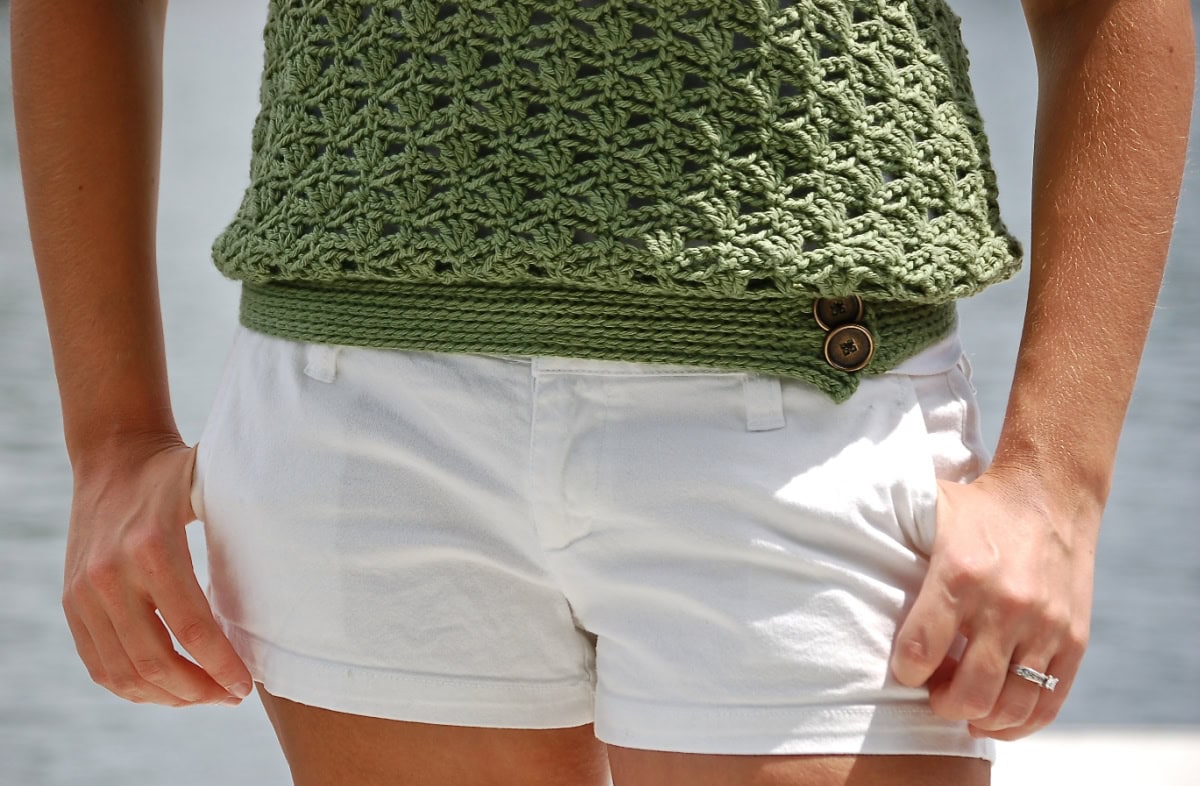
Once the body of the tank top is ready, you’ll add a top edge and braided crochet straps. After this is done, you’ll join your yarn at the hem and choose between two options. You can either keep it simple or go for a wider waistband with buttons. If you crochet this tank top a few times, be sure to try out both options to see which one you like better!
Two Options for the Hem
I love giving various options to style one piece so that you can choose which one represents your preferences more. For this crochet tank top, I’ve added two different waistband designs.
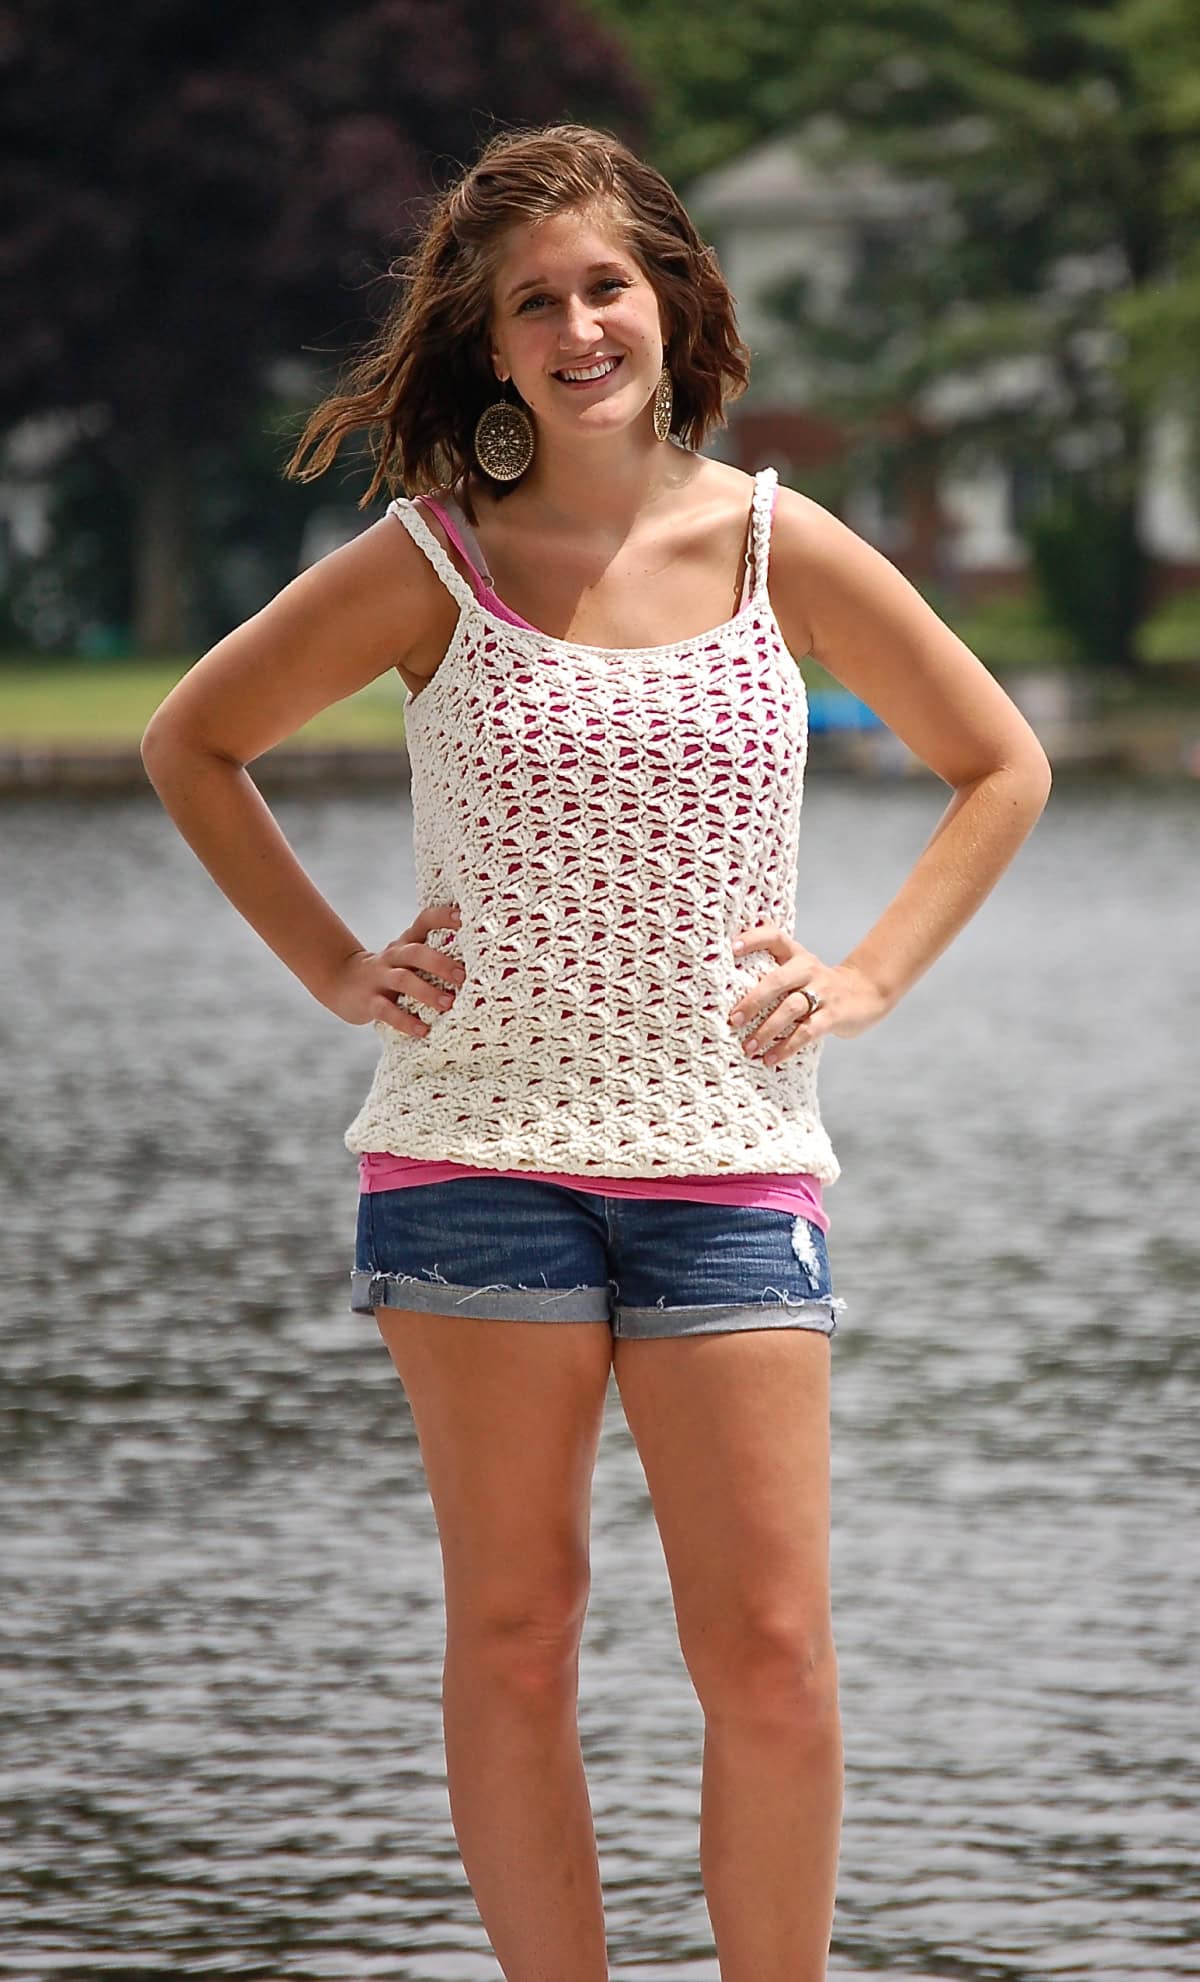
The first one is simpler and smarter and you’ll see it in the Ivory version. It’s made from single crochets and keeps the main attention on the lacy top. The fit is a little looser as well.
The second is a thicker waistband that gives the tank top more personality, especially when you choose to add big bold buttons to it. I incorporated this hem style in the Sage sample. Whether you choose to go for the first type or the second, the final look is sure to make you stand out!
How To Get The
Lakeshore Tank Top Pattern
Option 1: Scroll down for the free tank top crochet pattern right here in this blog post.
Option 2: Purchase the ad-free printable PDF from one of my shops:
Best Yarn for Crochet Tank Tops
For crochet tank tops, the best yarn choices are typically lightweight and breathable. It is entirely up to whether you use any of the following yarn types individually or in a yarn blend with varying combinations.
The following yarn types provide a comfortable and airy feel, ensuring your crochet tank top is perfect for warm summer days:
- Cotton yarn is a top favorite due to its natural breathability, moisture-wicking properties, and comfort against the skin.
- Linen yarn is another excellent option, known for its durability and coolness, making it perfect for hot weather. Linen yarns also add a wonderful drape to your summer clothes.
- Bamboo yarn, with its silky texture and breathable nature, is also ideal for summer garments.
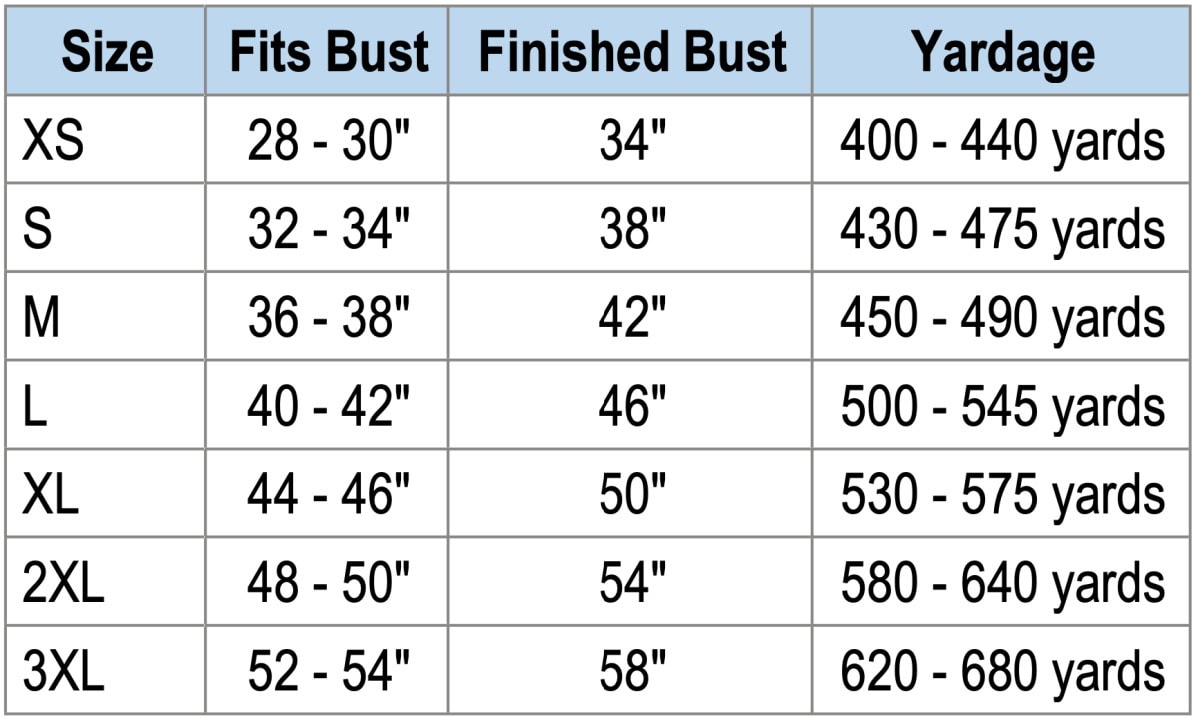
Choosing Which Size to Crochet
Model wears a women’s size medium and has on a size medium crochet summer tank top.
To choose your size, look over the size chart below.
- ‘Fits Bust’ measurement is the measurement of the intended wearer, not the garment’s finished measurement.
- Finished Bust is the measurement of the finished garment.
- This crochet top has 4″ – 6″+ of positive ease built in for a casual fit.
- If you prefer a more loosely fitted summer top, I would suggest making a top one size larger than bust size.
- If you prefer a more fitted look, I would suggest sizing down (as long as your chest size fits range of the smaller size).
- Adjusting Top Length: See the notes in the Body of Top section for adjusting length.
Size & Yardage Chart
The notes above refer to this size chart.
Yarn
For the Lakeshore Tank Top, I chose Hobby Lobby I Love This Cotton in Ivory and Sage. Being pure cotton yarn, it is generally non-irritating and suitable for sensitive skin, making it ideal for garments worn directly on the body.
Hobby Lobby I Love This Cotton is a worsted #4 yarn comprised of just cotton (as you may have guessed by the name). This allows it to be extra soft, durable, and machine-washable — all of the things you would want for a garment.
Yarn Substitutions
Other worsted weight yarns can be substituted as long as you meet gauge and you love the drape of the fabric.
While I used a pure cotton yarn, you can choose any worsted weight yarn that is a blend of any of the three yarns listed above that I think are great for wearables. The greater the quality of the yarn, the longer-lasting your crochet tank top will be.
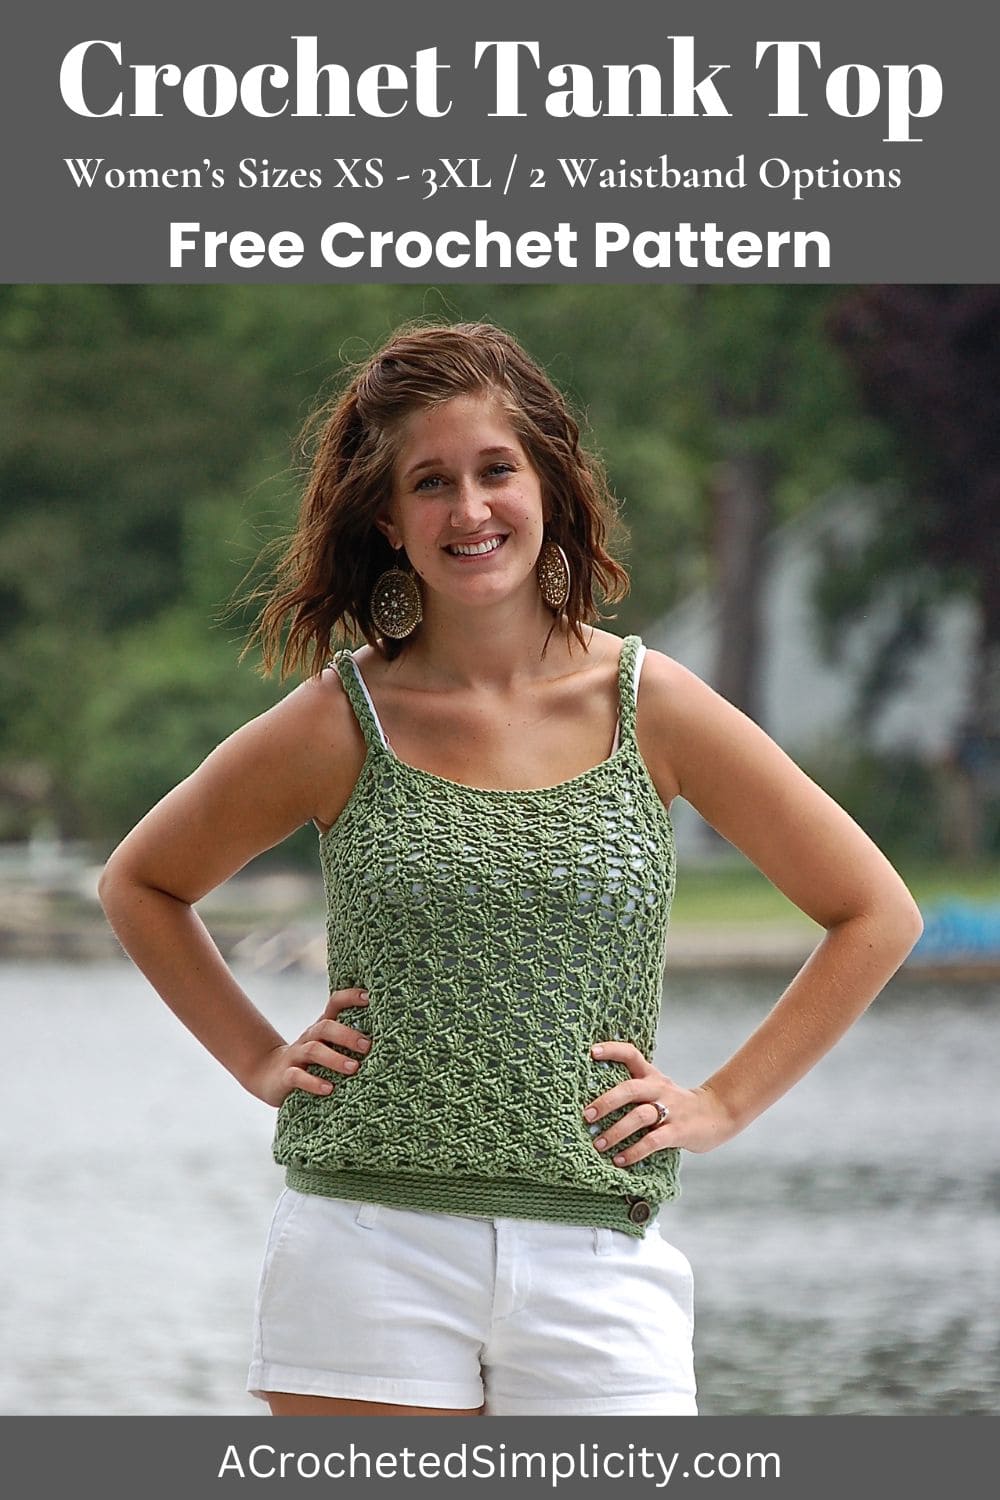
Lakeshore Crochet Tank Top – Free Pattern
The crochet tank top pattern is free below, but if you love to work offline, I’ve got a couple other great options for you.
Purchase the ad-free, printable PDF, (that includes all photo tutorials, + a stitch chart), on Ravelry, or on Etsy (aff).
This post contains affiliate links.
Materials
- Yarn: Worsted Weight / 4 / Yarn, Hobby Lobby I Love This Cotton in Sage and Ivory was used for the sample in the photos (100% Cotton – 180 yds / 165 m / 99 g / 3.5 oz).
- Yardage: See Size Chart Above
- Crochet Hook: J/10/6.00mm; I/9/5.50mm; H/8/5.00mm; or size needed to obtain gauge (my favorite crochet hooks are the Clover Amour Crochet Hooks, I’ve never had an ache in my hand since switching).
- Scissors
- Yarn Needle
- Stitch Markers (4)
- Buttons: (2) 3/4″ diameter (optional) / Needle & Thread
Abbreviations (US Terms)
- ch(s): chain(s)
- sl st(s): slip stitch(es)
- st(s): stitch(es)
- yo: yarn over
- sp(s): space(s)
- sc: single crochet
- sc2tog: single crochet decrease
- FLO: front loop only
- Rep: repeat
- Rnd: round
- RS: right side
- SM: stitch marker
- Join yarn with a standing single crochet
Experience Level
- Easy / Intermediate
Gauge
- Measure gauge along the bottom of the foundation chain.
- In pattern stitch as written in the swatch instructions with a 6.00mm crochet hook: 12 sts = 4″; 10 rows = 4″
- See Swatch Instructions below.
Sizes
- Women’s XS through 3XL
- See Size Chart above.
Special Stitches
- Join yarn with a standing single crochet: Begin with a slip knot on your hook, insert your hook into the stitch or space indicated, yo, pull up a loop, yo and draw thru both loops on hook.
Pattern Notes
- Turning chains are not included in the stitch count.
- The first stitch of each row is worked into the same stitch as the turning chain, unless noted otherwise.
- Yarn Notes: Hobby lobby I Love This Cotton in Sage and Ivory was used for the samples. Worsted Weight / 4 yarn, 100% Cotton (180 yards / 3.5 oz)
- Yardage & Color (see size chart above for yardage per size)
- Model wears a women’s medium and is wearing a medium sample.
- Summer Top Construction Notes: This summer crochet top is constructed in one piece. First, you’ll crochet the body of top from the bottom up. Next, you’ll add a top edge and braided crochet straps. Then, you’ll join yarn at the bottom of the top and work either option #1 or option #2 to finish the bottom edge. If you’ve chosen option #2, you’ll finish your summer top by attaching buttons.
- 2 Hem Finishing Options to choose from: Option #1 (cream sample) is a simple single crochet edge and Option #2 (green sample) is a wider waistband with buttons.
Gauge Swatch Instructions
I strongly recommend making a gauge swatch before you begin to make crochet tank tops. To get an accurate gauge check, without working up 10 rows, you can work up this quick swatch. Adjust your crochet hook size as needed to meet gauge so that your Lakeshore Tank Top comes out the right size. In the ad-free PDF, you can get a bonus Gauge Swatch Chart.
Row 1: With yarn and a 6.00mm crochet hook, ch 18, working into the back hump of the foundation ch, dc into the 3rd ch from your hook, ch 2, skip each of the next 2 chs, sc in the next ch, (ch 2, skip each of the next 2 chs, 3 dc in the next ch, ch 2, skip each of next 2 chs, sc in the next ch) 2 times. Turn. (20 sts)
Row 2: Ch 1, sc in the first st, (ch 3, skip each of next 2 chs and next dc, sc in the next dc, ch 3, skip the next dc and each of the next 2 chs, sc in the next sc) 2 times, ch 3, skip each of the last 2 chs, sc in the last st. Turn. (21 sts)
Row 3: Ch 1, sc in the first st, (ch 2, skip each of the next 3 chs, 3 dc in the next st, ch 2, skip each of the next 3 chs, sc in the next st) 2 times, ch 2, skip each of the next 3 chs, 2 dc in the last st. Turn. (21 sts)
Row 4: Ch 1, skip the first dc, sc in the next dc, ch 3, skip each of the next 2 chs, sc in the next sc, (ch 3, skip each of the next 2 chs and next dc, sc in the next dc, ch 3, skip the next dc and each of the next 2 chs, sc in the next sc) 2 times. Turn. (21 sts)
Row 5: Ch 2, dc in first st, ch 2, skip each of the next 3 chs, sc in the next sc, (ch 2, skip each of the next 3 chs, 3 dc in the next sc, ch 2, skip each of the next 3 chs, sc in the next sc) 2 times. Turn. (20 sts)
Fasten off. Finished size of swatch should be 5″ W x 2″ H.
Lakeshore Crochet Tank Top Written Pattern
Body of Top
The Body of Top is worked in joined and turned rounds. You will join with a slip stitch at the end of each round, then turn to work the next round in the opposite direction.
Changes for Sizes Written as Follows: XS (S, M, L, XL, 2XL, 3XL)
Stitch Counts Written as Follows: (XS, S, M, L, XL, 2XL, 3XL sts)
Rnd 1: With yarn and a 6.00mm crochet hook, ch 96 (108, 120, 132, 144, 156, 168), working into the back humps of the foundation ch, dc into the 3rd ch from your hook, ch 2, skip 2 chs, sc in the next ch, (ch 2, skip 2 chs, 3 dc in the next ch, ch 2, skip 2 chs, sc in the next ch) rep from ( to ) across. Join with a sl st to the 1st st of the rnd. Turn. (124, 140, 156, 172, 188, 204, 220 sts)
Note: There will be a small gap between the first and last stitches of Rnd 1, do not worry about that right now. You’ll take care of that later.
Rnd 2: Ch 1, sc in the first st, (ch 3, skip the next 2 chs & next dc, sc in the next dc, ch 3, skip the next dc & next 2 chs, sc in the next sc) rep from ( to ) around to the last 3 sts, ch 3, skip the last 2 chs, sc in the last st. Join. Turn. (125, 141, 157, 173, 189, 205, 221 sts)
Rnd 3: Ch 1, sc in the first st, (ch 2, skip the next 3 chs, 3 dc in the next st, ch 2, skip the next 3 chs, sc in the next st) rep from ( to ) around to the last 4 sts, ch 2, skip the next 3 chs, 2 dc in the last st. Join. Turn. (125, 141, 157, 173, 189, 205, 221 sts)
Rnd 4: Ch 1, skip the first st, sc in the next dc, ch 3, skip the next 2 chs, sc in the next sc, (ch 3, skip the next 2 chs & next dc, sc in the next dc, ch 3, skip the next dc & next 2 chs, sc in the next sc) rep from ( to ) around. Join. Turn. (125, 141, 157, 173, 189, 205, 221 sts)
Rnd 5: Ch 2, dc in the first st, ch 2, skip the next 3 chs, sc in the next sc, (ch 2, skip the next 3 chs, 3 dc in the next sc, ch 2, skip the next 3 chs, sc in the next sc) rep from ( to ) around. Join. Turn. (124, 140, 156, 172, 188, 204, 220 sts)
Choose either Option #1 (relaxed finished edge – cream top), or Option #2 (waistband with buttons – green top) and continue on with the instructions below for that option.
Adjusting the Length of Your Top
If you’d like to adjust the length of your top, you can do so by increasing or decreasing the number of rounds worked in the next section, in increments of 4. Just make sure that you end with a round 5.
Tip: Before deciding if your top is too long or too short, pinch it with your fingers where the straps would be, hold it up in front of you and see how it drapes before adjusting length. Option #2 will add approx. 4″ to the length of your top.
Option #1 – Relaxed Bottom Edge (cream top)
Rnds 6 – 41 (45, 45, 49, 49, 53, 53): Rep Rnds 2 – 5. (124, 140, 156, 172, 188, 204, 220 sts) in the last round
Do not fasten off. Continue on to the Top Edge and Straps for the size you’re making.
Option #2 – Waistband with Buttons (green top)
Rnds 6 – 33 (37, 37, 41, 41, 45, 45): Rep Rnds 2 – 5. (124, 140, 156, 172, 188, 204, 220 sts) in the last round
Do not fasten off. Continue on to the Top Edge and Straps for the size you’re making.
X-Small Top Edge & Straps
Place Stitch Markers: Before beginning Rnd 1, place stitch markers in the following stitches from the last round of the Body of Top: 16, 48, 79 & 108.
Note: As you crochet Rnd 1 and you come to a SM, remove it, sc in that stitch and then replace the SM in the sc you just worked. Work the stitches in Round 1 into both chains and stitches from the previous round.
Rnd 1 (RS): Switch to a 5.00mm crochet hook, ch 1, sc in the first st, sc2tog, sc in the next st, sc2tog, sc in each of the next 3 sts, sc2tog, sc in the next st, sc2tog, sc in each of the next 3 sts, sc2tog, sc in the next st, sc2tog, sc in each of the next 19 sts, sc2tog, sc in the next st, sc2tog, sc in each of the next 3 sts, sc2tog, sc in the next st, sc2tog, sc in each of the next 3 sts, sc2tog, sc in the next st, sc2tog, sc in each of the next 11 sts, sc2tog, sc in the next st, sc2tog, sc in each of the next 30 sts, sc2tog, sc in each of the next 3 sts, sc2tog, sc in each of the last 9 sts. Join. (108 sts)
Note: This size top is written with instructions for a 3 strand braid. If you’d like a wider 5 strand braid, simply work what’s in ( ) in round 2, 5 times.
Rnd 2: Ch 1, sl st in the first st, sl st in each of the next 11 sts, * (ch 53, sl st in the 2nd ch from your hook, sl st in each of the next 51 chs, sl st in the same st as the ch 53, sl st in the next st) work from ( to ) 3 times *, then sl st in each of the next 25 sts, repeat from * to * then sl st in each remaining st around. Join.
Fasten off. Weave in ends. Braid each strap as a 3 strand braid. Sew the ends of the braid together to keep them from unraveling. Position the loose end of each strap near the stitch markers on the back of the top. Stitch markers on back of top are a suggestion for strap placement only. To ensure most comfortable fit, pin the straps in place along the back of top and try garment on before sewing the straps into place.
Using a yarn needle and 8″ piece of yarn, sew each strap onto the tank top, placing the end of the braid on the inside edge of the top.
Tip: To adjust strap length, braid tighter or more loosely.
Sew closed the small gap created when joining round 1.
Small Top Edge & Straps
Place Stitch Markers: Before beginning Rnd 1, place stitch markers in the following stitches from the last round of the Body of Top: 20, 55, 92 & 124.
Note: As you crochet Rnd 1 and you come to a SM, remove it, sc in that stitch and then replace the SM in the sc you just worked. Work the stitches in Round 1 into both chains and stitches from the previous round.
Rnd 1 (RS): Switch to a 5.00mm crochet hook, ch 1, sc in the first st, sc2tog, sc in the next st, sc2tog, sc in each of the next 3 sts, sc2tog, sc in the next st, sc2tog, sc in each of the next 6 sts, sc2tog, sc in each of the next 3 sts, sc2tog, sc in each of the next 22 sts, sc2tog, sc in the next st, sc2tog, sc in each of the next 6 sts, sc2tog, sc in each of the next 3 sts, sc2tog, sc in the next st, sc2tog, sc in each of the next 3 sts, sc2tog, sc in each of the next 9 sts, sc2tog, sc in each of the next 3 sts, sc2tog, sc in each of the next 33 sts, sc2tog, sc in each of the next 3 sts, sc2tog, sc in each of the last 9 sts. Join. (124 sts)
Note: This size top is written with instructions for a 3 strand braid. If you’d like a wider 5 strand braid, simply work what’s in ( ) in round 2, 5 times.
Rnd 2: Ch 1, sl st in the first st, sl st in each of the next 15 sts, * (ch 57, sl st in the 2nd ch from your hook, sl st in each of the next 55 chs, sl st in the same st as ch 57, sl st in the next st) work from ( to ) 3 times *, then sl st in each of the next 28 sts, repeat from * to * then sl st in each remaining st around. Join.
Fasten off. Weave in ends. Braid each strap as a 3 strand braid. Sew the ends of the braid together to keep them from unraveling. Position the loose end of each strap near the stitch markers on the back of the top. Stitch markers on back of top are a suggestion for strap placement only. To ensure most comfortable fit, pin the straps in place along the back of top and try garment on before sewing the straps into place.
Using a yarn needle and 8″ piece of yarn, sew each strap onto the tank top, placing the end of the braid on the inside edge of the top.
Tip: To adjust strap length, braid tighter or more loosely.
Sew closed the small gap created when joining round 1.
Medium Top Edge & Straps
Place Stitch Markers: Before beginning Rnd 1, place stitch markers in the following stitches from the last round of the Body of Top: 24, 64, 108 & 137.
Note: As you crochet Rnd 1 and you come to a SM, remove it, sc in that stitch and then replace the SM in the sc you just worked. Work the stitches in Round 1 into both chains and stitches from the previous round.
Rnd 1 (RS): Switch to a 5.00mm crochet hook, ch 1, sc in the first st, sc2tog, sc in the next st, sc2tog, sc in each of the next 3 sts, sc2tog, sc in the next st, sc2tog, sc in each of the next 11 sts, sc2tog, sc in the next st, sc2tog, sc in each of the next 27 sts, sc2tog, sc in the next st, sc2tog, sc in each of the next 11 sts, sc2tog, sc in the next st, sc2tog, sc in each of the next 3 sts, sc2tog, sc in the next st, sc2tog, sc in each of the next 11 sts, sc2tog, sc in the next st, sc2tog, sc in each of the next 43 sts, sc2tog, sc in the next st, sc2tog, sc in each of the last 6 sts. Join. (140 sts)
Note: This size top is written with instructions for a 3 strand braid. If you’d like a wider 5 strand braid, simply work what’s in ( ) in round 2, 5 times.
Rnd 2: Ch 1, sl st in the first st, sl st in each of the next 19 sts, * (ch 61, sl st in the 2nd ch from your hook, sl st in each of the next 59 chs, sl st in the same st as ch 61, sl st in the next st) work from ( to ) 3 times *, then sl st in each of the next 34 sts, repeat from * to * then sl st in each remaining st around. Join.
Fasten off. Weave in ends. Braid each strap as a 3 strand braid. Sew the ends of the braid together to keep them from unraveling. Position the loose end of each strap near the stitch markers on the back of the top. Stitch markers on back of top are a suggestion for strap placement only. To ensure most comfortable fit, pin the straps in place along the back of top and try garment on before sewing the straps into place.
Using a yarn needle and 8″ piece of yarn, sew each strap onto the tank top, placing the end of the braid on the inside edge of the top.
Tip: To adjust strap length, braid tighter or more loosely.
Sew closed the small gap created when joining round 1.
Large Top Edge & Straps
Place Stitch Markers: Before beginning Rnd 1, place stitch markers in the following stitches from the last round of the Body of Top: 28, 68, 116 & 151.
Note: As you crochet Rnd 1 and you come to a SM, remove it, sc in that stitch and then replace the SM in the sc you just worked. Work the stitches in Round 1 into both chains and stitches from the previous round.
Rnd 1 (RS): Switch to a 5.00mm crochet hook, ch 1, sc in the first st, sc2tog, sc in the next st, sc2tog, sc in each of the next 3 sts, sc2tog, sc in the next st, sc2tog, sc in each of the next 14 sts, sc2tog, sc in each of the next 3 sts, sc2tog, sc in each of the next 25 sts, sc2tog, sc in each of the next 3 sts, sc2tog, sc in each of the next 14 sts, sc2tog, sc in the next st, sc2tog, sc in each of the next 3 sts, sc2tog, sc in the next st, sc2tog, sc in each of the next 14 sts, sc2tog, sc in each of the next 3 sts, sc2tog, sc in each of the next 38 sts, sc2tog, sc in the next st, sc2tog, sc in each of the last 14 sts. Join. (156 sts)
Note: This size top is written with instructions for a 3 strand braid. If you’d like a wider 5 strand braid, simply work what’s in ( ) in round 2, 5 times.
Rnd 2: Ch 1, sl st in the first st, sl st in each of the next 23 sts, * (ch 65, sl st in the 2nd ch from your hook, sl st in each of the next 63 chs, sl st in the same st as ch 65, sl st in the next st) work from ( to ) 3 times *, then sl st in each of the next 33 sts, repeat from * to * then sl st in each remaining st around. Join.
Fasten off. Weave in ends. Braid each strap as a 3 strand braid. Sew the ends of the braid together to keep them from unraveling. Position the loose end of each strap near the stitch markers on the back of the top. Stitch markers on back of top are a suggestion for strap placement only. To ensure most comfortable fit, pin the straps in place along the back of top and try garment on before sewing the straps into place.
Using a yarn needle and 8″ piece of yarn, sew each strap onto the tank top, placing the end of the braid on the inside edge of the top.
Tip: To adjust strap length, braid tighter or more loosely.
Sew closed the small gap created when joining round 1.
X-Large Top Edge & Straps
Place Stitch Markers: Before beginning Rnd 1, place stitch markers in the following stitches from the last round of the Body of Top: 28, 68, 124 & 159.
Note: As you crochet Rnd 1 and you come to a SM, remove it, sc in that stitch and then replace the SM in the sc you just worked. Work the stitches in Round 1 into both chains and stitches from the previous round.
Rnd 1 (RS): Switch to a 5.00mm crochet hook, ch 1, sc in the first st, sc2tog, sc in the next st, sc2tog, sc in each of the next 3 sts, sc2tog, sc in the next st, sc2tog, sc in each of the next 14 sts, sc2tog, sc in each of the next 3 sts, sc2tog, sc in each of the next 25 sts, sc2tog, sc in each of the next 3 sts, sc2tog, sc in each of the next 14 sts, sc2tog, sc in the next st, sc2tog, sc in each of the next 3 sts, sc2tog, sc in the next st, sc2tog, sc in each of the next 22 sts, sc2tog, sc in each of the next 3 sts, sc2tog, sc in each of the next 38 sts, sc2tog, sc in the next st, sc2tog, sc in each of the last 22 sts. Join. (172 sts)
Note: This size top is written with instructions for a 3 strand braid. If you’d like a wider 5 strand braid, simply work what’s in ( ) in round 2, 5 times.
Rnd 2: Ch 1, sl st in the first st, sl st in each of the next 23 sts, * (ch 69, sl st in the 2nd ch from your hook, sl st in each of the next 67 chs, sl st in the same st as ch 69, sl st in the next st) work from ( to ) 3 times *, then sl st in each of the next 33 sts, repeat from * to * then sl st in each remaining st around. Join.
Fasten off. Weave in ends. Braid each strap as a 3 strand braid. Sew the ends of the braid together to keep them from unraveling. Position the loose end of each strap near the stitch markers on the back of the top. Stitch markers on back of top are a suggestion for strap placement only. To ensure most comfortable fit, pin the straps in place along the back of top and try garment on before sewing the straps into place.
Using a yarn needle and 8″ piece of yarn, sew each strap onto the tank top, placing the end of the braid on the inside edge of the top.
Tip: To adjust strap length, braid tighter or more loosely.
Sew closed the small gap created when joining round 1.
2XL Top Edge & Straps
Place Stitch Markers: Before beginning Rnd 1, place stitch markers in the following stitches from the last round of the Body of Top: 28, 73, 135 & 172.
Note: As you crochet Rnd 1 and you come to a SM, remove it, sc in that stitch and then replace the SM in the sc you just worked. Work the stitches in Round 1 into both chains and stitches from the previous round.
Rnd 1 (RS): Switch to a 5.00mm crochet hook, ch 1, sc in the first st, sc2tog, sc in the next st, sc2tog, sc in each of the next 3 sts, sc2tog, sc in the next st, sc2tog, sc in each of the next 14 sts, sc2tog, sc in each of the next 3 sts, sc2tog, sc in each of the next 30 sts, sc2tog, sc in the next st, sc2tog, sc in each of the next 14 sts, sc2tog, sc in each of the next 3 sts, sc2tog, sc in the next st, sc2tog, sc in each of the next 3 sts, sc2tog, sc in each of the next 30 sts, sc2tog, sc in the next st, sc2tog, sc in each of the next 38 sts, sc2tog, sc in each of the next 3 sts, sc2tog, sc in each of the last 25 sts. Join. (188 sts)
Rnd 2: Ch 1, sl st in the first st, sl st in each of the next 23 sts, * (ch 81, sl st in the 2nd ch from your hook, sl st in each of the next 79 chs, sl st in the same st as ch 81, sl st in the next st) work from ( to ) 5 times *, then sl st in each of the next 37 sts, repeat from * to * then sl st in each remaining st around. Join.
Fasten off. Weave in ends. Braid each strap as a 5 strand braid (scroll down for a braiding photo tutorial). Sew the ends of the braid together to keep them from unraveling. Position the loose end of each strap near the stitch markers on the back of the top. Stitch markers on back of top are a suggestion for strap placement only. To ensure most comfortable fit, pin the straps in place along the back of top and try garment on before sewing the straps into place.
Using a yarn needle and 8″ piece of yarn, sew each strap onto the tank top, placing the end of the braid on the inside edge of the top.
Tip: To adjust strap length, braid tighter or more loosely.
Sew closed the small gap created when joining round 1.
3XL Top Edge & Straps
Place Stitch Markers: Before beginning Rnd 1, place stitch markers in the following stitches from the last round of the Body of Top: 31, 79, 144 & 184.
Note: As you crochet Rnd 1 and you come to a SM, remove it, sc in that stitch and then replace the SM in the sc you just worked. Work the stitches in Round 1 into both chains and stitches from the previous round.
Rnd 1 (RS): Switch to a 5.00mm crochet hook, ch 1, sc in the first st, sc2tog, sc in the next st, sc2tog, sc in each of the next 3 sts, sc2tog, sc in the next st, sc2tog, sc in each of the next 19 sts, sc2tog, sc in the next st, sc2tog, sc in each of the next 35 sts, sc2tog, sc in the next st, sc2tog, sc in each of the next 19 sts, sc2tog, sc in the next st, sc2tog, sc in each of the next 3 sts, sc2tog, sc in the next st, sc2tog, sc in each of the next 27 sts, sc2tog, sc in the next st, sc2tog, sc in each of the next 43 sts, sc2tog, sc in the next st, sc2tog, sc in each of the last 30 sts. Join. (204 sts)
Rnd 2: Ch 1, sl st in the first st, sl st in each of the next 25 sts, * (ch 85, sl st in the 2nd ch from your hook, sl st in each of the next 83 chs, sl st in the same st as ch, 85 sl st in the next st) work from ( to ) 5 times *, then sl st in each of the next 38 sts, repeat from * to * then sl st in each remaining st around. Join.
Fasten off. Weave in ends. Braid each strap as a 5 strand braid (scroll down for a braiding photo tutorial). Sew the ends of the braid together to keep them from unraveling. Position the loose end of each strap near the stitch markers on the back of the top. Stitch markers on back of top are a suggestion for strap placement only. To ensure most comfortable fit, pin the straps in place along the back of top and try garment on before sewing the straps into place.
Using a yarn needle and 8″ piece of yarn, sew each strap onto the tank top, placing the end of the braid on the inside edge of the top.
Tip: To adjust strap length, braid tighter or more loosely.
Sew closed the small gap created when joining round 1.
Bottom Edge / Waistband Options
There are 2 options to finish the bottom edge of your top.
- Option #1 is a simple option which will allow your top to drape nicely; it gives a more casual look.
- Option #2 is a wide waistband that buttons off to the left side; it gives a more refined look.
- Changes for sizes are written as follows: XS (S, M, L, XL, 2XL, 3XL)
- Stitch Counts Written as Follows: (XS, S, M, L, XL, 2XL, 3XL sts)
Option #1: Simple Finished Edge (Ivory)
Crochet Hook: I/9/5.50mm or J/10/6.00mm – Choose your hook based on the fit you’d like and/or your hips. If you’d like a less blousy fit and your hips are larger than your bust, I suggest using a 6.00mm crochet hook. If your hips are the same size or smaller than your bust, I suggest using a 5.50mm crochet hook.
Note: Turn your top upside down and work the band into the bottom of the foundation chain from Round 1.
Rnd 1: Join yarn with a standing sc in the bottom of the 1st st from round 1, sc in each ch and st around. Join with a sl st to the 1st st of the round. (94, 106, 118, 130, 142, 154, 166 sts)
Fasten off. Weave in ends.
Option #2: Waistband with Buttons (Sage)
Crochet Hook: I/9/5.50mm or H/8/5.00mm – Choose your hook based on the fit you’d like and/or your hips. If your chest and hips are approximately the same size, I suggest using a 5.50mm crochet hook. If your hips are quite a bit smaller than your bust, you may want to use a 5.00mm crochet hook for your waistband.
Note: Turn your top upside down and work the band into the bottom of the foundation chain from Round 1.
Tip: When working sl st crochet, work your sl sts more loosely than your other stitches in the garment. Working them tightly will make it really hard to work the next round.
Reminder: The turning chains at the beginning of each row are not counted as stitches.
Row 1: Join yarn with a standing sc in the 13th (13th, 13th, 20th, 25th, 30th, 30th) st to the RIGHT of the join of round 1, sc in each ch and st around. Do Not Join. Turn. (94, 106, 118, 130, 142, 154, 166 sts)
Row 2: Ch 6, sl st in the 2nd ch from your hook, sl st in each of the next 4 chs, sl st in each st across. Turn. (99, 111, 123, 135, 147, 159, 171 sts)
Row 3: Ch 1, sc in the FLO of each sl st of the previous row. Turn. (99, 111, 123, 135, 147, 159, 171 sts)
Row 4: Ch 1, sl st in each st across. Turn. (99, 111, 123, 135, 147, 159, 171 sts)
Row 5: Ch 1, sc in the FLO of each sl st of the previous row. Turn. (99, 111, 123, 135, 147, 159, 171 sts)
Row 6: Ch 1, sl st in each of the first 3 sts, ch 3, skip each of the next 3 sts, sl st in each remaining st across. Turn. (99, 111, 123, 135, 147, 159, 171 sts)
Row 7: Ch 1, sc in the FLO of each sl st and ch of previous row. Turn. (99, 111, 123, 135, 147, 159, 171 sts)
Row 8: Ch 1, sl st in each st across. Turn. (99, 111, 123, 135, 147, 159, 171 sts)
Row 9: Ch 1, sc in the FLO of each sl st of previous row. Turn. (99, 111, 123, 135, 147, 159, 171 sts)
Rows 10 – 13: Rep rows 6 – 9. (99, 111, 123, 135, 147, 159, 171 sts)
Row 14: Ch 1, sl st in each st across. (99, 111, 123, 135, 147, 159, 171 sts)
Fasten off. Weave in ends. Position buttons under the buttonholes on the end opposite the buttonholes. Using a needle and thread attach buttons to waistband.
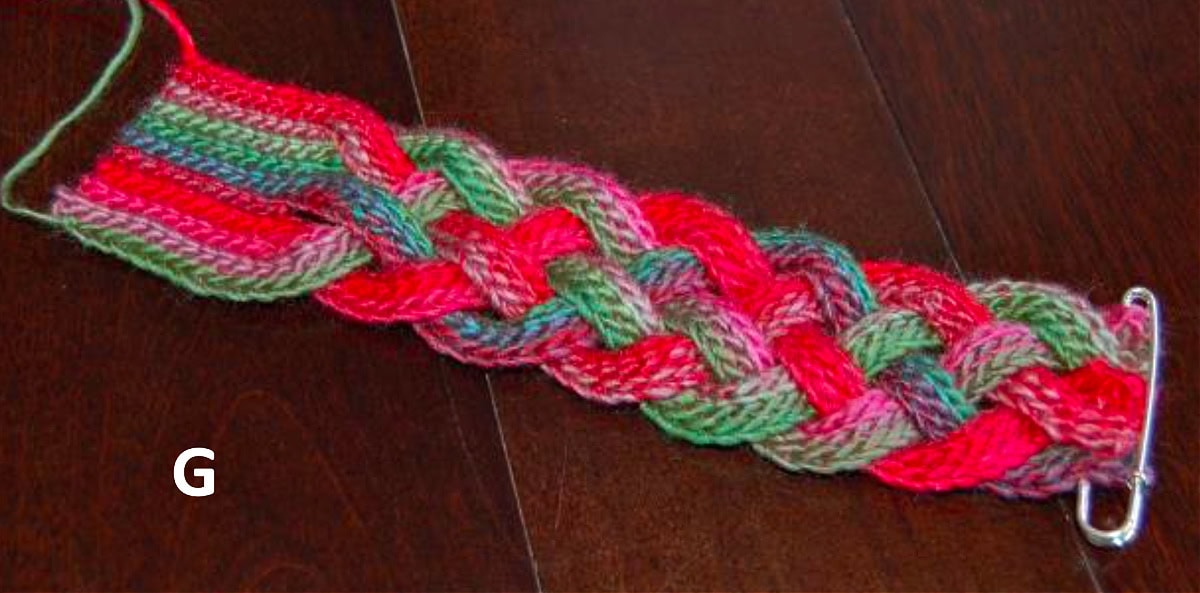
5 Strand Braid Tutorial
This tutorial shows you how to braid a 5 strand braided strap.
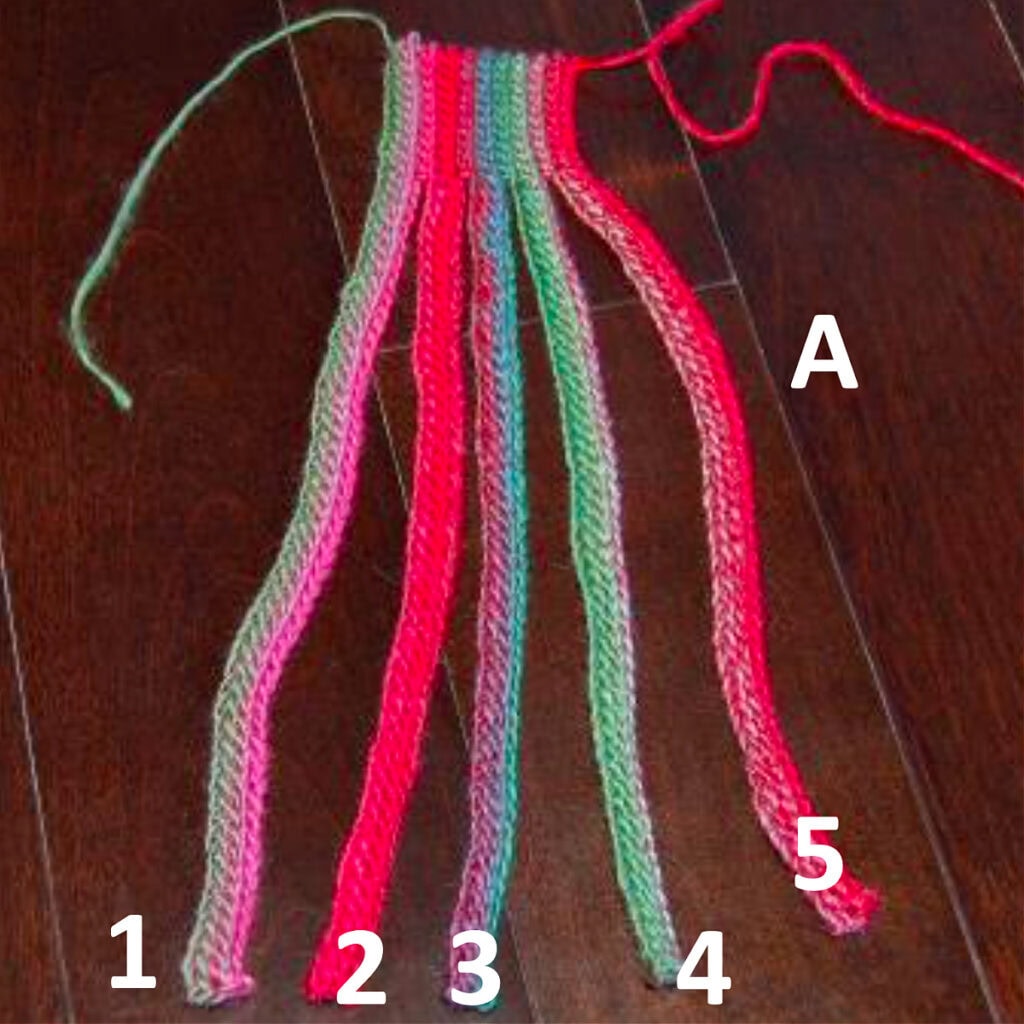
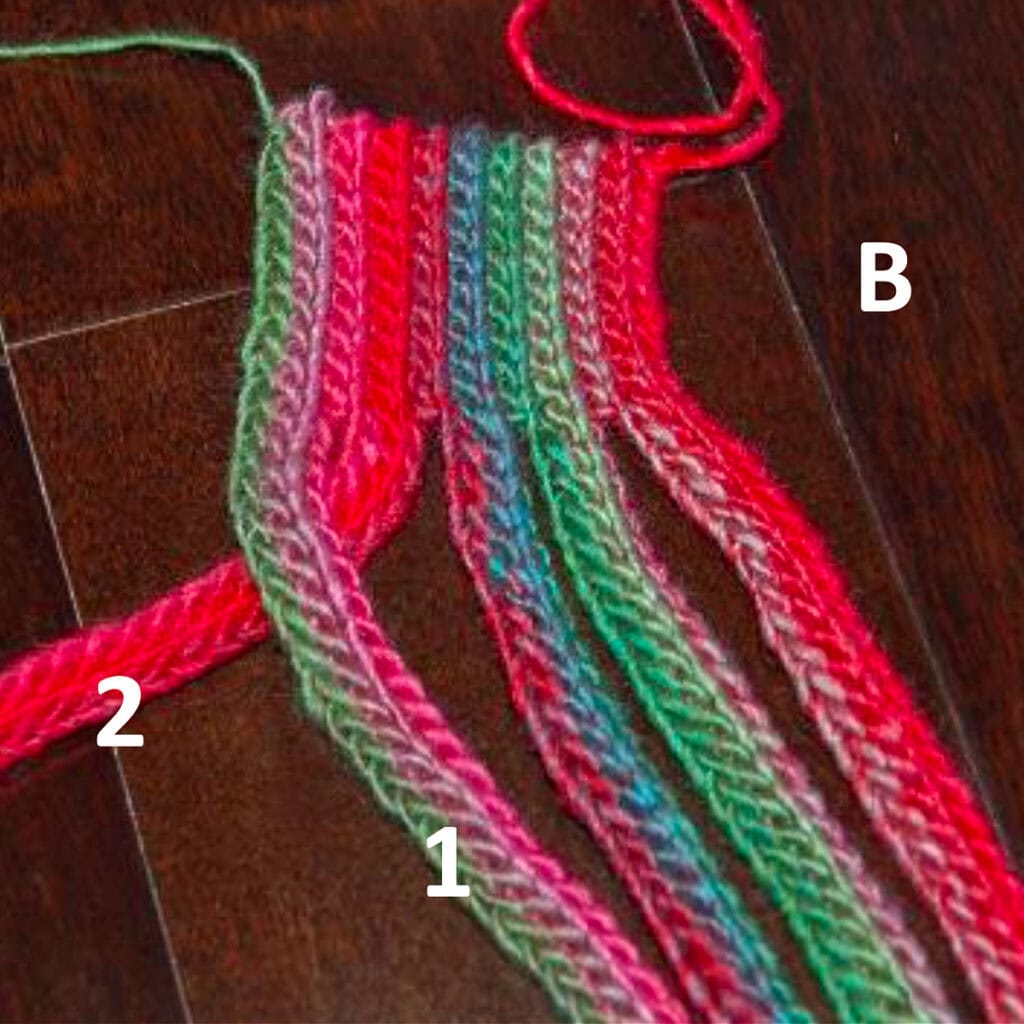
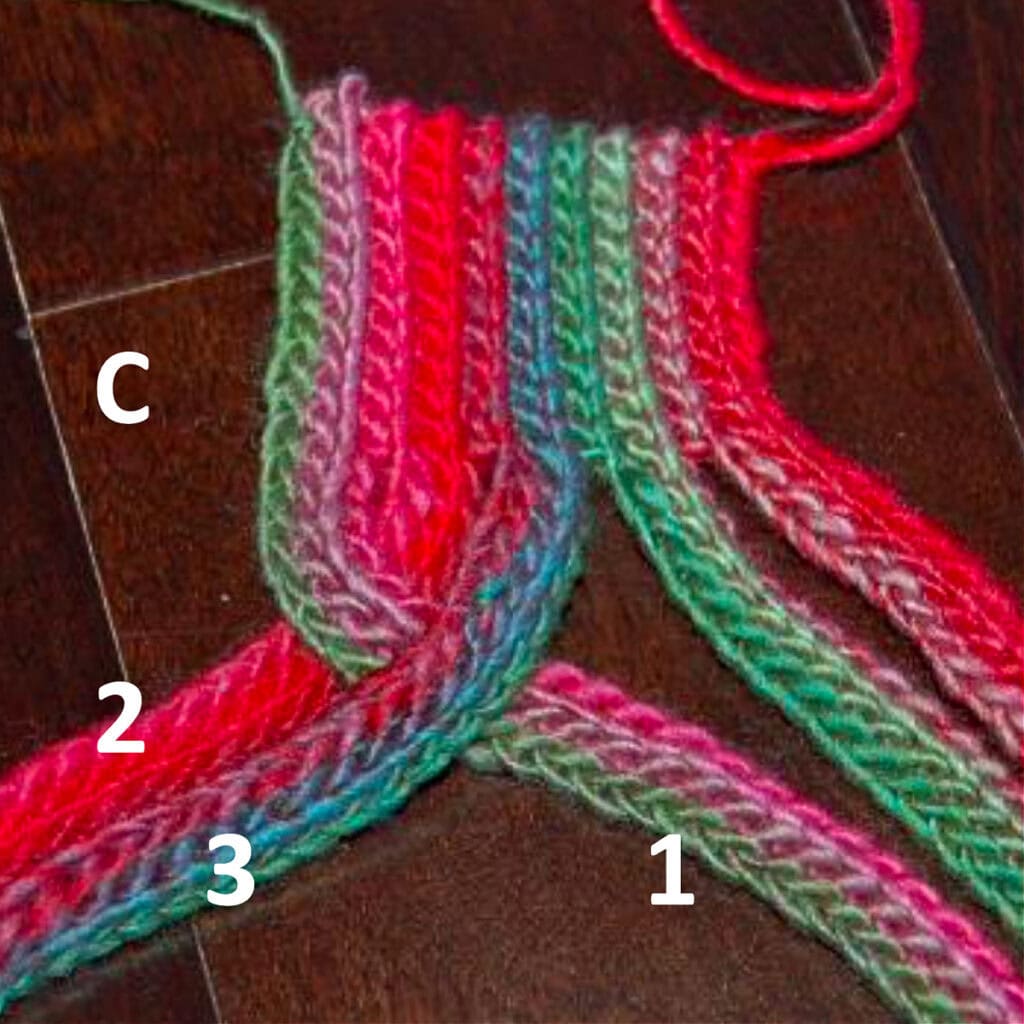
Photo B: Move strand 1 over strand 2 as shown.
Photo C: Move strand 3 over the top of strand 1 as shown.
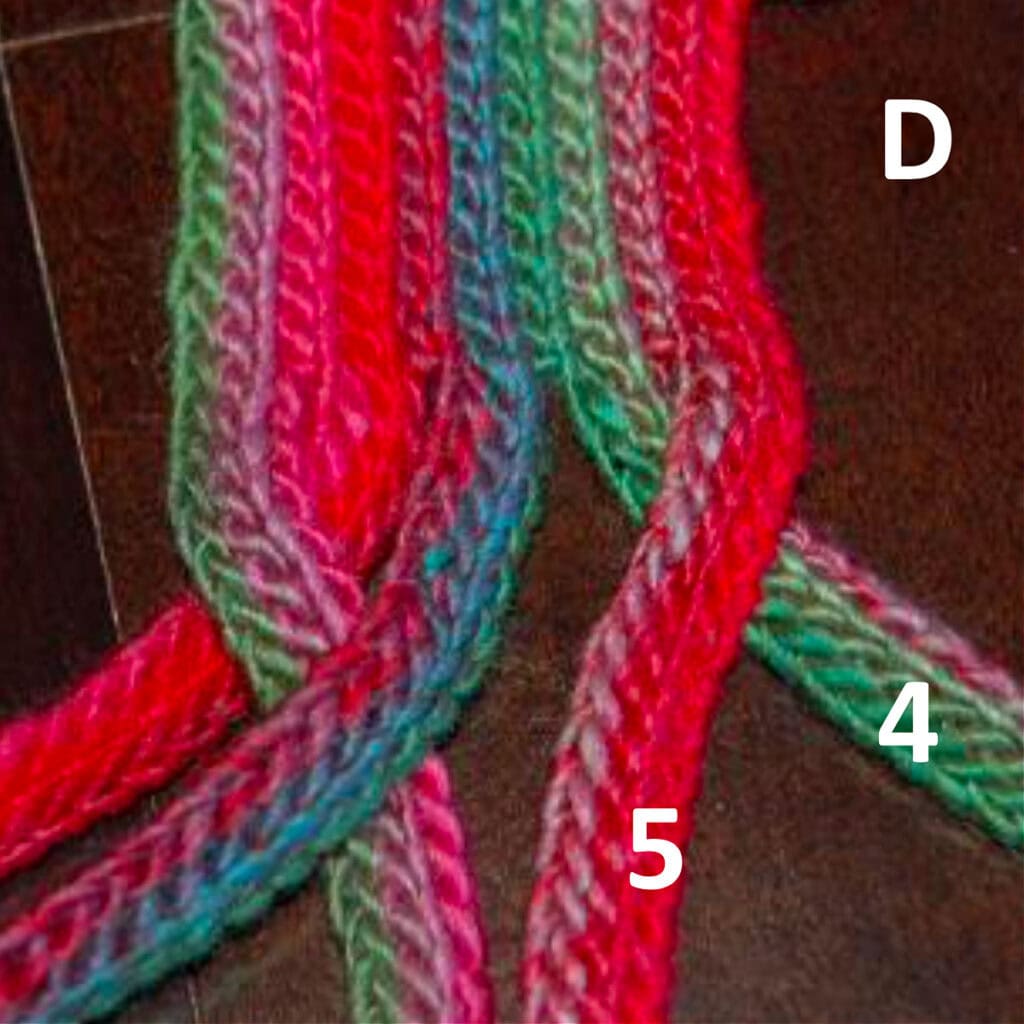
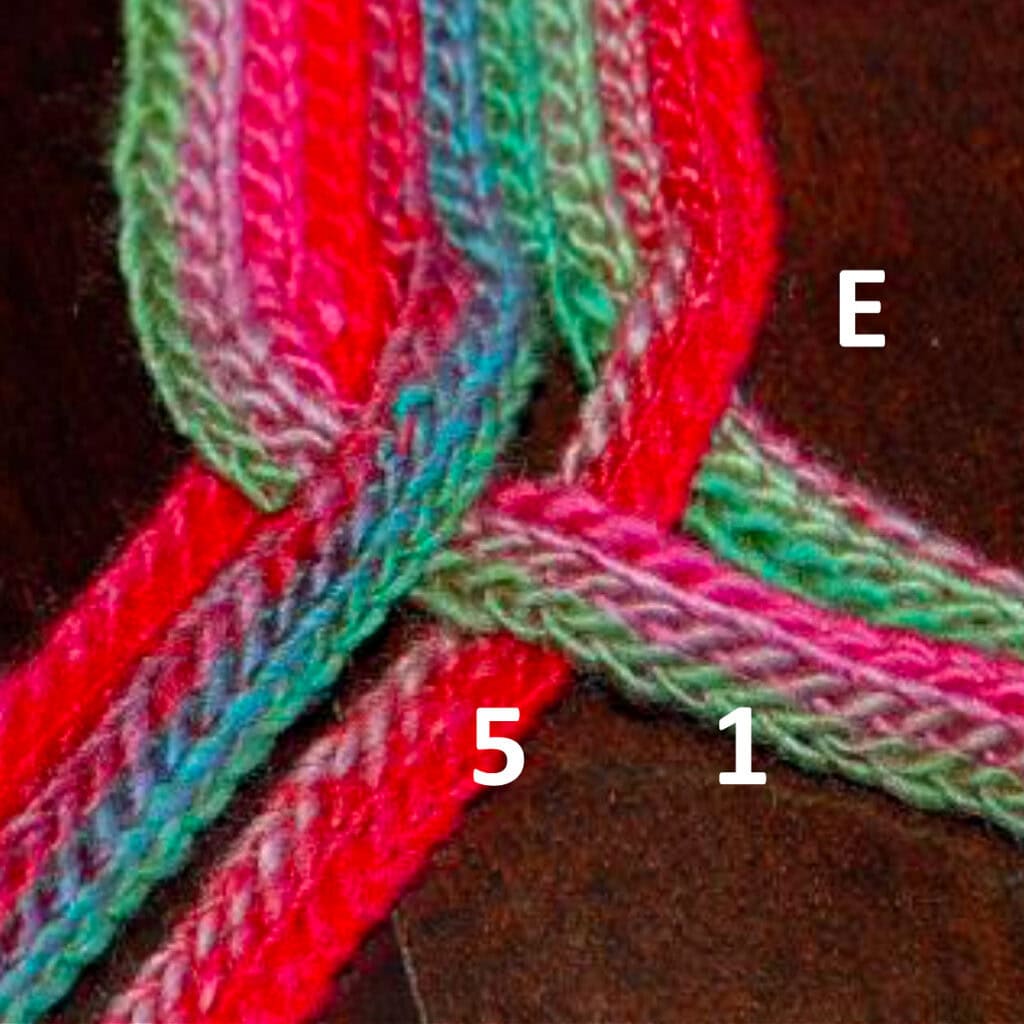
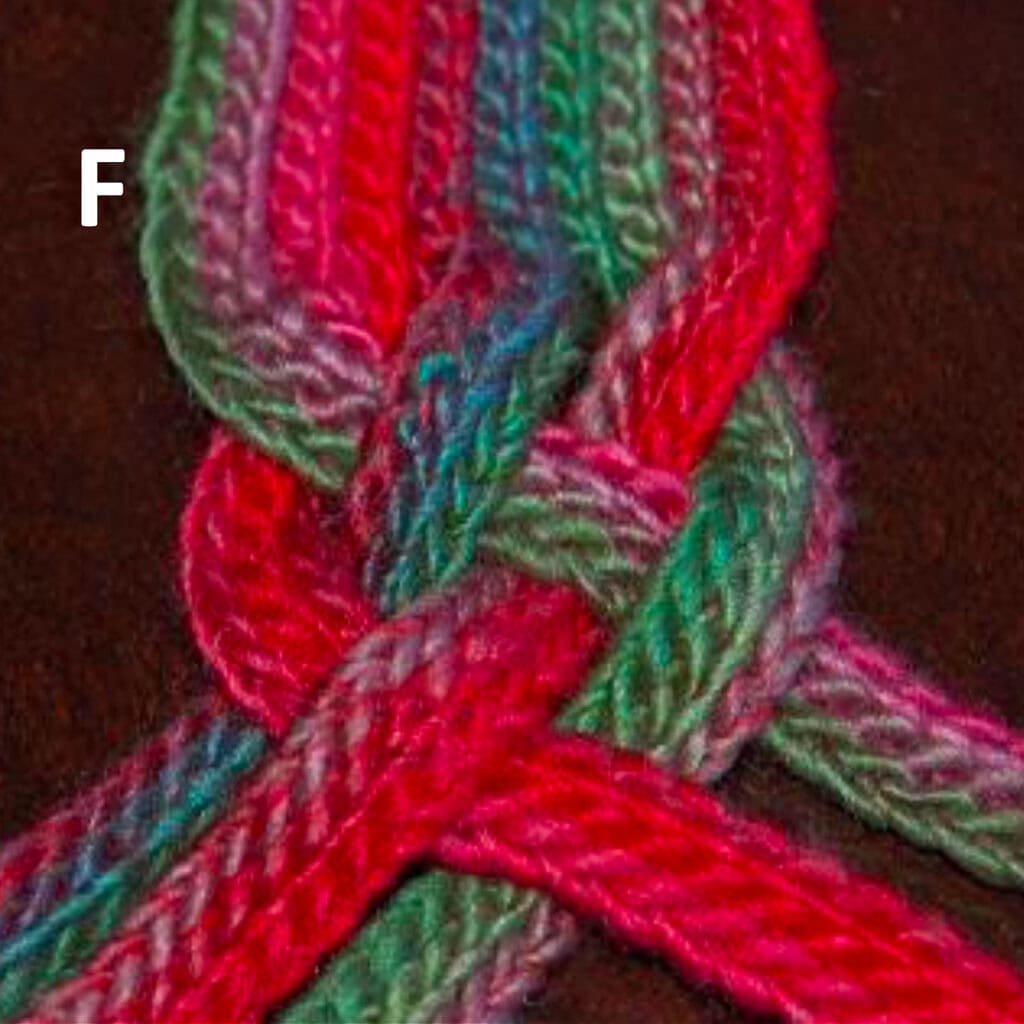
Photo E: Move strand 1 over strand 5 as shown.
Photo F: Repeat Photos B through E (when repeating follow by strand positions rather than numbers). This photo shows your braid after completing a couple passes.
I MADE IT! NOW WHAT?
Pin this post!: Save this crochet tank top pattern to your Pinterest boards so that you can come back and make it again.
Leave a comment below: We love to hear your feedback.
Share Your Finished Projects on Facebook or Instagram: I love to see your finished projects! Share with us on social media and tag me @acrochetedsimplicity or use the hashtag #ACrochetedSimplicity so I can find your posts.
Join us in the Facebook Community Group!
Come share your finished projects with us in the A Crocheted Simplicity Crochet Community Group on Facebook. Join us for fun community events such as crochet alongs, join in on crochet conversations, ask questions, get advice, and share your love for crochet!

More Free Crochet Summer Top Patterns I Think You’ll Love
- Chantilly Summer Crochet Top
- Honeycomb Mesh Crochet Top
- Summer Splendor Crochet Cardigan
- Summer Lovin’ Crochet Beach Cover-Up
- Wandering Free Crochet Summer Top
More Summer Crochet Top Patterns
Are you looking for more crochet summer top patterns free? We have several more patterns for women’s crochet tops, including tops, cardigans, and beach cover-ups.
We also have a few premium summer crochet top patterns as well.
Since HL’s ILTY is 100% cotton should I make a size larger to accommodate for the fibers shrinking in the wash? Thank you in advance!
Hi Karyn,
I’ve not had a problem with that yarn shrinking at all. 🙂 I would stick to your regular size.
Happy Crocheting,
Jennifer