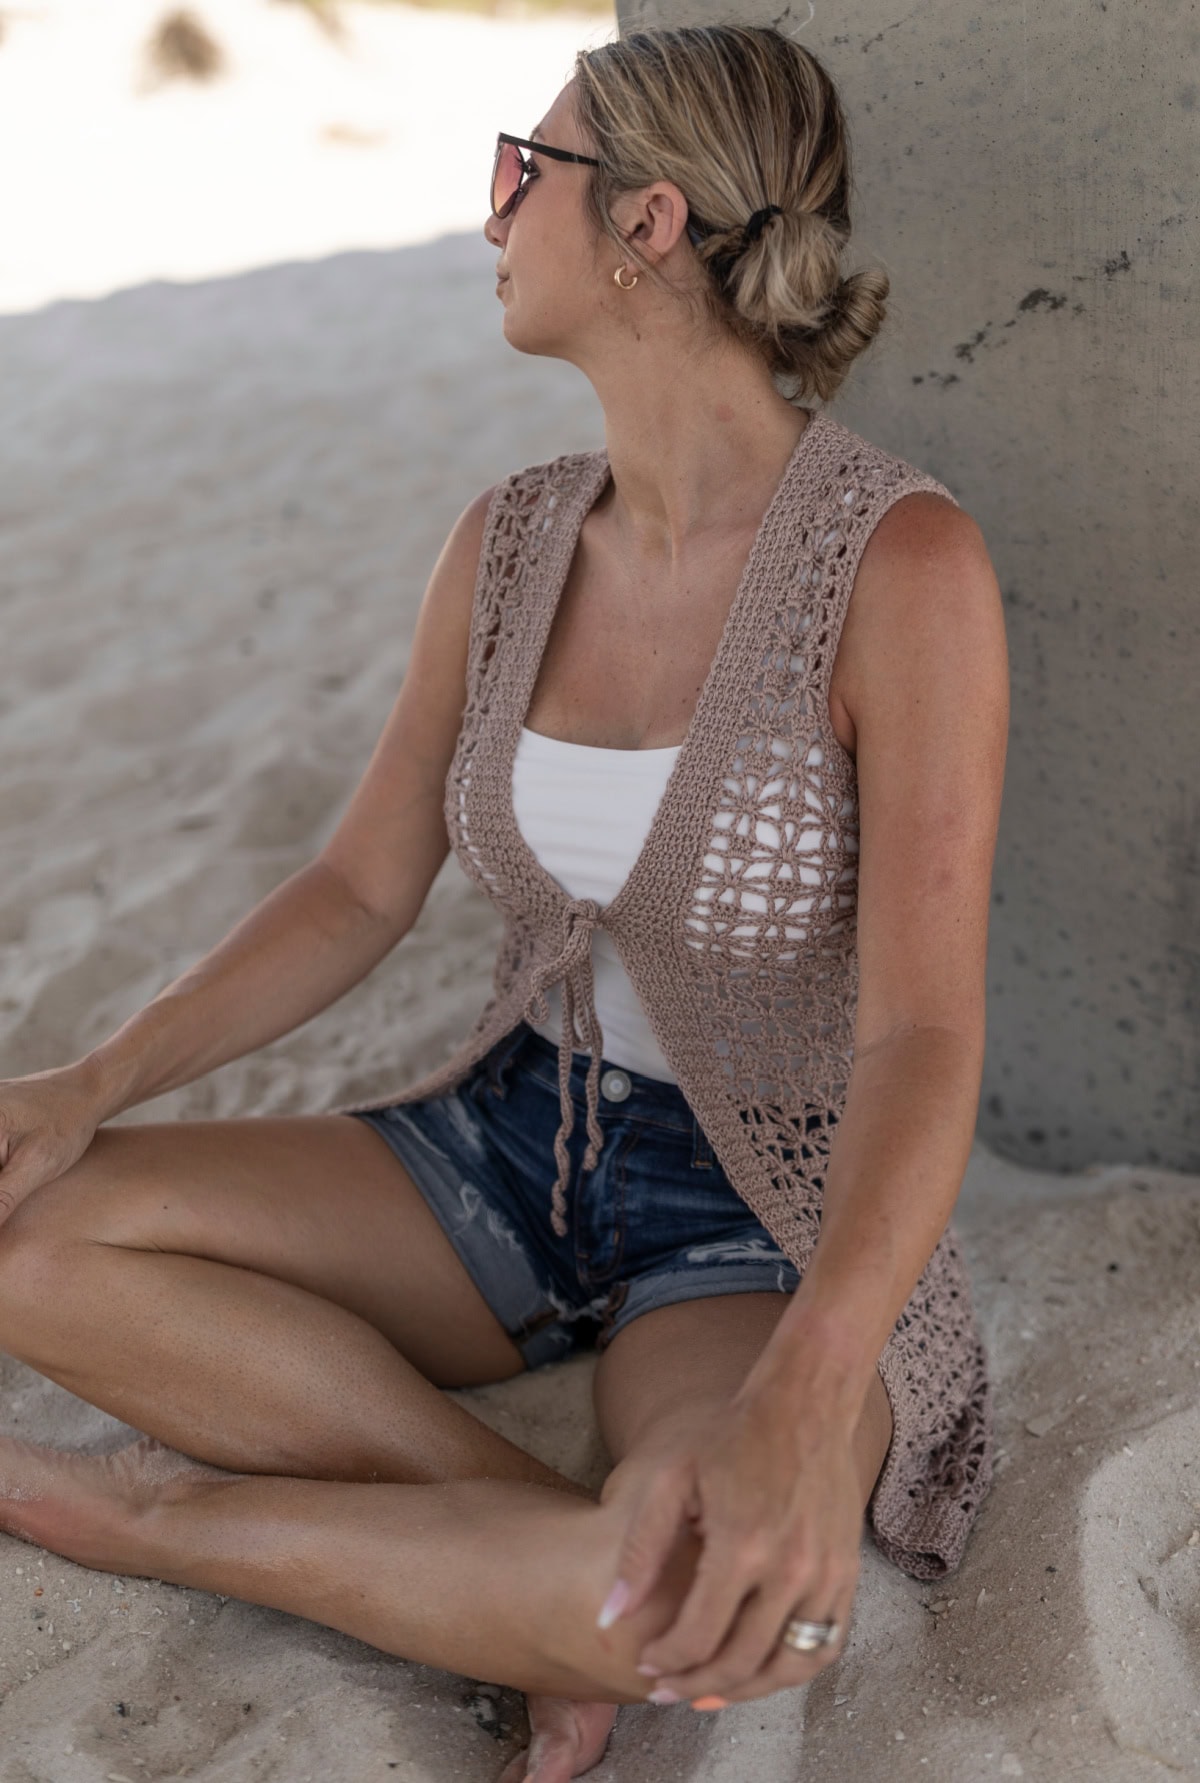
Isla Crochet Summer Vest
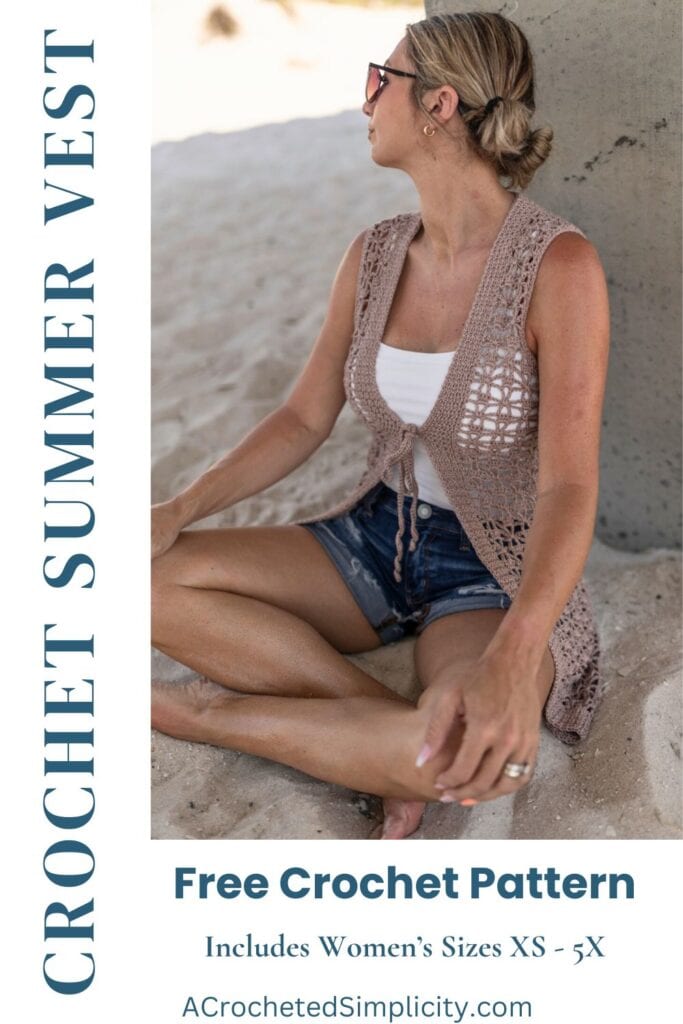
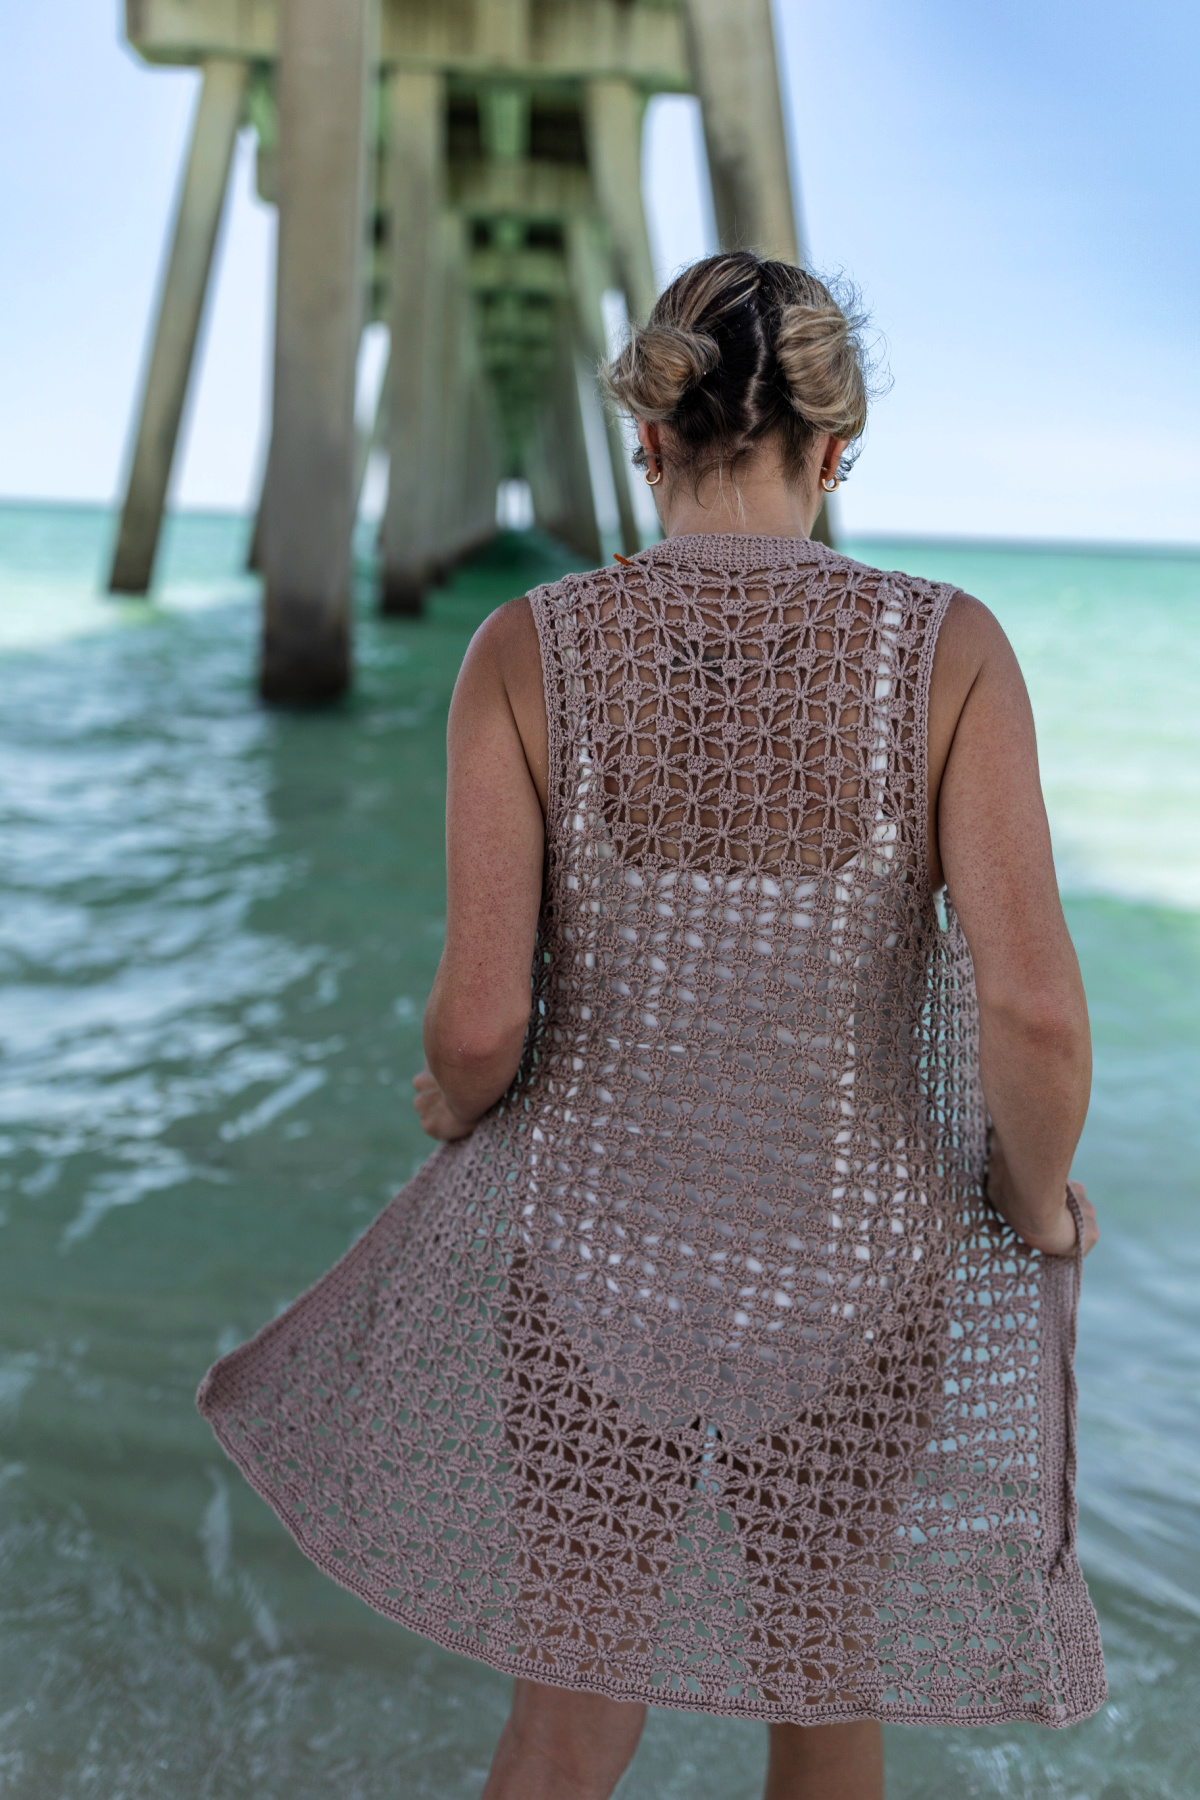
Looking for the perfect warm-weather crochet project? The Isla Crochet Summer Vest is your new go-to pattern for a breezy, stylish, layering garment.
Whether you’re heading to the beach, a weekend market, or just soaking up the sun, this DIY crochet vest adds the perfect touch of effortless charm to any outfit.
You’ll find the free crochet vest pattern below, or an ad-free print friendly PDF (including all photo tutorials + a BONUS garment schematic) on Ravelry, or on Etsy (aff).

Why You’ll Love the Isla Crochet Summer Vest
This summer crochet vest pattern was designed with simplicity and style in mind. It’s ideal for those looking for a fast and satisfying summer crochet pattern.
The pattern features lightweight stitches and an open, flowy design that flatters every body type. Pair it with your favorite sundress, jeans, or shorts—the Isla Vest is as versatile as it is beautiful.
How to Crochet a Summer Vest
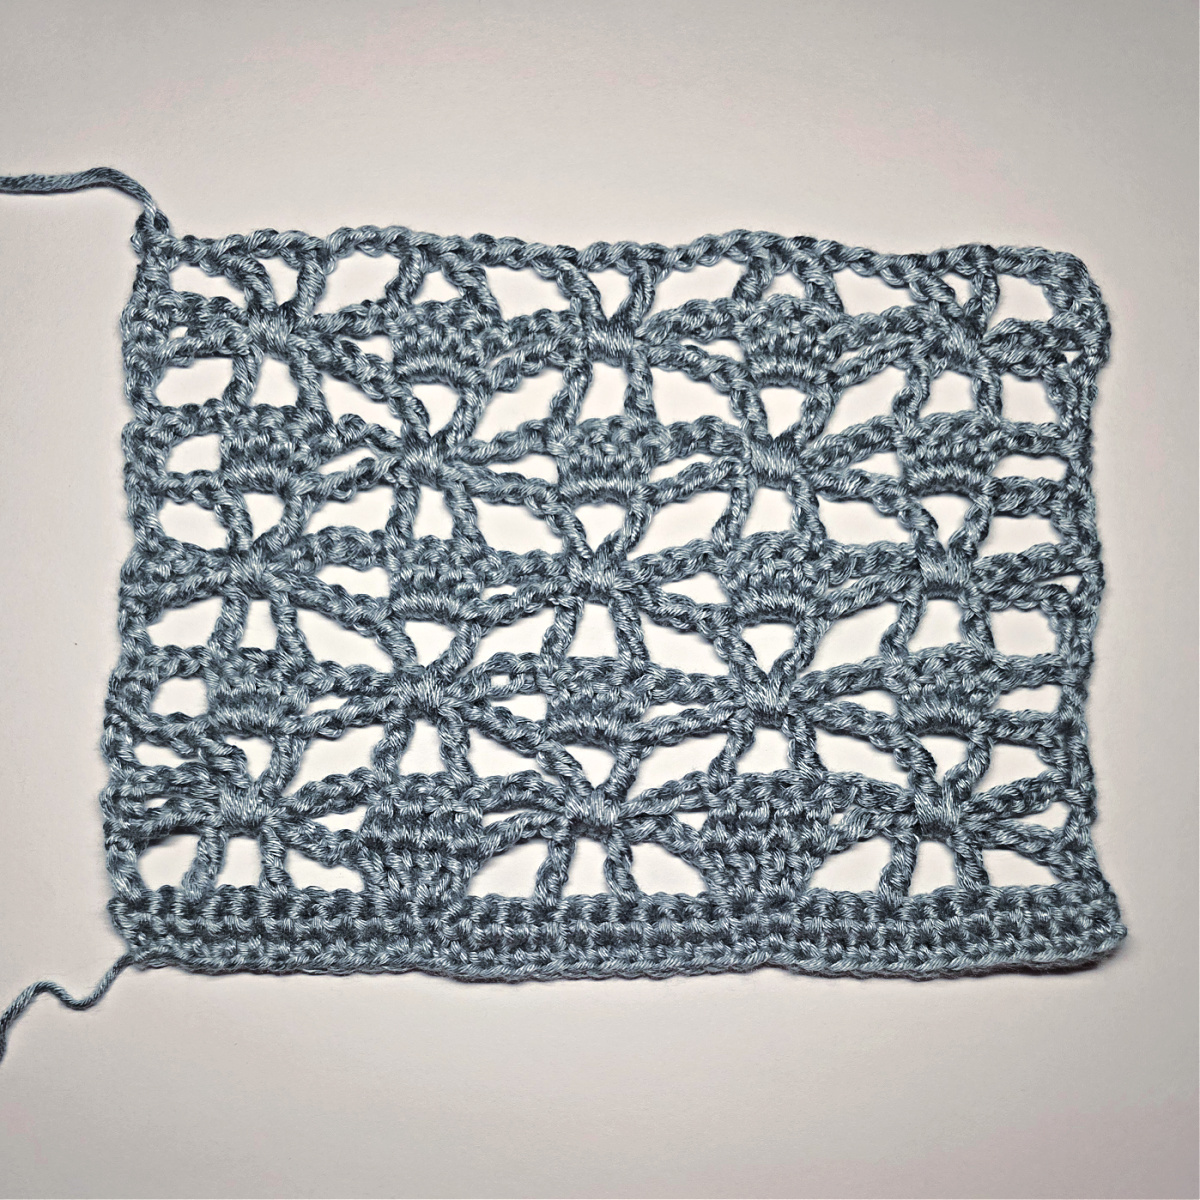
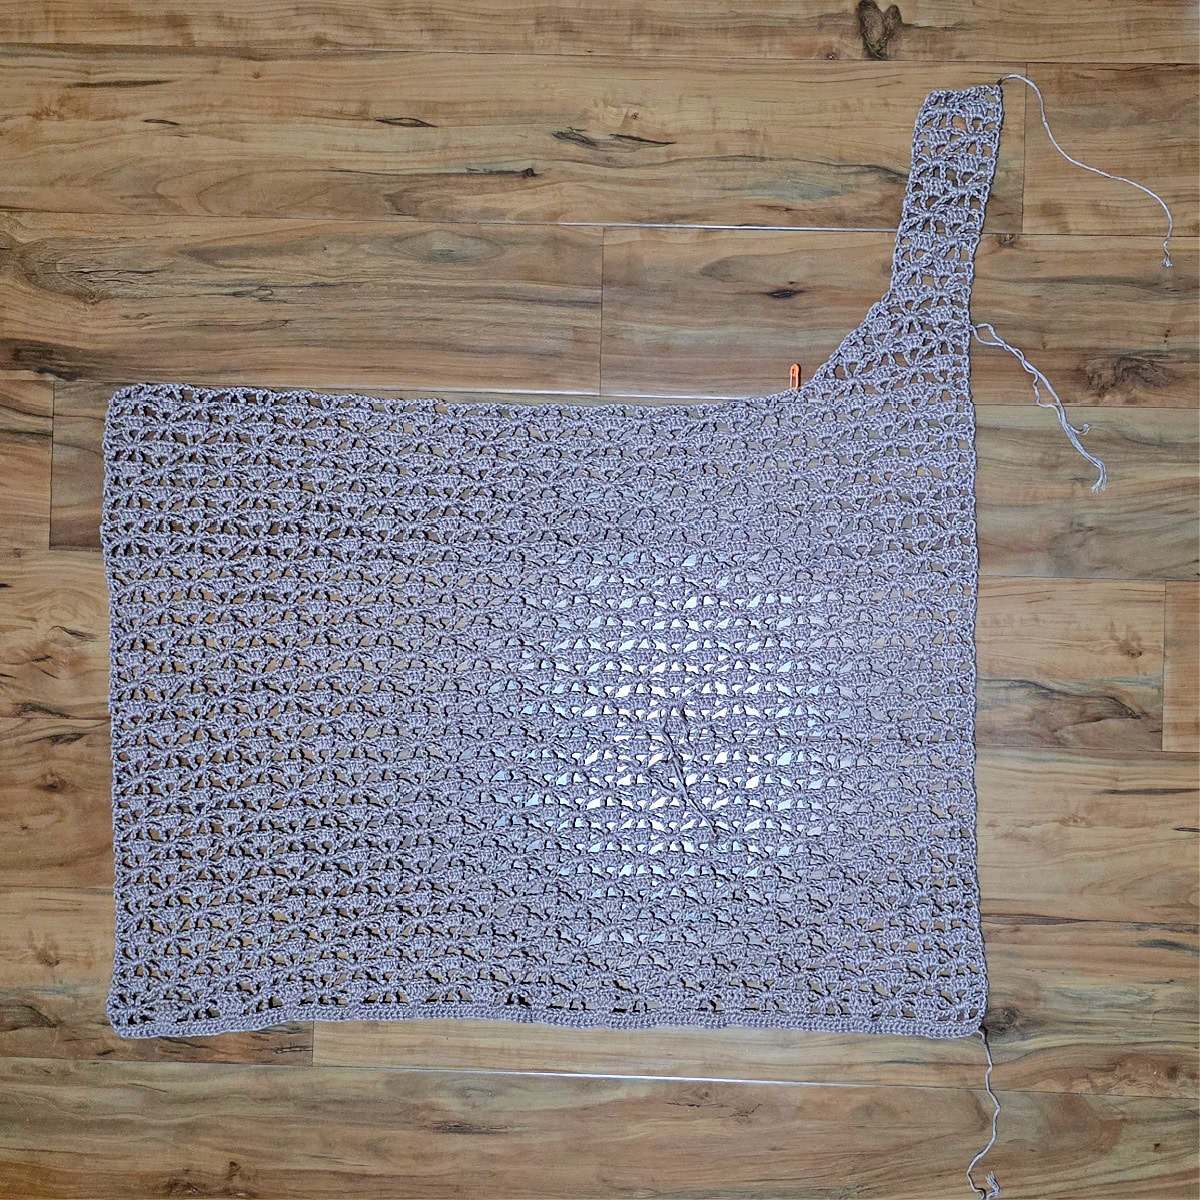
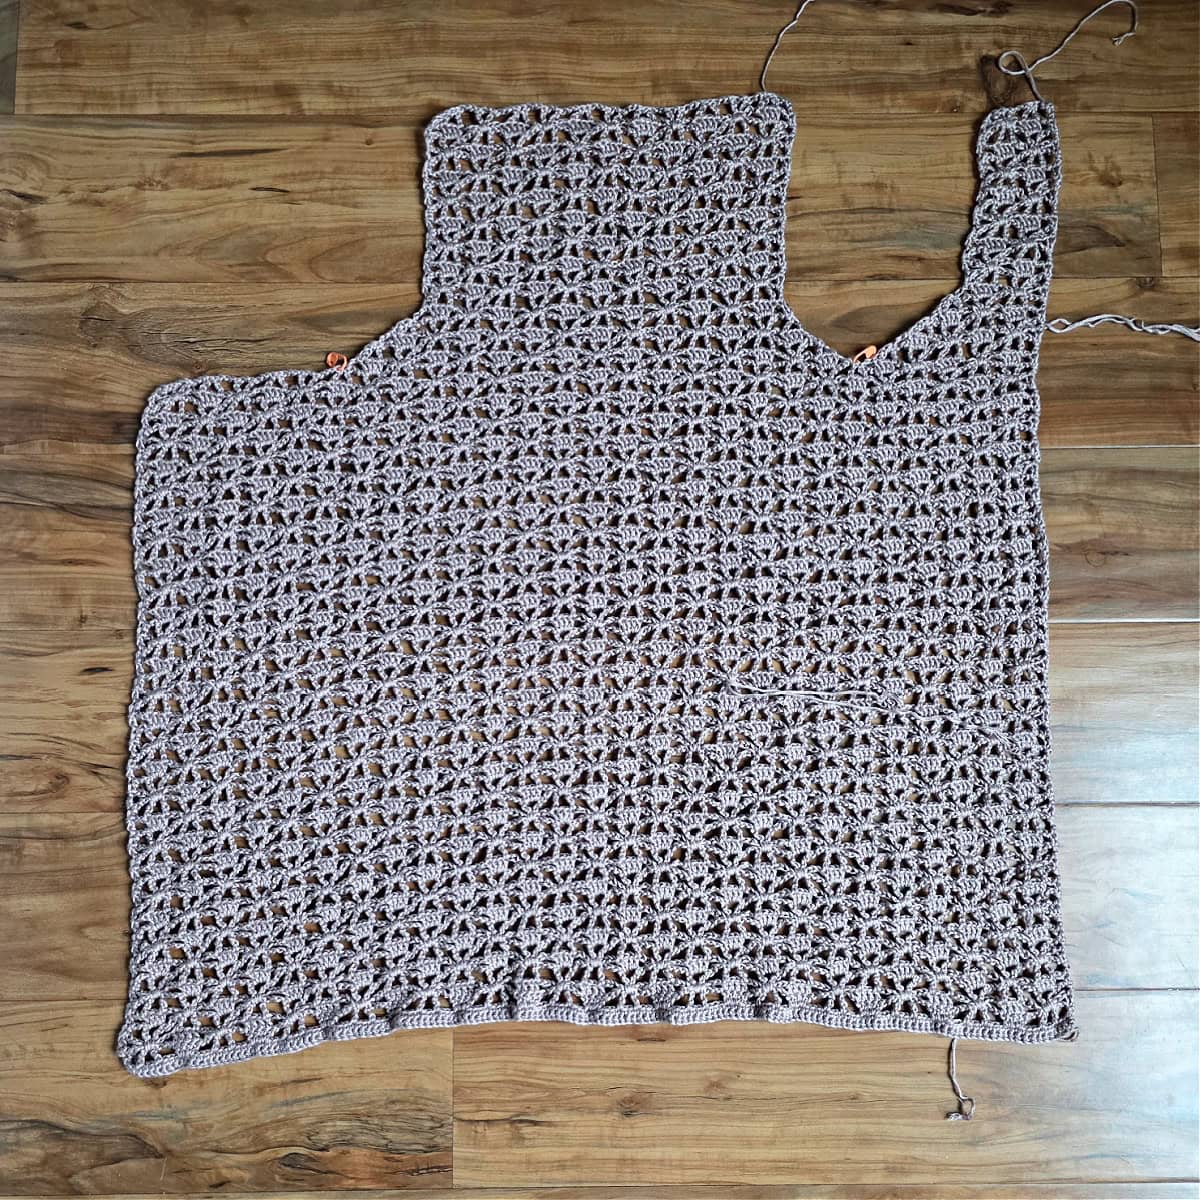
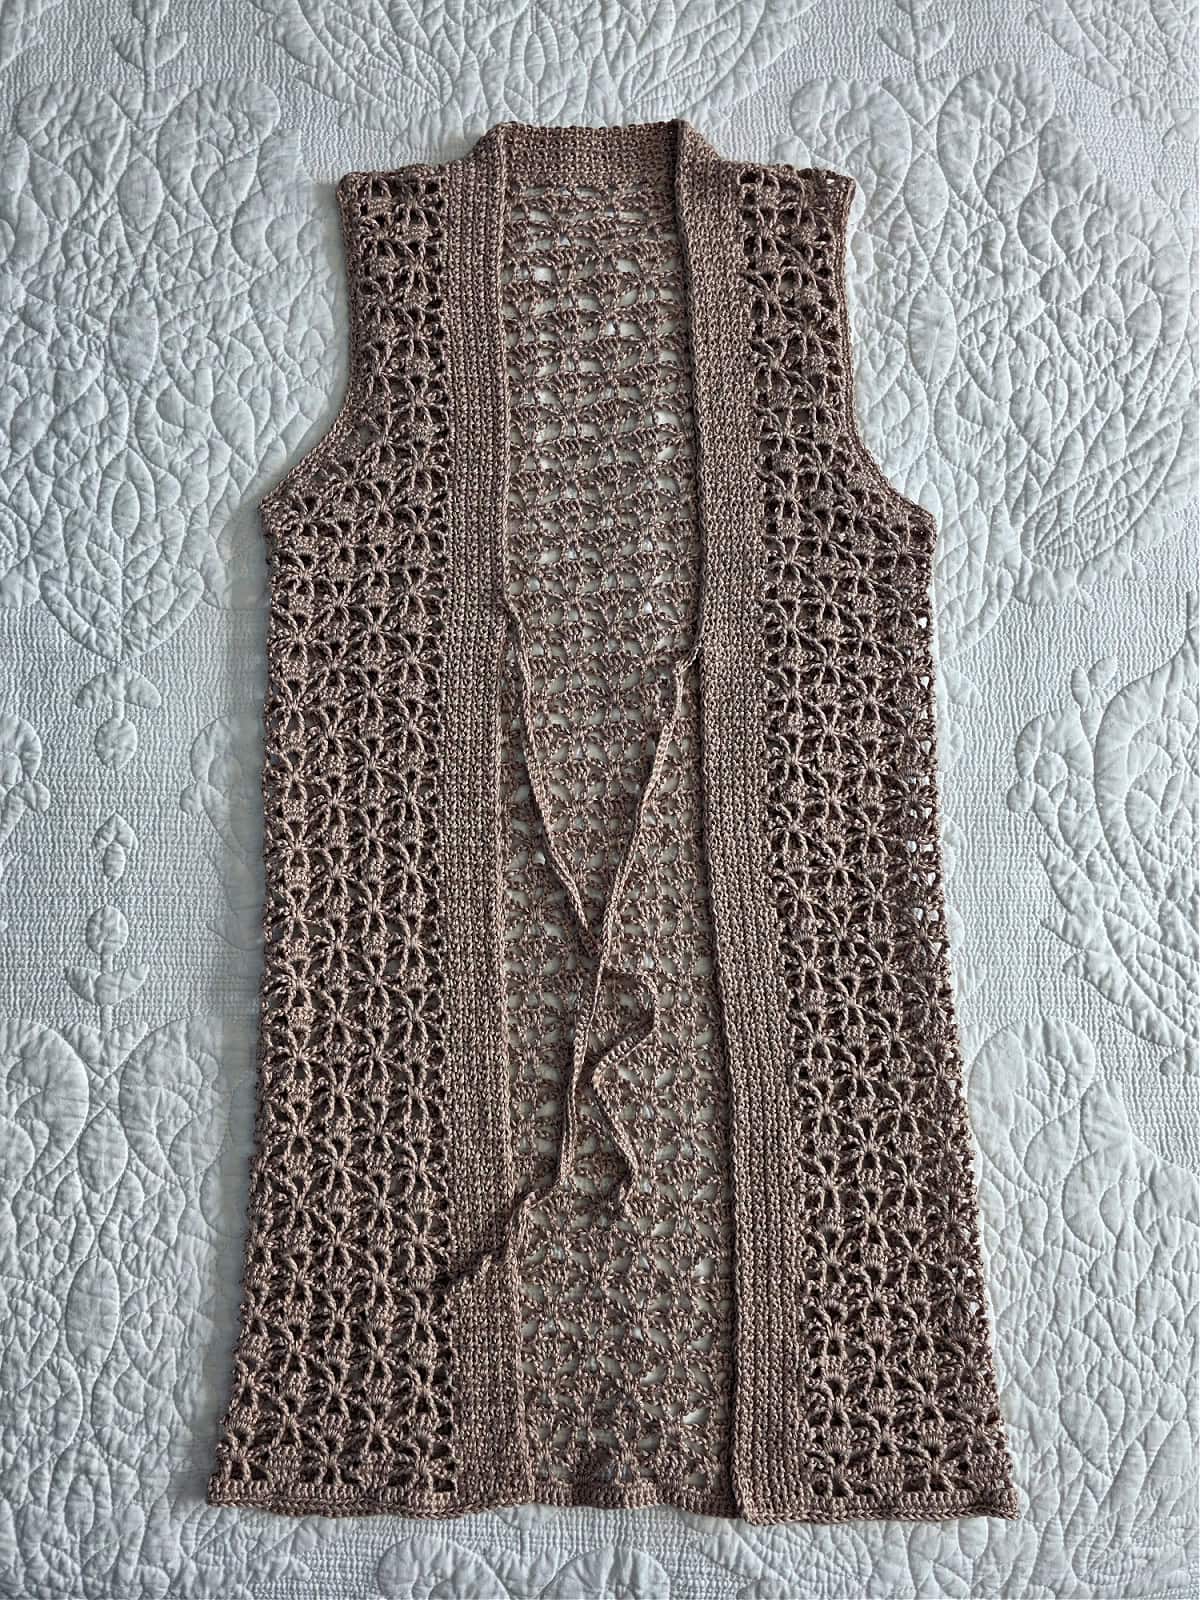
This lacy crochet vest pattern is constructed in one piece from the bottom up.
First, you’ll begin by working two rows of single crochet for the bottom hem.
Next, you’ll work the body of vest, in a lace crochet stitch pattern, from the bottom hem up to the bottom of the armhole opening. If you’d like a longer or shorter vest, this is where you’ll make that adjustment as noted in the written pattern below.
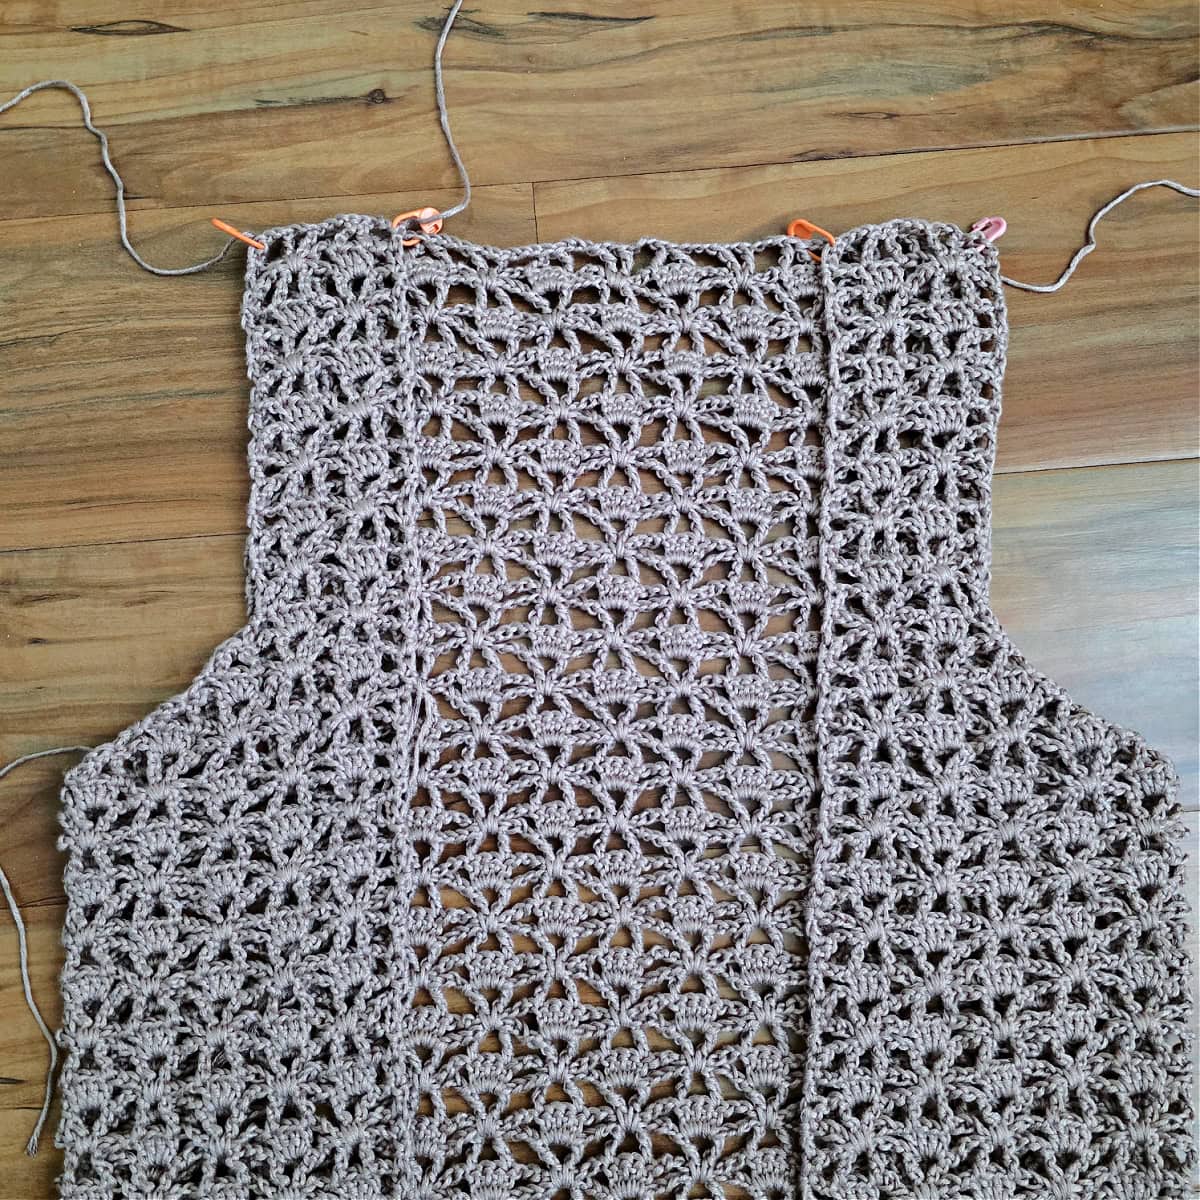
After completing the body of vest, you’ll work each of three upper panels onto it, one at a time. Each of the upper panels has simple shaping to form the armhole openings. Once all three upper panels are complete, you’ll seam the shoulders onto the back panel using a mattress stitch seam.
Then you’ll add a few rows of single crochet mesh stitch up and around the front opening of the vest. After that, add a row of stabilizing stitches (aka surface crochet) to the bottom hem and crochet a couple rounds of single crochet around each armhole opening.
Lastly, make and attach two crochet ties to the front opening of the vest.
How To Get The
Isla Crochet Summer Vest Pattern
Option 1: Scroll down for the free shoulder bag crochet pattern right here in this blog post.
Option 2: Purchase the ad-free printable PDF from one of my shops:
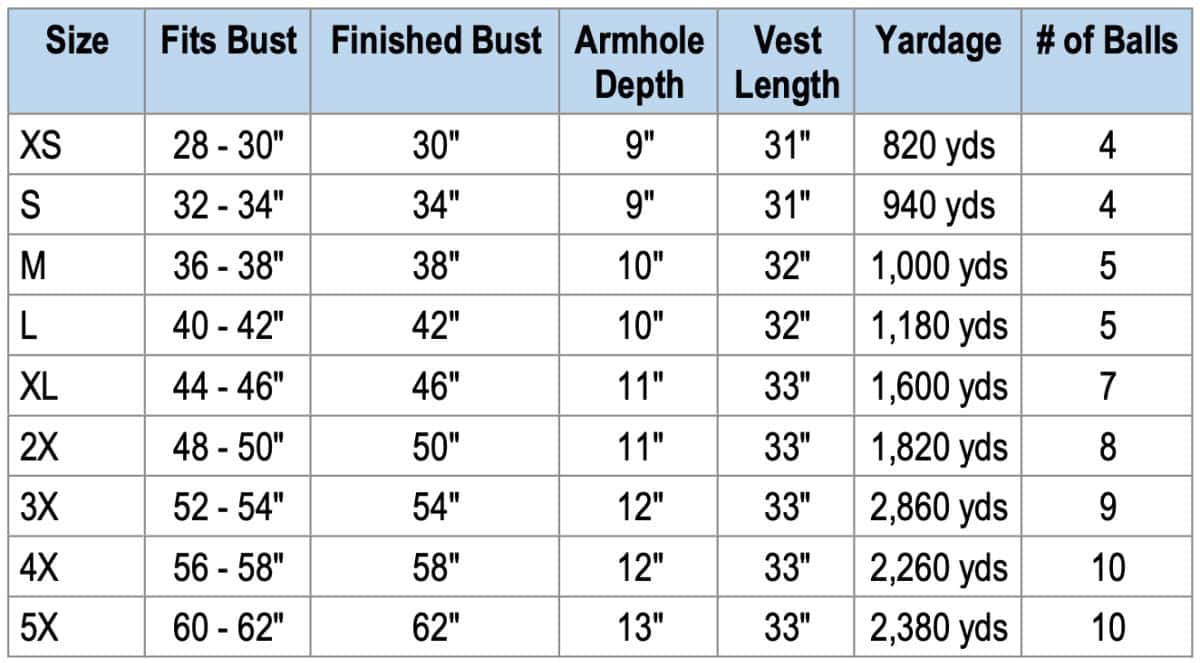
Choosing Which Size to Crochet
Model wears a women’s size medium and is modeling a size medium crochet mesh vest.
To choose your size, look over the size chart below.
- ‘Fits Bust’ measurement is the measurement of the intended wearer, not the garment’s finished measurement.
- Finished Bust, Armhole Depth, and Vest Length are measurements of the finished garment.
- This vest has 0-2″ of positive ease built in for a slightly fitted look.
- If you prefer a looser fit, I would suggest making a size larger than your actual bust size, (as long as your actual bust size is within the range of the smaller size’s finished bust).
- Vest length is measured from the nape of the neck down and includes the bottom edging.
Size & Yardage Chart
The notes above refer to this size chart.
If you make your vest longer than what the pattern states, you will need more yarn than what is shown in the table below.
Made with Truboo Yarn – Soft, Sustainable, and Silky Smooth
What makes this vest stand out is the yarn: Truboo by Lion Brand. Made from 100% bamboo, Truboo is known for its silky texture, gorgeous drape, and breathable qualities—making it perfect for summer wear. Plus, it’s eco-friendly and machine washable, so you get all the comfort without the hassle.
Key Features of Truboo Yarn:
- Luxurious sheen and softness
- Lightweight and breathable for summer
- Plant-based and sustainable
- Available in a range of vibrant and pastel shades
Yarn Substitutions
You can substitute another DK weight yarn as long as you’re able to meet gauge and you’re happy with the drape of the crochet fabric of the crochet vest. Acrylic and wool yarns are going to drape differently than bamboo and linen yarns.

Isla Crochet Summer Vest
The crochet vest pattern can be found free below, but if you love to work offline, I’ve got a couple other great options for you.
Purchase the ad-free, printable PDF (includes a BONUS garment schematic, on Ravelry, or on Etsy (aff).
Purchase the Crochet Vest Kit (aff): Lion Brand has a full kit of the Isla Crochet Summer Vest, available on their website. The crochet kit includes your choice of colors of yarn yarn and a digital copy of the crochet vest pattern.
This post contains affiliate links.
Materials
- Yarn: DK Weight / 3 yarn was used for this crochet summer vest pattern. Lion Brand Yarns Truboo was used for the sample. Other comparable yarns may be used as long as gauge is met.
- Lion Brand Yarns Truboo in Sand, DK weight / 3 yarn, 100% Rayon from Bamboo (241 yards / 220 m / 100 g / 3.5 oz)
- Sand #837-125W
- Yardage: See Size Chart Above
- Crochet Hooks: F/3.75mm; E/3.50mm; or size needed to obtain gauge (My favorite crochet hooks are the Clover Amour Crochet Hooks, I’ve never had an ache in my hand since switching).
- Scissors
- Yarn Needle
- Stitch Markers
Abbreviations (US Terms)
- ch(s): chain(s)
- sl st(s): slip stitch(es)
- st(s): stitch(es)
- yo: yarn over
- sc: single crochet
- dc: double crochet
- tr: treble crochet
- Alt-dc: alternate double crochet
- Alt-tr: alternate treble crochet
- Join yarn with a standing single crochet
- Join yarn with a standing double crochet
- SM: stitch marker
- Rep: repeat
- Rnd: round
Experience Level
- Intermediate
Gauge
- In pattern as written below: 27 sts = 5″
- Stitch height isn’t crucial.
Sizes
- Women’s XS through 5XL
- See size chart above.
Special Stitches
- Treble Crochet (tr): Yo, twice, insert hook into the next st and draw up a loop (4 loops on hook), yo, draw yarn thru 2 loops, (3 loops on hook), yo, draw yarn thru 2 loops on hook, (2 loops on hook), yo, draw yarn thru remaining 2 loops on hook.
- Alternate Double Crochet (Alt-dc): After turning your work, do not ch, instead, insert your hook into the first st, yo, pull up a loop, yo, pull thru both loops, insert your hook between the legs of the st just made, yo, pull up a loop, yo, pull through one loop, yo, pull thru remaining loops.
- Alternate Treble Crochet (Alt-tr): After turning your work, do not ch, instead, insert your hook into the first st, yo, pull up a loop, yo, pull thru both loops, insert your hook between the legs of the st just made, yo, pull up a loop, yo, pull thru both loops, insert your hook between the legs of the st just made, yo, pull up a loop, yo, pull through one loop, yo, pull thru remaining loops.
- Join yarn with a standing single crochet: Begin with a slip knot on your hook, insert your hook into the stitch or space indicated, yo, pull up a loop, yo and draw thru both loops on hook.
- Join yarn with a standing double crochet: Begin with a slip knot on your hook, yo, insert your hook into the stitch or space indicated, yo, pull up a loop, yo, pull through 2 loops on your hook, yo, pull through remaining 2 loops on your hook.
Pattern Notes
- Turning chains are not counted as stitches, unless noted otherwise.
- The first stitch of each row is worked into the same stitch as the beginning chain, unless noted otherwise.
- Yarn Notes: Lion Brand Yarns Truboo was used for the sample. Other comparable yarns may be used as long as gauge is met.
- Lion Brand Yarns Truboo, DK weight / 3 yarn, 100% Rayon from Bamboo (241 yards / 220 m / 100 g / 3.5 oz)
- See below for additional Truboo yarn notes.
- Yardage & Color
- Sand #837-125W (see chart above for yardage)
- Model wears a women’s medium and is wearing a medium sample.
- Changes for Sizes are written as follows: XS (S, M, L, XL, 2XL, 3XL, 4XL, 5XL) unless noted otherwise.
- Stitch Counts are written at the end of the rows as follows: (XS, S, M, L, XL, 2XL, 3XL, 4XL, 5XL sts) unless noted otherwise.
- Vest Construction Notes: This crochet vest is worked in one piece from the bottom up. You’ll begin by working two rows of single crochet for a solid bottom hem. Next, you’ll work the body of vest in the lace crochet stitch pattern. After completing the body of vest, the panel will be split into three and the upper panels are all crocheted in sections. Each of the upper panels has a little simple shaping to form the armhole openings. After all three upper panels are complete, you’ll seam the shoulders. Then you’ll add a few rows of single crochet mesh stitch up and around the front opening of the vest. Next, add a row of stabilizing stitched to the bottom hem and crochet a couple rounds of single crochet around each armhole opening. Lastly, make and attach two crochet ties to the front opening of the vest.
Additional Truboo Yarn Notes
Truboo is a rayon yarn made from bamboo which means it is more prone to stretching. I took this into account when I added measurements to this pattern, as noted at the end of Body of Vest instructions.
If you have chosen a yarn that does not stretch out like rayon bamboo does, you may need to increase your height measurements in the Body of Vest section to accommodate this.
I suggest making a hanging stitch swatch with your yarn so you will know how your specific yarn will react when worn. See the instructions below for how to make a hanging swatch.
Vest Swatch Instructions
Gauge: In pattern as written below: 27 sts = 5″; stitch height isn’t crucial
Row 1: With yarn & a 3.75mm crochet hook, ch 35 switch to a 3.50mm crochet hook, working into the back hump of the foundation ch, sc into the 2nd ch from your hook and in each ch across. Turn. (34 sts)
The width of Row 1 should be approximately 6.25″ W.
Row 2: Ch 1, sc in each at across. Turn. (34 sts)
Note: Make sure to work the chains within the rows loosely. The chains should be at least the same size as the other stitches. If they are a tad bigger, that will be okay too. Chains worked too tightly will greatly affect your gauge and the finished size of your swatch.
Row 3: Alt-dc in the first st, Ch 3, skip each of the next 3 sts, tr in the next st, skip each of the next 2 sts, tr in the next st, (ch 3, skip each of the next 3 sts, 2 dc in each of the next 2 sts, ch 3, skip each of the next 3 sts, tr in the next st, skip each of the next 2 sts, tr in the next st) work from ( to ) 2 times, ch 3, skip the next st, dc in the last st. Turn. (6 tr + 10 dc + 6 ch-3’s)
Row 4: Alt-dc in the first st, (ch 8, skip the next 2 ch-3’s & 2 tr, dc in each of the next 4 dc) work from ( to ) 2 times, then ch 8, skip the next 2 ch-3’s & 2 tr, dc in the last st. Turn. (3 ch-8’s + 10 dc)
Row 5: Alt-dc in the first st, ch 2, (tr, ch 2, tr) in the sp between the next 2 tr’s 2 rows down, [ch 3, tr in the next dc, skip each of the next 2 dc, tr in the next dc, ch 3, (tr, ch 2, tr) in the sp between the next 2 tr’s 2 rows down] work from [ to ] 2 times, ch 2, dc in the last st. Turn. (10 tr + 2 dc + 4 ch-3’s + 5 ch-2’s)
Row 6: Alt-dc in the first st, ch 2, skip the next tr, (work 4 dc in the next ch-2 sp, ch 8, skip the next 4 tr & 2 ch-3’s) work from ( to ) 2 times, then work 4 dc in the next ch-2 sp, ch 2, dc in the last st. Turn. (2 ch-8’s + 14 dc + 2 ch-2’s)
Row 7: Alt-dc in the first st, ch 3, tr in the first dc, skip each of the next 2 dc, tr in the next dc, [ch 3, (tr, ch 2, tr) in the sp between the next 2 tr’s 2 rows down, ch 3, tr in the next dc, skip each of the next 2 dc, tr in the next dc] work from [ to ] 2 times, then ch 3, dc in the last st. Turn. (10 tr + 2 dc + 6 ch-3’s + 2 ch-2’s)
Row 8: Alt-dc in the first st, (ch 8, skip the next 2 ch-3’s & 4 tr, work 4 dc in the next ch-2 sp) work from ( to ) 2 times, then ch 8, skip the next 2 ch-3’s & 2 tr, dc in the last st. Turn. (11 ch-8’s + 42 dc)
Rows 9 – 12: Rep Rows 5 – 8.
Row 13: Rep Row 5.
Fasten off.
How to Check Gauge without blocking your swatch: Slightly stretch the width of your swatch until the stitches are opened up nicely, as if you’ve blocked them.
Slightly stretched finished swatch should be 6.25″ W x 4.75″ H (height isn’t crucial).
See Hanging Swatch Instructions below.
instructions above.
Hanging Swatch Instructions
Making a hanging swatch will help you to understand how much the yarn you’ve chosen will or will not stretch when worn.
Step 1: Use the swatch instructions above to make a swatch. You may want to add another repeat of rows 5 – 8 to make your swatch taller. Write the measurements down.
Step 2: Hang your swatch from any place that the entire top edge can be secured. I’ve hung mine from the hearth above a fireplace. I’ve also used a towel bar in my bathroom. The most important thing is that you hang it evenly across the top edge and don’t just hang it from a corner or from a center point of the swatch.
Step 3: Clip a few clothespins (or something else that’s similar weight) onto the bottom edge of your swatch. I’ve also used an empty DVD case by closing it with the bottom edge of the swatch in it.
Step 4: Allow it to hang for a few hours. Re-measure the length to see how much it has stretched. This will help give you a better idea of how much your garment will lengthen as it’s worn. Use what you’ve learned to about your swatch to help you determine if you’ll want to add more length to your vest.
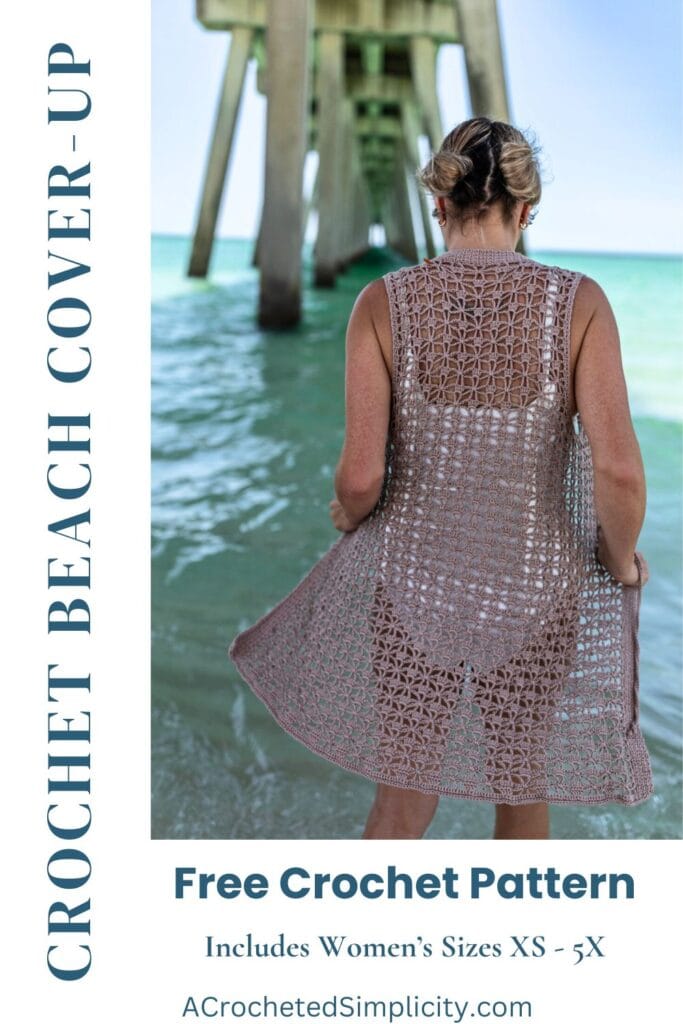
The Isla Crochet Summer Vest also makes a fabulous crochet beach coverup!
Crochet Summer Vest Written Pattern
Body of Vest
Changes for Sizes as Follows: XS (S, M, L, XL, 2X, 3X, 4X, 5X)
Stitch Counts as Follows: (XS, S, M, L, XL, 2X, 3X, 4X, 5X)
Stitch counts are also written separately for each size, but they will be listed in order of smallest to largest. See the end of Row 3 for an example of this.
Right Side / Wrong Side is not crucial for this project. You can choose which you prefer to be the right side later on.
Row 1: With yarn & a 3.75mm crochet hook, ch 131 (155, 167, 191, 215, 227, 239, 263, 287), switch to a 3.50mm crochet hook, working into the back hump of the foundation ch, sc into the 2nd ch from your hook and in each ch across. Turn. (130, 154, 166, 190, 214, 226, 238, 262, 286 sts)
The length of Row 1 should be approximately 24-1/4″ (28-3/4″, 31″, 35-1/2″, 40″, 42″, 44-1/2″, 49″, 53-1/2″) L.
Row 2: Ch 1, sc in each at across. Turn. (130, 154, 166, 190, 214, 226, 238, 262, 286 sts)
Note: Make sure to work the chains within the rows loosely. The chains should be at least the same size as the other stitches. If they are a tad bigger, that will be okay too. Chains worked too tightly will greatly affect your gauge and the finished size of your crochet vest.
Row 3: Alt-dc in the first st, Ch 3, skip each of the next 3 sts, tr in the next st, skip each of the next 2 sts, tr in the next st, (ch 3, skip each of the next 3 sts, 2 dc in each of the next 2 sts, ch 3, skip each of the next 3 sts, tr in the next st, skip each of the next 2 sts, tr in the next st) work from ( to ) 10 (12, 13, 15, 17, 18, 19, 21, 23) times, ch 3, skip the next st, dc in the last st. Turn. (22 tr + 42 dc + 22 ch-3’s) (26 tr + 50 dc + 26 ch-3’s) (28 tr + 54 dc + 28 ch-3’s) (32 tr + 62 dc + 32 ch-3’s) (36 tr + 70 dc + 36 ch-3’s) (38 tr + 74 dc + 38 ch-3’s) (40 tr + 78 dc + 40 ch-3’s) (44 tr + 86 dc + 44 ch-3’s) (48 tr + 94 dc + 48 ch-3’s)
Row 4: Alt-dc in the first st, (ch 8, skip the next 2 ch-3’s & 2 tr, dc in each of the next 4 dc) work from ( to ) 10 (12, 13, 15, 17, 18, 19, 21, 23) times, then ch 8, skip the next 2 ch-3’s & 2 tr, dc in the last st. Turn. (11 ch-8’s + 42 dc) (13 ch-8’s + 50 dc) (14 ch-8’s + 54 dc) (16 ch-8’s + 62 dc) (18 ch-8’s + 70 dc) (19 ch-8’s + 74 dc) (20 ch-8’s + 78 dc) (22 ch-8’s + 86 dc) (24 ch-8’s + 94 dc)
Row 5: Alt-dc in the first st, ch 2, (tr, ch 2, tr) in the sp between the next 2 tr’s 2 rows down, [ch 3, tr in the next dc, skip each of the next 2 dc, tr in the next dc, ch 3, (tr, ch 2, tr) in the sp between the next 2 tr’s 2 rows down] work from [ to ] 10 (12, 13, 15, 17, 18, 19, 21, 23) times, ch 2, dc in the last st. Turn. (42 tr + 2 dc + 20 ch-3’s + 13 ch-2’s) (50 tr + 2 dc + 24 ch-3’s + 15 ch-2’s) (54 tr + 2 dc + 26 ch-3’s + 16 ch-2’s) (62 tr + 2 dc + 30 ch-3’s + 18 ch-2’s) (70 tr + 2 dc + 34 ch-3’s + 20 ch-2’s) (74 tr + 2 dc + 36 ch-3’s + 21 ch-2’s) (78 tr + 2 dc + 38 ch-3’s + 22 ch-2’s) (86 tr + 2 dc + 42 ch-3’s + 24 ch-2’s) (94 tr + 2 dc + 46 ch-3’s + 26 ch-2’s)
Row 6: Alt-dc in the first st, ch 2, skip the next tr, (work 4 dc in the next ch-2 sp, ch 8, skip the next 4 tr & 2 ch-3’s) work from ( to ) 10 (12, 13, 15, 17, 18, 19, 21, 23) times, then work 4 dc in the next ch-2 sp, ch 2, dc in the last st. Turn. (10 ch-8’s + 46 dc + 2 ch-2’s) (12 ch-8’s + 54 dc + 2 ch-2’s) (13 ch-8’s + 58 dc + 2 ch-2’s) (15 ch-8’s + 66 dc + 2 ch-2’s) (17 ch-8’s + 74 dc + 2 ch-2’s) (18 ch-8’s + 78 dc + 2 ch-2’s) (19 ch-8’s + 82 dc + 2 ch-2’s) (21 ch-8’s + 90 dc + 2 ch-2’s) (23 ch-8’s + 98 dc + 2 ch-2’s)
Row 7: Alt-dc in the first st, ch 3, tr in the first dc, skip each of the next 2 dc, tr in the next dc, [ch 3, (tr, ch 2, tr) in the sp between the next 2 tr’s 2 rows down, ch 3, tr in the next dc, skip each of the next 2 dc, tr in the next dc] work from [ to ] 10 (12, 13, 15, 17, 18, 19, 21, 23) times, then ch 3, dc in the last st. Turn. (42 tr + 2 dc + 22 ch-3’s + 10 ch-2’s) (50 tr + 2 dc + 26 ch-3’s + 12 ch-2’s) (54 tr + 2 dc + 28 ch-3’s + 13 ch-2’s) (62 tr + 2 dc + 32 ch-3’s + 15 ch-2’s) (70 tr + 2 dc + 36 ch-3’s + 17 ch-2’s) (74 tr + 2 dc + 38 ch-3’s + 18 ch-2’s) (78 tr + 2 dc + 40 ch-3’s + 19 ch-2’s) (86 tr + 2 dc + 44 ch-3’s + 21 ch-2’s) (94 tr + 2 dc + 48 ch-3’s + 23 ch-2’s)
Row 8: Alt-dc in the first st, (ch 8, skip the next 2 ch-3’s & 4 tr, work 4 dc in the next ch-2 sp) work from ( to ) 10 (12, 13, 15, 17, 18, 19, 21, 23) times, then ch 8, skip the next 2 ch-3’s & 2 tr, dc in the last st. Turn. (11 ch-8’s + 42 dc) (13 ch-8’s + 50 dc) (14 ch-8’s + 54 dc) (16 ch-8’s + 62 dc) (18 ch-8’s + 70 dc) (19 ch-8’s + 74 dc) (20 ch-8’s + 78 dc) (22 ch-8’s + 86 dc) (24 ch-8’s + 94 dc)
Tip! To help keep track of the row you’re on, place a locking stitch marker into the first stitch of every Row 5 repeat that you work.
Rep Rows 5 – 8, ending with a Row 5, until Body of Vest measures 22″ (22″, 22″, 22″, 22″, 22″, 21″, 21″, 20″) H. Note: You’ll notice the larger sizes are a tad shorter. This is because their armhole depth is longer so the total length of the vest will be made up for it in the upper panels.
Note About Yarn & Finished Vest Length: After being worn, Truboo yarn will stretch a bit. I took this into account when figuring the length measurements above. I only crocheted my size medium sample to 22″ before splitting for the upper panels. If you’re using another yarn, such as a wool or wool blend that will not stretch out as much when worn, you may want to adding another couple inches to the measurements listed above so that your vest is long enough when worn.
Do not fasten off. Continue on to the beginning of the Front Right Panel for the size you’re making.
Begin Front Right Panel – Sizes XS (M, XL, 2X, 3X, 5X)
Changes for Sizes as Follows: XS (M, XL, 2X, 3X, 5X)
Stitch Counts as Follows: (XS, M, XL, 2X, 3X, 5X)
Row 1 (RS): Alt-dc in the first st, ch 2, skip the next tr, (work 4 dc in the next ch-2 sp, ch 8, skip the next 4 tr & 2 ch-3’s) work from ( to ) 1 (2, 3, 3, 3, 4) times, then work 4 dc in the next ch-2 sp, skip the next tr & ch-3, dc in the next tr. Place a locking SM in the next tr to mark where you’ll later join yarn to begin the Back Panel. Turn. (1 ch-8’s + 10 dc + 1 ch-2) (2 ch-8’s + 14 dc + 1 ch-2) (3 ch-8’s + 18 dc + 1 ch-2) (3 ch-8’s + 18 dc + 1 ch-2) (3 ch-8’s + 18 dc + 1 ch-2) (4 ch-8’s + 22 dc + 1 ch-2)
Row 2: Skip the first dc, alt-tr in the next dc, skip each of the next 2 dc, tr in the next dc, [ch 3, (tr, ch 2, tr) in the sp between the next 2 tr’s 2 rows down, ch 3, tr in the next dc, skip each of the next 2 dc, tr in the next dc] work from [ to ] 1 (2, 3, 3, 3, 4) times, then ch 3, dc in the last st. Turn. (6 tr + 1 dc + 3 ch-3’s + 1 ch-2) (10 tr + 1 dc + 5 ch-3’s + 2 ch-2’s) (14 tr + 1 dc + 7 ch-3’s + 3 ch-2’s) (14 tr + 1 dc + 7 ch-3’s + 3 ch-2’s) (14 tr + 1 dc + 7 ch-3’s + 3 ch-2’s) (18 tr + 1 dc + 9 ch-3’s + 4 ch-2’s)
Row 3: Alt-dc in the first st, (ch 8, skip the next 2 ch-3’s & 4 tr, work 4 dc in the next ch-2 sp) work from ( to ) 1 (2, 3, 3, 3, 4) times, skip the next tr, tr in the next tr. Turn. (1 ch-8 + 5 dc + 1 tr) (2 ch-8’s + 9 dc + 1 tr) (3 ch-8’s + 13 dc + 1 tr) (3 ch-8’s + 13 dc + 1 tr) (3 ch-8’s + 13 dc + 1 tr) (4 ch-8’s + 17 dc + 1 tr)
Do not fasten off. Continue on to the instructions for the size you’re making.
Size XS – Front Right Panel Continued
Row 4: Skip the first dc, alt-tr in the next dc, skip each of the next 2 dc, tr in the next dc, ch 3, (tr, ch 2, tr) in the sp between the next 2 tr’s 2 rows down, ch 2, dc in the last st. Turn. (4 tr + 1 dc + 1 ch-3 + 2 ch-2’s)
Row 5: Alt-dc in the first st, ch 2, skip the next tr, work 4 dc in the next ch-2 sp, ch 3, skip the next 2 tr & 1 ch-3, dc in the last st. Turn. (6 dc + 1 ch-3 + 1 ch-2)
Row 6: Alt-dc in the first st, ch 3, tr in the next dc, skip each of the next 2 dc, tr in the next dc, ch 3, dc in the last st. Turn. (2 dc + 2 tr + 2 ch-3’s)
Row 7: Alt-dc in the first st, ch 8, skip each of the next 2 tr’s and 2 ch-3 sps, dc in the last st. Turn. (2 dc + 1 ch-8)
Row 8: Alt-dc in the first st, ch 2, (tr, ch 2, tr) in the sp between the next 2 tr’s 2 rows down, ch 2, dc in the last st. Turn. (2 tr + 2 dc + 3 ch-2’s)
Repeat Rows 5 – 8 until the panel measures approximately 9″ H. Do not end with a Row 7 or you’ll have a big gap at the shoulder. Make a note of the number of rows you worked so you can work the same number of rows for the back panel and the other front panel.
Fasten off. Weave in ends. Continue on to the Back Panel below.
Sizes (M, XL, 2X, 3X, 5X) – Front Right Panel Continued
Row 4: Skip the first dc, alt-tr in the next dc, skip each of the next 2 dc, tr in the next dc, ch 3, (tr, ch 2, tr) in the sp between the next 2 tr’s 2 rows down, [ch 3, tr in the next dc, skip each of the next 2 dc, tr in the next dc, ch 3, (tr, ch 2, tr) in the sp between the next 2 tr’s 2 rows down] work from [ to ] (1, 2, 2, 2, 3) times, then ch 2, dc in the last st. Turn. (8 tr + 1 dc + 3 ch-3’s + 3 ch-2’s) (12 tr + 1 dc + 5 ch-3’s + 4 ch-2’s) (12 tr + 1 dc + 5 ch-3’s + 4 ch-2’s) (12 tr + 1 dc + 5 ch-3’s + 4 ch-2’s) (16 tr + 1 dc + 7 ch-3’s + 5 ch-2’s)
Row 5: Alt-dc in the first st, ch 2, skip the next tr, (work 4 dc in the next ch-2 sp, ch 8, skip the next 4 tr & 2 ch-3’s) work from ( to ) (1, 2, 2, 2, 3) times, then work 4 dc in the next ch-2 sp, skip the next tr & ch-3, dc in the next tr, skip the last st. Turn. (1 ch-8 + 10 dc + 1 ch-2) (2 ch-8’s + 14 dc + 1 ch-2) (2 ch-8’s + 14 dc + 1 ch-2) (2 ch-8’s + 14 dc + 1 ch-2) (3 ch-8’s + 28 dc + 1 ch-2)
Row 6: Skip the first dc, alt-tr in the next dc, skip each of the next 2 dc, tr in the next dc, [ch 3, (tr, ch 2, tr) in the sp between the next 2 tr’s 2 rows down, ch 3, tr in the next dc, skip each of the next 2 dc, tr in the next dc] work from [ to ] (1, 2, 2, 2, 3) times, then ch 3, dc in the last st. Turn. (6 tr + 1 dc + 3 ch-3’s + 1 ch-2) (10 tr + 1 dc + 5 ch-3’s + 2 ch-2’s) (10 tr + 1 dc + 5 ch-3’s + 2 ch-2’s) (10 tr + 1 dc + 5 ch-3’s + 2 ch-2’s) (14 tr + 1 dc + 7 ch-3’s + 3 ch-2’s)
Row 7: Alt-dc in the first st, (ch 8, skip the next 2 ch-3’s & 4 tr, work 4 dc in the next ch-2 sp) work from ( to ) (1, 2, 2, 2, 3) times, skip the next tr, tr in the next tr. Turn. (1 ch-8’s + 5 dc + 1 tr) (2 ch-8’s + 9 dc + 1 tr) (2 ch-8’s + 9 dc + 1 tr) (2 ch-8’s + 9 dc + 1 tr) (3 ch-8’s + 13 dc + 1 tr)
Do not fasten off. Continue on to the instructions for the size you’re making.
Size M – Front Right Panel Continued
Row 8: Alt-dc in the first dc, ch 2, tr in the next dc, skip each of the next 2 dc, tr in the next dc, ch 3, (tr, ch 2, tr) in the sp between the next 2 tr’s 2 rows down, ch 2, dc in the last st. Turn. (4 tr + 2 dc + 1 ch-3 + 3 ch-2’s)
Row 9: Alt-dc in the first st, ch 2, skip the next tr, work 4 dc in the next ch-2 sp, ch 8, skip the next 3 tr & 1 ch-3 & 1 ch-2 sps, dc in the last st. Turn. (6 dc + 1 ch-8 + 1 ch-2)
Row 10: Alt-dc in the first st, ch 2, (tr, ch 2, tr) in the sp between the next 2 tr’s 2 rows down, ch 3, tr in the next dc, skip each of the next 2 dc, tr in the next dc, ch 3, dc in the last st. Turn. (2 dc + 4 tr + 2 ch-3’s + 2 ch-2’s)
Row 11: Alt-dc in the first st, ch 8, skip each of the next 3 tr’s and 2 ch-3 sps, work 4 dc in the next ch-2 sp, ch 2, skip the next tr, dc in the last st. Turn. (6 dc + 1 ch-8 + 1 ch-2)
Row 12: Alt-dc in the first st, ch 3, tr in the next dc, skip each of the next 2 dc, tr in the next dc, ch 3, (tr, ch 2, tr) in the sp between the next 2 tr’s 2 rows down, ch 2, dc in the last st. Turn. (4 tr + 2 dc + 2 ch-2’s + 2 ch-3)
Repeat Rows 9 – 12 until the panel measures approximately 10″ H. Do not end with a Row 9 or 11, or you’ll have a big gap at the shoulder. Make a note of the number of rows you worked so you can work the same number of rows for the back panel and the other front panel.
Fasten off. Weave in ends. Continue on to the Back Panel below.
Sizes (XL, 2X, 3X, 5X) – Front Right Panel Continued
Row 8: Skip the first dc, alt-tr in the next dc, skip each of the next 2 dc, tr in the next dc, ch 3, (tr, ch 2, tr) in the sp between the next 2 tr’s 2 rows down, [ch 3, tr in the next dc, skip each of the next 2 dc, tr in the next dc, ch 3, (tr, ch 2, tr) in the sp between the next 2 tr’s 2 rows down] work from [ to ] (1, 1, 1, 2) times, then ch 2, dc in the last st. Turn. (8 tr + 1 dc + 3 ch-3’s + 3 ch-2’s) (8 tr + 1 dc + 3 ch-3’s + 3 ch-2’s) (8 tr + 1 dc + 3 ch-3’s + 3 ch-2’s) (12 tr + 1 dc + 5 ch-3’s + 4 ch-2’s)
Row 9: Alt-dc in the first st, ch 2, skip the next tr, (work 4 dc in the next ch-2 sp, ch 8, skip the next 4 tr & 2 ch-3’s) work from ( to ) (1, 1, 1, 2) times, then work 4 dc in the next ch-2 sp, ch 2, skip the next tr & ch-3, dc in the next tr, skip the last st. Turn. (1 ch-8 + 10 dc + 2 ch-2’s) (1 ch-8 + 10 dc + 2 ch-2’s) (1 ch-8 + 10 dc + 2 ch-2’s) (2 ch-8 + 14 dc + 2 ch-2’s)
Row 10: Alt-dc in the first st, ch 3, tr in the next dc, skip each of the next 2 dc, tr in the next dc, [ch 3, (tr, ch 2, tr) in the sp between the next 2 tr’s 2 rows down, ch 3, tr in the next dc, skip each of the next 2 dc, tr in the next dc] work from [ to ] (1, 1, 1, 2) times, then ch 3, dc in the last st. Turn. (6 tr + 2 dc + 4 ch-3’s + 1 ch-2) (6 tr + 2 dc + 4 ch-3’s + 1 ch-2) (6 tr + 2 dc + 4 ch-3’s + 1 ch-2) (10 tr + 2 dc + 6 ch-3’s + 2 ch-2’s)
Row 11: Alt-dc in the first st, (ch 8, skip the next 2 ch-3’s & 4 tr, work 4 dc in the next ch-2 sp) work from ( to ) (1, 1, 1, 2) times, ch 8, skip the next 2 ch-3’s & 3 tr, dc in the last st. Turn. (2 ch-8’s + 6 dc) (2 ch-8’s + 6 dc) (2 ch-8’s + 6 dc) (3 ch-8’s + 10 dc)
Row 12: Alt-dc in the first st, ch 2, (tr, ch 2, tr) in the sp between the next 2 tr’s 2 rows down, [ch 3, tr in the next dc, skip each of the next 2 dc, tr in the next dc, ch 3, (tr, ch 2, tr) in the sp between the next 2 tr’s 2 rows down] work from [ to ] (1, 1, 1, 2) times, then ch 2, dc in the last st. Turn. (6 tr + 2 dc + 2 ch-3’s + 4 ch-2’s) (6 tr + 2 dc + 2 ch-3’s + 4 ch-2’s) (6 tr + 2 dc + 2 ch-3’s + 4 ch-2’s) (10 tr + 2 dc + 4 ch-3’s + 5 ch-2’s)
Row 13: Alt-dc in the first st, ch 2, skip the next tr & ch-2, (work 4 dc in the next ch-2 sp, ch 8, skip the next 4 tr & 2 ch-3’s) work from ( to ) (1, 1, 1, 2) times, then work 4 dc in the next ch-2 sp, ch 2, skip the next tr & ch-2, dc in the last st. Turn. (1 ch-8 + 10 dc + 2 ch-2’s) (1 ch-8 + 10 dc + 2 ch-2’s) (1 ch-8 + 10 dc + 2 ch-2’s) (2 ch-8 + 14 dc + 2 ch-2’s)
Repeat Rows 10 – 13 until the panel measures approximately (11″, 11″, 12″, 13″) H. Do not end with a Row 11 or 13 or you’ll have a big gap at the shoulder. Make a note of the number of rows you worked so you can work the same number of rows for the back panel and the other front panel.
Fasten off. Weave in ends. Continue on to the Back Panel below.
Begin Front Right Panel – Sizes S / L / 4X
Changes for Sizes as Follows: S (L, 4X)
Stitch Counts as Follows: (S, L, 4X)
Row 1: Alt-dc in the first st, ch 2, skip the next tr, (work 4 dc in the next ch-2 sp, ch 8, skip the next 4 tr & 2 ch-3’s) work from ( to ) 2 (3, 4) times, then work 2 dc in the next ch-2 sp. Place a locking SM in the same ch-2 sp as the last 2 dc worked to mark where you’ll later join yarn to begin the Back Panel. Turn. (2 ch-8’s + 11 dc + 1 ch-2) (3 ch-8’s + 15 dc + 1 ch-2) (4 ch-8’s + 19 dc + 1 ch-2)
Row 2: Skip the first st, alt-tr in the next st, (tr, ch 2, tr) in the sp between the next 2 tr’s 2 rows down, [ch 3, tr in the next dc, skip each of the next 2 dc, tr in the next dc, ch 3, (tr, ch 2, tr) in the sp between the next 2 tr’s 2 rows down] work from [ to ] 1 (2, 3) times, then ch 3, tr in the next dc, skip each of the next 2 dc, tr in the next dc, ch 3, dc in the last st. Turn. (9 tr + 1 dc + 3 ch-3’s + 2 ch-2’s) (13 tr + 1 dc + 5 ch-3’s + 3 ch-2’s) (17 tr + 1 dc + 7 ch-3’s + 4 ch-2’s)
Row 3: Alt-dc in the first st, (ch 8, skip the next 2 ch-3’s & 4 tr, work 4 dc in the next ch-2 sp) work from ( to ) 2 (3, 4) times, then skip the next tr, dc in the next st. Turn. (2 ch-8’s + 10 dc) (3 ch-8’s + 14 dc) (4 ch-8’s + 18 dc)
Row 4: Skip the first dc, alt-tr in the next dc, skip each of the next 2 dc, tr in the next dc, ch 3, (tr, ch 2, tr) in the sp between the next 2 tr’s 2 rows down, [ch 3, tr in the next dc, skip each of the next 2 dc, tr in the next dc, ch 3, (tr, ch 2, tr) in the sp between the next 2 tr’s 2 rows down] work from [ to ] 1 (2, 3) times, then ch 2, dc in the last st. Turn. (8 tr + 1 dc + 3 ch-3’s + 3 ch-2’s) (12 tr + 1 dc + 5 ch-3’s + 4 ch-2’s) (16 tr + 1 dc + 7 ch-3’s + 5 ch-2’s)
Row 5: Alt-dc in the first st, ch 2, skip the next tr, (work 4 dc in the next ch-2 sp, ch 8, skip the next 4 tr & 2 ch-3’s) work from ( to ) 1 (2, 3) times, then work 4 dc in the next ch-2 sp, skip the next tr & ch-3, dc in the next tr, skip the last st. Turn. (1 ch-8 + 10 dc + 1 ch-2) (2 ch-8’s + 14 dc + 1 ch-2) (3 ch-8’s + 18 dc + 1 ch-2)
Row 6: Skip the first dc, alt-tr in the next dc, skip each of the next 2 dc, tr in the next dc, [ch 3, (tr, ch 2, tr) in the sp between the next 2 tr’s 2 rows down, ch 3, tr in the next dc, skip each of the next 2 dc, tr in the next dc] work from [ to ] 1 (2, 3) times, then ch 3, dc in the last st. Turn. (6 tr + 1 dc + 3 ch-3’s + 1 ch-2) (10 tr + 1 dc + 5 ch-3’s + 2 ch-2’s) (14 tr + 1 dc + 7 ch-3’s + 3 ch-2’s)
Row 7: Alt-dc in the first st, (ch 8, skip the next 2 ch-3’s & 4 tr, work 4 dc in the next ch-2 sp) work from ( to ) 1 (2, 3) times, skip the next tr, tr in the next tr. Turn. (1 ch-8 + 5 dc + 1 tr) (2 ch-8’s + 9 dc + 1 tr) (3 ch-8’s + 13 dc + 1 tr)
Do not fasten off. Continue on to the instructions for the size you’re making.
Size Small – Front Right Panel Continued
Row 8: Alt-dc in the first dc, ch 2, tr in the next dc, skip each of the next 2 dc, tr in the next dc, ch 3, (tr, ch 2, tr) in the sp between the next 2 tr’s 2 rows down, ch 2, dc in the last st. Turn. (4 tr + 2 dc + 1 ch-3 + 3 ch-2’s)
Row 9: Alt-dc in the first st, ch 2, skip the next tr, work 4 dc in the next ch-2 sp, ch 8, skip the next 3 tr & 1 ch-3 & 1 ch-2 sps, dc in the last st. Turn. (6 dc + 1 ch-8 + 1 ch-2)
Row 10: Alt-dc in the first st, ch 2, (tr, ch 2, tr) in the sp between the next 2 tr’s 2 rows down, ch 3, tr in the next dc, skip each of the next 2 dc, tr in the next dc, ch 3, dc in the last st. Turn. (2 dc + 4 tr + 2 ch-3’s + 2 ch-2’s)
Row 11: Alt-dc in the first st, ch 8, skip each of the next 3 tr’s and 2 ch-3 sps, work 4 dc in the next ch-2 sp, ch 2, skip the next tr, dc in the last st. Turn. (6 dc + 1 ch-8 – 1 ch-2)
Row 12: Alt-dc in the first st, ch 2, tr in the next dc, skip each of the next 2 dc, tr in the next dc, ch 3, (tr, ch 2, tr) in the sp between the next 2 tr’s 2 rows down, ch 2, dc in the last st. Turn. (4 tr + 2 dc + 3 ch-2’s + 1 ch-3)
Repeat Rows 9 – 12 until the panel measures approximately 9″ H. Do not end with a Row 9 or 11, or you’ll have a big gap at the shoulder. Make a note of the number of rows you worked so you can work the same number of rows for the back panel and the other front panel.
Fasten off. Weave in ends. Continue on to the Back Panel below.
Sizes (L, 4X) – Front Right Panel Continued
Row 8: Skip the first dc, alt-tr in the next dc, skip each of the next 2 dc, tr in the next dc, ch 3, (tr, ch 2, tr) in the sp between the next 2 tr’s 2 rows down, [ch 3, tr in the next dc, skip each of the next 2 dc, tr in the next dc, ch 3, (tr, ch 2, tr) in the sp between the next 2 tr’s 2 rows down] work from [ to ] (1, 2) times, then ch 2, dc in the last st. Turn. (8 tr + 1 dc + 3 ch-3’s + 3 ch-2’s) (12 tr + 1 dc + 5 ch-3’s + 4 ch-2’s)
Row 9: Alt-dc in the first st, ch 2, skip the next tr & ch-2, (work 4 dc in the next ch-2 sp, ch 8, skip the next 4 tr & 2 ch-3’s) work from ( to ) (1, 2) times, then work 4 dc in the next ch-2 sp, ch 2, skip the next tr & ch-3, dc in the next tr, skip the last st. Turn. (1 ch-8 + 10 dc + 2 ch-2’s) (2 ch-8 + 14 dc + 2 ch-2’s)
Row 10: Alt-dc in the first st, ch 3, tr in the next dc, skip each of the next 2 dc, tr in the next dc, [ch 3, (tr, ch 2, tr) in the sp between the next 2 tr’s 2 rows down, ch 3, tr in the next dc, skip each of the next 2 dc, tr in the next dc] work from [ to ] (1, 2) times, then ch 3, dc in the last st. Turn. (6 tr + 2 dc + 4 ch-3’s + 1 ch-2) (10 tr + 2 dc + 6 ch-3’s + 2 ch-2’s)
Row 11: Alt-dc in the first st, (ch 8, skip the next 2 ch-3’s & 4 tr, work 4 dc in the next ch-2 sp) work from ( to ) (1, 2) times, ch 8, skip the next 2 ch-3’s & 2 tr, dc in the last st. Turn. (2 ch-8’s + 6 dc) (3 ch-8’s + 10 dc)
Row 12: Alt-dc in the first st, ch 2, (tr, ch 2, tr) in the sp between the next 2 tr’s 2 rows down, [ ch 3, tr in the next dc, skip each of the next 2 dc, tr in the next dc, ch 3, (tr, ch 2, tr) in the sp between the next 2 tr’s 2 rows down ] work from [ to ] (1, 2) times, then ch 2, dc in the last st. Turn. (6 tr + 2 dc + 2 ch-3’s + 4 ch-2’s) (10 tr + 2 dc + 4 ch-3’s + 5 ch-2’s)
Row 13: Alt-dc in the first st, ch 2, skip the next tr & ch-2, (work 4 dc in the next ch-2 sp, ch 8, skip the next 4 tr & 2 ch-3’s) work from ( to ) (1, 2) times, then work 4 dc in the next ch-2 sp, ch 2, skip the next tr & ch-2, dc in the last st. Turn. (1 ch-8 + 10 dc + 2 ch-2’s) (2 ch-8 + 14 dc + 2 ch-2’s)
Repeat Rows 10 – 13 until the panel measures approximately (10″, 12″) H. Do not end with a Row 11 or 13 or you’ll have a big gap at the shoulder. Make a note of the number of rows you worked so you can work the same number of rows for the back panel and the other front panel.
Fasten off. Weave in ends. Continue on to the Back Panel below.
Back Panel – Sizes XS (M, XL, 2X, 3X, 5X)
Changes for Sizes as Follows: XS (M, XL, 2X, 3X, 5X)
Stitch Counts as Follows: (XS, M, XL, 2X, 3X, 5X)
Row 1: With yarn & a 3.50mm crochet hook, join yarn with a standing dc in the stitch marked with a SM, skip the next tr & ch-3, (work 4 dc in the next ch-2 sp, ch 8, skip the next 4 tr & 2 ch-3’s) work from ( to ) 6 (7, 9, 10, 11, 13) times, then work 4 dc in the next ch-2 sp, skip the next tr & ch-3, dc in the next tr. Place a locking SM in the next tr to mark where you’ll later join yarn to begin the Front Left Panel. Turn. (6 ch-8 + 30 dc) (7 ch-8’s + 34 dc) (9 ch-8’s + 42 dc) (10 ch-8’s + 46 dc) (11 ch-8’s + 50 dc) (13 ch-8’s + 58 dc)
Row 2: Skip the first dc, alt-tr in the next dc, skip each of the next 2 dc, tr in the next dc, [ch 3, (tr, ch 2, tr) in the sp between the next 2 tr’s 2 rows down, ch 3, tr in the next dc, skip each of the next 2 dc, tr in the next dc] work from [ to ] 6 (7, 9, 10, 11, 13) times, then skip the last st. Turn. (26 tr + 12 ch-3’s + 6 ch-2’s) (30 tr + 14 ch-3’s + 7 ch-2’s) (38 tr + 18 ch-3’s + 9 ch-2’s) (42 tr + 20 ch-3’s + 10 ch-2’s) (46 tr + 22 ch-3’s + 11 ch-2’s) (54 tr + 26 ch-3’s + 13 ch-2’s)
Row 3: Skip the first tr, alt-tr in the next tr, skip the next tr & ch-3 (work 4 dc in the next ch-2 sp, ch 8, skip the next 4 tr & 2 ch-3’s) work from ( to ) 5 (6, 8, 9, 10, 12) times, then work 4 dc in the next ch-2 sp, skip the next tr & ch-3, tr in the next tr, skip the last st. Turn. (5 ch-8 + 24 dc + 2 tr) (6 ch-8 + 28 dc + 2 tr) (8 ch-8’s + 36 dc + 2 tr) (9 ch-8’s + 40 dc + 2 tr) (10 ch-8’s + 44 dc + 2 tr) (12 ch-8’s + 52 dc + 2 tr)
Row 4: Skip the first dc, alt-tr in the next dc, skip each of the next 2 dc, tr in the next dc, [ch 3, (tr, ch 2, tr) in the sp between the next 2 tr’s 2 rows down, ch 3, tr in the next dc, skip each of the next 2 dc, tr in the next dc] work from [ to ] 5 (6, 8, 9, 10, 12) times, then skip the last st. Turn. (22 tr + 10 ch-3’s + 5 ch-2’s) (26 tr + 12 ch-3’s + 6 ch-2’s) (34 tr + 16 ch-3’s + 8 ch-2’s) (38 tr + 18 ch-3’s + 9 ch-2’s) (42 tr + 20 ch-3’s + 10 ch-2’s) (50 tr + 24 ch-3’s + 12 ch-2’s)
Row 5: Skip the first tr, alt-tr in the next tr, skip the next tr & ch-3 (work 4 dc in the next ch-2 sp, ch 8, skip the next 4 tr & 2 ch-3’s) work from ( to ) 4 (5, 7, 8, 9, 11) times, then work 4 dc in the next ch-2 sp, skip the next tr & ch-3, tr in the next tr, skip the last st. Turn. (4 ch-8 + 20 dc + 2 tr) (5 ch-8 + 24 dc + 2 tr) (7 ch-8’s + 32 dc + 2 tr) (8 ch-8’s + 36 dc + 2 tr) (9 ch-8’s + 40 dc + 2 tr) (11 ch-8’s + 48 dc + 2 tr)
Do not fasten off. Continue on to the instructions for the size you’re making.
Sizes XS (M) – Back Panel Continued
Changes for Sizes as Follows: XS (M)
Stitch Counts as Follows: (XS, M)
Row 6: Alt-dc in the first st, ch 2, tr in the next dc, skip each of the next 2 dc, tr in the next dc, [ch 3, (tr, ch 2, tr) in the sp between the next 2 tr’s 2 rows down, ch 3, tr in the next dc, skip each of the next 2 dc, tr in the next dc] work from [ to ] 4 (5) times, ch 2, dc in the last st. Turn. (18 tr + 8 ch-3’s + 6 ch-2’s + 2dc) (22 tr + 10 ch-3’s + 7 ch-2’s + 2dc)
Row 7: Alt-dc in the first st, ch 8, skip the next 3 tr, ch-3 & ch-2, (work 4 dc in the next ch-2 sp, ch 8, skip the next 4 tr & 2 ch-3’s) work from ( to ) 3 (4) times, then work 4 dc in the next ch-2 sp, ch 8, skip the next 3 tr, ch-3 & ch-2, dc in the last st. Turn. (5 ch-8 + 18 dc) (6 ch-8 + 22 dc)
Row 8: Alt-dc in the first st, ch 2, [ (tr, ch 2, tr) in the sp between the next 2 tr’s 2 rows down, ch 3, tr in the next dc, skip each of the next 2 dc, tr in the next dc, ch 3] work from [ to ] 4 (5) times, then (tr, ch 2, tr) in the sp between the next 2 tr’s 2 rows down, ch 2, dc in the last st. Turn. (18 tr + 8 ch-3’s + 7 ch-2’s + 2 dc) (22 tr + 10 ch-3’s + 8 ch-2’s + 2 dc)
Row 9: Alt-dc in the first st, ch 2, skip the next tr & ch-2, (work 4 dc in the next ch-2 sp, ch 8, skip the next 4 tr & 2 ch-3’s) work from ( to ) 4 (5) times, then work 4 dc in the next ch-2 sp, ch 2, skip the next tr & ch-2, dc in the last st. Turn. (4 ch-8 + 22 dc + 2 ch-2’s) (5 ch-8 + 26 dc + 2 ch-2’s)
Row 10: Alt-dc in the first st, ch 3, tr in the next dc, skip each of the next 2 dc, tr in the next dc, [ch 3, (tr, ch 2, tr) in the sp between the next 2 tr’s 2 rows down, ch 3, tr in the next dc, skip each of the next 2 dc, tr in the next dc] work from [ to ] 4 (5) times, ch 3, dc in the last st. Turn. (18 tr + 10 ch-3’s + 4 ch-2’s + 2 dc) (22 tr + 12 ch-3’s + 5 ch-2’s + 2 dc)
Rep Rows 7 – 10, until you have the same number of rows as the Front Right Panel.
Fasten off. Weave in ends. Continue on to the Front Left Panel below.
Sizes XL (2X, 3X, 5X) – Back Panel Continued
Changes for Sizes as Follows: XL (2X, 3X, 5X)
Stitch Counts as Follows: (XL, 2X, 3X, 5X)
Row 6: Skip the first dc, alt-tr in the next dc, skip each of the next 2 dc, tr in the next dc, [ch 3, (tr, ch 2, tr) in the sp between the next 2 tr’s 2 rows down, ch 3, tr in the next dc, skip each of the next 2 dc, tr in the next dc] work from [ to ] 7 (8, 9, 11) times, then skip the last st. Turn. (30 tr + 14 ch-3’s + 7 ch-2’s) (34 tr + 16 ch-3’s + 8 ch-2’s) (38 tr + 18 ch-3’s + 9 ch-2’s) (46 tr + 22 ch-3’s + 11 ch-2’s)
Row 7: Skip the first tr, alt-tr in the next tr, skip the next tr & ch-3 (work 4 dc in the next ch-2 sp, ch 8, skip the next 4 tr & 2 ch-3’s) work from ( to ) 6 (7, 8, 10) times, then work 4 dc in the next ch-2 sp, skip the next tr & ch-3, tr in the next tr, skip the last st. Turn. (6 ch-8’s + 28 dc + 2 tr) (7 ch-8’s + 32 dc + 2 tr) (8 ch-8’s + 36 dc + 2 tr) (10 ch-8’s + 44 dc + 2 tr)
Do not fasten off. Continue on to the instructions for the size you’re making.
Sizes XL (2X, 3X) – Back Panel Continued
Changes for Sizes as Follows: XL (2X, 3X)
Stitch Counts as Follows: (XL, 2X, 3X)
Row 8: Alt-dc in the first st, ch 2, tr in the next dc, skip each of the next 2 dc, tr in the next dc, [ch 3, (tr, ch 2, tr) in the sp between the next 2 tr’s 2 rows down, ch 3, tr in the next dc, skip each of the next 2 dc, tr in the next dc] work from [ to ] 6 (7, 8) times, ch 2, dc in the last st. Turn. (26 tr + 12 ch-3’s + 8 ch-2’s + 2dc) (30 tr + 14 ch-3’s + 9 ch-2’s + 2 dc) (34 tr + 16 ch-3’s + 10 ch-2’s + 2 dc)
Row 9: Alt-dc in the first st, ch 8, skip the next 3 tr, ch-3 & ch-2, (work 4 dc in the next ch-2 sp, ch 8, skip the next 4 tr & 2 ch-3’s) work from ( to ) 5 (6, 7) times, then work 4 dc in the next ch-2 sp, ch 8, skip the next 3 tr, ch-3 & ch-2, dc in the last st. Turn. (7 ch-8’s + 26 dc) (8 ch-8’s + 30 dc) (9 ch-8’s + 34 dc)
Row 10: Alt-dc in the first st, ch 2, [ (tr, ch 2, tr) in the sp between the next 2 tr’s 2 rows down, ch 3, tr in the next dc, skip each of the next 2 dc, tr in the next dc, ch 3] work from [ to ] 6 (7, 8) times, then (tr, ch 2, tr) in the sp between the next 2 tr’s 2 rows down, ch 2, dc in the last st. Turn. (26 tr + 12 ch-3’s + 9 ch-2’s + 2dc) (30 tr + 14 ch-3’s + 10 ch-2’s + 2 dc) (34 tr + 16 ch-3’s + 11 ch-2’s + 2 dc)
Row 11: Alt-dc in the first st, ch 2, skip the next tr & ch-2, (work 4 dc in the next ch-2 sp, ch 8, skip the next 4 tr & 2 ch-3’s) work from ( to ) 6 (7, 8) times, then work 4 dc in the next ch-2 sp, ch 2, skip the next tr & ch-2, dc in the last st. Turn. (6 ch-8’s + 30 dc + 2 ch-2’s) (7 ch-8’s + 34 dc + 2 ch-2’s) (8 ch-8’s + 38 dc + 2 ch-2’s)
Row 12: Alt-dc in the first st, ch 3, tr in the next dc, skip each of the next 2 dc, tr in the next dc, [ch 3, (tr, ch 2, tr) in the sp between the next 2 tr’s 2 rows down, ch 3, tr in the next dc, skip each of the next 2 dc, tr in the next dc] work from [ to ] 6 (7, 8) times, ch 3, dc in the last st. Turn. (26 tr + 14 ch-3’s + 6 ch-2’s + 2dc) (30 tr + 16 ch-3’s + 7 ch-2’s + 2 dc) (34 tr + 18 ch-3’s + 8 ch-2’s + 2 dc)
Rep Rows 9 – 12, until you have the same number of rows as the Front Right Panel.
Fasten off. Weave in ends. Continue on to the Front Left Panel below.
Size 5X – Back Panel Continued
Row 8: Skip the first dc, alt-tr in the next dc, skip each of the next 2 dc, tr in the next dc, [ch 3, (tr, ch 2, tr) in the sp between the next 2 tr’s 2 rows down, ch 3, tr in the next dc, skip each of the next 2 dc, tr in the next dc] work from [ to ] 10 times, then skip the last st. Turn. (42 tr + 20 ch-3’s + 10 ch-2’s)
Row 9: Alt-dc in the first st, ch 2, skip the next tr & ch-3, (work 4 dc in the next ch-2 sp, ch 8, skip the next 4 tr & 2 ch-3’s) work from ( to ) 9 times, then work 4 dc in the next ch-2 sp, ch 2, skip the next 2 tr & ch-3, dc in the last st. Turn. (9 ch-8’s + 42 dc + 2 ch-2’s)
Row 10: Alt-dc in the first st, ch 3, tr in the next dc, skip each of the next 2 dc, tr in the next dc, [ch 3, (tr, ch 2, tr) in the sp between the next 2 tr’s 2 rows down, ch 3, tr in the next dc, skip each of the next 2 dc, tr in the next dc] work from [ to ] 9 times, ch 3, dc in the last st. Turn. (38 tr + 20 ch-3’s + 9 ch-2’s + 2 dc)
Row 11: Alt-dc in the first st, ch 8, skip the next 3 tr & 2 ch-3’s, (work 4 dc in the next ch-2 sp, ch 8, skip the next 4 tr & 2 ch-3’s) work from ( to ) 9 times, then dc in the last st. Turn. (10 ch-8’s + 38 dc)
Row 12: Alt-dc in the first st, ch 2, [ (tr, ch 2, tr) in the sp between the next 2 tr’s 2 rows down, ch 3, tr in the next dc, skip each of the next 2 dc, tr in the next dc, ch 3] work from [ to ] 9 times, then (tr, ch 2, tr) in the sp between the next 2 tr’s 2 rows down, ch 2, dc in the last st. Turn. (38 tr + 18 ch-3’s + 12 ch-2’s + 2 dc)
Row 13: Alt-dc in the first st, ch 2, skip the next tr & ch-2, (work 4 dc in the next ch-2 sp, ch 8, skip the next 4 tr & 2 ch-3’s) work from ( to ) 9 times, then work 4 dc in the next ch-2 sp, ch 2, skip the next tr & ch-2, dc in the last st. Turn. (9 ch-8’s + 42 dc + 2 ch-2’s)
Rep Rows 10 – 13, until you have the same number of rows as the Front Right Panel.
Fasten off. Weave in ends. Continue on to the Front Left Panel below.
Sizes S / L / 4X – Back Panel
Changes for Sizes as Follows: S (L, 4X)
Stitch Counts as Follows: (S, L, 4X)
Row 1: With yarn & a 3.50mm crochet hook, join yarn with a standing dc in the ch-2 space marked with a SM, work 1 more dc in the same ch-2 sp, (ch 8, skip the next 4 tr & 2 ch-3’s, work 4 dc in the next ch-2 sp) work from ( to ) 7 (8, 12) times, then ch 8, skip the next 4 tr & 2 ch-3’s, work 2 dc in the next ch-2 sp. Place a locking SM in the same ch-2 sp as the last 2 dc worked to mark where you’ll later join yarn to begin the Front Left Panel. Turn. (8 ch-8’s + 32 dc) (9 ch-8’s + 40 dc) (13 ch-8’s + 52 dc)
Row 2: Skip the first dc, alt-tr in the next dc, [ (tr, ch 2, tr) in the sp between the next 2 tr’s 2 rows down, ch 3, tr in the next dc, skip each of the next 2 dc, tr in the next dc, ch 3] work from [ to ] 7 (8, 12) times, then (tr, ch 2, tr) in the sp between the next 2 tr’s 2 rows down, tr in the next dc, skip the last st. Turn. (8 ch-2’s + 32 tr + 14 ch-3’s) (9 ch-2’s + 36 tr + 16 ch-3’s) (13 ch-8’s + 52 tr + 24 ch-3’s)
Row 3: Alt-dc in the first st, skip the next tr, (work 4 dc in the next ch-2 sp, ch 8, skip the next 4 tr & 2 ch-3’s) work from ( to ) 7 (8, 12) times, then work 4 dc in the next ch-2 sp, skip the next tr, dc in the last st. Turn. (7 ch-8’s + 34 dc) (8 ch-8’s + 38 dc) (12 ch-8’s + 54 dc)
Row 4: Skip the first dc, alt-tr in the next dc, skip each of the next 2 dc, [ ch 3, tr in the next dc, skip each of the next 2 dc, tr in the next dc, ch 3, (tr, ch 2, tr) in the sp between the next 2 tr’s 2 rows down ] work from [ to ] 7 (8, 12) times, then skip the last st. Turn. (7 ch-2’s + 30 tr + 14 ch-3’s) (8 ch-2’s + 34 tr + 16 ch-3’s) (12 ch-8’s + 50 tr + 24 ch-3’s)
Row 5: Alt-tr in the first st, skip the next tr & ch-3, (work 4 dc in the next ch-2 sp, ch 8, skip the next 4 tr & 2 ch-3’s) work from ( to ) 6 (7, 11) times, then work 4 dc in the next ch-2 sp, skip the next tr & ch-3, tr in the next st, skip the last st. Turn. (6 ch-8’s + 28 dc + 2 tr) (7 ch-8’s + 32 dc + 2 tr) (11 ch-8’s + 48 dc + 2 tr)
Row 6: Skip the first st, alt-tr in the next dc, skip each of the next 2 dc, tr in the next dc, [ ch 3, (tr, ch 2, tr) in the sp between the next 2 tr’s 2 rows down, ch 3, tr in the next dc, skip each of the next 2 dc, tr in the next dc ] work from [ to ] 6 (7, 11) times, then skip the last st. Turn. (6 ch-2’s + 26 tr + 12 ch-3’s) (7 ch-2’s + 30 tr + 14 ch-3’s) (11 ch-8’s + 46 tr + 22 ch-3’s)
Row 7: Skip the first st, alt-tr in the next st, skip the next tr & ch-3, (work 4 dc in the next ch-2 sp, ch 8, skip the next 4 tr & 2 ch-3’s) work from ( to ) 5 (6, 10) times, then work 4 dc in the next ch-2 sp, skip the next tr & ch-3, tr in the next st, skip the last st. Turn. (5 ch-8’s + 24 dc + 2 tr) (6 ch-8’s + 28 dc + 2 tr) (10 ch-8’s + 44 dc + 2tr)
Row 8: Skip the first st, alt-tr in the next dc, skip each of the next 2 dc, tr in the next dc, [ ch 3, (tr, ch 2, tr) in the sp between the next 2 tr’s 2 rows down, ch 3, tr in the next dc, skip each of the next 2 dc, tr in the next dc ] work from [ to ] 5 (6, 10) times, then skip the last st. Turn. (5 ch-2’s + 22 tr + 10 ch-3’s) (6 ch-2’s + 26 tr + 12 ch-3’s) (10 ch-8’s + 42 tr + 20 ch-3’s)
Do not fasten off. Continue on to the instructions for the size you’re making.
Sizes S / L – Back Panel Continued
Changes for Sizes as Follows: S (L)
Stitch Counts as Follows: (S, L)
Row 9: Alt-dc in the first st, ch 2, skip the next tr & ch-3, (work 4 dc in the next ch-2 sp, ch 8, skip the next 4 tr & 2 ch-3’s) work from ( to ) 4 (5) times, then work 4 dc in the next ch-2 sp, ch 2, skip the next 2 tr & ch-3, dc in the last st. Turn. (4 ch-8’s + 22 dc + 2 ch-2’s) (5 ch-8’s + 26 dc + 2 ch-2’s)
Row 10: Alt-dc in the first st, ch 3, tr in the next dc, skip each of the next 2 dc, tr in the next dc, [ch 3, (tr, ch 2, tr) in the sp between the next 2 tr’s 2 rows down, ch 3, tr in the next dc, skip each of the next 2 dc, tr in the next dc] work from [ to ] 4 (5) times, ch 3, dc in the last st. Turn. (18 tr + 10 ch-3’s + 4 ch-2’s + 2 dc) (22 tr + 12 ch-3’s + 5 ch-2’s + 2 dc)
Row 11: Alt-dc in the first st, ch 8, skip the next 3 tr & 2 ch-3’s, (work 4 dc in the next ch-2 sp, ch 8, skip the next 4 tr & 2 ch-3’s) work from ( to ) 4 (5) times, then dc in the last st. Turn. (5 ch-8’s + 18 dc) (6 ch-8’s + 22 dc)
Row 12: Alt-dc in the first st, ch 2, [ (tr, ch 2, tr) in the sp between the next 2 tr’s 2 rows down, ch 3, tr in the next dc, skip each of the next 2 dc, tr in the next dc, ch 3] work from [ to ] 4 (5) times, then (tr, ch 2, tr) in the sp between the next 2 tr’s 2 rows down, ch 2, dc in the last st. Turn. (18 tr + 8 ch-3’s + 7 ch-2’s + 2 dc) (22 tr + 10 ch-3’s + 8 ch-2’s + 2 dc)
Row 13: Alt-dc in the first st, ch 2, skip the next tr & ch-2, (work 4 dc in the next ch-2 sp, ch 8, skip the next 4 tr & 2 ch-3’s) work from ( to ) 4 (5) times, then work 4 dc in the next ch-2 sp, ch 2, skip the next tr & ch-2, dc in the last st. Turn. (4 ch-8’s + 22 dc + 2 ch-2’s) (5 ch-8’s + 26 dc + 2 ch-2’s)
Rep Rows 10 – 13, until you have the same number of rows as the Front Right Panel.
Fasten off. Weave in ends. Continue on to the Front Left Panel below.
Size 4X – Back Panel Continued
Row 9: Skip the first st, alt-tr in the next st, skip the next tr & ch-3, (work 4 dc in the next ch-2 sp, ch 8, skip the next 4 tr & 2 ch-3’s) work from ( to ) 9 times, then work 4 dc in the next ch-2 sp, skip the next tr & ch-3, tr in the next st, skip the last st. Turn. (9 ch-8’s + 40 dc + 2tr)
Row 10: Skip the first st, alt-tr in the next dc, skip each of the next 2 dc, tr in the next dc, [ch 3, (tr, ch 2, tr) in the sp between the next 2 tr’s 2 rows down, ch 3, tr in the next dc, skip each of the next 2 dc, tr in the next dc] work from [ to ] 9 times, then skip the last st. Turn. (38 tr + 18 ch-3’s + 9 ch-2’s)
Row 11: Alt-dc in the first st, ch 2, skip the next tr & ch-3, (work 4 dc in the next ch-2 sp, ch 8, skip the next 4 tr & 2 ch-3’s) times, then work 4 dc in the next ch-2 sp, ch 2, skip the next 2 tr & ch-3, dc in the last st. Turn. (8 ch-8’s work from ( to ) 8 + 38 dc + 2 ch-2’s)
Row 12: Alt-dc in the first st, ch 3, tr in the next dc, skip each of the next 2 dc, tr in the next dc, [ch 3, (tr, ch 2, tr) in the sp between the next 2 tr’s 2 rows down, ch 3, tr in the next dc, skip each of the next 2 dc, tr in the next dc] work from [ to ] 8 times, ch 3, dc in the last st. Turn. (34 tr + 18 ch-3’s + 8 ch-2’s + 2 dc)
Row 13: Alt-dc in the first st, ch 8, skip the next 3 tr & 2 ch-3’s, (work 4 dc in the next ch-2 sp, ch 8, skip the next 4 tr & 2 ch-3’s) work from ( to ) 8 times, then dc in the last st. Turn. (9 ch-8’s + 34 dc)
Row 14: Alt-dc in the first st, ch 2, [ (tr, ch 2, tr) in the sp between the next 2 tr’s 2 rows down, ch 3, tr in the next dc, skip each of the next 2 dc, tr in the next dc, ch 3] work from [ to ] 8 times, then (tr, ch 2, tr) in the sp between the next 2 tr’s 2 rows down, ch 2, dc in the last st. Turn. (34 tr + 16 ch-3’s + 11 ch-2’s + 2 dc)
Row 15: Alt-dc in the first st, ch 2, skip the next tr & ch-2, (work 4 dc in the next ch-2 sp, ch 8, skip the next 4 tr & 2 ch-3’s) times, then work 4 dc in the next ch-2 sp, ch 2, skip the next tr & ch-2, dc in the last st. Turn. (8 ch-8’s + work from ( to ) 8 38 dc + 2 ch-2’s)
Rep Rows 12 – 15, until you have the same number of rows as the Front Right Panel.
Fasten off. Weave in ends. Continue on to the Front Left Panel below.
Front Left Panel – Sizes XS (M, XL, 2X, 3X, 5X)
Changes for Sizes as Follows: XS (M, XL, 2X, 3X, 5X)
Stitch Counts as Follows: (XS, M, XL, 2X, 3X, 5X)
Row 1 (RS): With yarn & a 3.50mm crochet hook, join yarn with a standing dc in the stitch marked with a SM, skip the next tr, (work 4 dc in the next ch-2 sp, ch 8, skip the next 4 tr & 2 ch-3’s) work from ( to ) 1 (2, 3, 3, 3, 4) times, then work 4 dc in the next ch-2 sp, ch 2, skip the next tr & ch-2, dc in the last st. Turn. (1 ch-8’s + 10 dc + 1 ch-2) (2 ch-8’s + 14 dc + 1 ch-2) (3 ch-8’s + 18 dc + 1 ch-2) (3 ch-8’s + 18 dc + 1 ch-2) (3 ch-8’s + 18 dc + 1 ch-2) (4 ch-8’s + 22 dc + 1 ch-2)
Row 2: Alt-dc in the first dc, ch 3, tr in the next dc, skip each of the next 2 dc, tr in the next dc, [ch 3, (tr, ch 2, tr) in the sp between the next 2 tr’s 2 rows down, ch 3, tr in the next dc, skip each of the next 2 dc, tr in the next dc] work from [ to ] 1 (2, 3, 3, 3, 4) times, then skip the last st. Turn. (6 tr + 1 dc + 3 ch-3’s + 1 ch-2) (10 tr + 1 dc + 5 ch-3’s + 2 ch-2’s) (14 tr + 1 dc + 7 ch-3’s + 3 ch-2’s) (14 tr + 1 dc + 7 ch-3’s + 3 ch-2’s) (14 tr + 1 dc + 7 ch-3’s + 3 ch-2’s) (18 tr + 1 dc + 9 ch-3’s + 4 ch-2’s)
Row 3: Skip the first st, alt-tr in the next st, skip the next tr, (work 4 dc in the next ch-2 sp, ch 8, skip the next 2 ch-3’s & 4 tr) work from ( to ) 1 (2, 3, 3, 3, 4) times, then dc in the last st. Turn. (1 ch-8 + 5 dc + 1 tr) (2 ch-8’s + 9 dc + 1 tr) (3 ch-8’s + 13 dc + 1 tr) (3 ch-8’s + 13 dc + 1 tr) (3 ch-8’s + 13 dc + 1 tr) (4 ch-8’s + 17 dc + 1 tr)
Do not fasten off. Continue on to the instructions for the size you’re making.
Size XS – Front Left Panel Continued
Row 4: Alt-dc in the first st, ch 2, (tr, ch 2, tr) in the sp between the next 2 tr’s 2 rows down, ch 3, tr in the next dc, skip each of the next 2 dc, tr in the next st, skip the last st. Turn. (4 tr + 1 dc + 1 ch-3 + 2 ch-2’s)
Row 5: Skip the first st, alt-dc in the next st, ch 3, skip the next tr, work 4 dc in the next ch-2 sp, ch 2, skip the next tr & ch-2, dc in the last st. Turn. (6 dc + 1 ch-3 + 1 ch-2)
Row 6: Alt-dc in the first st, ch 3, tr in the next dc, skip each of the next 2 dc, tr in the next dc, ch 3, dc in the last st. Turn. (2 dc + 2 tr + 2 ch-3’s)
Row 7: Alt-dc in the first st, ch 8, skip each of the next 2 tr’s and 2 ch-3 sps, dc in the last st. Turn. (2 dc + 1 ch-8)
Row 8: Alt-dc in the first st, ch 2, (tr, ch 2, tr) in the sp between the next 2 tr’s 2 rows down, ch 2, dc in the last st. Turn. (2 tr + 2 dc + 3 ch-2’s)
Row 9: Alt-dc in the first st, ch 2, skip the next tr & ch-2, work 4 dc in the next ch-2 sp, ch 2, skip the next tr & ch-2, dc in the last st. Turn. (6 dc + 2 ch-2)
Repeat Rows 6 – 9 until you have the same number of rows as the previous Upper Panels.
Fasten off. Weave in ends. Continue on to the Shoulder Seams below.
Sizes (M, XL, 2X, 3X, 5X) – Front Left Panel Continued
Row 4: Alt-dc in the first st, ch 2, (tr, ch 2, tr) in the sp between the next 2 tr’s 2 rows down, ch 3, tr in the next dc, skip each of the next 2 dc, tr in the next dc, [ ch 3, (tr, ch 2, tr) in the sp between the next 2 tr’s 2 rows down, ch 3, tr in the next dc, skip each of the next 2 dc, tr in the next dc ] work from [ to ] (1, 2, 2, 2, 3) times, then skip the last st. Turn. (8 tr + 1 dc + 3 ch-3’s + 3 ch-2’s) (12 tr + 1 dc + 5 ch-3’s + 4 ch-2’s) (12 tr + 1 dc + 5 ch-3’s + 4 ch-2’s) (12 tr + 1 dc + 5 ch-3’s + 4 ch-2’s) (16 tr + 1 dc + 7 ch-3’s + 5 ch-2’s)
Row 5: Skip the first st, alt-dc in the next st, skip the next tr & ch-3, (work 4 dc in the next ch-2 sp, ch 8, skip the next 4 tr & 2 ch-3’s) work from ( to ) (1, 2, 2, 2, 3) times, then work 4 dc in the next ch-2 sp, ch 2, skip the next tr & ch-2, dc in the last st. Turn. (1 ch-8 + 10 dc + 1 ch-2) (2 ch-8’s + 14 dc + 1 ch-2) (2 ch-8’s + 14 dc + 1 ch-2) (2 ch-8’s + 14 dc + 1 ch-2) (3 ch-8’s + 28 dc + 1 ch-2)
Row 6: Alt-dc in the first st, ch 3, tr in the next dc, skip each of the next 2 dc, tr in the next dc, [ ch 3, (tr, ch 2, tr) in the sp between the next 2 tr’s 2 rows down, ch 3, tr in the next dc, skip each of the next 2 dc, tr in the next dc ] work from [ to ] (1, 2, 2, 2, 3) times, then skip the last st. Turn. (6 tr + 1 dc + 3 ch-3’s + 1 ch-2) (10 tr + 1 dc + 5 ch-3’s + 2 ch-2’s) (10 tr + 1 dc + 5 ch-3’s + 2 ch-2’s) (10 tr + 1 dc + 5 ch-3’s + 2 ch-2’s) (14 tr + 1 dc + 7 ch-3’s + 3 ch-2’s)
Row 7: Skip the first st, alt-tr in the next st, skip the next tr & ch-3, (work 4 dc in the next ch-2 sp, ch 8, skip the next 2 ch-3’s & 4 tr) work from ( to ) (1, 2, 2, 2, 3) times, then dc in the last st. Turn. (1 ch-8’s + 5 dc + 1 tr) (2 ch-8’s + 9 dc + 1 tr) (2 ch-8’s + 9 dc + 1 tr) (2 ch-8’s + 9 dc + 1 tr) (3 ch-8’s + 13 dc + 1 tr)
Do not fasten off. Continue on to the instructions for the size you’re making.
Size M – Front Left Panel Continued
Row 8: Alt-dc in the first dc, ch 2, (tr, ch 2, tr) in the sp between the next 2 tr’s 2 rows down, ch 3, tr in the next dc, skip each of the next 2 dc, tr in the next dc, ch 2, dc in the last st. Turn. (4 tr + 2 dc + 1 ch-3 + 3 ch-2’s)
Row 9: Alt-dc in the first st, ch 8, skip the next 3 tr & 1 ch-3 & 1 ch-2 sps, work 4 dc in the next ch-2 sp, ch 2, skip the next tr & ch-2, dc in the last st. Turn. (6 dc + 1 ch-8 + 1 ch-2)
Row 10: Alt-dc in the first st, ch 3, tr in the next dc, skip each of the next 2 dc, tr in the next dc, ch 3, (tr, ch 2, tr) in the sp between the next 2 tr’s 2 rows down, ch 2, dc in the last st. Turn. (2 dc + 4 tr + 2 ch-3’s + 2 ch-2’s)
Row 11: Alt-dc in the first st, ch 2, skip the next tr & ch-2, work 4 dc in the next ch-2 sp, ch 8, skip each of the next 3 tr’s and 2 ch-3 sps, dc in the last st. Turn. (6 dc + 1 ch-8 – 1 ch-2)
Row 12: Alt-dc in the first dc, ch 2, (tr, ch 2, tr) in the sp between the next 2 tr’s 2 rows down, ch 3, tr in the next dc, skip each of the next 2 dc, tr in the next dc, ch 3, dc in the last st. Turn. (4 tr + 2 dc + 2 ch-3’s + 2 ch-2’s)
Repeat Rows 9 – 12 until you have the same number of rows as the previous Upper Panels.
Fasten off. Weave in ends. Continue on to the Shoulder Seams below.
Sizes (XL, 2X, 3X, 5X) – Front Left Panel Continued
Row 8: Alt-dc in the first st, ch 2, (tr, ch 2, tr) in the sp between the next 2 tr’s 2 rows down, ch 3, tr in the next dc, skip each of the next 2 dc, tr in the next dc, [ ch 3, (tr, ch 2, tr) in the sp between the next 2 tr’s 2 rows down, ch 3, tr in the next dc, skip each of the next 2 dc, tr in the next dc ] work from [ to ] (1, 1, 1, 2) times, then skip the last st. Turn. (8 tr + 1dc + 3 ch-3’s + 3 ch-2’s) (8 tr + 1 dc + 3 ch-3’s + 3 ch-2’s) (8 tr + 1 dc + 3 ch-3’s + 3 ch-2’s) (12 tr + 1 dc + 5 ch-3’s + 4 ch-2’s)
Row 9: Skip the first st, alt-tr in the next st, skip the next tr & ch-3, (work 4 dc in the next ch-2 sp, ch 8, skip the next 4 tr & 2 ch-3’s) work from ( to ) (1, 1, 1, 2) times, then work 4 dc in the next ch-2 sp, ch 2, skip the next tr & ch-2, dc in the last st. Turn. (1 ch-8 + 9 dc + 1 tr + 1 ch-2) (1 ch-8 + 9 dc + 1 tr + 1 ch-2) (1 ch-8 + 9 dc + 1 tr + 1 ch-2) (2 ch-8 + 13 dc + 1 tr + 1 ch-2)
Row 10: Alt-dc in the first st, ch 3, tr in the next dc, skip each of the next 2 dc, tr in the next dc, [ ch 3, (tr, ch 2, tr) in the sp between the next 2 tr’s 2 rows down, ch 3, tr in the next dc, skip each of the next 2 dc, tr in the next dc ] work from [ to ] (1, 1, 1, 2) times, then ch 3, dc in the last st. Turn. (6 tr + 2 dc + 4 ch-3’s + 1 ch-2) (6 tr + 2 dc + 4 ch-3’s + 1 ch-2) (6 tr + 2 dc + 4 ch-3’s + 1 ch-2) (10 tr + 2 dc + 6 ch-3’s + 2 ch-2’s)
Row 11: Alt-dc in the first st, (ch 8, skip the next 2 ch-3’s & 4 tr, work 4 dc in the next ch-2 sp) work from ( to ) (1, 1, 1, 2) times, ch 8, skip the next 2 ch-3’s & 3 tr, dc in the last st. Turn. (2 ch-8’s + 6 dc) (2 ch-8’s + 6 dc) (2 ch-8’s + 6 dc) (3 ch-8’s + 10 dc)
Row 12: Alt-dc in the first st, ch 2, (tr, ch 2, tr) in the sp between the next 2 tr’s 2 rows down, [ch 3, tr in the next dc, skip each of the next 2 dc, tr in the next dc, ch 3, (tr, ch 2, tr) in the sp between the next 2 tr’s 2 rows down] work from [ to ] (1, 1, 1, 2) times, then ch 2, dc in the last st. Turn. (6 tr + 2 dc + 2 ch-3’s + 4 ch-2’s) (6 tr + 2 dc + 2 ch-3’s + 4 ch-2’s) (6 tr + 2 dc + 2 ch-3’s + 4 ch-2’s) (10 tr + 2 dc + 4 ch-3’s + 5 ch-2’s)
Row 13: Alt-dc in the first st, ch 2, skip the next tr & ch-2, (work 4 dc in the next ch-2 sp, ch 8, skip the next 4 tr & 2 ch-3’s) work from ( to ) (1, 1, 1, 2) times, then work 4 dc in the next ch-2 sp, ch 2, skip the next tr & ch-2, dc in the last st. Turn. (1 ch-8 + 10 dc + 2 ch-2’s) (1 ch-8 + 10 dc + 2 ch-2’s) (1 ch-8 + 10 dc + 2 ch-2’s) (2 ch-8 + 14 dc + 2 ch-2’s)
Repeat Rows 10 – 13 until you have the same number of rows as the previous Upper Panels.
Fasten off. Weave in ends. Continue on to the Shoulder Seams below.
Front Left Panel – Sizes S / L / 4X
Changes for Sizes as Follows: S (L, 4X)
Stitch Counts as Follows: (S, L, 4X)
Row 1: With yarn & a 3.50mm crochet hook, join yarn with a standing dc in the ch-2 space marked with a SM, work 1 more dc in the same ch-2 sp, (ch 8, skip the next 4 tr & 2 ch-3’s, work 4 dc in the next ch-2 sp) work from ( to ) 2 (3, 4) times, then ch 2, skip the next tr & ch-2, dc in the last t. Turn. (2 ch-8’s + 11 dc + 1 ch-2) (3 ch-8’s + 15 dc + 1 ch-2) (4 ch-8’s + 19 dc + 1 ch-2)
Row 2: Alt-dc in the first st, [ ch 3, tr in the next dc, skip each of the next 2 dc, tr in the next dc, ch 3, (tr, ch 2, tr) in the sp between the next 2 tr’s 2 rows down ] work from [ to ] 2 (3, 4) times, then skip the next dc, tr in the last st. Turn. (9 tr + 1 dc + 4 ch-3’s + 2 ch-2’s) (13 tr + 1 dc + 6 ch-3’s + 3 ch-2’s) (17 tr + 1 dc + 8 ch-3’s + 4 ch-2’s)
Row 3: Alt-dc in the first st, skip the next tr, (work 4 dc in the next ch-2 sp, ch 8, skip the next 2 ch-3’s & 4 tr) work from ( to ) 2 (3, 4) times, then dc in the last st. Turn. (2 ch-8’s + 10 dc) (3 ch-8’s + 14 dc) (4 ch-8’s + 18 dc)
Row 4: Alt-dc in the first st, ch 2, (tr, ch 2, tr) in the sp between the next 2 tr’s 2 rows down, [ch 3, tr in the next dc, skip each of the next 2 dc, tr in the next dc, ch 3, (tr, ch 2, tr) in the sp between the next 2 tr’s 2 rows down] work from [ to ] 1 (2, 3) times, then ch 3, tr in the next dc, skip each of the next 2 dc, tr in the next dc, skip the last st. Turn. (8 tr + 1 dc + 3 ch-3’s + 3 ch-2’s) (12 tr + 1 dc + 5 ch-3’s + 4 ch-2’s) (16 tr + 1 dc + 7 ch-3’s + 5 ch-2’s)
Row 5: Skip the first st, alt-dc in the next st, skip the next tr & ch-3, (work 4 dc in the next ch-2 sp, ch 8, skip the next 4 tr & 2 ch-3’s) work from ( to ) 1 (2, 3) times, then work 4 dc in the next ch-2 sp, ch 2, skip the next tr & ch-2, dc in the last st. Turn. (1 ch-8 + 10 dc + 1 ch-2) (2 ch-8’s + 14 dc + 1 ch-2) (3 ch-8’s + 18 dc + 1 ch-2)
Row 6: Alt-dc in the first st, ch 3, tr in the next dc, skip each of the next 2 dc, tr in the next dc, [ch 3, (tr, ch 2, tr) in the sp between the next 2 tr’s 2 rows down, ch 3, tr in the next dc, skip each of the next 2 dc, tr in the next dc] work from [ to ] 1 (2, 3) times, then skip the last st. Turn. (6 tr + 1 dc + 3 ch-3’s + 1 ch-2) (10 tr + 1 dc + 5 ch-3’s + 2 ch-2’s) (14 tr + 1 dc + 7 ch-3’s + 3 ch-2’s)
Row 7: Skip the first st, alt-tr in the next st, skip the next tr & ch-3, (work 4 dc in the next ch-2 sp, ch 8, skip the next 2 ch-3’s & 4 tr) work from ( to ) 1 (2, 3) times, then dc in the last st. Turn. (1 ch-8 + 5 dc + 1 tr) (2 ch-8’s + 9 dc + 1 tr) (3 ch-8’s + 13 dc + 1 tr)
Do not fasten off. Continue on to the instructions for the size you’re making.
Size S – Front Left Panel Continued
Row 8: Alt-dc in the first dc, ch 2, (tr, ch 2, tr) in the sp between the next 2 tr’s 2 rows down, ch 3, tr in the next dc, skip each of the next 2 dc, tr in the next dc, ch 3, dc in the last st. Turn. (4 tr + 2 dc + 1 ch-3 + 3 ch-2’s)
Row 9: Alt-dc in the first st, ch 8, skip the next 3 tr & 2 ch-3, work 4 dc in the next ch-2 sp, ch 2, dc in the last st. Turn. (6 dc + 1 ch-8 + 1 ch-2)
Row 10: Alt-dc in the first st, ch 3, tr in the next dc, skip each of the next 2 dc, tr in the next dc, ch 3, (tr, ch 2, tr) in the sp between the next 2 tr’s 2 rows down, ch 2, dc in the last st. Turn. (2 dc + 4 tr + 2 ch-3’s + 2 ch-2’s)
Row 11: Alt-dc in the first st, ch 2, skip the next tr & ch-2, work 4 dc in the next ch-2 sp, ch 8, skip each of the next 3 tr’s and 2 ch-3, dc in the last st. Turn. (6 dc + 1 ch-8 – 1 ch-2)
Row 12: Alt-dc in the first st, ch 2, (tr, ch 2, tr) in the sp between the next 2 tr’s 2 rows down, ch 3, tr in the next dc, skip each of the next 2 dc, tr in the next dc, ch 3, dc in the last st. Turn. (4 tr + 2 dc + 2 ch-2’s + 2 ch-3’s)
Repeat Rows 9 – 12 until you have the same number of rows as the previous Upper Panels.
Fasten off. Weave in ends. Continue on to the Shoulder Seams below.
Sizes (L, XL) – Front Left Panel Continued
Row 8: Alt-dc in the first st, ch 2, (tr, ch 2, tr) in the sp between the next 2 tr’s 2 rows down, [ ch 3, tr in the next dc, skip each of the next 2 dc, tr in the next dc, ch 3, (tr, ch 2, tr) in the sp between the next 2 tr’s 2 rows down ] work from [ to ] (1, 2) times, then ch 3, tr in the next dc, skip each of the next 2 dc, tr in the next dc, skip the last st. Turn. (8 tr + 1 dc + 3 ch-3’s + 3 ch-2’s) (12 tr + 1 dc + 5 ch-3’s + 4 ch-2’s)
Row 9: Alt-dc in the first st, skip the next 2 tr & ch-3, (work 4 dc in the next ch-2 sp, ch 8, skip the next 4 tr & 2 ch-3’s) work from ( to ) (1, 2) times, then work 4 dc in the next ch-2 sp, ch 2, skip the next tr & ch-2, dc in the last st. Turn. (1 ch-8 + 10 dc + 2 ch-2’s) (2 ch-8 + 14 dc + 2 ch-2’s)
Row 10: Alt-dc in the first st, ch 3, tr in the next dc, skip each of the next 2 dc, tr in the next dc, [ ch 3, (tr, ch 2, tr) in the sp between the next 2 tr’s 2 rows down, ch 3, tr in the next dc, skip each of the next 2 dc, tr in the next dc ] work from [ to ] (1, 2) times, then ch 3, dc in the last st. Turn. (6 tr + 2 dc + 4 ch-3’s + 1 ch-2) (10 tr + 2 dc + 6 ch-3’s + 2 ch-2’s)
Row 11: Alt-dc in the first st, (ch 8, skip the next 2 ch-3’s & 4 tr, work 4 dc in the next ch-2 sp) work from ( to ) (1, 2) times, ch 8, skip the next 2 ch-3’s & 2 tr, dc in the last st. Turn. (2 ch-8’s + 6 dc) (3 ch-8’s + 10 dc)
Row 12: Alt-dc in the first st, ch 2, (tr, ch 2, tr) in the sp between the next 2 tr’s 2 rows down, [ ch 3, tr in the next dc, skip each of the next 2 dc, tr in the next dc, ch 3, (tr, ch 2, tr) in the sp between the next 2 tr’s 2 rows down ] work from [ to ] (1, 2) times, then ch 2, dc in the last st. Turn. (6 tr + 2 dc + 2 ch-3’s + 4 ch-2’s) (10 tr + 2 dc + 4 ch-3’s + 5 ch-2’s)
Row 13: Alt-dc in the first st, ch 2, skip the next tr & ch-2, (work 4 dc in the next ch-2 sp, ch 8, skip the next 4 tr & 2 ch-3’s) work from ( to ) (1, 2) times, then work 4 dc in the next ch-2 sp, ch 2, skip the next tr & ch-2, dc in the last st. Turn. (1 ch-8 + 10 dc + 2 ch-2’s) (2 ch-8 + 14 dc + 2 ch-2’s)
Repeat Rows 10 – 13 until you have the same number of rows as the previous Upper Panels.
Fasten off. Weave in ends. Continue on to the Shoulder Seams below.
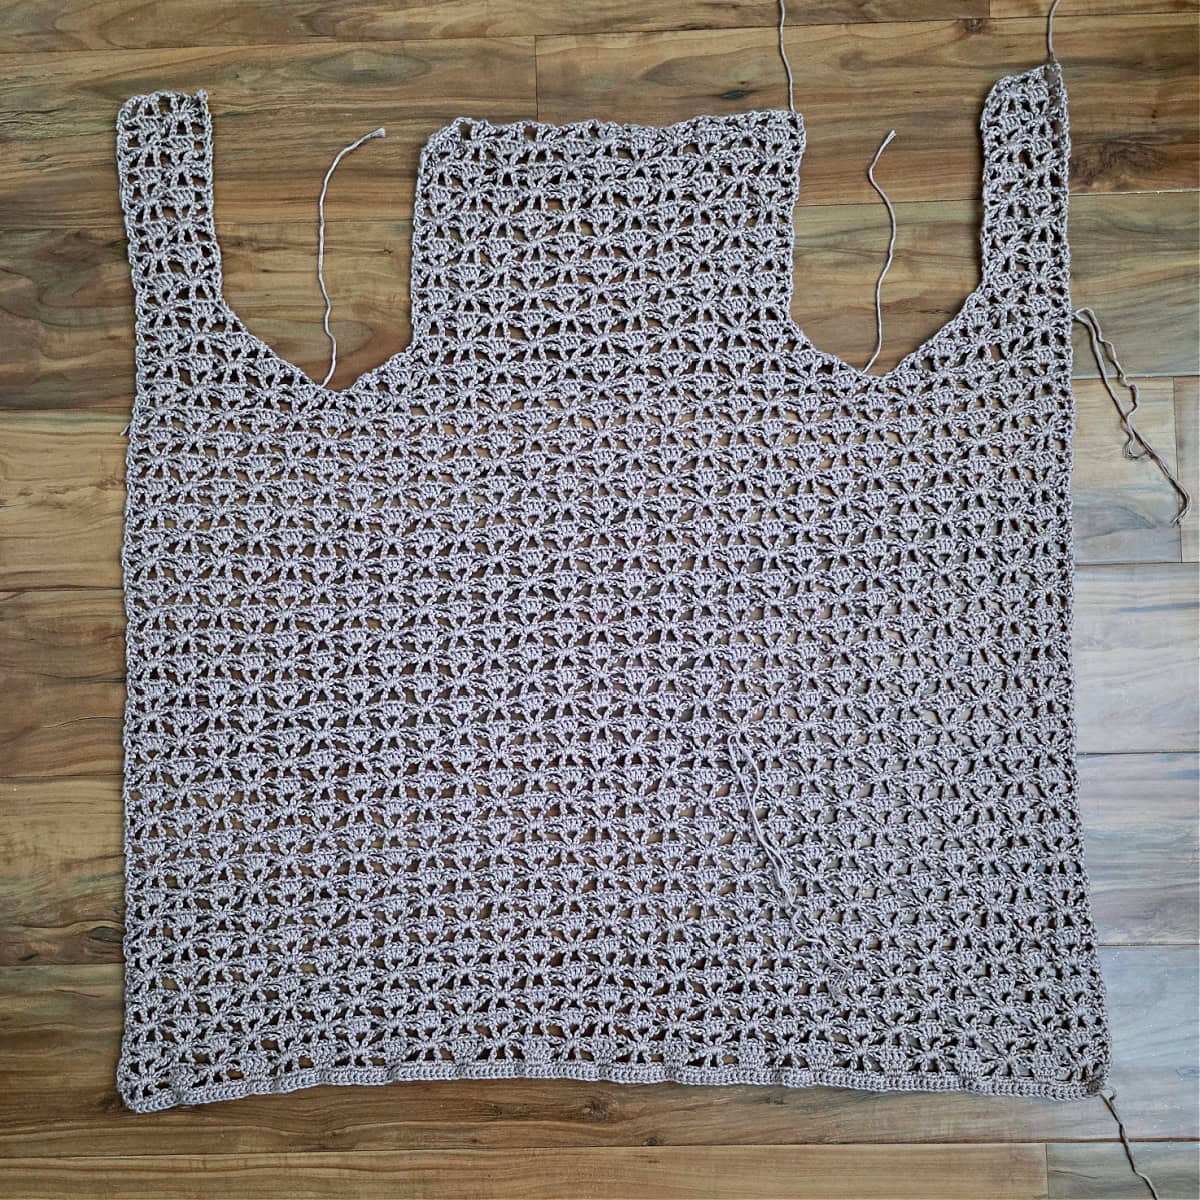
Shoulder Seams
I have a step-by-step photo tutorial of the Mattress Stitch Seam.
Fold the front right & left panels inward, lining up the inside corners of the front panels with the corners on the back panel. Use locking stitch markers to hold them in place.
From the corners, line up the stitches on the front panels with stitches on the back panel. Use locking stitch markers to hold the shoulders in place.
With a yarn needle and length of yarn 3 – 4 times the width of the shoulder seam, use the mattress stitch seaming technique to seam the shoulders.
Weave in ends. Continue on to the Front Opening Edging.

Front Opening Edge
Right Side / Wrong Side is not crucial for this project, but now you need to choose a side to be the right side.
The Front Opening Edging is worked up one side of the front opening of the vest, across the top of the back panel, and down the opposite side of the front opening.
Gauge: Gauge isn’t crucial for this step. The most important thing is that your edging lays flat. If your edging starts becoming wavy as you work, drop down a hook size or two. If your edging starts puckering, try going up a hook size or two.
Row 1 (RS): With the chosen RS facing you and with yarn & a 3.75mm crochet hook, join yarn with a standing sc in the lower left corner of the vest front opening, working all the way up and around the front opening, work 1 sc in each sc and 2 sc into each dc. Turn. Stitch count should be a multiple of 2 + 1 (or an odd number).
Row 2: Ch 1, sc in the first st, (ch 1, skip the next st, sc in the next st) work from ( to ) across. Turn.
Row 3: Ch 1, sc in the first st, (ch 1, skip the next ch-1, sc in the next sc) work from ( to ) across. Turn.
Rows 4 – 9: Rep Row 3.
Fasten off. Weave in ends. Continue on to the Bottom Stabilizing Edge.
Bottom Stabilizing Edge
The purpose of this step is to add stability to the bottom edge and give it a nice polished look.
Gauge: Make sure not to work the slip stitches tightly or it will greatly affect the size and stretch of your vest. Your slip stitches should be at same size or slightly larger than the stitches you’re working into. Adjust hook sizes, if necessary.
Row 1 (RS): With yarn & a 3.50mm crochet hook, join yarn with a sl st in either corner stitch along the bottom edge, sl st (aka surface crochet) in each st across to the opposite corner. Stitch count is not crucial.
Fasten off. Weave in ends. Continue on to Armhole Edging.
Armhole Edging
The purpose of this step is to add stability to the bottom edge and give it a nice polished look.
Gauge: Make sure not to work the slip stitches tightly or it will greatly affect the size and stretch of your vest. Your slip stitches should be at same size or slightly larger than the stitches you’re working into. Adjust hook sizes, if necessary.
Rnd 1 (RS): With yarn & a 3.50mm crochet hook, join yarn with a standing sc in a st at the bottom of the armhole opening, work 2 sc into each dc and 1 sc into each sc around the armhole opening. Join with a sl st to the 1st st. Stitch count is not crucial.
Rnd 2: Ch 1, sc in the first st, (ch 1, skip the next st, sc in the next st) work from ( to ) around. Join with a sl st to the 1st st. Stitch count is not crucial. It doesn’t matter if you end the round with a sc or a ch-1.
Fasten off. Weave in ends. Repeat for the second armhole opening. Continue on to Ties.
Ties (Make 2)
Row 1: With yarn & a 3.75mm crochet hook, create a ch that is 18″ long. Switch to a 3.50mm crochet hook, working into the back humps of the foundation ch, sc into the 2nd ch from your hook and in each ch across. Stitch count is not crucial.
Fasten off leaving a tail of yarn long enough to attach the tie to the vest. Make second tie then attach them to the front vest opening as shown in the photo. Weave in ends.
Now that your crochet summer vest is completed, add a professional finish by blocking it.
I MADE IT! NOW WHAT?
Pin this post!: Save this summer crochet vest pattern to your Pinterest boards so that you can come back and make it again.
Leave a comment below: We love to hear your feedback.
Share Your Finished Projects on Facebook or Instagram: I love to see your finished projects! Share with us on social media and tag me @acrochetedsimplicity or use the hashtag #ACrochetedSimplicity so I can find your posts.
Join us in the Facebook Community Group!
Come share your finished projects with us in the A Crocheted Simplicity Crochet Community Group on Facebook. Join us for fun community events such as crochet alongs, join in on crochet conversations, ask questions, get advice, and share your love for crochet!

More Free Crochet Summer Top Patterns I Think You’ll Love
- Honeycomb Mesh Crochet Top
- Chantilly Crochet Summer Top
- Summer Splendor Crochet Cardigan
- Summer Lovin’ Crochet Beach Cover-Up
- Wandering Free Crochet Summer Top
More Summer Crochet Top Patterns
Are you looking for more crochet summer top patterns free? We have several more patterns for women’s crochet tops, including tops, cardigans, and beach cover-ups.
We also have a few premium summer crochet top patterns as well.