Mila Crochet Cardigan Sweater Pattern
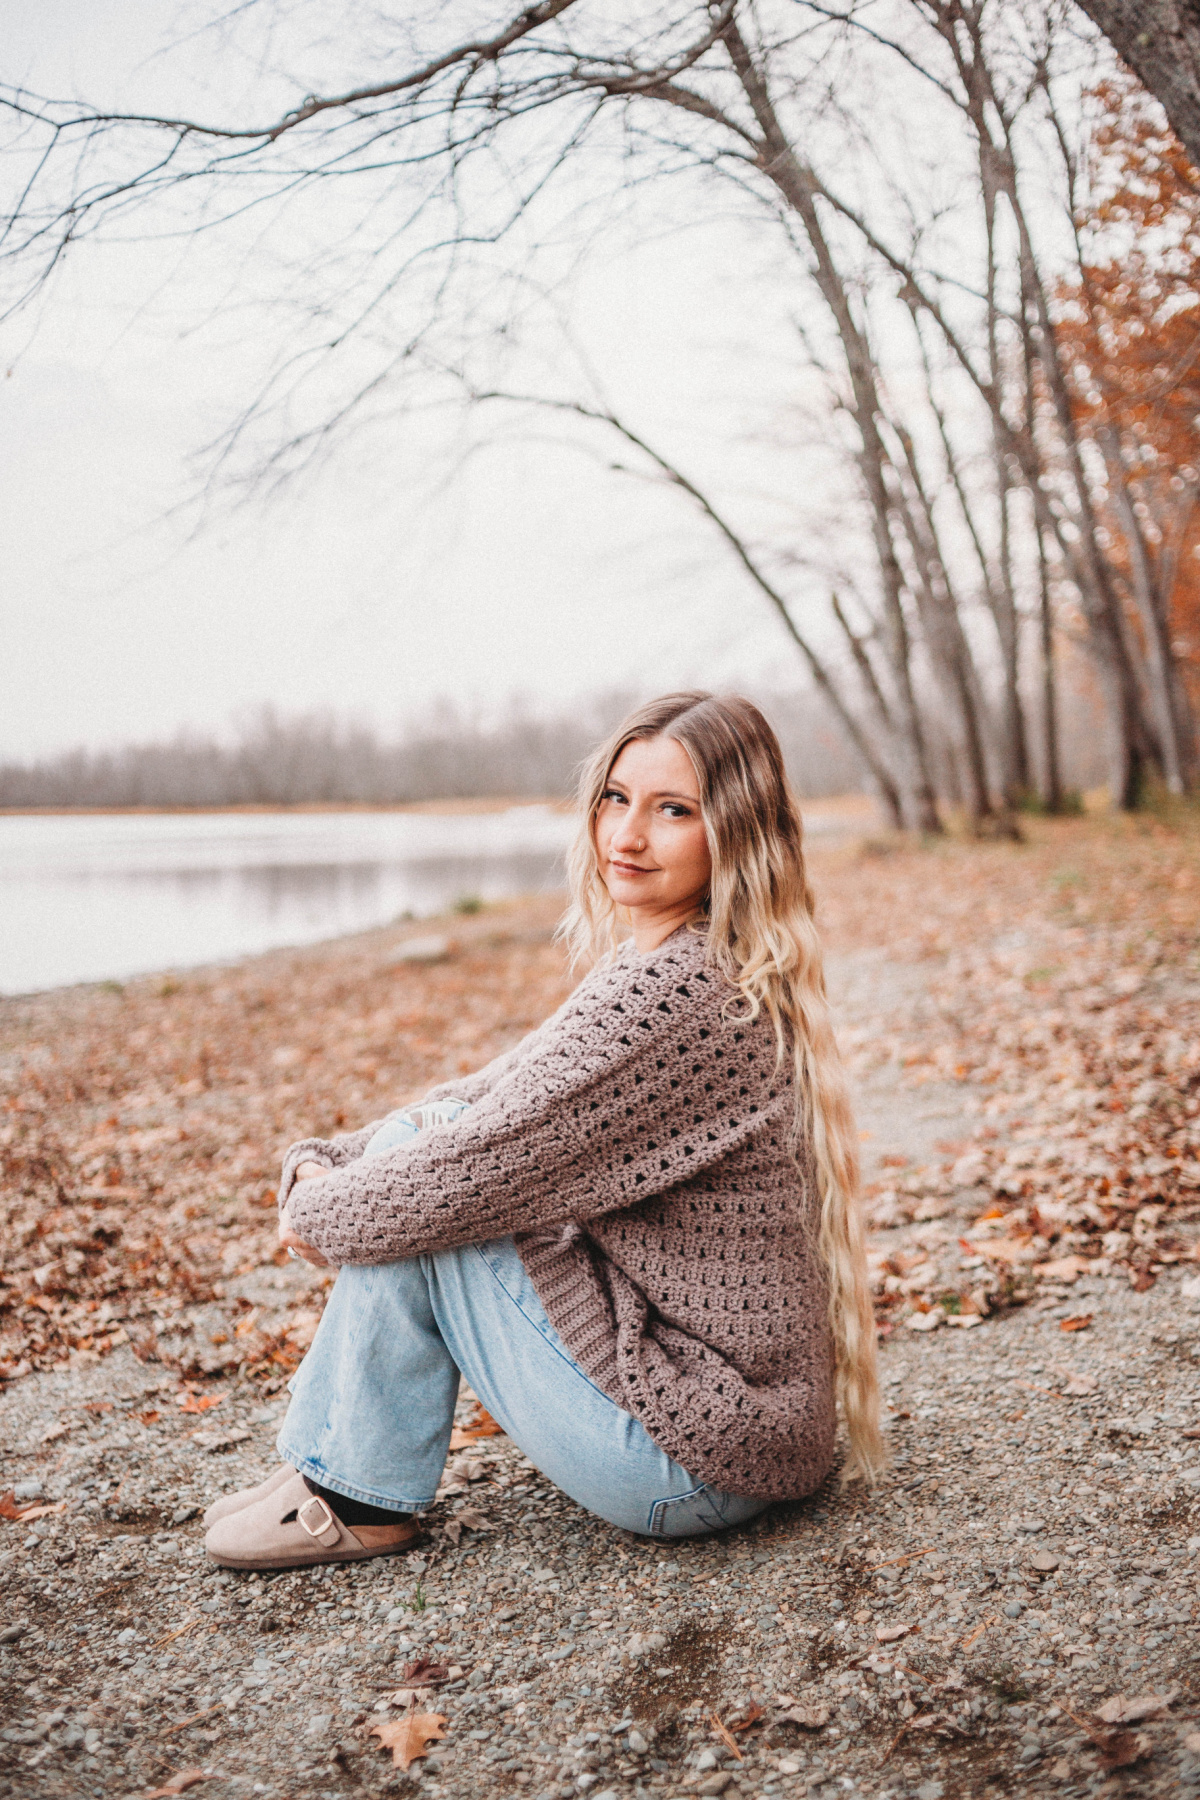
Work up this crochet cardigan sweater pattern as a wardrobe essential because of its comfortable fit and spacious pockets. You can keep your hands warm or store your keys and phone inside while you’re out and about. And if you’re a confident beginner looking to add a unique new stitch combination to your library, this is the pattern for you!
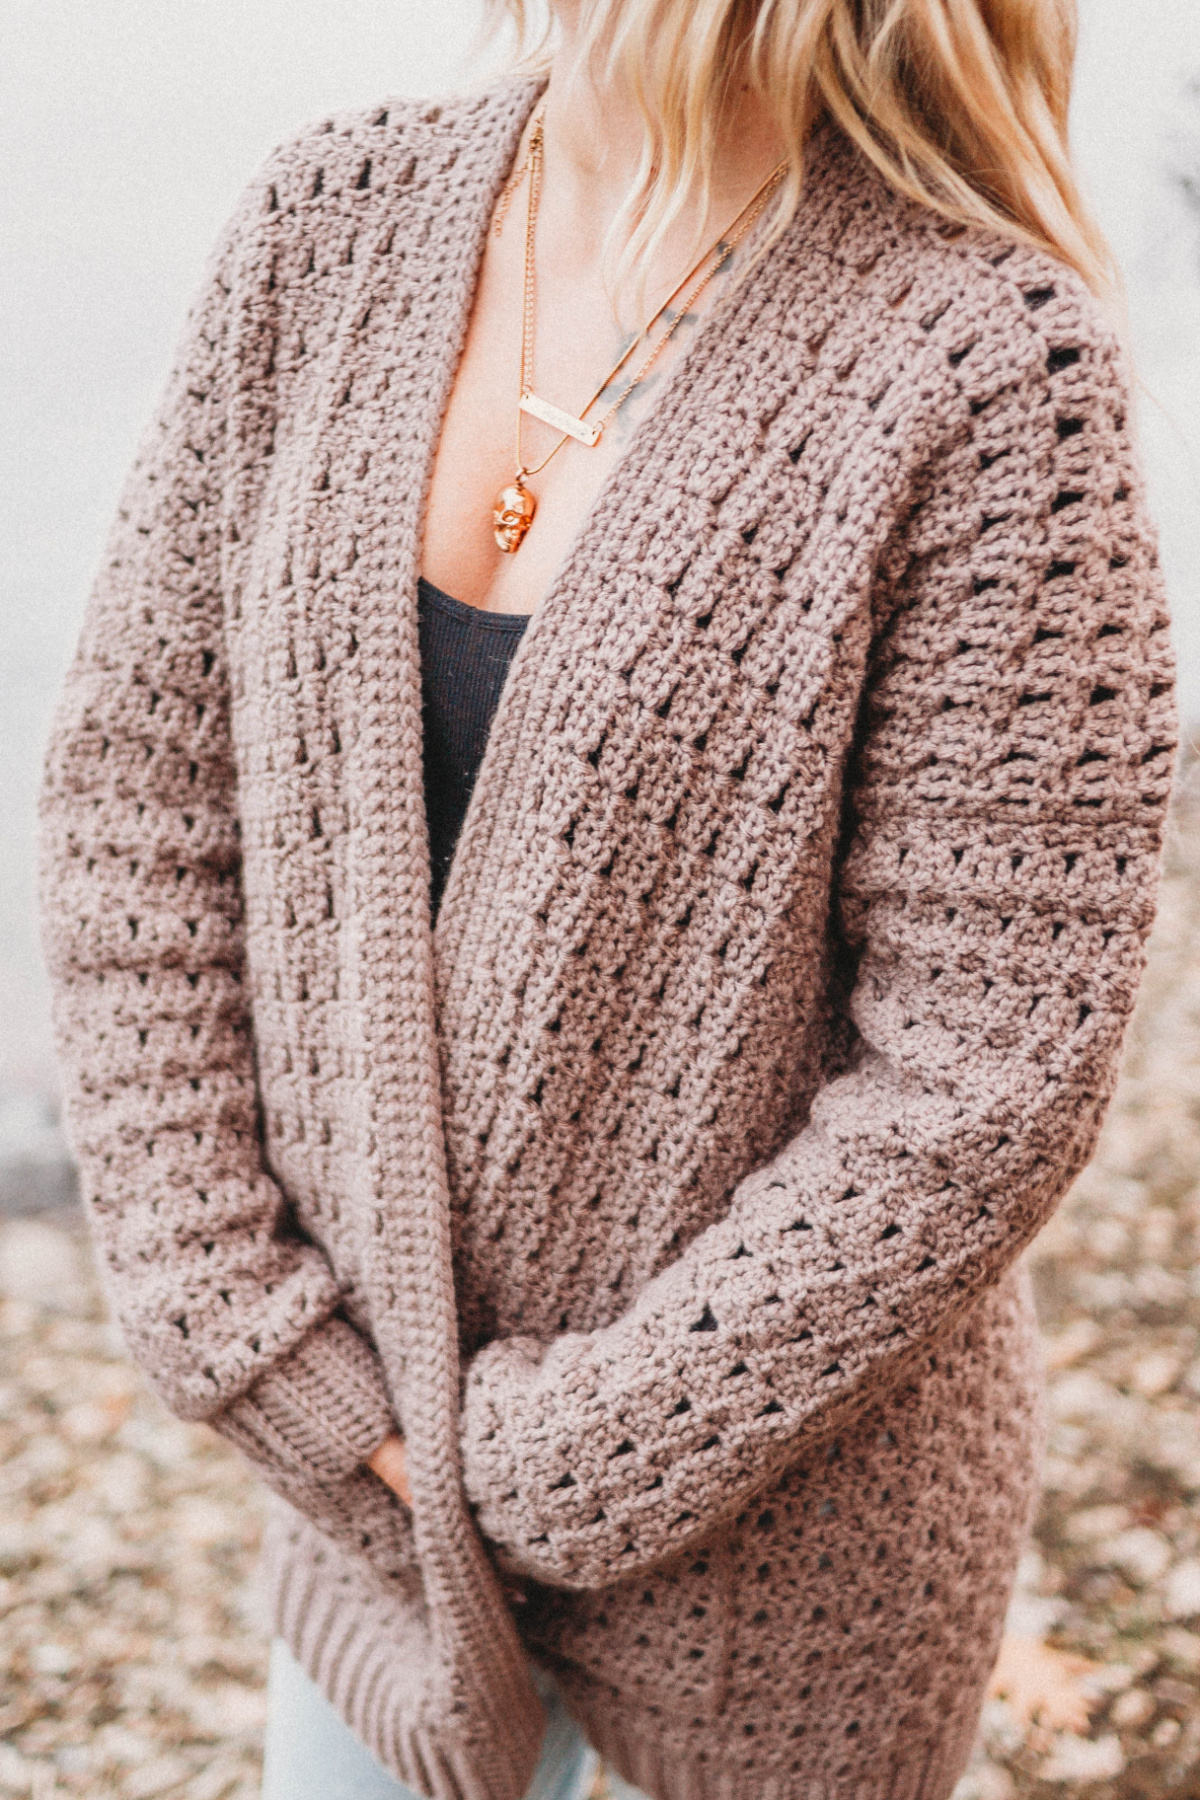
The final look of the Mila Crochet Cardigan is very solid but keeps some space for ventilation, allowing it to be an amazing piece for layering year-round. The construction is very easy as well, making this the ideal beginner cardigan for someone who’s just stepping into the world of handmade garments.
You’ll find the free crochet cardigan sweater pattern in the post below, or you can find an ad-free printable PDF (that includes all photo tutorials + schematic), on Ravelry, or Etsy (aff).
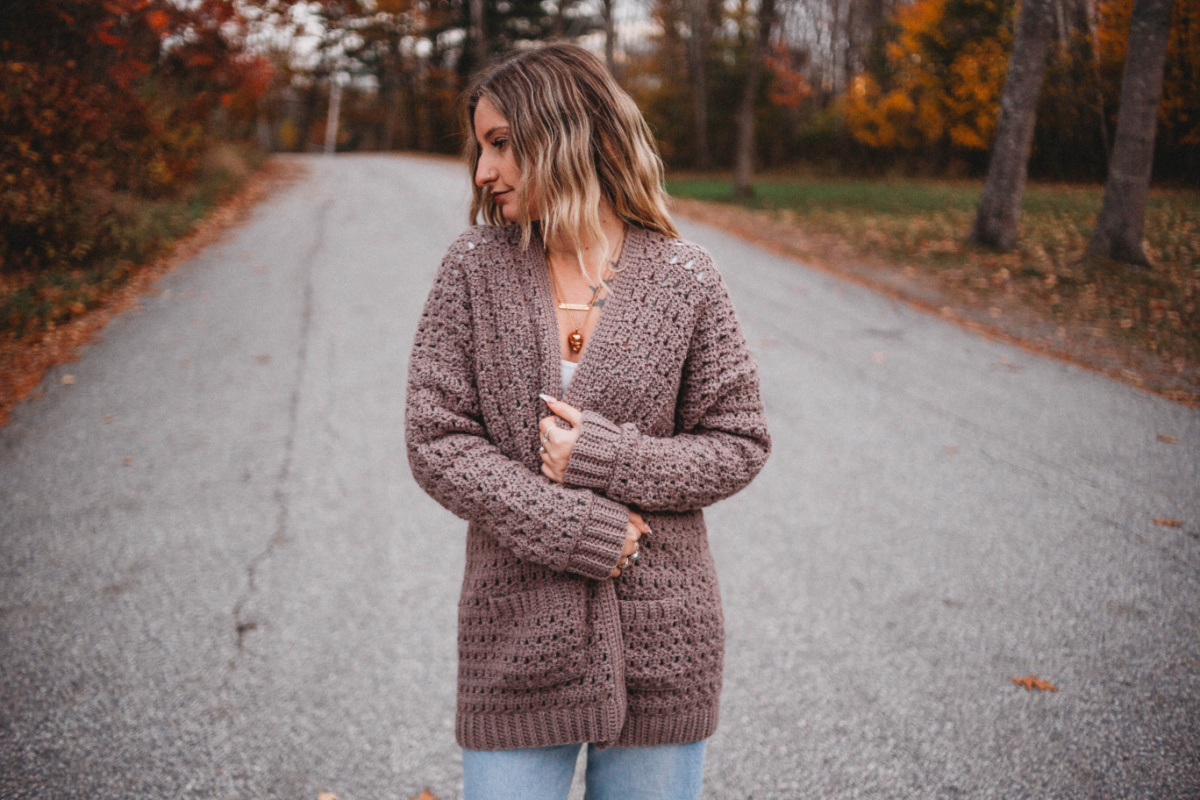
Crocheting a comfortable sweater like this one is a very rewarding project because not only do you get a cozy, custom-fit piece that matches your style, but you also make something meaningful with your own hands. The choice is up to you whether you keep it for yourself or give it to a loved one as a handmade present full of affection and care.
The Mila Cardigan acts as the perfect companion for a breezy evening walk, a relaxed picnic with friends, or a quiet morning spent outdoors with a warm drink. The crocheting process itself is soothing because the pattern has all you need to know for a stress-free journey.
Related: If you want to make another cardigan with lots of warmth packed in it, you should check out the Cozy Cabled Crochet Cardigan.
How to Crochet a Cardigan
This crochet cardigan sweater pattern has an easy construction that you’ll be able to grasp in your first go! You’ll start from the bottom hem and work up to the shoulders to create the main body.
To do so, first, you’ll crochet the wide ribbed bottom edge, then crochet the body onto the long edge of this ribbed edging. Once you reach the bottom of the armholes, you’ll split this into three panels and crochet the upper right panel, then back panel, then upper left panel.
You’ll then seam the shoulders, bringing all of the panels together. Next, crochet the sleeves right onto the armhole openings.
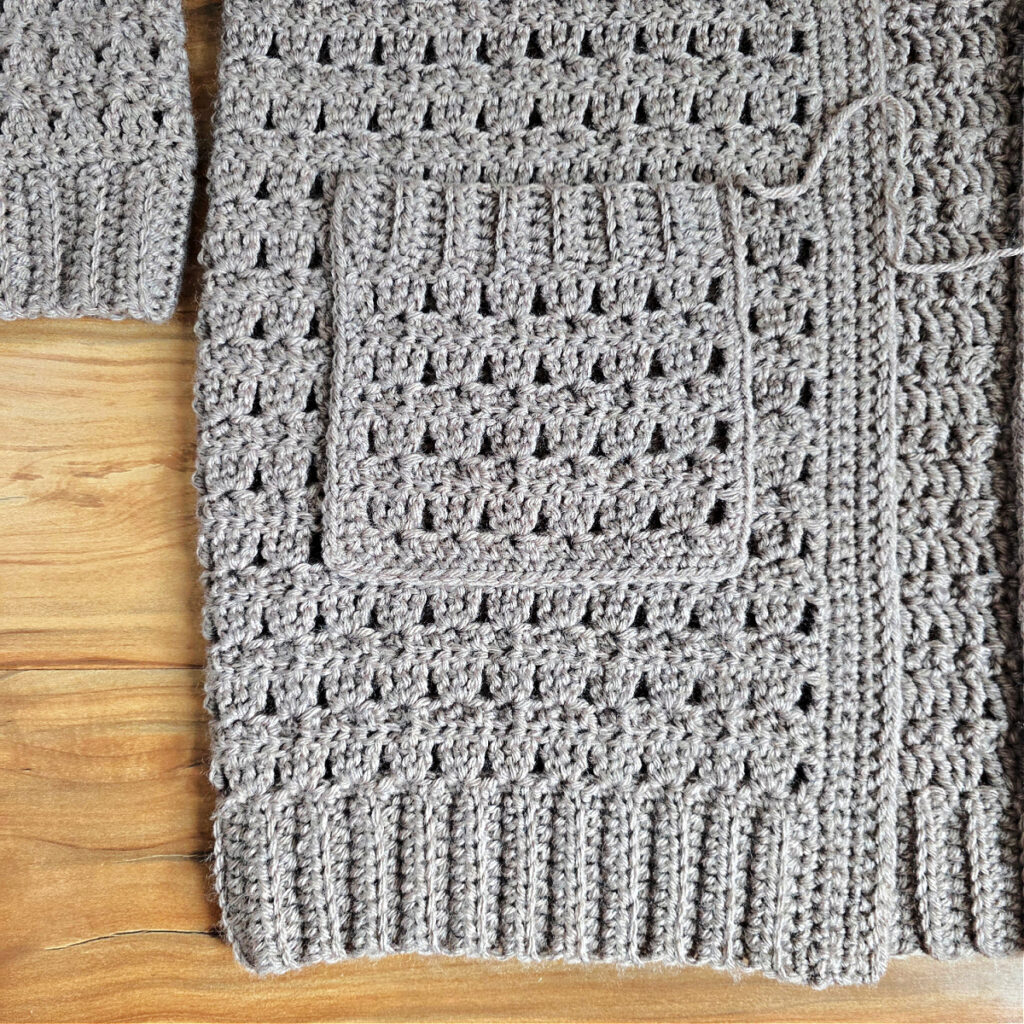
That makes the entirety of the cardigan, minus the edging. Try it on to make sure it fits perfectly! As a finishing touch, you’ll add a simple edging around the front opening of the cardigan. Lastly, pockets are crocheted and sewn onto the cardigan (you can skip this step if you don’t want pockets).
How To Get The
Mila Crochet Cardigan Sweater Pattern
Option 1: Scroll down for the free sweater crochet pattern right here in this blog post.
Option 2: Purchase the ad-free printable PDF from one of my shops:
Best Yarn for Crochet Sweaters
For crochet sweaters, while there are many options to choose from, I used an acrylic and wool blend yarn. The added wool content gives it extra warmth and makes it the ideal garment for cold winters. Because of the acrylic, it holds its shape well and has good stitch definition, which is especially great for patterns that have ribbing such as this one.
It’s also readily available and can come in a variety of colors which allows you to choose just the right one for whoever is receiving this crochet sweater.
Choosing Which Size to Crochet
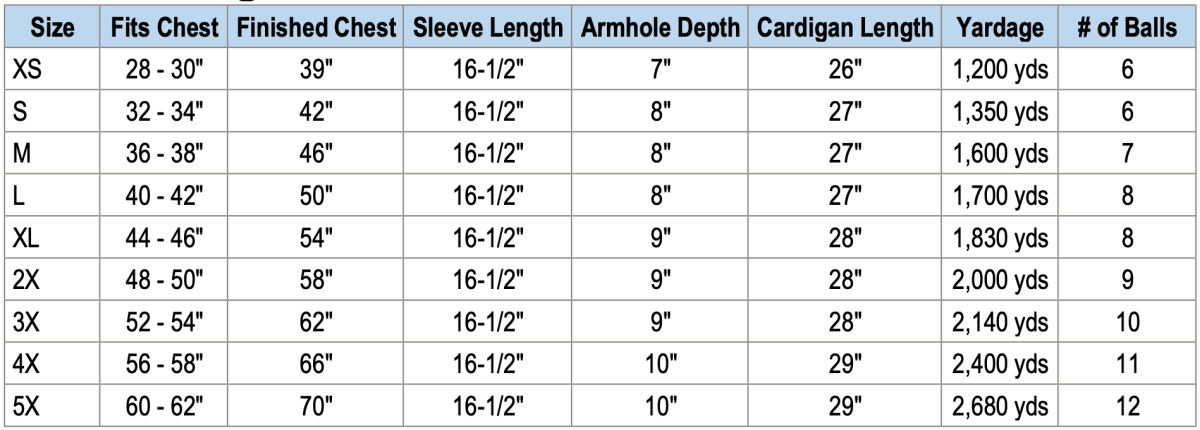
To choose your size, look over the size chart below.
- ‘Fits Chest’ measurement is the measurement of the intended wearer, not the garment’s finished measurement.
- Finished Chest, Sleeve Length, and Cardigan Length are measurements of the finished garment.
- This cardigan has 8-12″+ of positive ease built in for an oversized fit.
- If you prefer more classic fitting cardigan, I would suggest making one size smaller (as long as your chest size fits range of the smaller size).
- Cardigan length is measured from the nape of the neck down and includes the bottom ribbing.
- Sleeve length is measured from the underarm of the cardigan to edge of the cuff.
- Adjusting Sleeve Length: If you need to adjust sleeve length, there are instructions with how to do so in the sleeve section.
Size & Yardage Chart
The notes above refer to this size chart.
Oversized vs. Classic Fit
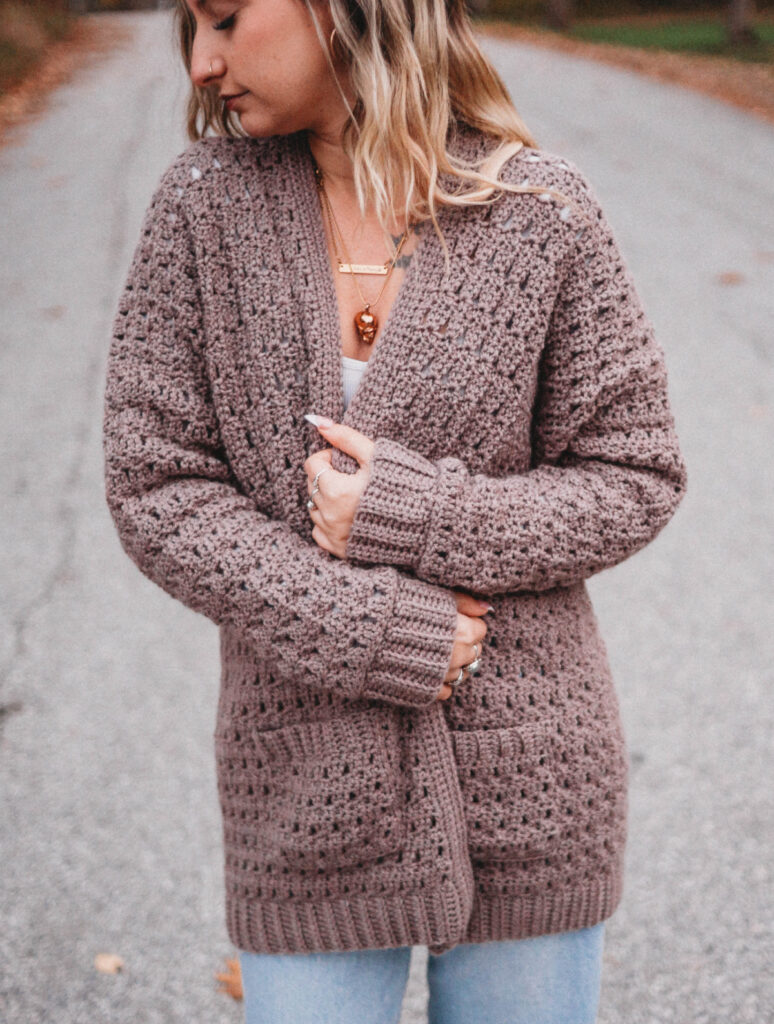
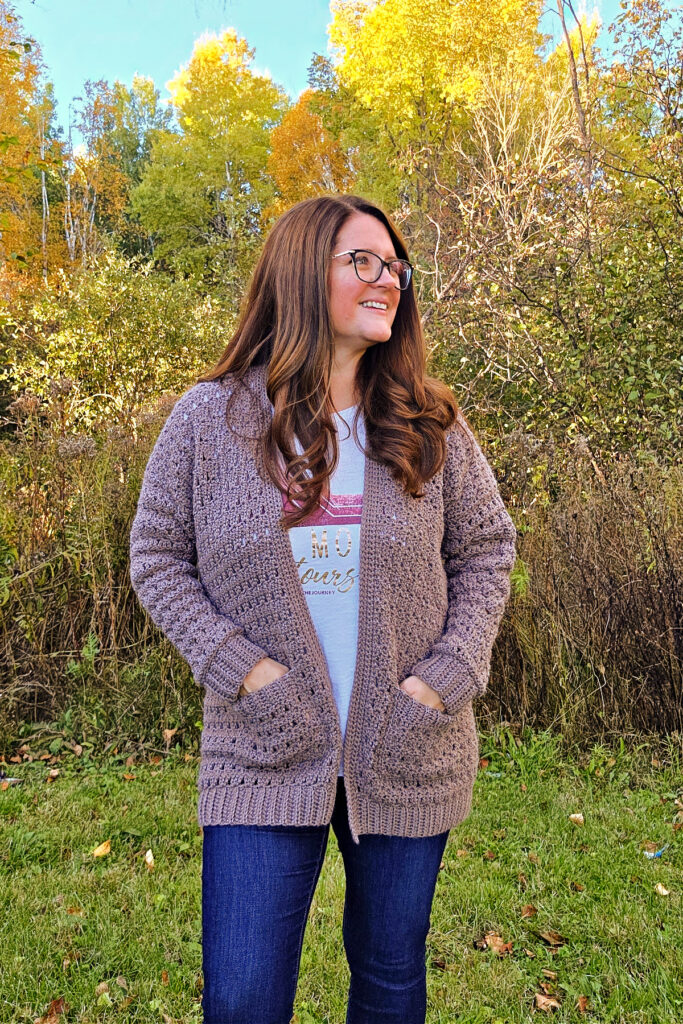
This cardigan has 8″ to 12” of positive ease for an oversized fit. If you want to have an oversized comfortable fit to it, then you can make your normal size. Otherwise, I would recommend that you size down for a more classic fit. You can see the difference below.
Yarn
This women’s crochet sweater was designed with a DK weight yarn to make sure it would have a beautiful drape to it while also being warm enough for colder winter days. I chose not to use a bulky yarn for fear it would then be too thick to be worn in the transitioning months of autumn and spring (we want to get the most wear out of this everyday piece).
I chose Lion Brand Wool-Ease DK in Taupe for my crochet sweater. This is a DK weight / 3, acrylic and wool blend yarn and it’s currently available in beautiful solid colors. This yarn offers a smooth even texture in a contemporary color palette with plenty of neutral tones.
Mila Crochet Cardigan – Free Pattern
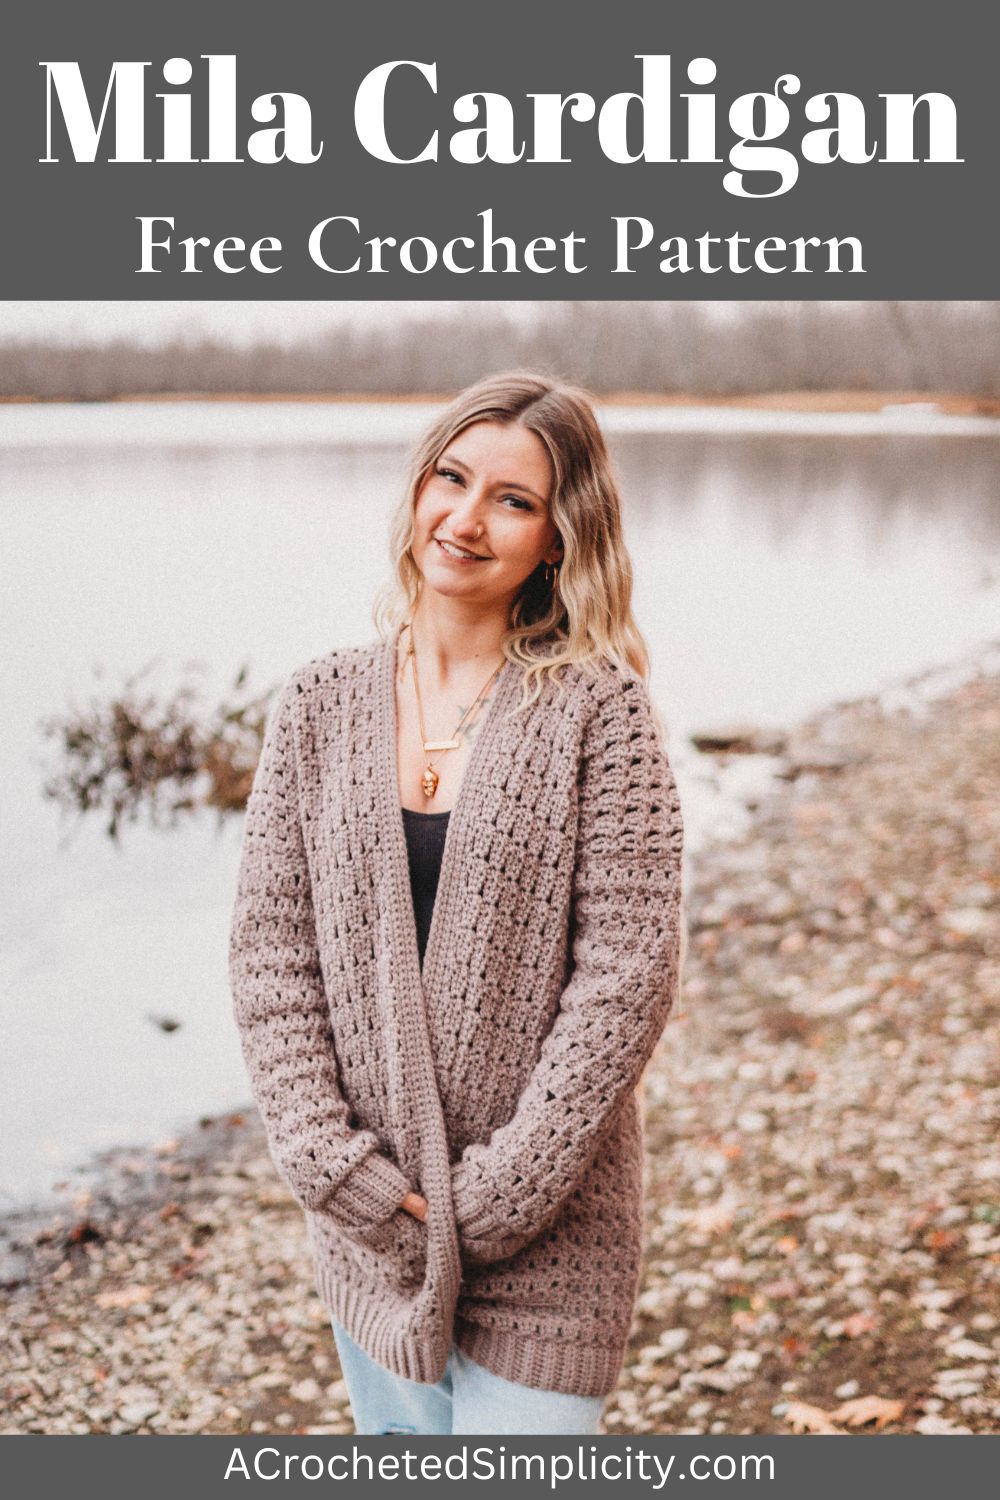
The crochet women’s cardigan pattern is free below, but if you love to work offline, I’ve got a couple other great options for you.
Purchase the ad-free, printable PDF, (that includes all photo tutorials, + a garment schematic), on Ravelry, or on Etsy (aff).
Purchase the Crochet Cardigan Kit: Lion Brand has a full crochet kit of the Mila Crochet Cardigan, available on their website. The includes your choice of colors and a digital copy of the crochet pattern.
This post contains affiliate links.
Materials
- Yarn: DK Weight / 3 / Yarn, Lion Brand Wool-Ease DK was used for the sample in the photos [80% acrylic / 20% wool (232 yds / 212 m / 85 g / 3 oz)].
- Yardage: See Size Chart Above
- Crochet Hook: I/9/5.50mm; H/8/5.00mm or size needed to obtain gauge (My favorite crochet hooks are the Clover Amour Crochet Hooks, I’ve never had an ache in my hand since switching).
- Measuring Tape
- Locking Stitch Markers or Scraps of Yarn
- Scissors
- Yarn Needle
Abbreviations (US Terms)
- ch(s): chain(s)
- sl st: slip stitch
- st(s): stitch(es)
- sc: single crochet
- hdc: half double crochet
- hdc2tog: half double crochet two together
- tr: treble crochet
- Alt-tr: alternate treble crochet
- ext sc: extended single crochet
- extsc2tog: extended single crochet decrease
- yo: yarn over
- BLO / FLO: back loop only / front loop only
- Rep: repeat
- Rnd: round
- RS: right side; WS: wrong side
Experience Level
- Easy
Gauge
- Gauge is given throughout the pattern in each individual section.
- Gauge swatch instructions are below.
Sizes
- Women’s XS – 5X
- See Size & Yardage Chart above.
Special Stitches
- Extended Single Crochet (ext sc): Insert hook into stitch indicated, yo, pull up a loop, yo, pull thru 1 loop on hook, yo, pull thru remaining two loops on hook.
- Extended Single Crochet Decrease (extsc2tog): Insert hook into stitch indicated, yo, pull up a loop, yo, pull thru 1 loop on hook, insert hook into next st, yo, pull up a loop, yo, pull thru 1 loop on hook, yo, pull thru remaining loops on hook.
- Half Double Crochet Decrease (hdc2tog): (Yo, insert hook into next stitch, yo, pull up a loop) twice, yo, pull through all loops on your hook.
- Alternate Treble Crochet (alt-tr): After turning your work, do not ch, instead, insert your hook into the first st, yo, pull up a loop, yo, pull thru both loops, insert your hook between the legs of the st just made, yo, pull up a loop, yo, pull thru both loops, insert your hook between the legs of the st just made, yo, pull up a loop, yo, pull through one loop, yo, pull thru remaining loops.
- Join yarn with a standing single crochet: Begin with a slip knot on your hook, insert your hook into the stitch or space indicated, yo, pull up a loop, yo and draw thru both loops on hook.
Pattern Notes
- Turning chains are not included in stitch count.
- The first stitch of each row is worked into the same stitch as the turning chain.
- Yarn Notes: Lion Brand Wool-Ease DK (232 yards / 212 m / 85 g / 3 oz / 80% Acrylic / 20% Wool) was used for the sample in the pictures. Other comparable yarns may be used as long as gauge is met.
- Color & Yardage
- Taupe: #636-125Y
- See Size & Yardage Chart above.
- Changes for Sizes as Follows: XS (S, M, L, XL, 2XL, 3XL, 4XL, 5XL)
- Stitch Counts as Follows: (XS, S, M, L, XL, 2XL, 3XL, 4XL, 5XL)
- Construction Notes: This cardigan is worked from the bottom hem up to the shoulders. First, you’ll crochet the wide ribbed bottom edge, then crochet the body onto the long edge of this ribbed edging. Once you reach the bottom of the armholes, you’ll split this into three panels and crochet the upper right panel, then back panel, then upper left panel. You’ll then seam the shoulders. Next, crochet the sleeves right onto the armhole openings. Next, you’ll add a simple edging around the front opening of the cardigan. Lastly, pockets are crocheted and sewn onto the cardigan.
- Once done, you can block if desired.
Mila Crochet Cardigan Sweater – Written Pattern
Gauge Swatch
Tip: Turn your gauge swatch into one of your pockets. See instructions below.
Gauge: With a 5.00mm crochet hook: 32 sts = 8″; In the stitch pattern as written below: 8 rows = 4″.
Set-up: With yarn & a 5.50mm crochet hook, ch 21.
Row 1 (RS): Switch to a 5.00mm crochet hook, working into the back hump of the foundation ch, ext sc into the 2nd ch from your hook and in each ch across. Turn. (20 sts)
Row 2: Alt-tr in the first st, skip the next st, 3 tr in the next st, * skip each of the next 2 sts, 3 tr in the next st, rep from * across to the last 2 sts, then skip the next st, tr in the last st. Turn. (20 sts) This breaks down to 6 groups of 3 dc + 1 Alt- tr + 1 tr.
Row 3: Ch 1, ext sc in the first st, * FLO ext sc in the next st, BLO ext sc in the next st, rep from * across to the last st, then BOTH LOOPS ext sc in the last st. Turn. (20 sts)
Rows 4 – 7: Rep Rows 2 – 3, 2 times.
Row 8: Rep Row 2.
At this point, your swatch should measure approximately 5″ W x 4″ H.
Making Pockets? If you’re planning to use your gauge swatch for one of your pockets, do not fasten off the swatch. Instead, continue on to Pocket Ribbing on to complete the pocket.
Changes for Sizes as Follows: XS (S, M, L, XL, 2XL, 3XL, 4XL, 5XL)
Stitch Counts as Follows: (XS, S, M, L, XL, 2XL, 3XL, 4XL, 5XL)
Bottom Ribbing
Gauge: With a 5.00mm crochet hook, in BLO hdc: 9 sts = 2.25″; 10 rows = 3.75″.
Row 1: With yarn & a 5.00mm crochet hook, ch 10, working into the back humps of the ch, hdc in the 2nd ch from your hook and in each ch across. Turn. (9 sts)
Rows 2 – 91 (107, 115, 123, 139, 139, 147, 163, 171): Ch 1, BLO hdc in each st across. Turn. (9 sts)
Do not fasten off. Continue on to Body of Cardigan. Your Bottom Ribbing should measure approximately 2.25″ W x 34″ (40″, 43″, 46″, 52″, 52″, 55″, 61″, 64″) L.
Body of Cardigan
Gauge: With a 5.00mm crochet hook: 32 sts = 8″; Rep the stitch pattern in Rows 2 – 3: 8 rows = 4″.
Row 1 (RS): After turning at the end of the last row of the ribbing, rotate to work along the long edge of the ribbing, work 2 sc in the first st, then (2 sc in the next st, sc in the next st) work from ( to ) 42 times. Turn. (137, 161, 173, 185, 209, 209, 221, 245, 257 sts)
Row 2 (WS): Alt-tr in the first st, skip the next st, 3 tr in the next st, * skip each of the next 2 sts, 3 tr in the next st, rep from * across to the last 2 sts, then skip the next st, tr in the last st. Turn. (137, 161, 173, 185, 209, 209, 221, 245, 257 sts) This breaks down to (45, 53, 57, 61, 69, 69, 73, 81, 85) groups of 3 dc + 1 Alt-tr + 1 tr.
Row 3: Ch 1, ext sc in the first st, * FLO ext sc in the next st, BLO ext sc in the next st, rep from * across to the last 2 sts, then FLO ext sc in the next st, BOTH LOOPS ext sc in the last st. Turn. (137, 161, 173, 185, 209, 209, 221, 245, 257 sts)
Rep Rows 2 – 3, making sure to end with a Row 3, until your cardigan measures 19″ (including the bottom ribbing).
Do not fasten off. Continue on to the Upper Front Left Panel.

Upper Front Left Panel
Row 1 (WS): Alt-tr in the first st, skip the next st, 3 tr in the next st, * skip each of the next 2 sts, 3 tr in the next st, work from * 8 (10, 11, 12, 14, 13, 14, 16, 17) times, then skip each of the next 2 sts, 2 tr in the next st, tr in the next st. Place a SM in the next stitch to mark where you’ll later join yarn to begin the Back Panel. Turn. (31, 37, 40, 43, 49, 46, 49, 55, 58 sts)
Row 2: Ch 1, ext sc in the first st, * FLO ext sc in the next st, BLO ext sc in the next st, rep from * across to the last st, then BOTH LOOPS ext sc in the last st. Turn. (31, 37, 40, 43, 49, 46, 49, 55, 58 sts) Note that if the stitch count for the size you’re making is an odd number, you’ll finish the row with a partial repeat, which will be a FLO ext sc, then both loops ext sc. If the stitch count for the size you’re making ends with an even number, you’ll finish the row with a full repeat, then both loops ext sc.
Rows 2 – 14 (16, 16, 16, 18, 18, 18, 20, 20): Rep Rows 1 – 2.
Fasten off, leaving a tail of yarn that is 3 – 4 times the width of the last row. Your panel should measure approximately 7″ (8″, 8″, 8″, 9″, 9″, 9″, 10″, 10″) H. Continue on to the Back Panel.
Back Panel
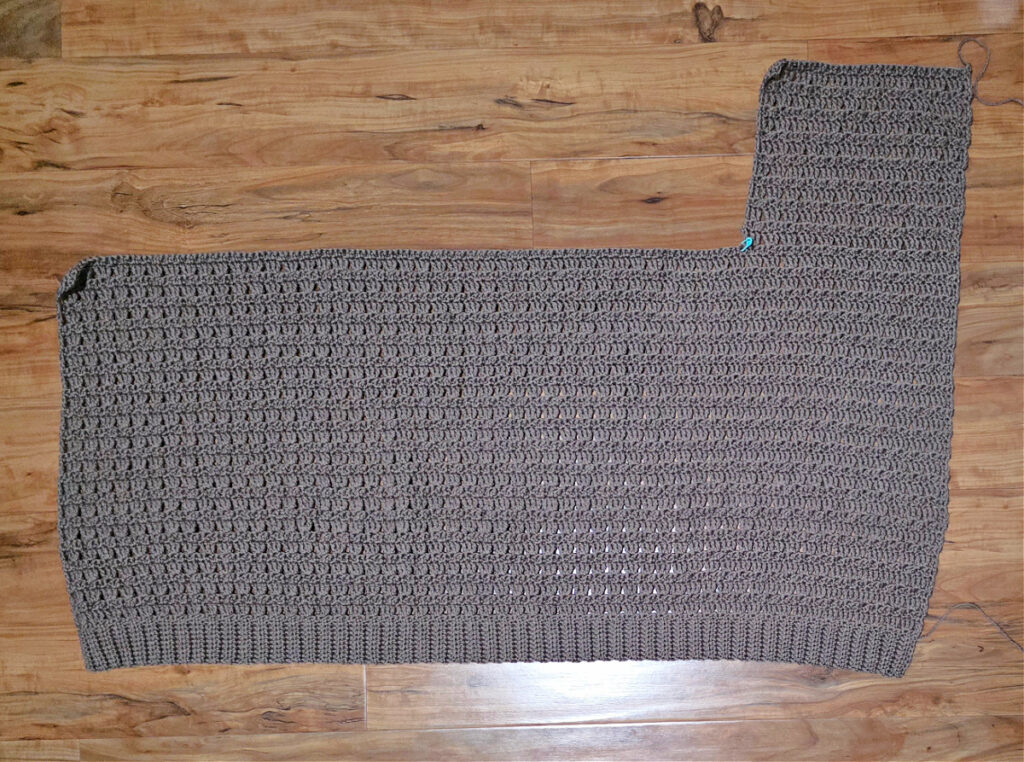
Row 1 (WS): With yarn & a 5.00mm crochet hook, join yarn with a sl st in the st you previously marked with a SM, ch 3, tr in the same st, 2 tr in the next st, * skip each of the next 2 sts, 3 tr in the next st, work from * 23 (27, 29, 31, 35, 37, 39, 43, 45) times, then skip each of the next 2 sts, 2 tr in the next st, tr in the next st. Place a SM in the next stitch to mark where you’ll later join yarn to begin the Upper Front Right Panel. Turn. (75, 87, 93, 99, 111, 117, 123, 135, 141 sts)
Row 2: Ch 1, ext sc in the first st, * FLO ext sc in the next st, BLO ext sc in the next st, rep from * across to the last st, then BOTH LOOPS ext sc in the last st. Turn. (75, 87, 93, 99, 111, 117, 123, 135, 141 sts)
Row 3: Alt-tr in the first st, 2 tr in the next st, * skip each of the next 2 sts, 3 tr in the next st, work from * 23 (27, 29, 31, 35, 37, 39, 43, 45) times, then skip each of the next 2 sts, 2 tr in the next st, tr in the next st. Turn. (75, 87, 93, 99, 111, 117, 123, 135, 141 sts)
Rows 4 – 13 (15, 15, 15, 17, 17, 17, 19, 19): Rep Rows 2 – 3.
Rows 14 (16, 16, 16, 18, 18, 18, 20, 20): Rep Row 2.
Fasten off. Weave in ends. Your panel should measure approximately 7″ (8″, 8″, 8″, 9″, 9″, 9″, 10″, 10″) H. Continue on to the Upper Front Right Panel.

Upper Front Right Panel
Row 1 (WS): With yarn & a 5.00mm crochet hook, join yarn with a sl st in the st you previously marked with a SM, ch 3, tr in the same st, 2 tr in the next st,* skip each of the next 2 sts, 3 tr in the next st, work from * 9 (11, 12, 13, 15, 14, 15, 17, 18) times, then skip the next st, tr in the last st. Turn. (31, 37, 40, 43, 49, 46, 49, 55, 58 sts)
Row 2: Ch 1, ext sc in the first st, * FLO ext sc in the next st, BLO ext sc in the next st, rep from * across to the last st, then BOTH LOOPS ext sc in the last st. Turn. (31, 37, 40, 43, 49, 46, 49, 55, 58 sts) Note that if the stitch count for the size you’re making is an odd number, you’ll finish the row with a partial repeat, which will be a FLO ext sc, then both loops ext sc. If the stitch count for the size you’re making ends with an even number, you’ll finish the row with a full repeat, then both loops ext sc.
Rows 2 – 14 (16, 16, 16, 18, 18, 18, 20, 20): Rep Rows 1 – 2.
Fasten off, leaving a tail of yarn that is 3 – 4 times the width of the last row. Your panel should measure approximately 7″ (8″, 8″, 8″, 9″, 9″, 9″, 10″, 10″) H. Continue on to the Shoulder Seams.
Shoulder Seams
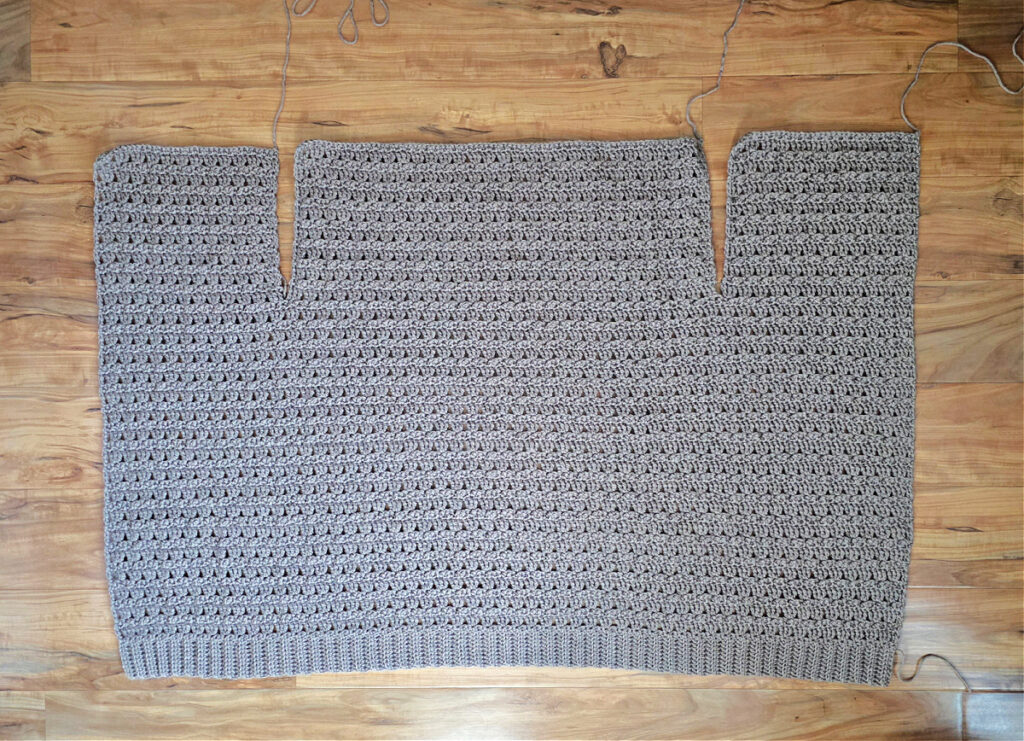
Step 1: With the WS facing out, line up the outer corners of each shoulder panel with the corners of the back panel. To make it easier, I recommend using locking stitch markers to hold the panels in place during seaming.
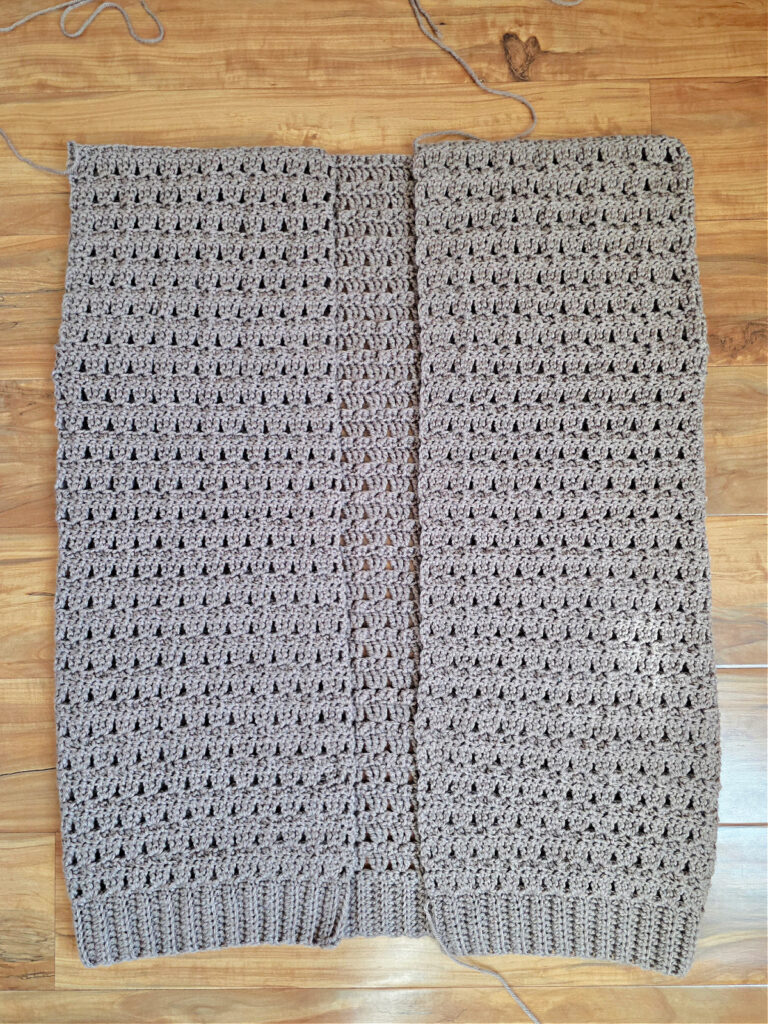
Step 2: Line up the 31 (37, 40, 43, 49, 46, 49, 55, 58) sts of each shoulder panel with corresponding stitches along the upper back panel. Use locking stitch markers to hold the panels together.
Step 3: With the wrong side facing out, use a yarn needle and the tail of yarn left after completing the upper front panels and whipstitch each of the front panels to the back panel.
Weave in ends. Turn your cardigan right side out. Continue on to the Sleeves.
Sleeve Set-Up
In this section, you’ll begin the sleeve by working a single crochet into the stitches around the armhole opening. As you work the tapered sleeves, you’ll add rounds that include simple shaping by working decrease stitches when you begin and end certain rounds.
XS, 4X, & 5X
Rnd 1 (RS): With yarn & a 5.00mm crochet hook and RS facing you, join yarn with a sc into the tr that’s on the left side of the armhole opening, work 2 more sc into the side of the tr, work 1 sc into the next ext sc, continue working around the armhole opening by working 3 sc into each tr and 1 sc into each ext sc. Join with a sl st to the 1st st. (56, 80, 80 sts)
Rnd 2 (RS): Ch 1, extsc2tog, * FLO ext sc in the next st, BLO ext sc in the next st, rep from * around to the last 2 sts, extsc2tog. Join. Turn. (54, 78, 78 sts)
Rnd 3 (WS): Alt-tr in the first st, 2 more tr in the same st, skip each of the next 2 sts, * 3 tr in the next st, skip each of the next 2 sts, rep from * around. Join. Turn. (54, 78, 78 sts)
Do not fasten off. Continue on to Rnd 4 of the Sleeve.
S, M, & L
Rnd 1 (RS): With yarn & a 5.00mm crochet hook and RS facing you, join yarn with a sc into the tr that’s on the left side of the armhole opening, work 2 more sc into the side of the tr, work 1 sc into the next ext sc, continue working around the armhole opening by working 3 sc into each tr and 1 sc into each ext sc. Join with a sl st to the 1st st. (64, 64, 64 sts)
Rnd 2 (RS): Ch 1, FLO ext sc in the first st, BLO ext sc in the next st, * FLO ext sc in the next st, BLO ext sc in the next st, rep from * around. Join. Turn. (64, 64, 64 sts)
Rnd 3 (WS): Ch 3 (does not count as a st), skip the first st, 3 tr in the next st, * skip each of the next 2 sts, 3 tr in the next st, rep from * around to the last 2 sts, skip each of the last 2 sts. Join. Turn. (63, 63, 63 sts)
Do not fasten off. Continue on to Rnd 4 of the Sleeve.
XL, 2X, & 3X
Rnd 1 (RS): With yarn & a 5.00mm crochet hook and RS facing you, join yarn with a sc into the tr that’s on the left side of the armhole opening, work 2 more sc into the side of the tr, work 1 sc into the next ext sc, continue working around the armhole opening by working 3 sc into each tr and 1 sc into each ext sc. Join with a sl st to the 1st st. (72, 72, 72 sts)
Rnd 2 (RS): Ch 1, FLO ext sc in the first st, BLO ext sc in the next st, * FLO ext sc in the next st, BLO ext sc in the next st, rep from * around. Join. Turn. (72, 72, 72 sts)
Rnd 3 (WS): Ch 3 (does not count as a st), skip the first st, 3 tr in the next st, * skip each of the next 2 sts, 3 tr in the next st, rep from * around to the last st, skip the last st. Join. Turn. (72, 72, 72 sts)
Do not fasten off. Continue on to Rnd 4 of the Sleeve.
Sleeve – Sizes XS, XL, 2X, 3X, 4X, 5X
Rnd 4: Ch 1, extsc2tog, * FLO ext sc in the next st, BLO ext sc in the next st, rep from * around to the last 4 sts, (extsc2tog) twice. Join. Turn. (51, 69, 69, 69, 75, 75 sts)
Rnd 5: Alt-tr in the first st, 2 more tr in the same st, skip the next st, * 3 tr in the next st, skip each of the next 2 sts, rep from * around to the last st, skip the last st. Join. Turn. (51, 69, 69, 69, 75, 75 sts)
Rnd 6: Ch 1, extsc2tog, * FLO ext sc in the next st, BLO ext sc in the next st, rep from * around to the last 5 sts, FLO ext sc in the next st, (extsc2tog) twice. Join. Turn. (48, 66, 66, 66, 72, 72 sts)
Rnd 7: Alt-tr in the first st, 2 more tr in the same st, skip the next st, * 3 tr in the next st, skip each of the next 2 sts, rep from * around to the last st, skip the last st. Join. Turn. (48, 66, 66, 66, 72, 72 sts)
Do not fasten off. Continue on to Rnd 8 for the size sleeve you’re making.
Sleeve – Size XS
Rnds 8 – 15: Rep Rnds 4 – 7, 2 times. (36 sts) at the end of Rnd 15.
Rnds 16 – 17: Rep Rnds 4 – 5. (33 sts)
Rnd 18: Ch 1, FLO ext sc in the first st, BLO ext sc in the next st, * FLO ext sc in the next st, BLO ext sc in the next st, rep from * around. Join. Turn. (33 sts)
Rnd 19: Ch 3 (does not count as a st), skip the first st, 3 tr in the next st, * skip each of the next 2 sts, 3 tr in the next st, rep from * around to the last st, skip the last st. Join with a sl st to the first tr. Turn. (33 sts)
Rnds 20 – 29: Rep Rnds 18 – 19, 5 times. (33 sts)
If you need to lengthen your sleeve, simply repeat Rnds 18 – 19. Note that the cuff will add 2″ to the length of your sleeve.
Do not fasten off. Continue onto the Sleeve Cuff. Sleeve should measure 14-1/2″ L before the cuff.
Sleeve – Sizes XL, 2X, 3X
Rnds 8 – 19: Rep Rnds 4 – 7, 3 times. (48, 48, 48 sts) at the end of Rnd 19.
Rnds 20 – 21: Rep Rnds 4 – 5. (45, 45, 45 sts)
Rnd 22: Ch 1, FLO ext sc in the first st, BLO ext sc in the next st, * FLO ext sc in the next st, BLO ext sc in the next st, rep from * around. Join. Turn. (45, 45, 45 sts)
Rnd 23: Ch 3 (does not count as a st), skip the first st, 3 tr in the next st, * skip each of the next 2 sts, 3 tr in the next st, rep from * around to the last st, skip the last st. Join with a sl st to the first tr. Turn. (45, 45, 45 sts)
Rnds 24 – 29: Rep Rnds 22 – 23, 3 times. (45, 45, 45 sts)
If you need to lengthen your sleeve, simply repeat Rnds 22 – 23. Note that the cuff will add 2″ to the length of your sleeve.
Do not fasten off. Continue onto the Sleeve Cuff. Sleeve should measure 14-1/2″ L before the cuff.
Sleeve – Sizes 4X, 5X
Rnds 8 – 23: Rep Rnds 4 – 7, 4 times. (51, 51 sts) at the end of Rnd 23.
Rnds 24 – 25: Rep Rnds 4 – 5. (48, 48 sts)
Rnd 26: Ch 1, FLO ext sc in the first st, BLO ext sc in the next st, * FLO ext sc in the next st, BLO ext sc in the next st, rep from * around. Join. Turn. (48, 48 sts)
Rnd 27: Ch 3 (does not count as a st), skip the first st, 3 tr in the next st, * skip each of the next 2 sts, 3 tr in the next st, rep from * around to the last st, skip the last st. Join with a sl st to the first tr. Turn. (48, 48 sts)
Rnds 28 – 29: Rep Rnds 26 – 27. (48, 48 sts)
If you need to lengthen your sleeve, simply repeat Rnds 26 – 27. Note that the cuff will add 2″ to the length of your sleeve.
Do not fasten off. Continue onto the Sleeve Cuff. Sleeve should measure 14-1/2″ L before the cuff.
Sleeve – Sizes S, M, L
Rnd 4: Ch 1, extsc2tog, * FLO ext sc in the next st, BLO ext sc in the next st, rep from * around to the last 5 sts, FLO ext sc in the next st, (extsc2tog) twice. Join. Turn. (60, 60, 60 sts)
Rnd 5: Alt-tr in the first st, 2 more tr in the same st, skip the next st, * 3 tr in the next st, skip each of the next 2 sts, rep from * around to the last st, skip the last st. Join. Turn. (60, 60, 60 sts)
Rnd 6: Ch 1, extsc2tog, * FLO ext sc in the next st, BLO ext sc in the next st, rep from * around to the last 4 sts, (extsc2tog) twice. Join. Turn. (57, 57, 57 sts)
Rnd 7: Alt-tr in the first st, 2 more tr in the same st, skip the next st, * 3 tr in the next st, skip each of the next 2 sts, rep from * around to the last st, skip the last st. Join. Turn. (57, 57, 57 sts)
Do not fasten off. Continue on to Rnd 8 for the size sleeve you’re making.
Sleeve – Sizes S, M
Rnds 8 – 19: Rep Rnds 4 – 7, 3 times. (39, 39 sts) at the end of Rnd 19.
Rnds 20 – 21: Rep Rnds 4 – 5. (36, 36 sts)
Rnd 22: Ch 1, FLO ext sc in the first st, BLO ext sc in the next st, * FLO ext sc in the next st, BLO ext sc in the next st, rep from * around. Join. Turn. (36, 36 sts)
Rnd 23: Ch 3 (does not count as a st), skip the first st, 3 tr in the next st, * skip each of the next 2 sts, 3 tr in the next st, rep from * around to the last st, skip the last st. Join with a sl st to the first tr. Turn. (36, 36 sts)
Rnds 24 – 29: Rep Rnds 22 – 23, 3 times. (36, 36 sts)
If you need to lengthen your sleeve, simply repeat Rnds 22 – 23. Note that the cuff will add 2″ to the length of your sleeve.
Do not fasten off. Continue onto the Sleeve Cuff. Sleeve should measure 14-1/2″ L before the cuff.
Sleeve – Size L
Rnds 8 – 15: Rep Rnds 4 – 7, 2 times. (45 sts) at the end of Rnd 15.
Rnds 16 – 17: Rep Rnds 4 – 5. (42 sts)
Rnd 18: Ch 1, FLO ext sc in the first st, BLO ext sc in the next st, * FLO ext sc in the next st, BLO ext sc in the next st, rep from * around. Join. Turn. (42 sts)
Rnd 19: Ch 3 (does not count as a st), skip the first st, 3 tr in the next st, * skip each of the next 2 sts, 3 tr in the next st, rep from * around to the last st, skip the last st. Join with a sl st to the first tr. Turn. (42 sts)
Rnds 20 – 29: Rep Rnds 18 – 19, 5 times. (42 sts)
If you need to lengthen your sleeve, simply repeat Rnds 18 – 19. Note that the cuff will add 2″ to the length of your sleeve.
Do not fasten off. Continue onto the Sleeve Cuff. Sleeve should measure 14-1/2″ L before the cuff.
Sleeve Cuff
In this section, you’ll first add a round of single crochet around the last round of the sleeve. Then, you’ll crochet cuff ribbing perpendicular to the sleeve.
Set-Up
Rnd 1 (RS): Continuing on from the sleeve, with the RS facing you, and with a 5.00mm crochet hook, ch 1, sc in each st around. Join with a sl st to the first st. (33, 36, 36, 42, 45, 45, 45, 48, 48 sts)
Do not fasten off. Continue on to the Cuff Ribbing.
Cuff Ribbing
Row 1 (RS): Ch 10, working into the back humps of the ch, hdc in the 2nd ch from your hook, hdc in each of the next 7 sts, hdc2tog in next ch and same st as ch 10. Do not turn yet. (9 sts)

- Photo A: This photo shows the beginning of Row 1 of the ribbed cuff. The yarn needle is showing where to work the first hdc into the 2nd ch form your hook.
- Photo B: Photo shows Row 1 complete to the hdc2tog. The yarn needles are showing where to work the hdc2tog.
- Photo C: This photo shows the hdc2tog complete. The yarn needles are inserted into the next 2 sts along the edge of the sleeve where you will work the 2 sl sts at the beginning of row 2.
Row 2: (Sl st into the NEXT st along the edge of the sleeve) 2 times, Turn, BLO hdc in each of the next 9 sts. Turn. (9 sts)

- Photo D: This photo shows the beginning of Row 2 of the ribbed cuff. The yarn needles are showing the first 2 sl sts of Row 2 that you will work before turning. I also placed a SM in the hdc2tog to help locate the first st to work into after we turn to finish working Row 2.
- Photo E: After turning to work the rest of Row 2, you can see the 2 sl sts and the stitch marker where you will work the first hdc.
- Photo F: This photo shows Row 2 of the ribbed cuff complete. I placed a SM in the FLO of the last stitch of the row to mark the loop where I need to begin the next row.
Row 3: Ch 1, BLO hdc in the first st, BLO hdc in each of the next 7 sts, BLO hdc2tog in the next st and the NEXT st along the edge of the sleeve. (9 sts)

- Photo G: The SM in this photo shows where to work the first stitch of Row 3. The yarn needles show where to work the hdc2tog at the end of the row.
- Photo H: The yarn needles are showing the 2 sts along the edge of the cowl where you will work the first two sl sts of Row 4. The SM is placed in the FLO of the hdc2tog to mark where to work the first hdc in the next row.
- Photo I: Begin Row 4 by sl st in the next 2 stitches along the edge of the sleeve.
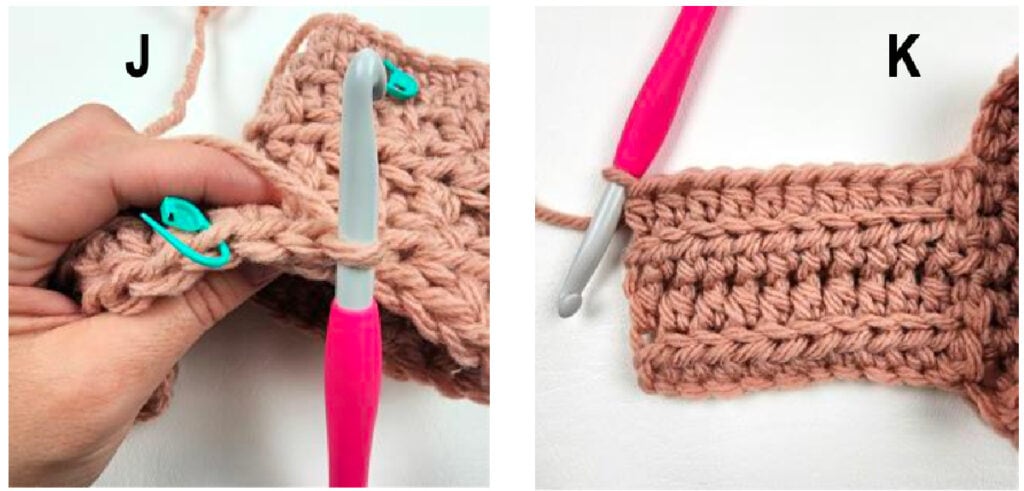
- Photo J: In this photo, you can see the 2 sl sts you worked before turning and the SM that’s marking where to work the first hdc.
- Photo K: This photo shows Rows 1 – 4 complete.
Rows 4 – 33 (35, 35, 41, 45, 45, 45, 47, 47): Rep Rows 2 – 3, around the edge of the sleeve.
Sizes XS, XL, 2X, 3X
Fasten off leaving an 8″ tail of yarn. Using a yarn needle and the tail of yarn, whipstitch the last row to the first row. Weave in ends. Sleeve should measure approximately 16-1/2″ L. Repeat for the second sleeve, then continue on to the Front Opening Edging.
Sizes S, M, L, 4X, 5X
Row (36, 36, 42, 48, 48): Rep Row 2.
Fasten off leaving an 8″ tail of yarn. Using a yarn needle and the tail of yarn, whipstitch the last row to the first row. Weave in ends. Sleeve should measure approximately 16-1/2″ L. Repeat for the second sleeve, then continue on to the Front Opening Edging.

Front Opening Edging
In this section, you’ll join yarn at the bottom right corner and sc up and around the front opening of the cardigan. You’ll repeat simple rows, back and forth, up and around the opening.
Row 1 (RS): With yarn & a 5.00mm crochet hook, join yarn with a standing sc at the bottom corner on the cardigan’s right side, work 1 sc into each sc and ext sc and 3 sc into each tr up and around the front opening to the bottom corner on the cardigan’s left side. Turn. Stitch count isn’t crucial. Adjust your hook size, if needed, so that your edging isn’t wavy or puckered.
Rows 2 – 5: Ch 1, sc in each st. Turn.
Row 6 (RS): Ch 1, working on the RS of the cardigan (the backside of Row 5 sts), sl st in each st up and around the front edging. *This may feel a little odd to do, but will get the sl sts on the RS of the cardigan.
Fasten off. Weave in ends. Continue on to the Pockets, if desired.
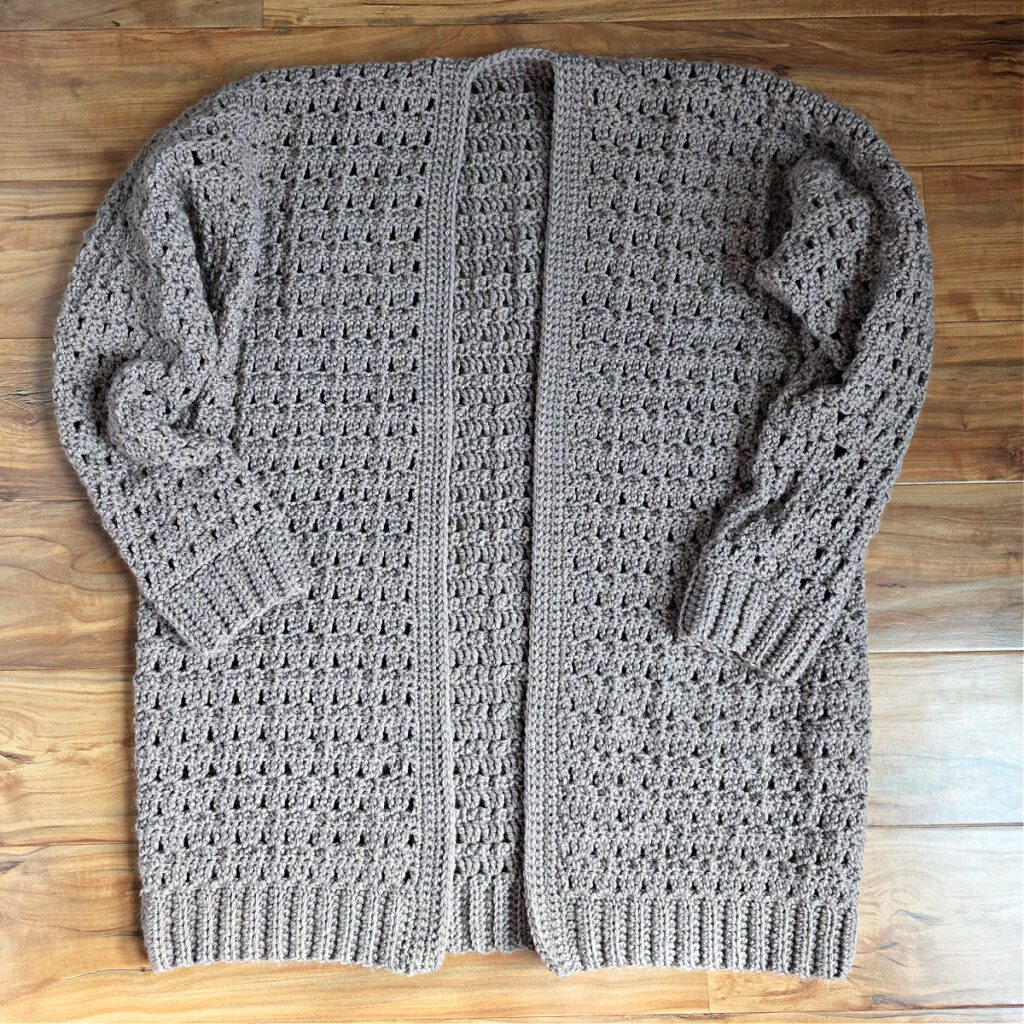
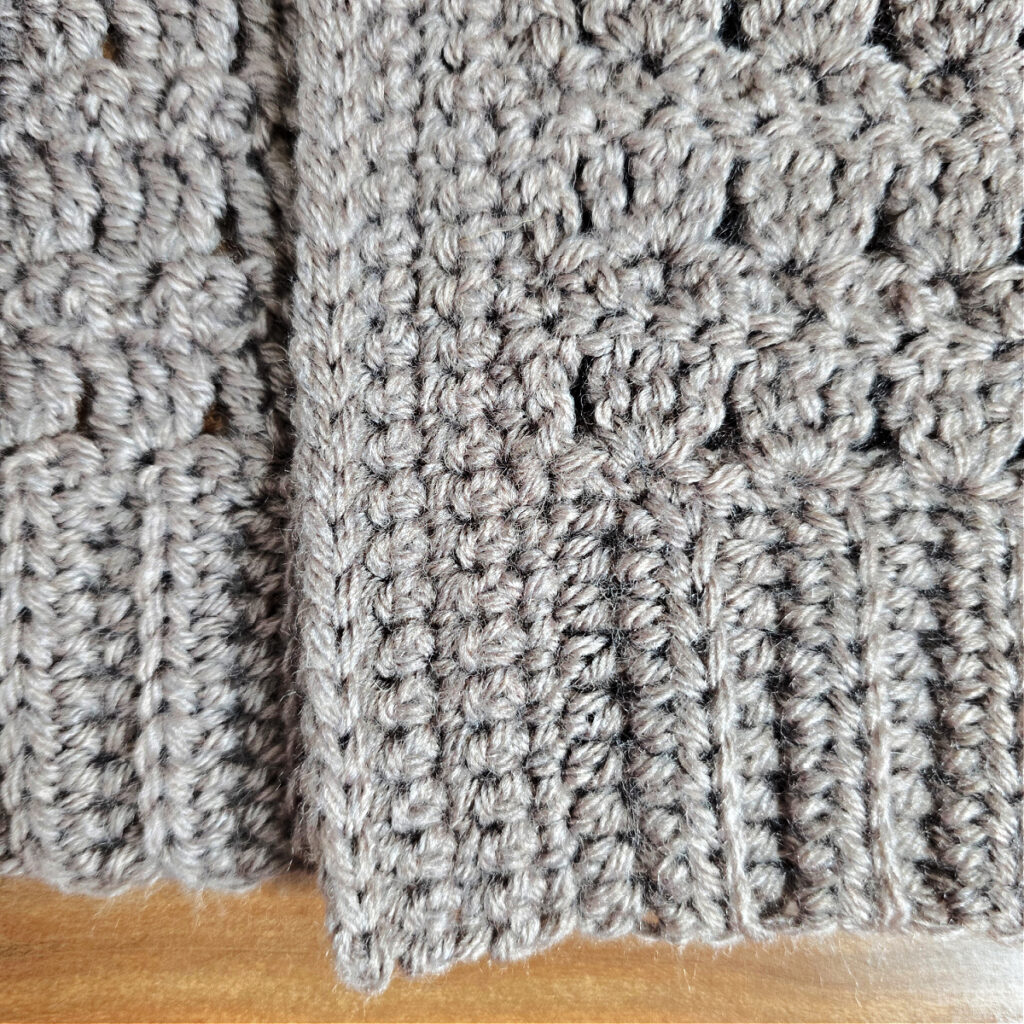
Pockets (Make 2)
Adjusting Pocket Size: If you’d prefer a wider pocket, simply increase your chain during set-up, in multiples of 3. If you’d like a deeper or more shallow pocket, simply work more or fewer repeats of Rows 2 – 3.
Set-up: With yarn & a 5.50mm crochet hook, ch 21.
Row 1 (RS): Switch to a 5.00mm crochet hook, working into the back hump of the foundation ch, ext sc into the 2nd ch from your hook and in each ch across. Turn. (20 sts)
Row 2: Alt-tr in the first st, skip the next st, 3 tr in the next st, * skip each of the next 2 sts, 3 tr in the next st, rep from * across to the last 2 sts, then skip the next st, tr in the last st. Turn. (20 sts) This breaks down to 6 groups of 3 dc + 1 Alt-tr + 1 tr.
Row 3: Ch 1, ext sc in the first st, * FLO ext sc in the next st, BLO ext sc in the next st, rep from * across to the last st, then BOTH LOOPS ext sc in the last st. Turn. (20 sts)
Rows 4 – 7: Rep Rows 2 – 3, 2 times.
Row 8: Rep Row 2. At this point, your pocket should measure approximately 5″ W x 4″ H.
Do not fasten off. Continue on to Pocket Ribbing.
Pocket Ribbing
In this section, you’ll crochet ribbing that is perpendicular to the pocket.
Row 1 (RS): Ch 6, working into the ch, hdc in the 2nd ch from your hook, hdc in each of the next 3 sts, hdc2tog in next ch and same st as ch 6. Do not turn yet. (5 sts)
Row 2: (Sl st into the NEXT st along the edge of the pocket) 2 times, Turn, BLO hdc in each of the next 5 sts. Turn. (5 sts)
Row 3: Ch 1, BLO hdc in the first st, BLO hdc in each of the next 3 sts, BLO hdc2tog in the next st and the NEXT st along the edge of the pocket. (9 sts)
Rows 4 – 13: Rep Rows 2 – 3, 5 times.
Row 14: Sl st into the NEXT st along the edge of the pocket, Turn, BLO hdc in each of the next 5 sts. Turn. (5 sts)
Do not fasten off. Continue on to Pocket Edging.
Pocket Edging
In this section, you’ll work sc around three sides of the pocket.
Row 1 (RS): Ch 1, crochet along 3 sides of the pocket by working 1 sc into each sc & ext sc, 3 sc into each tr, and 3 sc into each of the bottom corners of the pocket. (64 sts)
Fasten off, leaving a tail of yarn that is 3 – 4 times the three sides of the pocket you just edged. Continue on to Attaching the Pockets.

Attaching the Pockets
Step 1: Put the cardigan on the intended wearer and have her put her arms down as she would naturally. Use a stitch marker to mark where you would like the top edge of each pocket to be.
Step 2: Position the pockets so that the vertical edge closest to the front opening of the cardigan is parallel to the front opening edging. Use locking stitch markers or scrap pieces of yarn to hold the pocket in place during seaming.
Step 3: Using a yarn needle and yarn tail, sew the pocket onto the cardigan along the 2 vertical sides and bottom edge.
Weave in ends. Repeat for the second pocket.
I MADE IT! NOW WHAT?
Pin this post!: Save this crochet cardigan sweater pattern to your Pinterest boards so that you can come back and make it again.
Leave a comment below: We love to hear your feedback.
Share Your Finished Projects on Facebook or Instagram: I love to see your finished projects! Share with us on social media and tag me @acrochetedsimplicity or use the hashtag #ACrochetedSimplicity so I can find your posts.
Join us in the Facebook Community Group!
Come share your finished projects with us in the A Crocheted Simplicity Crochet Community Group on Facebook. Join us for fun community events such as crochet alongs, join in on crochet conversations, ask questions, get advice, and share your love for crochet!

More Crochet Cardigan Patterns I Think You’ll Love
- Celsea Button Up Cardigan
- Aurora Women’s Crochet Cardigan
- Fireside Crochet Cardigan
- Summer Splendor Cardigan
- Men’s Shawl Collar Cardigan
More Crochet Sweater Patterns
Are you looking for more crochet cardigan sweater patterns? We have several more patterns for crochet clothes, including matching sweaters for mothers and daughters and even for fathers and sons.

Thank you so much.
Laura