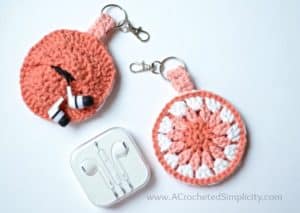
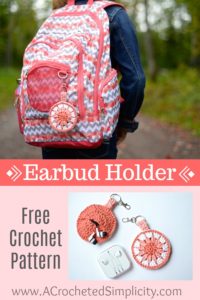
Earbud Holder – Free Crochet Pattern
Hello & Welcome! This eardbud holder was the project we made during our 3rd Mini-Mystery Crochet Along. If you haven’t already done so, please make sure to sign-up for our newsletter so that you don’t miss out on future mini-mystery crochet alongs! I always send out a newsletter a couple days before the next MMCAL begins so you have time to choose yarn from your stash and get everything ready.
>>CLICK HERE TO SIGN-UP TO RECEIVE OUR NEWSLETTER!<<
Check out the new Unicorn Earbud Holder, Click HERE.
For this project I chose to use 3 colors of Lily Sugar n’ Cream cotton yarn that I had in my stash. You can use 3 colors like I did, or just one or two. You do not need to use a cotton yarn for this project. To be honest with you, I chose the cotton yarn simply because it was a worsted weight and it matched what I was trying to coordinate it with. You can use an acrylic, cotton or wool blend yarn if you’d like.
Don’t use earbuds? Not a problem! This small project is perfect for holding many things such as chapstick, chargers, fidget spinners, etc…
~DON’T LOSE IT! ADD IT TO YOUR RAVELRY FAVORITES OR QUEUE.~
~DON’T FORGET TO PIN-IT TOO!~
*PURCHASE AN AD-FREE PDF OF THIS PATTERN (INCLUDING ALL SIZES, CHARTS, AND PHOTO TUTORIALS) ON CRAFTSY OR RAVELRY*
This post contains affiliate links.
MATERIALS
- Yarn: Worsted Weight / 4 Cotton Yarn / 21 yards; I used Lily Sugar n’ Cream cotton yarn (colors I used are listed in the notes below)
- Crochet Hook: G/6/4.0mm (My favorite crochet hooks are the Clover Amour Hooks, I’ve never had an ache in my hand since switching)
- Scissors
- Yarn Needle
- Locking Stitch Markers (5)
- Key Ring (1″ + or -) or Key Ring w/ a Lobster Clasp (If you do not have a key ring handy, let’s brainstorm about an item we can use that we may have sitting around the house. I have an idea for one in particular.)
Many of these materials are available for purchase through our affiliates below:
 Clover 1045/G Purple Amour ...Shop on Amazon
  Fiskars 154110-1001 Non-sti...Shop on Amazon
  Clover Lock Ring Markers, 2...Shop on Amazon
  WXJ13 Swivel Lobster Clasp ...Shop on Amazon
ABBREVIATIONS
- ch(s): chain(s)
- sl st(s): slip stitch(es)
- st(s): stitch(es)
- sp(s): space(s)
- sc: single crochet
- dc: double crochet
- yo: yarn over
- RS: right side
- Rep: repeat
- Rnd: round
- Alt-dc: alternate double crochet (click here for tutorial)
- Special Join Technique (click here for tutorial)
- Invisible Join Technique (click here for tutorial)
Experience Level
- Easy
Gauge
- Gauge is not crucial for this project.
Special Stitches
-
Alternate Double Crochet (alt-dc): After turning your work, do not ch, instead, insert your hook into the first st, yo, pull up a loop, yo, pull thru both loops, insert your hook between the legs of the st just made, yo, pull up a loop, yo, pull thru one loop, yo, pull thru remaining loops.
Notes
- Yarn Notes: The colors I used for my project are: Tangerine (Color A; 10 yards); Tea Rose (Color B; 5 yards); White (Color C; 6 yards).
- Choose ANY colors you’d like! This will look great in 1 – 3 colors.
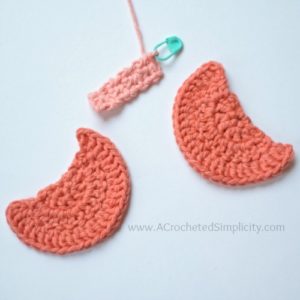
Front Motif
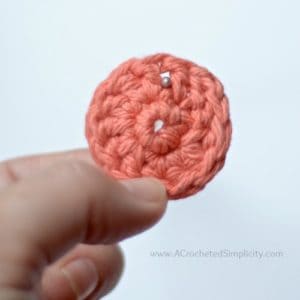
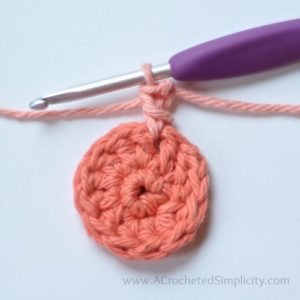
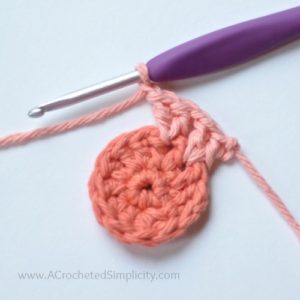
Rnd 1 (RS): Using a 4.00mm crochet hook & Color A, ch 2, work 6 sc into the 2nd ch from your hook. Join w/ a sl st to the 1st st. (6 sts)
Rnd 2: Alt-dc in the first st (click here for tutorial), work 1 more dc in the first st w/ the alt-dc, work 2 dc in each remaining st around. Join. (12 sts)
Fasten off Color A. Use Invisible Join Technique to create a nicer edge (click here for tutorial). Weave in ends. Approximate size: 1-1/2″ diameter.
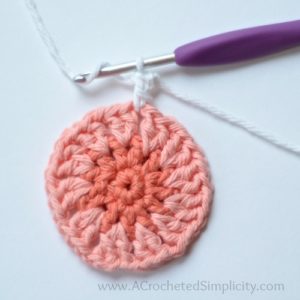
Rnd 3: Join Color B w/ a dc between any dc from previous rnd (see photos below & click here for stitch tutorial), work 1 more dc in same sp, ch 1, skip the next st, *work 2 dc between the next 2 sts, ch 1, skip the next st, rep from * around. Join. (24 dc, 12 ch-1 sps)
Fasten off Color B. Use Invisible Join Technique. Weave in ends. Approximate size: 2-3/8″ diameter.
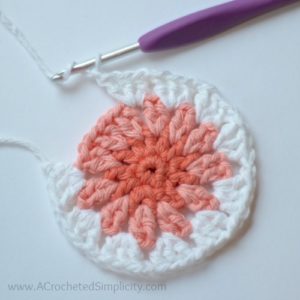
Tip!: Make sure to keep your ch-1’s in round 4 loose because you will need to work into them later.
Rnd 4: Join Color C w/ a dc in any ch-1 sp from rnd 3, work 2 more dc in same ch-1 sp, ch 1, skip each of the next 2 sts, *work 3 dc in the next ch-1 sp, ch 1, skip each of the next 2 sts, rep from * around. Join. (36 dc, 12 ch-1 sps)
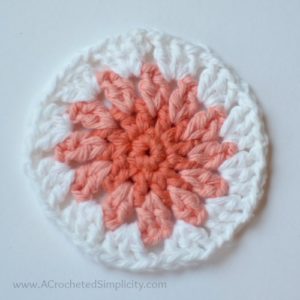
Fasten off Color C. Use Invisible Join Technique. Weave in ends. Continue on to Back Piece. Approximate size: 3-3/8″ diameter.
Back Piece (Make 2)
Row 1: Using a 4.00mm crochet hook & Color A, ch 2, work 4 sc into the 2nd ch from your hook. Do not join. Turn. (4 sts)
Row 2 (RS): Alt-dc in the first st, work 1 more dc in the first st w/ the alt-dc, work 2 dc in each remaining st around. Turn. (8 sts)
Row 3: Alt-dc in the first st, work 2 dc in each of the next 6 sts, work 1 dc in the last st. Turn. (14 sts)
Row 4: Alt-dc in the first st, work 1 more dc in the first st w/ the alt-dc, work 2 dc in each remaining st around. Turn. (28 sts)
Fasten off. Weave in ends. Make one more, then continue on to Strap. Approximate size: 3-3/8″ W x 1-7/8″ H.
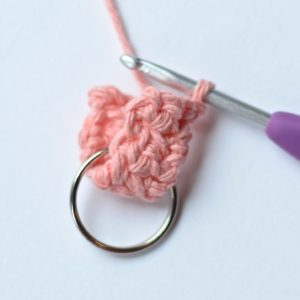
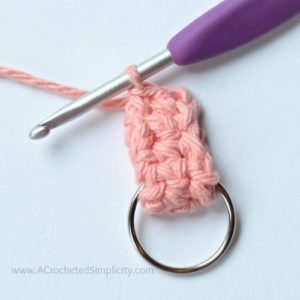
Strap
Row 1: Using a 4.00mm crochet hook & Color B, ch 3, sc in the 2nd ch from your hook, sc in the next ch. Turn. (2 sts)
Rows 2 – 8: Ch 1, sc in each st across. Turn. (2 sts)
Do not fasten off. Continue on to Strap Assembly. Approximate length: 2-1/2″.
Strap Assembly
Step 1: Insert the strap through the key ring and fold it in half (see photos below).
Step 2: Ch 1, working through both layers to secure the strap on the key ring, sc in each st across. (2 sts)
Fasten off. Weave in ends. Continue on to Earbud Holder Assembly.
Earbud Holder Assembly
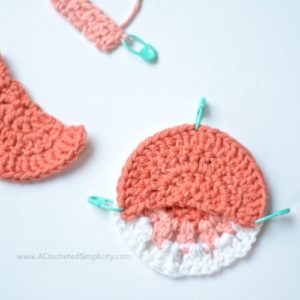
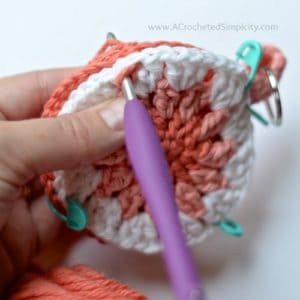
Photo Above: With WS together, line up one back piece on the front motif. I add a locking SM in any stitch along the top edge of the back piece. Then, carefully lining up the stitches, place a SM in the first and last stitches of the back piece. You should have 20 stitches left between the stitch markers on the sides.

Photo Above: Lay the second back piece on top of the assembly, opposite the first piece. Secure the second piece to the assembly using the SM on the side.
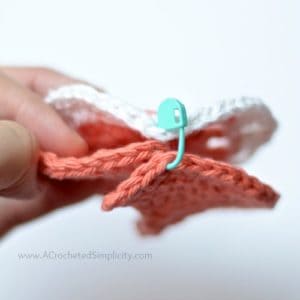
Photo Above: To make sure that the second piece is in the correct position, you will secure it in the 4th stitch from each end.
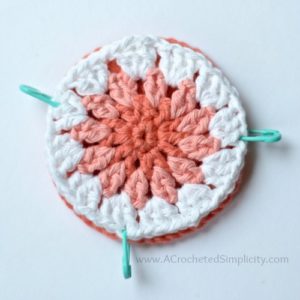
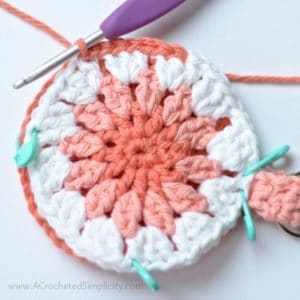
Photo Above: This photo shows what your assembly should look like from the RS after securing both back pieces.
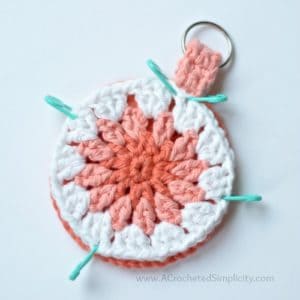
Photo Above: Locate stitches #10 & #11 that were left from the first assembly photo. Insert the strap assembly between the front motif and back piece. Use stitch markers to secure the strap to stitches #10 & #11 of the holder assembly.
Joining
Now we’re going to join the pieces together using the surface crochet technique, or slip stitch join. If you need a more detailed explanation on surface crochet, click HERE for the tutorial. This tutorial also includes tips.
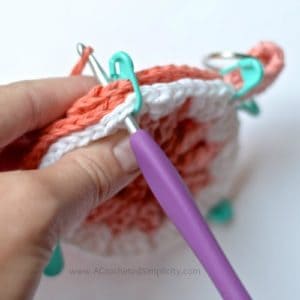
Photos Above: Working from the RS, you can begin the surface crochet in any stitch around the edge of the assembly.
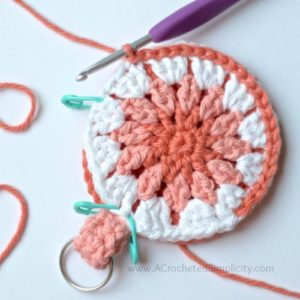

Photos Above: Continue surface crocheting in each stitch around the assembly to join all of the pieces together. Make sure you are working through all layers (there are 3 layers in a few areas). End by fastening off using the special join technique, click here for tutorial. Weave in all ends. Attach a lobster clasp if you have one.
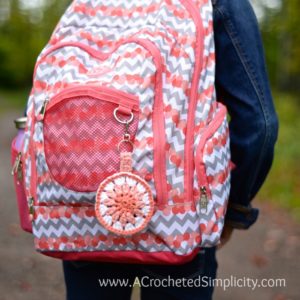
These make great party favors for kids’ birthday parties!
FIND ALL OF MY FREE CROCHET PATTERNS HERE
Are you intimidated by knit-look crochet? Would you love to learn my tips & tricks? Take an Annies Video Class with me and let me ease your fears and help you increase your skills! Click on the photo below to watch a free preview. You can also see the other 4 video classes I have available!

Please share your finished ACS projects with me in the A Crocheted Simplicity Crochet Community Group on Facebook!
HAPPY CROCHETING!


Hello,
Is the key ring used as an internal part of the project or as a marker (a re-usable item)?
Thanks,
Becky
Hi Becky,
The key ring isn’t used as a stitch marker. It is part of the project, but you can do without it by using another household item, or by adding one more small crochet part. I’m trying not to give it away with my response. lol I hope this helps.
Jennifer
Hey if I used yellow instead of tangerine in my project, would it look wierd?
Hi Misty,
You can use any colors you’d like. This one will be great in LOTS of different colors (even in a solid).
Jennifer
How much yarn do we need, in yards, please? (Per color, total?) I am sorry if you listed it, and I missed it.
Thank you,
Cindy
Hi Cindy,
The yardage is listed in the note section. 🙂
Jennifer
What size keyring? Inch, half inch, or ?
Hi Barbara,
I used the size that I linked to. The key ring is a 1″, but smaller or even a little larger will work too.
Jennifer
I use mine all the time. Thanks for a great, quick pattern Jennifer!
Do you have any videos? I love this pattern and I’m very new to crotchet. (Self teaching) I’m a much better learner when I have a visual.
Hi Samantha, I do not have a video for this pattern. Is there something in particular I can help you with? ~ Jennifer