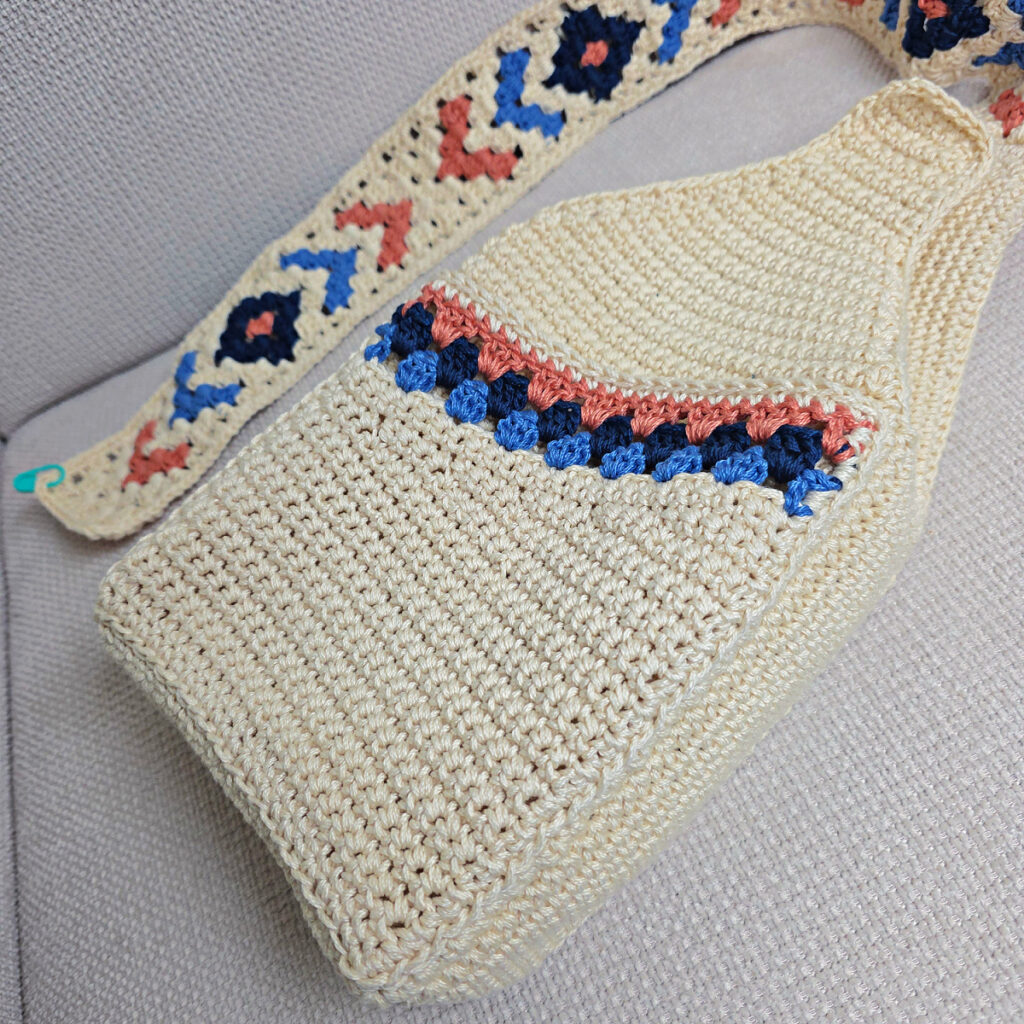
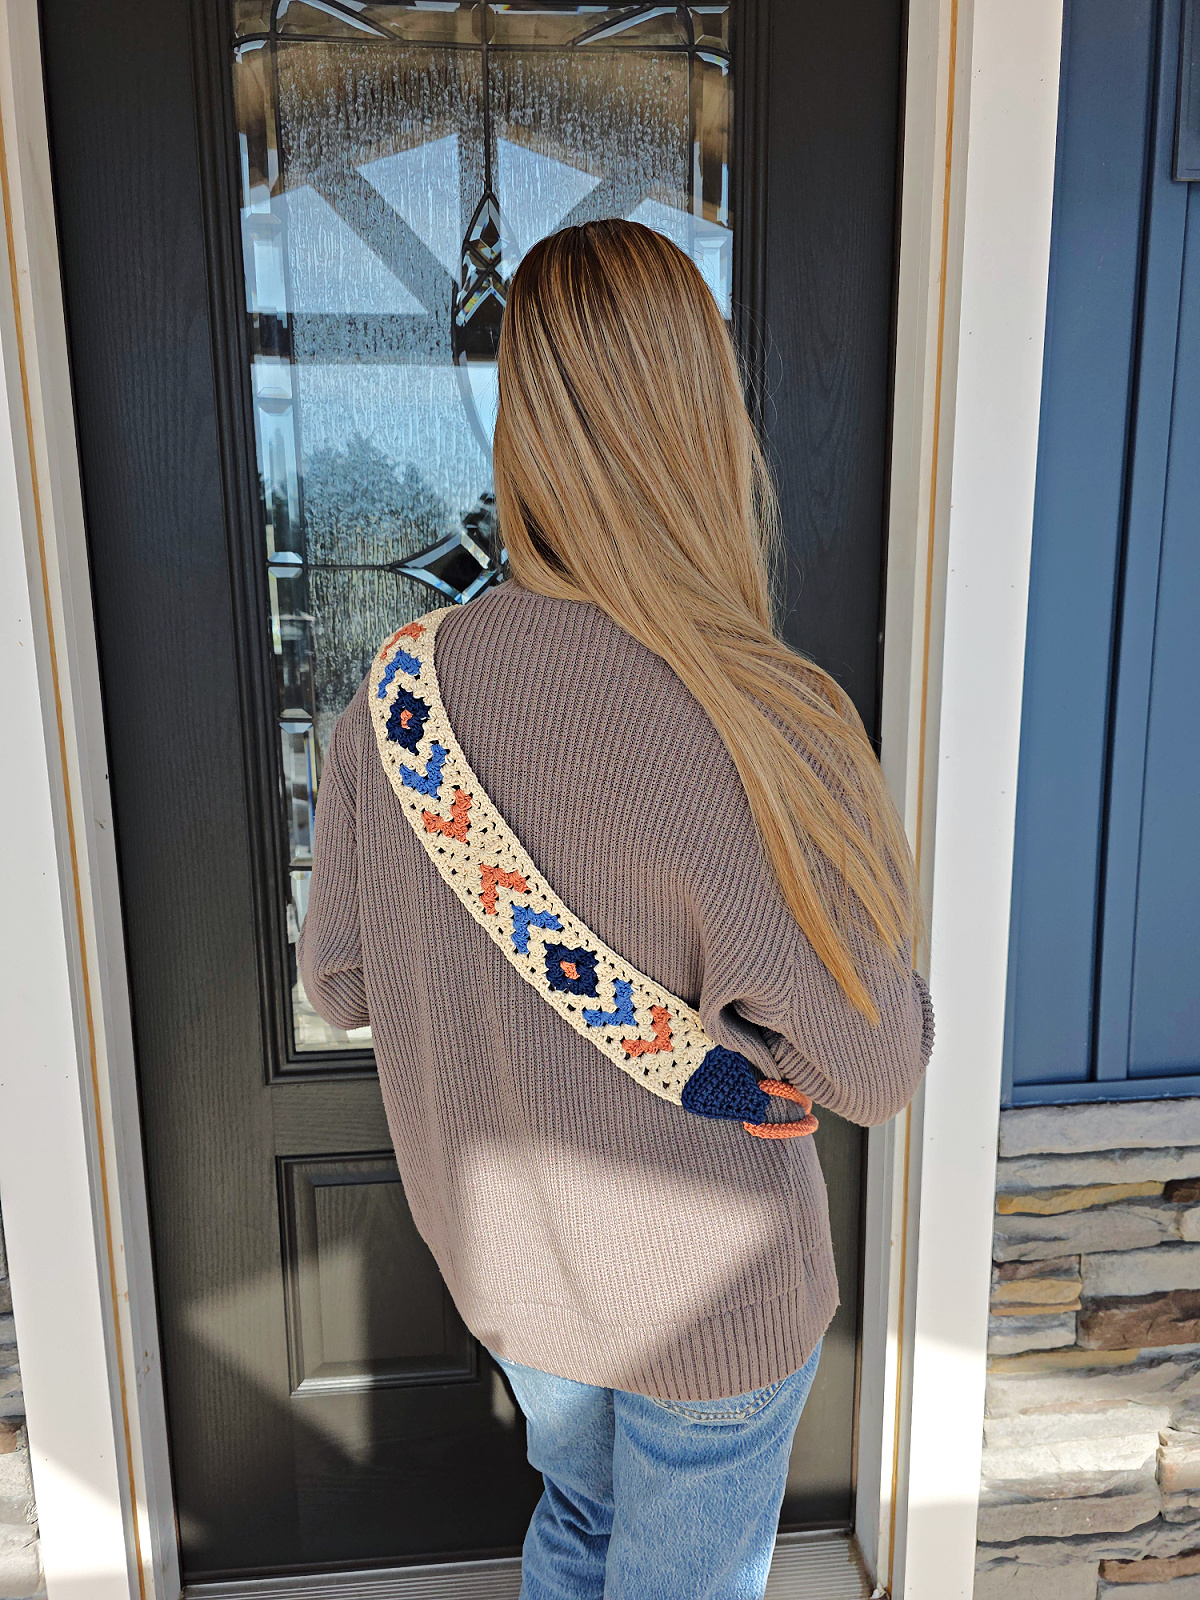
Boho Crochet Sling Bag
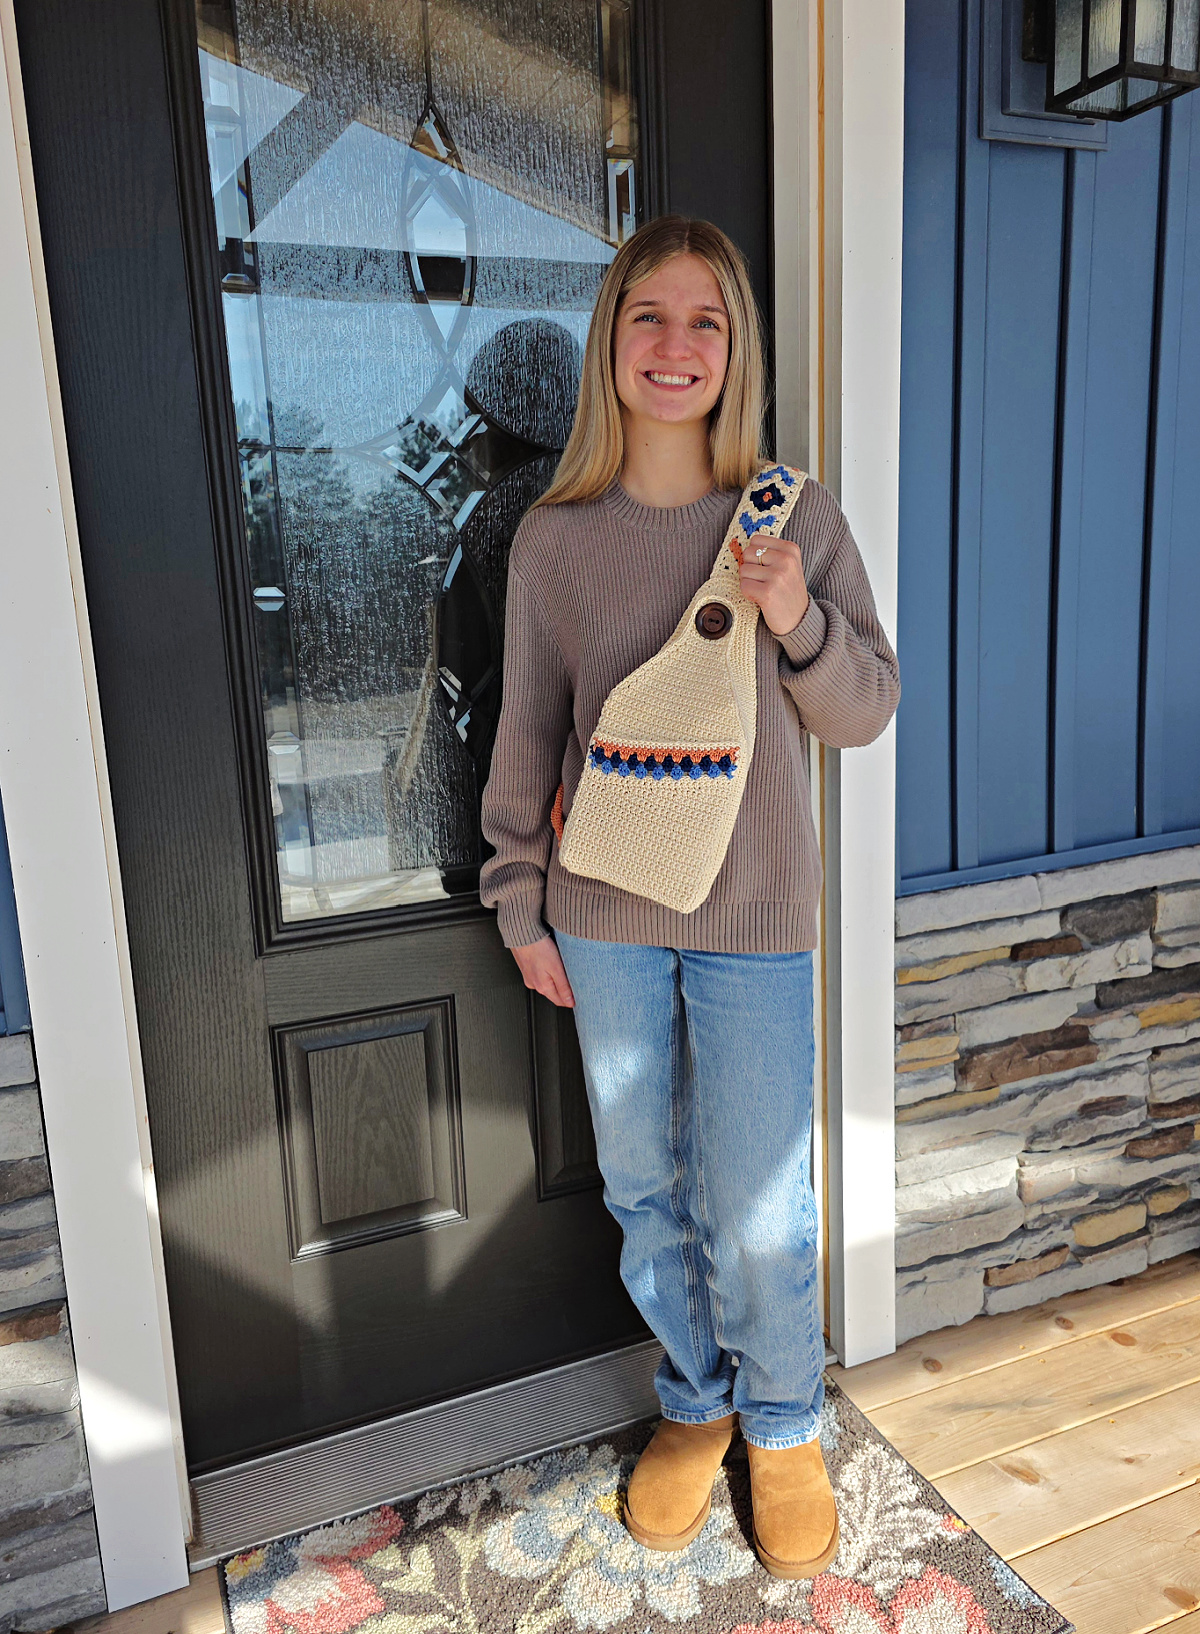
Make a trendy crochet sling bag to throw over your shoulder and keep your hands free while you’re out and about running errands.
That’s exactly what this pattern offers. With a crochet hook and a few skeins of yarn, you’ll have yourself a handy, stylish, and spacious crossbody crochet bag to store all of your essentials including your phone, sunglasses, wallet, keys, and more, so that nothing is too far from reach when you need it.
You’ll find the free crochet sling bag pattern in the post below, or you can find an ad-free printable PDF (that includes all photo tutorials), on Ravelry, or Etsy (aff).
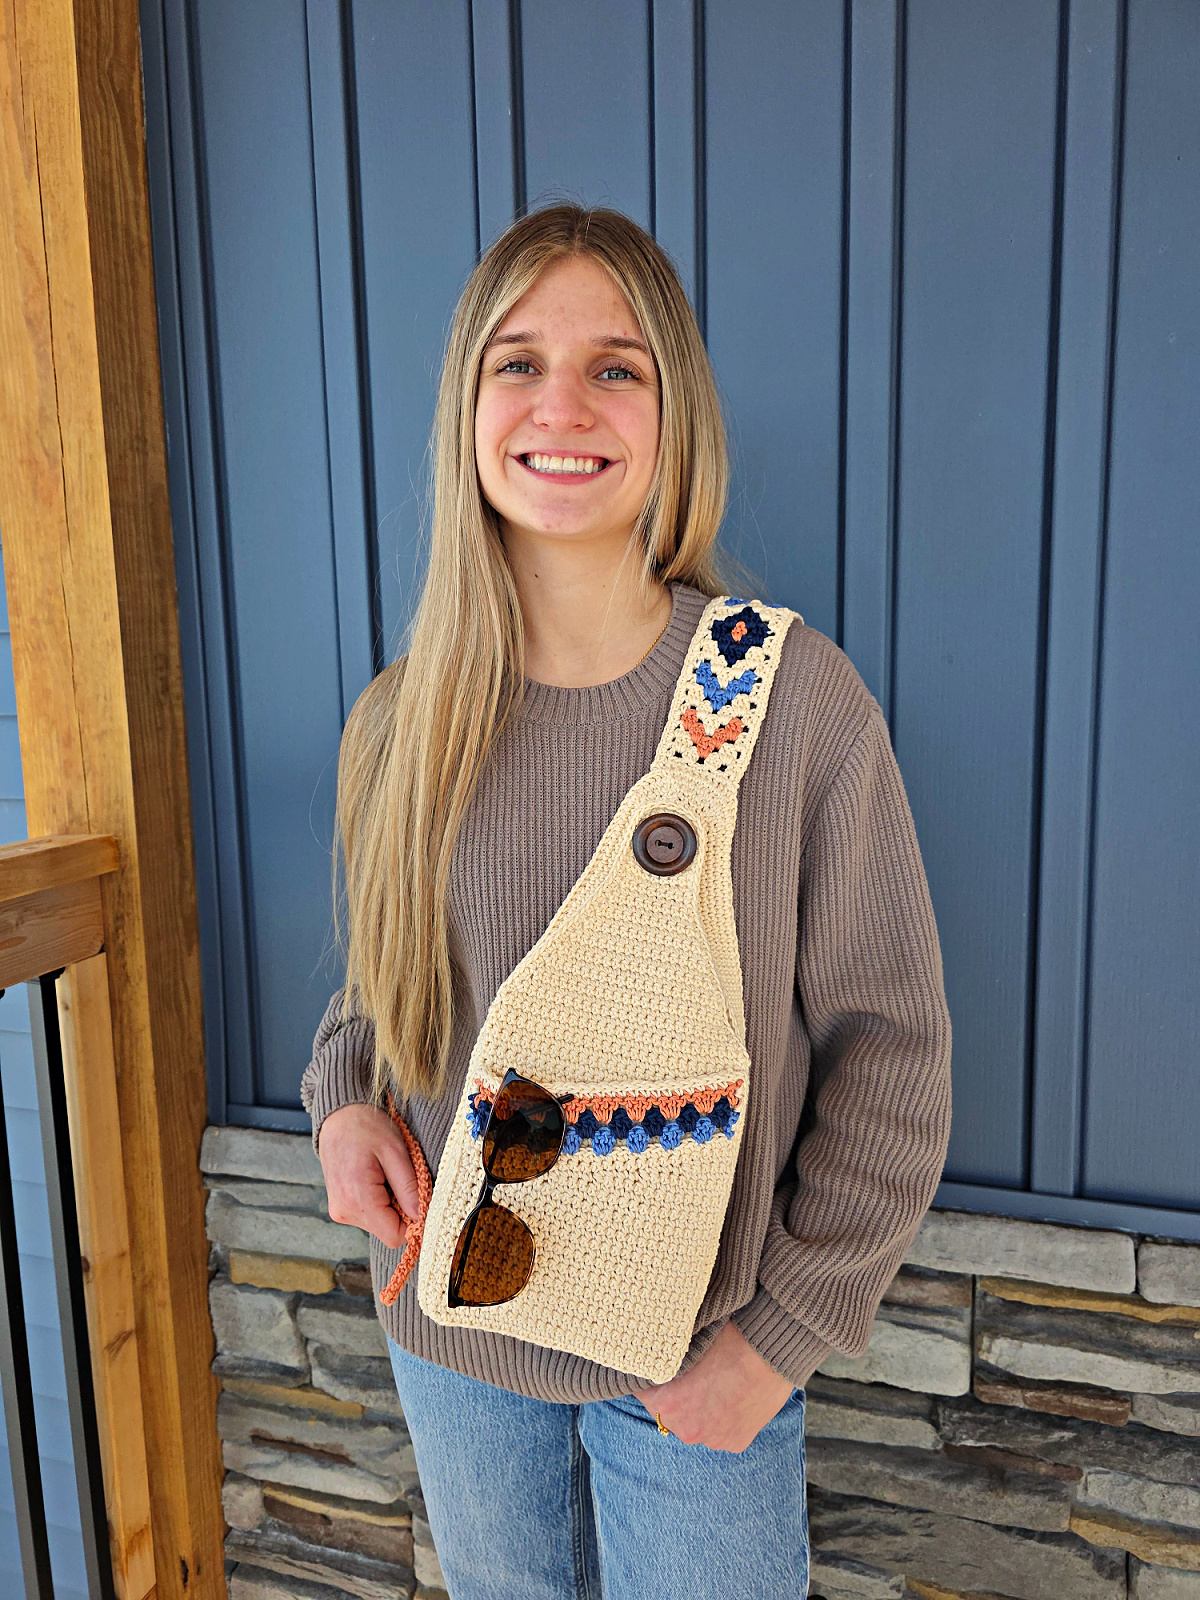
The Boho Crochet Sling Bag puts together a front pocket, thick adjustable strap, sturdy main body, and bespoke colorwork for a completed crochet project you’ll be proud (and grateful) to carry around. And if you have a friend in your life who seems to forever be misplacing their things when they go out, this is a great gift idea for them (especially using the colors they love for a truly unique gift).
Related: If you love adding colorwork with the Granny Stitch to your projects, check out Boho Chic Triangular Scarf as your next make after this one.
How to Crochet a Crossbody Bag
There are a few parts to this crochet sling bag and it’s important you have all of them to get the most functionality out of it. It is constructed with front and back panels and a pocket. You’ll start with the back panel worked flat.
The sides are then crocheted directly onto the back panel. The front panel and pocket are worked up separately and then joined securely with single crochet stitches.
The decorative granny stitch strap is crocheted directly onto the top of the crochet sling bag. An adjustable crochet strap is them made with a crochet rope and sewn onto the bag.
How To Get The
Boho Crochet Sling Bag Pattern
Option 1: Scroll down for the free crossbody crochet bag pattern right here in this blog post.
Option 2: Purchase the ad-free printable PDF from one of my shops:
Best Yarn for Crochet Bags
I typically recommend using 100% cotton yarn for a crochet bag for several reasons:
- Cotton yarns are soft and durable.
- Cotton yarns don’t pill easily.
- They hold up well to several washes in a washing machine.
- They show crochet stitch definition really well.
- They keep their shape.
- They don’t snag easily.
- They’re fairly inexpensive.
My second favorite yarn to crochet a bag with is 100% worsted weight wool, but keep in mind that animal fibers have a tendency to felt. And my third choice is double stranded acrylic yarn with a smaller hook than what’s recommended on the yarn label (because acrylic is stretchier).
If you’re going to line a crossbody crochet bag with fabric, you can use any yarn you’d like because the fabric will bear the weight of the items you place in the bag.
Related: If you want to keep your sunglasses from getting scratched up when you store them in your bag, you can make yourself a Hexagon Eyeglass Case.
Yarn
Since I love to use cotton for crochet bags, for the Boho Crochet Sling Bag, I chose Lion Brand Yarn 24/7 Cotton which is 100% mercerized cotton.
For the beige colored bag shown in the photos, I chose the shade Ecru as the main color. This collection is known for both its sheen and structure which remain no matter how much you wash and wear out your project. Since it’s machine washable, your handmade sling bag can easily get a lot of use before you clean it.
The weight of this yarn give it a firmness and density that help the bag hold its shape better compared to lighter yarns.
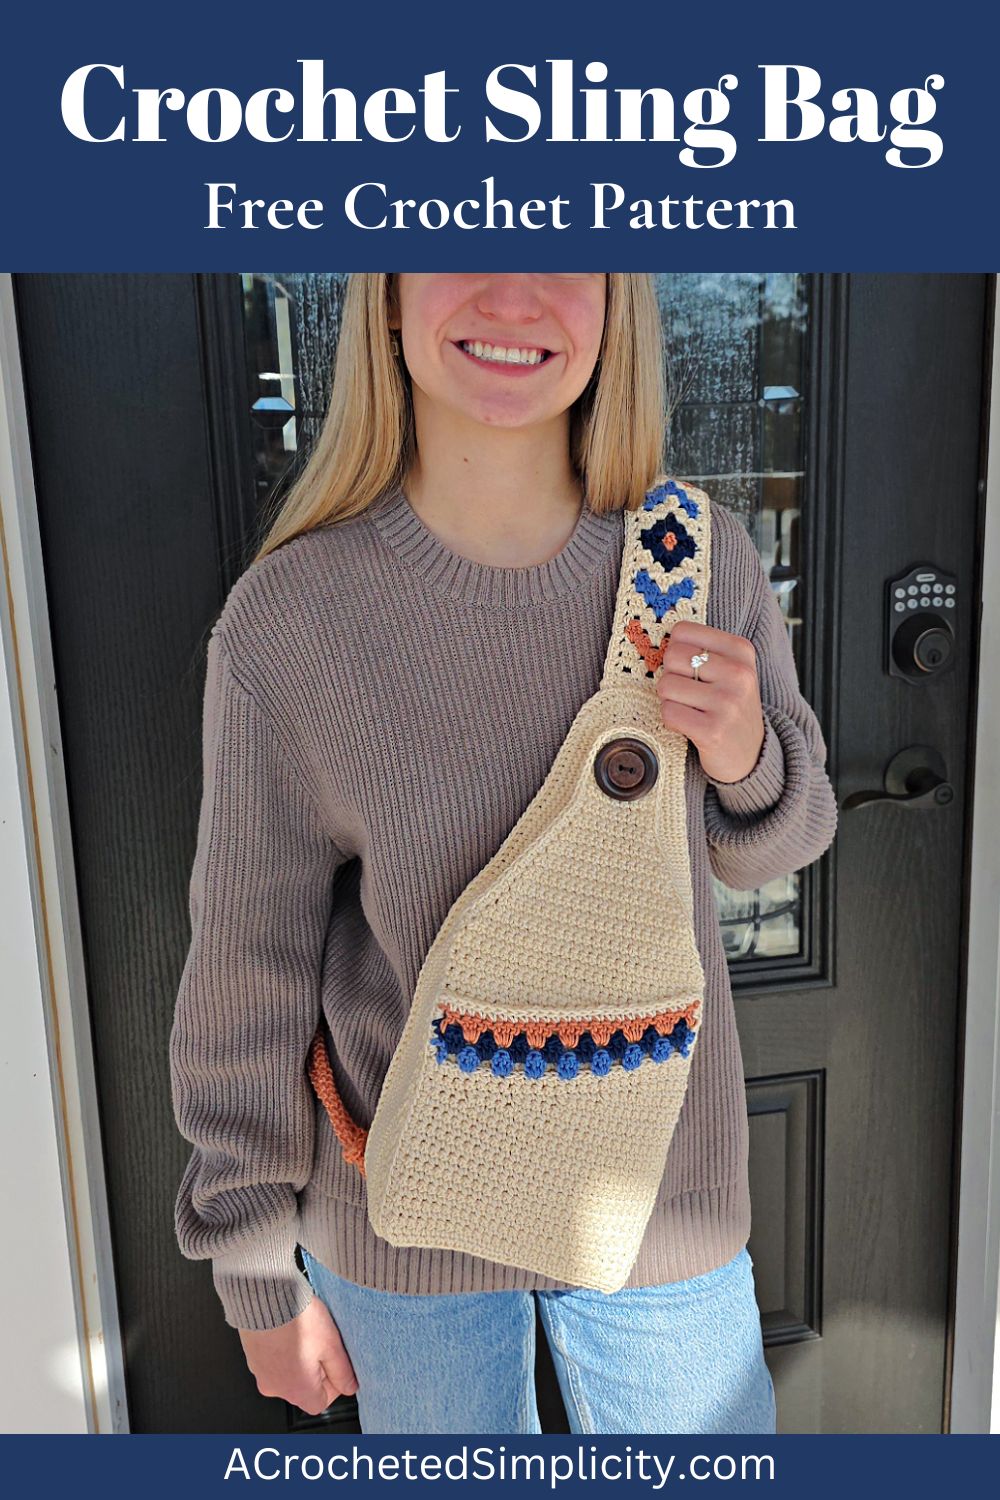
Boho Crochet Sling Bag – Free Pattern
The crochet sling bag pattern is free below, but if you love to work offline, I’ve got a couple other great options for you.
Purchase the ad-free, printable PDF, (that includes all photo tutorials), on Ravelry, or on Etsy (aff).
Save this pattern to your Ravelry favorites.
Purchase the Boho Crochet Sling Bag Crochet Kit (aff): Lion Brand has a full kit of the Boho Crochet Sling Bag, available on their website. The includes your choice of colors and a digital copy of the crochet pattern.
This post contains affiliate links.
Materials
- Yarn: Worsted Weight / 4 / Yarn, Lion Brand Yarn 24/7 Cotton [100% Mercerized Cotton (186 yds / 170 m / 100 g / 3.5 oz)] was used for the sample in the photos.
- Yardage and Color:
- MC: Ecru #761 – 098C (3 Balls / 475 yards)
- CA: Papaya #761-136AA (1 Ball / 60 yards)
- CB: Riviera #761-106BM (1 Ball / 40 yards)
- CC: Admiral #761-111AA (1 Ball / 40 yards)
- Crochet Hook: H/8/5.00mm; G/6/4.00mm; D/3.25mm; or size needed to obtain gauge (My favorite crochet hooks are the Clover Amour Crochet Hooks, I’ve never had an ache in my hand since switching).
- Measuring Tape
- Locking Stitch Markers
- Scissors
- Yarn Needle
- (1) 1-1/2” Button
Abbreviations (US Terms)
- ch(s): chain(s)
- st(s): stitch(es)
- sl st(s): slip stitch(es)
- sp(s): space(s)
- sc: single crochet
- dc: double crochet
- BPsc: back post single crochet
- Alt-ch3: alternate chain 3
- Invsc2tog: invisible single crochet decrease
- Invsc3tog: invisible single crochet decrease by 2
- BLO / FLO: back / front loop only
- RS: Right Side
- WS: Wrong Side
- Rep: repeat
- Rnd: round
- Special Join Technique
Experience Level
- Easy / Intermediate
Gauge
- In sc with a 4.00mm hook: 28 sts = 6.5″; 28 rows = 5.5″
- In granny stitch with a 3.25mm hook: 11 sts = 2-1/8″; 12 rows = 4″
Sizes
- One Size: 7″ W x 2-1/2″ D x 14″ H (not including the strap)
Special Stitches
- Alternate Chain-3 (Alt-Ch3): Complete last st of previous row, take loop off hook, insert hook into sp between last dc and last 3 dc of previous row, put loop on hook and pull thru sp, turn, ch 3.
- Invisible Single Crochet Decrease (invsc2tog): Insert hook into the FLO of stitch indicated, insert hook into the FLO of the next stitch, yo, pull up a loop, yo, pull thru all loops on hook. Decreases by 1 stitch.
- Invisible Single Crochet Decrease by 2 (invsc3tog): Insert hook into the FLO of stitch indicated, (insert hook into the FLO of the next stitch) twice, yo, pull up a loop, yo, pull thru all loops on hook. Decreases by 2 stitches.
- Back Post Single Crochet (BPsc): Insert hook from back to front to back around the post of the designated stitch, yo, pull up a loop, yo, pull thru both loops on hook.
- Join with a standing single crochet: Begin with a slip knot on your hook, insert your hook into the stitch or space indicated, yo, pull up a loop, yo and draw thru both loops on hook.
Pattern Notes
- Turning chains are not included in stitch count unless noted otherwise.
- Yarn Notes: Lion Brand Yarn 24/7 Cotton (3.5oz / 100 g / 186 yards / 170 meters / 100% mercerized cotton) was used for the samples. Another comparable worsted weight yarn may be substituted.
- Yardage & Color:
- MC: Ecru #761 – 098C (3 Balls / 475 yards)
- CA: Papaya #761-136AA (1 Ball / 60 yards)
- CB: Riviera #761-106BM (1 Ball / 40 yards)
- CC: Admiral #761-111AA (1 Ball / 40 yards)
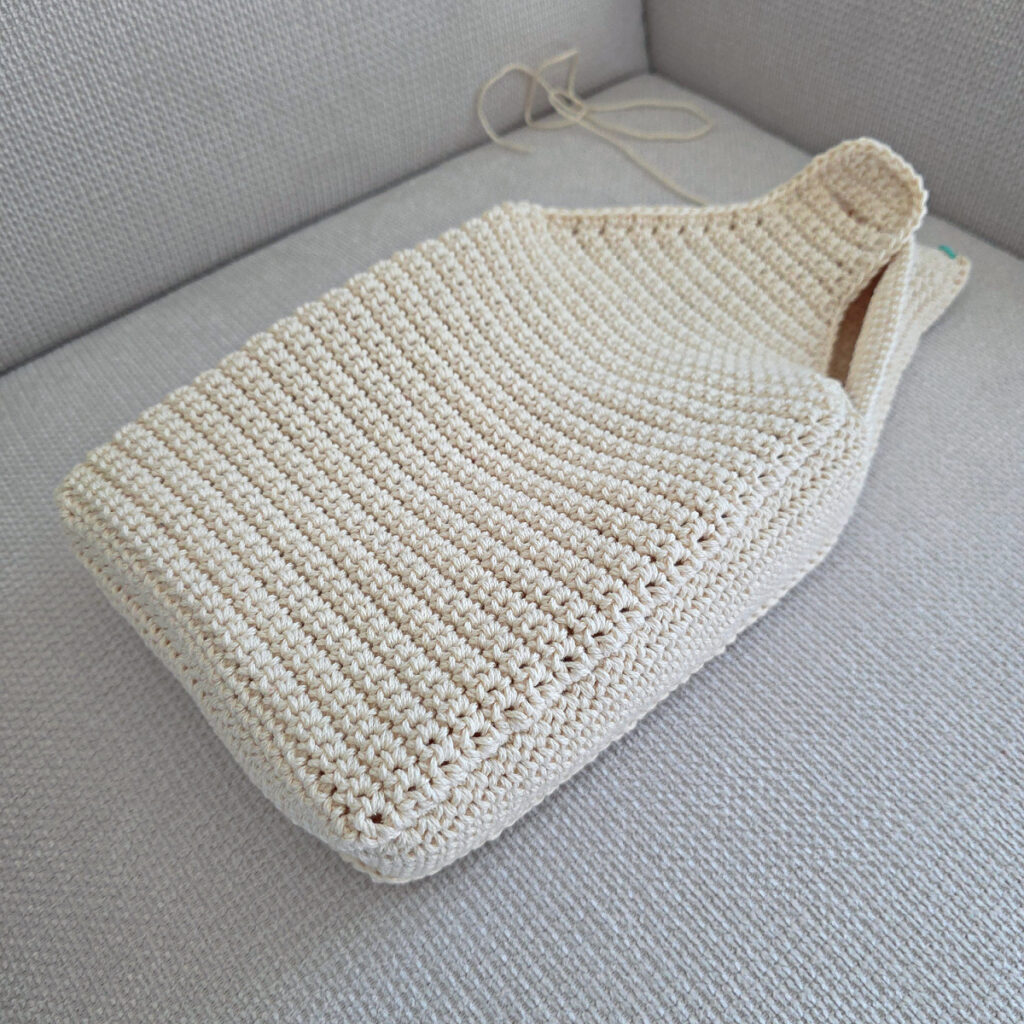
- Construction Notes: This crochet sling bag is constructed with a front and back panel and a pocket. Sides are crocheted directly onto the back panel, then the front panel and pocket are joined with single crochet stitches. The decorative granny stitch strap is crocheted directly onto the top of the sling bag. An adjustable crochet strap is them made with a crochet rope and sewn onto the bag.
Boho Crossbody Crochet Bag – Written Pattern
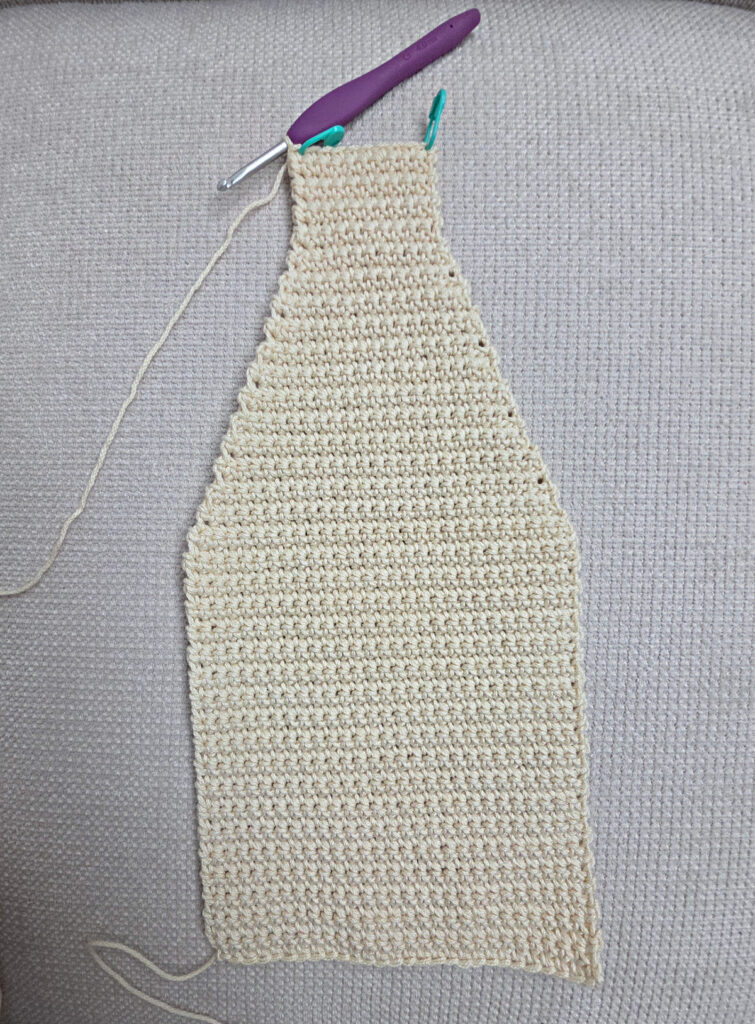
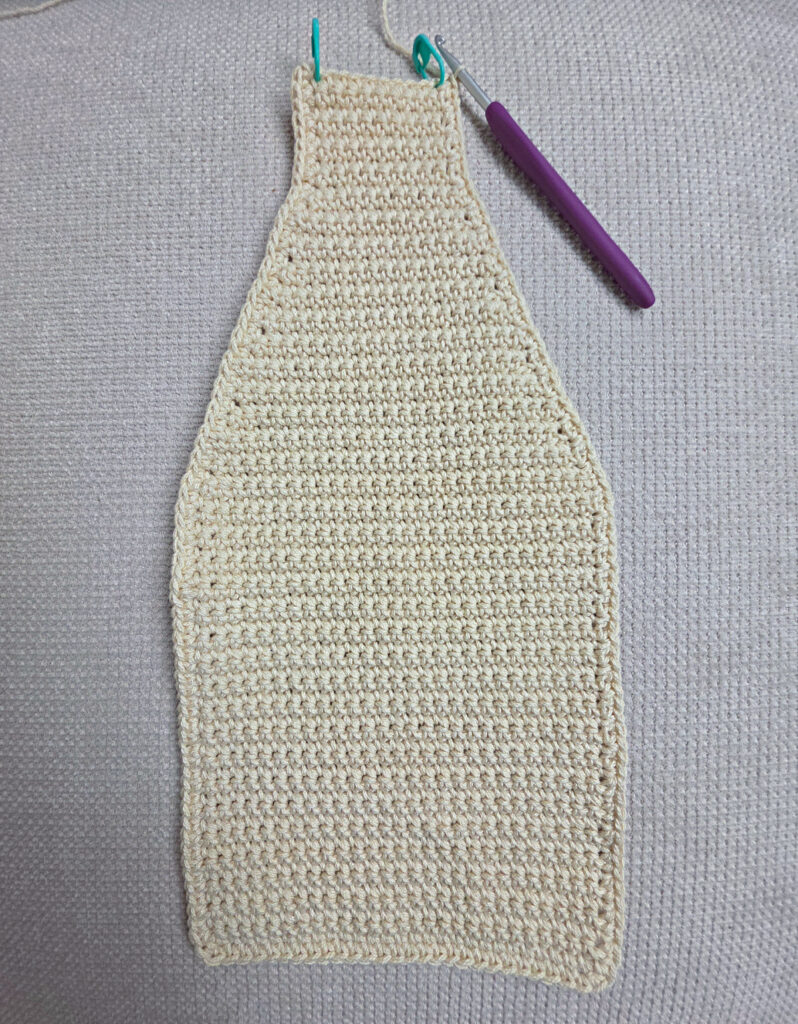
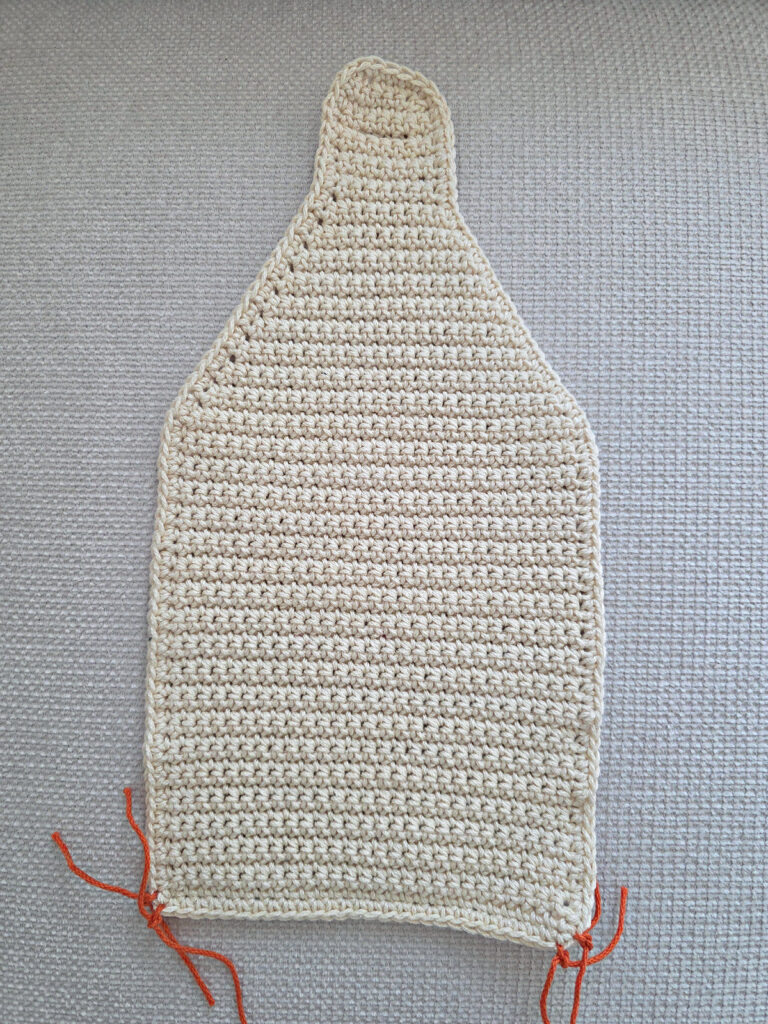
Back Panel
In this section, you’ll crochet the back panel of the bag from the bottom edge to the top tapered edge.
Set-Up: With MC yarn & a 5.00mm crochet hook, ch 29, switch to a 4.00mm crochet hook, working into the back humps of the foundation ch, sc into the 2nd ch from your hook and in each ch across. Turn. (28 sts)
Row 1 (RS): Ch 1, sc in each st across. Turn. (28 sts)
Rows 2 – 38: Ch 1, sc in each st across. Turn. (28 sts)
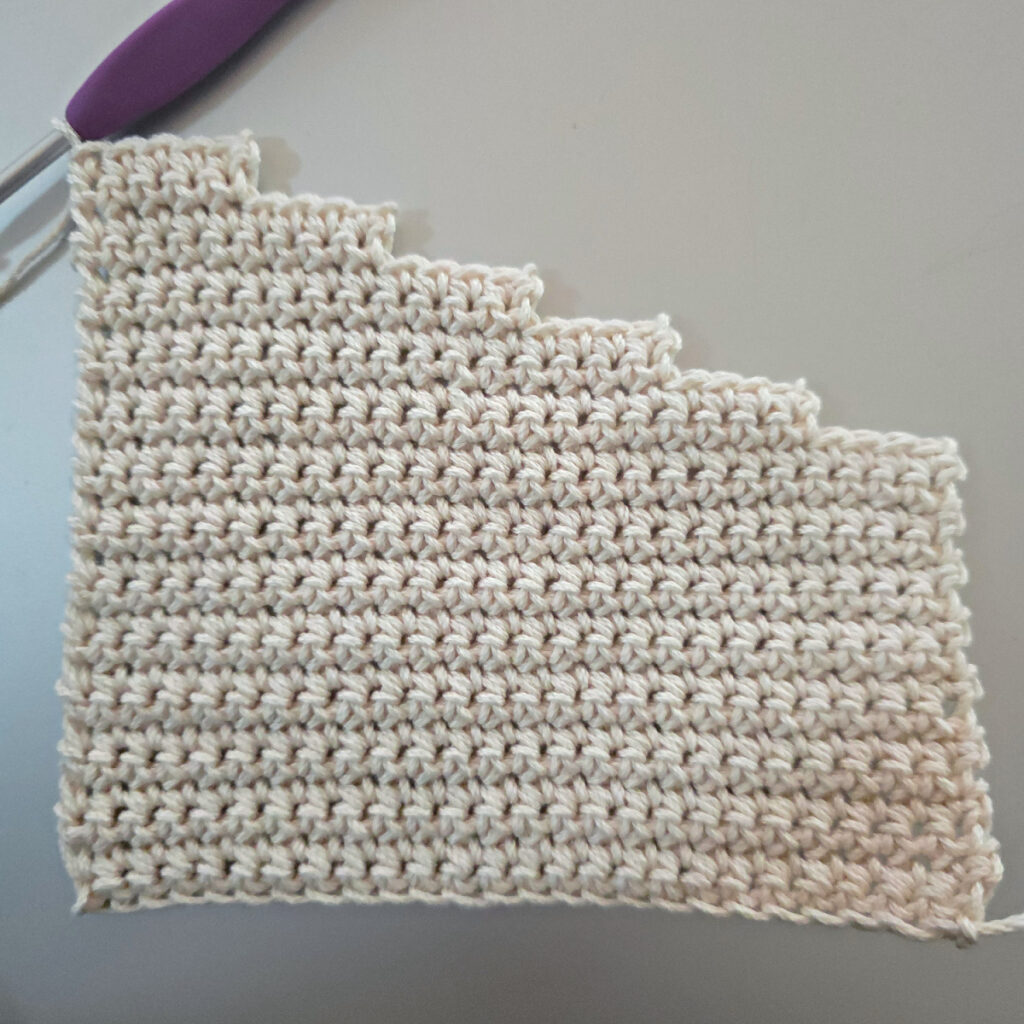
Row 39: Ch 1, skip the first st, sc in the next st, sc in each st across to the last 2 sts, skip the next st, sc in the last st. Turn. (26 sts)
Row 40: Ch 1, sc in each st across. Turn. (26 sts)
Row 41: Ch 1, sc in each st across. Turn. (26 sts)
Rows 42 – 65: Rep Rows 39 – 41, 8 times. (10 sts)
Rows 66 – 71: Ch 1, sc in each st across. Turn. (10 sts)
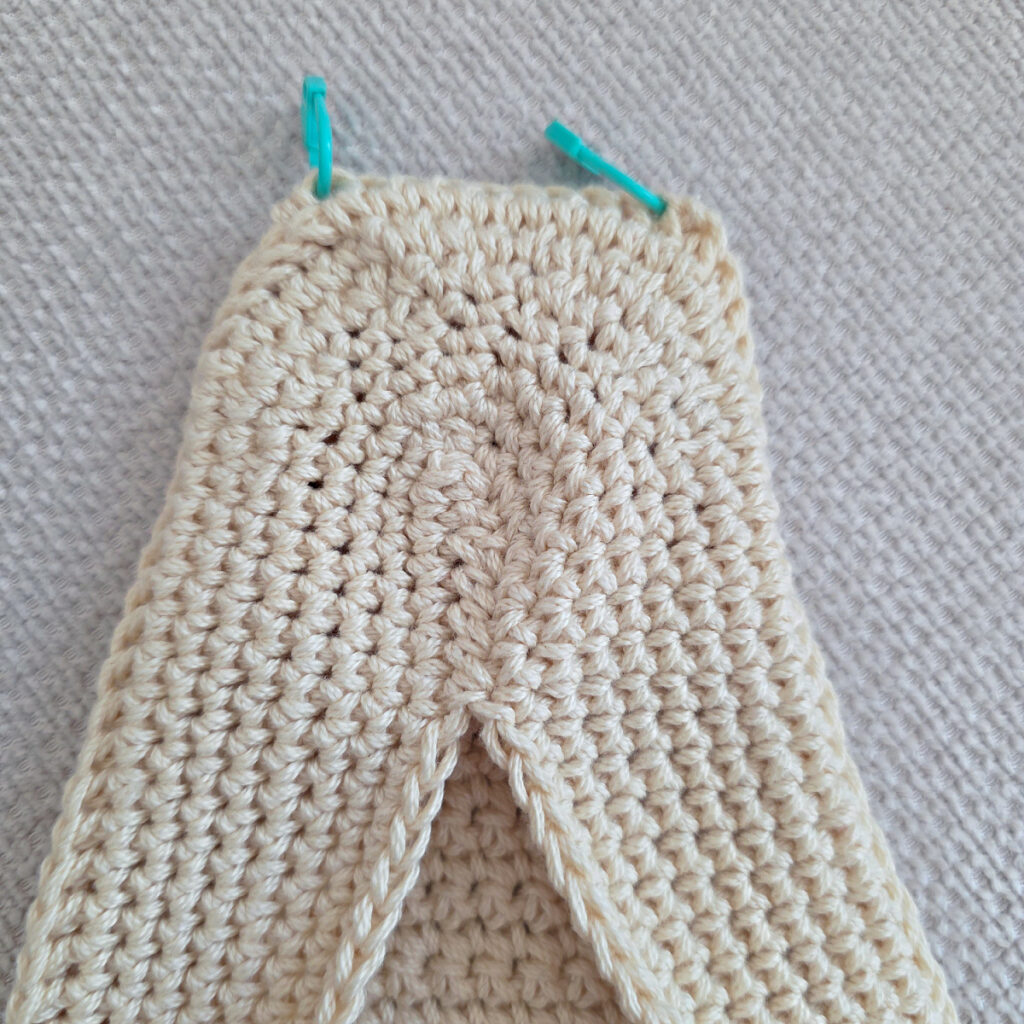
Place locking stitch markers in the first and last stitches of Row 71 to mark where you will later work the strap.
Do not fasten off. Continue to Back Panel Edging. The size of the back panel should be approximately 6-1/2″ W (Row 1 width) x 13-3/4″ H x 2-3/8″ W (Row 71 width).
Back Panel Edging
In this section, you’ll crochet around three sides of the back panel, leaving the top of the last row.
Rnd 1 (RS): Continuing on from the Back Panel, do not turn at the end of the last row, instead, rotate to begin working down the first side, ch 1, work 1 sc into each st down along the first side (71 sts), rotate and work 1 sc in each st along the bottom edge (28 sts), rotate and work 1 sc into each st up along the next side (71 sts). (170 sts)
Do not fasten off. Continue to Sides of Bag.
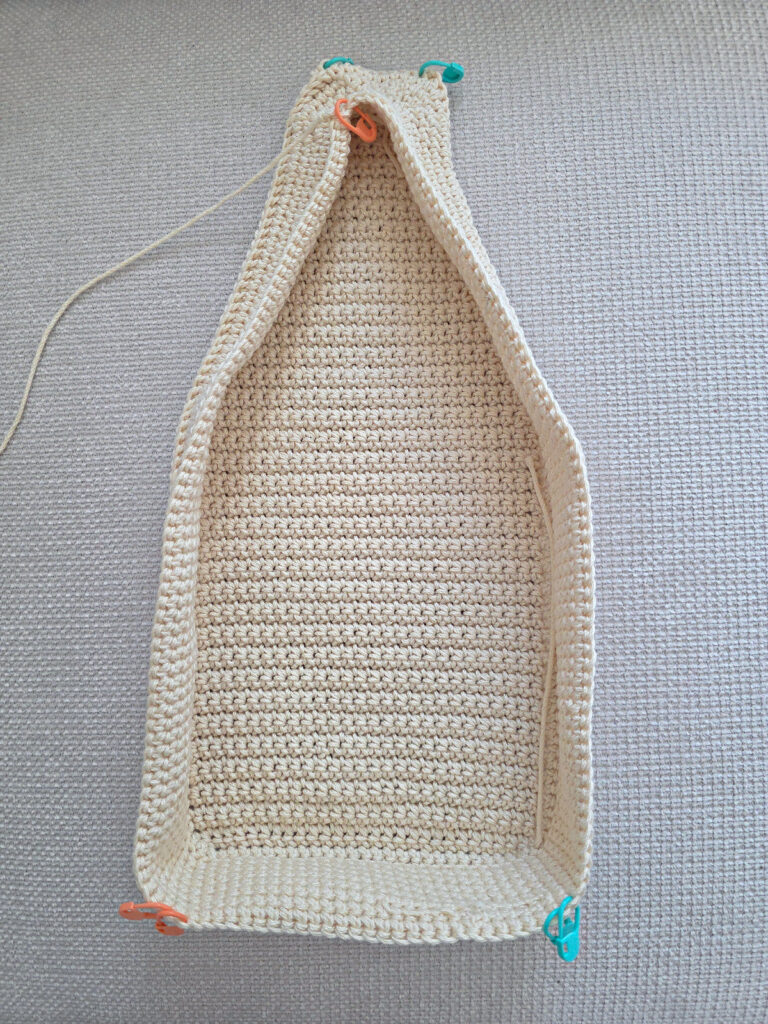
Sides of Bag
In this section, you’ll crochet around the perimeter of the back panel to create the sides of the bag and shape the top edge.
Note: This section is worked in continuous rounds to keep from having an unsightly seam. Do not join at the end of each round, instead use a scrap piece of yarn to keep track of the beginning of each round. Move the scrap of yarn up as you complete each round.
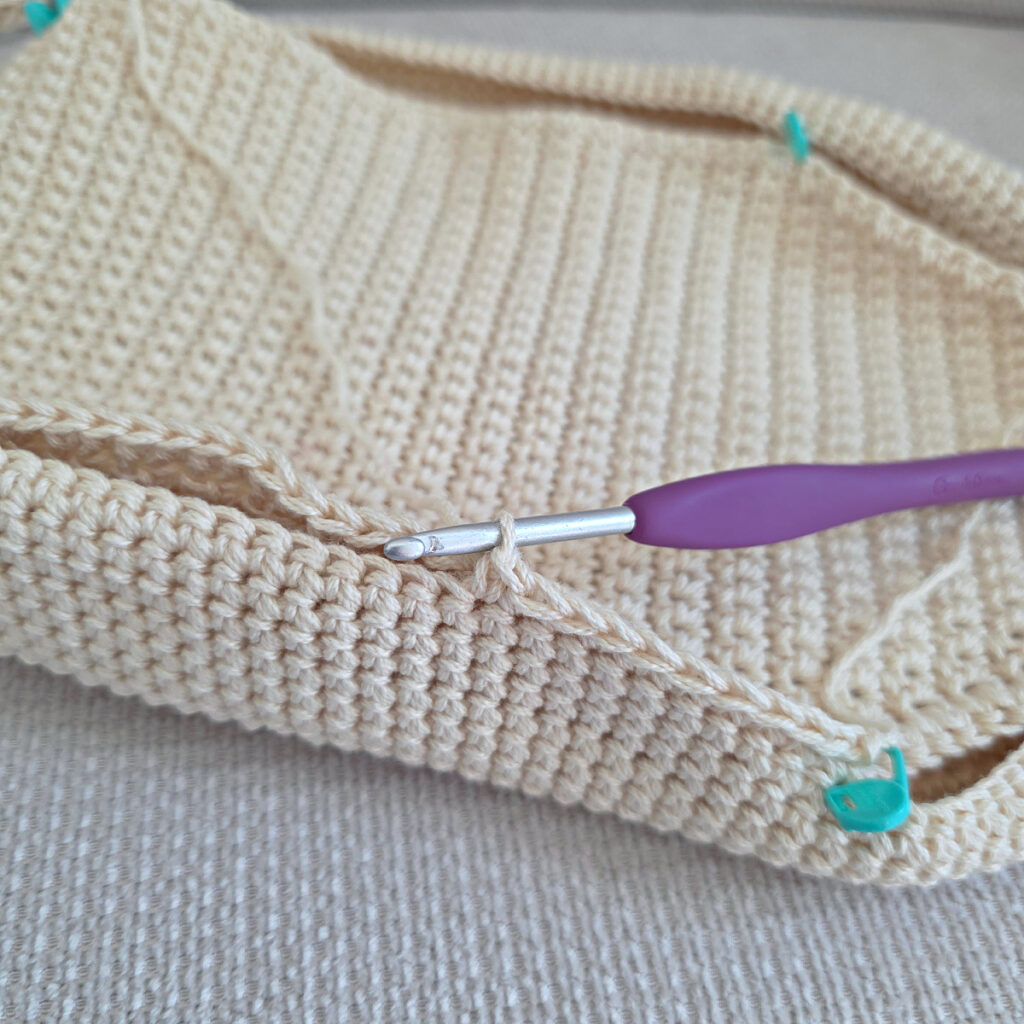
Rnd 1 (RS): Continuing on from the back panel edging, do not ch, BPsc across the last row of the back panel, rotate and work a BPsc around the remaining three sides of the back panel. Do not join. (180 sts)
Rnd 2: Sc in each st around. (180 sts)
Rnd 3: (sc in each of the next 2 sts, Invsc2tog) 4, times, sc in each st around to the last 6 sts, Invsc2tog, sc in each of the next 2 sts, Invsc2tog. (174 sts)
Rnd 4: (Invsc2tog, sc in the next st) 4 times, sc in each st around to the last 6 sts, (Invsc2tog, sc in the next st) 2 times. (168 sts)
Rnd 5: (Invsc2tog, sc in the next st) 2 times, Invsc2tog, sc in each st around to the last 3 sts, Invsc2tog, sc in the next st. (164 sts)
Rnds 6 – 8: Sc in each st around. (164 sts)
Rnd 9: Invsc3tog, sc in each remaining st around. (163 sts)
Fasten off leaving an 18″ tail of yarn. Continue on to Front Panel. The sides of the bag should measure approximately 1-7/8″ H (measured on the outside of the bag).
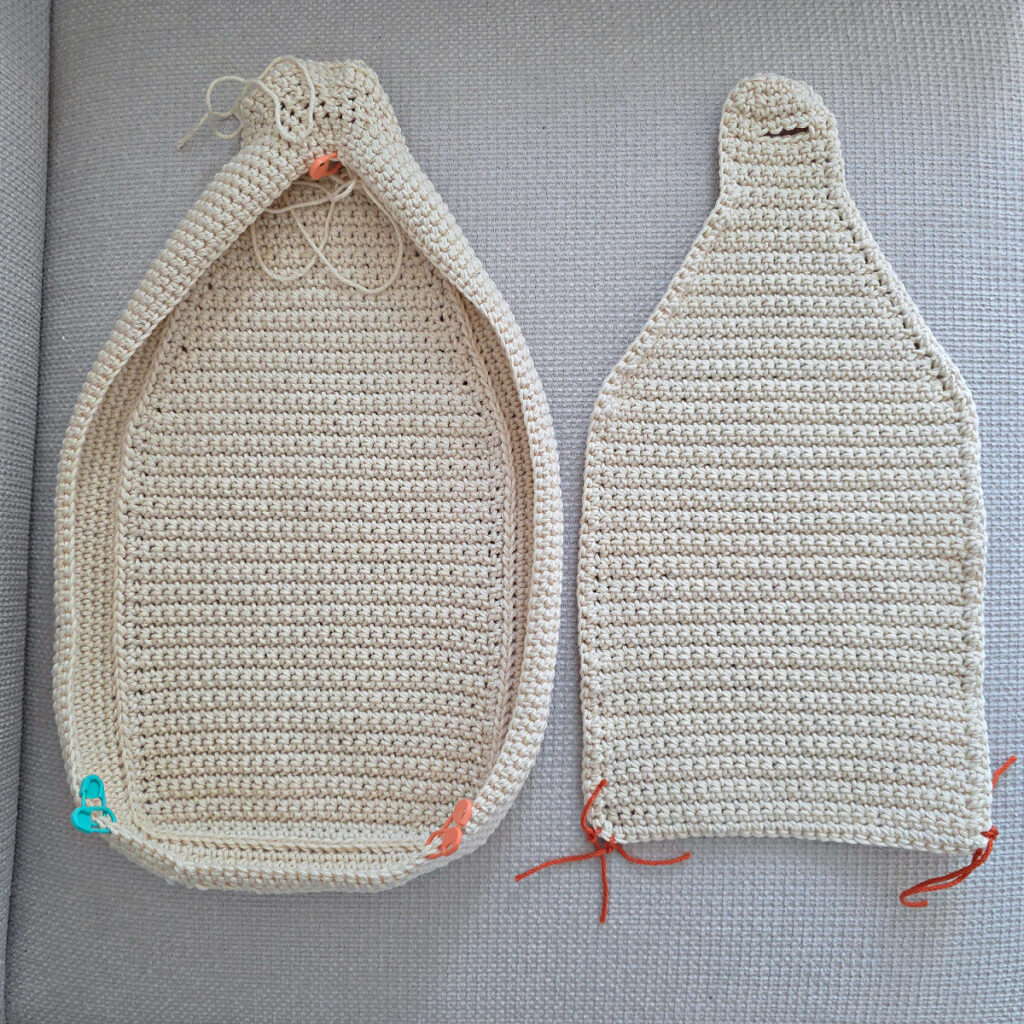
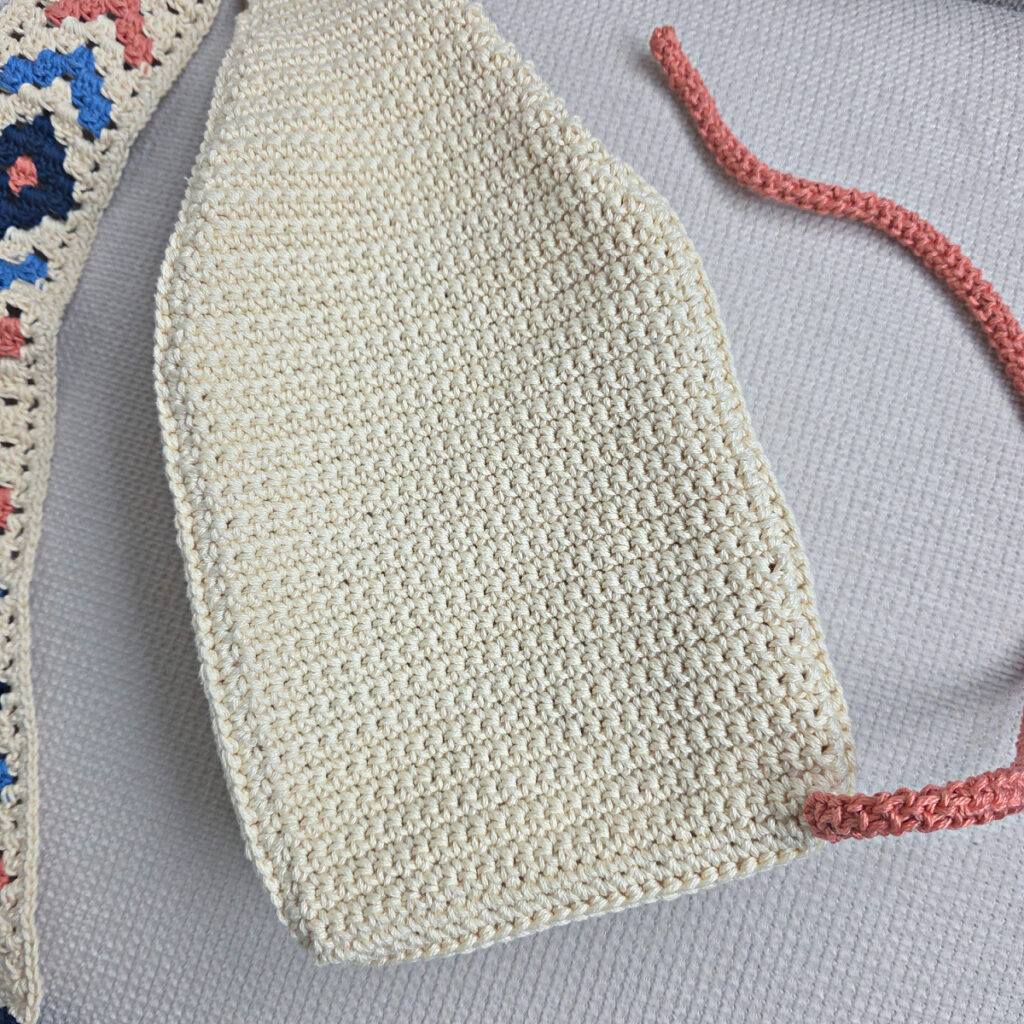
Front Panel
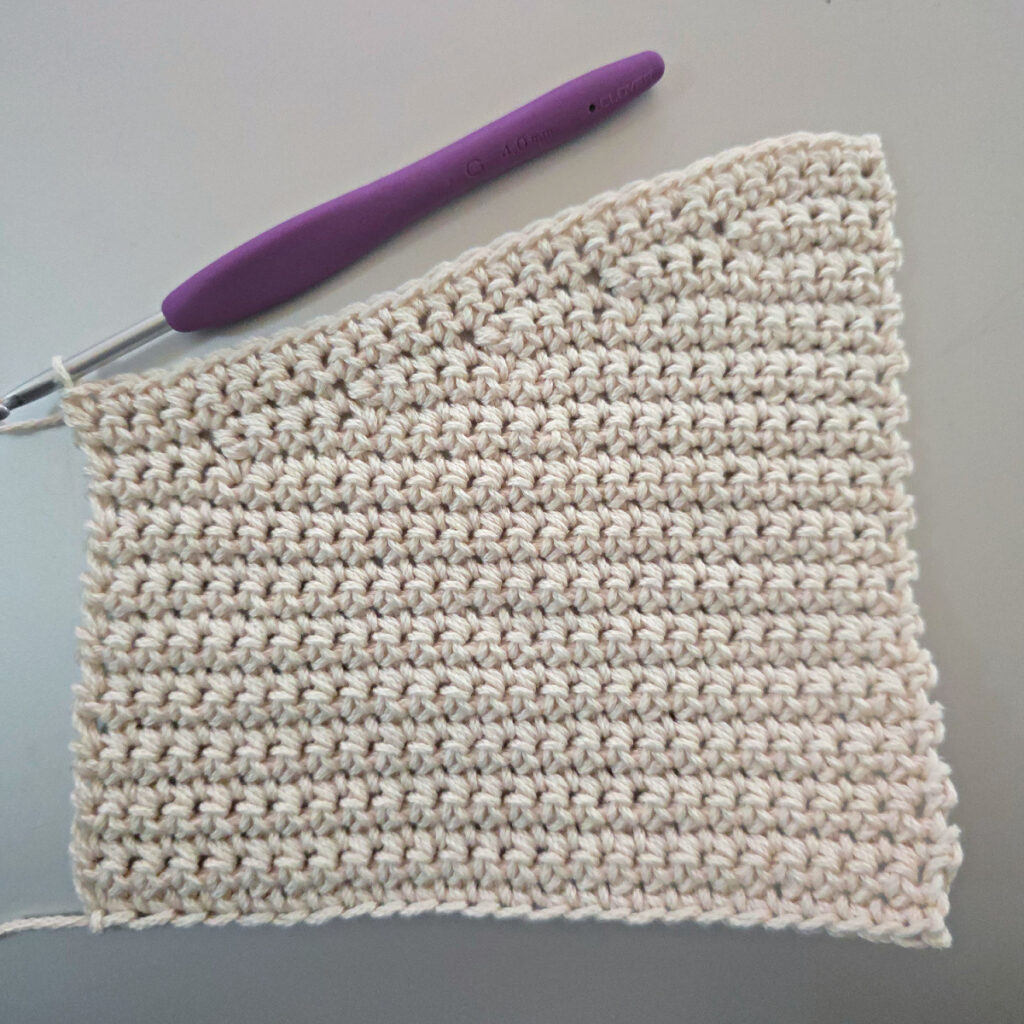
In this section, you’ll crochet a piece that is similar to the back panel, but the shaping of the last few rows will be different.
Set-Up: With MC yarn & a 5.00mm crochet hook, ch 29, switch to a 4.00mm crochet hook, working into the back humps of the foundation ch, sc into the 2nd ch from your hook and in each ch across. Turn. (28 sts)
Row 1 (RS): Ch 1, sc in each st across. Turn. (28 sts)
Rows 2 – 38: Ch 1, sc in each st across. Turn. (28 sts)
Row 39: Ch 1, skip the first st, sc in the next st, sc in each st across to the last 2 sts, skip the next st, sc in the last st. Turn. (26 sts)
Row 40: Ch 1, sc in each st across. Turn. (26 sts)
Rows 41 – 58: Rep Rows 39 – 40, 9 times. (8 sts)
Rows 59 – 62: Ch 1, sc in each st across. Turn. (8 sts)
Row 63: Ch 1, sc in each of the first 2 sts, ch 4, skip each of the next 4 sts, sc in each of the last 2 sts. Turn. (4 sts + 1 ch-4)
Row 64: Ch 1, sc in each st and ch across. Turn. (8 sts)
Row 65: Ch 1, sc in each st across. Turn. (8 sts)
Rows 66 – 67: Ch 1, skip the first st, sc in the next st, sc in each st across to the last 2 sts, skip the next st, sc in the last st. Turn. (4 sts) at the end of Row 67.
Do not fasten off. Continue to Front Panel Edging. The size of the back panel should be approximately 6-1/2″ W (Row 1 width) x 12-3/4″ H x 2″ W (width of Rows 59 – 65).
Front Panel Edging
In this section, you’ll crochet around the perimeter or the front panel.
Rnd 1 (RS): Continuing on from the Front Panel, do not turn at the end of the last row, instead, rotate to begin working down the first side, ch 1, work 1 sc into each st down along the first side (67 sts), rotate and work 1 sc in each st along the bottom edge (28 sts), rotate and work 1 sc into each st up along the next side (67 sts), rotate and work 1 sc into each st along the top edge (4 sts). Join with a sl st to the 1st st. (166 sts)
Do not fasten off. Continue to Join Front Panel to Sides of Bag.
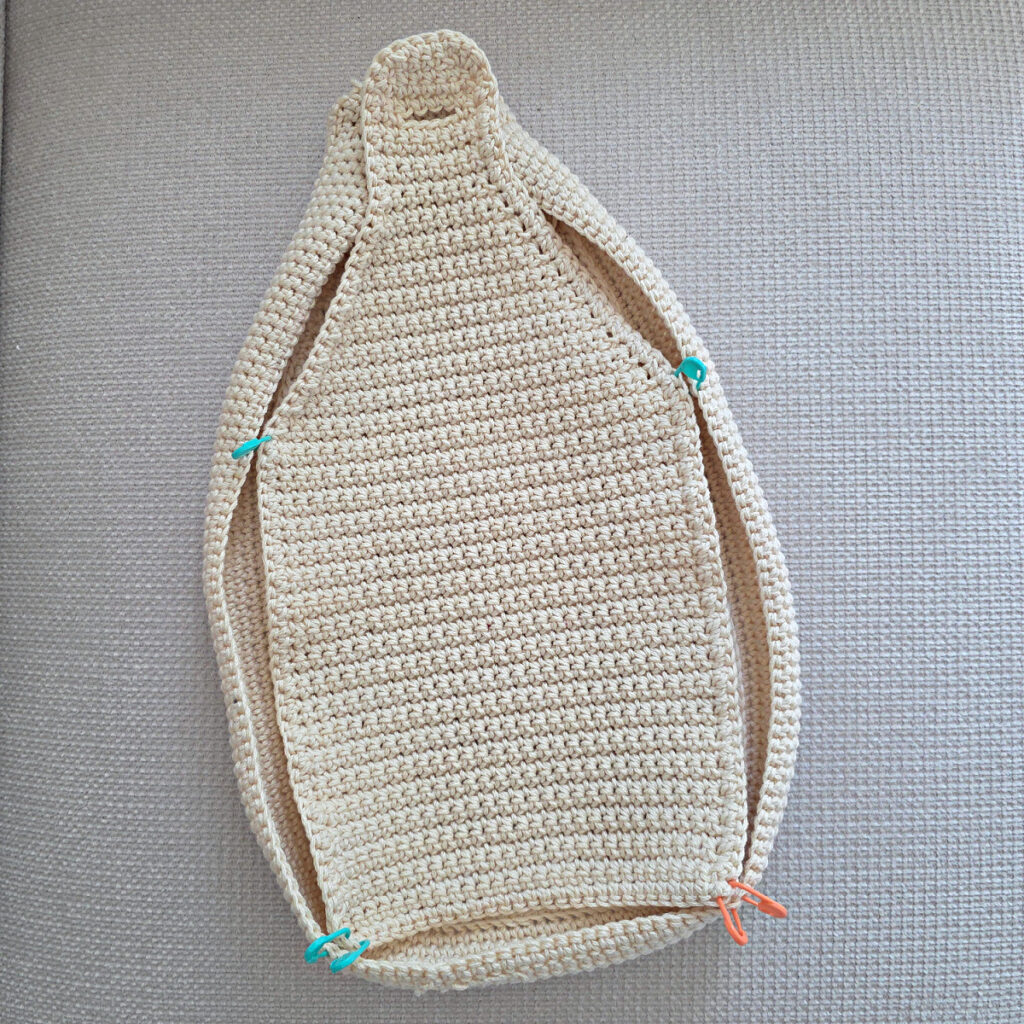
Join Front Panel to Sides of Bag
In this section, you’ll join the front panel to the sides of bag.
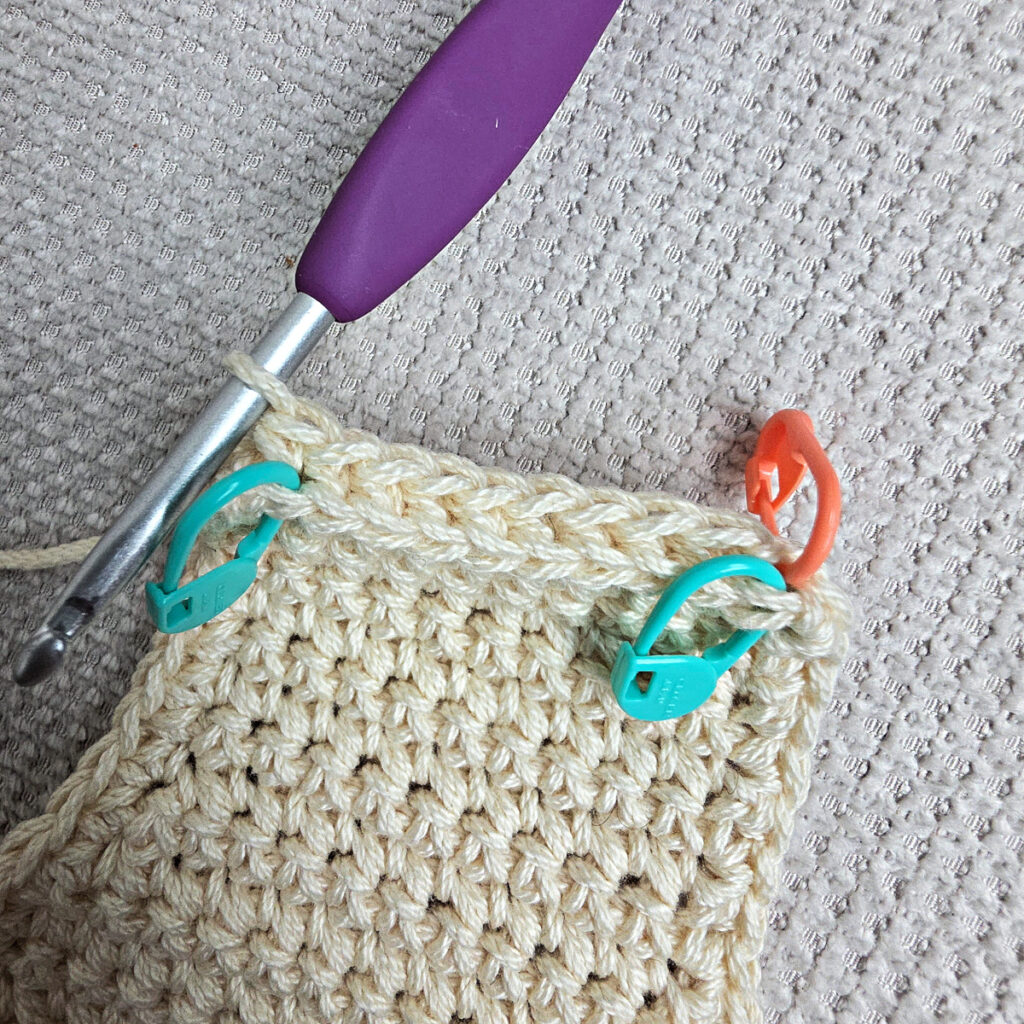
Step 1: Place Stitch Markers on the Front Panel
- Locate the 28 stitches along the bottom edge of the front panel. Place a SM in the 1st and 28th stitches.
- Place a SM to the left of the SM on the left corner (this will be the first stitch along the left side).
- Place a SM to the right of the SM on the right corner (this will be the first stitch along the right side).
Step 2: Place Stitch Markers on the Sides of Bag
- Locate the 28 stitches along the bottom edge of the Sides of Bag. Place a SM in the 1st and 28th stitches.
- Place a SM to the left of the SM on the left corner (this will be the first stitch along the left side).
- Place a SM to the right of the SM on the right corner (this will be the first stitch along the right side).
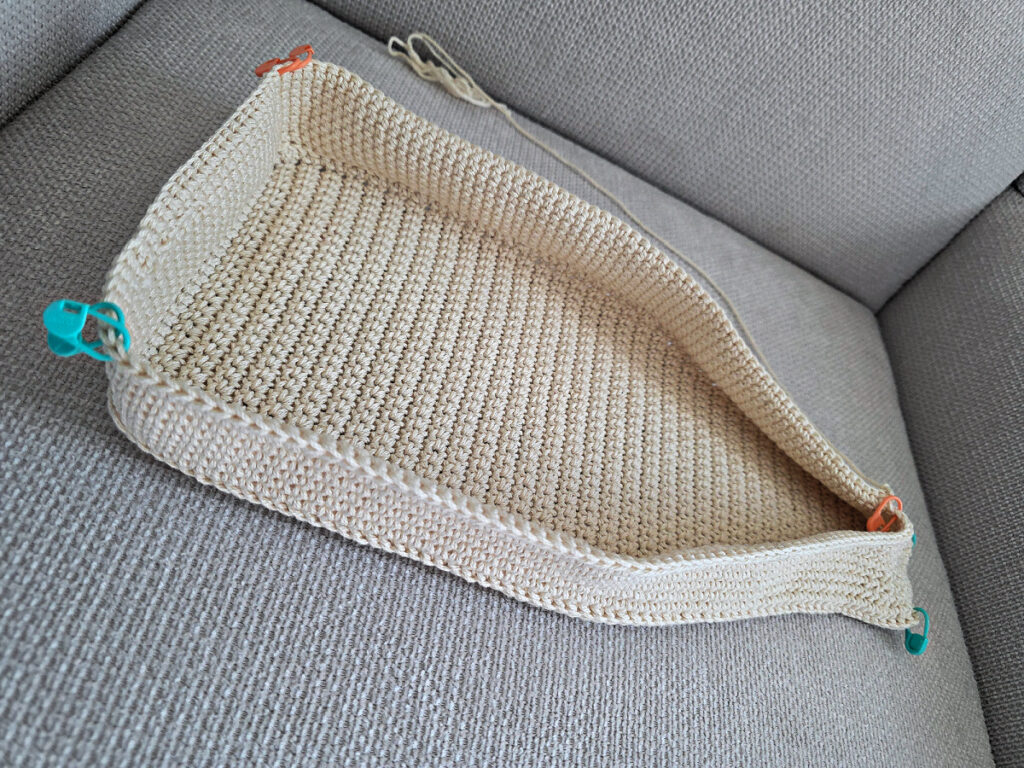
Step 3: Turn the Sides of Bag inside out. Turn the Front Panel over so that the WS is facing up. Line up the SM you placed in Steps 1 & 2. Use the SM to hold the two pieces together.
Step 4: Beginning with the stitch marked next to a corner stitch, count 38 stitches up along a side. Place a locking SM in the 38th stitch to hold the two pieces together. Repeat for the opposite edge.
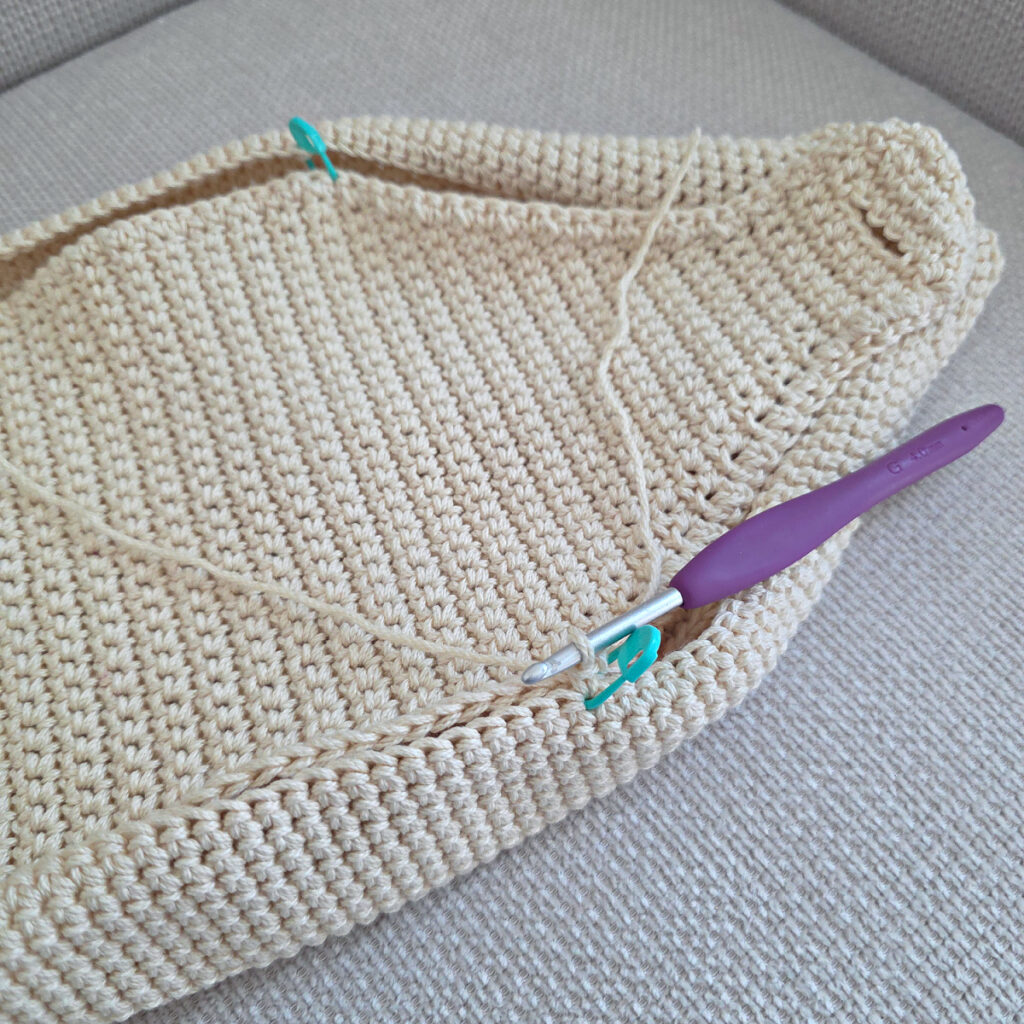
Step 5: With yarn & a 4.00mm crochet hook, making sure to crochet through both layers, join yarn with a standing sc in the 38th st along the right side, join the two layers by working a sc in each st around to the next st marked as the 38th st on the opposite side. (104 sts)
Fasten off. Weave in ends. Turn the bag right side out. Continue to Whipstitching Upper Portion of Sides of Bag.
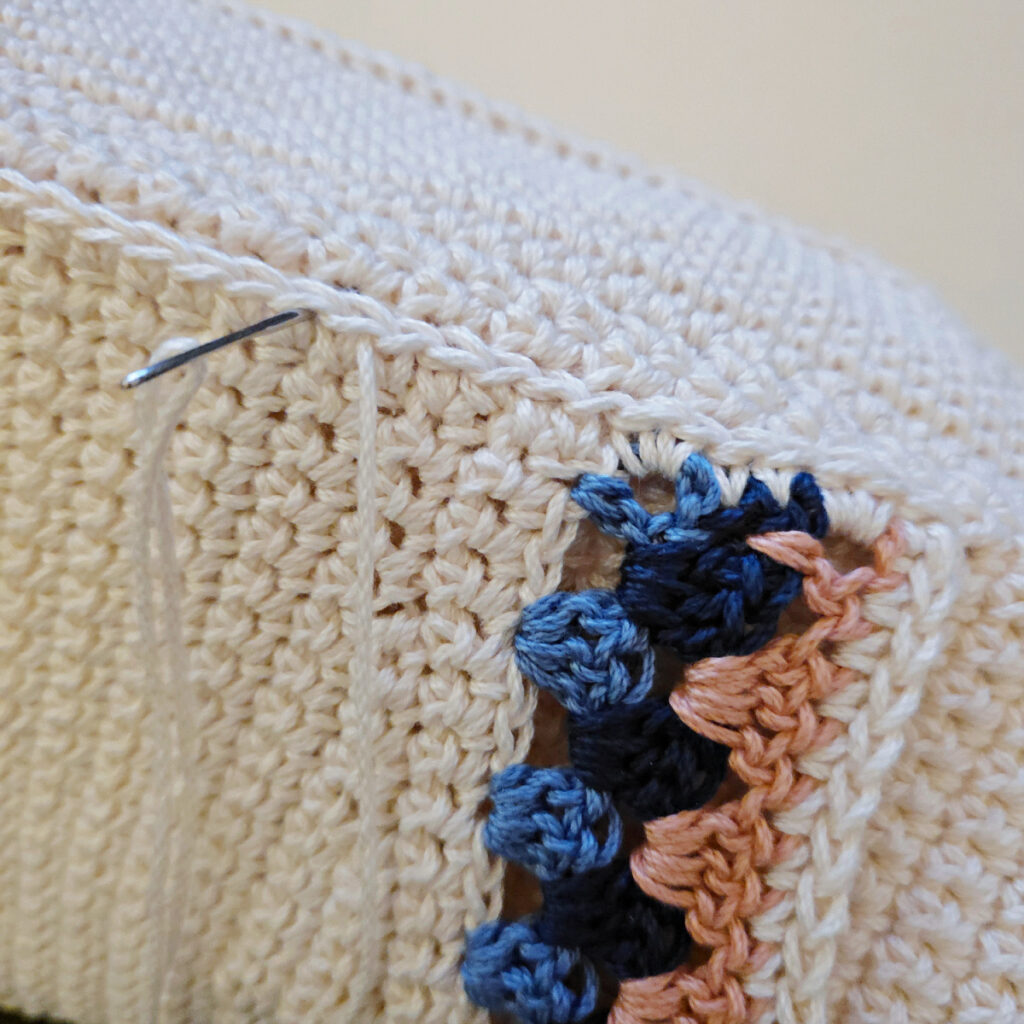
Whipstitching Upper Portion of Sides of Bag
In this section, you’ll whipstitch a few stitches together near the top of the sides of bag.
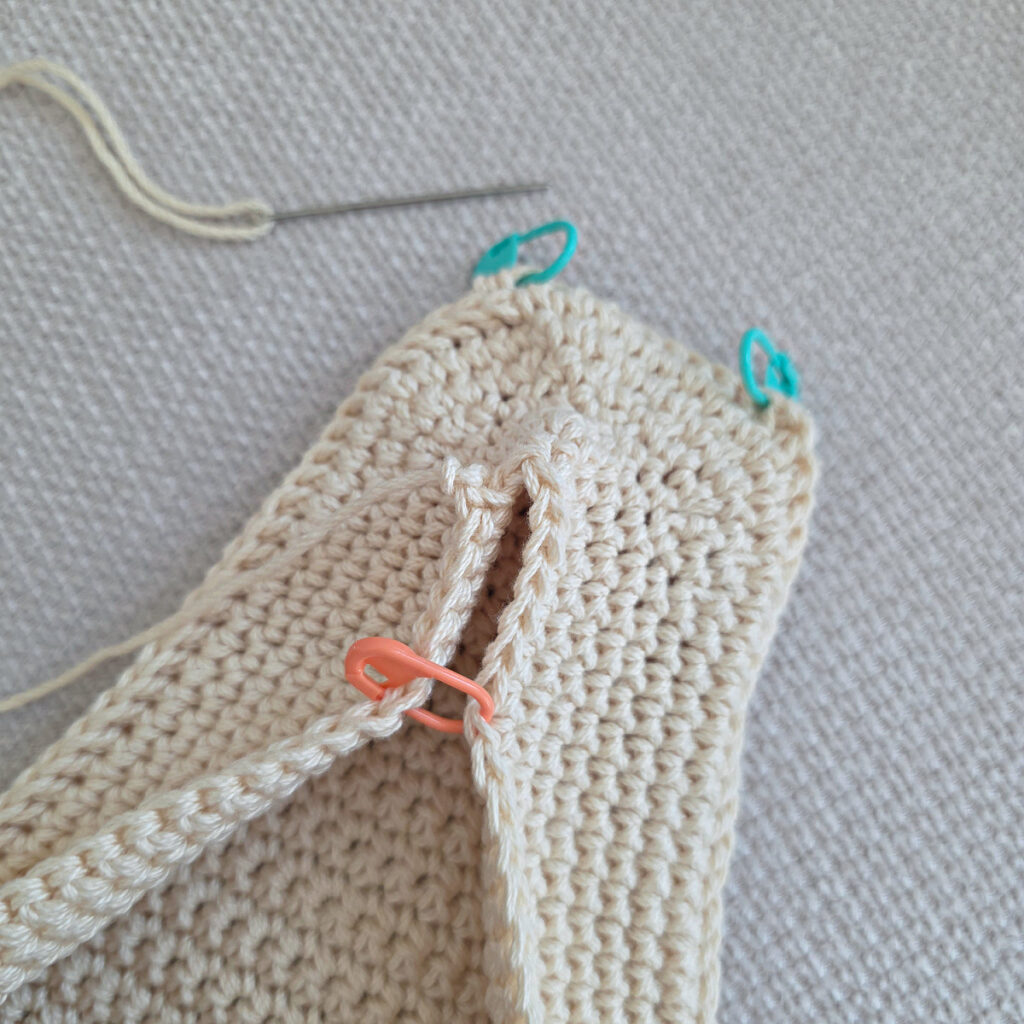
Line up 8 stitches on each side of the top opening of the Sides of Bag. Use a locking SM to hold the 8th stitches together while seaming.
With a yarn needle and tail of yarn left, whipstitch these stitches together. This is where you will later attach a button.
Weave in ends. Continue to Decorative Strap.
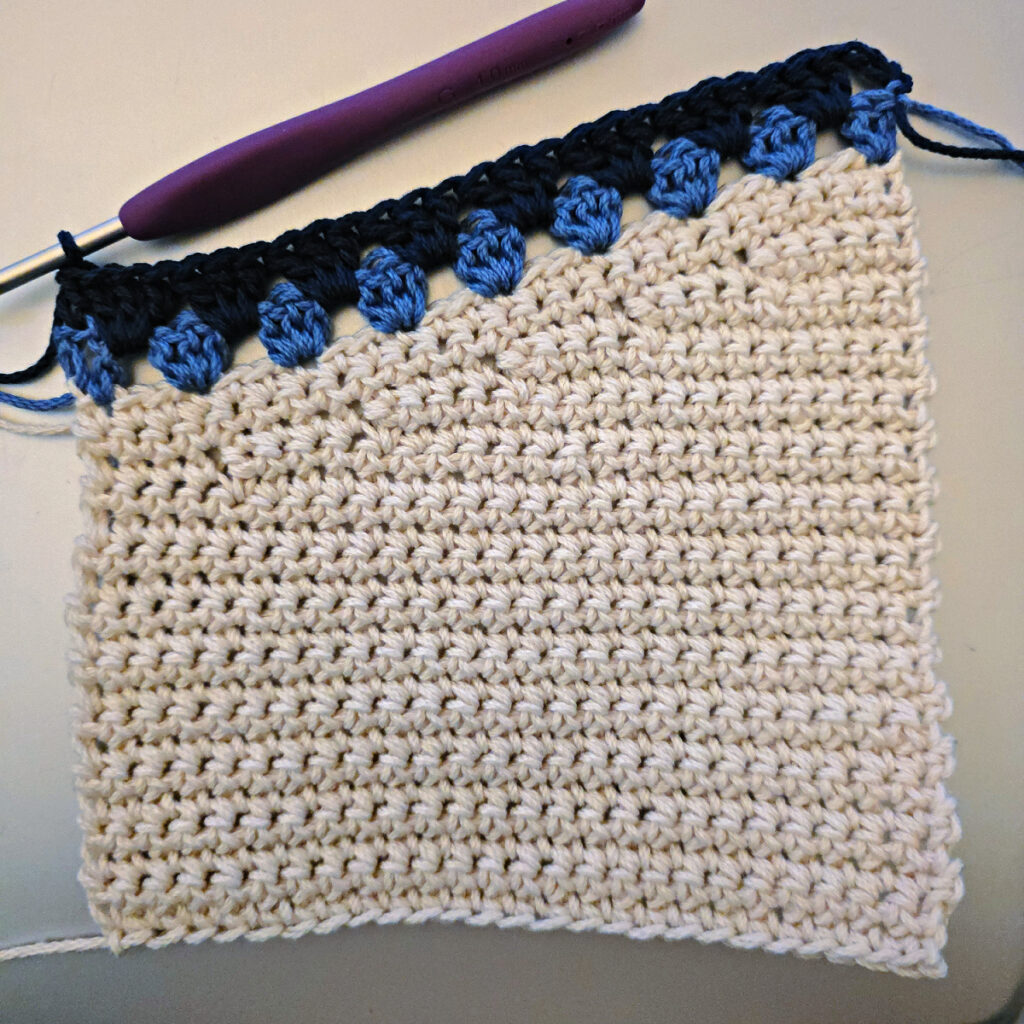
Decorative Strap
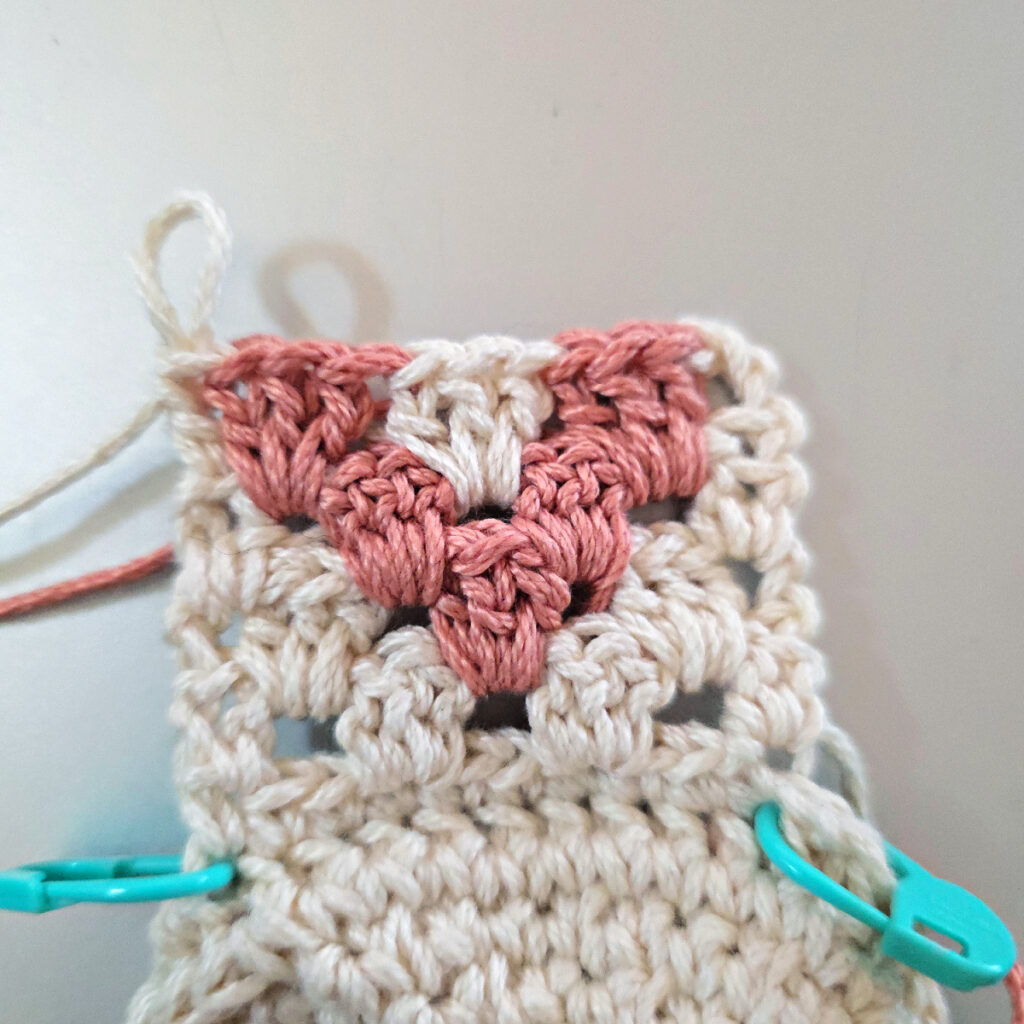
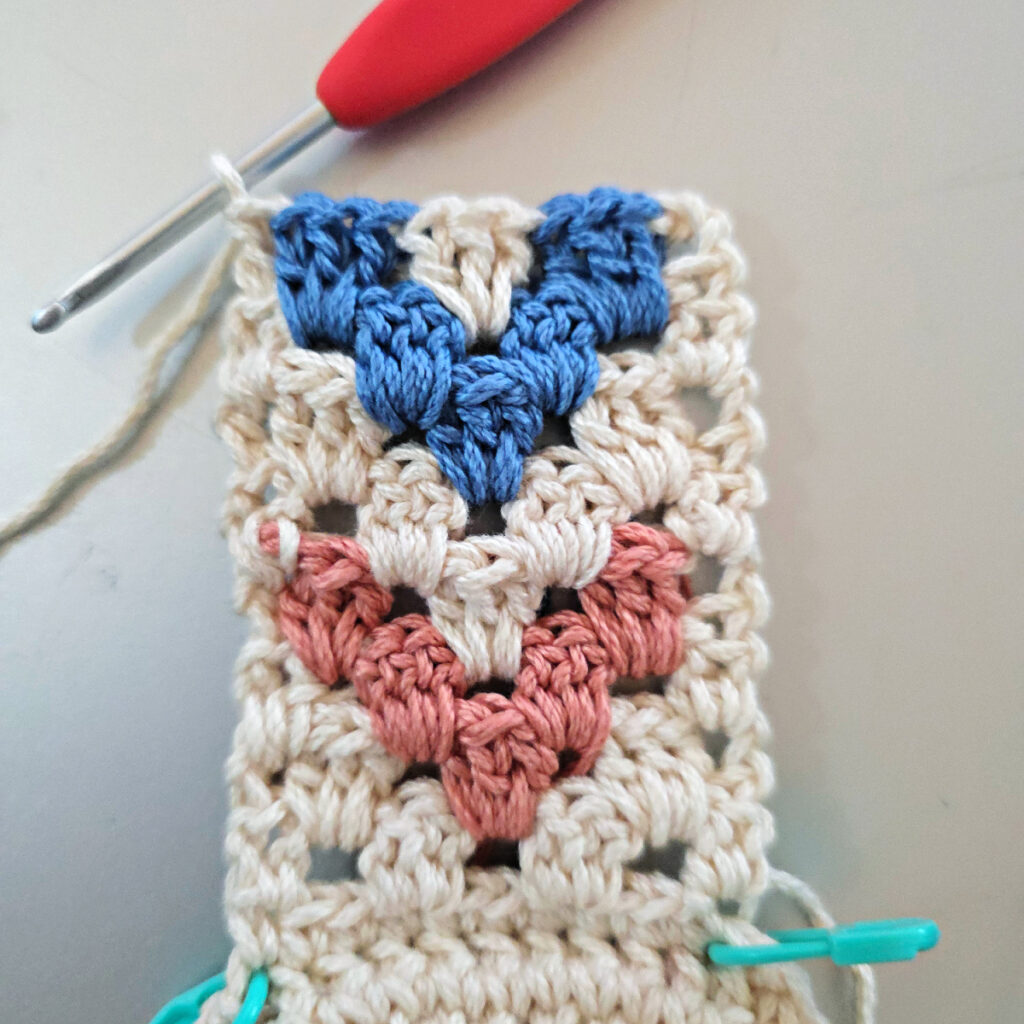
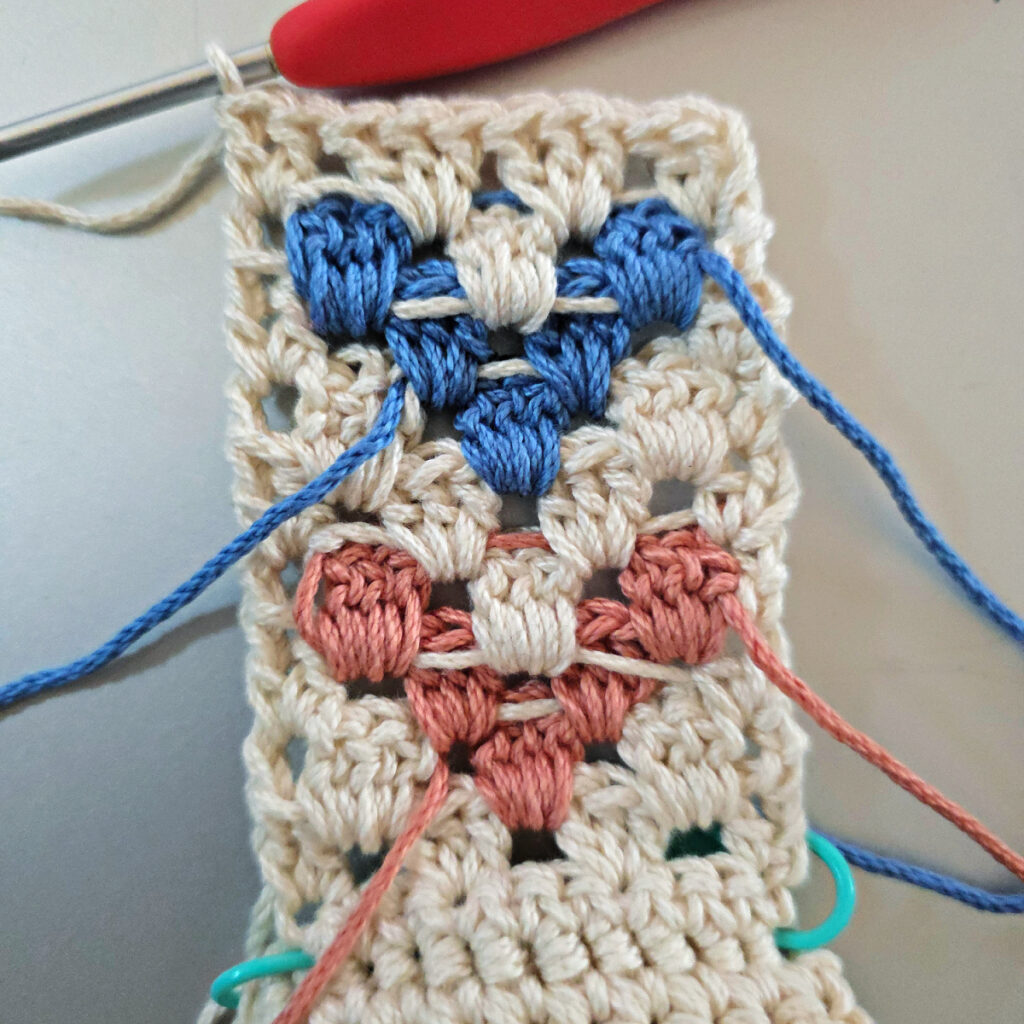
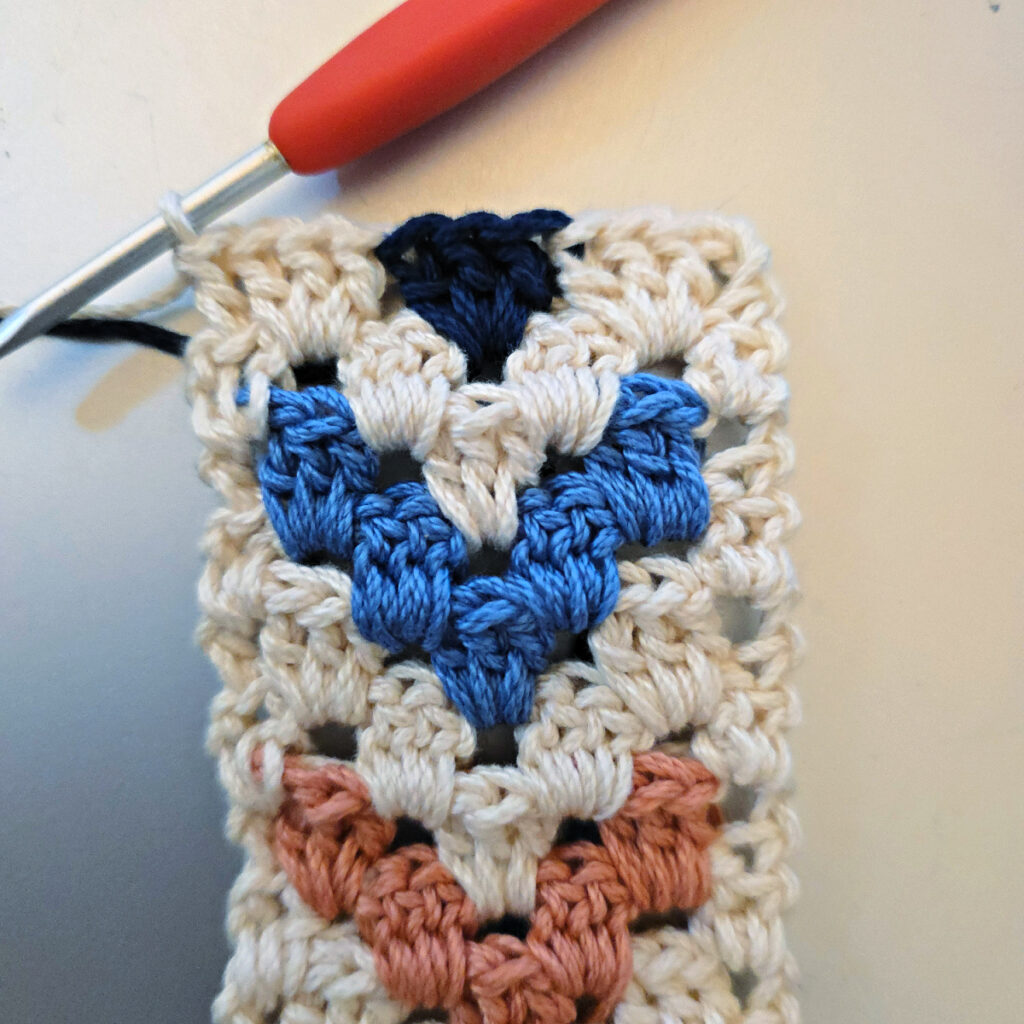
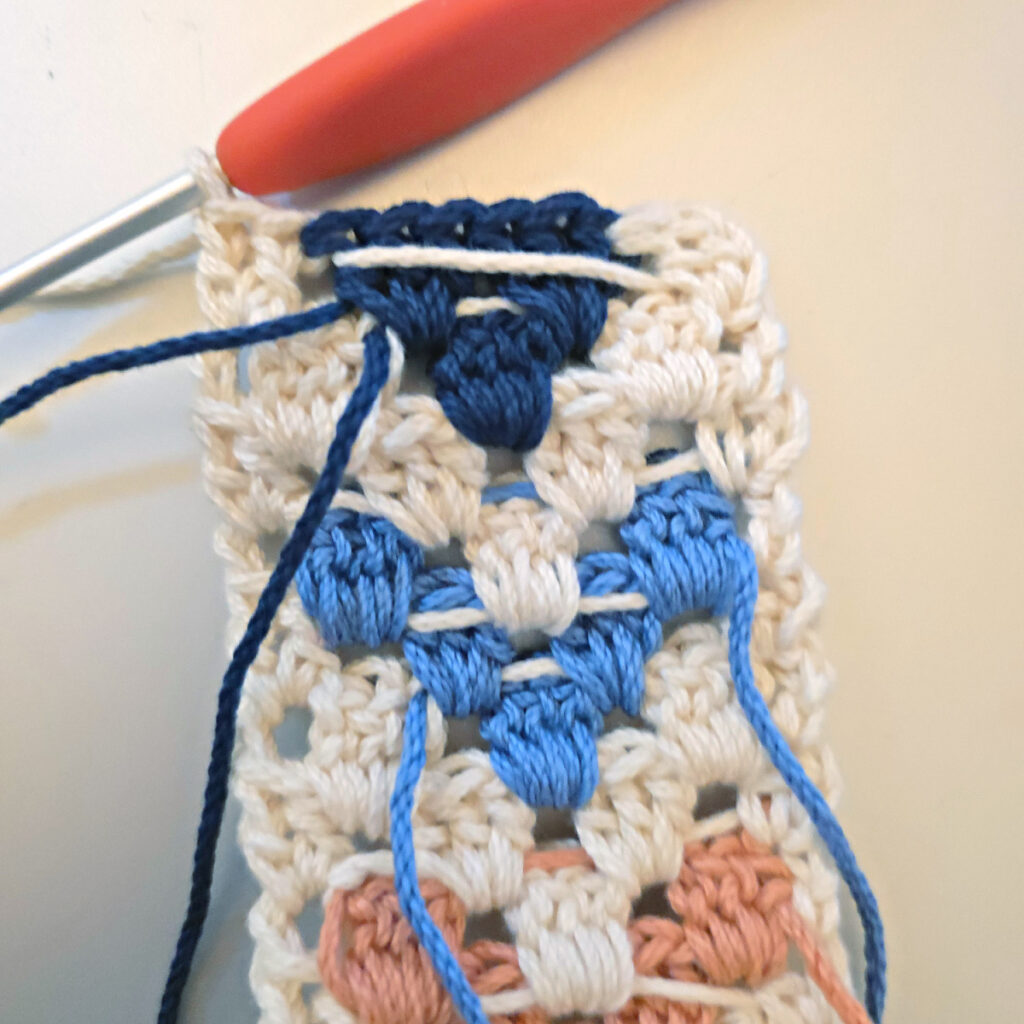
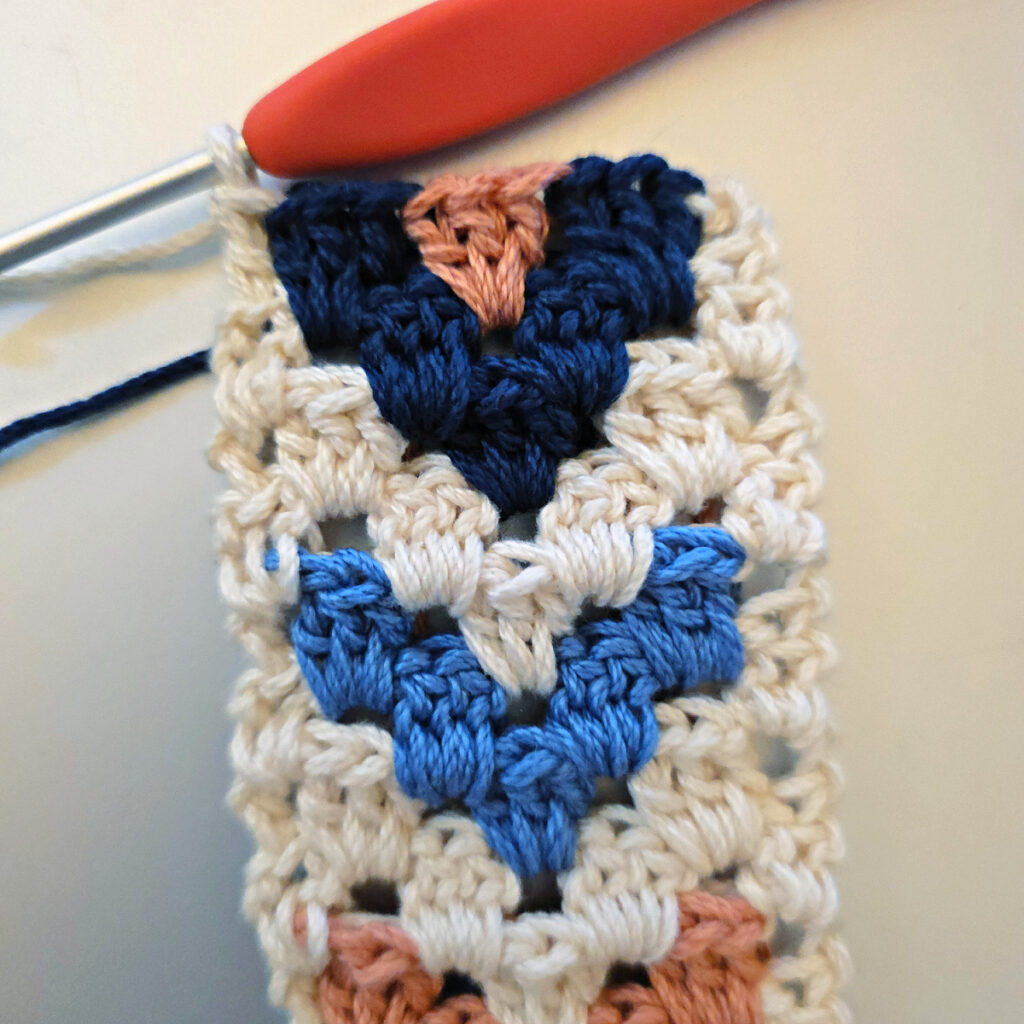
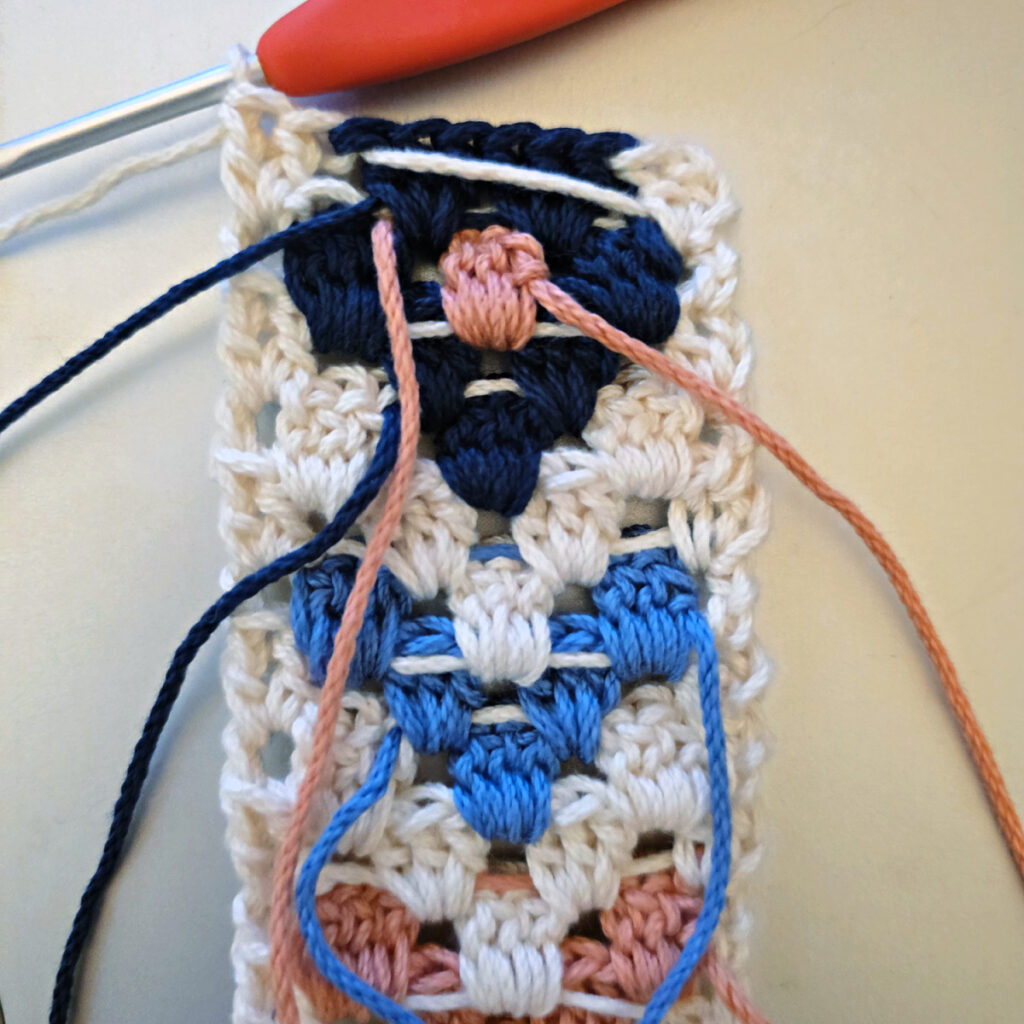
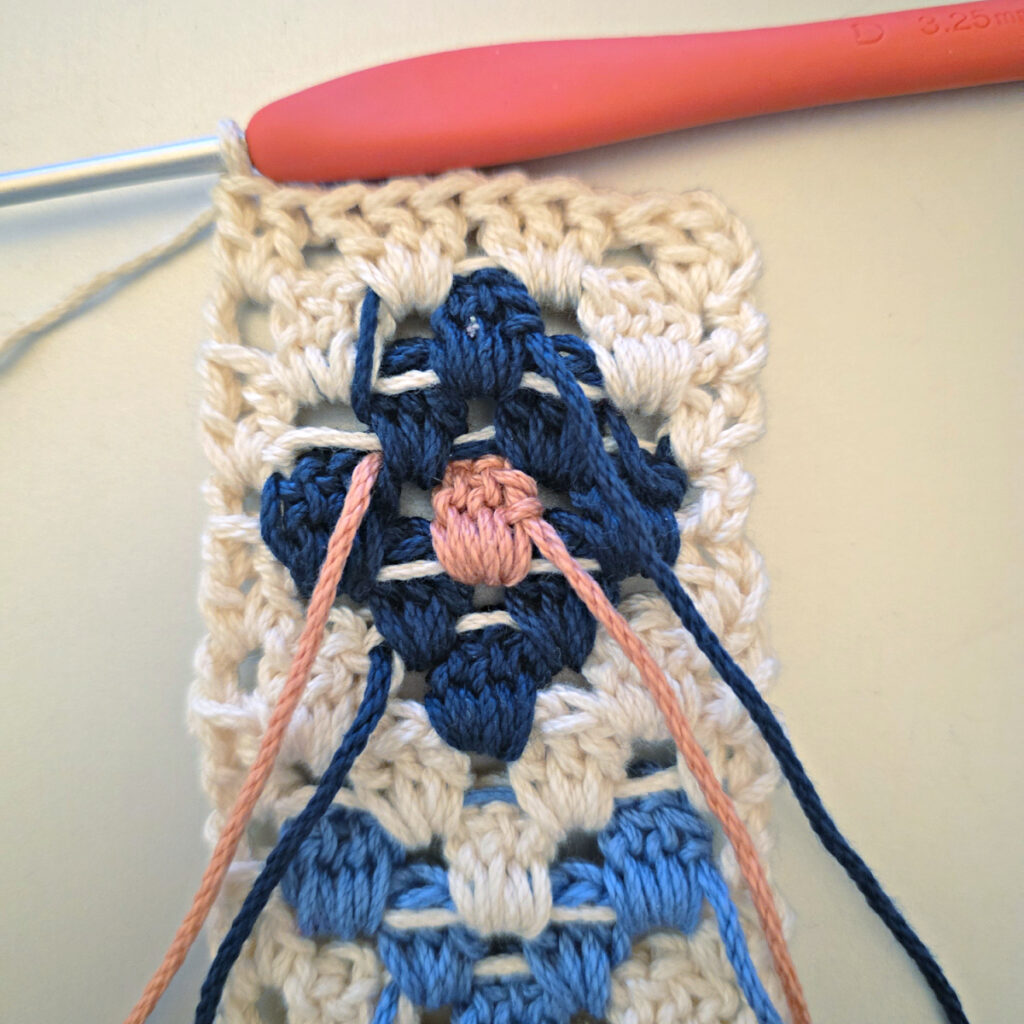
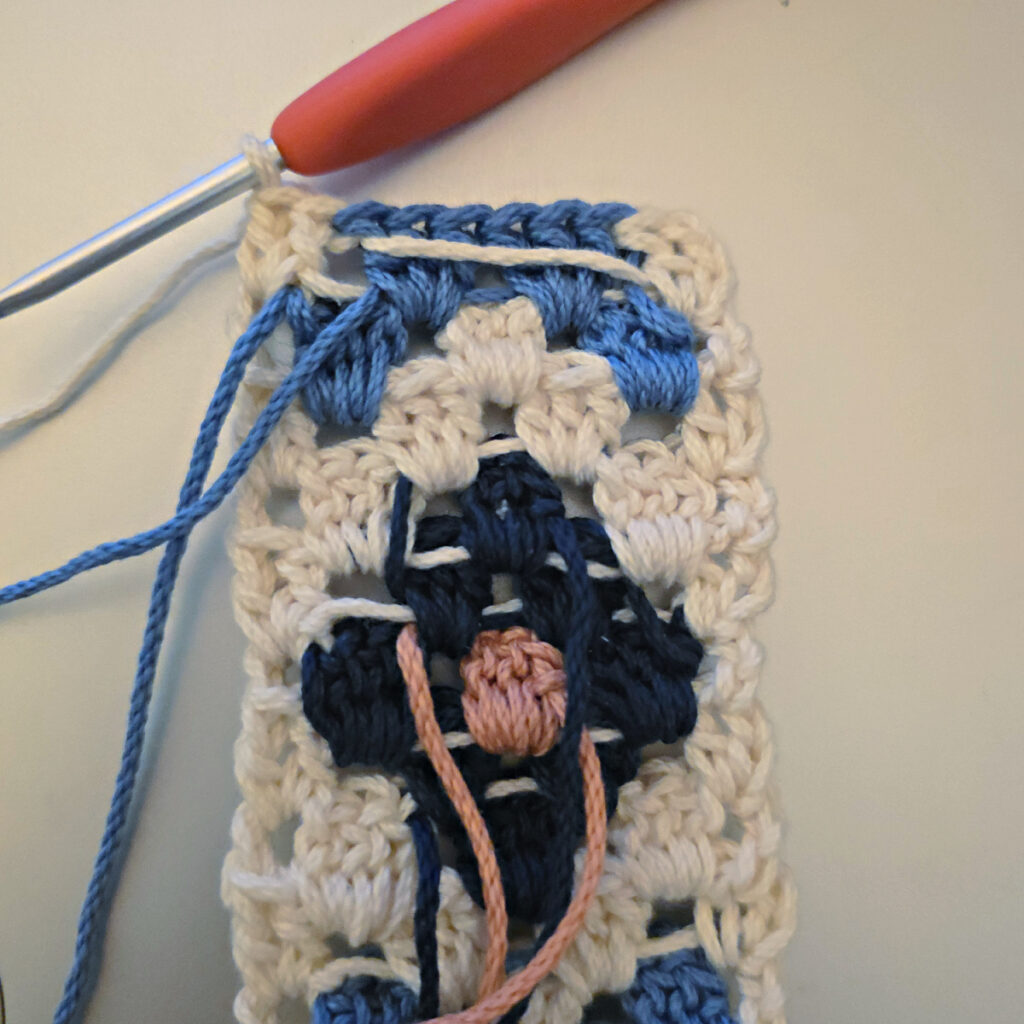
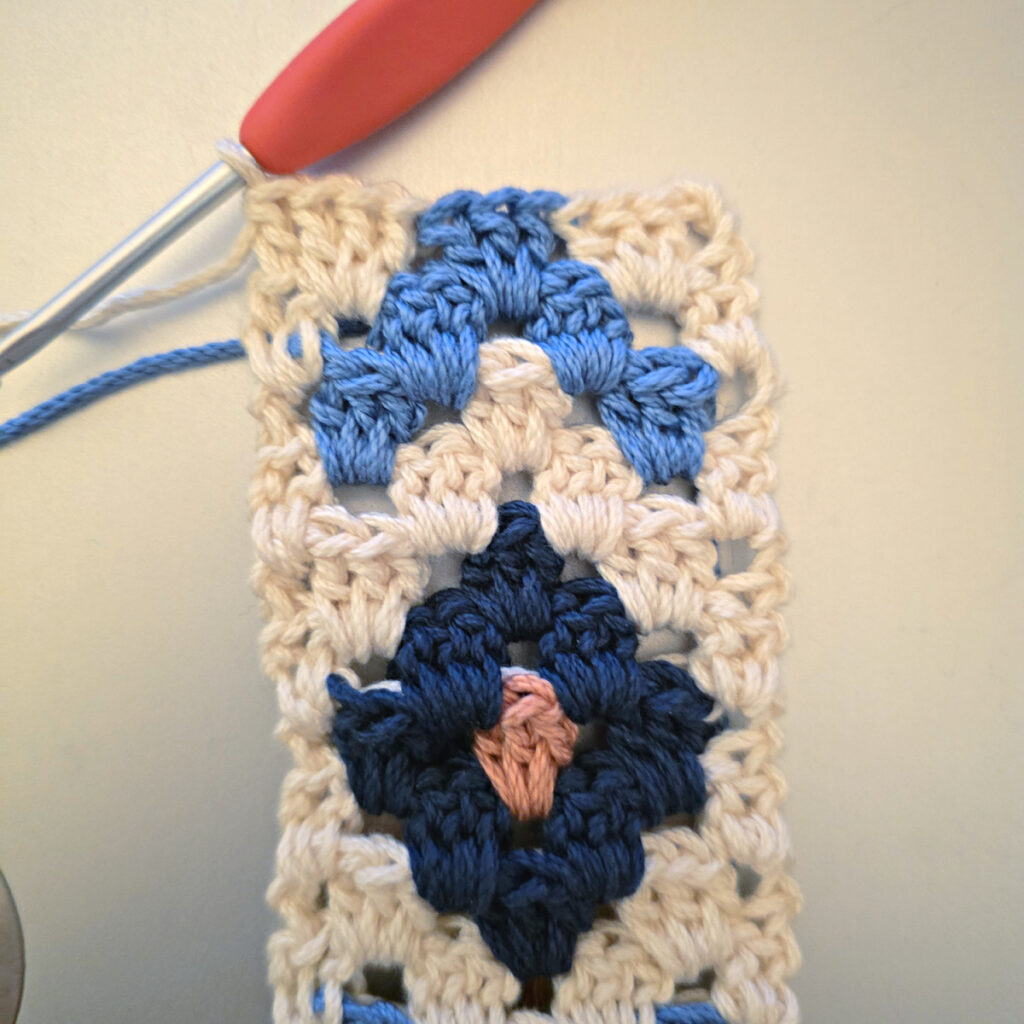
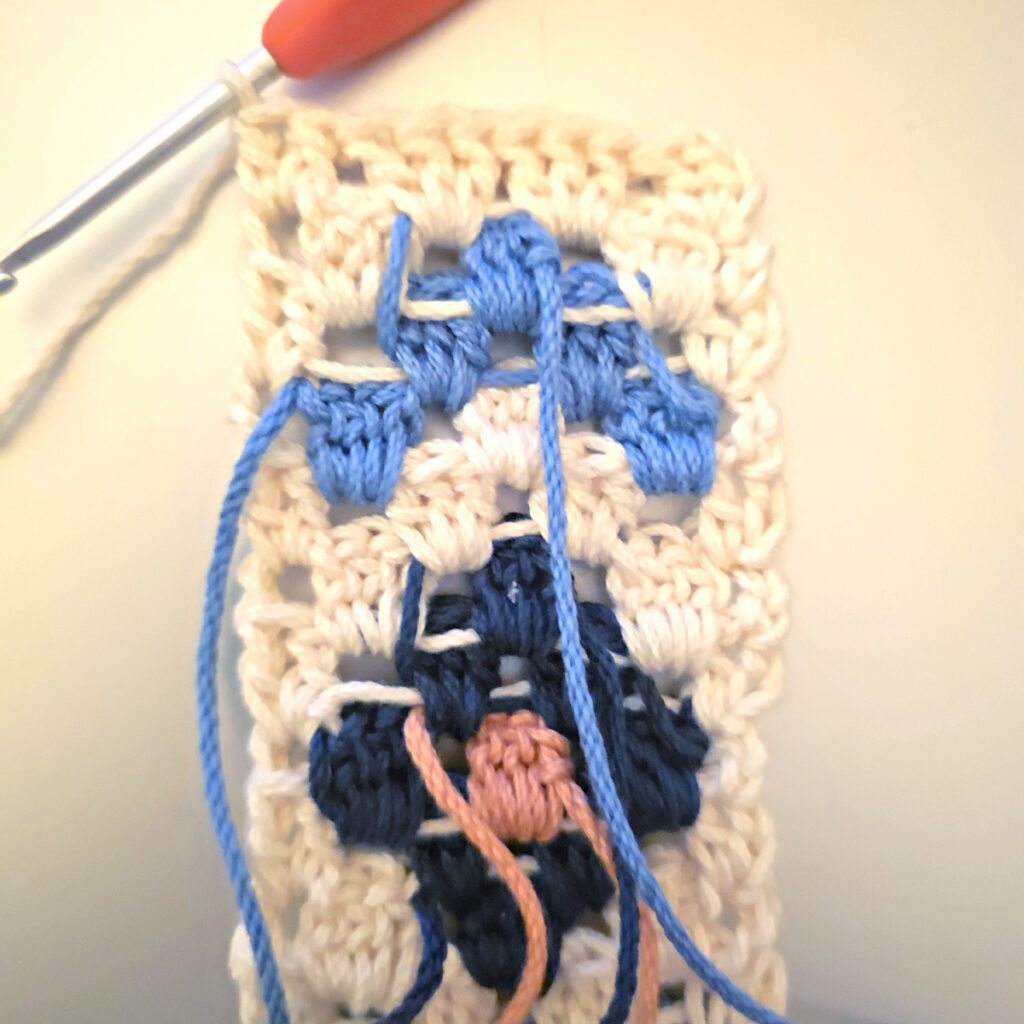
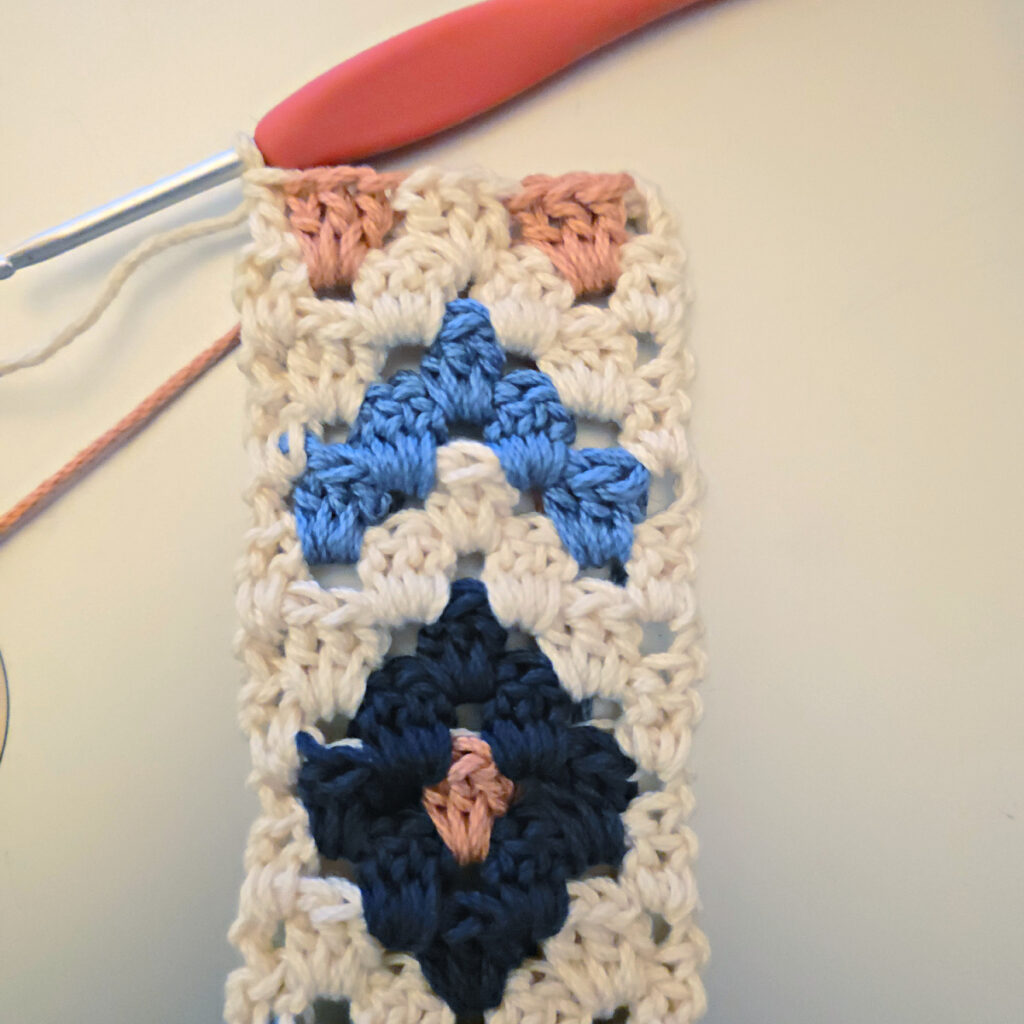
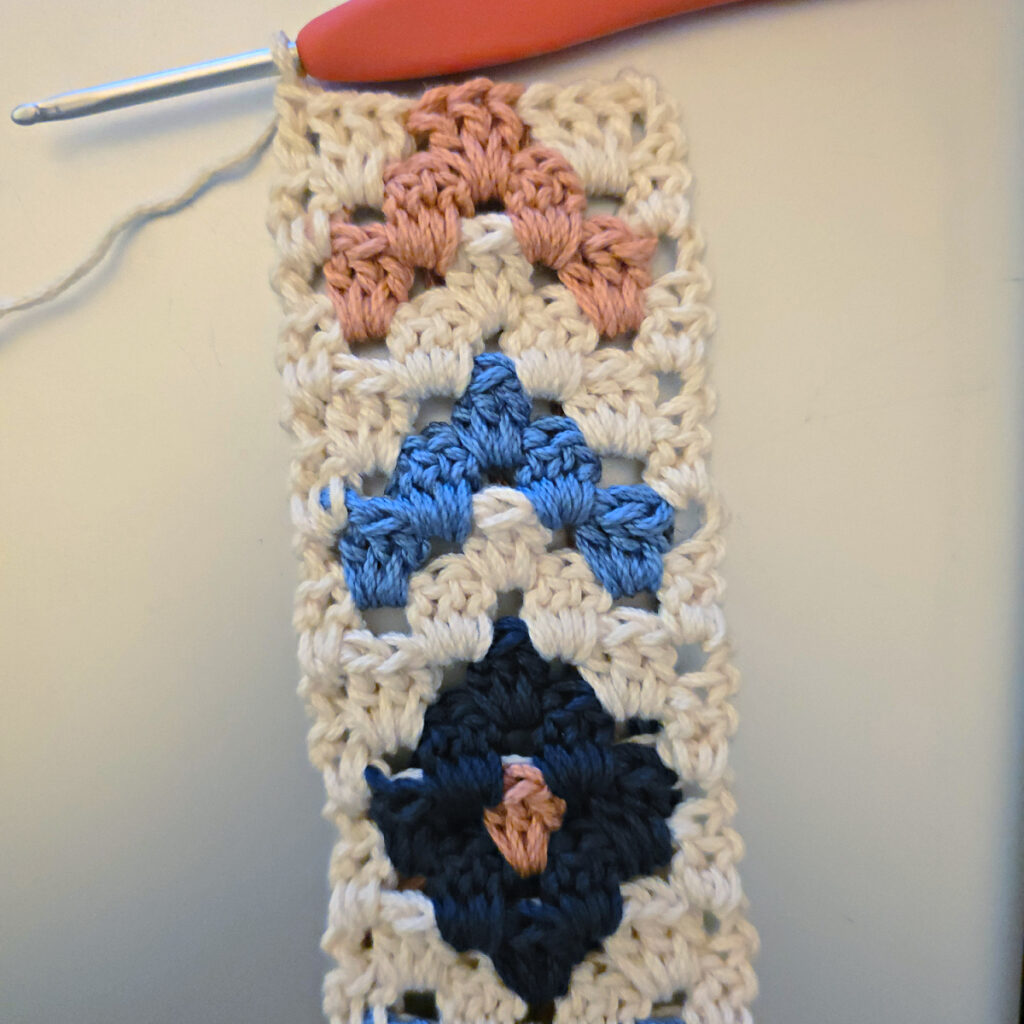
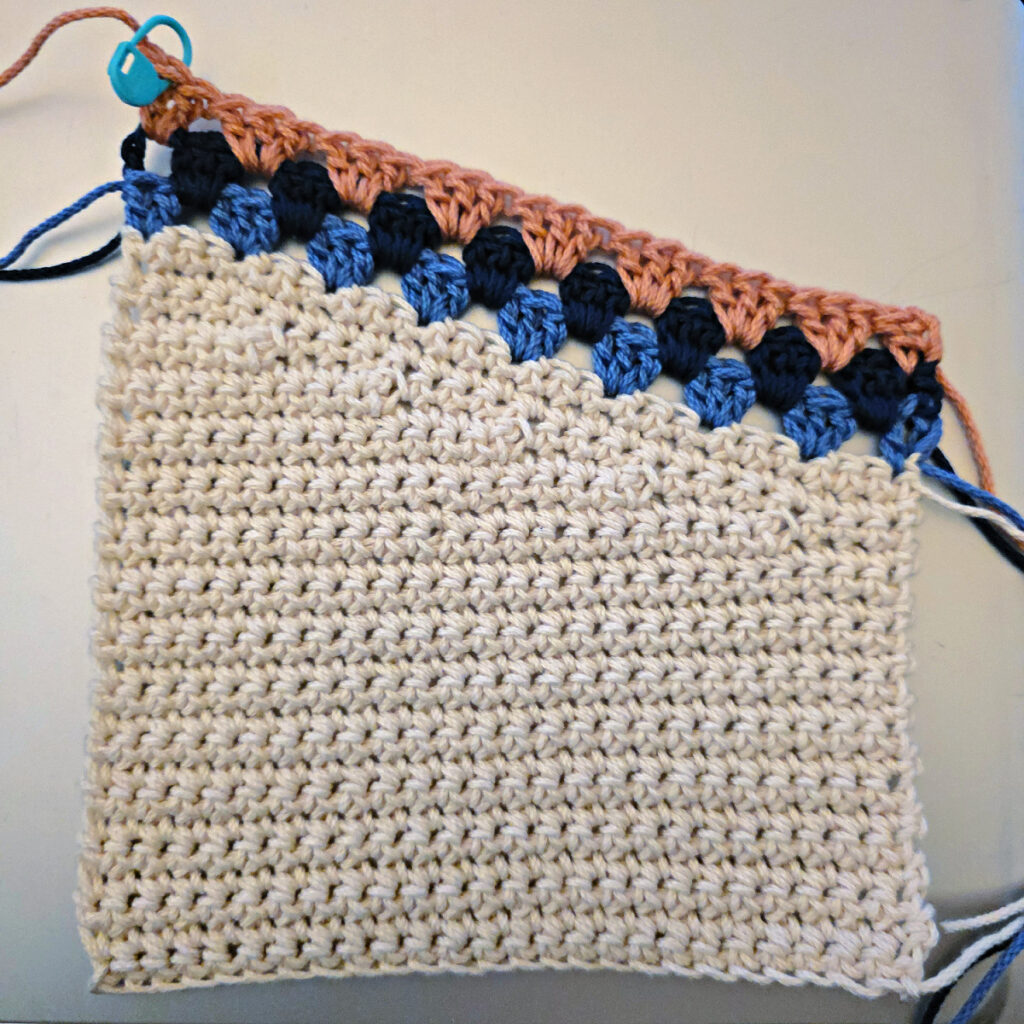
In this section, you’ll join yarn where you previously marked stitches for the strap and you’ll crochet the decorative strap directly onto the top edge of the bag. The decorative strap is worked in the granny stitch and created by working the color changes as instructed.
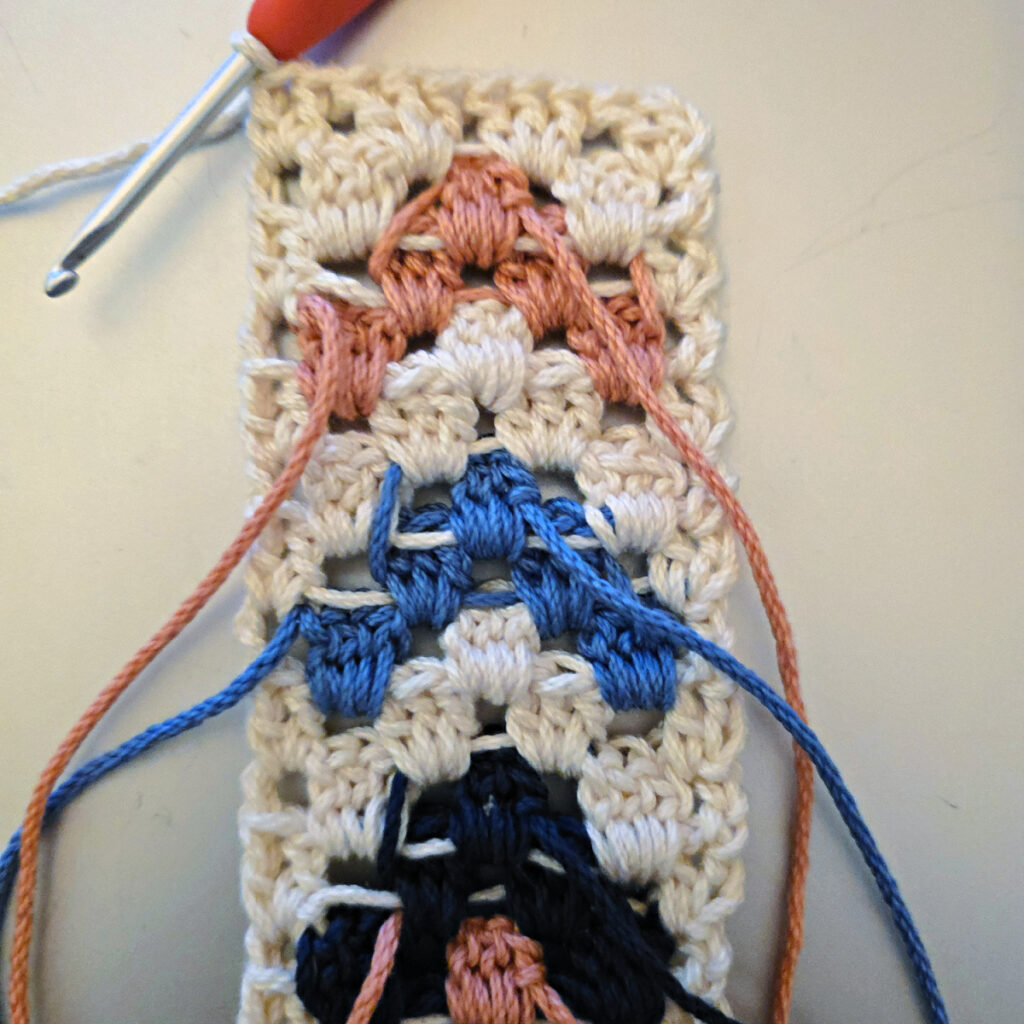
Color Changing Notes
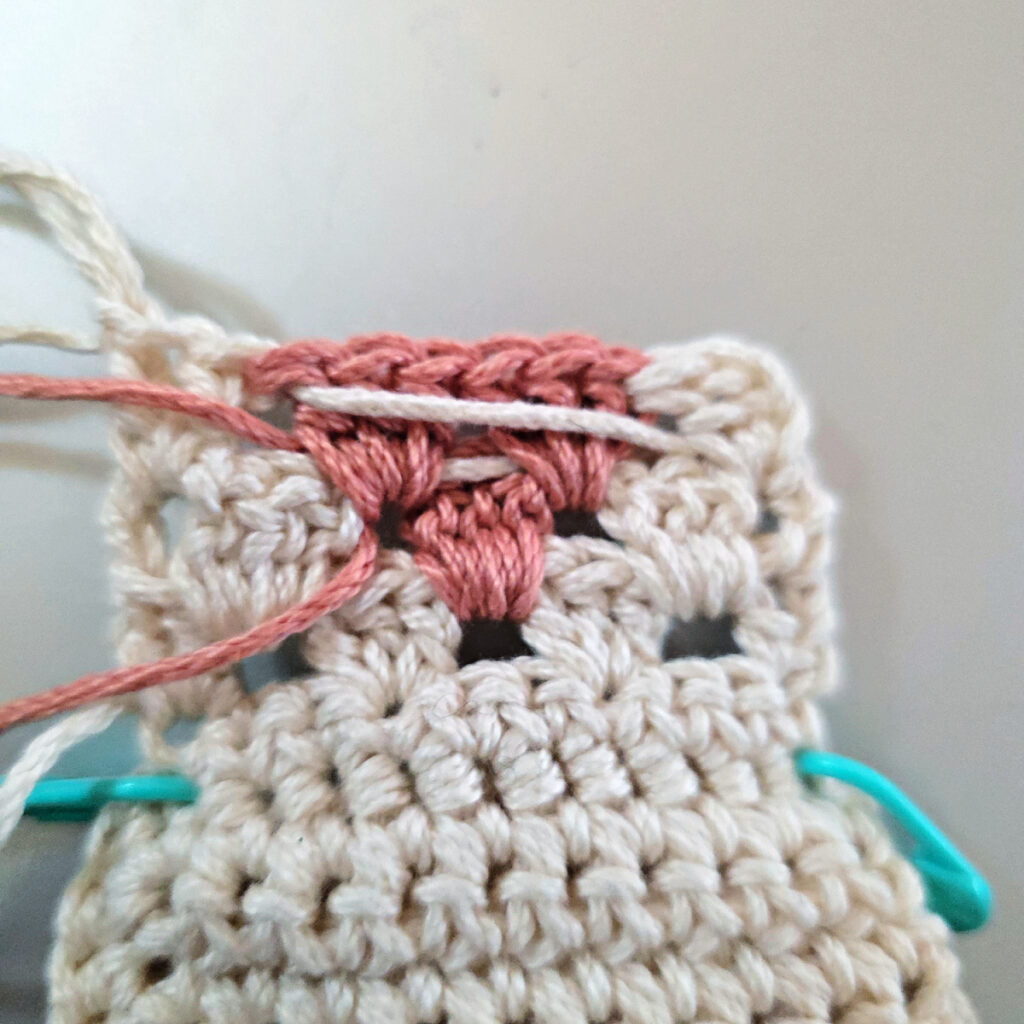
- You can use any color changing technique that you prefer. I chose to use intarsia crochet and float my unused yarn along the back side of my work. If you do not like to see the floats, you can use bobbins of yarn for each colored section.
- Work all color changes on the last pull through of the last stitch before the new color.
- Make sure to work all color changes on the WS.
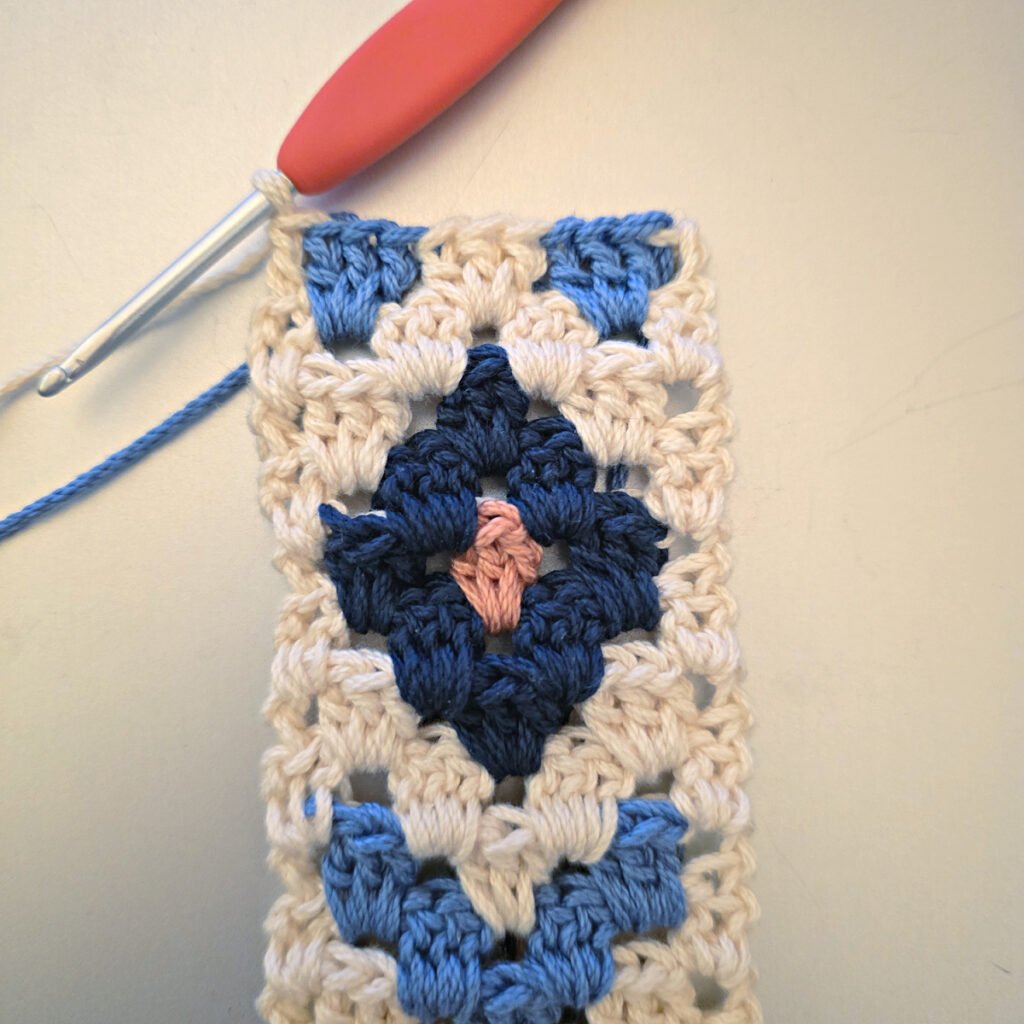
- Carry and float the unused yarn when working the motif, but do not pull yarn floats tight or your gauge will be greatly affected.
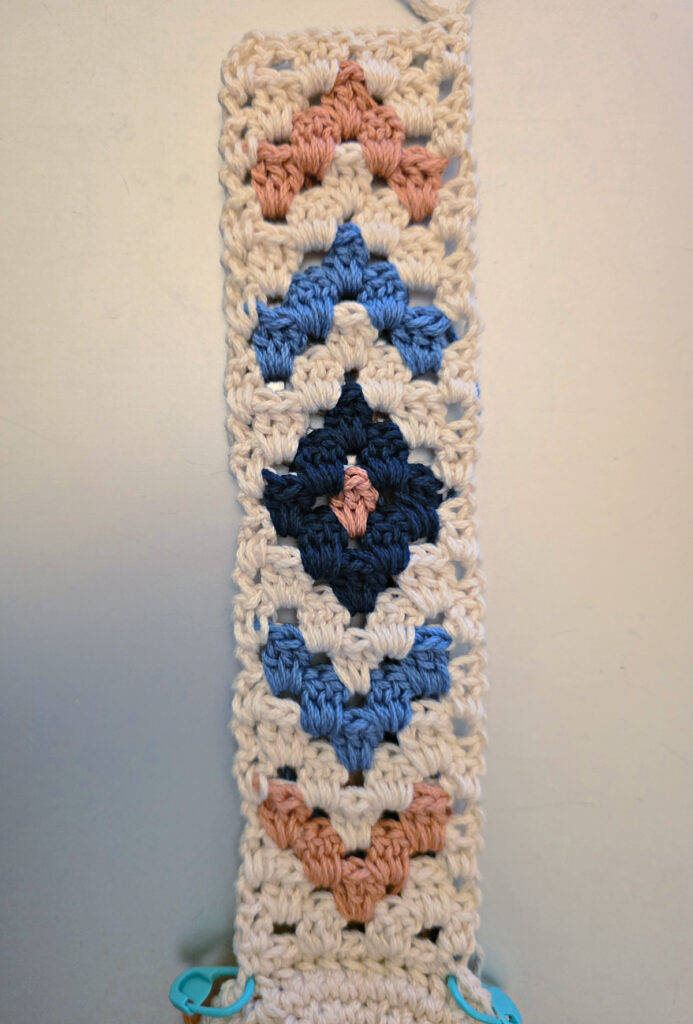
- See below for a photo of a finished motif.
- Here’s a detailed tutorial and tips on how to color change.
Colors: MC: Ecru; CA: Papaya; CB: Riviera; CC: Admiral
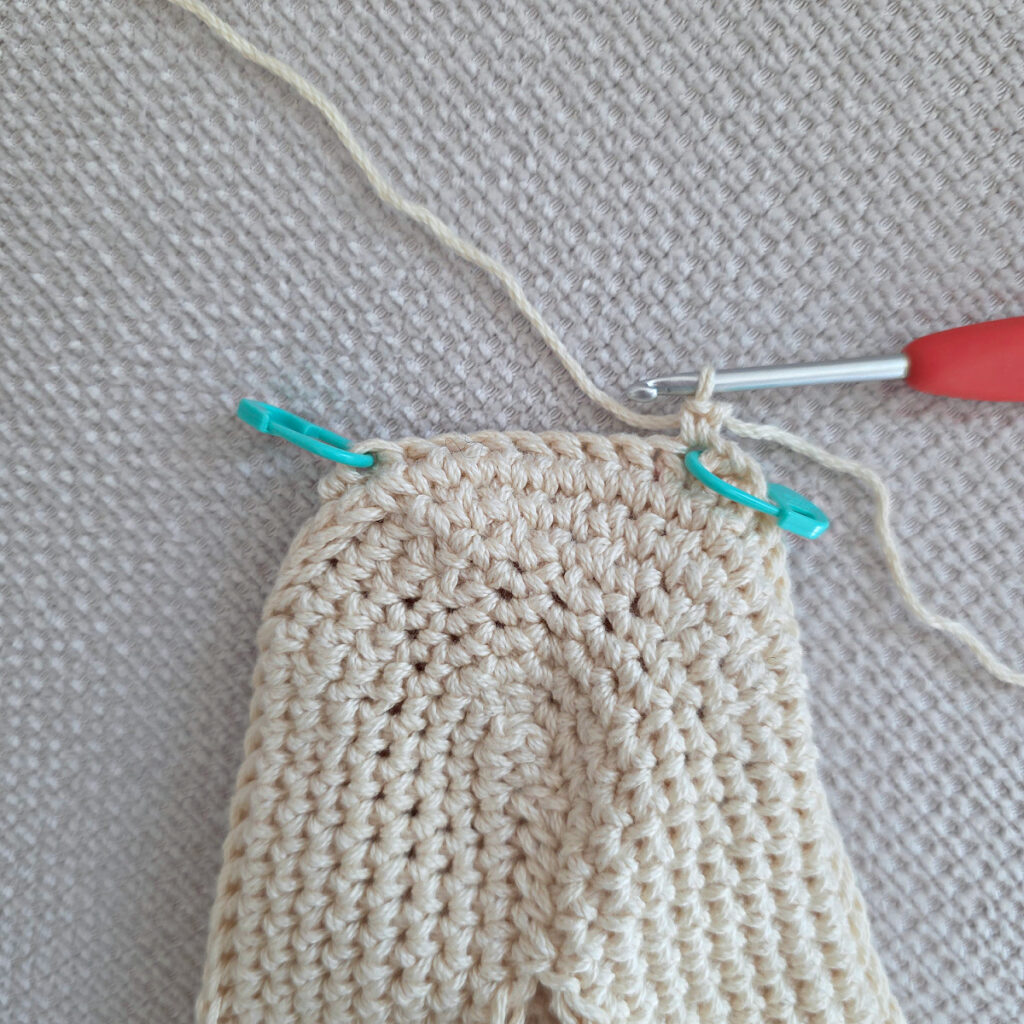
Row 1 (RS): Position the bag so that the front is facing you and the top edge it up. With MC yarn & a 3.25mm crochet hook, join yarn with a standing sc in the stitch on the right that was previously marked with a SM for the strap, sc in each of the next 9 sts. Place a locking SM in the side of the first sc of the row to mark where you will later join yarn to edge the strap. Turn. (10 sts)
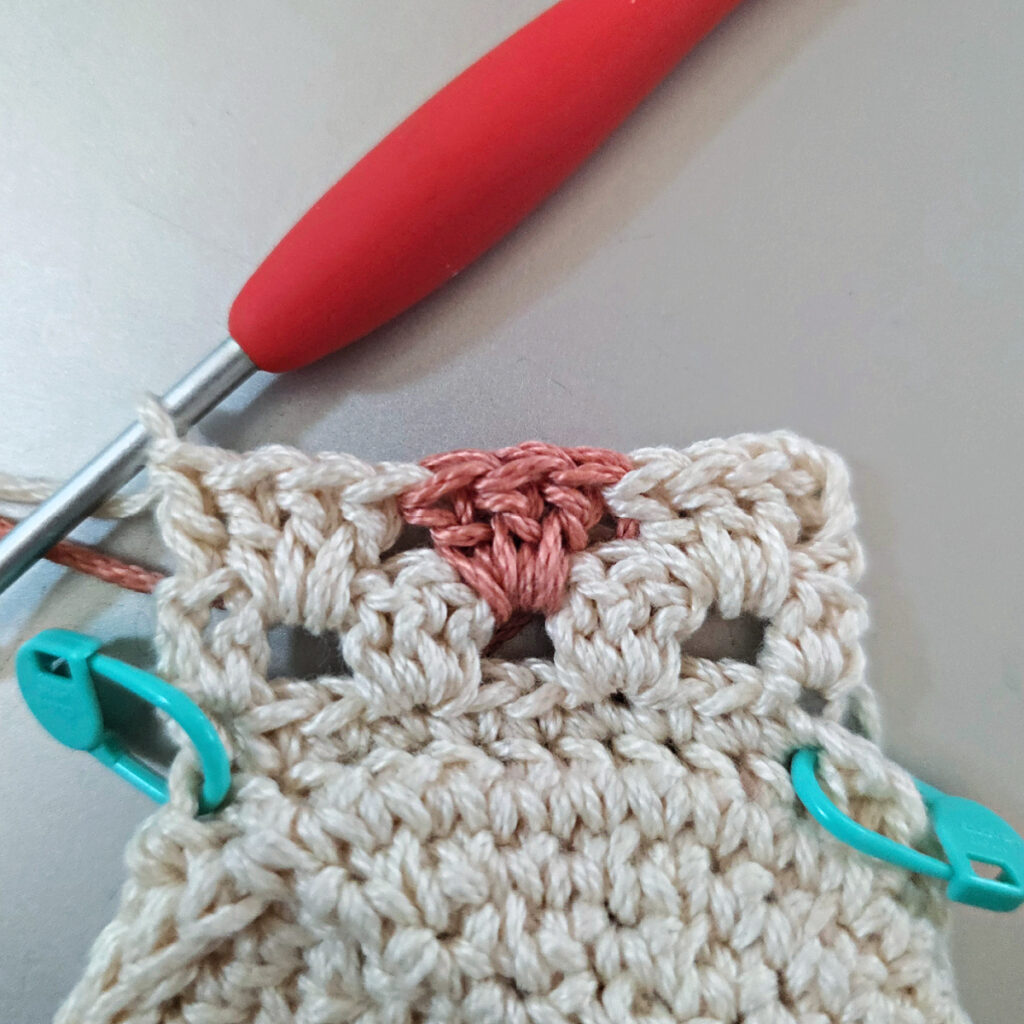
Row 2: (With MC) Ch 3 (counts as a st), dc in the first st, (skip each of the next 2 sts, 3 dc in the next st) 2 times, skip each of the next 2 sts, 2 dc in the last st. Turn. (10 sts)
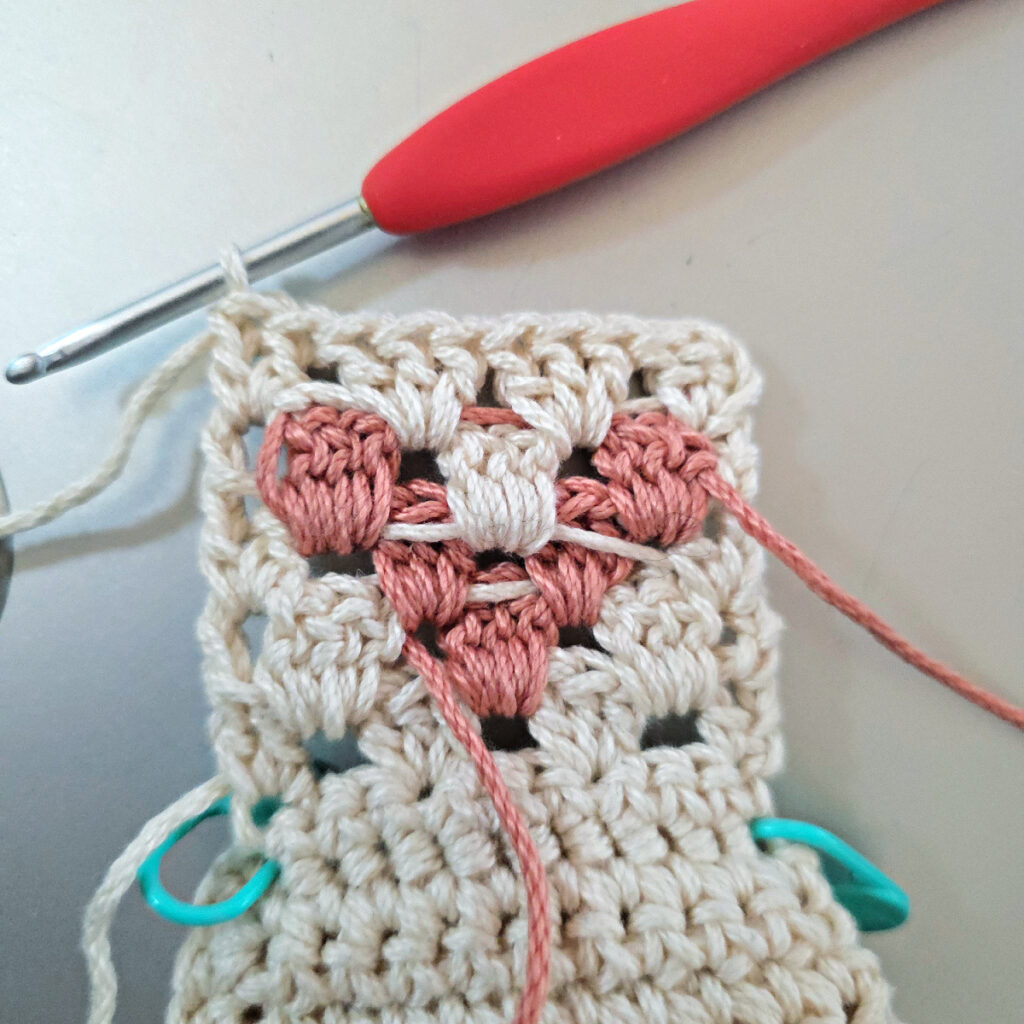
Row 3: (With MC) Ch 3, 3 dc in the sp before the next 3 dc group, (With CA) 3 dc in the next sp, (With MC) 3 dc in the next sp, dc in top of ch 3. (11 sts)
Row 4: (With MC) Alt-ch3, dc in same sp, (With CA) 3 dc in each of the next 2 sps, (With MC) 2 dc in the last sp. Turn. (10 sts)
Row 5: (With MC) Ch 3, (With CA) 3 dc in next sp, (With MC) 3 dc in the next sp, (With CA) 3 dc in the next sp, dc in top of ch 3. (11 sts)
Fasten off CA.
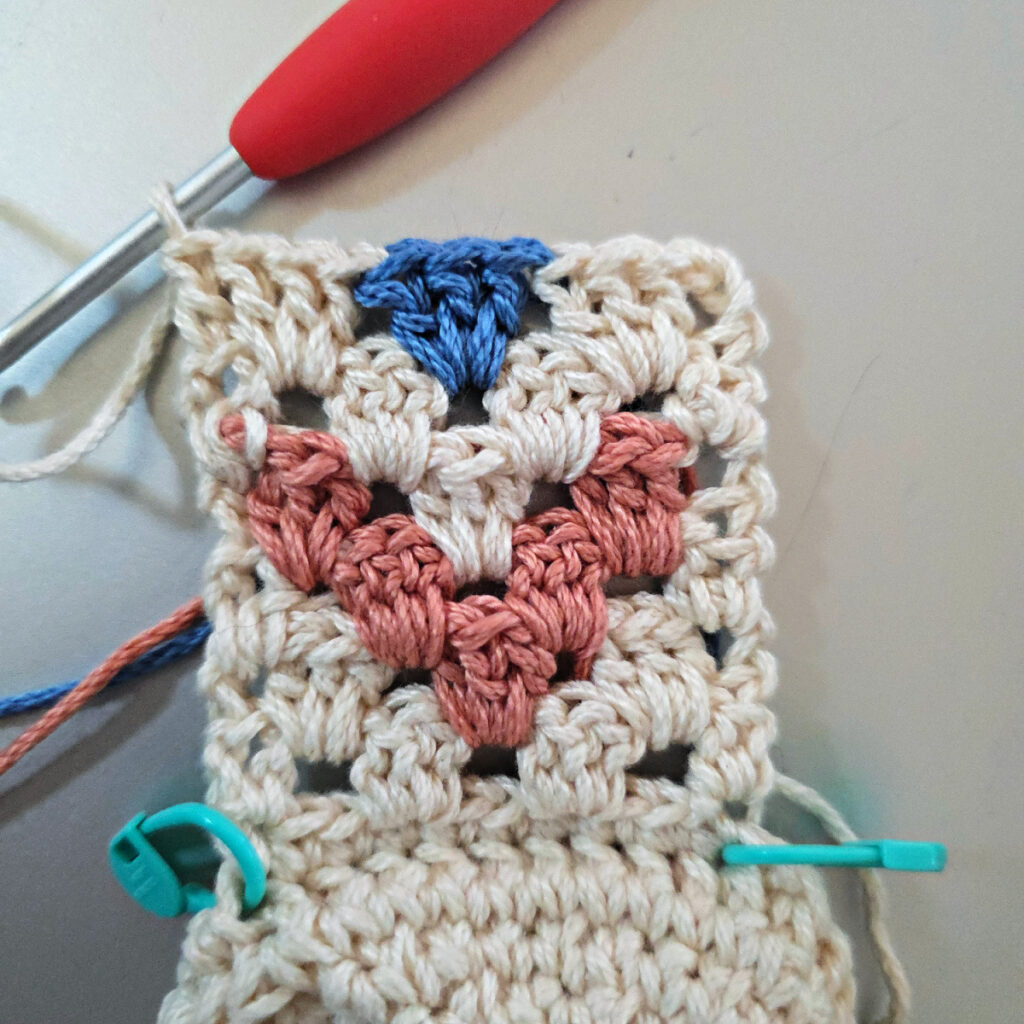
Row 6: (With MC) Alt-ch3, dc in same sp, 3 dc in each of the next 2 sps, 2 dc in the last sp. Turn. (10 sts)
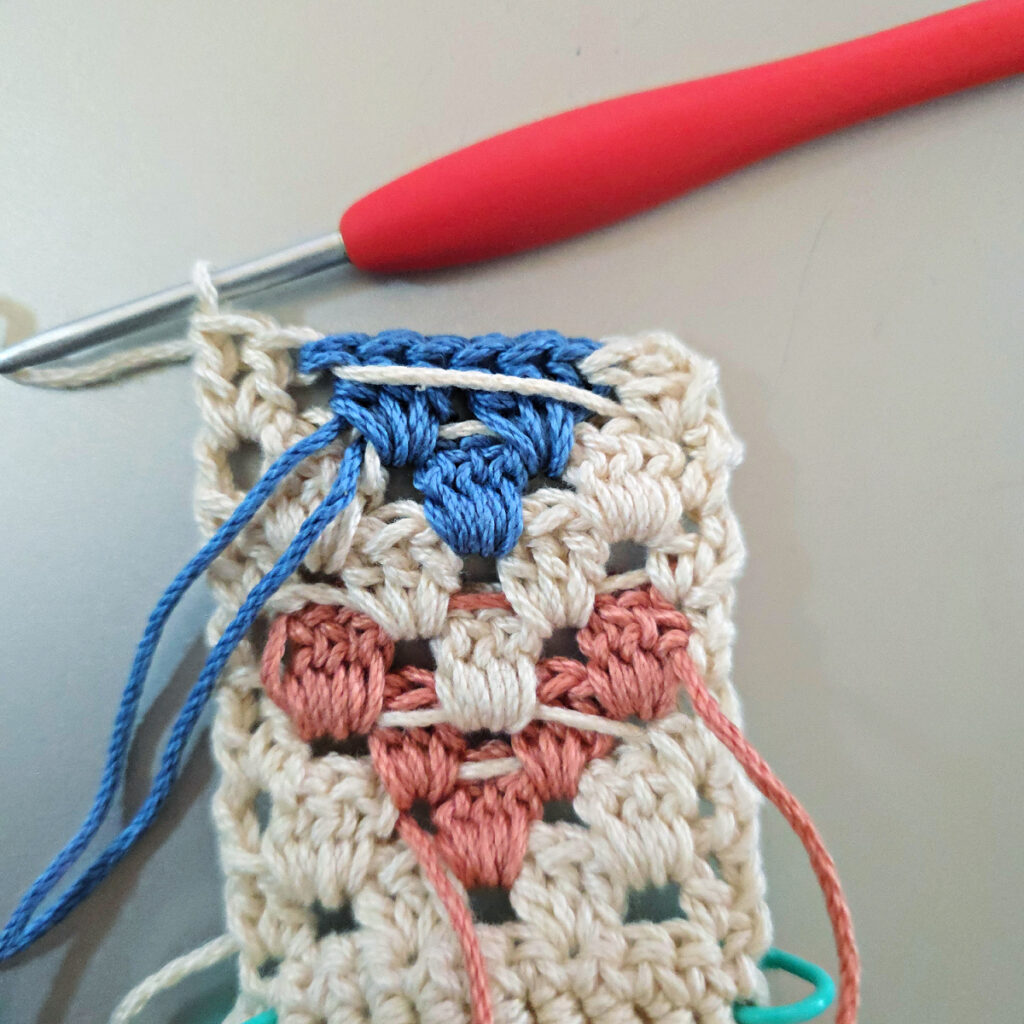
Row 7: (With MC) Ch 3, 3 dc in the next sp, (With CB) 3 dc in the next sp, (With MC) 3 dc in the next sp, dc in top of ch 3. (11 sts)
Row 8: (With MC) Alt-ch3, dc in same sp, (With CB) 3 dc in each of the next 2 sps, (With MC) 2 dc in the last sp. Turn. (10 sts)
Row 9: (With MC) Ch 3, (With CB) 3 dc in next sp, (With MC) 3 dc in the next sp, (With CB) 3 dc in the next sp, dc in top of ch 3. (11 sts)
Fasten off CB.
Row 10: (With MC) Alt-ch3, dc in same sp, 3 dc in each of the next 2 sps, 2 dc in the last sp. Turn. (10 sts)
Row 11: (With MC) Ch 3, 3 dc in the next sp, (With CC) 3 dc in the next sp, (With MC) 3 dc in the next sp, dc in top of ch 3. (11 sts)
Row 12: (With MC) Alt-ch3, dc in same sp, (With CC) 3 dc in each of the next 2 sps, (With MC) 2 dc in the last sp. Turn. (10 sts)
Row 13: (With MC) Ch 3, (With CC) 3 dc in next sp, (With CA) 3 dc in the next sp, (With CC) 3 dc in the next sp, dc in top of ch 3. (11 sts)
Fasten off CA.
Row 14: (With MC) Alt-ch3, dc in same sp, (With CC) 3 dc in each of the next 2 sps, (With MC) 2 dc in the last sp. Turn. (11 sts)
Row 15: (With MC) Ch 3, 3 dc in the next sp, (With CC) 3 dc in the next sp, (With MC) 3 dc in the next sp, dc in top of ch 3. (11 sts)
Fasten off CC.
Row 16: (With MC) Alt-ch3, dc in same sp, 3 dc in each of the next 2 sps, 2 dc in the last sp. Turn. (10 sts)
Row 17: (With MC) Ch 3, (With CB) 3 dc in next sp, (With MC) 3 dc in the next sp, (With CB) 3 dc in the next sp, dc in top of ch 3. (11 sts)
Row 18: (With MC) Alt-ch3, dc in same sp, (With CB) 3 dc in each of the next 2 sps, (With MC) 2 dc in the last sp. Turn. (10 sts)
Row 19: (With MC) Ch 3, 3 dc in the next sp, (With CB) 3 dc in the next sp, (With MC) 3 dc in the next sp, dc in top of ch 3. (10 sts)
Fasten off CB.
Row 20: (With MC) Alt-ch3, dc in same sp, 3 dc in each of the next 2 sps, 2 dc in the last sp. Turn. (10 sts)
Row 21: (With MC) Ch 3, (With CA) 3 dc in next sp, (With MC) 3 dc in the next sp, (With CA) 3 dc in the next sp, dc in top of ch 3. (11 sts)
Row 22: (With MC) Alt-ch3, dc in same sp, (With CA) 3 dc in each of the next 2 sps, (With MC) 2 dc in the last sp. Turn. (10 sts)
Row 23: (With MC) Ch 3, 3 dc in the sp before the next 3 dc group, (With CA) 3 dc in the next sp, (With MC) 3 dc in the next sp, dc in top of ch 3. (11 sts)
Fasten off CA.
Row 24: (With MC) Alt-ch3, dc in same sp, 3 dc in each of the next 2 sps, 2 dc in the last sp. Turn. (10 sts)
Row 25: (With MC) Ch 3, 3 dc in each of the next 3 sps, dc in top of ch 3. (11 sts)
Row 26: (With MC) Alt-ch3, dc in same sp, 3 dc in each of the next 2 sps, 2 dc in the last sp. Turn. (10 sts)
Rows 27 – 74: Rep Rows 3 – 26, 2 times.
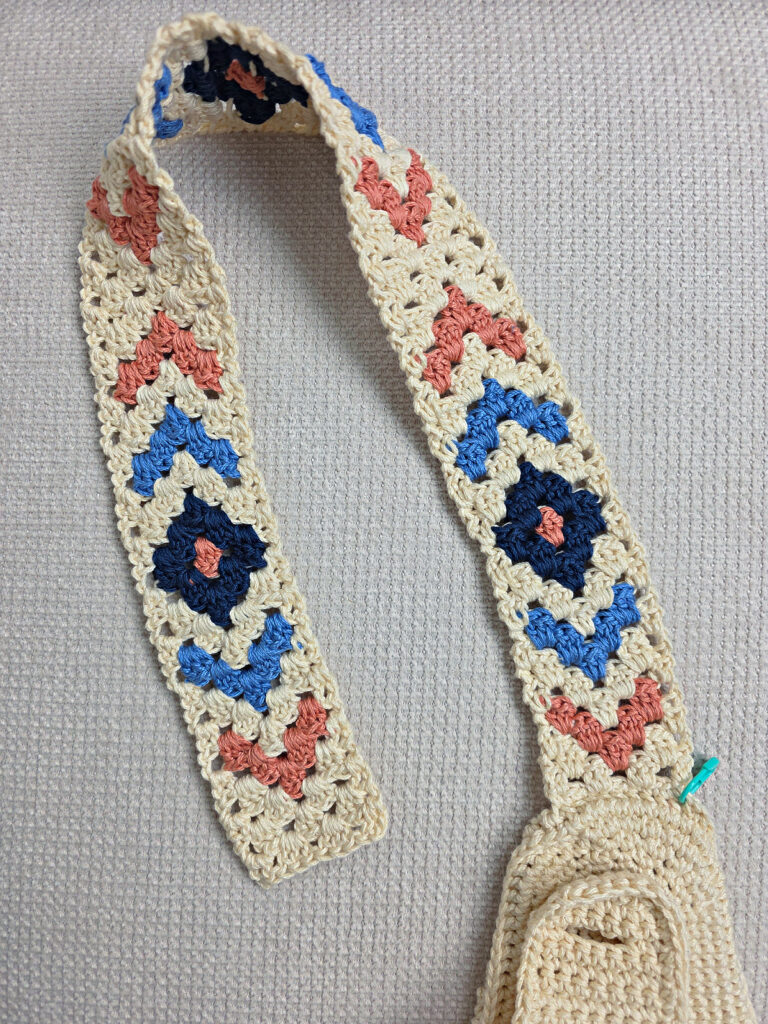
Fasten off. Weave in ends. The decorative strap should measure approximately 2-1/8″ W x 25-1/4″ L. Continue on to Strap Edging.

Strap Edging
In this section, you’ll join yarn where you placed a SM at the beginning of Row 1 of the strap and you’ll crochet around the three sides to give it a nice finished edge.
Gauge Note & Tip: Exact gauge is not crucial. Simply adjust your hook size so that your edge lays flat. As you’re working this section, if your edge becomes wavy, this means that your gauge is too loose. Try going down a hook size or two. If your edges start cinching in, this means your gauge is too tight. Try going up a hook size or two.
Row 1 (RS): With yarn & a 3.25mm crochet hook, join yarn with a standing sc in the stitch marked at the beginning of Row 1 of the decorative strap, work 2 sc into the side of each dc row to the first corner, work an extra st at the corner (147 sts), rotate to work along the short edge and work 1 sc into each st across (10 sts), rotate to work along the next side, work an extra st at the corner and work 2 sc into the side of each dc row to Row 1, work 1 sc into the side of Row 1 (147 sts). (304 sts)
Fasten off. Weave in ends. Continue to Pocket.
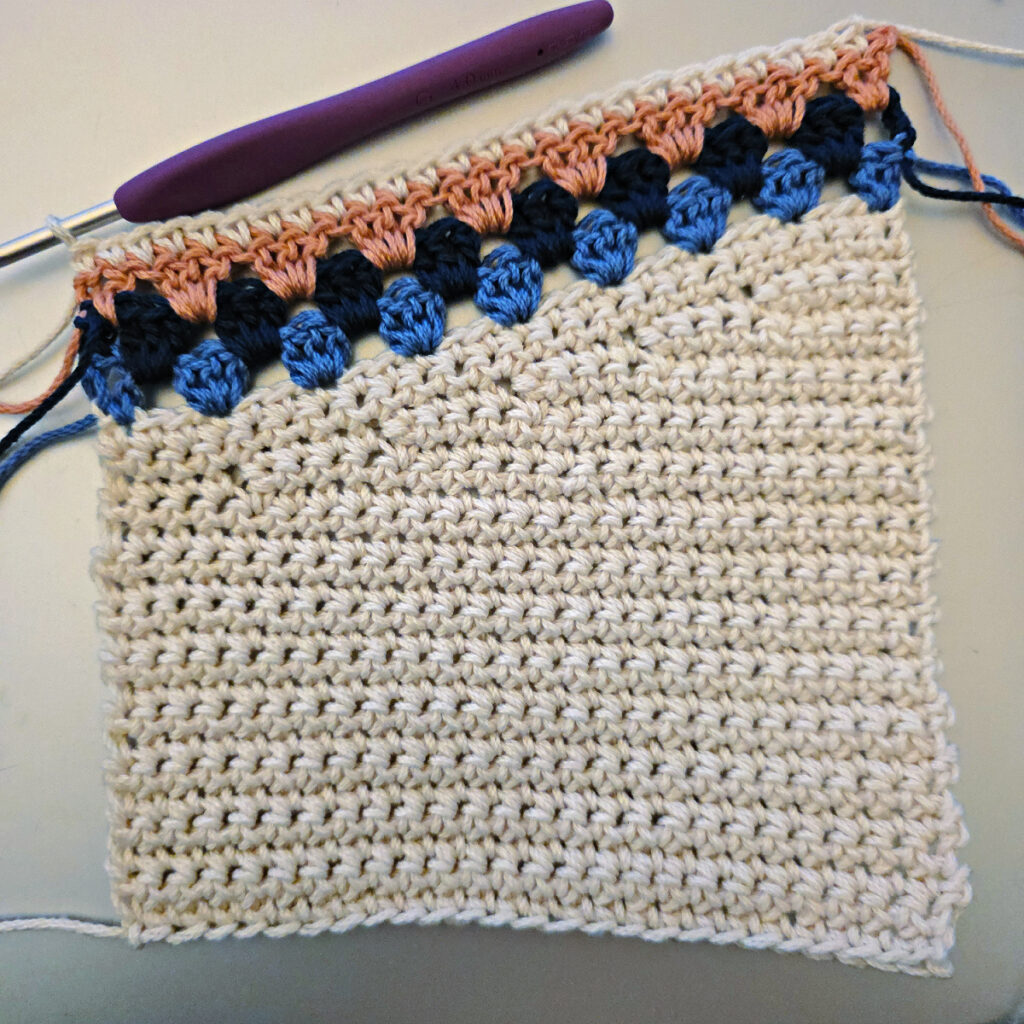
In this section, you’ll crochet the pocket. You’ll begin by working in rows and then work a few short rows to shape the top edge. Lastly, you’ll add a few rows of granny stitches.
Row 1 (RS): With MC yarn & a 5.00mm crochet hook, ch 26, switch to a 4.00mm crochet hook, working in the back humps of the foundation ch, sc into the 2nd ch from your hook and each ch across. Turn. (25 sts)
Rows 2 – 16: Ch 1, sc in each st across. Turn. (25 sts)
Row 17: Ch 1, sc in the first 21 sts, skip the last 4 sts. Turn. (21 sts)
Row 18: Ch 1, sc in each st across. Turn. (21 sts)
Row 19: Ch 1, sc in the first 17 sts, skip the last 4 sts. Turn. (17 sts)
Row 20: Ch 1, sc in each st across. Turn. (17 sts)
Row 21: Ch 1, sc in the first 13 sts, skip the last 4 sts. Turn. (13 sts)
Row 22: Ch 1, sc in each st across. Turn. (13 sts)
Row 23: Ch 1, sc in the first 9 sts, skip the last 4 sts. Turn. (9 sts)
Row 24: Ch 1, sc in each st across. Turn. (9 sts)
Row 25: Ch 1, sc in the first 5 sts, skip the last 4 sts. Turn. (5 sts)
Row 26: Ch 1, sc in each st across. Turn. (5 sts)
Row 27: Ch 1, sc in each st across Row 20 sts and into each skipped stitch from the previous rows. (25 sts)
Rows 28 – 29: Ch 1, sc in each st across. Turn. (25 sts)
Fasten off MC.
Note: Rows 30 – 32 are worked in the granny stitch, changing color at the beginning of each row.
Row 30: (With CB), Ch 3 (counts as a st), dc in the first st, (skip each of the next 2 sts, 3 dc in the next st) 7 times, skip each of the next 2 sts, 2 dc in the last st. Turn. (25 sts)
Fasten off CB.
Row 31: (With CC) Ch 3, 3 dc in the sp before the next 3 dc group, 3 dc in each of the next 7 sps, dc in top of ch 3. (26 sts)
Fasten off CC.
Row 32: (With CA) Alt-ch3, dc in same sp, 3 dc in each of the next 7 sps, 2 dc in the last sp. Place a SM in the first stitch of the row to mark where you’ll join yarn. Turn. (25 sts)
Fasten off CA.
Row 33: With MC yarn & a 4.00mm crochet hook, join yarn with a standing sc into the marked st, sc in each remaining st across. Do not turn. (25 sts)
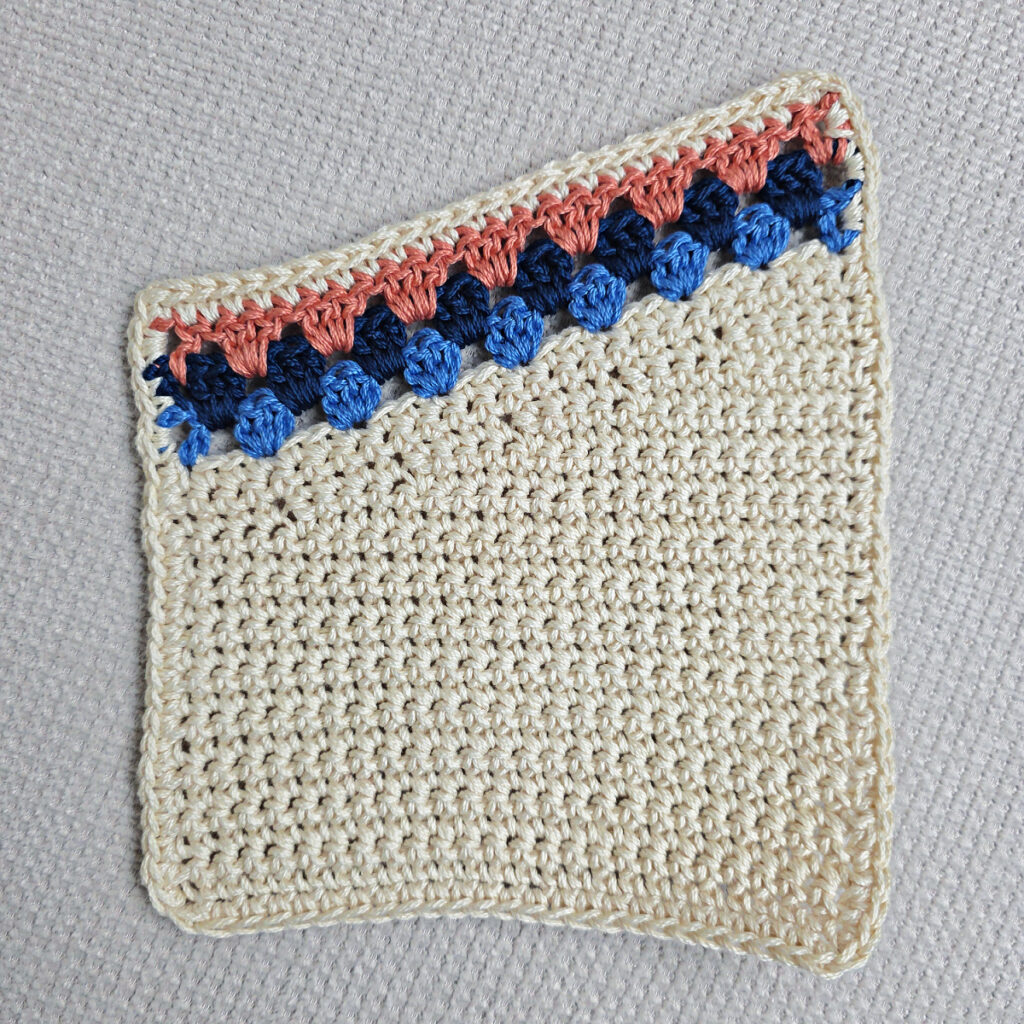
Do not fasten off. Continue to Pocket Edging. Pocket should be approximately 6-1/8″ W x 7-1/4″ H (at highest point).

Pocket Edging
In this section, you’ll continue on from the last row of the pocket and rotate to crochet around the sides and bottom. Once you reach the top edge, you’ll slip stitch across to add stability to the top edge.
Gauge Note & Tip: Exact gauge is not crucial. Simply adjust your hook size so that your edge lays flat. As you’re working this section, if your edge becomes wavy, this means that your gauge is too loose. Try going down a hook size or two. If your edges start cinching in, this means your gauge is too tight. Try going up a hook size or two.
Rnd 1 (RS): Ch 1, rotate to work along the first edge, work 1 sc into each sc and 2 sc into each dc (26 sts), rotate to work across the bottom edge (25 sts), work 1 sc into each st across, rotate to work along the next edge, work 1 sc into each sc and 2 sc into each dc (36 sts), rotate to work across the top edge, sl st in each st across (25 sts). (112 sts)
Fasten off, leaving a 36″ tail of yarn. Weave in ends. Continue to Attaching Pocket.
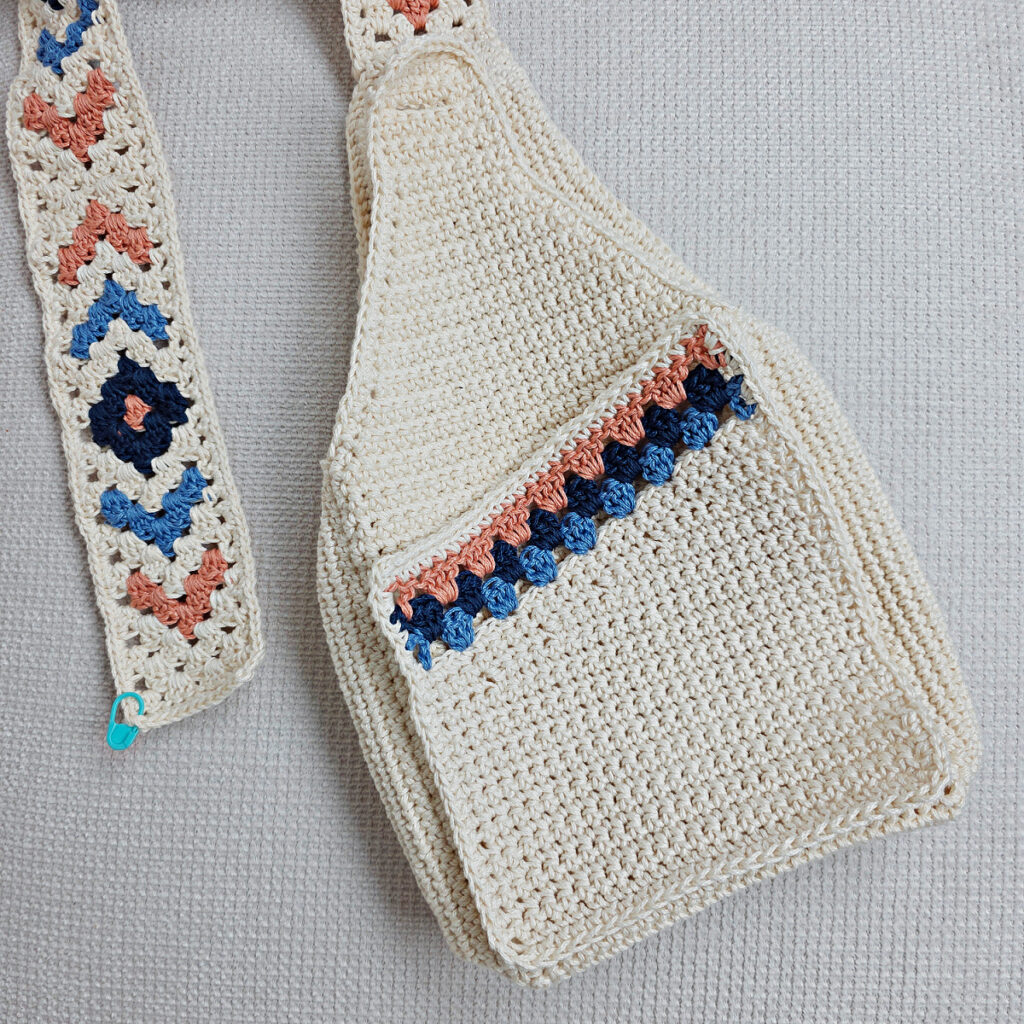
Attaching Pocket
In this section, you’ll attach the pocket to the front panel of the bag with the tail of yarn left.
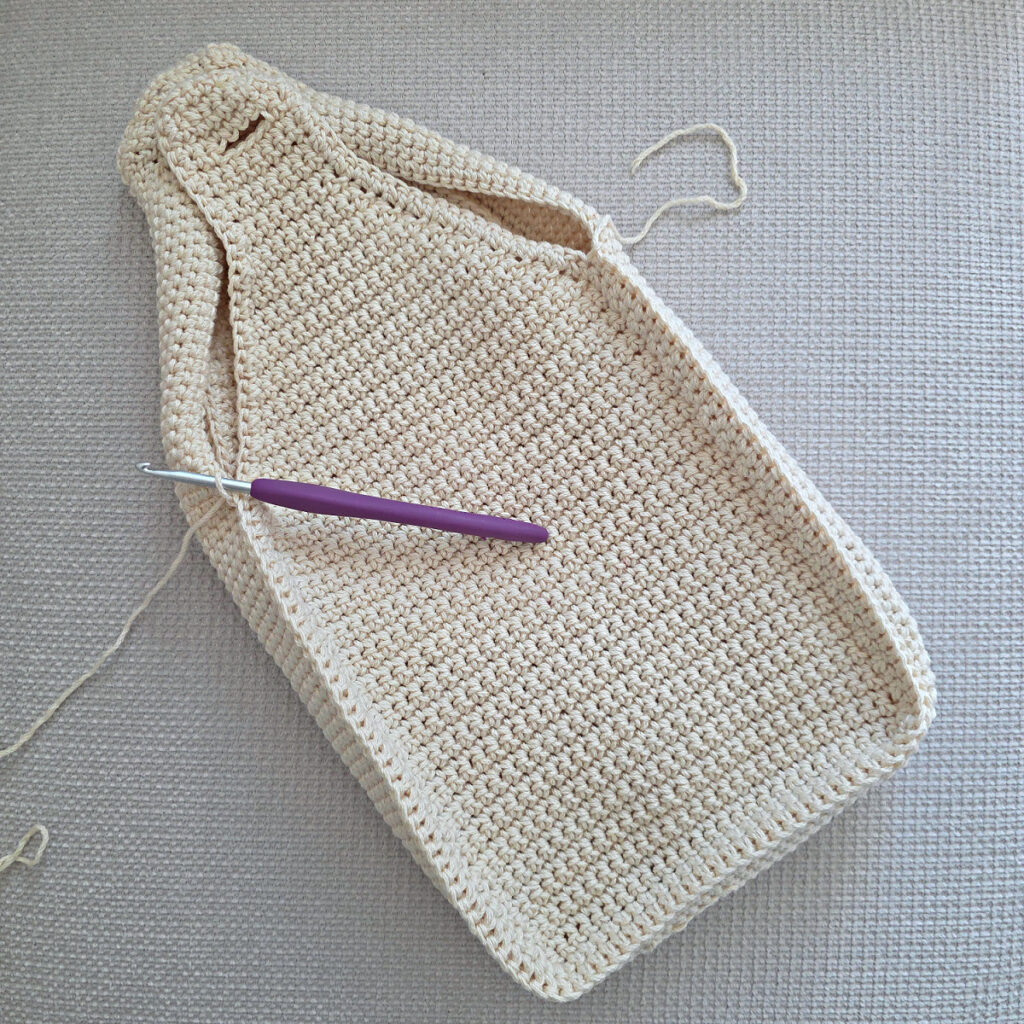
Step One: Position your bag so that the front is facing you. Lay the pocket on top of the front panel as shown in the photo.
Step Two: With a yarn needle and tail of yarn, sew the pocket onto the front panel beginning on the left side and stitching down the side, then across the bottom, then up the other side. Do not stitch across the top edge of the pocket.
Weave in ends. Continue to Strap Connector.
Strap Connector
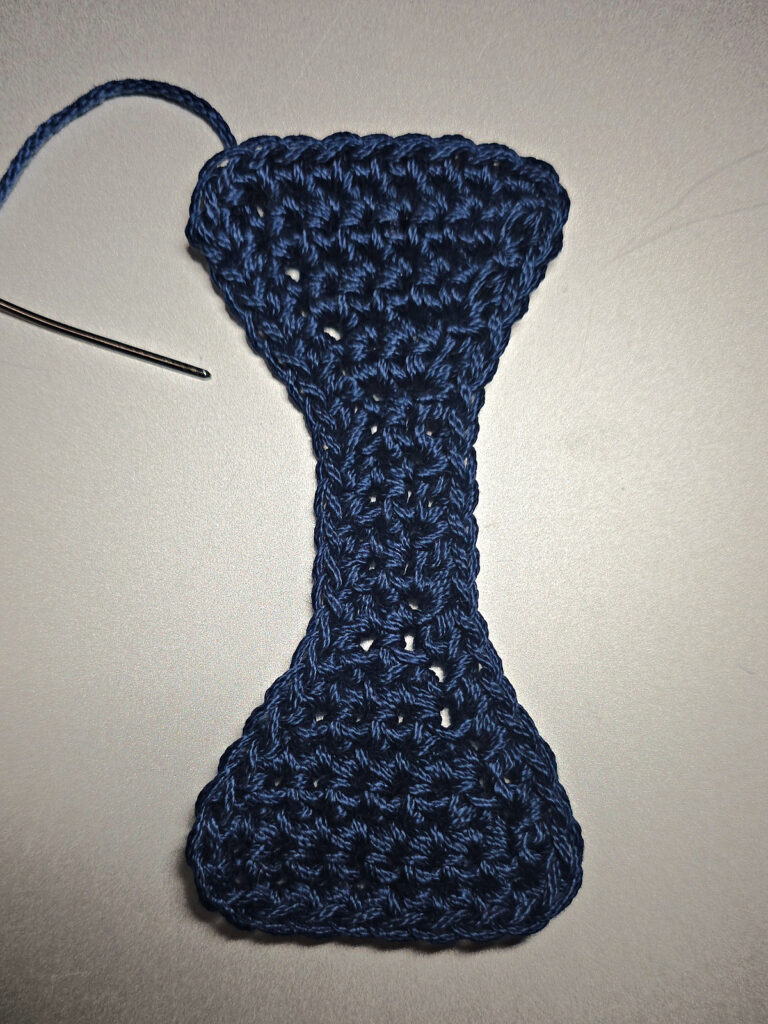
In this section, you’ll create a small piece that will be sewn to the end of the decorative strap. This piece will act as a connector between the decorative strap and the adjustable rope strap.
Row 1 (RS): With CC yarn & a 5.00mm crochet hook, ch 9, switch to a 4.00mm crochet hook, working into the back humps of the foundation ch, sc in the 2nd ch from your hook and in each ch across. Turn. (8 sts)
Row 2: Ch 1, sc in each st across. Turn. (8 sts)
Row 3: Ch 1, skip the first st, sc in each of the next 5 sts, skip the next st, sc in the last st. Turn. (6 sts)
Row 4: Ch 1, sc in each st across. Turn. (6 sts)
Row 5: Ch 1, skip the first st, sc in each of the next 3 sts, skip the next st, sc in the last st. Turn. (4 sts)
Row 6: Ch 1, sc in each st across. Turn. (4 sts)
Row 7: Ch 1, skip the first st, sc in the next st, skip the next st, sc in the last st. Turn. (2 sts)
Rows 8 – 14: Ch 1, sc in each st across. Turn. (2 sts)
Row 15: Ch 1, 2 sc in each st. Turn. (4 sts)
Row 16: Ch 1, sc in each st across. Turn. (4 sts)
Row 17: Ch 1, 2 sc in the first st, sc in each of the next 2 sts, 2 sc in the last st. Turn. (6 sts)
Row 18: Ch 1, sc in each st across. Turn. (6 sts)
Row 19: Ch 1, 2 sc in the first st, sc in each of the next 4 sts, 2 sc in the last st. Turn. (8 sts)
Row 20: Ch 1, sc in each st across. Do not turn. (8 sts)
Edging: Continuing on, ch 1, sc in each st around the perimeter, adding one extra st at each of the four corners. Join with a sl st to the 1st st. (60 sts) Stitch count isn’t crucial.
Fasten off, leaving an 18″ tail of yarn. Continue to Attaching the Strap Connector.
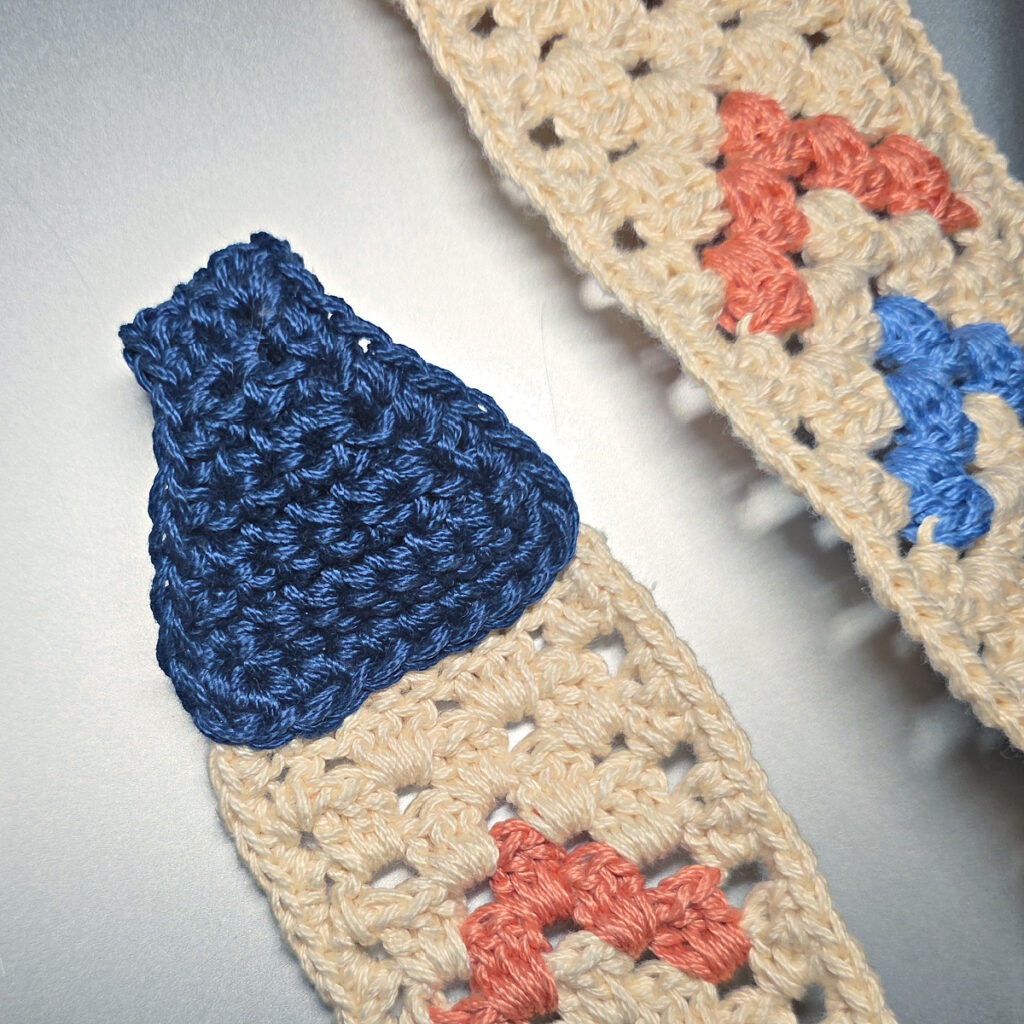
Attaching the Strap Connector
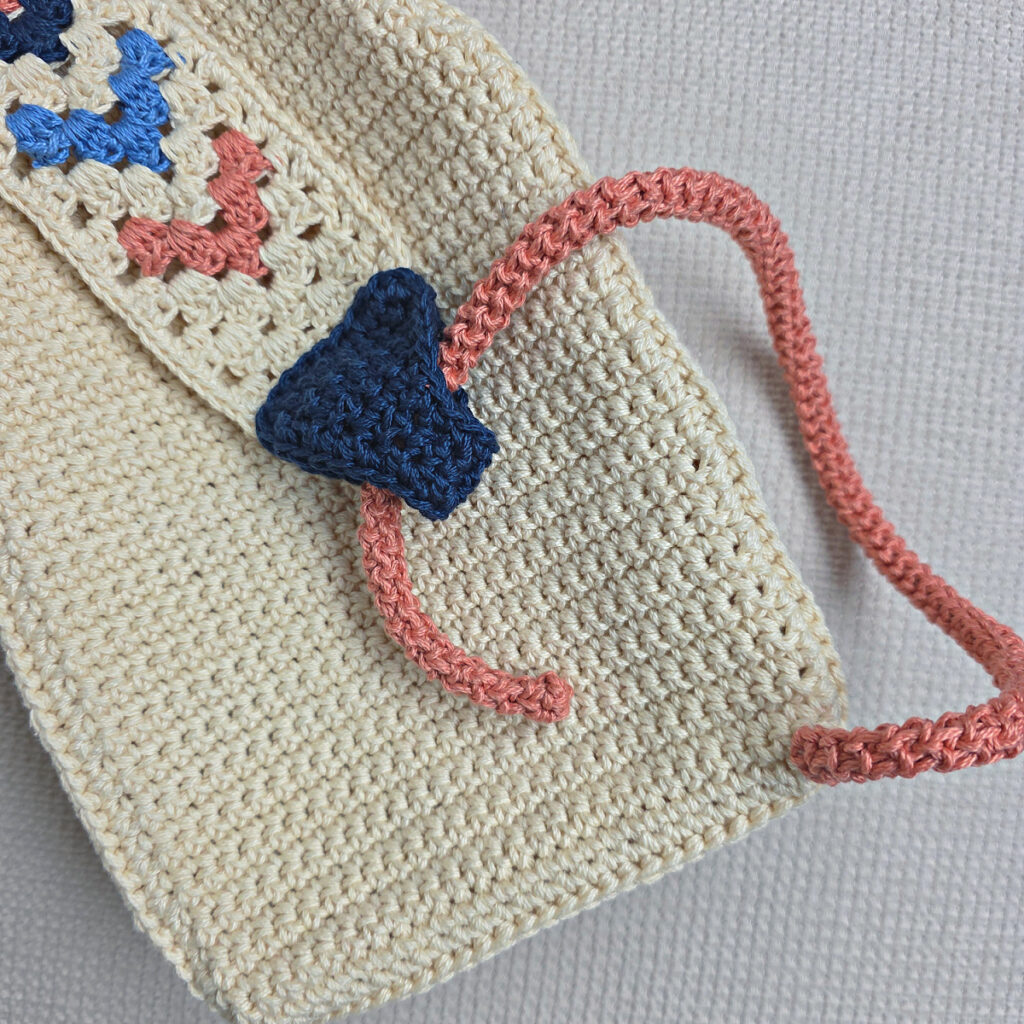
In this section, you’ll fold the strap connector in half and secure it to the short edge of the decorative strap.
Step One: Fold the strap connector in half and position it over the short edge of the strap. The strap should be sandwiched between the ends of the strap connector.
Step Two: With a yarn needle and tail of yarn left, attached the strap connector onto the short edge of the decorative strap.
Weave in ends. Continue to Adjustable Crochet Rope Strap Instructions & Photo Tutorial.

Crochet Rope Strap Instructions & Photo Tutorial
Construction Notes: This crochet rope is worked in continuous rounds (a spiral). You will begin round 1 of this crocheted rope as you do other items. However, when you get to round 3, you will be working with the RS of your work facing you.
BUT you will be working into the 3rd loop (back bar) that’s on the back side of the sc. As you crochet the rope, the RS of your sc will be on the inside of the rope and what is visible on the outside of the crocheted rope is actually the WS of your sc.
Rnd 1: With CA yarn & a 4.00mm crochet hook, ch 2, work 4 sc into the 2nd ch from your hook. Do not join. (4 sts)
Rnd 2: Do not ch, sc in each st around. Do not join.
Rnd 3: With the RS of the sc facing the center of the rope, work into the back side of the sts from the previous round and into the 3rd loop (or back bar), work 1 sc into the 3rd loop/back bar of each sc around. Do not join.
Adjustable Strap: Rep Rnd 3 until your crocheted rope measures 18″ long, slightly stretched.
Fasten off, leaving a 12″ tail of yarn. Weave in beginning tail. Continue on to Attaching the Strap & Button.
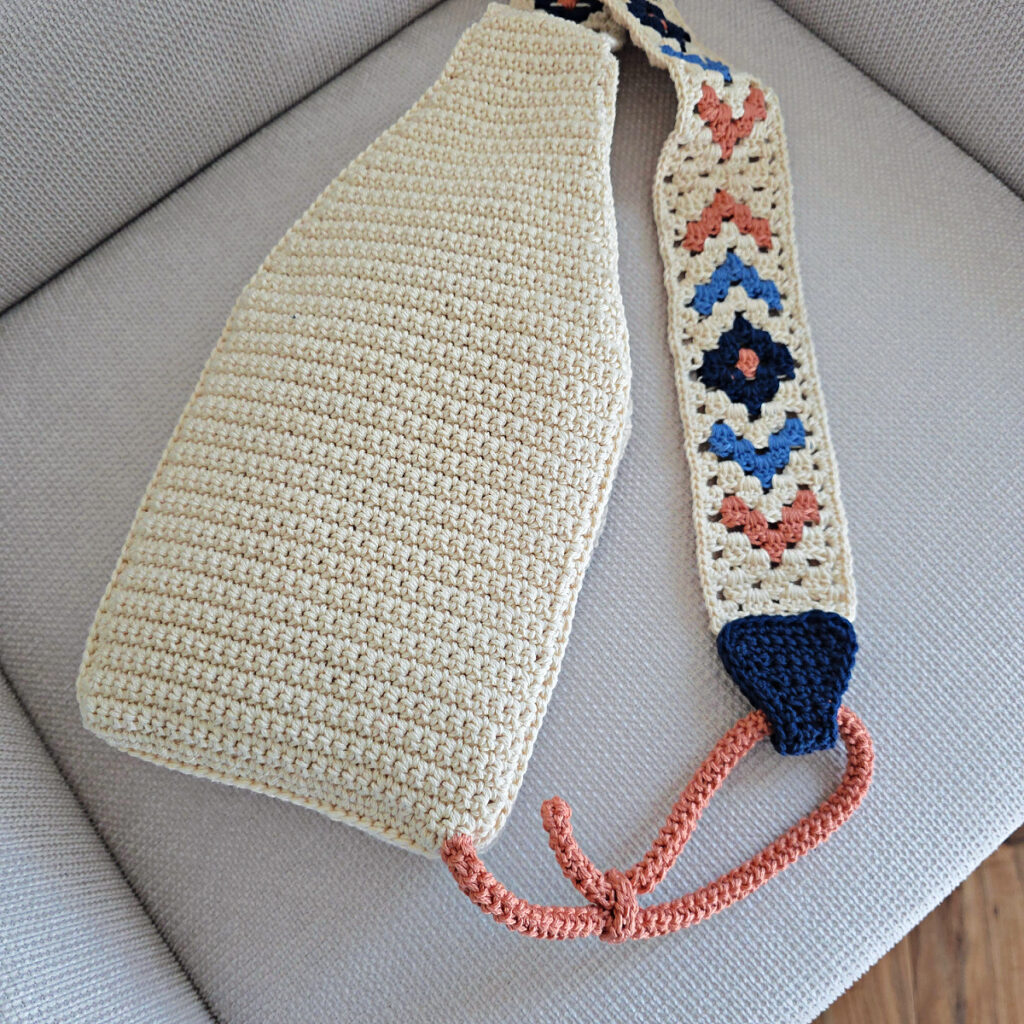
Attaching the Strap & Button
As you continue to work, the crochet rope will begin to take shape and it’ll be easier to see how the RS ends up on the inside.
Step One: With a yarn needle and tail of yarn, attach the end of the crochet rope to either lower back corner of the sling bag. I attached mine to the lower right corner (when the back of the bag is facing you).
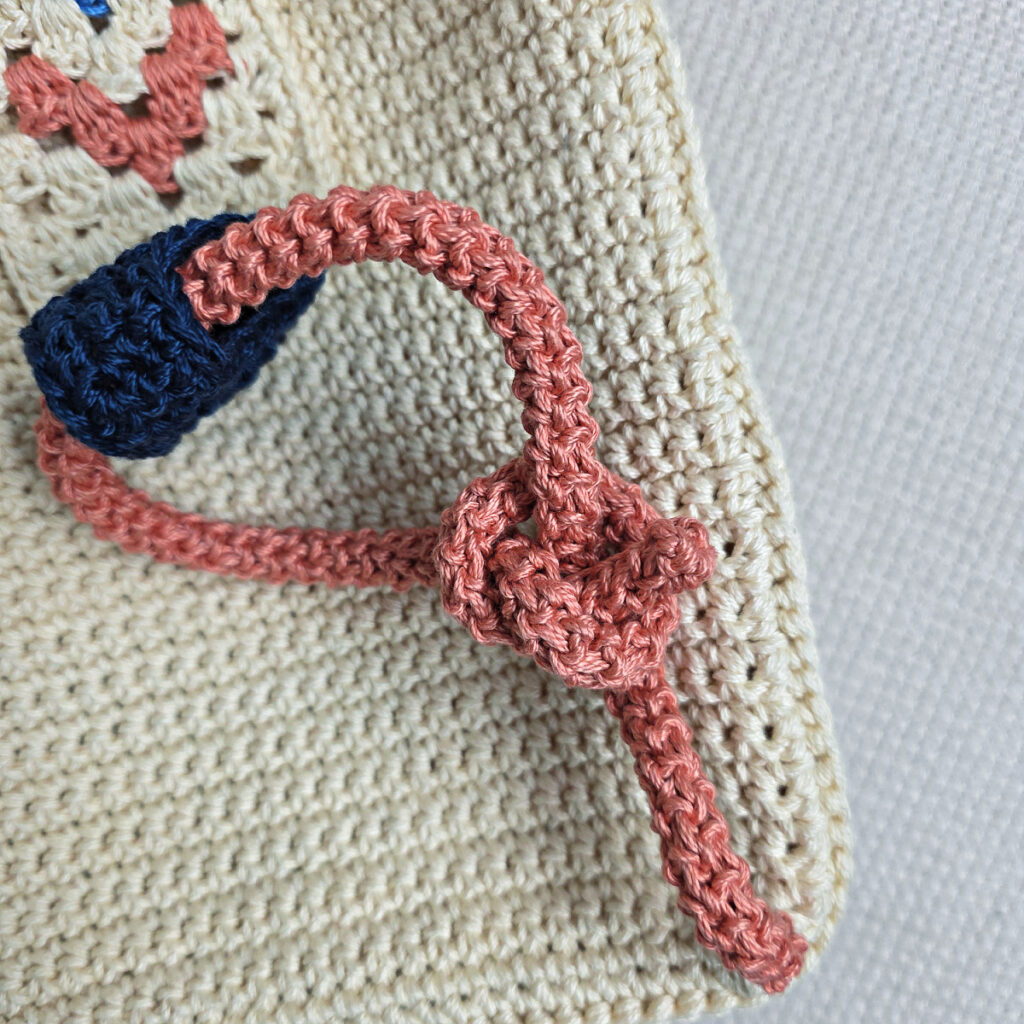
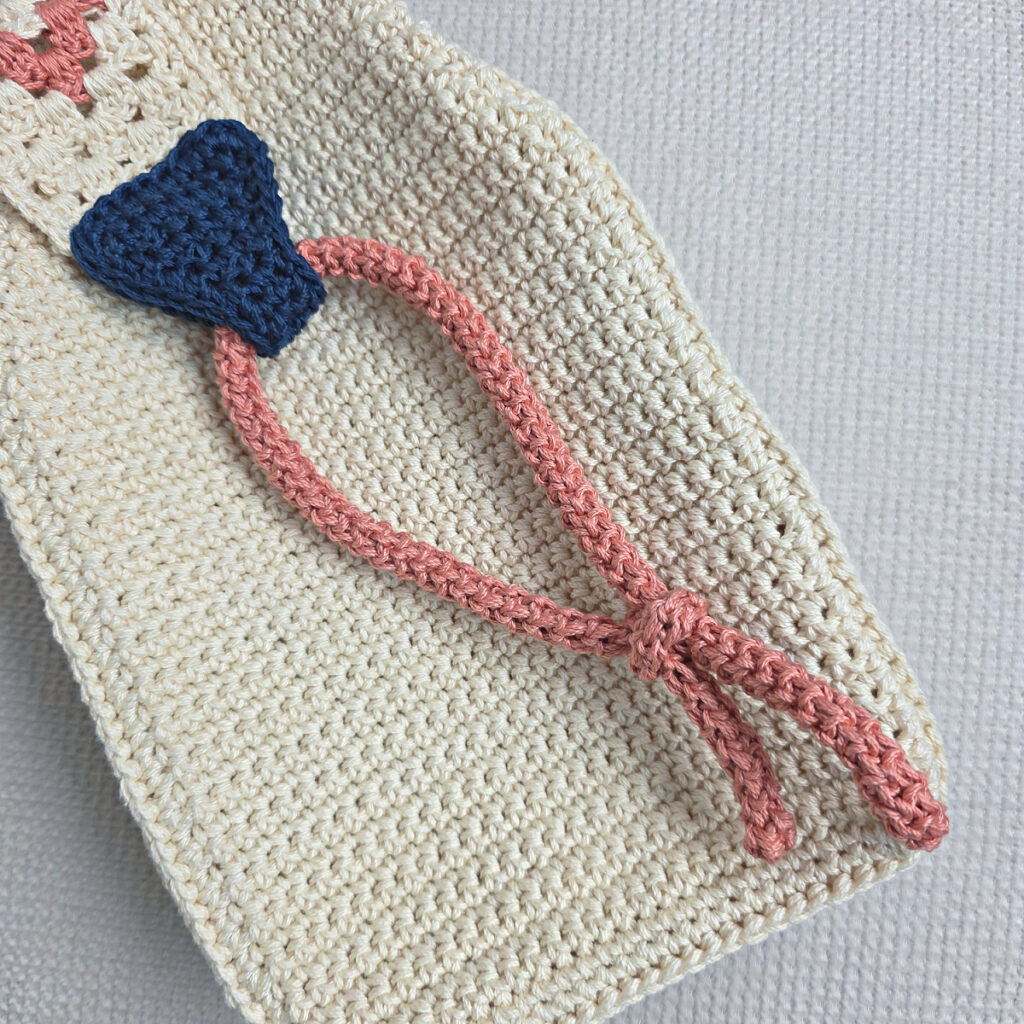
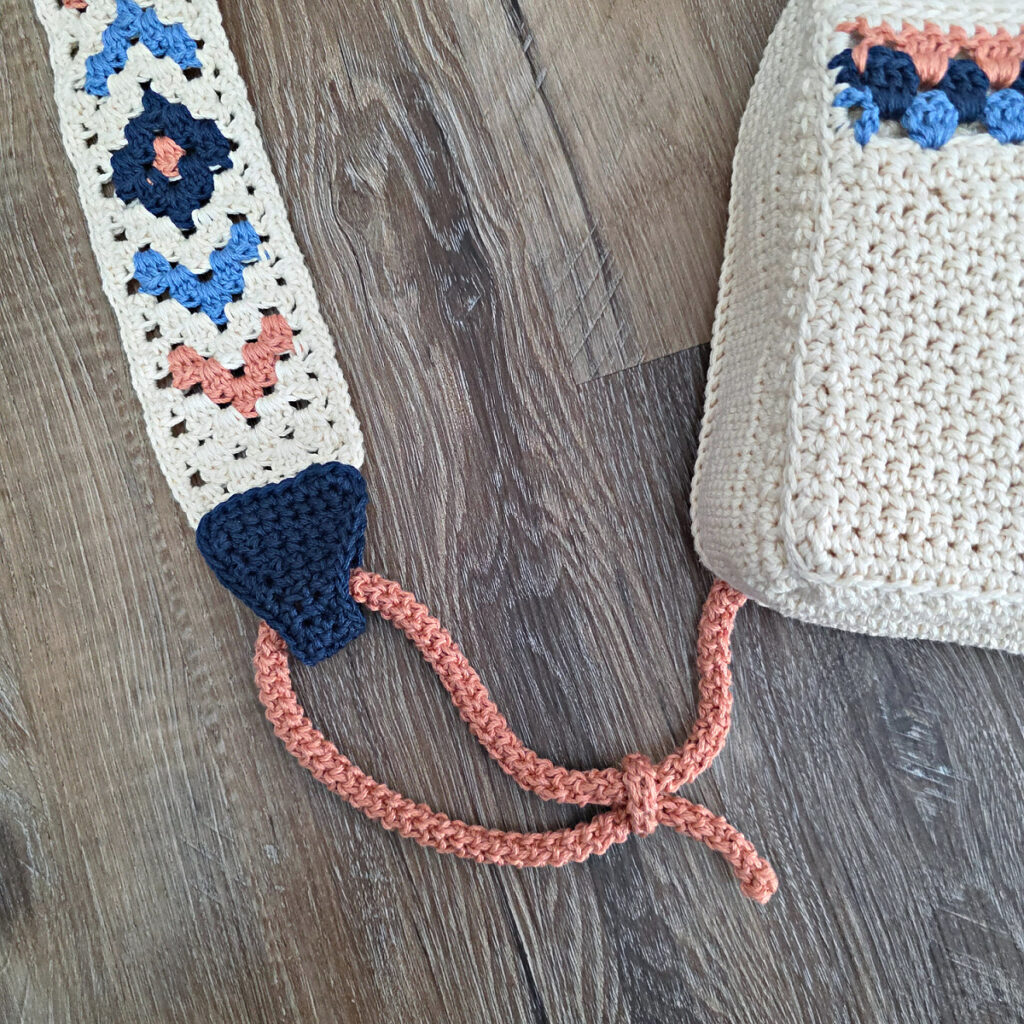
Step Two: Insert the opposite end of the crochet rope through the strap connector. Knot the loose end of the crochet rope around itself, as shown in the photos below. Tighten knot. Weave in any ends.
The knot you just created is what makes the strap adjustable. It slides up and down the crochet rope.

Step Three: With a yarn needle & yarn, or a needle & thread, attach the button to the Sides of Bag that you whipstitched together earlier. Make sure to position it under the buttonhole on the front panel.
I MADE IT! NOW WHAT?
Pin this post!: Save this crochet sling bag pattern to your Pinterest boards so that you can come back and make it again.
Leave a comment below: We love to hear your feedback.
Share Your Finished Projects on Facebook or Instagram: I love to see your finished projects! Share with us on social media and tag me @acrochetedsimplicity or use the hashtag #ACrochetedSimplicity so I can find your posts.
Join us in the Facebook Community Group!
Come share your finished projects with us in the A Crocheted Simplicity Crochet Community Group on Facebook. Join us for fun community events such as crochet alongs, join in on crochet conversations, ask questions, get advice, and share your love for crochet!

More Free Patterns for Crochet Bags
- Summer Retro Tote Bag
- Lille Crochet Shoulder Bag
- Strawberry Lemonade Tote Bag
- On The Bias Tote Bag
- Cool Stripes Bag
More Free Patterns for Granny Stitch Colorwork
More Crochet Patterns for Crochet Purses & Handbags
Are you looking for more crocheted purse patterns? We have several more free and premium crochet patterns for bags, backpacks, purses, and totes. We have a variety of free crochet bag patterns and premium crochet bag patterns.