Easy Short Row Crochet Hat Pattern

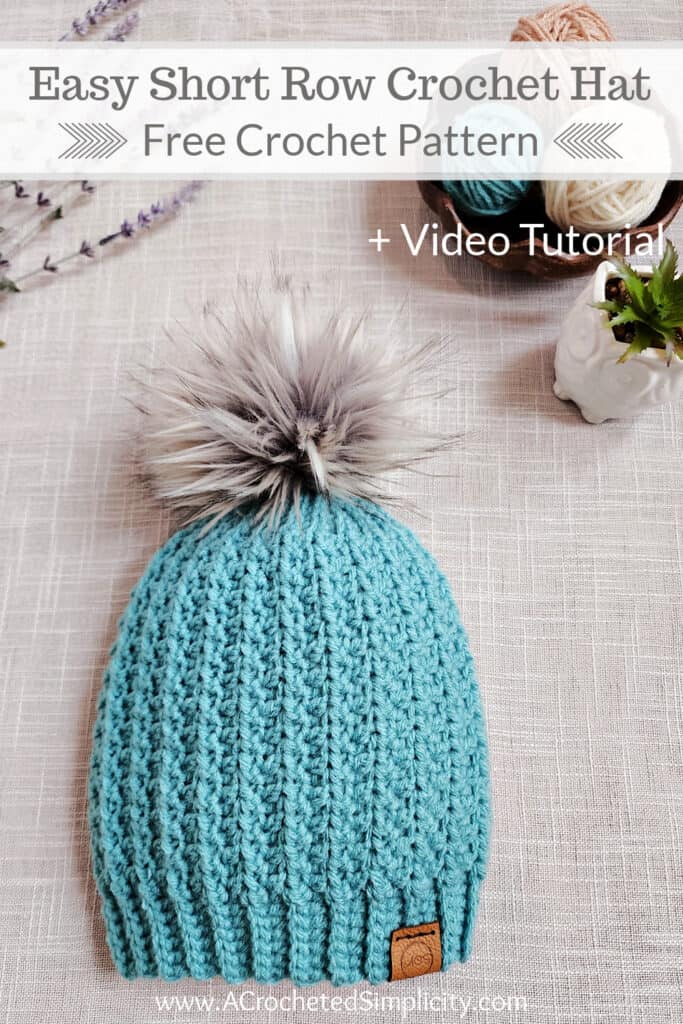
Learn How to Crochet an Easy Short Row Crochet Hat – The Best Fitting Hat you’ll ever Crochet!
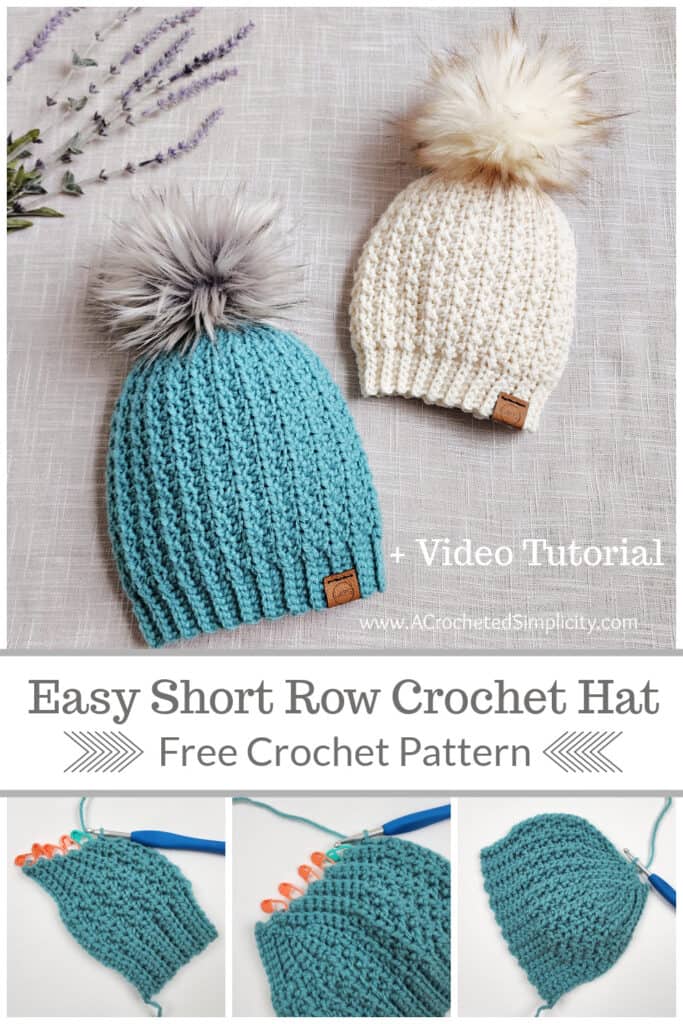
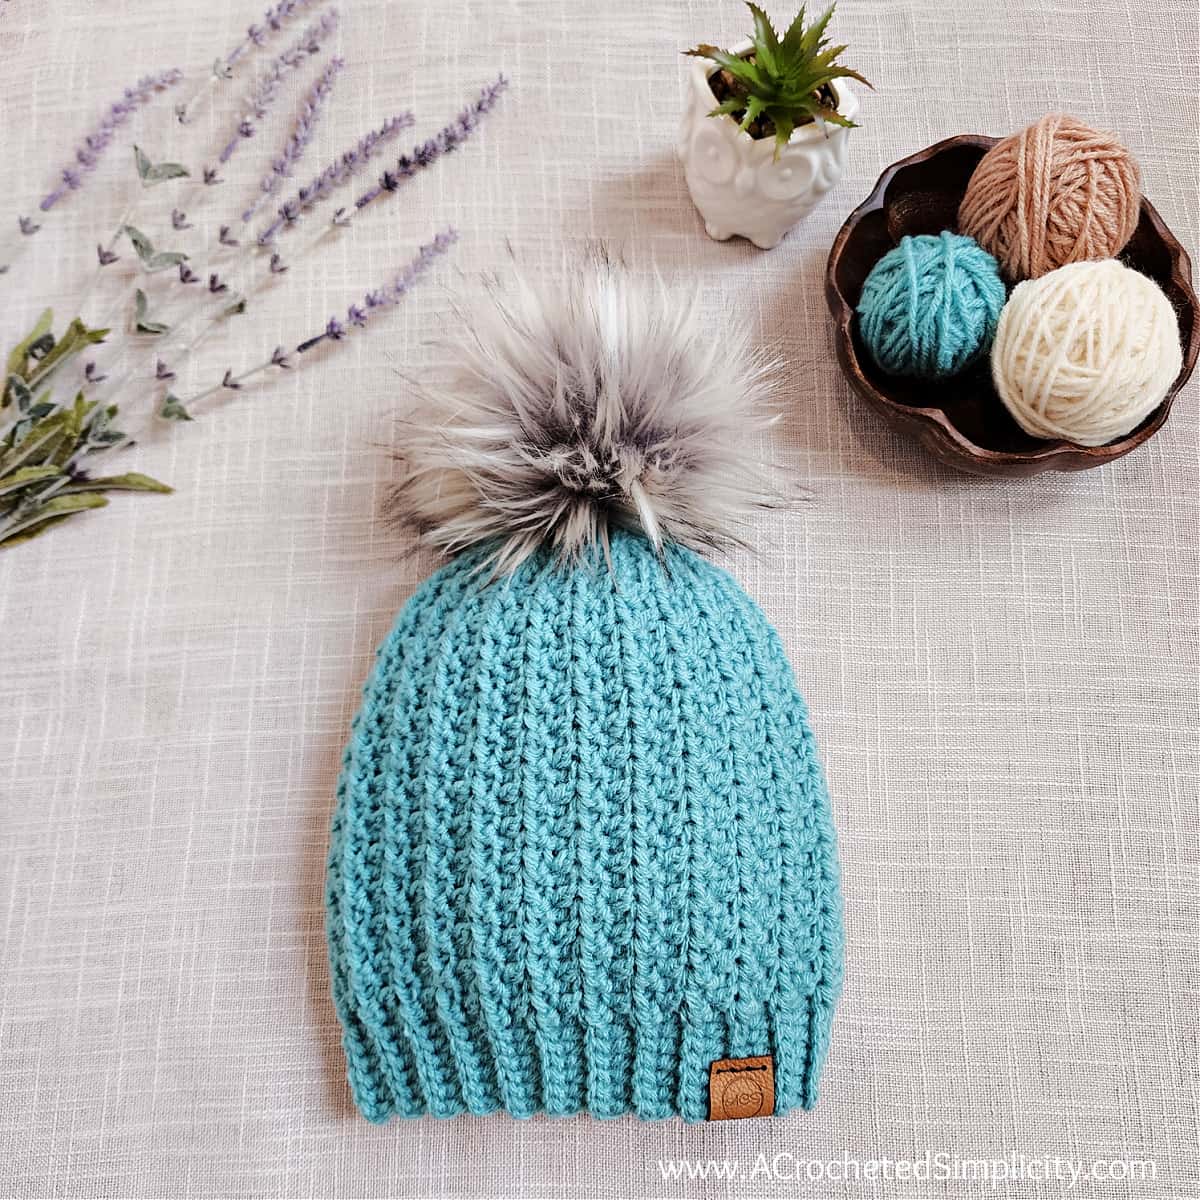
Crocheting short rows is a simple technique that looks trickier than it is and it produces the most beautifully shaped crown you’ll ever crochet!
If you love crocheting hats, but dislike bulky crowns, then crochet short rows are just what you need in your crochet life and crochet toolbox!
You can find the free Easy Short Row Crochet Hat pattern in this post below, or an ad-free print friendly version (including all photo tutorials) on Ravelry, or on Etsy (aff).
The Easy Short Row Crochet Hat is a great one skein crochet project!
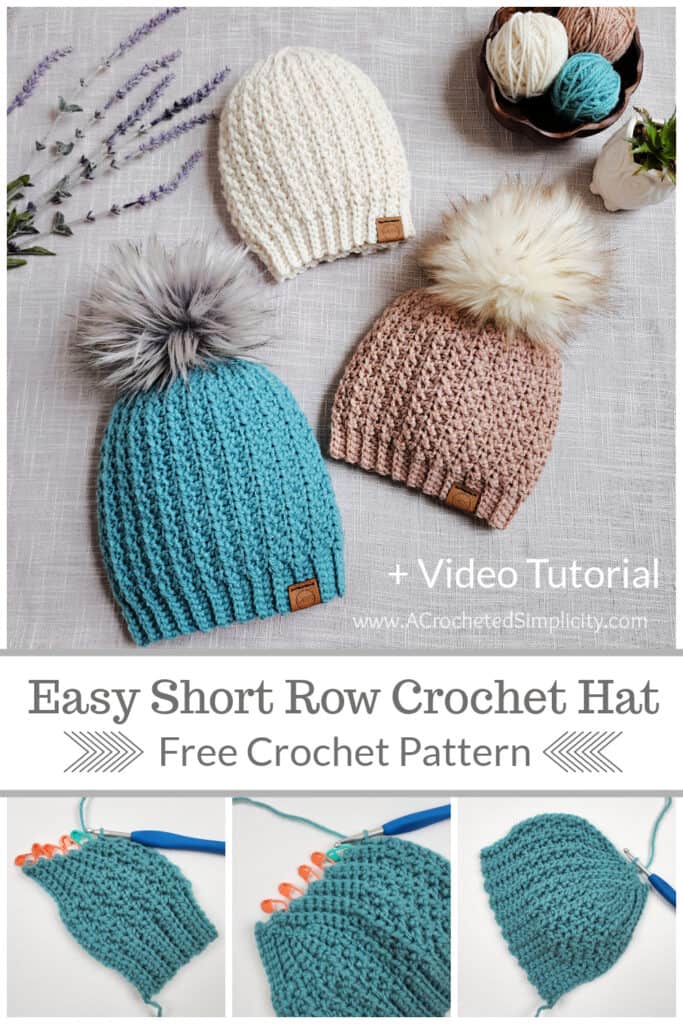
Choose between a short row crochet beanie or slouch hat! I’ve included instructions for both styles and even the largest, longest size uses less than 1 ball of yarn!
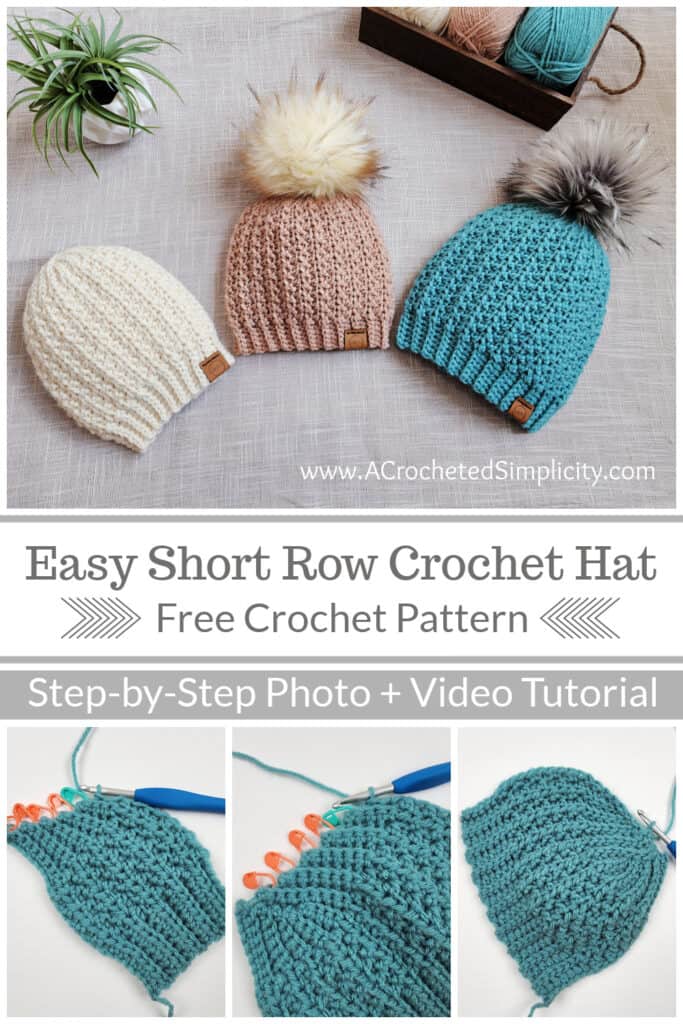
This crochet short row hat pattern also includes a step by step photo tutorial below AND a video tutorial to help ensure your success.
Crochet Short Row Hats
I’ve designed several crochet short row hat patterns over the past few years, both free and premium patterns. The following is a list of the current short row crochet hat patterns I have available:
- Done in One Beanie
- Knit-Look Super Bulky Slouch
- Mini-Moguls Ski-Slouch
- Knit-Look Everyday Beanie & Slouch
- Men’s Reversible Knit-Look Beanie
- Winter Waves Reversible Beanie & Slouch
- Willow Slouch
- Boho Chic Mosaic Slouch
- Alix Beanie & Slouch
- “Mock Smock” Beanie & Slouch
- Herring Beanie & Slouch
- Winter Poms Slouch
- Reversible Basic Ribbed Beanie
- Knit Look Cabled Hearts Beanie
- Knit Look Cabled or Not Beanie
- Summer Waves Sunhat
Phew! I didn’t realize I had designed so many short row crochet hat patterns!
If you’ve never crocheted short rows before, by the time you complete your Easy Short Row Beanie, you’ll be an expert at How to Crochet Short Rows!
Yarn
Worsted weight yarn is my favorite weight yarn to use for crochet beanies… mostly because I live in the great frozen north (Michigan’s Upper Peninsula) and crochet hats made with yarns lighter than a 4, won’t keep our ears from getting frostbite!
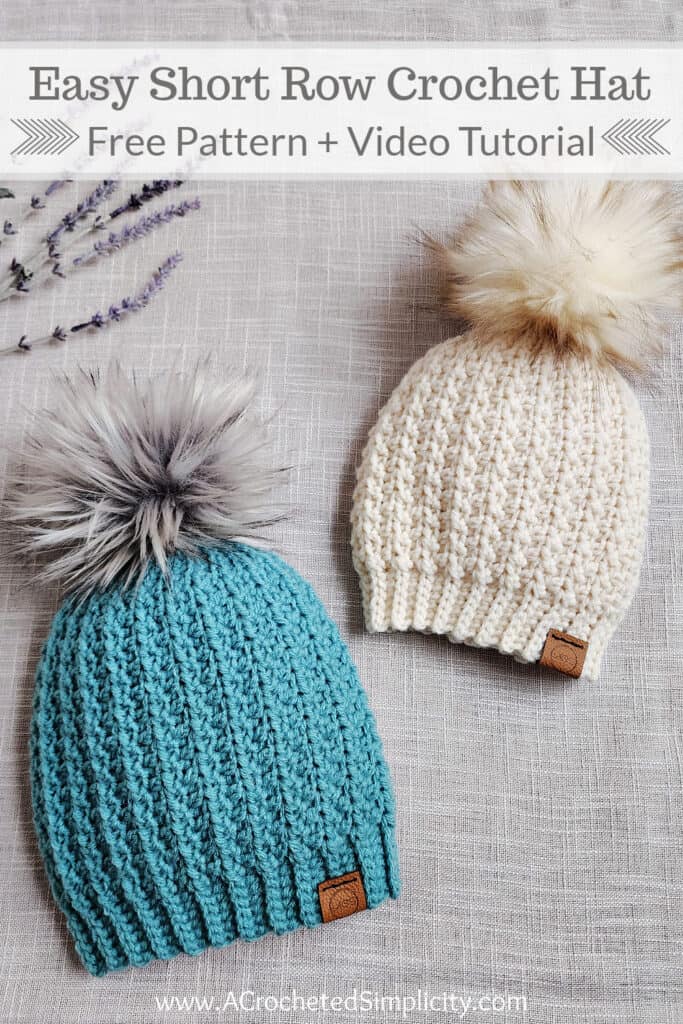
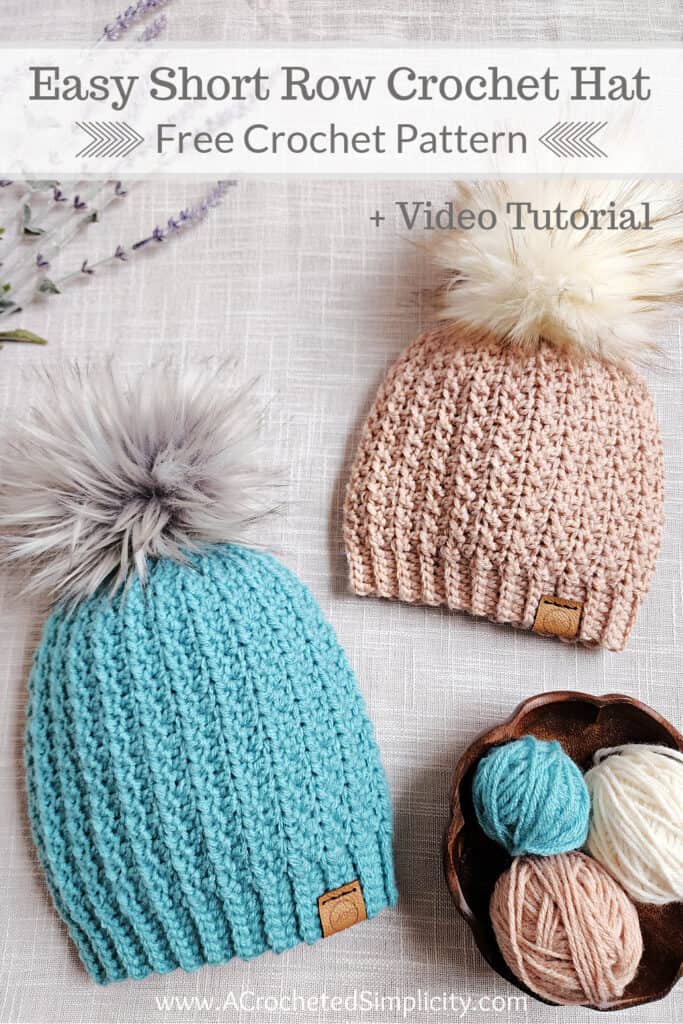
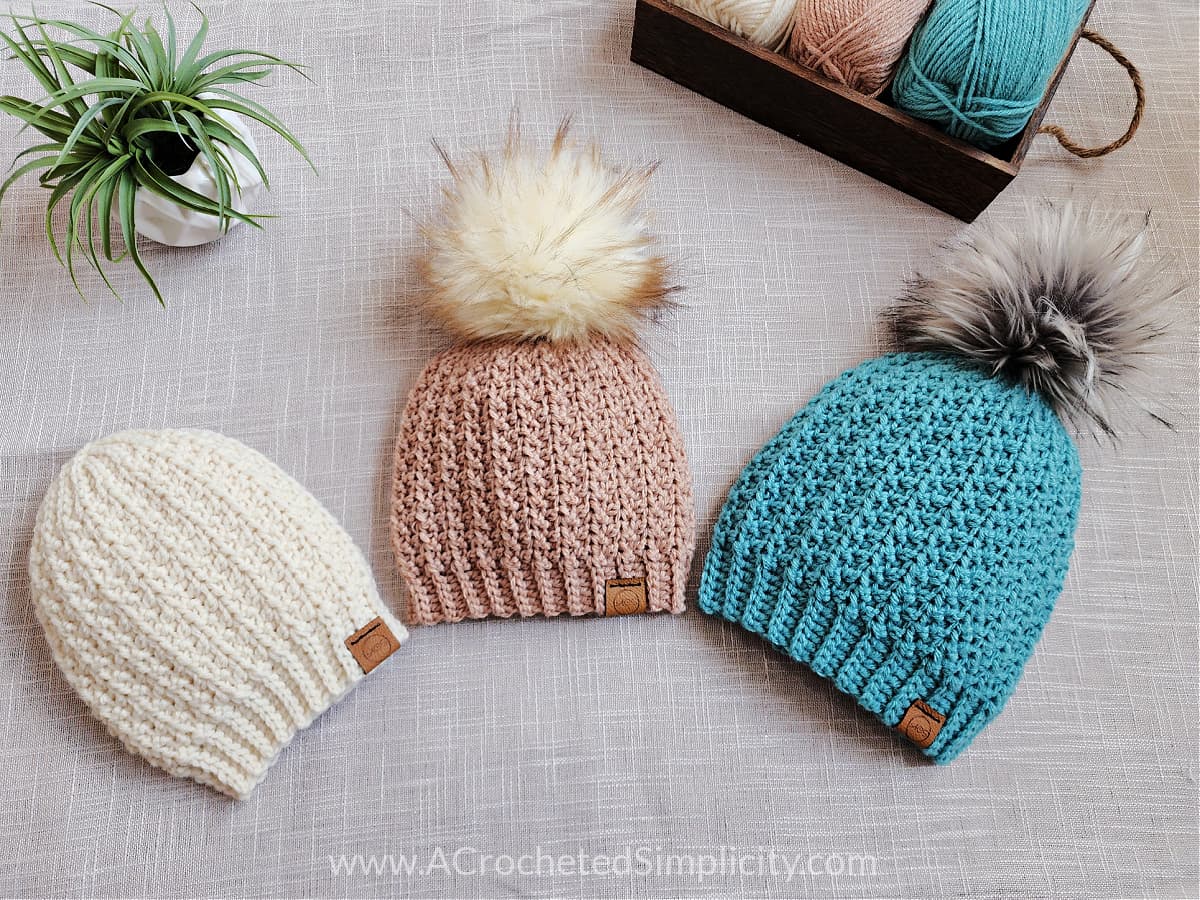
I chose Lion Brand Yarns Wool Ease for the short row crochet hats shown in this blog post. This is, hands down, my favorite worsted weight yarn for hats!
Wool Ease is a worsted weight / 4, acrylic wool blend yarn and it’s available in 31 fabulous colors! You’re sure to find the perfect color for your next crochet hat.
There are several other worsted weight yarns that would make great substitutions. Lion Brand Heartland, Lion Brand Pound of Love, Lion Brand Vanna’s Choice, Lion Brand Jeans… just to name a few.
Self-Striping Yarn: If you choose a self-striping yarn, your stripes will be vertical because this hat is crocheted from side to side, crown to hat band.
Make a Coordinating Set!
If you love coordinating sets, my Easy Crochet Cowl uses the same textured stitch pattern and would make beautiful crochet beanie and cowl set!
How to Crochet an Easy Short Row Crochet Hat – VIDEO TUTORIAL
Although this short row crochet hat pattern uses basic crochet stitches, and I’ve included several photos within the written pattern below, I have a few tips and tricks to share with you. I felt it was easiest to share them in a YouTube crochet video tutorial.
If you realize that you love crochet short rows and you want to learn more, I have a couple other crochet short row videos on my channel. You’ll also find several in my Ravelry & Etsy shops.
If you love crochet video tutorials, make sure to subscribe to our channel because there are more great tutorials coming your way!
What are Short Rows in Crochet?
Short rows are exactly as they sound… short rows. They are rows that are shorter than the previous rows and they are used to add shaping, subtle or dramatic, to crochet projects.
Short rows are typically crocheted by leaving unworked stitches at the end of a row (essentially skipping the last stitch of the row). Then later, these unworked stitches are picked back up to complete crochet short row shaping.
There are several different ways to use short rows to shape crochet projects, but my favorite way to use them is to create pie shaped wedges to crochet perfectly shaped crowns.
Crocheting short rows is a simple technique I have used to shape the crown of many of my crochet hat designs. They may sound tricky to do, but are actually pretty simple . Watch the crochet video tutorial for visual help.

Easy Short Row Crochet Hat – Free Crochet Hat Pattern
The free hat crochet pattern is below, but if you love to work offline, I’ve got a couple other great options for you.
Purchase the ad-free, printable PDF, including all photo tutorials, on Ravelry, or on Etsy (aff).
This post contains affiliate links.
Materials
- Yarn: Worsted Weight / 4 / Yarn, (Lion Brand Yarns Wool Ease was used for the samples in the photos) (3 oz / 85 g / 197 yards / 180 m / 80% acrylic / 20% wool).
- Wool Ease is also available on Amazon.
- Yardage for each size listed in the Fits Head Size section below.
- Crochet Hooks: I/9/5.50mm; H/8/5.00mm; or size needed to obtain gauge (My favorite crochet hooks are the Clover Amour Crochet Hooks, I’ve never had an ache in my hand since switching).
- Locking Stitch Markers
- Scissors
- Yarn Needle
Abbreviations (US Terms)
- ch(s): chain(s)
- sl st(s): slip stitch(es)
- st(s): stitch(es)
- yo: yarn over
- sc: single crochet
- hdc: half double crochet
- SM: stitch marker
- Rep: repeat
- BLO: back loop only
- FLO: front loop only
- RS / WS: Right Side / Wrong Side
Fits Head Size
- Toddler: 16″ – 17-½″ circ. (125 – 130 yards)
- Child: 18″ – 20″ circ. (155 – 170 yards)
- Teen / Adult Small: 20-½” – 22″ circ. (165 – 180 yards)
- Adult Medium / Large: 22-1/2″ – 24″ circ. (170 – 185 yards)
Gauge
- Alternate FLO hdc / BLO hdc, with 5.00mm hook: 15 sts = 3.75″; 10 rows = 4″
Experience Level
- Easy
Pattern Notes
- Turning chains are not included in stitch count.
- The first stitch of each row is worked into the same stitch as the beginning chain, unless noted otherwise.
- Yarn Notes: Lion Brand Yarns Wool Ease was used for the samples. Another comparable worsted weight yarn may be used as long as gauge is met.
- Lion Brand Yarns Wool Ease in Succulent, Fisherman, & Canyon Sunset were used for the hats shown in the photos: 80% Acrylic / 20% Wool (197 yds / 180 m / 85 g / 3 oz)
- Yardage
- Toddler: 125 – 130 yards
- Child: 155 – 170 yards
- Teen / Adult Small: 165 – 180 yards
- Adult Medium / Large: 170 – 185 yards
- Construction: This crochet hat is worked sideways using my favorite short row method and then seamed.
- Adjusting the Size of Your Beanie or Slouch (as you Crochet): Read this section before you begin. It may come in handy later!
- Crochet Video Tutorial: https://youtu.be/u6wfuEI_wz0
Pro Tip! Choose hat size based on the intended recipient’s actual head size, when possible. This will ensure the best fit!
Adjusting the Size of Your Beanie or Slouch (as you Crochet)
If you don’t have a standard size noggin (like myself), or you are struggling to meet my gauge, use these simple instructions to crochet a hat that fits PERFECTLY!
- Adjusting Crochet Hat Length: If you prefer a longer or shorter hat, simply increase or decrease your foundation chain in multiples of 2 stitches. These extra (or fewer) stitches will be worked in the middle of each row.
- The middle of each row is the alternating FLO/BLO hdc stitch pattern.
- Increase Circumference: If you’ve completed the hat as written and find that you need to adjust the circumference of your hat to make it larger, simply begin another short row section and work additional rows, ending with an even numbered row.
- Work the last even numbered row just like the last row in the written pattern (to make sure you’ve finished your adjusted section of short rows).
- Then, leave a tail of yarn that is 3 times the length of your hat and fasten off. Continue to the Seam.
- Decrease Circumference: If you’ve completed the hat as written and find that you need to adjust the circumference of your hat to make it smaller, simply remove a few rows, making sure to end with an even numbered row.
- Work the last even numbered row just like the last row in the written pattern (to make sure you’ve finished your adjusted section of short rows).
- Then, leave a tail of yarn that is 3 times the length of your hat and fasten off. Continue to the Seam.
Short Row Crochet Hat Instructions
Toddler Size
Progression Photos can be found at the bottom of this blog post.
Changes for Styles Written as Follows: Beanie (Slouch)
Finished Toddler Size (seamed & laid flat): 7.2″ W x 7″ L (7.2″ W x 8″ L)
Note that finished length is less than the length of Row 1 due to the nature of the short rows.
Row 1 (RS): With a 5.50mm crochet hook & yarn, ch 31 (35), switch to a 5.00mm crochet hook, working in the back humps of the ch, sc in the 2nd ch from your hook, sc in each of the next 7 chs, (hdc in the FLO of the next ch, hdc in the back hump of the next ch) work from ( to ) 8 (10) times, working in the back hump of the ch, hdc in each of the last 6 chs. Turn. (30, 34 sts)
*Gauge Check: Length of Row 1 should be: 7.5″ (8.5″).
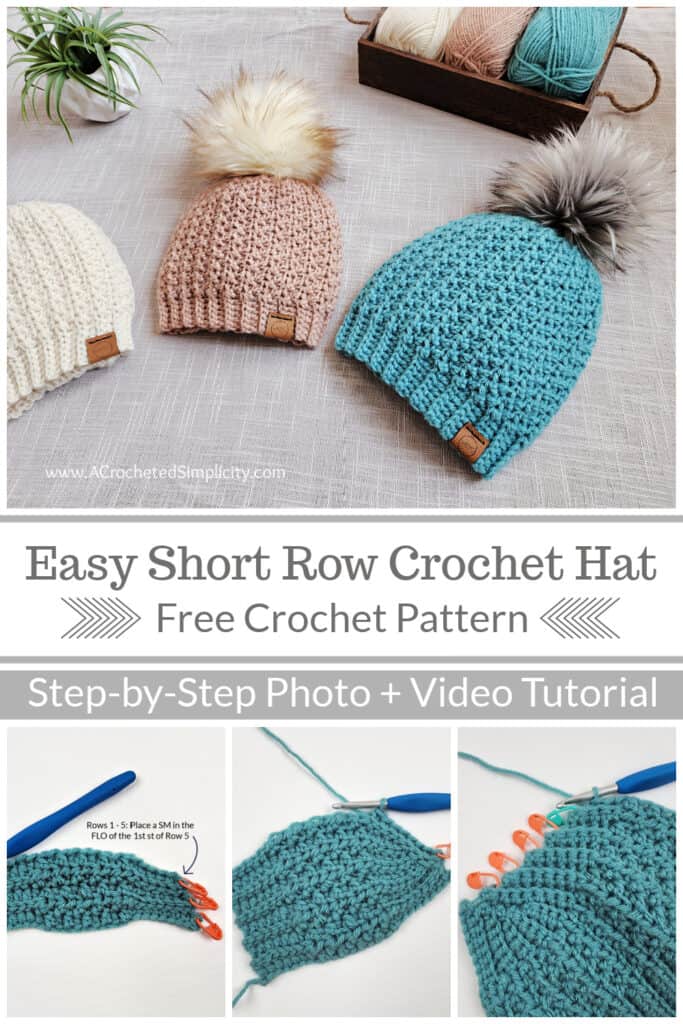
Tips for Crocheting Short Rows: Before turning, place a SM in the FLO of the first stitch of Row 1 & every odd numbered row throughout. If you haven’t worked short rows before, this will help you complete Row 10 & the end of each short row section after Row 10.
Row 2: Ch 1, BLO sl st in the first st, BLO sl st in each of the next 5 sts, (hdc in the BLO of the next st, hdc in the FLO of the next st) work from ( to ) 8 (10) times, BLO sl st in each of the next 7 sts, skip the last st. Turn. (29, 33 sts)
Row 3: Ch 1, BLO sc in the first st, BLO sc in each of the next 6 sts, (hdc in the FLO of the next st, hdc in the BLO of the next st) work from ( to ) 8 (10) times, BLO hdc in each of the last 6 sts. Turn. (29, 33 sts)
Row 4: Ch 1, BLO sl st in the first st, BLO sl st in each of the next 5 sts, (hdc in the BLO of the next st, hdc in the FLO of the next st) work from ( to ) 8 (10) times, BLO sl st in each of the next 6 sts, skip the last st. Turn. (28, 32 sts)
Row 5: Ch 1, BLO sc in the first st, BLO sc in each of the next 5 sts, (hdc in the FLO of the next st, hdc in the BLO of the next st) work from ( to ) 8 (10) times, BLO hdc in each of the last 6 sts. Turn. (28, 32 sts)
Row 6: Ch 1, BLO sl st in the first st, BLO sl st in each of the next 5 sts, (hdc in the BLO of the next st, hdc in the FLO of the next st) work from ( to ) 8 (10) times, BLO sl st in each of the next 5 sts, skip the last st. Turn. (27, 31 sts)
Row 7: Ch 1, BLO sc in the first st, BLO sc in each of the next 4 sts, (hdc in the FLO of the next st, hdc in the BLO of the next st) work from ( to ) 8 (10) times, BLO hdc in each of the last 6 sts. Turn. (27, 31 sts)
Row 8: Ch 1, BLO sl st in the first st, BLO sl st in each of the next 5 sts, (hdc in the BLO of the next st, hdc in the FLO of the next st) work from ( to ) 8 (10) times, BLO sl st in each of the next 4 sts, skip the last st. Turn. (26, 30 sts)
Row 9: Ch 1, BLO sc in the first st, BLO sc in each of the next 3 sts, (hdc in the FLO of the next st, hdc in the BLO of the next st) work from ( to ) 8 (10) times, BLO hdc in each of the last 6 sts. Turn. (26, 30 sts)
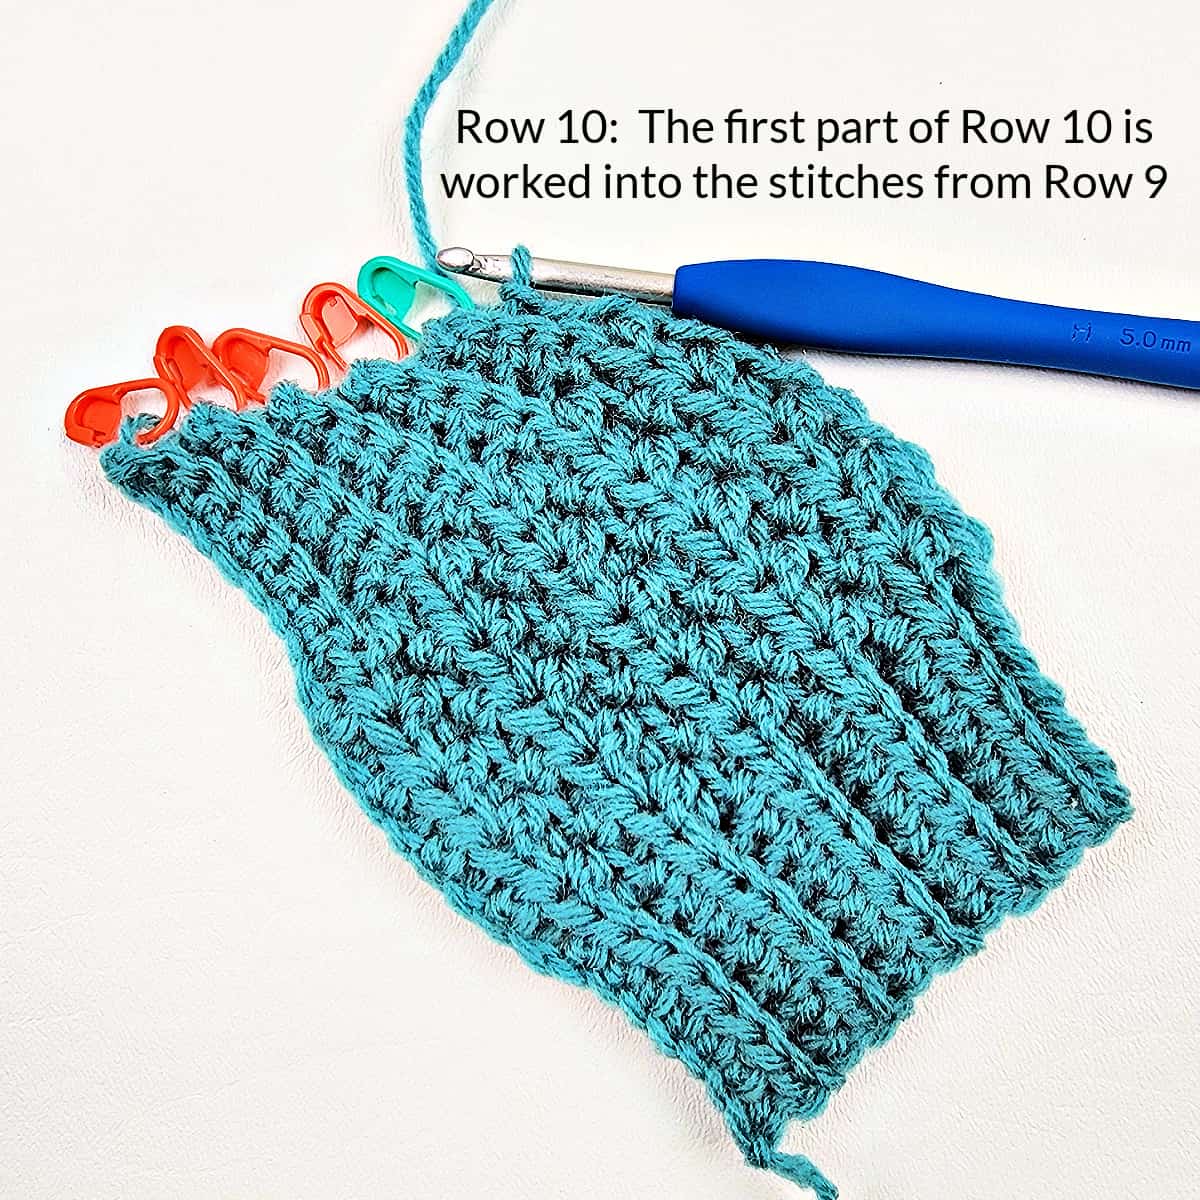
Row 10: Ch 1, BLO sl st in the first st, BLO sl st in each of the next 5 sts, (hdc in the BLO of the next st, hdc in the FLO of the next st) work from ( to ) 8 (10) times, BLO sl st in each of the next 4 sts and in each unworked st to Row 1. Turn. (30, 34 sts)
Remove SM after completing this row. Row height at this point should be 4″.
Row 11: Ch 1, BLO sc in the first st, BLO sc in each of the next 7 sts, (hdc in the FLO of the next st, hdc in the BLO of the next st) work from ( to ) 8 (10) times, BLO hdc in each of the last 6 sts. Turn. (30, 34 sts)
Rows 12 – 19: Repeat Rows 2 – 9.
Row 20: Ch 1, BLO sl st in the first st, BLO sl st in each of the next 5 sts, (hdc in the BLO of the next st, hdc in the FLO of the next st) work from ( to ) 8 (10) times, BLO sl st in each of the next 4 sts and in each unworked st to Row 11. Turn. (30, 34 sts)
Row 21: Ch 1, BLO sc in the first st, BLO sc in each of the next 7 sts, (hdc in the FLO of the next st, hdc in the BLO of the next st) work from ( to ) 8 (10) times, BLO hdc in each of the last 6 sts. Turn. (30, 34 sts)
Rows 22 – 29: Repeat Rows 2 – 9.
Row 30: Ch 1, BLO sl st in the first st, BLO sl st in each of the next 5 sts, (hdc in the BLO of the next st, hdc in the FLO of the next st) work from ( to ) 8 (10) times, BLO sl st in each of the next 4 sts and in each unworked st to Row 21. Turn. (30, 34 sts)
Row 31: Ch 1, BLO sc in the first st, BLO sc in each of the next 7 sts, (hdc in the FLO of the next st, hdc in the BLO of the next st) work from ( to ) 8 (10) times, BLO hdc in each of the last 6 sts. Turn. (30, 34 sts)
Rows 32 – 35: Repeat Rows 2 – 5.
Row 36: Ch 1, BLO sl st in the first st, BLO sl st in each of the next 5 sts, (hdc in the BLO of the next st, hdc in the FLO of the next st) work from ( to ) 8 (10) times, BLO sl st in each of the next 6 sts and in each unworked st to Row 31. Turn. (30, 34 sts)
Remove SM after completing this row. Row height at this point should be 14.4″. If it is not, don’t fret! Refer to the section ‘Adjusting the Size of Your Beanie & Slouch’ above, for a quick adjustment without having to frog your entire hat!
Leave a tail of yarn that is 3 times the length of your hat and fasten off. Continue to the Seam near the end of this blog post.
Child Size
Progression Photos can be found at the bottom of this blog post.
Changes for Styles Written as Follows: Beanie (Slouch)
Finished Child Size (seamed & laid flat): 8″ W x 7.5″ L (8″ W x 8.5″ L)
Note that finished length is less than the length of Row 1 due to the nature of the short rows.
Row 1 (RS): With a 5.50mm crochet hook & yarn, ch 33 (37), switch to a 5.00mm crochet hook, working in the back humps of the ch, sc in the 2nd ch from your hook, sc in each of the next 7 chs, (hdc in the FLO of the next ch, hdc in the back hump of the next ch) work from ( to ) 9 (11) times, working in the back hump of the ch, hdc in each of the last 6 chs. Turn. (32, 36 sts)
*Gauge Check: Length of Row 1 should be: 8″ (9″).
Tip: Before turning, place a SM in the FLO of the first stitch of Row 1 & every odd numbered row throughout. If you haven’t worked short rows before, this will help you complete Row 10 & the end of each short row section after Row 10.
Row 2: Ch 1, BLO sl st in the first st, BLO sl st in each of the next 5 sts, (hdc in the BLO of the next st, hdc in the FLO of the next st) work from ( to ) 9 (11) times, BLO sl st in each of the next 7 sts, skip the last st. Turn. (31, 35 sts)
Row 3: Ch 1, BLO sc in the first st, BLO sc in each of the next 6 sts, (hdc in the FLO of the next st, hdc in the BLO of the next st) work from ( to ) 9 (11) times, BLO hdc in each of the last 6 sts. Turn. (31, 35 sts)
Row 4: Ch 1, BLO sl st in the first st, BLO sl st in each of the next 5 sts, (hdc in the BLO of the next st, hdc in the FLO of the next st) work from ( to ) 9 (11) times, BLO sl st in each of the next 6 sts, skip the last st. Turn. (30, 34 sts)
Row 5: Ch 1, BLO sc in the first st, BLO sc in each of the next 5 sts, (hdc in the FLO of the next st, hdc in the BLO of the next st) work from ( to ) 9 (11) times, BLO hdc in each of the last 6 sts. Turn. (30, 34 sts)
Row 6: Ch 1, BLO sl st in the first st, BLO sl st in each of the next 5 sts, (hdc in the BLO of the next st, hdc in the FLO of the next st) work from ( to ) 9 (11) times, BLO sl st in each of the next 5 sts, skip the last st. Turn. (29, 33 sts)
Row 7: Ch 1, BLO sc in the first st, BLO sc in each of the next 4 sts, (hdc in the FLO of the next st, hdc in the BLO of the next st) work from ( to ) 9 (11) times, BLO hdc in each of the last 6 sts. Turn. (29, 33 sts)
Row 8: Ch 1, BLO sl st in the first st, BLO sl st in each of the next 5 sts, (hdc in the BLO of the next st, hdc in the FLO of the next st) work from ( to ) 9 (11) times, BLO sl st in each of the next 4 sts, skip the last st. Turn. (28, 32 sts)
Row 9: Ch 1, BLO sc in the first st, BLO sc in each of the next 3 sts, (hdc in the FLO of the next st, hdc in the BLO of the next st) work from ( to ) 9 (11) times, BLO hdc in each of the last 6 sts. Turn. (28, 32 sts)
Row 10: Ch 1, BLO sl st in the first st, BLO sl st in each of the next 5 sts, (hdc in the BLO of the next st, hdc in the FLO of the next st) work from ( to ) 9 (11) times, BLO sl st in each of the next 4 sts and in each unworked st to Row 1. Turn. (32, 36 sts)
Remove SM after completing this row. Row height at this point should be 4″.
Row 11: Ch 1, BLO sc in the first st, BLO sc in each of the next 7 sts, (hdc in the FLO of the next st, hdc in the BLO of the next st) work from ( to ) 9 (11) times, BLO hdc in each of the last 6 sts. Turn. (32, 36 sts)
Rows 12 – 19: Repeat Rows 2 – 9.
Row 20: Ch 1, BLO sl st in the first st, BLO sl st in each of the next 5 sts, (hdc in the BLO of the next st, hdc in the FLO of the next st) work from ( to ) 9 (11) times, BLO sl st in each of the next 4 sts and in each unworked st to Row 11. Turn. (32, 36 sts)
Row 21: Ch 1, BLO sc in the first st, BLO sc in each of the next 7 sts, (hdc in the FLO of the next st, hdc in the BLO of the next st) work from ( to ) 9 (11) times, BLO hdc in each of the last 6 sts. Turn. (32, 36 sts)
Rows 22 – 29: Repeat Rows 2 – 9.
Row 30: Ch 1, BLO sl st in the first st, BLO sl st in each of the next 5 sts, (hdc in the BLO of the next st, hdc in the FLO of the next st) work from ( to ) 9 (11) times, BLO sl st in each of the next 4 sts and in each unworked st to Row 21. Turn. (32, 36 sts)
Row 31: Ch 1, BLO sc in the first st, BLO sc in each of the next 7 sts, (hdc in the FLO of the next st, hdc in the BLO of the next st) work from ( to ) 9 (11) times, BLO hdc in each of the last 6 sts. Turn. (32, 36 sts)
Rows 32 – 39: Repeat Rows 2 – 9.
Row 40: Ch 1, BLO sl st in the first st, BLO sl st in each of the next 5 sts, (hdc in the BLO of the next st, hdc in the FLO of the next st) work from ( to ) 9 (11) times, BLO sl st in each of the next 4 sts and in each unworked st to Row 31. Turn. (32, 36 sts)
Remove SM after completing this row. Row height at this point should be 16″. If it is not, don’t fret! Refer to the section ‘Adjusting the Size of Your Beanie & Slouch’ above, for a quick adjustment without having to frog your entire hat!
Leave a tail of yarn that is 3 times the length of your hat and fasten off. Continue to the Seam near the end of this blog post.
Teen / Adult Small Size
Progression Photos can be found at the bottom of this blog post.
Changes for Styles Written as Follows: Beanie (Slouch)
Finished Teen / Adult Small Size (seamed & laid flat): 9.2″ W x 8″ L (9.2″ W x 9″ L)
Note that finished length is less than the length of Row 1 due to the nature of the short rows.
Row 1 (RS): With a 5.50mm crochet hook & yarn, ch 35 (39), switch to a 5.00mm crochet hook, working in the back humps of the ch, sc in the 2nd ch from your hook, sc in each of the next 7 chs, (hdc in the FLO of the next ch, hdc in the back hump of the next ch) work from ( to ) 10 (12) times, working in the back hump of the ch, hdc in each of the last 6 chs. Turn. (34, 38 sts)
*Gauge Check: Length of Row 1 should be: 8.5″ (9.5″).
Tip: Before turning, place a SM in the FLO of the first stitch of Row 1 & every odd numbered row throughout. If you haven’t worked short rows before, this will help you complete Row 10 & the end of each short row section after Row 10.
Row 2: Ch 1, BLO sl st in the first st, BLO sl st in each of the next 5 sts, (hdc in the BLO of the next st, hdc in the FLO of the next st) work from ( to ) 10 (12) times, BLO sl st in each of the next 7 sts, skip the last st. Turn. (33, 37 sts)
Row 3: Ch 1, BLO sc in the first st, BLO sc in each of the next 6 sts, (hdc in the FLO of the next st, hdc in the BLO of the next st) work from ( to ) 10 (12) times, BLO hdc in each of the last 6 sts. Turn. (33, 37 sts)
Row 4: Ch 1, BLO sl st in the first st, BLO sl st in each of the next 5 sts, (hdc in the BLO of the next st, hdc in the FLO of the next st) work from ( to ) 10 (12) times, BLO sl st in each of the next 6 sts, skip the last st. Turn. (32, 36 sts)
Row 5: Ch 1, BLO sc in the first st, BLO sc in each of the next 5 sts, (hdc in the FLO of the next st, hdc in the BLO of the next st) work from ( to ) 10 (12) times, BLO hdc in each of the last 6 sts. Turn. (32, 36 sts)
Row 6: Ch 1, BLO sl st in the first st, BLO sl st in each of the next 5 sts, (hdc in the BLO of the next st, hdc in the FLO of the next st) work from ( to ) 10 (12) times, BLO sl st in each of the next 5 sts, skip the last st. Turn. (31, 35 sts)
Row 7: Ch 1, BLO sc in the first st, BLO sc in each of the next 4 sts, (hdc in the FLO of the next st, hdc in the BLO of the next st) work from ( to ) 10 (12) times, BLO hdc in each of the last 6 sts. Turn. (31, 35 sts)
Row 8: Ch 1, BLO sl st in the first st, BLO sl st in each of the next 5 sts, (hdc in the BLO of the next st, hdc in the FLO of the next st) work from ( to ) 10 (12) times, BLO sl st in each of the next 4 sts, skip the last st. Turn. (30, 34 sts)
Row 9: Ch 1, BLO sc in the first st, BLO sc in each of the next 3 sts, (hdc in the FLO of the next st, hdc in the BLO of the next st) work from ( to ) 10 (12) times, BLO hdc in each of the last 6 sts. Turn. (30, 34 sts)
Row 10: Ch 1, BLO sl st in the first st, BLO sl st in each of the next 5 sts, (hdc in the BLO of the next st, hdc in the FLO of the next st) work from ( to ) 10 (12) times, BLO sl st in each of the next 4 sts and in each unworked st to Row 1. Turn. (34, 38 sts)
Remove SM after completing this row. Row height at this point should be 4″.
Row 11: Ch 1, BLO sc in the first st, BLO sc in each of the next 7 sts, (hdc in the FLO of the next st, hdc in the BLO of the next st) work from ( to ) 10 (12) times, BLO hdc in each of the last 6 sts. Turn. (34, 38 sts)
Rows 12 – 19: Repeat Rows 2 – 9.
Row 20: Ch 1, BLO sl st in the first st, BLO sl st in each of the next 5 sts, (hdc in the BLO of the next st, hdc in the FLO of the next st) work from ( to ) 10 (12) times, BLO sl st in each of the next 4 sts and in each unworked st to Row 11. Turn. (34, 38 sts)
Row 21: Ch 1, BLO sc in the first st, BLO sc in each of the next 7 sts, (hdc in the FLO of the next st, hdc in the BLO of the next st) work from ( to ) 10 (12) times, BLO hdc in each of the last 6 sts. Turn. (34, 38 sts)
Rows 22 – 29: Repeat Rows 2 – 9.
Row 30: Ch 1, BLO sl st in the first st, BLO sl st in each of the next 5 sts, (hdc in the BLO of the next st, hdc in the FLO of the next st) work from ( to ) 10 (12) times, BLO sl st in each of the next 4 sts and in each unworked st to Row 21. Turn. (34, 38 sts)
Row 31: Ch 1, BLO sc in the first st, BLO sc in each of the next 7 sts, (hdc in the FLO of the next st, hdc in the BLO of the next st) work from ( to ) 10 (12) times, BLO hdc in each of the last 6 sts. Turn. (34, 38 sts)
Rows 32 – 39: Repeat Rows 2 – 9.
Row 40: Ch 1, BLO sl st in the first st, BLO sl st in each of the next 5 sts, (hdc in the BLO of the next st, hdc in the FLO of the next st) work from ( to ) 10 (12) times, BLO sl st in each of the next 4 sts and in each unworked st to Row 31. Turn. (34, 38 sts)
Row 41: Ch 1, BLO sc in the first st, BLO sc in each of the next 7 sts, (hdc in the FLO of the next st, hdc in the BLO of the next st) work from ( to ) 10 (12) times, BLO hdc in each of the last 6 sts. Turn. (34, 38 sts)
Rows 42 – 45: Repeat Rows 2 – 5.
Row 46: Ch 1, BLO sl st in the first st, BLO sl st in each of the next 5 sts, (hdc in the BLO of the next st, hdc in the FLO of the next st) work from ( to ) 10 (12) times, BLO sl st in each of the next 6 sts and in each unworked st to Row 41. Turn. (34, 38 sts)
Remove SM after completing this row. Row height at this point should be 18.4″. If it is not, don’t fret! Refer to the section ‘Adjusting the Size of Your Beanie & Slouch’ above, for a quick adjustment without having to frog your entire hat!
Leave a tail of yarn that is 3 times the length of your hat and fasten off. Continue to the Seam near the end of this blog post.
Adult Medium / Large
Progression Photos can be found at the bottom of this blog post.
Changes for Styles Written as Follows: Beanie (Slouch)
Finished Adult Medium / Large Size (seamed & laid flat): 10″ W x 8.5″ L (10″ W x 9.5″ L)
Note that finished length is less than the length of Row 1 due to the nature of the short rows.
Row 1 (RS): With a 5.50mm crochet hook & yarn, ch 37 (41), switch to a 5.00mm crochet hook, working in the back humps of the ch, sc in the 2nd ch from your hook, sc in each of the next 7 chs, (hdc in the FLO of the next ch, hdc in the back hump of the next ch) work from ( to ) 11 (13) times, working in the back hump of the ch, hdc in each of the last 6 chs. Turn. (36, 40 sts)
*Gauge Check: Length of Row 1 should be: 9″ (10″).
Tip: Before turning, place a SM in the FLO of the first stitch of Row 1 & every odd numbered row throughout. If you haven’t worked short rows before, this will help you complete Row 10 & the end of each short row section after Row 10.
Row 2: Ch 1, BLO sl st in the first st, BLO sl st in each of the next 5 sts, (hdc in the BLO of the next st, hdc in the FLO of the next st) work from ( to ) 11 (13) times, BLO sl st in each of the next 7 sts, skip the last st. Turn. (35, 39 sts)
Row 3: Ch 1, BLO sc in the first st, BLO sc in each of the next 6 sts, (hdc in the FLO of the next st, hdc in the BLO of the next st) work from ( to ) 11 (13) times, BLO hdc in each of the last 6 sts. Turn. (35, 39 sts)
Row 4: Ch 1, BLO sl st in the first st, BLO sl st in each of the next 5 sts, (hdc in the BLO of the next st, hdc in the FLO of the next st) work from ( to ) 11 (13) times, BLO sl st in each of the next 6 sts, skip the last st. Turn. (34, 38 sts)
Row 5: Ch 1, BLO sc in the first st, BLO sc in each of the next 5 sts, (hdc in the FLO of the next st, hdc in the BLO of the next st) work from ( to ) 11 (13) times, BLO hdc in each of the last 6 sts. Turn. (34, 38 sts)
Row 6: Ch 1, BLO sl st in the first st, BLO sl st in each of the next 5 sts, (hdc in the BLO of the next st, hdc in the FLO of the next st) work from ( to ) 11 (13) times, BLO sl st in each of the next 5 sts, skip the last st. Turn. (33, 37 sts)
Row 7: Ch 1, BLO sc in the first st, BLO sc in each of the next 4 sts, (hdc in the FLO of the next st, hdc in the BLO of the next st) work from ( to ) 11 (13) times, BLO hdc in each of the last 6 sts. Turn. (33, 37 sts)
Row 8: Ch 1, BLO sl st in the first st, BLO sl st in each of the next 5 sts, (hdc in the BLO of the next st, hdc in the FLO of the next st) work from ( to ) 11 (13) times, BLO sl st in each of the next 4 sts, skip the last st. Turn. (32, 36 sts)
Row 9: Ch 1, BLO sc in the first st, BLO sc in each of the next 3 sts, (hdc in the FLO of the next st, hdc in the BLO of the next st) work from ( to ) 11 (13) times, BLO hdc in each of the last 6 sts. Turn. (32, 36 sts)
Row 10: Ch 1, BLO sl st in the first st, BLO sl st in each of the next 5 sts, (hdc in the BLO of the next st, hdc in the FLO of the next st) work from ( to ) 11 (13) times, BLO sl st in each of the next 4 sts and in each unworked st to Row 1. Turn. (36, 40 sts)
Remove SM after completing this row. Row height at this point should be 4″.
Row 11: Ch 1, BLO sc in the first st, BLO sc in each of the next 7 sts, (hdc in the FLO of the next st, hdc in the BLO of the next st) work from ( to ) 11 (13) times, BLO hdc in each of the last 6 sts. Turn. (36, 40 sts)
Rows 12 – 19: Repeat Rows 2 – 9.
Row 20: Ch 1, BLO sl st in the first st, BLO sl st in each of the next 5 sts, (hdc in the BLO of the next st, hdc in the FLO of the next st) work from ( to ) 11 (13) times, BLO sl st in each of the next 4 sts and in each unworked st to Row 11. Turn. (36, 40 sts)
Row 21: Ch 1, BLO sc in the first st, BLO sc in each of the next 7 sts, (hdc in the FLO of the next st, hdc in the BLO of the next st) work from ( to ) 11 (13) times, BLO hdc in each of the last 6 sts. Turn. (36, 40 sts)
Rows 22 – 29: Repeat Rows 2 – 9.
Row 30: Ch 1, BLO sl st in the first st, BLO sl st in each of the next 5 sts, (hdc in the BLO of the next st, hdc in the FLO of the next st) work from ( to ) 11 (13) times, BLO sl st in each of the next 4 sts and in each unworked st to Row 21. Turn. (36, 40 sts)
Row 31: Ch 1, BLO sc in the first st, BLO sc in each of the next 7 sts, (hdc in the FLO of the next st, hdc in the BLO of the next st) work from ( to ) 11 (13) times, BLO hdc in each of the last 6 sts. Turn. (36, 40 sts)
Rows 32 – 39: Repeat Rows 2 – 9.
Row 40: Ch 1, BLO sl st in the first st, BLO sl st in each of the next 5 sts, (hdc in the BLO of the next st, hdc in the FLO of the next st) work from ( to ) 11 (13) times, BLO sl st in each of the next 4 sts and in each unworked st to Row 31. Turn. (36, 40 sts)
Row 41: Ch 1, BLO sc in the first st, BLO sc in each of the next 7 sts, (hdc in the FLO of the next st, hdc in the BLO of the next st) work from ( to ) 11 (13) times, BLO hdc in each of the last 6 sts. Turn. (36, 40 sts)
Rows 42 – 49: Repeat Rows 2 – 9.
Row 50: Ch 1, BLO sl st in the first st, BLO sl st in each of the next 5 sts, (hdc in the BLO of the next st, hdc in the FLO of the next st) work from ( to ) 11 (13) times, BLO sl st in each of the next 4 sts and in each unworked st to Row 41. Turn. (36, 40 sts)
Remove SM after completing this row. Row height at this point should be 20″. If it is not, don’t fret! Refer to the section ‘Adjusting the Size of Your Beanie & Slouch’ above, for a quick adjustment without having to frog your entire hat!
Leave a tail of yarn that is 3 times the length of your hat and fasten off. Continue to the Seam near the end of this blog post.
Progression Photos
The progression photos are of a small swatch I made. Follow the written instructions for the size you’re making. Do not count the stitches in the photos.
Watch the crochet video tutorial, if you need more of a visual than the photos offer.
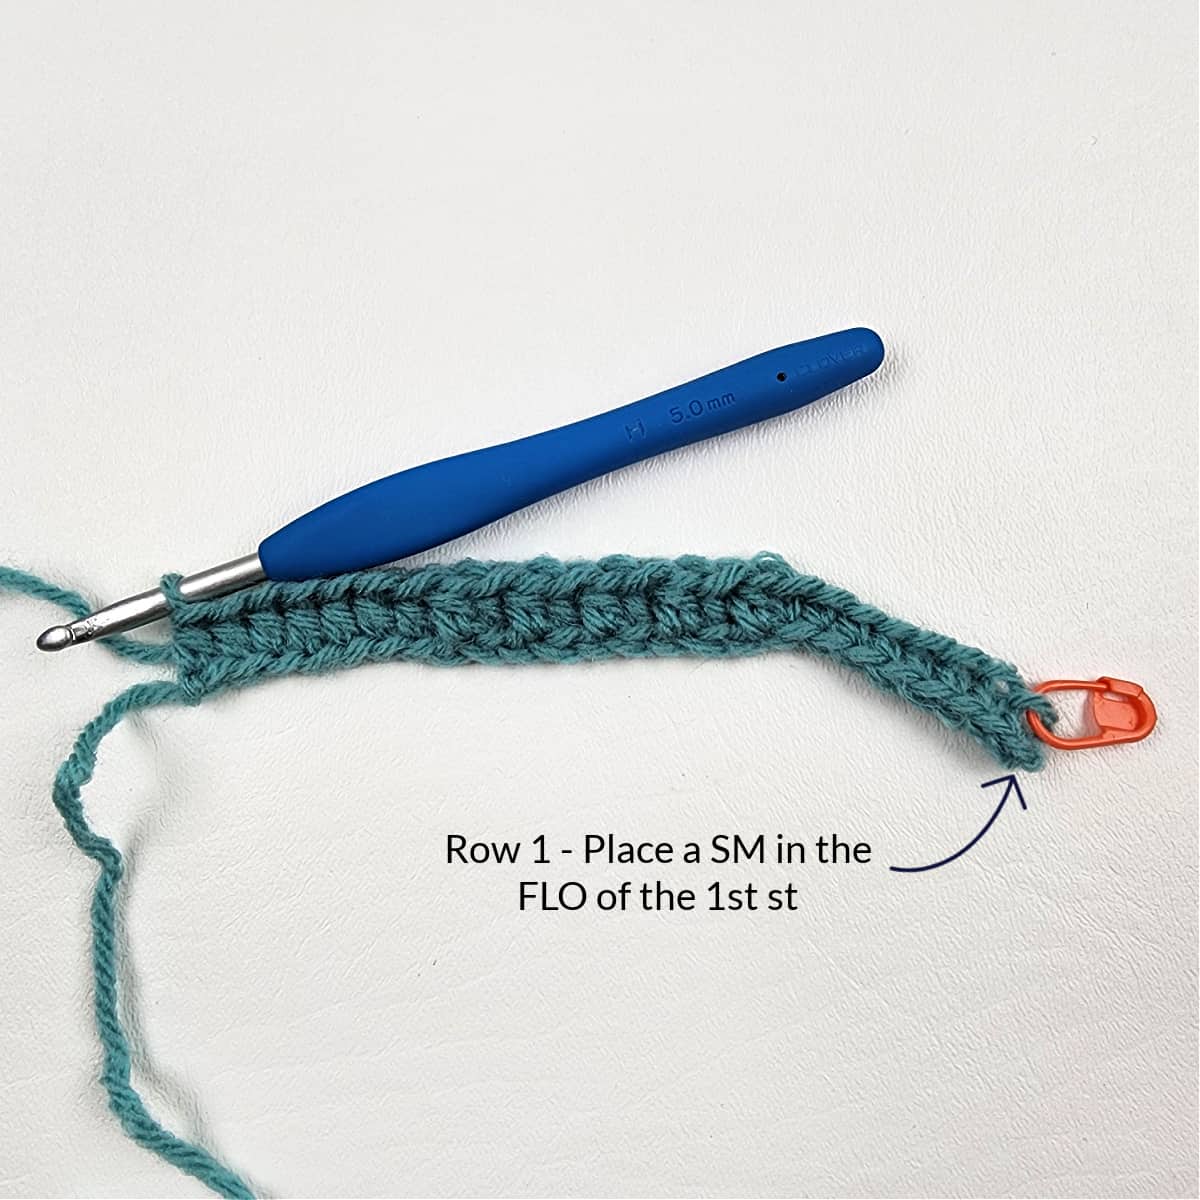
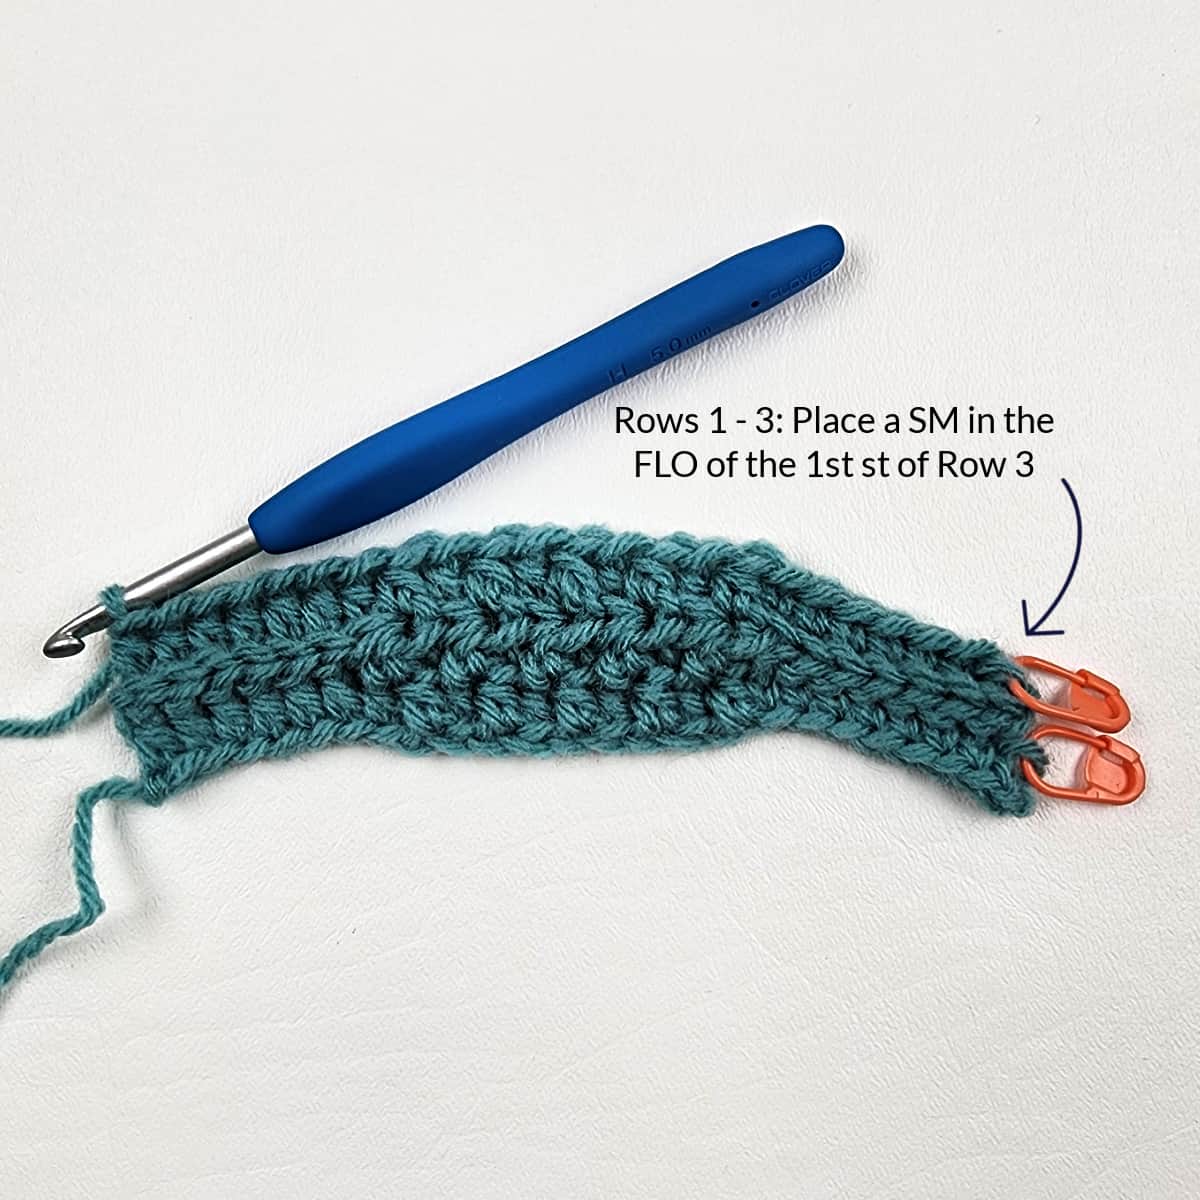
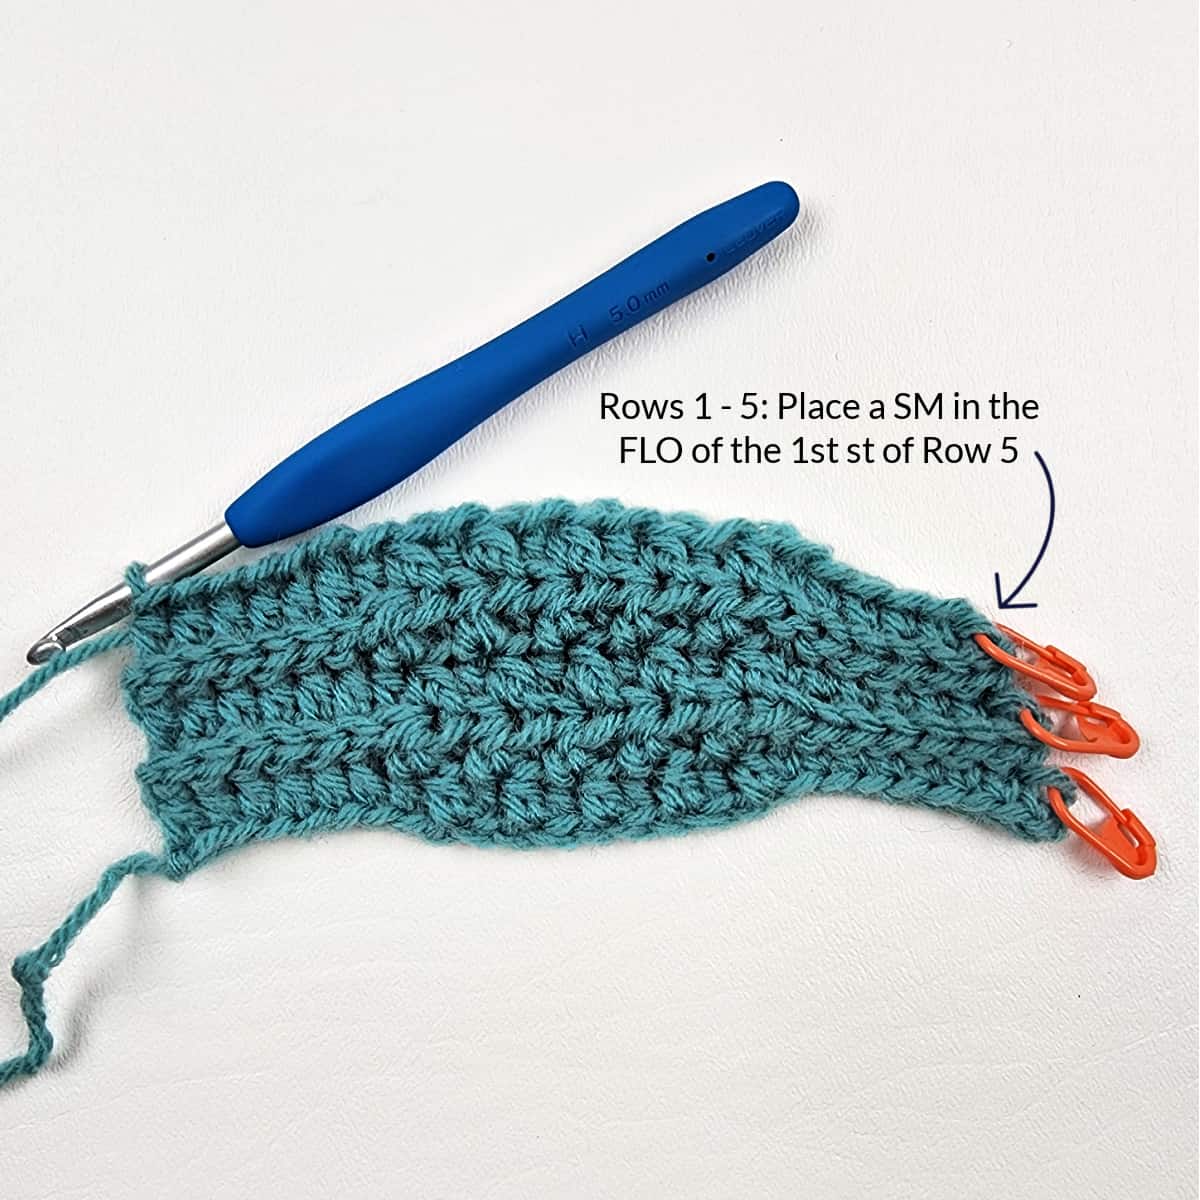
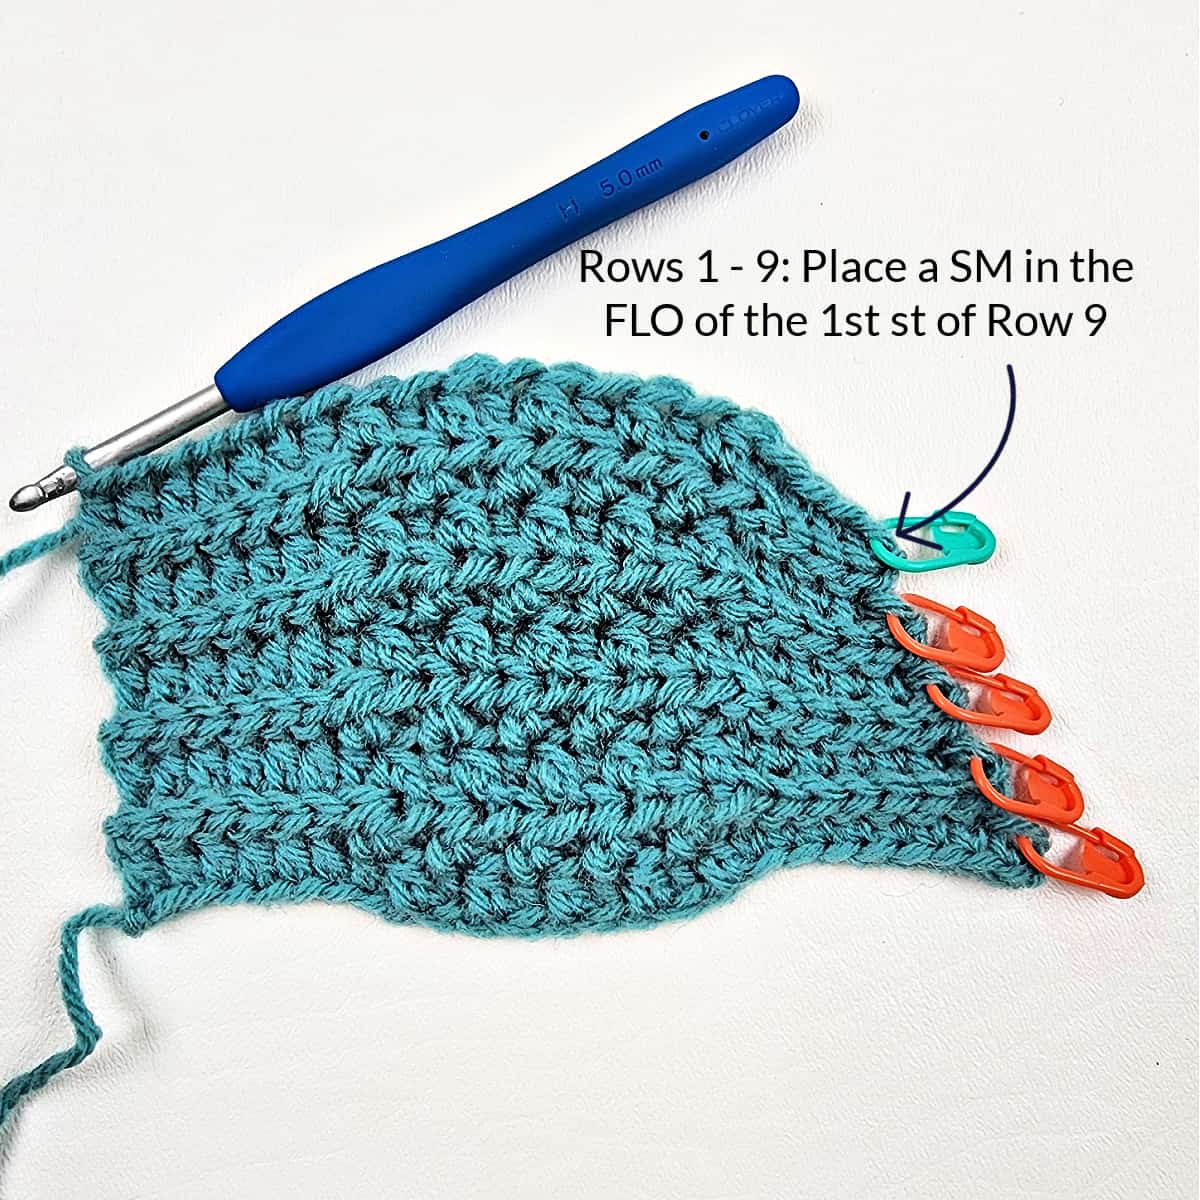
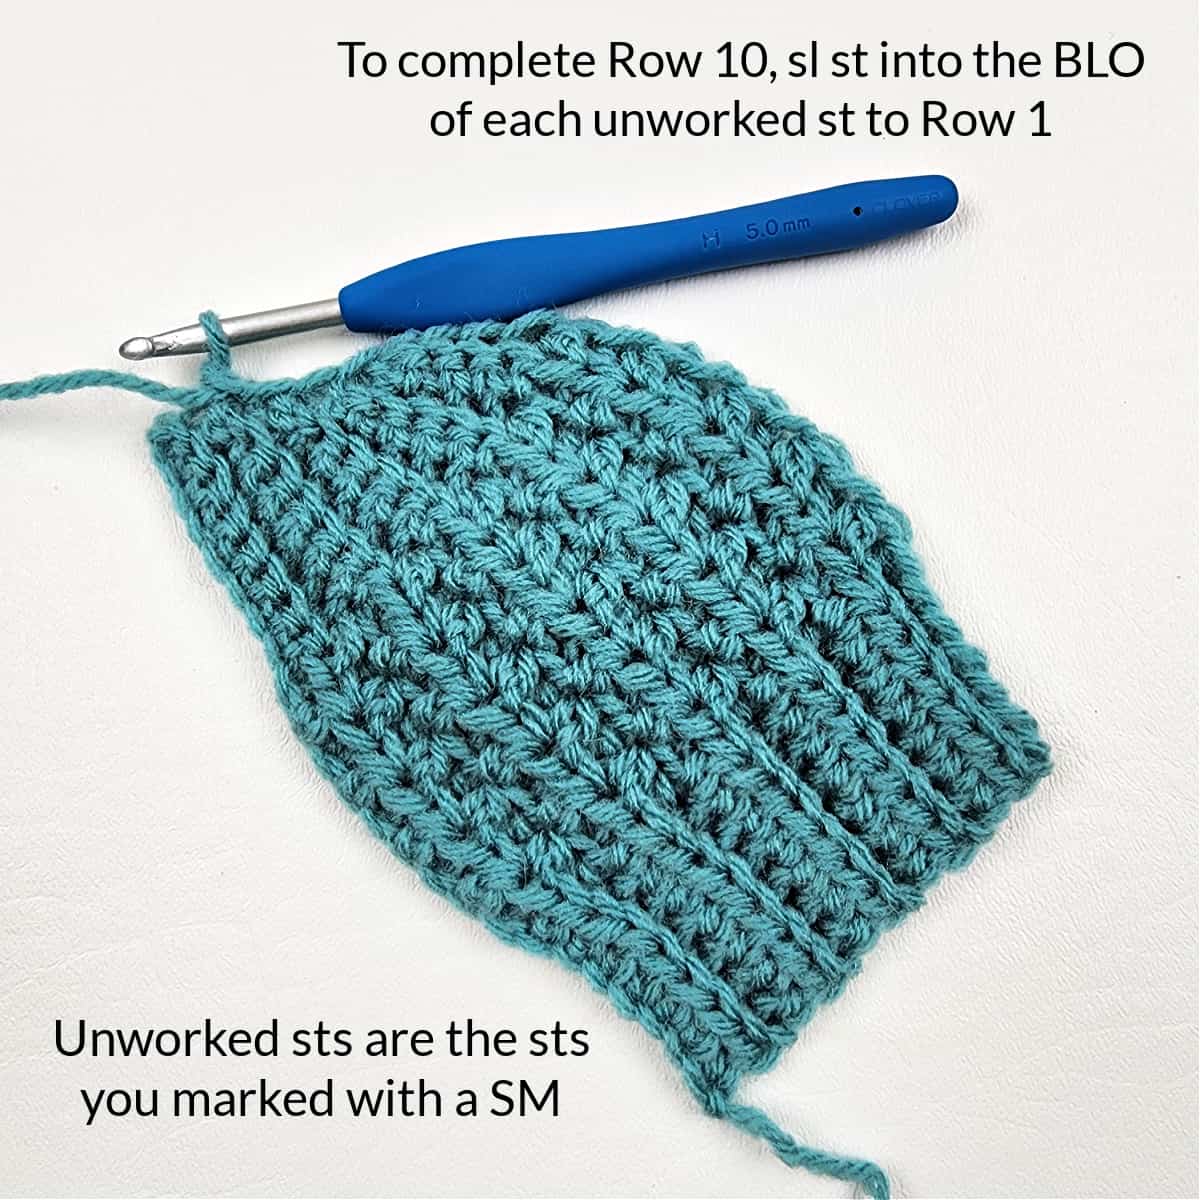
Note: The “unworked” sts are the sts you marked with SM’s in each odd numbered row.
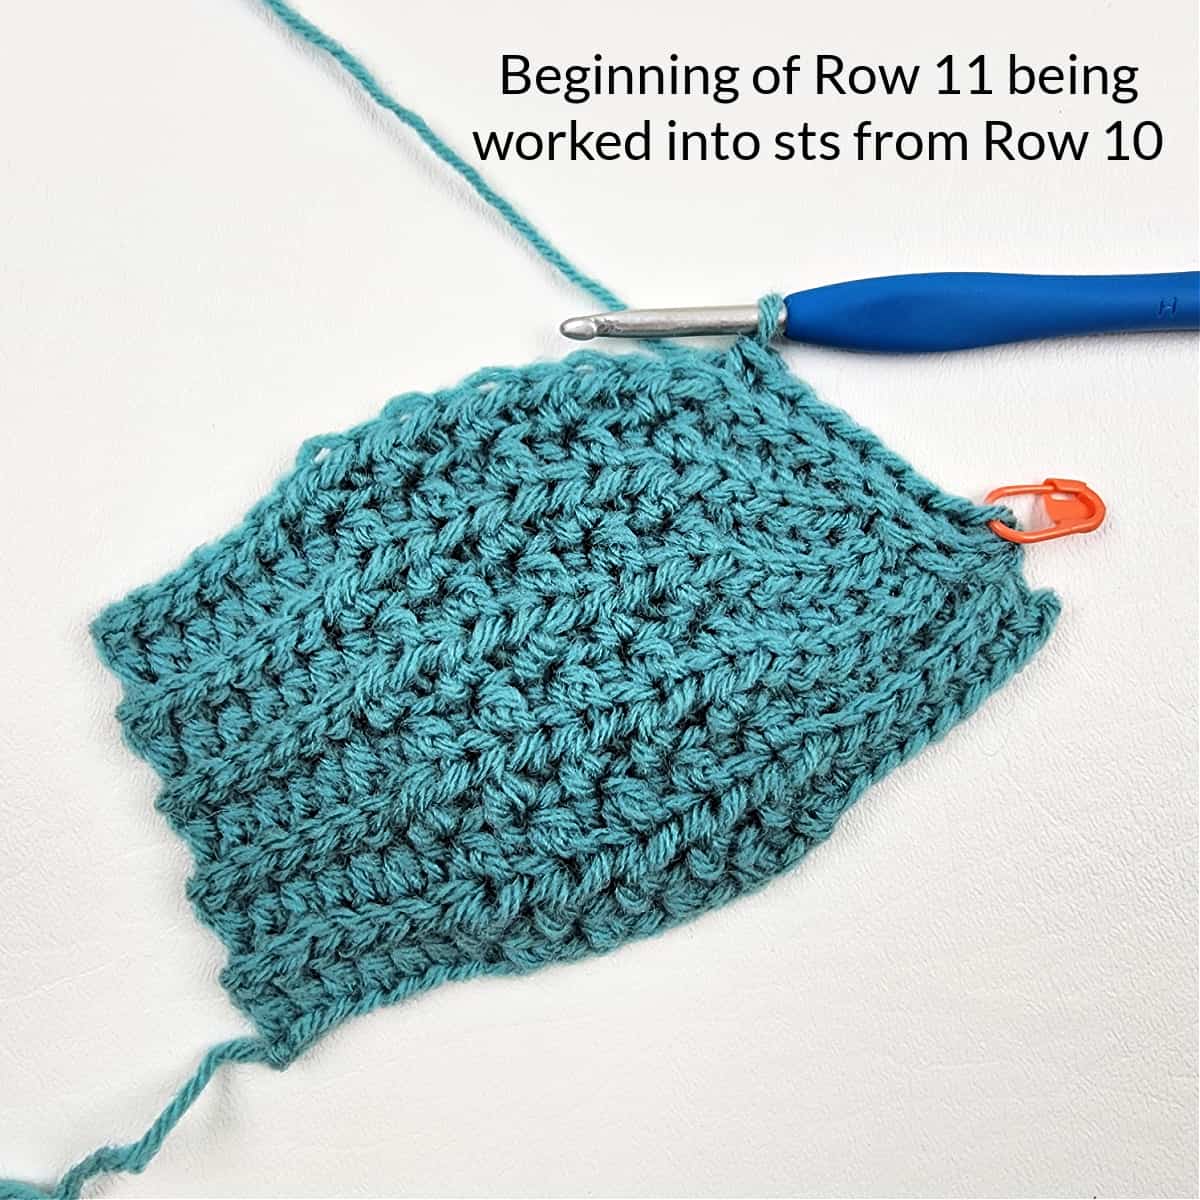

Note: The “unworked” sts are the sts you marked with SM’s in each odd numbered row.
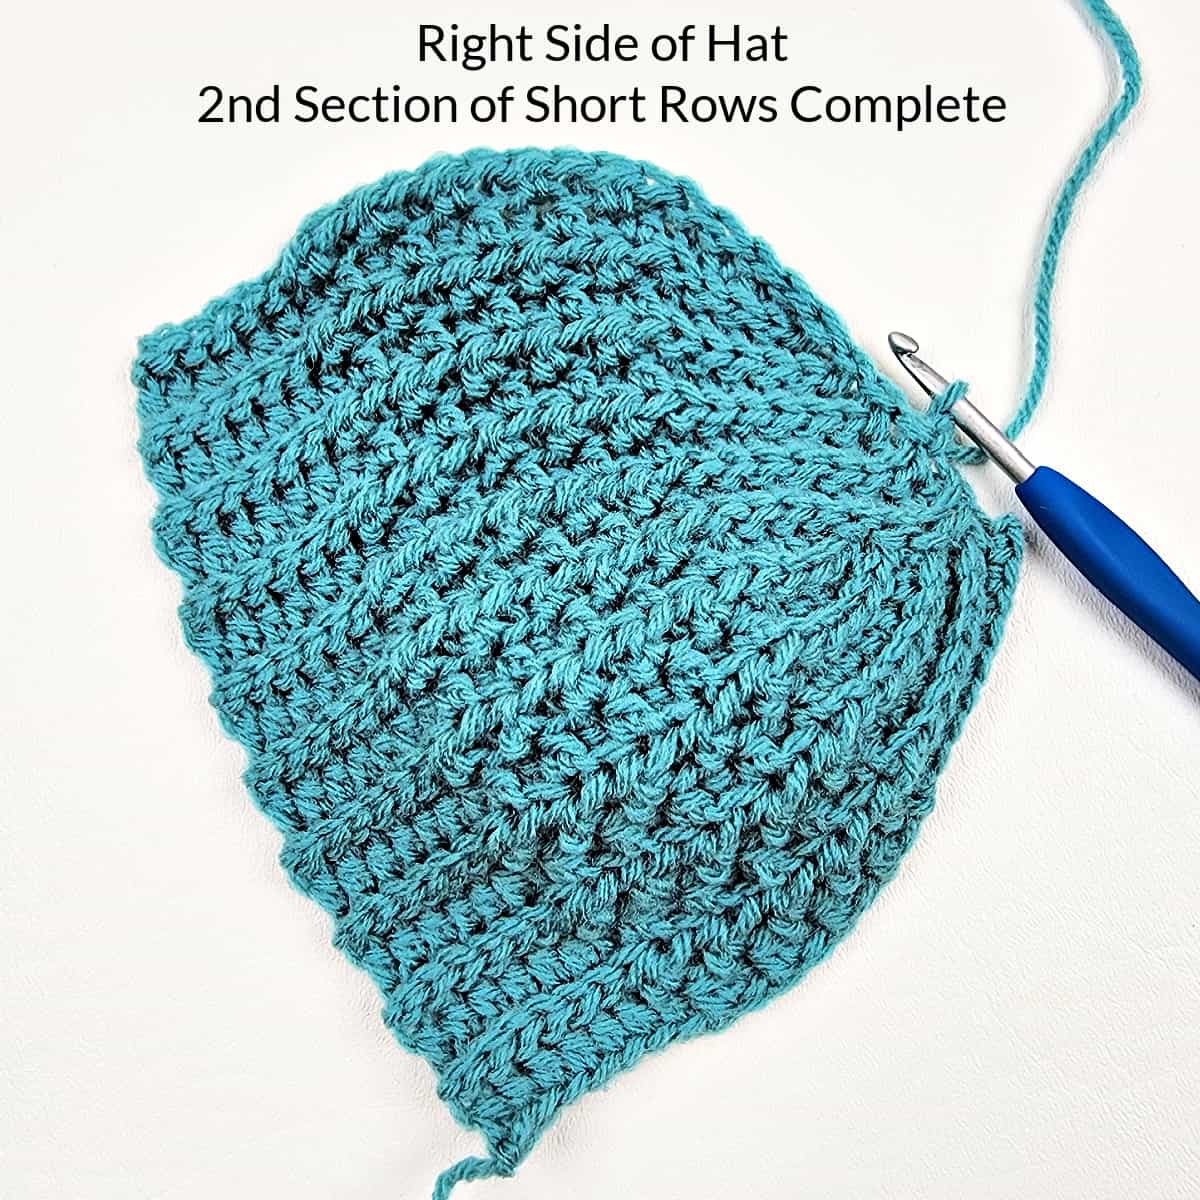
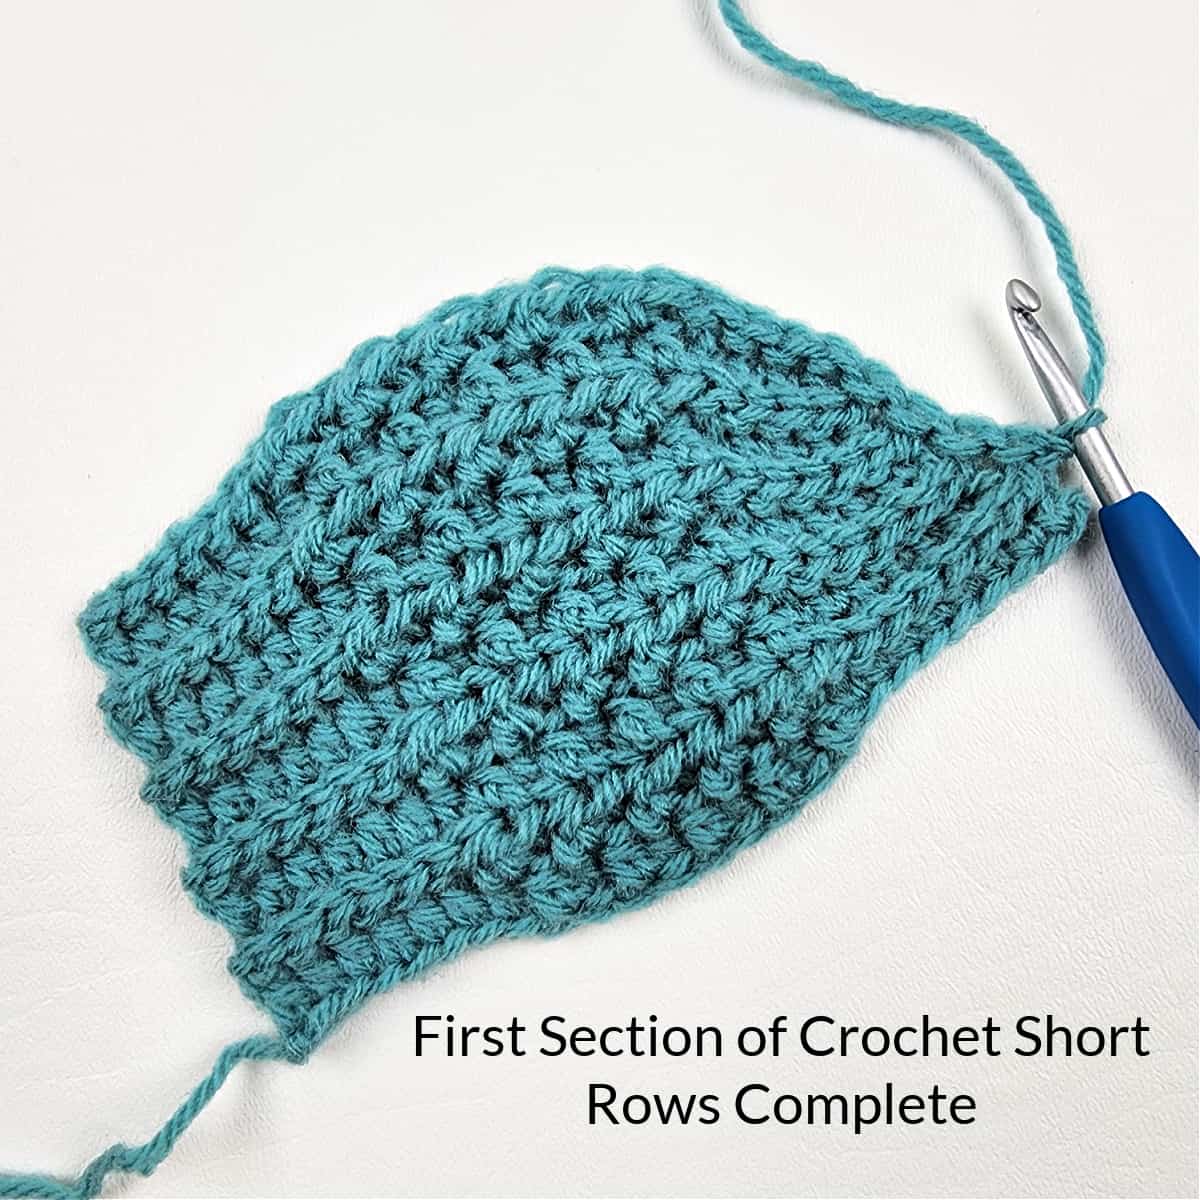
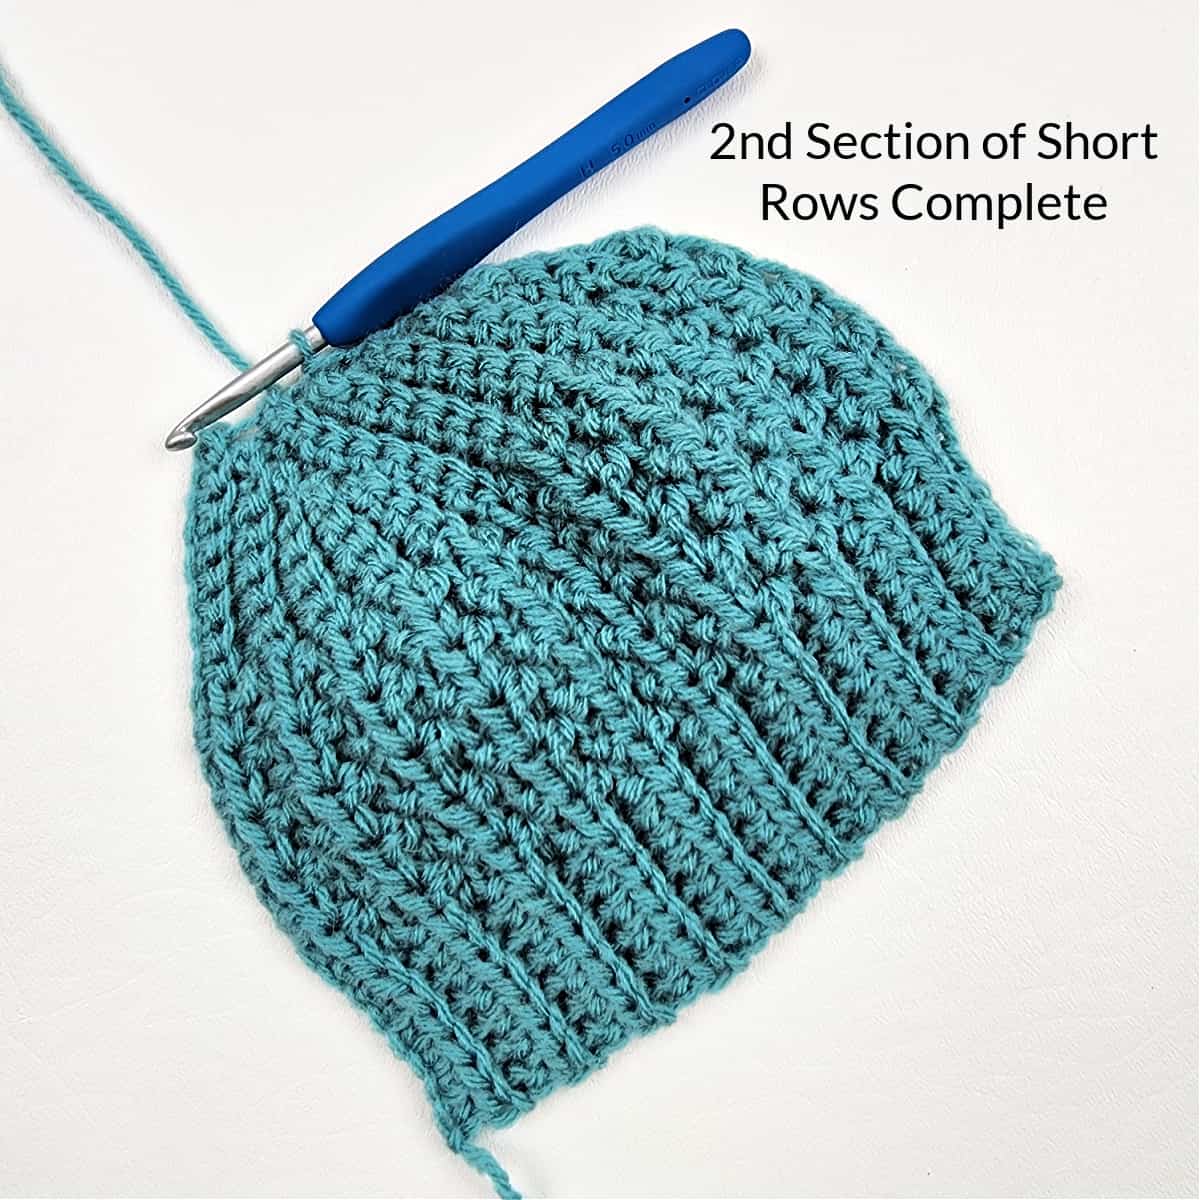
You’ve completed 2 sections of crochet short rows.
Follow the written pattern to complete the number of rows for the size short row crochet hat you’re making, then continue on to the Seam below.
Seam Instructions & Photo Tutorial
The following are the written instructions, but if you need a visual, check out the video tutorial on YouTube, or the photos below.
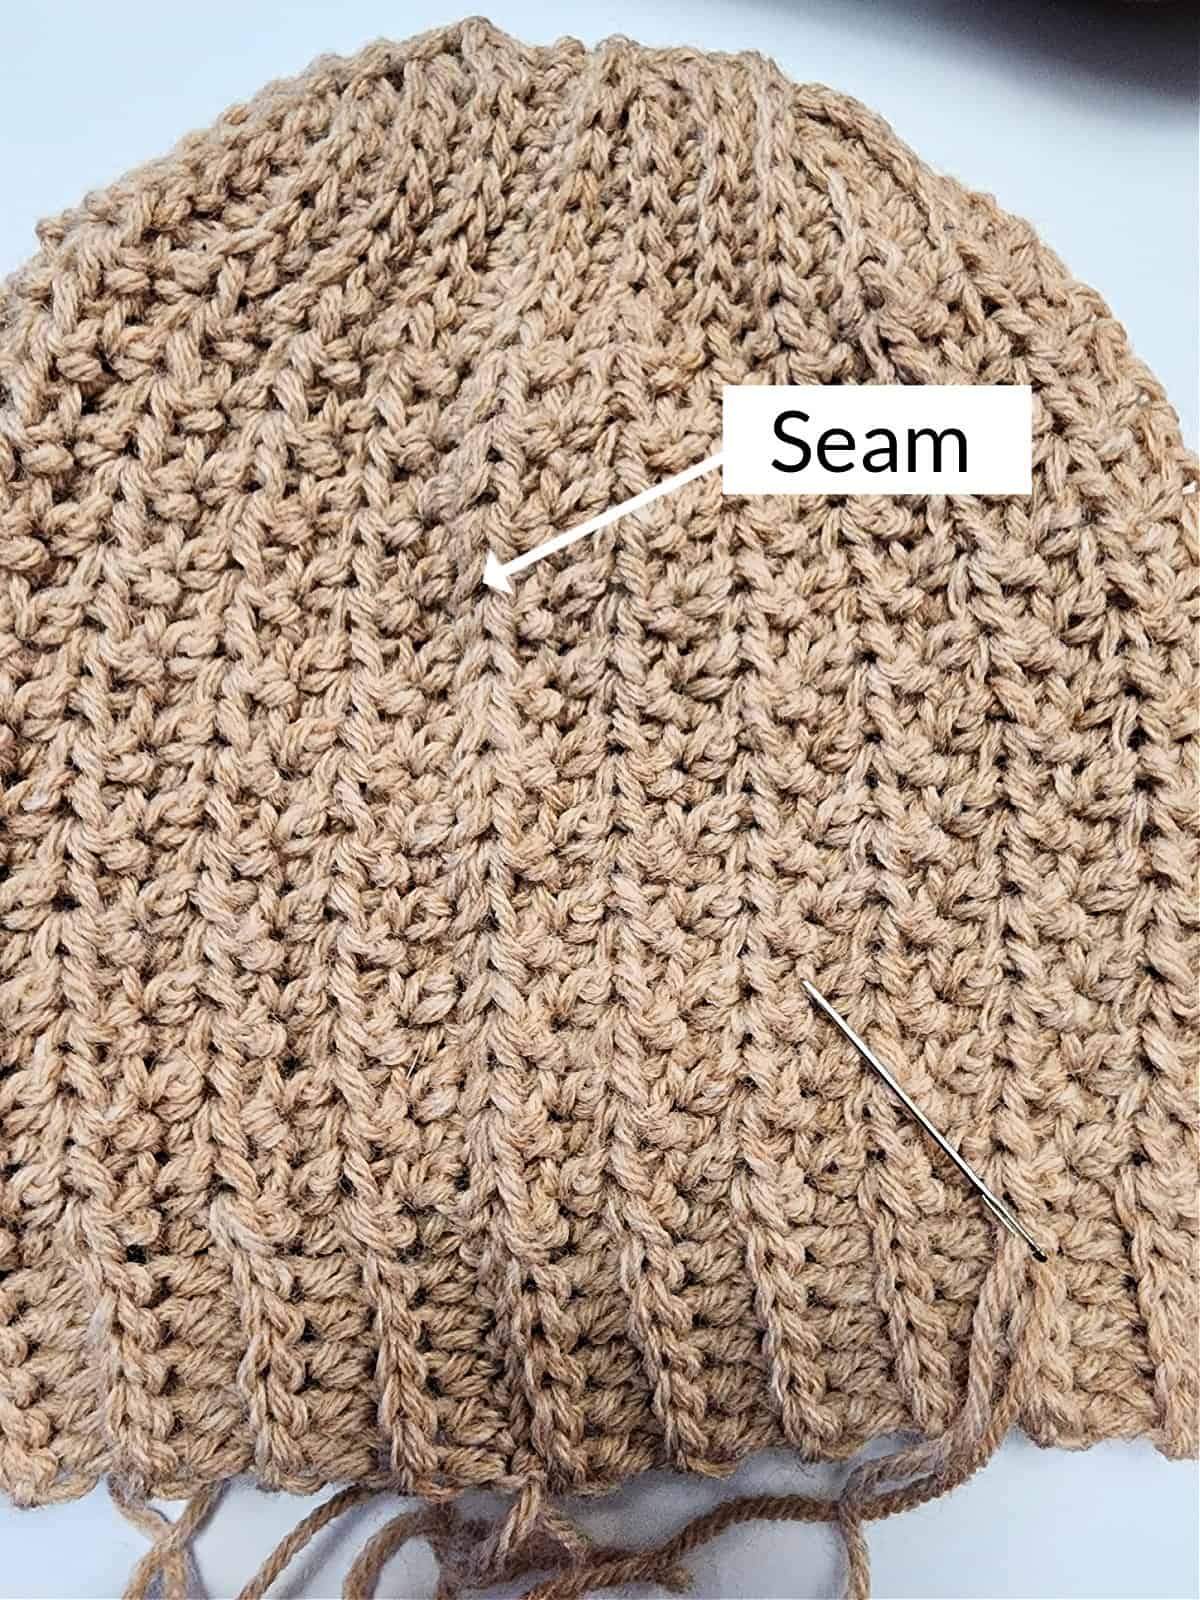
Pro Tip! As you are working your whipstitch seam, seam a few stitches then pull gently on the tail of yarn to make sure the seam is tight and has no loops or bumps. I repeat this every inch or so as I’m whipstitching a seam. It’s much easier to fix a bumpy seam as you’re working than it is to have to fix it after you’ve completed it the entire seam.
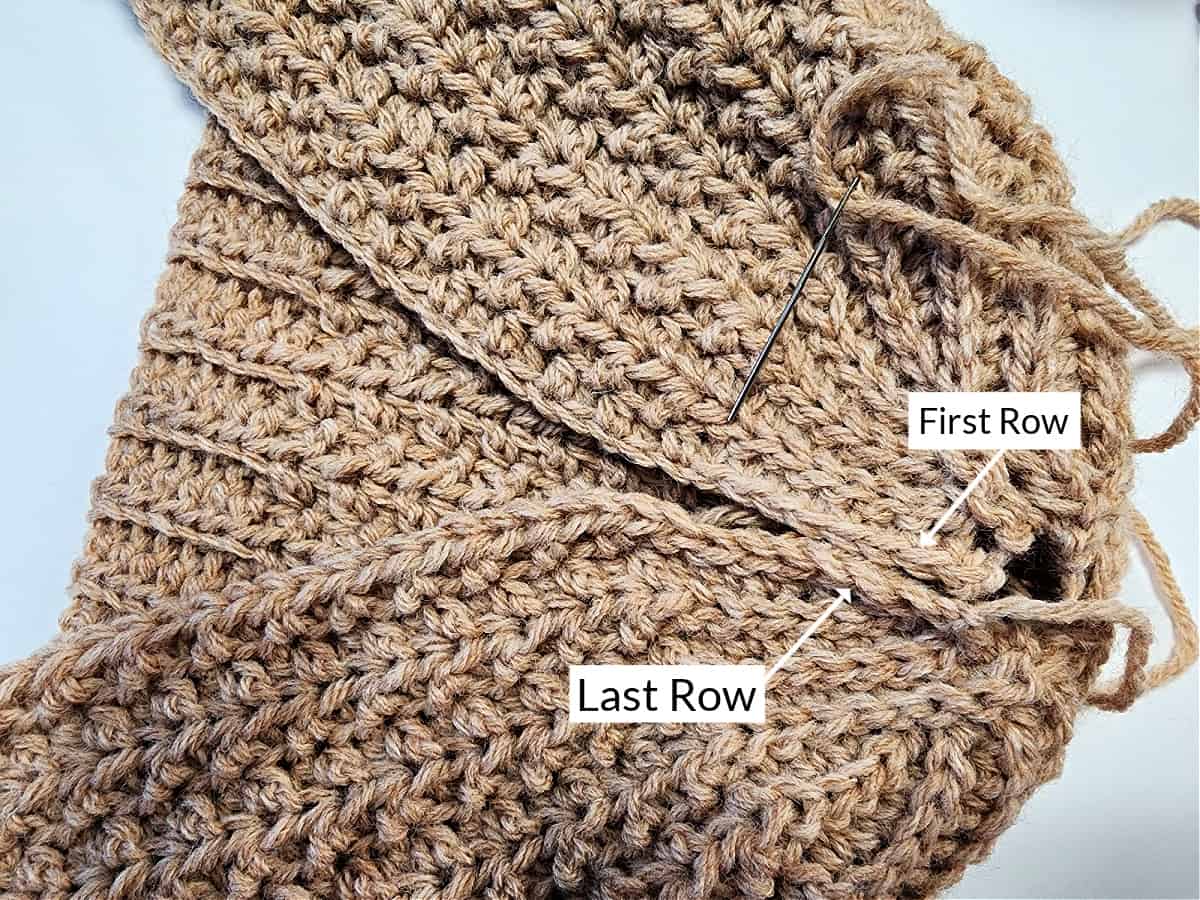
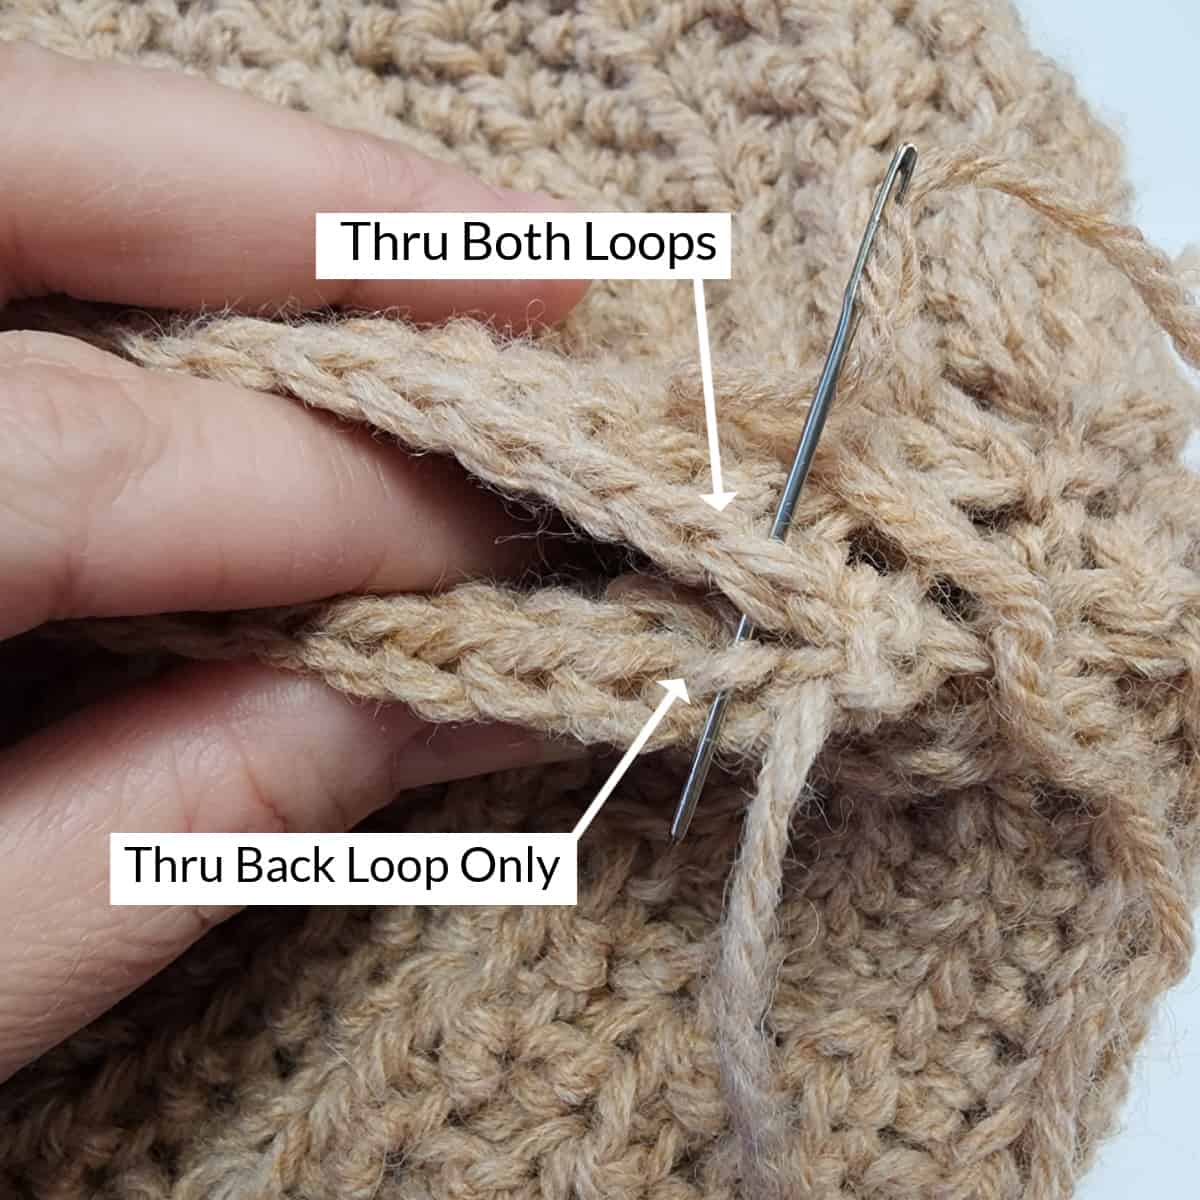
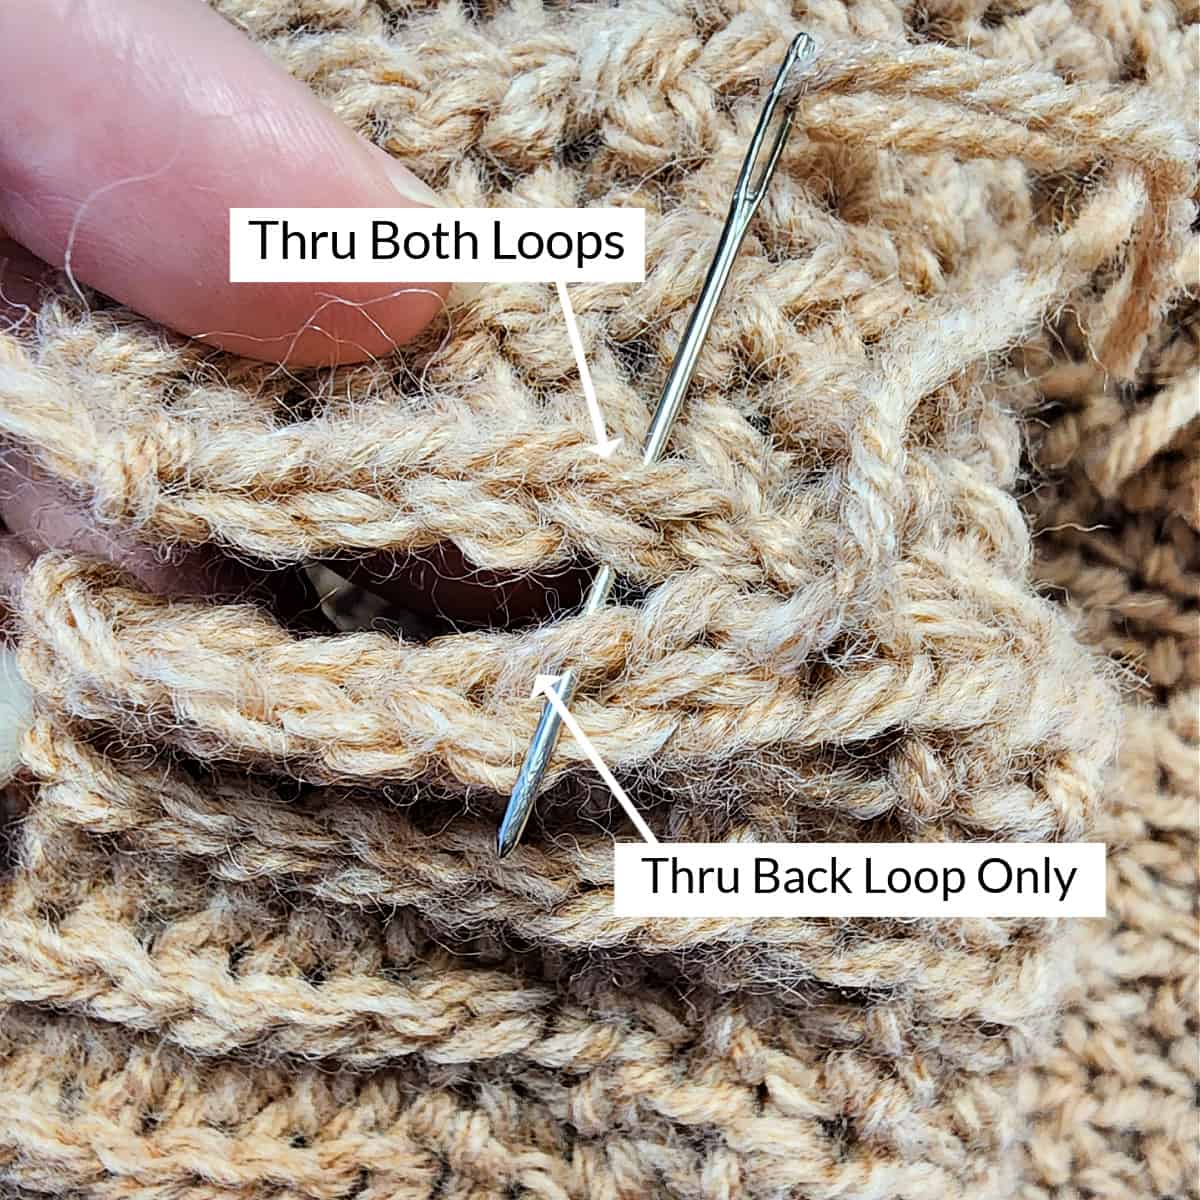
Seam Written Instructions: With the right side of the hat facing out, bring the first row up to meet the last row. Using a yarn needle and tail of yarn, whipstitch the first row to the last row using the following loops:
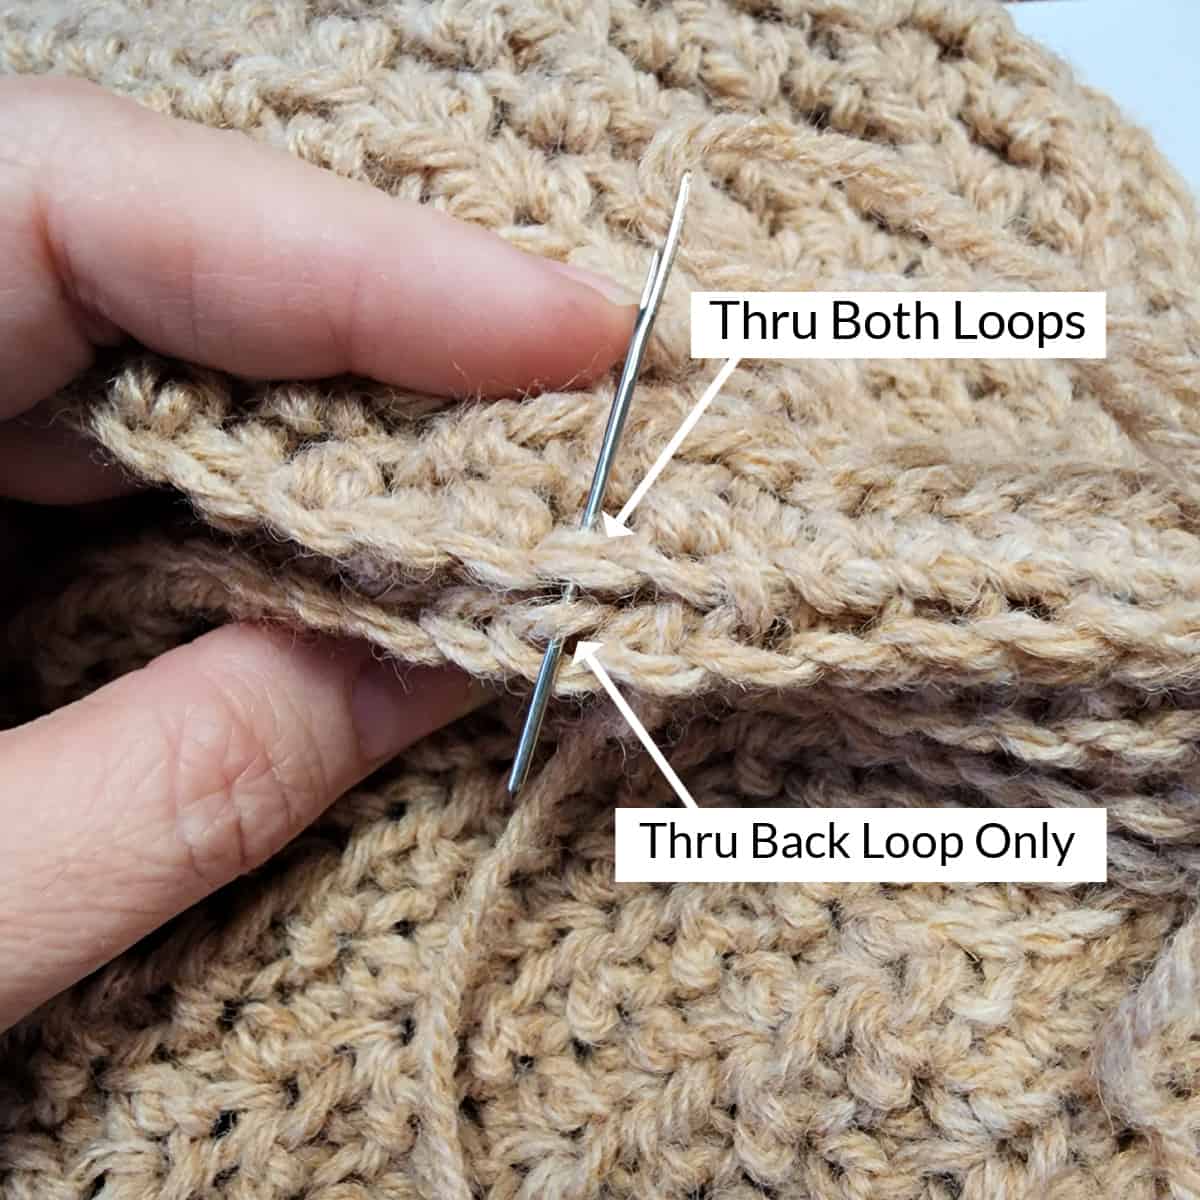
- Crown (first 8 sts): whipstitch BOTH loops of the first row to the BLO of the last row.
- Body of the hat (middle textured section): (whipstitch BOTH loops of the first row (back row in the photos below) to the FLO of the last row (front row in the photos below), then whipstitch BOTH loops of the first row (back row in the photos below) to the BLO of the last row (front row in the photos below) ) repeat across to the Hat Band.
- Hat Band (last 6 hdc): whipstitch BOTH loops of the first row to the BLO of the last row.
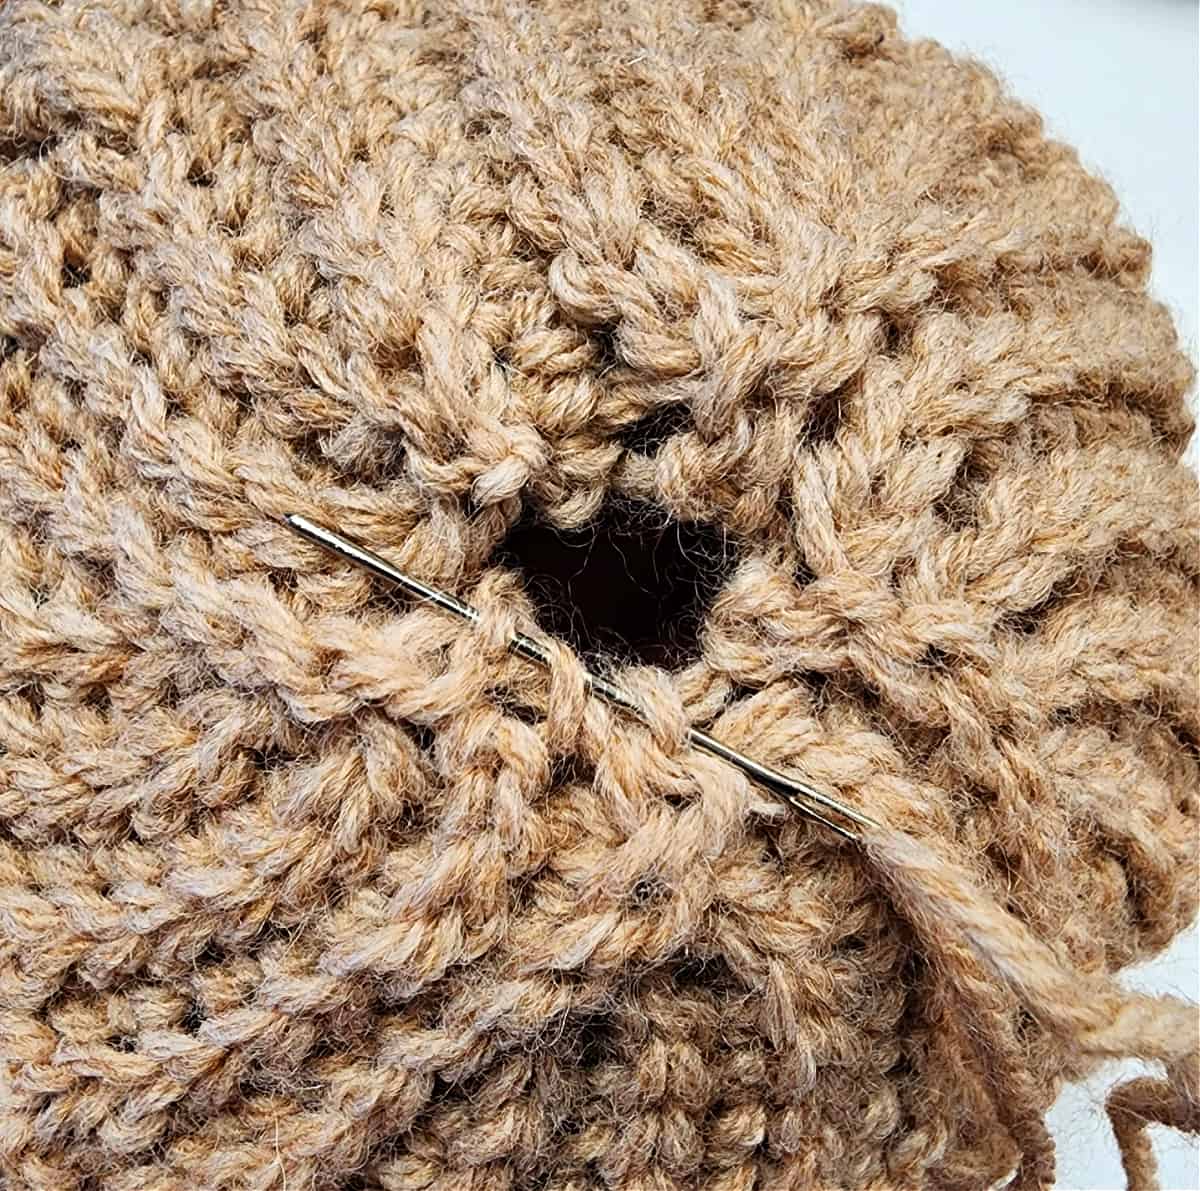
Close Crown Gap: Use a 6-8″ piece of yarn and a yarn needle, weave in and out of the stitches in the crown opening, pull yarn ends to tighten and close the gap. Weave in ends.
Seam Photo Tutorial
Note: You will be using different loops in each section of the hat, for the whipstitch seam. For a nearly invisible seam, make sure to seam each section with the correct rows.
Continue to the next set of photos to whipstitch the 8 sts in the Crown.

Crown (first 8 sts): whipstitch BOTH loops of the first row (back row in photo above) to the BLO of the last row (front row in photo above).
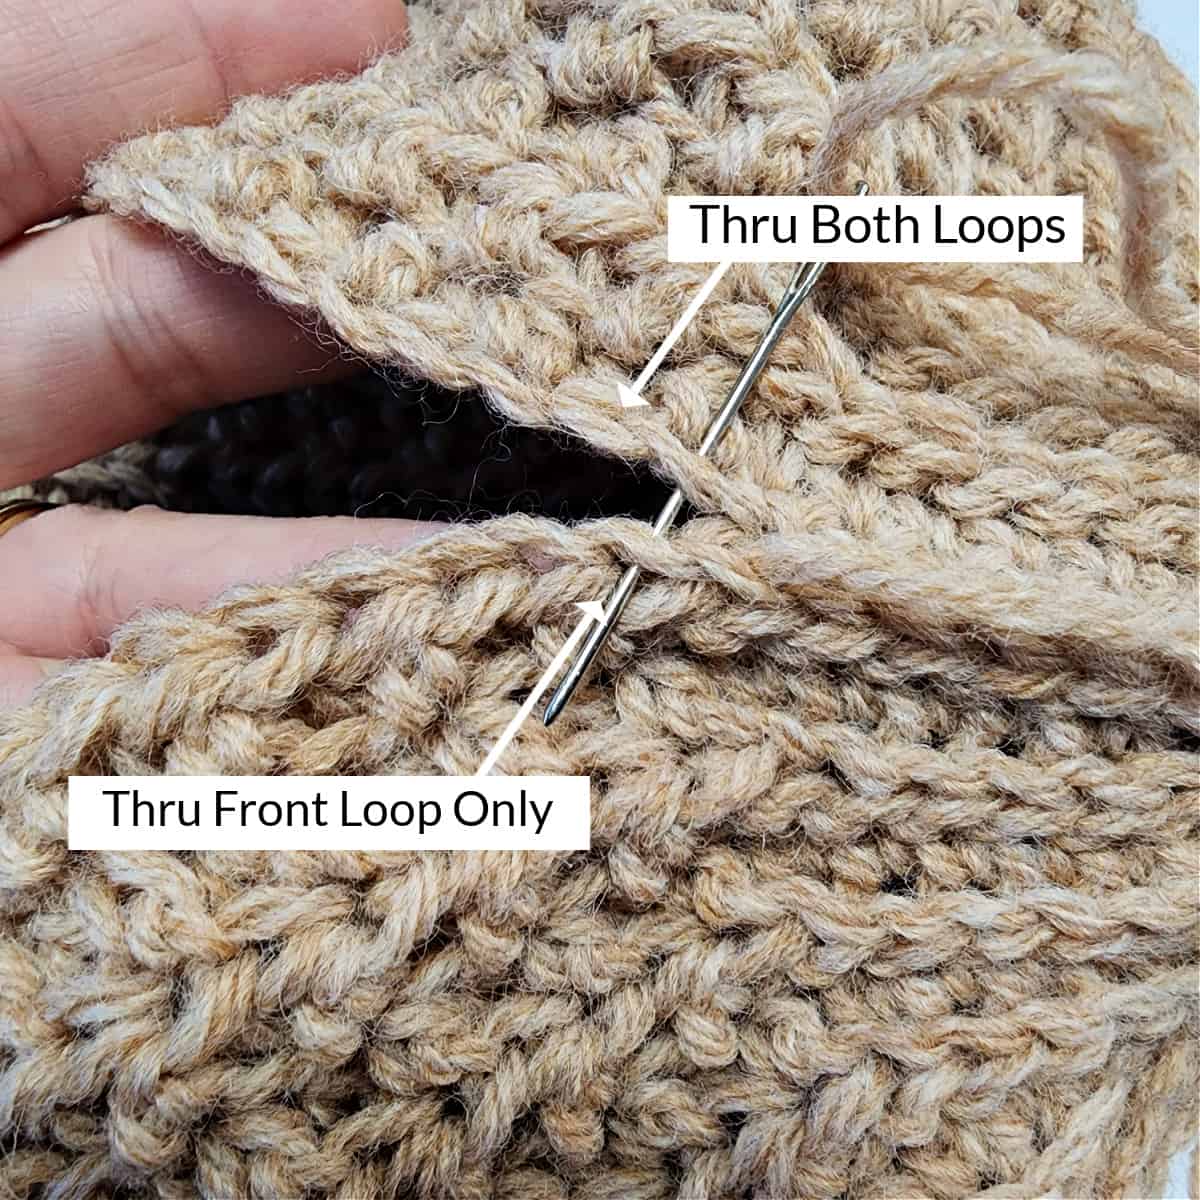
Body of the hat (middle textured section): First, whipstitch BOTH loops of the first row (back row in photo) to the FLO of the last row (front row in photo).
Next, whipstitch BOTH loops of the first row (back row in the photo) to the BLO of the last row (front row in the photo).
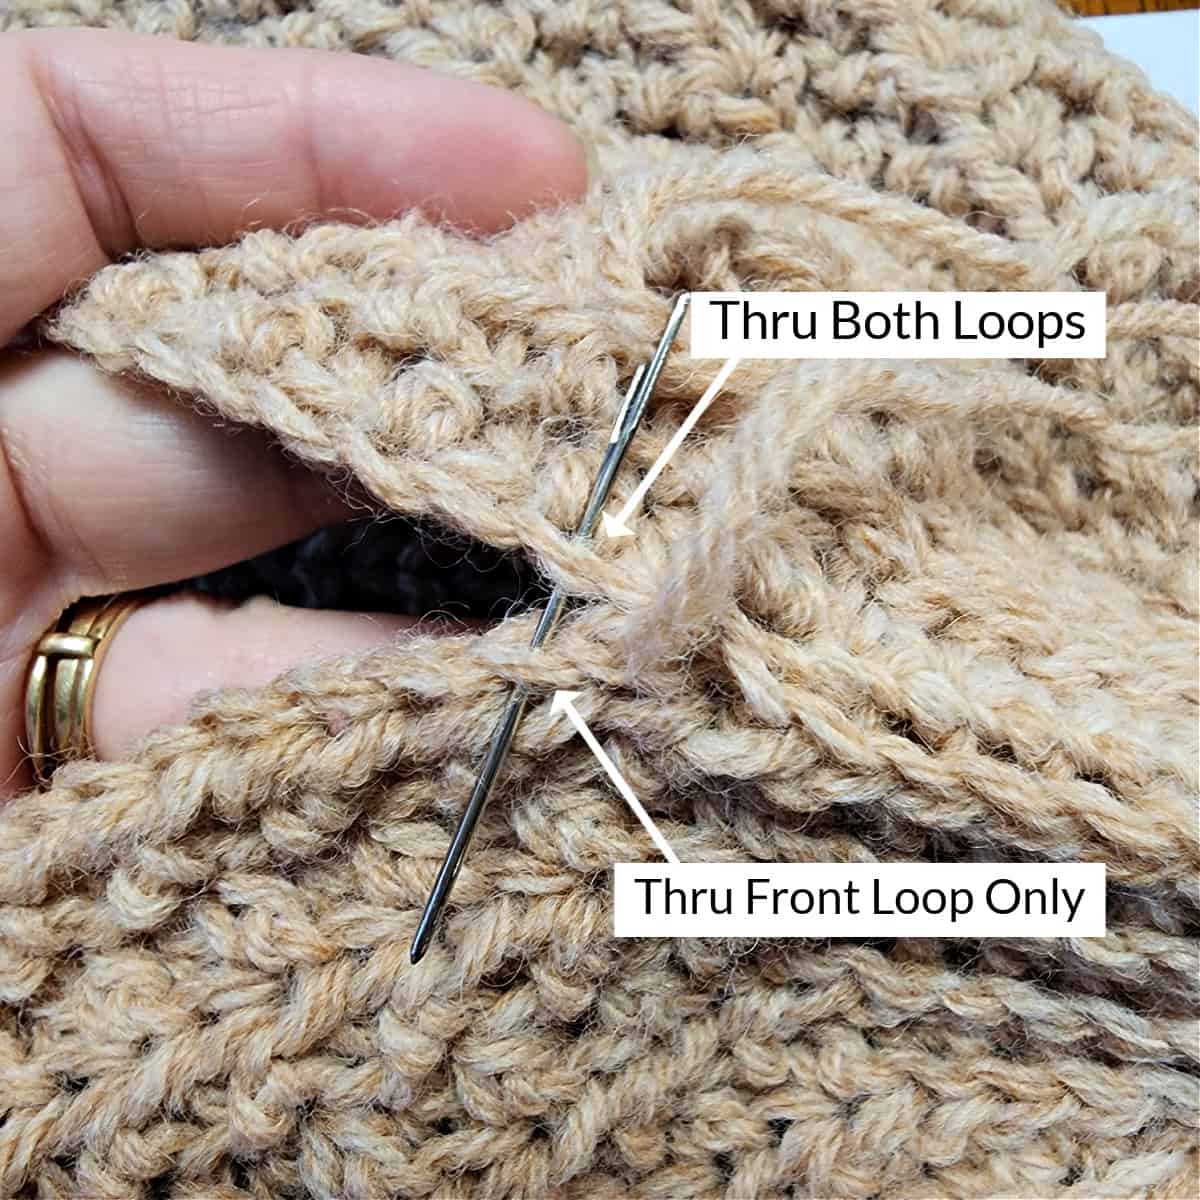
Whipstitch BOTH loops to FLO (shown above), then BOTH loops to BLO.
Add Your Own Finishing Touches!
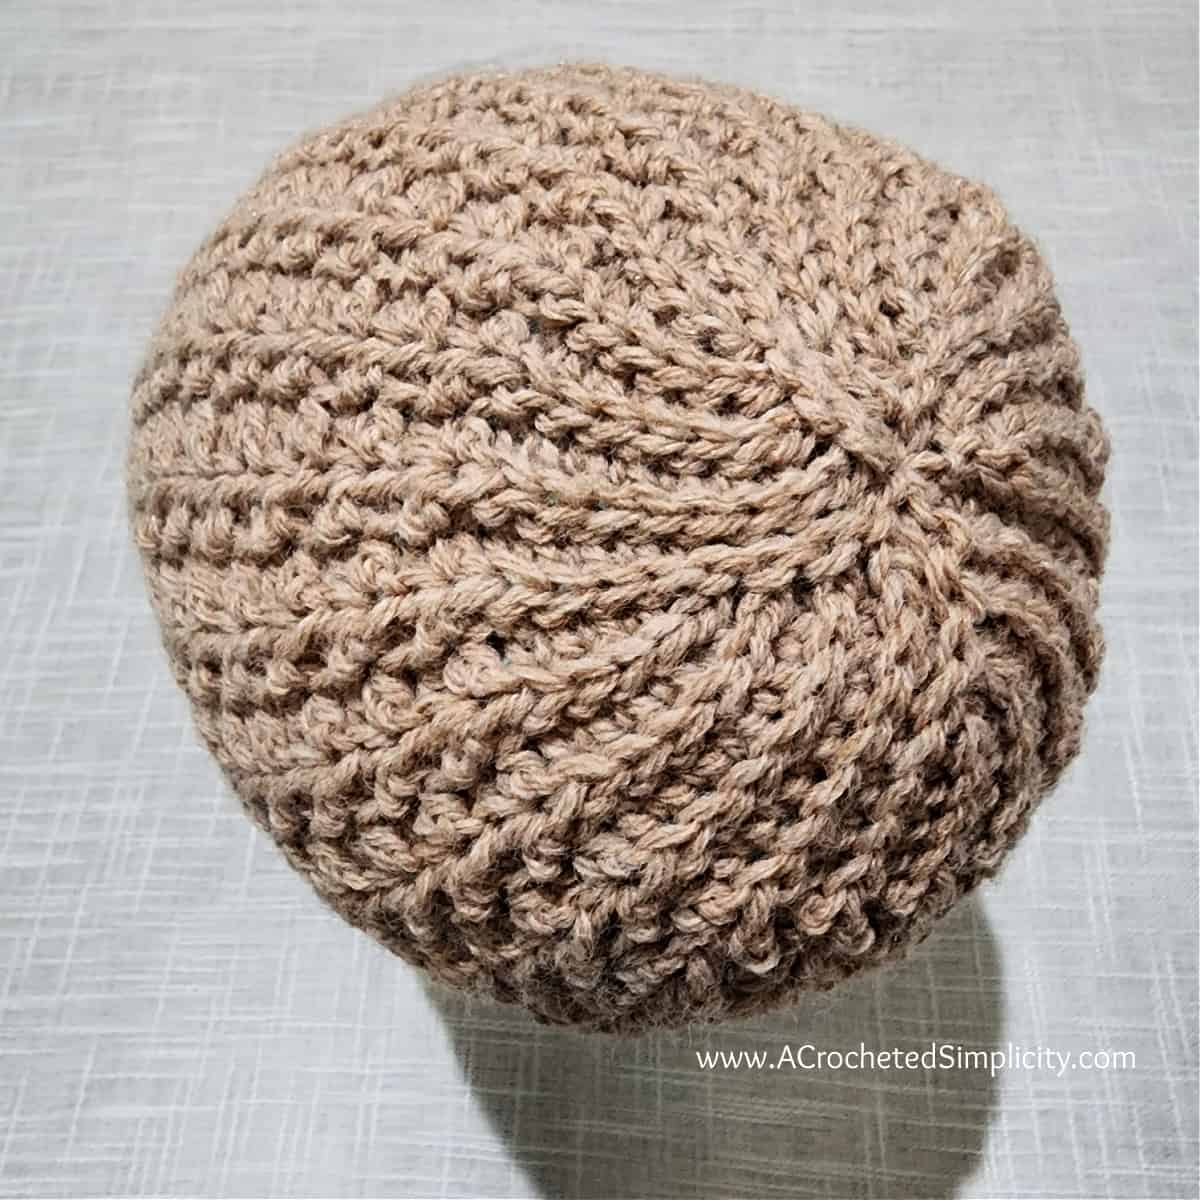
Now that you’ve completed your Easy Short Row Crochet Beanie or Slouch, it’s time to add your own finishing touches using one of the following fun options!
I MADE IT! NOW WHAT?
Pin this post!: Save this easy short row crochet hat pattern to your Pinterest boards so that you can come back and make it again.
Leave a comment below: We love to hear your feedback.
Share Your Finished Projects on Facebook or Instagram: I love to see your finished projects! Share with us on social media and tag me @acrochetedsimplicity or use the hashtag #ACrochetedSimplicity so I can find your posts.
JOIN US IN THE FACEBOOK COMMUNITY GROUP!
Come share your finished projects with us in the A Crocheted Simplicity Crochet Community Group on Facebook. Join us for fun community events such as crochet alongs, join in on crochet conversations, ask questions, get advice, and share your love for crochet!

More Crochet Patterns for Short Row Crochet Hats I Think You’ll Love
More Knit Look Crochet Patterns
Are you looking for more crochet patterns that use knit-look crochet stitches and techniques? We have several free crochet patterns for men and women, right here on our blog.
Browse the variety of free knit-look crochet patterns we have on our blog that use knit-look stitches.
I’ve tried and ripped out three attempts of this written pattern. I want it to work so much! Something is off on the ends. I can’t get passed row nine. Both ends are uneven. So frustrating. Bummed.
Hi Sara,
Did you scroll down in the blog post to the Progression Photos? I’ve added row-by-row photos and for some rows, step-by-step.
As for your comment about the ends being uneven, you’re not crocheting a rectangle. Each section will resemble more of a wedge / pie shape.
If you need additional help after looking over the photos, please let me know. If you are able to e-mail me a photo, I am happy to take a look and see what’s going on. [email protected]
Let me know if I can help,
Jennifer
I love this hat pattern. The short rows make it fit so much better.
This beanie is so lovely. I really want to give it a go with some variegated yarn!
I want to try this technique as looks like it will make such a nice crown on the hat. I appreciaate all the photos you’ve included.
I always associated short rows with knitting! Looking forward to learning crochet shaping through this technique! Happy New Year!