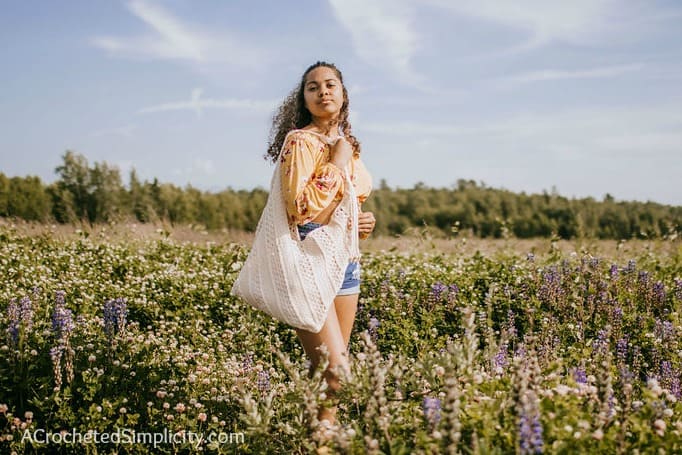
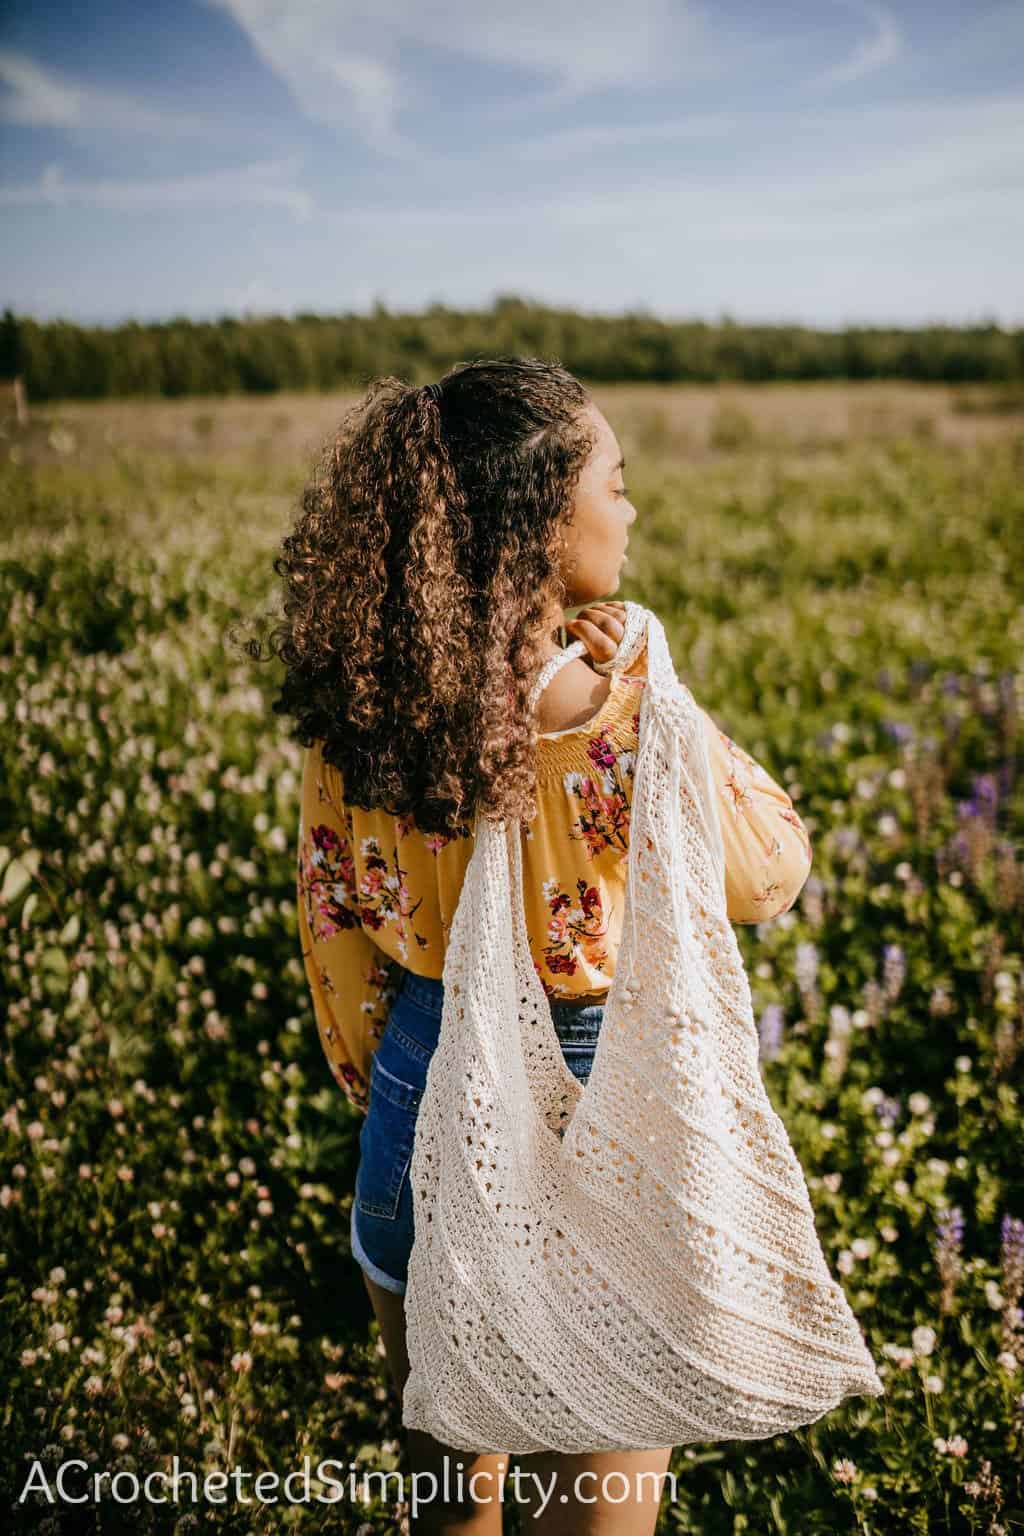
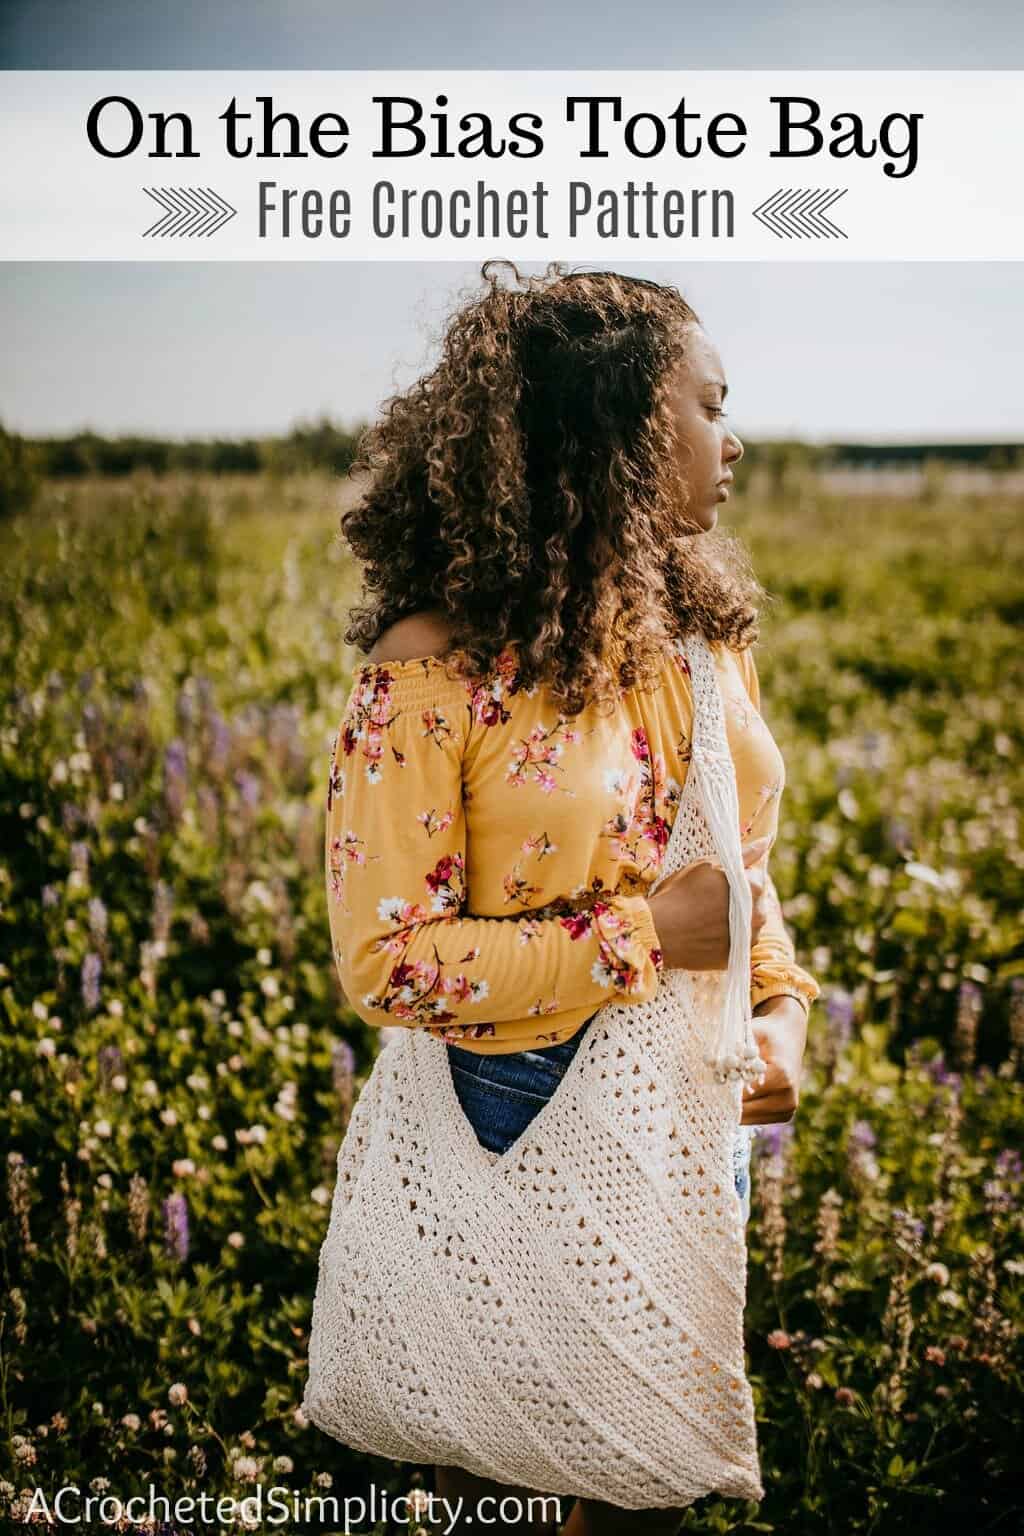
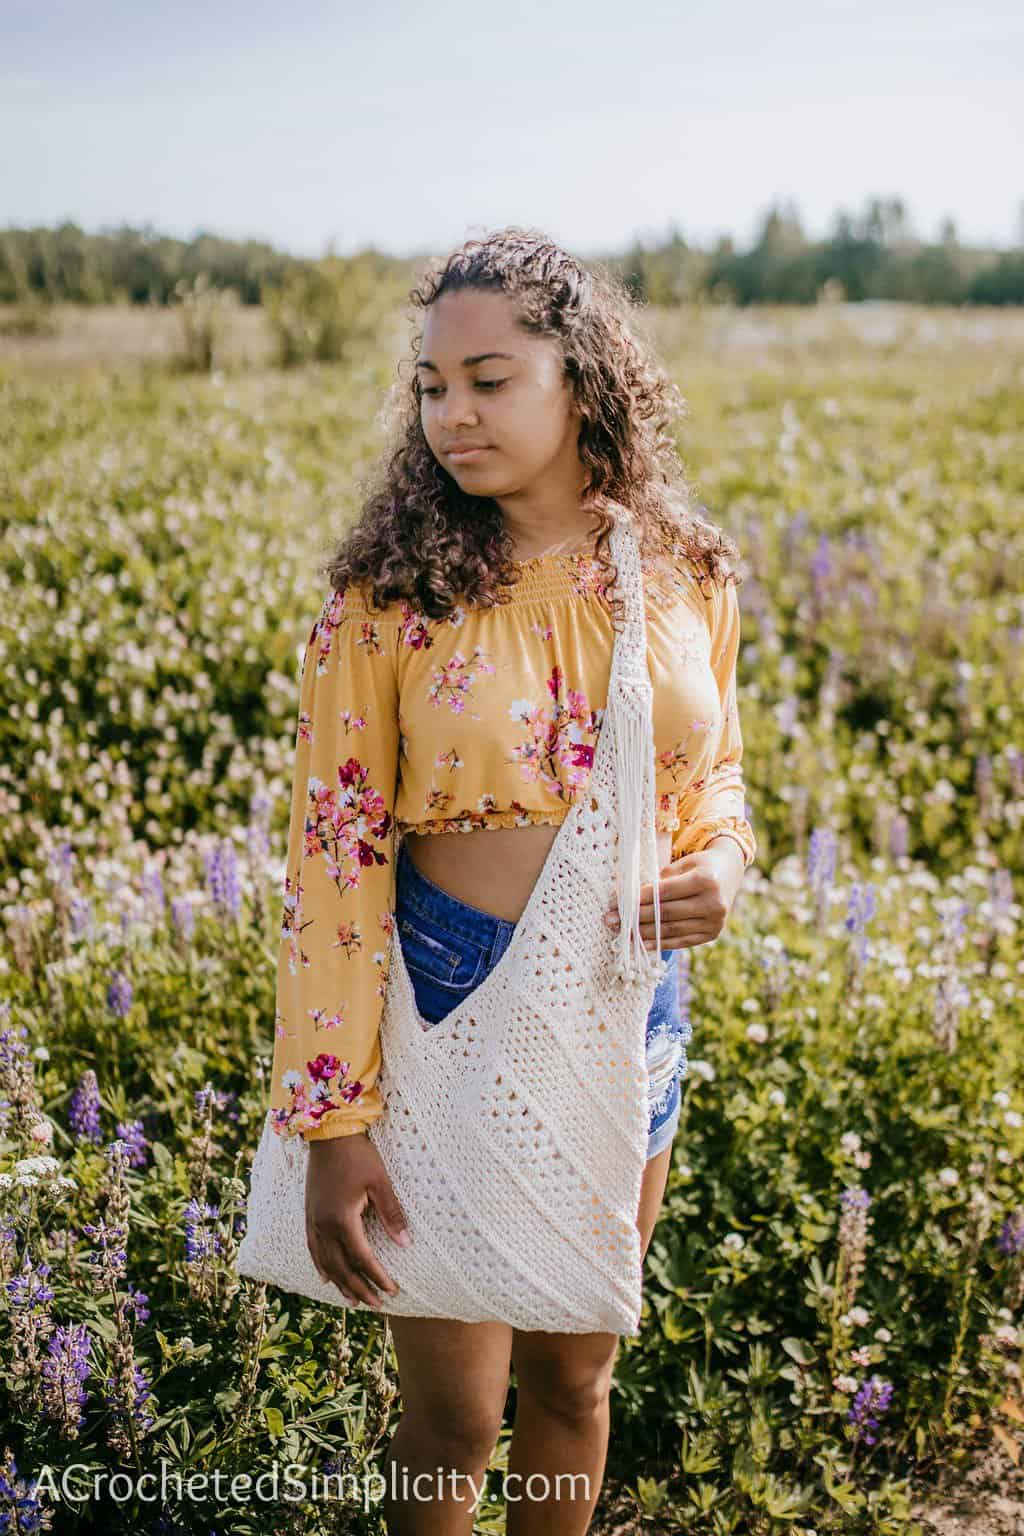
On The Bias Crochet Tote Bag
Learn to make a crochet tote bag that’s big enough to carry all your summer essentials and then some!
Whether you’re taking a short day trip, or an overnight trip, the On The Bias Crochet Tote Bag is roomy enough to hold all of your essentials for a day of fun!
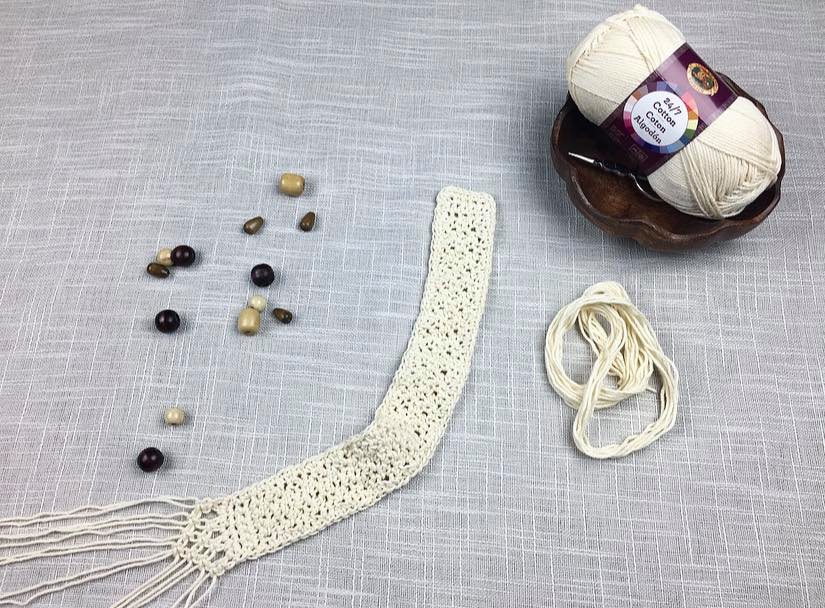
You’ll find the crochet tote bag pattern is free below, or an ad-free print friendly PDF (including a all photo tutorials) on Ravelry, or on Etsy (aff).
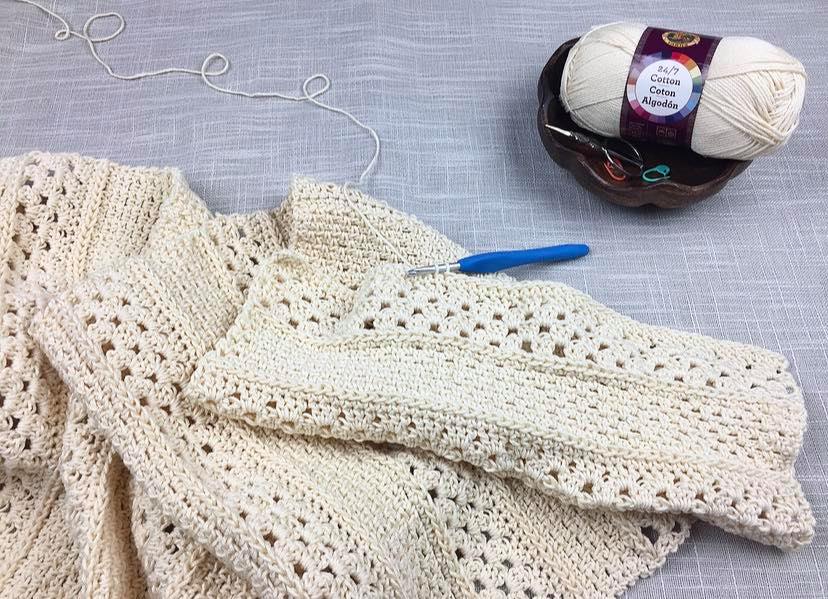
I prefer to use 100% cotton yarns for my crocheted bags all year round. I love the stitch definition that comes along with cotton yarn and I especially love the mercerization of Lion Brand Yarns 24/7 cotton! Crochet bags are also very durable when made with cotton yarn so I try not to categorize my yarns by season.
Origami Bags
If you’ve ever gotten lost on Pinterest, I’m sure you’ve seen many varieties of Azuma Bukuro bags, aka Japanese Bento Bags. They’re a popular style of Japanese market bags, sometimes referred to as origami bags because of the way you fold the fabric to form the bag.
Whether you crochet, knit, or sew, I’ve seen oodles of azuma bukuro bags in all 3 mediums, but each is different than the next depending on the stitch patterns and yarns used. Even though the mediums may differ greatly, the construction is the same. To make your bag, you simply need a rectangle that is 3 times longer than it is wide. Easy peasy!
Related: I designed my first Azuma Bukuro crochet bag pattern a couple years ago. So, if you’re looking for the same style bag, but a little smaller, you’ll love this one.
Yarn & Yarn Substitutions
Cotton has always been my go-to fiber for crochet bag patterns and Lion Brand 24/7 was the perfect choice for this project. Available in 24 incredible colors, Lion Brand 24/7 cotton yarn is a worsted-weight, mercerized cotton yarn with a beautiful sheen and fantastic stitch definition. You’re sure to find a color combination that fits your taste.
If you choose to use a yarn with a different fiber content, such as an acrylic like Lion Brand Vanna’s Choice, you can certainly do so. Just remember that the acrylic will be stretchier so I would suggest making the strap a tad bit shorter to compensate for that.
Skills & Techniques You’ll Use
This crochet tote bag pattern alternates sections of the crochet granny stitch and linen stitch to make the large rectangle that forms the bag.
Crochet skills you’ll practice:
- Crochet Granny Stitch
- Alternate Ch-3
- Linen Stitch (aka the moss stitch)
- How to Make an Origami Bag
- Lark’s Head Knot – step-by-step photo tutorial below
- Square Knot – step-by-step photo tutorial below
On the Bias Crochet Tote Bag – Free Pattern
The free crochet tote bag pattern is below, but if you love to work offline, I’ve got a couple other great options for you.
Purchase the ad-free, printable PDF, including all photo tutorials, on Ravelry, or on Etsy (aff).
Purchase the crochet tote bag kit: Lion Brand also has a full kit of the On the Bias Crochet Tote Bag, available on their website. The kit includes your choice of 37 colorways and a digital copy of the crochet tote bag pattern.
Save this pattern to your Ravelry favorites.
Subscribe to my YouTube Channel!
This post contains affiliate links.
Materials
- Yarn: Worsted Weight / 4; Lion Brand Yarns 24/7 Cotton was used for the sample. 100% Mercerized Cotton Yarn (186 yards / 170 m / 3.5 oz / 100 g). Available for purchase on the Lion Brand Website or Amazon
- Ecru (800 yards / 5 balls)
- Crochet Hooks: I/9/5.50mm, H/8/5.00mm, or size needed to obtain gauge (My favorite crochet hooks are the Clover Amour Hooks, I’ve never had an ache in my hand since switching)
- Scissors
- Yarn Needle
- Locking Stitch Markers (4 or more)
- Wooden Beads (32) (optional)
Abbreviations (US Terms)
- ch(s): chain(s)
- sl st(s): slip stitch(es)
- st(s): stitch(es)
- sc: single crochet
- dc: double crochet
- Alt-ch3: alternate ch-3
- sp: space
- Rnd(s): round(s)
- RS: right side
- WS: wrong side
- SM: stitch marker
- Rep: repeat
Size
- One Size: 19″ W x 21.5″ H (not including strap)
Gauge
- In granny stitch: 9 dc + 2 ch-1 sps = 2;.85″; 4 rows = 1.875″
- In Moss Stitch / Linen Stitch: (sc in next st, ch 1, skip next st): 11.5 sts = 3″; 8 rows = 1.875″
Special Stitches
- Alternate-Ch3 (Alt-ch3): Complete last st of previous row, take loop off hook, insert hook into sp between last dc and last 3 dc of previous row, put loop on hook and pull thru sp, turn, ch 3.
Pattern Notes
- I tend to crochet on the tighter side. You may need to go down a hook size (or two) to meet gauge if you crochet on the looser side.
- The first stitch of every row is worked into the same stitch as the turning chain, unless stated otherwise.
- Yarn Notes: Lion Brand Yarn 24/7 Cotton, in Ecru, was used for the sample. (3.5oz / 100 g / 186 yards / 170 meters / 100% mercerized cotton). Another comparable worsted weight yarn may be substituted.
- Yardage: Ecru (800 yards / 5 balls)
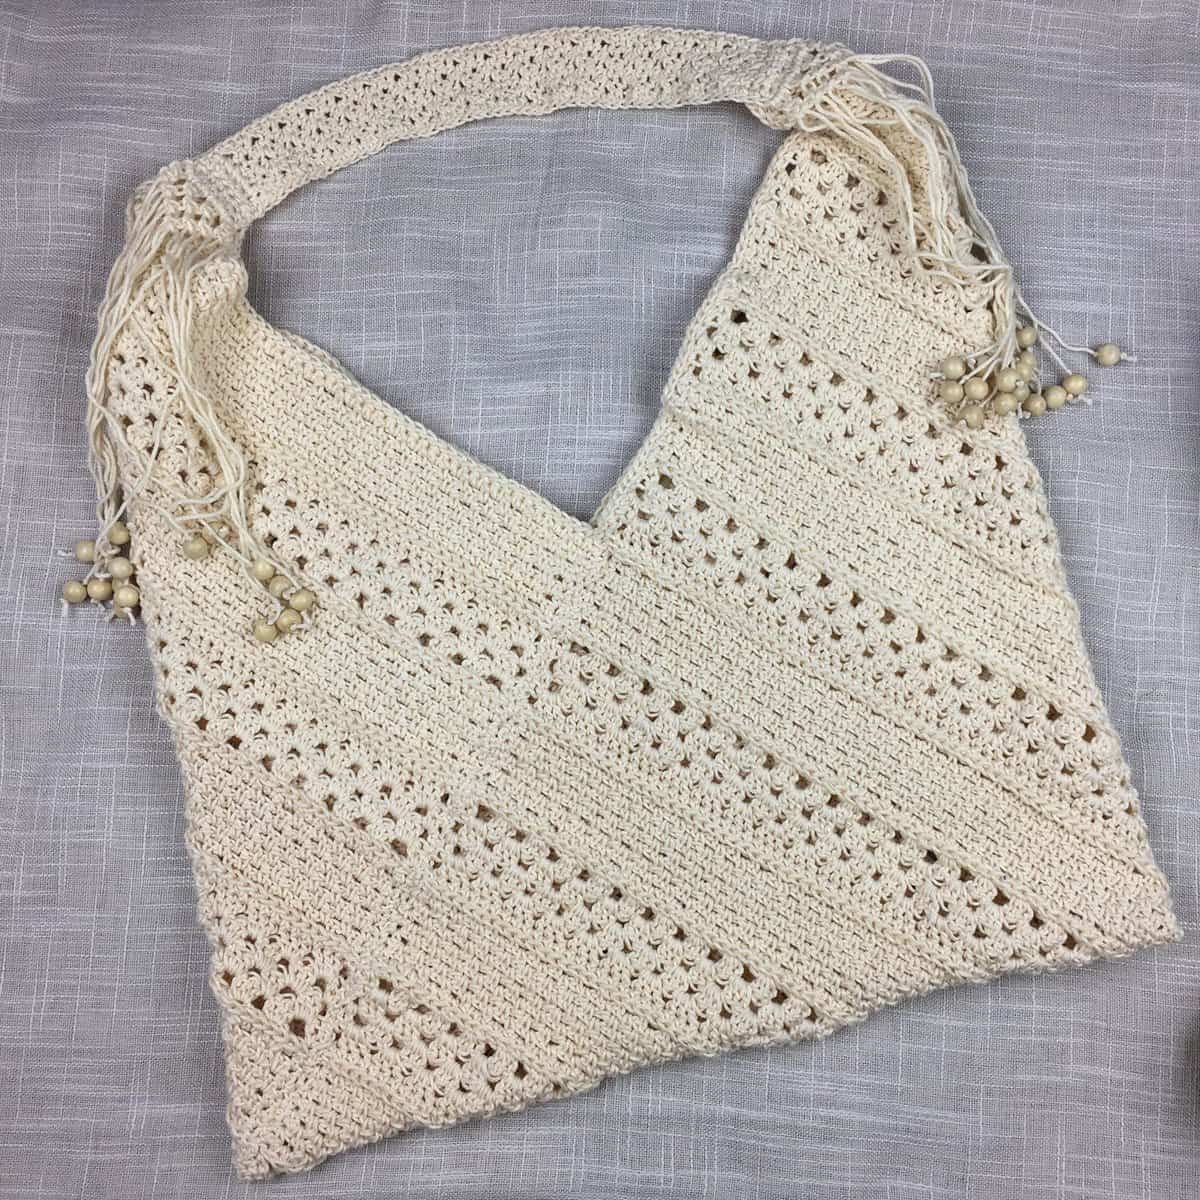
- Construction: This tote bag is worked in rows to form a rectangle. The length of the rectangle is 3 times its width. The rectangle is then folded in a special way to form the bag. Seams are sewn up with a mattress stitch and a strap added.
Crochet Tote Bag Pattern
Rectangle
Note: Make sure to keep your ch-1’s loose in the linen stitch rows (sc in next, ch 1, skip next st), or your work will cinch.
Set-Up: With a 5.50mm crochet hook, ch 57.
Row 1 (WS): Switch to a 5.00mm crochet hook, working into the back hump of the chain, sc in the 2nd ch from your hook and in each ch across. (56 sts)
Row 2 (RS): Ch 3 (counts as a st), Turn, dc in the first st, (skip each of the next 2 sts, 3 dc in the next st ) work from ( to ) across to the last 4 sts, skip each of the next 3 sts, 2 dc in the last st. (55 sts)
Row 3: Ch 3, Turn, skip the first 2 sts, (3 dc in the next sp between the dc’s from the previous row, skip each of the next 3 dc) work from ( to ) across to the last sp, work 3 dc in the last sp, skip the next dc, dc in top of ch 3. (56 sts)
Row 4: Alt-ch3 (see tutorial on page 4), dc in same sp, (3 dc in the next sp between the dc’s from the previous row, skip each of the next 3 dc) work from ( to ) across to the ch-3 from the previous row, 2 dc in the last sp. (55 sts)
Row 5: Rep Row 3. Turn.
Row 6: Ch 1, sc in each st across. Turn. (56 sts) Last sc is worked into the top of ch3 from the previous row.
Row 7: Do not chain, sl st in each st across. Turn. (56 sts) *Be careful not to work your slip stitches too tight or it’ll cinch your work.
Row 8: Ch 1, working into the stitches from Row 6, sc in the first st, (ch 1, skip the next st, sc in the next st) rep across to the last st, sc in the last st. Turn. (56 sts)
Rows 9 – 15: Ch 1, sc in the first st, (ch 1, skip the next st, sc in the next ch-1 sp) rep across to the last st, sc in the last st. Turn. (56 sts)
Row 16: Ch 1, sc in each st across. Turn. (56 sts)
Row 17: Do not chain, sl st in each st across. Turn. (56 sts) *Be careful not to work your slip stitches too tight or it’ll cinch your work.
Rows 18 – 177: Rep Rows 2 – 17. Note: When repeating Row 2, work your stitches into the previous Row 16 repeat.
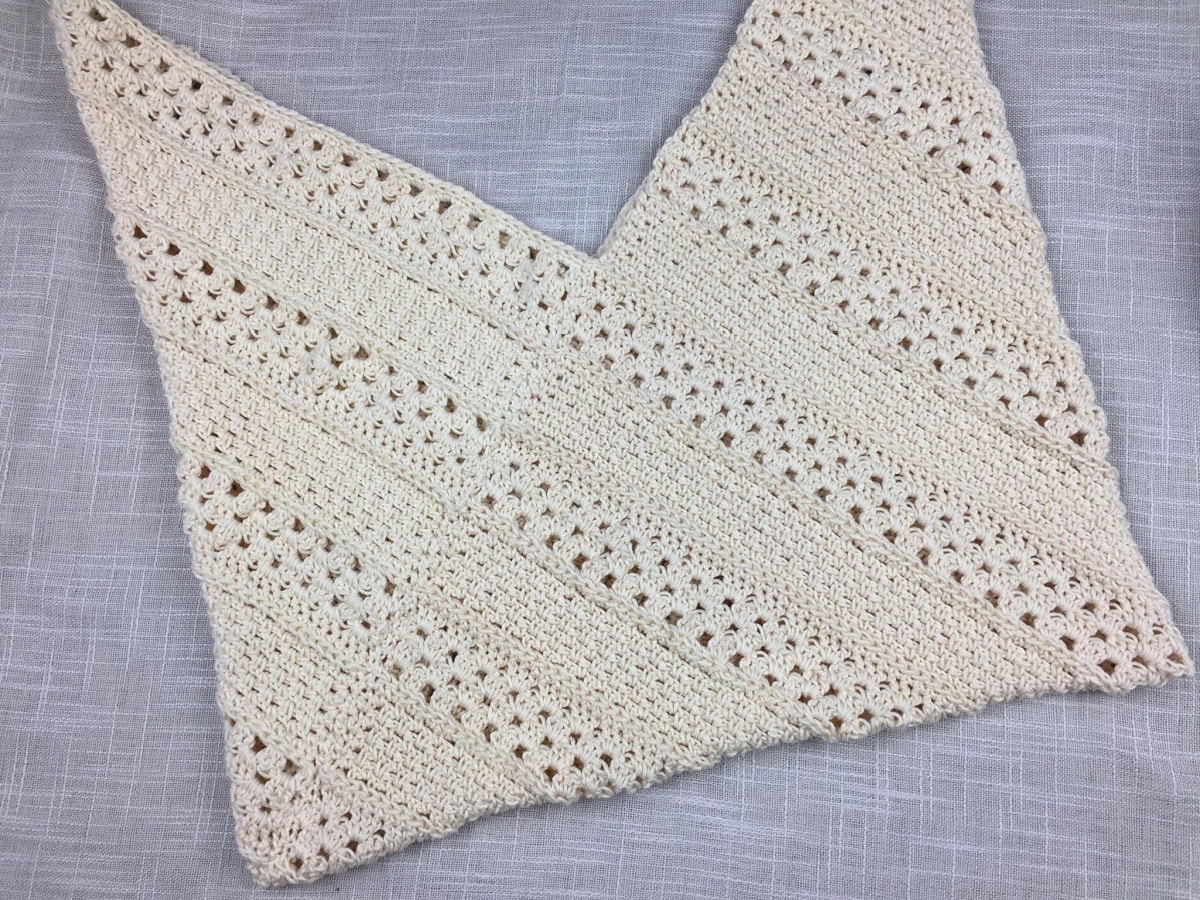
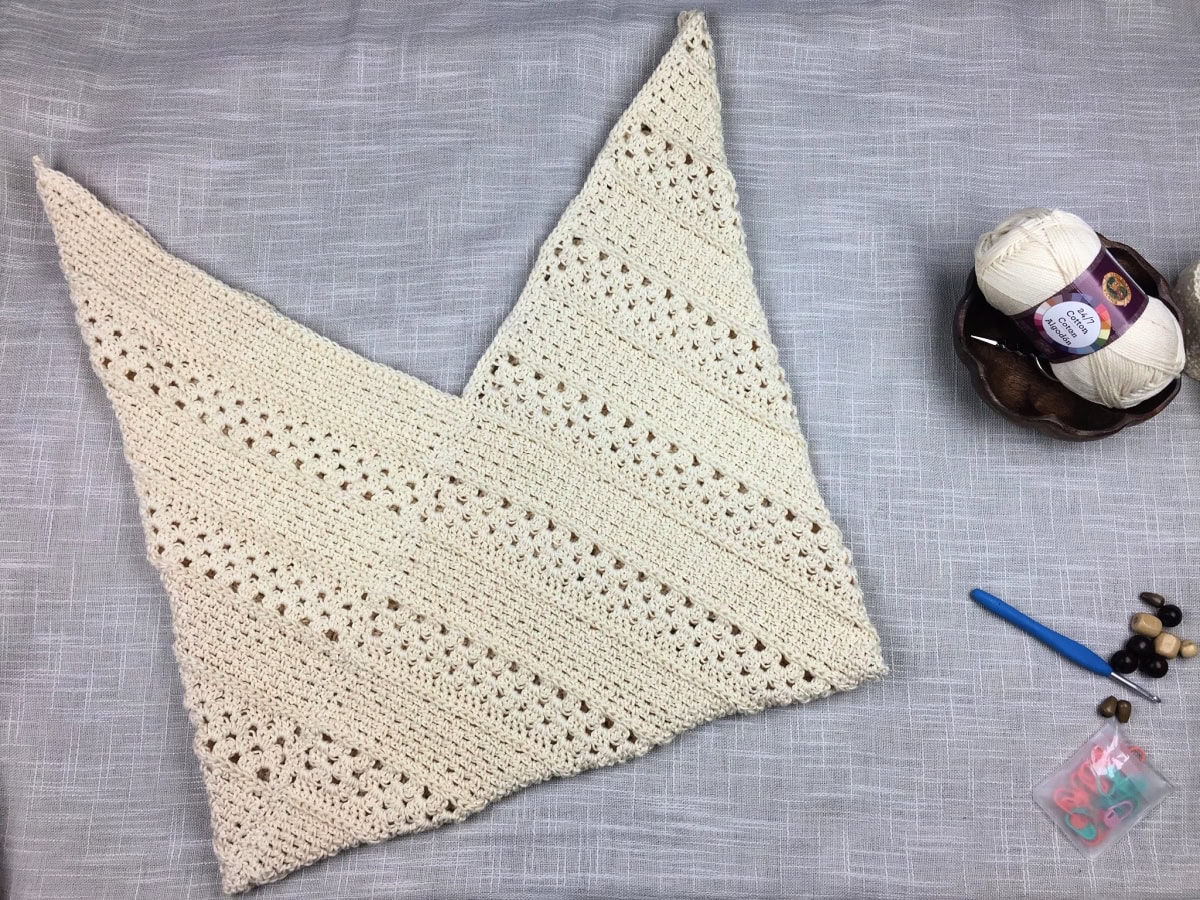
Fasten off. Weave in ends. Block to shape, if desired. Continue on to Bag Assembly. Finished measurements should be approximately 14.5″ W x 43.25″ L.
Bag Assembly
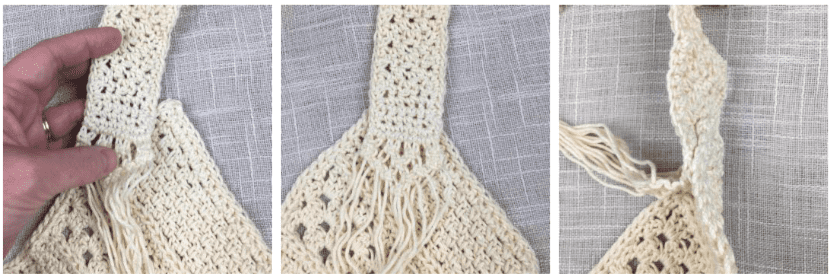
Now it’s time for a little origami!
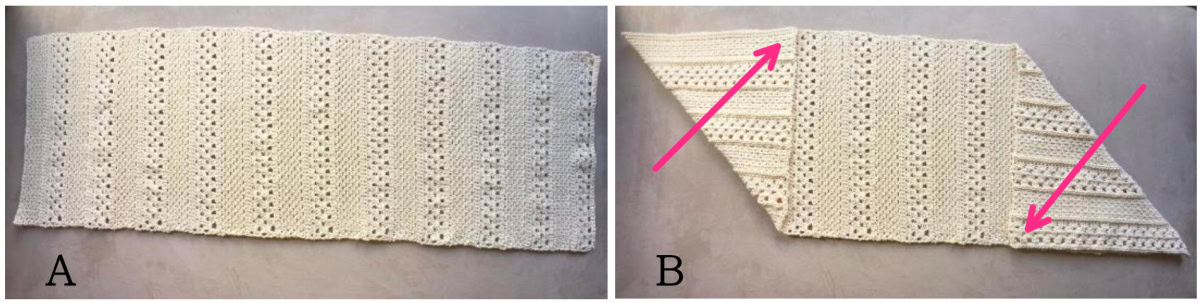
Photo A: Lay your bag out in front of you as shown in the photo. Make sure the wrong side is facing up.
Photo B: Bring the bottom left corner up to meet the upper long edge (as shown in the photo). Bring the upper right corner down to meet the lower long edge (as shown in the photo).
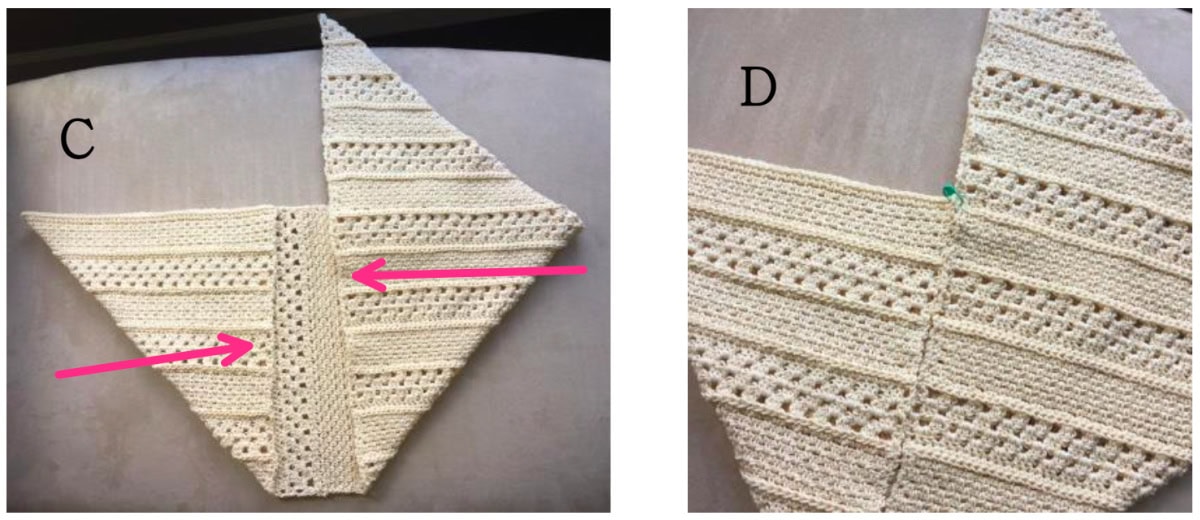
Photo C: Bring the lower edge up to meet the edge created in photo B. See pink arrows.
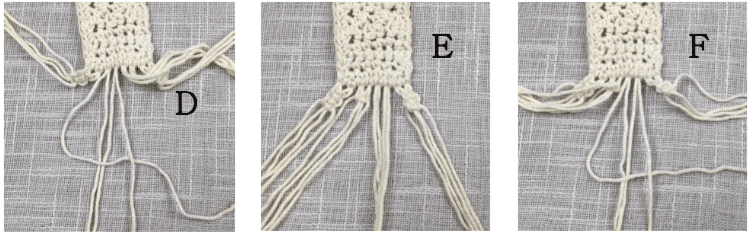
Photo D: After completing photo C, make sure that your rows are lined up. Next, use a stitch marker to hold the pieces together.
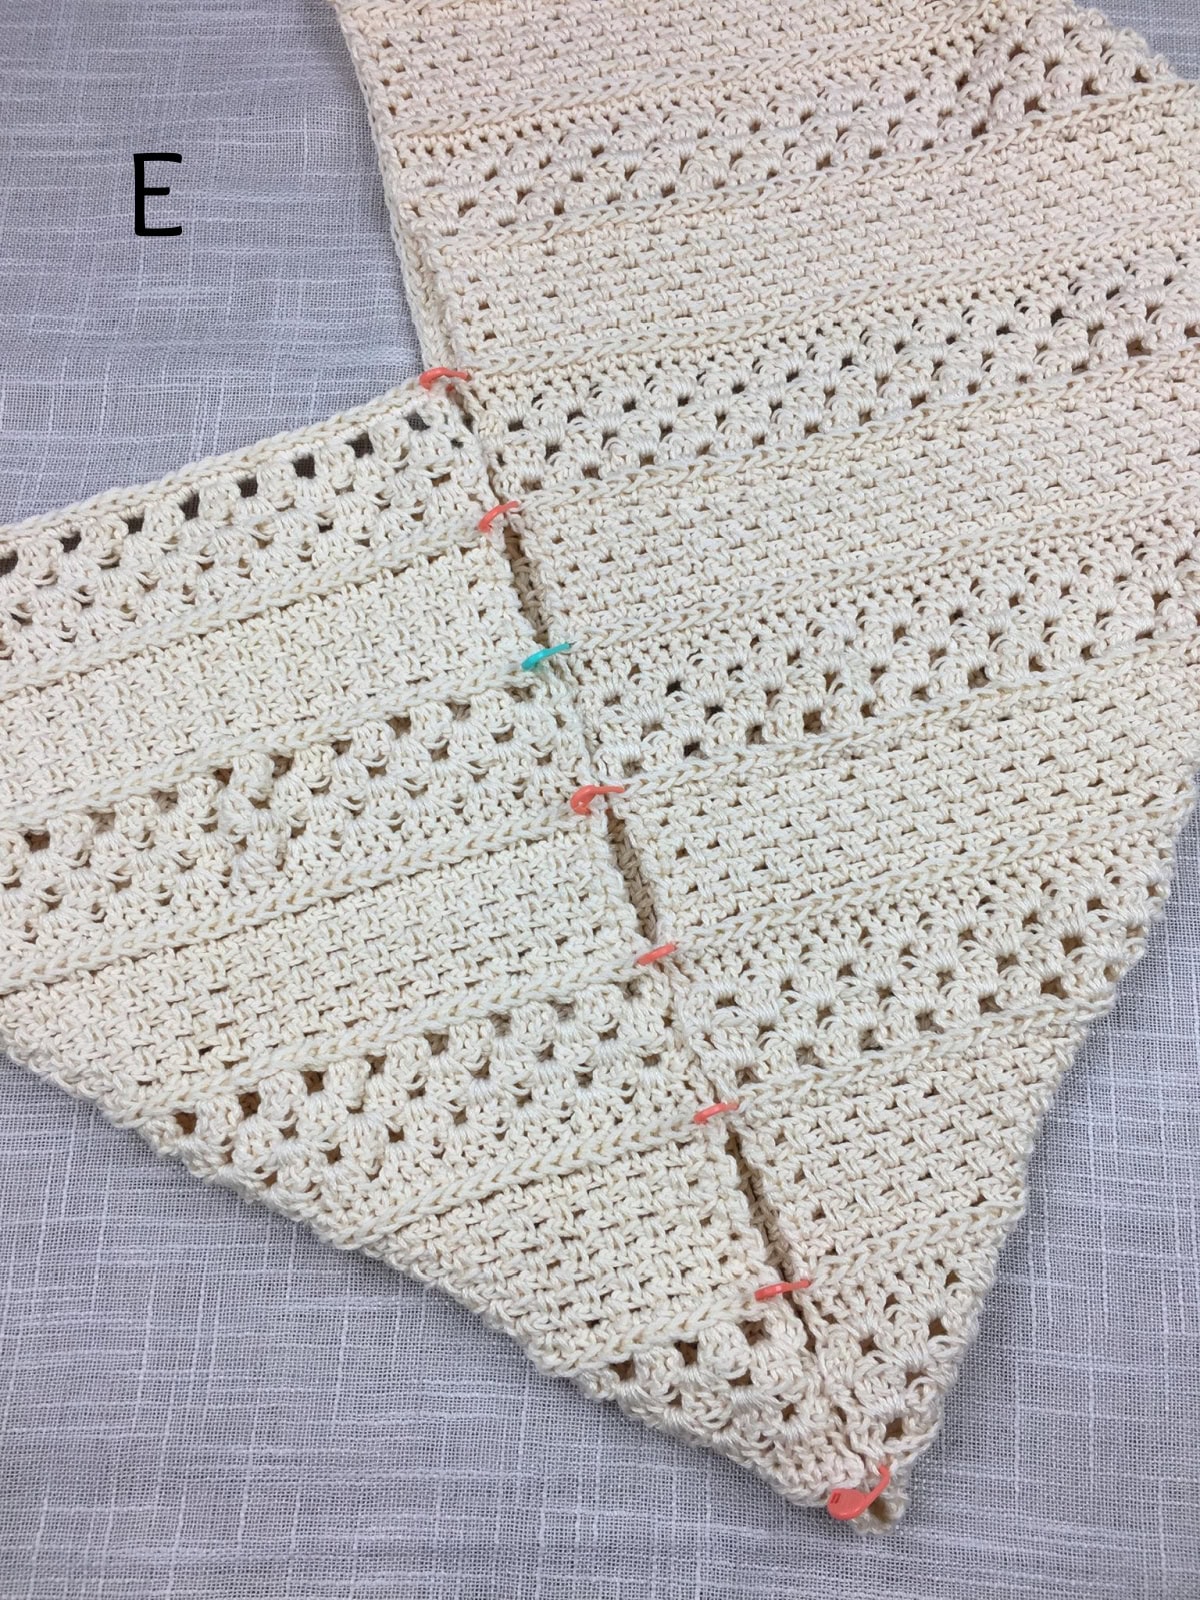
Photo E: Use several stitch markers to keep bag lined up during seaming. I placed mine in the ridges of slip stitch rows.
Now it’s time to seam your bag!
Seaming the Bag
- Use the Mattress Stitch Seam to sew the bag together between the stitch marker you placed in Photo D and the bottom corner of the bag. Also see Photo E.
- Repeat for the opposite side of the bag, then continue on to Bag Edging Instructions.
Bag Edging
Note: The Bag Edging is only worked on the 2 unfinished edges of the bag opening.
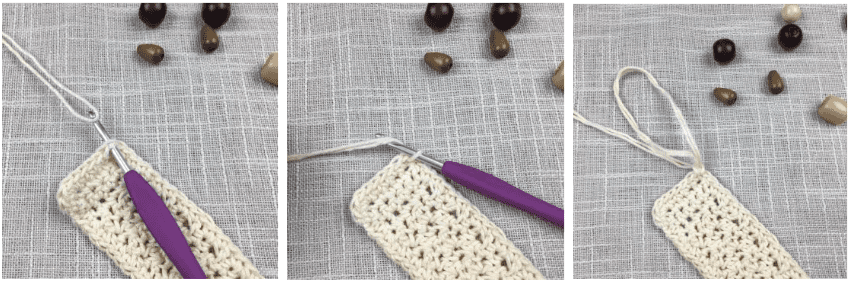
Row 1 (RS): With a 5.00mm crochet hook, join yarn w/ a sl st at the top corner of the bag, ch 1, sc evenly down the unfinished edge to the center “V” in the bag. I worked 1 sc into the side of each sc & sl st rows and 2 sc into the side of each dc row. Join w/ a sl st into a st at the center “V”. Turn. Go down a hook size (or two) if your edging becomes wavy. *Stitch count isn’t crucial.
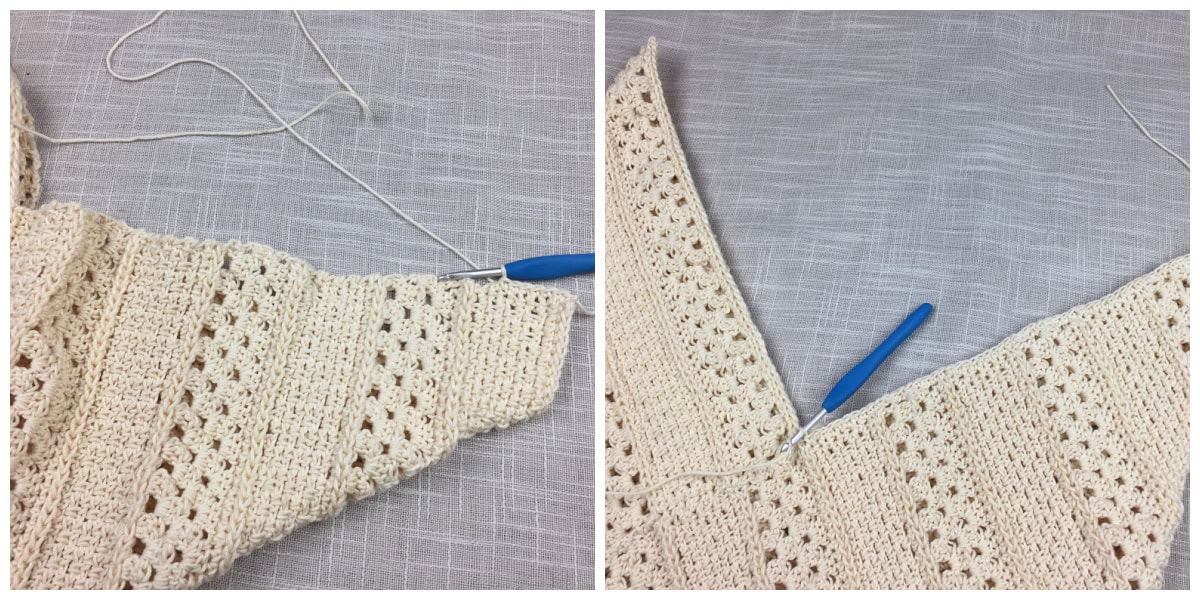
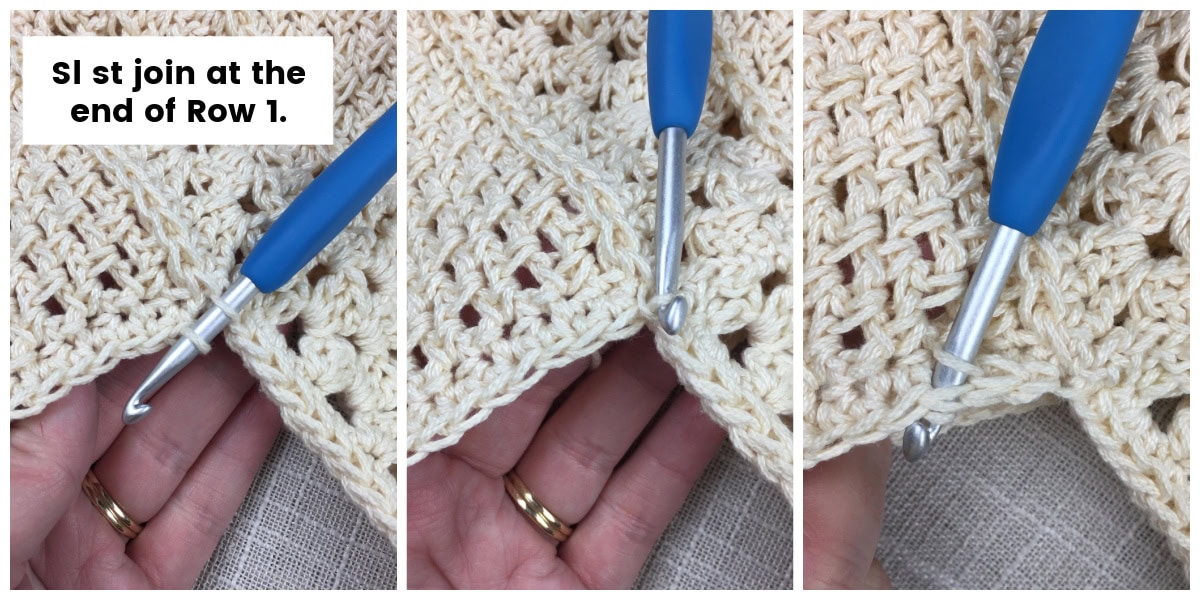
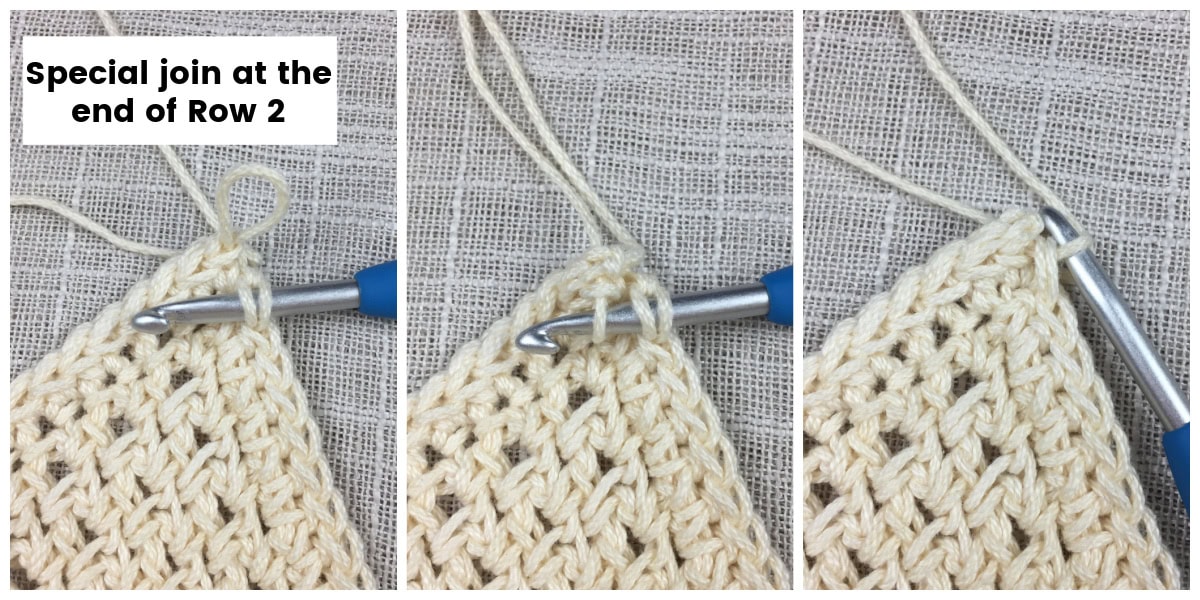
Row 2: Do not chain, working on the RS of the bag (this is a little awkward), sl st in each st across. To join, remove loop from your hook, insert hook under loops of st at top corner, put loop back on hook and pull thru the stitch (click here for Special Join Technique Tutorial).
Fasten off. Weave in ends. Repeat for the second unfinished edge then continue on to Bag Strap.
Bag Strap
Row 1: With a 5.00mm crochet hook, ch 6, working into the back hump of the chain, sc in the 2nd ch from your hook and in each ch across. Turn. (5 sts)
Rows 2 – 3: Ch 1, sc in each st across. Turn. (5 sts)
Row 4: Ch 1, sc in the first st, (dc in the next st, sc in the next st) twice. Turn. (5 sts)
Row 5: Ch 1, dc in the first st, (sc in the next st, dc in the next st) twice. Turn. (5 sts)
Repeat Rows 4 – 5 until strap measures 13″. Then work Final Rows 1 – 3.
Final Rows 1 – 3: Ch 1, sc in each st across. Turn. (5 sts)
Continue on to Edging Round.
Edging Round: Ch 1, rotate to work into the sides of the rows, (work 1 sc into the side of each row and st & 3 sc in each corner) rep around. Join w/ a sl st to the 1st st. *Stitch count isn’t crucial.
Fasten off. Weave in ends. Continue on to Strap Details below. Then finish your bag by Attaching the Strap.
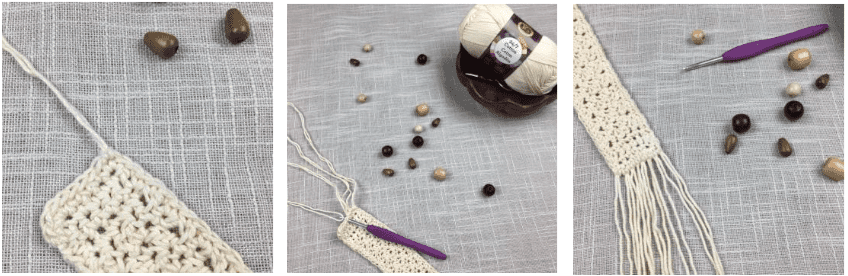
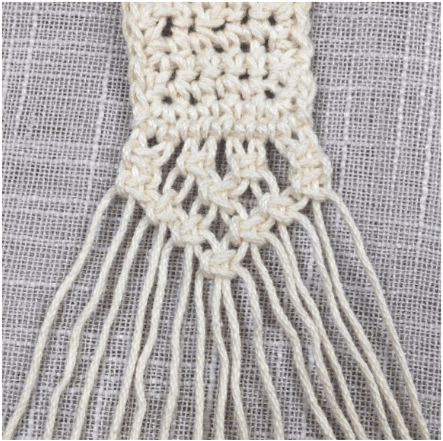
Macrame Strap Detailing
I added a little macrame detailing to each end of the strap. Don’t worry if you haven’t done macrame before, these photos will take you step-by-step through the process. I used only 2 basic knots for the strap detailing. It’s SO much easier than you think!
Yarn: Cut 16 pieces of yarn, 1 yard long each.
Lark’s Head Knot
Have you ever added fringe before? That is a Lark’s Head Knot. This knot is used to attach your yarn to the strap.
Step 1: With RS of the strap facing up, fold a piece of yarn in half to make a loop.
Step 2: Insert a crochet hook through a stitch along the short end of the strap, grab the piece of yarn at the loop and pull it through the stitch to create a small loop.
Step 3: Use the end of your hook to grab the ends of the yarn and pull them through that loop.
Step 4: Add 8 strands to one short end of the strap.
Square Knot
The rest of the macrame design uses only the square knot. I’ll show you how to make a square knot, step-by-step. Then I’ll show you which strands to use to make the remainder of the square knots. You’ll make a total of 12 square knots per side.
Each Square Knot uses only 4 strands of yarn.
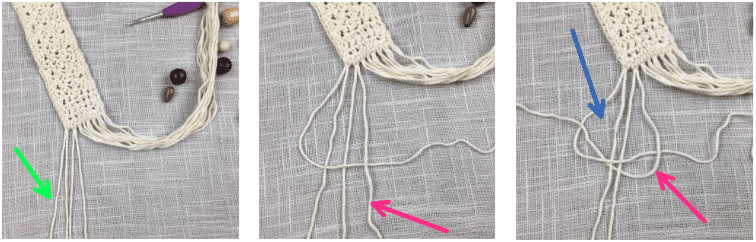
With the right side facing up, we’re going to begin with the 4 strands of yarn furthest to the left.
Step 1: Start with 2 Lark’s Head Knots (you’ll have 4 strands of yarn).
Step 2: Take the outer left strand (green arrow) and cross it over the top of the middle 2 strands and under the outer right strand (pink arrow).
Step 3: Take the outer right strand (pink arrow) cross it under the middle 2 strands and loop it through the hole on the left (blue arrow).
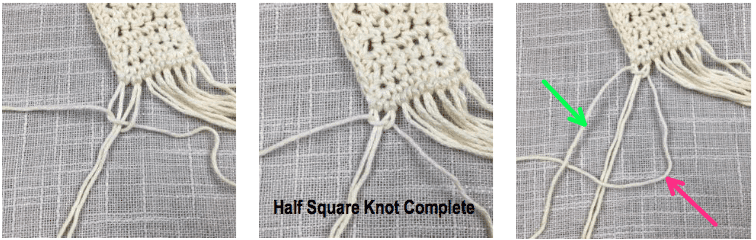
Step 4: Pull the outer strands tight (don’t let them twist). This completes a Half Square Knot. Continue to complete a Full Square Knot.
Step 5: Using the same 4 strands, Take the outer right strand (pink arrow) and cross it over the top of the middle 2 strands and under the outer left strand (green arrow).
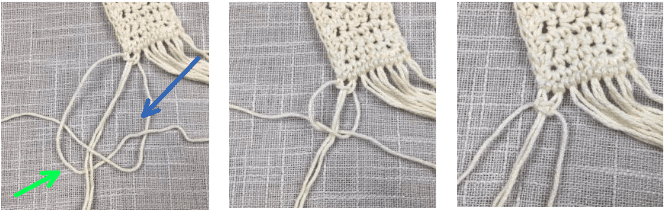
Step 6: Take the outer left strand (green arrow) cross it under the middle 2 strands and loop it through the hole on the right (blue arrow).
Step 7: Pull the outer strands tight (don’t let them twist). This completes a Full Square Knot.
Order of Knots
You’ve completed the first square knot. Only 11 more to complete and your macrame strap detailing will be complete. Complete knots in the following order using the strands specified.
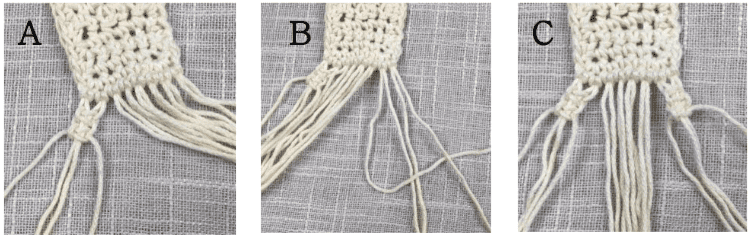
Photo A: Using the same 4 strands of yarn, make 1 more square knot.
Photos B & C: Using the 4 strands of yarn on the right, complete make 2 square knots.
Photos D & E: Using the 4 strands to the right of the square knots you made in Photo A, make 1 square knot.
Photo F: Using the 4 strands to the right of the square knot you just made, make 1 square knot.
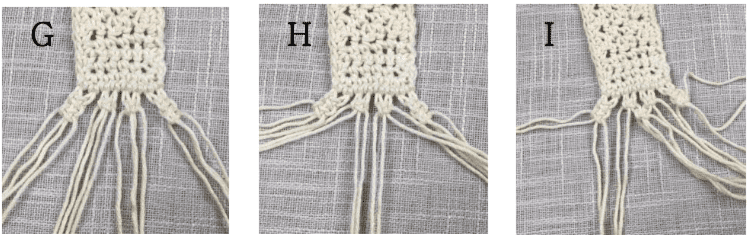
Photo G: Shows the square knot in Photo F complete.
Photo H: Using the 4 center strands (2 strands from each of the 2 middle knots), make 1 square knot.
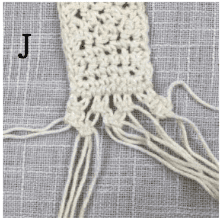
Photos I & J: Using the 4 strands shown, make 1 square knot.
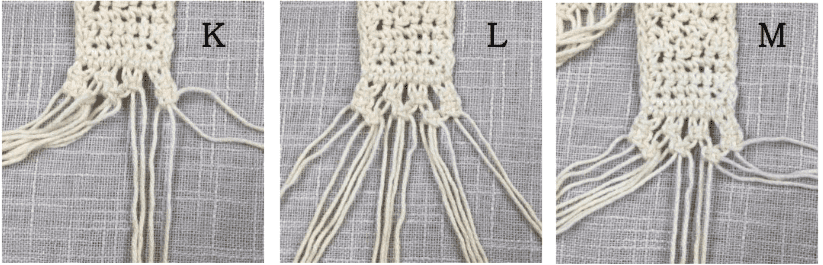
Photos K & L: Using the 4 strands shown, make 1 square knot.
Photos M & N: Using the 4 strands shown, make 1 square knot.
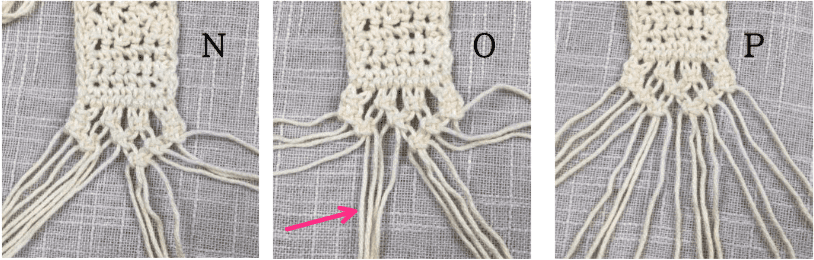
Photos O & P: Using the 4 strands shown (pink arrow), make 1 square knot.
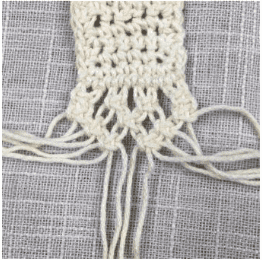
Photo Above: Using the 4 strands shown, make 1 last square knot.
The photo above shows the macrame detailing complete.
Repeat for the opposite end of the strap. Then continue on to Adding Beads, if desired.
Adding Beads
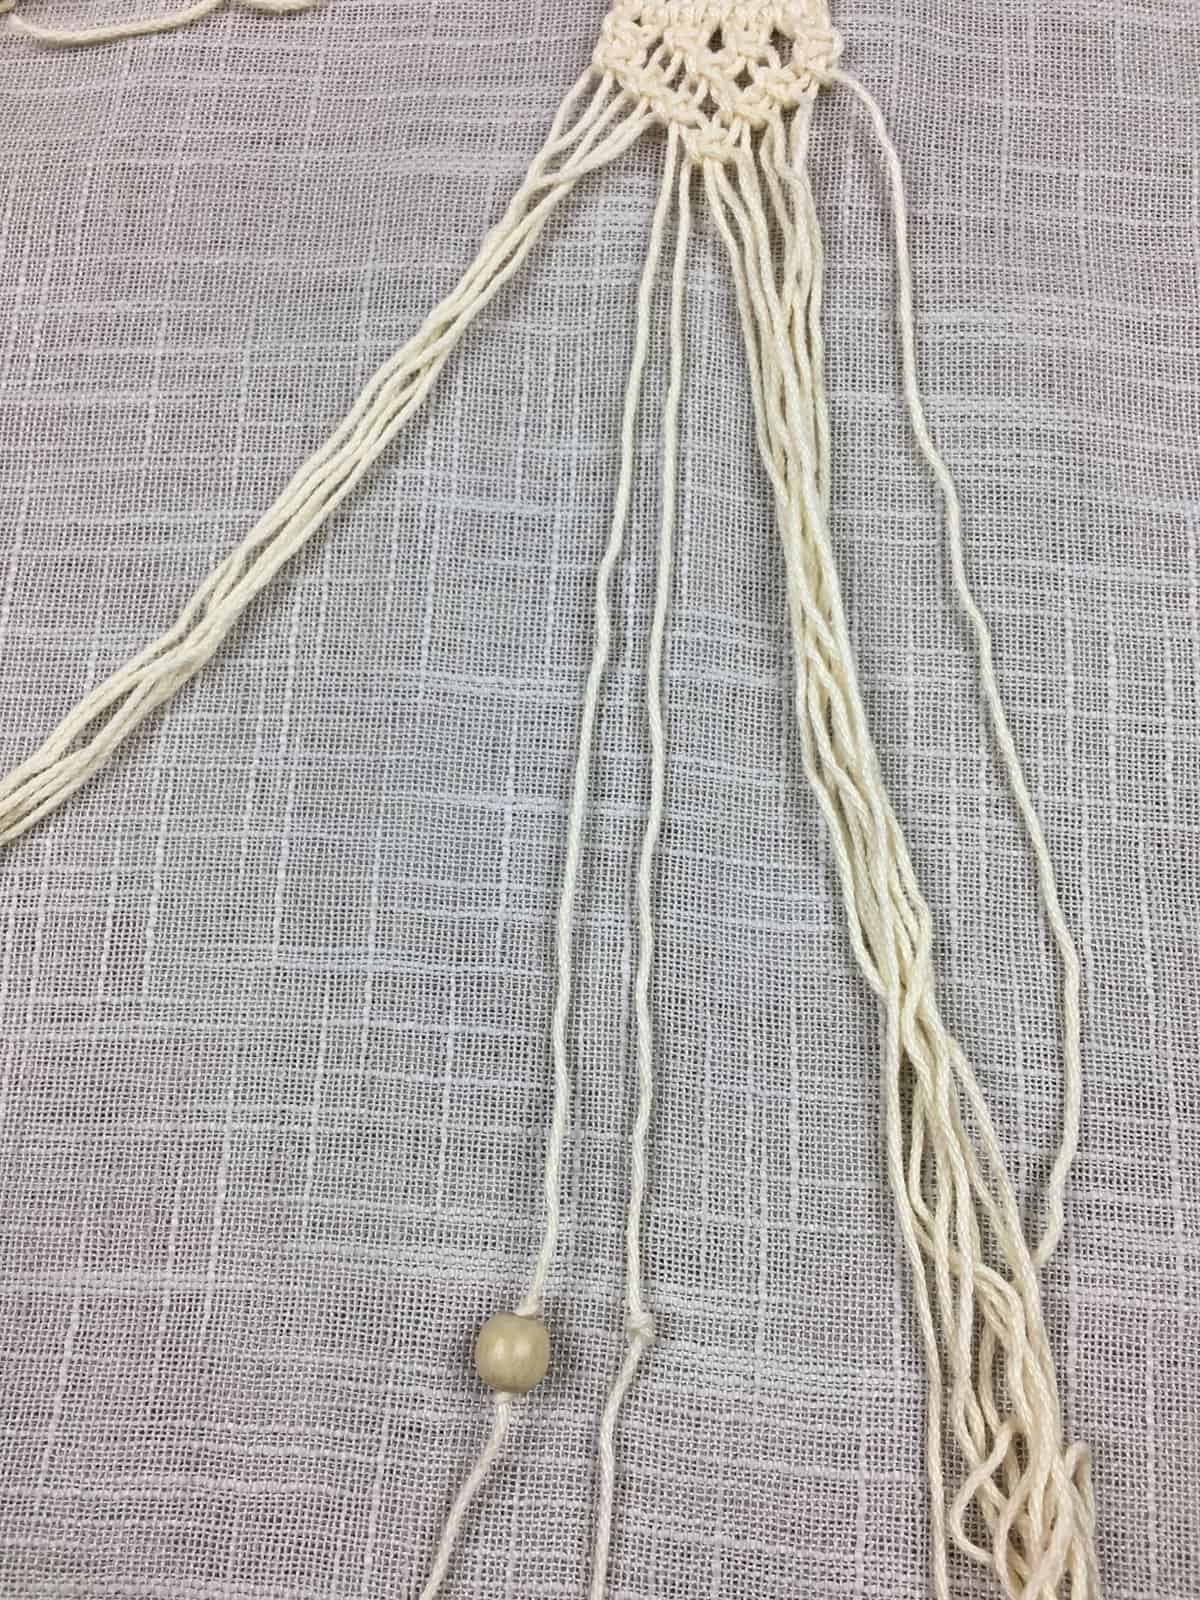
Photo Above: Add a double knot approximately 9″ down from the macrame knots.
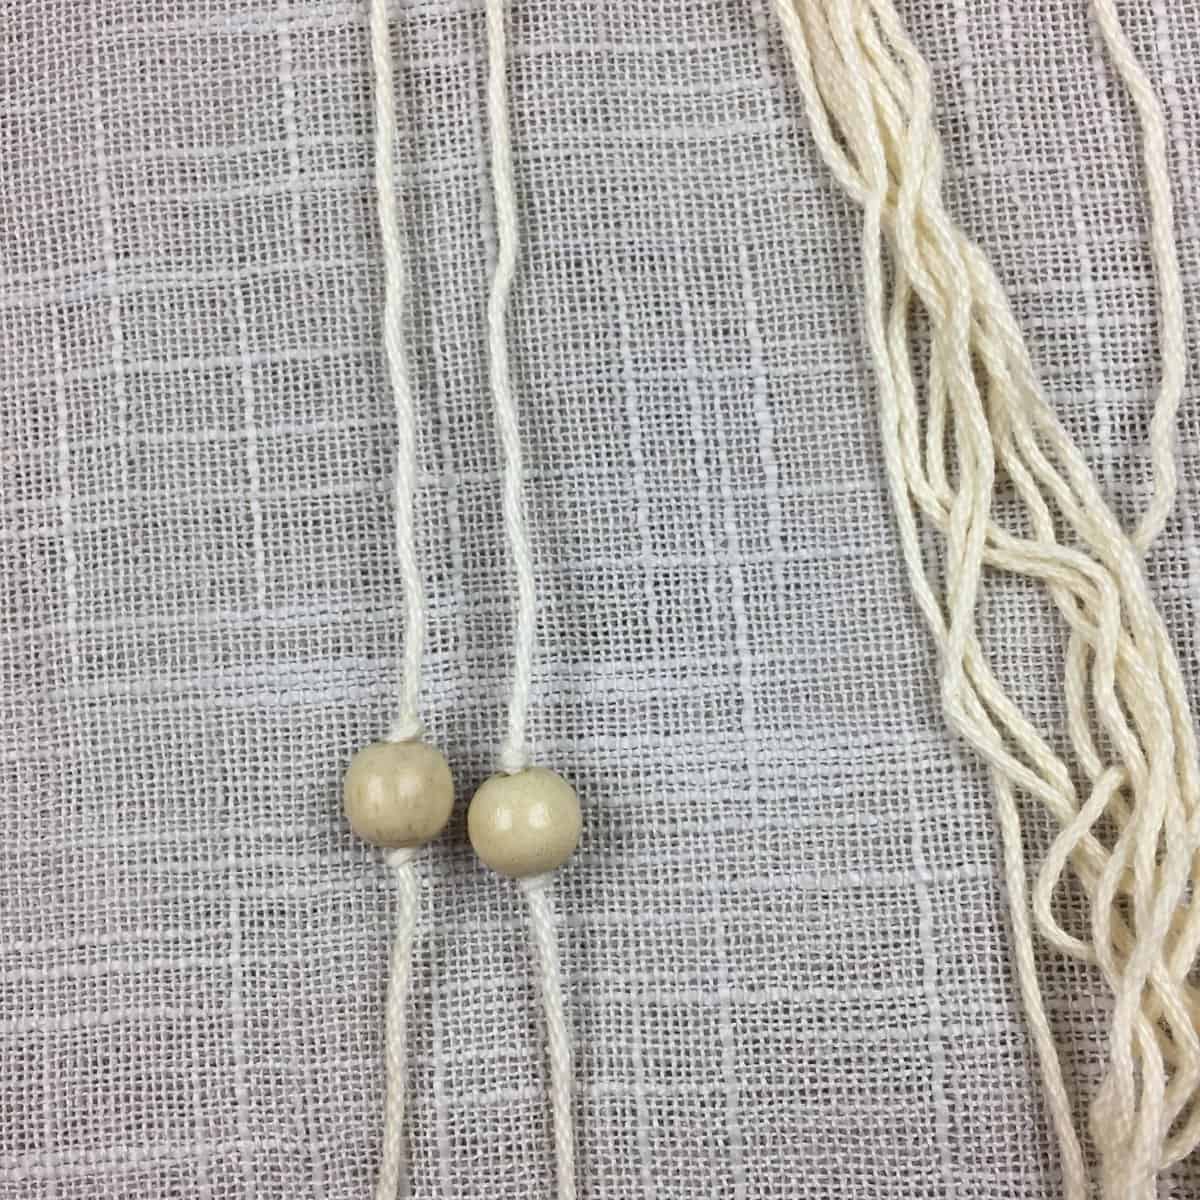
Photo Above: String 1 bead onto the yarn strand and add a double knot under it.
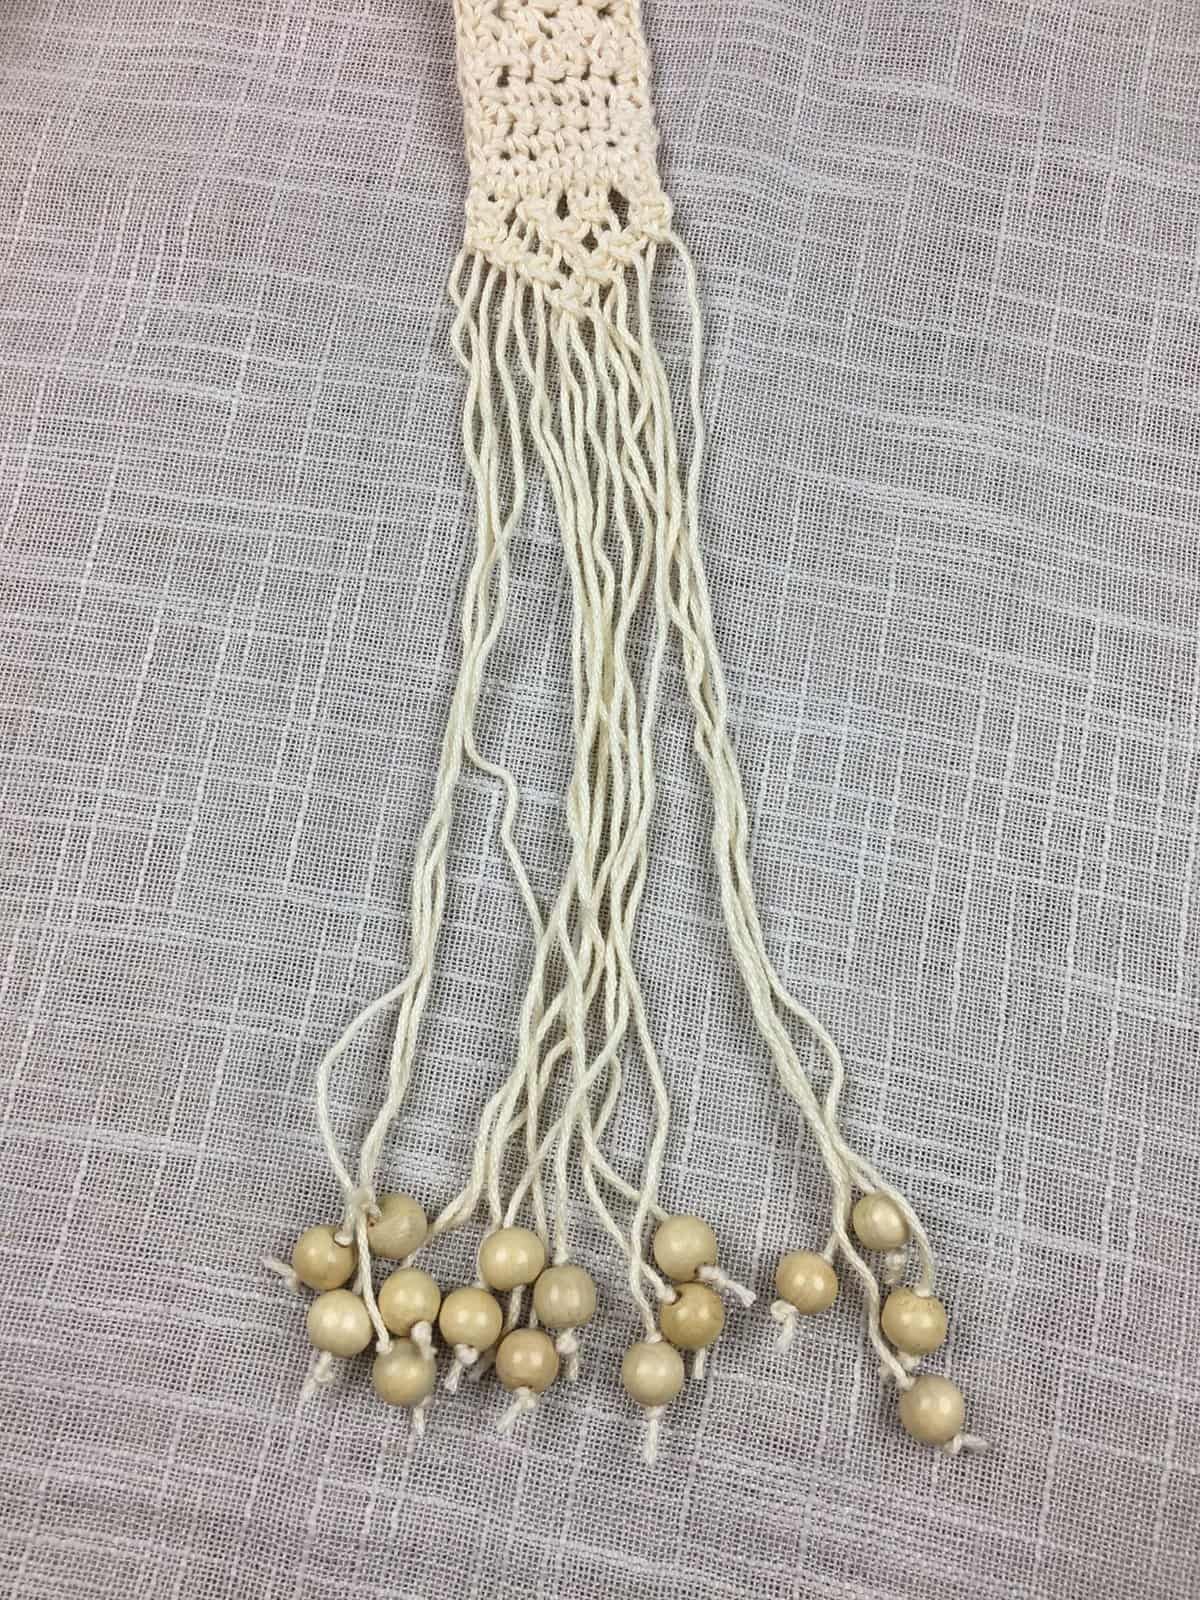
Photo Above: Add 1 bead to each strand of yarn. Trim loose ends.
Continue on to Attaching the Strap.
Attaching the Strap
Use a yarn needle and 18″ long piece of yarn and attach each end of the strap onto 1 point of the bag.
Sew 1.5″ above the macrame portion.

I chose not to sew the macrame portion of the strap down. You can, if you prefer.
I Made it! Now What?
Pin this post! Save this free crochet tote bag pattern to your Pinterest boards so that you can come back and make it again.
Leave a comment below: We love to hear your feedback.
Share Your Finished Projects on Facebook or Instagram: I love to see your finished projects! Share with us on social media and tag me @acrochetedsimplicity or use the hashtag #ACrochetedSimplicity so I can find your posts.
Join us in the Facebook Community Group!
Come share your finished projects with us in the A Crocheted Simplicity Crochet Community Group on Facebook. Join us for fun community events such as crochet alongs, join in on crochet conversations, ask questions, get advice, and share your love for crochet!

More Crochet Tote Bag Patterns I Think You’ll Love
More Crochet Patterns for Bags & Totes
Are you looking for more crochet bag patterns? We have several more free & premium crochet patterns for bags, backpacks, purses, and totes. We have a variety of free crochet bag patterns and premium crochet bag patterns.
Wow! This is a beautiful bag! AND a very ambitious project! I have too many UFOsto finish before I tackle something like this! I will however save to Pinterest and Ralvery. Have a great fall and winter!
Thank you! I hope you revisit once you get your UFOs under control. It really is a fun project. ~ Jennifer
That is some good looking bag!!!! Am going shopping tomorrow and will get some yarn to make several,,,, would make superlative Christmas presents. Thanks so much for sharing SMILE
Hi Helen,
Thank you so much for your kind words! I agree that they’ll make awesome Christmas gifts!!!
~Jennifer
Do you think that I could use size 18 crochet thread (Crocheted two threads together throughout, if need to) to give more strength and durability to this, and it come out ok?
Hi Autumn,
I would actually try making a gauge swatch with a single strand of size 18 crochet thread. A single thread may work as the 24/7 yarn is thinner than other worsted weight cotton yarns. If you don’t like the look of it, you can always double strand. 🙂
Jennifer
My project seems to be too long or not wide enough! Would blocking sort this?
Hi Lauren,
Blocking could rectify this for you depending on how far off your measurements are. You could also fold it and hold it in place with stitch markers to see how it all lines up and then go from there. Feel free to send me an e-mail with a photo, if you’d like me to take a look at it for you.
Jennifer