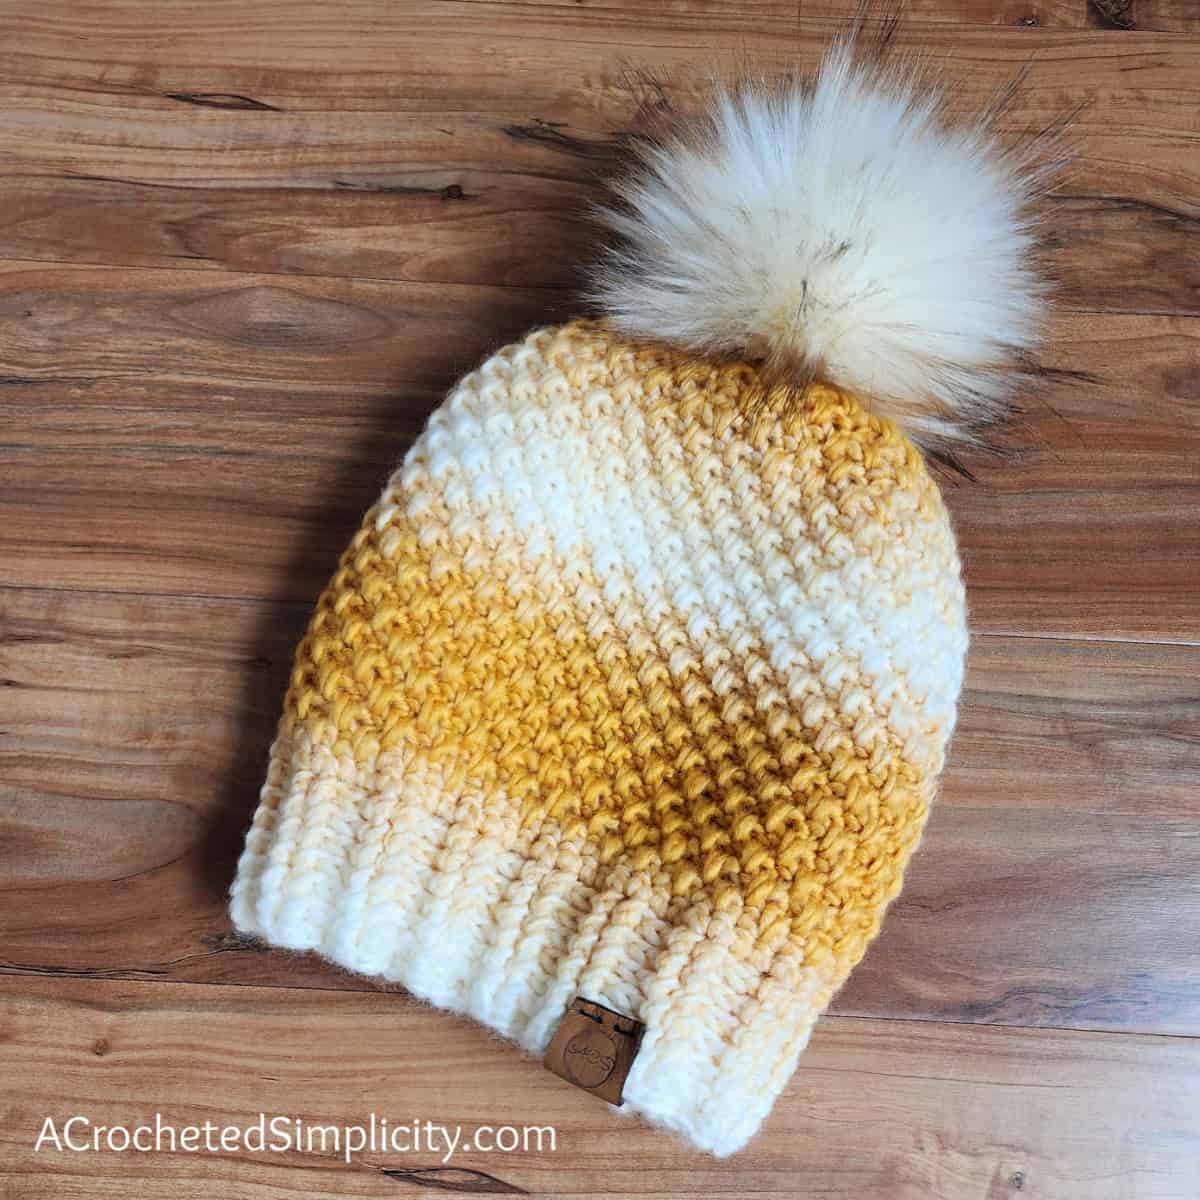
Bulky Crochet Hat Pattern Free – Eloise Slouch
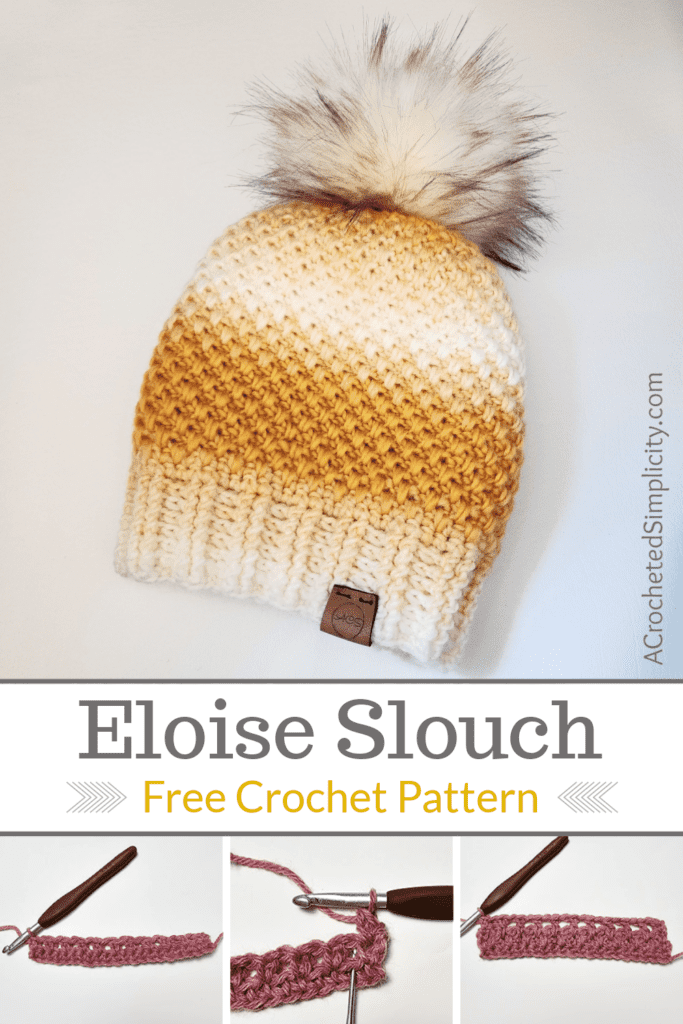
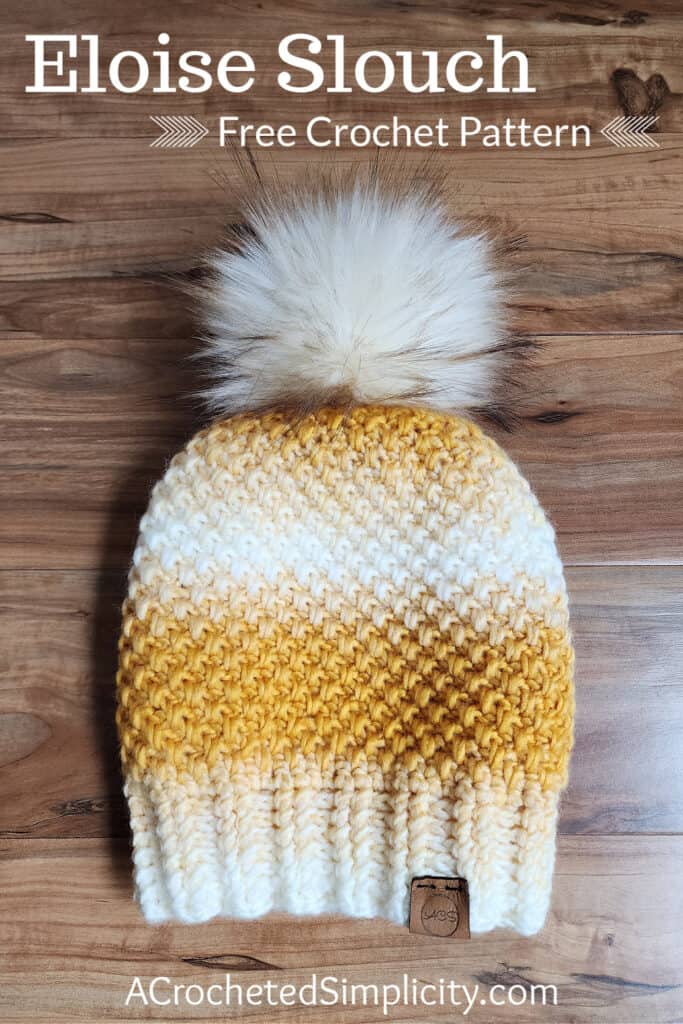
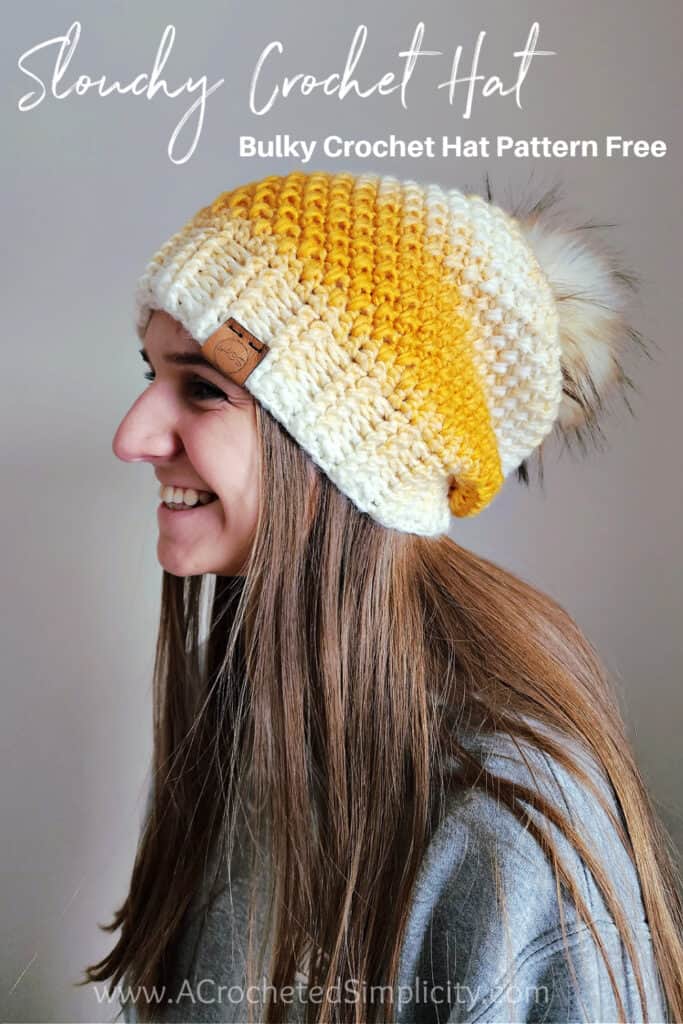
Learn to crochet the perfect winter crochet hat with only one ball of Lion Brand Scarfie Yarn and this bulky crochet hat pattern free.
Whether you’ve been searching for a women’s crochet hat pattern, a pattern for crochet chunky yarn, Scarfie Yarn crochet patterns, one ball of yarn crochet projects, or simply a free crochet slouch hat pattern, the Eloise Crochet Slouch checks all the boxes!
You can find the free bulky crochet hat pattern for the Eloise Slouch in this post below, or an ad-free print friendly version on Love Crafts, Ravelry, or on Etsy (aff).
The faux fur pom on the crochet chunky beanie above was purchased on Etsy (aff).
For Customized Leather, Cork, and Wood Labels, I highly recommend All This Wood on Etsy! I used a 1″ x 2″ leather label for this bulky crochet hat.
This time of year I try to come up with a few one skein crochet projects to help use up the leftover yarn that I’ve accumulated throughout the year. And it just so happens that the holidays are coming up so it helps me to get started on making gifts.
One skein crochet projects are perfect for several reasons. I personally like them because they help to use up random balls of leftover yarn from larger projects. They also make great last minute crochet gifts and they are the perfect size crochet projects to take with you on long car rides.
The Eloise Crochet Slouch is a great one skein Lion Brand Scarfie crochet pattern. It’s small and easy to travel with, uses only one ball of Scarfie yarn, and makes a great gift for a family member, friend, or co-worker!
Extended Moss Stitch & Variations
There are many great crochet stitches for hats, but this one is crocheted with basic stitches using the double crochet moss stitch, also known as the extended moss stitch. The double crochet moss stitch itself is a slight variation of the more popular moss stitch (also known as the linen stitch).
The differences between the moss stitch (linen stitch) and the double crochet moss stitch (extended moss stitch), are 1) the double crochet moss stitch uses a double crochet stitch in place of a single crochet stitch and 2) the double crochet stitches are worked into the double crochet stitches from 2 rows below, whereas the single crochet are worked into the chain space from the previous row.
I love the classic crochet moss/linen stitch pattern (and I’ve used it in many crochet designs) but, I really like the change in texture that’s produced by switching from single crochet stitches to double crochet stitches.
There are several moss stitch variations crochet patterns and each has its own unique qualities. One is more of an openwork crochet stitch pattern and the other creates a more dense fabric.
I prefer the more popular moss/linen stitch when crocheting items that need to be more lightweight and have more drape to them such as garments, sunhats, and lightweight crochet afghans. But the double crochet/extended moss stitch is great for crocheting items that I’d like to be more dense and have no holes such as Christmas stockings and warm winter crochet accessories.
Although the most popular variations of the crochet moss stitch pattern use a single crochet or double crochet, the sky’s the limit! You could substitute nearly any basic crochet stitch and create a nice stitch pattern variation.
Check out my crochet stitch tutorials for the extended moss stitch & double extended moss stitch.
SEPTEMBER HAT OF THE MONTH CAL 2022
The Eloise Slouch crochet beanie is my contribution to the 7th annual Hat of the Month Club CAL hosted by Rhondda from Oombawka Design and Amy from The Stitchin’ Mommy. Rhondda’s hat of the month for September is her new Between Seasons Hat. Amy’s hat of the month for September is her new Jubilee Hat.
If you would like to know more about this CAL, including the schedule please visit the links above.
Bulky-Weight Yarn
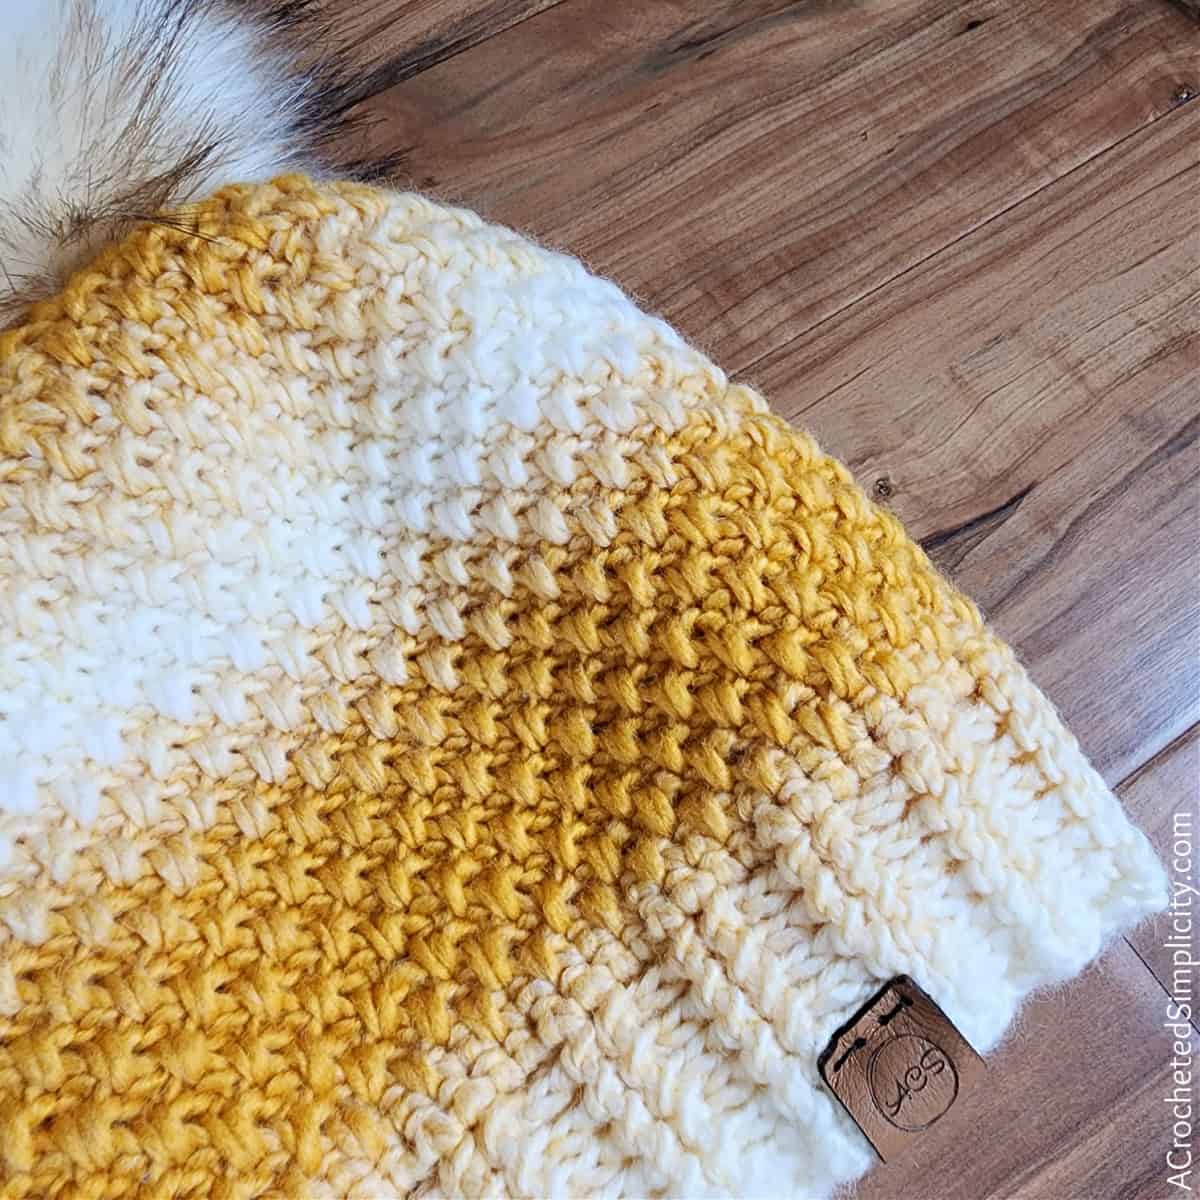
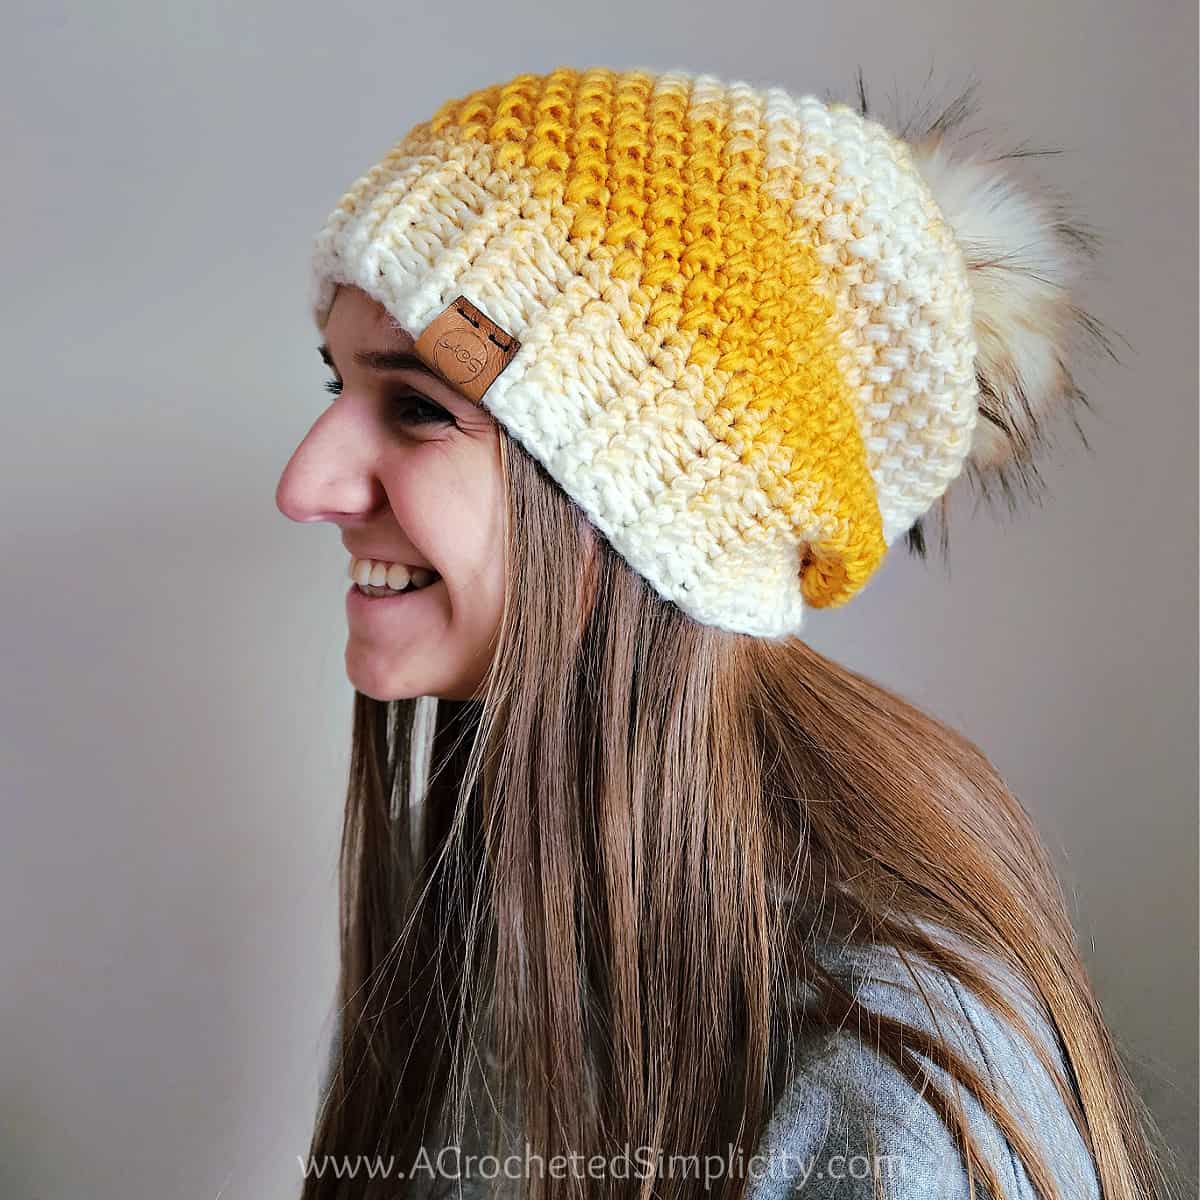
For this chunky yarn crochet hat pattern, I chose to use Lion Brand Scarfie. Scarfie is a bulky yarn, acrylic and wool blend, that is available in 25 gorgeous long self-striping colorways! Scarfie is a fantastic yarn for projects that you’d love an ombre look without working color changes and having extra ends to weave in.
Each ball of Scarfie yarn comes with 312 yards making it great for a one skein Scarfie hat pattern!
If you’ve always wanted to crochet with Scarfie yarn, this crochet slouchy hat free pattern is the perfect one ball crochet Scarfie project!
Did you know? Chunky yarn and bulky yarn are one in the same and the terms are used interchangeably.
Yarn Substitutes
If you don’t have access to Lion Brand Scarfie, but would love to make this chunky yarn hat pattern, no worries! I’ve got a couple great options for you to check out.
When I haven’t used a yarn before and need to find a yarn substitution, the first thing I do is to check YarnSub.com to look for a comparable yarn.
If you’re unable to find a suitable bulky yarn, the next best thing is to hold 2 strands of lighter worsted yarn together (by lighter worsted I mean a 4 weight yarn, not DK 3 weight yarn). For example, I’ve held together 2 strands of Lion Brand Wool Ease or Pound of Love when I’ve needed a chunky yarn.
I highly recommend that when holding 2 strands together, it’s best to do a crochet swatch to make sure that the 2 yarns you’re holding together will work for Scarfie Yarn crochet hat patterns.
More Free Crochet Patterns Using Lion Brand Scarfie Yarn
Free Scarfie Crochet Patterns
- Aveline Reversible Crochet Keyhole Scarf – uses only one ball of yarn!
- Argyle Crochet Cowl & Infinity Scarf – pattern includes worsted weight and chunky crochet yarn instructions
- Scarfie Bandana Cowl Crochet Pattern – only one skein of yarn needed!
- Agate Beach Chevron Crochet Blanket – have you been searching for Scarfie Lite patterns?

ELOISE SLOUCH – FREE CROCHET HAT PATTERN
The free crochet pattern is below, but if you love to work offline, or need to order your yarn, I’ve got a couple other great options for you.
Purchase the ad-free, printable PDF, including all photo tutorials, on Love Crafts, Ravelry, or Etsy (aff).
This post contains affiliate links.
Materials
- Yarn: Bulky 5 Weight Yarn /5/ Lion Brand Scarfie in Cream/Mustard was used for hat in the photos. 78% Acrylic / 22% Wool (312 yds / 285 m / 150 g / 5.3 oz)
- Yardage: 170 (180, 190, 200) yards
- Crochet Hooks: I/9/5.50mm; J/10/6.00mm (My favorite crochet hooks are the Clover Amour Hooks, I’ve never had an ache in my hand since switching)
- Scissors
- Yarn Needle
- Faux Fur Pom Poms (optional – I LOVE these poms!)
- Faux Fur Pom shown in photo was purchased on Etsy (aff)
Many of these materials are available for purchase through our affiliates below:
 Lion Brand Yarn 826-214 Sca...Shop on Amazon
 ") JINSEY 12pcs Faux Fur Fluff...Shop on Amazon
JINSEY 12pcs Faux Fur Fluff...Shop on Amazon  Clover 1047/H Deep Blue Amo...Shop on Amazon
  Clover 3672 Amour Crochet H...Shop on Amazon
  Fiskars 154110-1001 Non-sti...Shop on Amazon
FITS HEAD SIZE
- Toddler: 16″ – 17-1/2″ circumference
- Child: 18″ – 20″ circumference
- Teen / Adult Small: 20-1/2” – 22-1/2” circumference
- Adult Medium / Large: 23″ – 24-1/2″ circumference
Experience Level
- Easy
Gauge
- Hat band with 6.00mm hook, in fpsc: 12 sts = 3.25″ ; 7 rows = 2″
- Body of Hat with 5.50mm hook, in extended moss stitch: 9 sts = 3″; 9 rows = 3″
ABBREVIATIONS (US TERMS)
- ch(s): chain(s)
- sl st(s): slip stitch(es)
- st(s): stitch(es)
- sc: single crochet
- dc: double crochet
- dc2tog: double crochet decrease
- BPsc: back post single crochet
- FPsc: front post single crochet
- RS: right side
- BLO: back loop only
- FLO: front loop only
- Rep: repeat
- Rnd: round
- yo: yarn over
NOTES
- Turning chains are not included in stitch count unless noted otherwise.
- Yarn Notes: Lion Brand Scarfie Yarn was used for the samples. Another comparable bulky weight yarn may be used as long as gauge is met. Some worsted weight yarns may also meet gauge.
- Lion Brand Yarns Scarfie in Cream/Mustard: 78% Acrylic / 22% Wool (312 yds / 285 m / 150 g / 5.3 oz)
- Yardage: 170 (180, 190, 200) yards
- Changes for sizes are written as follows: Toddler (Child, Teen/Adult Small, Adult Medium/Large).
- This free crochet slouch hat pattern is sized from toddler all the way up to an adult crochet hat pattern.
- This free crochet hat is worked in joined rounds from the hat band to the crown.
Special Stitches
- Back Post Single Crochet (BPsc): Insert hook from back to front to back around the post of the designated stitch, yo, pull up a loop, yo, pull thru both loops on hook.
- Front Post Single Crochet (FPsc): Insert hook from front to back to front around the post of the designated stitch, yo, pull up a loop, yo, pull thru both loops on hook.
- Double Crochet Decrease (dc2tog): (Yo, insert hook in next st, yo, pull up a loop, yo, pull thru 2 loops on hook) twice, yo, pull thru remaining 3 loops on hook.
Are you ready to make a crochet hat pattern using Scarfie yarn?
Crochet Pattern Slouchy Hat Instructions
Chunky Yarn Crochet Hat Band
Set-up: With yarn and a 6.00mm crochet hook, ch 56 (64, 72, 80) sts, being careful not to twist the ch, join with a sl st to the 1st ch. (56, 64, 72, 80 sts)
Rnd 1: Ch 1, working into the back hump of the ch, sc in each ch around. Join with a sl st to the first st. (56, 64, 72, 80 sts)
Rnds 2 – 7: Ch 1, (FPsc around each of the next 2 sts, BPsc around each of the next 2 sts) rep around. Join.
Do not fasten off. Continue on to the Body of Hat.
Body of Hat
Rnd 1: Switch to a 5.50mm crochet hook, ch 1, sc in each st around. Join with a sl st to the 1st st. (56, 64, 72, 80 sts)
Rnd 2: Ch 1, (sc in the next st, ch 1, skip the next st) rep around. Join.
Rnd 3: Ch 2 (counts as turning ch & 1st ch-1), skip the first st, dc in the next skipped st 2 rows below, (ch 1, skip the next st, dc in the next skipped st 2 rows below) rep around. Join.
Rnd 4: Ch 1, (dc in the next skipped st 2 rows below, ch 1, skip the next st) rep around. Join.
Rnd 5: Ch 2, (counts as turning ch & 1st ch-1), skip the first st, dc in the next skipped st 2 rows below, (ch 1, skip the next st, dc in the next skipped st 2 rows below) rep around. Join.
Rep Rnds 4 – 5, ending with a Rnd 5 rep, until your hat measures. 7″ (7.5″, 8″, 8.5″ sts).
Do not fasten off. Continue on to the Crown Shaping for the size you’re making.
Crown Shaping – Toddler
Rnd 1: Ch 1, [ dc2tog over the next 2 sts 2 rounds below skipping over a dc, (ch 1, skip the next st, dc in the next skipped st 2 rounds below) 5 times, ch 1, skip the next st ] work from [ to ] 4 times. Join. (48 sts) See photos below for working the dc2tog.
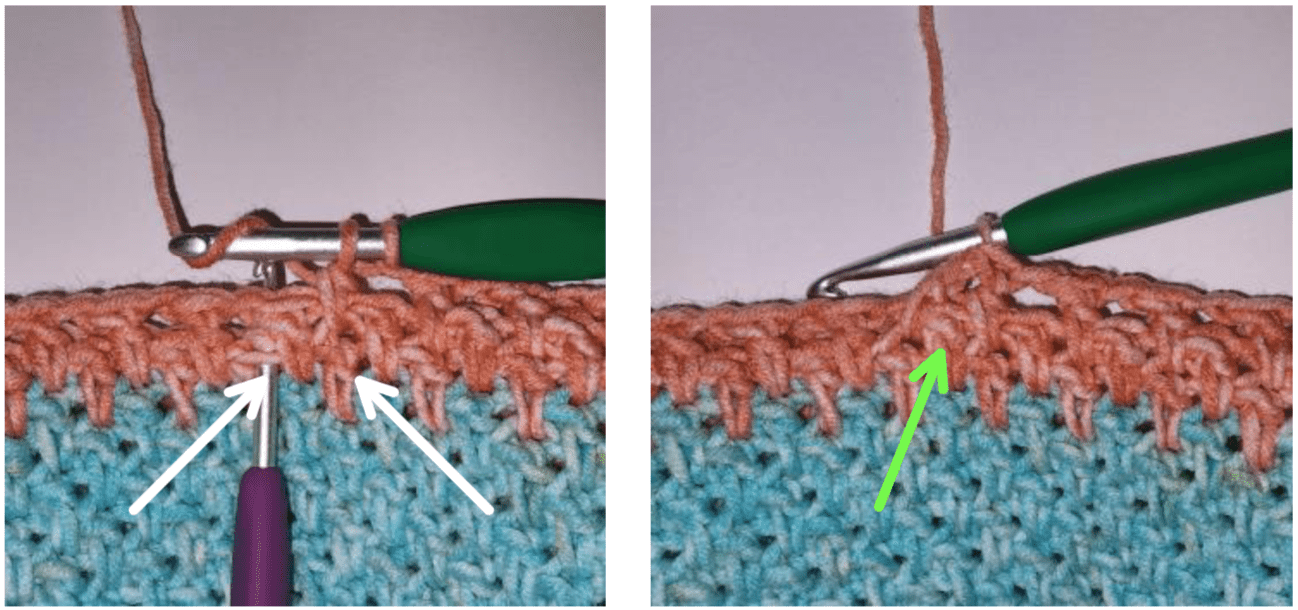
Photo Above Left: The white arrows are pointing to the 2 skipped dc from 2 rounds below that you need to work your dc2tog into.
Photo Above Right: The green arrow is pointing to the dc you will skip while working the dc2tog.
Rnd 2: Ch 2 (counts as turning ch and 1st ch-1), skip the first st, [ dc2tog over the next 2 sts 2 rounds below skipping over a dc, (ch 1, skip the next st, dc in the next skipped st 2 rounds below) 4 times, ch 1, skip the next st ] work from [ to ] 3 times, then dc2tog over the next 2 sts 2 rounds below skipping over a dc, (ch 1, skip the next st, dc in the next skipped st 2 rounds below) 4 times. Join. (40 sts)
Rnd 3: Ch 1, dc in the next skipped st 2 rounds below, ch 1, skip the next st, [ dc2tog over the next 2 sts 2 rounds below skipping over a dc, (ch 1, skip the next st, dc in the next skipped st 2 rounds below) 3 times, ch 1, skip the next st ] work from [ to ] 3 times, then dc2tog over the next 2 sts 2 rounds below skipping over a dc, ch 1, skip the next st, (dc in the next skipped st 2 rounds below, ch 1, skip the next st) 2 times. Join. (32 sts)
Rnd 4: Ch 2 (counts as turning ch and 1st ch-1), skip the first st, dc in the next skipped st 2 Rnds below, ch 1, skip the next st, [ dc2tog over the next 2 sts 2 rounds below skipping over a dc, (ch 1, skip the next st, dc in the next skipped st 2 rounds below) 2 times, ch 1, skip the next st ] work from [ to ] 3 times, dc2tog over the next 2 sts 2 rounds below skipping over a dc, ch 1, skip the next st, dc in the next skipped st 2 rounds below. Join. (24 sts)
Rnd 5: Ch 1, [ dc2tog over the next 2 sts 2 rounds below skipping over a dc, ch 1, skip the next st, dc in the next st 2 rounds below, ch 1, skip the next st ] work from [ to ] 4 times. Join. (16 sts)
Rnd 6: Ch 1, (sc in the next st, dc2tog over the next 2 sts 2 rounds below) 4 times. Join. (8 sts)
Fasten off. Leave 8″ tail to see closed crown. Sew closed crown. Weave in ends.
Choose a side! The hat shown in the photos was turned inside out. I preferred that side.
Crown Shaping – Child
Rnd 1: Ch 1, [ dc2tog over the next 2 sts 2 rounds below skipping over a dc, (ch 1, skip the next st, dc in the next skipped st 2 rounds below) 6 times, ch 1, skip the next st ] work from [ to ] 4 times. Join. (56 sts) See photos below for working the dc2tog.
Photo Above Left: The white arrows are pointing to the 2 skipped dc from 2 rounds below that you need to work your dc2tog into.
Photo Above Right: The green arrow is pointing to the dc you will skip while working the dc2tog.
Rnd 2: Ch 2 (counts as turning ch and 1st ch-1), skip the first st, [ dc2tog over the next 2 sts 2 rounds below skipping over a dc, (ch 1, skip the next st, dc in the next skipped st 2 rounds below) 5 times, ch 1, skip the next st ] work from [ to ] 3 times, then dc2tog over the next 2 sts 2 rounds below skipping over a dc, (ch 1, skip the next st, dc in the next skipped st 2 rounds below) 5 times. Join. (48 sts)
Rnd 3: Ch 1, dc in the next skipped st 2 rounds below, ch 1, skip the next st, [ dc2tog over the next 2 sts 2 rounds below skipping over a dc, (ch 1, skip the next st, dc in the next skipped st 2 rounds below) 4 times, ch 1, skip the next st ] work from [ to ] 3 times, then dc2tog over the next 2 sts 2 rounds below skipping over a dc, ch 1, skip the next st, (dc in the next skipped st 2 rounds below, ch 1, skip the next st) 3 times. Join. (40 sts)
Rnd 4: Ch 2 (counts as turning ch and 1st ch-1), skip the first st, dc in the next skipped st 2 rounds below, ch 1, skip the next st, [ dc2tog over the next 2 sts 2 rounds below skipping over a dc, (ch 1, skip the next st, dc in the next skipped st 2 rounds below) 3 times, ch 1, skip the next st ] work from [ to ] 3 times, then dc2tog over the next 2 sts 2 rounds below skipping over a dc, (ch 1, skip the next st, dc in the next skipped st 2 rounds below) 2 times. Join. (32 sts)
Rnd 5: Ch 1, [ dc2tog over the next 2 sts 2 rounds below skipping over a dc, (ch 1, skip the next st, dc in the next st 2 rounds below) 2 times, ch 1, skip the next st ] work from [ to ] 4 times. Join. (24 sts)
Rnd 6: Ch 2 (counts as turning ch and 1st ch-1), skip the first st, [ dc2tog over the next 2 sts 2 rounds below skipping over a dc, ch 1, skip the next st, dc in the next st 2 rounds below, ch 1, skip the next st ] work from [ to ] 3 times, then dc2tog over the next 2 sts 2 rounds below skipping over a dc, ch 1, skip the next st, dc in the next st 2 rounds below. Join. (16 sts)
Rnd 7: Ch 1, (dc2tog over the next 2 sts 2 rounds below, sc in the next st) 4 times. Join. (8 sts)
Fasten off. Leave 8″ tail to see closed crown. Sew closed crown. Weave in ends.
Choose a side! The hat shown in the photos was turned inside out. I preferred that side.
Crown Shaping – Teen / Adult Small
Rnd 1: Ch 1, [ dc2tog over the next 2 sts 2 rounds below skipping over a dc, (ch 1, skip the next st, dc in the next skipped st 2 rounds below) 6 times, ch 1, skip the next st ] work from [ to ] 4 times, (dc in the next skipped st 2 rounds below, ch 1, skip the next st) 4 times. Join. (64 sts) See photos below for working the dc2tog.
Photo Above Left: The white arrows are pointing to the 2 skipped dc from 2 rounds below that you need to work your dc2tog into.
Photo Above Right: The green arrow is pointing to the dc you will skip while working the dc2tog.
Rnd 2: Ch 2 (counts as turning ch and 1st ch-1), skip the first st, [ dc2tog over the next 2 sts 2 rounds below skipping over a dc, (ch 1, skip the next st, dc in the next skipped st 2 rounds below) 6 times, ch 1, skip the next st ] work from [ to ] 3 times, then dc2tog over the next 2 sts 2 rounds below skipping over a dc, (ch 1, skip the next st, dc in the next skipped st 2 rounds below) 5 times, ch 1, skip the next st, dc in the next skipped st 2 rounds below. Join. (56 sts)
Rnd 3: Ch 1, dc in the next skipped st 2 rounds below, ch 1, skip the next st, [ dc2tog over the next 2 sts 2 rounds below skipping over a dc, (ch 1, skip the next st, dc in the next skipped st 2 rounds below) 6 times, ch 1, skip the next st ] work from [ to ] 3 times, then dc2tog over the next 2 sts 2 rounds below skipping over a dc, ch 1, skip the next st, dc in the next skipped st 2 rounds below, ch 1, skip the next st. Join. (48 sts)
Rnd 4: Ch 2 (counts as turning ch and 1st ch-1), skip the first st, dc in the next skipped st 2 rounds below, ch 1, skip the next st, [ dc2tog over the next 2 sts 2 rounds below skipping over a dc, (ch 1, skip the next st, dc in the next skipped st 2 rounds below) 5 times, ch 1, skip the next st ] work from [ to ] 3 times, then dc2tog over the next 2 sts 2 rounds below skipping over a dc. Join. (40 sts)
Rnd 5: Ch 1, [ dc2tog over the next 2 sts 2 rounds below skipping over a dc, (ch 1, skip the next st, dc in the next st 2 rounds below) 4 times, ch 1, skip the next st ] work from [ to ] 3 times, then dc2tog over the next 2 sts 2 rounds below skipping over a dc, ch 1, skip the next st. Join. (32 sts)
Rnd 6: Ch 2 (counts as turning ch and 1st ch-1), skip the first st, [ dc2tog over the next 2 sts 2 rounds below skipping over a dc, (ch 1, skip the next st, dc in the next st 2 rounds below) 2 times, ch 1, skip the next st ] work from [ to ] 3 times, then dc2tog over the next 2 sts 2 rounds below skipping over a dc, (ch 1, skip the next st, dc in the next st 2 rounds below) 2 times. Join. (24 sts)
Rnd 7: Ch 1, dc in the next st 2 rounds below, ch 1, skip the next st, [ dc2tog over the next 2 sts 2 rounds below skipping over a dc, ch 1, skip the next st, dc in the next st 2 rounds below, ch 1, skip the next st ] work from [ to ] 3 times, then dc2tog over the next 2 sts 2 rounds below skipping over a dc, ch 1, skip the next st. Join. (16 sts)
Rnd 8: Ch 1, (sc in the next st, dc2tog over the next 2 sts 2 rounds below) 4 times. Join. (8 sts)
Fasten off. Leave 8″ tail to see closed crown. Sew closed crown. Weave in ends.
Choose a side! The hat shown in the photos was turned inside out. I preferred that side.
Crown Shaping – Adult Medium / Large
Rnd 1: Ch 1, [ dc2tog over the next 2 sts 2 rounds below skipping over a dc, (ch 1, skip the next st, dc in the next skipped st 2 rounds below) 8 times, ch 1, skip the next st ] work from [ to ] 4 times. Join. (72 sts) See photos below for working the dc2tog.
Photo Above Left: The white arrows are pointing to the 2 skipped dc from 2 rounds below that you need to work your dc2tog into.
Photo Above Right: The green arrow is pointing to the dc you will skip while working the dc2tog.
Rnd 2: Ch 2 (counts as turning ch and 1st ch-1), skip the first st, [ dc2tog over the next 2 sts 2 rounds below skipping over a dc, (ch 1, skip the next st, dc in the next skipped st 2 rounds below) 7 times, ch 1, skip the next st ] work from [ to ] 3 times, then dc2tog over the next 2 sts 2 rounds below skipping over a dc, (ch 1, skip the next st, dc in the next skipped st 2 rounds below) 6 times, ch 1, skip the next st, dc in the next skipped st 2 rounds below. Join. (64 sts)
Rnd 3: Ch 1, dc in the next skipped st 2 rounds below, ch 1, skip the next st, [ dc2tog over the next 2 sts 2 rounds below skipping over a dc, (ch 1, skip the next st, dc in the next skipped st 2 rounds below) 6 times, ch 1, skip the next st ] work from [ to ] 3 times, then dc2tog over the next 2 sts 2 rounds below skipping over a dc, ch 1, skip the next st, (dc in the next skipped st 2 rounds below, ch 1, skip the next st) 5 times. Join. (56 sts)
Rnd 4: Ch 2 (counts as turning ch and 1st ch-1), skip the first st, dc in the next skipped st 2 rounds below, ch 1, skip the next st, [ dc2tog over the next 2 sts 2 rounds below skipping over a dc, (ch 1, skip the next st, dc in the next skipped st 2 rounds below) 5 times, ch 1, skip the next st ] work from [ to ] 3 times, then dc2tog over the next 2 sts 2 rounds below skipping over a dc, (ch 1, skip the next st, dc in the next skipped st 2 rounds below) 4 times . Join. (48 sts)
Rnd 5: Ch 1, [ dc2tog over the next 2 sts 2 rounds below skipping over a dc, (ch 1, skip the next st, dc in the next st 2 rounds below) 4 times, ch 1, skip the next st ] work from [ to ] 4 times. Join. (40 sts)
Rnd 6: Ch 2 (counts as turning ch and 1st ch-1), skip the first st, [ dc2tog over the next 2 sts 2 rounds below skipping over a dc, (ch 1, skip the next st, dc in the next st 2 rounds below) 3 times, ch 1, skip the next st ] work from [ to ] 3 times, dc2tog over the next 2 sts 2 rounds below skipping over a dc, (ch 1, skip the next st, dc in the next st 2 rounds below) 3 times. Join. (32 sts)
Rnd 7: Ch 1, dc in the next st 2 rounds below, ch 1, skip the next st, [ dc2tog over the next 2 sts 2 rounds below skipping over a dc, (ch 1, skip the next st, dc in the next st 2 rounds below) 2 times, ch 1, skip the next st ] work from [ to ] 3 times, then dc2tog over the next 2 sts 2 rounds below skipping over a dc, ch 1, skip the next st, dc in the next st 2 rounds below, ch 1, skip the next st. Join. (24 sts)
Rnd 8: Ch 1, (sc in the next st, dc2tog over the next 2 sts 2 rounds below) 6 times. Join. (12 sts)
Fasten off. Leave 8″ tail to see closed crown. Sew closed crown. Weave in ends.
Choose a side! The hat shown in the photos was turned inside out. I preferred that side.
Personalize Your Winter Crochet Hat USING ONE OF THESE FUN OPTIONS!
- Chain Loop Yarn Pom
- Faux Fur Pom
- Personalized Tags
- Faux Fur Pom shown in photo was purchased on Etsy (aff)
QUESTIONS CROCHETERS FREQUENTLY ASK ABOUT BULKY YARN CROCHET HAT PATTERNS
In addition to questions I’ve answered in this blog post above, below are some commonly asked questions about a winter crochet hat.
What is scarfie yarn?
Scarfie yarn is a craft yarn council 5 weight / bulky yarn (chunky yarn). It is a 78% acrylic, 22% wool yarn blend comes in a 312 yard ball. It is currently available in 22 beautiful colors that each have a unique self-striping ombre effect.
What is the difference between chunky and bulky yarn?
There is no difference between chunky and bulky yarns. They are one in the same. Both ‘bulky’ and ‘chunky’ are terms that refer to a size 5 yarn weight.
How much yarn do you need to crochet a hat?
The answer to this question varies from crochet pattern to crochet pattern depending on the weight of yarn used and even the crochet stitches that are used.
For this slouchy crochet hat pattern, depending on the size you’re making, you will need approximately 170 – 200 yards. This is less than one ball of Scarfie yarn.
What can I make with one ball of yarn crochet?
There are many different projects you can crochet with one ball of yarn. Hats, gloves, scarves, and dishcloths seem to be the most common.
I MADE IT! NOW WHAT?
Pin this post! Save this free bulky yarn hat patterns to your Pinterest boards so that you can come back and make it again.
Leave a comment below: We love to hear your feedback.
Share Your Finished Projects on Facebook or Instagram: I love to see your finished projects! Share with us on social media and tag me @acrochetedsimplicity or use the hashtag #ACrochetedSimplicity so I can find your posts.
JOIN US IN THE FACEBOOK COMMUNITY GROUP!
I hope you’ve enjoyed this bulky yarn crochet hat pattern free! Make sure to check out our other pattern for crochet hat.
Come share your finished projects with us in the A Crocheted Simplicity Crochet Community Group on Facebook. Join us for fun community events such as crochet alongs, join in on crochet conversations, ask questions, get advice, and share your love for crochet!

MORE FREE WINTER CROCHET HAT PATTERNS I THINK YOU’LL LOVE
MORE Winter Crochet Hat Patterns
Are you looking for more free crochet patterns for hats? We have several free crochet hat patterns for men, women, teens, children, and babies right here on our blog.
But, if you haven’t found just the right beanie patterns for you, don’t miss our selection premium crochet hat patterns!
Lion Brand Scarfie Yarn Patterns
If you’re looking for even more Scarfie yarn patterns, check out Lion Brand! They have all sorts or projects from Scarfie Yarn crochet hat patterns, scarves, and cowls to ponchos, sweaters and blankets!
What a beautiful hat. I love the stitch pattern. I got the pattern today. Thank you! I can’t wait to get started.
Are we turning every *other* row? So don’t turn work for row 4 but turn for row 5?
Hi Erienne,
You do not turn at all for this pattern. Hope this helps!
Jennifer
How did you get your ribbing straight? Mine goes at a diagonal and not the nice straight up and down like you have.
When we start the body of the hat on round 3 and we chain 2 at the beginning (one counts as turning chain and one is ch-1 space) where do we join at the end of the round? in the 1st DC or the ch-1 space or the turning chain? Thanks in advance!
Hi Jean,
Join to the 1st stitch of the round, that will be the first dc.
I hope this helps,
Jennifer
I love this hat and see a few of them in my future. I also love how you explaine everything so well. Thank you.
This looks lovely.
Thank you for the Eloise Slouch hat pattern. I have been looking for a pattern to use Scarfie yarn. I have the color Rust and can’t wait to try it. I’m a beginner, but I think I can make it.
The Mini-Moguls Ski Slouch is gorgeous. Very difficult to choose adjust one favorite pattern.
This is pretty ! Reminds me of the Christmas special ´Eloise Christmas 🎄 💛