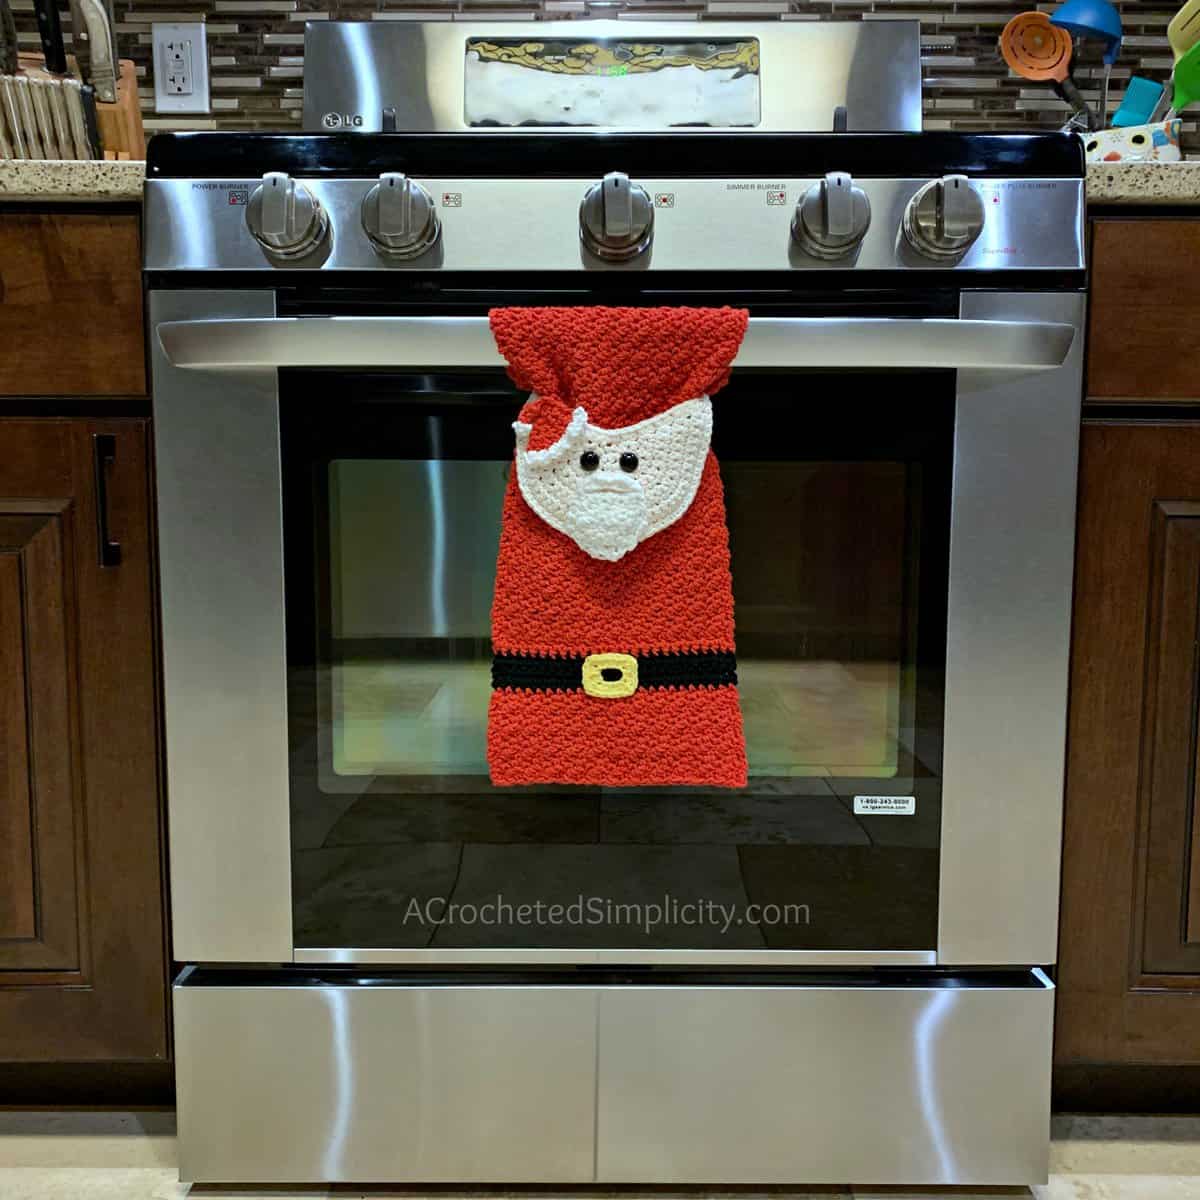
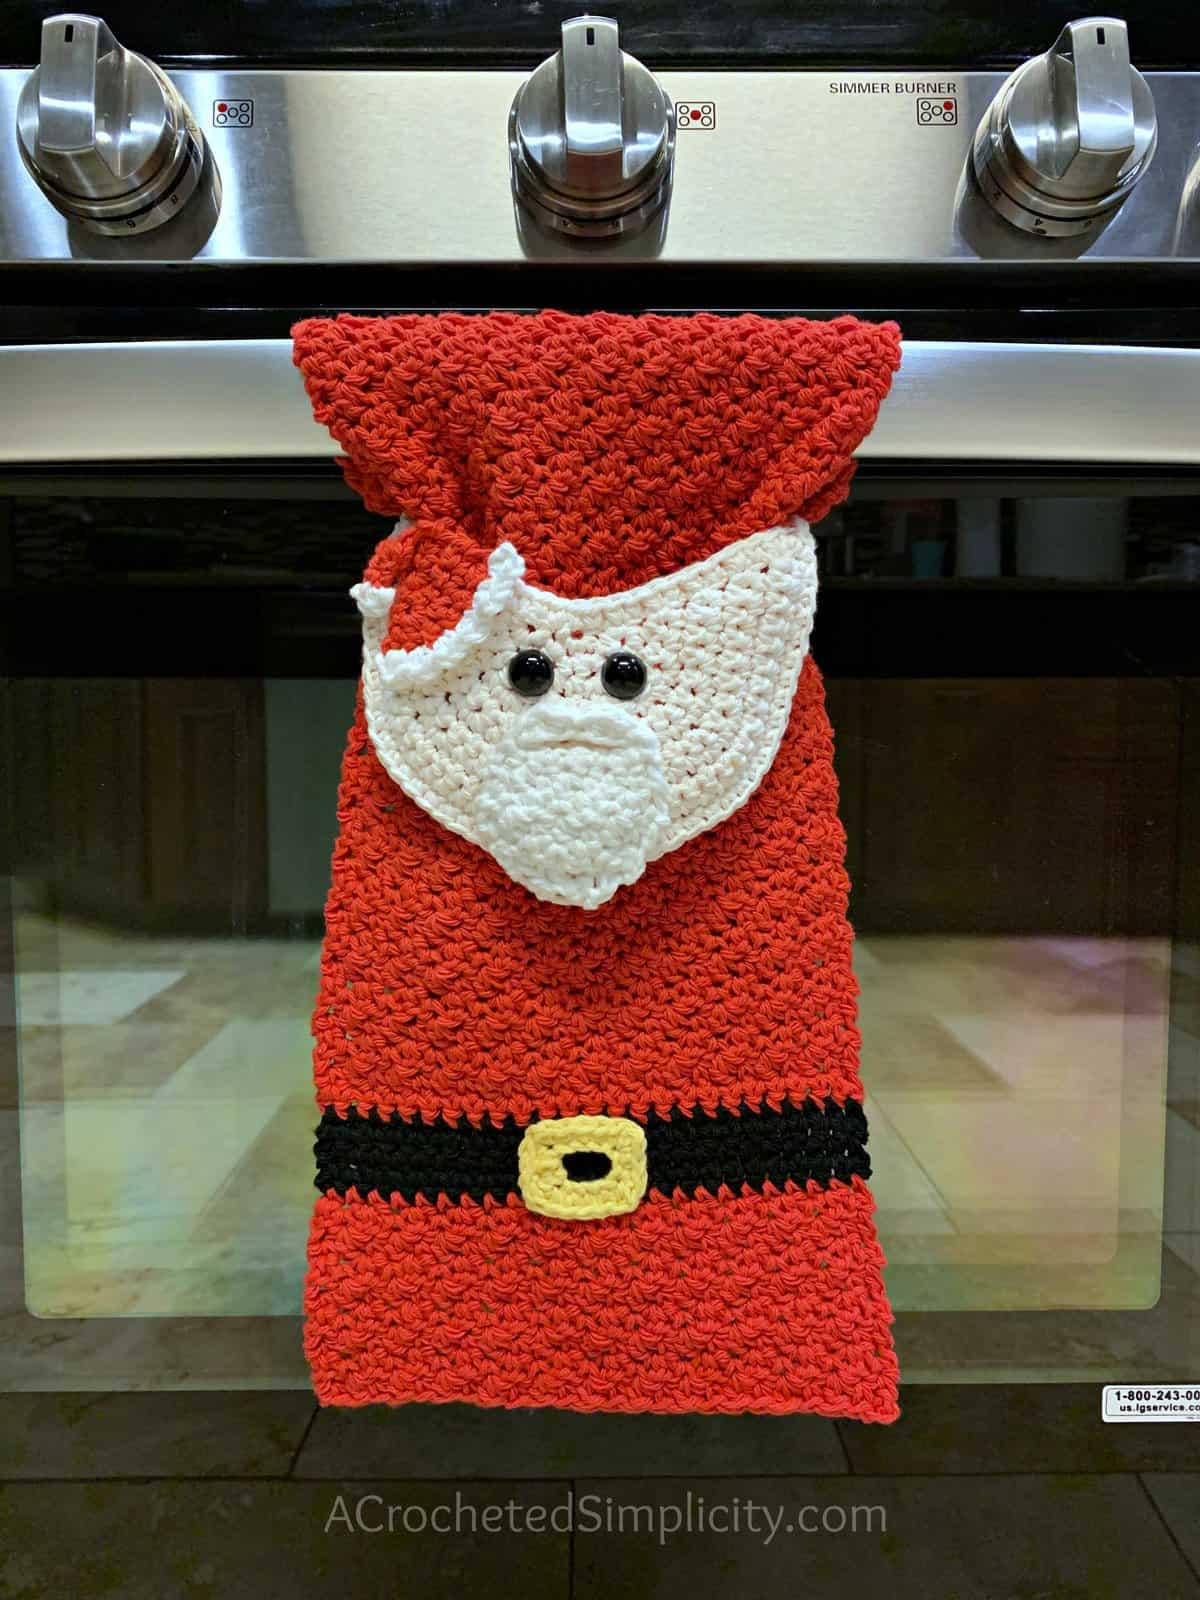
Santa Claus Kitchen Towel – Free Crochet Towel Pattern
After receiving lots of love for my Farmhouse Striped Kitchen Towel and Buffalo Plaid Kitchen Towel, I knew I just had to make a few fun, festive towels for the upcoming holiday season. The Gingerbread Man Kitchen Towel was the first in this series of crochet kitchen towels for the holidays and I was immediately smitten. Since designing the Gingerbread Man Kitchen Towel, I’ve released a Snowman & Turkey and now it’s time for the Santa Claus Kitchen Towel.
You can find the free crochet towel pattern in this post below, or an ad-free print friendly version on Ravelry, or on Etsy.
This fall, I’ve been making new crochet kitchen towels, but I wanted them to be a little less traditional in style. Having to constantly pick up the towels off the floor and wash them because they’ve slipped off the oven handle yet again, gets old in a quick hurry. I love the way the Farmhouse Striped & Buffalo Plaid Kitchen Towels hang, but wanted something a little different for the Christmas crochet towels. I hope you love the simplicity of these towels and are excited to add a little fun to your Christmas kitchen decor.
Crochet Character Keyhole Towels
Since designing my first crochet Christmas towel, I’ve received requests for all sorts of characters for the different holidays. The following are the character keyhole towels I’ve designed to date. They can all be found on my blog by clicking the links below:
- Ghost Kitchen Towel
- Frankenstein’s Monster Kitchen Towel
- Kitty Cat Kitchen Towel
- Turkey Kitchen Towel
- Snowman Kitchen Towel
- Gingerbread Man Kitchen Towel
- Santa Kitchen Towel – in this blog post below!
- Mrs. Claus Kitchen Towel
- Reindeer Kitchen Towel
- Elf Kitchen Towel
- Buffalo Plaid Moose Kitchen Towel
- Leprechaun Kitchen Towel
- Easter Bunny Towel & Washcloth Set
Non-Character Crochet Stay Put / Keyhole Towels
I’ve also designed several other crochet kitchen towels that are not characters.
You’ll find a variety of styles to match your home. Styles range from buffalo plaid to farmhouse to basic keyhole towel patterns that you can customize to match your home’s decor.
You can find all non-character keyhole towel patterns here: Free Crochet Kitchen Towel Patterns
Yarn
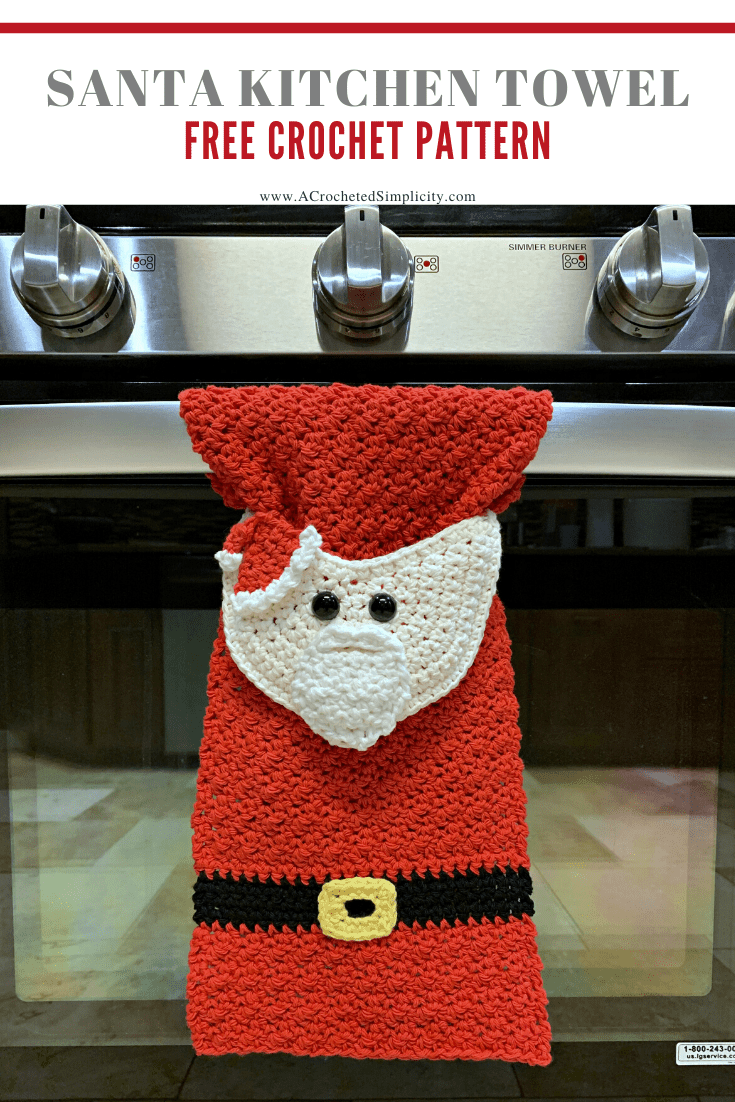
Santa Claus Kitchen Towel – Free Crochet Dish Towel Pattern
The free crochet dish towel pattern is below, but if you love to work offline, or need to order your yarn, I’ve got a couple other great options for you.
Purchase the ad-free, printable PDF that includes all photo tutorials, on Ravelry, or Etsy.
Save this pattern to your Ravelry favorites.
This post contains affiliate links.
Materials
- Yarn: Lily Sugar n’ Cream / Worsted Weight / 4 / Cotton Yarn
- Red (125 yards)
- Soft Ecru: (25 yards)
- Black: (8 yards)
- White (5 yards)
- Yellow (2 yards)
- Crochet Hooks: J/10/6.00mm, H/8/5.00mm (My favorite crochet hooks are the Clover Amour Hooks, I’ve never had an ache in my hand since switching)
- Scissors
- Yarn Needle
- 15mm Black Safety Eyes (2) – optional
Gauge
- In sc with a 5.00 mm hook: 8 sts = 2″; 8 rows = 2″
- In body of towel with a 6.00 mm hook: 12 sts = 4″; 5 rows = 2″
Size
- One Size: 8″ W x 17″ L (not including the head)
Abbreviations (US Terms)
- ch(s): chain(s)
- st(s): stitch(es)
- sl st(s): slip stitch(es)
- sc: single crochet
- hdc: half double crochet
- dc: double crochet
- sc2tog: single crochet decrease
- RS: Right Side
- Rep: repeat
- Join yarn with a standing single crochet
Notes
- Turning chains are not included in stitch count unless noted otherwise.
- Yarn Notes: Lily Sugar n’ Cream worsted weight cotton yarn was used for the sample, 100% Cotton (120 yards / 109 m / 71 g / 2.5 oz).
- Yardage:
- Red (125 yards)
- Soft Ecru: (25 yards)
- Black: (8 yards)
- White (5 yards)
- Yellow (2 yards)
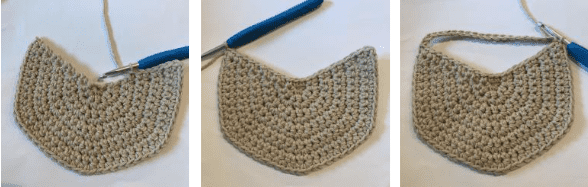
- This dish towel is constructed by first making a half circle for the head. You’ll then work the body of the towel from top down. Lastly, you’ll add facial features and a hat and belt buckle. I chose to use black plastic safety eyes for my towel, but have included instructions for crochet eyes, if you prefer them instead.
Santa Claus Dish Towel Instructions
Head
Row 1 (RS): With soft ecru yarn & a 5.00 mm hook, ch 2, work 4 sc in the 2nd ch from your hook. Do not join. Turn. (4 sts)
Row 2: Ch 1, work 2 sc in each st across. Turn. (8 sts)
Row 3: Ch 1, 2 sc in the first st, sc in the next st, * 2 sc in the next st, sc in the next st, rep from * across. Turn. (12 sts)
Row 4: Ch 1, 2 sc in the first st, sc in each of the next 2 sts, * 2 sc in the next st, sc in each of the next 2 sts, rep from * across. Turn. (16 sts)
Row 5: Ch 1, 2 sc in the first st, sc in each of the next 3 sts, * 2 sc in the next st, sc in each of the next 3 sts, rep from * across. Turn. (20 sts)
Row 6: Ch 1, 2 sc in the first st, sc in each of the next 4 sts, * 2 sc in the next st, sc in each of the next 4 sts, rep from * across. Turn. (24 sts)
Row 7: Ch 1, 2 sc in the first st, sc in each of the next 5 sts, * 2 sc in the next st, sc in each of the next 5 sts, rep from * across. Turn. (28 sts)
Row 8: Ch 1, 2 sc in the first st, sc in each of the next 6 sts, * 2 sc in the next st, sc in each of the next 6 sts, rep from * across. Turn. (32 sts)
Row 9: Ch 1, 2 sc in the first st, sc in each of the next 7 sts, * 2 sc in the next st, sc in each of the next 7 sts, rep from * across. Turn. (36 sts)
Row 10: Ch 1, 2 sc in the first st, sc in each of the net 8 sts, * 2 sc in the next st, sc in each of the next 8 sts, rep from * across. Turn. (40 sts)
Row 11: Ch 1, 2 sc in the first st, sc in each of the next 9 sts, * 2 sc in the next st, sc in each of the next 9 sts, rep from * across. Do not Turn. (44 sts)
Do not fasten off. Continue on to Body of Towel. Approximate width of head at this point is 5.75″.
Body of Towel
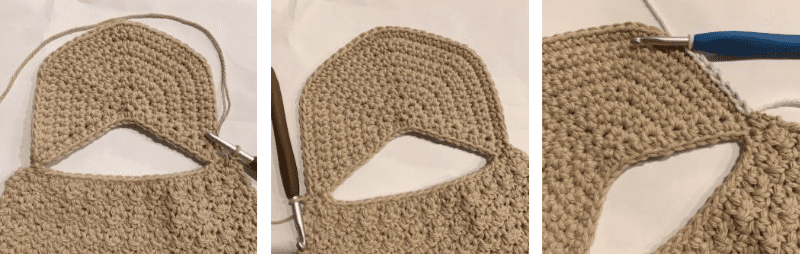
Row 1 (RS): With soft ecru yarn, ch 1, work 1 sc into the side of each row across half circle, also add 1 sc in the center ch. Turn. (23 sts) *Switch to red yarn. Fasten off soft ecru.
Row 2: With red yarn, ch 20, skip 22 sts, join with sl st in the 23rd st. Turn. (20 chs) See photo below, right.
Row 3: Switch to a 6.00 mm crochet hook, ch 1, working into the back hump of the ch, work 2 sc in the first ch, sc in each of next 18 chs, 2 sc in last ch. Turn. (22 sts)
Row 4: Ch 1, (sc, dc) in the first st, (sc in the next st, dc in the next st) 10 times, (sc, dc) in the last st. Turn. (24 sts)
Row 5: Ch 1, sc in the first st, dc in the next st, * sc in the next st, dc in the next st, rep from * across. Turn.
Rep Row 5 until your towel measures 12.5” from Row 2 of Body of Towel.
Do not fasten off. Continue on to Belt & Remainder of Body.
Belt & Remainder of Body
Row 1: Ch 1, sc in the first st, sc in each st across. Turn. (24 sts) *Fasten off red. Switch to black.
Row 2: With black yarn, join yarn with a standing sc in the first st, sc in each st across. Turn.
Rows 3 – 5: Ch 1, sc in the first st, sc in each st across. Turn. *At the end of Row 5, fasten off black. Switch to red.
Row 6: With red yarn, join yarn with a standing sc in the first st, sc in each st across. Turn.
Row 7: Ch 1, sc in the first st, dc in the next st, * sc in the next st, dc in the next st, rep from * across. Turn.
Rep Row 7 until your towel measures 17” from Row 2 of Body of Towel.
Fasten off. Weave in ends. Continue on to Santa Head Edging. Approximate length of body of towel is 17″.
Santa Head Edging
Row 1: With a 5.00mm crochet hook, join soft ecru yarn with a standing sc in the bottom of the st of Row 3 of Body of Towel (see pic below), sc in each st around the head, work 1 last sc in the bottom of the st at the opposite end of Row 3 of Body of Towel. (46 sts)
Fasten off. weave in ends. Continue on to Santa’s Hat, Belt Buckle, Eyes & Beard. Approximate width of head is now 6.25″.
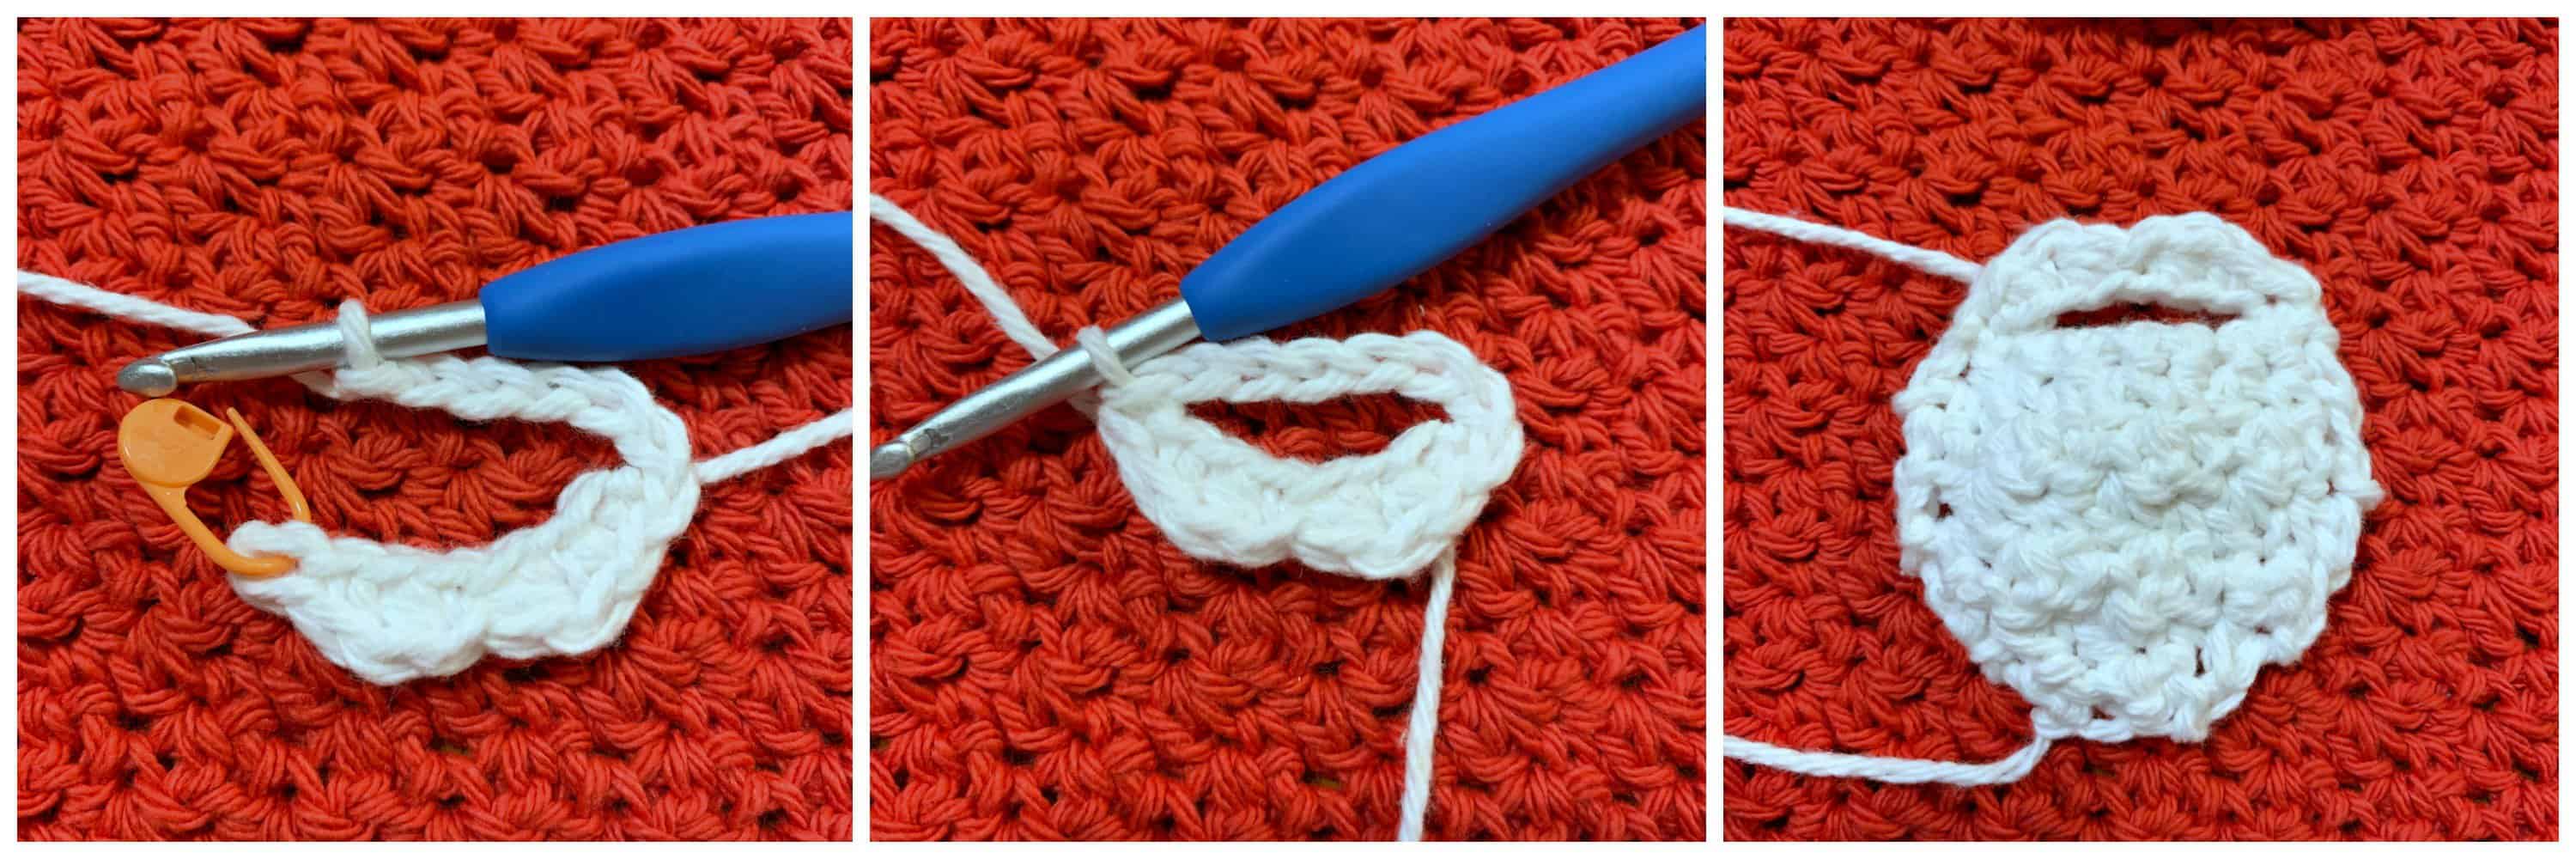
Belt Buckle
Set-up: With a 5.00 mm crochet hook and yellow yarn, ch 12. Being careful not to twist the ch, join with a sl st to the first ch.
Rnd 1: Ch 1, working into the back humps of the ch, sc in the first ch, (sc, ch 1, sc) in the next ch, sc in each of the next 3 chs, (sc, ch 1, sc) in the next ch, sc in the next ch, (sc, ch 1, sc) in the next ch, sc in each of the next 3 chs, (sc, ch 1, sc) in the next ch. Join with a sl st to the 1st st. (16 sc + 4 ch-1’s)
Fasten off leaving a 10″ long tail for sewing. Continue on to Santa’s Hat.
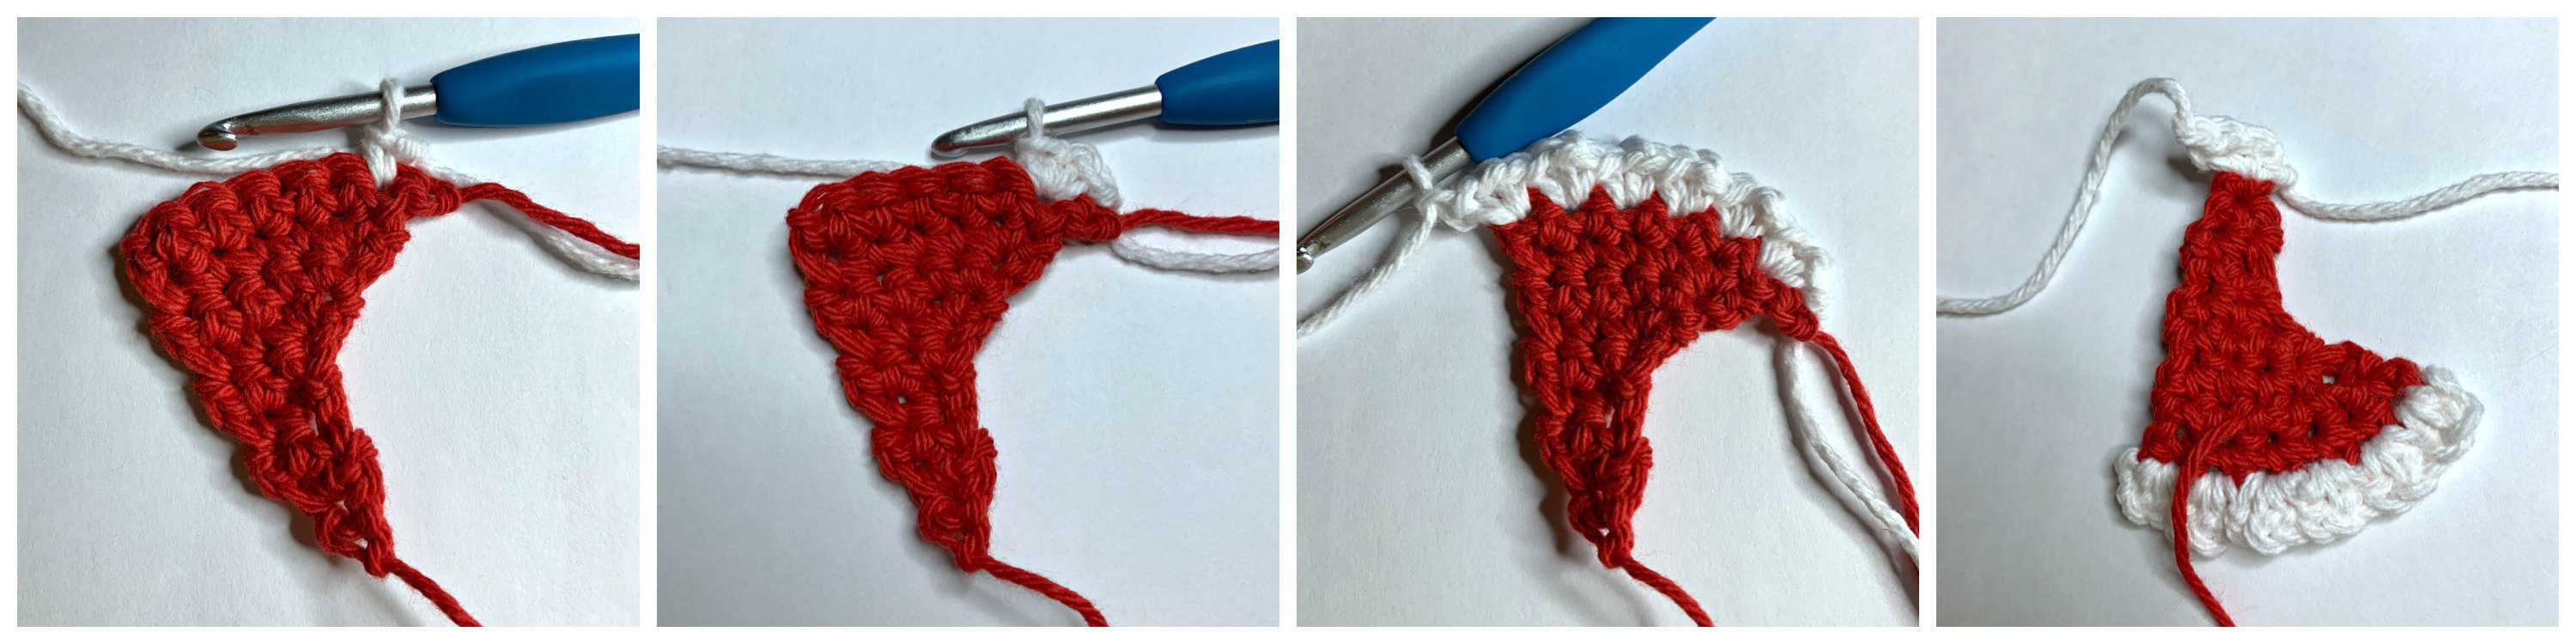
Santa’s Hat
Row 1: With a 5.00 mm crochet hook and red yarn, ch 2, work 1 sc in the 2nd ch from your hook. Turn. (1 st)
Row 2 (RS): Ch 1, 2 sc in the first st. Turn. (2 sts)
Rows 3 – 4: Ch 1, sc in the first st, sc in the next st. Turn.
Row 5: Ch 1, sc in the first st, 2 sc in the next st. Turn. (3 sts)
Row 6: Ch 1, 2 sc in the first st, sc in each of the next 2 sts. Turn. (4 sts)
Row 7: Ch 1, sc in the first st, sc in each of the next 2 sts, 2 sc in the last st. Turn. (5 sts)
Row 8: Ch 1, 2 sc in the first st, sc in each of the next 4 sts, Turn. (6 sts)
Row 9: Ch 1, sc in the first st, sc in each st across. Turn. *Fasten off red. Switch to white.
Row 10 (RS): With a 5.00 mm crochet hook, join white yarn with a standing sc in the first st, ch 1, work 1 more sc in the first st, * (sc, ch 1, sc) in the next st, rep from * across. (12 sc + 6 ch-1’s)
Fasten off. Weave in ends. Continue on to Pom.
Pom: With a 5.00mm crochet hook, join white yarn with a standing sc in the bottom of Row 1 of Santa’s Hat, ch 1, sc in the same st.
Fasten off. Weave in ends. Continue on to Santa’s Beard.
Santa’s Beard
Row 1: With a 5.00 mm crochet hook and white yarn, ch 8, working into the back hump of the ch, sl st in the 2nd ch from your hook, sc in the next ch, hdc in the next ch, sl st in the next ch, hdc in the next ch, sc in the next ch, sl st in the next ch, ch 8, rotate so that you can sl st in the bottom of the ch where you worked the very first sl st (see orange stitch marker in photo below). Turn. (7 sts + 8 chs)
Row 2: Ch 1, sc in each ch across. Turn. (8 sts)
Rows 3 – 5: Ch 1, sc in the first st, dc in the next st, (sc in the next st, dc in the next st) 3 times. Turn.
Row 6: Ch 1, sc2tog, (sc in the next st, dc in the next st) 2 times, sc2tog. Turn. (6 sts)
Row 7: Ch 1, sc2tog, dc in the next st, sc in the next st, sc2tog. Turn. (4 sts)
Row 8: Ch 1, sc2tog twice. (2 sts)
Fasten off. Weave in ends. Continue on to either making the Eyes, or if using black plastic safety eyes, continue on to Adding Details.
Eyes (Make 2)
Rnd 1: With black yarn and a 5.00 mm crochet hook, ch 2, work 6 sc in the 2nd ch from your hook. Join with a sl st to the first st. (6 sts)
Fasten off leaving a 10” tail for sewing. Weave in beginning tail end. Eyes are approximately .5″ in diameter. Continue on to Adding Details.
Adding Details
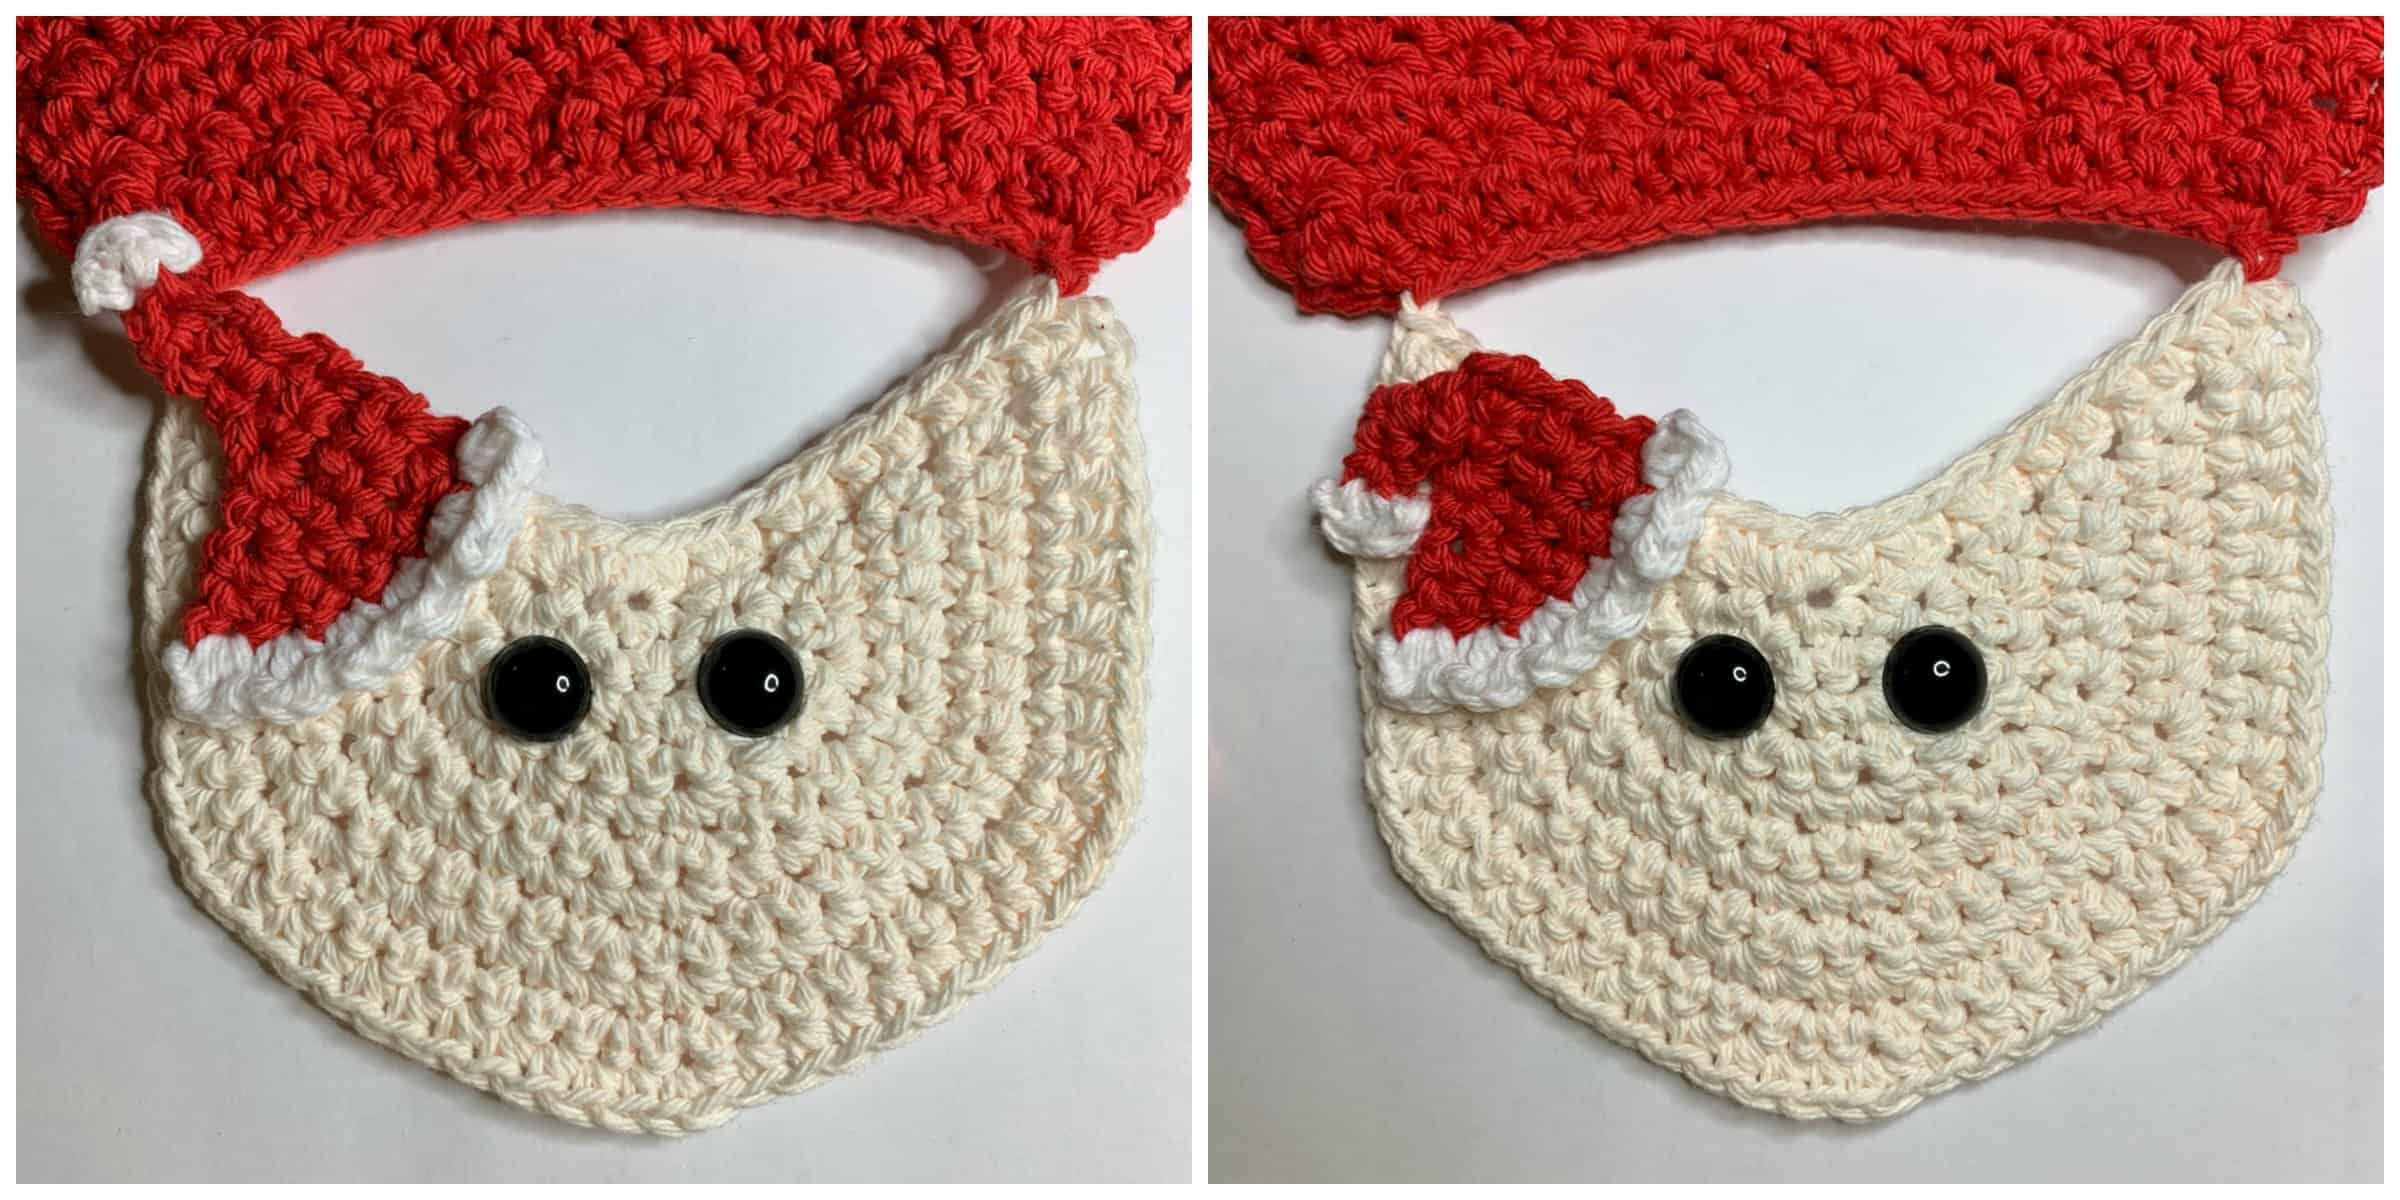
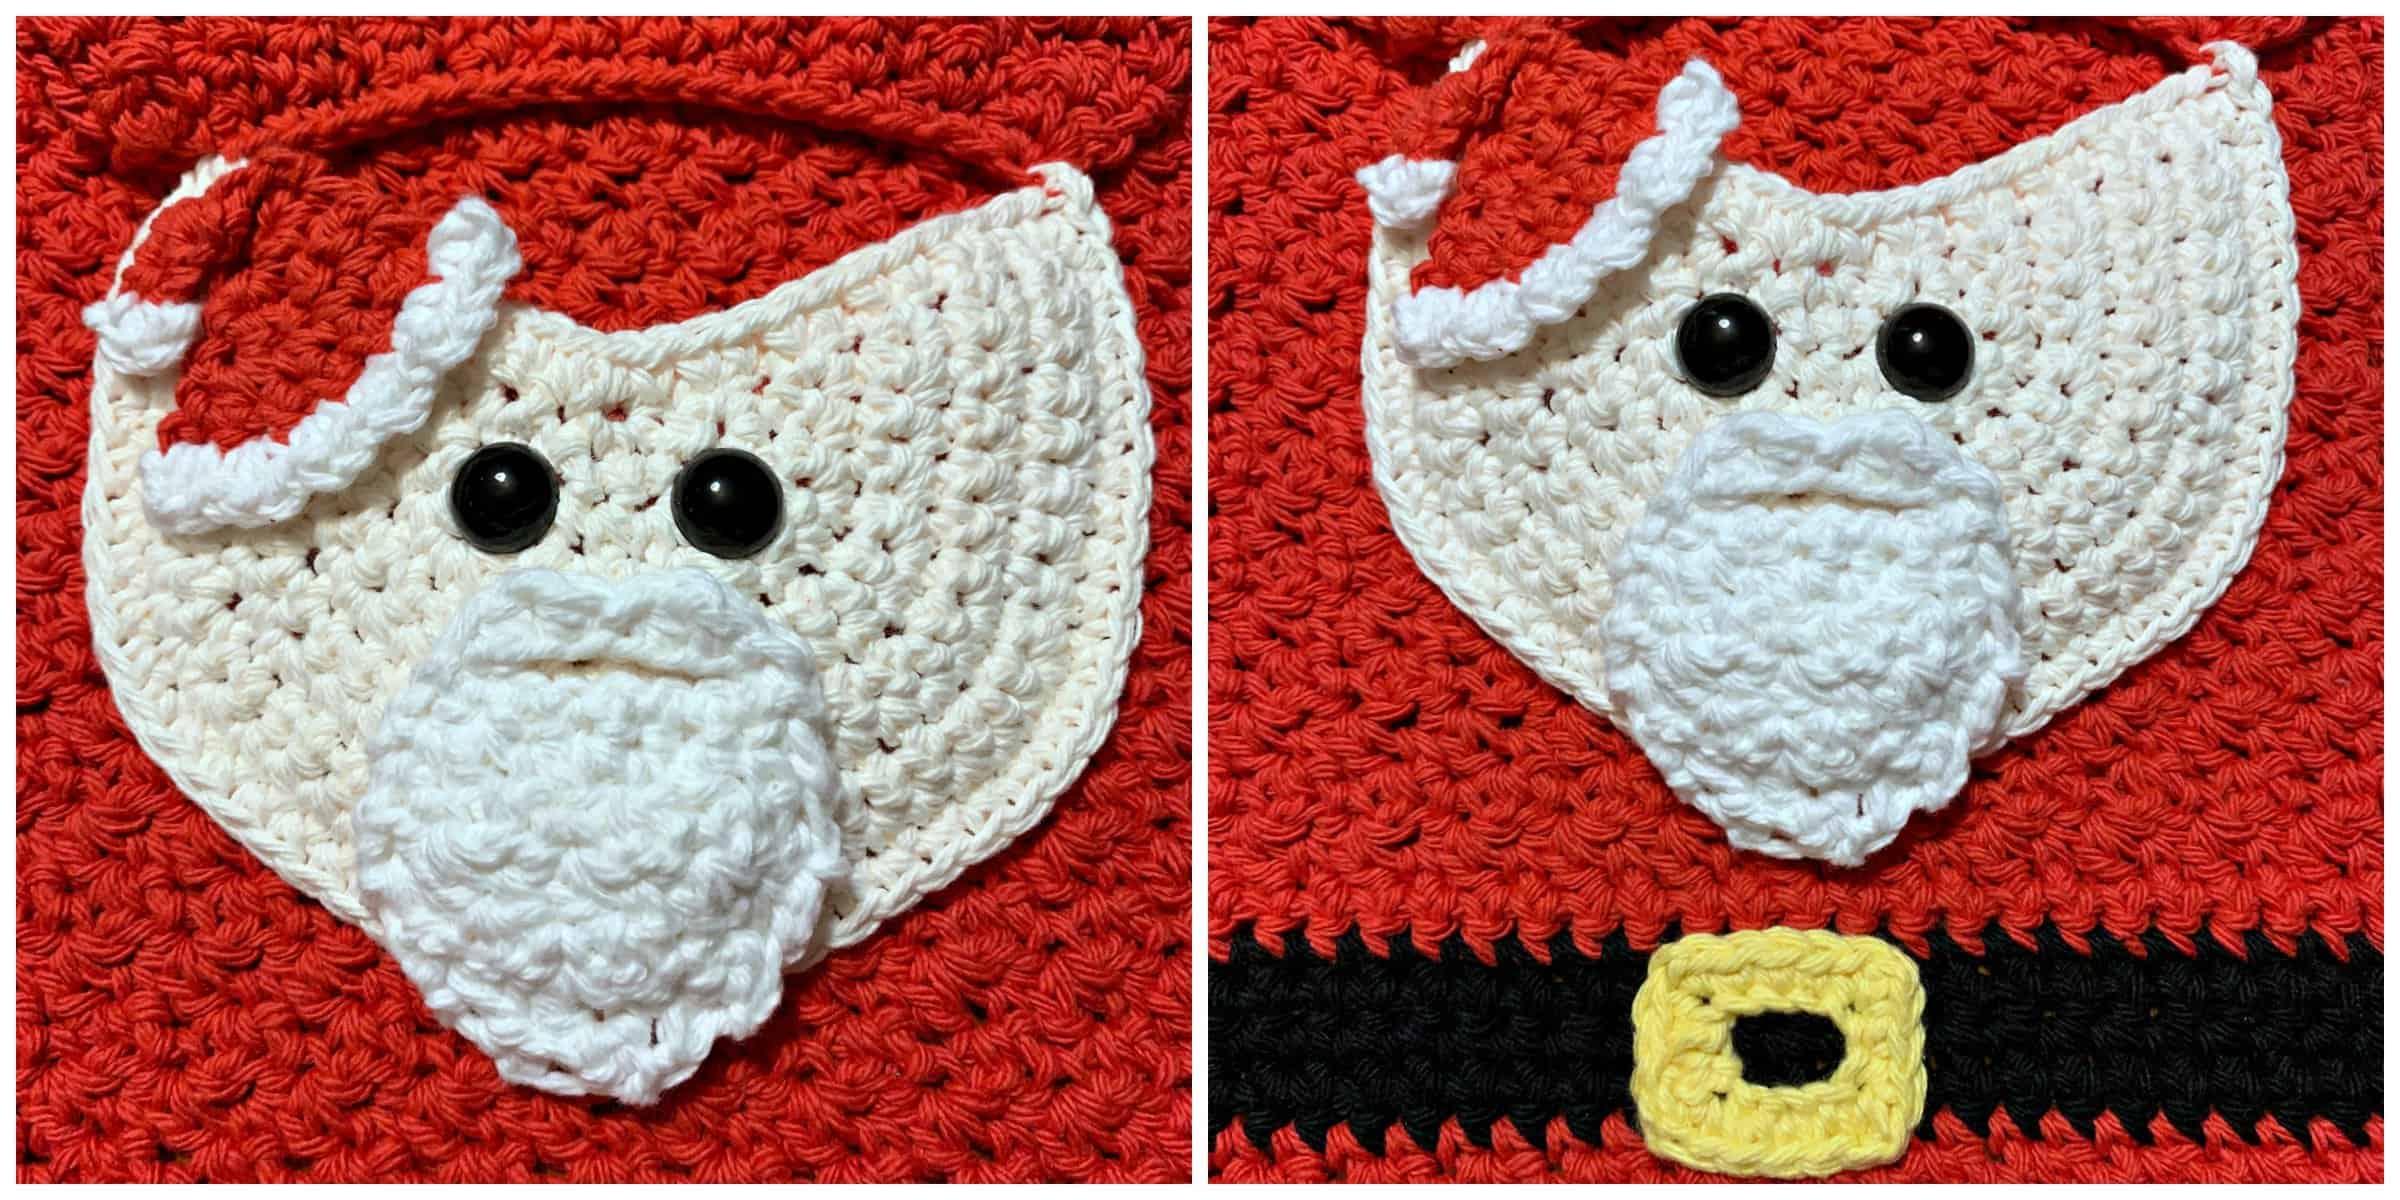
Step 1: Attach the black craft eyes or sew on the black crocheted eyes using a yarn needle. I attached mine between rows 3 & 4 of the head. I placed them 1.25″ apart from the center of one eye to the center of the next. The space between the eyes is approximately 5/8″ (approximately 3 sts in row 3). Weave in ends if you made crocheted eyes.
Step 2: Use a yarn needle and 12″ piece of red yarn to attach Santa’s Hat as shown in the photos below. After attaching the hat, fold the tip of it over as shown in the photos and sew it in place. Weave in ends.
Step 3: Use a yarn needle and tail of yarn to attach the Belt Buckle as shown in the photos below. Weave in ends.
Step 4: Use a yarn needle and 12″ piece of white yarn to attach Santa’s Beard as shown in the photos below. Weave in ends.
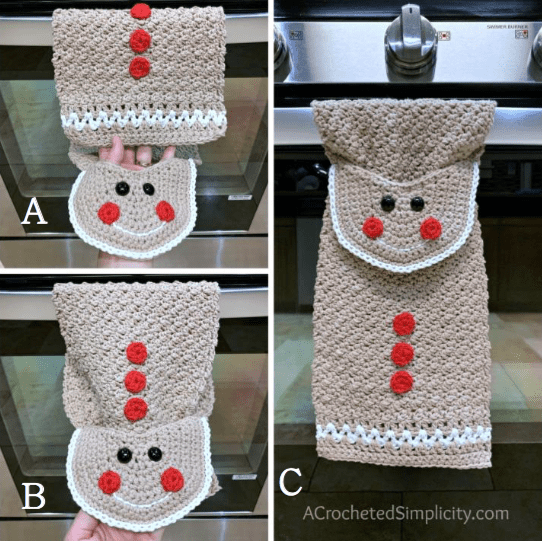
Now that I’ve completed my Santa Claus Crochet Kitchen Towel, how do I hang it up?
Step 1 (photo A): With your crochet Santa looking at you, insert your hand behind his head and through the hole. Bring the bottom edge of the towel, up and over the oven door handle from behind it. The belt buckle should now be facing you.
Step 2 (photo B): Grab the bottom edge of the towel and pull it through the hole.
Step 3 (photo C): Pull the body of the towel all the way down to secure it. Step back and enjoy your talents!
I Made It! Now What?
Pin this post! Save this free crochet mittens pattern to your Pinterest boards so that you can come back and make it again.
Leave a comment below: We love to hear your feedback.
Share Your Finished Projects on Facebook or Instagram: I love to see your finished projects! Share with us on social media and tag me @acrochetedsimplicity or use the hashtag #ACrochetedSimplicity so I can find your posts.
Join us in The Facebook Community Group!
Come share your finished projects with us in the A Crocheted Simplicity Crochet Community Group on Facebook. Join us for fun community events such as crochet alongs, join in on crochet conversations, ask questions, get advice, and share your love for crochet!

If you love Santa Claus, my friend Sonya, from Blackstone Designs, has a couple of super cute Santa Claus crochet patterns: Santa Belly Pot Holder & Santa Belly Flatware Holder.
Thanks for this great pattern, I adapted it recently and made a pig one for a friend who likes pigs.
I’d love to see a picture of your piggie! I’m planning to create a few more animals after the holidays. 🙂
Jennifer
I would like permision to sell these patterns when I make ttese them!
Of course you can sell anything you create using my patterns!
Can I have permission to sell these items? Please.
Of course!
I absolutely LOVE these towels! I can see myself making a bunch not just for my own kitchen but as gifts for friends and family. Thanks for the adorable patterns.
I love your Santa towel! Mine always fall so this is a great way to stay up!!