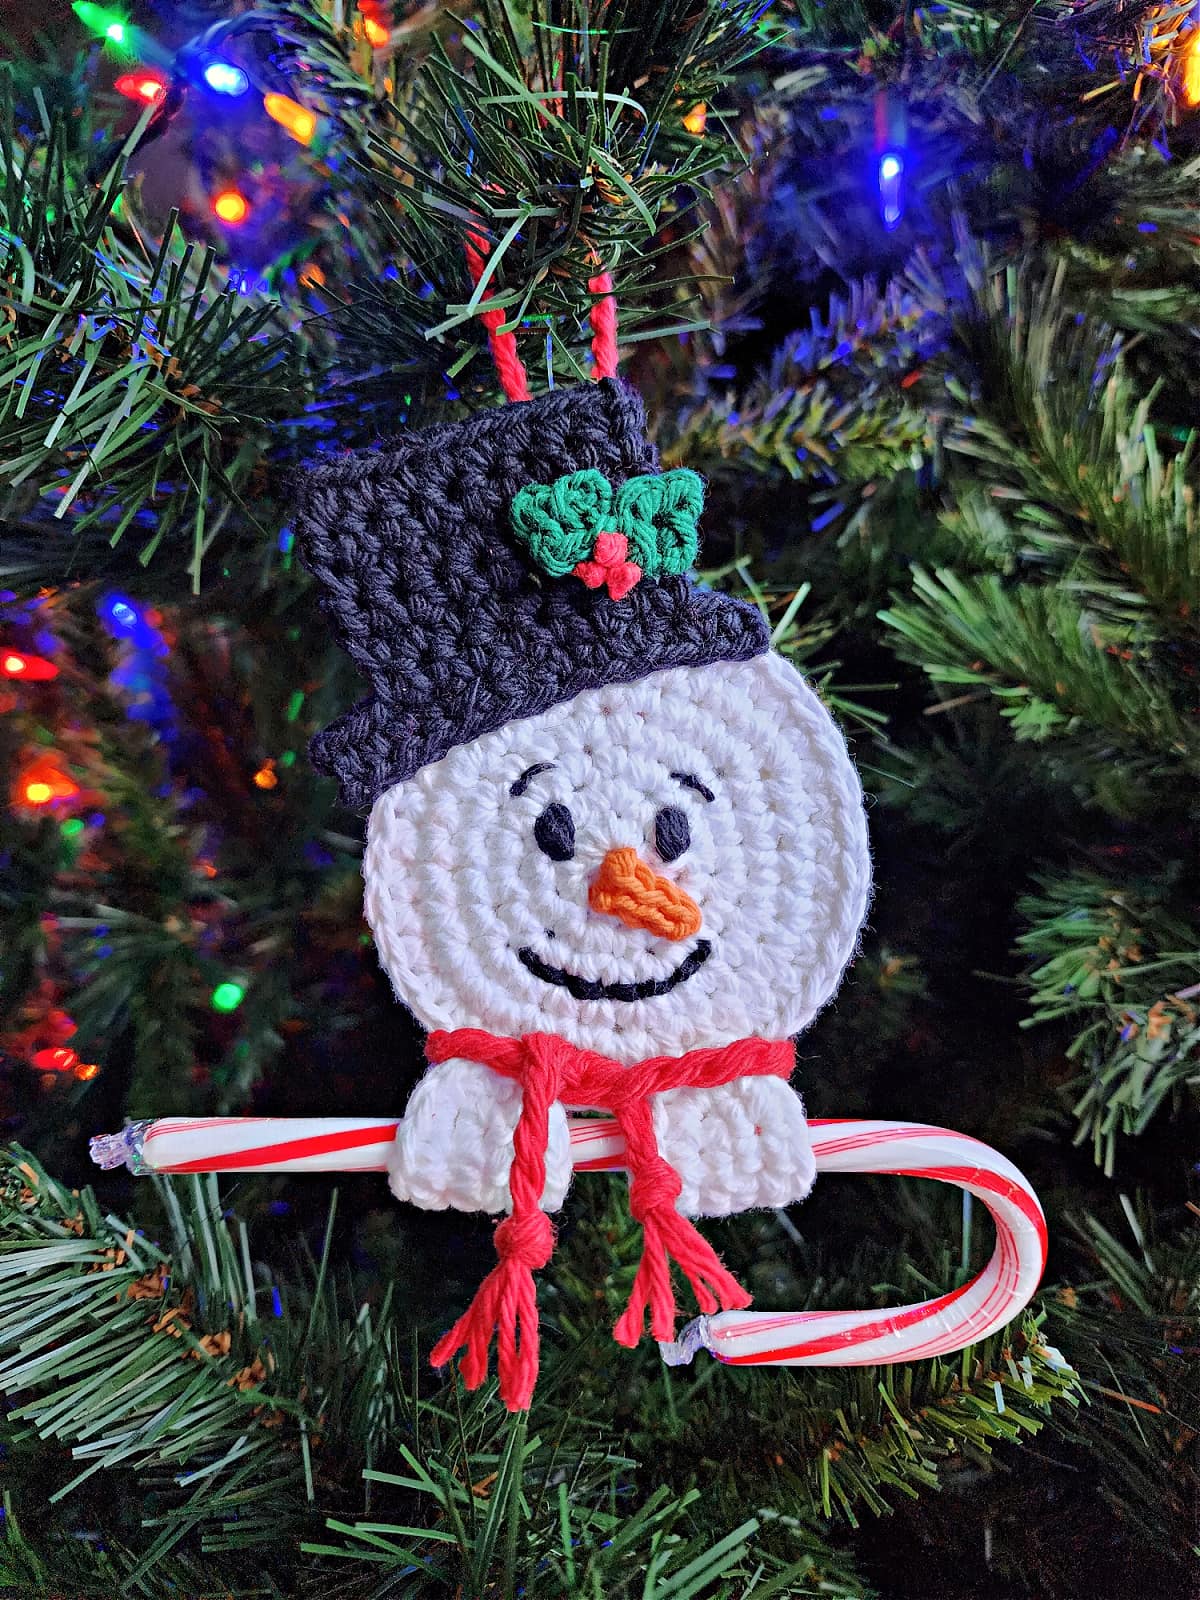
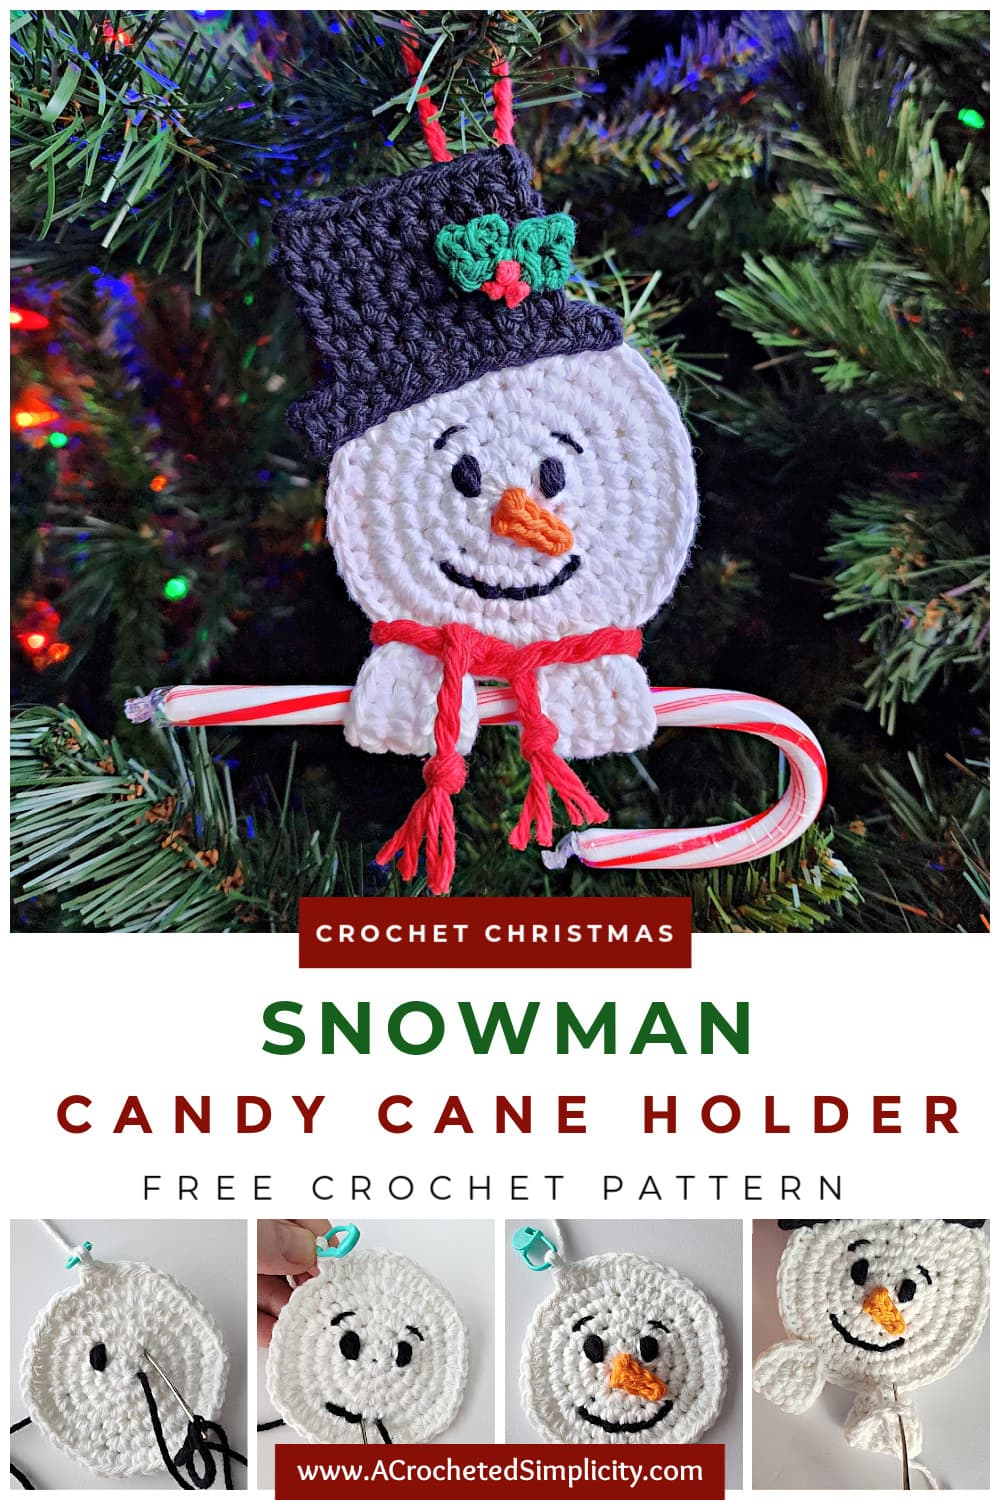
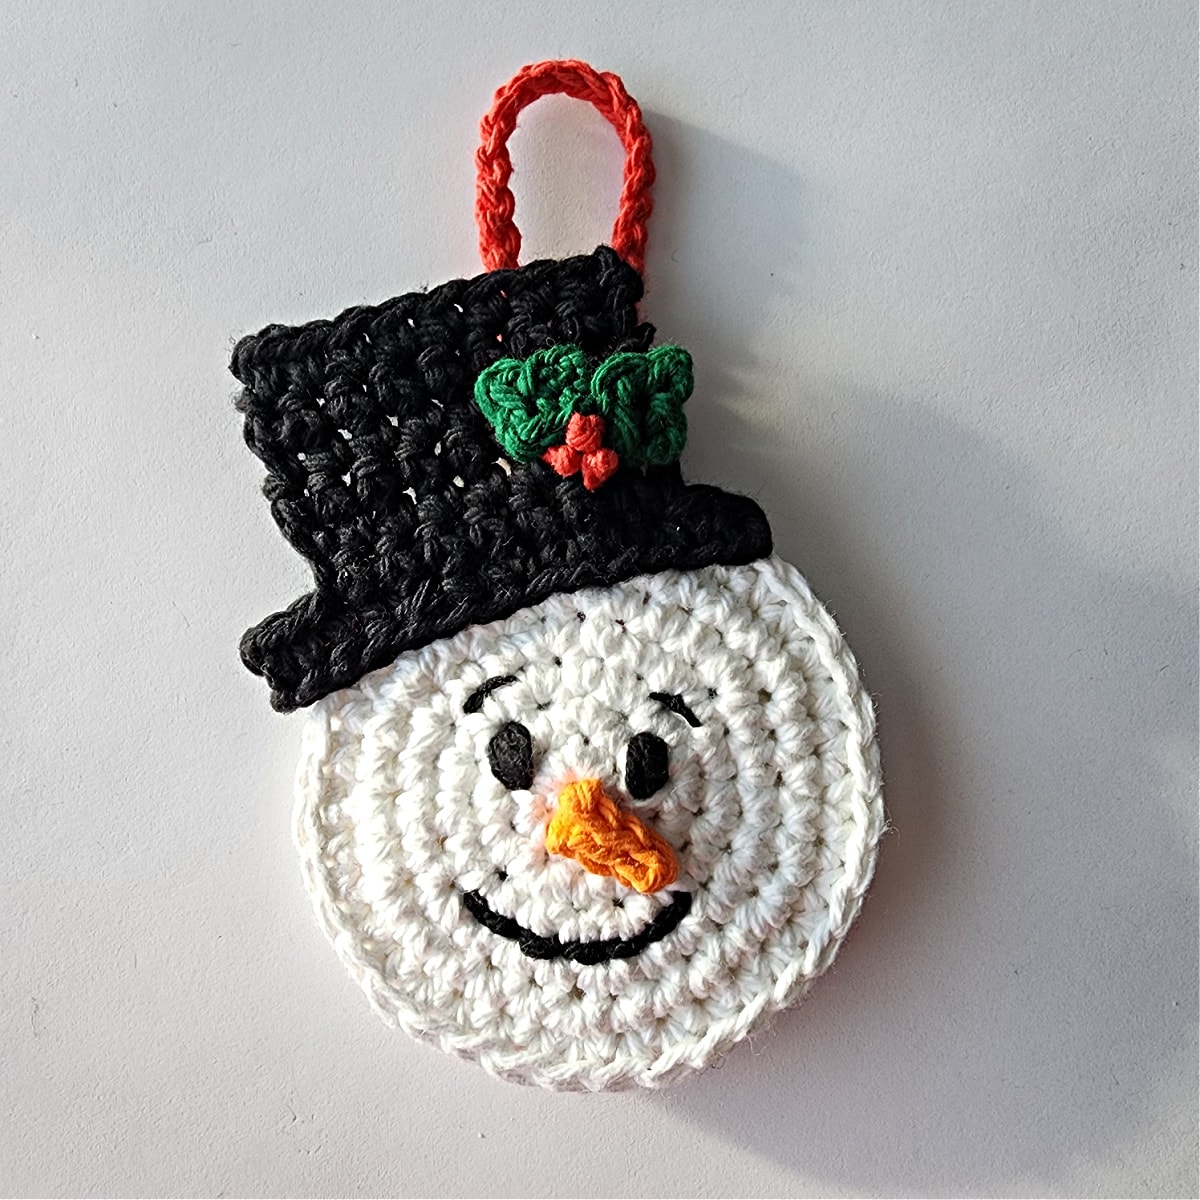
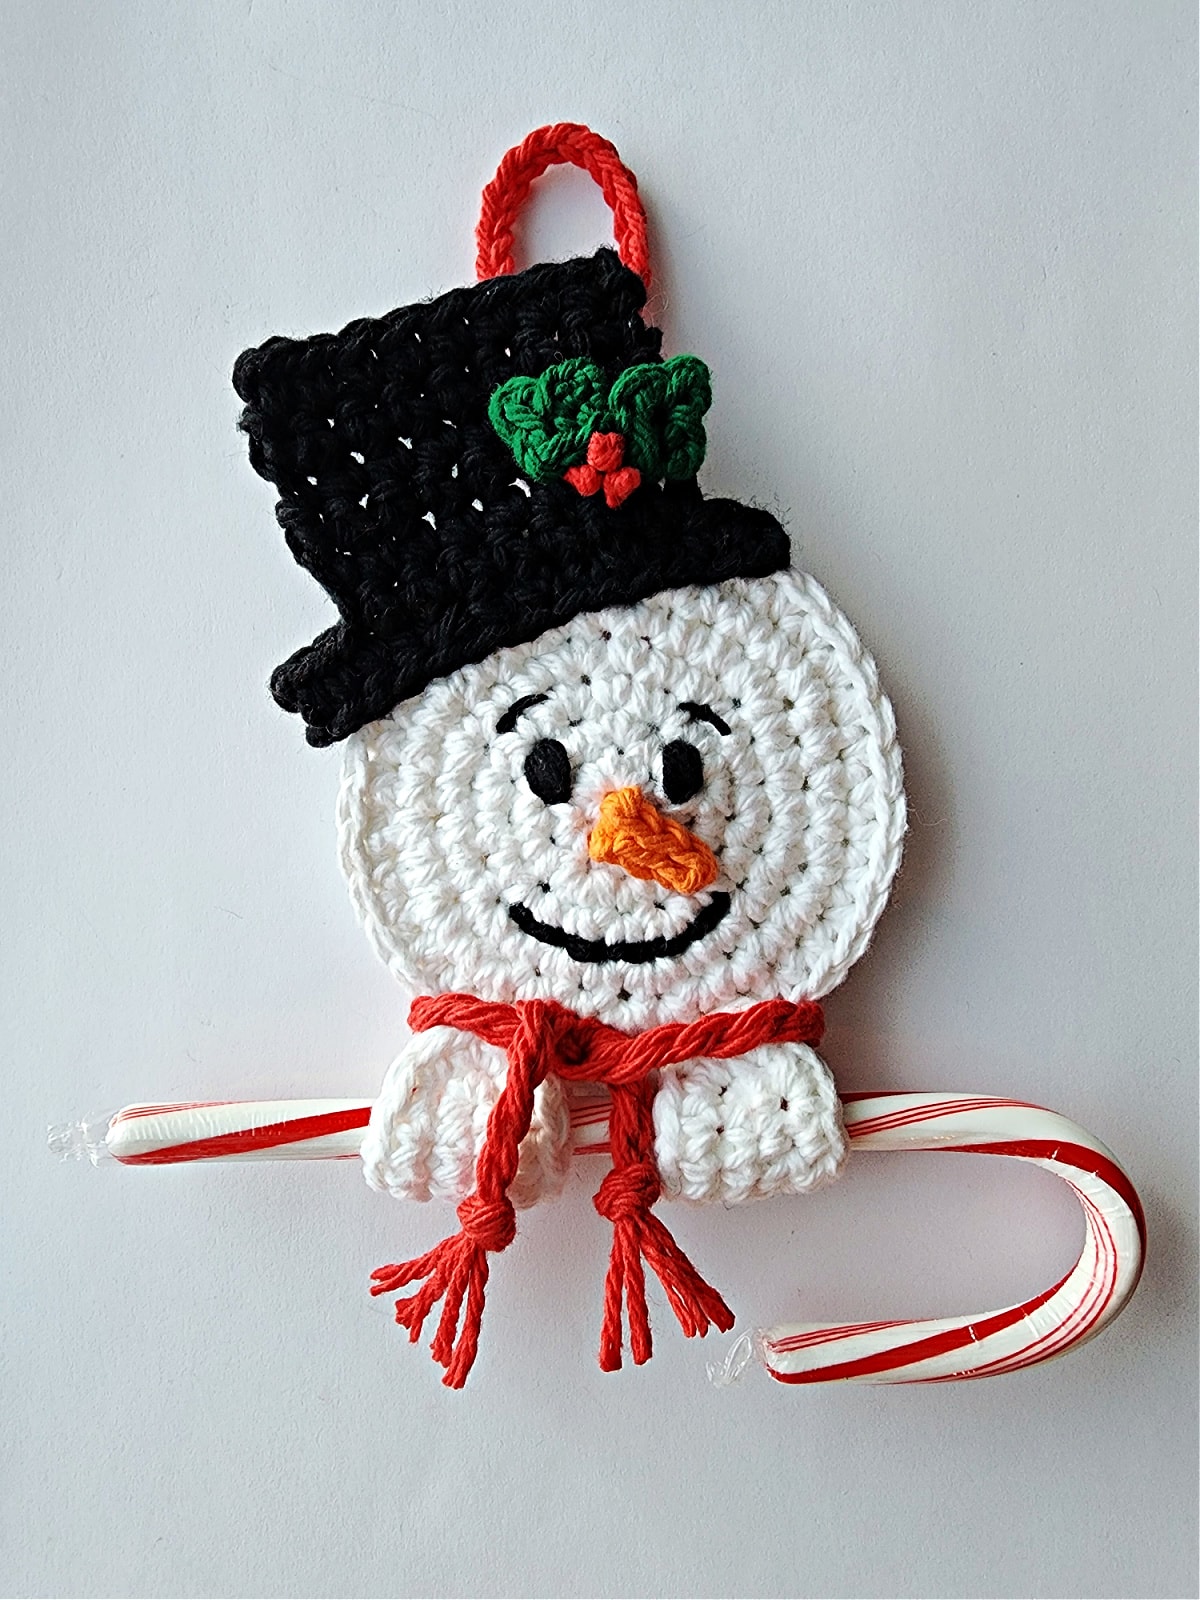
Crochet Snowman Candy Cane Holder
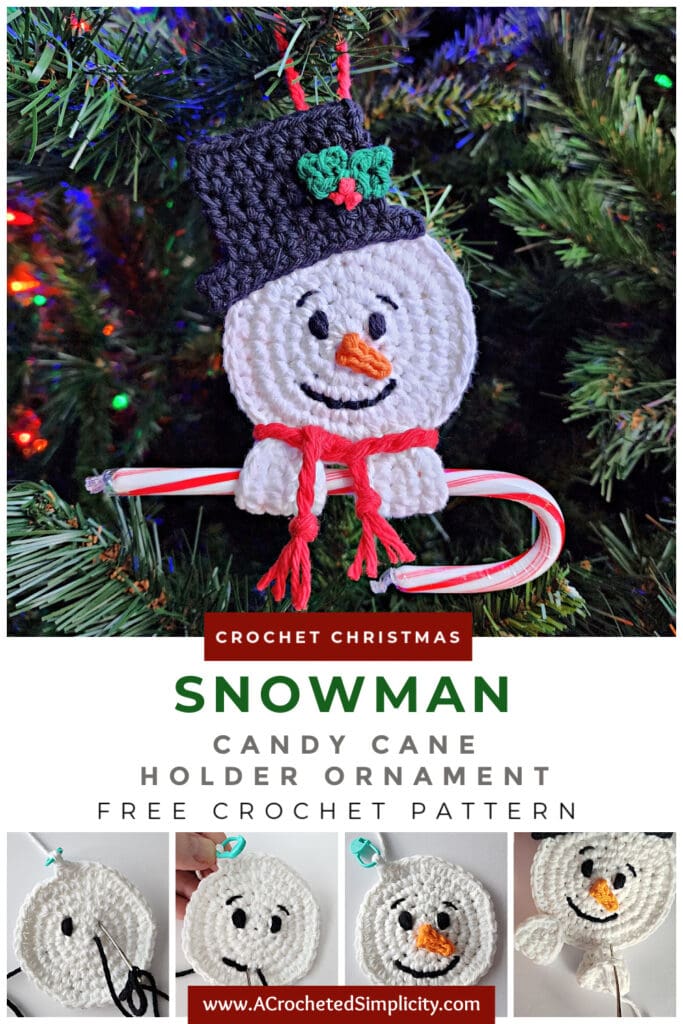
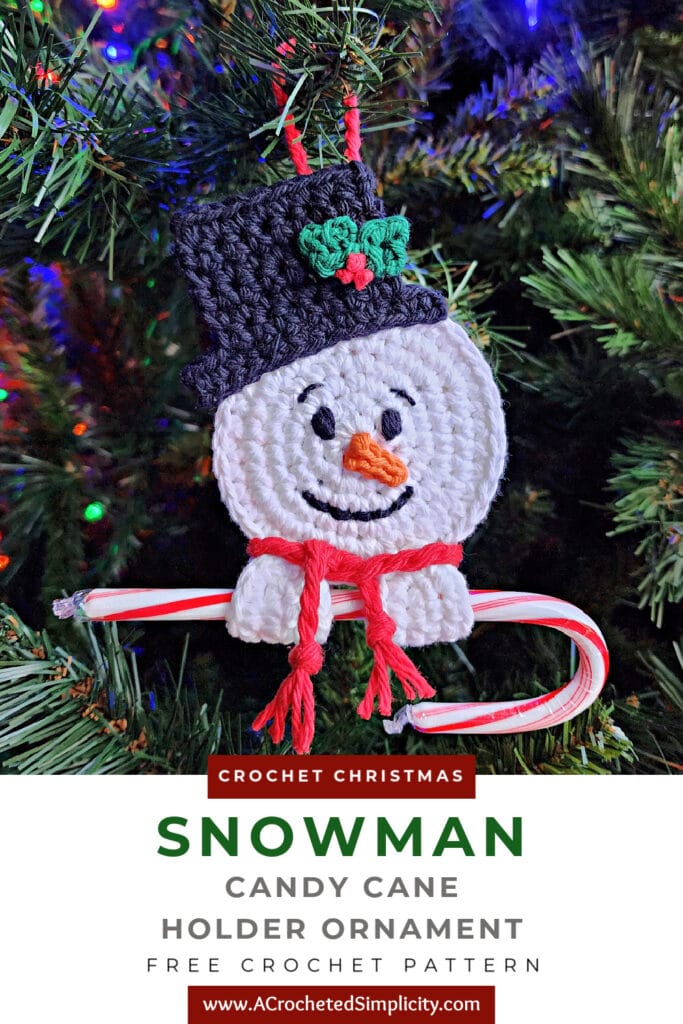
Looking for a last minute gift? Make a Crochet Snowman Man Candy Cane Holder!
This cute (and super quick) crochet Christmas ornament also doubles as a fun DIY Christmas gift tag!
The crochet snowman candy cane holder pattern is free in the post below, or you can find an ad-free print friendly version (that includes all photo tutorials) on Ravelry, or on Etsy (aff).
Whether you’re making Christmas decor for your home or a snowman Christmas tree, or you want to add little handmade touches to gift bags and presents this year, candy cane ornaments are perfect!
All you need to make a snowman candy cane holder is a little bit of yarn and less than an hour of your time and you’ll be adding to your snowman decorations in no time at all.
These adorable crochet candy cane holders also make great DIY Christmas Gift Tags! So far, we have a Gingerbread Boy & Girl and a Reindeer.
Christmas Traditions
When I was a young girl, my grandparents started a family tradition for all of us grandkids. Each year for our birthdays and Christmas season, they would make and gift us a handmade Christmas ornament.
My grandpa would cut and sand the shapes out of wood and my grandma would hand paint the ornaments. My favorite part about decorating our family’s Christmas tree each year was that I had my very own ornaments to hang on it.
My grandparents wanted each of their grandkids to have a set of Christmas ornaments for our own Christmas tree someday, after we moved out of our parents’ house.
This year, I decided to start crocheting ornaments for my own grandkids so when they are fully grown, they too will have a set of Christmas memories for their own tree.
So far this, year I’ve made three different ornaments for them, the crochet gingerbread man candy cane holder, a candy cane reindeer ornament, and this snowman ornament. They are all fun, quick crochet projects!
How to Make a Candy Cane Holder
This free crochet snowman candy cane holder is made by crocheting a few small pieces and then assembling them all together.
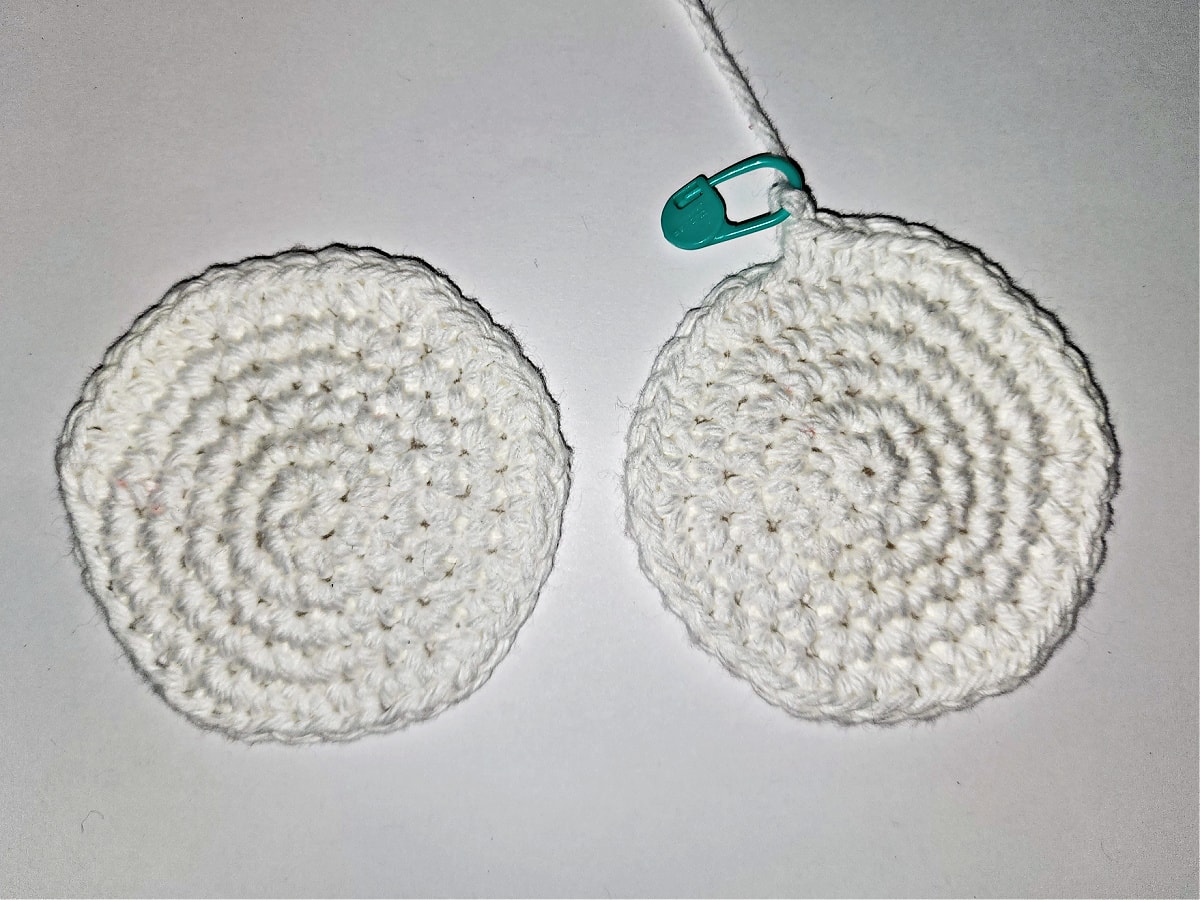
First, you’ll crochet two circles for the snowman’s head. The head is worked in in a spiral (continuous rounds). Because we’re making two heads, there’s no need to weave in all the ends from adding all of the little details. Your ends will all be hidden after you join the two heads together. This will save some time!
Next, you’ll crochet a top hat with holly leaves and berries, a carrot nose, and two hands.
Next, you’ll embroider eyes, eyebrows, and a small mouth onto his face.
Then, crochet a simple chain hanging loop and attach it.
After attaching the hanging loop, you’ll join the two snowman heads with a round of single crochet.
Lastly, attach his top hat and hands. Then, you’ll make and attach a simple yarn rope scarf.
Yarn
I used Lily Sugar n’ Cream for my snowman crochet candy cane holder pattern. I love the color choices available in the Lily Sugar n’ Cream line and it’s easy to mix and match with Peaches and Cream and Bernat Handicrafter. All 3 are very similar cotton yarns.
Although I chose a 100% cotton yarn for my crochet candy cane holder, you can use most any other fiber. Acrylic, wool, and even acrylic, wool, or cotton blends will work great for your snowman Christmas tree decorations.
Snowman Candy Cane Holder – Free Crochet Ornament Pattern
The crochet snowman candy cane holder is free below, but if you love to work offline, I’ve got a couple other great options for you.
Purchase the ad-free, printable PDF, including all photo tutorials on Ravelry, or on Etsy (aff).
This post contains affiliate links.
Materials
- Yarn: Worsted Weight / 4 Cotton Yarn such as Lily Sugar n’ Cream, Peaches & Cream, Bernat Handicrafter, or another comparable yarn – (acrylic yarn can also be used).
- White: 40 yards
- Black: 6 yards
- Red: 4 yards
- Green: 2 yards
- Orange: 1 yard
- Crochet Hook: G/6/4.00mm (These crochet hooks are the only ones I use!)
- Scissors – These are my favorite because they’re super sharp and mini! You can purchase just ONE, or NINE (only $1.44 each & they make great gifts for your crafting friends)
- Locking Stitch Markers
- Yarn Needle
- Candy Canes
- Christmas pencils would also be a fun option for kids.
Abbreviations (US Terms)
- ch(s): chain(s)
- sl st(s): slip stitch(es)
- st(s): stitch(es)
- sp: space
- sc: single crochet
- yo: yarn over
- SM: stitch marker
- Rnd: round
- RS: Right Side
- WS: wrong side
- Join yarn with a standing sc
Experience Level
- Easy
Gauge
- Measurements are given throughout the pattern.
Size
One Size: 5.25″ H x 3.25″ W (not including hanging loop or scarf)
Special Stitches
- Join yarn with a standing single crochet: Begin with a slip knot on your hook, insert your hook into the stitch or space indicated, yo, pull up a loop, yo and draw thru both loops on hook.
Pattern Notes
- Turning chains are not included in stitch count unless noted otherwise.
- Worsted Weight Yarn: I used Lily Sugar ‘n Cream for my samples (70.9 g / 2.5 oz / 120 yards / 109 m / 100% cotton)
- You can substitute other worsted weight yarns.
- Suitable Fibers: 100% acrylic yarns, 100% wool yarns, blends of acrylic & wool and similar fibers will all work great for this project.
- Yardage & Colors
- White: 40 yards
- Black: 6 yards
- Red: 4 yards
- Green: 2 yards
- Orange: 1 yard
- Snowman Candy Cane Holder Construction: This crochet candy cane holder is constructed by crocheting a few small pieces and then assembling them. First, you’ll crochet two heads for the snowman. Then you’ll crochet a top hat with holly leaves and berries, a carrot nose, and two hands. Next, you’ll embroider eyes, eyebrows, and a small mouth onto his face. Then crochet a simple hanging loop and attach it. Join the two snowman heads with a round of single crochet and attach his top hat and hands. Lastly, you’ll make and attach a scarf.
Crochet Snowman Candy Cane HolderPattern
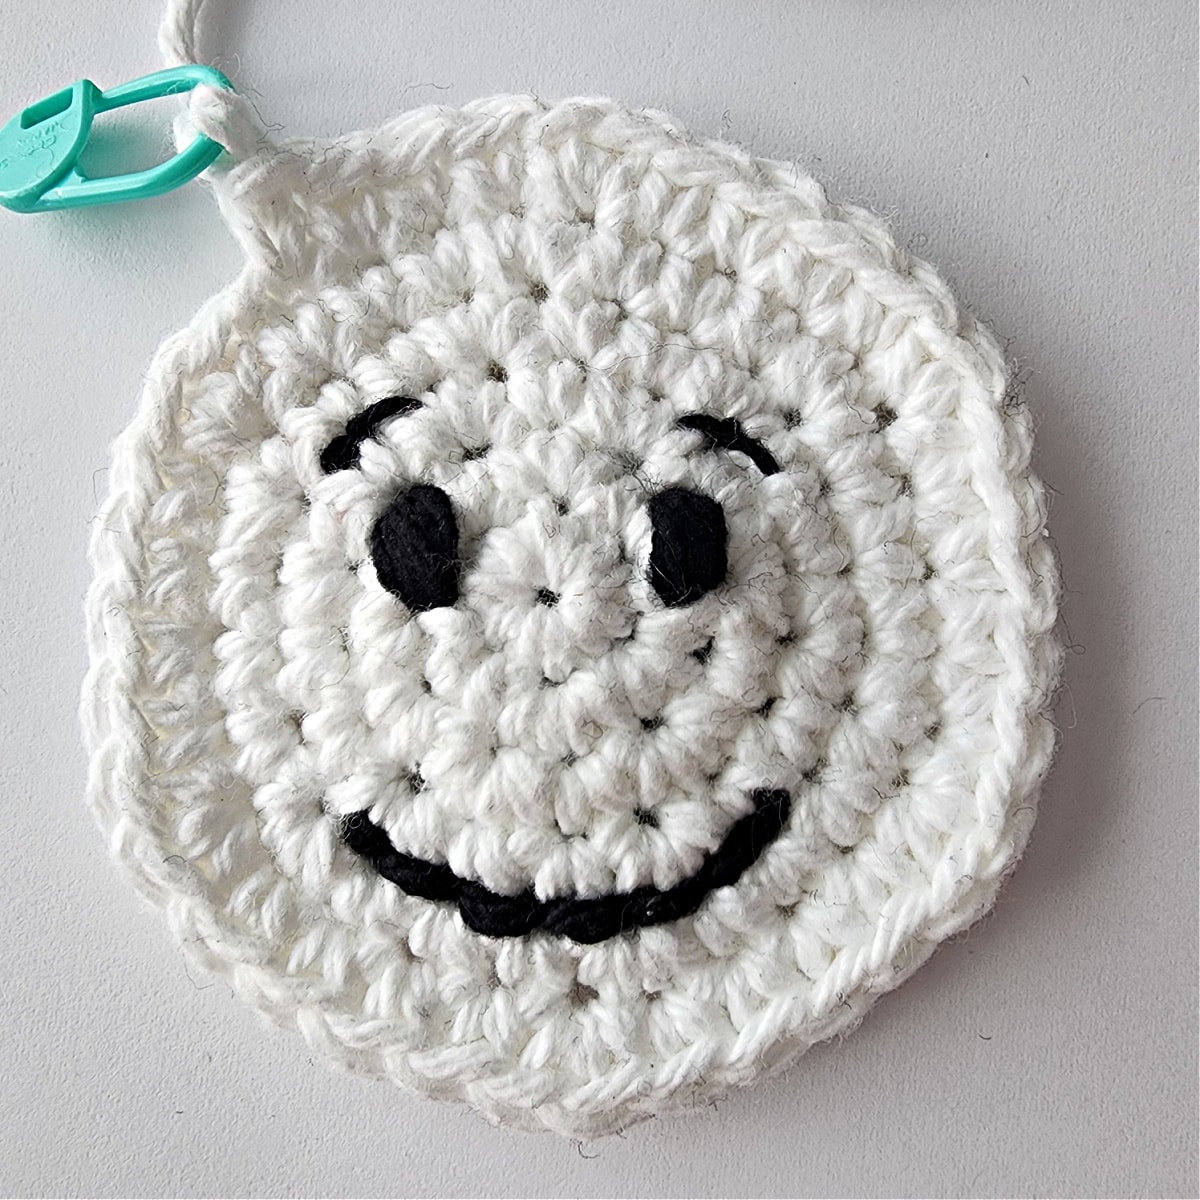
Snowman’s Head
Make 2: You will make two heads (a front and a back). Because the snowman has two layers, you don’t need to weave in all the ends you’ll have from adding all of the little details. When you join the two layers, all those ends will be hidden.
Note: The snowman’s head is worked in continuous rounds to keep from having an unsightly seam. Do not join at the end of each round, instead use a scrap piece of yarn to keep track of the beginning of each round. Move the scrap of yarn up as you complete each round.
Rnd 1 (RS): With white yarn & a 4.00mm crochet hook, ch 2, work 6 sc in the 2nd ch from your hook. Do not join. (6 sts)
Rnd 2: 2 sc in each st around. Do not join. (12 sts)
Rnd 3: (2 sc in the next st, sc in the next st) work from ( to ) 6 times. Do not join. (18 sts)
Rnd 4: (2 sc in the next st, sc in each of the next 2 sts) work from ( to ) 6 times. Do not join. (24 sts)
Rnd 5: (2 sc in the next st, sc in each of the next 3 sts) work from ( to ) 6 times. Do not join. (30 sts)
Rnd 6: (2 sc in the next st, sc in each of the next 4 sts) work from ( to ) 6 times. Do not join. (36 sts)
Head #1: Fasten off. Weave in ends. Make Head #2.
Head #2: Do not fasten off. Instead, use a locking stitch marker to hold the working yarn until you join the heads later.
Approximate size of the head should be 2.125″ W.
Continue on to the Snowman’s Top Hat.
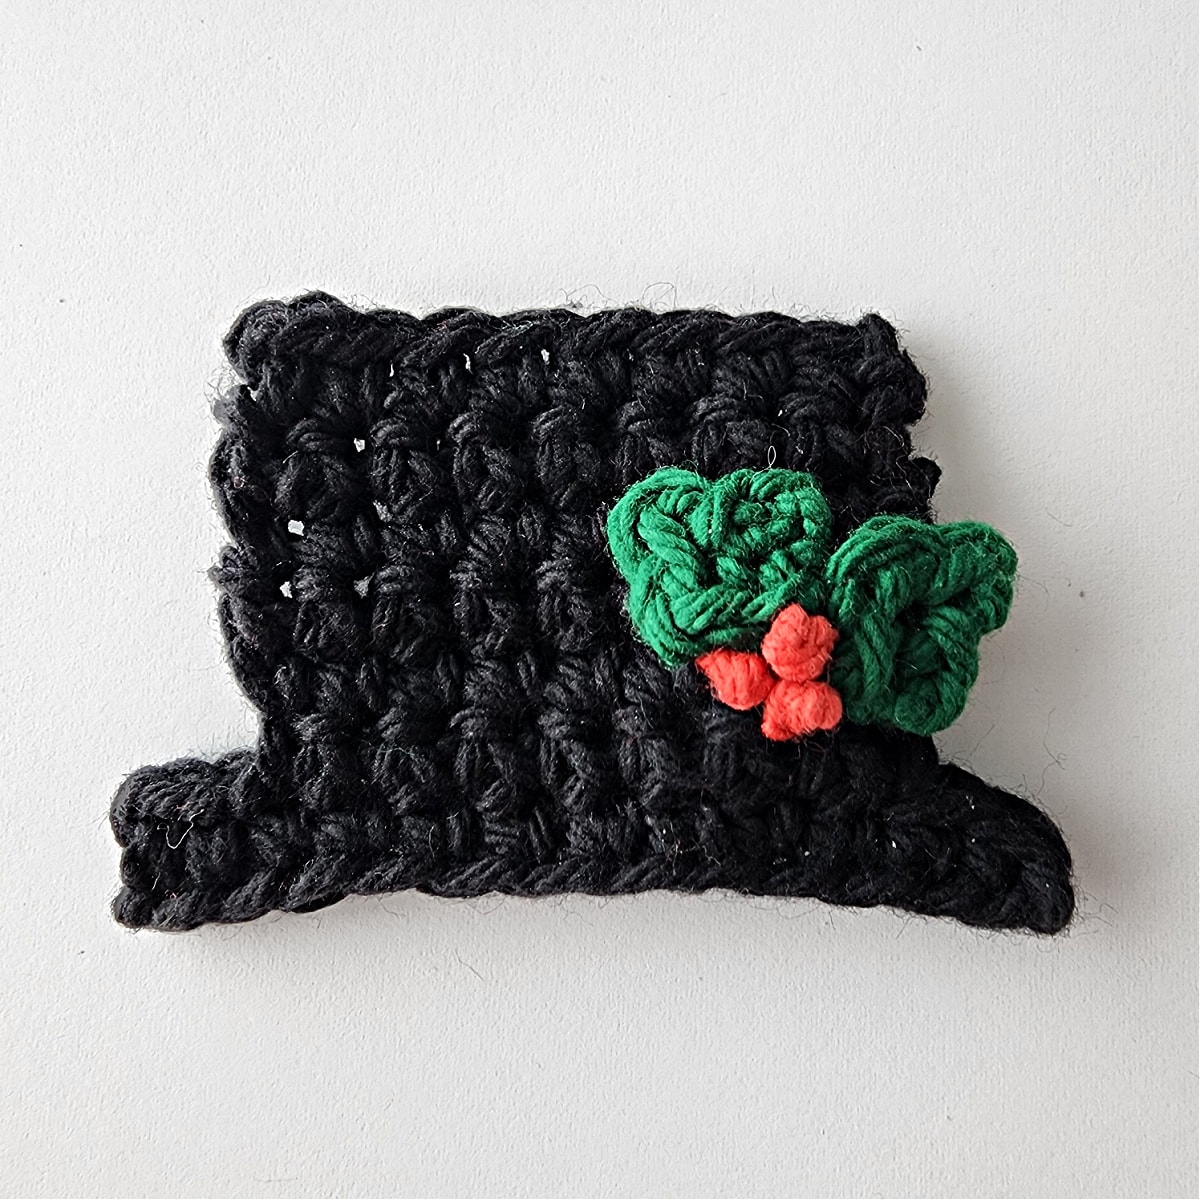
Snowman’s Top Hat
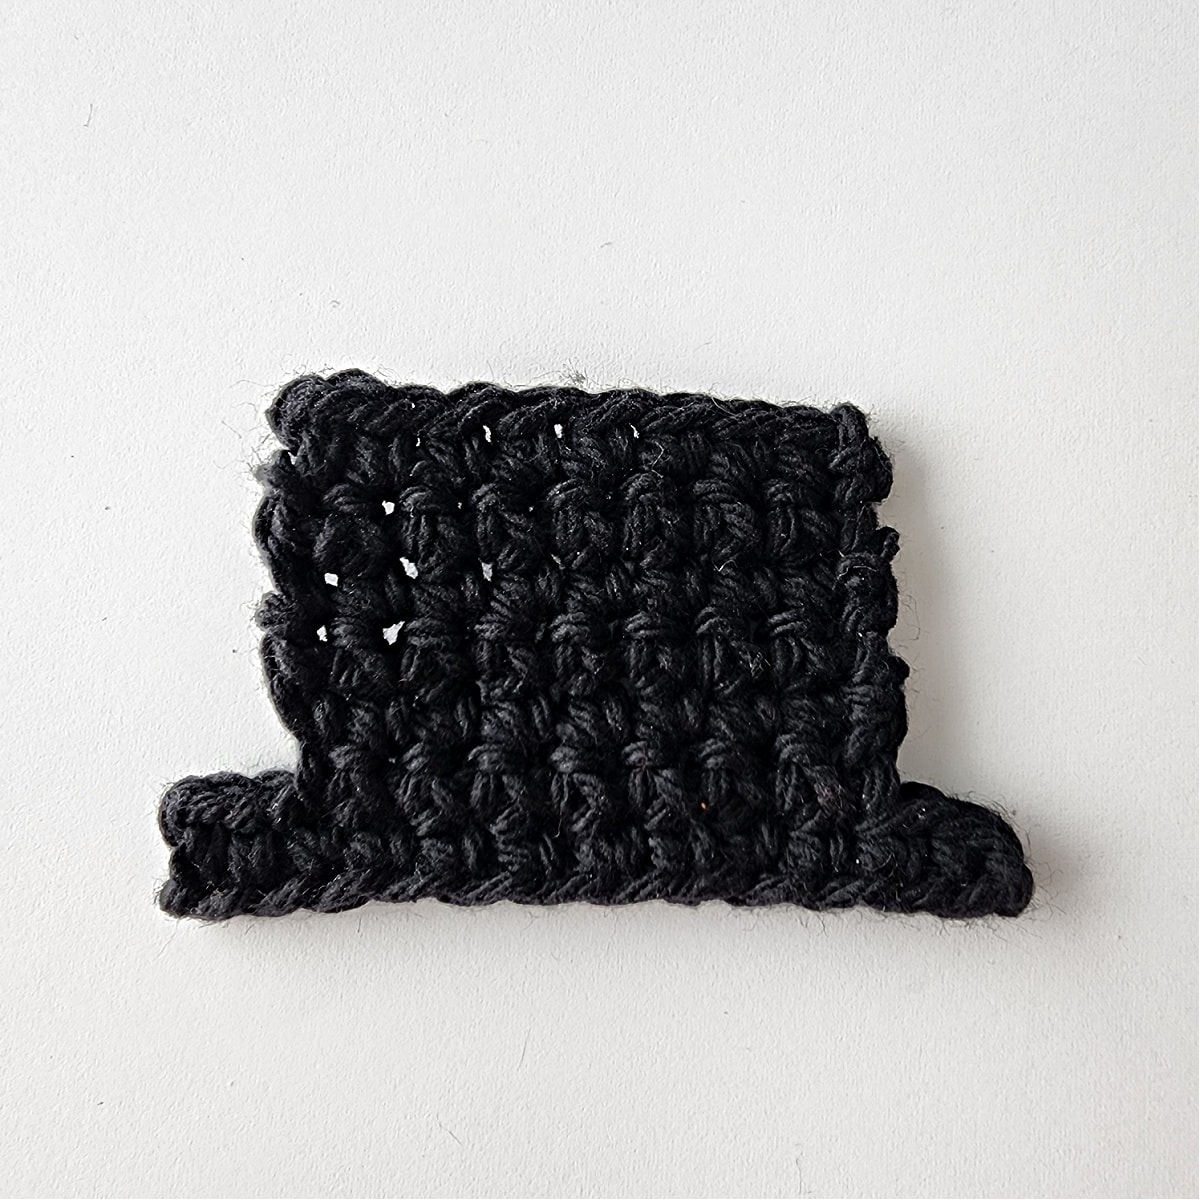
Row 1 (RS): With black yarn and a 4.00 mm crochet hook, ch 13, working into the back hump of the foundation ch, sc in the 2nd ch from your hook, sc in each ch across. (12 sts) *Place a stitch marker in the 10th stitch. Turn.
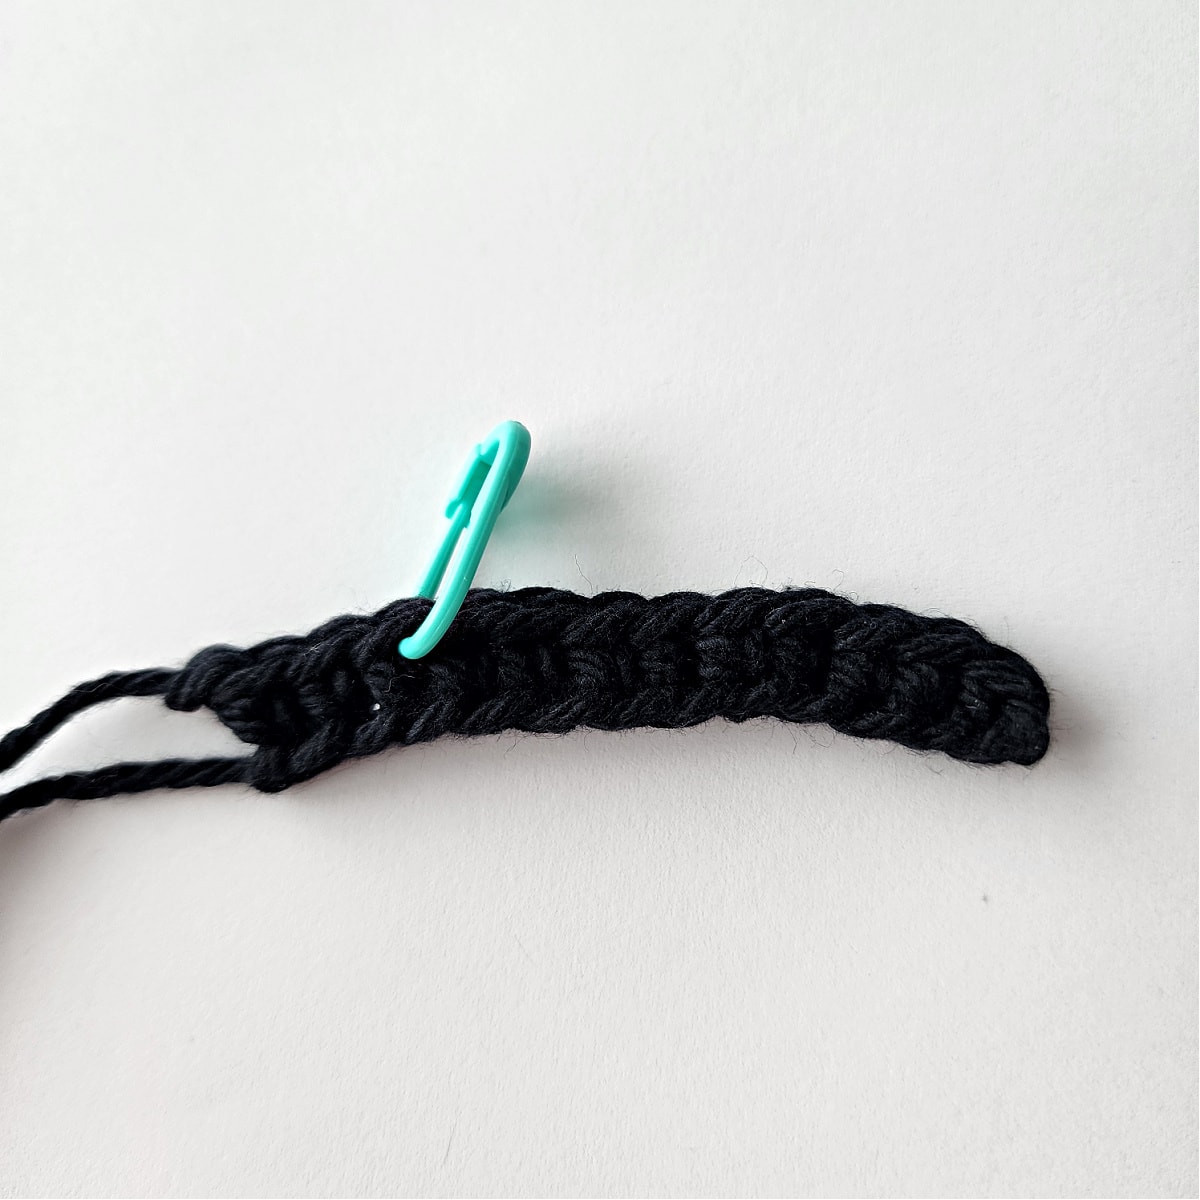
Row 2: With black yarn and a 4.00mm crochet hook, join yarn with a standing sc in the st you just marked with a stitch marker, sc in each of the next 7 sts. Turn. (8 sts)
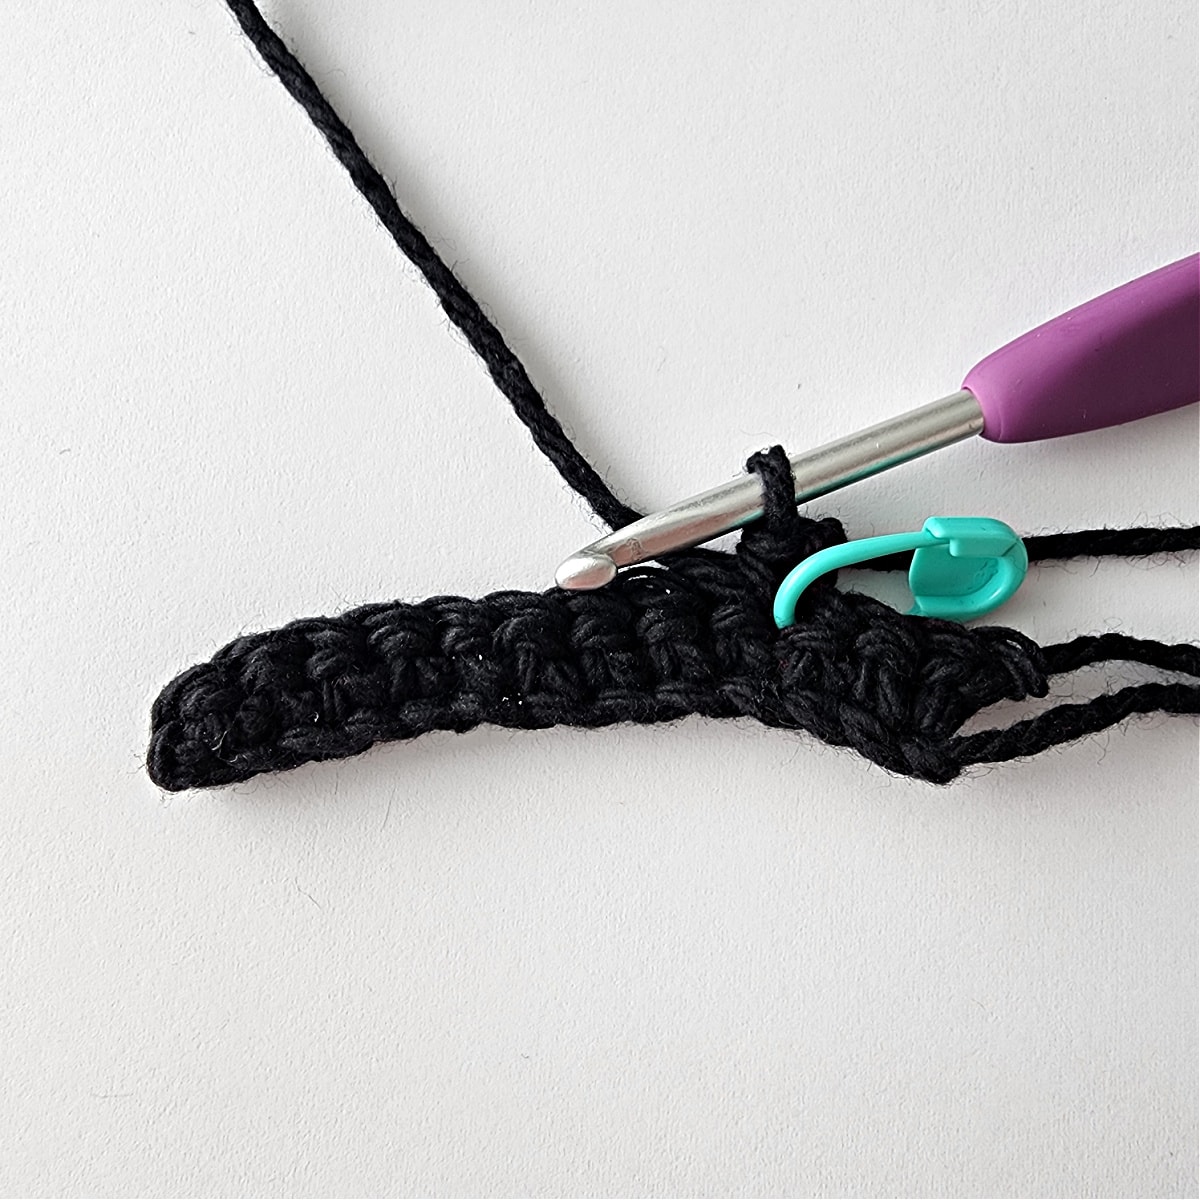
Rows 3 – 7: Ch 1, sc in each st across. Turn. (8 sts)
Fasten off. Weave in ends. Continue on to Holly Leaves & Berries. Hat is approximately 3″ W (brim) x 1.875″ H.
Holly Leaves (Make 2)
Row 1: With green yarn and a 4.00 mm crochet hook, (ch 2, sl st in the 2nd ch from your hook) twice, ch 2, sl st into the first ch of the row. You should have a leaf with 3 points.
Fasten off leaving an 8″ tail for sewing. Continue on to Holly Berries. Leaves are approximately .625″ H.
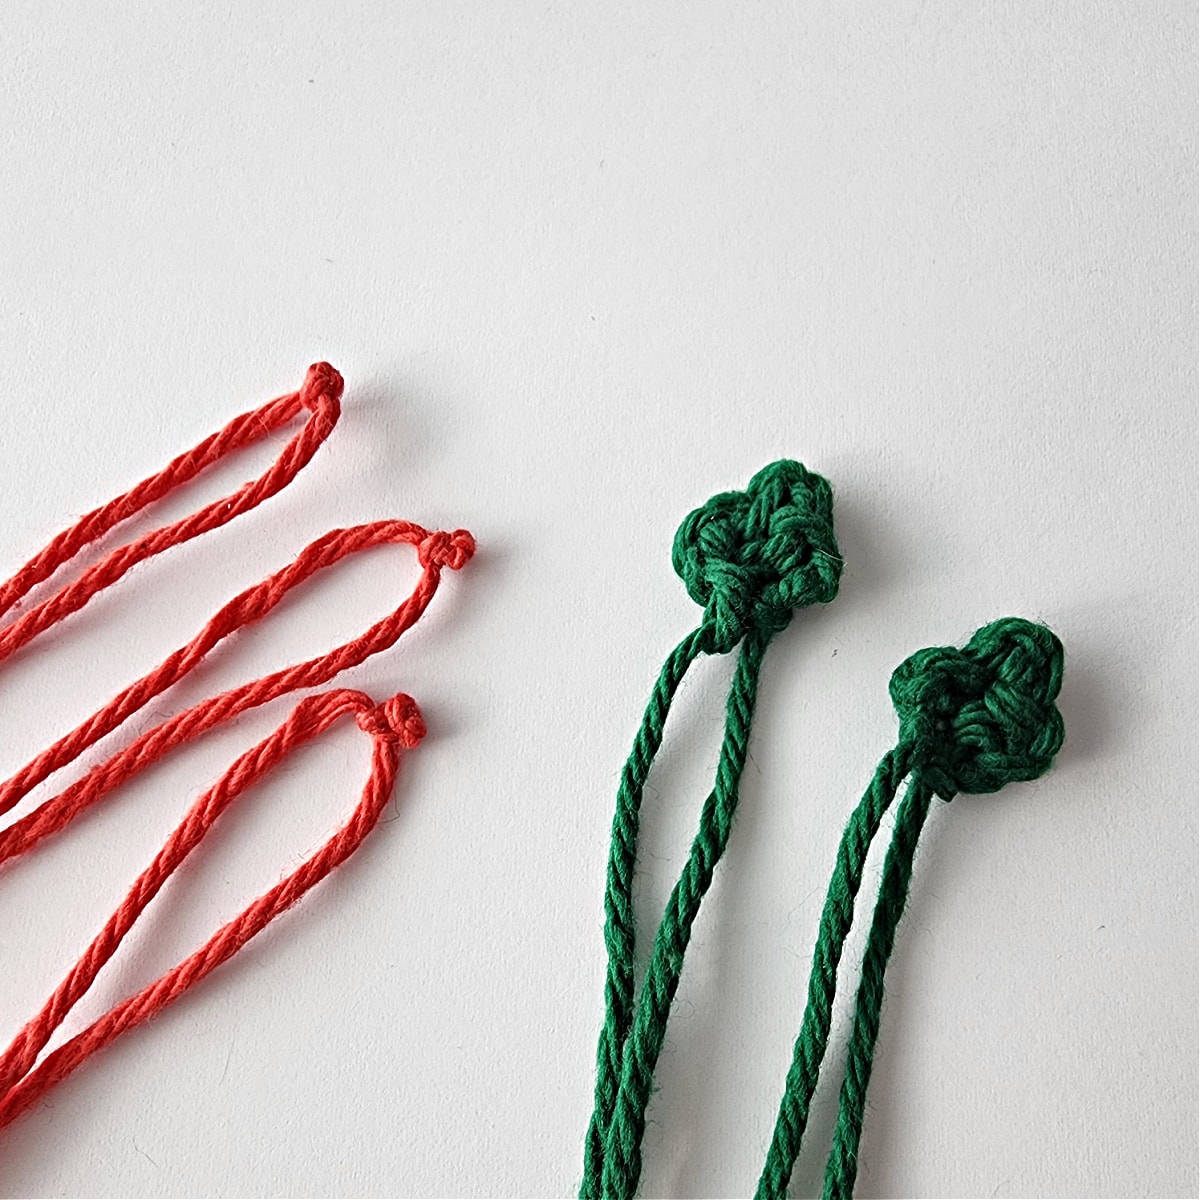
Holly Berries (Make 3)
With a 10″ piece of red yarn, make a knot in the middle of it, then make 2 more knots on top of the first knot. Continue on to Attaching Holly Leaves & Berries to the Top Hat.
Attaching Holly Leaves & Berries to the Top Hat
Step 1: Using a yarn needle and tail of yarn, attach both of the holly leaves near the right-hand side of the hat.
Step 2: Using a yarn needle and tail of yarn, attach each of the holly berries to the hat as shown in the photo above.
Weave in ends. Continue on to the Carrot Nose.
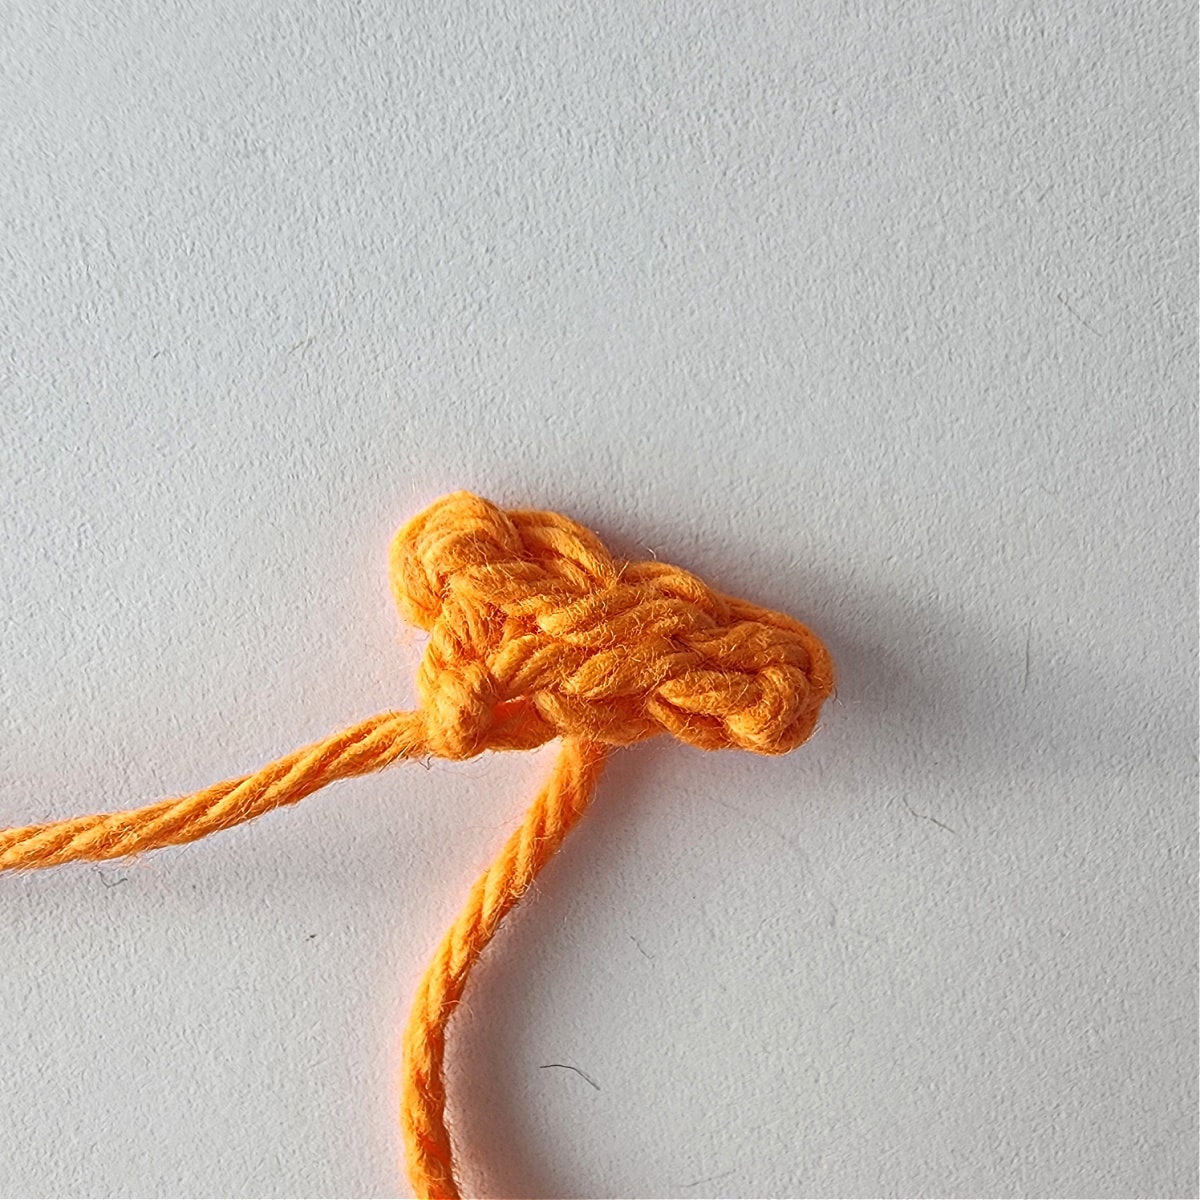
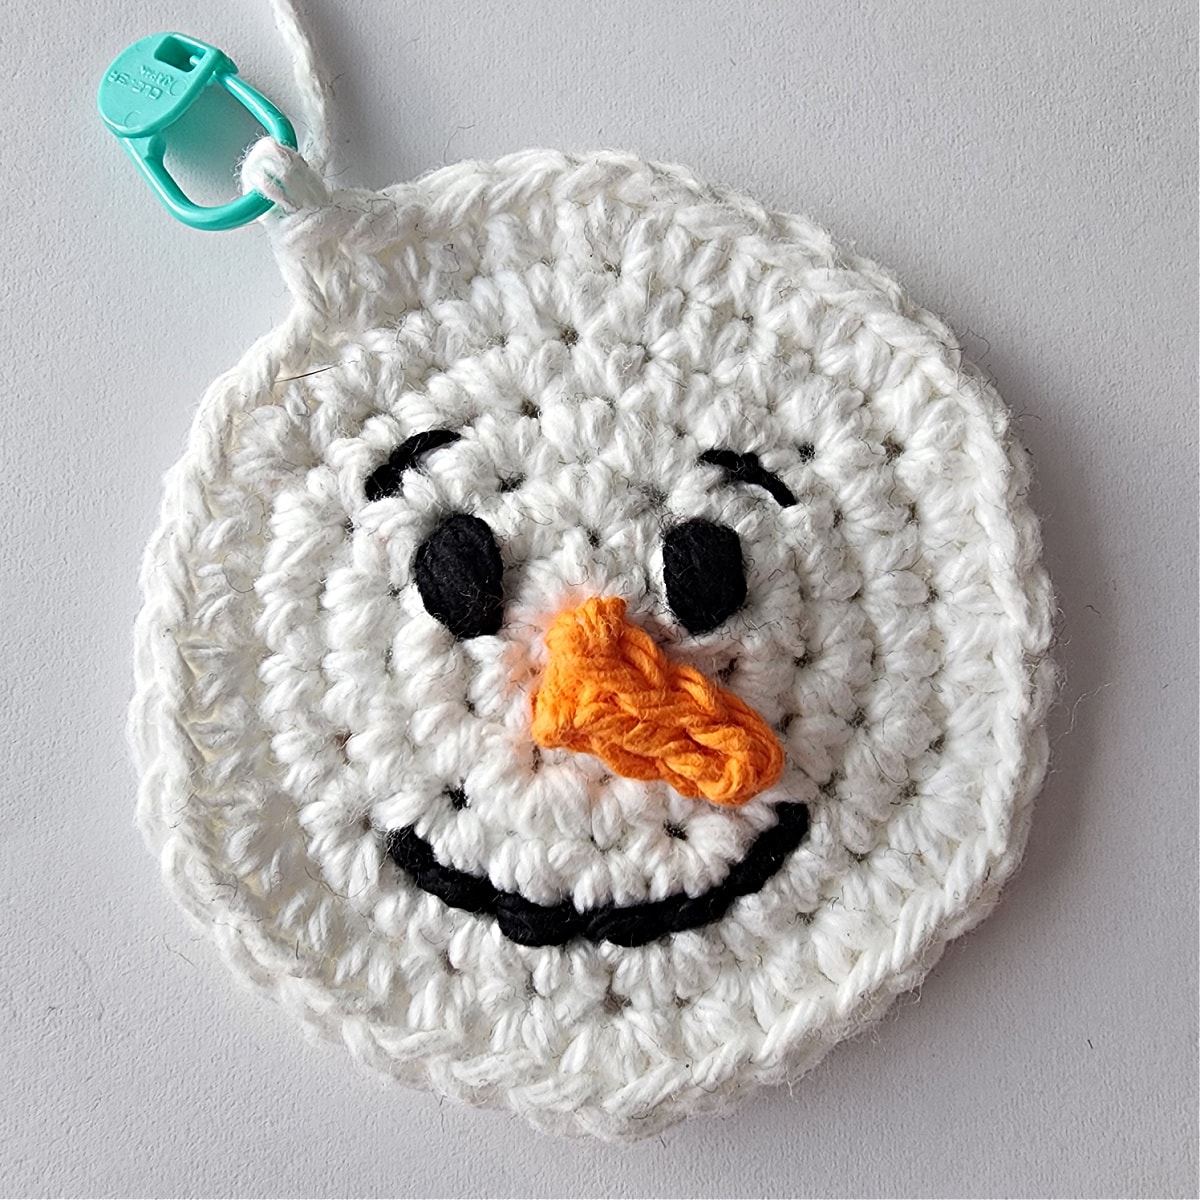
Carrot Nose
Row 1: With orange yarn and a 4.0 mm crochet hook, ch 4, working into the back hump of the ch, sl st in the 2nd ch from your hook, sl st in the next ch, sc in the last ch. (3 sts)
Fasten off leaving an 8” tail for sewing. Weave in beginning tail end.
Nose is approximately .5″ L.
Continue on to the Facial Features.
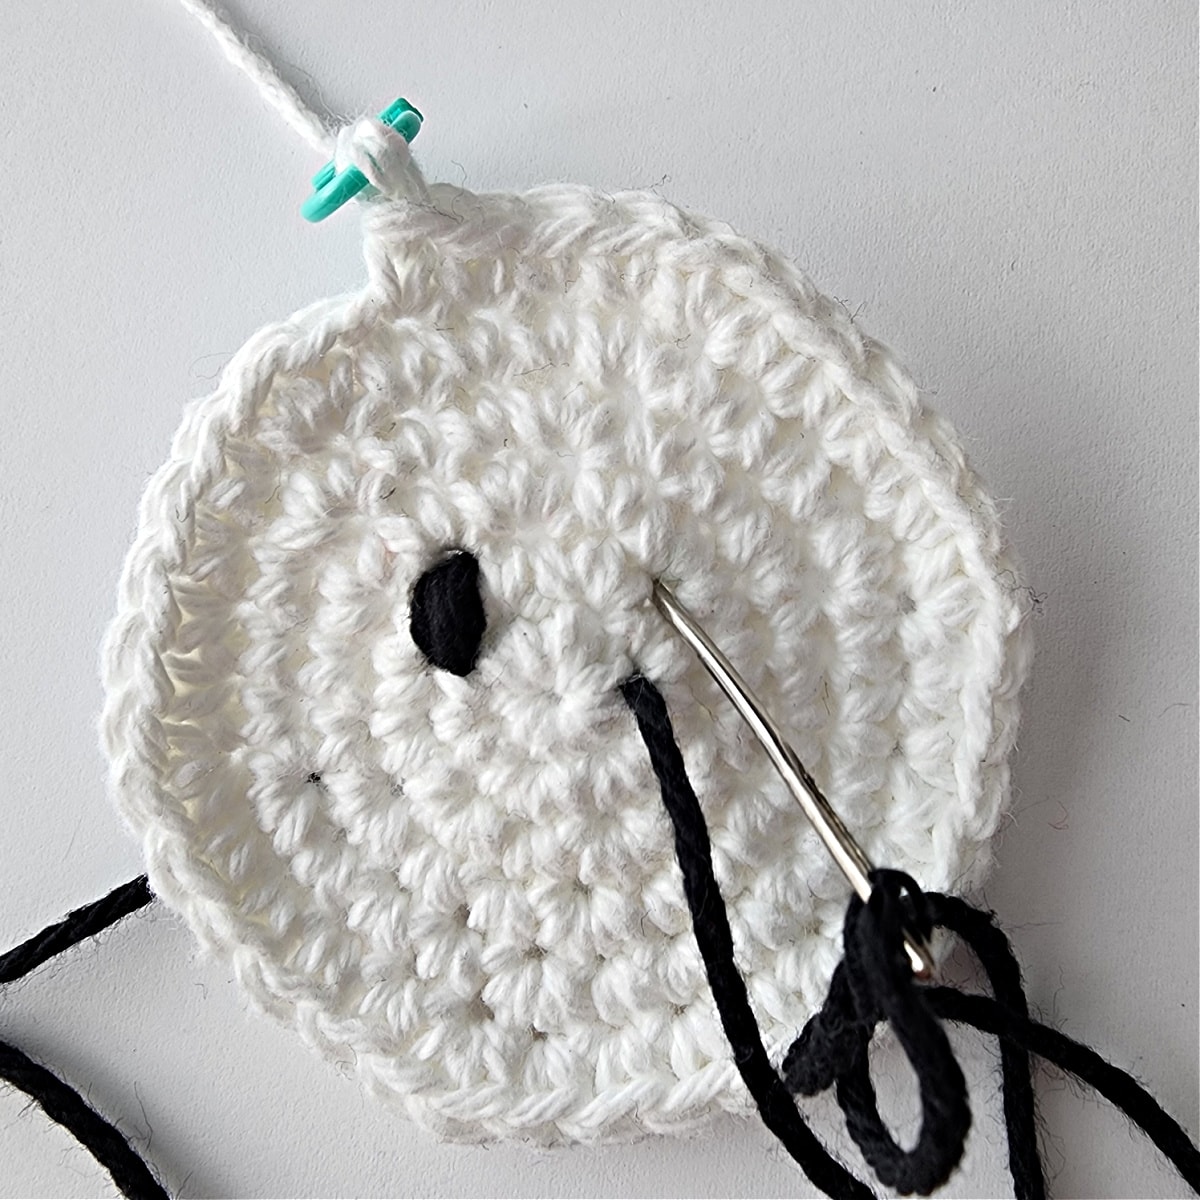
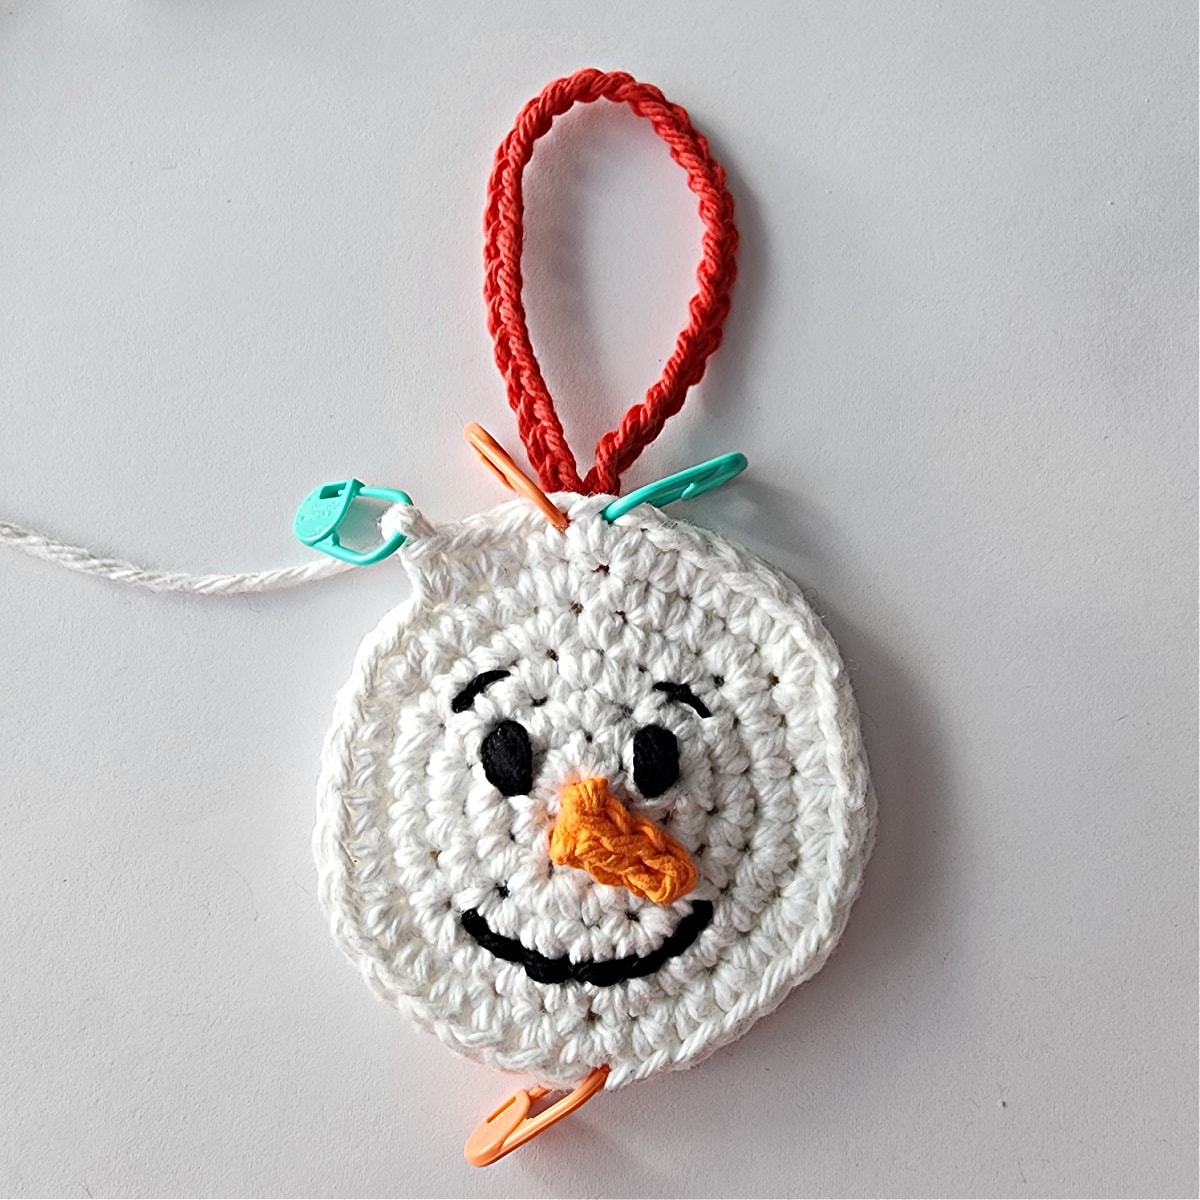
Facial Features
Facial features are worked onto the Snowman’s Head that has the working yarn attached to it.
Eyes
With an 18″ piece of black yarn and yarn needle, embroider eyes on the snowman’s face as shown below. I looped the yarn around a stitch, 5 times per eye, near the center of the face.
Continue to Eyebrows (optional), or Mouth.

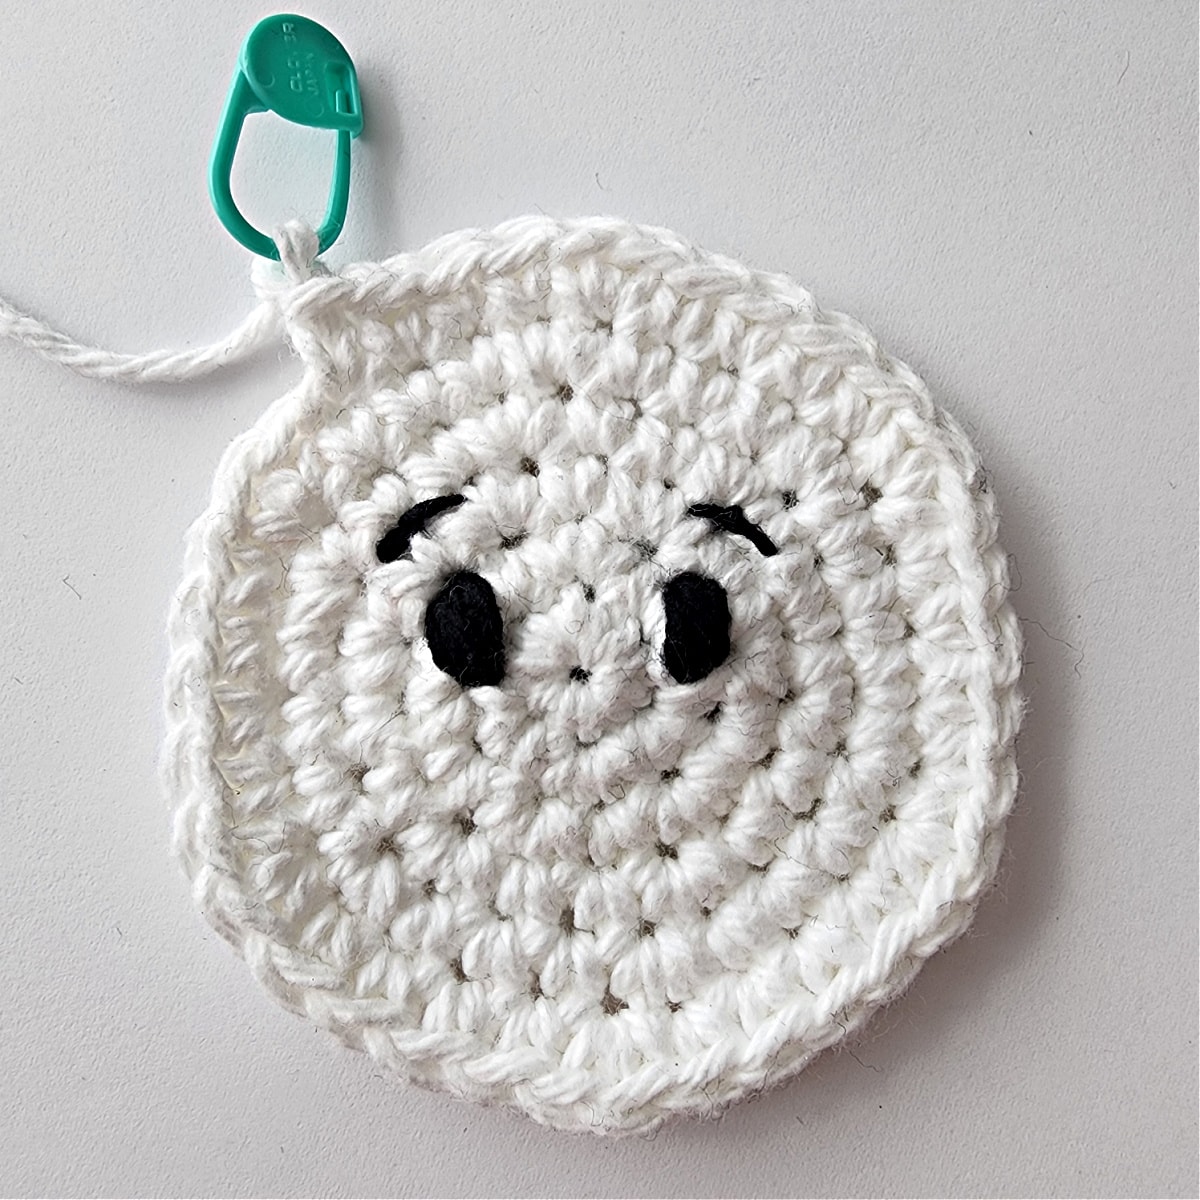
Eyebrows (optional)
For this step, you can use black thread, OR pull apart the plies of black worsted weight cotton yarn and use only one ply.
With a 12″ piece of black yarn and yarn needle, embroider eyelashes on the snowman’s face, near his eyes, as shown above
Continue on to the Mouth.
Mouth
With an 18″ piece of black yarn and yarn needle, embroider mouth on the snowman’s face as shown in the photos.
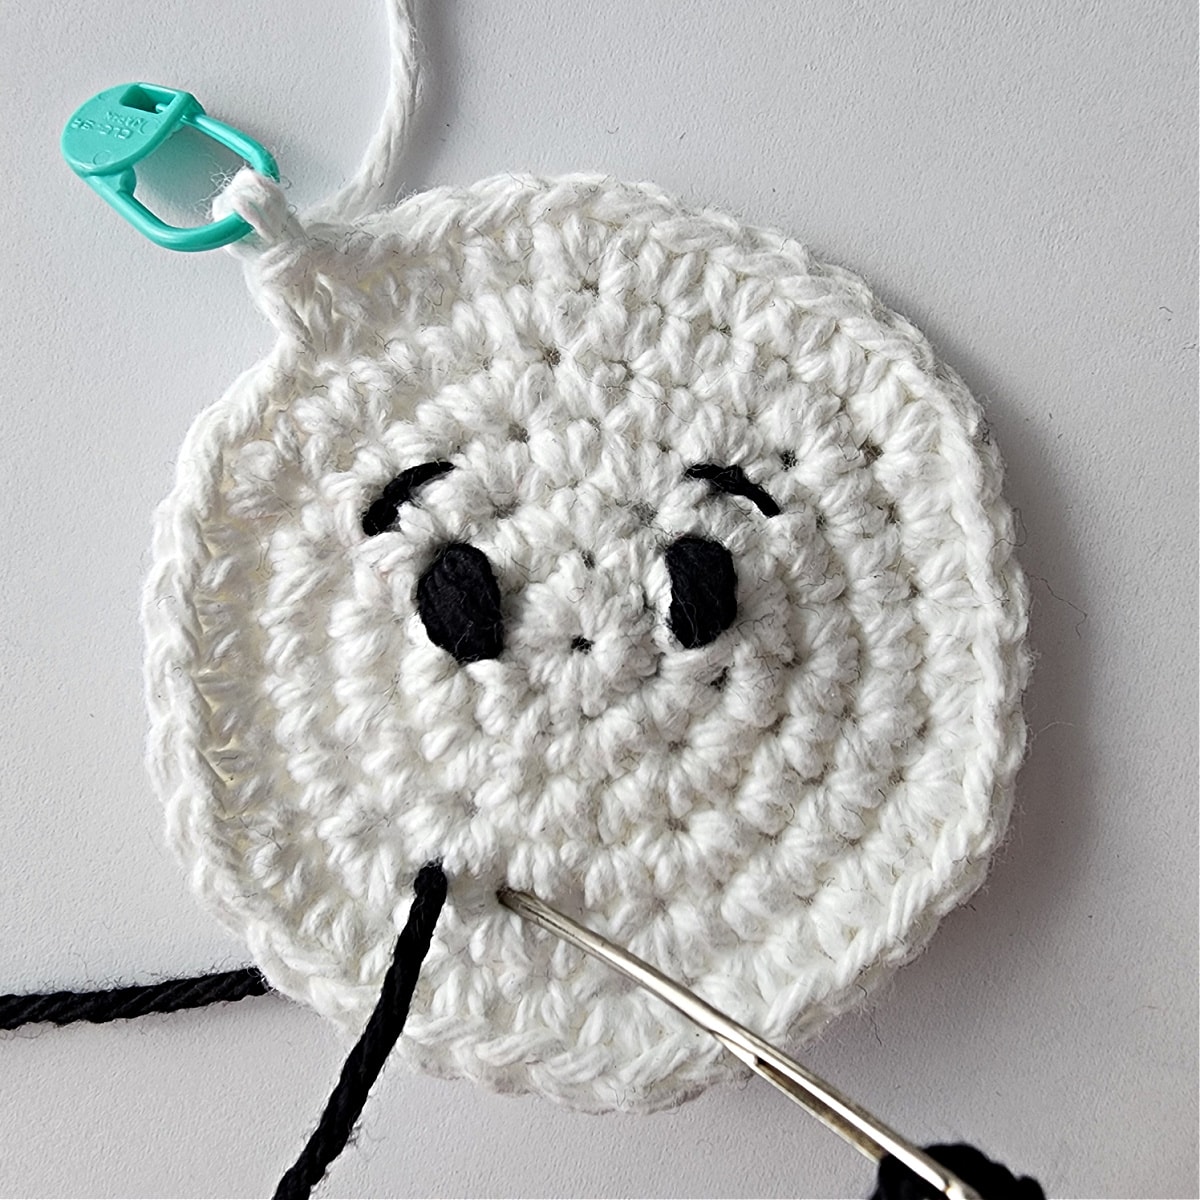
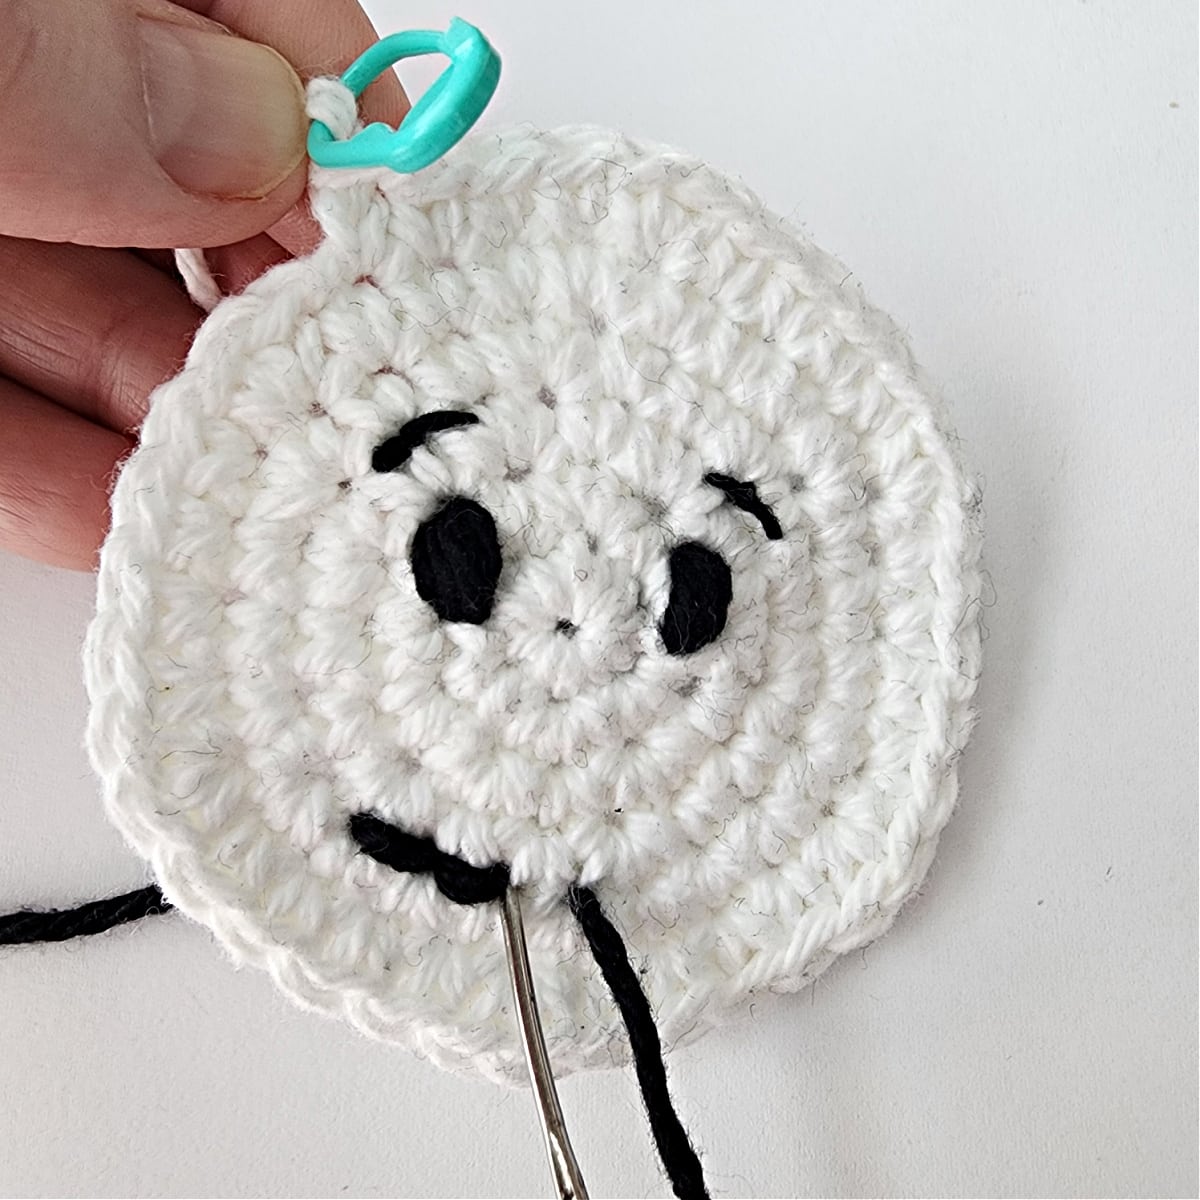
Attach Nose
With tail of orange yarn and a yarn needle, sew the nose onto the snowman’s face.
Continue on to the Hanging Loop.
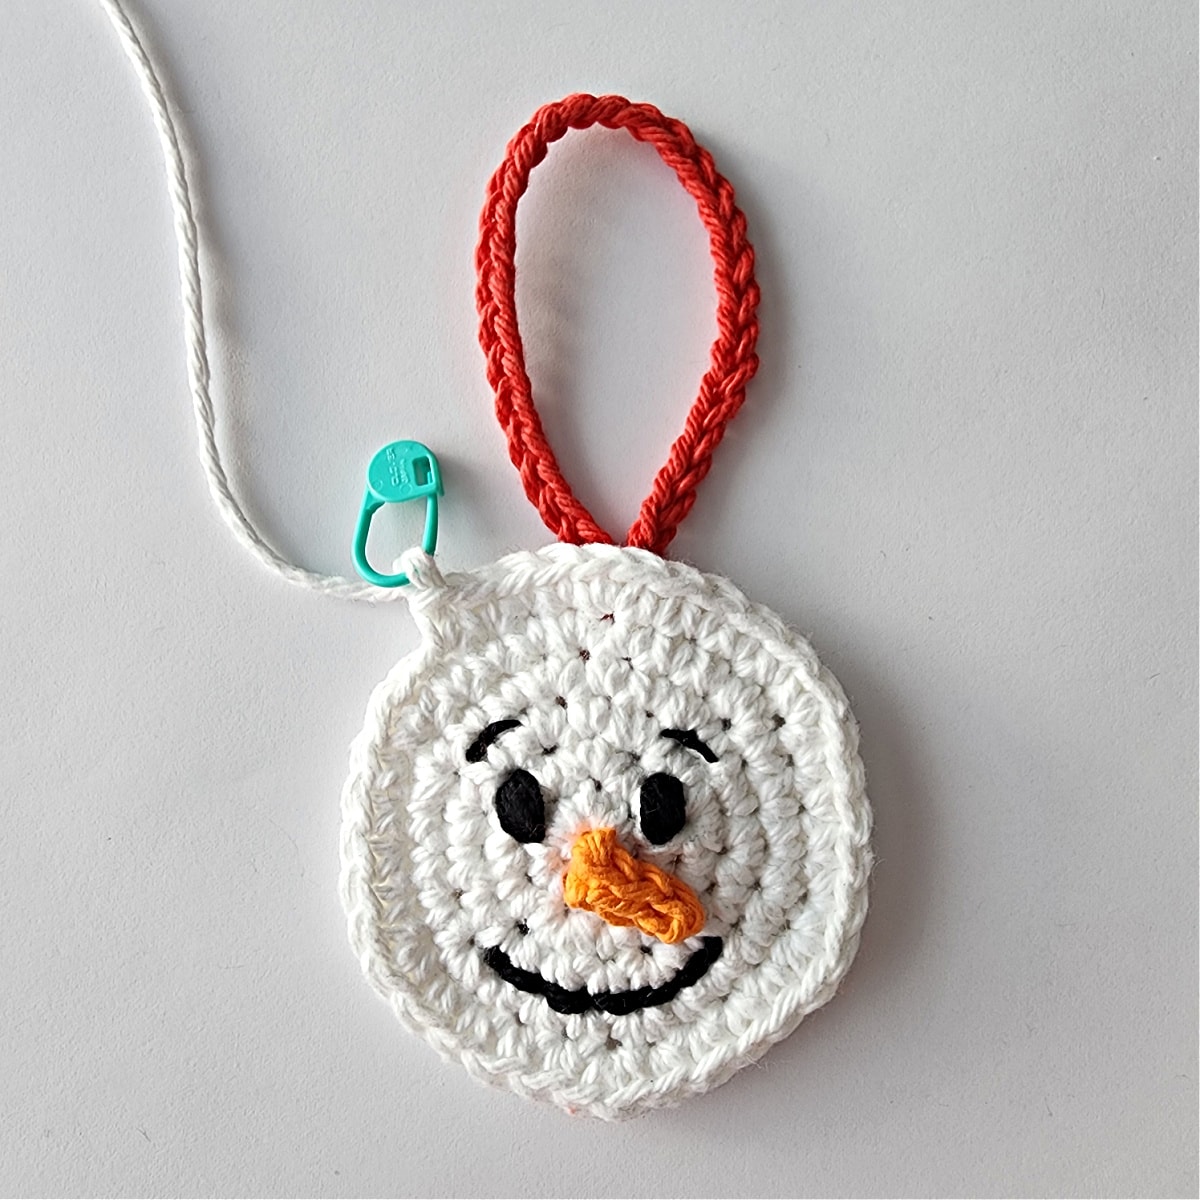
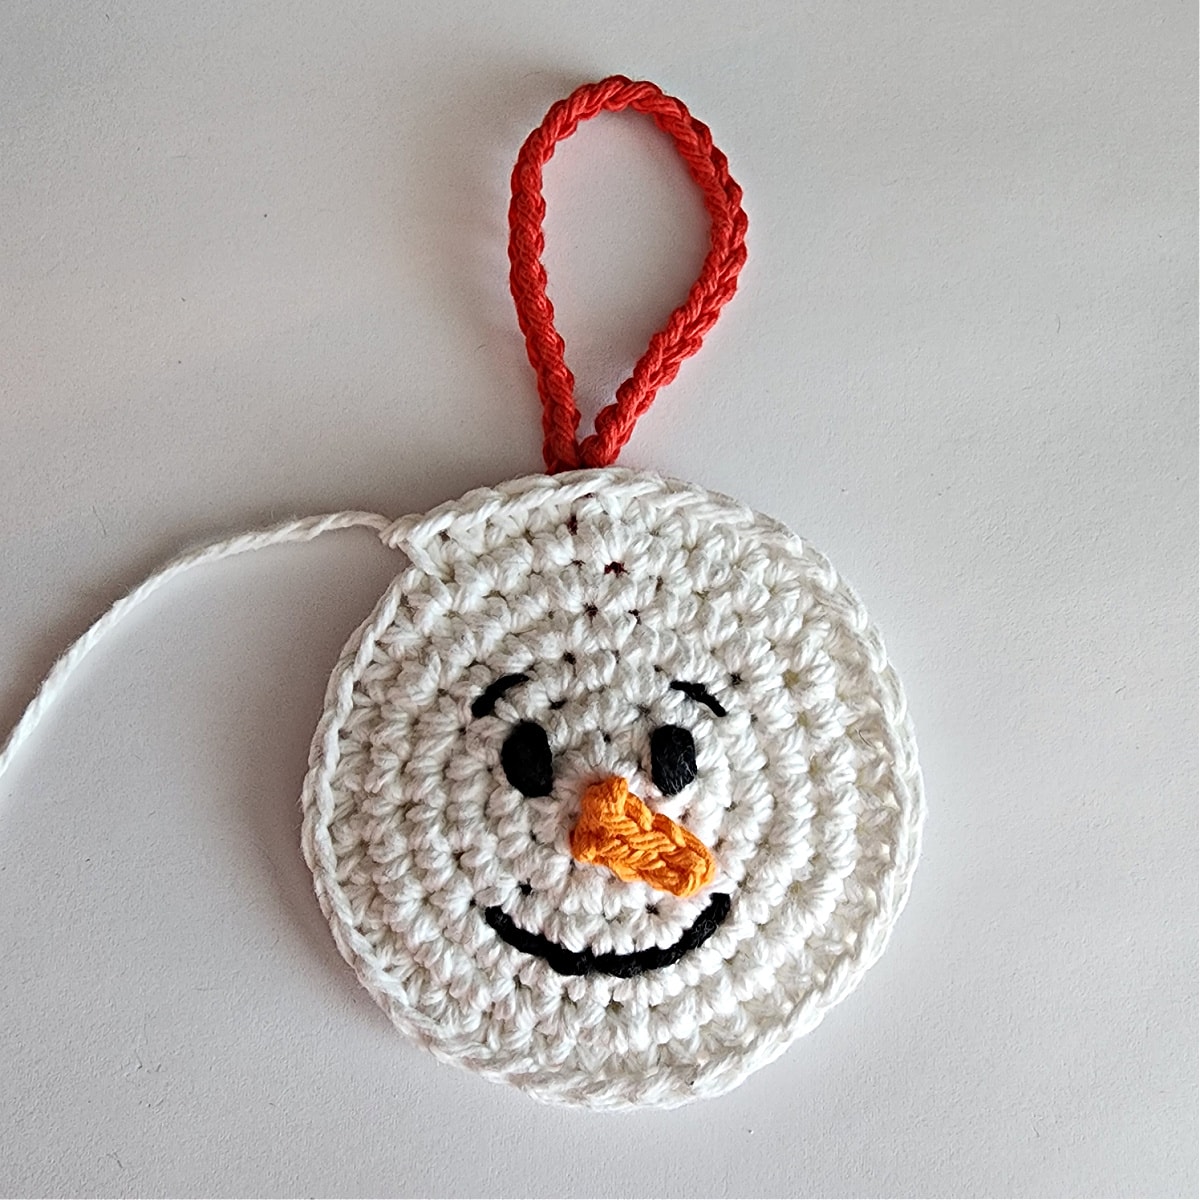
Hanging Loop
With any color yarn & a 4.00mm crochet hook, create a chain that is 6″ long. Join with a sl st to the 1st ch.
Fasten off, leaving a tail of yarn. With a yarn needle and tail of yarn, sew the hanging loop onto the back of the snowman’s head, nearest the top center stitches. Weave in ends.
Continue on to Candy Cane Holder Hands.
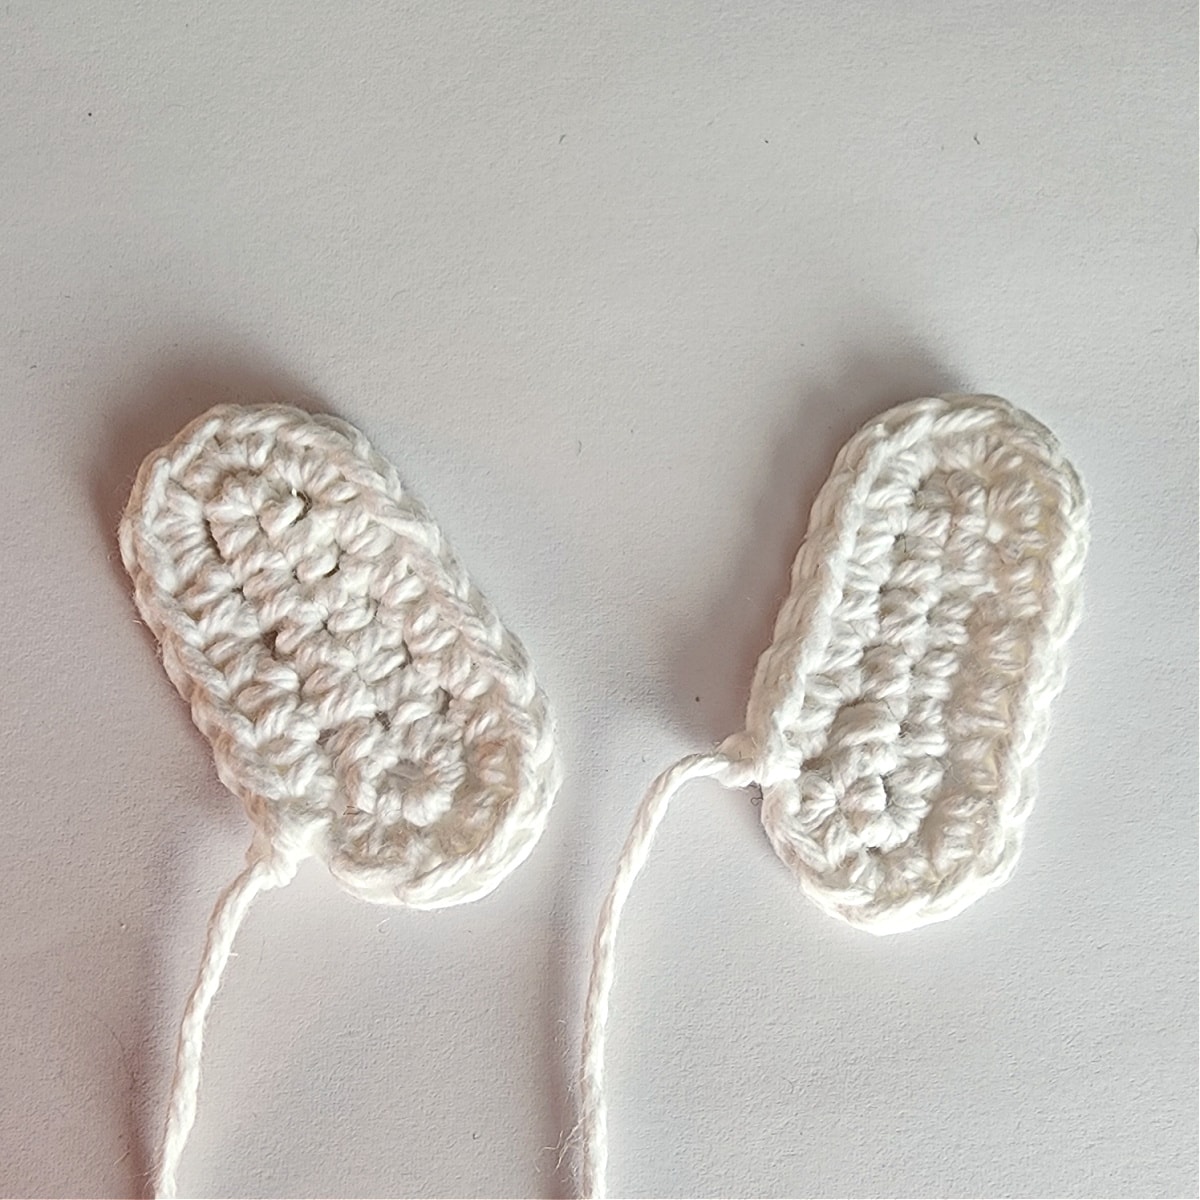
Candy Cane Holder Hands (Make 2)
Note: Snowman’s Hands are worked in continuous rounds (spiral). I suggest using a scrap of yarn as a stitch marker to help keep track of rounds.
Rnd 1 (RS): With 4.00mm crochet hook and white yarn, ch 7, work 3 sc in the 2nd ch from your hook, sc in each of the next 4 chs, 3 sc in the last ch, rotate to work on the opposite side of the ch, sc in each of the last 4 chs. Do not join. (14 sts)
Use a scrap piece of yarn to keep track of the beginning and end of the next round.
Rnd 2: (2 sc in each of the next 3 sts, sc in each of the next 4 sts) work from ( to ) 2 times. Join with a sl st to the 1st sc. (20 sts)
Fasten off leaving a tail of yarn to sew the snowman’s hand onto his head. Hand should be approximately 1″ W x 2.125″ L.
Make a second hand then continue on to Joining the Snowman’s Heads.
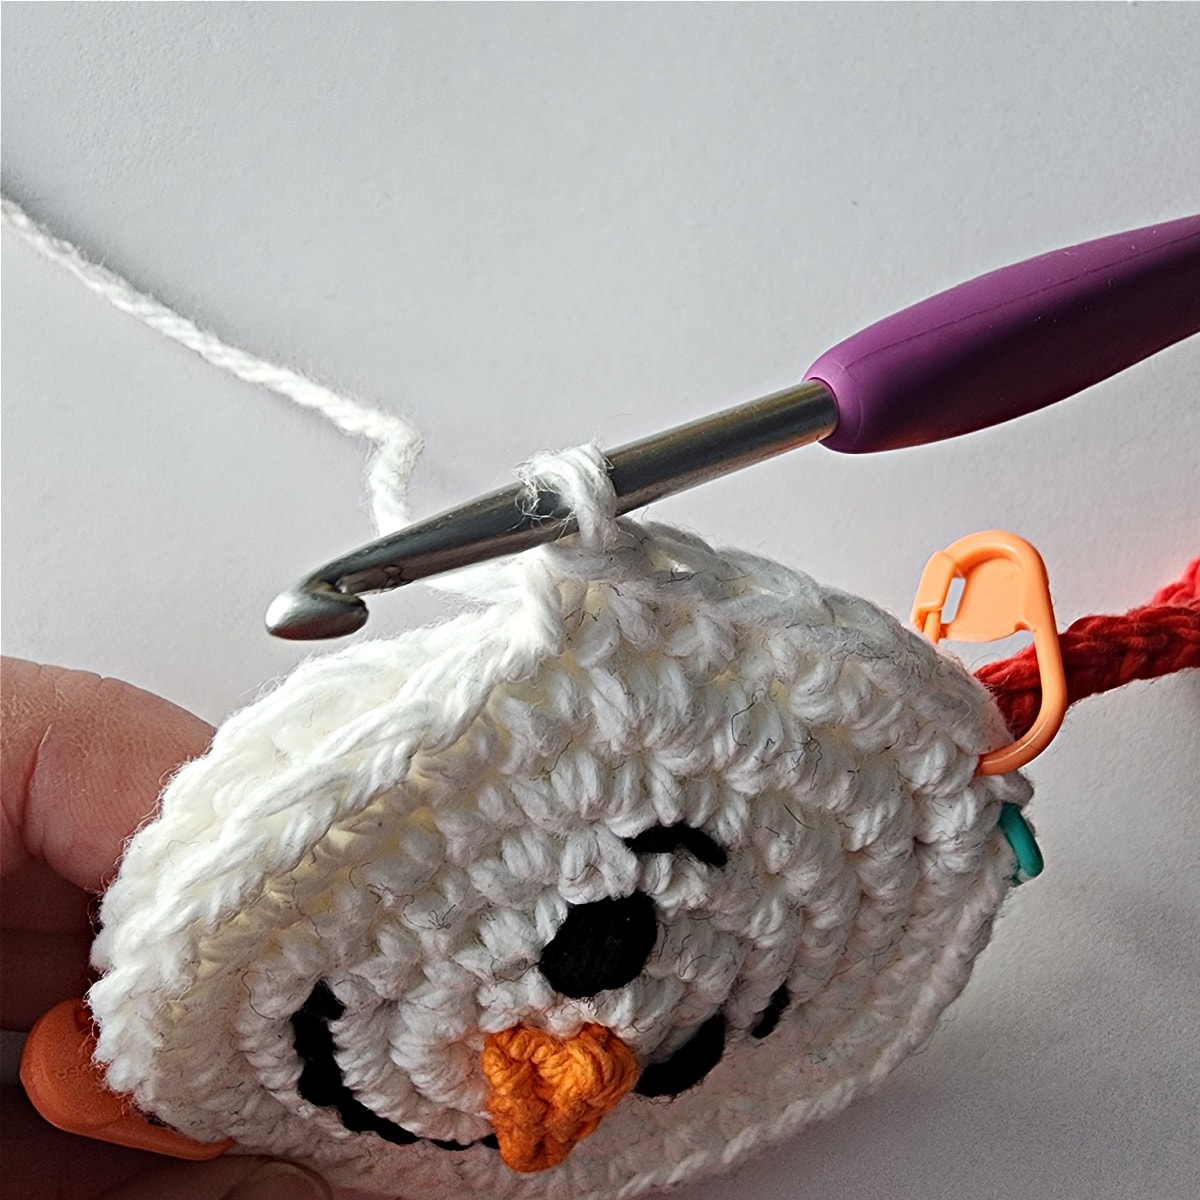
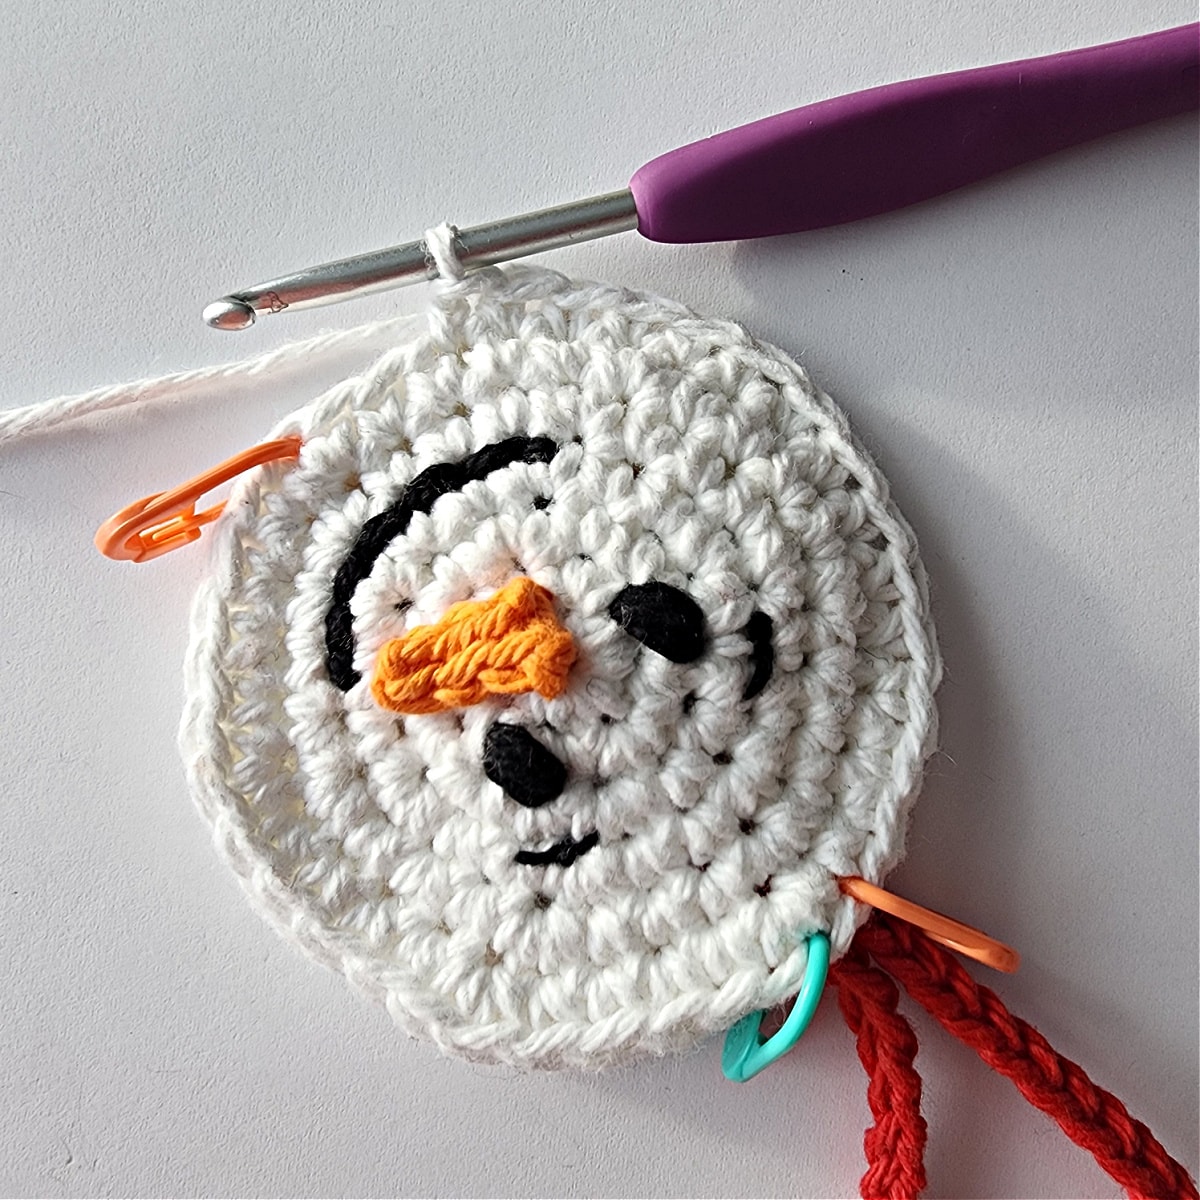
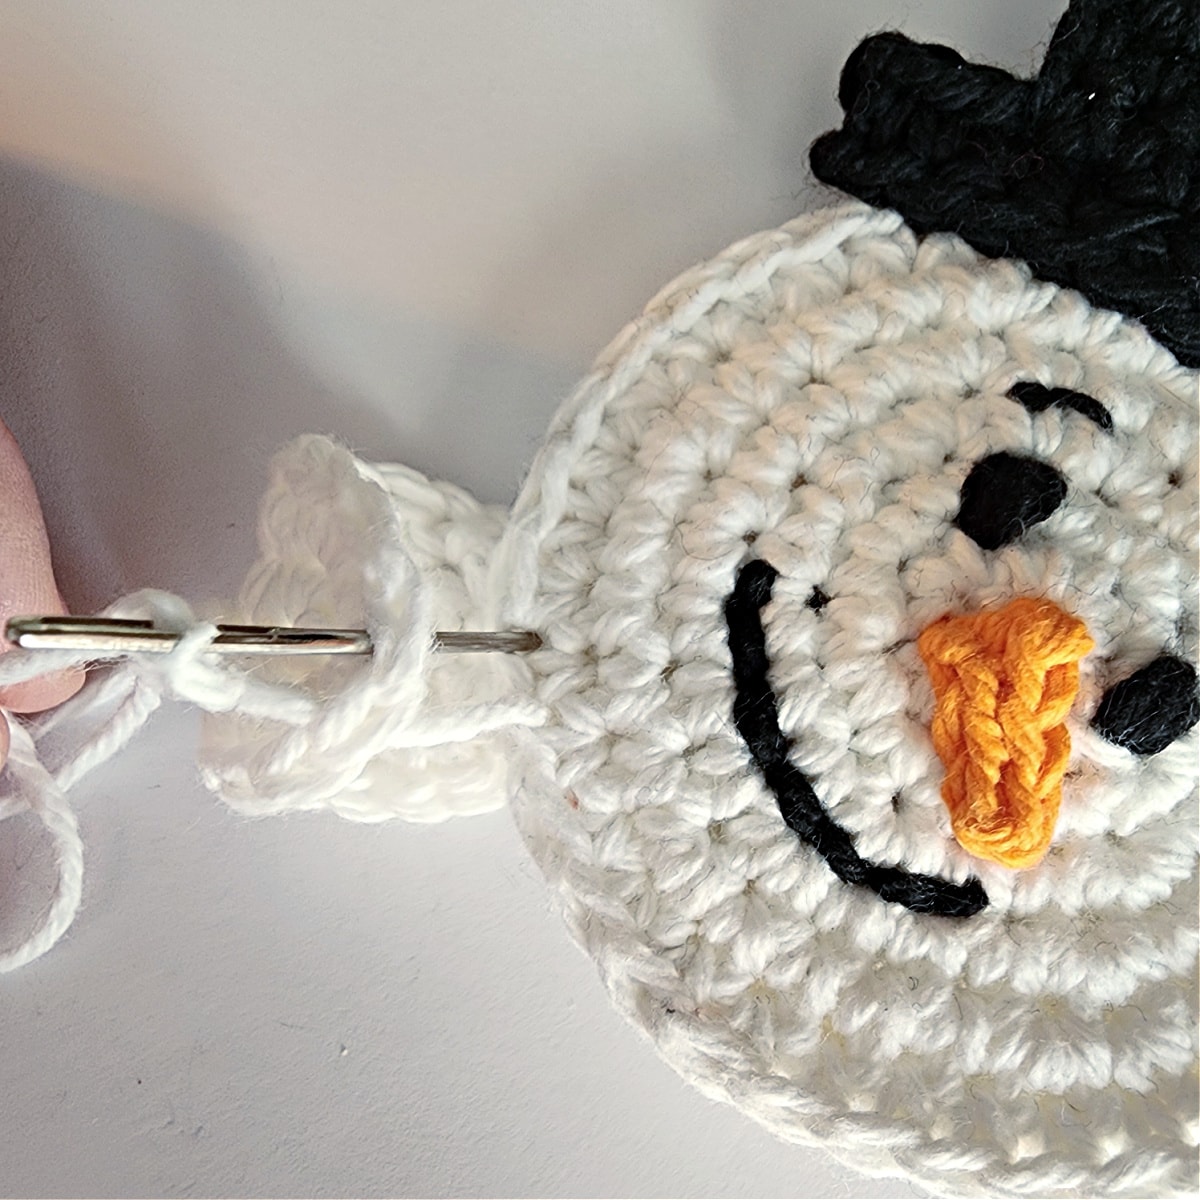
Joining the Snowman’s Heads
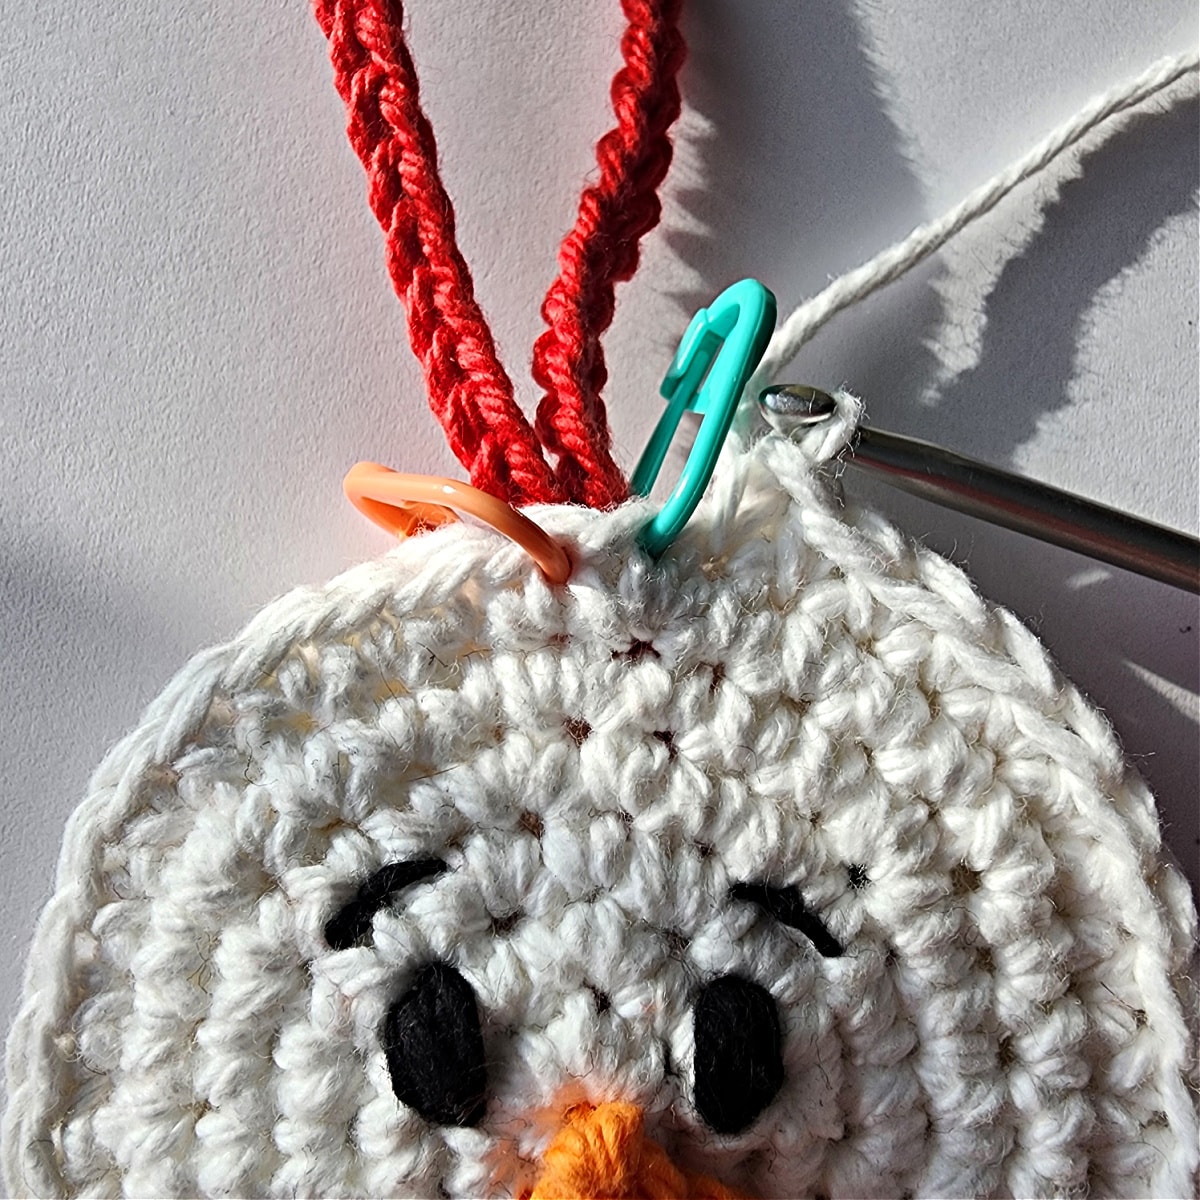
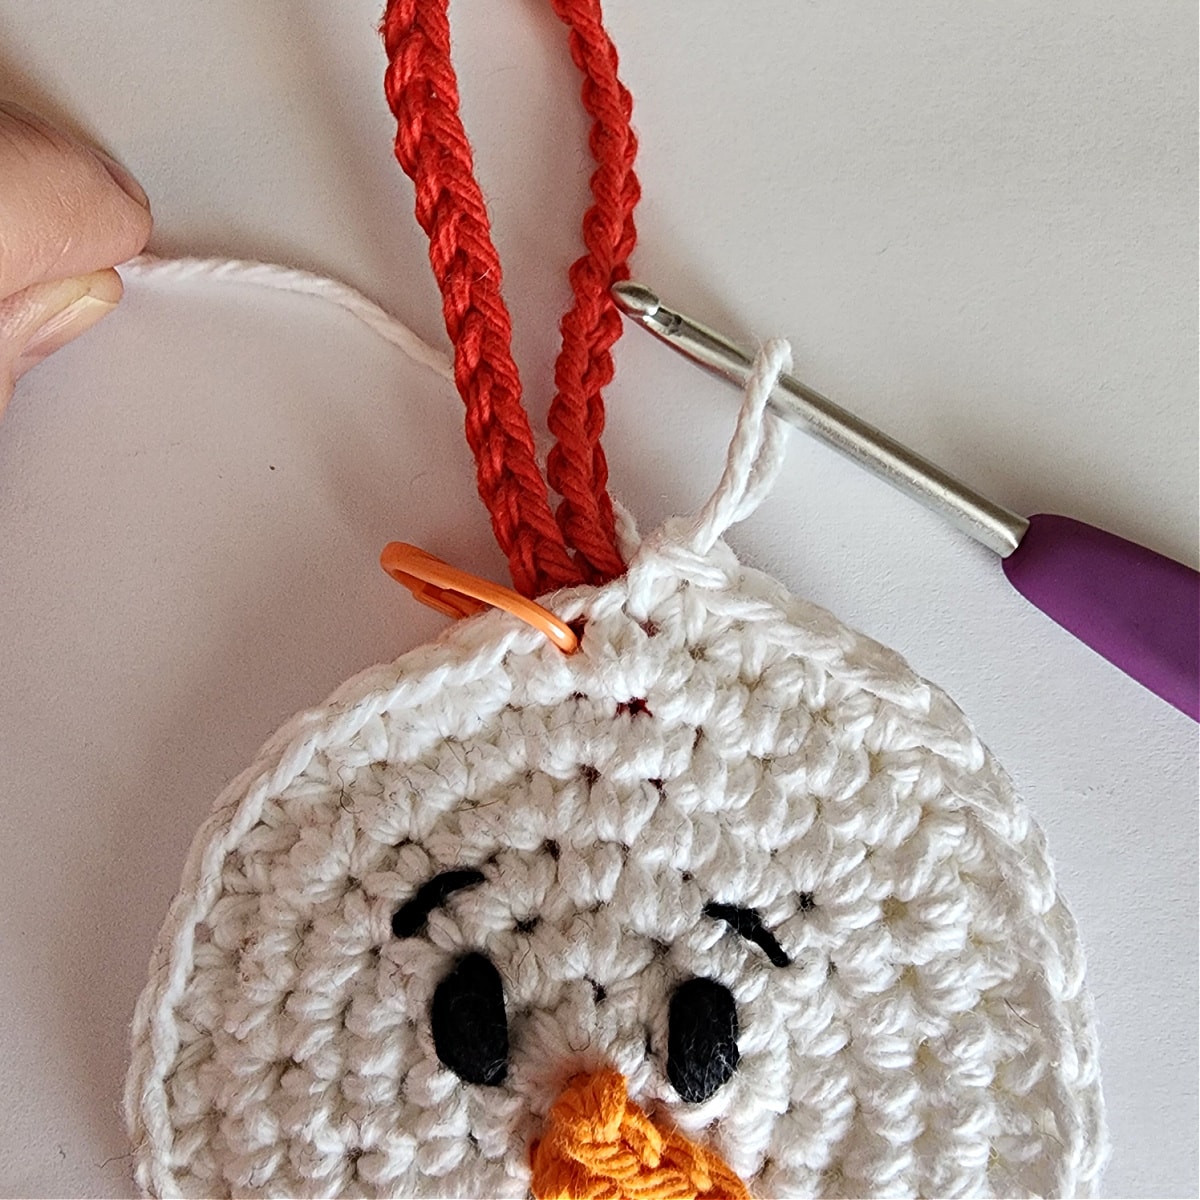
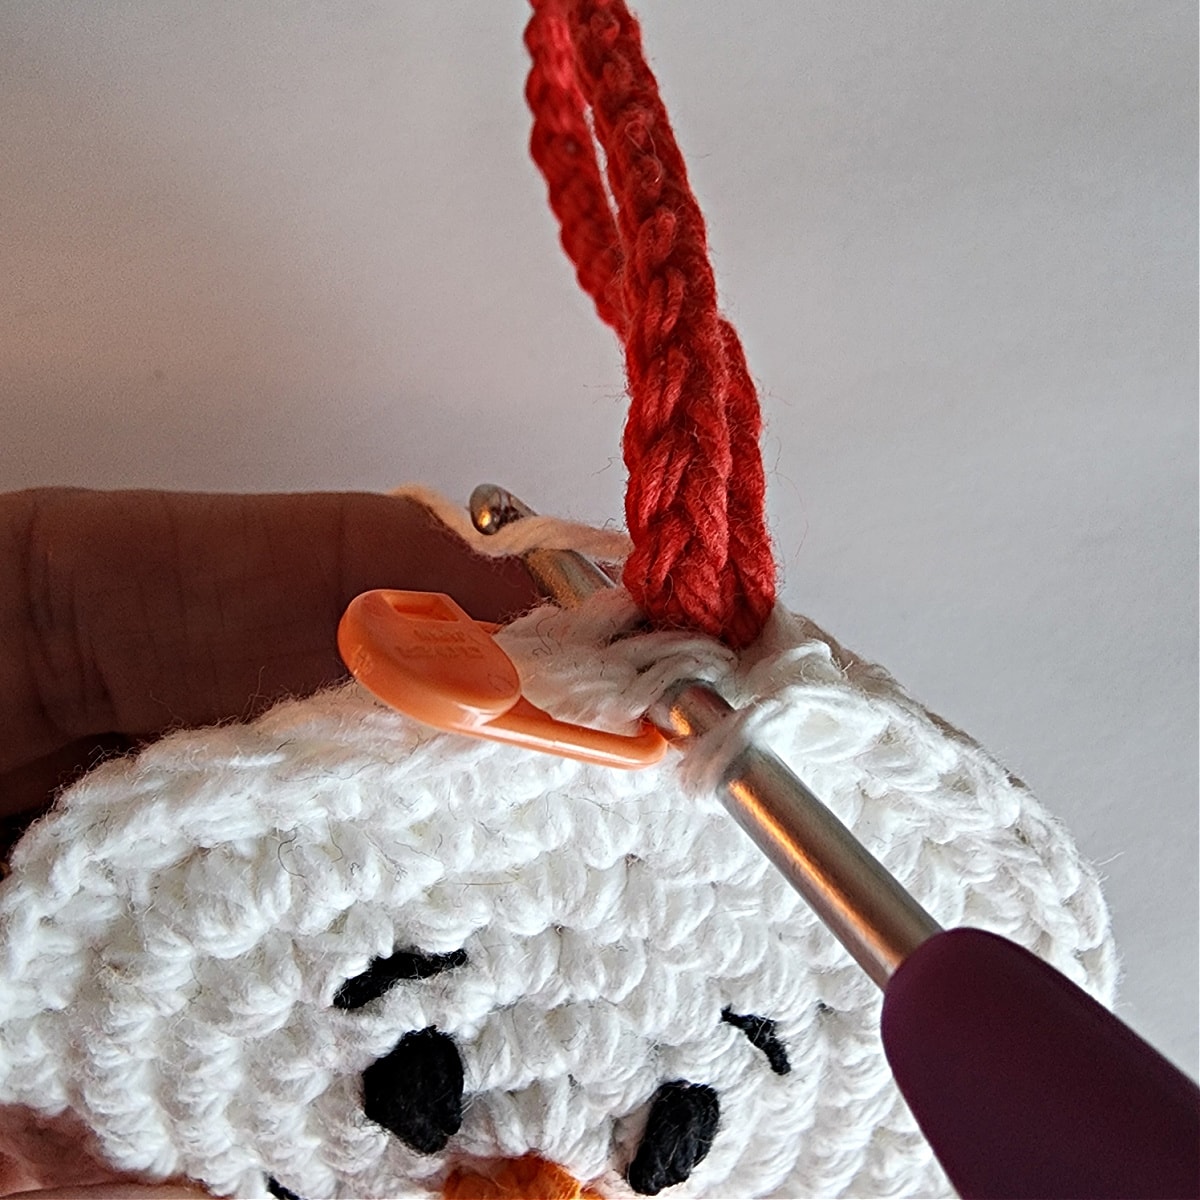
Step One: With the wrong sides together, lay your snowman’s heads on top of each other. Use locking stitch markers to help hold the two heads together while you join them. Place a stitch marker in each of the top two, most center stitches on his head. Position the hanging loop between these two stitches.
Step Two: With a 4.00mm crochet hook and the working yarn that’s still attached to the snowman’s head, working through both layers, single crochet in each stitch around the snowman’s head. Make sure not to work your stitches too tight or your head will pucker. See photos below for how I worked around the hanging loop.

Attaching the Snowman’s Top Hat
With your snowman facing up, position the top hat as shown in the photo below. Use a yarn needle and 18″ piece of black yarn to sew the top hat onto the snowman’s head.
Continue on to Attaching Candy Cane Holder Hands.
Attaching Candy Cane Holder Hands
Note: Make sure to sew the hands on as close to the bottom, outside edge of the snowman’s head as possible to make sure the candy cane will fit through.
Tip! If you feel the candy cane holder hands will be a smidge tight, you can gently pull on them to stretch them out.
Step One: Lay your snowman face up. Position one end of a snowman’s hand under his head, as shown in the photo below. Fold the hand in half with the opposite end on top of his head.
Step Two: With a yarn needle and tail of white yarn, sew the snowman’s hand onto the bottom edge of his head. Sew through all layers to secure the hand. Repeat for the second hand.

Snowman’s Scarf
I made a small yarn rope for the snowman’s scarf. If you don’t want to fuss with a yarn rope, you can use the Alternate Scarf instructions below, for your snowman’s scarf.
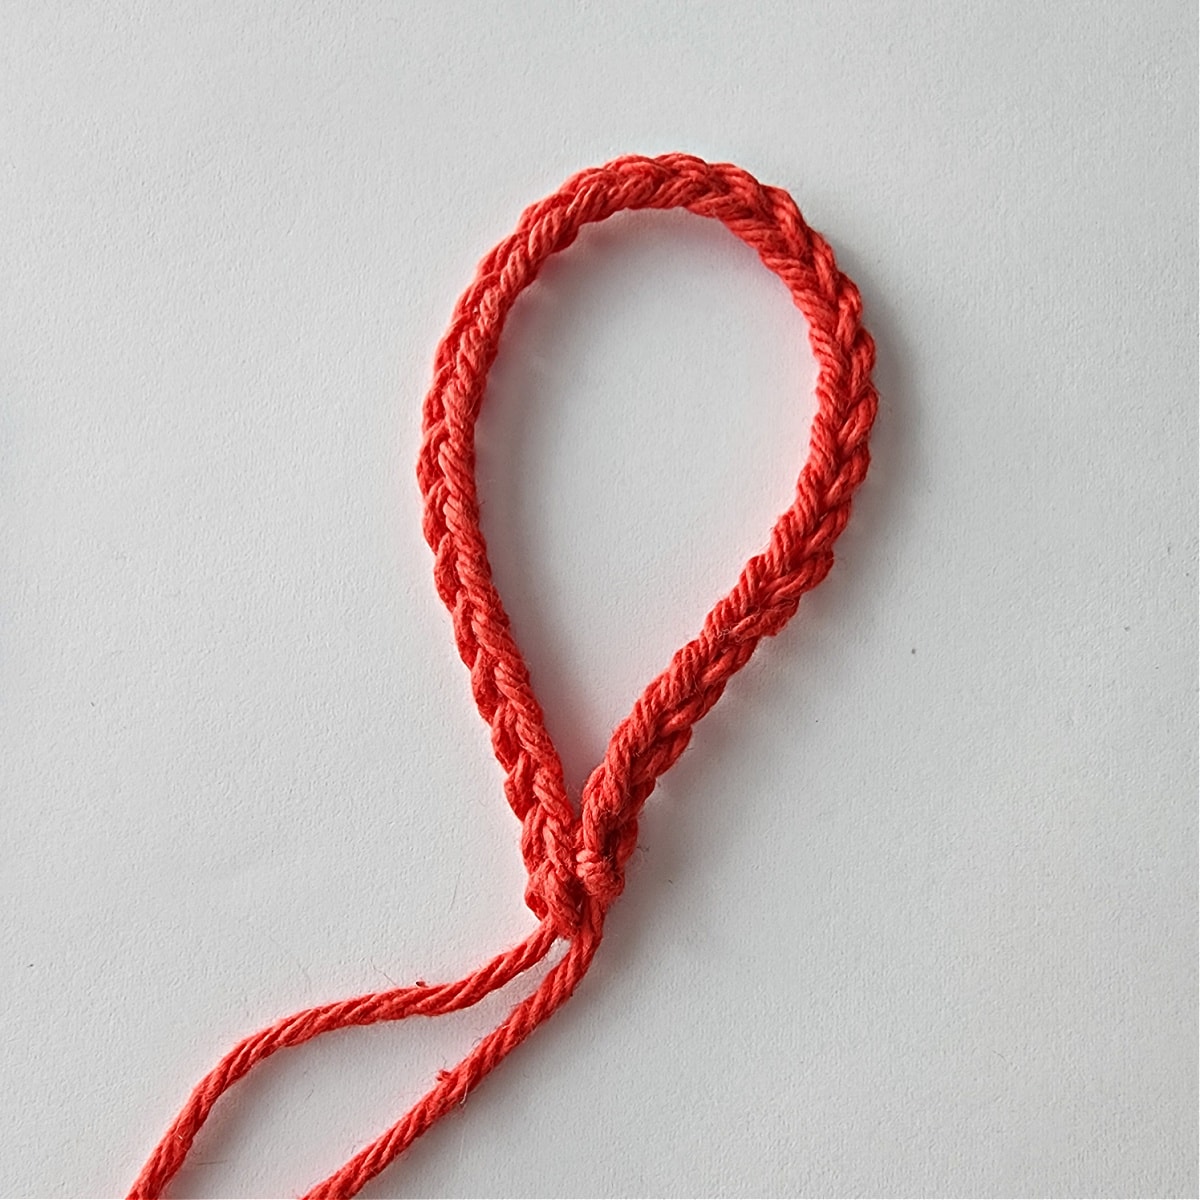
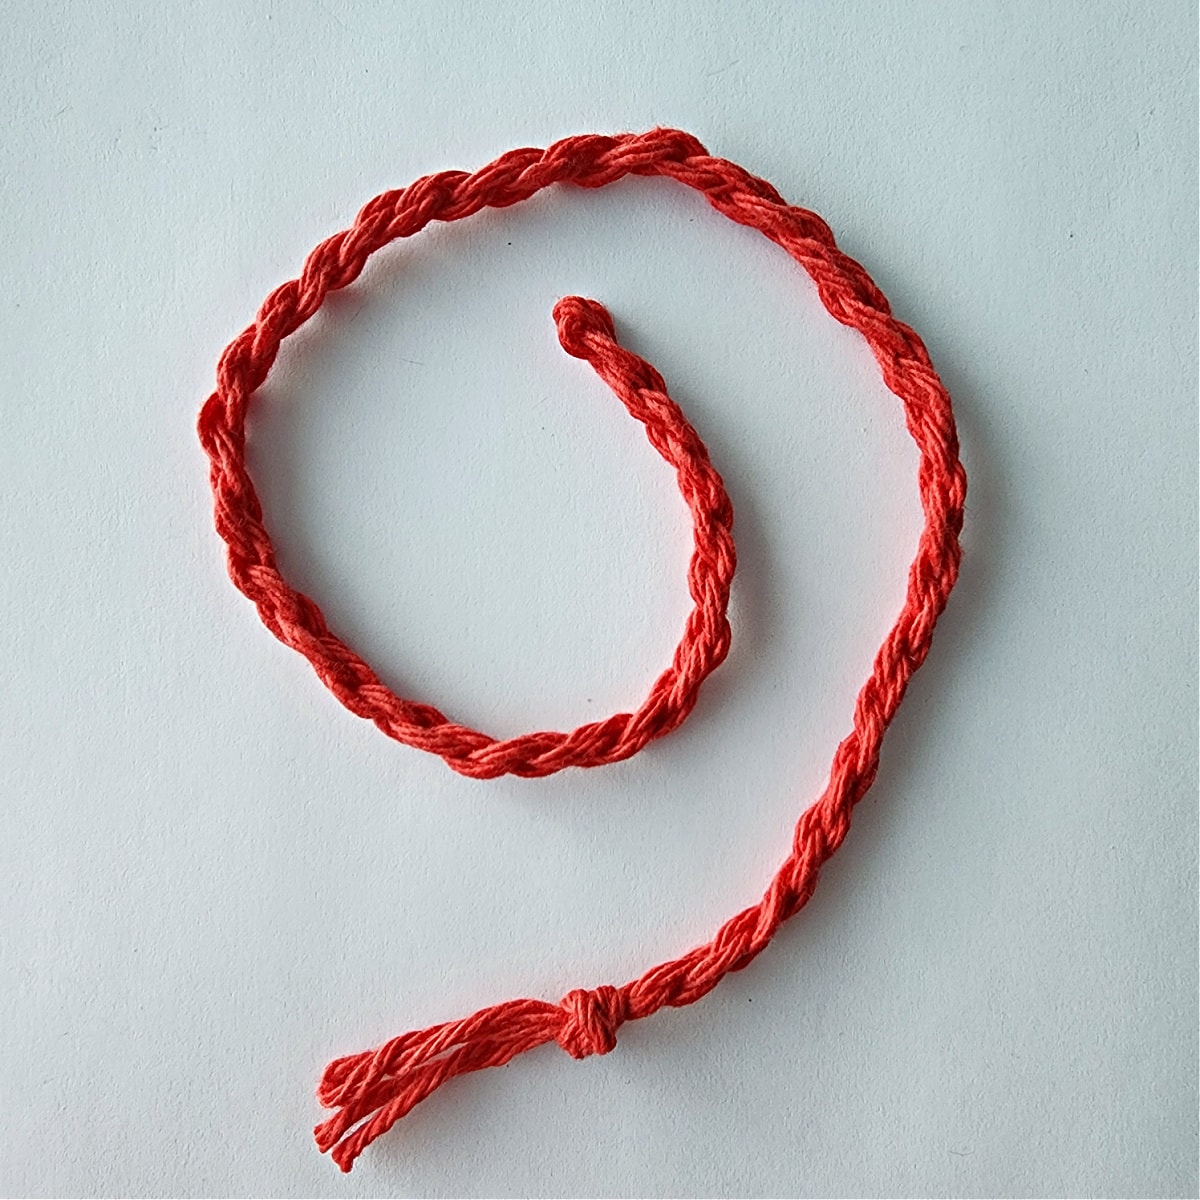
Yarn Rope Scarf
14″ Long Yarn Rope: To make my 14″ long yarn rope, I used 1 strand of red yarn that was 2 yards long.
I found a simple to follow yarn rope (aka a twisted cord) tutorial.
Continue on to Attaching the Snowman’s Scarf.
Alternate Scarf
Row 1: With red yarn and a 4.00mm crochet hook, create a chain that is 14″ long.
Fasten off. Continue on to Attaching Snowman’s Scarf.
Attaching Snowman’s Scarf
Step One: Lay your snowman in front of you, face up. Wrap the scarf around his head as shown in the photo below.
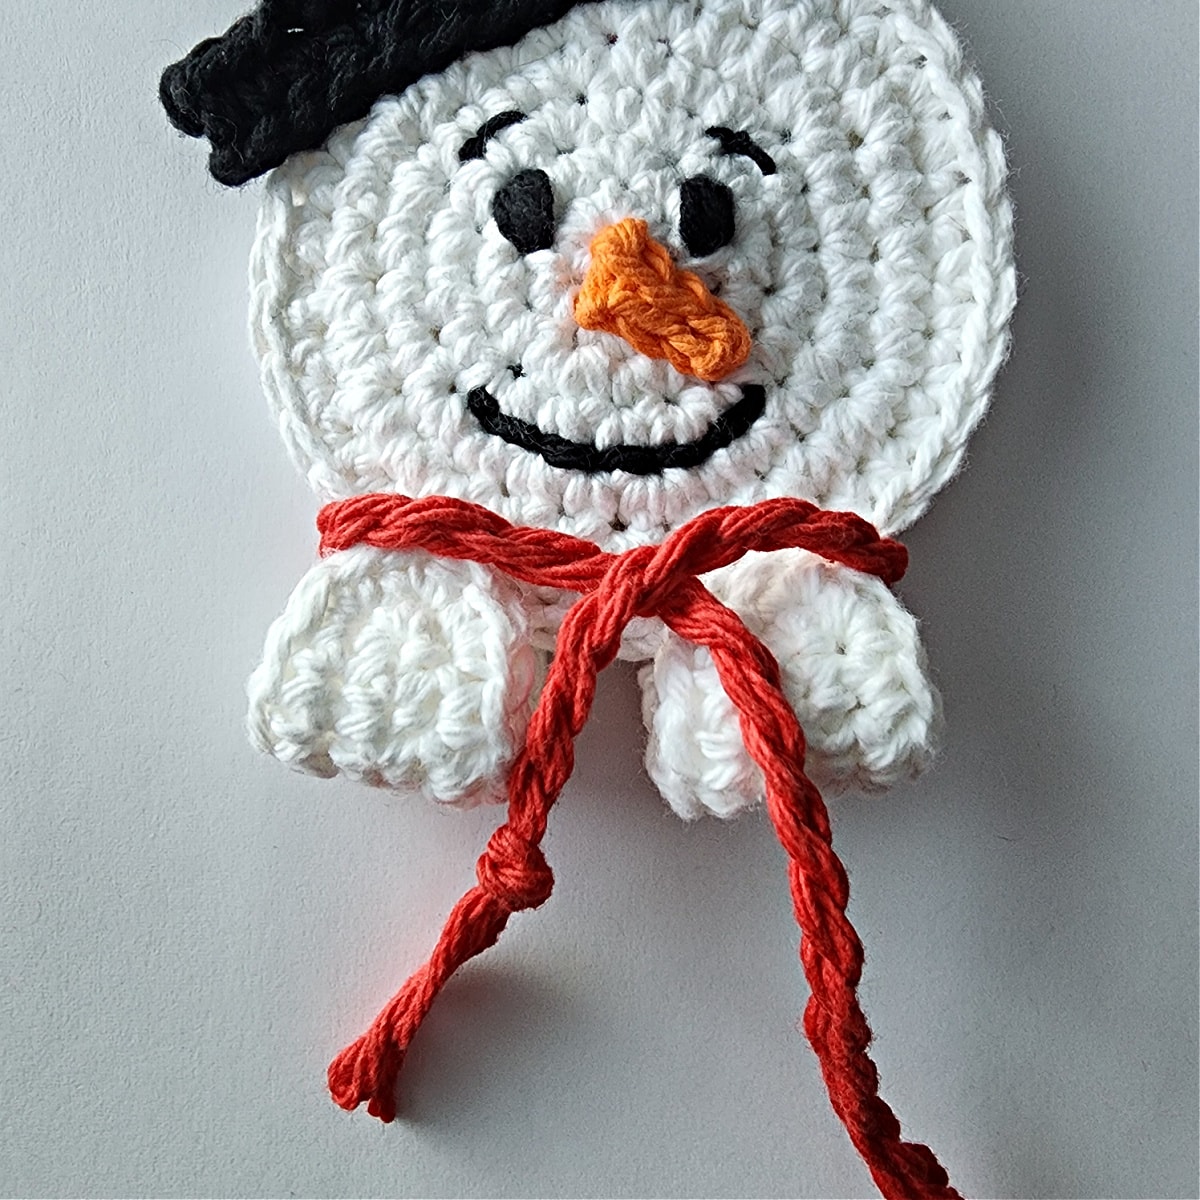
Step Two: Loosely tie the scarf (do not knot it). Then, with an 8″ piece of red yarn and a yarn needle, secure the scarf to the snowman’s head by working a stitch up through the center where you tied the scarf.
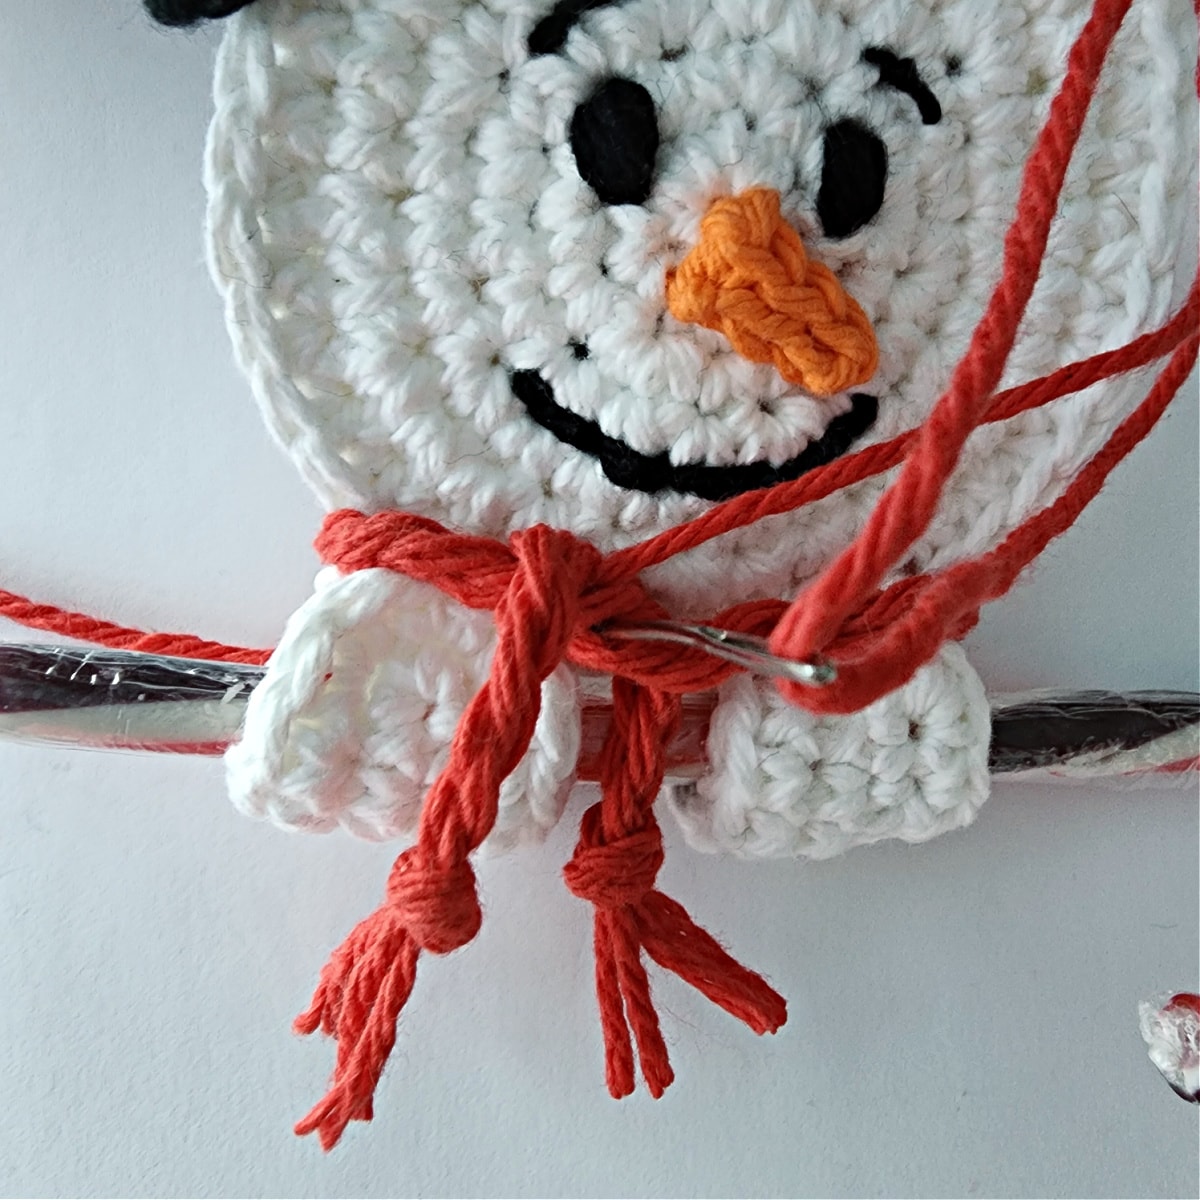
Step Three: Adjust the length of your scarf, if needed. I had to create a new knot at one end to make my scarf shorter. Then I trimmed my ends to make it even.
Related: If you enjoyed making this snowman candy cane ornament, I think you’ll love the Reindeer Candy Cane Holder Ornament, and the Gingerbread Boy & Girl Candy Cane Holders, too!
I MADE IT! NOW WHAT?
Pin this post! Save this snowman candy cane holder ornament to your Pinterest boards so that you can come back and make it again.
Leave a comment below: We love to hear your feedback.
Share Your Finished Projects on Facebook or Instagram: I love to see your finished projects! Share with us on social media and tag me @acrochetedsimplicity or use the hashtag #ACrochetedSimplicity so I can find your posts.
JOIN US IN THE FACEBOOK COMMUNITY GROUP!
I hope you’ve enjoyed this crochet snowman candy cane holder and made many crocheted Christmas gifts!
Come share your finished projects with us in the A Crocheted Simplicity Crochet Community Group on Facebook. Join us for fun community events such as crochet alongs, join in on crochet conversations, ask questions, get advice, and share your love for crochet!

MORE CROCHET IDEAS FOR CHRISTMAS I THINK YOU’LL LOVE
MORE CHRISTMAS SNOWMAN DECOR
Do you LOVE Christmas Snowman Decorations?
If so, you may fall in love with these snowman crochet patterns for Christmas decor: Snowman Crochet Hand Towel and Snowman Wreath.
So cute! Definitely going to make for the grandkids. Thank you.
These snowmen candy cane holders are adorable! I found them too late for Christmas 2023, but I plan to make dozens for next year, to use as gift toppers, tree ornaments and little treats for lots of people with whom I don’t exchange gifts, but want to wish merry Christmas, like the receptionist at the allergy office, and the postal clerk, who always seems frazzled, but patient.
Whst a sweet ornament.
Thank you for this adorable snowman candy cane holder. It will be a quick fun project one day!
It was so hard to pick just one pattern. I’m picking your candy cane holders, Snowman, Reindeer, and the Boy and Girl Gingerbread people. They were just what I was looking for this Christmas. Thank you so much.
Love this pattern – wish I had found it sooner. I plan to make these next year as little extra gifts!
This is so cute. Will have to make these for my Co workers next year
These will be perfect for me to make for my coworkers next Christmas.
I’d better get to work.
I love my snowman all year long.
thank you!!
love this pattern
Love these! Got a few made for Xmas . Plan to make more of the snowman and other patterns for next year.
The kids loved these. Thank you
These are so cute! I wish I’d seen this before Christmas. I’ll have to save this for next year.
I just love these candy cane holder ornaments!!! They are all so cute!!
The kids loved them. Thank you!!
These snowman candy cane holders are super cute. I hope to do some for Christmas 2024
I just love snowmen and this little guy will make a great addition to my collection.
Love these! perfect to make for tags for my grandkids 🙂
Somehow I missed this before Christmas. He is so cute I think I will start making them to be ahead of the game for next year!!!
OMG this is adorable.. I need to make the whole set.
Entry for the NYE Giveaway…
I love the Crochet Snowman Man Candy Cane Holder! I am fond of anything snowman and the candy cane snowman holder is so cute, Thank you for the pattern!
can I make this with a acrylic thread
Hi Joyce,
You most certainly can. I just happen to have more colors in cotton on hard when I make them. 🙂
Happy Crocheting,
Jennifer