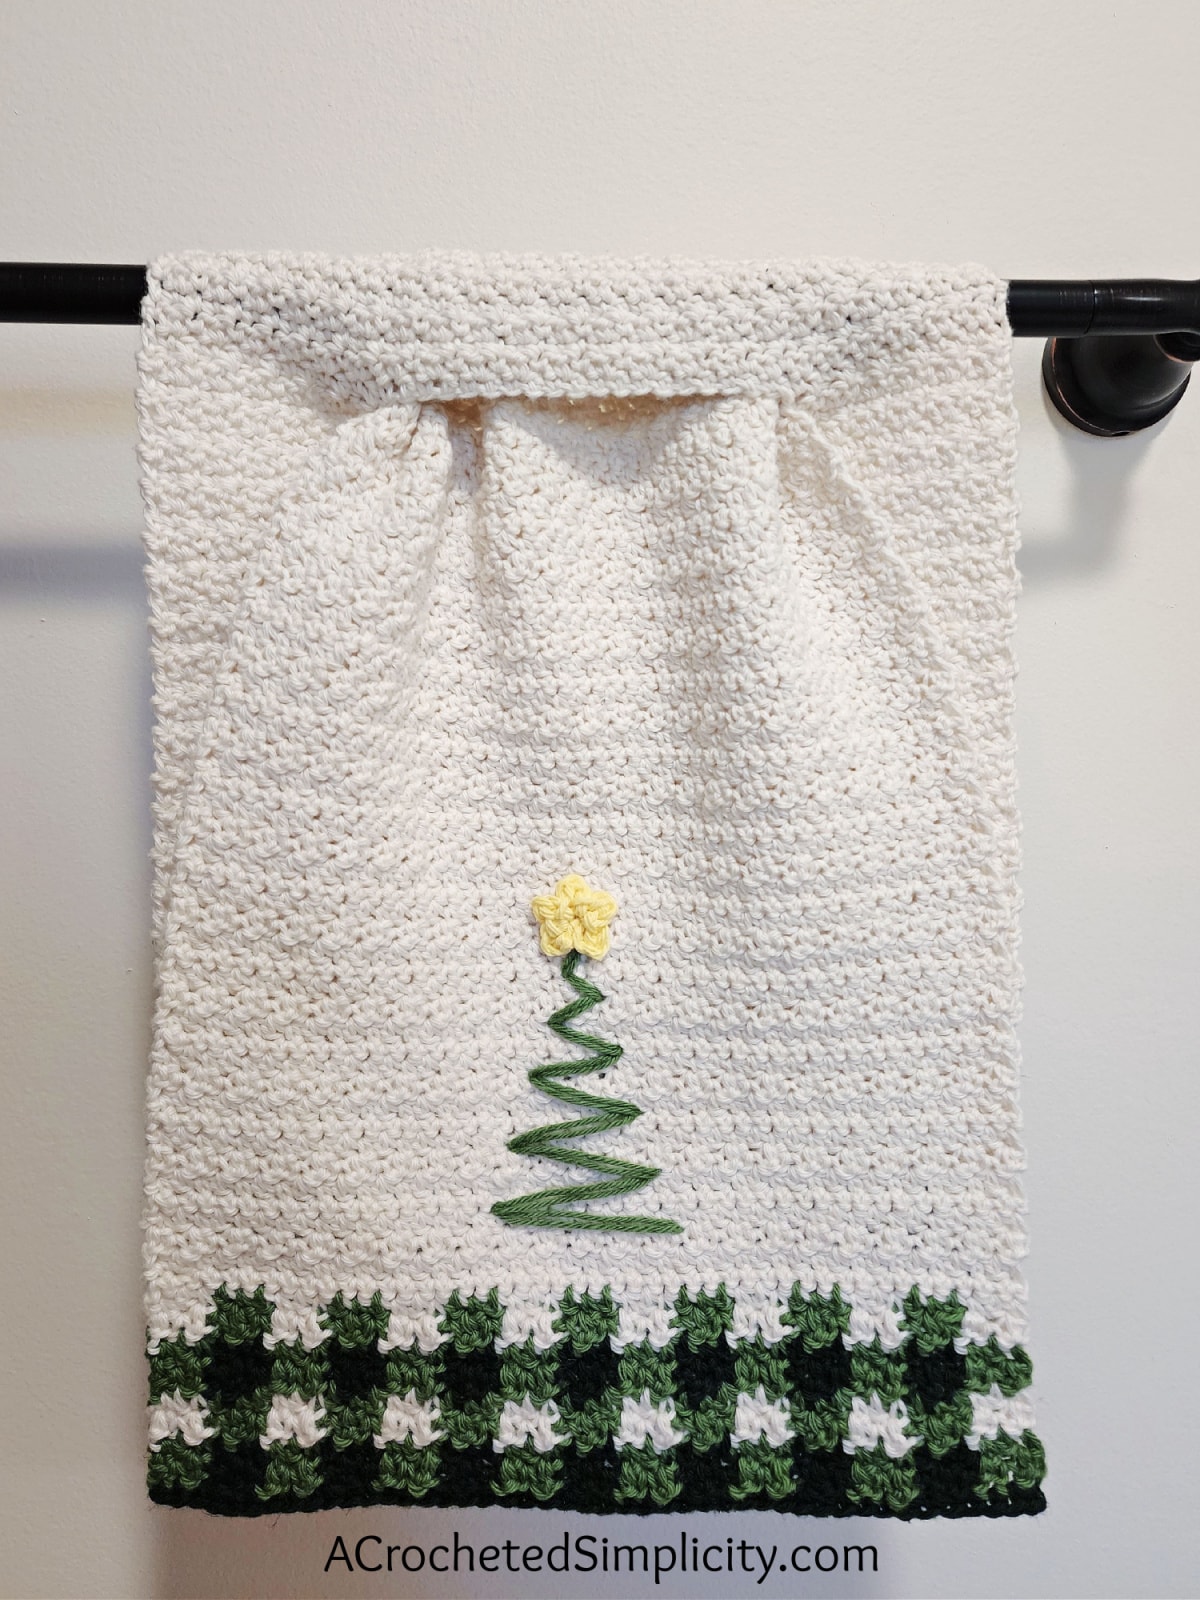
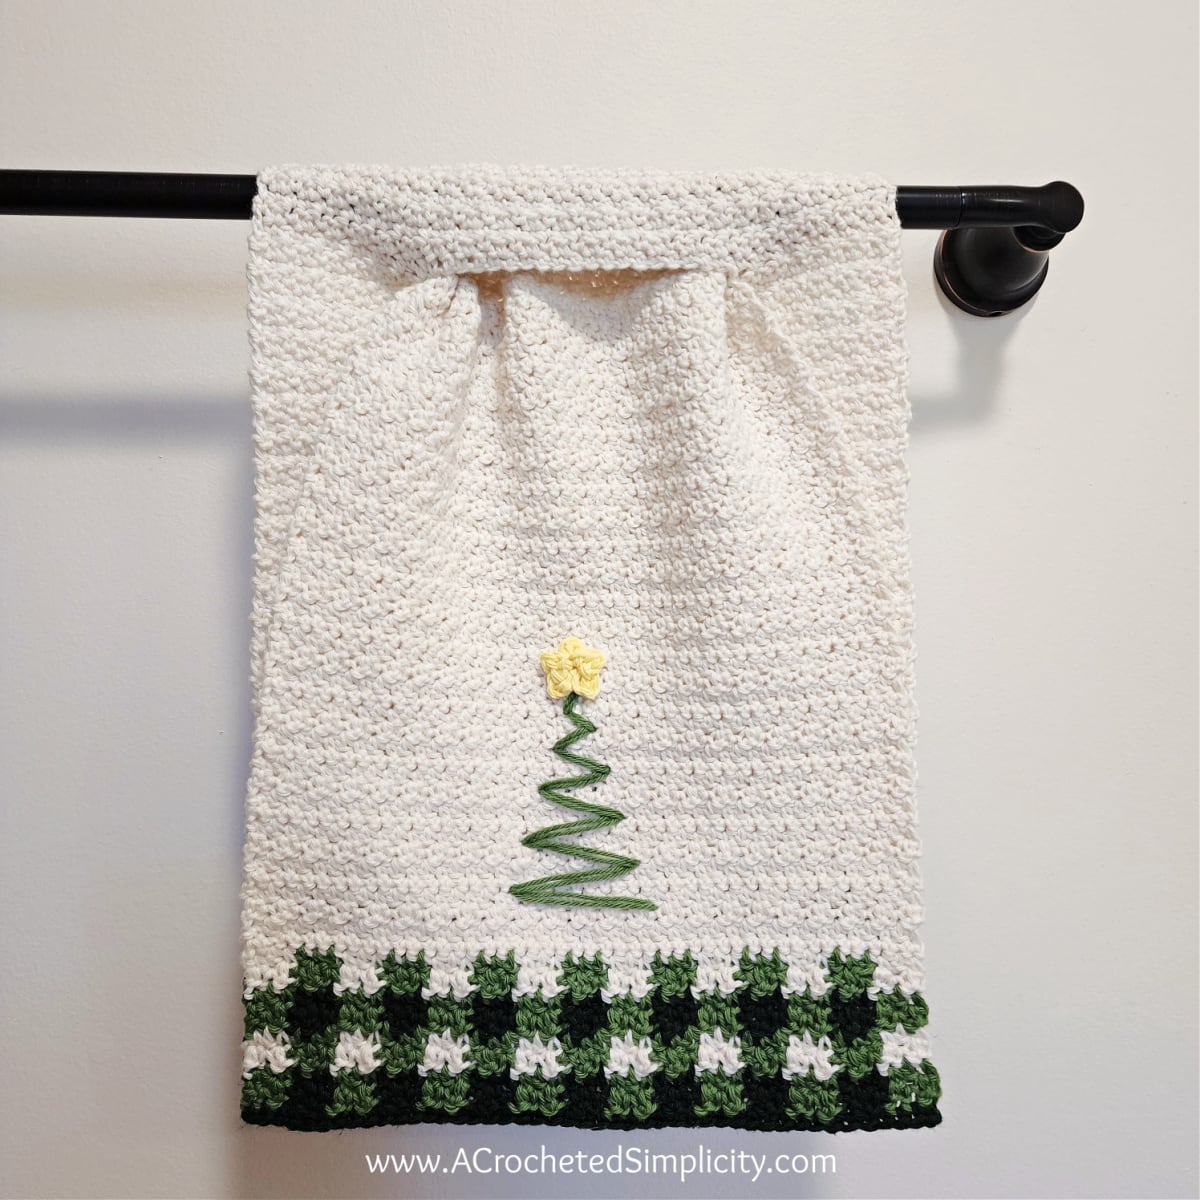
O’ Christmas Tree Towel – Free Crochet Keyhole Towel Pattern
Make the O’ Christmas Tree Towel this holiday season and you’ll have a fun, festive crochet hand towel to add to your Christmas decor!
Each year, I try to come up with new crochet Christmas ideas to add a festive touch to my home decor. One of my favorite seasonal projects to make is a crochet hand towel.
You’ll find the free crochet hand towel pattern for the O’ Christmas Tree Towel in this post below, or an ad-free print friendly version on Love Crafts, Ravelry, or on Etsy (aff).
After designing my Farmhouse Striped Keyhole Towel and Basic Keyhole Towel, I knew that this year’s newest Xmas pattern for crochet decor would be a Christmas keyhole towel.
I originally designed this crochet Christmas tree towel for the holiday season, but if you leave off the small crochet star, you’ll have a great woodsy crochet decor design. And, if leave off both the Christmas Tree and star topper, you’ll have a great year round crochet buffalo plaid hand towel.
Related: If you love making crochet hand towels, I have several free crochet towel patterns you’ll love!
The Yarn
Cotton is the go-to fiber for dish cloths and dish towels as it’s the most absorbent. There are several cotton yarns out there that would be perfect for this project, but I chose to go with a DK/3 weight cotton yarn, Knit Picks CotLin. Cotlin is a 70% Tangius Cotton, 30% Linen blend and is available in 44 beautiful colors making it the perfect yarn line for working buffalo plaid or gingham check. It is always a pleasure working with this cotton blend yarn.
Substitution: If you do not have access to a DK/3 weight cotton yarn, you can use a sport weight/2 or worsted weight/4 weight cotton yarn instead. Your dish towel may come out a little smaller or larger than mine, if you choose to use a different weight yarn, but it’s a crochet dish towel and not a garment that will be worn. So, if it comes out a little smaller or bigger, it will still work great!
CAN I USE ACRYLIC YARN FOR CROCHET HAND TOWELS?
A crochet towel made with acrylic yarn makes a fantastic crochet dusting cloth! However, I do not recommend using acrylic yarn if your intentions are to make a hanging kitchen towel for drying dishes, or drying your hands.
Tips for Choosing Buffalo Check Colors
The buffalo plaid (gingham check) pattern looks great in just about any color combination, but keep the following in mind when you’re choosing colors.
You’ll need to choose a total of 3 colors. Of those 3 colors, you’ll have a dark, medium, and light color. You’ll use the medium color the most as it’s used in every single row. The colors that alternate are the lightest and darkest colors. For this particular pattern, you’ll work 2 rows alternating MC & CC1, then 2 rows alternating MC & CC2.
Related: If you love buffalo plaid, check out our free buffalo check crochet patterns.
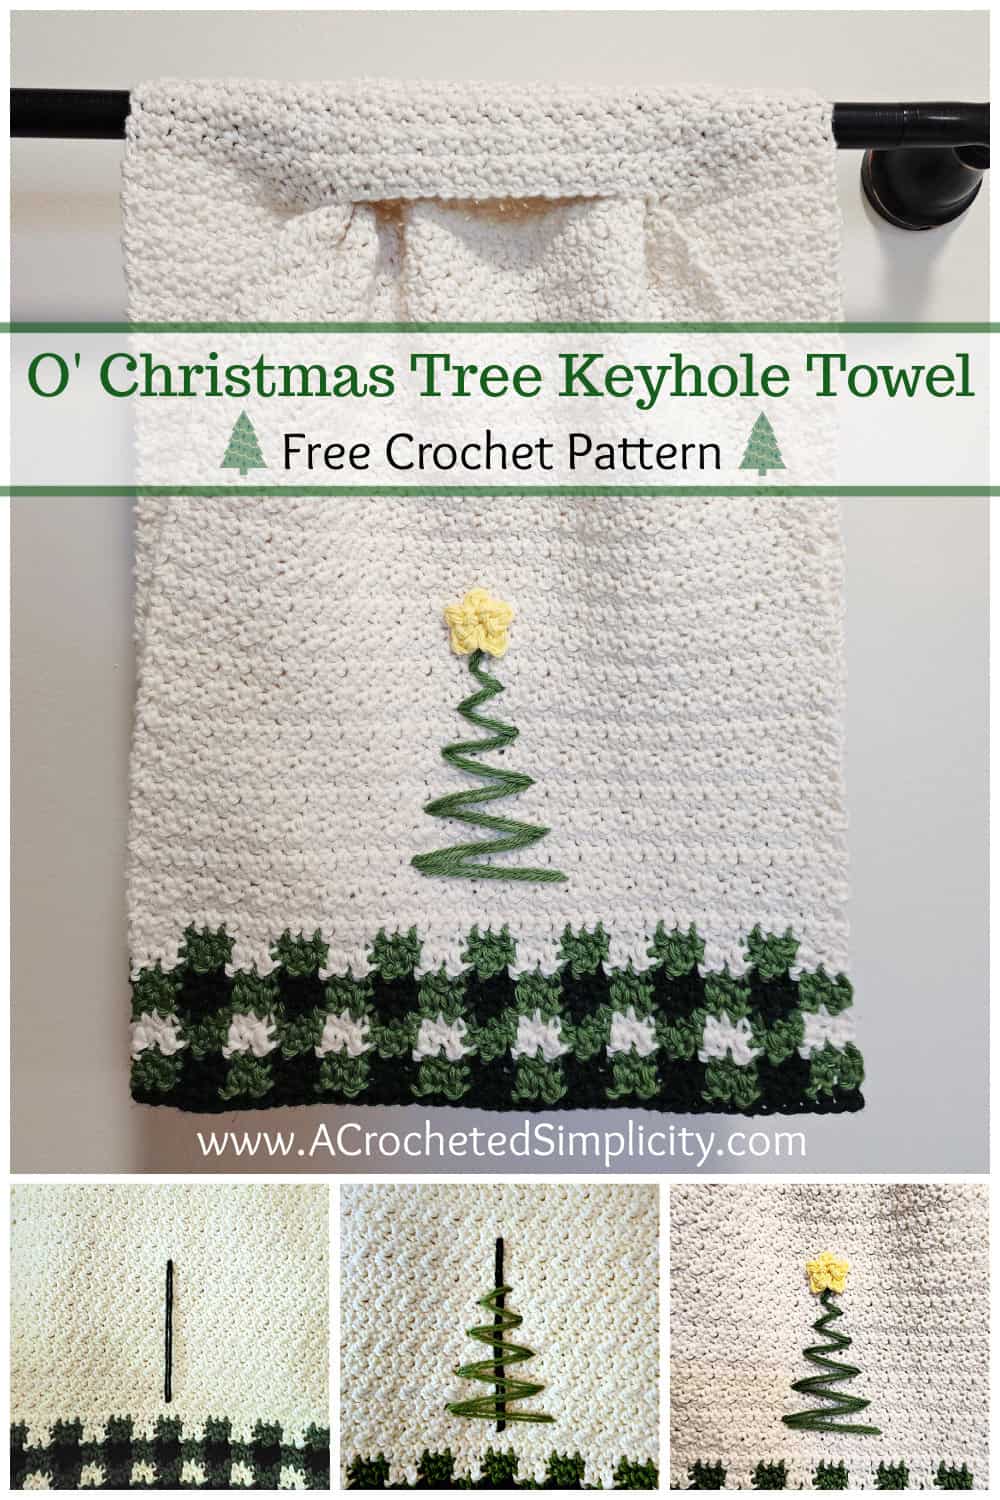
Pin it to Save it for Later!
O’ CHRISTMAS TREE TOWEL – FREE CROCHET HAND TOWEL PATTERN
The free crochet towel pattern is below, but if you love to work offline, or need to order your yarn, I’ve got a couple other great options for you.
Purchase the ad-free, printable PDF that includes all photo tutorials & the buffalo check crochet color chart, on Love Crafts, Ravelry, or Etsy (aff).
This post contains affiliate links.
Materials
- Yarn: Knit Picks CotLin / DK / 3 Weight Cotton Yarn – 3 colors / 1 ball of each (for buffalo plaid pattern) / 2 balls of 1 color (for a solid color towel)
- Yardages in DK weight yarn:
- MC: Cream/Swan (180 yards)
- CC1: Light Green/Sprout (30 yards)
- CC2: Dark Green/Ivy (30 yards)
- Yellow for Star: (1 yard) (optional)
- You can also substitute a sport weight / 2 cotton yarn or worsted weight / 4 cotton yarn. See Yarn note above.
- Yardages in DK weight yarn:
- Crochet Hook: G/6/4.00mm (my favorite hooks are Clover Amour Hooks, I’ve never had an ache in my hand since switching)
- Measuring Tape
- Scissors
- Tapestry Needle
Abbreviations (US Terms)
- ch(s): chain(s)
- st(s): stitch(es)
- sc: single crochet
- dc: double crochet
- RS: Right Side
- Rep: repeat
- MC: Cream (Swan)
- CC1: Light Green (Sprout)
- CC2: Dark Green (Ivy)
Gauge
- In pattern stitch (sc in next, dc in next): 18 sts = 4″; 14 rows = 3″
Size
- One Size: 10″ W x 28″ L
Pattern Notes
- Turning chains are not counted as a stitch or included in stitch count.
- The first stitch of each row is worked into the same stitch as the turning chain, unless stated otherwise.
- Yarn Notes: Knit Picks CotLin was used for the sample. Another comparable DK / 3 weight yarn may be used as long as gauge is met.
- Knit Picks CotLin, 70% Tanguis Cotton / 30% Linen (123 yards / 50 g ).
- Yardage:
- MC: Cream (180 yards)
- CC1: Light Green (30 yards)
- CC2: Dark Green (30 yards)
- Yellow for Star: (1 yard) (optional)
- Hand Towel Construction: This crochet hand towel is constructed in rows from one short edge to the other. You’ll create a keyhole mid-way through. The crochet keyhole is how the towel is secured when hanging and keeps it from falling to the floor. After the keyhole is created, you’ll continue to a specific length and then finish off the crochet kitchen towel with a touch of crochet buffalo plaid. You can also choose to leave the plaid off and crochet a plain towel. A Christmas tree is then embroidered on and then small crochet star attached.
Crochet Hand Towel Pattern
Changing Colors: For all color changes, you’ll change colors on the last pull through of the last stitch of the row.
Set-Up: With a 4.00mm crochet hook & MC yarn, ch 46.
Row 1: Working into the back hump of the foundation chain, sc in the 2nd ch from your hook and in each ch across. Turn. (45 sts)
Row 2 (RS): Ch 1, sc in the first st, dc in the next st, (sc in the next st, dc in the next st), rep from ( to ) across to the last st, sc in the last st. Turn.
Row 3: Ch 1, dc in the first st, sc in the next st, (dc in the next st, sc in the next st), rep from ( to ) across to the last st, dc in the last st. Turn.
Row 4: Ch 1, sc in the first st, dc in the next st, (sc in the next st, dc in the next st), rep from ( to ) across to the last st, sc in the last st. Turn.
Row 5: Ch 1, sc in each st across. Turn.
Rep Rows 2 – 5, ending with a Row 5 Rep, until work measures approximately 12″.
Do not fasten off. Continue on to Creating the Crochet Keyhole.
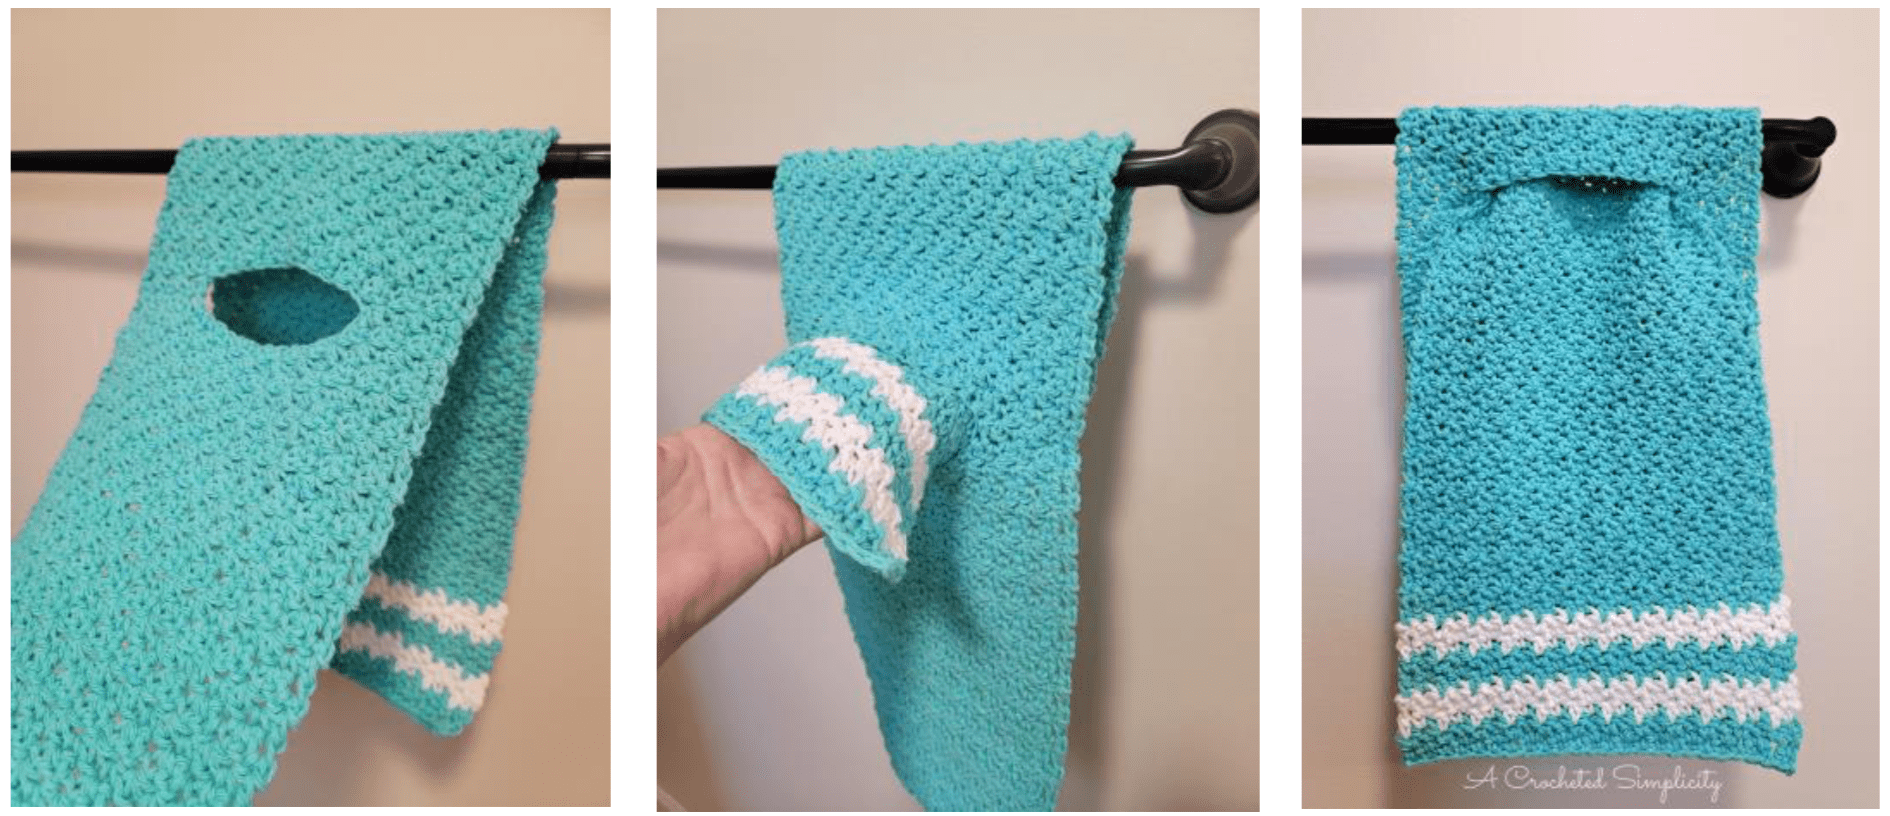
Creating the Crochet Keyhole
Row 1: Ch 1, sc in the first st, dc in the next st, (sc in the next st, dc in the next st) 5 times, sc in the next st, ch 19, skip each of the next 19 sts, (sc in the next st, dc in the next st) 6 times, sc in the last st. Turn. (26 sts + 19 chs)
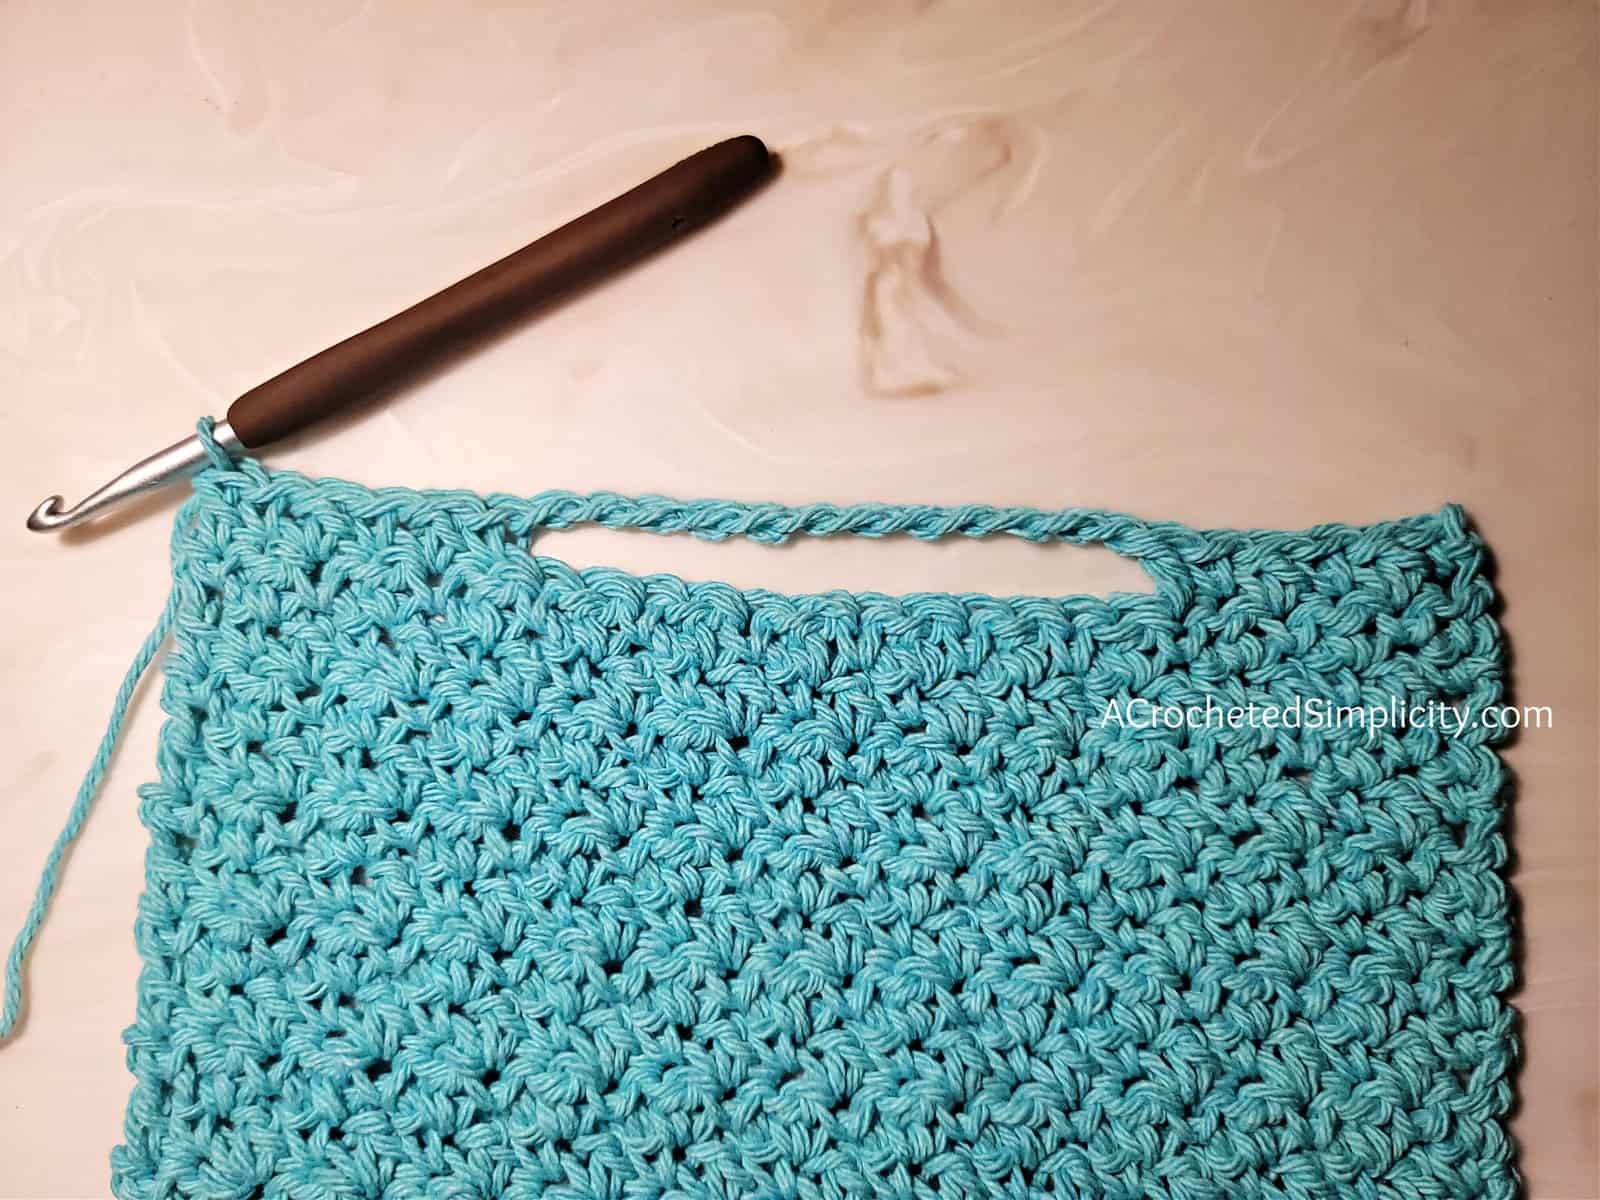
Note: The photos above and below are of the Basic Keyhole Crochet Kitchen Towel, but the method of creating the keyhole for this crochet hand towel is the same.
Row 2: Ch 1, dc in the first st, sc in the next st, (dc in the next st, sc the next st) 5 times, dc in the next st, (sc in the next ch, dc in the next ch) 9 times, sc in the next ch, (dc in the next st, sc in the next st) 6 times, dc in the last st. Turn. (45 sts)
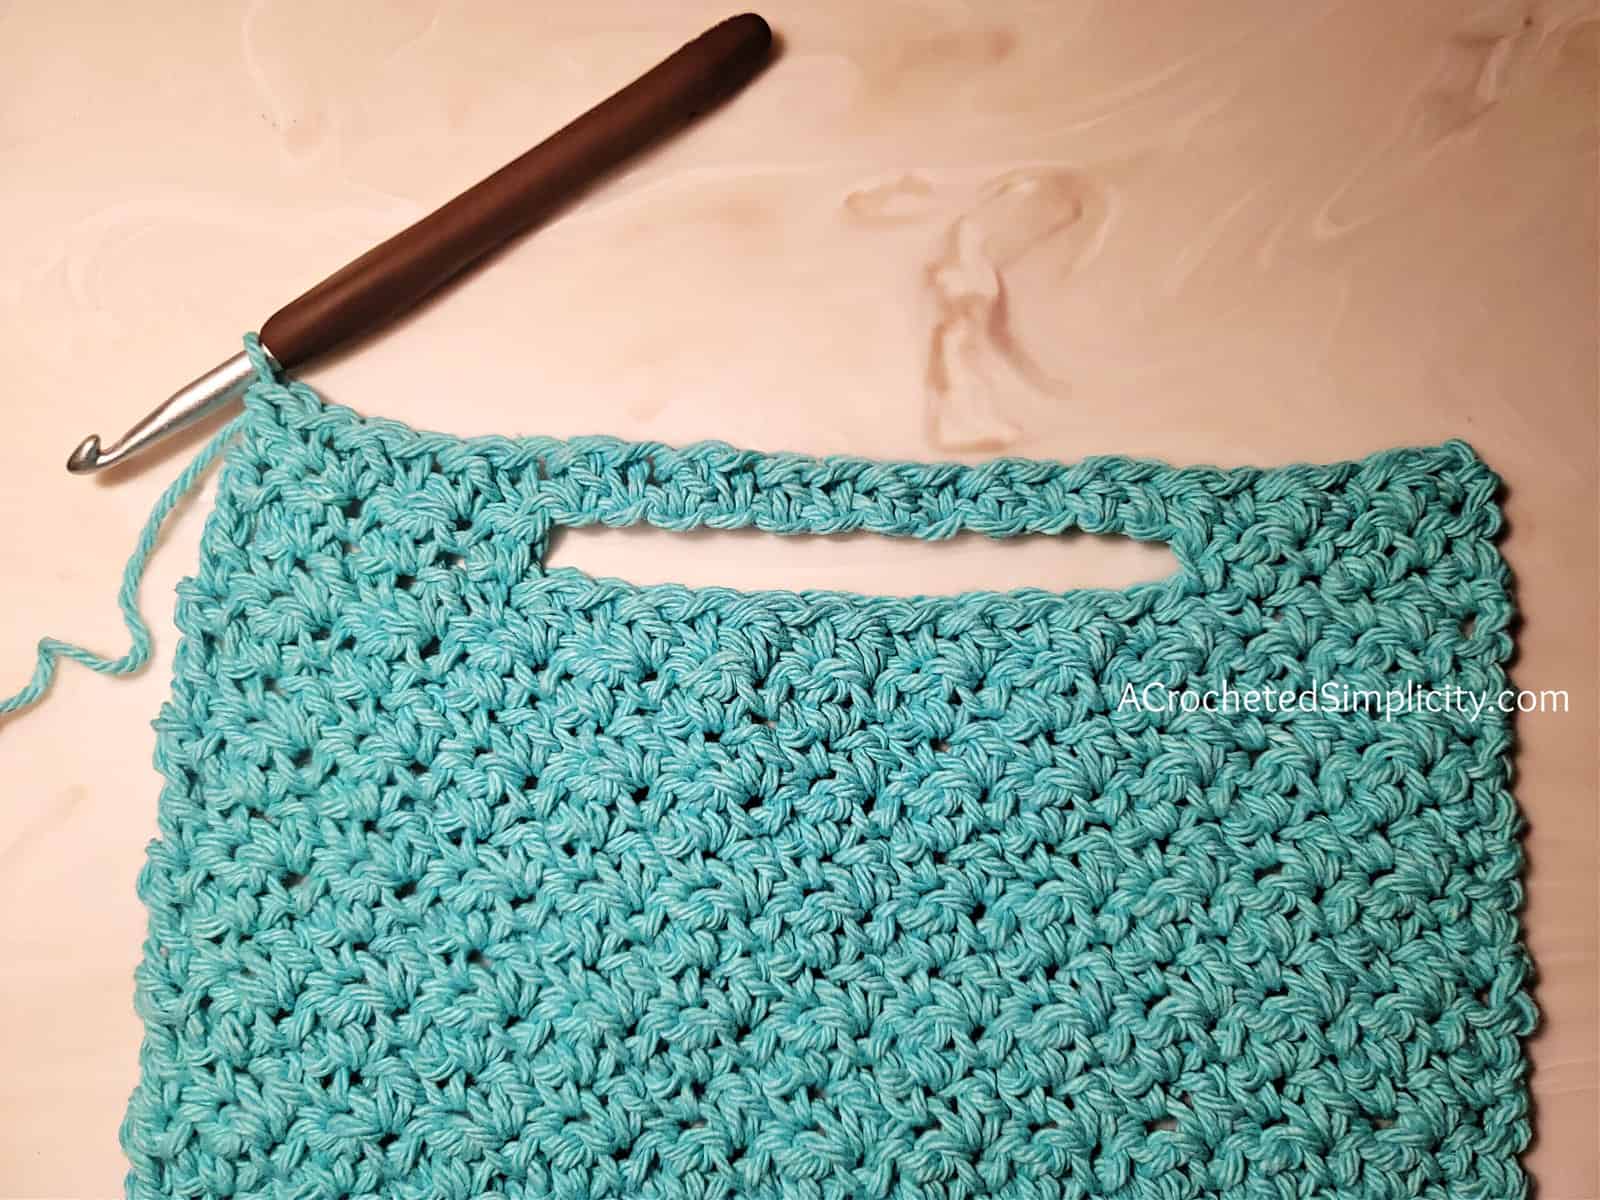
Do not fasten off. Continue on to the Remainder of Crochet Hand Towel Pattern.
Remainder of Crochet Hand Towel Pattern
Row 1: Ch 1, sc in the first st, dc in the next st, (sc in the next st, dc in the next st), rep from ( to ) across to the last st, sc in the last st. Turn. (45 sts)
Row 2: Ch 1, sc in each st across. Turn.
Row 3: Ch 1, sc in the first st, dc in the next st, (sc in the next st, dc in the next st), rep from ( to ) across to the last st, sc in the last st. Turn.
Row 4: Ch 1, dc in the first st, sc in the next st, (dc in the next st, sc in the next st), rep from ( to ) across to the last st, dc in the last st. Turn.
Row 5: Ch 1, sc in the first st, dc in the next st, (sc in the next st, dc in the next st), rep from ( to ) across to the last st, sc in the last st. Turn.
Row 6: Ch 1, sc in each st across. Turn.
Rep Rows 3 – 6, ending with a Row 6 Rep, until work measures approximately 13.5″ from the keyhole opening.
Do not fasten off. Continue on to the Crochet Buffalo Plaid Section.
Crochet Buffalo Plaid
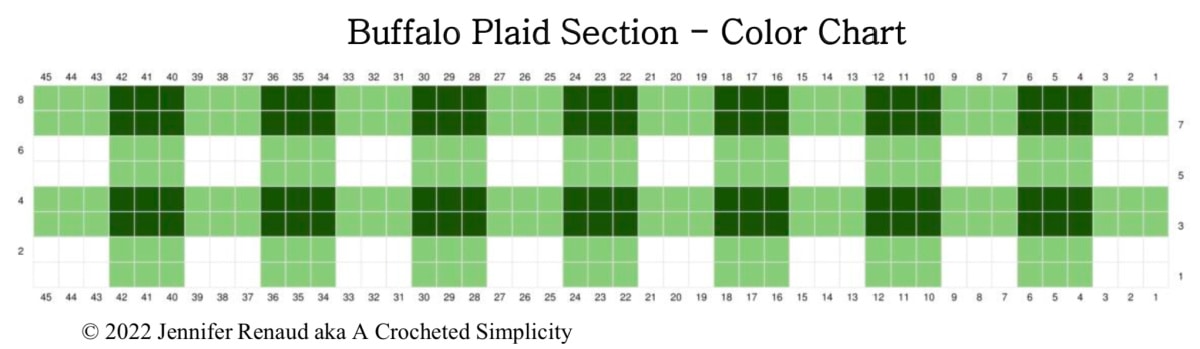
Buffalo Check Color Pattern – See Color Chart Above
- Pattern Stitch: (sc in the next st, dc in the next st)
- Color Pattern for Rows 1-2 & 5-6 : 3 sts MC, (3 sts CC1, 3 sts MC) 7 times.
- Color Pattern for Rows 3-4 & 7-8: 3 sts CC1, (3 sts CC2, 3 sts CC1) 7 times.
Changing Colors: For all color changes, you’ll change colors on the last pull through of the last stitch in each colored section.
Row 1 (RS): With MC, ch 1, sc in the first st, dc in the next st, sc in the next st, * switch to CC1, dc in the next st, sc in the next st, dc in the next st, switch to MC, sc in the next st, dc in the next st, sc in the next st, rep from * across. Turn. (45 sts)
Row 2: With MC, ch 1, dc in the first st, sc in the next st, dc in the next st, * switch to CC1 sc in the next st, dc in the next st, sc in the next st, switch to MC dc in the next st, sc in the next st, dc in the next st, rep from * across. Turn.
Fasten off MC.
Row 3: With CC1, ch 1, sc in the first st, dc in the next st, sc in the next st, * switch to CC2, dc in the next st, sc in the next st, dc in the next st, switch to CC1, sc in the next st, dc in the next st, sc in the next st, rep from * across. Turn.
Row 4: With CC1, ch 1, dc in the first st, sc in the next st, dc in the next st, * switch to CC2 sc in the next st, dc in the next st, sc in the next st, switch to CC1 dc in the next st, sc in the next st, dc in the next st, rep from * across. Turn.
Fasten off CC2.
Rows 5 – 8: Rep Rows 1 – 4. *At the end of Row 8, do not fasten off CC2.
Row 9: With CC2, ch 1, sc in each st across.
Fasten off. Weave in ends. Continue on to Embroider Christmas Tree, if desired.
Embroider Christmas Tree
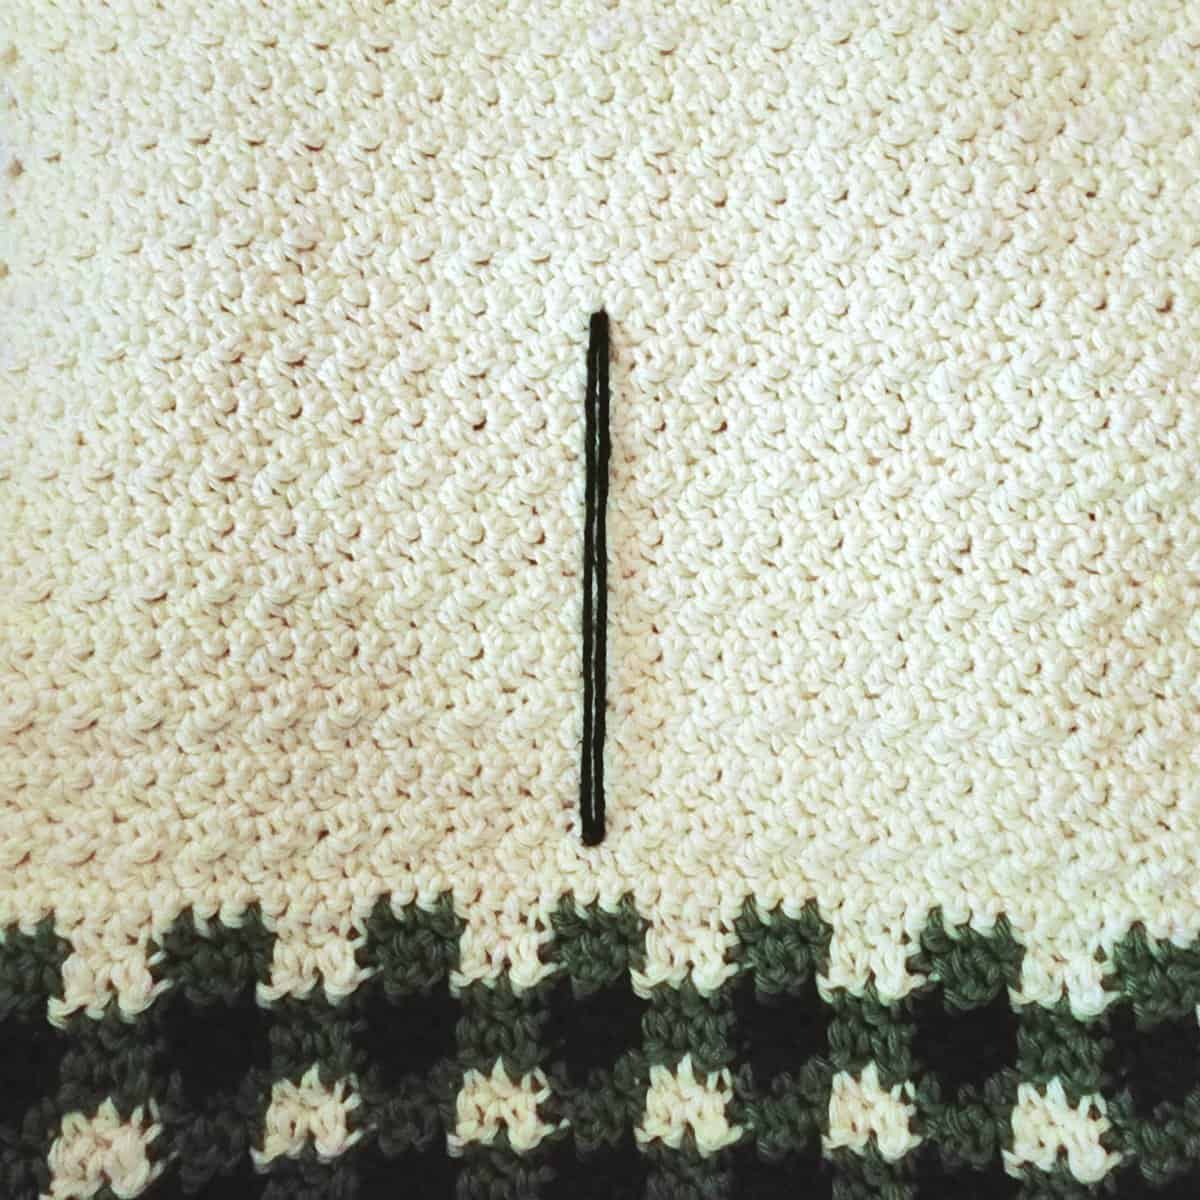
Step 1: Use a yarn needle and scrap of yarn (I used dark green) to stitch a straight vertical line. I began my line in the center of my crochet hand towel, between the 2nd & 3rd row above the buffalo plaid section and stitched it approximately 4″ tall. This line is only to give you a visual center for your tree. You will remove it later.
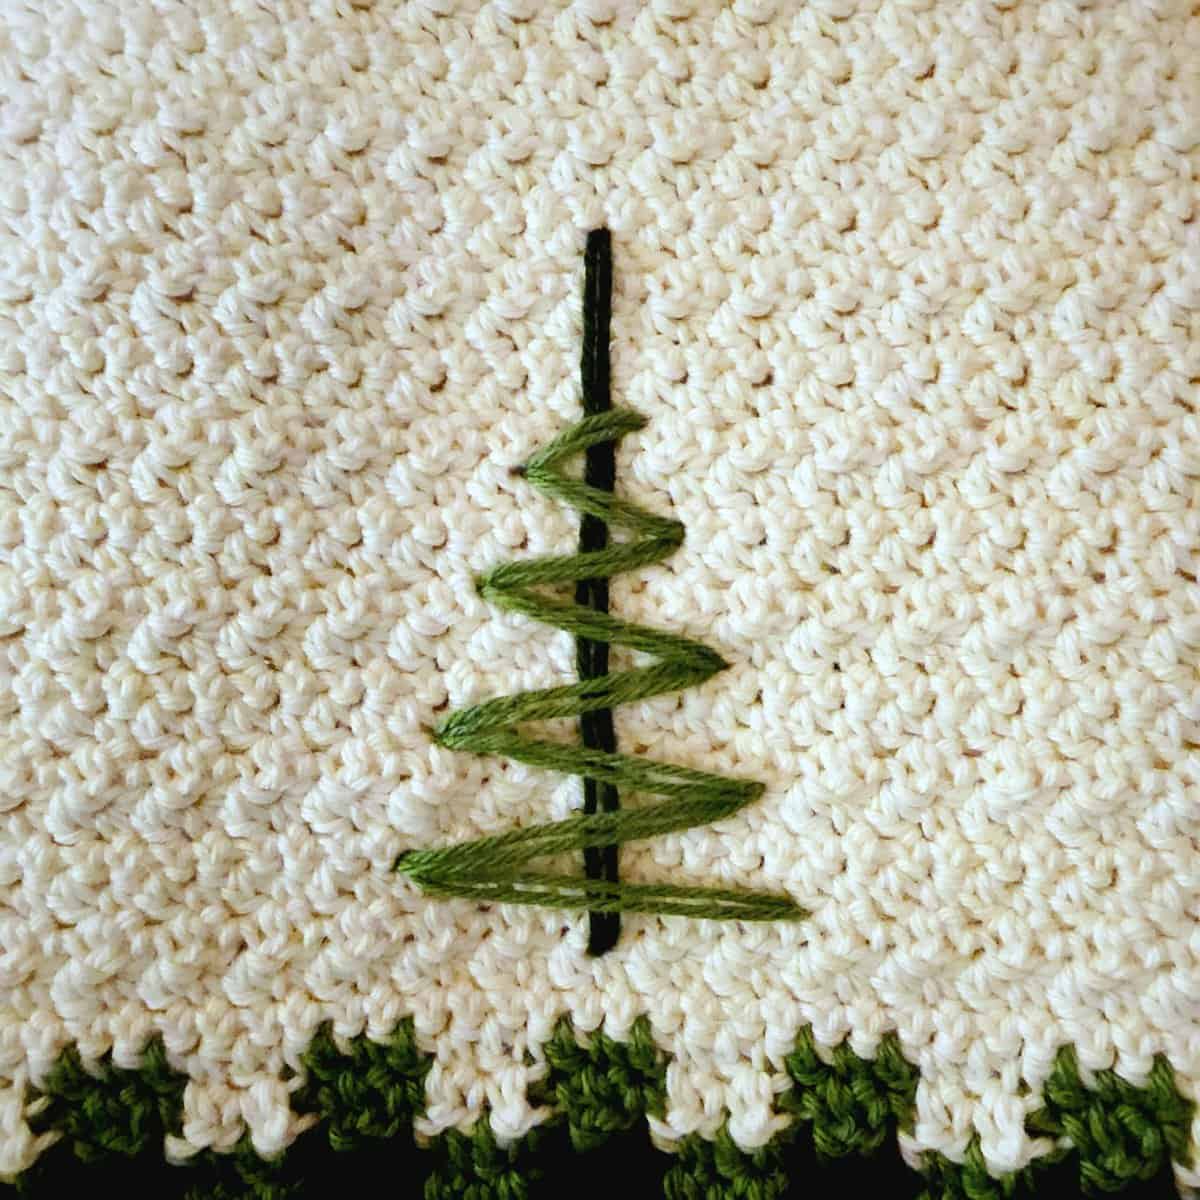
Step 2: Using a yarn needle and 2 strands of light green yarn held together as 1 strand, embroider zig zags across the center vertical line you just stitched. I started my zig zags on the lower right and worked up the tree. I worked 10 zig zags total. See final picture below.
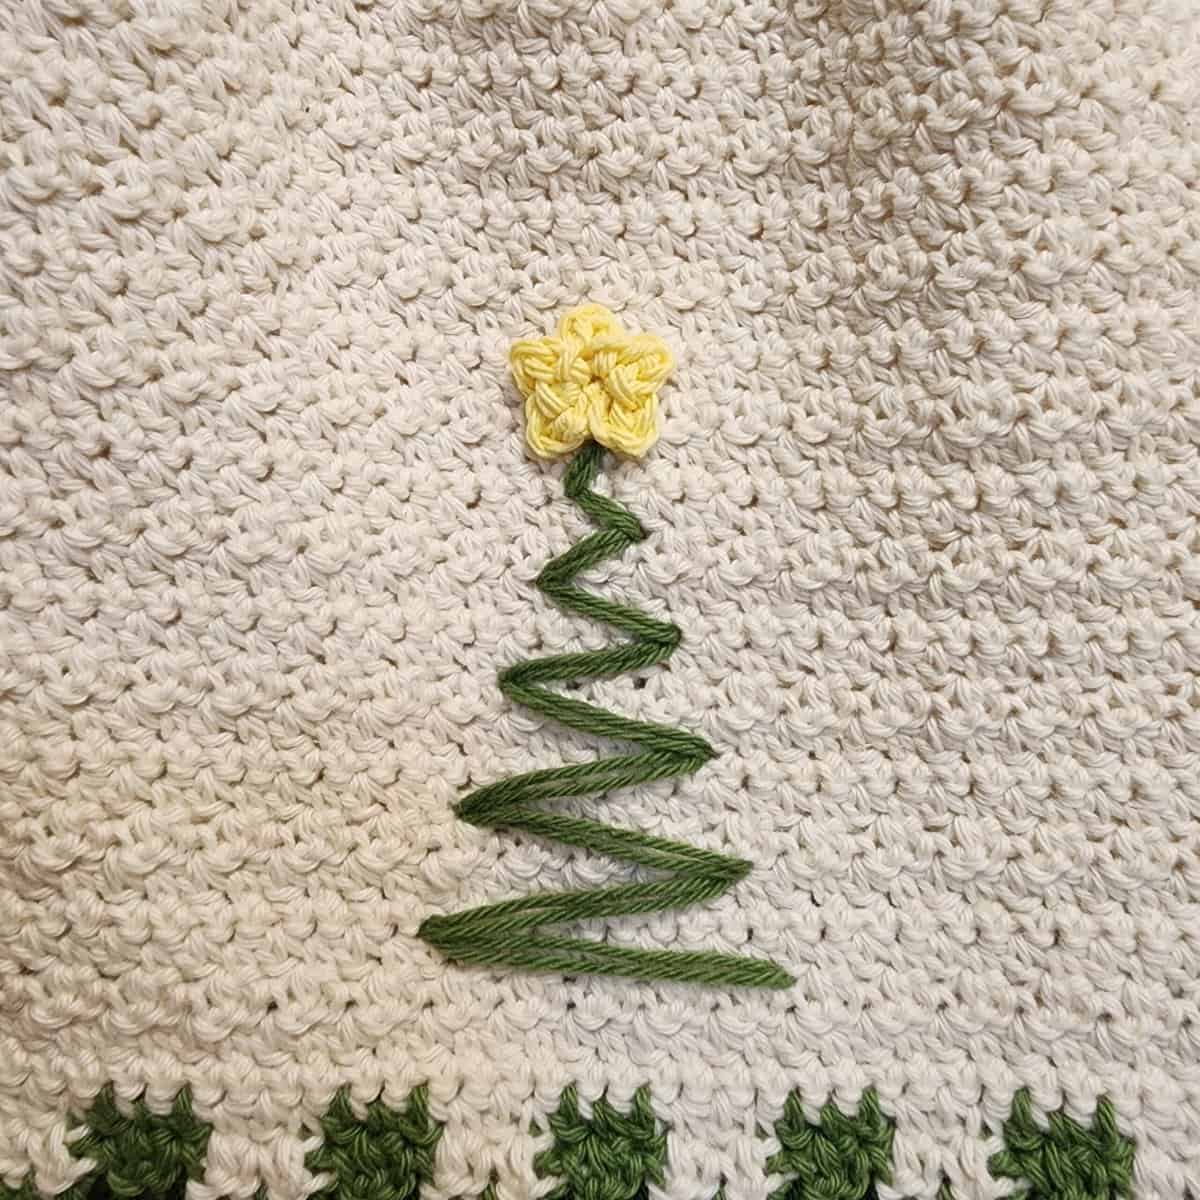
Step 3: Use the instructions below to crochet a tiny star, then use a yarn needle and tail of yarn to attach the tiny crochet star to the crochet hand towel as shown in the photo.
Tiny Crochet Star Pattern
Rnd 1: With yellow yarn and a 4.00mm crochet hook, begin with a magic ring, sl st in the magic ring, (ch 3, sl st in the magic ring) 5 times.
Fasten off leaving a tail of yarn for sewing. Attach tiny crochet star to the O’ Christmas Tree towel.
Now that I’ve finished, how do I hang it up?
Step 1: Drape the crochet hand towel over the towel bar with the longest part of the towel in the back and the right side facing you (you should see the Christmas Tree design).
Step 2: Reach behind and grab the bottom edge of the towel and pull it through the keyhole. Line up the short ends of the crochet hand towel.
Step back and enjoy your talents!
I MADE IT! NOW WHAT?
Pin this post! Save this sunflower dish towel crochet pattern to your Pinterest boards so that you can come back and make it again.
Leave a comment below: We love to hear your feedback.
Share Your Finished Projects on Facebook or Instagram: I love to see your finished projects! Share with us on social media and tag me @acrochetedsimplicity or use the hashtag #ACrochetedSimplicity so I can find your posts.
JOIN US IN THE FACEBOOK COMMUNITY GROUP!
Come share your finished projects with us in the A Crocheted Simplicity Crochet Community Group on Facebook. Join us for fun community events such as crochet alongs, join in on crochet conversations, ask questions, get advice, and share your love for crochet!

MORE FREE CROCHET HAND TOWEL PATTERNS
Are you looking for more crochet hand towel patterns? We have several more free crochet patterns for hand towels.
You’ll find a crochet kitchen towel with button, an easy crochet hanging dish towel, several crochet character towels and scrubbies, and plenty more crochet kitchen towel patterns.
Thank you so much love this pattern! I’ve saved a number of others for Christmas gift ideas. Thanks again
These are all so cute! I can’t wait to try and make some Thank you
I love the beauty and simplicity of this pattern! My Grandpa’s favorite was Buffalo Check. I want to make these for my mum.
Thanks for sharing your amazing creativity!
This is so cute. So simple but really makes a statement.